

Page 1

301 Fulling Mill Road, Suite G ©Copyright 2013 by Legrand,
Middletown, PA 17057 Inc All Rights Reserved.
(800)-321-2343 www.onqlegrand.com
™
adorne
Wireless Video Intercom Kit
(P/N AI6100M1)
™
adorne
Wireless Video Room Unit
(P/N AI6000M1)
User’s Guide
1308223 REV. A
Page i
Page 2

301 Fulling Mill Road, Suite G ©Copyright 2013 by Legrand,
Middletown, PA 17057 Inc All Rights Reserved.
(800)-321-2343 www.onqlegrand.com
Certifications
FCC Notice - FCC ID: YV8-202650 (Door Unit) and YV8-202662 (Room Unit)
This device complies with part 15 of the FCC Rules. Operation is subject to the following two
conditions: (1) This device may not cause harmful interference, and (2) this device must accept any
interference received, including interference that may cause undesired operation.
Caution: Any changes or modifications to this device not explicitly approved by Legrand could void
your authority to operate this equipment.
Canadian Department of Communications - IC: 9922A-202650 (Door Unit) and 9922A-202662
(Room Unit)
This device complies with Industry Canada license-exempt RSS standard(s). Operation is subject to the
following two conditions: (1) this device may not cause interference, and (2) this device must accept any
interference, including interference that may cause undesired operation of the device.
This digital apparatus does not exceed the Class B limits for radio noise emissions from digital apparatus
set out in the Radio Interference Regulations of the Canadian Department of Communications.
Page ii
Page 3

301 Fulling Mill Road, Suite G ©Copyright 2013 by Legrand,
Middletown, PA 17057 Inc All Rights Reserved.
(800)-321-2343 www.onqlegrand.com
TABLE OF CONTENTS
A. Introduction 1
B. System Components Overview 2
C. User Interface Overview 3
1. How to Navigate the User Interface 4
2. Pop-up Style Message Screens 5
3. Additional Icons on the Display 5
D. System Personalization 6
1. Choosing Unit Names 6
2. Room Settings 8
3. Door Settings 11
4. Time/Date Settings 15
5. System Settings (System Language) 16
E. System Configuration 18
1. Adding another Video Room Unit (or Door Unit after System Reset) 18
2. Removing a Video Room Unit (or Door Unit) 19
3. System Diagnostics 20
4. System Reset 21
F. System Operation 23
1. Answering a Door Unit 23
2. Calling another Video Room Unit 24
3. Door Messaging 25
4. Recording a Door Greeting 25
5. Recording a Message 27
6. Sending a Message 29
7. Playing a Message 31
8. Muting a Unit 32
9. Monitoring a Unit 32
10. Operation with a Battery-powered Door Unit 33
Page iii
Page 4
Page 1
301 Fulling Mill Road, Suite G ©Copyright 2013 by Legrand,
Middletown, PA 17057 Inc All Rights Reserved.
(800)-321-2343 www.onqlegrand.com
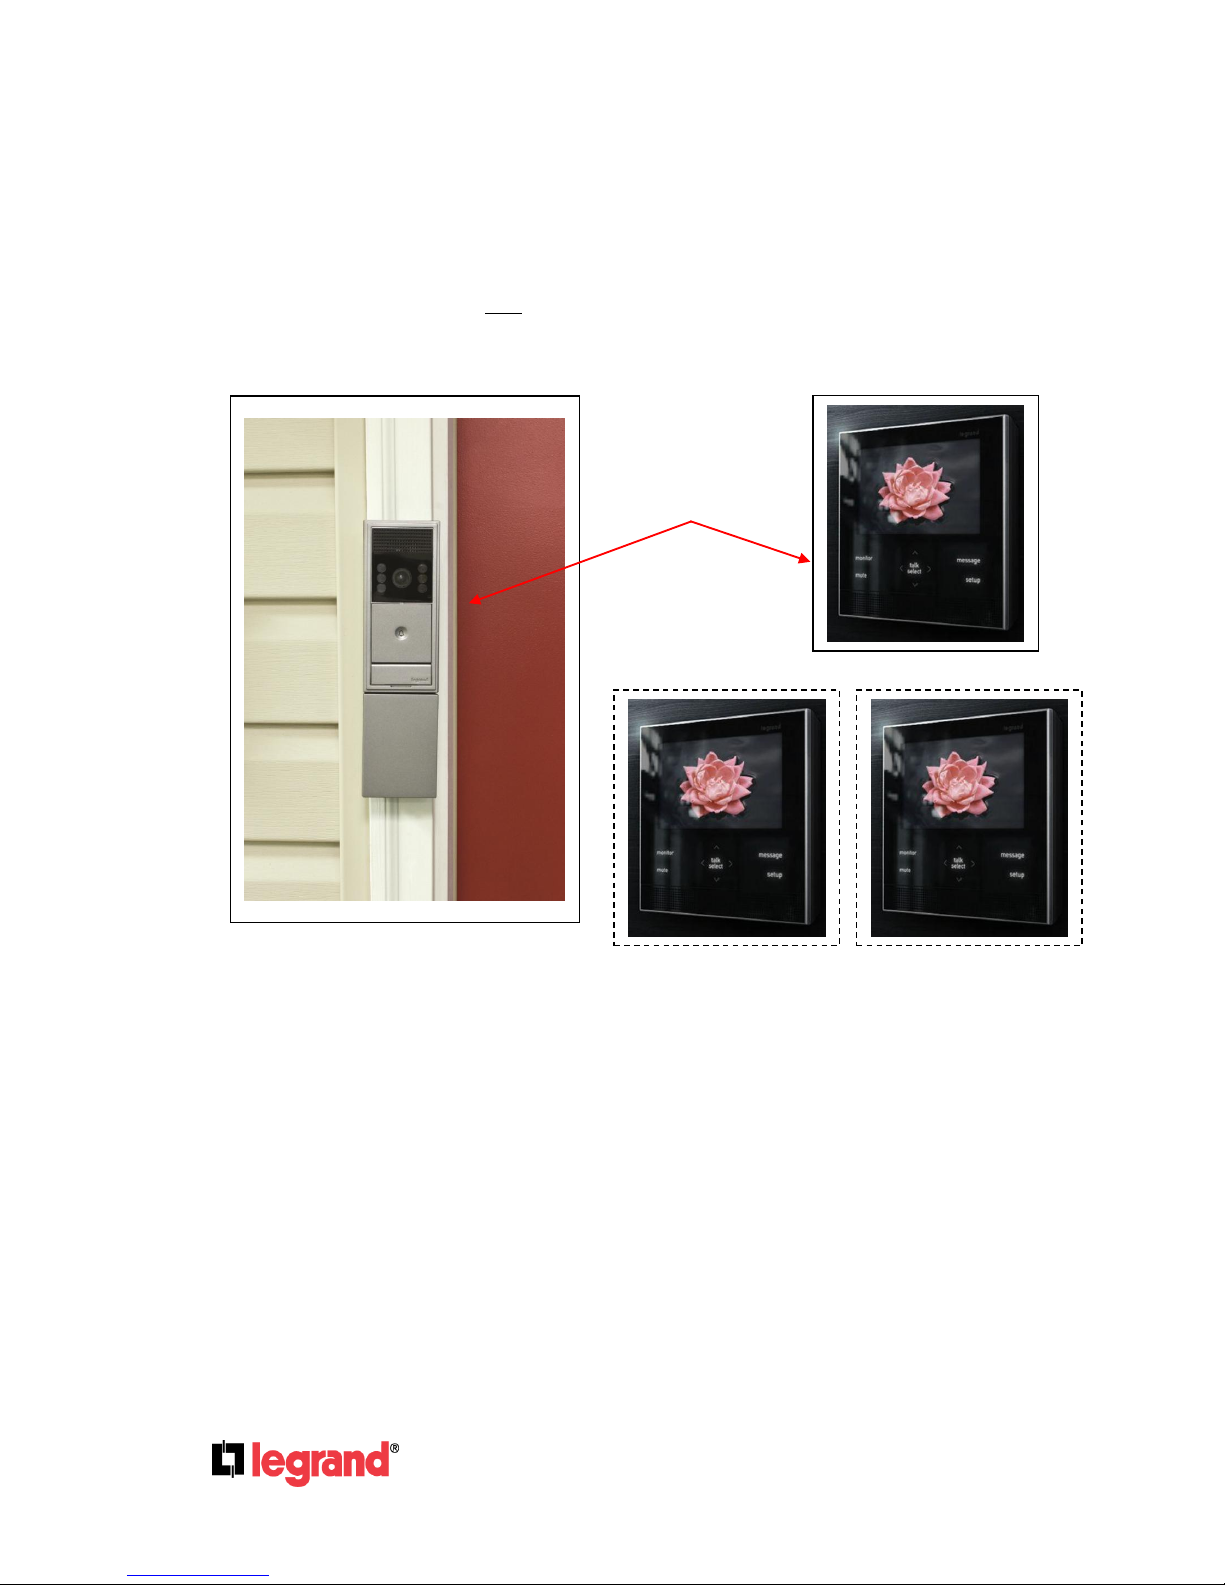
A. Introduction
The Legrand adorne™ Wireless 2.4GHz Video Intercom Kit (see Figure 1), is an
advanced wireless-based video intercom system consisting of a Video Door Unit and
up to three Video Room Units. The AI6100M1 Wireless Video Intercom Kit consists
of the Video Door Unit and one Video Room Unit packaged together. Up to two
additional Video Room Units (AI6000M1) can be ordered separately to create a
maximized system.
Figure 1
AI6100M1
AI6000M1
AI6000M1
Page 5
Page 2
301 Fulling Mill Road, Suite G ©Copyright 2013 by Legrand,
Middletown, PA 17057 Inc All Rights Reserved.
(800)-321-2343 www.onqlegrand.com
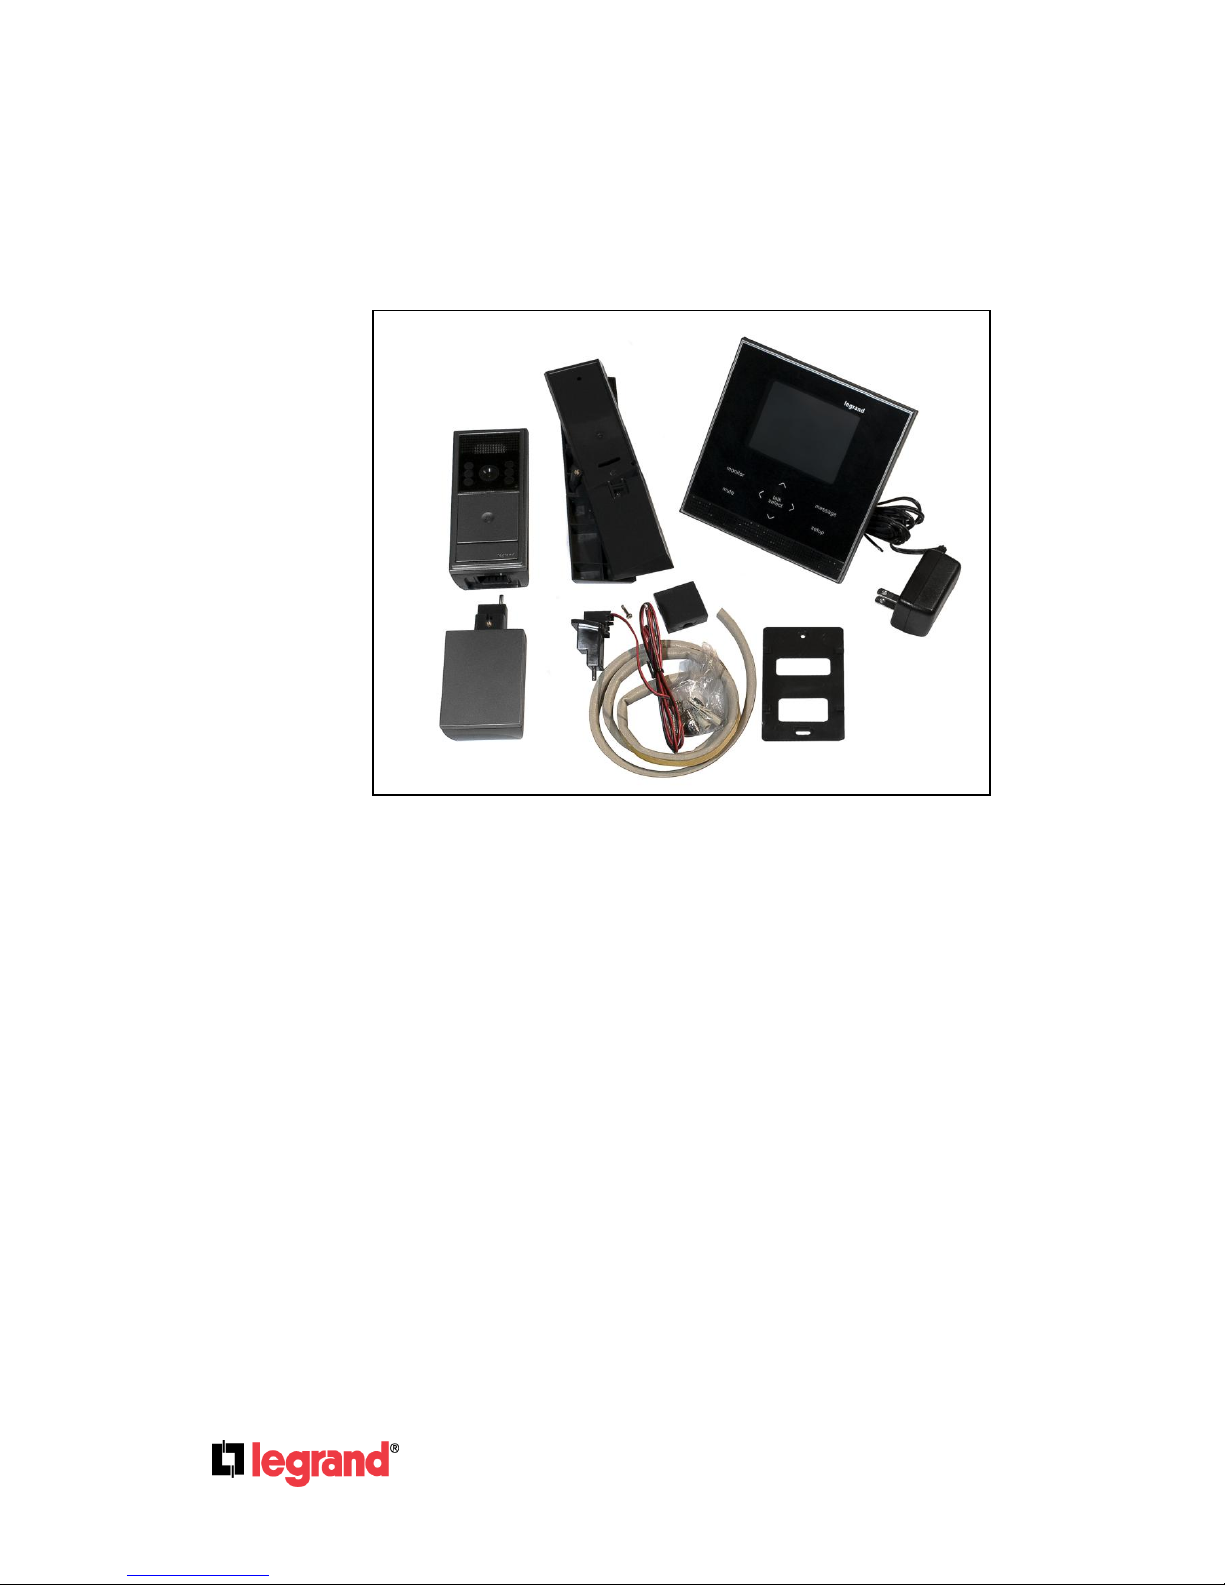
B. System Components Overview
System Components
The following components are typically utilized to make up the AI6100M1 Wireless Video
Intercom Kit (see Figure 2).
Wireless Video Door Unit: The Video Door Unit may be powered by existing doorbell
power (16-20V AC), and in that case, mounted on the door frame, or may be powered by
an included battery unit, which enables the Video Door Unit to be door frame or center of
door mounted. The battery option requires six AA batteries (not included), which should
provide for six months of typical operation. All installation components for each style of
operation are provided, including angled door frame mounting brackets, a flat center-ofdoor mounting bracket and a doorbell power kit.
Wireless Video Room Unit: The Wireless Video Room Unit comes with its own AC
adapter for power, a wall mount bracket for wall mounting and a folding stand for table
top use. The Room Unit supports three languages (English, French and Spanish), and
has several built in features for system personalization, including 88 Room Names, 19
Door Names, 7 GUI Menu Themes (background/text colors) and 18 Doorbell Tones.
Room Units also support messaging, so that the delivery man can leave a message
saying a package has been left, or when multiple Room Units are employed, messages
can be sent to other Room Units to announce when dinner is ready. The maximum
wireless range of the system is up to 200ft. line of site or up to 75ft. obstructed.
Figure 2
Page 6

Page 3
301 Fulling Mill Road, Suite G ©Copyright 2013 by Legrand,
Middletown, PA 17057 Inc All Rights Reserved.
(800)-321-2343 www.onqlegrand.com
C. User Interface Overview
There can be only one Master Room Unit in a system, whether it is the only Video Room
Unit, or if there are multiple Video Room Units. It is typically the first Room Unit powered on
and configured.
The Master Video Room Unit is the only Room Unit that can create custom Door Greetings
or retrieve a message left at the Door Unit.
Video Room Units that are not the Master Unit have no icon.
There are also several icons discussed later that appear just to the left of the Unit name,
such as Busy, Monitor, Mute, etc. that indicate the status of a particular Unit
video
door
icon
master
room
unit
icon
navigation
buttons
lcd
display
setup
button
monitor
button
this unit’s
name
mute
button
message
button
talk/select
button
other units
that this
unit sees
date/time
as set on
this unit
Page 7

Page 4
301 Fulling Mill Road, Suite G ©Copyright 2013 by Legrand,
Middletown, PA 17057 Inc All Rights Reserved.
(800)-321-2343 www.onqlegrand.com
1. How to Navigate the User Interface:
Press Up/Down Navigation
Buttons to move the highlight to
a different selection.
Press theTALK/SELECT Button
to see the highlighted selection’s
sub-menu (or answer the Door).
The Left Navigation Button
acts as the Back Button.
The Left and Right navigation Buttons are also used when not performing another
function to lower and raise the volume of the Video Room Unit.
The Right Navigation Button
is used to move the highlight to
select a different function.
In the example shown, we’ve
stopped on “Record”
to record a message to the
Master Suite.
Press the TALK/SELECT Button
to Begin recording.
Again, the Left Navigation Button
Acts as the Back Button.
Page 8

Page 5
301 Fulling Mill Road, Suite G ©Copyright 2013 by Legrand,
Middletown, PA 17057 Inc All Rights Reserved.
(800)-321-2343 www.onqlegrand.com
2. Pop-up Style Message Screens:
Depending on the operation, the
display may be replaced by a PopUp Message (sending a message to
the master suite in this case).
The most common one of these
is initiated when the Left or Right
Buttons are pressed from an
otherwise idle Room Unit (as
previously discussed, it’s used to
adjust the Room Unit’s volume).
3. Additional Icons on the Display:
When a Room Unit is placed in Mute
or Monitor mode, icons are added to
the Room Unit to show the status of
a particular Unit (in this case, the
master suite user has placed his
Room Unit in Mute).
Page 9
Page 6
301 Fulling Mill Road, Suite G ©Copyright 2013 by Legrand,
Middletown, PA 17057 Inc All Rights Reserved.
(800)-321-2343 www.onqlegrand.com
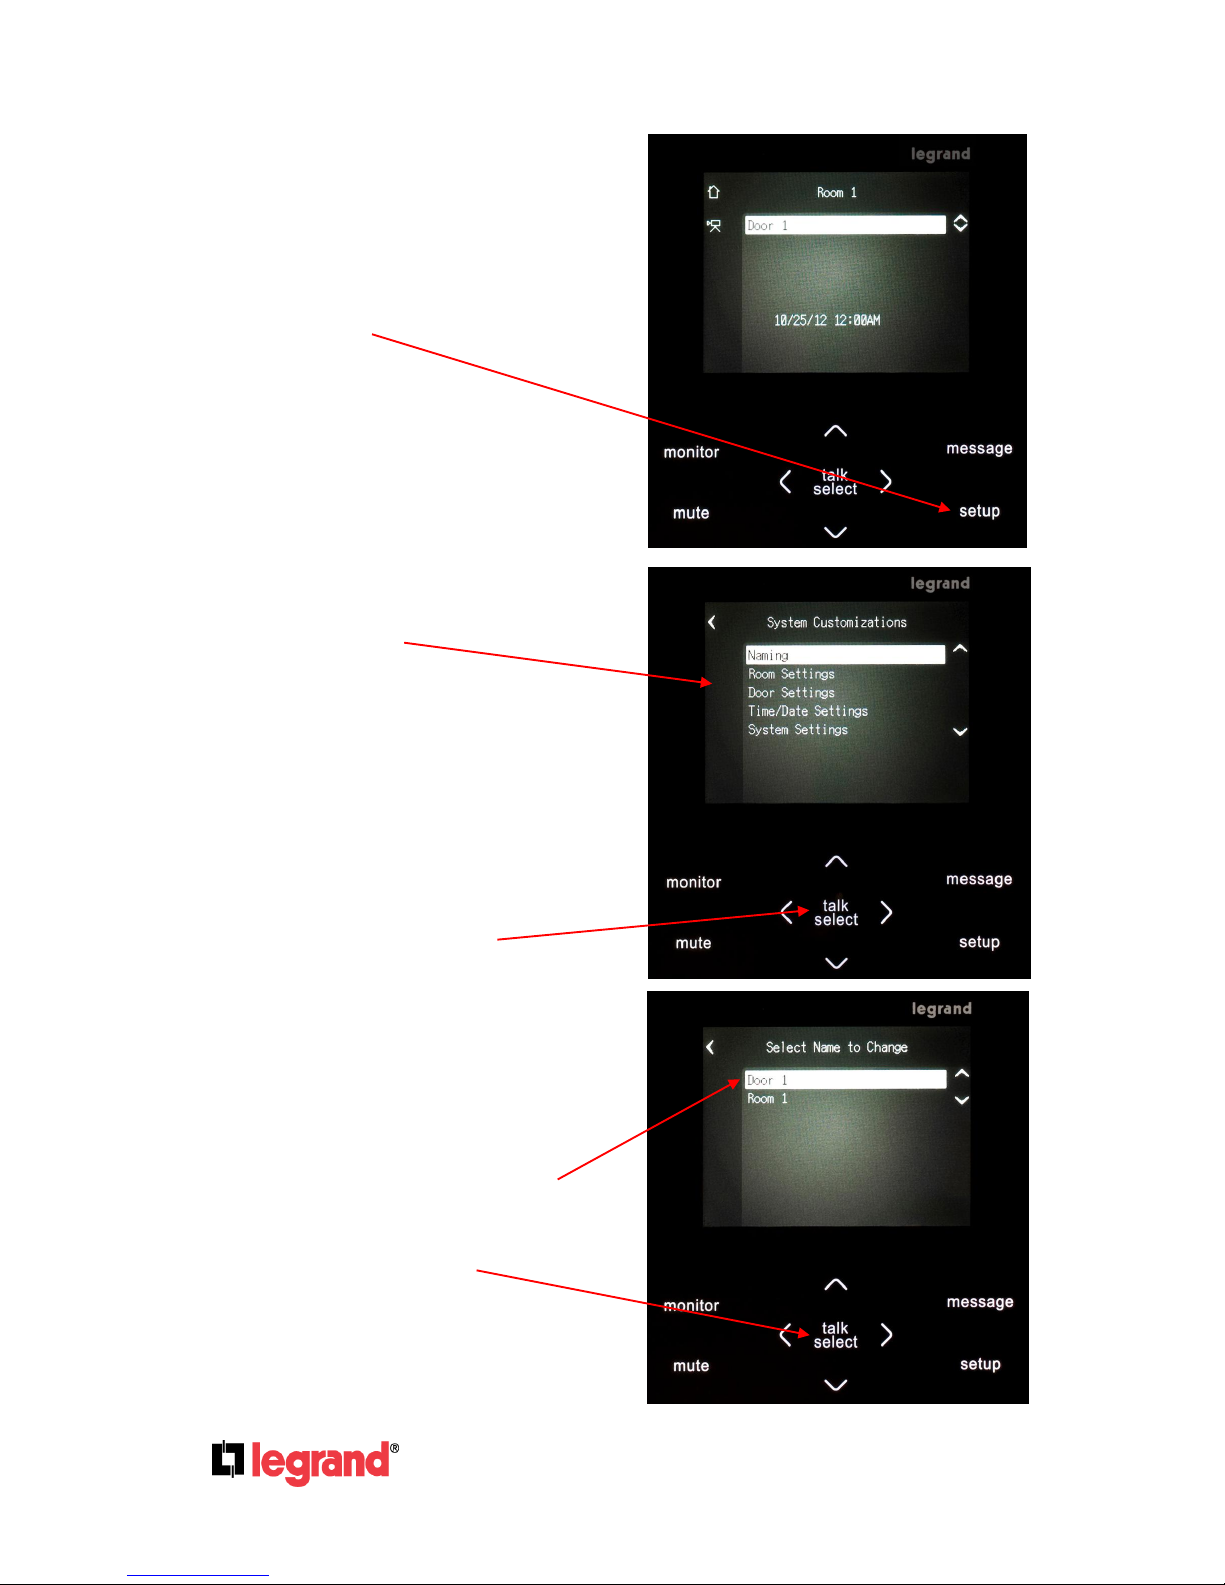
D. System Personalization
The following section explains how to
use any Wireless Video Door System
Room Unit to personalize the system.
Start by pressing the Setup Button on
the Room Unit.
Pressing the Setup Button takes you
to this screen, where you can Name
the Room and Door Unit, change
Room and Door Settings, set the Time
and Date Settings and adjust the
System Settings.
1. Choosing Unit Names
Leave the “Naming” selection
highlighted and press the
Talk/Select Button to begin the
unit naming function.
Leave the “Door 1” selection
highlighted, which is the default
name for Door Unit and press the
Talk/Select Button.
Page 10

Page 7
301 Fulling Mill Road, Suite G ©Copyright 2013 by Legrand,
Middletown, PA 17057 Inc All Rights Reserved.
(800)-321-2343 www.onqlegrand.com
You are shown a list of 19
possible Door Unit names. Use
the Up and Down arrows to
navigate the list. Once you see a
name you want to use, with that
name highlighted (Front Door in
this case), press the Talk/Select
Button to select that name for
your Door Unit.
Now that we’ve named the Door
Unit, highlight the default name
of the Room Unit (Room1) and
press the Talk/Select Button.
You are shown a list of 88
possible Room Unit names.
Use the Up and Down arrows to
navigate the list. Once you see a
name you want to use, with that
name highlighted, press the
Talk/Select Button to select that
name for your Room Unit.
Page 11

Page 8
301 Fulling Mill Road, Suite G ©Copyright 2013 by Legrand,
Middletown, PA 17057 Inc All Rights Reserved.
(800)-321-2343 www.onqlegrand.com
As you can see, both our Door Unit
and our Room Unit now have
names. Press “Setup” to continue
personalization.
2. RoomSettings
To further personalize our Room
Unit, highlight “Room Settings” and
press Talk/Select.
On this screen you can select to
adjust this Room Unit’s Theme
(background/text colors), its Chime
Volume, its Display Timeout, or its
Brightness.
With the Theme highlighted, press
Talk/Select.
Page 12

Page 9
301 Fulling Mill Road, Suite G ©Copyright 2013 by Legrand,
Middletown, PA 17057 Inc All Rights Reserved.
(800)-321-2343 www.onqlegrand.com
There are 7 different Themes that
may be selected. You may want to
try several of them to see which one
you prefer. For this document, we’ll
stick with Bronze, which has a pretty
good contrast for printing. If you
want to change Themes, just use
the Up/Down arrows to select the
Theme and press Talk/Select to
lock in your new Theme.
From the Room Settings screen,
select Chime Volume
and press Talk/Select when you
want to increase or decrease the
volume of the doorbell chime as it is
played on this Room Unit.
Use the Up / Down arrows to adjust
the chime volume. Each press
adjusts the volume 5%. When you
get the volume level you want, you
can press the Left arrow, or the
Talk/Select Button to lock that
volume in for this Room Unit.
Page 13

Page 10
301 Fulling Mill Road, Suite G ©Copyright 2013 by Legrand,
Middletown, PA 17057 Inc All Rights Reserved.
(800)-321-2343 www.onqlegrand.com
From the Room Settings screen,
highlight the “Display Timeout”
selection and press the Talk/Select
Button.
Use the Up / Down arrows to adjust
the amount of time before the
Display goes inactive when the Unit
is no longer being operated. The
choices are 30 seconds, 1 minute, 2
minutes, or Never. After selecting
your preferred timeout, press the
Talk/Select Button to lock in your
setting.
From the Room Settings screen,
highlight the “Brightness Control”
selection and press the Talk/Select
Button.
Page 14

Page 11
301 Fulling Mill Road, Suite G ©Copyright 2013 by Legrand,
Middletown, PA 17057 Inc All Rights Reserved.
(800)-321-2343 www.onqlegrand.com
Use the Up / Down arrows to adjust
the level of screen brightness.
After selecting your preferred
brightness, press the Talk/Select
Button to lock in your setting.
3. Door Settings
From the main Setup screen,
highlight Door Settings
and press the Talk/Select Button.
To select one of the 18 provided
door chimes, simply highlight the
existing “Chime”
and press the Talk/Select Button.
Page 15

Page 12
301 Fulling Mill Road, Suite G ©Copyright 2013 by Legrand,
Middletown, PA 17057 Inc All Rights Reserved.
(800)-321-2343 www.onqlegrand.com
As you use the Up / Down arrows to
select a different chime, the chime
will play at this station, so that you
can hear each selection. When you
are satisfied with your selection,
press a Left arrow or the Talk/Select
Button to lock your selection in.
Notice that there is a selection (the
last one) for customers who prefer
their existing doorbell chime to any
of Legrand’s. In that case, their
chime sounds instead of any of the
Legrand chimes, but the system still
works the same.
WARNING:
If you select “External System
Chime” (and are using existing
doorbell wiring to provide system
power), there MUST be an
external door chime attached to
the doorbell wiring system.
From the Door Settings screen,
the next item is for “Chime Volume”.
Highlight the “Chime Volume”
selection and press the Talk/Select
Button.
Use the Up / Down arrows to select
the Door Chime volume. Each press
adjusts the volume 5%. When you
get the volume level you want, you
can press the left arrow, or the
Talk/Select Button to lock that
volume in for that Door Unit
Page 16
Page 13
301 Fulling Mill Road, Suite G ©Copyright 2013 by Legrand,
Middletown, PA 17057 Inc All Rights Reserved.
(800)-321-2343 www.onqlegrand.com
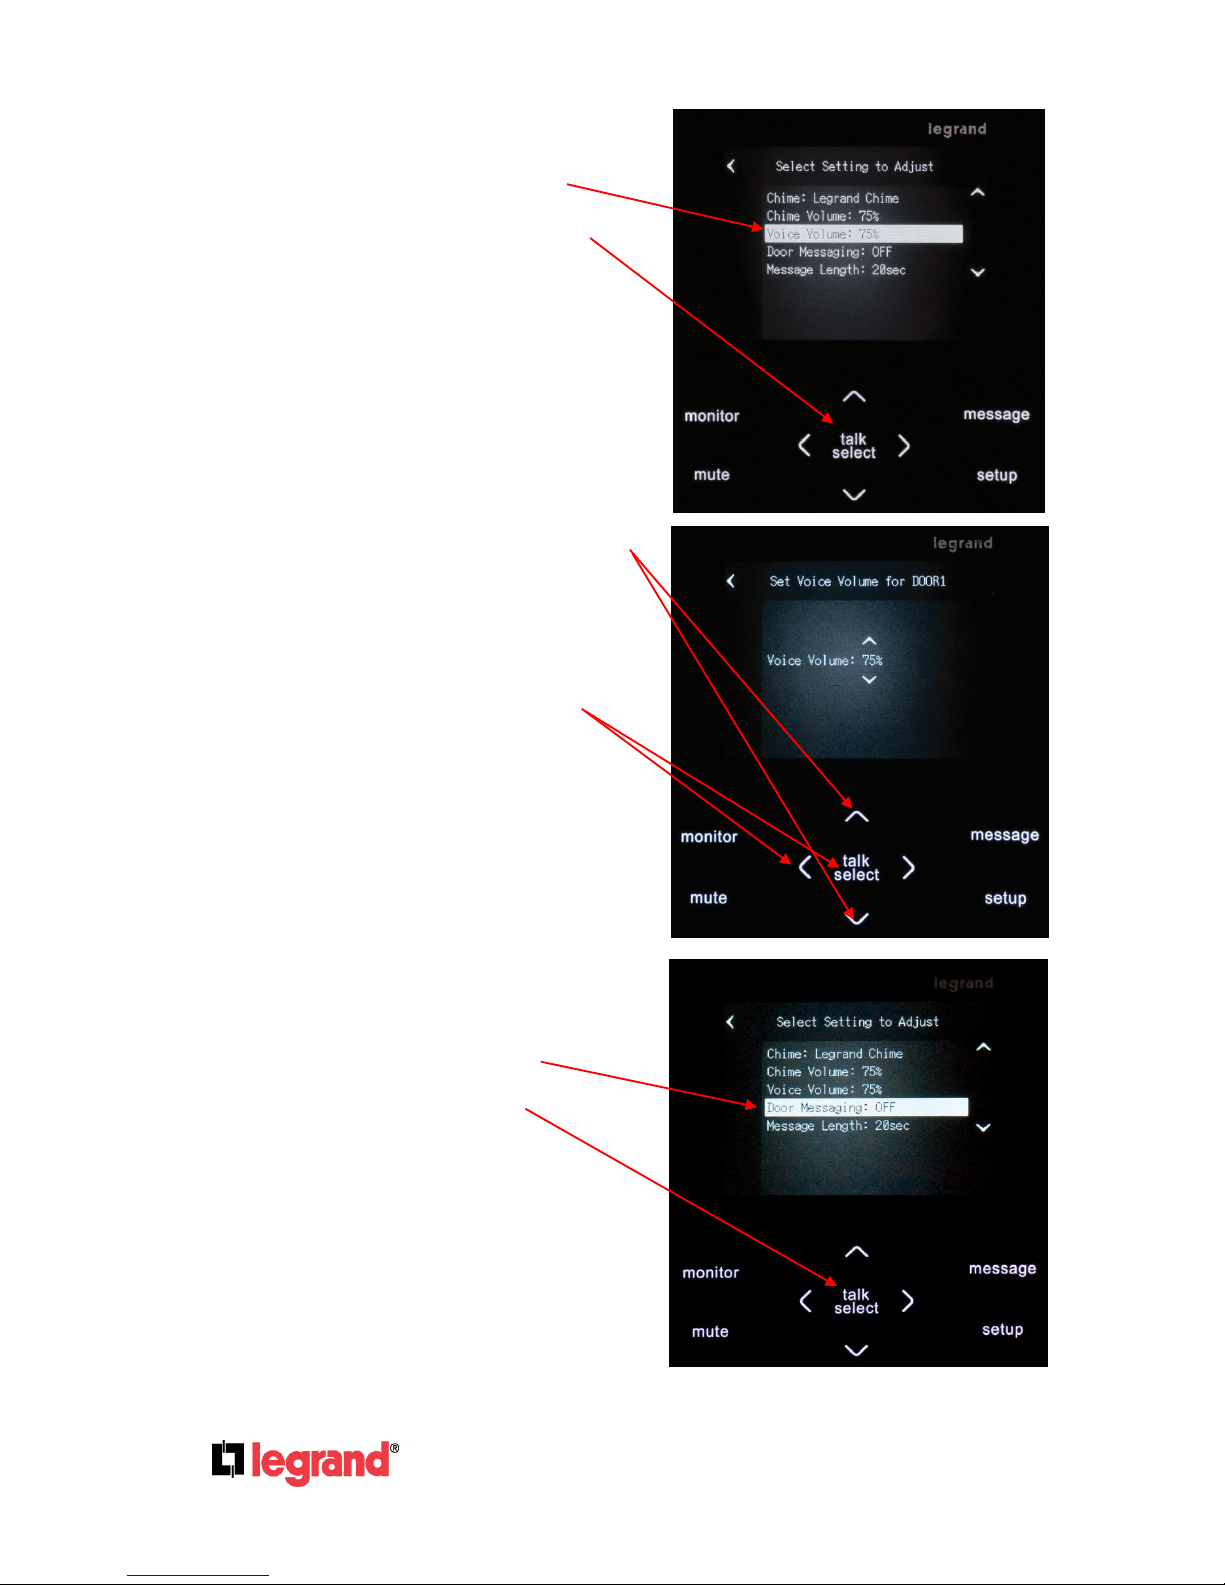
From the Door Settings screen, the
next item is for “Voice Volume”.
Highlight the “Voice Volume”
selection and press the Talk/Select
Button.
Use the Up / Down arrows to select
the level of Voice Volume. Each
press adjusts the volume 5%. When
you get the volume level you want,
you can press the left arrow, or the
Talk/Select Button to lock that
volume in for that Door Unit
From the Door Settings screen, the
next item is for Door Messaging.
Highlight “Door Messaging”
and press the Talk/Select Button.
Page 17

Page 14
301 Fulling Mill Road, Suite G ©Copyright 2013 by Legrand,
Middletown, PA 17057 Inc All Rights Reserved.
(800)-321-2343 www.onqlegrand.com
Use the Up / Down arrows to select
either “ON” or “OFF” (default is
“OFF”). Press the Left Arrow or
Talk/Select to lock in your choice.
When “ON” is selected, a prompt
will play 25 seconds after someone
presses your doorbell, and no one
answers. The prompt will instruct
the visitor to press the doorbell
button to leave a message for the
homeowner.
Select Message Length
and press Talk/Select to adjust the
door message length.
Use the Up / Down arrows
to adjust the message length
to “15, 20 (default), 25 or 30sec.”.
Press the Left Arrow or Talk/Select
to lock in your setting.
NOTE: If the visitor doesn’t press
the doorbell within 10 seconds after
the Door Prompt plays, the Door
Unit returns to normal operation.
Page 18

Page 15
301 Fulling Mill Road, Suite G ©Copyright 2013 by Legrand,
Middletown, PA 17057 Inc All Rights Reserved.
(800)-321-2343 www.onqlegrand.com
4. Time/Date Settings
From the main Setup screen,
highlight “Time/Date Settings”
and press the Talk/Select Button.
To adjust the time of day, highlight
the “Time” line
and press the Talk/Select Button.
Use the Right arrow or Talk/Select
to switch between hours and
minutes, and the Up / Down arrows
to adjust the setting. Press the Left
Arrow to lock in the setting.
Page 19

Page 16
301 Fulling Mill Road, Suite G ©Copyright 2013 by Legrand,
Middletown, PA 17057 Inc All Rights Reserved.
(800)-321-2343 www.onqlegrand.com
To adjust the date, highlight the
“Date” line
and press the Talk/Select Button.
Use the Right arrow or Talk/Select
to switch between month, day and
year, and the Up / Down arrows to
adjust the setting. Press the Left
Arrow to lock in the setting.
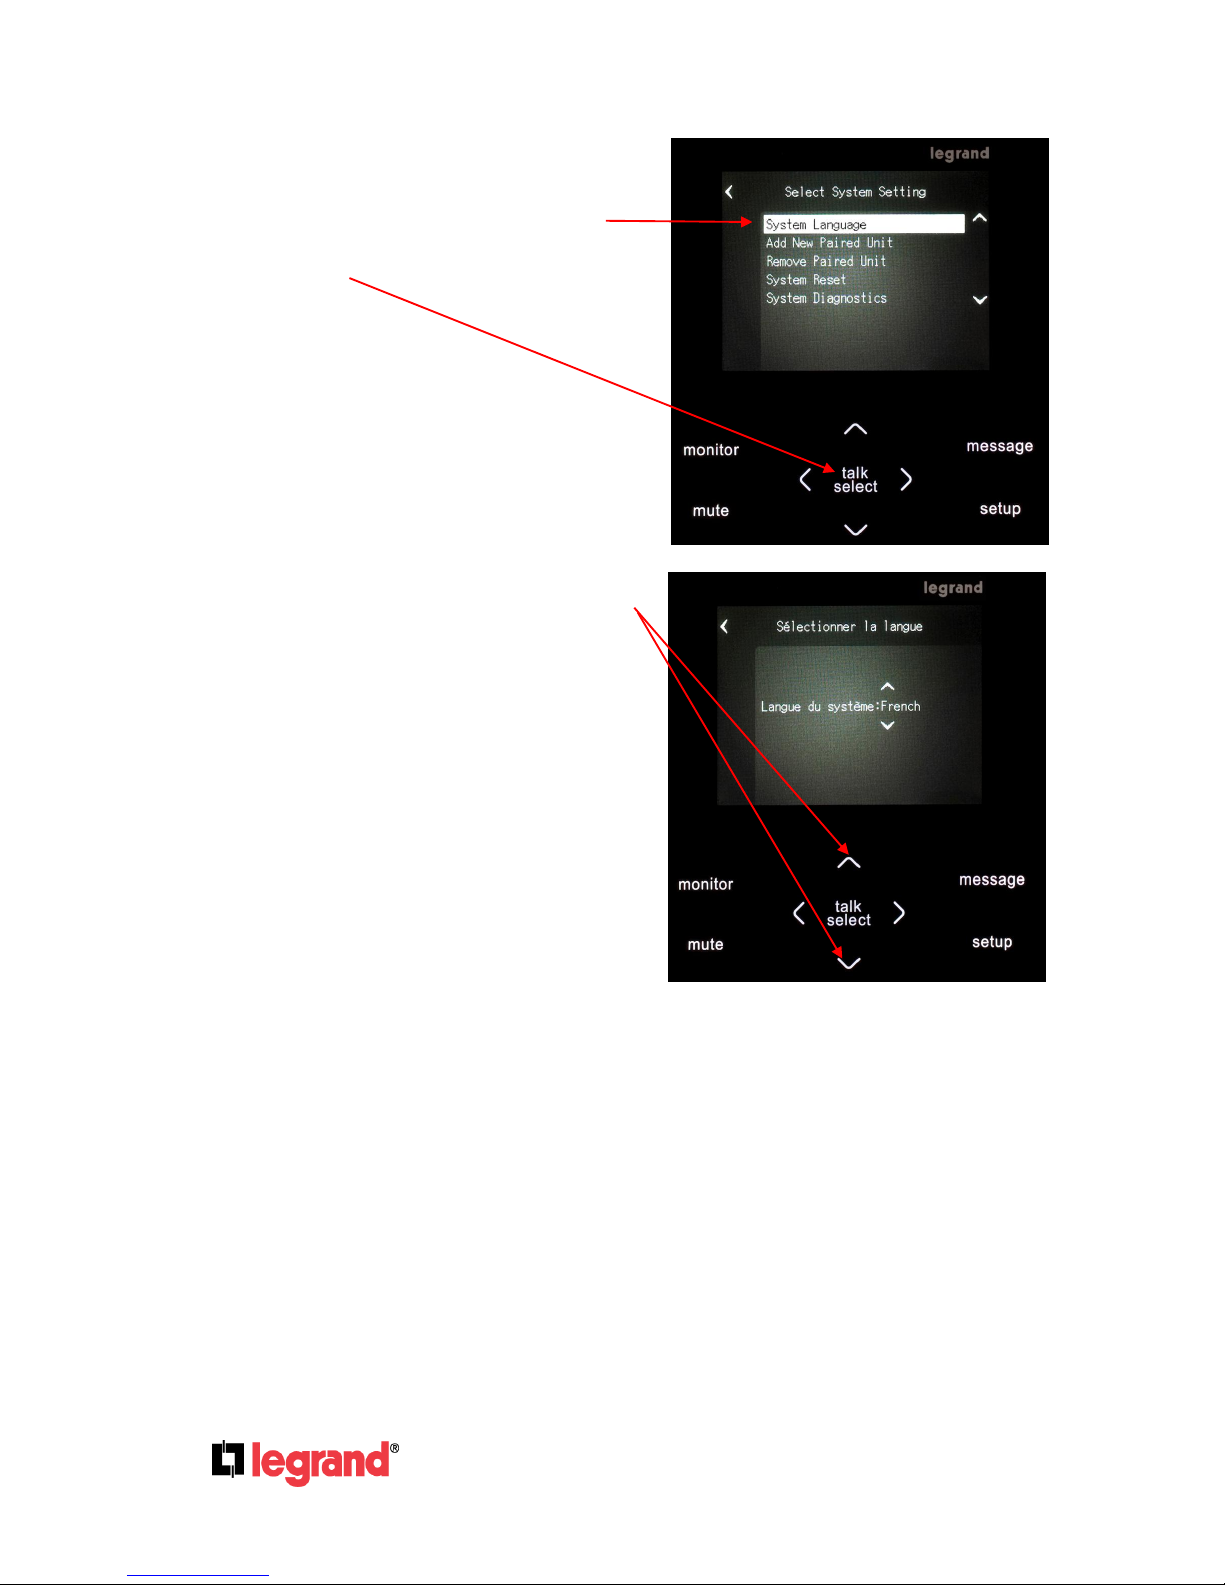
5. System Settings
The last item on the main Setup
menu is “System Settings”.
It includes an area to set one of
three languages to be displayed,
areas to add or remove another
Room Unit, an area to initiate a
System Reset, and an area to run
System Diagnostics. To go to the
System Settings screen, highlight
the “System Settings” line and press
the Talk/Select Button.
Page 20
Page 17
301 Fulling Mill Road, Suite G ©Copyright 2013 by Legrand,
Middletown, PA 17057 Inc All Rights Reserved.
(800)-321-2343 www.onqlegrand.com
To select which one of three
languages you want displayed,
highlight the “System Language”
line and press the Talk/Select
Button.
Use the Up / Down arrows to select
which language (English, French, or
Spanish) the Room Unit will utilize.
Press the Left Arrow or Talk/Select
to lock in the setting.
Page 21
Page 18
301 Fulling Mill Road, Suite G ©Copyright 2013 by Legrand,
Middletown, PA 17057 Inc All Rights Reserved.
(800)-321-2343 www.onqlegrand.com
E. System Configuration
The following section includes
information on adding and removing
additional Room Units, performing
System Diagnostics, and performing a
System Reset.
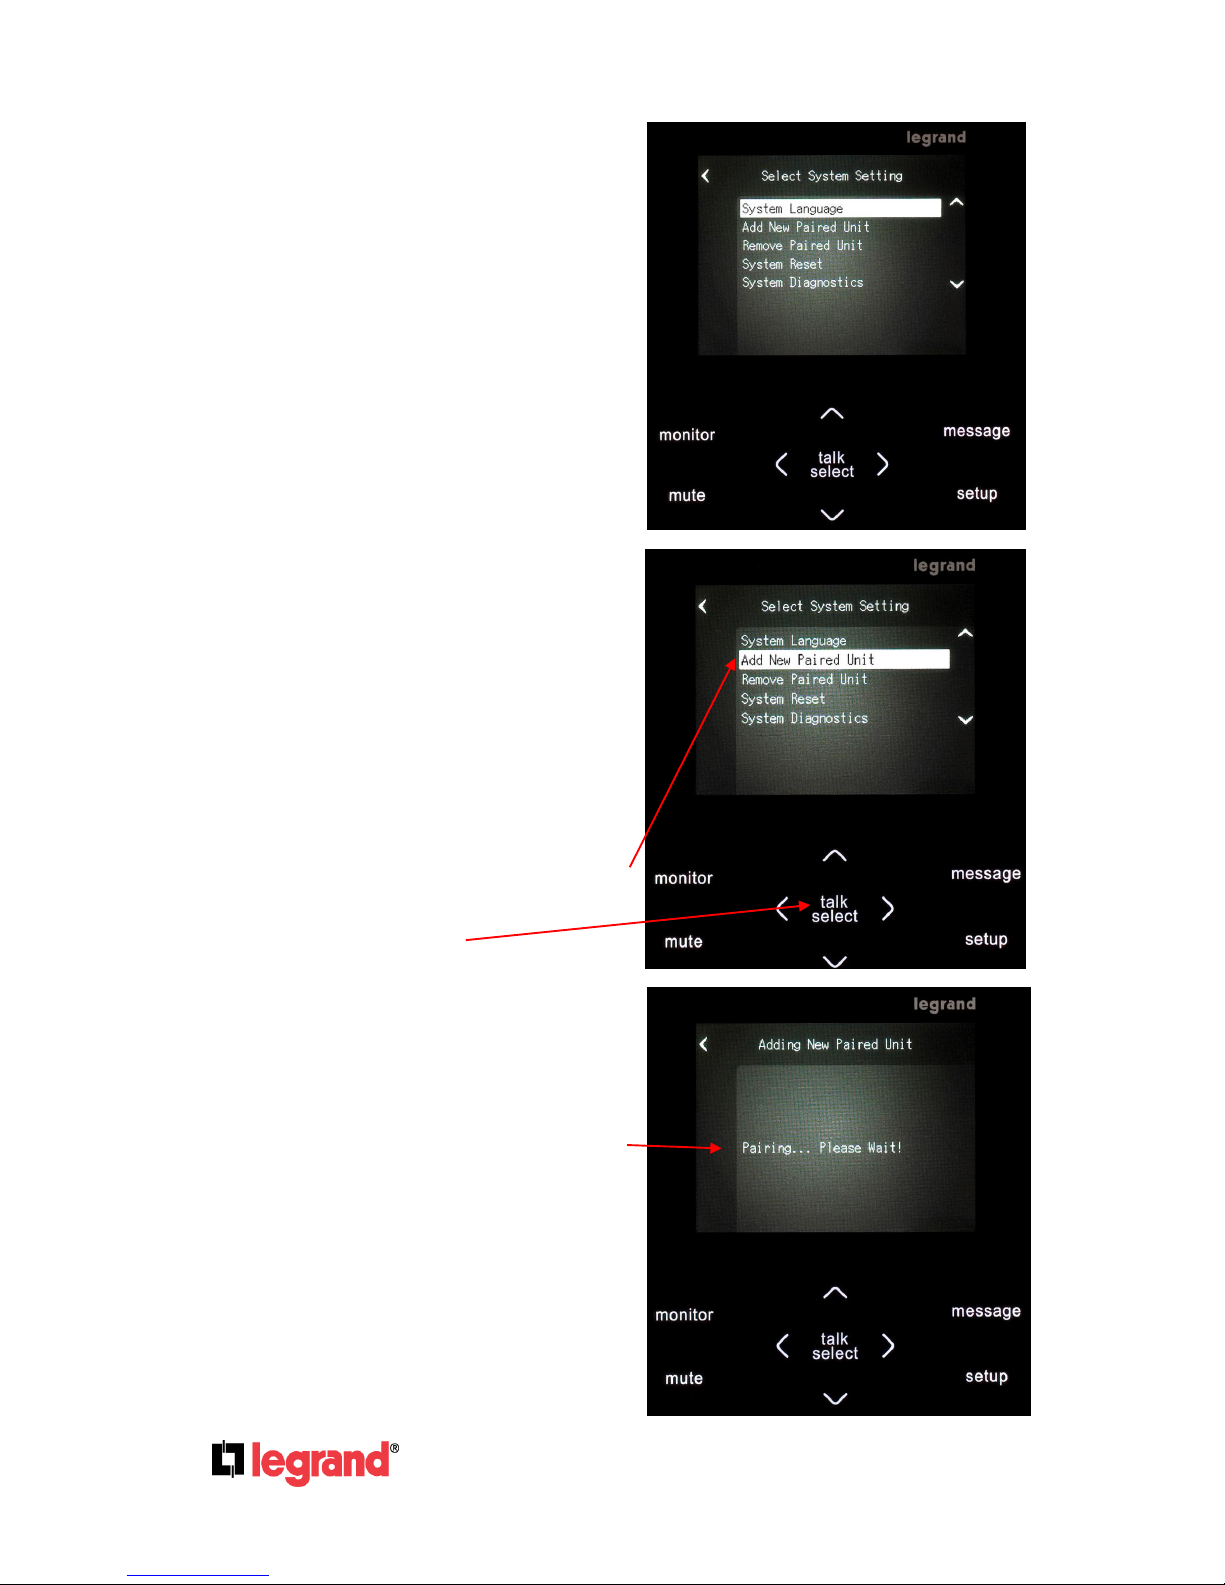
1. Adding Another Video Room
Unit (or Door Unit to a reset
Master Room Unit)
To add an additional Video Room
Unit (or Door Unit to a reset Master
Room Unit), plug in the AC adapter
of the new Video Room Unit (or
power the Door Unit). The new Unit
should be beeping twice at a regular
interval. On the original Room Unit
(the master Unit with the little house
next to his name), highlight the “Add
New Paired Unit” line and press the
Talk/Select Button.
The master Unit will then beep three
times to indicate it has paired with
the new Unit.
During the pairing operation, a Popup screen will let you know that the
new unit is indeed being paired.
Page 22

Page 19
301 Fulling Mill Road, Suite G ©Copyright 2013 by Legrand,
Middletown, PA 17057 Inc All Rights Reserved.
(800)-321-2343 www.onqlegrand.com
When the pairing operation is
complete, a different Pop-up screen
will tell you that the new unit (Room
3 in this example) has been paired.
Remember, you’ll need to name that
new unit and decide on any other
personalization (see previous
section) that you may want to do.
Here is an example of a system with
two Video Room Units and one
Door Unit. In this case, you are in
the Kitchen (the master Unit) and
you have added a unit and named it
Master Suite.
2. Removing a Video Room Unit
(or Door Unit)
To remove a Video Room Unit (or
Door Unit) from the system, on the
master Video Room Unit, highlight
the “Remove Paired Unit” line
and press the Talk/Select Button.
Page 23

Page 20
301 Fulling Mill Road, Suite G ©Copyright 2013 by Legrand,
Middletown, PA 17057 Inc All Rights Reserved.
(800)-321-2343 www.onqlegrand.com
The next screen will show you all
the units, and you should highlight
the name of the unit that you want
to remove (in this case Master
Suite). Press the Talk/Select Button
to complete the removal.
3. System Diagnostics
If you are having issues with your
Legrand Wireless Video Intercom
System, Legrand Tech Support may
ask you to run system diagnostics to
help them remotely diagnose the
issue. In that case, from the
SetUp/Systems Settings screen,
highlight the “System Diagnostics”
line and press the Talk/Select
Button.
After the diagnostics have run, a
Pop-up screen will appear with the
results of the diagnostics. Legrand
Tech Support will most likely have
you read off the information that is
presented on the screen.
Page 24

Page 21
301 Fulling Mill Road, Suite G ©Copyright 2013 by Legrand,
Middletown, PA 17057 Inc All Rights Reserved.
(800)-321-2343 www.onqlegrand.com
4. System Reset
Although very unlikely, if you are
having serious issues with your
Legrand Wireless Video Intercom
System, Legrand Tech Support may
ask you to reset a Unit or the whole
system and start from scratch.
Before doing that, it would be a
good idea to record all the
particulars about the system
(names, settings, etc.), because the
System Reset will delete all of that
information. Before performing a
“System Reset” from the Master
Unit, you may be asked by Tech
Support to first “Remove one or
more Paired Units”. A “System
Reset” from a Room Unit will simply
clear the memory of that unit.
From the SetUp / Systems Settings
screen, highlight the “System Reset”
line and press the Talk/Select
Button.
Next a caution Pop-up screen will
appear reminding you that all
settings will be erased. Press the
Talk/Select Button to continue.
When the System Reset is
complete, another Pop-up screen
will appear to remind you to consult
the user documentation to create a
new network ID. If this Room Unit is
going to be your new Master, press
the Setup button followed by the
Talk/Select button.
However, if you are simply adding
this Room Unit to a system with an
existing Master Unit, go to the
Master Unit and perform steps E1
after adding the Door Unit (below).
Page 25

Page 22
301 Fulling Mill Road, Suite G ©Copyright 2013 by Legrand,
Middletown, PA 17057 Inc All Rights Reserved.
(800)-321-2343 www.onqlegrand.com
If you did create a new Master Unit,
you should see this screen.
Note that there is a little house icon
on the same line as this unit’s
default name (Room 1).
NOTE: When Tech Support
directed you to “Unpair” or
“System Reset” all the units, they
should have also had you unpair
or reset the Door Unit by holding
its doorbell button for @10
seconds (until it beeps at you)
and like unpaired or system reset
Room Units, begins beeping
twice every few seconds.
They should have also had you
unplug each Room Unit after it
was reset.
You can only pair one unit at a time,
so generally, on a new or
completely reset system, after all
the units are reset and unplugged, it
is a good idea to first plug in the
Door Unit and from the Master
Room Unit perform steps E1 above
to first add the Door Unit.
After you’ve added the Door Unit,
the screen should look like this.
To add any additional Room Units,
again perform the steps in section
E1 above (ie. Apply power to new
Room Unit and from Master Room
Unit “Add Paired Unit”).
Page 26

Page 23
301 Fulling Mill Road, Suite G ©Copyright 2013 by Legrand,
Middletown, PA 17057 Inc All Rights Reserved.
(800)-321-2343 www.onqlegrand.com
F. System Operation
The following section includes
information on answering the door,
recording a greeting, recording a
message, sending a message, playing
messages, muting units and monitoring
units. There is also a separate area that
discusses the things that change when a
battery powered Door Unit is utilized.
Let’s start off this section with answering
a Door Unit call – so, what happens
when someone presses the Door Unit
Button?
1. Answering a Door Unit
When a visitor presses your Door
Unit Button, all Video Room Units
display the door camera image,
and play the door chime that was
selected for that Door Unit. The first
Video Room Unit that presses the
Talk/Select Button
will be able to communicate with the
Door Unit. At that point, any other
Video Room Units will display a list
of system Units, and those in
communication will show a “Busy”
icon next to their Unit name.
In the example shown, the Master
Suite is the Unit that answered and
is communicating with the Front
Door. When the Master Suite
pressed the Talk/Select Button, both
Units went into “Talk Hands Free
Mode”, and can communicate for 1
minute, similar to a normal phone
conversation.
Page 27

Page 24
301 Fulling Mill Road, Suite G ©Copyright 2013 by Legrand,
Middletown, PA 17057 Inc All Rights Reserved.
(800)-321-2343 www.onqlegrand.com
2. Calling Another Video Room
Unit
If your system has more than one
Video Room Unit, you can call one
of the other Video Room Units. In
this example, I’m in the Kitchen and
I want to call the Master Suite. Use
the Up / Down arrows to move
the highlight to the Master Suite
and press the Talk/Select Button to
communicate with the Master Suite.
Notice that on the each Video Room
Unit a “Busy” icon
has been placed next to the two
Units that are now communicating.
Just as in Door Unit communication,
after the Kitchen pressed the
Talk/Select Button, both Units have
one minute of hands free time to
talk to each other in an open line
fashion. To end the session before
the one minute expires, either Unit
can press the Talk/Select Button,
and the call will be ended. If they
want to talk longer than one minute,
either Unit can press their
Talk/Select Button, to begin a new
session.
Page 28

Page 25
301 Fulling Mill Road, Suite G ©Copyright 2013 by Legrand,
Middletown, PA 17057 Inc All Rights Reserved.
(800)-321-2343 www.onqlegrand.com
3. Door Messaging
If a visitor comes to your door when
you are not home and presses the
doorbell, a built in prompt will play
after 25 seconds, telling them how
to leave a message. It will tell them
to press the doorbell button
and leave a message. The length of
the message they leave is
adjustable 15-30 seconds (see
section D.3.- Door Settings.), if Door
Messaging is turned ON. You can
also record a Door Greeting that
would play instead of the built-in
prompt (see following section).
4. Recording a Door Greeting
To record a Door Greeting that will
play when someone presses your
doorbell and you are not home,
instead of the default prompt, start
by pressing the Message Button.
Use the Up / Down arrows to
highlight “Record/Send Greeting”
and press the Talk/Select Button.
A Pop-up screen will allow you to
Play, Record, or Send the Door
Greeting or select the Default
prompt to be sent to the Door Unit.
Highlight Record by pressing the
Right arrow and press the
Talk/Select Button
to begin recording.
Page 29

Page 26
301 Fulling Mill Road, Suite G ©Copyright 2013 by Legrand,
Middletown, PA 17057 Inc All Rights Reserved.
(800)-321-2343 www.onqlegrand.com
As you are recording your new Door
Greeting, a Pop-up screen will keep
track of the time of the recording in
seconds, and remind you to press
the Talk/Select Button to end the
recording.
Use the Right arrow
to highlight the Play function
and press the Talk/Select Button
to hear the new Door Greeting.
Press the Talk/Select Button again
to hear the new Door Greeting.
Page 30

Page 27
301 Fulling Mill Road, Suite G ©Copyright 2013 by Legrand,
Middletown, PA 17057 Inc All Rights Reserved.
(800)-321-2343 www.onqlegrand.com
A Pop-up screen will display the
time in seconds as the new Door
Greeting is playing.
Notice that if you press Talk/Select
at this point, you will erase the new
Door Greeting.
If you like the new Door Greeting,
simply press a Left arrow to lock it
in.
5. Recording a Message
Using very similar steps, you can
also record a message, which would
typically be sent to another Video
Room Unit, such as “Dinner is in the
oven”. Up to 3 outbound messages
may be recorded and saved for later
use, like “Take out the garbage” that
you send to another room every
garbage day.
To record such a message, press
the Message Button,
and highlight the “Record/Send
Message” line and press the
Talk/Select Button.
The next thing you have to do is
select to which other Video Room
Unit you’d like to send the message.
In this example we will send the
message to the Master Suite (our
only other Video Room Unit.
So, highlight the Master Suite and
press the Talk/Select Button.
Page 31

Page 28
301 Fulling Mill Road, Suite G ©Copyright 2013 by Legrand,
Middletown, PA 17057 Inc All Rights Reserved.
(800)-321-2343 www.onqlegrand.com
Use the Right arrow (if needed)
to highlight the Record function
and press the Talk/Select Button
to begin recording your message.
A Pop-up screen will display the
time in seconds as you are
recording the message.
When you are done recording
press the Talk/Select Button
to end recording.
To hear the message you just
recorded, use the Right arrow
to highlight the Play function
and press the Talk/Select Button
to hear the message.
Page 32
Page 29
301 Fulling Mill Road, Suite G ©Copyright 2013 by Legrand,
Middletown, PA 17057 Inc All Rights Reserved.
(800)-321-2343 www.onqlegrand.com
Press the Talk/Select Button again
to hear the message.
A Pop-up screen will display the
time in seconds as the message is
playing.
Notice that if you press Talk/Select
at this point, you will erase the
message.
If you like the message, simply
press a Left arrow to lock it in.
Press the Left arrow one more time
and it will take you back to screen to
Send the message to the Master
Suite.
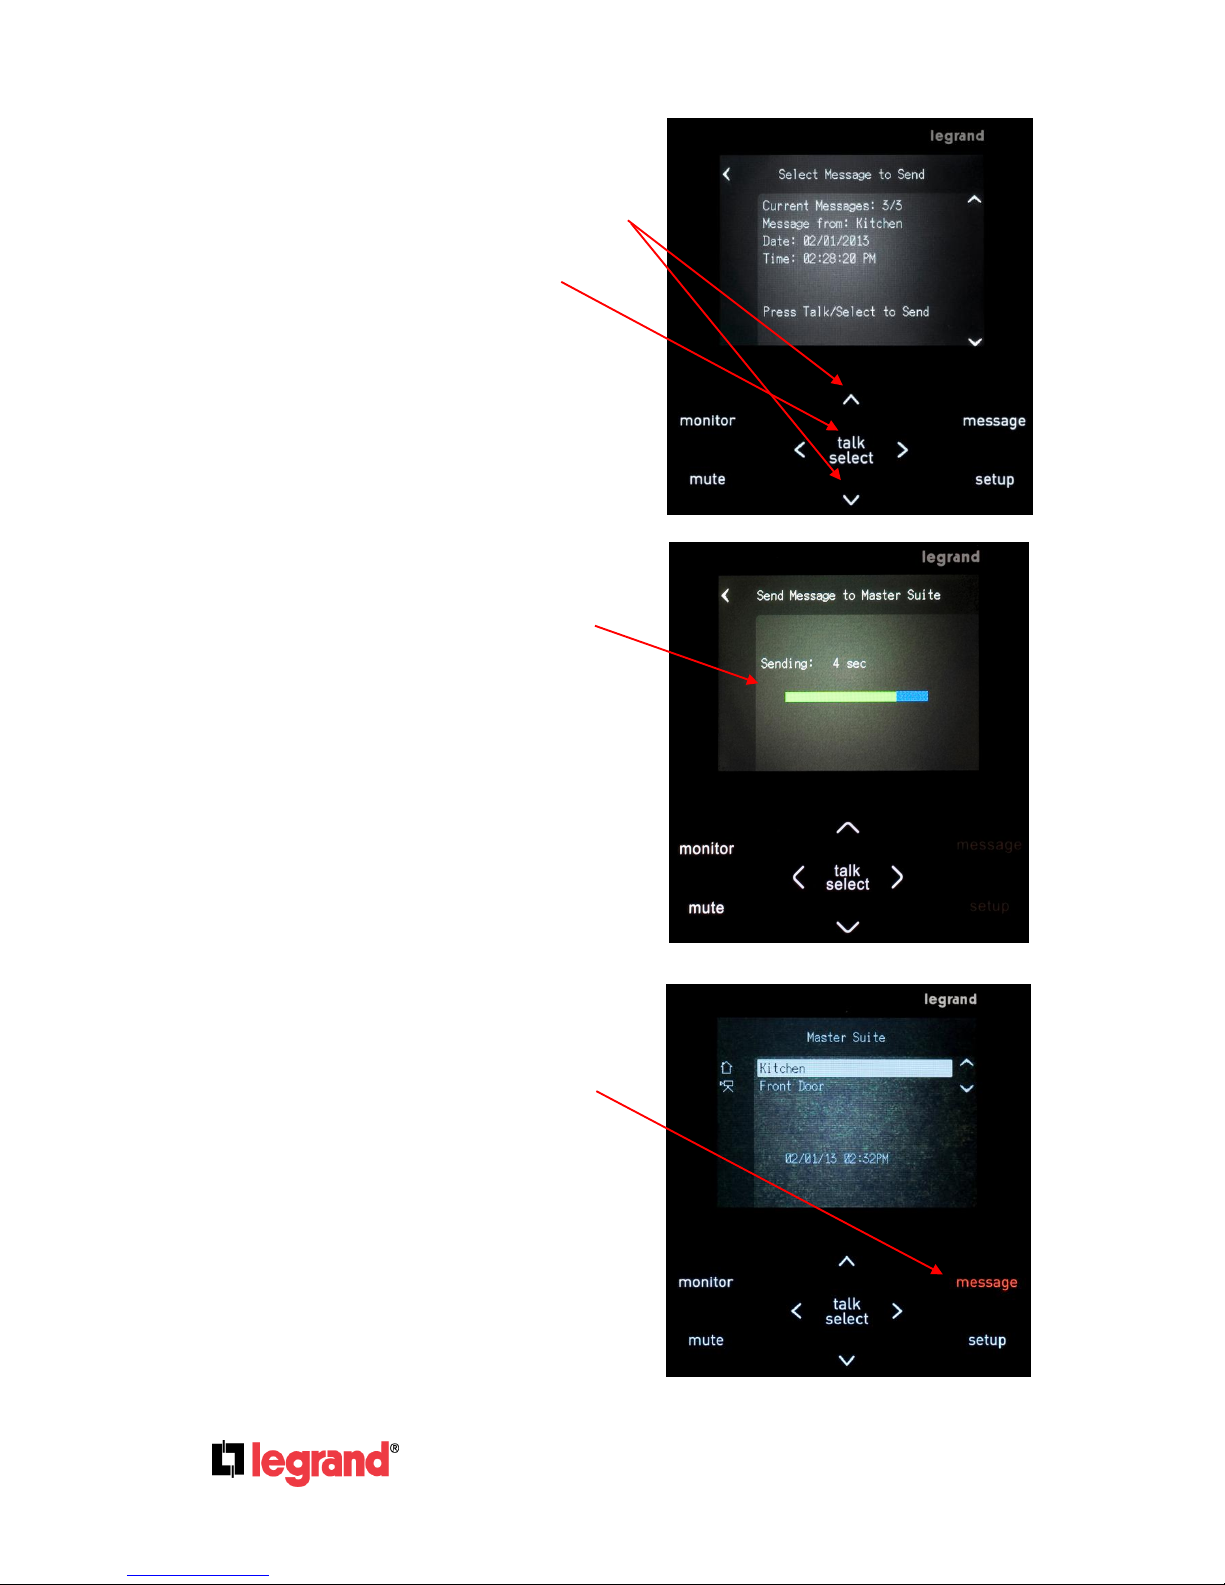
6. Sending a Message
Once you have recorded a message
and are happy with it, use the Right
arrow to highlight “Send”
and press the Talk/Select Button.
Page 33
Page 30
301 Fulling Mill Road, Suite G ©Copyright 2013 by Legrand,
Middletown, PA 17057 Inc All Rights Reserved.
(800)-321-2343 www.onqlegrand.com
A Pop-up screen will allow you to
choose which message to send
(you may have up to 3 in your
queue). Use the Up / Down arrows
to select which message to send.
Press the Talk/Select Button
to send the message to the other
Video Room Unit.
While the message is being sent to
the other Video Room Unit, this
Pop-up shows you the status.
At the other Video Room Unit,
(in this case the Master Suite), the
Message Button will be flashing
to indicate there is a new message.
Page 34
Page 31
301 Fulling Mill Road, Suite G ©Copyright 2013 by Legrand,
Middletown, PA 17057 Inc All Rights Reserved.
(800)-321-2343 www.onqlegrand.com
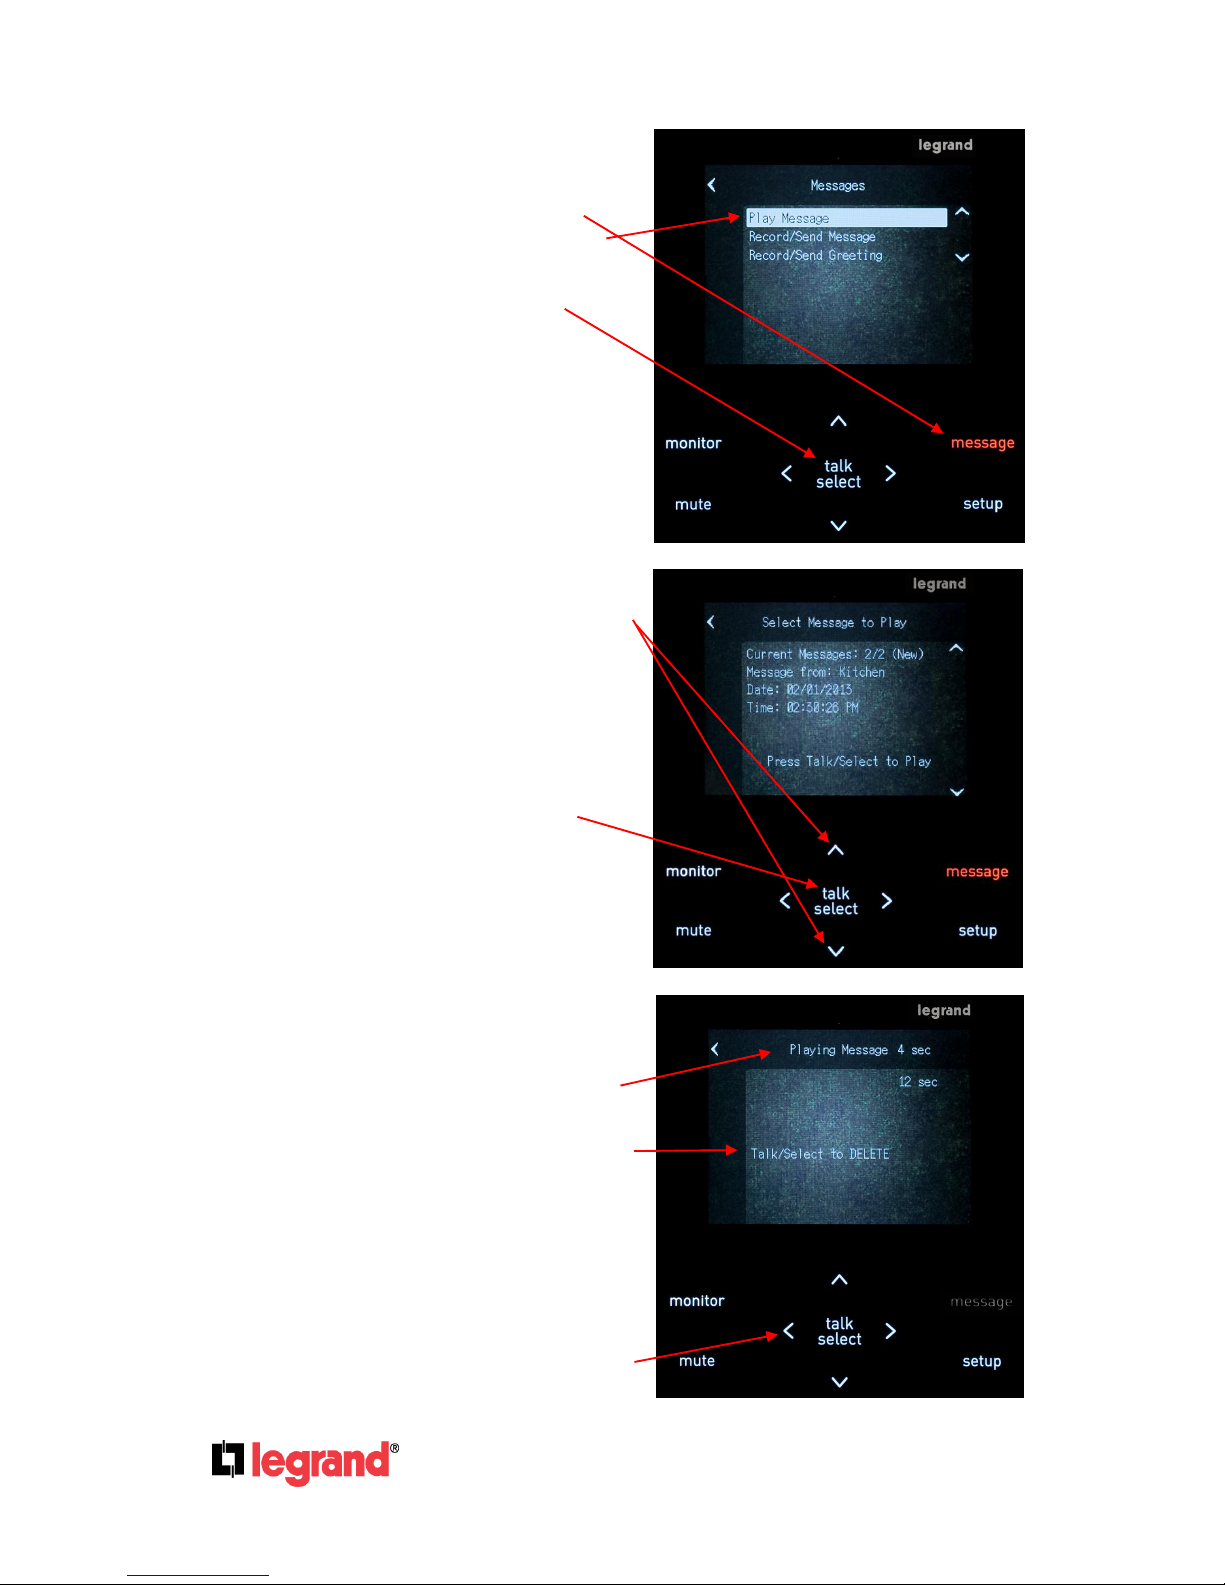
7. Playing a Message
To Play a received message from
another Unit, press the flashing
Message Button, insure the “Play
Message” line is highlighted, and
press the Talk/Select Button.
Use the Up /Down arrows to select
which of your incoming messages to
Play (you can have up to 10
messages in your incoming
message queue – if you receive an
11th message, it overwrites the
oldest message in your incoming
queue). Press the Talk/Select
Button again to hear the message.
A Pop-up screen will display the
time in seconds as the message is
playing.
Notice that if you press Talk/Select
at this point, you will erase the
message. If you choose to erase the
message, you may get a warning
Pop-up telling you there are no
more messages.
If you don’t want to erase the
message, simply press a Left arrow
to keep it.
Page 35

Page 32
301 Fulling Mill Road, Suite G ©Copyright 2013 by Legrand,
Middletown, PA 17057 Inc All Rights Reserved.
(800)-321-2343 www.onqlegrand.com
8. Muting a Unit
To place a Video Room Unit in
Mute, simply press the Mute Button.
This can be thought of as a Do Not
Disturb feature, as it simply turns off
the speaker in the Unit. This means
that if someone rings the doorbell at
the Door Unit, you will not hear the
chime at your Room Unit.
Notice also that a Mute icon is
placed to the left of your Unit name
on this and all other Video Room
Units, to let everyone know you are
in Mute mode.
9. Monitoring a Unit
There may come a time where you
need to monitor a baby’s room, or
perhaps the room of an elderly
parent. To place a Video Room Unit
into Monitor mode, simply go to that
Room Unit and press the Monitor
Button.
All other Video Room Units will then
be able to hear on their speaker any
sounds made in that room.
A Monitor icon is also placed to the
left of the Unit name of the Room
Unit in Monitor mode on this and
every other Video Room Unit.
If another Room Unit does not want
to hear the sounds from that room,
they may place their Video Room
Unit in Mute mode (see step 8
above).
Page 36

Page 33
301 Fulling Mill Road, Suite G ©Copyright 2013 by Legrand,
Middletown, PA 17057 Inc All Rights Reserved.
(800)-321-2343 www.onqlegrand.com
10. Operation with a Batterpowered Door Unit
There are several unique
differences to the overall Wireless
Video Intercom System operation
when utilizing battery power, instead
of hard-wired doorbell power. The
most notable difference is that to
save battery life, the doorbell light is
not illuminated.
Another thing that happens, when
battery powered, is that when the
doorbell times out after inactivity, it
really turns off. This means that you
cannot call the Door Unit or preview
its camera from a Room Unit by
selecting it and pressing the
Talk/Select Button.
Also, you cannot use a user
created Door Greeting, or obviously
connect to an external chime (no
wires).
Another thing that happens is, if you
changed your doorbell chime, and
press the Door Unit doorbell button,
that first press just wakes up the
Unit and the chime that plays at the
Door Unit will be the old one. Press
it one more time and the new chime
will play.
 Loading...