

Page 1
LTHBREM High Bay Remote Control
for use with LTHBPIR
Specifications:
Power supply 2 x AAA 1.5V battery (not included)
Carrying Case RC-100 in carrying case
Working range
Operating temperature
Dimensions
Attention: Please remove the batteries from the
compartment if the remote control won't be used for
more than 30 days.
Up to 15 meters
0ºC ~ 50ºC
123 x 70 x 20.3mm
Remote with
carrying case
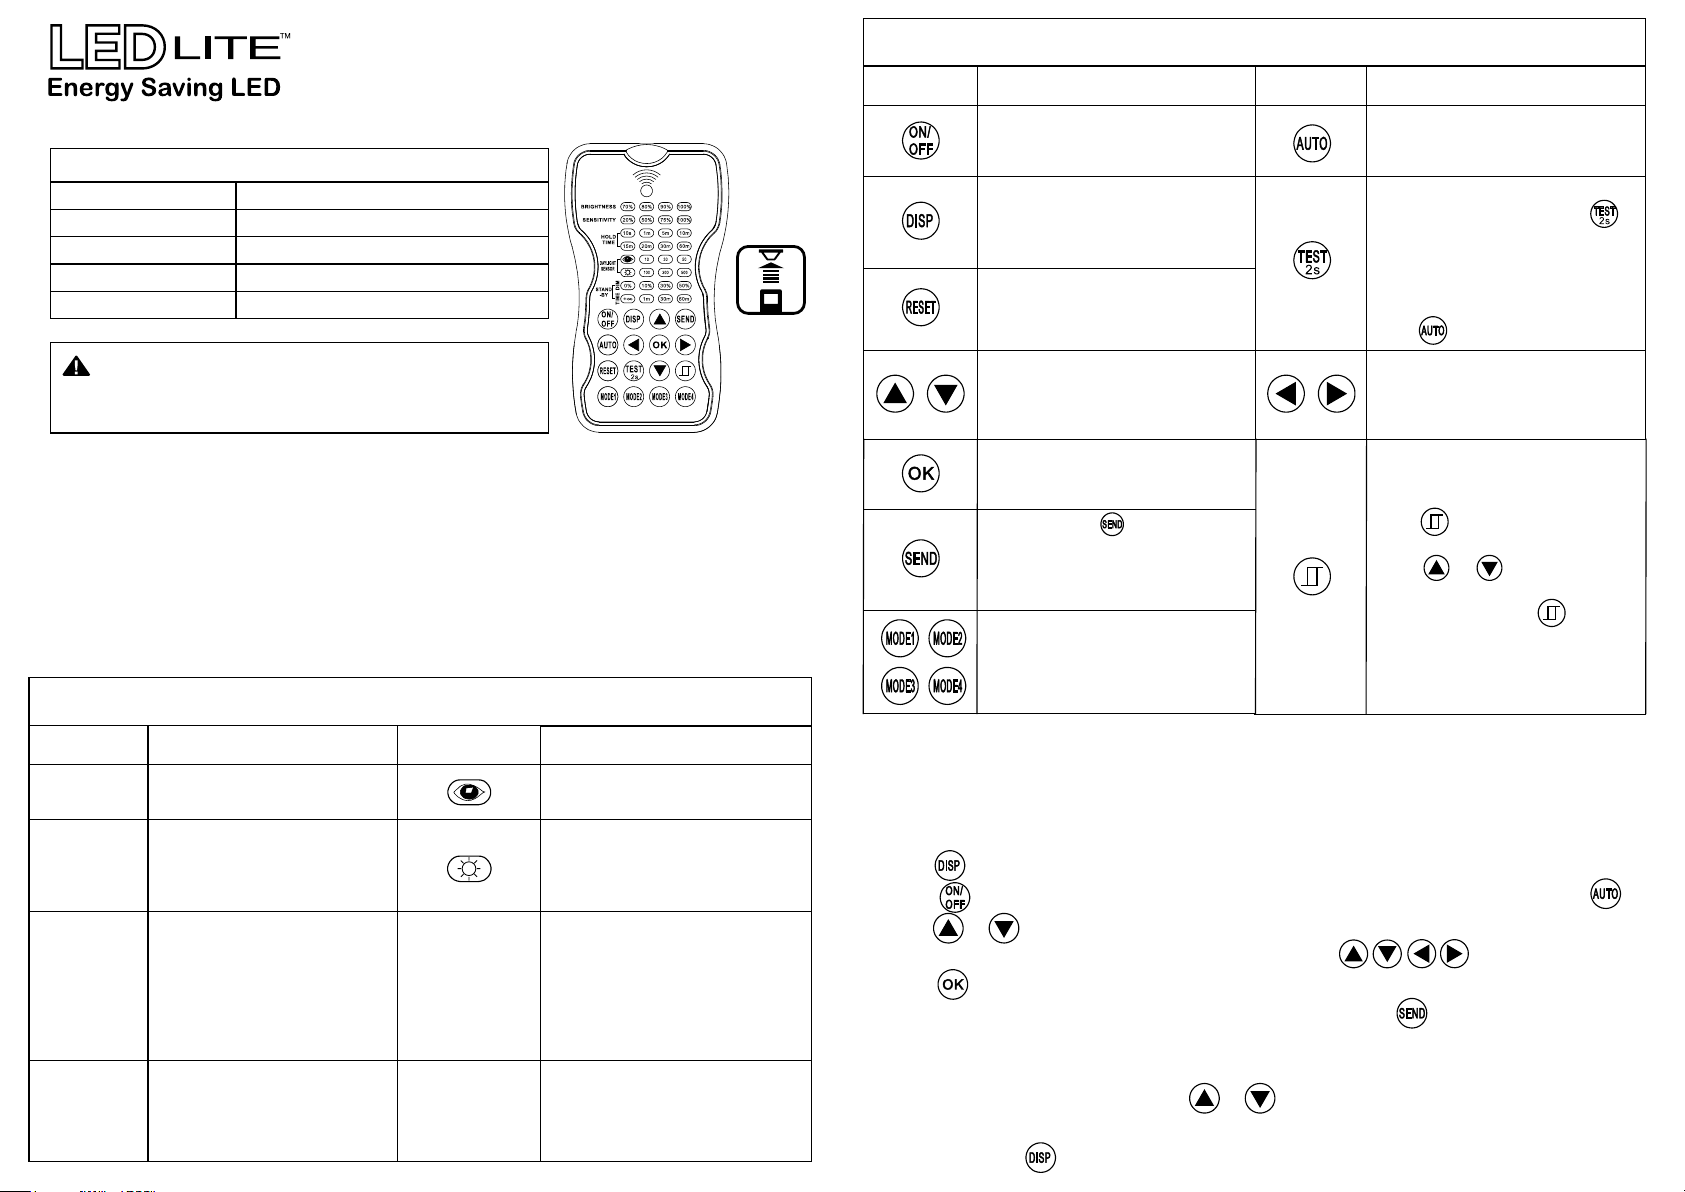
Button Operation
Button Description Description
Set the light in permanent ON or
permanent OFF position. The PIR
sensor will be disabled
Display the current/latest setting
in LED indicators (the buttons
with the latest settings will have
the LED indicator on)
Set the PIR sensor to factory
default settings
Press to Enter in Setting mode. The
settings LEDs will start flashing.
Use the UP/DOWN arrows to
choose the desired setting.
Button
Set the current surrounding lux
level as the daylight threshold
After choosing the sensitivity
threshold, press once on the
to test the sensitivity chosen.
The PIR sensor will activate the test
mode for 2sec. At the same time,
the stand-by period and the
daylight sensor are disabled.
Press to exit this mode.
Use the LEFT/RIGHT arrows to
choose the desired settings from
the LED indicators
Introduction:
The LTHBREM is designed to work in conjunction with the LTHBPIR sensor. It is a wireless
IR configuration tool that allows the user to configure and modify settings of the PIR sensor.
The remote control IR signal can reach up to 15 meters. To speed up the configuration, the
remote control can store up to 4 PIR parameter modes.
The device can display previous sensor settings, copy, send settings or store set profiles.
Being able to copy/paste identical settings for multiple fittings, will ease the workflow for
big projects that use identical settings for more devices.
LED Indicators:
LED Description
Brightness
Sensitivity
Hold Time
Daylight
Sensor
Set lux level of the fitting
Set PIR sensor sensitivity
The time that the sensor
will turn off or dim the light
after the area is vacated.
Set various thresholds of
natural light level for the
PIR sensor.
LED Description
Set the current surrounding lux
level as the daylight threshold
Set the daylight sensor in OFF
position. All movement will now
trigger the PIR sensor regardless
of the natural light brightness
Set the output light level of the
fitting during vacancy. The PIR
Stand-by Dim
Stand-by Time
sensor will regulate the lighting
output at the set level. Setting
the stand-by dim to 0 means
that the light will be OFF
during vacancy
Set the time that the PIR sensor
will keep the light dimmed after
the HOLD TIME setting elapsed
Confirm the selected setting
in the remote control
By pressing the button, the
remote control will send current
selected settings to the PIR sensors.
The light will flash once to
confirm the change
Select one of the four preset settings
that are available. The settings can
be changed and saved as custom
modes
Press to open or close the
smart daylight sensor.
Press or to enter in setting
mode. The selectable parameter
LEDs will flash. Press again to
close or open the daylight sensor
Setting the PIR sensor(s):
All PIR sensor settings and parameters are changeable trough the remote control only.
The LTHBREM can change, store or factory reset the settings of the PIR.
Changing multiple settings of the sensor(s):
1. Press and the remote control LEDs will indicate the latest set settings.
NOTE: If button was pressed before, the PIR sensor must be unlocked by pressing .
2. Press or to enter setting mode, the LEDs that indicates the selectable settings will
start flashing. Navigate to the desired setting by pressing .
3. Press to confirm selected setting and save.
4. Point the remote control to the targeted PIR sensor and press to upload the setting
into the sensor. The LED light which the sensor is connected to will flash once to confirm the
new setting.
NOTE: To enter the setting mode press or .
NOTE: The LED light which the sensor is connected to will flash once to confirm the new setting.
NOTE: By pressing the remote control will display the current/latest setting that were sent.
Page 2
LTHBREM
Changing multiple settings of the sensors with the PIR sensor open.
1. Press and the remote control LEDs will display the current/latest setting.
2. Press or to enter setting mode. The LEDs that indicates the selectable settings
will start flashing.
3. Press , two lux LED indicators will start to flash. In daylight sensor settings, select
lux as the low threshold for the light to turn on automatically.
Select lux as the high threshold for the light to turn off automatically.
4. Press to confirm all settings and save.
5. Point the remote control to the targeted PIR sensor and press to upload the setting
into the sensor. The LED light connected to the sensor will flash once to confirm
the new setting.
NOTE: is disabled by default.
1. Open or close the smart daylight sensor by pressing when the remote control is in
setting condition.
2. When the smart daylight sensor is open, the stand-by time can only be .
3. The smart daylight sensor will operate independently when activated.
4. See Daylight Sensor Function for more infomation.
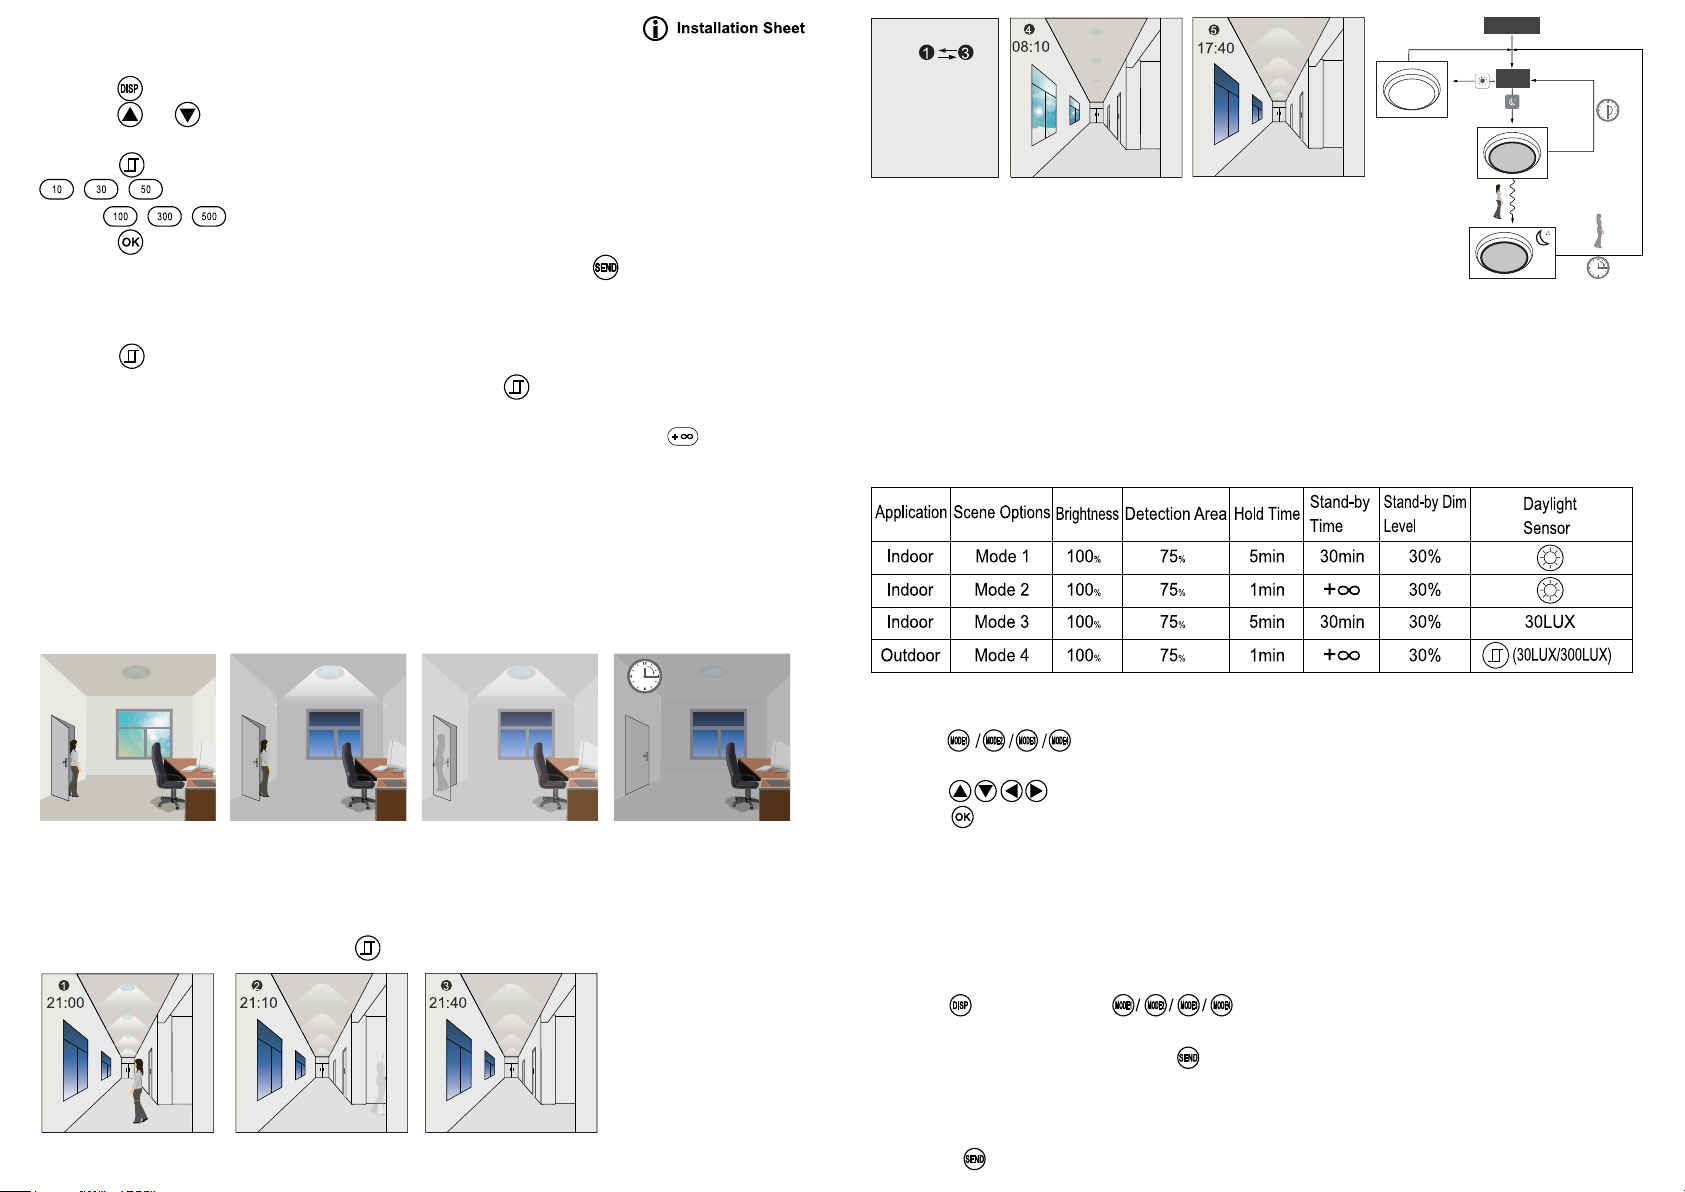
Corridor Function:
By having a tri-level control, the LTHBPIR can be mounted in different environments.
The PIR sensor can be set to trigger when there is insufficient natural light. After the trigger,
the PIR can be programmed to dimm the light up to 2 times, eventually the light will turn off
if the PIR will not be triggered again.
Power On
Steps
go in a cycle at night
100% ON
when movement
detected dims at
10% in long absence
When natural light exceeds
the preset level the light
will stay off even if
movement is detected.
Off
Light turns on at 10%
automatically when natural
light is under the preset level.
Check
Dimm
100% On
Every 30min
No movement
Movement
About RESET and MODE(1,2,3,4):
MODE (1,2,3,4): The remote control comes with 4 customizable scene MODES.
Set up desired parameters for the sensor and save them as a new MODE(1,2,3,4).
RESET: All sensor settings go back to factory default settings.
Factory Default Scene Modes
Hold-time ends
1.Off
With enough natural light
the PIR will not trigger
when presence is detected.
2.Hold Time
After the lux threshold is
reached, the PIR will
automatically trigger when
presence is detected.
3.Stand-by
Once movement is no
longer detected the light
will dimm to the pre-set
lux level.
4.Off
The light will switch off
after the stand-by period.
Daylight Sensor Function:
Open the daylight sensor by pushing when the remote control is in setting condition.
See the settings used for
this example below:
Hold-time: 30min
Set point on: 50lux
Set point off: 300lux
Stand-by Dim: 10%
Stand-by period +∞
(When the photocell
Light turns ON when
movement is detected.
Light dimms to stand-by
level after the hold time.
Light keeps its dimming
level at night.
sensor is open, the
stand-by time is +∞)
Change the MODES:
1. Press button and the remote control Led indicators will show the current
parameters.
2. Press to select the new parameters.
3. Press to confirm all parameters and save in the mode.
UPLOAD
The upload function allows you to configure the sensor with all parameters in one operation.
You may select CURRENT SETTING parameters or the MODE for uploading.
Upload the current parameters to sensor(s) and duplicate the sensor
parameters from one to another.
1. Press button or press and all parameters will be displayed on the
remote control.
2. Aim at the new sensor and press button. The light connected to the sensor will turn
on and off confirming a successful upload.
Note: To upload the same parameters to multiple sensors, just aim at the desired sensor
and press button.
 Loading...