

LauraStar Magic Evolution 723, Premium Evolution II 729, Magic Evolution II 728, Premium Evolution 725 User Manual
Page 1
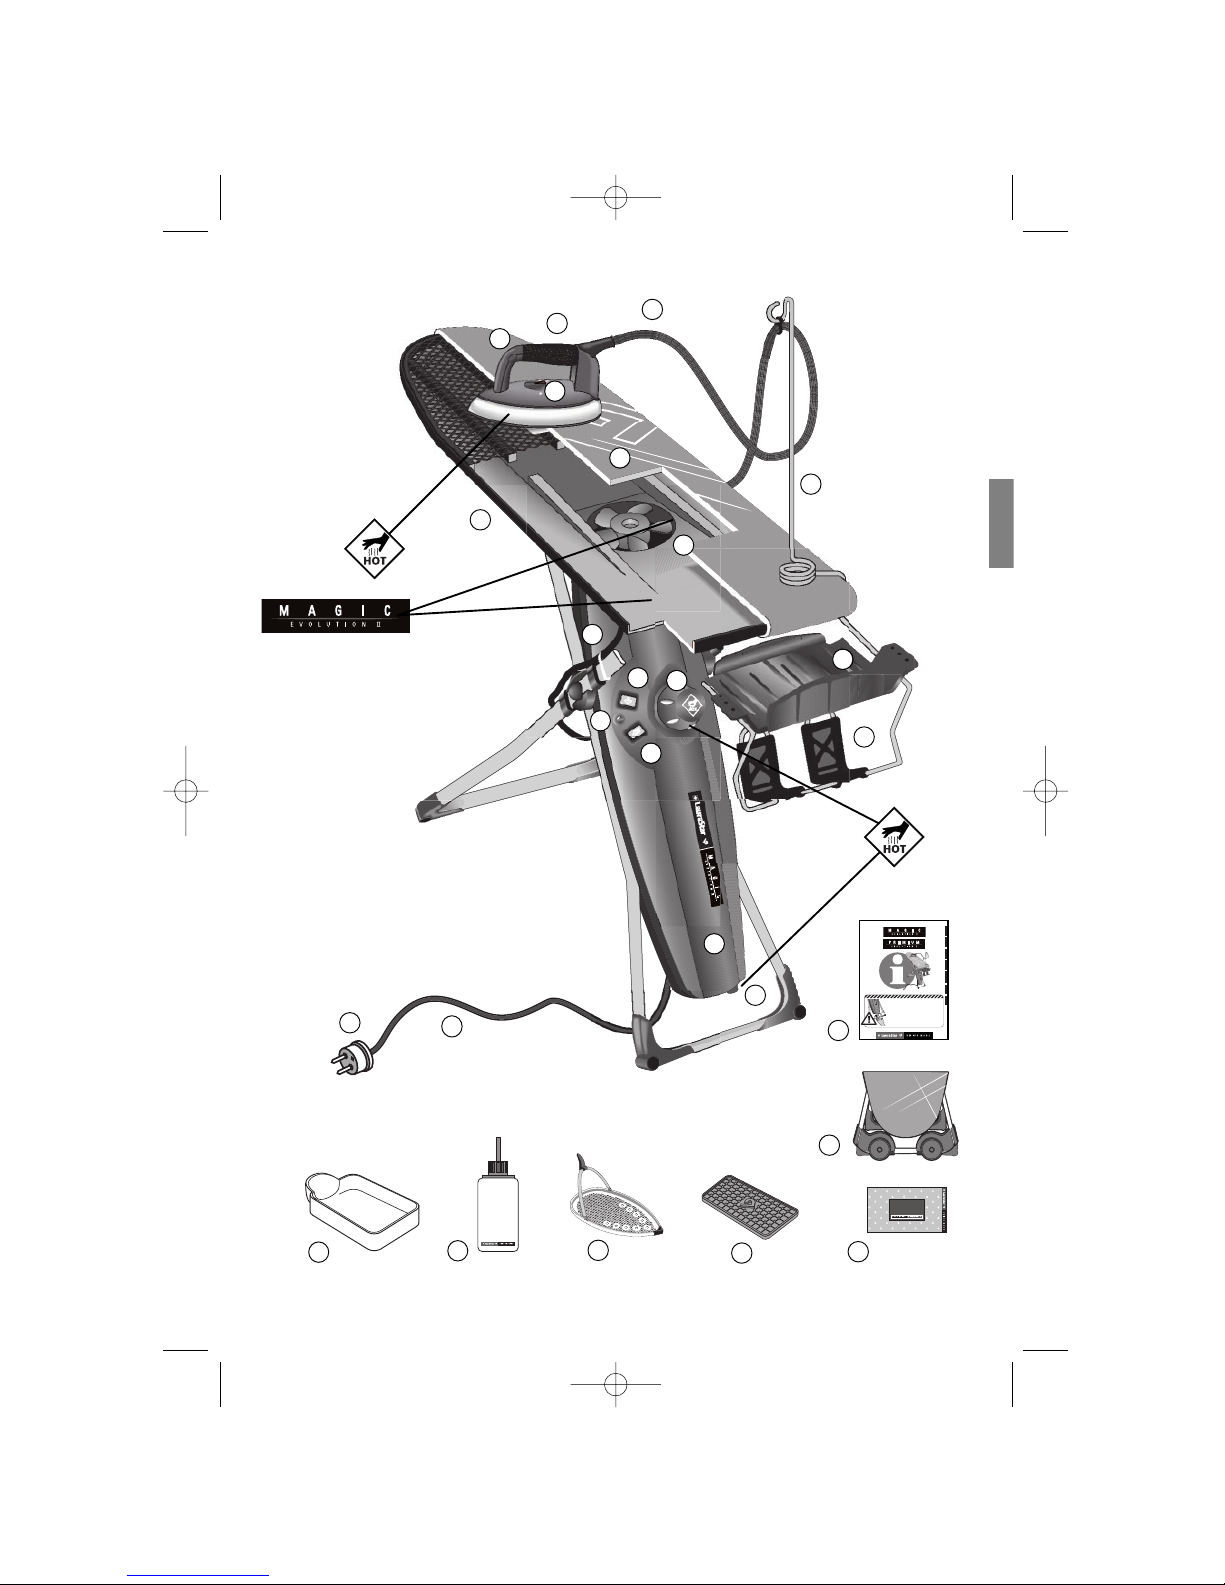
Table (1)
Iron (2)
Operating instructions (3)
Wheels (optional) (4)
Operating instructions video (5)
Special LauraStar cover (6)
Cord-holder (7)
Silicone mat (8)
Softpressing soleplate (9)
Bottle (10)
Drain receptacle (11)
Boiler (12)
Iron switch (13)
Boiler switch (14)
Green pilot lamp (15)
Drain cap (16)
Filling cap (17)
Plug (18)
Cable (19)
Iron basket (20)
Iron rest (21)
Thermostat (22)
Steam control button
right / left-handed (23)
Monotube (24)
Motor (25)
Motor cable (26)
I
Thank you for showing confidence in our company and congratulations for choosing a LauraStar system.
However, it is important that you read this manual completely before
using your LauraStar
TM
system. This garment care system is for home
use only. The manual is valid for the following models:
-Magic Evolution (Model 723)
-Magic Evolution II (Model 728)
-Premium Evolution (Model 725)
-Premium Evolution II (Model 729)
This system uses steam and heat, so many parts of the system can
cause burns when in use.
These hot parts will be labeled in this manual with the following
symbol:
English
Index
• Safety measures 1
• Installation 2
• Using for the first time 3
• Getting started 3
• Ironing 4
• Refilling 6
• Maintenance 7
• Hints on usage 8
• Linen care guide 9
• Problems and solutions 10
• Customer service 11
• Technical features 11
• International guarantee 12
• Adresses 12
Dear customer
Thank you and congratulations
MagicEVO2-PreEVO2 Anglais 28.1.2003 10:16 Page 1
Page 2
II
Deutsch
En
g
lish
ItalianoNederlands
Es
p
añol
Fran
ç
ais
Norsk
VORSICHT! Verbrühungsgefahr! Lassen Sie das Bügelsystem mindestens 2 Stunden lang abkühlen,
bevor Sie den Entleerungsverschluss lösen!
ATTENTION! Danger de brûlures! Après avoir débranché l'appareil, laissez-le refroidir pendant 2
heures au minimum avant de dévisser le bouchon de vidange!
WARNING! Risk of burns! After unplugging the appliance, allow it to cool for at least 2 hours before
unscrewing the drain cap.
ATTENZIONE! Pericolo di scottature! Dopo aver scollegato l'apparecchio, lasciarlo raffreddare per
almeno due ore prima di svitare il tappo di scarico.
ATENCIÓN: Riesgo de quemaduras graves. Una vez desenchufado el aparato, déjelo enfriar durante
2 horas como mínimo antes de desenroscar el tapón de vaciado.
OPGELET! Gevaar voor brandwonden! Na het uittrekken van de stekker van het toestel, moet u
het minstens 2 uur laten afkoelen alvorens de ledigingsdop los te schroeven!
ADVARSEL! Fare for brannskader! Etter å ha frakoblet strykejernet, bør det avkjøles i minst 2 timer
før tømmepluggen åpnes!
1
2
6
7
12
13
14
15
16
18
19
20
17
22
23
24
25
21
9
8
4
5
11
10
26
3
English
MagicEVO2-PreEVO2 Anglais 28.1.2003 10:16 Page 2
Page 3
1
1.
2.
3
.
5.
6.
7.
8.
9.
10.
12.
11.
13.
4.
English
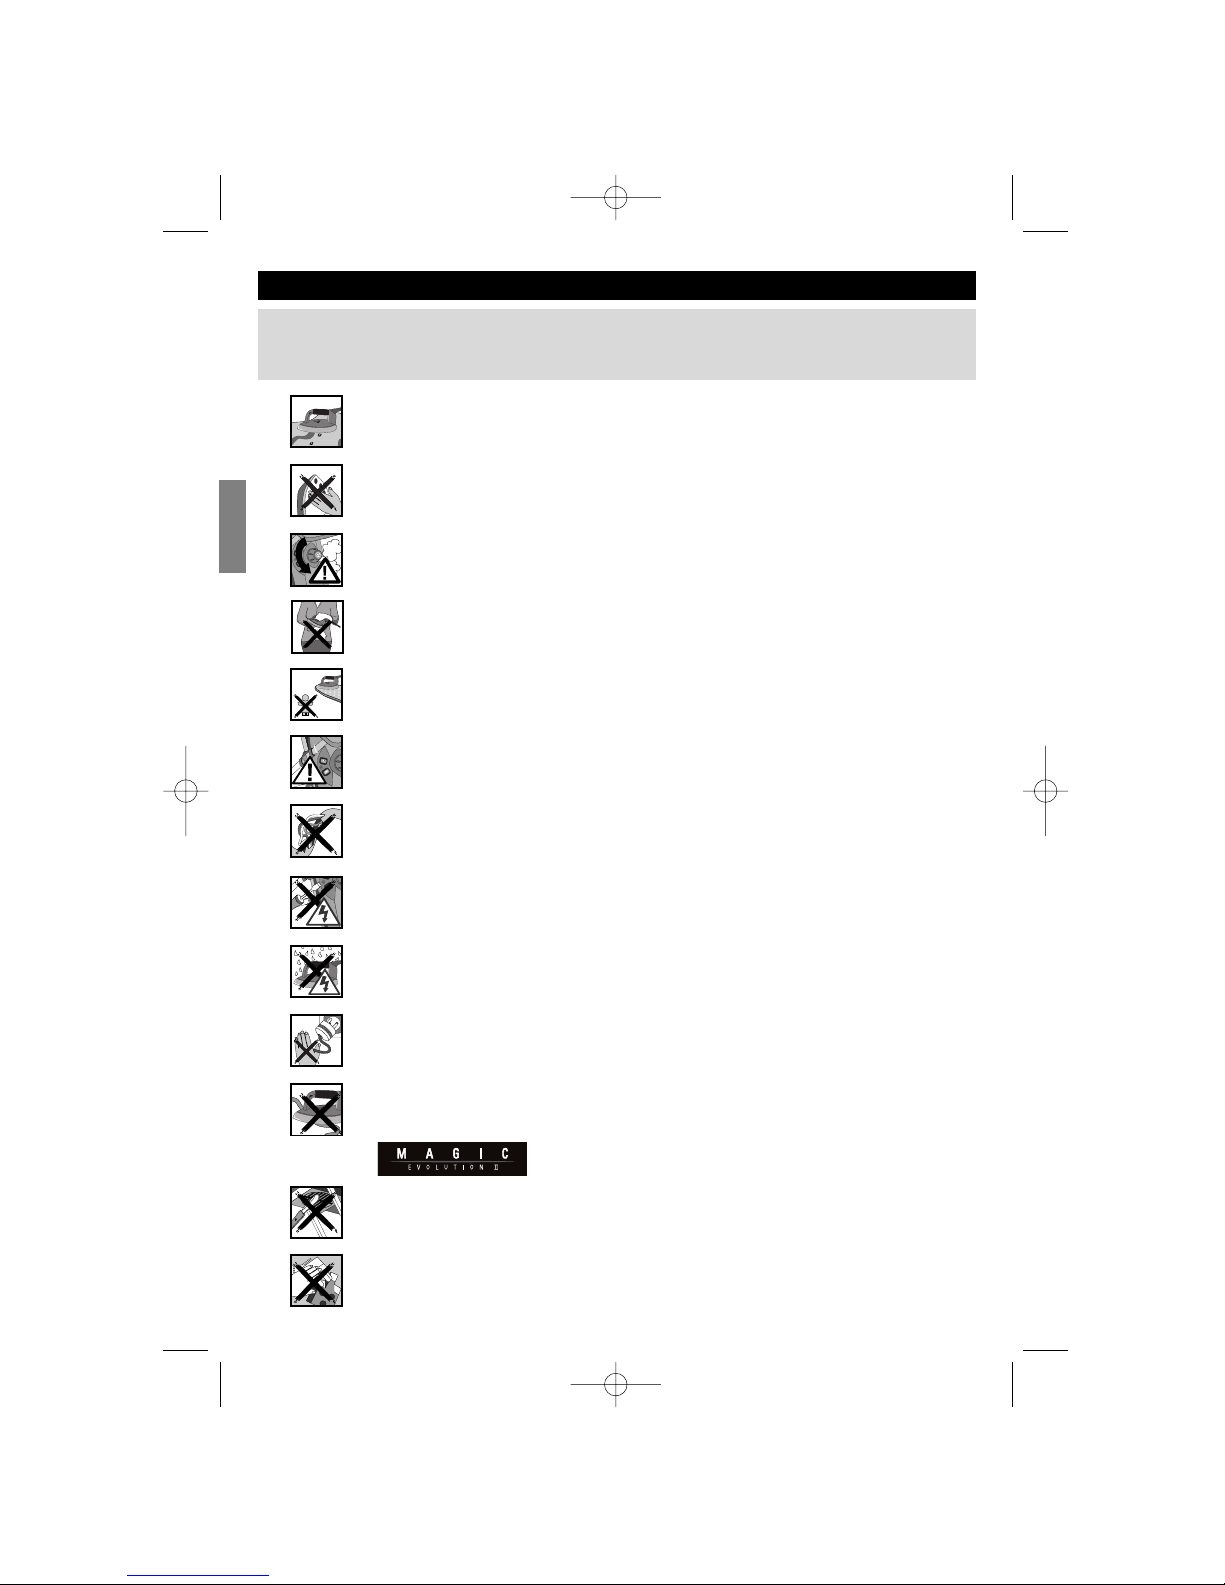
Safety measures
Please read the following safety measures carefully and keep them along with the operating
instructions of your other appliances. Please repeat the safety measures to all new users of
your appliance.
1. Use your appliance only for ironing.
2. This appliance is an electrical appliance. Some of its parts get very hot during use.
Any contact with these parts can therefore cause serious burns.
3. This appliance contains pressurized steam. Under no circumstances should the
caps (16) and (17) be opened without first reading the operating instructions.
4. Never iron clothes while you are wearing them.
5. Keep children and infirm persons away from the appliance. The appliance must
be stored out of their reach when not in use. Under no circumstances should the
appliance be left unattended when still pluggedin.
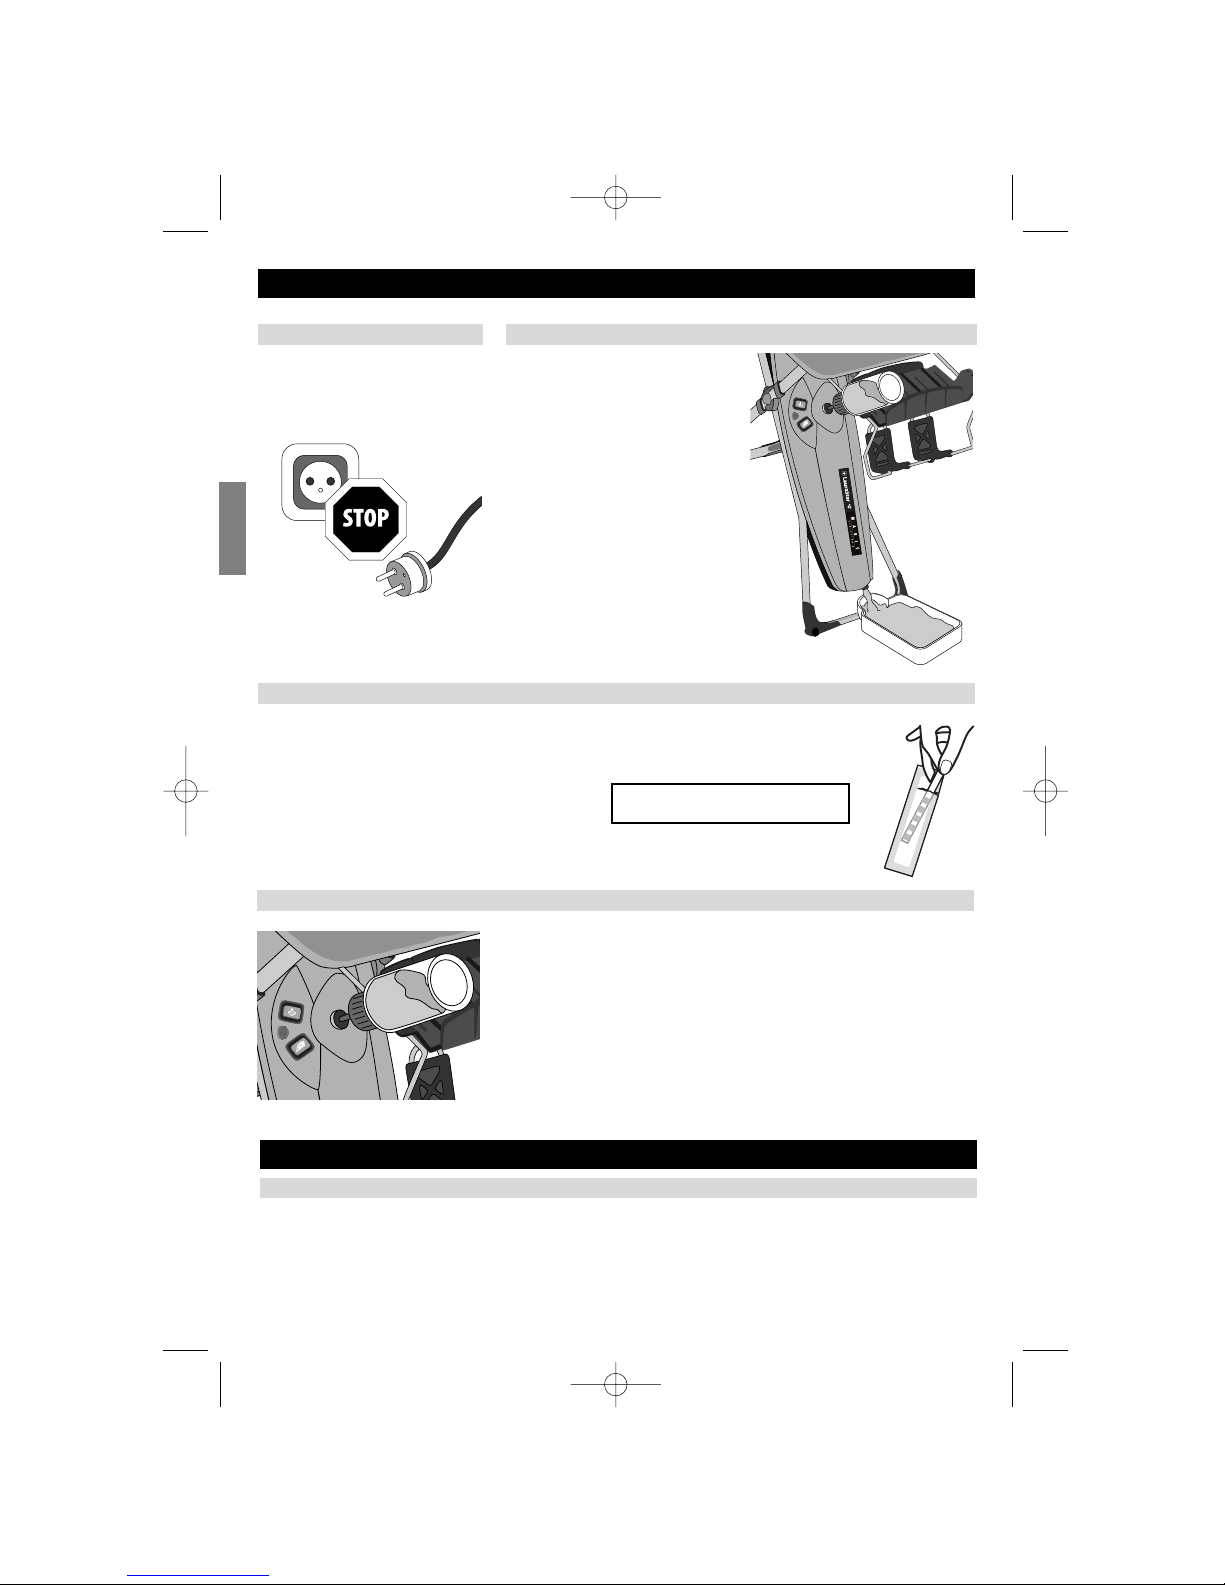
6. Turn off the steam and iron switches before plugging in or unplugging the appliance, when filling or emptying the boiler, as well as before any maintenance.
7. The appliance and both electric and steam supply cords must be used only when
in perfect condition.
8. To prevent any danger of electric shock, you must under no circumstances open
the appliance yourself or change the power cord. In case of damage or doubt, the
appliance should be immediately returned to the approved after-sales service.
9. This electrical appliance can cause serious electric shocks if brought into contact with water or any other liquid.
10. Do not unplug your appliance by pulling the electric cord. Instead, firmly grip the
plug and pull it out of the socket.
11. The electric and steam supply cords must not come into contact with hot surfaces.
12.
Do not introduce objects into the ventilator cage. The protective grid of the ventilator is built to withstand only normal use and does not protect against the voluntary
introduction of objects. Mind the children!
13. To avoid the accumulation of water in the board system, never iron when the
motor socket is switched off.
MagicEVO2-PreEVO2 Anglais 28.1.2003 10:16 Page 3
Page 4
2
English
• Cord-holder: (7)
Slide on to the table like indicated in the drawing (p.II).
• Silicone mat: (8)
This mat is built to withstand a hot iron. Do not place the iron on any
other surface.
• Iron rest: (21)
Clip the iron rest on the iron basket as indicated in the drawing. It
is built to withstand a hot iron.
• Wheels: (4)
Optional.
The cover
Slide the cover from back to
front. Turn it down under the tip
of the board. The system is supplied with a special cover. It has
a special lining which allows
vacuum and blowing to be uniform over the whole table. To
obtain a new cover, contact your
customer service agent. The
cover may be washed at 30°. No
spinning.
The accessories
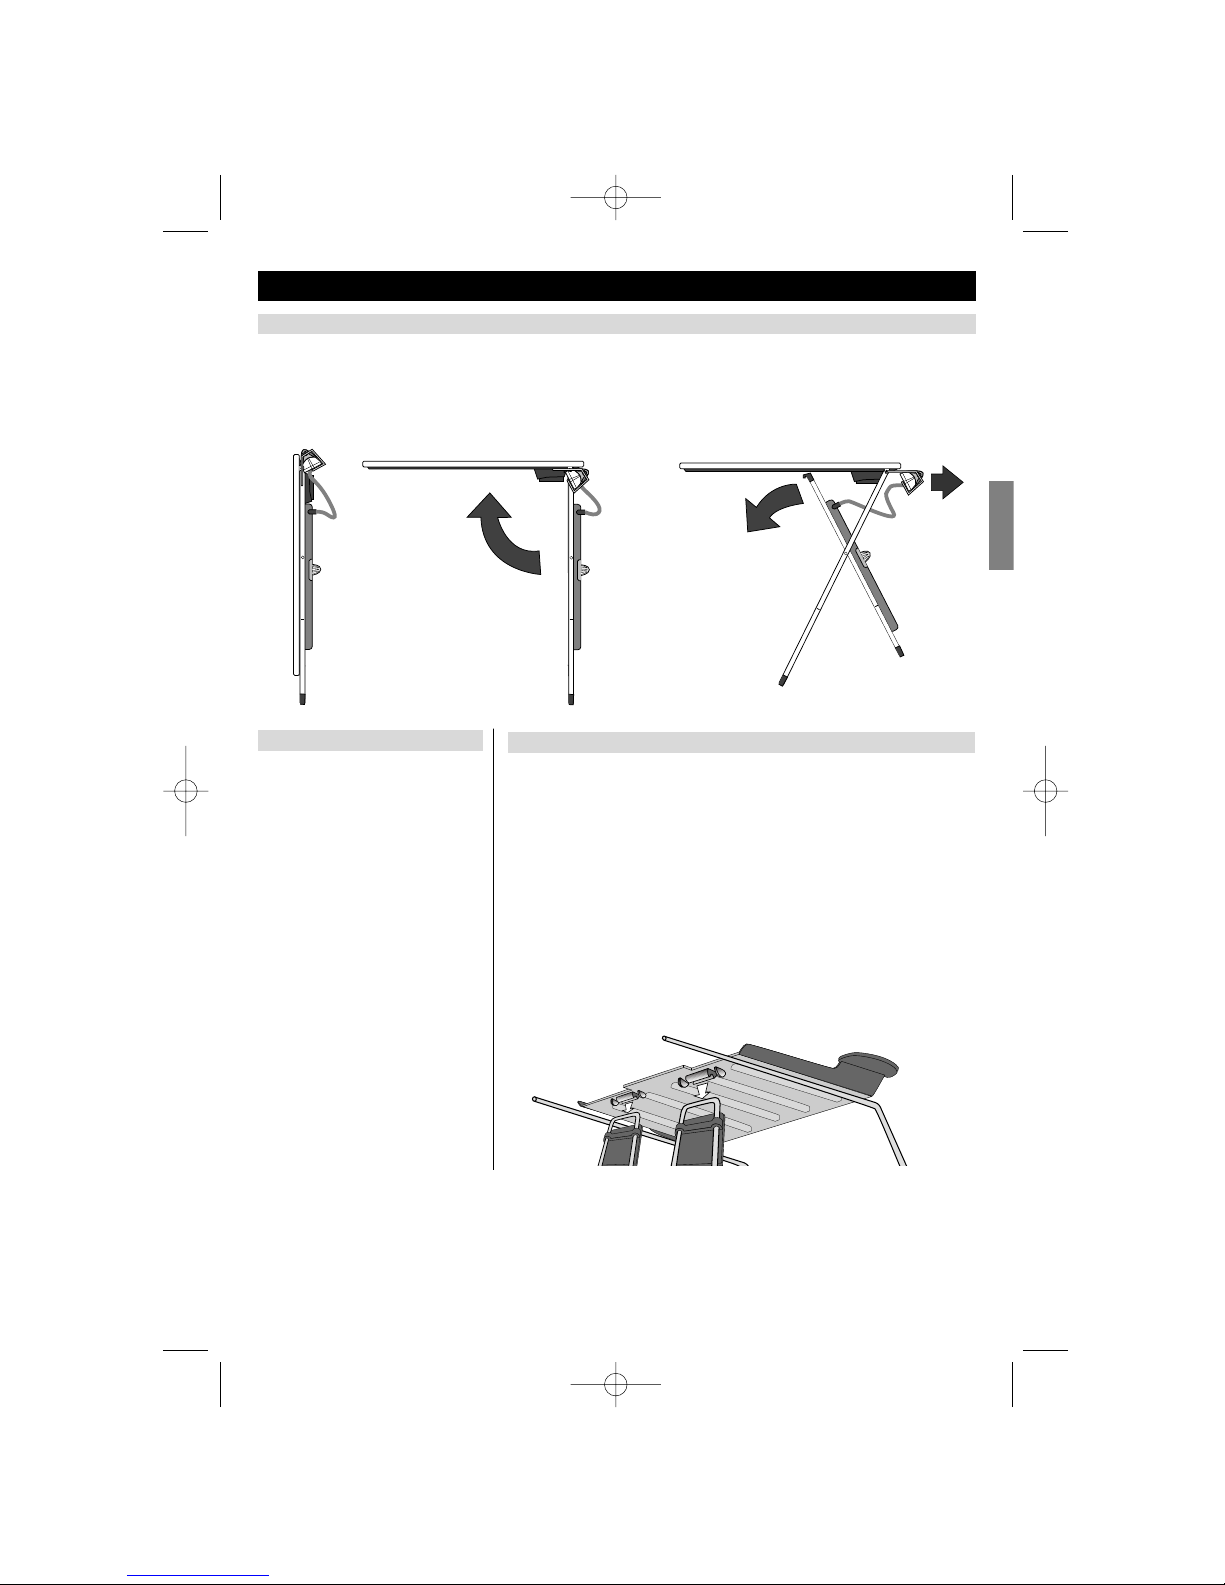
The table
1. Place the board vertically on the ground. 2. Lift the table top and hold it in one hand. 3. With the other
hand slide the adjustment device (under the board) up to whichever of the three stop bars corresponds
to your height.
Pull the iron basket from beneath the table by sliding it outwards.
Installation
CAUTION: Do not use any other cover. A non-standardised cover would seriously reduce the effectiveness of the vacuum and blowing functions.
MagicEVO2-PreEVO2 Anglais 28.1.2003 10:16 Page 4
Page 5
Filling
Please refer to the last two pages of the manual.
Unscrew the appropriate cap (17) and fill the boiler with water. To fill
it up use the bottle (10) provided: it has an anti-overfill device which
stops the flow when the boiler is full (the capacity of the bottle is
greater than that of the boiler).
Squeeze the bottle briefly to start the filling of the boiler. Once full,
screw the filling cap back on again (17) as far as it will go.
3
English
Fix the board in the highest
position. Put the rinsing receptacle beneath the boiler.
Unscrew the drain cap (16).
Unscrew the filling cap (17).
Pass the contents of a bottle
(10) of hot water through the
boiler to rinse it. Screw the
drain cap back on again (16).
Screw the filling cap back on
again (17).
CAUTION: Fill up the boiler
before every use.
Première utilisation
Using for the first time
System disconnected
Rinsing the boiler
Always unplug the mains before
filling the boiler.
What sort of water to choose?
Getting started
Always fill the boiler with water before starting to iron as it could be damaged if heated up while empty.
CAUTION: Heating up without water invalidates your system’s guarantee.
Filling before using the system
Water hardness test included.
MagicEVO2-PreEVO2 Anglais 28.1.2003 10:16 Page 5
Page 6

Switches
Setting of the iron temperature
4
2. Turn on both switches and
wait until the green light comes
on (approx. 7 to 8 minutes).
1. Insert the plug.
7-8 min8 min
Steam button
Vacuum / Blowing - choice of 2 speeds
A single steam control button situated on the iron allows you to both start the emission of steam and
switch from “blowing” mode to “vacuum” mode (or vice versa).
Changing from one mode to the other can be done only when the motor is off. The chosen mode stops
automatically at the end of a cycle (lasts 4 seconds). At that moment you may select the desired mode.
In addition to the vacuum and blowing functions, the steam control button enables the strength of the
flow of air from the ventilator to be regulated. When the iron is switched on, the ventilator is pre-set to
maximum capacity (100%). Changing from one mode to the other can be done only when the motor is off.
To change to reduced airflow (50%), press the steam control button twice very quickly. To go back to
maximum airflow, press the steam control button twice again.
Ironing
English
Position "A":
Normal temperature
Without Softpressing soleplate:
- cotton, linen.
With Softpressing soleplate:
- wool, silk, synthetics.
Position "B":
Low temperature
With Softpressing soleplate:
- for extremely delicate synthetics
eg: synthetic velours, Alcantara
®
(synthetic suede), sport stretch
garments.
Check that the indicator light of the iron is also on before ironing.
ATTENTION: After a change of setting it takes about 2 mins for the new temperature to stabilize!
If the iron spurts water, slightly increase the temperature.
Before starting to iron or after lengthy ironing interruption, press the steam button 2 or 3 times to evacuate any water which may have condensed in the steam tube.
Even if the shape of the iron in the video is different from your system's one, the functions remain the
same.
MagicEVO2-PreEVO2 Anglais 28.1.2003 10:16 Page 6
Page 7

Blowing
A very short press (less than half a second) on the steam control button starts the “blowing” mode.
When blowing mode is chosen each press of the steam control button to give steam restarts the cycle
(lasts 4 seconds).
Vacuum
A long press (more than one second) on the steam control button starts the “vacuum” mode. Vacuum is
engaged at every emission of steam and stops 4 seconds after the end of the jet of steam to guarantee
optimum drying of the fabric.
When vacuum is being used each press on the steam control button to give steam restarts the cycle
(lasts 4 seconds).
5
English
Using the Softpressing soleplate.
The Softpressing soleplate must be used for dark materials that are likely to become shiny and synthetic
materials that might stick to the soleplate. Do not forget to remove the Softpressing soleplate after use.
To use the Softpressing soleplate:
1. Insert the tip of the iron into the front of the Softpressing soleplate while keeping the back of the iron
raised
2. Pull the tongue backwards as shown in the diagram. The tongue should not fall back.
Wait for about 2 minutes for the Softpressing soleplate to reach the same temperature as the iron.
CAUTION: Make sure the Softpressing soleplate does not touch mohair, cachemir, velvet and angora!
Iron these materials at a distance. Do not forget to remove the Softpressing soleplate after use.
MagicEVO2-PreEVO2 Anglais 28.1.2003 10:16 Page 7
Page 8

6
Refilling
14
13
English
Low water indicator
A buzzer goes off when the water in the boiler drops to the minimum
level.
Please refer to the chapter below for refilling while ironing.
WARNING
Refilling while ironing
• The Iron Uses PRESSURIZED STEAM. DO NOT OPEN the Filling Cap Except as
Instructed below. Contact with the Pressurized Steam Can Cause Severe Scalding.
• TURN OFF and Then Unplug When Not in Use or When Filling / Emptying Steam
Generator.
6. Now unscrew the filling cap
completely and refill as shown
on page 3.
5. Unscrew the filling cap slowly
until you hear or see the steam
escaping -about 2 turns- and
wait until residual steam has
totally escaped. Use a cloth to
avoid direct contact with the
steam.
4. And unplug the device.
3. Turn off the iron switch (13).
2. Press the steam control but-
ton and hold it down until no
more steam is emitted. Direct
iron away from your body or
others.
1.Turn off the boiler switch (14).
MagicEVO2-PreEVO2 Anglais 28.1.2003 10:16 Page 8
Page 9

Maintenance
7
Storage of the board
1. Turn the iron and boiler switches to the off position.
Unplug system.
2. Take the monotube out of cord-holder.
3. Remove cord-holder from ironing board.
4. Place iron in basket.
5. Slide basket under the board. You can store the
system even if the iron is still hot.
6. Lift ironing board by both ends, weight of generator
will automatically fold the system.
7. You can leave water in generator until next use.
Cleaning the iron
Rinsing the boiler - cold appliance!
Risk of burns! Make sure the appliance is cold before rinsing. After unplugging, allow the appliance to
cool for at least 2 hours before rinsing.
To prolong the efficiency of the steam generator and avoid calcium deposits you must rinse the steam generator regularly.
English
Use our Polyfer cleaning cloth which you can obtain from your supplier making sure you follow the written instructions. Clean the soleplate more often if
you use starch when ironing (even if the starch deposit is not visible).
Please refer to the instructions below for rinsing.
1. Disconnect the power supply.
2. Allow the appliance to cool for at least 2 hours.
3. Fix the board in the highest position.
4. Place the drain receptacle under the boiler.
5. Unscrew the drain cap.
6. Unscrew the filling cap.
7. Pass the contents of a bottle of tap water through the boiler to
remove any scale.
8. Repeat this operation until the water coming out of the boiler is
free of residues.
9. Screw the drain cap back on.
10. Fill up with water.
11. Screw the filling cap back on.
N.B.: If no water comes out of the drain opening this should be
unblocked with a pointed instrument.
WARNING: Risk of splashes
Calcium content Number of hours use between 2 rinses
Weak, zero or with the LauraStar Aqua water-filter pot 20
Average 15
High 10
MagicEVO2-PreEVO2 Anglais 28.1.2003 10:16 Page 9
Page 10

Why have blowing and vacuum?
Hints on usage
8
Angora / Wool
• Steam iron about 10 cm from the surface of the material, in order not to damage it.
• Shake the garment by hand so that it regains its normal shape.
Silk
Vertical removal of creases
Hang the garment on a coat
hanger or hold it up.
With a sweeping movement from
top to bottom lightly touch the
material while giving short bursts
of steam.
Note: It is easy to remove creases from most materials, except
for cotton, linen and some silks.
If it is difficult to remove the
creases from a material, iron it as
normal on the ironing board.
Special materials
• Velvet
• Corduroy
• Jersey
If you are not using a
Softpressing soleplate, steam
iron 2-3 cm from the surface of
the material, then finish by hand.
Steam iron silk in the normal
way.
In the case of dark silk you are
advised to use a Softpressing
soleplate.
HOT
• • • • ••• • •
•• • • •
English
Perfect ironing requires steam to be injected into the fabric. This is a requirement for the complete
removal of creases. Do not continually inject steam into fabric: press the steam control button intermit-
tently. For this the LauraStar
™
Magic Evolution / II system uses the same methods as professional dry
cleaning: vacuum and blowing.
To improve the quality of ironing and increase the autonomy of your appliance, steam iron the material first
and then re-iron it without steam, in order to dry the material.
blowing
vacuum
Velvet
Back Buttons Welt Legs Inside Sleeves Bottons Top Pleats
and collar and creases and lining and collar
MagicEVO2-PreEVO2 Anglais 28.1.2003 10:16 Page 10
Page 11

9
English
Machine wash. The number indicates the maximum allowed water temperature in C°.
Machine wash. The line placed under the symbol indicates reduced spin.
Hand wash. Maximum temperature: 40° C.
Do not wash.
Wash
Dryclean
Any solvent allowed.
Any dry cleaning solvent ohter than Trichloroethylene.
Only petroleum solvent.
Do not dryclean.
Dry
Tumble dry, Normal: Medium heat.
Tumble dry, Normal: Low heat.
Do not tumble dry.
Dry flat.
Do not wring.
Iron
High temperature: max. 200C, 290F
Medium temperature: max. 150C, 300F
Low temperature: max.: 110C, 230F
Do not iron
Bleach
Linen care guide
MagicEVO2-PreEVO2 Anglais 28.1.2003 10:16 Page 11
Page 12

10
Before calling customer service check the following points.
Problems and solutions
FER
Problem
• The soleplate is dripping.
• The iron does not heat up.
• The iron is too hot.
Probable cause
• The iron is not ready.
• The thermostat is not well
adjusted.
• The boiler has not been
rinsed recently.
• The boiler has been rinsed
with a product other than
water.
• Disconnected at the wall.
• Switches are off.
• The thermostat is not well
adjusted.
What to do
• Wait for the iron ready indicator
light to come on.
• Adjust the thermostat following
indications see p.4
• Rinse the boiler until the water no
longer contains any residues see p.7.
• Call customer service.
• Plug in at the wall.
• Switch them on.
• Adjust the thermostat following
indications see p.4.
We are glad to be of assistance. Our address is indicated on the last page.
English
VENTILATOR
Problem
• The vacuum produces no sound
• The tip of the table becomes
wet in the storage position.
Probable cause
• The ventilator cable is
unplugged.
• Normal condensation in the
cap.
What to do
• Plug it in.
• Leave the unit open until the
water has evaporated.
• Use less steam. Pay attention to
the instructions for use with
respect to vacuuming and
blowing see p.8.
Problem
• Emits a humming sound when
steam is ejected from the iron.
• Cracking sounds when the
boiler is lit.
• The green light comes on
and goes off during ironing.
• The iron is no longer producing steam. Pressure has
fallen.
BOILER
Probable cause
• The boiler is vibrating.
• The boiler is being heated
without being refilled
• Water is warming up.
• The boiler is empty.
• The switches are off.
• The wall socket is disconnected.
What to do
• This noise is normal for a new
appliance, it will disappear in the
course of use.
• Fill the boiler with water. See p.6.
• This is normal.
• Fill the boiler with water. See p.6.
• Switch both switches on.
• Connect to the wall socket.
MagicEVO2-PreEVO2 Anglais 28.1.2003 10:16 Page 12
Page 13

Call Customer Service before sending in your system and follow
the instructions you are given.
Switch the system off. Empty the tank and remove it from the ironing board (if this one is not to be sent). Wrap the tank with the iron
in a box. Do not forget to enclose a copy of the purchase agreement, the guarantee card or the cash receipt. Send the defective
system to customer services in your country.
Customer service
Dispatch to customer service
11
English
INCLUDED
Silicone mat 508.7801.703
Bottle 514.0005.703
Drain receptacle 585.0003.703
Cord-holder 502.0008.703
*Standard cover, gray 503.7802.706
*Standard cover, maroon 503.7828.723
*Softpressing sole-plate 501.7800.706
*Softpressing sole-plate (ME-PE II) 104.7800.724
*Iron rest 546.7816.723
Available accessories
OPTIONAL
Origami cover, gray 503.7824.706
Origami cover, maroon 503.7829.723
Standard cover, blue 503.7805.706
Standard cover, green 503.7806.706
Polyfer 581.7803.703
Jeannette 105.0000.898
Wheels 549.7816.717
Water-filter pot 301.7830.898
*you have received one or the other depending on the selected
model.
Can be purchased from your normal supplier or approved LauraStar agency:
Availability of optional accessories vary according to the countries.
Technical features
Output of the generator: 1000 watts Output of the iron: 800 watts
Steam pressure: 3,5 bars. Weight of the iron: 1,2 kg, total: 12,7 kg.
Tank capacity: 0,9 l. Power supply: 220 - 240 volts, AC., 50 Hz
Height of the board 79 - 95 cm. Folded down system (H x L x W): 130 x 39 x 18 cm.
MagicEVO2-PreEVO2 Anglais 28.1.2003 10:16 Page 13
Page 14

Adresses
International Guarantee
12
EC declaration of conformity
LauraStar Magic Evolution Type: 02-0036 Model: 723
LauraStar Magic Evolution II Type: 02-0036 Model: 728
LauraStar Premium Evolution Type: 02-0036 Model: 725
LauraStar Premium Evolution II Type: 02-0036 Model: 729
We declare under our own responsibility that these products comply with the standardised documents
or standards of the appropriate EU Directives in force.
English
1. This
LauraStarTMappliance is
guaranteed for the standard period
of time laid down in accordance
with local legislation for the purchase of such consumer goods
(EU = 24 months). The guarantee is
valid as from the date on the invoice
or the cash receipt.
2. The guarantee does not cover
normal wear and tear, wear of the
electrical cord or wear of the soleplate. Damage caused by falling, by
water, or by connection to a power
source outside the specified voltage, is not covered by the guaran-
tee. The equipment is intended for
domestic use only. Inappropriate
use of the appliance, non-compliance with the directions on use and
maintenance which form an integral
part of the instructions for use, as
well as an unauthorized interference
will result in the cancellation of your
guarantee rights. Use of the equipment for non-domestic purposes will
reduce the coverage of the guarantee.
3. If the
LauraStar™
equipment sustains any damage which is not covered by the guarantee, the repair of
such damage will not be covered by
the guarantee and will be invoiced
accordingly, even if the work is done
at an official service point.
4. The damaged machine has to be
sent to the LauraStar customer service center.
5. In certain countries, the terms of the
guarantee may vary according to the
laws applying in those countries, and
the effect of such laws on our guarantee LauraStar™ will be acknowledged by us.
CH 0800 55 84 48 LauraStar SA Production
support@laurastar.com Centro Nord-Sud 2C, CH-6934 Bioggio
D 0180 323 24 00 LauraStar (Deutschland) GmbH
D_kundendienst@laurastar.com Toyota-Allee 45, D-50858 Köln-Marsdorf
F 0820 820 669 LauraStar France Sàrl
F_serviceapresvente@laurastar.com Site d’Archamps, F-74160 Archamps
B 016 400 400 N.V. LauraStar Benelux SA
BE_serviceapresvente@laurastar.com Industrieweg 5, B-3001 Heverlee
BE_dienstnaverkoop@laurastar.com
E 093 247 85 70 Presat SA
presat@presat.net Ribes 49/53, E-08013 Barcelona
NL 076 571 00 25 LauraStar Nederland
NL_dienstnaverkoop@laurastar.com Goeseelsstraat 16, NL-4817 MV Breda
RU +7 095 938 2095 Byt Elit
+7 095 938 1971 Ulitza Kosyghina; Dom 15, Block A; 2 Etage, Office 29
RU-Moscow 119334
Others countries: tél: ++ 41 21 948 21 00 fax: ++41 21 948 21 11
Internet: www.laurastar.com e-mail: info@laurastar.com
MagicEVO2-PreEVO2 Anglais 28.1.2003 10:16 Page 14
 Loading...