

Page 1

IMPORTANT SAFEGUARDS
When using your flatiron, basic safety precautions should always be followed, including the
following:
READ ALL INSTRUCTIONS BEFORE USING
1. Use iron only for its intended use. 2. To protect against a risk of electric shock, do not
immerse the iron in water or other liquids. 3. The iron should always be turned to off before
plugging or unplugging from outlet. Never yank cord to disconnect from outlet; instead, grasp
plug and pull to disconnect. 4. Do not allow cord to touch hot surfaces. Let iron cool completely
before putting away. Loop cord loosely around iron when storing. 5. Always disconnect iron
from electrical outlet when filling with water or emptying and when not in use. 6. Do not
operate iron with a damaged cord or if the iron has been dropped or damaged. To avoid the risk
of electric shock, do not disassemble the iron, take it to a qualified service person for
examination and repair. Incorrect reassembly can cause a risk of electric shock when the iron
is used. 7. Close supervision is necessary for any appliance being used by or near children. Do
not leave iron unattended while connected or on an ironing board. 8. Burns can occur from
touching hot metal parts, hot water, or steam. Use caution when you turn a steam iron upside
down. 9. If you notice any malfunction, disconnect the power supply and don’t attempt to repair
the appliance, but contact the Customer Service Center 10. WARNING! Risk of burns! After
unplugging the iron, allow it to cool for at least 2 hours before unscrewing the DRAIN cap for
rinsing.
SPECIAL INSTRUCTIONS
1. To avoid a circuit overload, do not operate another high wattage appliance on the same
circuit. 2. If an extension cord is absolutely necessary, a 15-ampere cord should be used. Cords
rated for less amperage may overheat. Care should be taken to arrange the cord so that it
cannot be pulled or tripped over.
SAVE THESE INSTRUCTIONS
Operating
Instructions
English
10/2002 (USA) Art. N° 504.0600.723
Español
Français
Page 2
• Important Safety Precautions 1
• Installation 2
• Preparing to use your appliance 3
• Starting to use your appliance 4
• Ironing 5
• Hints for use 5
• Refilling 7
• Maintenance 8
• Storage 9
• Technical data 9
• Problems/Solutions 10
• Customer services 11
• International Guarantee 12
• Warranty card 12
Contents
Dear customer
Thank you and congratulations
Thank you for showing confidence in our company and congratulations for choosing LauraStarTMMagic Evolution. Properly used
and maintained, this system will give you years of dependable
service.
However, it is important that you read this manual completely
before using your LauraStar
TM
Magic Evolution system. This gar-
ment care system is for home use only.
This system uses steam and heat, so many parts of the system
can cause burns when in use. These hot parts will be labelled in
this manual with the following symbol:
Additional warnings
Please pay particular attention to the important safety tips.
Additional warnings for your safety and cautions to prevent damage to the system are included throughout this manual. These are
indicated by:
or
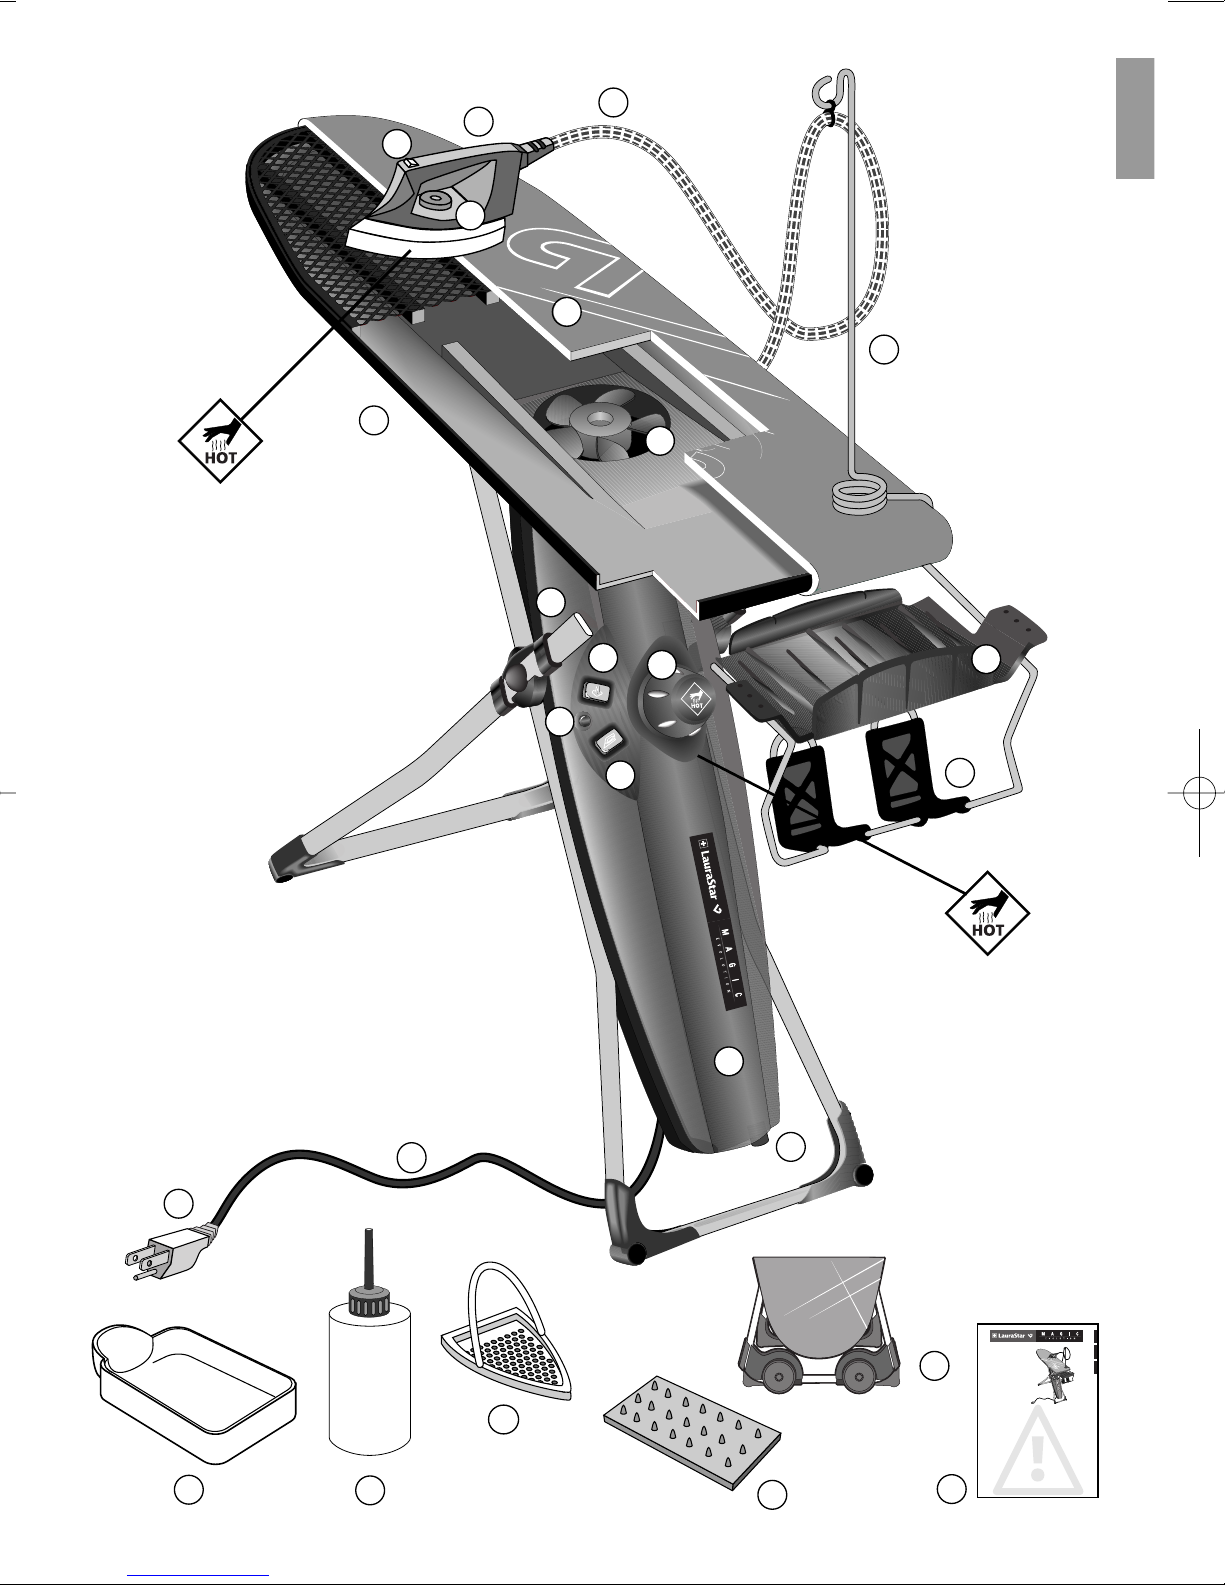
Description
I
Table
iron
operating instructions
wheels (optional)
cord-holder
silicone mat
Softpressing soleplate
bottle
drain receptacle
boiler
iron switch
boiler switch
green pilot light
drain cap
filling cap
plug
cable
iron basket
iron rest
motor
motor cable
thermostat
steam button
monotube
1
2
3
4
5
6
7
8
9
10
11
12
13
14
15
16
17
18
19
21
22
23
24
25
WARNING
CAUTION
English
20
LauraStar ™ Magic Evolution
cover
Page 3
g
p
ç
1
2
3
4
5
6
7
9
10
11
12
13
14
15
16
17
18
20
22
23
24
25
II
English
8
21
19
lish
En
añol
Es
Operating
Instructions
IMPORTANT SAFEGUARDS
When using your flatiron, basic safety precautions should always be followed, including the
following:
READ ALL INSTRUCTIONSBEFORE USING
1. Use iron only for its intended use. 2. To protect against a risk of electric shock, do not
immerse the iron in water or other liquids. 3.The iron should always be turned to off before
plugging or unplugging from outlet. Never yank cord to disconnect from outlet; instead, grasp
plug and pull to disconnect. 4. Do not allow cord to touch hot surfaces. Let iron cool completely
before putting away. Loop cord loosely around iron when storing. 5. Always disconnect iron
from electrical outlet when filling with water or emptying and when not in use. 6. Do not
operate iron with a damaged cord or if the iron has been dropped or damaged. To avoid the risk
of electric shock, do not disassemble the iron, take it to a qualified service person for
examination and repair. Incorrect reassembly can cause a risk of electric shock when the iron
is used. 7.Close supervision is necessary for any appliance being used by or near children. Do
not leave iron unattended while connected or on an ironing board. 8.Burns can occur from
touching hot metal parts, hot water, or steam. Use caution when you turn a steam iron upside
down. 9. If you notice any malfunction, disconnect the power supply and don’t attempt to repair
the appliance, but contact the Customer Service Center 10. WARNING! Risk of burns! After
unplugging the iron, allow it to cool for at least 2 hours before unscrewing the DRAIN cap for
rinsing.
SPECIALINSTRUCTIONS
1.To avoid a circuit overload, do not operate another high wattage appliance on the same
circuit. 2.If an extension cord is absolutely necessary, a 15-ampere cord should be used. Cords
rated for less amperage may overheat. Care should be taken to arrange the cord so that it
cannot be pulled or tripped over.
10/2002 (USA) Art. N°504.0600.723
SAVETHESE INSTRUCTIONS
ais
Fran
Page 4

1. Use ONLY for Ironing Following These Operating Instructions.
2.
The Iron Uses HOT SURFACES. Contact with Hot Surfaces Can
Cause Severe Bruns or Damage to Nearby Objects.
3. The Iron Uses PRESSURIZED STEAM. DO NOT OPEN the Filling Cap
Except as Instructed on Page 3 of This Manual. Contact with the
Pressurized Steam Can Cause Severe Scalding.
4. Never iron clothes while you are wearing them.
5. Keep Out of Reach of CHILDREN During Use and Storage. DO NOT Leave
Iron Unattended During Use.
6. TURN OFF and Then Unplug When Not in Use or When Filling/Emptying
Boiler.
7. INSPECT Electrical Cord and Steam Tube Weekly for any Fraying or
Damage; DO NOT USE with Damaged Cord or Monotube.
8. DO NOT Attempt to Repair or Service Components.
9.
DO NOT USE Near Water or Other Liquids to Avoid the Possibility of
Electrical Shock.
10. To Unplug, Grip the Plug Firmly and Remove it from the Wall Socket;
DO NOT Pull on Cord.
11. Do not introduce objects into the ventilator cage. The protective grid of the ven-
tilator is built to withstand only normal use and does not protect against the voluntary
introduction of objects. Mind the children!
12. The Main Electrical Cable and Monotube Must Not be Allowed to
Come into Contact with Hot Surfaces.
13. To avoid the accumulation of water in the board, never iron when the
motor cable is unplugged.
14. ONLY Use in Well Lighted Area.
15. ALWAYS Use in Well Grounded Electrical Outlet.
16. DO NOT Use Boiler Without Water.
Please read the following safety measures carefully and keep them along with the
operating instructions of your other appliances. Please repeat the safety measures to
all new users of your appliance.
1
Important Safety Precautions
1.
2.
3
.
5.
6.
7.
8.
9.
10.
11.
12.
13.
HOT
HOT
HOT
HOT
English
4.
Page 5

• Cord-holder: 6
Slide on to the table like indicated in the drawing (p.II).
• Silicone mat: 7
This mat is built to withstand a hot iron. Do not place the iron on any
other surface.
• Iron rest: 20
Clip the iron rest on the iron basket as indicated in the drawing. It
is built to withstand a hot iron.
• Wheels: 4
Optional.
The cover
Slide the cover from back to
front. Turn it down under the tip
of the board. The system is supplied with a special cover. It has
a special lining which allows
vacuum and blowing to be uniform over the whole table. To
obtain a new cover, contact your
customer service agent. The
cover may be washed at 30°, no
spinning.
The accessories
The table
1. Place the board vertically on the ground. 2. Lift the table top and hold it in one hand. 3. With the other
hand slide the adjustment device (under the board) up to whichever of the three stop bars corresponds
to your height.
Pull the iron basket from beneath the table by sliding it outwards.
2
Installation
ALWAYS Place Hot Iron on Silicone Mat or on Iron Rest When Not
in Use. DO NOT Place Hot Iron on Any Other Surface.
CAUTION
Do not use any other cover as it
would seriously reduce the
effectiveness of the vacuum and
blowing functions.
CAUTION
English
Page 6
Première utilisation
Appliance unplugged
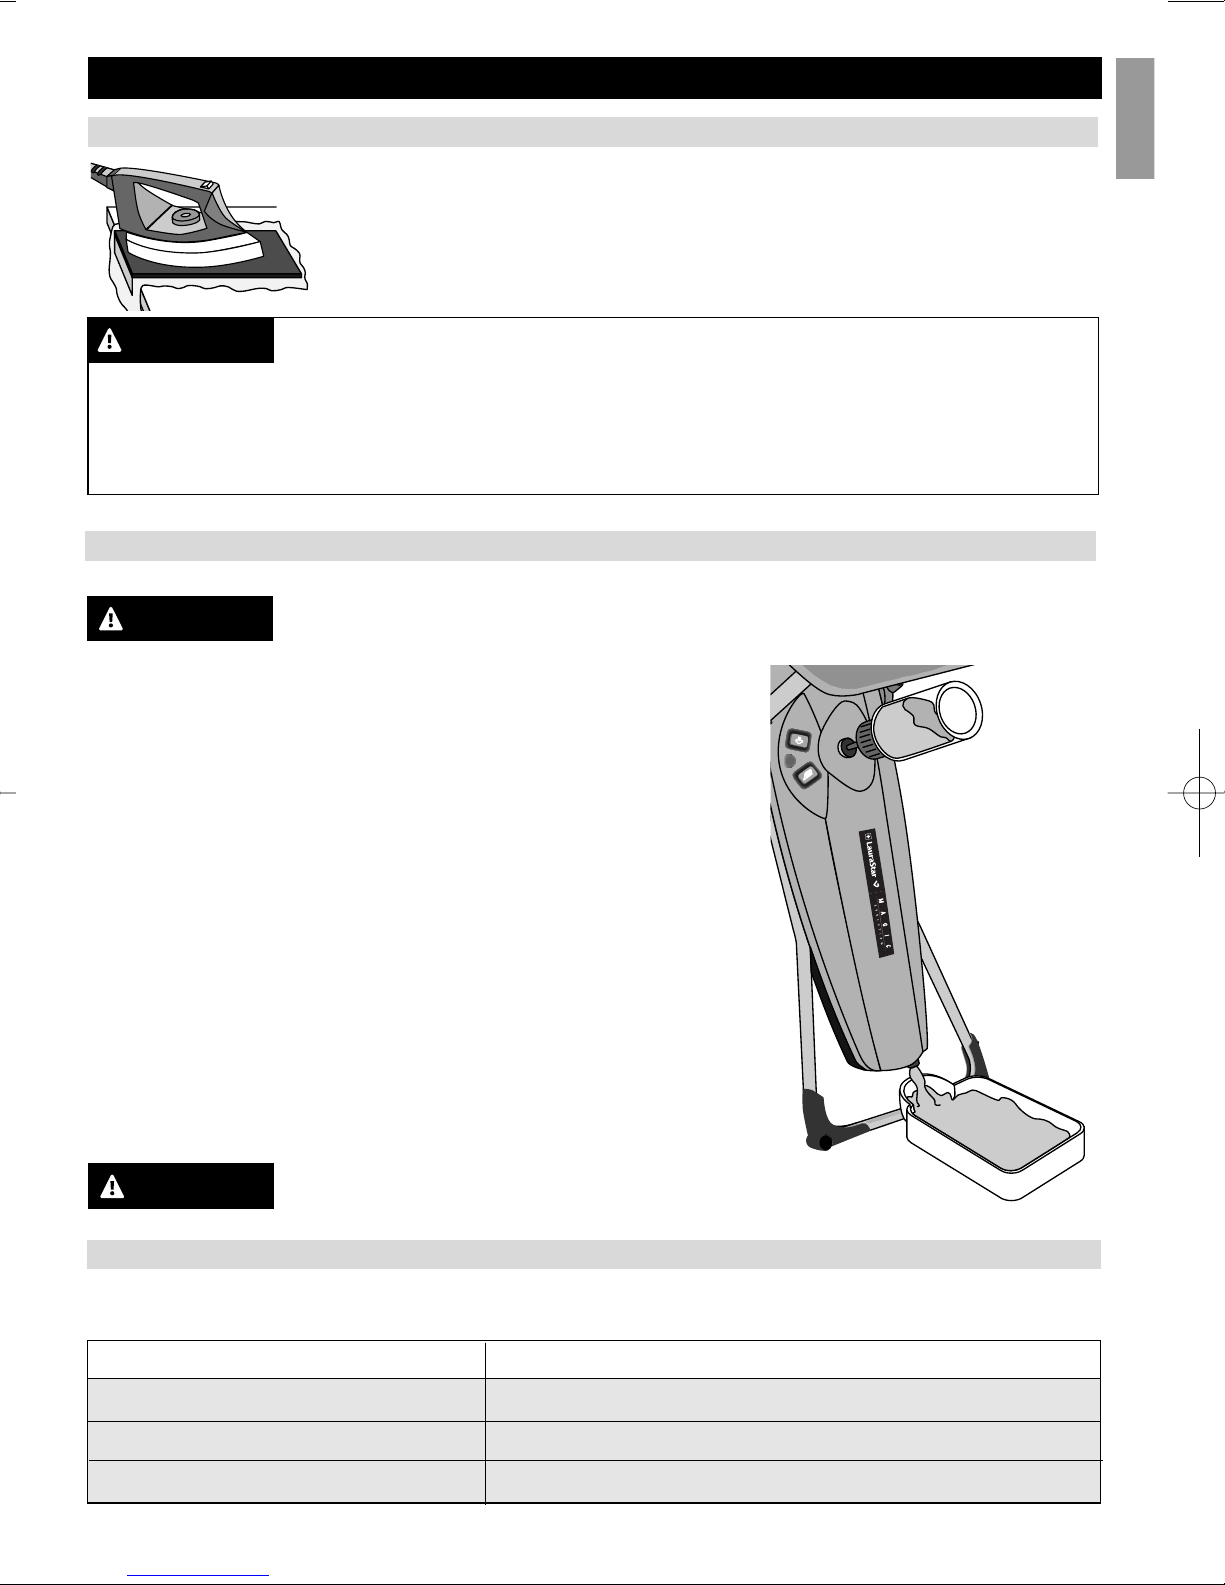
Rinsing the boiler
Fix the board in the highest
position. Put the rinsing receptacle beneath the boiler.
Unscrew the drain cap.
Unscrew the filling cap. Pass
the contents of a bottle of tap
water through the boiler to rinse
it. Screw the filling and the drain
cap back on again.
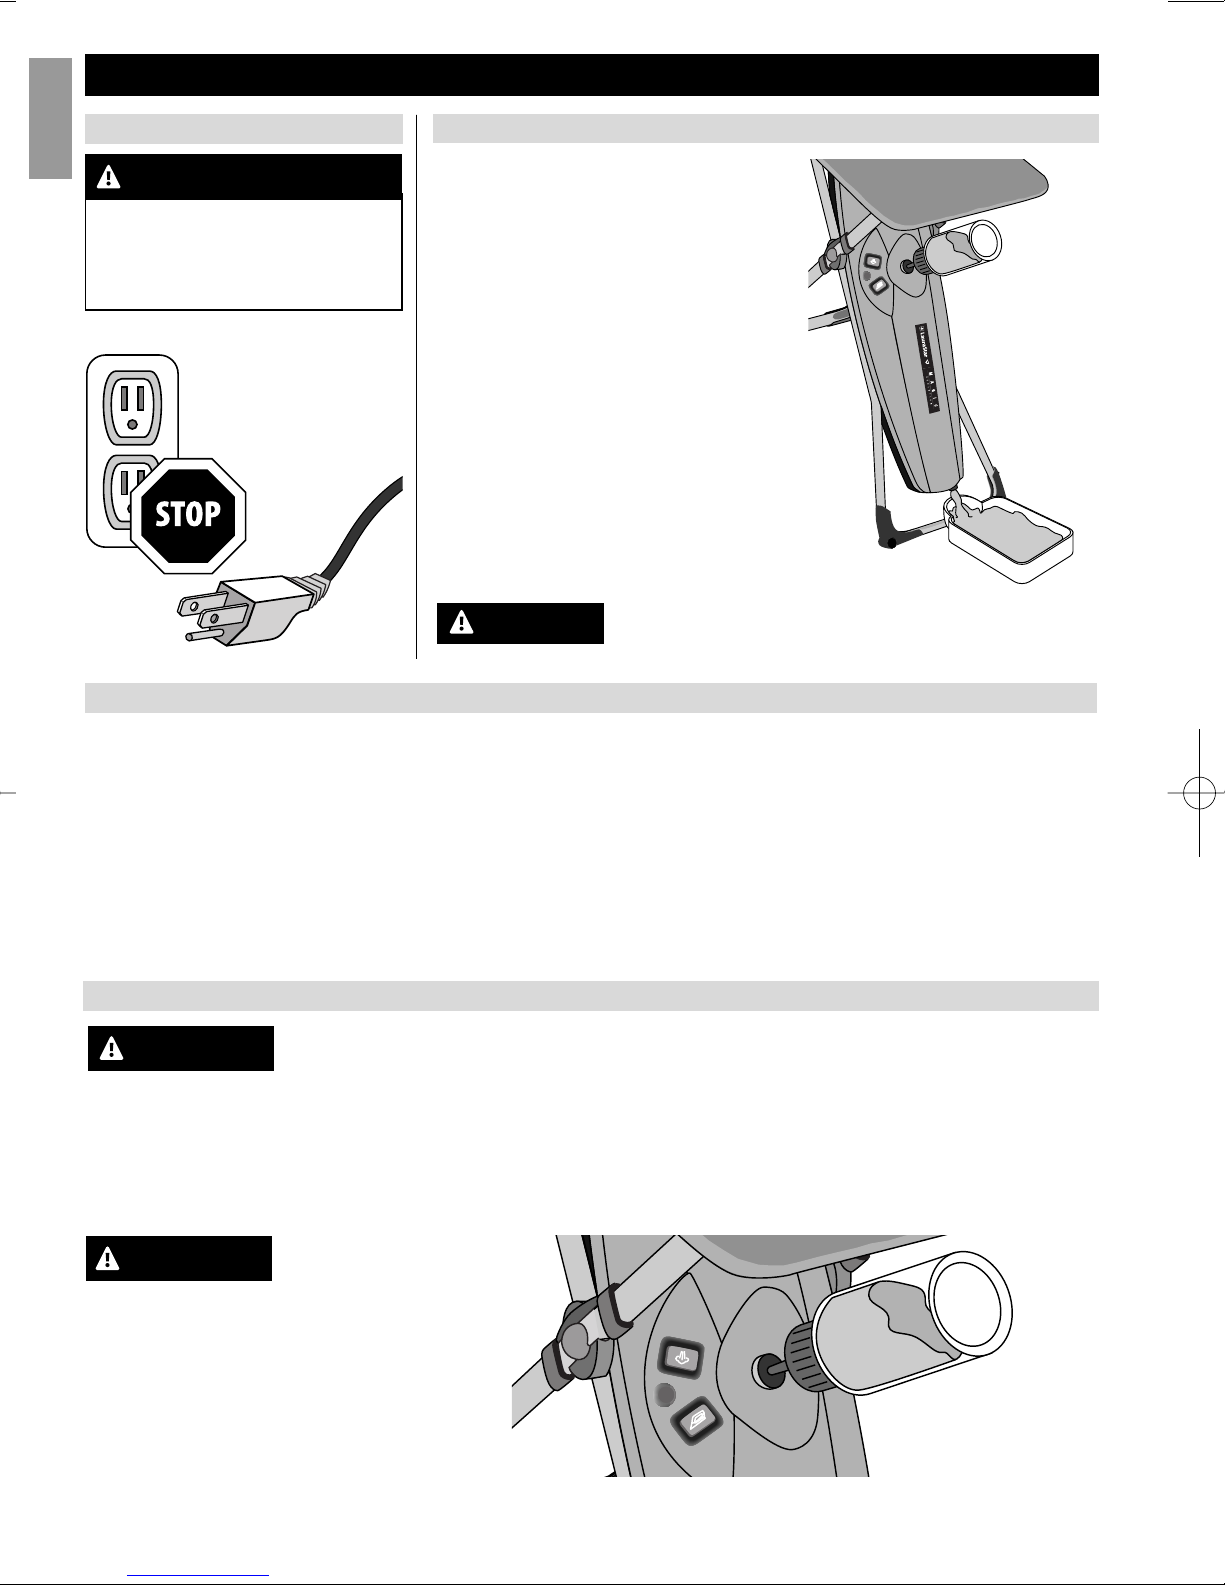
Filling the boiler
1. Unscrew the filling cap.
2. Fill the boiler with water using the bottle provided: it has an anti-overfill device which stops the flow
when the boiler is full (the capacity of the bottle is greater than that of the boiler).
Squeeze the bottle briefly to start the filling of the boiler. Once full, screw the filling cap back on again as
far as it will go.
3
Preparing to use your appliance
CAUTION
Always remove the mains
plug from the socket before
filling the boiler.
ALWAYS Unplug Electrical Cord Before Filling the Boiler
For refilling while ironing,
please follow the instructions
on page 7!
WARNING
WARNING
WARNING
English
For further rinsing, follow instructions on page 8!
Fill up the boiler before every use.
What sort of water?
If your tap water is soft or medium (equal or less than 18°f/11°d/1.8mmol/l), you may use your tap water.
If it's not the case, we advise you to mix it with industrial standard demineralised water: 1/3 tap water 2/3 demineralised water.
To find out the exact hardness of your tap water, contact your local authorities or water company.
Never use additives (ex. perfumed water) deionizised water or water softened with salt, neither distilled
water, nor recovery water from the linen-drier, as these products are detrimental to the good quality of the
steam.
Page 7

Switches
1. Push the plug into the socket.
2. Switch on Boiler and Iron
switches and wait for the green
steam light (about 8 to 10 minutes).
Starting to use your appliance
4
Always refill the boiler before ironing. If the boiler heats up without water, you
could damage it. Using the appliance with no water in the boiler invalidates your
warranty.
The green steam indicator light illuminates when the
appliance is ready for use.
CAUTION
English
Setting of the iron temperature
This dial only regulates the temperature of the iron soleplate. We recommend that you iron all materials at the same temperature (zone •••). Test
your iron on a rag before commencing ironing. If the iron spurts water,
slightly increase the temperature. If no steam is seen coming out of the iron
reduce the temperature slightly.
After a change of setting it takes about 2 min
for the new temperature to stabilize.
Steam button
Before starting to iron, give 3
bursts of steam to eject water
condensed in the tube, then test
your iron on a piece of material.
If it still spits water increase the
temperature slightly.
CAUTION
Page 8

Blowing – vacuum & choice of 2 speeds
A single steam button situated on the iron allows you to both start the emission of steam and switch from
“blowing” mode to “vacuum” mode (or vice versa).
Changing from one mode to the other can be done only when the motor is off. The chosen mode stops
automatically at the end of a cycle (lasts 4 seconds). At that moment you may select the desired mode.
In addition to the vacuum and blowing functions, the steam button 24 enables the strength of the airflow
from the ventilator to be regulated. When the iron is switched on, the ventilator is pre-set to maximum
capacity (100%). Changing from one mode to the other can be done only when the motor is off. To change
to reduced airflow (50%), press the steam button twice very quickly. To go back to maximum airflow, press
the steam button twice again.
Blowing
A very short press (less than half a second) on the steam button starts the “blowing” mode. When blowing mode is chosen, each press of the button to give steam restarts the cycle (lasts 4 seconds).
Vacuum
A long press (more than one second) on the steam button starts the “vacuum” mode. Vacuum is engaged
at every emission of steam and stops 4 seconds after the end of the jet of steam to guarantee optimum
drying of the fabric.
When vacuum is being used each press on the button to give steam restarts the cycle (lasts 4 seconds).
5
Ironing
Hints for use
Why have blowing and vacuum?
To improve the quality of ironing and increase the autonomy of your appliance, steam iron the material first
and then re-iron it without steam, in order to dry the material.
Perfect ironing requires steam to be injected into the fabric. This is a requirement for the complete removal
of creases. For this, the Laurastar
™
Magic Evolution system uses the same methods as for professional dry
cleaning: vacuum and blowing.
Angora/Wool
• Steam iron about 4 in. from the surface of the material to avoid damage.
• Shake the garment by hand so that it regains its normal shape.
English
• • • • ••• • •
blowing
vacuum
Velvet
Back Buttons Welt Legs Inside Sleeves Buttons Top Pleats
and collar and creases and lining and collar
Page 9
6
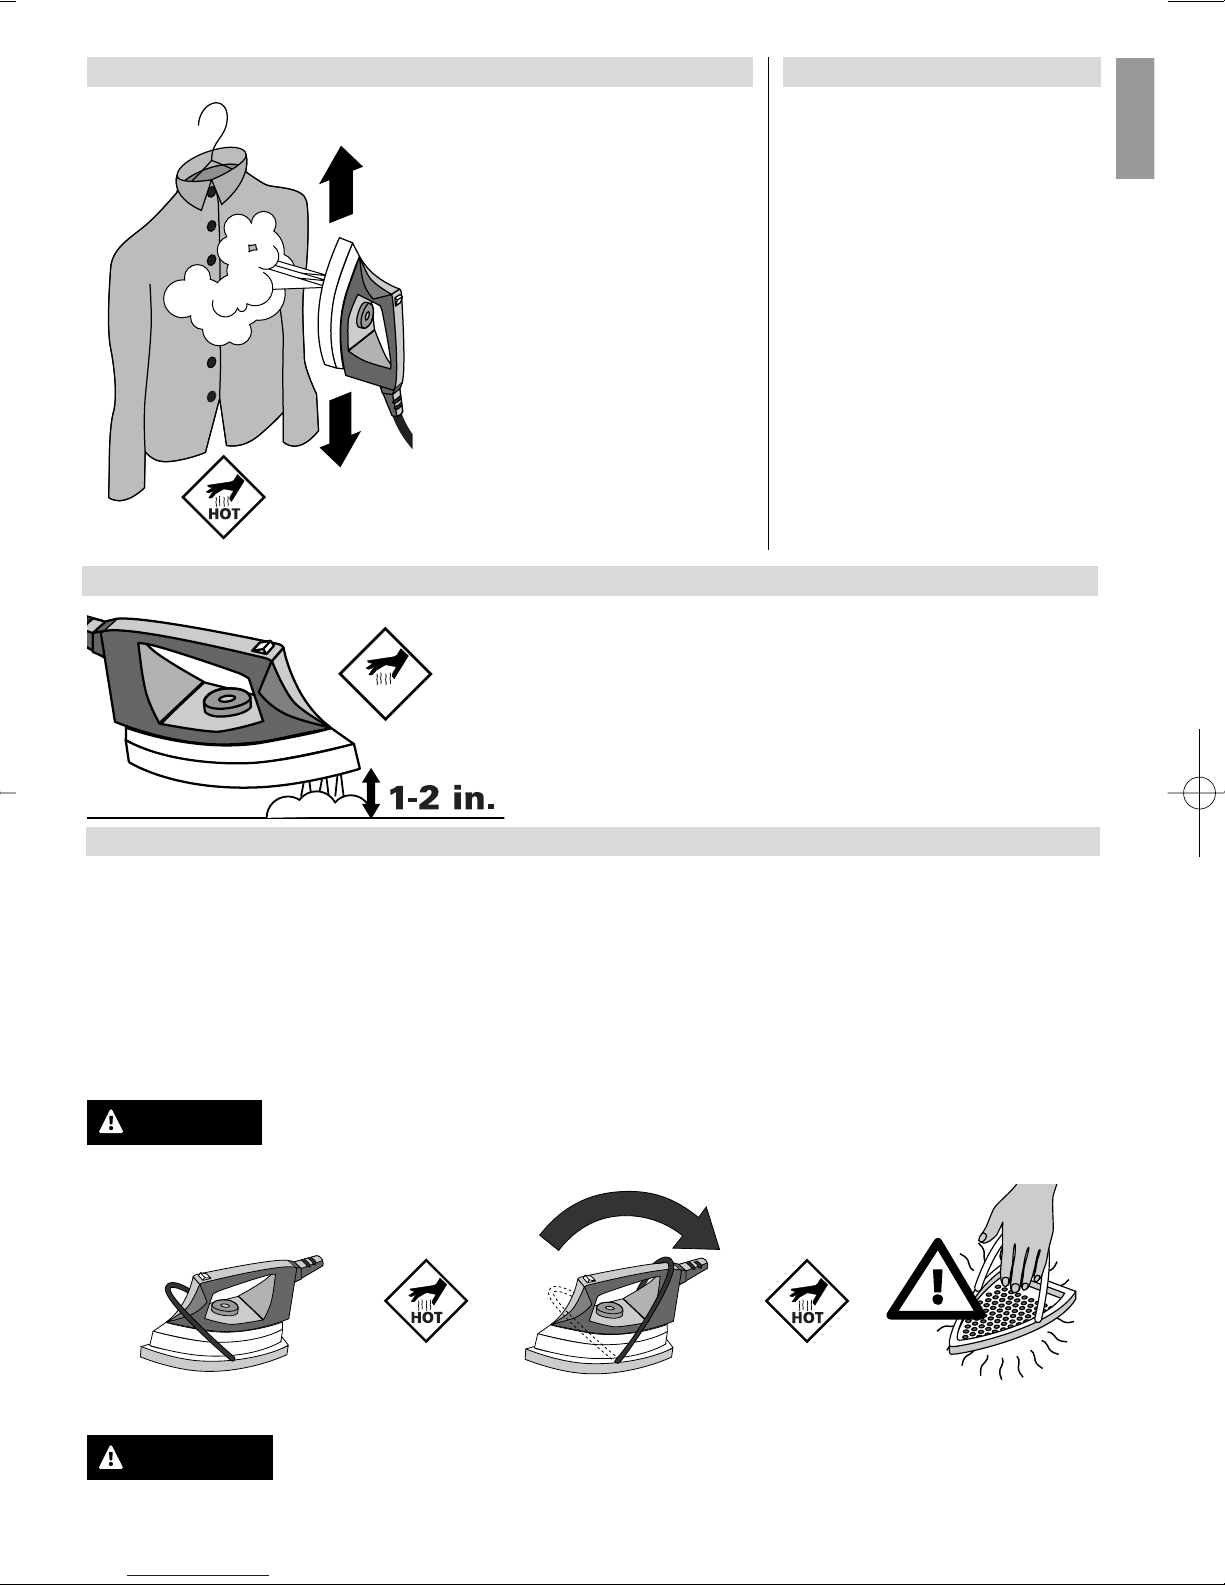
Using the Softpressing soleplate
The Softpressing soleplate must be used for dark materials that are likely to become shiny and synthetic
materials that might stick to the soleplate.
To use the Softpressing soleplate:
1. Place the iron in the soleplate.
2. Pull the spring towards the end of the iron as shown in the drawing. Wait for about 2 minutes for the
soleplate to reach the same temperature as the iron. This avoids droplets of condensation falling onto the
material. ALWAYS remove the Softpressing soleplate after use.
Silk
Vertical removal of creases
Hang the garment on a coat
hanger or hold it up.
With a sweeping movement from
top to bottom, lightly touch the
material while giving short bursts
of steam.
Note: It is easy to remove creases from most materials, except
for cotton, linen and some silks.
If it is difficult to remove the
creases from a material, iron it as
normal on the ironing board.
Special materials
• Velvet
• Corduroy
• Jersey
If you are not using the
Softpressing soleplate, steam
iron 1-2 in. from the surface of
the material, then finish by hand.
Steam iron silk in the normal
way.
In the case of dark silk you are
advised to use the Softpressing
soleplate.
HOT
Make sure the Softpressing soleplate does not touch mohair, cashmere, velvet and
angora! Iron these materials at a distance.
• Contact with the Softpressing soleplate can cause severe burns and damage nearby
objects.
• Misusing a hot iron with steam under pressure can cause severe burns.
WARNING
CAUTION
English
Page 10

7
Refilling while ironing
6. Now unscrew the filling cap
completely and refill as shown
on page 3.
5. Unscrew the filling cap slowly
until you hear or see the steam
escaping -about 2 turns- and
wait until residual steam has
totally escaped. Use a cloth to
avoid direct contact with the
steam.
4. And unplug the device.
3. Turn off the iron switch (12).
2. Press the steam button and
hold it down until no more steam
is emitted. Direct iron away from
your body or others.
1.Turn off the boiler switch (13).
Low water indicator
A buzzer goes off when the water in the boiler drops to the minimum
level.
Please refer to the chapter below for refilling while ironing.
Refilling
• The Iron Uses PRESSURIZED STEAM. DO NOT OPEN the Filling Cap Except as
Instructed below. Contact with the Pressurized Steam Can Cause Severe Scalding.
• TURN OFF and Then Unplug When Not in Use or When Filling / Emptying Steam
Generator.
13
12
WARNING
English
Page 11
8
Cleaning the iron
Please refer to the instructions below for rinsing.
1. Disconnect the power supply.
2. Allow the appliance to cool for at least 2 hours.
3. Fix the board in the highest position.
4. Place the drain receptacle under the boiler.
5. Unscrew the drain cap.
6. Unscrew the filling cap.
7. Pass the contents of a bottle of tap water through the boiler to
remove any scale.
8. Repeat this operation until the water coming out of the boiler is free
of residues.
9. Screw the drain cap back on.
10. Fill up with water.
11. Screw the filling cap back on.
N.B.: If no water comes out of the drain opening this should be unblocked
with a pointed instrument.
Rinsing the boiler - cold appliance!
Maintenance
Risk of burns! Make sure the appliance is cold before rinsing. After unplugging,
allow the appliance to cool for at least 2 hours before rinsing.
Rinse Table
Calcium content Number of hours use between two rinses
Weak or zero 20 hours
Average 15 hours
High 10 hours (following indications p.3)
Use our Poli-Fer cleaning mat which you can obtain from your supplier making
sure you follow the written instructions. Clean the soleplate more often if you
use starch when ironing (even if the starch deposit is not visible).
• DO NOT use a de-scaler or other chemical product as they may damage the
boiler and the iron.
• DO NOT immerse the iron in liquid of any sort.
• DO NOT hold the iron under running water from the tap.
• DO NOT open the Drain Cap Except as instructed below.
To prolong the efficiency of the boiler and avoid calcium deposits, you must rinse the boiler regularly.
WARNING
WARNING
English
Risk of splashes.
WARNING
Page 12
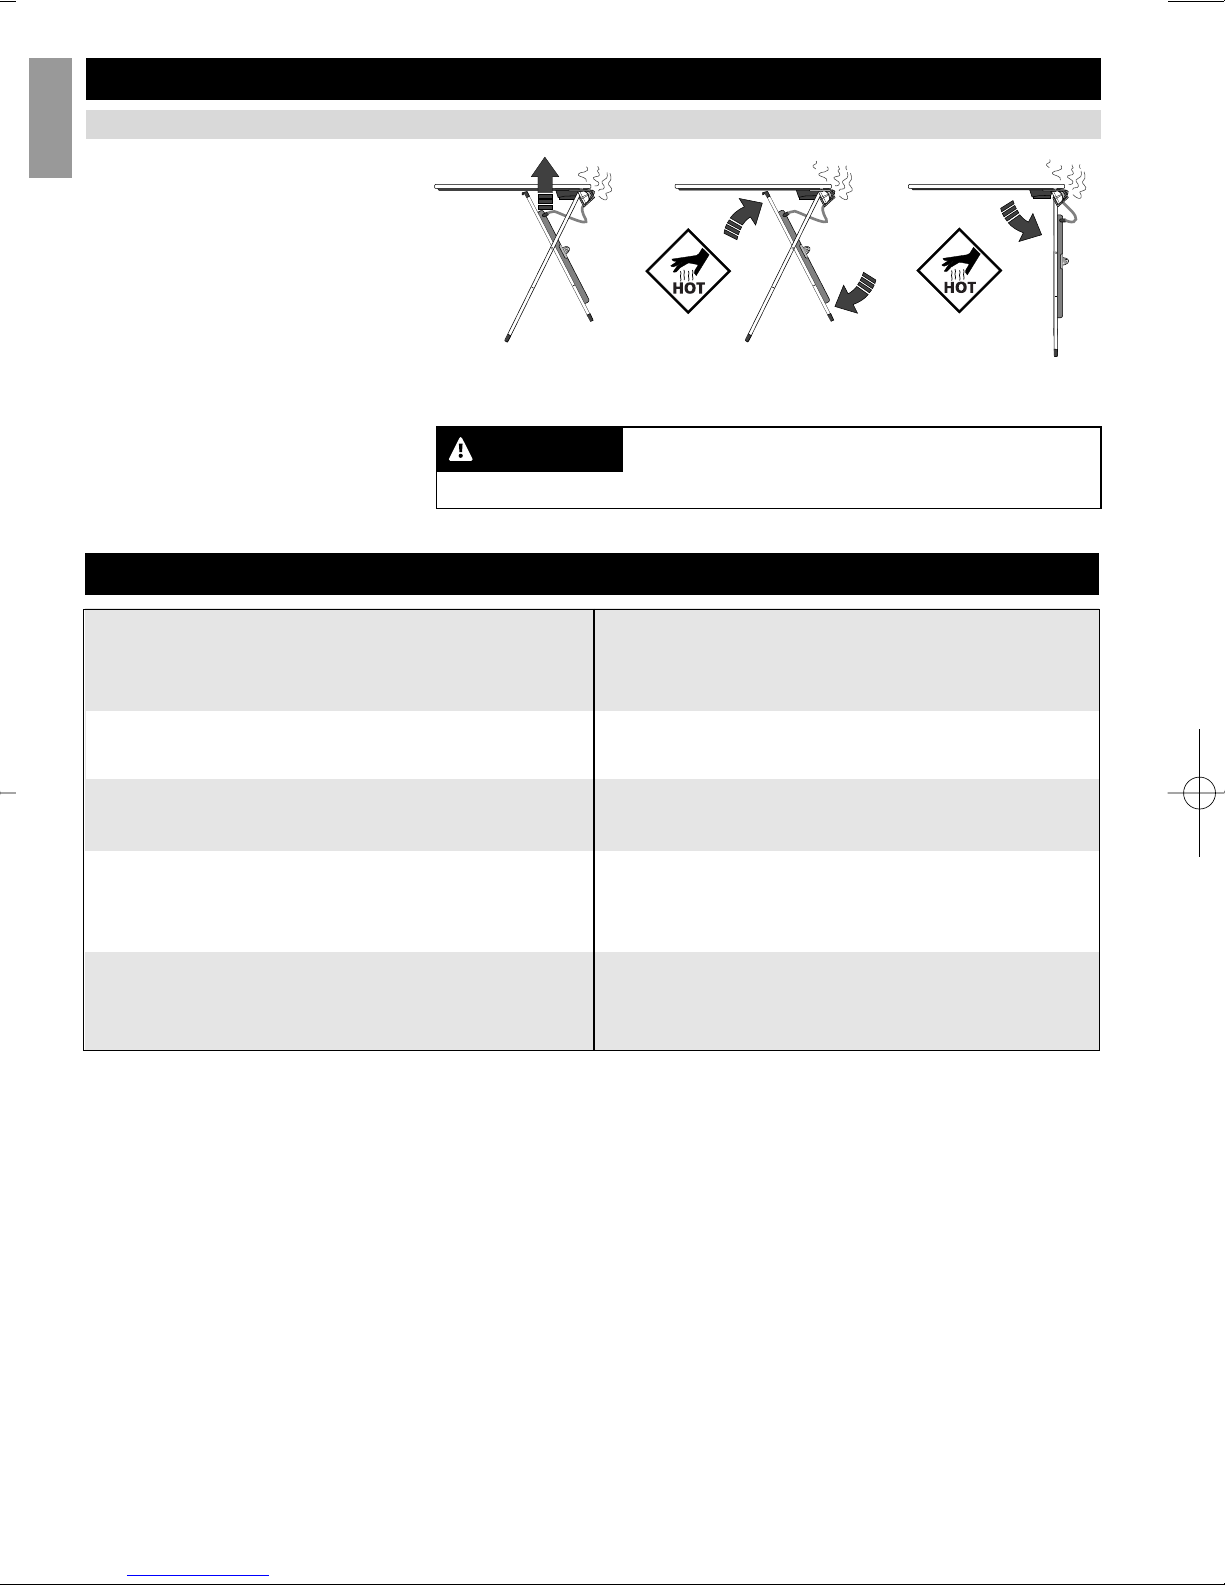
DO NOT touch the iron while storing it.
Risk of burns!
A
Storage
Storage of the board
1. Turn iron and boiler switches to
the off positions. Unplug system. 2.
Take monotube out of cord-holder.
3. Remove cord-holder from ironing board. 4. Place iron in basket.
5. Slide basket under board. 6. Lift
ironing board by both ends, weight
of generator will automatically fold
system. 7. Leave water in generator until next use. Once boiled,
water does not go stale.
B
C
WARNING
English
9
Technical Data
Steam pressure 40 p.s.i.g / 3.5 bar
Vertical ironing Yes
Boiler capacity 1 quart / 0.9 l
Power supply
USA only 120 V / 60 Hz
220 - 240 V / 50 Hz
Appliance power
USA only max. 1600 W
max. 1800 W
Iron power
USA only 600 W
800 W
Total weight 28 lbs / 12.7 kg
Weight of iron 2.6 lbs / 1.2 kg
Dimensions 51.2 x 15.4 x 7 in.
130 x 39 x 18 cm
Height of the board 31-37 in. / 79-95 cm
Page 13
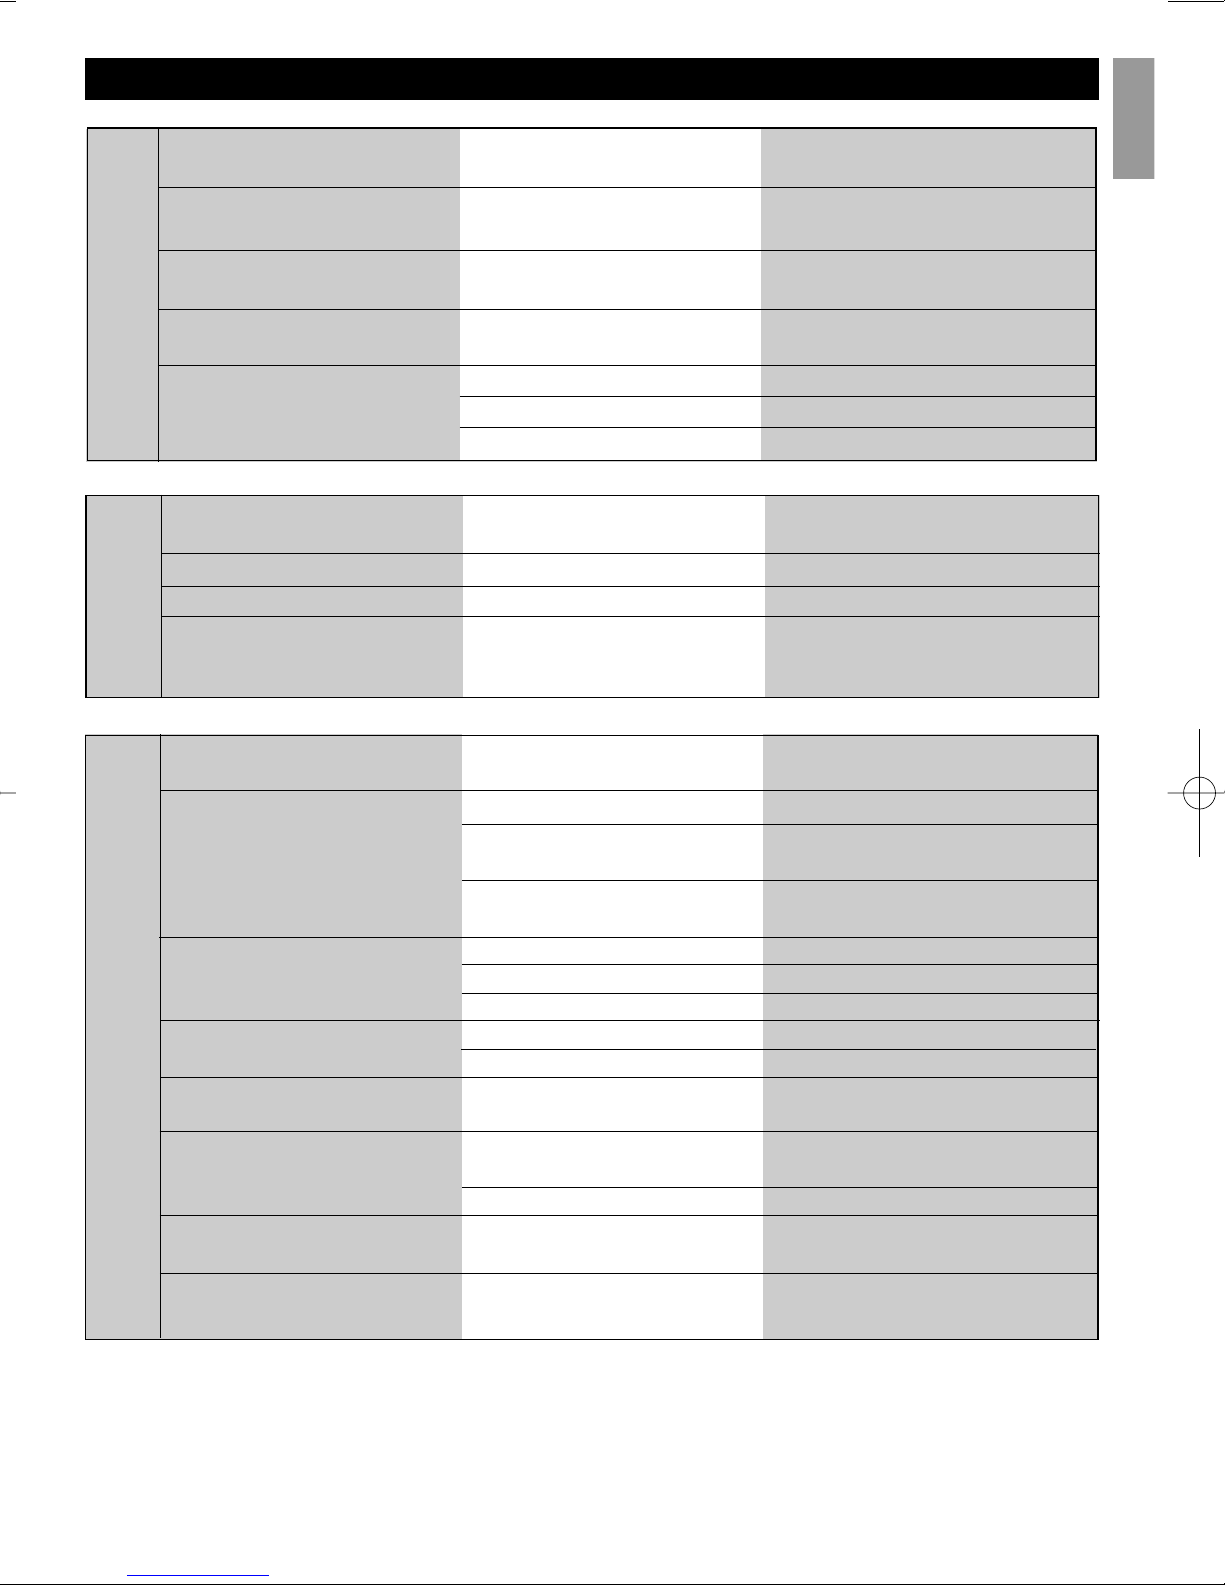
VENTILATOR
IRON
Problem
• The vacuum no longer works.
• Blowing no longer works.
• The tip of the table becomes
wet in the storage position.
Probable cause
• The ventilator cable is unplugged.
• The ventilator cable is unplugged.
• Condensation in the cap.
What to do
• Plug it in.
• Plug it in.
• Leave the unit open until the
water has evaporated.
Problem
• The iron spurts out water.
• The iron is no longer giving
out steam.
• The iron does not heat up.
• The iron is too hot.
• The steam lacks pressure.
• The soleplate of the iron is dirty.
• Steam will not stop coming out.
Probable cause
• The thermostat is not set to zone •••.
• The boiler has not been rinsed
recently.
•
The boiler has been rinsed with
a product other than water.
• Boiler empty.
• Iron disconnected.
• System disconnected.
• Disconnected at the wall.
• Switches are off.
• The thermostat has been set to
zone •••.
• The holes in the soleplate are
blocked.
• The boiler is empty.
• This may happen after several
hours of ironing.
• The steam button is blocked.
What to do
• Adjust the thermostat to zone •••.
• Rinse the boiler until the water no
longer contains any residues.
• Call customer services.
• Refill the boiler.
• Switch both switches on.
• Switch both switches on.
• Plug in at the wall.
• Switch them on.
• Adjust the thermostat following indi-
cations p. 4.
• Unblock them once the iron is cool.
• Fill the boiler with water.
•
Clean the soleplate with our Poli-Fer
cleaning mat see p.8.
•
Press the steam button rapidly and
repeatedly.
English
10
Problems/Solutions
Problem
• Is vibrating (BZZ - BZZ).
• Making banging noises (TAC -
TAC) when the boiler is lit.
• The green light comes on and
goes off during ironing.
• The iron is no longer producing steam. Pressure has
fallen.
BOILER
Probable cause
• The boiler is vibrating.
• The boiler still contains a little
water.
• Water is warming up.
• The boiler is empty.
• The switches are off.
• The wall socket is disconnected.
What to do
• This is normal and will disappear as usage
continues.
• Press the steam button.
• This is normal.
• Fill the boiler with water.
• Switch both switches on.
• Connect to the wall socket.
Page 14

Manufacturer
LauraStar SA
Pra de Plan
CH-1618 Châtel-St-Denis
Switzerland
+41-21-948-21-00
+41-21-948-21-10
Internet: www.laurastar.com
UL approved
Address
11
English
Customer services
Dispatch to customer services – Call Customer Services before sending your system and follow the instructions you are given.
Switch the system off. Empty the
tank and remove it from the ironing board (if this one is not to be
sent). Wrap the tank with the iron
in a box. Do not forget to enclose
a copy of the purchase agreement, the guarantee card or the
cash receipt. Send the defective
system to the customer services
in your country.
• If the Problems/Solutions guide does not resolve a problem that
you are experiencing with this product, contact an authorized Customer
Service center.
• CAUTION: Do not attempt to repair or service this appliance. Such action
may be hazardous and will void the factory warranty.
• The appliance must only be opened and repaired by a qualified, registered
technician.
• For warranty service a copy of your receipt for purchase of the product will
be required.
Page 15
Warranty Card
12
Vendor’s stamp:
Date:
Receipt N°:
Art. N°:
Please attach a copy of this warranty card when sending in your unit.
©All rights reserved. Subject to change.
English
International Guarantee
1. This LauraStarTMappliance is guar-
anteed for the standard period of time
laid down in accordance with local
legislation for the purchase of such
consumer goods. The guarantee is
valid as from the date on the invoice
or the cash receipt.
2. The guarantee does not cover normal wear and tear, wear of the electrical cord or wear of the soleplate.
Damage caused by falling, by water,
or by connection to a power source
outside the specified voltage, is not
covered by the guarantee. The equipment is intended for domestic use
only. Inappropriate use of the appliance, non-compliance with the directions on use and maintenance which
form an integral part of the instructions for use, as well as an unauthorized interference will result in the
cancellation of your guarantee rights.
Use of the equipment for non-domestic purposes will reduce the coverage
of the guarantee.
3. If the LauraStar
TM
equipment sustains any damage which is not covered by the guarantee, the repair of
such damage will not be covered by
the guarantee and will be invoiced
accordingly, even if the work is done
at an official service point.
4. The damaged machine has to be
sent to the LauraStar
TM
customer
service center.
5. In certain countries, the terms of the
guarantee may vary according to the
laws applying in those countries, and
the effect of such laws on our guarantee LauraStarTMwill be acknowledged
by us.
Page 16

Instrucciones
Español
MEDIDAS DE SEGURIDAD
Cuando usted utilice su plancha, es fundamental respetar las siguientes medidas de seguridad:
Lea todo el modo de empleo antes de utilizar el aparato
1. Utilice el aparato solamente para planchar. 2. Para evitar riesgos de electrocución, no
sumerja ni la plancha ni el depósito en agua o en cualquier otro líquido. 3. Desactive los interruptores de la plancha y de la base antes de conectar o de desconectar el cable de alimentación eléctrica. No tire del cable para desenchufar la plancha, tome firmemente la clavija
para retirarla. 4. El cable de alimentación eléctrica no debe entrar jamás en contacto con
superficies calientes. Deje enfriar completamente la plancha antes de guardarla. Cuando
guarde la plancha, enrolle el cable alrededor de la base. 5. Desconecte siempre la clavija
eléctrica para llenar, vaciar o enjuagar el aparato y también cuando no lo utilice. 6. Utilice el
aparato solamente si el cordón, el monotubo y la plancha se encuentran en perfecto estado.
Para evitar cualquier riesgo de electrocución, no desarme ni la plancha ni el aparato; diríjase
al servicio de posventa autorizado. La utilización de un aparato incorrectamente armado
puede causar la electrocución. 7. Vigile la utilización del aparato especialmente cuando los
niños estén presentes o si son éllos los que lo hacen. No deje jamás el aparato conectado o la
plancha apoyada sobre la tabla de planchar sin una estricta vigilancia. 8. El contacto con las
partes metálicas calientes, con el agua caliente o con el vapor, pueden provocar quemaduras.
Tenga cuidado al dar vuelta una plancha de vapor.
9. Si usted constata que el aparato no funciona correctamente, desenchúfelo y no trate de repararlo usted mismo, llévelo al servico
posventa autorizado. 10. ATENCION! PELIGRO DE QUEMADURAS! DESPUES DE DESCONEC-
TAR EL APARATO, ESPERE AL MENOS DOS HORAS ANTES DE DESENROSCAR EL TAPON DE
LLENADO, PARA EFECTUAR EL ENJUAGUE!
INSTRUCCIONES COMPLEMENTARIAS
1. Para evitar una sobrecarga en su intalación eléctrica, no haga funcionar al mismo tiempo
otro aparato de máximo consumo (Watts). 2. Si debiera utilizar una extensión eléctrica, ella
debe ser para 15 amperes. Una extensión más débil se calentaría. Por prudencia, los cables
deben disponerse de manera que no se enganchen o puedan arrancarse.
CONSERVE CUIDADOSAMENTE ESTAS INSTRUCCIONES
Page 17

• Medidas importantes de seguridad 1
• Instalación 2
• Primer utilización 3
• Puesta en marcha 4
• Planchado 5
• Consejos de utilización 5
• Llenado 7
• Mantenimiento 8
• Guardado 9
• Datos técnicos 9
• Guía de problemas y soluciones 10
•
Servicio a los clientes 11
• Garantía Internacional 12
• Tarjeta de garantía 12
Indice
Estimado cliente
Agradecimientos y felicitaciones
Agradecemos la confianza que nos ha otorgado y lo felicitamos
por haber elegido LauraStar
TM
Magic Evolution.
La utilización correcta y el cuidado adecuado asegurarán a vuestro
aparato una larga vida!
Le rogamos leer enteramente este modo de empleo antes de utilizar por primera vez el aparato, el cual está destinado exclusivamente para uso doméstico.
Este aparato produce calor y vapor, algunos elementos del mismo
se calientan mucho durante el funcionamiento pudiendo causar
quemaduras.
Estos elementos muy calientes están indicados en el modo de
empleo con el siguiente símbolo:
Advertencias complementarias
A lo largo de este manual usted encontrará las advertencias complementarias concernientes tanto a su seguridad como a la prevención de un eventual daño de su aparato. Estas advertencias
serán indicadas por:
Descripción
I
Español
o
ADVERTENCIA
ATENCIÓN!
Tabla
Plancha
Modo de empleo
Ruedas (opcional)
Guía-hilos
Tapiz de silicona
Suela Softpressing
Botella de llenado
Cubeta de vaciado
Depósito
Interruptor de la plancha
Interruptor del depósito
Piloto luminoso verde
Tapón de vaciado
Tapón de llenado
Clavija
Cable de alimentación de corriente
Cesto de la plancha
Apoya plancha
Motor
Cable del motor
Termostato
Botón de control del vapor
Monotubo
1
2
3
4
5
6
7
8
9
10
11
12
13
14
15
16
17
18
19
20
21
22
23
25
24
Funda
LauraStar
TM
Magic Evolution
Page 18

1
2
3
4
5
6
7
9
10
11
12
13
14
15
16
17
18
20
22
23
24
25
II
8
21
19
Español
Page 19

1. Utilice este aparato solamente para planchar y siguiendo las
instrucciones.
2.
La plancha posee elementos que se calientan mucho, tocarlos puede
causar graves quemaduras o dañar los objetos que estén muy cerca.
3. Este aparato produce vapor a presión. No abra por ningún motivo el
tapón de llenado sin leer antes las instrucciones de la página 3 de
este manual. El contacto con el vapor a presión puede causar graves
quemaduras.
4. No planchar sobre el cuerpo.
5. Tenga a los niños alejados del aparato mientras lo utilice y cuando lo
guarde. Vigile en todo momento el aparato mientras esté enchufado.
6. DESACTIVE los interruptores y desenchufe el aparato cuando lo llene,
cuando lo enjuague o cuando ya no lo utilice.
7. CONTROLE cada semana el cordón eléctrico y el monotubo. Si alguno de
los dos está dañado no utilice el aparato.
8. No abra el aparato ni efectúe reparaciones usted mismo. Llévelo al servi-
cio de posventa autorizado.
9.
Para evitar graves riesgos de electrocución, no ponga el aparato en contacto con
agua ni con cualquier otro líquido.
10. No tire del cordón eléctrico. Para desenchufar el aparato retire la clavija
tomándola firmemente.
11. No introduzca ningún objeto en el recinto del ventilador. La parrilla de protec-
ción del ventilador corresponde a las exigencias del uso normal, pero no
protege contra la introducción voluntaria de objetos. Vigile a los niños !
12. El cordón eléctrico y el monotubo no deben entrar en contacto con
elementos calientes.
13. A fin de evitar la acumulación de agua dentro del casco del sistema, no
planche nunca si la clavija del motor está desenchufada.
14. Utilice la plancha sólo en un lugar bien iluminado.
15. Enchufe la clavija solamente en un enchufe de pared con descarga a
tierra segura.
16. No utilice el aparato si el depósito no contiene agua.
Lea atentamente las siguientes páginas e informe a los nuevos usuarios acerca de la
utilización del aparato.
1
Medidas importantes de seguridad
HOT
HOT
HOT
HOT
Español
1.
2.
3
.
5.
6.
7.
8.
9.
10.
11.
12.
13.
4.
Page 20

• Guía-hilos: 6
Fíjelo sobre la tabla como lo muestra el dibujo (p.II).
• Tapiz de silicona: 7
Su función es que la plancha caliente repose en él.
Esta destinado a recibir la plancha caliente.
• Apoya plancha: 20
Coloque el apoya-plancha sobre el soporte de la plancha.
• Ruedas: 4
Opcional.
Funda
Deslice la funda desde atrás
hacia adelante. Ajústela pasando
por arriba de la punta de la tabla.
La funda suministrada con el
aparato posee un forro especial
que asegura una repartición uniforme de la aspiración y del
soplado en toda la tabla. Para
obtener una funda nueva, llame
al servicio posventa. La funda es
lavable a 30°, sin centrifugado.
Accesorios
Tabla
1. Coloque la tabla de planchar verticalmente sobre el suelo. 2. Levante la bandeja y sujétela con una
mano. 3. Con la otra mano deslice el dispositivo para regular la altura que se encuentra debajo de la
tabla, hasta el punto de fijación que le resulte más cómodo.
Saque la cesta de la plancha deslizándola hacia el exterior de la tabla.
2
Instalación
Apoye SIEMPRE la plancha sobre el tapiz de silicona o sobre el
apoya plancha. No la deposite sobre ninguna otra superficie.
ATENCIÓN
No utilice otra funda. Una funda
no homologada disminuiría
seriamente la eficacia de las
funciones de aspiración y
soplado.
ATENCIÓN
Español
Page 21

Primer llenado
1. Desenrosque el tapón de llenado.
2. Llene el depósito de agua con la ayuda de la botella de llenado suministrada. Ésta está equipada de un
dispositivo especial que no permite que siga saliendo agua si el depósito ya está lleno (la botella tiene una
capacidad superior al depósito). Presione ligeramente la botella para que el agua comience a salir.
Cuando el depósito esté lleno, cierre el tapón con cuidado.
3
ATENCIÓN!
Desenchufe SIEMPRE la clavija antes de llenar el depósito.
Para el llenado durante el planchado lea las instrucciones de
la página 7.
ADVERTENCIA
Para los siguientes vaciados refiérase a las
instrucciones de la página 8. Llene el depósito
antes de cada utilización.
Première utilisation
Aparato desenchufado
Primer utilización
Retire siempre la clavija del
enchufe de la pared antes de
llenar el depósito.
ADVERTENCIA
Enjuague del depósito
Ajuste la tabla al nivel más alto.
Coloque la cubeta de vaciado
debajo del tapón de vaciado.
Desenrosque el tapón de vaciado. Desenrosque el tapón de
llenado. Vuelque el contenido de
una botella llena con agua del
grifo dentro del depósito para
enjuagarlo. Vuelva a enroscar
los tapones de llenado y vaciado.
Español
ATENCIÓN!
Tipo de agua?
Si el agua corriente de su domicilio contiene igual o menos de 18°f / 11°d/ 1.8mmol/l, puede utilizarla. Si
no es el caso, le aconsejamos diluirla con agua desmineralizada, de venta habitual en el comercio, utilizando: 1/3 de agua corriente y 2/3 de agua desmineralizada.
Para conocer la dureza del agua corriente de su zona infórmese en el Ayuntamiento o en la compañía
de aguas de su ciudad.
No utilice nunca aditivos como perfumes, ni agua con sales o desionizada ni agua destilada, ni agua
de recuperación de la secadora de ropa porque estos productos perjudican la calidad del vapor.
Page 22

Conexión del aparato
1. Conecte la clavija en el enchufe.
2. Conecte los interruptores del
depósito y de la plancha, y
espere a que el piloto verde del
vapor se encienda (alrededor
de 8 a 10 minutos).
Puesta en marcha
4
Llene siempre el depósito antes de comenzar a planchar. Calentar el aparato
vacío podría dañarlo. Utilizar el aparato sin agua en el depósito anula la garantía!
El piloto luminoso verde del vapor se enciende cuando
el aparato está listo para ser empleado.
ATENCIÓN!
Español
Ajuste del termostato de la temperatura de la plancha
Este disco regula solamente la temperatura de la base de la
plancha. Le recomendamos planchar todos los tejidos a la
misma temperatura (zona •••). Haga una prueba con un paño. Si
la plancha gotea, aumente ligeramente la temperatura. Si no ve
salir el vapor visible, reduzca ligeramente la temperatura.
Después de cada ajuste de temperatura,
espere 2 minutos para que la nueva temperatura se estabilice.
Botón de control del vapor
Antes de comenzar a planchar
pulse 3 veces el botón de control
del vapor hacia un costado para
evacuar el agua condensada
dentro del monotubo, luego
pruebe la plancha sobre un
paño: si gotea, aumente ligeramente la temperatura.
ATENCIÓN!
Page 23

Soplado y aspiración & 2 velocidades a elección
Un solo botón de control, situado en la plancha, permite a la vez accionar la salida del vapor y pasar del
modo "soplado" al modo "aspiración" (o viceversa). El cambio de un modo al otro solo puede efectuarse si
el motor se ha parado. El modo escogido termina automaticamente al término de un ciclo de funcionamiento (duración de un ciclo: 4 segundos). Es en éste momento que usted puede cambiar de modo.
Además de las funciones de aspiración y soplado (véase p.5), el botón de control del vapor 24 permite
regular la potencia de la corriente de aire del ventilador. Cuando se conecta a la corriente, la ventilación está
preajustada al máximo (100%). El paso de un modo a otro sólo puede realizarse con el motor apagado.
Para reducir la corriente de aire (al 50%), pulse dos veces muy rápidamente el botón de control.
Para volver a la corriente de aire máxima, vuelva a pulsar dos veces el botón de control.
Soplado
Una pequeña presión (menos de medio segundo) sobre el botón de la plancha activa la función "soplado".
Cuando el soplado está activado, cada presión para emitir vapor relanza el ciclo de funcionamiento
(duración de un ciclo: 4 segundos).
Aspiración
Una presión prolongada (más de un segundo) activa la función "aspiración". La aspiración comienza con
cada emisión de vapor y se detiene 4 segundos después del final del chorro de vapor para garantizar un
óptimo secado de la prenda. Cuando la aspiración está activada, cada presión para emitir vapor relanza
el ciclo de funcionamiento (duración de un ciclo: 4 segundos).
5
Planchado
Consejos de utilización
Para qué sirven el soplado y la aspiración?
Para mejorar la calidad del planchado y aumentar la autonomía del aparato, planche una primera vez con
vapor y la segunda vez sin vapor para secar la tela.
Un planchado perfecto exige la inyección de vapor en el tejido. Solamente así las arrugas partirán totalmente. El sistema LauraStar
TM
Magic Evolution utiliza el mismo método que las tintorerías profesionales:
aspiración y soplado.
Angora / lana
• Para no apelmazar la prenda, pásele la plancha a unos 10 cms de distancia, dando al mismo tiempo vapor.
• Luego tome la prenda y agítela para devolverle su volumen.
• • • • ••• • •
SOLPLADO
ASPIRADO
Terciopelos
Espalda Botones Dobladillos Pinzas Interior Mangas Botones Cintura Pliegues
y cuello y pliegues y forro y cuello
Español
Page 24

6
Utilización de la suela Softpressing
La suela Softpressing es indispensable para los tejidos oscuros que son sensibles al lustrado y para las
telas sintéticas con tendencia a pegarse al ser planchadas.
Cómo utilizar la suela Softpressing:
1. Coloque la plancha sobre la suela Softpressing.
2. Extienda el resorte hacia atrás y asegúrelo en la ranura de caucho de la plancha. Espere 2 minutos
hasta que la suela obtenga una óptima temperatura. Esto evitará que las gotas de condensación
caigan sobre la prenda. No olvide retirar la suela Softpressing luego de ser utilizada.
Seda
Desarrugar verticalmente
Los tejidos especiales
• Terciopelo
• Pana
• Jersey
Sin la suela Softpressing, vaporice teniendo alejada la plancha
a 2-3 cms de la prenda y luego
iguale con la mano.
HOT
Cuide que la suela Softpressing no toque las telas de mohair, cachemir, terciopelo y
angora! Planche estos tejidos a distancia.
• El contacto de la suela Softpressing fijada a la base de la plancha puede
provocar graves quemaduras y dañar los objetos que se encuentren cerca.
• La utilización inadecuada de un sistema de planchado a presión puede causar
graves quemaduras.
ADVERTENCIA
ATENCIÓN!
2-3 cms.
Suspenda la prenda con una percha o sosténgala con la mano.
Con movimientos de arriba hacia
abajo, toque ligeramente la tela
dando al mismo tiempo pequeños
golpes de vapor.
Nota: Casi todos los tejidos se
desarrugan fácilmente, excepto
el algodón, el lino y ciertos tipos
de seda.
Si éste fuera el caso, coloque la
prenda sobre la tabla de planchar y plánchela normalmente.
Usted puede planchar la seda
normalmente con vapor.
Para las sedas oscuras sensibles
al lustrado, se aconseja utilizar la
suela Softpressing.
Español
Page 25

7
Llenado durante el planchado
6. Desenrosque completamente el
tapón y proceda al llenado como se
indica en la página 3.
5. Desenrosque lentamente el tapón
de llenado (con un paño para evitar
todo contacto directo con el vapor)
justo hasta que escuche o vea
escaparse el vapor –alrededor de 2
vueltas- espere a que el vapor residual se escape totalmente.
4.Retire la clavija del enchufe de la
pared.
3. Desconecte el interruptor de la
plancha (12).
2. Presione sobre el botón de control
de vapor de la plancha y manténgalo
presionado hasta que cese la emisión
de vapor. Dirija el vapor lejos de usted
y de cualquier otra persona.
1. Desconecte el interruptor del
depósito (13).
Advertencia sonora de falta de agua
Una alarma sonora suena para señalar que es necesario llenar el
depósito antes de continuar con el planchado.
Lea las instrucciones del próximo capítulo para llenar el depósito
durante el planchado.
Llenado
• Este aparato produce VAPOR A PRESION. Lea atentamente las siguientes
instrucciones antes de desenroscar el tapón de llenado. El contacto con el
vapor a presión puede causar graves quemaduras.
• DESCONECTE el aparato y DESENCHÚFELO cuando no lo utilice. Haga lo
mismo antes de llenarlo o enjuagarlo.
13
12
ADVERTENCIA
Español
Page 26

8
Limpieza de la plancha
Para el vaciado siga las siguientes instrucciones:
1. Retire la clavija del enchufe de la pared.
2. Deje enfriar el aparato al menos 2 horas.
3. Ajuste la tabla al nivel más alto.
4. Coloque la cubeta de vaciado debajo del tapón de vaciado.
5. Desenrosque el tapón de vaciado.
6. Desenrosque el tapón de llenado.
7. Vuelque el contenido de una botella, llena con agua del grifo,
a través del depósito para evacuar los residuos de sarro.
8. Repita la operación hasta que el agua salga sin residuos.
9. Vuelva a enroscar el tapón de vaciado.
10. Llene el depósito de agua.
11. Vuelva a enroscar el tapón de llenado.
Nota: Si el agua no sale por el orificio de vaciado, libérelo con algún
instrumento puntiagudo.
Enjuagado del depósito - con el aparato frío!
Mantenimiento
Peligro de quemaduras! El enjuague debe realizarse cuando el aparato esté
frío. Luego de desenchufar el aparato, déjelo enfriar al menos 2 horas antes
de enjuagarlo.
Tabla de enjuague
Contenido de cal o sal en el agua Cantidad de horas de utilización entre 2 enjuagues
Bajo o nulo 20 horas
Medio 15 horas
Alto 10 horas (según recomendaciones de la página 3)
Si la base de la plancha está sucia, utilice nuestro tapiz de limpieza Poli-Fer
siguiendo las instrucciones descritas. Solicítelo a su distribuidor autorizado.
Si utiliza almidón para el planchado, limpie con más frecuencia la base de su
plancha (aunque el depósito de almidón no se vea).
• No utilice JAMAS ni desincrustantes ni productos químicos! Esto podría dañar
la plancha o el depósito.
• No sumerja la plancha ni en agua ni en cualquier otro líquido.
• No limpie nunca la plancha bajo el agua del grifo.
• No desenrosque el tapón de vaciado excepto cuando siga las siguientes
instrucciones.
Para prolongar la eficacia de su depósito y evitar las expulsiones de sarro, es preciso enjuagarlo regularmente.
ADVERTENCIA
Riesgo de salpicaduras
Español
ADVERTENCIA
ADVERTENCIA
Page 27

A
Guardado
Guardado de la tabla
1. Desconecte los interruptores de la
plancha y del depósito. Retire la clavija del toma corrientes del muro.
2. Retire el monotubo del guía-hilos.
3. Retire el guía-hilos del aparato.
4. Coloque la plancha, dentro el cesto
de la plancha. 5. Deslice el cesto
debajo de la tabla. 6. Levante la tabla
de planchar sosteniéndola por los 2
extremos. El peso del depósito cerrará automáticamente el aparato.
7. Puede dejar el agua dentro del
depósito hasta el próximo planchado,
pues una vez hervida, el agua ya no
se altera.
B
C
9
Datos técnicos
Presión del vapor 40 p.s.i.g / 3.5 bar
Planchado vertical si
Capacidad del depósito 1 quart / 0.9 l
Alimentación
sólo USA 120 V / 60 Hz
220 - 240 V / 50 Hz
Potencia del aparato
sólo USA max. 1600 W
max. 1800 W
Potencia de la plancha
sólo USA 600 W
800 W
Peso total 28 lbs / 12.7 kg
Peso de la plancha 2.6 lbs / 1.2 kg
Sistema plegado 51.2 x 15.4 x 7 in.
130 x 39 x 18 cm
Altura de la tabla 31-37 in. / 79-95 cm
NO TOQUE la plancha mientras guarda
el aparato.
Peligro de quemaduras!
ADVERTENCIA
Español
Page 28

10
Guía de problemas y soluciones
DEPÓSITO
Posibles causas
• El generador vibra.
• El depósito contiene todavía un
poco de agua.
• El agua se ha recalentado.
• El depósito está vacío.
• Los interruptores están apagados.
• La clavija está desconectada del
enchufe de la pared.
Soluciones
• Es normal. El ruido desaparece
durante la utilización.
• Presione el botón de control del vapor.
• El depósito funciona normalmente.
• Llene el depósito de agua.
• Encienda los 2 interruptores.
• Enchufe la clavija.
VENTILADOR
PLANCHA
Problema
• La aspiración no funciona.
• El soplado no funciona.
• La punta de la tabla se moja
cuando está guardada.
Posibles causas
• La clavija del ventilador está desenchufada.
• La clavija del ventilador está de-
senchufada.
• Condensación dentro del casco.
Soluciones
• Enchufe la clavija del ventilador.
• Enchufe la clavija del ventilador.
• Deje el aparato abierto hasta que
el agua se evapore.
Problema
• Agua gotea de los orificios
de la base de la plancha.
• No sale vapor de la plancha.
• La plancha no calienta.
• La plancha está demasiado
caliente.
• El vapor no tiene presión.
• La base de la plancha está sucia.
• No acaba de salir el vapor.
Posibles causas
• El termostato no está regulado en
la zona •••.
• El depósito no ha sido enjuagado
recientemente.
• El depósito ha sido enjuagado con
otro líquido distinto al agua.
• El depósito está vacío.
• La plancha está desconectada.
• El depósito está desconectado.
• La clavija está desconectada del
enchufe de la pared.
• Los interruptores están apagados.
• El termostato está regulado
sobre•••.
• Los orificios de la base de la
plancha están obstruídos.
• El depósito está vacío.
• Puede producirse tras muchas
horas de utilización.
• El botón del vapor se ha bloqueado.
Soluciones
• Regule el termostato en la zona •••.
• Enjuague el depósito hasta que el agua
salga sin residuos.
• Contacte el servicio de posventa.
• Llene el depósito.
• Encienda los 2 interruptores.
• Encienda los 2 interruptores.
• Enchufe la clavija.
• Encienda los interruptores.
• Ajustar el termostato según las indi-
caciones de la pág. 4.
• Cuando la plancha se haya enfria-
do, libérelos.
• Llene el depósito.
•
Limpie la base cuando esté fría con
el tapiz de limpieza Poli-Fer (ver pág. 8)
• Pulse repetidas y rápidas veces el
botón del vapor.
Español
Problema
• Emite vibraciones (BZZ, BZZ).
• Escucha chasquidos (TAC, TAC)
cuando enciende el depósito.
• El piloto verde se enciende y se
apaga durante el planchado.
• La plancha no emite vapor.
No hay presión.
Page 29

LauraStar SA
Pra de Plan
CH-1618 Châtel-St-Denis
Switzerland
+41-21-948-21-00
+41-21-948-21-10
Internet: www.laurastar.com
UL aprobado
Direcciones
11
Servicio a los clientes
Llame al servicio al cliente antes de enviar el sistema de su plancha.
Desenchufe el aparato.
Vacíe y desmonte el depósito
(si la tabla no va a ser enviada).
Empaquételo, así como la
plancha, dentro de una caja.
No olvide de adjuntar al envío
una copia del contrato de compra, de la tarjeta de garantía o
del recibo de caja. Envíe el sistema defectuoso al servicio
posventa de su país.
Español
• Si los consejos de la guía " Problemas y soluciones " no llegan a resolver el
problema, póngase en contacto con un servicio posventa autorizado.
• ATENCIÓN: no desmonte ni la plancha ni el aparato, además de ser peligroso, esto anulará la garantía.
• Es importante que el aparato sea abierto y reparado únicamente por per-
sonas calificadas y autorizadas.
• Para cualquier pedido de reparación bajo garantía, es necesario adjuntar
una copia del comprobante de compra.
Page 30

Tarjeta de garantía
12
Sello del vendedor:
Fecha:
Recibo de caja:
Art. N°:
Le rogamos adjunte esta tarjeta de garantía en el envío de su LauraStar
TM
.
©Derechos reservados. Bajo reserva de modificaciones.
1. Este aparato LauraStar
TM
tiene
una garantía durante el período-
habitual fijado por la legislación
local para la compra de un bien
de consumo de este tipo. La
garantía entra en vigor a partir
de la fecha que figure en la factura o recibo de caja.
2. El uso normal del aparato, de
los cordones y de la suela quedan excluidos de la garantía. Los
desperfectos debidos a caídas,
al agua y a los cambios de tensión no están sujetos a garantía.
Este aparato está destinado al
Garantía Internacional
uso doméstico. La utilización
distinta al uso originalmente previsto, el incumplimiento de las
instrucciones de uso y mantenimiento que forman parte de las
instrucciones así como cualquier manipulación no autorizada conlleva la supresión del
derecho a la garantía. El uso
profesional reduce las prestaciones de la garantía.
3. Si un aparato LauraStar
TM
se
deja en un punto de servicio
autorizado para una reparación
ajena a las cláusulas de la
garantía, ésta será considerada
como una “reparación sin garantía” y actuará a todos los efectos
como una factura.
4.El aparato defectuoso debe
enviarse al centro de servicio
LauraStar
TM
.
5. Según los países, las prestaciones particulares pueden aplicarse además de las condiciones
de la garantía LauraStar
TM
. Las
normas en vigor en los países tienen valor de ley.
Español
Page 31

Page 32

PRÉCAUTIONS IMPORTANTES
Lorsque vous utilisez votre fer à repasser, il convient de respecter certaines mesures de
sécurité fondamentales:
Lisez tout le mode d’emploi avant d’utiliser l’appareil
1. N’utilisez l’appareil que pour le repassage. 2. Pour éviter tout risque d’électrocution, n’im-
mergez pas le fer ou la chaudière dans l’eau ou tout autre liquide. 3. Eteignez fer et chaudière
avant de brancher ou débrancher la fiche. Ne débranchez pas la fiche en tirant sur le cordon
électrique, mais saisissez fermement la fiche et retirez-la. 4. Veillez à ce que le cordon d’alimentation ne soit jamais en contact avec des surfaces chaudes. Laissez refroidir complètement le fer avant de ranger. Enroulez légèrement le cordon autour de la chaudière pour le
rangement 5. Débranchez toujours la fiche pour le remplissage, la vidange et le rinçage, ainsi
que lorsque l’appareil n’est pas utilisé. 6. N’utilisez pas l’appareil si le cordon, le tuyau ou le fer
sont endommagés. Afin d’éviter tout risque d’électrocution, ne démontez pas le fer ou l’appareil, mais confiez-les à un service clientèle agréé. L’utilisation après un remontage incorrect
peut causer l’électrocution. 7. Une étroite surveillance est nécessaire lorsqu’un appareil est
utilisé par des enfants ou en présence de ceux-ci. Ne laissez jamais l’appareil branché ni le fer
posé sur la table à repasser sans surveillance. 8. Le contact avec les parties métalliques
chaudes ou de l’eau chaude ou de la vapeur peut provoquer des brûlures. Prudence lorsque
vous retournez un fer à vapeur. 9. Si vous constatez que l’appareil ne fonctionne pas correctement, retirez la fiche et apportez-le à un service clientèle qualifié. 10. ATTENTION! DANGER DE
BRULURES! APRÈS AVOIR DÉBRANCHÉ L’APPAREIL, ATTENDEZ AU MOINS DEUX HEURES
AVANT DE DÉVISSER LE BOUCHON DE VIDANGE POUR LE RINCER!
INSTRUCTIONS COMPLÉMENTAIRES
1. Pour éviter une surcharge de votre installation électrique, ne faites pas fonctionner un autre
appareil à haute puissance (Watts) simultanément. 2. Si vous deviez utiliser une rallonge, elle
doit être prévue pour 15 Ampères. Une rallonge plus faible pourrait chauffer. Par prudence, les
cordons doivent être disposés de manière à ne pas pouvoir être tirés ou accrochés.
CONSERVEZ PRÉCIEUSEMENT CES INSTRUCTIONS
Mode
d’emploi
Français
Page 33

• Précautions importantes de sécurité 1
• Installation 2
• Première utilisation 3
• Mise en route 4
• Repassage 5
• Conseils d’utilisation 5
• Remplissage 7
• Entretien 8
• Rangement 9
• Données techniques 9
• Guide problèmes et solutions 10
• Service clientèle 11
• Garantie internationale 12
• Carte de garantie 12
Table des matières
Chère cliente, cher client
Remerciements et félicitations
Nous vous remercions de la confiance que vous nous avez
accordée et vous félicitons d’avoir choisi LauraStar
TM
Magic
Evolution.
Une utilisation correcte et un entretien adéquat, assureront à
votre appareil une longue vie!
Nous vous prions de bien vouloir lire entièrement ce mode d’em-
ploi avant la première mise en marche de l’appareil, lequel est
destiné uniquement à un usage ménager.
Cet appareil produit de la chaleur et de la vapeur, et plusieurs éléments de l’appareil deviennent très chauds pendant le fonctionnement et pourraient causer des brûlures.
Ces éléments très chauds sont indiqués dans ce mode d’emploi
avec le symbole suivant:
Avertissements complémentaires
De plus, tout au long de ce manuel vous trouverez des avertissements complémentaires concernant votre sécurité ainsi que la
prévention de tout dommage éventuel à l’appareil. Ils seront
indiqués par:
Descriptif
I
Table
Fer
Mode d’emploi
Roulettes (optionnel)
Housse LauraStar
TM
Magic Evolution
Guide-fil
Tapis en silicone
Semelle Softpressing
Bouteille de remplissage
Bac de vidange
Chaudière
Interrupteur du fer
Interrupteur de la chaudière
Témoin lumineux vert
Bouchon de vidange
Bouchon de remplissage
Fiche
Câble
Panier du fer
Repose-fer
moteur
Câble moteur
Thermostat
Bouton de commande vapeur
Monotube
1
2
3
4
5
6
7
8
9
10
11
12
13
14
15
16
17
18
19
20
21
22
23
24
ou
AVERTISSEMENT
ATTENTION!
Français
25
Page 34

Français
1
2
3
4
5
6
7
9
10
11
12
13
14
15
16
17
18
20
22
23
24
25
II
8
21
19
Page 35

1. N’utilisez cet appareil que pour le repassage et en suivant ces
instructions.
2.
Le fer a des ELEMENTS TRÈS CHAUDS. Les toucher peut causer de
graves brûlures ou endommager les objets trop rapprochés.
3. Cet appareil produit de la VAPEUR SOUS PRESSION. N’ouvrez en
aucun cas le bouchon de remplissage sans lire auparavant les
instructions de la page 3 de ce manuel. Le contact avec la VAPEUR
SOUS PRESSION peut causer de graves brûlures.
4. Ne repassez jamais des vêtements sur le corps.
5. Tenez les ENFANTS éloignés de l’appareil pendant l’utilisation et le range-
ment. Ne laissez jamais l’appareil branché sans surveillance.
6. ETEIGNEZ l’appareil et débranchez la fiche pour le remplir, le rincer, ou si
vous ne l’utilisez pas.
7. CONTRÔLEZ chaque semaine le cordon électrique et le monotube.
N’UTILISEZ PAS l’appareil si l’un ou l’autre est endommagé.
8. N’effectuez pas d’intervention ou de réparation vous-même sur l’appareil,
mais portez-le à un service clientèle agréé.
9.
Ne mettez pas l’appareil en contact avec de l’eau ou tout autre liquide afin
d’éviter de graves électrocutions.
10. Ne débranchez pas la fiche en tirant sur le cordon électrique, mais sai-
sissez fermement la fiche et retirez-la.
11. N’introduisez pas d’objets dans la cage du ventilateur. La grille de protection
du ventilateur répond aux exigences d’une utilisation normale, mais ne protège
pas contre l’introduction volontaire d’objets. Surveillez les enfants!
12. Le cordon électrique et le monotube ne doivent pas entrer en contact
avec des éléments chauds.
13. Pour éviter toute accumulation d’eau dans la coque du système, ne
repassez jamais lorsque la prise du moteur est débranchée.
14. N’utilisez le fer que dans un endroit bien éclairé.
15. Ne branchez la fiche que dans une prise murale avec une mise à terre sûre.
16. N’utilisez pas l’appareil lorsque la chaudière ne contient pas d’eau.
Veuillez lire attentivement les pages suivantes et informer tout nouvel utilisateur de
votre appareil.
1
Précautions importantes de sécurité
HOT
HOT
HOT
HOT
Français
1.
2.
3
.
5.
6.
7.
8.
9.
10.
11.
12.
13.
4.
Page 36

ATTENTION!
La housse
N’utilisez pas d’autre housse,
car une housse non-homologuée diminuerait sérieusement l’efficacité des fonctions
aspiration et soufflerie.
Les accessoires
La table
1. Posez verticalement la planche sur le sol. 2. Soulevez le plateau et maintenez-le d’une main. 3. De
l’autre main, faites glisser le dispositif de réglage (sous la planche) jusqu’à l’un des trois points d’ancrage correspondant à votre taille.
Sortez le panier du fer, en le faisant glisser vers l’extérieur de la planche.
Installation
Attention Placez TOUJOURS votre fer chaud sur le tapis en silicone ou le repose-fer. Ne le posez sur aucune autre surface.
ATTENTION!
Faites glisser la housse d’arrière
en avant pour la mettre en place.
Ajustez-la en passant pardessus la pointe de la planche.
L’appareil est livré avec une
housse spéciale. Celle-ci possède une doublure particulière
qui assure une répartition uniforme de l’aspiration et de la
soufflerie sur toute la table. Pour
obtenir une nouvelle housse,
appelez le service clientèle. La
housse est lavable à 30°, sans
essorage.
Français
2
• Guide-fil:
Fixez-le comme sur le dessin.
• Tapis en silicone:
Ce tapis est destiné à recevoir le fer chaud.
• Repose-fer:
Installez le repose-fer sur le panier du fer. Il est destiné à
recevoir le fer chaud.
• Roulettes:
Optionnel.
6
7
20
4
Page 37

Première utilisation
Appareil débranché
Quelle eau choisir?
Premier remplissage
3
Première utilisation
Retirez toujours la fiche de la
prise avant de remplir la
chaudière.
Débranchez TOUJOURS la fiche de l’appareil avant de remplir la chaudière.
Pour le remplissage en cours
d’utilisation, voir les instructions “remplissage en cours de
repassage” de la page 7.
Rinçage de la chaudière
Ajustez la table au niveau le plus
haut. Placer le bac de vidange
sous le bouchon de vidange.
Dévissez le bouchon de vidange.
Dévissez le bouchon de remplissage. Versez le contenu d’une
bouteille remplie d’eau du robinet dans la chaudière pour la
rincer. Revissez le bouchon de
remplissage et le bouchon de
vidange.
Pour les vidanges à venir, référez-vous aux
instructions de la page 8.
Remplissez la chaudière avant chaque utilisation.
1
. Dévissez le bouchon de remplissage.
2. Remplissez la chaudière d’eau à l’aide de la bouteille de remplissage prévue à cet effet. Cette bouteille
est équipée d’un dispositif anti-débordement, qui stoppe le flux d’eau dès que la chaudière est pleine (la
bouteille a une contenance supérieure à la chaudière). Pressez brièvement la bouteille pour que l’eau
commence à s’écouler. Une fois la chaudière pleine, revissez le bouchon avec soin.
AVERTISSEMENT
AVERTISSEMENT
AVERTISSEMENT
ATTENTION!
Français
Si votre eau courante a une teneur en calcaire inférieure ou égale à 18°f/11°d/1.8mmol/l, vous pouvez
utiliser de l'eau du robinet. Si ce n'est pas le cas, nous vous conseillons de la diluer avec de l'eau déminéralisée du commerce, à raison de 1/3 eau du robinet 2/3 eau déminéralisée.
Pour connaître la dureté exacte de votre eau du robinet, informez-vous auprès de votre mairie ou de
votre service des eaux.
N'utilisez jamais d'additifs (ex. eau parfumée), ni d'eau adoucie au sel, ni d’eau déionisée, ni d’eau distillée, ni d’eau de récupération du sèche-linge car ces produits nuisent à la bonne qualité de la vapeur.
Page 38

Branchement de l’appareil
1. Branchez la fiche dans la prise.
2. Allumez les interrupteurs de
la chaudière et du fer et attendez que le témoin vert de la
vapeur s’allume (env. 8 à 10 minutes).
Réglage de la température du fer
Ce disque ne règle que la température de la semelle du fer. Nous vous
recommandons de repasser tous les tissus à la même température
(zone
•••
). Faites un essai préalable sur un chiffon prévu à cet effet. Si le fer
crache de l’eau, augmentez légèrement la température. Si vous ne voyez
pas de vapeur sortir du fer, réduisez légèrement la température.
Après un réglage de température, attendez 2
minutes pour que la nouvelle température soit
stabilisée.
Bouton de commande vapeur
Mise en route
4
• Remplissez toujours la chaudière avant de commencer le repassage. Faire
chauffer l’appareil à vide pourrait l’endommager. Utiliser l’appareil sans eau
dans la chaudière invalide votre garantie!
Le témoin lumineux vert de la vapeur s’allume lorsque
l’appareil est prêt à l’emploi.
Avant de commencer le repassage, donnez 3 grands coups de
vapeur de côté pour évacuer
l’eau condensée dans le monotube, puis testez votre fer sur un
chiffon: s’il crache de l’eau, augmentez légèrement la température.
ATTENTION!
ATTENTION!
Français
Page 39

Soufflerie – aspiration et choix de 2 vitesses
Un bouton de commande unique, situé sur le fer, vous permet à la fois d’actionner l’émission de vapeur et
de passer du mode "soufflerie" au mode "aspiration" (ou vice versa). La commutation d’un mode à l’autre
ne peut s’effectuer que lorsque le moteur est arrêté. La fonction choisie s’arrête automatiquement au
terme d’un cycle de fonctionnement (durée du cycle: 4 secondes). A ce moment-là, vous pouvez commuter
sur le mode voulu.
En plus des fonctions d'aspiration et de soufflerie (voir § p. 5), le bouton de commande vapeur 24 permet de régler la puissance du flux d'air du ventilateur. A la mise sous tension, la ventilation est pré-réglée
au maximum (100%). La commutation d'un mode à l'autre ne peut s'effectuer que lorsque le moteur est
arrêté. Pour passer en flux d'air réduit (50%), effectuez une double pression très rapide sur le bouton de
commande. Pour revenir au flux d'air maximum effectuez à nouveau une double pression sur le bouton de
commande.
Soufflerie
Une très brève pression (moins d’une demi-seconde) sur le bouton du fer lance la fonction "soufflerie".
Lorsque la soufflerie est en service, chaque pression effectuée sur le bouton pour émettre de la vapeur
relance le cycle de fonctionnement (durée du cycle: 4 secondes).
Aspiration
Une pression prolongée (plus d’une seconde) sur le bouton du fer lance la fonction "aspiration".
L’aspiration s’enclenche lors de chaque émission de vapeur et s’arrête 4 secondes après la fin du jet de
vapeur, afin de garantir un séchage optimal du tissu. Lorsque l’aspiration est en service, chaque pression
effectuée sur le bouton pour émettre de la vapeur relance le cycle de fonctionnement (durée du cycle: 4
secondes).
5
Repassage
Conseils d’utilisation
Pourquoi avoir une soufflerie et une aspiration?
Pour améliorer la qualité du repassage et augmenter l’autonomie de votre appareil, repassez une fois le tissu
avec la vapeur, puis une seconde fois sans vapeur pour sécher le tissu.
Un repassage impeccable exige une injection de vapeur dans le tissu. C’est à cette condition seulement
que les plis seront totalement éliminés. Le système LauraStar
TM
Magic Evolution utilise pour cela les
mêmes méthodes que les pressings professionnels: l’aspiration et la soufflerie.
Angora / Laine
• Passez le fer, tout en donnant de la vapeur, à environ 10 cm du tissu, afin de ne pas feutrer.
• Puis prenez le vêtement en main et agitez-le pour lui redonner son volume.
Français
• • • • ••• • •
Soufflerie
Aspiration
Velours
Dos Boutons Revers Pinces Intérieur Manches Boutons Haut Plis
et col et plis et doublures et col
Page 40

6
Utilisation de la semelle Softpressing
La semelle Softpressing est indispensable pour les tissus foncés qui sont sensibles au lustrage et les tissus synthétiques qui ont tendance à coller au fer.
Comment utiliser la semelle Softpressing:
1. Poser le fer dans la semelle Softpressing.
2. Tendez le ressort en arrière, et crochez-le sous l’ergot en caoutchouc du
fer. Attendez environ 2 minutes pour que la semelle atteigne la bonne température. Ceci évitera que des gouttelettes d’eau de condensation ne
tombent sur le tissu.
Enlevez TOUJOURS la semelle Softpressing après utilisation.
La soie
Défroisser verticalement
Suspendez le vêtement sur un
cintre ou tenez-le à la main.
En faisant un mouvement de haut
en bas, touchez légèrement le
tissu tout en donnant de petites
touches de vapeur.
Remarque: Presque tous les tissus se défroissent facilement, à
l’exception du coton, du lin et de
certaines soies.
Si un tissu se défroisse difficilement, mettez-le sur la table et
repassez-le normalement.
Les tissus spéciaux
• Le velours
• Le velours côtelé
• Le jersey
Sans la semelle Softpressing,
vaporisez en tenant le fer à 2-3
cm du tissu puis égalisez à la
main.
Vous repassez la soie normale-
ment avec la vapeur.
Pour éviter de lustrer les soies
foncées, il est conseillé d’utiliser
la semelle Softpressing.
2-3 cm
HOT
Veillez à ce que la semelle Softpressing ne touche pas le mohair, le cachemire, le
velours et l’angora! Repassez ces tissus à distance.
• Le contact avec la semelle Softpressing fixée sur la semelle du fer peut
provoquer de graves brûlures et endommager des objets environnants.
• L’utilisation inadéquate d’un système de repassage sous pression peut
causer de graves brûlures.
AVERTISSEMENT
ATTENTION!
Français
Page 41

7
Remplissage en cours de repassage
6. Dévissez complètement le bou-
chon et procédez au remplissage
comme indiqué à la page 3.
5. Dévissez lentement le bouchon de
remplissage (avec un chiffon pour
éviter tout contact direct avec de la
vapeur) jusqu’à ce que vous entendiez
ou aperceviez la vapeur s’échapper environ 2 tours - et attendez que la
vapeur résiduelle se soit entièrement
échappée.
4.Retirez la fiche de la prise.
3. Eteignez l’interrupteur du fer (12).
1.Eteignez l’interrupteur de la
chaudière (13).
Avertisseur sonore de fin d’eau
Un avertisseur sonore retentit pour signaler qu’il faut faire le plein de
la chaudière avant de continuer à repasser.
Veuillez vous référer aux instructions du chapitre suivant pour le
remplissage de la chaudière en cours de repassage.
Remplissage
• Cet appareil produit de la VAPEUR SOUS PRESSION. Lisez impérativement
les instructions ci-après, avant de dévisser le bouchon de remplissage. Le
contact avec de la vapeur sous pression peut causer de graves brûlures.
• ETEIGNEZ l’appareil et RETIREZ la fiche quand l’appareil n’est pas utilisé.
Faites de même avant le remplissage ou la vidange de l’appareil.
2. Pressez sur le bouton de commande
vapeur du fer et maintenez-le enfoncé
jusqu’à ce que l’émission de vapeur
cesse. Dirigez la vapeur loin de vous ou
de toute autre personne.
AVERTISSEMENT
Français
12
13
Page 42

8
Nettoyage du fer
Rinçage de la chaudière – appareil froid!
Entretien
Tableau de rinçage
Teneur en calcaire ou en sel Nombre d’heures d’utilisation entre 2 rinçages
Faible ou nulle 20 heures
Moyenne 15 heures
Haute 10 heures (selon recommandations p.3.)
Si la semelle du fer est sale, utilisez notre tapis de nettoyage Poli-Fer en suivant les instructions décrites. Vous pouvez l’obtenir chez votre revendeur.
Nettoyez plus souvent la semelle de votre fer si vous utilisez de l’amidon pour
votre repassage (même si le dépôt d’amidon n’est pas visible).
• N’utilisez jamais de détartrant ou de produit chimique! Cela pourrait
endommager le fer ou la chaudière.
• N’immergez pas le fer dans l’eau ou tout autre liquide.
• Ne nettoyez jamais le fer sous le robinet.
• Ne dévisser pas le bouchon de vidange, excepté selon les instructions ci-après.
Pour prolonger l’efficacité de votre chaudière et éviter les rejets de calcaire, vous devez impérativement
rincer régulièrement la chaudière.
Risque de brûlures! Le rinçage doit se faire lorsque l’appareil est froid.
Après avoir débranché l’appareil, laissez-le refroidir au moins 2 heures
avant de rincer.
AVERTISSEMENT
ATTENTION!
Français
AVERTISSEMENT
Risque d’éclaboussures.
Pour la vidange, conformez-vous aux instructions suivantes:
1. Retirez la fiche de la prise.
2. Laissez refroidir l’appareil au moins 2 heures.
3. Ajustez la table au niveau le plus haut.
4. Placez le bac de vidange sous le bouchon de vidange.
5. Dévissez le bouchon de vidange.
6. Dévissez le bouchon de remplissage.
7. Faites passer le contenu d’une bouteille remplie d’eau du robinet à
travers la chaudière pour évacuer les résidus de calcaire.
8. Répétez l’opération jusqu’à ce que l’eau sortant de la chaudière soit
exempte de résidus.
9. Revissez le bouchon de vidange.
10. Faites le plein d’eau.
11. Revissez le bouchon de remplissage.
NB.: Si l’eau ne sort pas par l’orifice de vidange, débouchez cet orifice
avec un instrument pointu.
Page 43

Données techniques
Rangement
Rangement de la planche
NE TOUCHEZ PAS le fer pendant le
rangement de l’appareil.
Risques de brûlures!
AVERTISSEMENT
Français
A
B
C
1. Eteignez les interrupteurs du fer
et de la chaudière. Retirez la fiche
de la prise. 2. Retirez le monotube
du guide-fil. 3. Enlevez le guide-fil
de l’appareil. 4. Mettez le fer dans
le panier. 5. Glissez le panier sous
la planche. 6. Soulevez la planche
en la tenant par les 2 extrémités. Le
poids de la chaudière provoquera
la fermeture automatique de l’ap-
pareil. 7. Laissez l’eau dans la
chaudière jusqu’à la prochaine
utilisation. Une fois bouillie, l’eau
ne s’altère plus.
9
Puissance du fer USA seulement 600 W
800 W
Poids total 28 lbs / 12.7 kg
Poids du fer 2.6 lbs / 1.2 kg
Dimensions 51.2 x 15.4 x 7 in.
130 x 39 x 18 cm
Hauteur de la planche 31-37 in. / 79-95 cm
Pression de la vapeur 40 p.s.i.g / 3.5 bar
Repassage vertical Yes
Capacité de la chaudière 1 quart / 0.9 l
Alimentation
USA seulement 120 V / 60 Hz
220 - 240 V / 50 Hz
Puissance de l’appareil
USA seulement max. 1600 W
max. 1800 W
Page 44

10
VENTILATEUR
FER
Problème
• L’aspiration ne fonctionne plus.
• La soufflerie ne fonctionne plus.
• La pointe de la table se mouille
en position de rangement.
Causes possibles
• La fiche du ventilateur est débranchée.
• La fiche du ventilateur est débranchée.
• Condensation dans la coque.
Solutions
• Branchez la fiche du ventilateur.
• Branchez la fiche du ventilateur.
• Laissez l’appareil ouvert jusqu’à
évaporation complète de l’eau.
Problème
• De l’eau sort par les trous de la
semelle du fer.
• Le fer n’émet plus de vapeur.
• Le fer ne chauffe pas.
• Le fer est trop chaud.
• La vapeur manque de pression.
• La semelle du fer est sale.
• L’émission de vapeur ne cesse
pas.
Causes possibles
• Le thermostat n’est pas réglé
dans la zone •••.
• La chaudière n’a pas été rincée
récemment.
• La chaudière a été rincée avec un
produit autre que de l’eau.
• La chaudière est vide.
• Le fer est déclenché.
• La chaudière est déclenchée.
• La fiche murale est débranchée.
• Les interrupteurs sont éteints.
• Le thermostat est réglé dans la
zone •••.
• Les orifices de la semelle sont
obstrués.
• La chaudière est vide.
• Peut se produire après plusieurs
heures d’utilisation.
• Le bouton de commande vapeur
est bloqué.
Solutions
• Réglez le thermostat dans la zone •••.
• Rincez la chaudière jusqu’à ce que l’eau
de rinçage ne contienne plus de résidus.
• Contactez le service clientèle.
• Remplissez la chaudière.
• Allumez les 2 interrupteurs.
• Allumez les 2 interrupteurs.
• Branchez la fiche murale.
• Allumez les interrupteurs.
• Réglez le thermostat selon les indica-
tions p.4.
• Dès que le fer sera froid,
dégagez-les.
• Remplissez la chaudière .
•
Nettoyez la semelle à froid à l’aide
du tapis de nettoyage Poli-Fer.
(voir p. 8)
• Exercez des pressions rapides et répétées
sur le bouton de commande vapeur.
Français
Guide problèmes et solutions
CHAUDIÈRE
Causes possibles
• Le générateur vibre.
• La chaudière contient encore
un peu d’eau.
• L’eau est réchauffée.
• La chaudière est vide.
• Les interrupteurs sont éteints.
• La prise murale est débranchée.
Solutions
• C’est normal, le bruit disparaît pendant
l’utilisation.
• Appuyer sur le bouton de commande
vapeur.
• La chaudière fonctionne normalement.
• Remplissez la chaudière d’eau.
• Allumez les 2 interrupteurs.
• Branchez la prise murale.
Problème
• Emet des vibrations (BZZ - BZZ).
• Vous entendez des claquements
(TAC, TAC) quand on allume la
chaudière.
• La lumière verte s’allume et
s’éteint pendant le repassage.
• Le fer n’émet plus de vapeur.
La pression est tombée.
Page 45

11
Adresse
Français
Service clientèle
• Si les conseils du guide “Problèmes et solutions“ ne parviennent pas à
résoudre le problème, contactez un service clientèle agréé.
• ATTENTION: Ne démontez pas le fer ou l’appareil, cela peut être dangereux
et annulera la garantie du fabricant.
• Il est très important que l’appareil soit uniquement ouvert et réparé par des
techniciens qualifiés et agréés.
• Pour une demande de réparation sous garantie, une copie de la quittance
d’achat devra être fournie.
Appelez le service clientèle avant de lui envoyer votre système.
Débranchez l’appareil.
Videz et démontez la chaudière
(si la planche reste chez vous).
Emballez-la, ainsi que le fer,
dans un carton. N’oubliez pas de
joindre à l’envoi une copie du
contrat d’achat, de la carte de
garantie ou de la quittance de
caisse. Envoyez le système
défectueux au service clientèle
de votre pays.
Manufacturer
LauraStar SA
Pra de Plan
CH-1618 Châtel-St-Denis
Switzerland
+41-21-948-21-00
+41-21-948-21-10
Internet: www.laurastar.com
UL approved
Page 46

12
Garantie internationale
Carte de garantie
Veuillez joindre une copie de cette carte de garantie lors de l’envoi de votre LauraStar
TM
Tous droits réservés. Sous réserve de modifications.
Français
1. Cet appareil LauraStar™ est
garanti pendant la durée
habituelle fixée selon la législa-
tion locale pour l’achat d’un tel
bien de consommation. La
garantie entre en vigueur à
partir de la date figurant sur la
facture ou sur le ticket de
caisse.
2. L'usure normale de l'appareil,
des cordons et de la semelle est
exclue de la garantie. Les
dégâts dus à des chutes, dégâts
d'eau, non-respect de la tension
nominale ne sont pas couverts
par la garantie. Cet appareil est
destiné à un usage ménager. Le
détournement de l'usage premier de l'appareil, le nonrespect des prescriptions d'utilisation et d’entretien faisant partie intégrante du mode d'emploi
ainsi que toute intervention non
autorisée entraîne la suppression du droit à la garantie. Un
usage professionnel provoque
une diminution du droit à la
garantie.
3. Si un appareil LauraStar™ est
confié au point de service
autorisé pour une intervention
en dehors des clauses de
garantie, celle-ci sera considérée comme une "réparation
hors garantie" et fera l'objet
d'une facture.
4. L'appareil défectueux doit
être acheminé au centre de service LauraStar™.
5. Selon les pays, des prestations particulières peuvent être
appliquées en plus des conditions de garantie LauraStar™.
Les réglementations en vigueur
dans le pays font foi.
Timbre du revendeur:
Date:
Quittance de caisse:
N° art:
Page 47

10/2002 (USA)
 Loading...