

Page 1
La Marzocco Technical Center s.r.l.
Via Bolognese 68 - Loc. Pian Di San Bartolo 50010 Firenze, Italy
t: +39.
055.4026358 f: +39.055.4026359
e-mail: martech@lamarzocco.com
www.lamarzocco.com
La Marzocco International L.L.C.
Introduction 2
Components 3
Specifications 4
Installation 5
Engaging the Portafilter 7
Operating the Swift 8
Adjusting Coffee Coarseness 10
Adjusting Dose Quantity 11
Daily Cleaning 13
Burr Change-Out 19
Chute Clean-Out Tool 25
Fuse Replacement and Reset Switches 26
Tips and Troubleshooting 28
Electrical Diagrams 31-32
Approvals inside back cover
Contents
Contents
SWIFT EPS
B
English
®
Page 2

2
English
La Marzocco International | USA • La Marzocco Technical Center s.r.l. | Italy
Introduction
Espresso Preparation System
Congratulations on choosing the Swift EPS
B from La
Marzocco. Your application of this new product in
your café or home will result in a number of
important benefits to you.
Quality, Consistency, Conservation, and Speed.
Your new Swift EPS
B grinds, doses and tamps coffee
directly into the portafilter, eliminating the need to
do this manually. It measures and doses by volume,
not time, so waste and product inconsistency are
reduced. At the same time, the Swift EPS
B enhances
coffee freshness by grinding coffee by dose, not by
bulk.
This manual includes information about how to
maintain and troubleshoot your Swift EPS
B for
optimal performance.
Please review it carefully.
Page 3
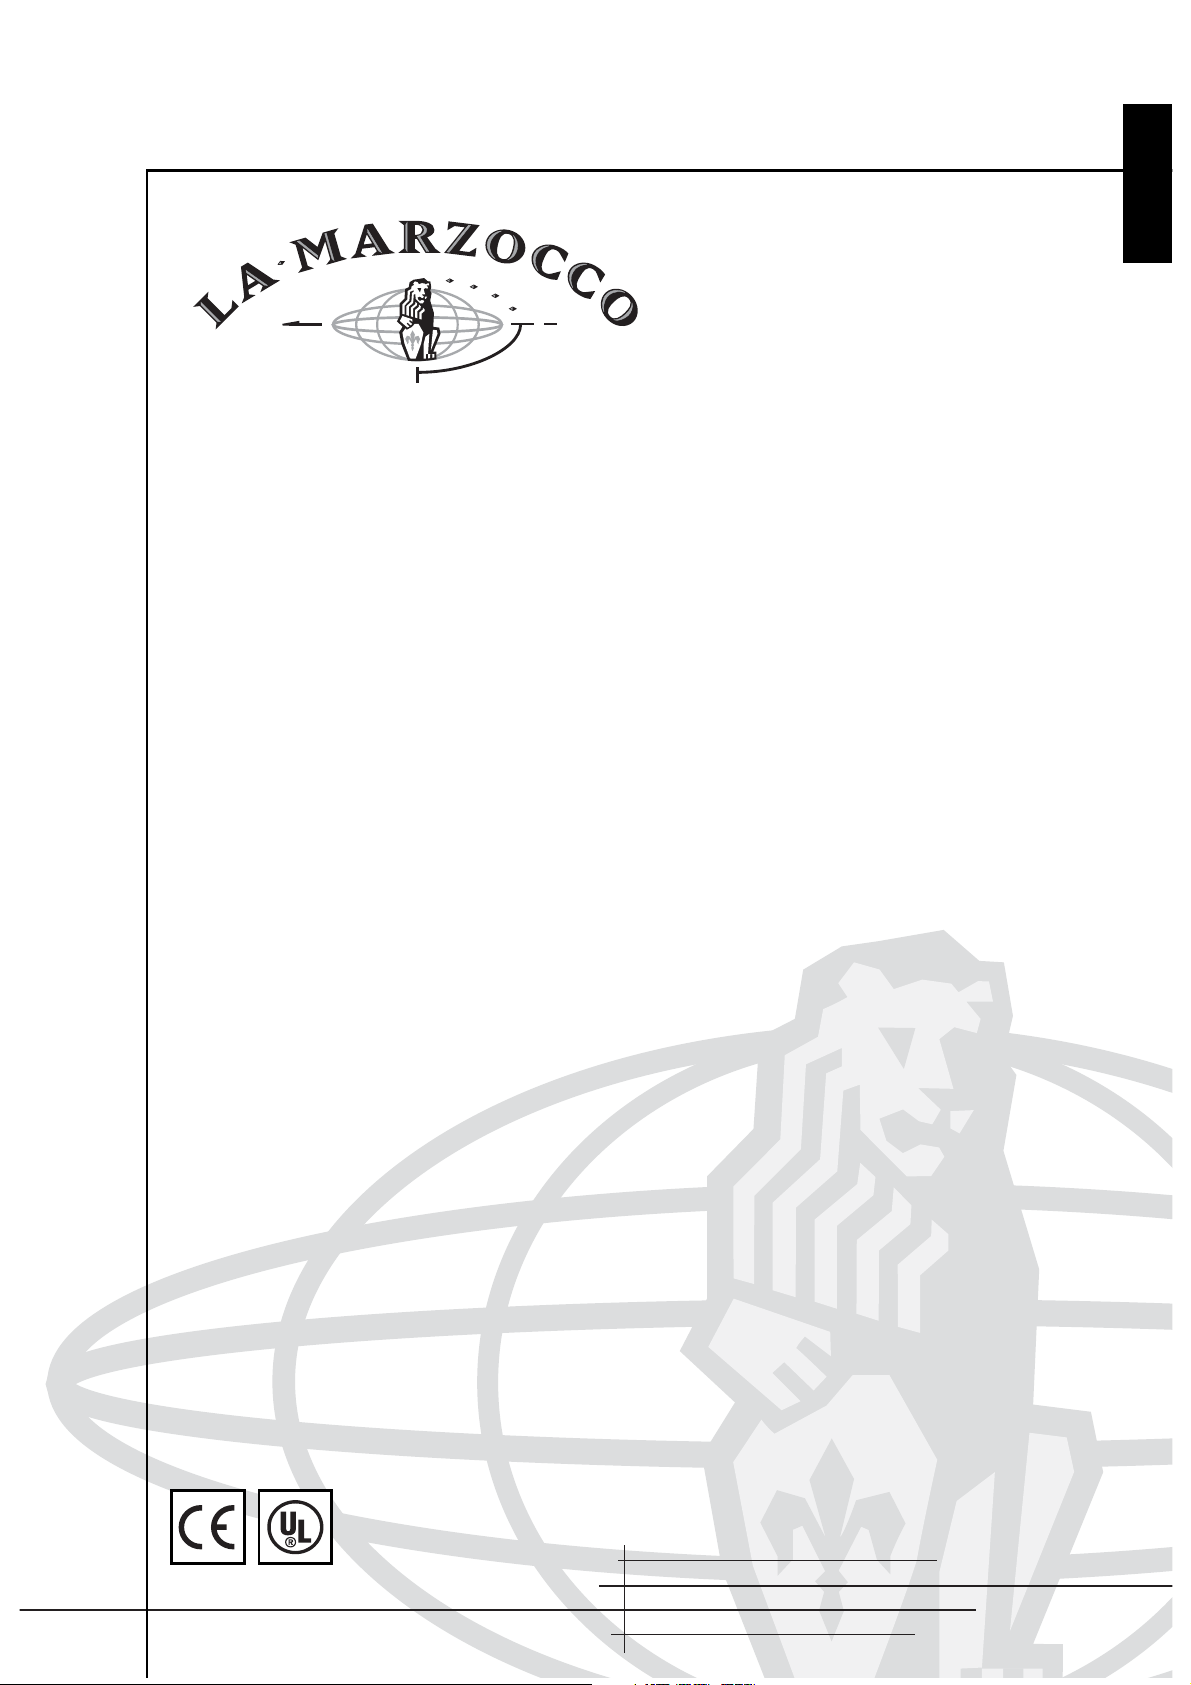
.
Components
Verify that all parts are included when you receive
your new Swift EPS
B.
(a) Grinder
(b) Two bean hoppers and lids
(c) Drip tray
(d) Fuse pulling tool
(e) Screwdriver
(f) Cleaning brush
(g) 22 mm. Portafilter baskets
(h) Tamper cover lid
(i) Fuses (inside tamper cover lid)
(j) Long-arm L-key 3/32 hex size
(k) Grinder discharge clean-out tool
Manual
Warranty and registration card
3
English
www.lamarzocco.com
d, e, i, j, k . Inside tamper cover
b.
e.
d.
a.
h.
c.
g
b.
j.
k.
f.
Page 4

4
English
La Marzocco International | USA • La Marzocco Technical Center s.r.l. | Italy
Specifications
Height 65.5 cm/25.75 in.
Width 35 cm/13.75 in.
Depth 36 cm/14 in.
Shipping Weight 34 kg/75 lbs.
Voltage Single phase 220 VAC
or Single phase 110 VAC
Amperage 7.5 amps, 220 VAC
or 15 amps, 110 VAC
Bean Hopper Capacity 1.8 kg/4 lbs. each
Page 5
Installation
The Swift EPSB
is easy to install. However, there are
several important considerations to keep in mind.
The Swift EPS
B
requires a grounded 110v, 15 amp (or
220v, 7.5 amp) power supply. It also requires a
minimum 16” x 16” (406 mm x 406 mm) space on
the counter. Since the unit is 26” (660 mm) in height,
allow at least 30” (762 mm) of vertical clearance so
there is sufficient space to allow the easy removal of
the bean hoppers and lids. The Swift EPS
B
weighs
about 75 lbs (34 kg), so make sure your counter will
support this.
5
English
www.lamarzocco.com
(1) Install the bean hoppers and tighten the
safety screws.
(2) Plug the Swift EPSB into a grounded 110v or
220v single phase power supply.
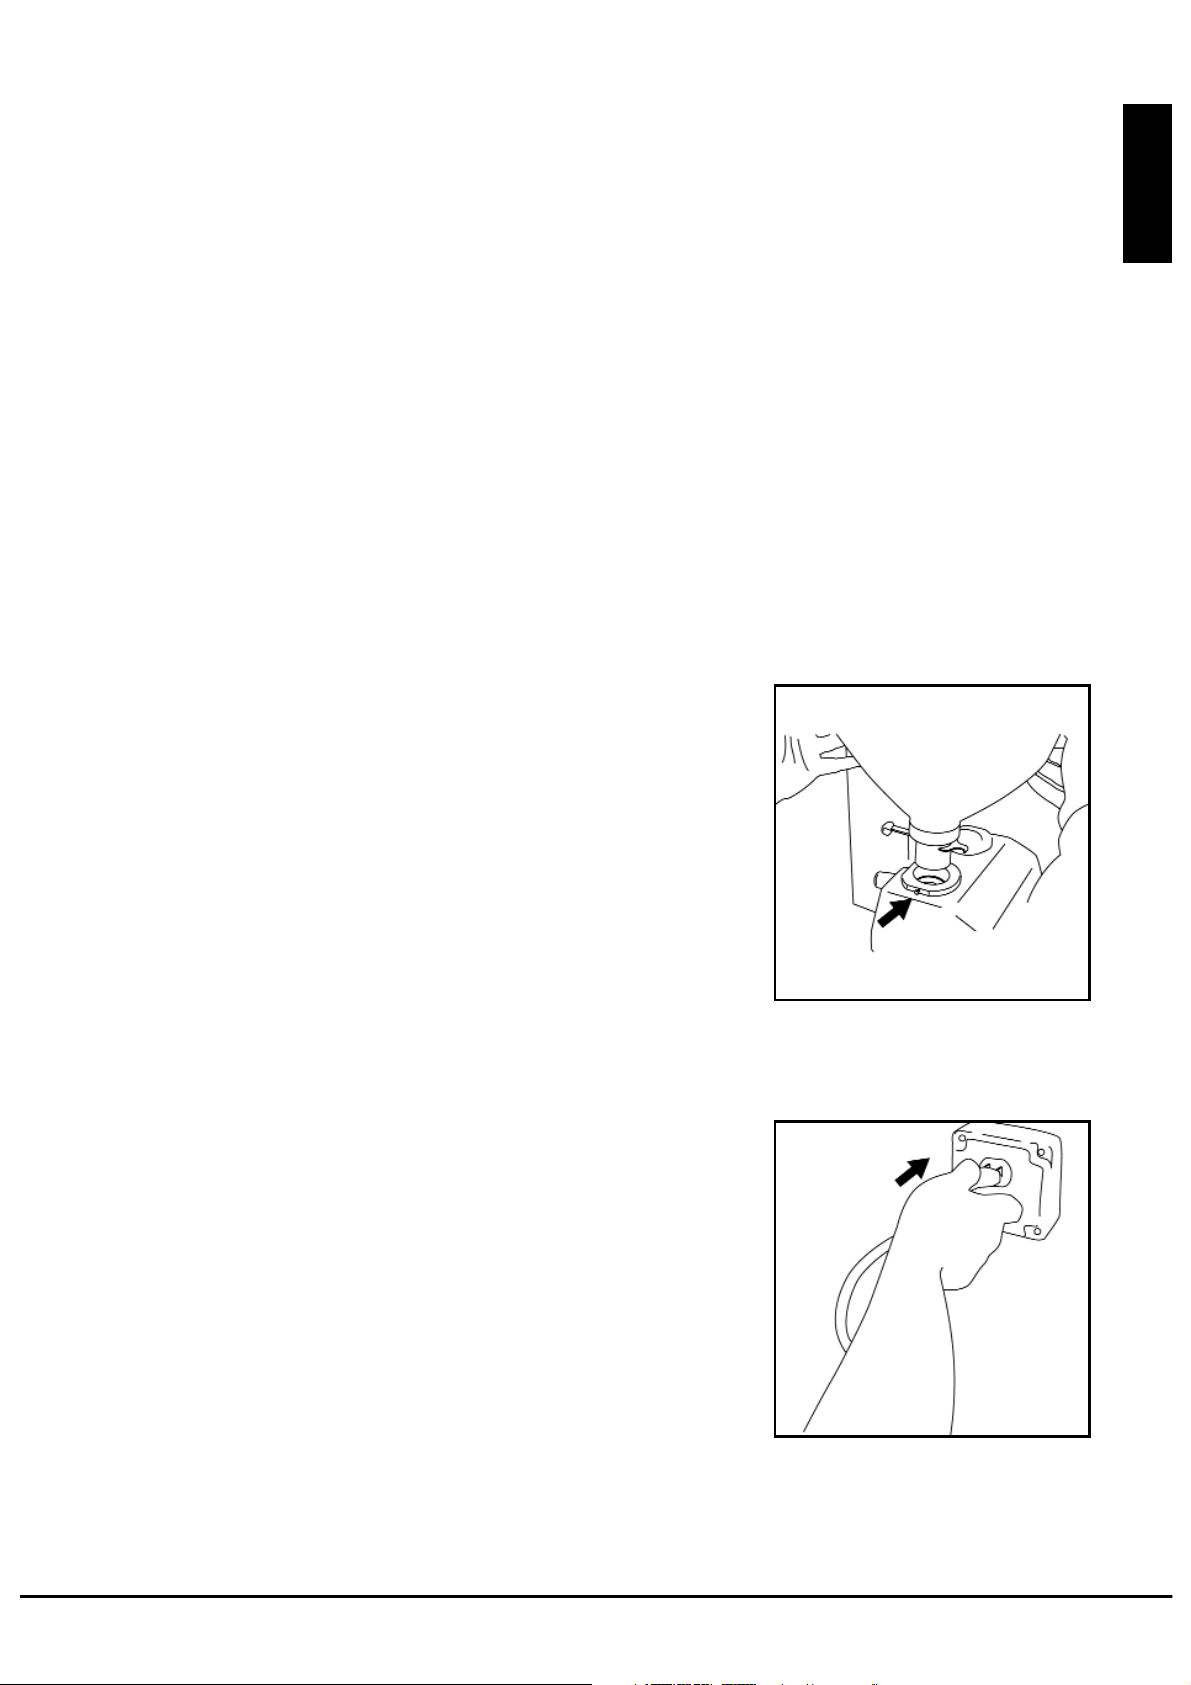
Page 6
6
English
La Marzocco International | USA • La Marzocco Technical Center s.r.l. | Italy
(4) Open the bean gates.
(3) Pour coffee into the bean hoppers.
(5) Turn on the grinder by engaging the main
power switch. The red light will come on.
Leave space above
the Swift EPS
B
Page 7
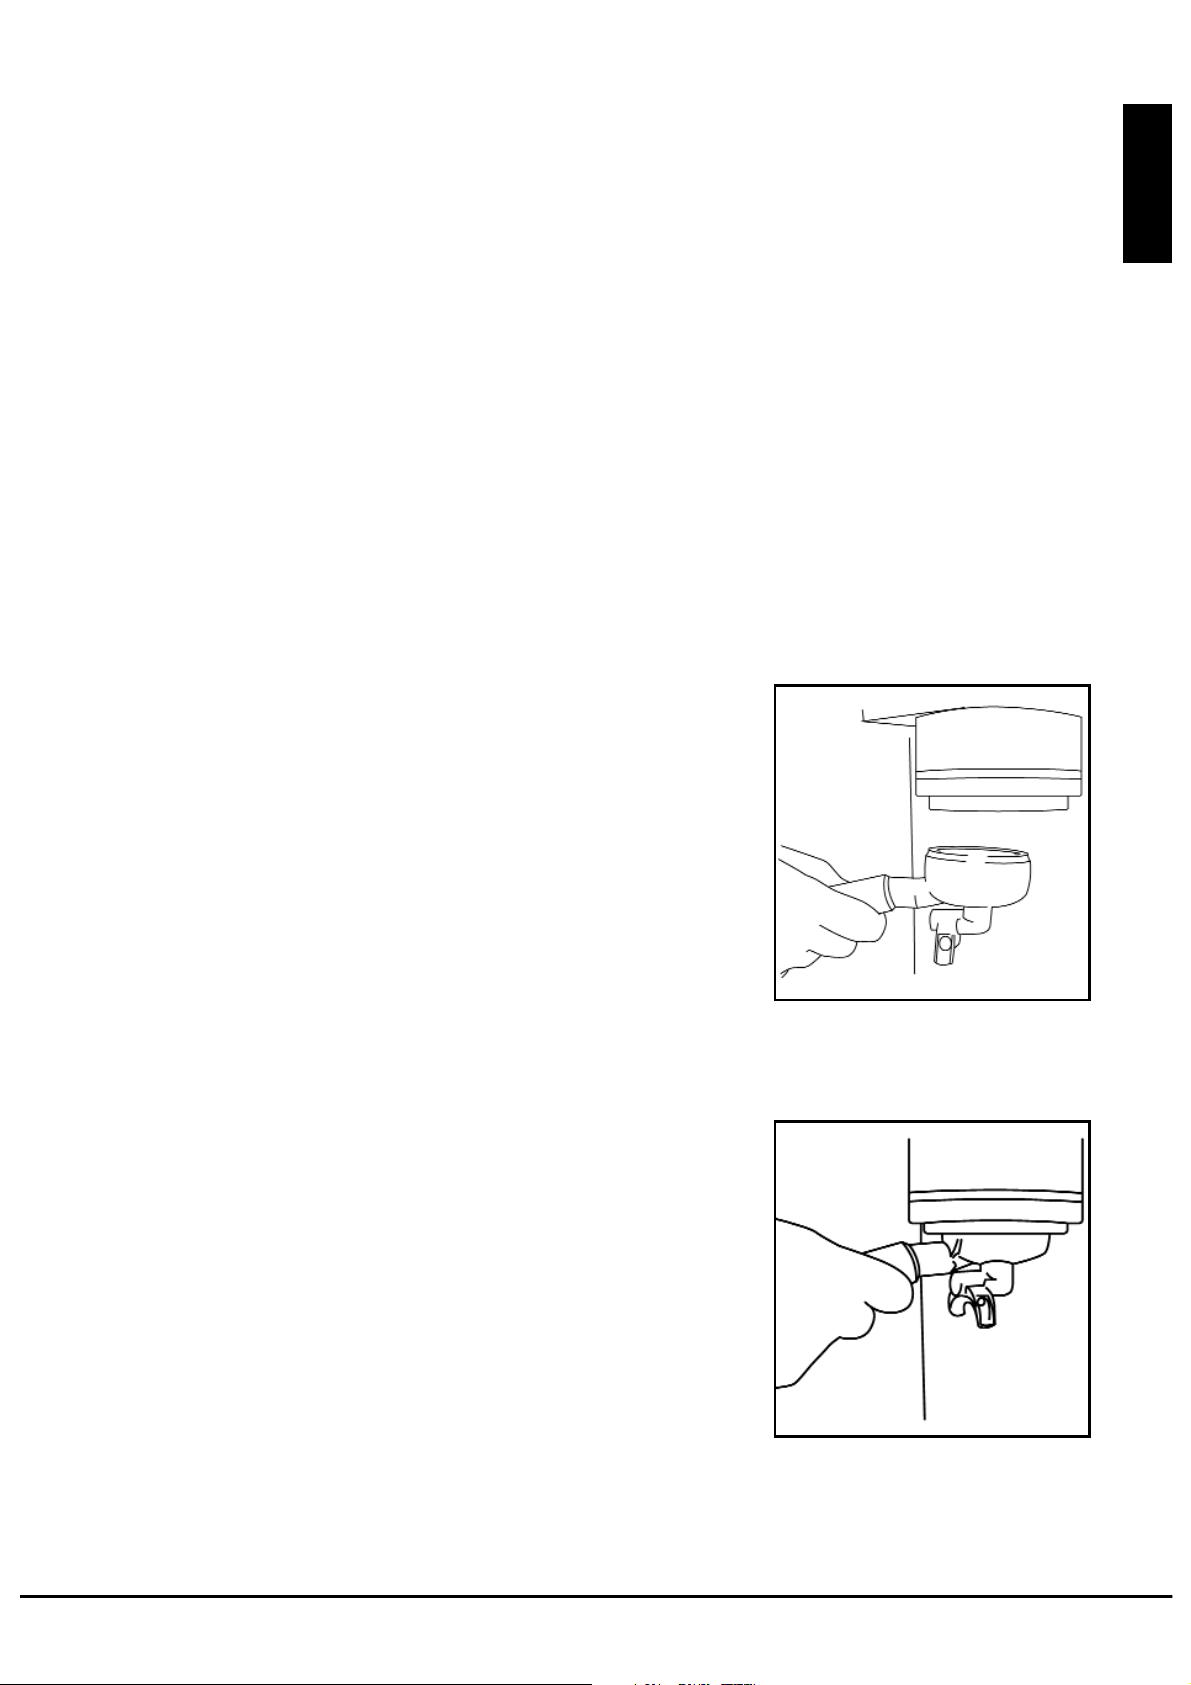
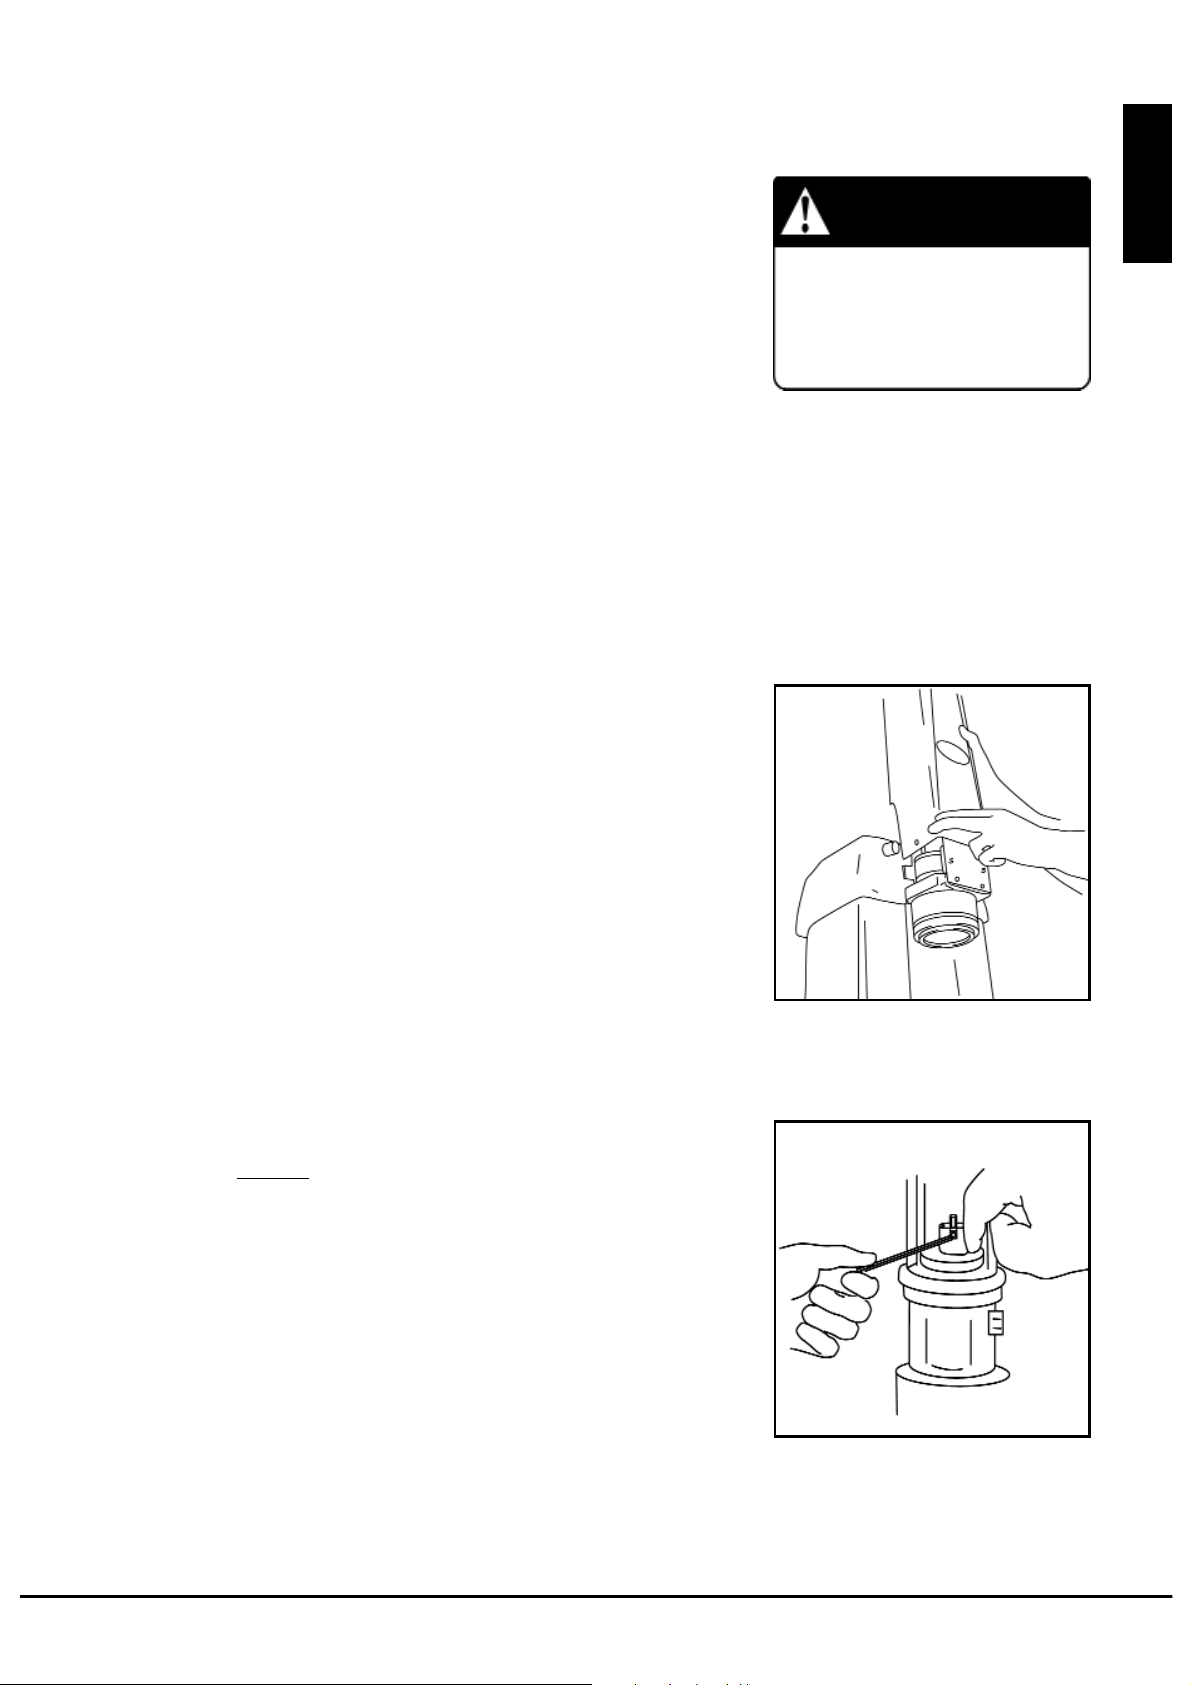
There is no need to force it into position
Engage portafilter gently
Engaging the Portafilter
The portafilter engages directly to the Swift EPS
B.
Since the Swift EPS
B has no watertight seal, it is not
necessary to force the portafilter into place. Engage
the portafilter with only a light amount of force. If the
grinder shifts on the counter top, you are using too
much force.
7
English
www.lamarzocco.com
Page 8
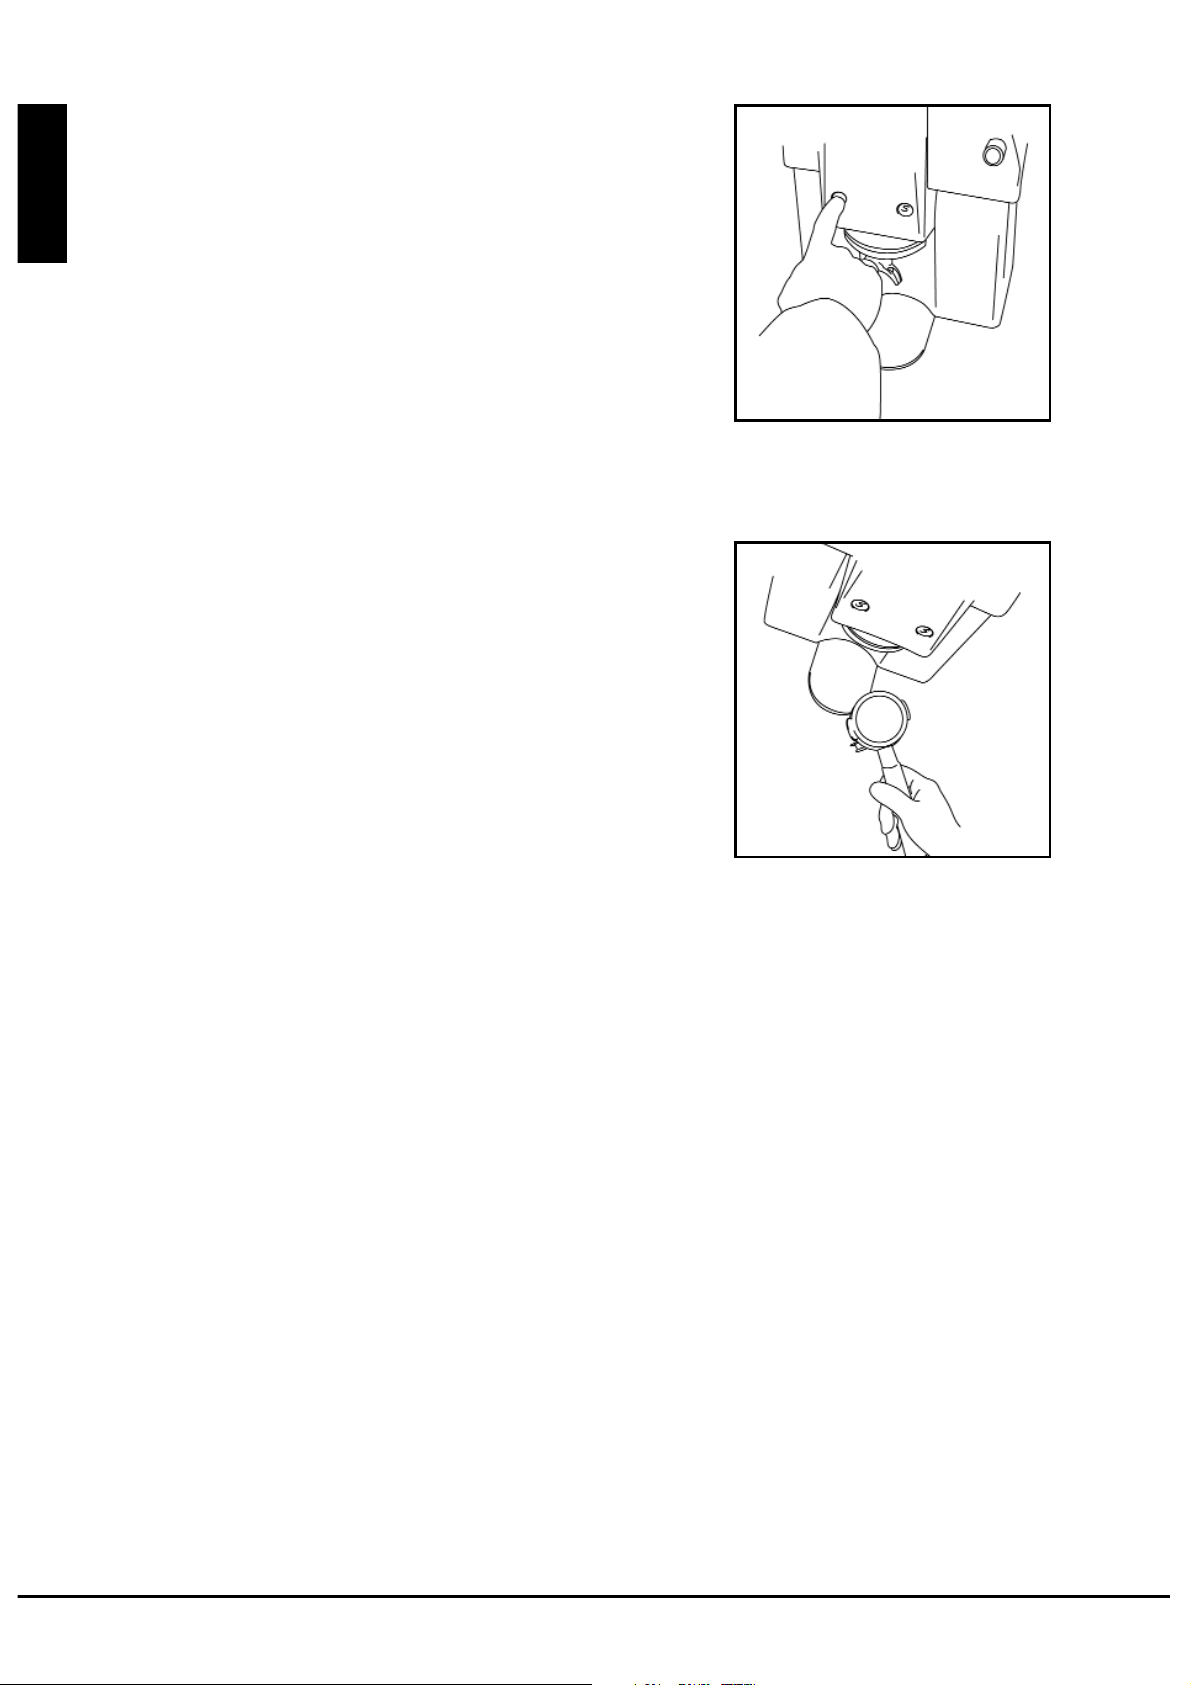
Select the right or left
bean hopper
Remove prepared portafilter
Operating the Swift EPS
B
Once the portafilter is engaged, press one of the start
buttons located at the front of the Swift EPS
B. The
right and left buttons correspond to the right and left
bean hoppers. Coffee will be ground, dosed, and
tamped from one of these locations, depending on
which button you press.
The red indicator lights located above the start
buttons are illuminated when the Swift EPS
B is
grinding and tamping.
Once the red light corresponding to the button
selected is no longer illuminated, you may remove
the portafilter from the Swift EPS
B and engage it into
the espresso machine.
The Swift EPS
B
tamps the coffee as it is ground. When
the volume of ground coffee in the portafilter reaches
the set level, the grinding motor turns off. The
tamping motor continues to run for 1-3 seconds,
“polishing” the tamped coffee.
8
English
La Marzocco International | USA • La Marzocco Technical Center s.r.l. | Italy
Page 9
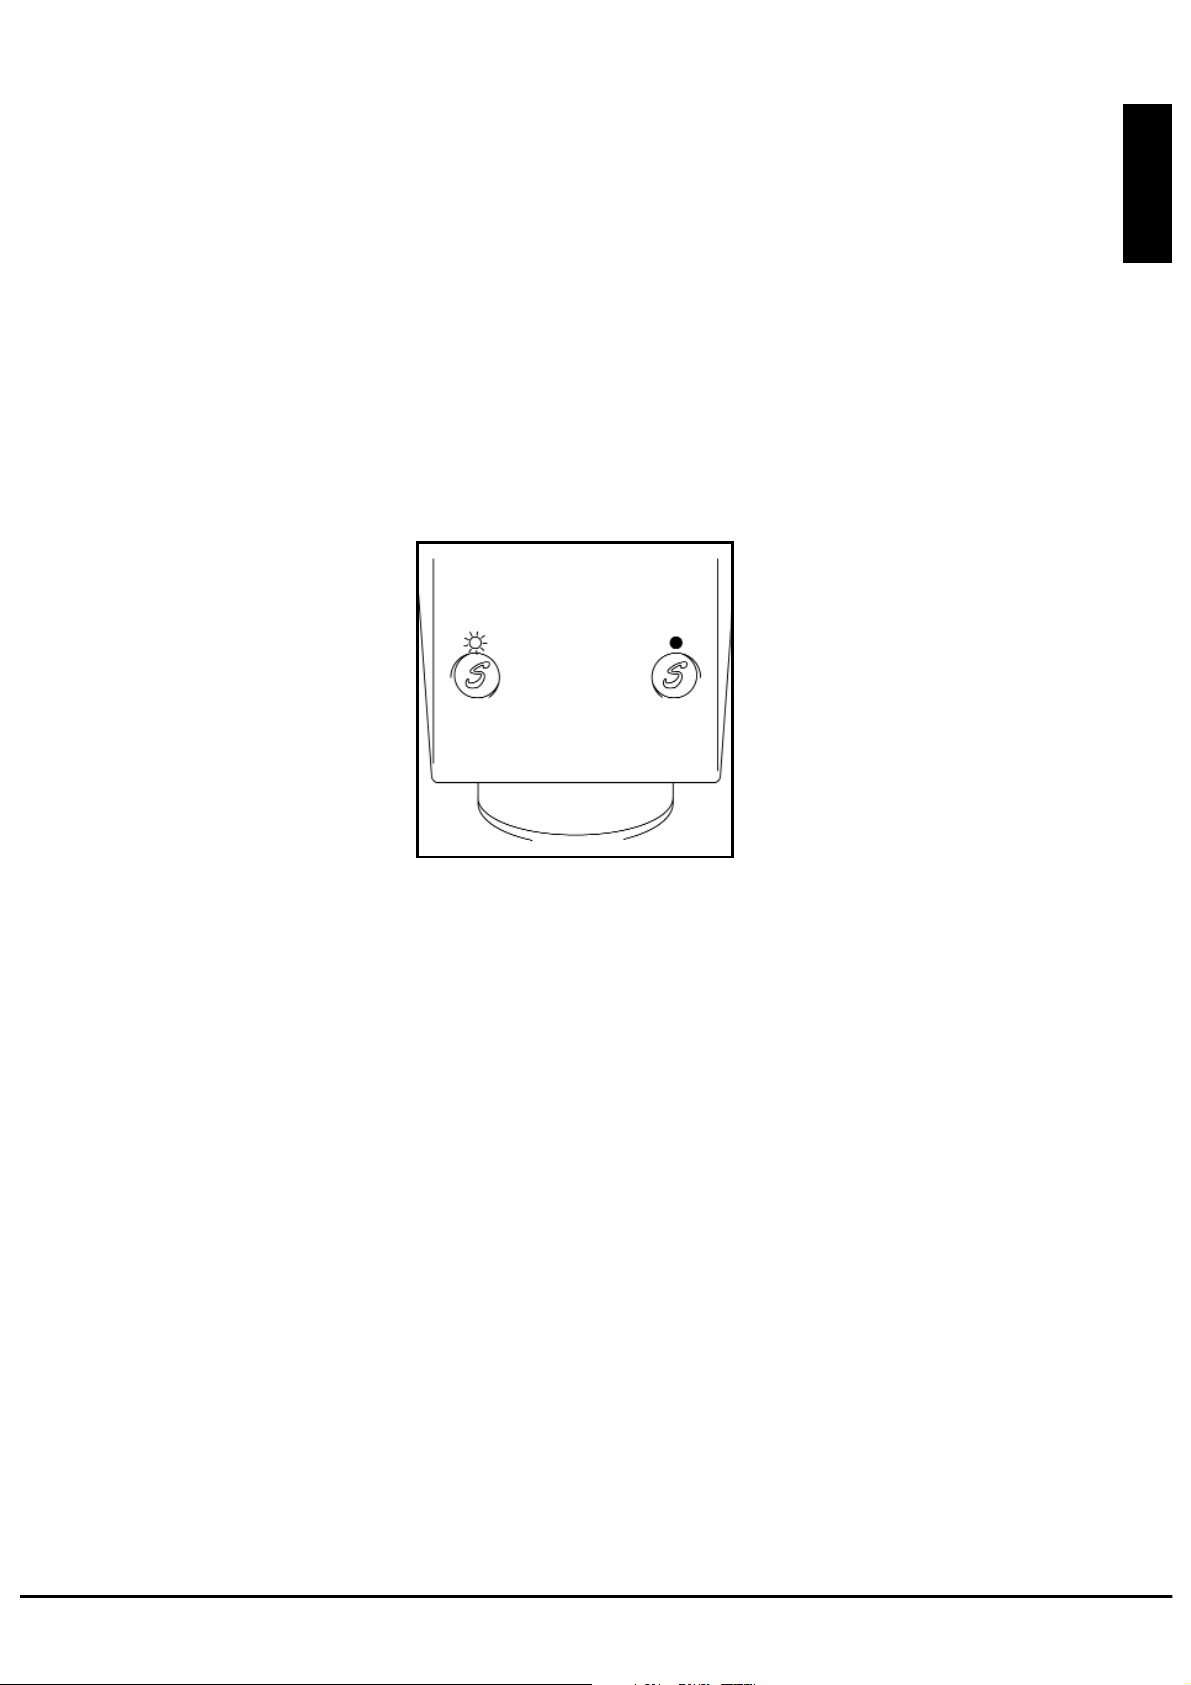
Blinking indicator lights
relay information
Flashing indicator lights
The red indicator lights will flash for a number of
reasons. These are summarized below:
• You attempted to start the process with a full
portafilter.
• The safety timer has run out due to an empty bean
hopper, a closed bean gate, or a plugged bean
hopper chute.
• There is no portafilter engaged in the Swift EPS
B.
9
English
www.lamarzocco.com
Page 10
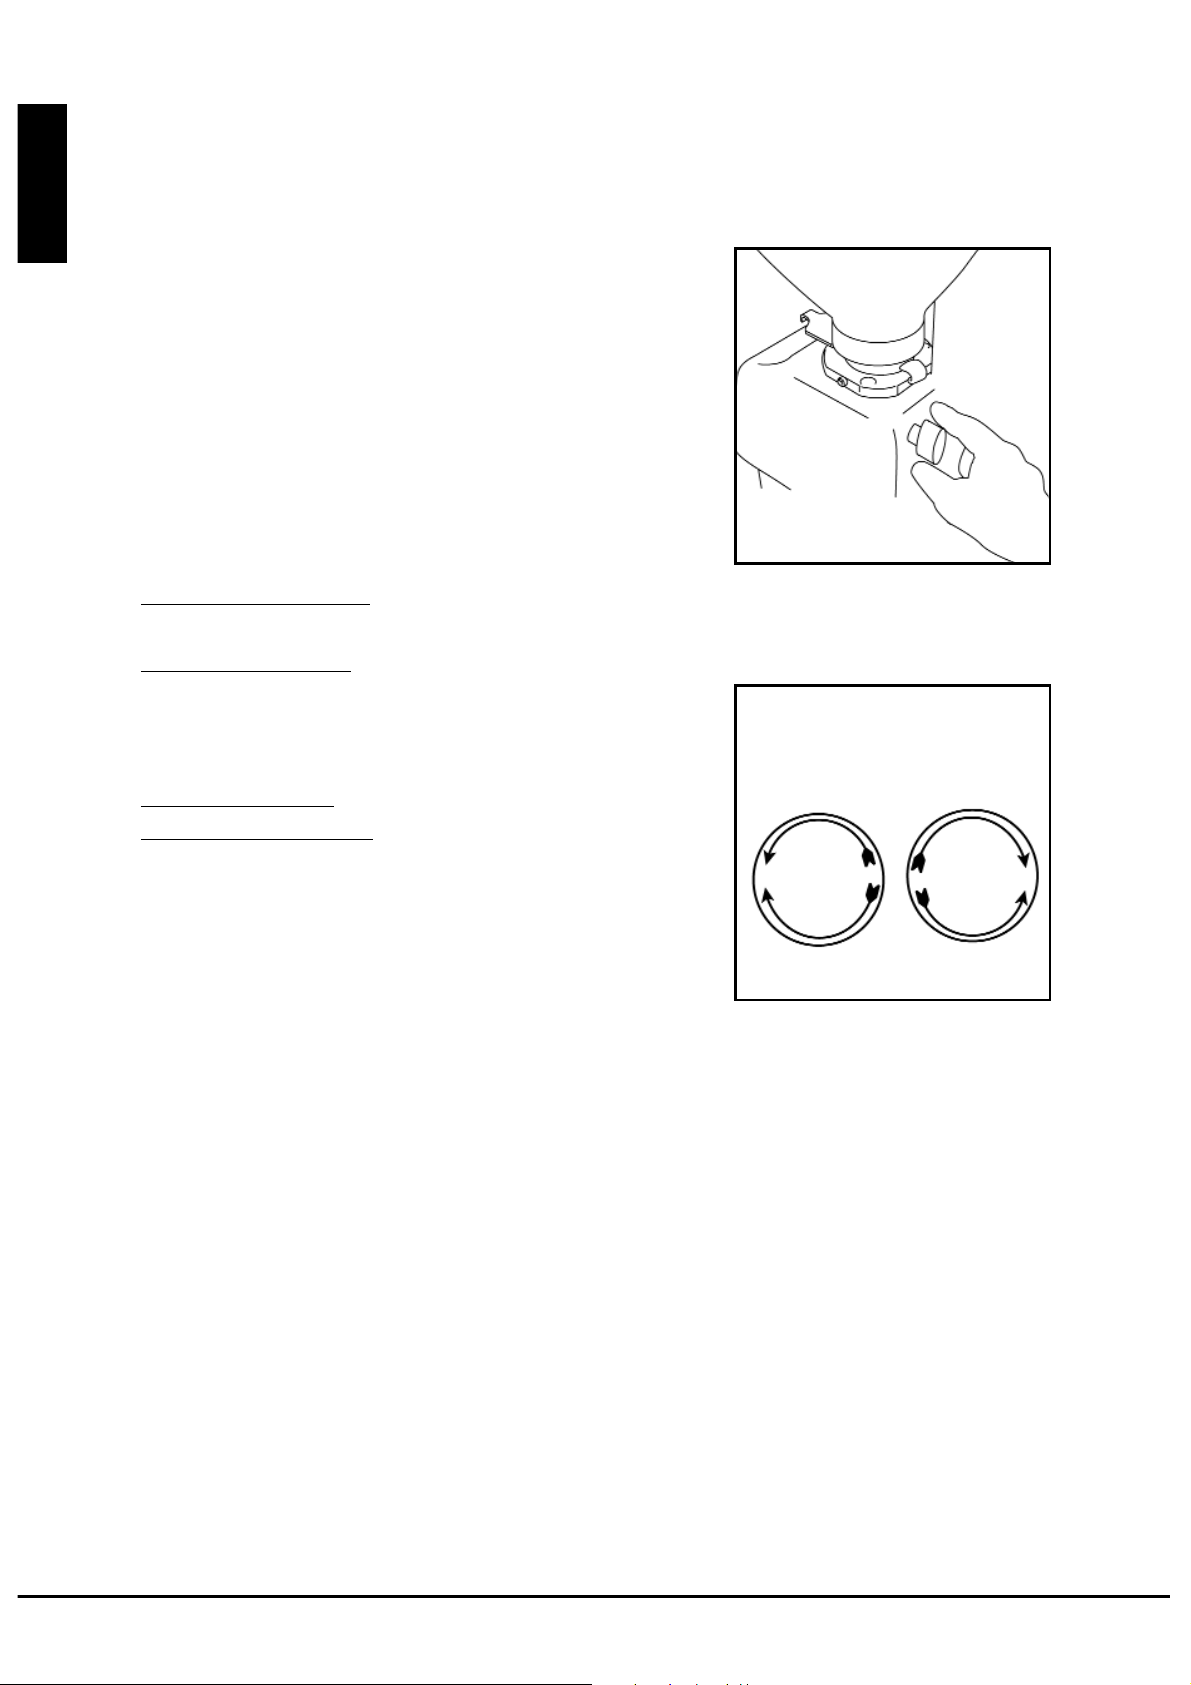
Adjusting Coffee Grind
To achieve your desired brew time and coffee
consistency, a manual adjustment can be made to
the grinder to modify the grind of the coffee. (The
tamping pressure is not adjustable and remains
constant). Rotate the adjustor knobs as described
below.
(1) Locate the grinder adjustor knob that
corresponds to the left or right side of the grinder.
(2) Grinding the coffee more finely will result in a
slower pour. To achieve a slower pour, adjust the
knobs as follows:
Left bean hopper:
Turn the knob counterclockwise.
Right bean hopper
: Turn the knob clockwise.
(3) Grinding the coffee more coarsely will result in a
faster pour. To achieve a faster pour, adjust the
knobs as follows:
Left bean hopper
: Turn the knob clockwise.
Right bean hopper
: Turn the knob counter-
clockwise.
When making this adjustment, remember to turn the
knob in a minimum of half-turn increments.
Brew one or two shots to test the adjustment.
Note: There are many variables that can affect
coffee, including temperature, humidity, and
freshness of the roast. All of these can cause slight
variations in shot times.
10
English
Adjust coffee grind
La Marzocco International | USA • La Marzocco Technical Center s.r.l. | Italy
SLOWER
POUR
FASTER
POUR
SLOWER
POUR
Left
bean
hopper
Right
bean
hopper
FASTER
POUR
Page 11
Adjusting Dose Quantity
The Swift EPSB
is set to dose approximately 16 to 18
grams of coffee in 22mm basket provided with the
grinder. It is possible to change the dosage quantity
by raising or lowering the height of the impeller.
Additionally, the Swift EPS
B is able to dose different
quantities using other baskets, available through your
retailer.
11
English
Lift off cover
Loosen set screw
www.lamarzocco.com
WARNING
HAZARDOUS VOLTAGE
DISCONNECT FROM
POWER SUPPLY BEFORE
SERVICING
(1) Remove the tamper cover as described on
page 19.
(2) Using the long-arm 3/32 hex-size L-key,
loosen
the set screw in the collar of the
tamper shaft coupling.
Page 12

(4) To increase the
dosage amount,
turn the impeller
clockwise, as
viewed from
below.
To decrease the
dosage amount,
turn the impeller
counter-clockwise,
as viewed from
below.
Note: One 360° turn is equal to approximately 1 gram of coffee.
12
Increase the dosage
English
Decrease the dosage
Hold tamper shaft coupler
and rotate impeller
Retighten set screw
La Marzocco International | USA • La Marzocco Technical Center s.r.l. | Italy
(3) Holding the tamper shaft coupling in place,
rotate the impeller in the direction desired.
(5) Ensure that the set screw is against the flat
side of the tamper shaft. Retighten the set
screw in the collar of the tamper shaft
coupling.
(6) Reassemble.
Page 13

Daily Cleaning
Daily cleaning of the Swift EPSB
is important to the
quality of your coffee beverages and to the
mechanical life of the equipment. When the cleaning
instructions are carried out each day, there will be
little chance of old coffee residue spoiling the flavor
of your espresso drinks, or interfering with the
mechanical operation of your machine. There are
three areas that must be cleaned: the bean hoppers,
the burr chamber, and the impeller.
13
English
Close the bean gate
Disconnect
www.lamarzocco.com
(1) To clean the bean hoppers, close the bean
gate to stop the flow of coffee beans to the
grinding burrs.
(2) Grind coffee into the portafilter to clear the
remaining coffee. This may require two doses.
(3) Disconnect the Swift EPSB from its power
supply.
Bean hoppers and burr chamber
WARNING
HAZARDOUS VOLTAGE
DISCONNECT FROM
POWER SUPPLY BEFORE
SERVICING
Page 14

14
English
Remove bean hoppers
Loosen safety screw
La Marzocco International | USA • La Marzocco Technical Center s.r.l. | Italy
(4) The bean hoppers are locked into position by
safety screw. Loosen the safety screw and lift
the bean hopper from its mount.
(5) Lift the bean hopper from its position. (Hold
the bean gate closed while removing the
bean hopper.)
(6) With a small brush, clean the burr chamber.
Page 15

CAUTION
DO NOT OPERATE WITHOUT
BEAN HOPPERS IN PLACE
AND SAFETY SCREWS
TIGHTENED
15
English
Wipe
Vacuum
www.lamarzocco.com
(7) Vacuum coffee fragments and loose grounds
from the burr chamber.
(8) Wipe the inside of the bean hopper with a soft
cloth to remove coffee oils.
(9) Repeat for both right and left bean hoppers.
(10) Reassemble unit.
Do not operate without bean hoppers in place
and safety screws tightened.
Page 16

Impeller
16
English
Tamper cover lid removal
Hold shaft lock firmly
La Marzocco International | USA • La Marzocco Technical Center s.r.l. | Italy
(2) Lift off the tamper cover lid.
(1) Disconnnect the Swift EPSB from its power
supply.
(3) Press and hold the shaft lock to prevent the
shaft from turning.
WARNING
HAZARDOUS VOLTAGE
DISCONNECT FROM
POWER SUPPLY BEFORE
SERVICING
Page 17

17
English
Remove the reverse-threaded
impeller
www.lamarzocco.com
(4) With your thumb and forefinger, press
against the impeller flats. Turn the impeller
clockwise, as viewed from below, to remove.
Page 18

18
English
Clean impeller
Clean portafilter engagement
area
La Marzocco International | USA • La Marzocco Technical Center s.r.l. | Italy
(5) With the impeller out, clean around the
bayonet ring with the brush and wipe loose
grounds from this area. Insert the cleaning
brush into the coffee collection area above
the impeller and again wipe loose grounds
away. Clean the impeller with a soft, dry
cloth.
(6) Reinstall the impeller by turning counter
clockwise.
(7) Reconnect the Swift EPS
B to its power supply.
Page 19

Burr change-out
Periodic burr replacement is required. While the
ceramic burrs used in the Swift EPS
B have a much
longer life expectancy than normal steel burrs, it is
still necessary to watch your coffee for the tell-tale
signs of burr wear. These signs include inconsistent
shot extraction times, and the absence of noticeable
change in your espresso when adjustments are made
to the grinder.
Remove upper screws (2)
19
English
Remove lower screws (2)
Lift off cover
www.lamarzocco.com
(1) Close the bean gates and grind out remaining
coffee.
(2) Remove both bean hoppers (see pages 13-15).
(3) Remove the four screws holding the tamper
cover in place, and lift off the tamper cover.
WARNING
HAZARDOUS VOLTAGE
DISCONNECT FROM
POWER SUPPLY BEFORE
SERVICING
Page 20

20
English
Remove screws
Lift off cover
La Marzocco International | USA • La Marzocco Technical Center s.r.l. | Italy
(5) Remove the four perimeter grinder cover
screws. Lift off cover.
(4) Slide the two grind adjustor knobs from the
shafts.
Page 21

21
English
Remove adjusting mechanism
Loosen adjustor clamp
www.lamarzocco.com
(6) Remove adjustor clamp from grinder head
and remove adjusting mechanism.
Page 22

22
English
Lift off
Rotate
La Marzocco International | USA • La Marzocco Technical Center s.r.l. | Italy
(7) Rotate burr collar several revolutions
counterclockwise, until free.
Page 23

23
English
Remove upper screws
Remove lower screws
Wipe clean
www.lamarzocco.com
(9) Clean burr engagement surface with a towel
or brush.
(8) Remove the three burr mounting screws from
both upper and lower burrs.
Page 24

24
English
Position burr
Vacuum
La Marzocco International | USA • La Marzocco Technical Center s.r.l. | Italy
(11) Install new burrs. Do not over-tighten screws,
and be sure no debris is left under the burrs.
(12) Reassemble. Use a small amount of food
grade grease on the upper burr mount
threads when reinstalling.
(10) Vacuum the burr chamber.
Page 25

Chute clean-out tool
Occasionally the chute between the grinders and
tamping chamber may become clogged, causing the
fuse (resettable or replacable) to trip. In addition to
replacing or resetting the fuse, it is important to
remove the clogged grounds. On machines with
serial numbers above 656, a chute clean-out tool is
included. This tool is used to loosen compacted
grounds and alleviate clogging.
25
English
Lift off cover
Insert tool into chute hole
www.lamarzocco.com
(1) Clean out the hoppers and burr chambers as
described on pages 13-15.
(2) Remove tamper cover as described on p. 19.
(3) Find the holes located on either side of the
lower grounds chamber.
(4) Insert the long end of the clean-out tool into
the hole. Repeat on other side.
(5) Reassemble machine.
WARNING
HAZARDOUS VOLTAGE
DISCONNECT FROM
POWER SUPPLY BEFORE
SERVICING
Page 26

Fuse replacement and Reset Switches
The Swift EPSB
has four fuses located at the rear of the
machine behind the removable panel. These
correspond to each of the grinder motors, the
tamping motor, and the electronic controls.
Occasionally it may be necessary to replace a fuse.
When switching fuses be sure to use only correctly
rated replacement fuses. Electronics = 1 ea. @ 125m
amps (normal); motor, grinder = 2 ea. @ 10 amps
GDC; motor, tamper = 1 ea. @ 1 amp GDC. On
machines with serial numbers 656 and higher, the
10 amp motor fuses are replaced with reset
switches on the exteror of the grinder. The head of
the switch will protrude when it needs to be reset.
Note: See page 31-32 for fuse sizes and locations.
26
English
Remove screws (2)
Pull out
La Marzocco International | USA • La Marzocco Technical Center s.r.l. | Italy
Pull down
(1) Disconnect the Swift EPSB from its power
supply.
(2) Access the fuse area by removing the two
screws located at the lower part of the rear
panel door. Do not remove the ground wire
screw on the rear panel door.
(3) Pull the panel door down and away, then
unplug the ground wire, to expose the control
electronics.
WARNING
HAZARDOUS VOLTAGE
DISCONNECT FROM
POWER SUPPLY BEFORE
SERVICING
Page 27

27
English
Replace cover
www.lamarzocco.com
(5) Replace the damaged fuse with the correctly
rated fuse. (See electrical schematic, page
31-32)
(4) Remove the fuse using the tool provided.
Note: A damaged fuse is identifiable by a
broken filament and discoloration of the fuse
glass.
(6) Replace cover and
screws.
(7) Reconnect power.
Turn on and resume use.
Page 28

TIPS AND TROUBLESHOOTING
What is the ideal shot time?
Shot time varies with all roasts and brew temperatures used to
brew espresso. Most likely, a minimum shot time is 18 seconds
and a maximum is somewhere in the 30 to 35 second range.
The ideal brew time for your coffee depends the coffee roast and
dose size. It is a relationship of bean solids and oils plus tamping
pressure and brew water temperature. Most of all, personal taste
preference should control shot time.
After brewing, re-engage the portafilter in the group.
Temperature stability at the portafilter will result in more
consistent pour times. The portafilter mounting area is a source
of heat which can benefit the brewing process when used to
keep the portafilter at temperature.
Clean
groups and portafilters daily.
Clean
espresso contact surfaces (screens and inserts) will result
in better flavored coffee.
Limit rinsing from the grouphead to one second or less.
Excessively rinsing the portafilter reduces the amount of hot
water available for brewing. An infusion of cold water into the
brewing vessel may temporarily lower water temperature below
the desired level. Since rinsing is usually undertaken as a way to
clean the portafilter, consider wiping the portafilter instead. If
you must rinse, do so with as little water as possible.
Watch the espresso you are brewing. Although making espresso
is partly a mechanical process, the outcome is determined by
organic factors like the coffee, the weather, the water, and your
ability to balance these. Defining and adhering to a set of fixed
parameters like brew time and shot size helps to ensure a
beautiful shot. However, ultimately the look and taste of the
espresso is the final arbiter of a shot’sacceptability. You must
determine when everything is just right.
28
English
La Marzocco International | USA • La Marzocco Technical Center s.r.l. | Italy
Page 29

TROUBLESHOOTING GUIDE
(* Items are for techs)
Push start buttons and NOTHING happens.
- Check that the electrical plug is fully inserted
- Switch the on/off switch to the on position
(the light should be lit)
*Check fuses
Push the start button and the LIGHTS FLASH.
- The portafilter is not fully engaged
- The portafilter is already full
- The tamper is stuck in the full or up position (see tamper
cleaning instructions)
- The safety timer has run out due to and empty bean hopper,
closed bean gate, or a plugged bean hopper chute.
*Safety micro-switch is faulty
*Safety micro-switch rod is not contacting the switch properly
Grind TIME OUT is reached before basket is full.
- Check that the bean hopper gate is fully open
- Grind coarseness may be too fine
- Check passage below bean hopper for obstructions
*Adjust grind time reostat
One GRINDING MOTOR does not run
(serial numbers 0-655)
- Check for blown fuse (see manual under fuse replacement)
- If a grinder motor fuse is blown replace it with a 10 amp GDC
fuse
- Before starting the grinder motor remove the bean hopper
(see manual) and ensure that the motor spins freely. If it does
not spin freely follow the burr chamber cleaning instructions
and look for foreign objects: nail, paper clip, rock, penny, etc.
29
English
www.lamarzocco.com
Page 30

One GRINDING MOTOR does not run
(serial numbers after 656)
- Press the reset button that corresponds with the motor that
does not run
- If the reset button pops out again, turn the grind adjust knob
4 rotations in the faster pour direction, insert the clean out rod
(see manual) remove the clean out rod, and restart the grinder.
- If the reset button pops out again, remove the bean hopper
(see manual) and ensure that the
motor spins freely. If it does not spin freely follow the burr
chamber cleaning instructions and look for foreign objects: nail,
paper clip, rock, penny, etc.
- Do not attempt to reset the breaker more than twice as this
action may overheat and damage the triac on the main power
board.
*Swap the power leads between the two motors to troubleshoot
motor and triac.
Shot gushes out at first and then slows down.
Adjust finish height of impeller
Inconsistent shot times
Adjust finish height of impeller
Change worn burrs
30
English
La Marzocco International | USA • La Marzocco Technical Center s.r.l. | Italy
Page 31

Electrical diagrams
Serial numbers up to 655
31
English
www.lamarzocco.com
TIME-OUT
GRINDER
115/230 VAC
LEFT
P
GREEN
P2
RIGHT
ON/OFF
SWITCH
TIME DELAY OFF
TAMPER
WHITE
CAP.
RED
WHITE
BLACK
115 VAC
GRINDER
MOTOR
BLACK
WHITE
FULL LIMIT SWITCH
WHITE
BLUE
WHITE
RED
PORTA-FILTER IN
LIMIT SWITCH
230 VAC
2
1
4
3
MOTOR
GRINDER
CAP.
WHITE
BLACK
WHITE
RED
WHITE
YELLOW/GREEN
FUSE NO.
1
2
3
4
BLACK
YELLOW/GREEN
FUNCTION CONTROL
TRANSFORMER
GRINDER MOTOR
TAMPER MOTOR
GRINDER MOTOR
CAP.
WHITE
RED
125mA FAST ACTING
10A TIME DELAY
1A TIME DELAY
10A TIME DELAY
MOTOR
TAMPER
AMPERAGE
Page 32

32
English
La Marzocco International | USA • La Marzocco Technical Center s.r.l. | Italy
Serial numbers 655 and above
115/230 VAC
TIME-OUT
GRINDER
P
LEFT
P2
CAP.
GREEN OR GREEN/YELLOW
RED
WHITE
RIGHT
ON/OFF
SWITCH
WHITE
MOTOR
GRINDER
TIME DELAY OFF
TAMPER
115 VAC
BLACK
BLACK
RED
10 AMP
MANUAL
RESET
FULL LIMIT SWITCH
WHITE
BLUE
WHITE
RED
PORTA-FILTER IN
LIMIT SWITCH
230 VAC
1
2
WHITE
10 AMP
MANUAL
RESET
RED
BLACK
MOTOR
GRINDER
RED
CAP.
WHITE
CAP.
YELLOW/GREEN
FUSE NO.
BLACK
COUNTER
1
2
BLACK
FUNCTION CONTROL
TRANSFORMER
TAMPER MOTOR
BLACK
RED
YELLOW/GREEN
125mA FAST ACTING
1A TIME DELAY
WHITE
AMPERAGE
MOTOR
TAMPER
 Loading...