

La Crosse Technology WS-9057U User Manual
WIRELESS FORECAST STATION
Model WS-9057U-IT-LC| Quick Setup Guide
INVENTORY OF CONTENTS
1. Wireless Forecast Station
2. Thermo/hygro transmitter (TX29UDTH-IT)
3. Instruction manual
FEATURES:
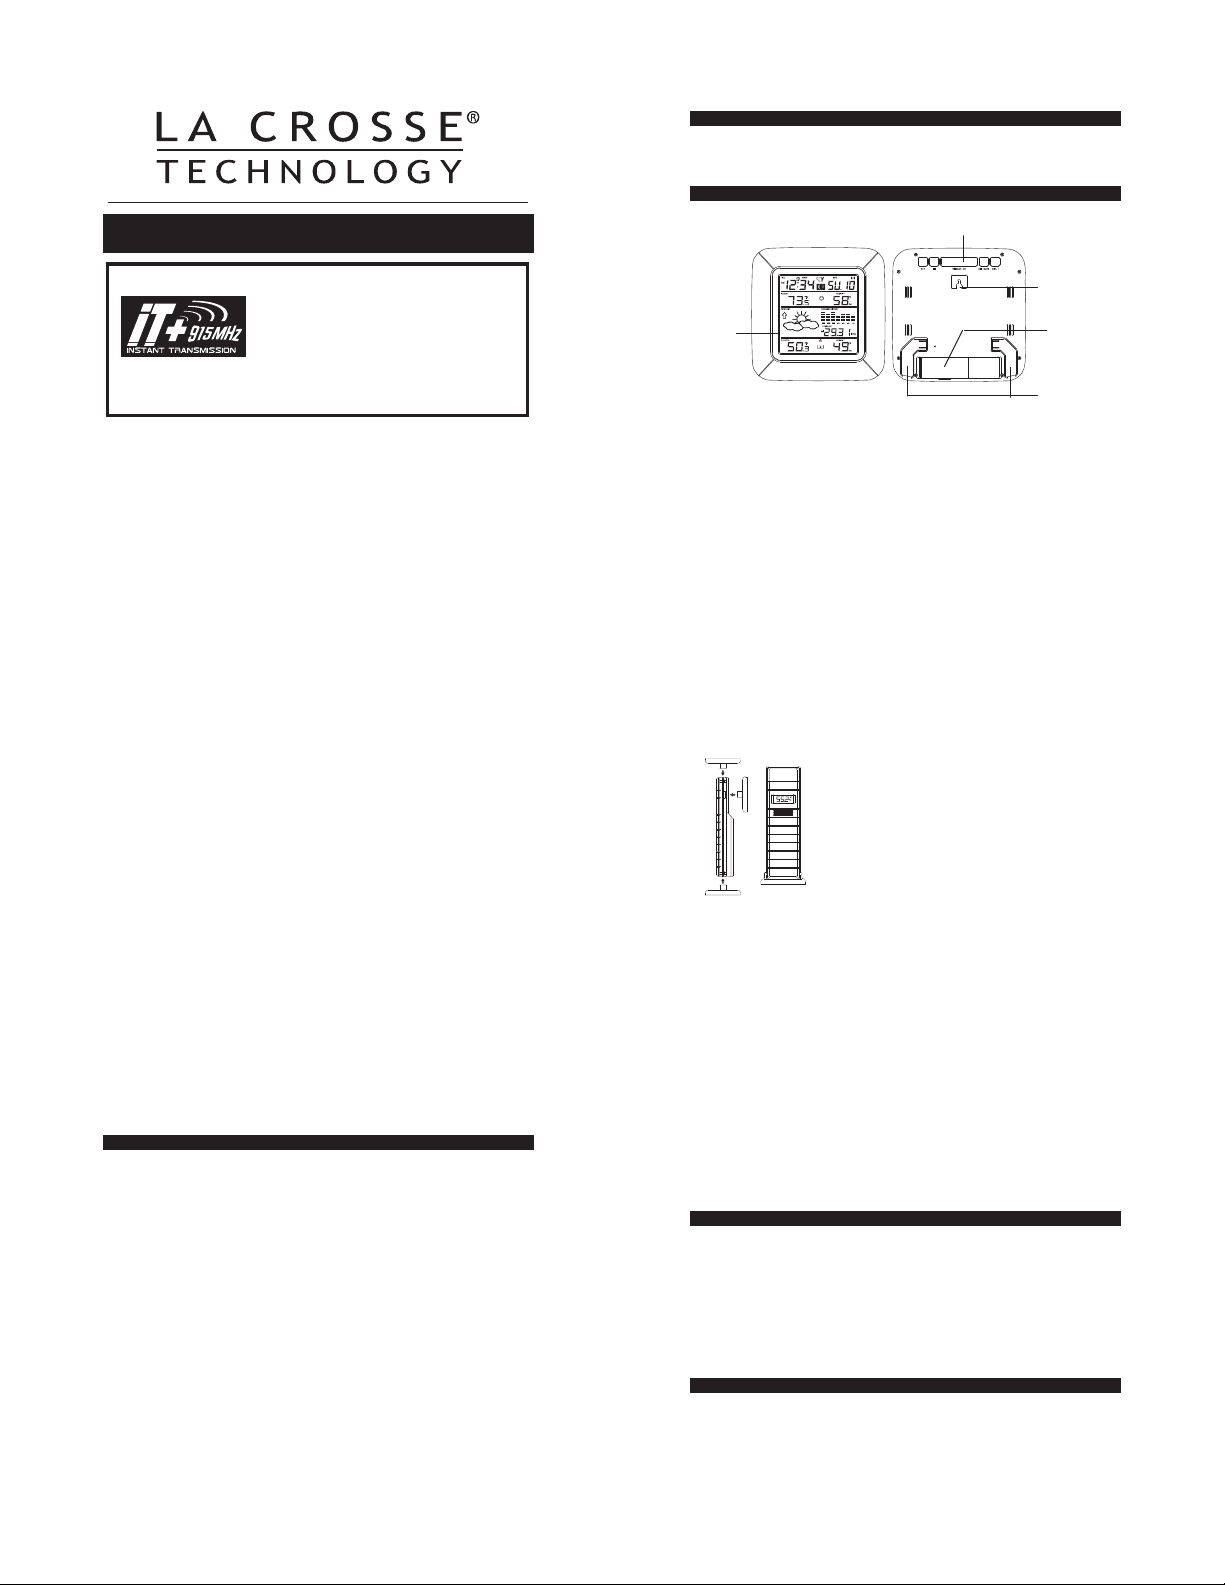
The Wireless forecast station
Function Keys
This product offers:
INSTANT TRANSMISSION is the state-ofthe-art new wireless transmission
technology, exclusively designed and
developed by LA CROSSE TECHNOLOGY.
INSTANT TRANSMISSION offers you an
immediate update (every 4 seconds!) of all
your outdoor data measured from the
transmitters: follow your climatic variations
in real-time!
1
x WWVB Radio controlled time with manual setting option
x Time reception ON/OFF (user selectable)
x 12/24 hour time display
x Time zone option ±12 hours
x Daylight saving time (DST On/Off)
x Weekday and day calendar display (year and month only in se tting
mode)
x Alarm setting with snooze function
x Display 12 Moon phases throughout the year
x Weather forecasting with weather tendency indicator
x Indoor comfort indicator
x Temperature display in °F/°C
x Indoor and outdoor temperature display with MIN/MAX records and
time of reception
x Humidity data display as RH%
x Indoor and outdoor humidity display with MIN/MAX records
x Relative air pressure hPa/ inHg with adjustable reference value
x Weather icon sensitivity setting
x Relative air pressure history for the past 24 hours (electronic
barometer with barometric pressure trend)
3
LCD
Display
2
x LCD contrast selectable
x Can receive up to 3 outdoor transmitters
x Wireless transmission at 915 MHz
x Signal reception intervals at 4 seconds
x Low battery indicator
x Table standing or wall mounting
Thermo-Hygro Transmitter
x Remote transmission of outdoor
temperature and humidity to wireless
forecast station by 915 MHz signals
x Alternate display of temperature and
humidity display
x Water-resistant casing
x Wall mounting case. (Mount in a sheltered
place. Avoid direct rain and sunshine
4
Wall Mount
Battery
Compartment
Foldable
Stands
SETUP INSTRUCTIONS STEP BY STEP:
STEP 1:
x Remove battery cover from the wireless forecast station. Lift up and pull
out to remove the cover.
x Insert 2 NEW “C” batteries (not included) into the back of the wireless
forecast station. Observe the correct polarity (see marking inside the
battery compartment).
x The Wireless Forecast Station will light up and show, indoor
temperature, humidity and pressure.
x Do Not Mix Old and New Batteries
x Do Not Mix Alkaline, Standard, Lithium or Rechargeable Batteries
STEP 2:
x Ensure that the transmitter is within 10 feet of the wireless forecast
station.
x Remove battery cover from TX29UDTH-IT transmitter: Slide the battery
cover down and lift off the back.
x Insert 2 NEW AA batteries into the transmitter. Observe the correct
polarity.
5
x Within 3 minutes the Wireless forecast station will show readings in the
outdoor temperature area on the LCD.
x Note: Allow the Wireless forecast station and the transmitter to stay
within 10 feet of each other for the first 15 minutes of set up.
TROUBLE SHOOTING:
x If the wireless forecast station does not display the outdoor temperature
after 3 minutes, remove the batteries from both units and start the setup
process again.
x For optimal 915MHz signal reception, the outdoor transmitter should be
placed within 330 feet (100 meters) from the indoor Wireless forecast
station.
x The forecast icons on the Wireless forecast station require 48-60 hours
to synch with the barometric pressure, so immediate readings may not
be accurate.
SETUP WITH MULTIPLE TRANSMITTERS:
The wireless forecast station will accommodate up to three remote
outdoor transmitters (TX29UDTH-IT). The SNOOZE/CH button allows
6
you to easily see the temperature in various locations: outdoors, baby’s
room, greenhouse, basement, etc.
To connect multiple remote transmitters to the Wireless Forecast Station:
1. Remove the battery cover from all the transmitters.
2. Insert 2-AA batteries in the first outdoor transmitter .
3. Insert 2 NEW “C” batteries (not included) into the back of the wireless
forecast station. The Wireless Forecast Station will light up and show,
indoor temperature, humidity and pressure.
4. When the reading appears in the outdoor temperature area, move to
the second transmitter.
5. Insert 2-AA batteries in the second outdoor transmitter.
6. The outdoor temperature area should show a temperature reading on
channel 1 and on channel 2.
7. When the readings appear in the outdoor temperature area (channel
2), move to the third transmitter.
8. Insert 2-AA batteries in the third outdoor transmitter.
9. When RF (radio frequency) connection is established, the respective
temperature & humidity for each of the selected channels (1, 2, or 3)
will appear on the main unit. Allow the transmitters and wireless
forecast station to sit near each other for 15 minutes to lock in the
signals.
Press and release the SNOOZE/CH button to view channel 1, 2 or 3 on
the Wireless Forecast Station when multiple transmitters are used.
Note: You cannot change channels if only one transmitter is connected.
Notes:
x If the signal reception is not successful on the first frequency of
915MHz for 45 seconds, the frequency is changed to 920MHz and the
learning is tried for another 45 seconds. If it is still not successful the
reception is tried for 45 seconds on 910MHz. This will also be done
during re-synchronization.
x When the wireless forecast station is receiving the WWVB time signal,
the outdoor transmitter data signal will temporarily not be received by
the wireless forecast station. During this short period of time, the
outdoor readings shown on the wireless forecast station will not be
renewed until the WWVB time signal is successfully received.
7
TO INSTALL AND REPLACE BATTERIES IN THE THERMO-HYGRO
TRANSMITTER
The Thermo-Hygro Transmitter uses 2 x AA, IEC, LR6,
1.5V batteries. To install and replace the batteries, please
follow the steps below:
1. Remove the cover.
2. Insert the batteries, observing the correct polarity (see
marking).
3. Replace the battery cover.
Note:
When changing batteries in any of the units, all units need to be reset by
following the setting up procedures. This is due to a random security code
assigned by the transmitter at start-up. This code must be received and
stored by the Wireless forecast station in the first 3 minutes of power
being supplied to the transmitter.
9
8
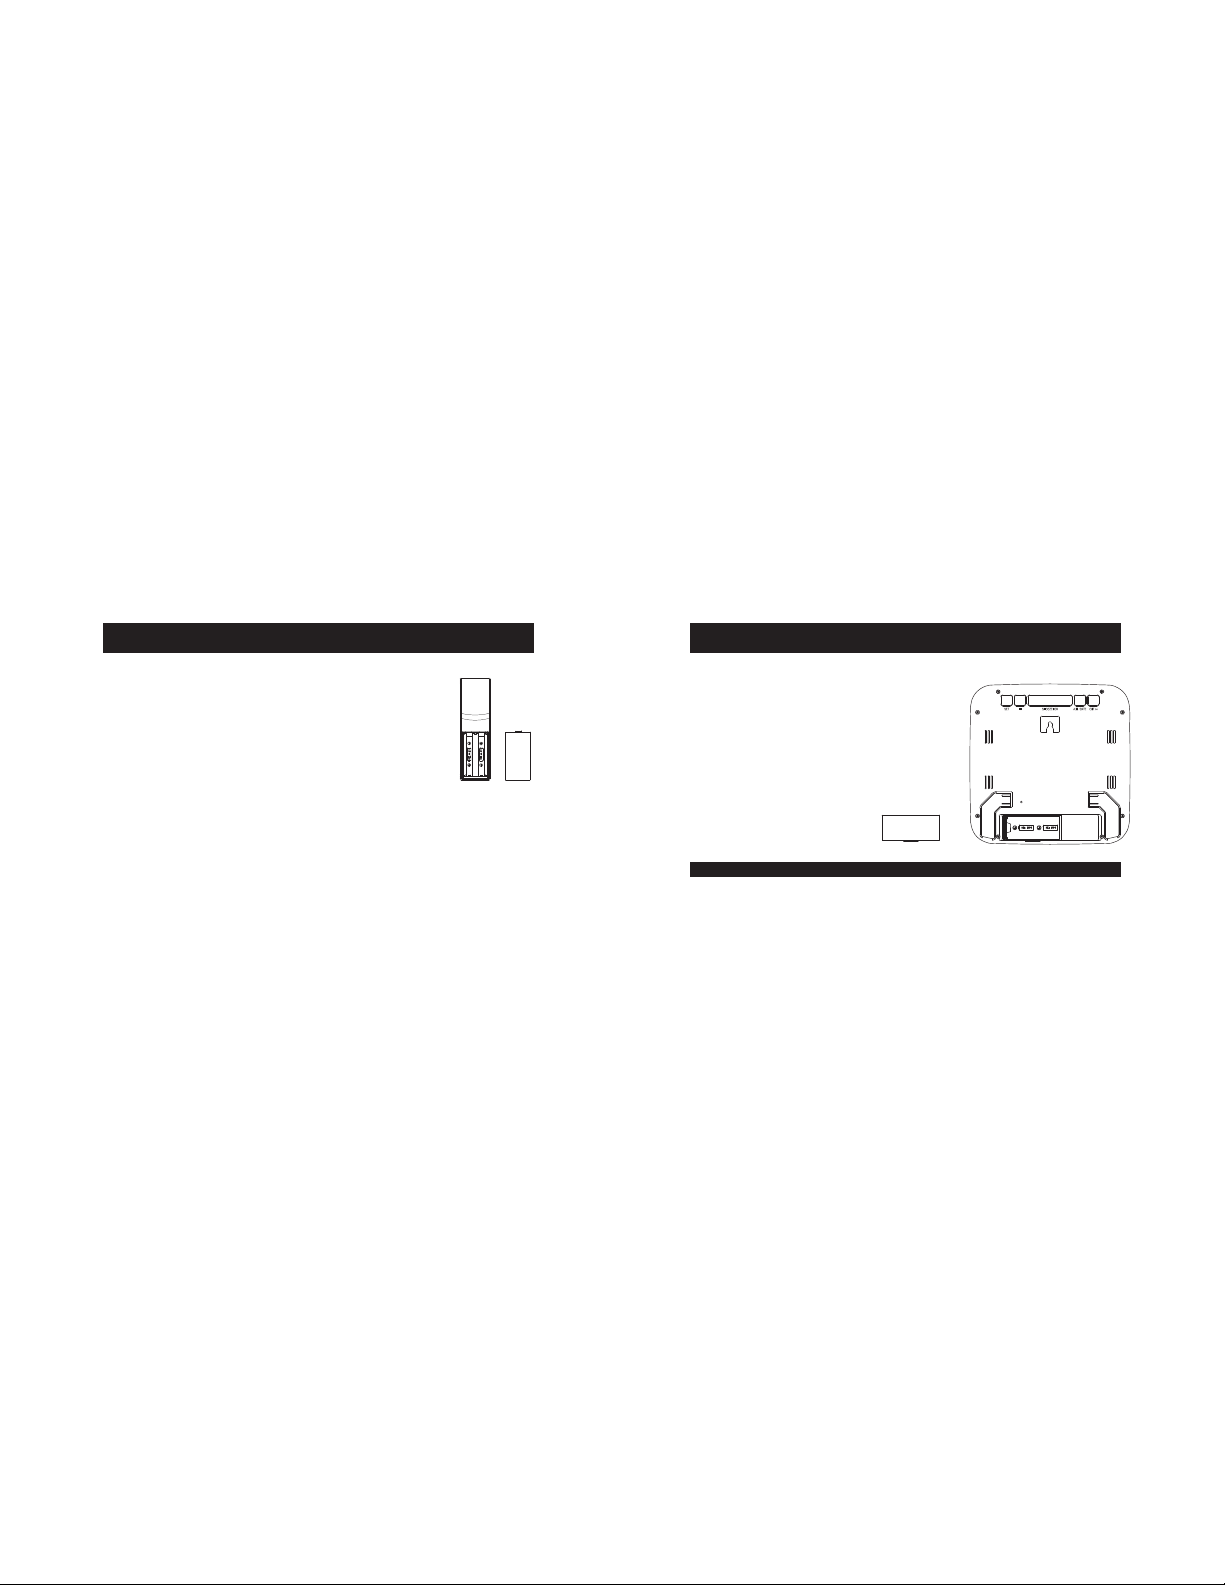
TO INSTALL AND REPLACE BATTERIES IN THE WIRELESS
FORECAST STATION
The Wireless forecast station uses 2 x C, IEC LR14 1.5V batteries. To
install and replace the batteries, please follow the steps below:
1. Insert finger or other solid object in the
space at the bottom center of the battery
compartment and lift up to remove the
cover.
2. Insert batteries observing the correct
polarity (see marking).
3. Replace compartment cover.
PROGRAM MENU
The SET button moves through the program menu. When you press and
release the SET button after each step, you will be moved to the next
step. The OUT/+ button will change a value.
10
CONTRAST: Hold the SET button for five seconds. LCD 4 will flash.
To increase or decrease the Contrast of the LCD display, press and
release the OUT/+ button. Press and release the SET button once to
move to the time zone.
TIME ZONE: The Time Zone will flash, showing a number following by
the letter h. Use the OUT/+ buttons to change the Time Zone. Please
note North American Time Zones are Negative Numbers: -4h Atlantic, -5h
Eastern,-6h Central, -7h Mountain, -8h Pacific, -9h Alaskan an d -10h
Hawaiian. The dash preceding the Time Zone number must be showing
for these Time Zones to be accurate. Press and release the SET button
to move to DST setting.
DAYLIGHT SAVING TIME: DST will show and ON will flash. Most
states use DST, so this should be set to ON. However if your location
does not use DST, use the OUT/+ button to turn it OFF. Press and
release the SET button once to select radio-controlled time.
RADIO-CONTROLLED TIME: RCC will show and ON will flash. Use the
OUT/+ button to set the RCC signal. (Leave this ON to receive WWVB
signal) Press and release the SET button once to select 12/24-hour time.
11
12/24-HOUR TIME MODE: Either 12h or 24h will flash. Use OUT/+
button to change from 12 to 24 hour format time (12h for AM/PM, 24h for
military time). Press and release the SET button once to select hour.
HOUR: The Hour will flash. Use the OUT/+ button to set the Hour. If
using 12-hour Time Mode, be sure to check the hour for am or pm. Press
and release the SET button once to move to minutes.
MINUTES: The Minutes will flash. Use the OUT/+ button to set the
minutes. Press and release the SET button once to select the year.
YEAR: The Year will flash. Use the OUT/+ button to set the Year. Press
and release the SET button once to select the month.
MONTH: The Month will flash. Use the OUT/+ button to set the Month.
Press and release the SET button once to select the date.
DATE: The numeric day will flash. Use the OUT/+ button to set the
Date correctly. Press and release the SET button once to select
Fahrenheit or Celsius.
12
 Loading...