

Page 1
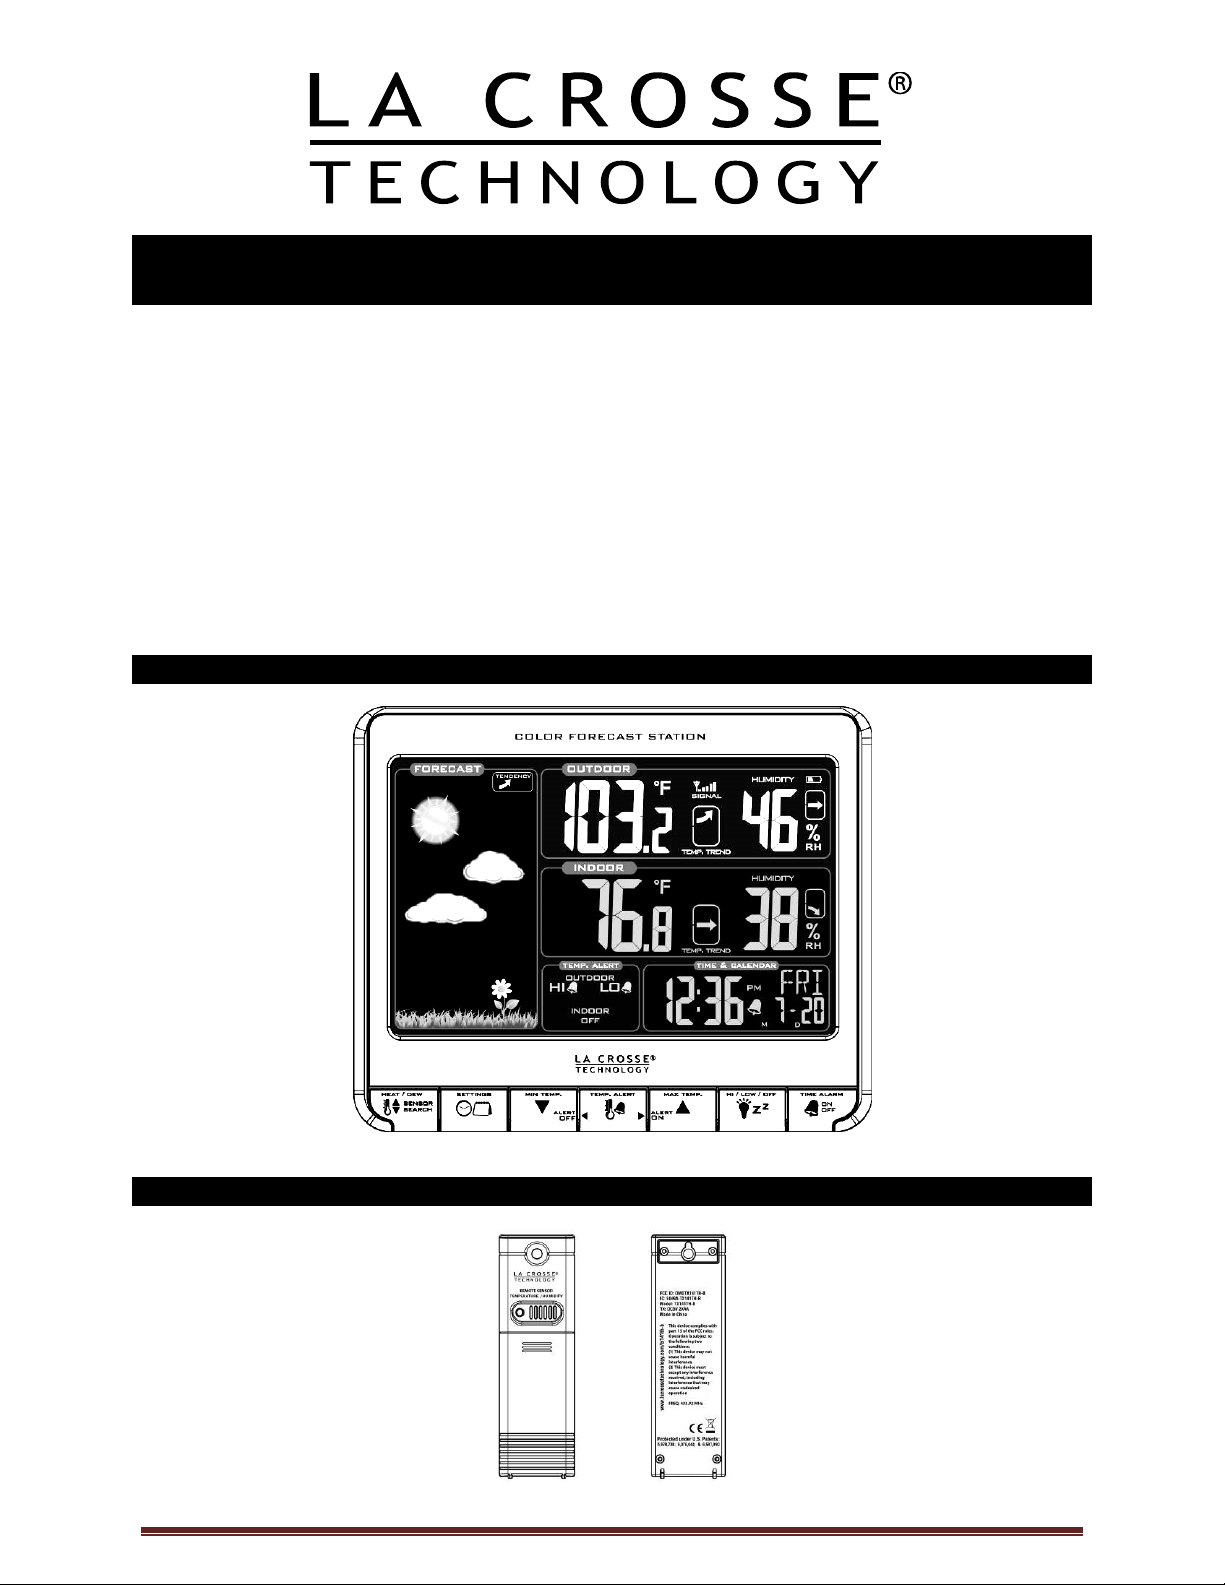
WIRELESS COLOR FORECAST STATION
Model K84315 | Instruction Manual
The Wireless Color Forecast Station features manual set time and date, weather f or ec ast, indoor and
outdoor temperat ur e/humidity, temperature alerts, heat index and dew point, on a stylish, colorful and
easy-to-read display. Use the integrated USB charging port to char ge your sm artphone, camera or other
device when the Forecast S tation operates on A/C power. The device also features a wireless
transmission range of over 200 feet (60 meters) in open air from the transmit ter to the Forecast Station.
THIS STATION LEARNS
The Forecast Station calibrates barometric pressure based on its location over a period of time to
generate an accurate, perso nal forecast. Please allow 3 to 4 weeks for baro met er cali bration.
IMPORTANT: As the Forecast Station builds memory, it will compare t he c urrent av er age pr essure to t he
past forty day aver age pr essure for increased accuracy. The longer the Forecast Station operates in one
location, the mor e ac c ur ate the forec ast ic ons wil l be.
Wireless Color Forecast Station
Outdoor Temperature/Humidity Transmitter TX141TH-B
La Crosse Technology, Ltd. Page 1
Page 2

Table of Contents
Wireless Color Forecast Station 1
Outdoor Temperature/Humidity Transmitter TX141TH-B 1
Table of Contents 2
Features 3
Setup Instructions step-by-step 3
Troubleshooting 3
Search for Outdoor Transmitter 4
Power the Color Forecast Station 4
A/C Power Adapter 4
Batteries 4
Install Batteries in the Outdoor Transmitter 4
Function Buttons 5
Program Menu 5
12-hour or 24-hour Time Format 5
Set Time 5
Set Calendar 5
Fahrenheit/Celsius 6
Alarm Time 6
Set Alarm 6
Activate/Deact ivate Alarm 6
Snooze Alarm 6
USB Charge Port 6
Backlight 7
A/C Power Adapter 7
Batteries 7
Weather Forecast Icon 7
F or ec ast Trend Arrows 8
Min/Max Temperature Data 8
View Min 8
Reset Min 8
View Max 8
Reset Max 8
Low Battery Icon 8
Temperature Aler ts 9
Select Temperat ur e Alert s 9
T em per ature Alerts ON/OFF 9
T em per ature Alert Sounds 10
Heat Index 10
Dew Point Temperat ur e 10
Outdoor Temper ature/Humidity Flashes 10
Care and Maintenance 11
Position the Forecast Station 11
Position the Outdoor Transmitter 11
Specifications 11
Indoor 11
Outdoor 11
Power Requi r ements 12
Battery Life 12
Warranty Information 12
FCC Statement 12
La Crosse Technology, Ltd. Page 2
Page 3
Features
• Calendar (Month/date, 2000-2099 Def ault Year 2012)
• Time (hour/minute)
• Indoor Temperature/Humidity
• Indoor Temperature and Humidity Trend
• Wireless Outdoor Temperature/Humi dity
• Outdoor Temperature and Humidity Trend
• °F/°C selectable
• Alarm and Snooze Function
• Weather Forecast: Sunny, Partly Sunny, Cloudy, Rainy and St ormy
• Low Battery i ndic ator for Outdoor Sensor and Station
• Color display
• Heat Index and Dew Point for outdoor
• MIN/MAX Daily Records with auto reset ( 0:00)
• High/Low Temperature Alert for Indoor and Outdoor Temperature
• High/Low/Off Backlight option
• Sensor Signal Strength
• Sits on desktop or tabletop
• 5.0V A/C adapter (included) OR optional 3 "AAA" Alkaline batteries (not included)
Setup Instructions Step-by-Step
STEP 1:
• Insert the 5-volt A/C power adapter into the designated area on the back of the Forec ast Station.
• Pl ug the A/C power adapter into a wall outlet for c ontinuous backlight (ON/OFF) , and dimm er feat ur e.
STEP 2: (opti onal battery operati on)
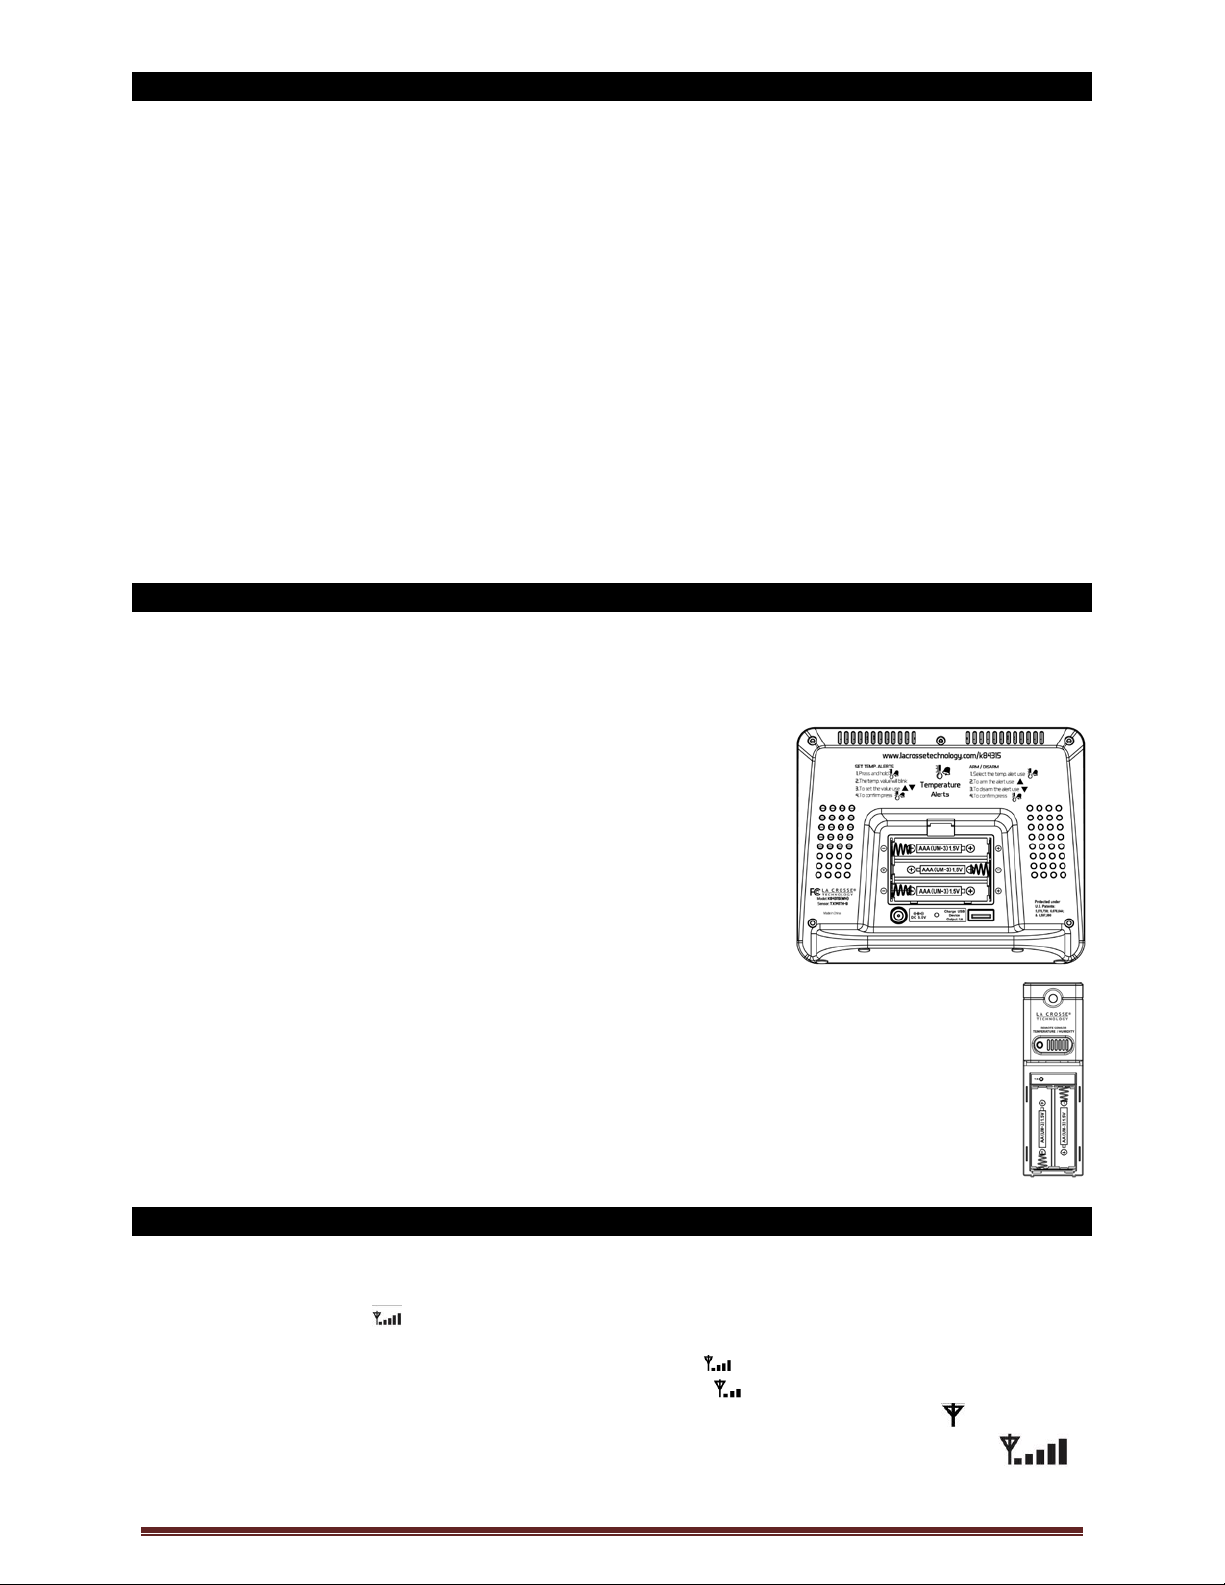
Slide tab to down and pull out to remove the battery cover.
Insert three new AAA batteries (not included) into the back of the
Forecast Stati on. O bserve the correct polarity ( see marki ng insi de
the battery compartment).
The Forec ast Station will light up and show indoor temperat ur e,
humidity and time.
(Backli ght will illuminate for 8 seconds when using only batt er y
power with a press/release of the SNOOZE/LIGHT button)
Do Not Mix Old and New Batteri es
Do Not Mix Alkaline, Standard, Lithium or Recharg eabl e Bat t eries
STEP 3:
• Ensure that the transmitter i s within 10 feet of the Forecast Station.
• Remove battery cover from transmitter. Slide the batt ery cov er down and lift off the front.
• Insert two new AA batteries i nto the TX141TH-B transmitter. Observe the correct polarity.
• Within three minutes, the For ec ast Station will show readings in t he outdoor temperature
area on the LCD.
Note: Use Alkaline bat teries (or Lithium for temper atures bel ow -20°F/-28.8°C).
Troubleshooting
After the bat teries are inserted, the Forecast Station will search for the out door temperature/humidit y
transmitter for three minutes.
The antenna sym bol will fl ash during reception and temperatur e displ ay will be dashes “---“.
No antenna symbol will show during RF (radio frequency) synchr onization.
If synchronization fails once, the ant enna will lose one bar.
If synchronization fails twice, the antenna will lose two bars.
If RF (radio frequency ) r ec eption fails five times, the antenna symbol will be shown as .
The antenna will show full display with successful RF (radio frequency) reception.
La Crosse Technology, Ltd. Page 3
Page 4

Search for Transmitter
Battery
If the outdoor temperature is not display ed aft er three minutes, hold the SENSOR
SEARCH button on the Forecast Station for three seconds to search f or the
outdoor transmitter.
Next, rem ov e the batter y c ov er f r om the TX141TH-B transmitter then press the TX
button to send a signal.
If it still does not r ec eive the outdoor temperat ur e, rem ov e the A/C cord and batteries from both the
Forecast Station and the transmitter f or 15 minut es repeat setup instructi ons fr om step 1.
Power the Forecast Station
The Forecast Stati on c an be powered by t he 5-volt A/C adapter or with batteries.
A/C Power Adapter
• Insert enc losed 5-volt A/C power adapter into a wall outlet , t hen into the Forecast Station.
Compartment
Batteries
1. Remove battery cover. Slide tab down and pull off to r emove battery cover.
2. Install three new AAA batteries according to the polarity markings.
• Do Not Mix Old and New Batteries
• Do Not Mix Alkaline, Lithium, Standard or Rechargeable Batteries
If the F or ec ast Station does not display indoor t em per ature after 60 seconds, remove adapt er and
batteries and wait for at least 60 seconds before repeating the setup process.
Install Batteries in the Outdoor Transmitt er
1. Slide the battery cover down, then lift off the back of the transmitter.
2. Insert two new AA bat teries into the transmitter. Observe the correct polarity (see marking
inside batter y compar tment).
3. Keep transmi tter 5-10 ft. from the Forecast Station during setup.
4. After 15 minutes, if the outdoor temperature shows on the Forecast Stati on, you can move
the outdoor transmitter outside to a shaded loc ation within range of the For ec ast Station.
La Crosse Technology, Ltd. Page 4
Page 5

Function Buttons
12H
Program Menu
The program menu all ows you to select your preferences:
12/24-Hour Time Format
Hour
Minutes
Year
Month
Date
Celsius/Fahrenheit
The SETTINGS button will m ov e through the program menu, and confirm selections.
The UP ARROW increases a value.
The DOWN ARROW decreases a value.
12-hour or 24-hour Tim e Format
The Time may be displayed i n 12-hour or 24-hour format. Default is 12-hour time.
Note: When in 12-hour format, AM or PM will show in front of the hour.
1. Hold the SETTINGS button for three seconds to enter time set mode.
2. 12H will flash.
3. Use the ARROW buttons to c hoose 12-hour or 24-hour time format.
4. Press the SETTINGS button to confirm and move to hour.
Set Time
To set the time manually:
1. The hour dig it will flash .
2. Use the ARROW buttons to c hoose the hour.
3. Press the SETTINGS button to confirm and move to minutes.
4. The minutes will flash.
5. Use the ARROW buttons to c hoose the mi nutes.
6. Press the SETTINGS button to confirm and move to the year.
Set Calendar
To set the calendar:
1. The year will flas h.
2. Use the ARROW buttons to c hoose the y ear.
3. Press the SETTINGS button to confirm and move to the month.
4. The month will flash .
5. Use the ARROW buttons to c hoose the m onth.
6. Press the SETTINGS button to confirm and move to the date.
7. The date will flash.
8. Use the ARROW buttons to c hoose the date.
9. Press the SETTINGS button to confirm and move to Fahrenheit /Celsius.
Note: The day of the week will set aut om atically once the year, m onth and date are set.
La Crosse Technology, Ltd. Page 5
Page 6

Fahrenheit/Celsius
1. °F or °C will flash.
2. Use the ARROW butt ons to sel ec t F ahr enheit or Celsius.
3. Press and release the S E TT INGS button to confirm and exit the pr ogr am menu.
Note: When no buttons are pressed for ten seconds, the Forecast S tation will save the last change
and default back to a normal time display.
Alarm Time
The TIME ALARM button moves t hr ough alarm set mode and confirms settings.
The UP ARROW increases a value.
The DOWN ARROW decreases a value.
Set Time Alarm
In normal time mode, pr ess and release the TIME ALARM button once to show alarm time. Hold the TIME
ALARM button for three seconds to enter alarm set mode.
1. The hour wil l flash .
2. Use the ARROW buttons to set the hour.
3. Press the TIME ALARM butt on to confirm and switch to minutes.
4. The minutes will flash.
5. Use the ARROW buttons to set the minutes.
6. Press TIME ALARM button to confirm.
7. Press the SETT INGS button to return to normal mode
Note: When no buttons are pressed for ten seconds, the Forecast S tation will save the last change and
default back to norm al mode.
Activate/ Deac tivate Time Alarm
In normal mode, pr ess and release the TIME ALARM button once to show alarm time.
Press and release the T IME ALARM button repeatedly to t ur n ON/OFF alarm.
The alarm icon appears when alarm is activated.
Note: The alarm will ri ng for 2 mi nutes then t ur n off if no buttons are pres sed.
Snooze
When the alarm sounds, press the HI/LOW/OFF button to snooze the alarm for 10
minutes.
The snooze option c an be r epeated three times.
The alarm icon will flash while the snooze feature is active.
Note: While the alarm sounds, press any butt on except the TIME ALARM butt on to turn t he alarm off.
USB Charge Port
The integrated USB charging port (on back) will charge your smart phone, camera or other devices when
the atomic alarm clock is plugged into a power outlet with the included 5V A/C adapter.
Note: This is a power-output c har ging port. The charging port does not suppl y power to the atomic alarm
clock.
Begin chargi ng your external device by connecti ng the devic e’s USB c har ging cable (not included) to t he
La Crosse Technology, Ltd. Page 6
Page 7

USB charging port on the side of the atomic alarm clock. Charging times will vary.
Note: Some USB cables are for data transfer only and cannot be used for char ging.
• Make sure that the USB cable you use will charge your device.
• Most USB c ables included with mobile devices will work for charging.
USB Power Output: 1A maximum current.
DO NOT overload the USB port. Char ge 1A devices or less only
Backlight
A/C Adapter
The backlight i s on continuously when operating the Forecast S tation wi th the 5 -volt A/C adapter. The
backlight has three settings: High, Low and OFF for your vi ewing c omfort.
• HIGH: The backlight will default to HI at setup when the adapter is in use.
• LOW: Press and release the HI/LOW /OFF but ton to dim the backlight.
• OFF: Press and release the HI/LOW /OFF but ton again to turn the backlight off.
Press and release the HI/ LOW /OFF but ton again to return to full strength.
Note: When the A/C adapter is NOT in use, the HI/LOW/OFF light feature is not available.
Note: When the backlight is off, press any button to activate the backlight for 10 seconds.
Battery Power
When operating on batt er y power onl y , press and release any button and the backlight will show for 10
seconds.
Weather Forecast Icons
The Forecast Stati on pr edicts weather conditi on of t he nex t 12 hours based on t he c hange of atmospheric
pressure with 70-75% accur ac y .
Note: As weather conditi ons cannot be 100% c or r ec tly forecasted, we are not responsible for any loss
caused by an incorrect forec ast.
THIS STATION LEARNS
The Forecast Station calibrates barometric pressure based on its location over a period of time to
generate an accurate, perso nal forecast. Please allow 3 to 4 weeks for baro met er cali bration.
The Forec ast Station samples the barom etric pr essure ev er y twelve minutes.
These samples are averaged hourly and daily then stored in nonvolatile m emory.
The three hour pr essure ic on c hange is based off of the last four aver age hourl y r eadings.
IMPORTANT: As the Forecast Station builds memory, it will compare t he c urrent av er age pr essure to t he
past forty day aver age pr essure for increased accuracy. The longer the Forecast Station operates in one
location, the mor e ac c ur ate t he forec ast ic ons wil l be.
La Crosse Technology, Ltd. Page 7
Page 8

The icons forec ast the weather in terms of getting better or worse and not necessarily sunny or rai ny as
each icon indic ates. F or ex am ple, if the cur r ent weathe r is cloudy and the rainy icon is displ ay ed, it does
not mean that the product is faulty because it is not raining. It simply means that the air pressure has
dropped and the weather is expec ted to get worse, but not necessarily rainy.
Common to weather forecasting, absolute acc ur acy cannot be guaranteed. The weather forec asting
feature is estimated to have an accuracy level of about 75% due to the v ar yi ng ar eas the Forecast Station
has been designed for use. In areas that experience sudden change s i n weather ( for example from sunny
to rain), the Forec ast Station will be more accurate compared to use in ar eas where the weather is
stagnant most of the time (for example mostly sunny).
Forecast Trend Arrow s
In the upper right corner of the f or ec ast displ ay, you can see forecast trend arrows that indicate the rising
or falling pressure trend.
Rising Pressure
Falling Pressure
• The up t r ending ar r ow indicates the weather is improv ing.
• The down trending arrow indicat es the weather m ay worsen.
• When there is no arrow, the pressure is steady.
Temperature Trend Arrows
The indoor and outdoor temperature trend indicat or s wil l update every 30 minutes or less. These trends
represent temper ature changes over the past three hours.
Example: At 1:00pm, the arr ow indicates the change in temperat ur e si nc e 10:00am. At 1:30pm, the
arrow will indicate the temperature change si nc e 10:30am.
Temperature rose mor e than 2°F /1°C in the past three hours
Temperature has not changed more than 2°F /1°C in the past t hr ee hour s.
Temperature fell more than 2°F /1°C in the past three hours
MIN/MAX Temperatures
The Forecast Stati on pr ov ides the daily minimum and maxim um tem per atures each day starting at
midnight (12: 00 AM). T he Forec ast S tation automatically resets the m in/max temperatures at midnight
(12:00 AM).
View MIN data :
• Press and release the MIN TEMP button to view the minimum Indoor and Outdoor
Temperatures.
Reset MIN data:
• Hold the MIN TEMP button for five seconds and the Indoor and all Outdoor Minimum
Temperatures will be r eset.
• The t em per ature area will show dashes briefl y then r eturn to current temperat ur es.
View MAX data:
• Press and release the MAX TEMP button to view the maxim um Indoor and Outdoor
Temperatures.
Reset MAX data:
• Hold the MAX TEMP button for five seconds and the Indoor and all O utdoor
Maximum Temperatures wil l be r eset.
• The t em per ature area will show dashes briefl y then r eturn to current temperat ur es.
La Crosse Technology, Ltd. Page 8
Page 9

Low Battery Icon
• When the low battery icon appears i n the indoor (IN) data readi ng sect ion, replace the batteri es in
the Forecast Station.
• When the low battery icon appears in the outdoor (OUT) dat a readi ngs section, replace the
batteries i n the out door transmitter.
Temperature Alerts
Setting the temperature alerts are a separate activ ity from turning the alerts ON or OFF.
Press the TEMP ALERT button to toggle between the temperature alerts.
Hold the TEMP ALERT button to set individual high and low aler ts.
The bell icon indicates each alert that is active.
The MAX TEMP (UP arrow) button will turn a temperature alert ON.
This button will incr ease an al er t value in Temp Alert set mode.
The MIN TEMP (Down arrow) button will turn a temperature al er t OFF.
This button will decr ease an al er t value in Temp Alert set mode.
One or all of the HI and LO temperature alerts may be set.
Range for indoor temperature alert: +32°F to +122°F (0°C to 50°C)
Range for outdoor tem per ature alert: -40°F to 140°F (-40°C to 60°C)
Select Temperature Alert Values
Temperature Aler t value wil l flash individually in the outdoor or indoor temperature area when select ed to
be set. The alert is not active just from selecting the value. To activate or deactivate a tem per ature alert,
see the next section (T emperature Alerts ON/OFF).
Hold the TEMP ALERT button for fiv e seconds to selec t and set temperatur e aler t values.
To skip an alert value and m ov e to the next, sim ply press and release the TEMP ALERT
button again.
1. OUTDOO R HI alert will flash.
2. Press the ARROW butt ons to set the alert value.
3. Press the TEMP ALE RT button to confirm.
4. Then, press the TE M P ALERT but ton again switch to OUTDOOR LOW setting.
5. OUTDOO R LO alert will flash.
6. Press the ARROW butt ons to set the alert value.
7. Press the TEMP ALE RT button to confirm.
8. Then, press the TE M P ALERT but ton again switch to INDOOR HI setting.
9. INDOO R HI alert will flash.
10. Press the ARROW buttons to set the alert value.
11. Press the TEMP ALERT button to confirm .
12. Then, press the TEMP ALERT butt on again switc h to INDOOR LOW setting.
13. INDOOR LO alert will flash.
14. Press the ARROW buttons to choose the v alue.
15. Press the TEMP ALERT button to confirm and exit.
Note: After selecti ng temperature alert values, use the next step to turn individual alerts
ON or OFF.
La Crosse Technology, Ltd. Page 9
Page 10

Temperature Aler ts ON/OFF
Temperature alerts will indicate ON with a bell icon
next to each individual Hi and Lo alarm in the
window TEMP. ALERT. Individual temperature alerts are OFF when the bel l icon is not present next to
the alert.
Note: When no temperature alerts are set, the Temperatur e A lert area will show ALERTS
OFF.
1. In normal time mode, hold then release the TEMP ALERT button to toggle between:
o Outdoor HI
o Outdoor LO
o Indoor HI
o Indoor LO
2. Press the MAX TEMP butt on to turn the selected alert ON.
3. The alert icon
appears when alarm is activated.
4. Press the MIN TEMP butt on to turn the selected alert OFF.
Temperature Aler t Sounds
When temperature alert sounds, t he c or r espondi ng alert icon will flash.
The alert beeps once every minute, until the temperature i s out of alert range.
Press any button to stop alert.
The alert symbol will still show.
Turn alert OFF:
1. In normal mode, hold and release the TEMP ALERT button t o select the alert to turn off.
2. Select t he HI or LO alert in the window TEMP. ALERT.
3. Press the MIN TEMP button to turn that alert OFF.
Heat Index and Dew Point Temperature
Heat Index
Heat Index combines the effects of heat and humidity. It is the appar ent temperature of how hot it feels to
a human being. As humidity inc r eases, the body is unable to cool effectively; therefore, the temper ature
will feel warmer.
View Heat Index: From a normal displ ay , press the HEAT/DEW button once and Heat
Index will show instead of the outdoor ambient temperature.
Note: Heat index will be the same number as the temperature unt il the outdoor
temperature is above 80 °F (26.7°C).
Dew Point Temperat ur e
Dew Point Temperat ur e is the satur ation point of the air, or the temperature to which the air has to cool in
order to create condensati on. The higher the dew points, the higher the moisture content of t he air at a
given temperature.
View Dew Point Temperature: From a normal display, press the HEAT/DEW butt on
twice and Dew Point will show instead of the outdoor ambient temper ature. The words
Dew Point will show near outdoor temperatures.
Note: Dew Point is lower than the ac tual temperatur e.
La Crosse Technology, Ltd. Page 10
Page 11

Outdoor Te m pe r a tur e /Humidit y Fla shing
• Low battery icon present in the outdoor temperature area:
1. Change batteries in the transmitter and pr ess the TX button.
2. Hold the SENSOR SEARCH button for three seconds and the For ec ast Station will search for the
outdoor transmitter again.
• End of Transmission Range:
1. Move the transm itter closer to the forecast station.
2. Avoid obstr uc tions in the signal path.
3. Keep transmit ter and Forecast Station away from elec tronics.
Care and Maintenance
• Do No t Mix Old and New Batteries
• Do No t Mix Alkali ne, Lithium, Standard or Recharg eabl e Bat t eries
• Do not expose the Forecast Station to extreme temperatures, vibration or shock. Keep dry.
• Clean Forecast Station with a soft damp cloth. Do not use solvents or scouring agents.
• The Forecast Station is not a toy. Keep it out of reac h of children.
• The Forecast Station is not to be used for m edic al pur pose or f or public information. It is for home use
only.
• The specifications of this Forec ast S tation may change without prior notice.
• Impr oper use or unaut hor ized opening of housing wil l voi d the warranty.
• If the Forec ast Station does not work properly, c hange the bat teries and/or check the A/C cord
connection.
Position the Forecast S t ati on
Choose a location f or the Forec ast S tation that is within range of the outdoor transmitter. The
Forecast Stati on has a buil t in base stand to sit on a table or desk.
• Choose a locati on 6 feet or more from electronics such as cordless phones, gaming systems,
televi sions, micr owaves, routers, baby monitor s, etc., which can prevent signal reception.
• Be aware of elect ri c al wir es and pl um bing within a wall.
• Best reception is achieved when the front or the bac k of the Forecast St ation is facing the
outdoor transmitter. This allows a larger portion of the antenna to receiv e a signal.
Positio n t he Outdoor Tra ns m it te r
Once the Forecast St ation shows the outdoor temperature/hum idity, place it and the tr ansmit ter in the
desired locations and wai t approximately one-hour before permanently mounting the transmitter to ensure
that there is proper rec eption. The transmitter should be mounted vertically, in a shaded, protected area,
at least 6 feet from the ground t o av oid dam age and ensure accurat e r eadings. The transmitter is water
resistant, not waterpr oof and should not be placed anywhere it will become submerged in water or subj ec t
to standing water or snow. Choose a location for the transmitter that is within range of the Forecast
Station and under an overhang for accuracy.
Option 1:
• Install one mounting screw (included) into a wall leaving approximately ½ of an inch
(12.7mm) extended.
• Place the tr ansmit ter onto the screw, using the hanging hole on the backside.
• Gently pull t he transmitter down to lock the screw into plac e.
Option 2:
• Insert the mounting screw through the front of t he transmitter and into the wall.
• Tight en the screw to snug (do not over tighten).
To achieve a true temperature/humidity readi ng, mount where direc t sunlight cannot r eac h the out door
transmitt er. M ount t he outdoor transmitter on a North-facing wall or in any well shaded area. Under an
eave or deck rail work well. The maximum transmitting range in open ai r i s over 200 feet (60 meters).
La Crosse Technology, Ltd. Page 11
Page 12

Obstacles such as walls, windo ws, stucco, c onc r ete, and large metal objects can reduce the range. Place
the transmitter at least six feet in the air to improve signal transm ission.
Specifications
Indoor
Temperature Range: 0°C to 50°C (+32°F to +122°F)
Interval: About every 30 seconds
Outdoor
Temperature Range: -40°C to 60°C (-40°F to 140°F)
Distance: Over 200 feet (60 meters)
RF 433MHz (open air)
Interval: About every 50 seconds
Power
Forecast Stati on: 5.0-volt A/C adapter (included)
Optional 3-AAA, IE C, LR3 batteries (not included)
TX141TH-B Transmitter: 2-AA, IEC, LR6 batteries (not inc luded)
USB Charge Port: Output 1.0 amp
Battery Lif e
TX141TH-B Transmitt er
Battery Lif e: Battery life is over 24 months when using reputable battery brands.
Forecast Stati on
Battery Lif e: Battery life is over 12 months when using reputable battery brands.
Dimensions
Forecast Stati on: 150 x 42 x 123 mm (5.91”L x 1.66”W x 4.84”H)
TX141TH-B Transmitt er : 40 x 20 x 130 mm (1.57" L x 0.79" W x 5.12" H)
Warranty Informati on
La Crosse Technology, Ltd provides a 1-year limited warranty on this product against manufacturing defects in
materials and workmanship.
This limited warranty begins on the original date of purchase, is valid only on products purchased and used in North
America and only to the original purchaser of this product. To receive warranty service, the purchaser must contact
La Crosse Technology, Ltd for problem determination and s er vice pro cedures. Warr anty service can only be
performed by a La Crosse Technology, Ltd authorized service center. The original dated bill of sale must be
presented upon request as proof of purchase to La Crosse Technology, Ltd or La Crosse Technology, Ltd’s
author ized service cent er.
La Crosse Technology, Ltd will repair or replace this product, at our option and at no charge as stipulated herein, with
new or reconditioned parts or products if found to be defective during the limited warranty period specified above. All
replaced parts and products become the property of La Crosse Technology, Ltd and must be returned to La Crosse
Technology, Ltd. Replacement parts and products assume the remaining original warranty, or ninety (90) days,
whichever i s longer. La Crosse Technology, Ltd will pay all expenses for labor and materials for all repairs covered
by this warranty. If necessary repairs are not covered by this warranty, or if a product is examined which is not in
need or repair, you will be charged for the repairs or examination. The owner must pay any shipping charges
incurred in getting your La Crosse Technology, Ltd product to a La Crosse Technology, Ltd authorized service center.
La Crosse Technology, Ltd wil l pay ground return s hipping charges to the owner of the product to a USA address
only.
Your La Crosse Technology, Ltd warranty covers all defects in material and workmanship with the following specified
exceptions: (1) damage caused by accident, unreasonable use or neglect (including the lack of reasonab le and
necessary maintenance); (2) damage occurring during shipment (claims must be presented to the carrier); (3)
damage t o, or deterioration of , any accesso r y or decor ati ve sur face; (4) dama ge resulting f rom f ail ure to f oll ow
La Crosse Technology, Ltd. Page 12
Page 13

instructions contained in your owner’s manual; (5) damage resulting from the performance of repairs or alterations by
someone other than an authorized La Crosse Technology, Ltd authorized service center; (6) units used for other than
home use (7) applications and uses that this product was not intended or (8) the products inability to receive a signal
due to any source of interference.. This warranty covers only actual defects within the product itself, and does not
cover the cost of i nstal lat ion or removal from a fix ed in s tallation, normal set-up o r adj ustments, cl aims based on
misrep resen tat ion b y the s eller or p er formance var iat ions resu lting from i nstal lation-related circ umstanc es.
LA CROSSE TECHNOLOGY, LTD WILL NOT ASSUME LIABILITY FOR INCIDENT AL, CONSEQUE NTI AL,
PUNITIVE, OR OTHER SIMILAR DAMAGES ASSOCIATED WITH THE OPERATION OR MALFUNCTION OF THIS
PRODUCT. THIS PRODUCT IS NOT TO BE USED FOR MEDICAL PURPOSES OR FOR PUBLIC INFORMATION.
THIS PRODUCT IS NOT A TOY. KEEP OUT OF CHILDREN’S REACH.
This warranty gives yo u spec i fic legal r ights. You may also have other rig hts specific to you r State. Some St ates d o
not allow the exclusion of consequential or incidental damages therefore the above exclusion of limitation may not
apply to you.
For warranty work, technical suppor t , or information contact :
La Crosse Technology, Ltd
2817 Losey Blvd. S.
La Crosse, WI 54601
Contact Support: 1-608-782-1610
Product Registr ation:
www.lacrossetechnology.com/support/register
Online information available at:
www.lacrossetechnology.com/k84315
Protected under U.S. Patents:
5,978,738
6,076,044
6,597,990
FCC Statement
This equi p m ent has been tested and found to comply with the limits for a Class B digital device, pursuant to part 15 of the FCC
Rules. These limits are designed to prov ide reasonable protection against harmful interference in a residential installation. This
equipment generates uses and can radiate radio frequency energy and, if not installed and used in accordance with the instructions,
may cause harmful interference to radio communications. However, there is no guarantee that interference will not occur in a
particul ar ins t allati on. If this equi p m ent does caus e harmful int erferen c e t o radi o or tel evision rec eption, wh ic h c an b e determin ed b y
turning t h e equ ip m ent off and on, the user is encouraged to tr y to c or r ect th e interference by one or m ore of t h e f ollow i ng m easures:
—Reori ent or r elocate the r ec ei vi ng antenn a.
—Increase the separation between the equipment and receiver.
—Connect the equi p m ent into an outl et on a cir c uit different f r om that to whic h t h e rec eiver is connected .
—Consult the deal er or an e xp erienced r ad i o/TV technician for help.
This device must not be co-located or oper at i ng in c onju nc t i on w it h a ny other ant en na or transm it t er. Operation is subject to the
following t wo conditi on s:
(1) this device may not cause harmful interference, and
(2) this device must accept any interference received, including interference that may cause undesired operation.
Caution!
The manufacturer is not responsible for any radio or TV interference caused by unauthorized modifications to this equipment. Such
modifications could void the user authority to operate the equipment.
All rights reserved. This manual may not be reproduced in any form, even in part, or duplicated or processed using electronic,
mechani cal or chem ical proces s wit h out th e wri tten perm is s i on of th e publ is her.
This booklet may contain errors or misprints. The information it contains is regularly checked and corrections are included in
subsequent edit i ons . W e disc l ai m an y r es p ons ib ility f or any tec hnical er ror or print in g er r or , or t h eir c onsequences.
All trad em arks an d p at en ts ar e rec og nized.
La Crosse Technology, Ltd. Page 13
 Loading...