

Page 1
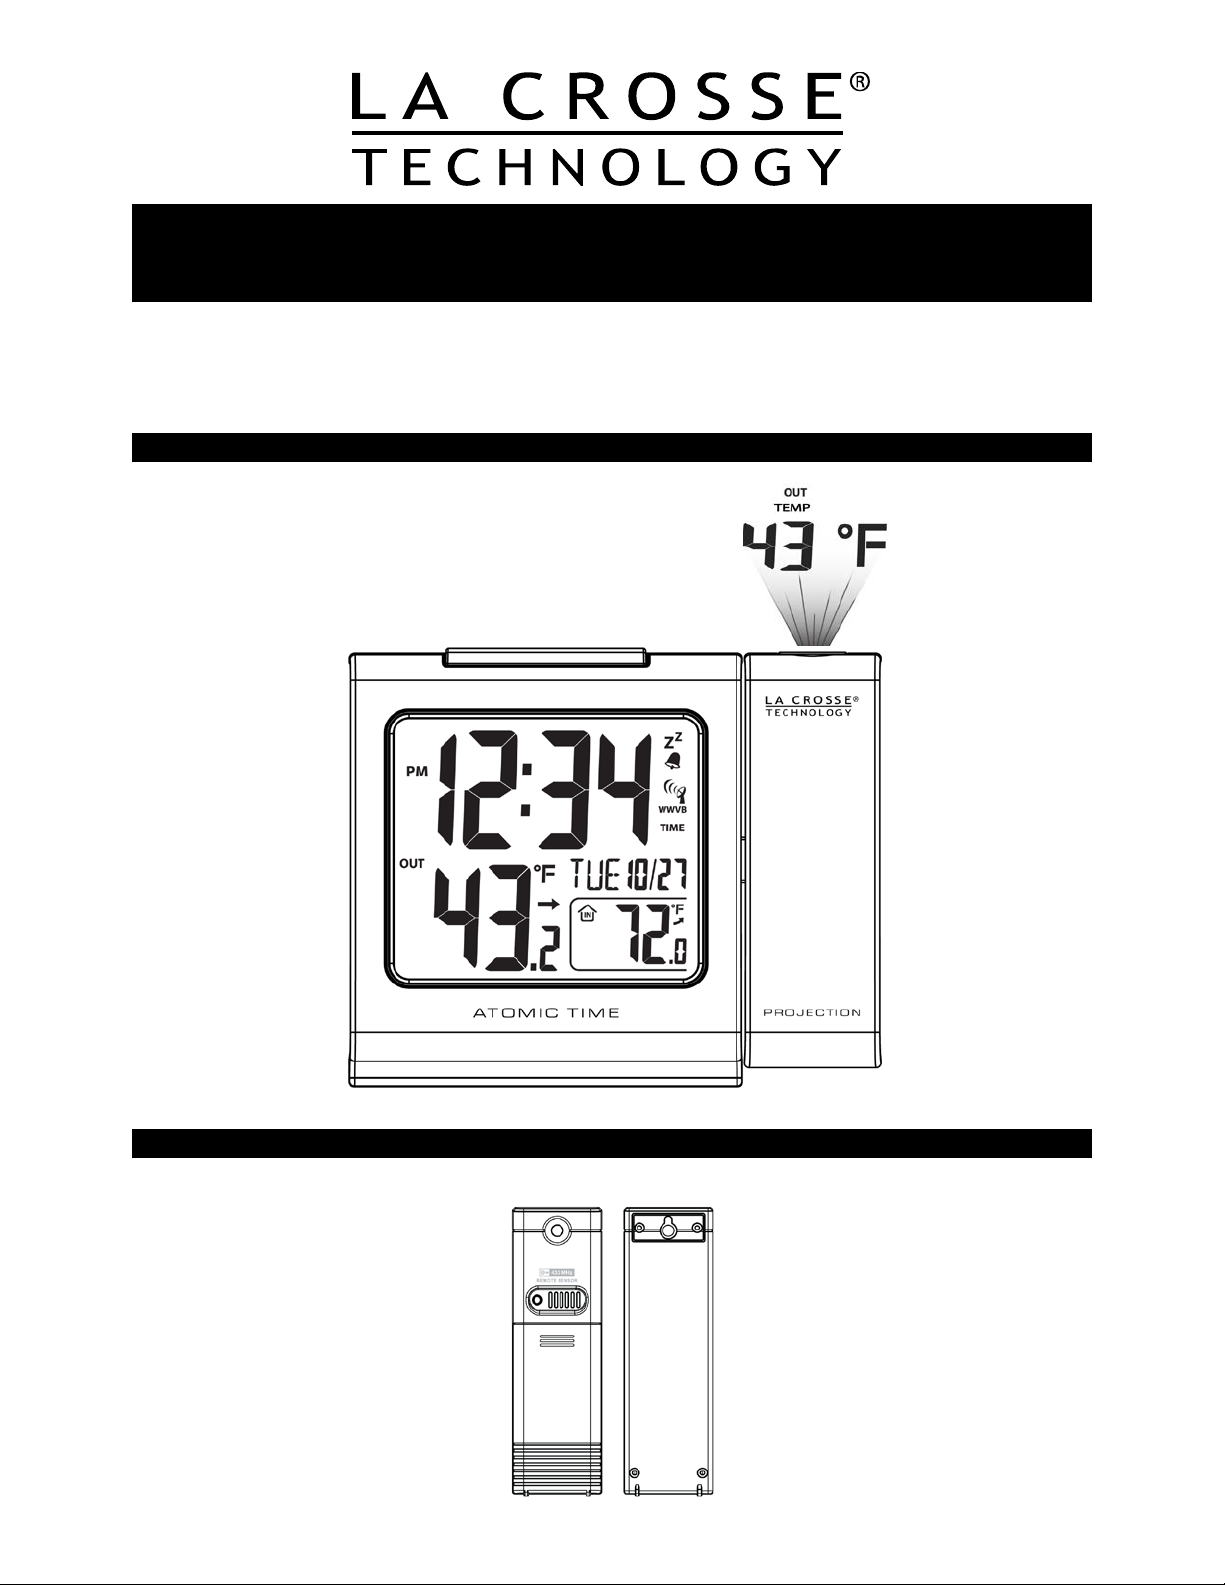
Atomic Projection Alarm
with Indoor and Outdoor Temperature
Model K84285 | Instruction Manual
The Atomic Projection Alarm features accurate atomic time and indoor and outdoor t em per ature on a
stylish, colorful and easy-to-read display. Time and/or outdoor t em per ature can be projected on a wall or
ceiling. Use the i ntegrated USB charging port to charge your dev ic es when the P r ojection Alarm is
plugged into a power outlet.
Atomic Projection Alarm
Outdoor Temperature Transmitter: TX141
1
Page 2
Table of Contents
Atomic Projection Alarm 1
Outdoor Temper ature Transmitter TX141 1
Table of Contents 2
Features 3
Initial Setup 3
Power the Projecti on Al arm 4
A/C Adapter 4
Batteries 4
Install Batteri es i n the Outdoor Transmitter 4
WWVB Radio-controlled Time 5
WWVB Reception Icon 5
Manual Signal Search 5
Functions Buttons 5
Program Menu 6
WWVB Reception On/Off 6
Time Zone 6
Daylight Saving Time Indicator 7
12/24 Hour Time Format 7
Set Time 7
Set Calendar 7
Fahrenheit/Celsius 7
Alarm Set 8
Deact ivate Alarm 8
Snooze 8
Backlight and Projection Intensity 8
Projection 8
Battery Operation 8
A/C Power 8
Rotate Projecti on 8
Change Projection M ode 8
USB Charge Port 9
Temperature Trend I c ons 9
Low Battery Icon 9
Position Outdoor Transmitter 9
Position Projection Alarm 10
Care and Maintenance 10
Specifications 11
Accuracy 11
Warranty 12
FCC Statement 13
K84285
5V A/C Adapter
2-AAA batteries
TX141
2-AA batteries
2
Page 3

Features
• Projects tim e & outdoor temperature on wall or ceiling
• Projection r otat es i n 90 degr ee inc r em ents
• Projection options: (1) Default: t oggle between time and temperature, (2) time only or (3) temperature
only
• Time zones: Atlanti c Time (AST), Eastern Time (EST), Central Time ( CST) , Mountain Time (MST),
Pacific Time (PST), Alaskan T ime (AKT) & Hawaiian Time (HAT )
• Light up color display bac kli ght and projection with a press of a button using battery power OR
continuous light with A/C adapter (ON/OFF option)
• Backlight and pr ojec tion settings: High, l ow and off
• Charge devices with USB c har ging por t: Output 0.5A
• Atomic time and date sets itself
• 12/24 hour time with mi nutes
• Snooze alarm and alarm i c on
• Calendar: day, date
• IN/OUT temperatur e (°F/ ° C) with trend arrow
• Low battery icon f or clock & sensor
• Sits on desktop or tabletop
• 5.0V A/C adapter (included) for primary power and battery bac k up
• Battery lif e is over 24 months when using t he A/C adapter
Initial Set up
1. Insert A/C adapter into the wall outlet then into t he display or insert 2 new AAA batter ies (not
included) into the display (see Power the Atomic Projection Alarm). The Projection Alarm will light
up and display time and indoor temperature.
2. Insert 2 new AA batteri es i nto the transmitter, observi ng the correct polari ty (see In st all Batteries in
the Outdo or Transmitter ).
3. Keep the transmitt er 5-10 feet from the Projection Alarm for 15 minut es to establish a good
connection.
4. Within 3 minutes, the outdoor t em per ature should be displayed on the Projection Alarm. If the outdoor
temperature is not displayed after 3 minutes, remove power from the transmitter and the di spl ay for
60 seconds and start agai n from step 1.
5. For optimum 433 MHz transmission, the outdoor trans m itter should be placed a distance of no m or e
than 200 feet (60 meters, open air) from the Projection Alarm.
IMPORTANT: When operating on A/C power, the backlight, pr ojec tion and USB charging port will turn off
while the Projection Alarm searches for the WW VB signal, to avoid interference. T he bac kli ght and
projection will return after the 2-10 minute search. The USB charging port will then r esume working.
• Do Not Mix Old and New Batteries
• Do Not Mix Alkaline, Stand ard, Li thiu m or Rech argeable Batteries
3
Page 4
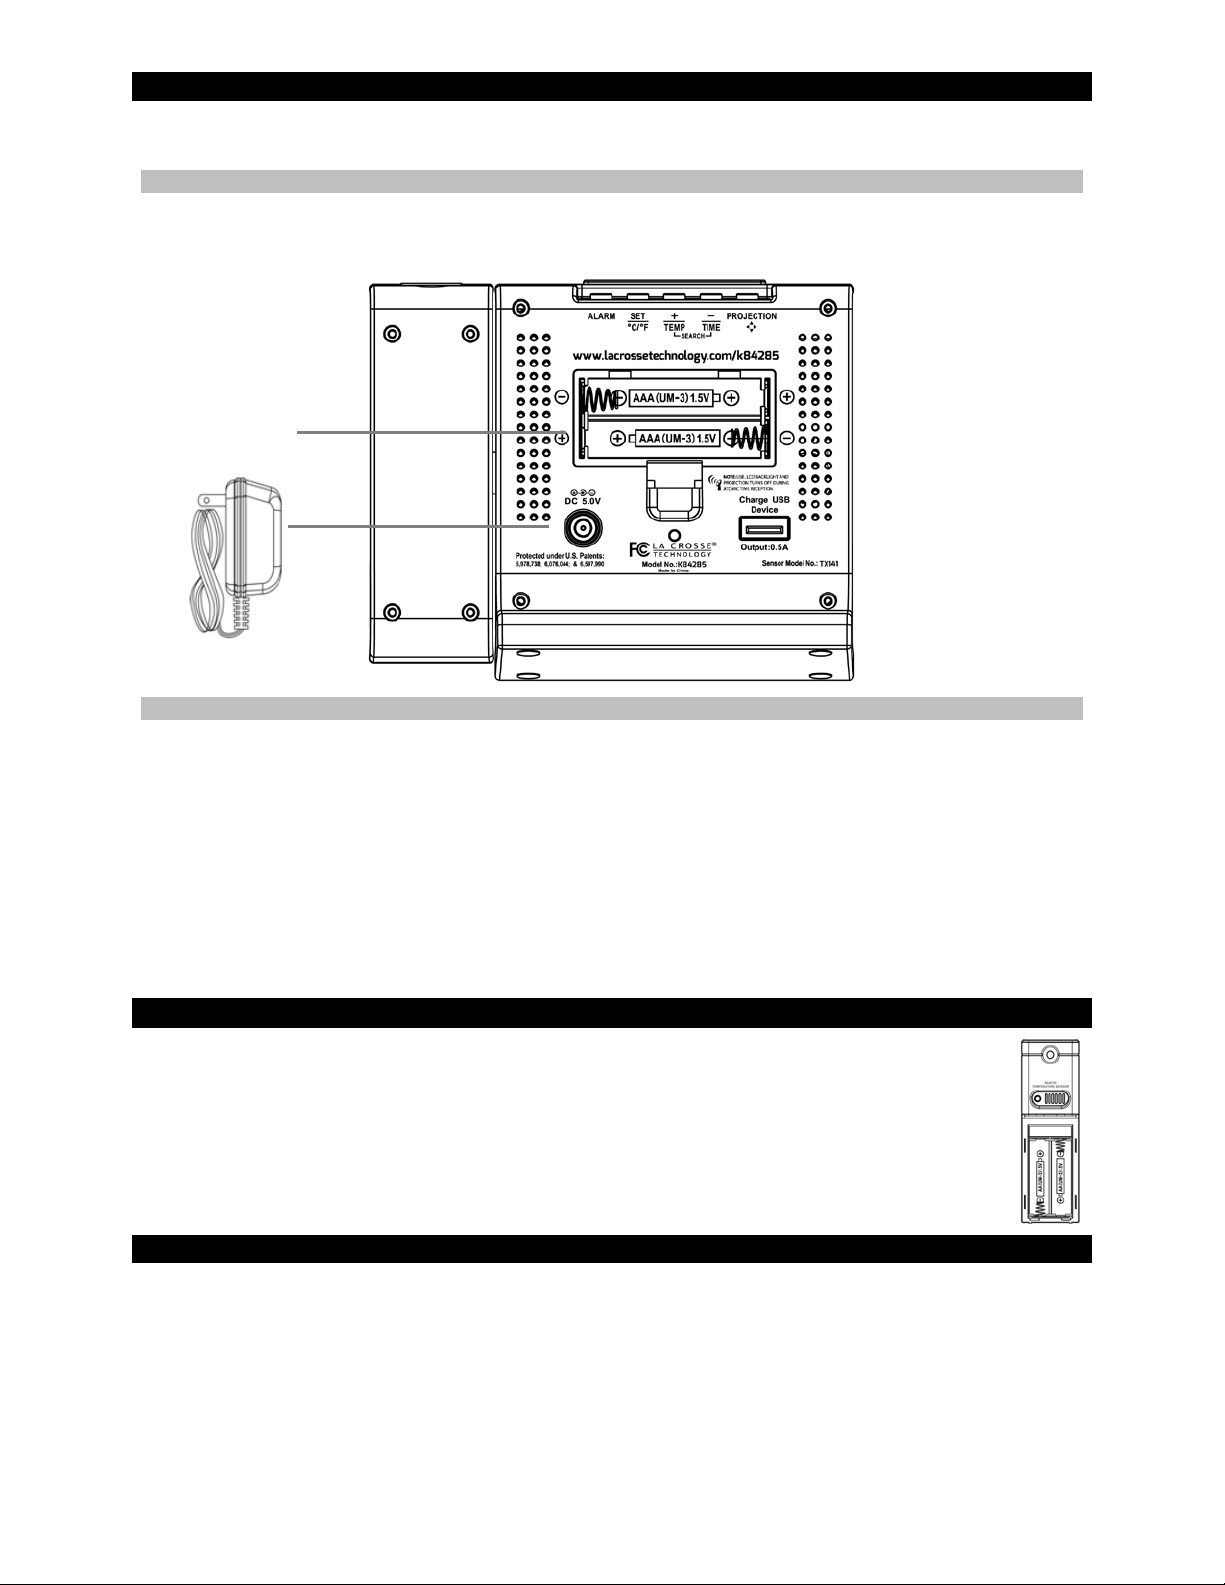
Power the Projection Alarm
Battery
5-Volt a/c ad apter
The Projection Al arm can be powered by the 5-volt A/C adapter or 2 A A A batteries.
A/C power adapter
• Insert enclosed 5-volt A/C power adapter into a wall outlet, t hen into the Projection Alarm.
Compartment
Optional Batt er y Oper ation
1. To remove battery cover, slide tab to the right and pull out t o r em ov e batt er y cover .
2. Install two new AAA batter ies according to the polarity m ar ki ngs.
• Do Not Mix Old and New Batteries
• Do Not Mix Alkaline, Lithium, Standard or Rechargeable Batteries
If the Projection Alarm does not display indoor temperature aft er 60 seconds, remove adapter and
batteries, and wait for at least 60 seconds before repeating the setup process.
IMPORTANT: When operating on A/C power, the backlight, pr ojec tion and USB charging port will turn off
while the Projection Alarm searches for the WW VB signal, to avoid interferenc e. T he bac kli ght and
projection will return after the 2-10 minute search. Then the USB charging port will resume worki ng.
Install Batteries in the Outdoor Transmitter
1. Slide the battery cover down, then lift off the front of t he transmitter.
Note: Be careful not to break the t abs on the batt er y c ov er.
2. Insert two new AA batteri es i nto the transmitter. Observe t he c or r ec t polarity (see markings
inside batter y compar tment).
3. Keep transmitter 5-10 ft. from the Projection Alarm during setup.
4. After 15 minutes, if the out door temperature shows on the displ ay , you can move the
outdoor transmitter outside to a shaded loc ation within range of t he Projection Alarm.
Troubleshooting
• If the Projection Alarm does not display the outdoor temperature after 3 minutes, r em ov e the A/C
power adapter and all bat teries from both units and start t he setup pr oc ess again.
• If the outdoor temperature does not show up af ter a second attempt, please slide open t he battery
cover of the outdoor transmitter to r ev eal the T X button. Press the T X button for 3 seconds to send a
wireless signal to the Projection Alarm.
• Hold the +/TEMP button for 5 seconds so the clock will search for the sensor.
• For optimal 433 MHz signal reception, the outdoor transmitter shoul d be plac ed within 200 feet (60
meters) from the Pr ojec tion Alarm.
4
Page 5

WWVB Radio-control le d Tim e
SNOOZE/LIGHT/HI/LOW/OFF (TOP)
The NIST radio station, WW VB, i s locat ed in Ft. Collins, Colorado and transmits the exact time signal
continuously throughout the Unit ed States at 60 kHz. The signal can be received up to 2,000 miles away
through the internal antenna in the Projection Alarm. However, due to the nature of the E arth’s
Ionosphere, reception is very limit ed duri ng dayl ight hours. The Projection Alarm will search for a signal
every night when recepti on is best. The WWVB radio station derives its signal from the NIST Atomic
Clock in Boulder, Colorado. A team of physicists continually measures every second of every day to an
accuracy of ten billi onths of a second a day. These physicists have c r eated an international standard,
measuring a second as 9,192,631, 770 v ibrations of a Cesium 133 atom in a vacuum. This a tomic clo ck
regulates the WWVB transmitter.
WWVB Reception Icon
The icon with full si gnal str ength will appear on screen in front of the date when the
reception of atomi c time is successful.
• The tower icon will show solid when the display has received the WWVB signal.
• No tower icon displayed. The display was unable to r ec eive a signal at this tim e.
• Reposition the display for better signal reception or tr y again at bedtime.
• The display will start searching at UTC: 07:00 and if no reception on the first att em pt
they will try again at 08:00, 09:00 and 10:00. Each attempt will be at least 2 mi nutes and the most will
be 10 minutes.
• If there is no signal or too much interference, the receiver will only be on f or 2 minut es.
• If the signal is good, it may catch a si gnal in A BOUT 2-3 minutes.
• If the signal is marginal, it will try to catch a signal for up to 10 minutes.
• IMPORTANT: When operating on A/C power, the backlight, projection and USB charging port will
turn off while the Projec tion Alarm searches for the WWVB signal , t o av oid interference. The backli ght
and projection will return after the 2-10 minute search (which occurs during the late night or early
morning hours). T hen the USB charging port will resume working.
Note: In case the Projection Alar m is not able to detect the WW VB-signal (distur banc es, transmitti ng
distance, etc.) , the time may be manually set.
Manual Signal Search
In normal mode, hold the RCC button until the rec eption icon appears to force a search of the WWVB
signal. The WWVB icon will flash during the search. If this icon disappears after the 2 minute search,
the radio time signal is not available at the moment.
• Recommended distance to any int erfering sources like comput er monit or s or TV sets is a minimum of
6 feet (2 meters).
• Within ferro-conc r ete room s (basem ents, superstructures, etc.), the received signal i s natur ally
weakened. In extr em e cases, please plac e the unit close to a window and/or point its front or back
towards the Fort Collins, Colorado.
• During nighttime, the atmospheric disturbances are usual ly less severe and reception i s possible in
most cases. A single daily r ec eption is adequate to keep the accuracy dev iation below 1 second.
Note: In case the Projection Alarm is not able to detect the WWVB-signal (disturbances, tr ansmitting
distance, etc.) , t he time and date can be manually set (see “program menu”).
Function Buttons
5
Page 6

Button
Press and Release Functio ns
Hold 2 seconds
SET/°C/°F
Move through program m enu ( setup)
Select temperature in °C/°F
Enter program menu, set time,
date, etc. (setup)
ALARM
Once: View Alarm
Twice: Activat e or Deactivate Alarm
Alarm set
+/TEMP
1 step forward (setup)
Search for Sensor
Fast advance (setup)
-/TIME
1 step backward (setup)
Fast backward ( setup) WWVB
Search
PROJECTION
Rotate Projecti on 90 degr ees
Change what is projected:
Time only
Temp alternating ( default)
SNOOZE/LIGHT
Once: Backlight and Projection low
adapter)
Trigger snooze al arm (ri nging)
WWVB
ON
TIME
ZONE
EST
Time/Outdoor T em p alternating
(default)
Once:
Twice: Outdoor Temp only
Third time: Time/Outdoor
HI/LOW/OFF
Program Menu
The SET button will moves through the items in the program menu. The +/TEMP or -/TIME buttons will
change these values:
• WWVB recepti on ON or OFF
• Time Zone (Seven Time Zones)
• Dayli ght Sav ing Indicator
• 12/24 hour time format
• Manual tim e set (Hour, Minutes)
• Calendar set (Y ear , Month, Date)
WWVB Time Reception
The WWVB time reception default s to ON. To turn the WWVB reception OFF:
1. Hold the SET button for 5 seconds.
2. WWVB and ON will flash.
3. Press and release the +/TEMP or -/TIME buttons to turn thi s OFF.
4. Confirm with the SET button and m ov e to the Time Zone.
Time Zone
This station off er s seven time zones listed in letter format (default is EST):
• AST Atlantic Time
• EST Eastern Time
• CST Central Time
• MST Mountain Time
• PST Pacific Time
• AKT Alaskan Time
• HAT Hawaiian Time
1. EST will flash.
2. Press and release the +/TEMP or -/TIME buttons to select a different Time Zone.
intensity (A/C)
Twice: Backlight and Projection OFF
(A/C)
Third time: Backlight and projection ON
high intensity ( default, A/C
Battery Power: Activate backlight for 10
seconds
6
Page 7

3. Confirm with the SET button and mov e to Daylight Saving Indicator.
DST
ON
12H
2010
Daylight Saving Indicator
DST will default t o the ON positi on as most of the country observes the DST change. If you liv e in an
area does not observe t he DST change, switch this to the OFF position.
1. DST and ON will flash.
2. Press and release the +/TEMP or -/TIME buttons to turn DST to OFF.
3. Confirm with the SET button and m ov e to 12/24 hou r time format.
12/24 Hour Time Format
The Time may be displayed i n 12-hour or 24-hour format. Def ault is 12-hour time.
Note: When in 12-hour format AM or PM will show in f ront of the hour.
1. 12H will flash.
2. Press and release the +/TEMP or -/TIME buttons to select 24-hour tim e.
3. Confirm with the SET button and m ov e to Set Time.
Set Time
To set the time manually:
1. The hour digit wil l f la sh.
2. Press and release the +/TEMP or -/TIME buttons to select the hour.
3. Press and release the SET button to set the minutes.
4. The minutes digit will flash.
5. Press and release the +/TEMP or -/TIME buttons to select the minutes.
6. Confirm with the SET button and move to Set Calendar.
Set Calendar
The date default of the Projection Alarm is 1.1.2010.
To set the calendar:
1. The year will flash.
2. Press and release the +/TEMP or -/TIME buttons to set the year (between year 2010-2039).
3. Press the SET button again t o confirm and to enter the month setting.
4. The month will flash.
5. Press and release the Pr ess and releas e the +/TEMP or -/TIME buttons to set the month.
6. Press the SET button again t o confirm and enter date setting.
7. The date will flash.
8. Press and release the +/TEMP or -/TIME buttons to set the date.
9. Confirm all calendar settings with the SET button to confirm and exit the program menu.
Note: The day of the week will set aut om atically once the year, m onth and date are set.
Fahrenheit/Celsius
1. Press and release the SET/°C/°F button once to switch from Fahrenheit to Celsius.
7
Page 8

Alarm Set
Hold the ALARM button for 5 seconds to enter the alarm time set mode.
1. The alarm hour dig it will flash.
2. Press and release the +/TEMP or -/TIME buttons to select t he hour .
3. Press and release the SET button to set the minutes. The minute digits
will flash.
4. Press and release the +/TEMP or -/TIME buttons t o select the minutes.
5. Press and release ALARM to c onfirm the alarm settings, then press and rel ease SET button to exit.
6. The alarm icon
7. The alarm icon
Deactivat e Alarm
1. Press and release the ALARM butt on onc e to show Alarm Time.
2. Press and release the ALARM butt on to deactivate the Alarm. The
indicati ng the alarm is no longer active.
Snooze
1. When the alarm sounds, press the SNO OZ E/LIGHT button to trigger snooze al arm for 10 minutes.
The snooze icon Zz will flash when the snooze f eature is active.
2. To stop alarm for one day, press ALARM but ton, while in snooze mode. The alarm icon
solid.
Note: When the alarm sounds, i t continues for 2 minutes and then shuts off c om pletely.
Backlight and Projection Intensity
Hold two seconds, and then release the SNOOZE/LIGHT button to adjust the brightness of the bac kli ght
and projection (together):
• ON High intensity: (default setting on A/C power)
• ON Low intensity: Hold and release SNOOZE /LIGHT button once
• OFF: Hold and release SNO OZ E /LIGHT button
• ON High intensity (default): Hold and release SNOOZE/LIG HT but ton
Projection
• Battery Power: Press and release the SNOOZE/LIGHT button to show the projection f or 10 seconds.
• Note: Projection will not display constant ly when operating on battery power.
• A/C Power: Projection is displ ay ed c onstantly
• Note: can be turned off see “Backli ght and Projection Intensit y”
• Rotate Projection: Press and release the PROJECT button t o rotate projection image 90 degrees on
the wall or ceiling. Press and release the PROJECT button again t o rotate another 90 degrees.
• Change Pro je c t io n M o de : Hold two seconds, and then release the PROJECT button to switch
projection modes. You will need to watch t he pr ojec tion image to view the changes.
o Time and Outdoor Temperatu re: alternate every 5 seconds (default)
o Time: Hold and release PROJECT button
o Outdoor Temperature: Hold and release PROJE CT button again
Note: Both time and outdoor temperatur e will not show at the same time.
will show after the minutes indic ating the alarm is active.
wil l flash when the alarm is sounding.
alarm icon will disappear
will remain
8
Page 9

Projection Arm Rotati on : The projec tion arm can be rotated 180 degrees to vi ew
the projecti on on the wall or c eiling.
USB Charge Port
The integrated USB charging port (on back) will char ge your sm art
phone, camera or other dev ic es when the Projection Alarm is plugged
into a power outlet wit h the included 5V A/C adapter.
Note: This is a power-output c har ging port. The charging port does not
supply power to the Projection Alarm.
Begin charging your ex ternal device by connecting the device’s USB
charging cabl e (not incl uded) to the USB charging port on the back of
the Projection Alarm. Charging times will vary.
Note: Some USB cables are for data transfer only and cannot be used
for charging. Mak e sure that the USB cable you use will charge your
device. Most USB cables i ncl uded with mobile devices will work for charging.
• USB Power Output: 1A maximum current
• Do NOT over load USB port. Char ge 0.5A devices or less only
IMPORTANT: When operating on A/C power, the backlight, pr ojec tion and USB charging port will turn off
while the Projection Alarm searches for the WW VB signal, to avoid interference. T he bac kli ght and
projection will return after the 2-10 minute search (whic h oc c ur s during the late night or early morning
hours). The USB charging por t will then resume working.
Temperature Trend Icons
The indoor and outdoor temper ature trend indicat or s are updated every 30 minutes. These trends
represent temper ature changes over the past thr ee hours.
Temperature rose more than 2°F /1°C in the past three hours
Temperature has not changed more than 2°F /1°C in the past three hours
Temperature fell more than 2°F /1°C in t he past three hours
The temperatur e trend indicators are shown next t o the indoor temperature and outdoor tem per ature
readings.
Outdoor Temperature Flashing
• Low battery icon
the station beeps to search f or the outdoor transmitter again.
• End of Transmission Range: Move the transmitter closer to the displ ay . Av oid obstr uc tions in the
signal path. Keep tr ansmitter and display away from electr onics.
Low Battery Icon
• When this icon
Projection Al arm.
• When this icon
outdoor transmitter.
Positio n t he Outdoor Trans m itt e r
Once the Projection Alarm shows the outdoor temperature, place the Projection Alarm and the transmitter
in the desired locations and wait approximately 1 hour before permanently mounting the transmitter to
ensure that there i s proper r ec eption. The transmitt er should be mounted vertically, i n a shaded,
present: Change batteries in the transmitter, and then hold the CH button until
appears in the indoor (I N) data r eading section, replace the batteries in the
appears in the outdoor (OUT) data readings section, replace the batteries in the
9
Page 10

protected area, at least 6 f eet from the ground to avoid damage and ensure accur ate readings. The
transmitt er i s water resistant, not waterproof and should not be placed anywhere it will bec om e
submerged in water or subjec t to standing water or snow.
Choose a location f or the transmitter that is within r ange of the Projection Alarm and under an overhang
for accuracy. Wireless transmitting range in open air is over 200 feet (60 meters) from outdoor transmitter
to Projection Alarm.
Option 1:
• Install one mounting screw (not included) into a wall leaving approximately ½ of an inc h
(12.7mm) extended.
• Place the transmitter onto the screw, using the hangi ng hole on the backside.
• Gently pull the transmi tter down to lock the screw into place.
Option 2:
• Insert the mounting screw (not included) through the front of the transmitter and into the
wall.
• Tighten the screw to snug (do not over tighten).
To achieve a true temperature r eading, mount where direct sunlight cannot reach the outdoor transmitter.
Mount the outdoor transmitter on a North-facing wall or in any well shaded area. Under an eave or deck
rail work well. The maximum transmitting range in open ai r i s over 200 feet (60 meters). Obstacles such
as walls, windows, stucco, c onc r ete and large metal objects can reduce t he r ange. Place the transmitter
at least 6 feet in the air to im prove signal transmission.
Position the Projection Alarm
1. The Projection Alarm has a wide base to sit on a desk or table.
2. Choose a location 6 f eet or more from elec tronics such as cordless phones, gaming systems,
televisions, microwaves, routers, etc.
3. Place within range of t he outdoor transmitter.
4. The maximum transmitting range in open air is 200 feet (60 met er s). Obstacles such as walls,
windows, stucco, conc r ete and large metal object s can reduce the r ange.
5. For best WWVB reception orientate the Projection Alarm with the front of the back facing Ft. Colli ns,
Colorado.
Care and Maintenance
• Do Not Mix Old and New Batteries
• Do Not Mix Alkaline, Stand ard, Li thiu m or Rech argeable Batteries
• Do not expose the Projection Alarm to extreme temperatures, vibration or shock.
• Keep Projection Alarm dry.
• Clean the Projection Alarm with a soft damp cloth. Do not use solvents or scouring agents.
• The Projection Alarm is not a toy. Keep it out of reach of children.
• The Projection Alarm is not to be used for medical purpose or for public information. It is for home use
only.
• The specificati ons of this Projection Alarm may change without prior notice.
• Improper use or unauthorized opening of housing wil l voi d the warranty.
• If the unit does not work properl y , change the batteries and/or c hec k the A/C cord connection.
Specifications
Indoor
Temperature Range: +32°F to +122°F (0° C to 50° C)
Accuracy: +/- 2°F
Interval: About every 30 seconds
Outdoor
Temperature Range: -40°F to 140°F (-40°C to 60°C)
10
Page 11

Alkaline Batteries: -20°F to 140°F (-28.8°C to 60°C)
Lithium Batteries: -40°F to 140°F (-40°C to 60°C)
Temperatures below -20°F (-28.8°C) require Lithi um batteries in the
outdoor sensor.
Distance: 200 feet (60 meters) RF 433MHz (open ai r )
Interval: About every 50 seconds
Power
Atomic Projection Alarm: 5-volt A/C power adapter (included)
Optional 2-AAA, IE C, LR3 batter ies (not included)
TX141 Transmitter: 2-AA, IEC, LR6 bat teries (not included)
USB: Output 0.5 Am p maximum. Do not overl oad US B port.
Battery Lif e
TX141 Transmitter
Battery Lif e: Battery lif e is over 24 months when using reputable battery br ands for
both Alkaline and Lit hium batteries
Atomic Projection Alarm
Battery Backup: Battery lif e is over 24 months when using t he A C adapter for primary
power
Dimensions
Atomic Projection Alarm: 5.23” W x 4.33” H x 1.96” D (133 x 110 x 50mm)
TX141 Transm itter: 1.57" L x 0.79" W x 5. 12" H (40 x 20 x 130 mm)
Accuracy
Indoor Temperat ur e
• Operating temperature range: 32°F to 122°F (0°C to 50°C)
• Accuracy: ± 2°F 32°F to 122°F (0 °C to 50°C)
• Resolution: 0.1°F
• W hen above 122°F (50°C) the temperature sensor should c ontinue to read the corr ect temperature
as long as the LCD display conti nues to function.
• When below 32°F (0°C) the t emperature sen sor should continue to read c or r ec tly as long as the LCD
display continues to function.
Outdoor Temper ature
• Operating temperature range: -40°F to 140°F (-40°C to 60°C)
• Accuracy: ± 2°F 32°F to 122°F (0°C to 50°C)
• Accuracy: ±4°F (-40°F to 32°F (-40°C t o 0°C);122°F to140°F ( 50°C to 60C°))
• Resolution: 0.1°F
• W hen above 140°F (60°C), t he temperature sensor shoul d continue to read t he correct temperature
as long as the LCD display conti nues to function.
• When below -40°F (-40°C), the temperat ur e sensor should tr ansmit conti nue to read correctly as long
as the LCD display continues to function.
11
Page 12

Warranty Informati on
Printed in China
La Crosse Technology, Ltd provides a 1-year limited warranty on this product against manuf actur ing
defects in materials and workmanship.
This limited warranty begins on the original dat e of purchase, i s valid only on products purchased and
used in North America and only to t he original purchaser of this product. To receive warranty service, the
purchaser must contac t La Crosse Technology, Ltd f or problem determination and servic e pr oc edur es.
Warranty service c an only be performed by a La Crosse Technology, Ltd authorized service center. The
original dat ed bill of sale must be presented upon request as proof of purchase to La Crosse Technology ,
Ltd or La Crosse Technology, Ltd’s authorized service center.
La Crosse Technology, Ltd will repair or replace thi s product, at our option and at no charge as stipulated
herein, with new or reconditioned parts or produc ts if found to be defective during the limi ted warranty
period specified above. All replaced part s and products become the property of La Crosse Technology,
Ltd and must be returned t o La Crosse Technology , Ltd. Replacement parts and products assume the
remaining ori ginal warrant y , or ninety (90) days, whichever is longer. La Crosse Technology, Ltd will pay
all expenses for l abor and m aterials for all repairs covered by this warranty. If nec essary repairs are not
covered by this warranty, or if a product is examined which is not in need or r epair, you will be charged for
the repairs or examination. The owner must pay any shipping c har ges i nc ur r ed in gett ing the La Crosse
Technology, Ltd produc t to a La Crosse Technology, Ltd authori z ed service center. La Crosse
Technology, Ltd will pay gr ound r eturn shipping charges to the owner of the product to a USA address
only.
The La Crosse Technology, Ltd warranty covers all defect s i n m aterial and workmanship with the
following specif ied exceptions: (1) damage caused by accident, unreasonable use or neglec t (including
the lack of reasonable and necessary maintenanc e) ; (2) damage occ ur r ing during shipment (claims must
be presented to the carrier); (3) damage to, or deteri or ation of, any accessory or decorativ e surf ac e; (4)
damage resulting from failure to follow instr uc tions contained in the owner’s manual; (5) damage resulting
from the performanc e of repairs or alterations by som eone other than an authorized La Crosse
Technology, Ltd aut hori z ed service center; (6) units used f or other than home use (7) applications and
uses that this product was not intended or (8) the products inability to receive a signal due to any source
of interfer enc e.. This warranty covers only actual defects within the product itself, and does not cover the
cost of install ation or removal from a fixed installation, normal set-up or adjustments, claims based on
misrepresentati on by the seller or performance variations resulting from installation-related
circumstances.
LA CROSSE TECHNOLOGY, LTD WILL NOT ASSUME LIA BILIT Y FO R INCI DE NTAL,
CONSEQUENTIAL, PUNIT IVE , OR OTHER SIMILAR DAMAGE S ASSOCIATED WITH THE
OPERATION OR MALFUN C TION OF THIS PROD U CT. THIS PRODU C T IS NOT TO BE USED FOR
MEDICAL PURPOSES OR FOR PUBLIC INFORMATION. THIS PRODUCT IS NOT A TOY. KEEP OUT
OF CHILDREN’S REACH.
This warranty giv es you specific legal rights. You may also hav e other rights specific to the St ate. Some
States do not allow the excl usi on of consequenti al or incidental damages ther efore the above exclusion of
limitation m ay not apply to you.
For warranty work, technical support, or information contact:
La Crosse Technology, Ltd
2817 Losey Blvd. S.
La Crosse, WI 54601 Online at:
www.lacrossetechnology.com/k84285
Contact Support : 1-608-782-1610 5,978,738
Product Registr ation: 6,597,990
www.lacrossetechnology.com/support/register
Protected under U.S. Patents:
6,076,044
12
Page 13

FCC Statement
This Device complies with Part 15 of the FCC Rules. Operation is subject to the following two condit ions:
(1) This device may not cause harmful interference, and (2) t he dev ic e m ust accept any interference
received, including interference that may cause undesired operation.
NOTE: THE MANUFACTURER IS NOT RESPONSIBLE FO R A NY RADIO OR TV INTERFE RE NCE
CAUSED BY UNAUTHORIZED MODIFICATIONS TO THIS EQUIPMENT. SUCH MODIFICATIONS
COULD VOID THE USER AUTHORITY TO OPERATE THE EQUIPMENT
All rights reserv ed. This handbook must not be reproduced i n any form , even in excer pts, or duplicated or
processed using elec tronic, mechanic al or chemic al pr ocedures without written permission of the
publisher.
This handbook may cont ain mi stak es and printing errors. The information in this handbook is regul arl y
checked and correcti ons made in the next issue. We accept no liabilit y for technical mistakes or pri nting
errors, or thei r consequence s.
All trademarks and patent s are ack nowledged.
13
 Loading...