

Page 1
K2 EXTREME
K2-100
1.0 Introduction.............................................................................................................................................................
2.0 The K2-100 Parts and Its Functions.........................................................................................................................
3.0 Major Function Modes - Time Keeping, Altimeter and Barometer Mode......................................................................
4.0 Time Keeping Mode and its Sub-displays.................................................................................................................
4.1 Time Keeping Mode - Current Time and Dual Time Display..................................................................................
4.2 Time Keeping Mode - Setting the Current Time and the Dual Time.......................................................................
4.3 Time Keeping Mode - Daily Alarm, Date Alarm and Chime/Alarm On/Off..............................................................
4.4 Time Keeping Mode - Setting the Daily Alarm and the Date Alarm........................................................................
4.5 Time Keeping Mode - Start/Stop the Chronograph...............................................................................................
4.6 Time Keeping Mode - Record/Recall a Lap Memory.............................................................................................
4.7 Time Keeping Mode - Countdown Timer and Repeater Timer....................................................................................
4.8 Time Keeping Mode - Setting the UPV for the Timer and the Timer Counting Display...................................................
4.9 Time Keeping Mode - Using the Timer................................................................................................................
5.0 Altimeter Mode and its sub-displays.........................................................................................................................
5.1 Altimeter Mode - Altitude Graph Display.............................................................................................................
5.2 Altimeter Mode- Altitude History Graph Scale.....................................................................................................
5.3 Altimeter Mode - Calibrate the Altimeter.............................................................................................................
5.4 Altimeter Mode - Set the Altitude Alarm..............................................................................................................
5.5 Altimeter Mode - Normal Altitude and Relative Altitude.......................................................................................
GB
1
2
3
4
5
6
7
8
9
10
11
12
13
14
16
17
18
19
20
GB
5.6 Altimeter Mode - 24 Hour Memory (the History Graph).......................................................................................
5.7 Altimeter Mode - Ascending and Descending Rate of the 24 Hour Memory.........................................................
5.8 Altimeter Mode - The User Log Memory (ULM)..................................................................................................
5.9 Altimeter Mode - Set the Sampling Rate of ULM................................................................................................
5.10 Altimeter Mode - Start the Recording of the ULM.............................................................................................
5.11 Altimeter Mode - Recall the ULM Altitude Memory Segment.............................................................................
5.12 Altimeter Mode - Recall the ULM Altitude Memory Record................................................................................
6.0 Barometer Mode and its sub-displays......................................................................................................................
6.1 Barometer Mode - Barometric Pressure Graph Display...........................................................................................
6.2 Barometer Mode - Pressure History Graph Scale...................................................................................................
6.3 Barometer Mode - Implication of the Barometric Pressure History Graph...........................................................
6.4 Barometer Mode - Calibrate the Barometer........................................................................................................
6.5 Barometer Mode - 48 Hour Memory...................................................................................................................
6.6 Barometer Mode - Ascending / Descending Rate of the 48 Hour Memory...........................................................
7.0 Specifications.........................................................................................................................................................
21
22
23
24
25
26
27
28
30
31
32
33
34
35
36
37
Page 2
GB
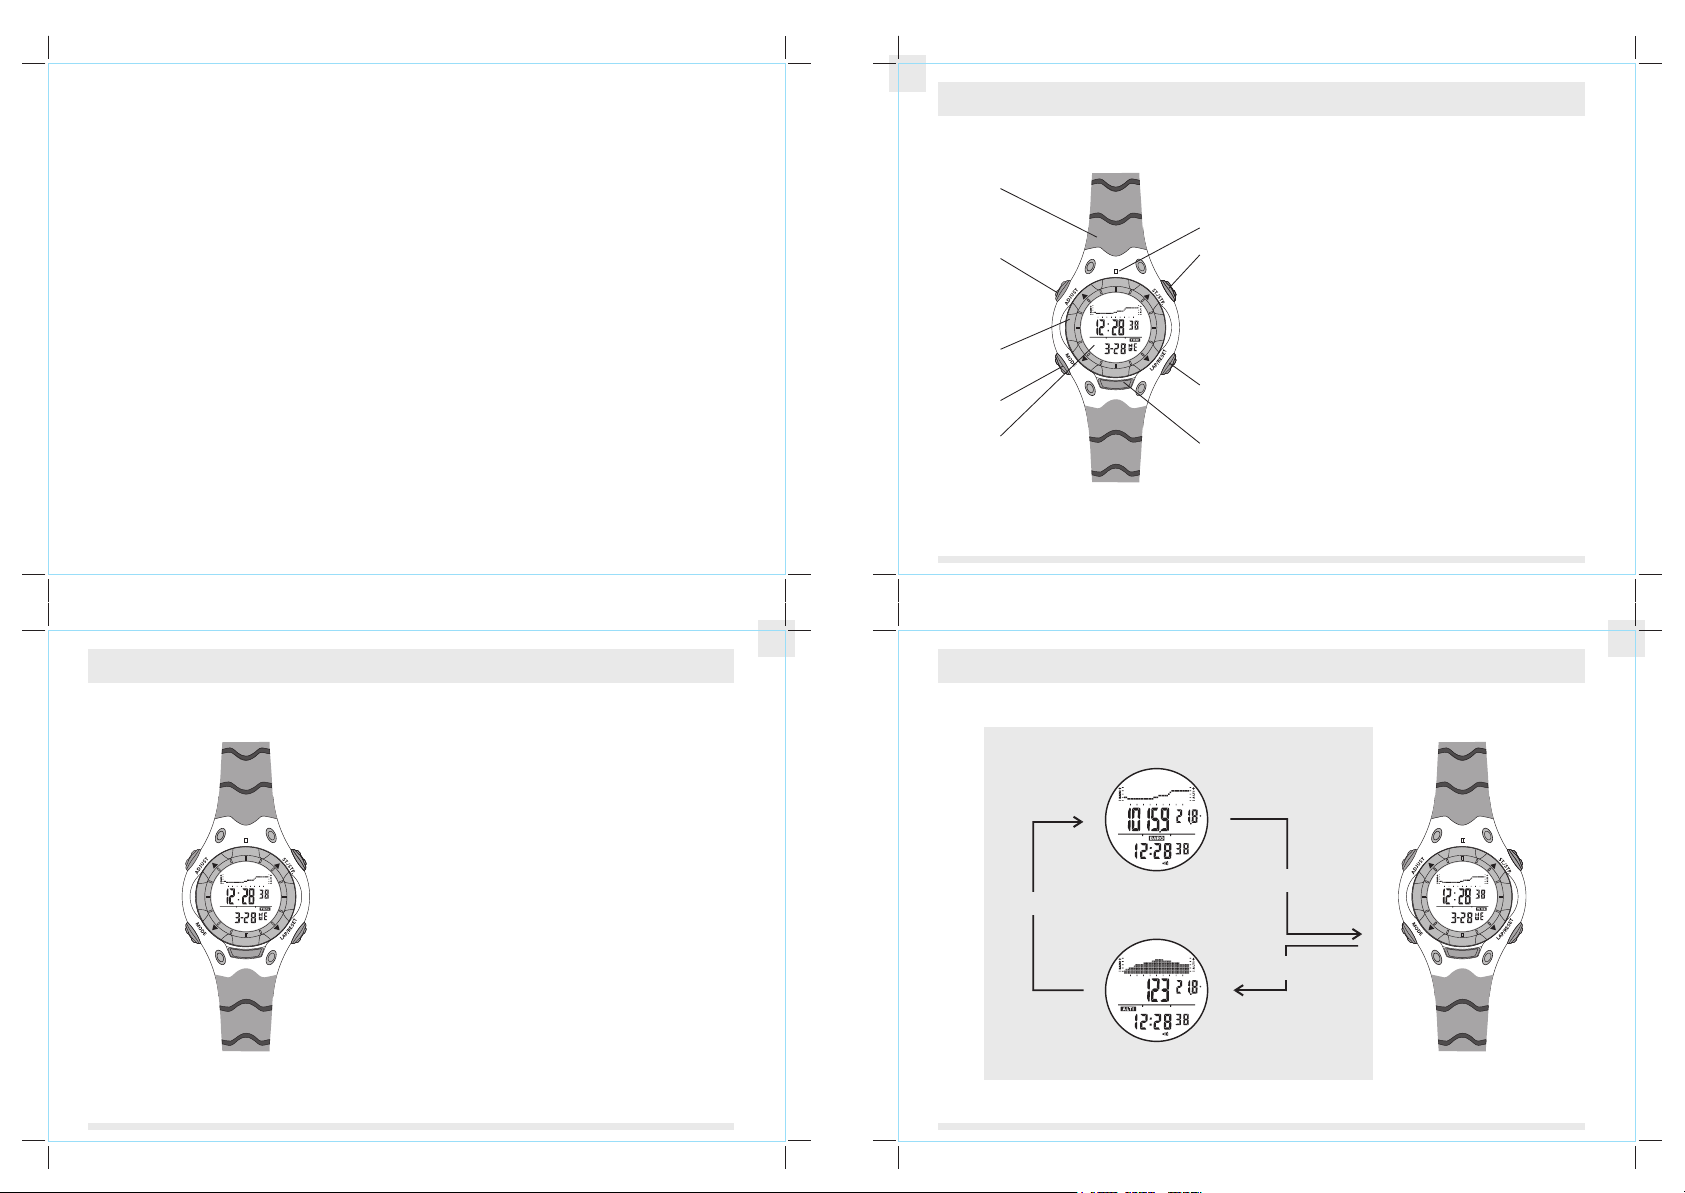
2.0 The K2-100 Parts and Its Functions
PU strap
pointer
adjust
button
rotatory
ring
mode
button
display
60
45
P
30
start/stop
button
15
lap/reset
button
light
button
Mode Button
- To select among Time Keeping Mode, Barometer Mode
and Altimeter Mode.
- To exit setting sequences.
Adjust Button
- Press and hold for 2 seconds to enter setting modes.
- To select sub function of Time Keeping Mode, Barometer
Mode and Altimeter Mode.
- To select the items in setting modes.
- To select Altitude 24 hour memory.
To select Barometric Pressure 48 hour memory.
Start/Stop Button
- To increase the number during setting.
- To start / stop the chronograph and timer.
- To switch between Current Time and Dual Time Display
Lap/Reset Button
- To decrease the number during setting.
- To record lap memory in Chronograph Mode.
- Press and hold for 2 seconds to reset lap memory in
Chronograph Mode.
- To select history graph scale information.
- Press and hold for 2 seconds to switch among sensor
units.
2
1.0 Introduction
60
45
30
1
GB
3
GB
3.0 Major Function Modes - Time Keeping, Altimeter and Barometer Mode
Thanks for your purchase of the K2-100.
Your K2-100 features an electronic sensor that measures
the out door con diti ons suc h as tem pera ture , pr essu re a nd
alt itude .
Your K2-100 provides the essential information while
you are performing hiking, climbing and other outdoor
activities.
Your K2-100 also includes normal time, dual time, daily
ala rm, c hrono graph a nd t imer.
Your K2-100 is carefully designed and produced for
ou td oor ac ti vit ie s, in or de r t o u til iz e t hes e f ea tur es of
your K2-100, it is advisable to read the following
15
P
ins truct ions:
- Read the instructions before you use the K2-100.
- Avoid exposing your K2-100 to extreme conditions for
an unreasonable amount of time.
- Avoid rough usage or severe impacts to your K2-100.
- Do not open the K2-100's case. Only a certified
service agency should service the unit as your K2-100
contains precise electronic sensors and components.
- Clean your K2-100 with a soft cloth occasionally to
prolong the life of you watch.
- Store your K2-100 in a dry place when it is not in
use .
1 3
mode
button
hPa
mb
P
Barometer Mode
m
P
Altimeter Mode
C
60
mode
button
mode
C
button
45
Time Keeping Mode
15
P
30
2 4
Page 3
GB
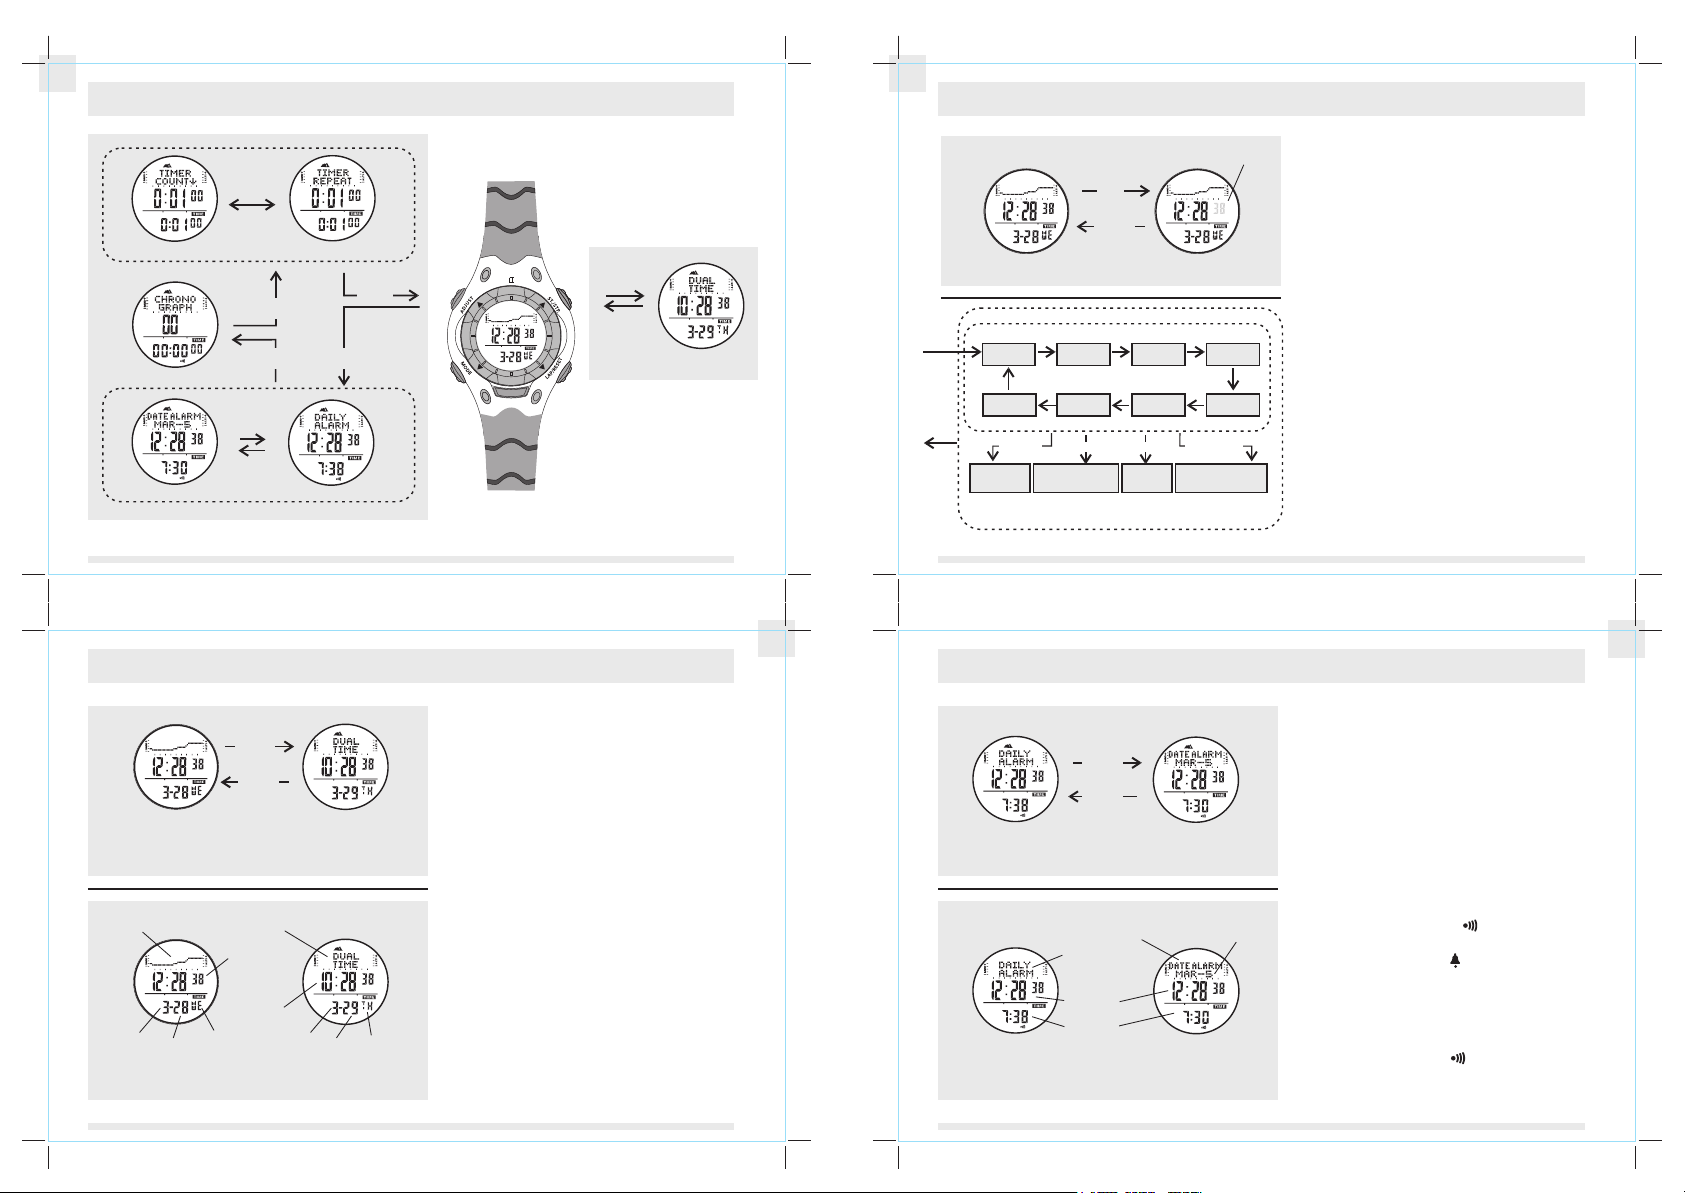
4.0 Time Keeping Mode and its Sub-displays
GB
4.2 Time Keeping Mode - Setting the Current Time and the Dual Time
hPa
Countdown Timer Display Repeater Timer Display
Chronograph Display
P
A
Date Alarm Display
start/stop
button
adjust
button
adjust
button
Daily Alarm Display
adjust
button
adjust
button
P
A
60
45
P
30
Current Time Display
15
4
5
4.1 Time Keeping Mode - Current Time and Dual Time Display
Current Time and Dual Time Display
- Press the [start/stop] button once to switch between
start/stop
button
P
start/stop
button
Current Time Display
Dual Time Display
Switch between the Current / Dual Time Display
dual time
pressure history graph
P
month monthdate date
Current Time Display
display Indicator
current time
dual time
day of week day of week
Dual Time Display
Current / Dual Time Display
A
A
the Current Time Display and the Dual Time Display.
Current Time Display
- The 1st row of the display shows the Pressure History Graph
of the last 48 hours;
- The 2nd row of the display shows the current
time in hour, minute and second;
- The 3rd row of the display shows the month, day and day of
week.
- Press and hold the [lap/reset] button for 2 seconds to select
between 'second' display or 'temperature' display.
Dual Time Display
- The 1st row of the display shows the Dual Time Display
Indicator.
- The 2nd row of the display shows the dual time in hour,
minute and second;
- The 3rd row of the display shows the month, day and day of
week for the dual time.
NOTE:
To use the Pressure History Graph, check the 'Implication of
-
the Pressure History Graph ' section for more detail.
start/stop
button
A
Dual Time Display
GB
To Set the Time and Date
- To set the date and time, press and hold the [adjust]
button for 2 seconds to change from the Current Time
Display to Current Time Setting Display.
- The second digits flash on the display because they are
being selected.
The Setting Procedure
- Press [adjust] button to change the selection as in the
Current Time Setting Sequence.
- While digits are flashing (selected), press the [start/stop]
button to increase the number; press the [lap/reset] button
to decrease the number. Hold the button to change
the number at a higher speed.
- While display contrast setting is being selected, press the
[start/stop] button to increase the number. Press the
[lap/reset] button to decrease the number. 15 gives a
darker display; 0 gives a lighter display.
- After you set the time, date, display format and display
contrast, press the [mode] button to exit the Current Time
Setting Sequence.
- If no button is pressed in the setting display for about 3
minutes the K2-100 will return to the Current Time
Mode automatically
To Set the Dual Time
- To set the date and time, press and hold the [adjust]
button for 2 seconds to change from the Dual Time
Display to Dual Time Setting Display.
- Follow the Current Time Setting steps to set the
subsequent settings of the dual time.
hold
adjust
P P
Current Time Display
hold
adjust
mode
button
adjust
second
adjust adjust
display
contrast
start/stop hold start/stop lap/reset hold lap/reset
Increase
the number
Increase the minute
at a higher speed
mode
button
adjust
minute hour
adjustadjust
12/24
hour format
Decrease
the number
Current Time Setting Display
day
Current Time Setting Sequence
digits have been
selected (flashing)
adjust
year
adjust
month
Decrease the number
at a higher speed
6
7
4.3 Time Keeping Mode - Daily Alarm, Date Alarm and Chime/Alarm On/Off
Daily Alarm and Date Alarm Display
- K2-100 has two alarm modes: The Daily Alarm and
the Date Alarm.
start/stop
P
A
Daily Alarm Display
start/stop
Switch between the Daily / Date Alarm Display
date alarm
indicator
daily alarm
indicator
P
A
Daily Alarm Display
current time
alarm time
Daily / Date Alarm Displays
P
A
Date Alarm Display
the alarm
date
P
A
Date Alarm Display
- The Daily Alarm and the Date Alarm work
independently.
- When the Daily Alarm is ON, the K2-100 sounds at the
preset alarm time every day.
- When the Date Alarm is ON, the K2-100 sounds at the
preset alarm time on the schedule date.
- Press the [start/stop] button to switch between
the Daily Alarm Display and the Date Alarm Display.
To Set the Daily Alarm and Chime On or Off
- Press the [lap/reset] button to change the ON/OFF status
of alarm and the hourly chime, in the Daily Alarm Display.
- When the alarm indicator appears (alarm
ON), the K2-100 sounds at the preset alarm time
every day.
- When the chime indicator appears (chime ON),
the K2-100 beeps every hour on the hour.
- To stop the sound, press any button to stop the alarm.
To Set the Date Alarm On or Off
- Press the [lap/reset] button to change the ON/OFF status
of the alarm, in the Date Alarm Display.
- When the alarm indicator appears (alarm ON),
the K2-100 sounds at the preset alarm time on the
preset date.
GB
5
6
7
8
Page 4
GB
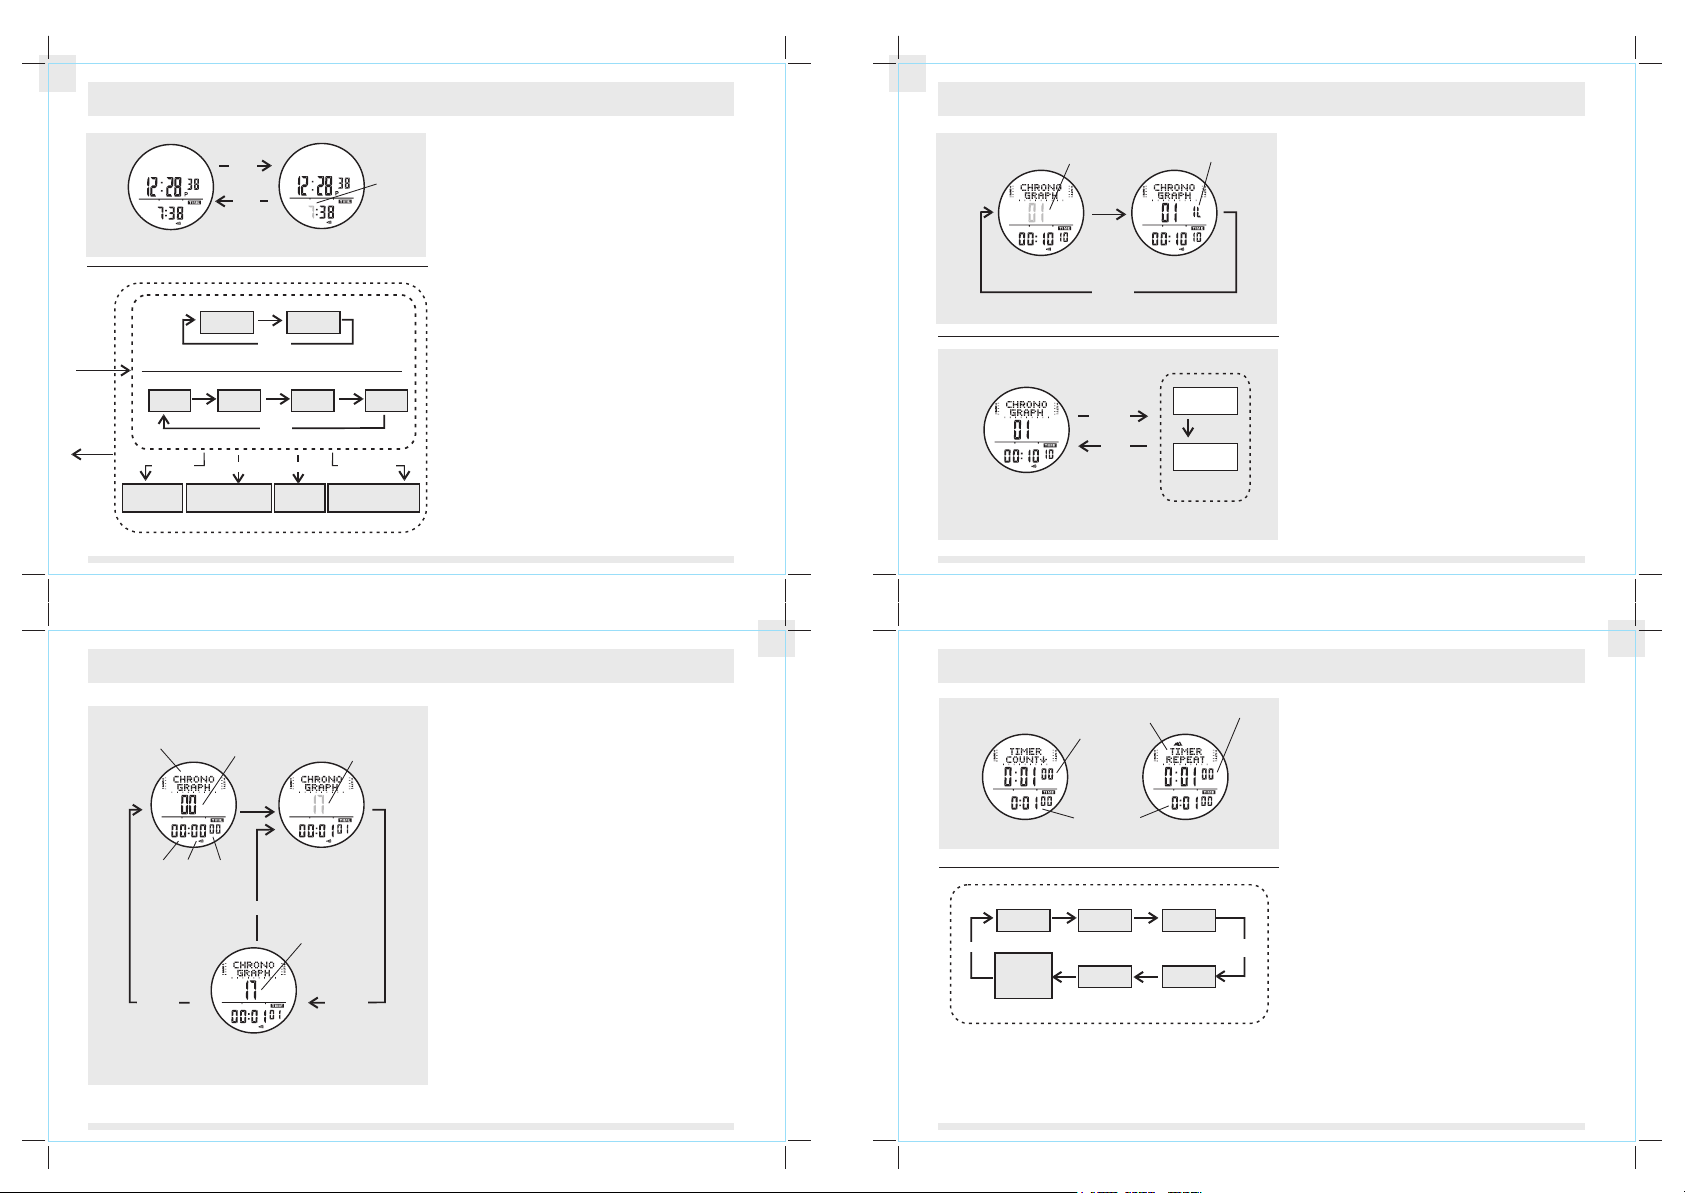
4.4 Time Keeping Mode - Setting the Daily Alarm and the Date Alarm
GB
4.6 Time Keeping Mode - Record/Recall a Lap Memory
hour digits
have been
selected
(flashing)
Decrease the number
at a higher speed
8
Daily/Date Alarm Display
hold
adjust
mode
button
hold
adjust
A
mode
A
hour
start/stop hold start/stop lap/reset hold lap/reset
Increase
the number
button
Daily/Date Alarm Setting Display
adjust
hour
Daily Alarm Setting Sequence
adjust adjust adjust
minute
Date Alarm Setting Sequence
Increase the minute
at a higher speed
minute
adjust
month day
adjust
Decrease
the number
9
4.5 Time Keeping Mode - Start/Stop the Chronograph
chronograph
display indicator
hour minutes seconds
Chronograph
'Zero' Display
hold
lap/reset
1/100 sec
start/stop
start/stop
Chronograph Stop Display
the digits
keep running
Chronograph
Running Display
the digits
stop running
start/stop
9
To Set The Daily Alarm
- Press and hold the [adjust] button for 2 seconds to change
from Daily Alarm Display to Daily Alarm Setting
Display.
- The hour digits flash on the display because it is being
selected.
The Setting Procedure
- Press [adjust] button to change the selection in the
Daily Alarm Setting Sequence.
- While any digits are flashing (selected), press the [start/stop]
button to increase the number; press the [lap/reset] button to
decrease the number. Hold down the button to change the
number at a higher speed.
- After you set the alarm time, press the [mode] button to exit
the setting sequence.
- If no button is pressed in the setting display for about 3
minutes, the K2-100 will return to the Alarm Time Mode
automatically
To Set The Date Alarm
- Press and hold the [adjust] button for 2 seconds to change
from Date Alarm Display to Date Alarm Setting Display.
- The hour digits flash on the display because it is being
selected.
The Setting Procedure
- Press the [adjust] button to change the selection in the
Date Alarm Setting Sequence.
- Follow the Daily Alarm Setting steps to set the
subsequent settings of the Date Alarm.
Chronograph Mode
- The Chronograph measures elapsed times and laptimes.
- The display shows the 'All Zeros' display when the
chronograph is being selected the first time or the
chronograph is reset.
- The chronograph resolution in 1/100 second.
To Start/Stop the Chronograph
- When the chronograph is idle, press the [start/stop]
button to start the chronograph; press the [start/stop]
button once again to stop the chronograph.
- The elapsed time between the 2-[start/stop]-keystoke
will appear on the display.
- Repeat the steps mentioned above to get another set
of elapsed time.
To Reset the Chronograph
- To record a new set of elapsed times, press and
hold the [lap/reset] button for 2 seconds to reset
the chronograph to the 'All Zeros' display.
GB
the digits
is running
Chronograph
Running Display
To record the Lap Memory
Chronograph
Stop Display
To recall the Lap Time
lap/reset
5 second
hold adjust
mode
the lap
number
Chronograph
LapDisplay
1st lap memory
the next
lap memory
lap memory recall
sequence
lap/reset
To Record Lap Memory
- The Chronograph Mode allows you to record up to 10
lap memories.
- Press the [lap/reset] button once to record the lap
memory while the chronograph is running.
- The lap number will be displayed at the right hand side of
the display for 5 seconds, as well as the lap time display
on the bottom row of the display. Then the chronograph
starts running again automatically.
- While the lap number and lap time are displayed, the
chronograph keeps running.
- Repeat the steps mentioned above to get another set of
lap memory.
To Recall Lap Memory
- Press and hold the [adjust] button to enter the lap
memory recall sequence, in the Chronograph Stop Display.
- Press the [lap/reset] button to switch among the lap
memories.
- Press the [mode] button to exit the lap memory recall
sequence.
To Reset Lap Memory
- To record new sets of lap time, press and hold the
[lap/reset] button for 2 seconds to reset the chronograph
lap memory while the chronograph is stopped.
10
11
4.7 Time Keeping Mode - Countdown Timer and Repeat Timer
countdown timer
display indicator
Count Down Timer Display Repeater Timer Display
3 min
User
Pre-set
Value
(UPV)
repeater timer
display indicator
the counting row
hPa
the setting row
lap/reset lap/reset
5 min
lap/reset lap/reset lap/resetlap/reset
45 min
the counting row
10 min
15 min
Timer Setting Sequence
Countdown Timer and Repeat Timer Display
- The K2-100 has two timer counting displays:
Countdown Timer and Repeat Timer.
- The Countdown Timer starts counting from the preset
value to zero and stops at zero.
- The Repeat Timer starts counting from the preset
value to zero and then the timer restarts the counting
again and again automatically until the [start/stop] button
is pressed.
- To select between Countdown Timer and Repeat
Timer Display, check the 'Setting the Timer Counting
Display' section for more detail.
The Timer Display Format
- The 1st row of the display shows the Countdown Timer
or the Repeat Timer indicators.
- The 2nd row of the display shows the digits, which the
timer starts counting down from.
- The 3rd row of the display shows the digits, which the
timer is going to be set at.
To set the Timer from the Quick-Set-Values
- Press the [lap/reset] button to select among the 5
quick-set-values (3,5,10,15 and 45 min) and the existing
User Pre-set Value (UPV) as in the
Sequence.
- When the desired value displays on the 3rd row of the
display, press and hold the [lap/reset] button for 2
seconds to load that value to the 2nd row of the display.
The timer is now set.
- To set the timer values other than the 5 quick-set-value
and the existing UPV, check the 'To Set the User Pre-set
Value' section for detail.
11
GB
Timer Setting
10
12
Page 5

GB
4.8 Time Keeping Mode - Setting the UPV for the Timer and the Timer Counting Display
To Set the UPV and the Timer Counting DIsplay
- Press and hold the [adjust] button for 2 seconds to
change the display from Timer Display to User Pre-set
Value Setting Display.
- The hour digits flash on the display because it is
being selected.
The setting procedure
- Press [adjust] button to change the selection as in the
User Pre-set Value Setting Sequence.
- While digits are being selected (flashing), press the
[start/stop] button to increase the number; press the
[lap/reset] button to decrease the number. Hold down the
button to change the number at a higher speed.
- When the FLASHING PART moves to "REPEAT" or
"COUNT " character, just press [start/stop] or [lap/
resst] button to select the Countdown timer or Repeater
timer.
- After you set the timer, press the [mode] button to exit
the setting sequence.
- If no button is pressed in the setting display for about 3
minutes, the K2-100 will return to the Timer Mode
automatically
hold
adjust
mode
button
hold
adjust
mode
button
digits have been
Timer Display
hour
selected (flashing)
User Pre-set Value (UPV)
Setting Display
adjustadjust
Timer Counting Display
(Countdown Timer or
Repeater Timer)
secondminute
UPV and Timer Counting Display Setting Sequence
adjustadjust
GB
5.0 Altimeter Mode and its sub-displays
adjust
button
adjust
adjust
button
(from -24 hour to -15 min.
(from -15 min. to -24 hour)
adjust
button
Altitude Setting Sequence
To view the memory
by forward scrolling
To view the memory
by backward scrolling
button
start/stop
lap/reset
24 Hour Memory Display
adjust
button
hold
adjust
mode
button
adjust
button
mode
button
60
m
45
P
30
Altimeter Graph Display
15
12
13
4.9 Time Keeping Mode - Using the Timer
digits start
counting
start/stop
Timer Display
(Timer sets as 1 minute)
hold
lap/reset
Counting Display
start/stop
digits stop
counting
Stop Counting Display
start/stop
digits start
counting
again
Counting Display
13
To Use the Timer
- When the Timer is set, press the [start/stop] button to
start the timer. Press the [start/stop] button again to stop
the timer.
- The time to 'Zero' will be shown on the display.
- The timer starts to beep every second when it is 5
seconds from the end of the countdown.
- When the countdown time is reached, a long beep that
lasts for 2 seconds will be heard.
- Pressing any button in this period will terminate the beep
sound prematurely.
- The user preset time will be loaded automatically at the
end of the beep sound.
To Reset the Timer
- Press and hold the [lap/reset] button for 2 seconds to
reset the timer after it has stopped.
GB
14
15
5.0 Altimeter Mode and its sub-displays ... continue
60
lap/reset
m
45
P
30
Altimeter Graph Display
15
button
hold
lap/reset
hold
lap/reset
C (Celsius)
m (Meter)
F (Fahrenheit)
m (Meter)
15
Graph Scale Display
hold
lap/reset
hold
lap/reset
Unit Selection Sequence
C (Celsius)
ft (Feet)
F(Fahrenheit)
ft (Feet)
hold
lap/reset
GB
14
16
Page 6

GB
5.1 Altimeter Mode - Altitude Graph Display
GB
5.3 Altimeter Mode - Calibrate the Altimeter
Altitude history graph
Altitude in meter
Temperature
in degree Celsius
Real time
Altitude Graph Display
altitude
total display altitude
(Y axis resolution X 11 row)
the altitude
variable
total display time
(Y-axis)
(15 min. X 40 column=600 min or 10 hour)
the time variable
(X-axis)
Altitude History Graph
hold
lap/reset
hold
lap/reset
C (Celsius)
ft (Feet)
F(Fahrenheit)
ft (Feet)
hold
lap/reset
hold
lap/reset
C (Celsius)
m (Meter)
F (Fahrenheit)
m (Meter)
Unit Selection Sequence
16
5.2 Altimeter Mode- Altitude History Graph Scale
lap/reset
button
Altitude Graph
Display
X-axis
resolution
15 minutes
History Graph Scale Display
Y-axis
resolution
1, 2, 5, 10
20, 50
100, 200, 500
1000, 2000
meter(s)
17
Altimeter Graph Display
- In the Altimeter Graph Display, the 1st row of the display
shows the altitude history graph of the last 24 hours.
The 2nd row of the display shows the altitude
and the current temperature.
- The 3rd row of the display shows the current t
minute and second.
ime:
hour
The Altitude History Graph
- The K2-100 stores the altitude values automatically
as time goes by.
- The Altitude History Graph of the Altitude Graph Display
is plotted by these historical altitude values.
- The X-axis of the history graph is time variable; the Yaxis of the history graph
History Graph makes up 11 rows and 40 columns.
- The memory on the left hand side of the history graph
is recorded early than those on the right.
- The scale of the Y-axis of the history graph is changeable,
the scale will be changed in order to fit in the altitude
values. Check the 'Altitude History Graph Scale' section
for more detail on the scale of the history graph.
is altitude variable. The A
ltitude
To Switch among Units
- The K2-100 can display altitude in meter (m) or feet (ft);
the K2-100 can display temperature in Celsius ( C) or
Fahrenheit ( F).
- Press and hold the [lap/reset] button to change the units
as in the units select sequence.
Altitude History Graph Scale
- The scale of the Y-axis of the History Graph is varied
for fitting all the alt
- Press the [lap/reset] button once to view the altitude
scale information, in the Altitude Graph Display,
- The 'GRAPH SCALE' message will slide out and display
for 3 seconds, then the X-axis and Y-axis resolutions
will be shown.
- For example, 'X=0:15'00"' implies that the resolution of
X-axis is 15 minute per column; at the same time,
'Y=20m' implies that the resolution of Y-axis is 20
meter per row.
- The maximum and the minimum altitudes of the History
Graph will be shown on the display a while later.
- For example, 'MAX 151M' implies that the current
maximum altitude of the Altitude History Graph is 151
meter. 'MIN 0m' implies the current minimum altitude of
the Altitude History Graph is 0 meter.
itude memory into the grap
h.
NOTE:
- The resolution of X-axis of the history graph (time
variable) is fixed as 15 minutes.
- The resolution of Y-axis of the history graph (altitude
variable) is ranging from 1,2,5,10,20,50,100,200,500,1000
to 2000 meters.
GB
hold
adjust
hold
adjust
Altitude in meter
start/stop lap/reset
Increase
the altitude
Altitude History Graph
hold
adjust
digits flashing
Decrease
the altitude
Calibration Sequence
( Calibrate the altitude from 123 to 128m)
Altitude Graph Display
mode
button
mode
button
18
5.4 Altimeter Mode - Set the Altitude Alarm
adjust
alarm 1 ON
indicator
hold
Altitude Graph Display
mode
button
mode
button
digits
flashing
19
hold
adjust
Increase
the altitude
adjust
button
digits have been
selected (flashing)
alarm
limit line
lap/resetstart/stop
Decrease
the altitude
Altitude Alarm 1 Setting Sequence
( Set the Altitude Alarm 1 as 129m)
Before Calibrating the Altimeter
- The altimeter's calibration procedure is designed for
use in the normal altimeter mode.
- As the altitude is calculated from the air pressure,
the change of air pressure will affect the altitude reading.
- To achieve a more accurate reading, the K2-100 needs to
be calibrated from time to time as pressure may change
gradually even within hours.
- Calibration of the K2-100 must occur at a known
altitude, such as at sea level or beside an altitude sign pole,
as that altitude value has to be entered into the K2-100
during the calibration procedure.
Important: Entering an incorrect altitude in the calibration
procedure will result in a mistaken altitude in the future.
Altitude Calibration Procedures
- Press and hold the [adjust] button for 2 seconds to enter the
Altitude Calibration Display.
- Press the [adjust] button once again to enter the calibration
sequence, the digits of the middle row of the display and the
altitude unit will start flashing.
- Press the [start/stop] button to increase the number; press
the [lap/reset] button to decrease the number. Holding down
the button changes the number at a higher speed.
- After you set the altitude, press the [mode] button to exit the
setting sequence.
- Press the [mode] button once again to return to
Altitude Graph Display.
Altitude Alarm 1 and 2
- The K2-100 has two built-in altitude alarms: Altitude
Alarm 1 and Altitude Alarm 2 that work independently.
- The Alarm icon will flash and the K2-100 will sound for 10
seconds when you pass through the Altitude Alarm Limit,
either below or above the limit.
- When the alarm sounds, press any button to stop the alarm.
- The Altitude Alarms can be set within the range from
-30065ft to 30065 ft (-9164m to 9164m).
- If two Altitude Alarms are set at the same altitude limit value,
the Altitude Alarm 1 will be activated only.
To Set the Altitude Alarm Limit and set the Alarm 1 ON/OFF
- Press and hold the [adjust] button for 2 seconds to enter
Altitude Calibration Display. Press the [adjust] button once
again to select the Altitude Alarm 1 Display.
- Press and hold the [adjust] button to enter the Altitude Alarm
Setting Display. In the setting display, the altitude digits and
the altitude unit will flash. Press the [start/stop] button to
increase the altitude number; press the [lap/reset] button to
decrease altitude number. Holding down the button changes
the altitude at a higher speed.
- Once you change the altitude alarm, the Altitude Alarm
1 turn ON automatically. After you set the altitude alarm,
press the [mode] button to exit the setting sequence.
- Press the [lap/reset] button to turn the alarm ON or OFF.
- Press the [mode] button once again to return to the Altitude
History Graph Display. A dotted line will show on the display
to illustrate the Alarm 1's limit.
To Set the Altitude Alarm 2
- Set the Altitude Alarm 2 in the same manner as setting
Altitude Alarm 1.
GB
Page 7

GB
5.5 Altimeter Mode - Normal Altitude and Relative Altitude
GB
5.7 Altimeter Mode - Ascending and Descending Rate of the 24 Hour Memory
Normal and Relative Altitude
- The K2-100 measures Normal and Relative
adjust
button
adjust
button
hold
adjust
Relative Altitude Setting Sequence
button
button
lap/reset
button
lap/reset
button
adjust
adjust
hold
adjust
Altitude Graph Display
Relative Altitude DisplayNormal Altitude Display
mode
button twice
Altitudes.
- Normal altitude is the difference between your current
altitude and SEA LEVEL. (Assuming that air pressure at
sea level is 1013.21mbar).
- Relative altitude is the difference between your
current altitude and the altitude of a specific altitude level
at which you set the altimeter to 'Zero'.
- To use relative altitude, for example, measure the
altitude difference between the starting point and the
finish points of a trek.
- To measure the altitude difference, set the K2-100 to
Relative Altitude display at the starting point of the trek,
the K2-100 will automatically set the altitude to 'Zero'.
- Check the altitude at the finish point of the trek, the
K2-100 will show the altitude difference on the
display.
To Switch between the Normal and Relative Altitude
- Press and hold the [adjust] button for 2 seconds to enter
Altitude Setting Display. Press the [adjust] button four
times to select the Normal / Relative Altitude Display.
- Press and hold the [adjust] button to enter the setting
display of the Normal / Relative Altitude Display. Press
the [lap/reset] button to switch between the Normal and
Relative Altitude.
- After you set the altitude, press the [mode] button to
exit the setting sequence. Press the [mode] button once
again to return to the Altitude Graph Display.
20
21
5.6 Altimeter Mode - 24 Hour Memory (the History Graph)
24 Hour Memory
- The K2-100 has two altitude memory functions: the 24
adjust
button
Altitude Graph Display
flashing
column
24 Hour Memory Display
(the oldest memory)
start/stop lap/reset
To view the memory
by forward scrolling
(from -24 hour to -15 min.
lap/reset
button
flashing
column
24 Hour Memory Display
( the newest memory)
To view the memory
by backward scrolling
(from -15 min. to -24 hour)
mode
button
Hour Memory and the User Log Memory.
- 24 Hour Memory automatically records the altitude values
for every 15 minutes of the last 24 hours.
- These figures can be reviewed in the 24 Hour
Memory Display.
Review the 24 Hour Memory
- Press the [adjust] button to select the 24 Hour Memory
Display, in the Altitude Graph Display.
- The 'ALTIMETER 24 HR MEM' will slide out and display
for 3 seconds, the 'MEM' indicator will be shown as
well.
- The Altitude 24 hour's history graph shows on the 1st row
of the display.
- The altitude memory and temperature shows on the 2nd
row of the display.
- The time that the memory was recorded will show on
the 3rd row of the display.
- Press the [lap/reset] button to view the memory through
backward scrolling (from -15min to -24hour), press the
[start/stop] button to view the memory through forward
scrolling (from -24 hour to -15 min).
Note:
- The memory columns on the left hand side of the
history graph are recorded early than those on the right.
- The flashing column of the history graph indicates which
memory is displaying during the 24 hour memory
reviewing.
21
GB
Ascending and Descending Rate
- The K2-100 has a built-in function for calculating the ascending
and descending rate of the Altitude of the last 24 hours.
- The ascending and descending rate is the altitude
difference between two memory records.
- A (+) value implies ascending rate; a (-) value implies a
descending rate.
- These rates can be reviewed in the Ascending/
Descending Rate Display.
Review the Ascending and Descending Rate
- Press the [adjust] button three times to select the
Ascending / Descending Rate Display, in the Altitude
Graph Display.
- While the Ascending / Descending Rate Display is shown,
the Altitude Ascending or Descending Rate shows on the
1st row of the display.
- The altitude memory and temperature show on the 2nd
row of the display.
- The time that the memory was recorded shows on
the 3rd row of the display.
- Press the [lap/reset] button to view the memory by
backward scrolling ( from -15 min. to 24 hour), press the
[start/stop] button to view the memory through forward
scrolling (from -24 hour to -15 min.).
- While these displays are shown, press the [mode] button
to exit the reviewing and the display will return
to the Altitude Graph Display.
adjust
button
Ascending / Descending
start/stop
To view the memory
by forward scrolling
(from -24 hour to -15 min.)
adjust
button
Rate Display
adjust
button
Altitude Graph Display
ascending or
descending rate
lap/reset
To view the memory
by backward scrolling
(from -15 min. to -24 hour)
mode
button
22
23
5.8 Altimeter Mode - The User Log Memory (ULM)
starting point
of a trek
(start recording)
8 March 2001
AM 8:00 00
m
700
600
500
400
300
200
100
0
The date which the memory segment was recorded: 8 March 2001
The time span of the memory segment: 5:00 00
altitude memory
record
30
60 90 120 150 180 210
the sampling rate = 30 minutes
ULM
Altimeter
Logbook
The Relationship between Altimeter Logbook,
Altitude Memory, Segment and Altitude Memory Record
ULM
Altitude Memory
Segment
altitude memory
segment
240 270 300 minute
ULM
Altitude Memory
Record
Finish point
of a trek
(stop recording)
8 March 2001
PM 1:00 00
User Log Memory
- The K2-100 has a built-in altitude memory function - User
Log Memory (ULM).
- The user can set the starting/finishing time and the
sampling interval of the ULM. For example, start the
recording of the ULM at the starting point of a trek, stop
the recording of the ULM at the finish point of that trek,
and set the sampling rate as 30 minutes.
- Check the 'To Set Sampling Rate' section for setting the
sampling rate of the ULM.
The Altitude Logbook, Altitude Memory Record and
Altitude Memory Segments
- The altitude memory records is the altitude data of
each sampling during the ULM recording.
- The altitude memory segment is a group of altitude
memory records of one ULM recording
.
- The altimeter logbook stores all altitude memory segments.
The Feature of the User Log Memory
- During the review of the ULM segments or records,
the K2-100 shows the following:
1. The date which the memory segment was recorded,
2. The time span of the memory segment,
3. The time which the altitude record was stored,
4. The temperature at which the altitude record was
5. The scale of the history graph,
6. The max and min altitudes of the history graph,
7. The ascend/descend rate (the difference between two
8. The accumulative ascend (the total ascending) and,
9. The accumulative descend (the total descending) of the
23
GB
stored,
memory records) of the altitude record,
altitude record.
22
24
Page 8

GB
5.9 Altimeter Mode - Set the Sampling Rate of ULM
GB
5.11 Altimeter Mode - Recall the ULM Altitude Memory Segment
Altitude Sampling Rate
adjust
button
adjust
button
adjust
button
hold
adjust
- The sampling rate is used for the User Log Memory
- There are 4 quick-set-rate (1,10 sec 1 min. and 10 min).
- To set the rate other than the 4 quick-set-rate and the
10 sec.
1 sec.
lap/reset
button
hold
adjust
digits have been
selected (flashing)
1 min.
Sampling Rates
adjust mode
Altitude Sampling Rate Setting Sequence
UPR
Quick-set
hour
adjust
min.
adjust
sec.
UPR Setting
Sequence
10 min.
adjust
Altitude Graph Display
mode
button
mode
button
IMPORTANT:To get an accurate result on the altitude ascending
and descending rate, please DO NOT alter the sampling rate
during the time the User Log Memory is recording.
To Select among the Quick-Set-Rates
- Press and hold the [adjust] button for 2 seconds to enter
- Press the [lap/reset] button to select among the 4 quick-set-
To Set the User Preset Rate
- Press and hold the [adjust] button to enter the setting display
- While digits are selected (flashing), press the [start/stop]
- After you set the rate, press the [mode] button to exit the
24
25
5.10 Altimeter Mode - Start the Recording of the ULM
the user log memories
start recording
Recording Display
adjust &
start/stop
log book
indicator
flashing
indicator
start/stop
button
start/stop
button
the Altitude
History Graph
the no. of
free record
space remain
Altitude Graph DisplayAltitude User Log Memory
the segment
mode
in recording
button
lap/reset
button
Free Record Graph Display
the no. of
free record
space remain
lap/reset
button
Free
Record
Display
Start/stop the User Log Memory
- Press the [start/stop] button once to start the recording of
- The 'MEM' indicator starts flashing which indicates that
Free Record Display
- While the User Log Memory is recording (User Log
- The segment number and the number of free record
- Press [lap/reset] button to select between the Altitude
- Press the [mode] button to return to the User Log
To Delete the User Log Memory Segment
- Press and hold the [lap/reset] button for 5 seconds in the
- To delete an individual ULM Altitude Memory Segment,
25
recording. This setting controls the sampling interval of each
log memory.
and 1 User Preset Rate (UPR) in the K2-100.
existing UPR, check the "To Set the User Preset Rate'
section for more detail.
Altitude Setting Display. Press the [adjust] button three times
to select the Sampling Rate Display.
rates and the existing UPR. When the desired rate is shown,
press the [mode] button to exit the setting.
of the UPR in the Sampling Rate Display. Press the [adjust]
button to change the selection as in the User Preset Rate
Setting Sequence.
button to increase the number; press the [lap/reset] to
decrease the number. Holding down the button changes
the number at a higher speed.
setting sequence. Press the [mode] button once again to
return to the Altitude Graph Display.
the User Log Memory, in the Altitude Graph Display.
the User Log Memory recording in progress.
Press the [start/stop] button once again to stop the
recording of the User Log Memory.
Memory Recording Display), press the [adjust] and
[start/stop] buttons together to change the display to
Free Record Display.
space is being updated on the Free Record Display.
History Graph and the Segment Member.
Memory Recording Display.
Free Record Display to delete all ULM Altitude Memory
Segments.
press and hold the [adjust] button for 5 seconds in that
ULM Altitude Memory Segment Display.
GB
user log memory
log book indicator
total no. of
free records
time span
of this
segment
the 1st
altitude
memory
the time which
this memory segment
was started
Select the ULM Altitude Memory Segment
adjust
button
start/stop
total no. of the
memory segments
are in use
the date which
this memory
segment
was recorded
start/stop
button
lap/reset
button
the segment
number
adjust &
mode
button
Altitude Graph Display
select the next memory
segment through
forward scrolling
select the next memory
segment through
backward scrolling
Memory segments
selection sequence
Select the User Log Memory Segment
- Before viewing the detail of the memory, check the
following procedure to select the desire memory segment.
- Press the [adjust] and [start/stop] button together in the
Altitude Graph Display, the 'ALTIMETER LOG BOOK' will
slide out and display for 3 seconds, the K2-100 will
switch to the Free Records Display automatically.
- During the Free Records Display, the total number of free
records segments will show on the display, as well as
the 'RECALL' indicator.
- Press the [adjust] button once again to select the
Segment Display. During the Segment Display, the related
information of this altitude memory segment will show on
the display.
- Press the [start/stop] button to select among the
segments through forward scrolling; press the [lap/reset]
button to select among the segments through backward
scrolling.
- When the desired segment is displaying, press the
[adjust] button once to review the altitude memory record
of this segment.
NOTE:
- The maximum number of records in one segment is 1999,
while the total number of record is 2250.
- When the memory is full, a 'MEM FULL' will flashing on
the display.
- Check 'To Delete the User Log Memory Segment' section
for how to delete the User Log Memory Segment.
26
27
5.12 Altimeter Mode - Recall the ULM Altitude Memory Record
ULM Altitude Memory Record Display
- When you are reviewing the ULM Altitude Memory Record,
select the next memory
segment through
forward scrolling
select the next memory
segment through
backward scrolling
Memory segments
selection sequence
adjust
button
the altitude
memory
start/stop
button
select the next
memory through
forward scrolling
select the next
memory through
backward scrolling
Memory records
selection sequence
lap/reset
button
the history
graph
the memory
number
the time which
this memory
segment
was started
adjust
button
adjust
button
check the
accumulative descend
of the record
adjust
button
check the
accumulative ascend
of the record
adjust
button
check the ascending/
descending rate of
the record
adjust
button
check the detail of
the history graph
of the record
the 1st row of the display shows the Altitude History
Graph.
- The 2nd row of the display shows the altitude memory
and the memory number.
- The 3rd row of the display shows the time which the
memory was recorded.
- Press the [start/stop] button
Memory Record of this segment through forward scrolling;
press the [lap/reset] button to review the next Altitude
Memory Record of this segment through backward
scrolling.
- During the ULM Altitude Memory Record reviewing, press
the [adjust] button to check the additional information of
that memory record:
- press [adjust] button once to check the detail of the
history graph (the resolution of X and Y axis, the
X axis' maximum and minimum value)
- press the [adjust] button twice to check the ascending
/ descending rate of the record,
- press the [adjust] button
accumulative ascend of the record,
- press the [adjust] button
accumulative descend of the record,
- Press the [mode] button once to exit the reviewing display;
press the [mode] button twice to return to Altitude Graph
Display.
NOTE:
- During the ULM Altitude Memory Record reviewing, the
current record will be flashing on the history graph.
27
to review the next Altit
three times to check t
four times to check t
GB
ude
he
he
26
28
Page 9

GB
6.0 Barometer Mode and its sub-displays
GB
6.1 Barometer Mode - Barometric Pressure Graph Display
Increment the
Barometric Pressure
Decrement the
Barometric Pressure
To view the memory
by forward scrolling
(from -48 to -1 )hour
To view the memory
by backward scrolling
(from -1 to -48 hour)
start/stop
lap/reset
Barometric Calibration Sequence
start/stop
lap/reset
48 Hour Memory Display
flashing
digits
28
hold
adjust
mode
button
adjust
button
mode
button
29
6.0 Barometer and its sub-displays ... continue
60
45
Barometric Graph Display
15
30
lap/reset
button
hold
lap/reset
hold
lap/reset
C (Celsius)
hPa(mb)
F (Fahrenheit)
hPa(mb)
Unit Selection Sequence
29
Graph Scale Display
hold
lap/reset
hold
lap/reset
60
45
30
Barometric Graph Display
C (Celsius)
inHg
F(Fahrenheit)
lap/reset
inHg
hold
Barometric Pressure
History Graph
Barometric
Pressure
Barometric Pressure
Graph Display
pressure
15
total display pressure
(Y axis resolution X 11 row)
the pressure
variable
(Y-axis)
C (Celsius)
hPa/mb
hold
lap/reset
F (Fahrenheit)
hPa/mb
total display time
(1 hour X 40 column=40 hour)
Barometric Pressure
hold
lap/reset
hold
lap/reset
Unit Selection Sequence
History Graph
C (Celsius)
F(Fahrenheit)
Temperature
in degree Celsius
Real time
inHg
inHg
the time variable
(X-axis)
hold
lap/reset
Barometric Pressure Graph Display
- In the Barometric Pressure Graph Display, the 1st row of
the display shows the pressure history graph of the last
48 hours.
The 2nd row of the display shows the Barometric
Pressure and the current temperature.
- The 3rd row of the display shows the current time: hour
minute and second.
The Barometric Pressure History Graph
- The K2-100 stores the Barometric pressure values
automatically as the time go by.
The Barometric Pressure history graph of the Barometric
Graph Display is plotted on these pressure values.
--The X-axis of the history graph is time variable; the Yaxis of the history graph is barometric pressure variable.
The Barometric Pressure History Graph is made up
of 11 rows and 40 columns.
- The memory columns on the left hand side of the
history graph are recorded earlier than those on the right.
- The scale of the history graph is changeable, the scale
will be changed in order to fit in the Barometric Pressure
values. Check the 'Barometric Pressure History Graph
Scale' section for more detail on the scale of the history
graph.
To Switch among Units
- The K2-100 can display pressure in millibar (mb) hecto
pascal (hPa) or inch mercury (inHg); the K2-100
can display temperature in Celsius ( C) or Fahrenheit ( F).
- Press and hold the [lap/reset] button to change the units
as in the units select sequence.
30
31
GB
GB
6.2 Barometer Mode - Pressure History Graph Scale
Pressure History Graph Scale
- The scale of the Y-axis of the History Graph is
lap/reset
button
Pressure
Graph Display
X-axis
resolution
1 hour
History Graph Scale Display
Y-axis
resolution
0.1, 0.2, 0.5
1, 2, 5
10, 20, 50
100, 200, 300
millibar(s)
changeable for fitting all t
graph.
- Press the [lap/reset] button once to view t
scale information, in the Barometric Pressure Graph
Display,
- The 'GRAPH SCALE' message will slide out and display
for 3 seconds, then the X-axis and Y-axis resolutions
will be shown.
- For example, 'X=1:00'00"' implies that the resolution of
X-axis is 1 hour per column; at the same time, 'Y=0.5mb'
implies that the resolution of Y-axis is 0.5 millibar per
row.
- The highest and the lowest altitudes of the History
Graph will be shown on the display a while later.
- For example, 'HIGHEST 1100.0mb' implies that the
current maximum pressure of the Pressure History Graph
is 1100.0 millibar. 'LOWEST 1000.0m' implies that the
minimum pressure of the Pressure History Graph is
1000.0 millibar.
NOTE:
- The resolution of X-axis of the history graph (time
variable) is fixed as 1 hour.
- The resolution of Y-axis of the history graph ( barometric
pressure variable) is ranging from 0.1, 0.2, 0.5, 1, 2, 5,
10, 20, 50, 100, 200 and 300 millibar.
31
he pressure memory into t
he pre
ssure
he
30
32
Page 10

GB
6.3 Barometer Mode - Implication of the Barometric Pressure History Graph
GB
6.5 Barometer Mode - 48 Hour Memory
Rise Trend
Steady Trend
Fall Trend
Pressure History Graph
32
33 35
6.4 Barometer Mode - Calibrate the Barometer
hold
adjust
digits have
been selected
(flashing)
start/stop lap/reset
increment
Decrement
the pressure
the pressure
hold
adjust
Calibration Sequence
( Calibrate the Pressure from 1013.8 to 1019.8 mb)
Barometric Pressure
Graph Display
mode
button
33
Implication of the Pressure History Graph
- In general, a rise trend in the Pressure History Graph
may forecast good weat
- A steady trend in the Pressure History Graph has the
possibility to have steady weather ahead.
- A falling trend in the Pressure History Graph may
predict bad weather ahead.
IMPORTANT: To get an
forecast, the user has to stay at the same altitude for over
48 hours.
Before Calibrate the Barometer
- The K2-100 was calibrated for you in the factory. For normal
use, you need not to calibrate the Barometer. But for vigorous
users, a calibration procedure has been build in the K2-100.
- Before calibrate the Barometer, you must have the
ambient barometric pressure, because that pressure value
has to be input into the K2-100 during the calibration
procedure.
- You may call up the observatory station at the nearest
location from your current position to get the ambient
barometric pressure.
Important: Inputing an incorrect pressure in the calibration
procedure will result in a mistaken pressure reading in the future.
Pressure Calibration Procedures
- Press and hold the [adjust] button for 2 seconds to change
the display from the Pressure Graph Display to Barometric
Pressure Calibration Display.
- The digits of the middle row of the display and the barometric
pressure unit start flashing because it is selected.
- Press the [start/stop] button to increase the number; press
the [lap/reset] button to decrease the number. Hold down the
button to change the number at a higher speed.
- If you select a wrong barometric pressure unintentionally,
press and hold the [adjust] button for 3 seconds to restore
the setting to the absolute pressure value.
- After you set the barometric pressure, press the [mode]
button to exit the setting and return to Barometric Pressure
Graph Display.
- If no button is pressed in the setting display for about 3
minutes, the K2-100 will return to the Barometric Pressure
Graph Display.
her ahead.
accurate result of the weat
her
GB
48 Hour Memory
- The K2-100 has a built-in memory function: the 48
adjust
button
flashing
dot
48 Hour Memory Display
(the oldest memory)
start/stop lap/reset
To view the memory
by forward scrolling
(from -48 to -1 )hour
lap/reset
button
Barometric Pressure
Graph Display
48 Hour Memory Display
( the newest memory)
To view the memory
by backward scrolling
(from -1 to -48 hour)
mode
button
flashing
dot
Hour Memory.
- 48 Hour Memory records the Barometric Pressure for
every one hour of the last 48 hours.
- These memories can be reviewed in the 48 Hour Memory
Display.
Review the 48 Hour Memory
- Press the [adjust] button to select the 48 Hour Memory
Display in the Barometric Pressure Graph Display.
- The 'BAROMETER 48 HR MEM' will slide out and display
for 3 seconds, the 'MEM' indicator will be shown also.
- The Barometric Pressure 48 hour history graph shows
on the 1st row of the display.
- The pressure memory and temperature show on
the 2nd row of the display.
- The time which recorded the memory shows on the 3rd
row of the display.
- Press the [lap/reset] button to view the memory through
backward scrolling (from -1 to -48 hour), press the
[start/stop] button to view the memory through forward
scrolling ( from -48 to -1 hour).
NOTE:
- The memory columns on the left hand side of the
history graph are recorded earlier than those on the right.
34
6.6 Barometer Mode - Ascending / Descending Rate of the 48 Hour Memory
Ascending and Descending Rate
- The K2-100 a has built-in a function for calculating the
ascending and descending rate of the Barometric
Pressure of the last 48 hours.
- These figures can be reviewed in the Ascending Rate
Display and the Descending Rate Display.
Review the Ascending and Descending Rate
- Press the [adjust] button three times to select the
Ascending / Descending Rate Display in the Barometric
Pressure Graph Display.
- While the Ascending / Descending Rate Display is shown,
the Barometric Pressure Ascending or Descending Rate
shows on the 1st row of the display.
- A (+) value implies ascending rate; a (-) value implies a
descending rate.
- The pressure memory and the temperature sho w on the
2nd row of the display.
- The time which this memory was recorded shows on the
3rd row of the display.
- Press the [lap/reset] button to view the memory by
backward scrolling ( from -1 to 48 hour), press the
[start/stop] button to view the memory through forward
scrolling (from -48 to -1 hour).
- While these displays are shown, press the [mode] button
to exit the reviewing and the display will return
to the Barometric Pressure Graph Display.
35
adjust
button
start/stop
To view the memory
by forward scrolling
(from -48 to -1 )hour
adjust
adjust
button
button
Barometric Pressure
Ascending / Descending
Rate Display
lap/reset
To view the memory
by backward scrolling
(from -1 to -48 hour)
Graph Display
ascending or
descending rate
mode
button
GB
34 36
Page 11

GB
GB
7.0 Specifications ... continue
7.0 Specifications
Real Time Mode
- Hour, minute, second, am, pm, month, day, day of week
or barometer pressure tendency display (Selectable
between day of week)
Time System
- 12-hour or 24-hour format
Calendar System
- Auto-Calendar pre-programmed from the year 2000 to
2099
Alarm Mode
- 1 minute resolution
- 1 daily alarm and 1 date alarm
- Hourly chime
Alarm Sounds
- Sounds for 20 seconds at preset time of real time clock
Chronograph Mode
- 1/100 second resolution
Measuring Range
- 23 hours 59 minutes 59.99 seconds
Measuring Mode
- 10 lap memories
- Recall lap memories and total time
Altitude Reference Setting
- -9164m to 9164m or -30065ft to 30065ft
Influence
- Minimum influence of temperature change on altitude
Conversion
- ICAO/ISA (Pressure to Altitude conversion)
Sampling Interval
- First 3 minutes: 1 second; after 3 minutes: 1 minute
Barometer Mode
- 0.1 hPa/mbar or 0.01 inHg resolution
Measuring range
- 300.0 hPa/mbar to 1100.0 hPa/mbar or 8.84 inHg to 32.44
inHg
Display range
- Same as measuring range
Pressure Tendency Setting
- 0.01 hPa/mbar resolution
- 0.00 hPa/mbar to 99.99 hPa/mbar
Compensation
- Temperature compensation
36
37 39
GB
Timer Mode
- 1 second resolution
Count Down Timer
- Quick set function (3, 5, 10, 15 and 45 minutes)
- One user-define timer up to 23 hours 59 minutes 59
seconds
Operation Mode
- Countdown or repeat mode
Timer Sounds
- Beep at last 5 seconds and
sounds for 2 seconds when count to zero
Altimeter Mode
- 1m or 3.28ft resolution
Measuring range
- -702m to 9164m or -2303ft to 30065ft (Assume sea level
is 1013.21 hPa/mbar and 0m)
Display range
- -9164m to 9164m or
altitude reference setting)
Accuracy
- +/-50m or +/-164ft (Over temperature range -10.0 C to
60.0 C or 14.0 F to 140.0 F)
37
-30065ft to 30065ft (Depends on the
Sampling Interval
- First 3 minutes: 1 second; After 3 minutes: 1 minute
Thermometer
- 0.1 C or 0.18 F resolution
Measuring range
- -10.0 C to 60.0 C or 14.0 F to 140.0 F
Accuracy
- +/- 1 C or +/-1.8 F (Over temperature range -10.0 C
to +60.0 C or 14.0 F to 140.0 F)
Sampling Interval
- First 3 minutes: 1 second ; After 3 minutes: 1 minute
Backlight
- Electro-Luminescent (EL) backlight
Battery
- Single 3V lithium battery (CR2032)
Battery Life
- Approximately 1.5 year under the following conditions:
30 seconds alarm operation per day
5 seconds EL backlight operation per day
3 minutes sensor mode operation per day
Battery Low Detection
- Battery voltage< 2.4 V +/- 0.2
38
38 40
Page 12

WARRANTY INFORMATION
La Crosse Technology, Ltd provides a 1-year limited warranty on this product against manufacturing defects in materials and
workmanship.
This limited warranty begins on the original date of purchase, is valid only on pro ducts purchased and used in North America and only
to the original purchaser of this product. To receive warranty service, the purchaser must contact La Crosse Technology, Ltd for
problem determination and service procedures. Warranty service can only be performed by a La Crosse Technology, Ltd authorized
service center. The original dated bill of sale must be presented upon request as proof of purchase to La Crosse Technolo gy, Ltd or La
Crosse Technology, Ltd’s authorized service center.
La Crosse Technology, Ltd will repair or replace this product, at our option and at no charge as stipulated here in, with new or
reconditioned parts or products if found to be defective during the limited warranty perio d specifi ed above. All replaced parts and
products become the property of La Crosse Technology, Ltd and must be returned to La Crosse T echno logy, Ltd. Replacement parts
and products assume the remaining original warranty, or ninety (90) days, whichever is longer. La Crosse Technology, Ltd will pay all
expenses for labor and materials for all repairs covered by this warranty. If necessary repairs are not covered by this warranty, or if a
product is examined which is not in need or repair, you will be charged for the repairs or examination. The owner must pay any
shipping charges incurred in getting your La Crosse Technolog y, Ltd product to a La Crosse Technology, Ltd authorized service center.
La Crosse Technology, Ltd will pay ground return shipping charges to the owner of the product to a USA address only.
Your La Crosse Technology, Ltd warranty covers all defects in material and workmanship with the following spec ified exceptions: (1)
damage caused by accident, unreasonable use or neglect (including the lack of reasonable and necessary maintenance); (2) damage
occurring during shipment (claims must be presented to the carrier); (3) damage to, or deterioration of, any accessory or decorative
surface; (4) damage resulting from failure to follow instructions contained in your owner’s manual; (5) damage resulting from t he
performance of repairs or alterations by someone other than an authorized La Crosse Technology, Ltd authorized service center; (6)
units used for other than home use (7) applications and uses that this product was not intended or (8) the products inability to receive a
signal due to any source of interference.. This warranty covers only actual defects within the product itself, and does not cover the cost
of installation or removal from a fixed installation, normal set-up or adjustments, claims based on misrepr esentation by the seller or
performance variations resulting from installation-related circumstances.
LA CROSSE TECHNOLOGY, LTD WILL NOT ASSUME LIABILITY FOR INCIDENTAL, CONSEQUENTIAL, PUNITIVE, OR OTHER
SIMILAR DAMAGES ASSOCIATED WITH THE OPERATION OR MALFUNCTION OF THIS PRODUCT. THIS PRODUCT IS NOT TO
BE USED FOR MEDICAL PURPOSES OR FOR PUBLIC INFORMATION. THIS PRODUCT IS NOT A TOY. KEEP OUT OF
CHILDREN’S REACH.
This warranty gives you specific legal rights. You may also have other rights specific to your State. Some States do no allow the
exclusion of consequential or incidental damages therefore the above exclusion of limitation may not apply to you.
For warranty work, technical support, or information contact:
La Crosse Technology, Ltd
2809 Losey Blvd S.
La Crosse, WI 54601
Phone: 608.782.1610
Fax: 608.796.1020
e-mail:
support@lacrossetechnology.com
(warranty work)
sales@lacrossetechnology.com
(information on other products)
web:
www.lacrossetechnology.com
All rights reserved. This handbook must not be reproduced in any form, even in excerpts, or duplicated or processed using electronic,
mechanical or chemical procedures without written permission of the publisher.
This handbook may contain mistakes and printing errors. The information in this handbook is regularly checked and corrections made
in the next issue. We accept no liability for technical mistakes or printing errors, or their consequences.
All trademarks and patents are acknowledged.
1
 Loading...