

Page 1
Add-on Sensor for existing
La Crosse Alerts™ Remote Water Detector &
Temp. & Humidity Monitor w/ Early Warning Alerts
Model: D012.104.E1
Did you know that frozen pipes that crack and burst damage a
quarter million properties each year? The best defense against
costly water damage to your home, business or vacation rentals
is the La Crosse Alerts™ Remote Water Detector with early
warning alerts to notify you of a water leak before it has time to
cause extensive damage.*
Use your smartphone, tablet or computer to monitor for water
leaks and high or low temperature and humidity levels that could
lead to frozen pipes and mold growth.*
Water damage can originate in almost any room: frozen pipes,
broken pipes, broken dishwasher hose or leakage, washing
machine overflow, leaking roof, basement leaks, foundation
cracks, plumbing leaks, sump pump overflow and leaks from
bad weather such as snow, rain or floods.*
The good news is that water damage is a costly problem that
you can prevent with text and e-mail alerts from anywhere with
Internet access.*
Wall-mount the water detector, or use the included tabletop
stand and place the H2O sensor on the floor to activate the
wireless alert system when it becomes wet.* Alerts are sent
when pre-set temperature and humidity levels are exceeded,
water is detected and when the batteries are low or the
connection is lost, saving you from having to stop and check.*
MONITORING OPTIONS
Home, second home, office or rental property
Kitchens, baths, laundry & pool rooms
Utility sinks, sumps & water heaters
Basements, garages & attics
Near aquariums & terrariums
Greenhouses & farms
PACKAGE CONTENTS (D012.104.E1)
1. Wireless water detector with ambient temperature and
humidity monitor (TX70U-IT)
2. H20 (water) sensor on 6 Ft. detachable cable (D000.104)
that detects WET (H20) or DRY (DRY) conditions.
3. Mounting hardware
4. Instruction manual
5. IMPORTANT: Activation Key Card for set up and
activation. Do not throw away.
ADDITIONAL EQUIPMENT (NOT INCLUDED)
Two fresh AAA, IEC LR03, 1.5V Alkaline batteries
Two-sided tape as needed
Internet Gateway, AC adapter and LAN cable - (all parts of La
Crosse Alerts™ full kits, not included)
Browser with high speed Internet
Network router
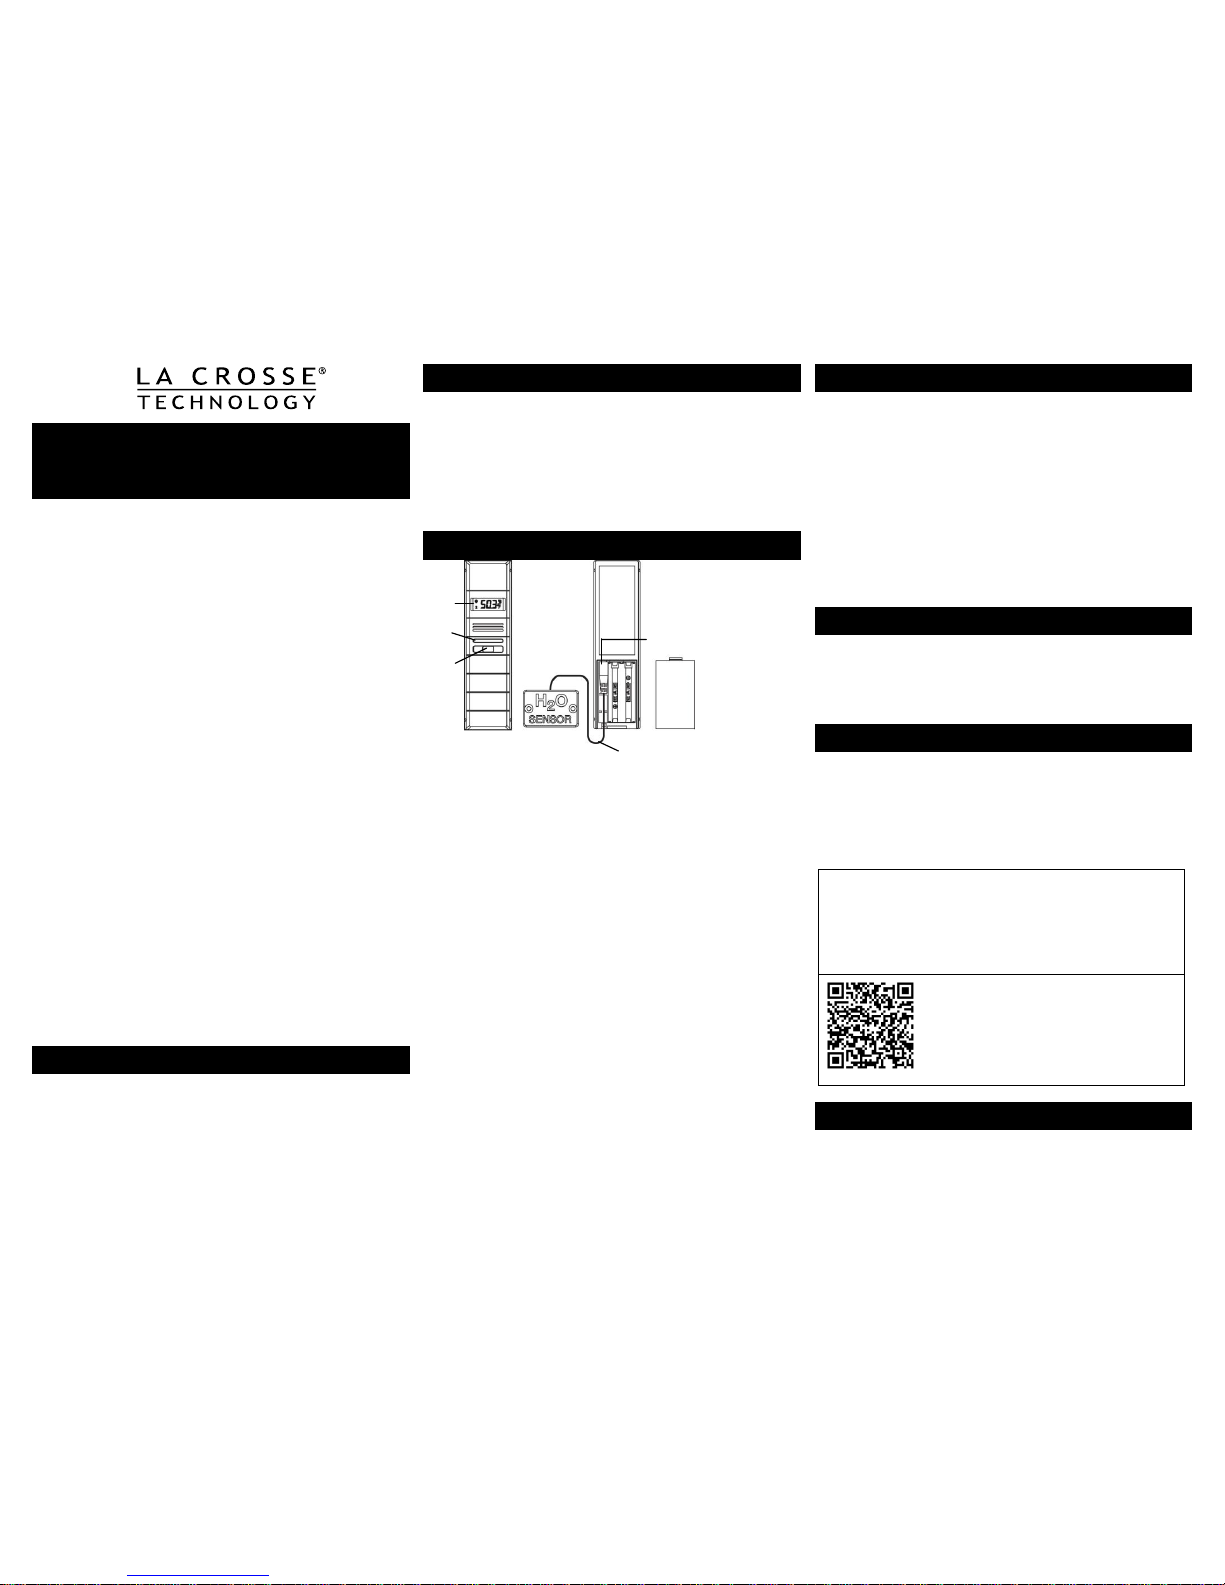
FEATURES AND MEASUREMENTS (Diagram 1)
(A) TX70U-IT Wireless Water Detector / Ambient Sensor:
Displays ambient temperature and humidity (Channel 1)
Note: The TX70U-IT water detector case with LCD is
not water proof. The case cannot get wet and may be
affected by high humidity conditions.
Monitors ambient air temperature and humidity (CH1)
and displays water status determined by H20 sensor
(CH2)
Weather resistant case (not water proof)
Wall hanging or free standing
Add up to 5 sensors (sold separately) per Internet
gateway(not included) to monitor additional areas
200 Ft wireless range
(B) D000.104 Water Sensor on 6 Ft. Detachable Cable:
Detects the presence or absence of water which is displayed on
the LCD: WET (H20) / DRY status (Channel 2)
The detachable H20 (water) sensor detects water.
**Attach it to the main sensor case and place the
sensor on the floor or other area you wish to monitor
for WET/DRY conditions.
**The official D000.104 H20 Sensor can be plugged
into the sensor at any time without resetting.
HOW IT WORKS
The wireless sensor transmits water status & temperature
and humidity measurements to a La Crosse Alerts™
Gateway (not included) within a 200 Ft. (60.96m) wireless
range.*
The Gateway (not included) connects to your existing
network router and uses your high-speed Internet
connection to upload collected measurements to your own
account at www.lacrossealerts.com.*
Once the Gateway (not included) and temperature and
humidity sensor are activated on your account, you can
monitor sensors online from a smartphone, tablet or
computer, and set up custom e-mail/text alerts*.
PREPARE FORSETUP
1. Begin the set up near your existing network router and a
computer with high-speed Internet access.
2. Unpack package contents and insert the H2O sensor cord
into the TX70U-IT water detector (see diagram 1).
SETUP AND ACTIVATION
1. Locate the Activation Key Card in the package for setup
instructions and the Activation Key. The Activation Key is
necessary to activate your sensor. Please keep your
Activation Card for reference.
2. Visit www.lacrossealerts.com with your Activation Key
Card to create your account and activate the product.
ACTIVATION INFORMATION:
THE INCLUDED ACTIVATION KEY is good for
1 year of ENHANCED SERVICE with early warning
text & e-mail alerts, plus 4 more years of BASIC
SERVICE for standard remote monitoring.
Lost your Activation Key Card?
Contact Customer Support:
www.lacrossetechnology.com/support/alerts
Phone: (608) 785-7920
MEASUREMENT LOG DOWNLOAD
Once the sensor is activated and building a measurement log,
you can download the data as a comma separated values
(CSV) file. You must use an application such as Microsoft
Excel® or Google Docs® that supports comma separated
values (CSV) formatted files to view the table data.
This socket is ONLY
for the water sensor.
DO NOT insert
power plug into it.
**H2O sensor with
6-foot wire to plug into sensor
LCD
LED
Button
(B)
(A)
Page 2
SELECT A LOCATION TO MOUNT WATER
DETECTOR
Select a location…
Select a location that protects the sensor from water.
The sensor case is water resistant, not water proof.
Select a location within range of the Internet Gateway (not
included) (see “IMPORTANT SETUP & OPERATION
NOTES”).
Place H2O sensor on the floor where you choose to monitor
for water and secure the water detector case in an area that
is protected from water. Once activated, you can view the
temperature/ humidity and H2O/Dry readings on the LCD.
Mount the sensor once it is activated (see “SETUP AND
ACTIVATION”).
IMPORTANT! Test the sensor in the desired mounting
location for at least 1 hour to ensure good reception with
the Internet Gateway (not included). Confirm your readings at
www.lacrossealerts.com before permanently mounting. Move
the sensor closer to the Internet Gateway (not included)
if the signal is lost or not received.
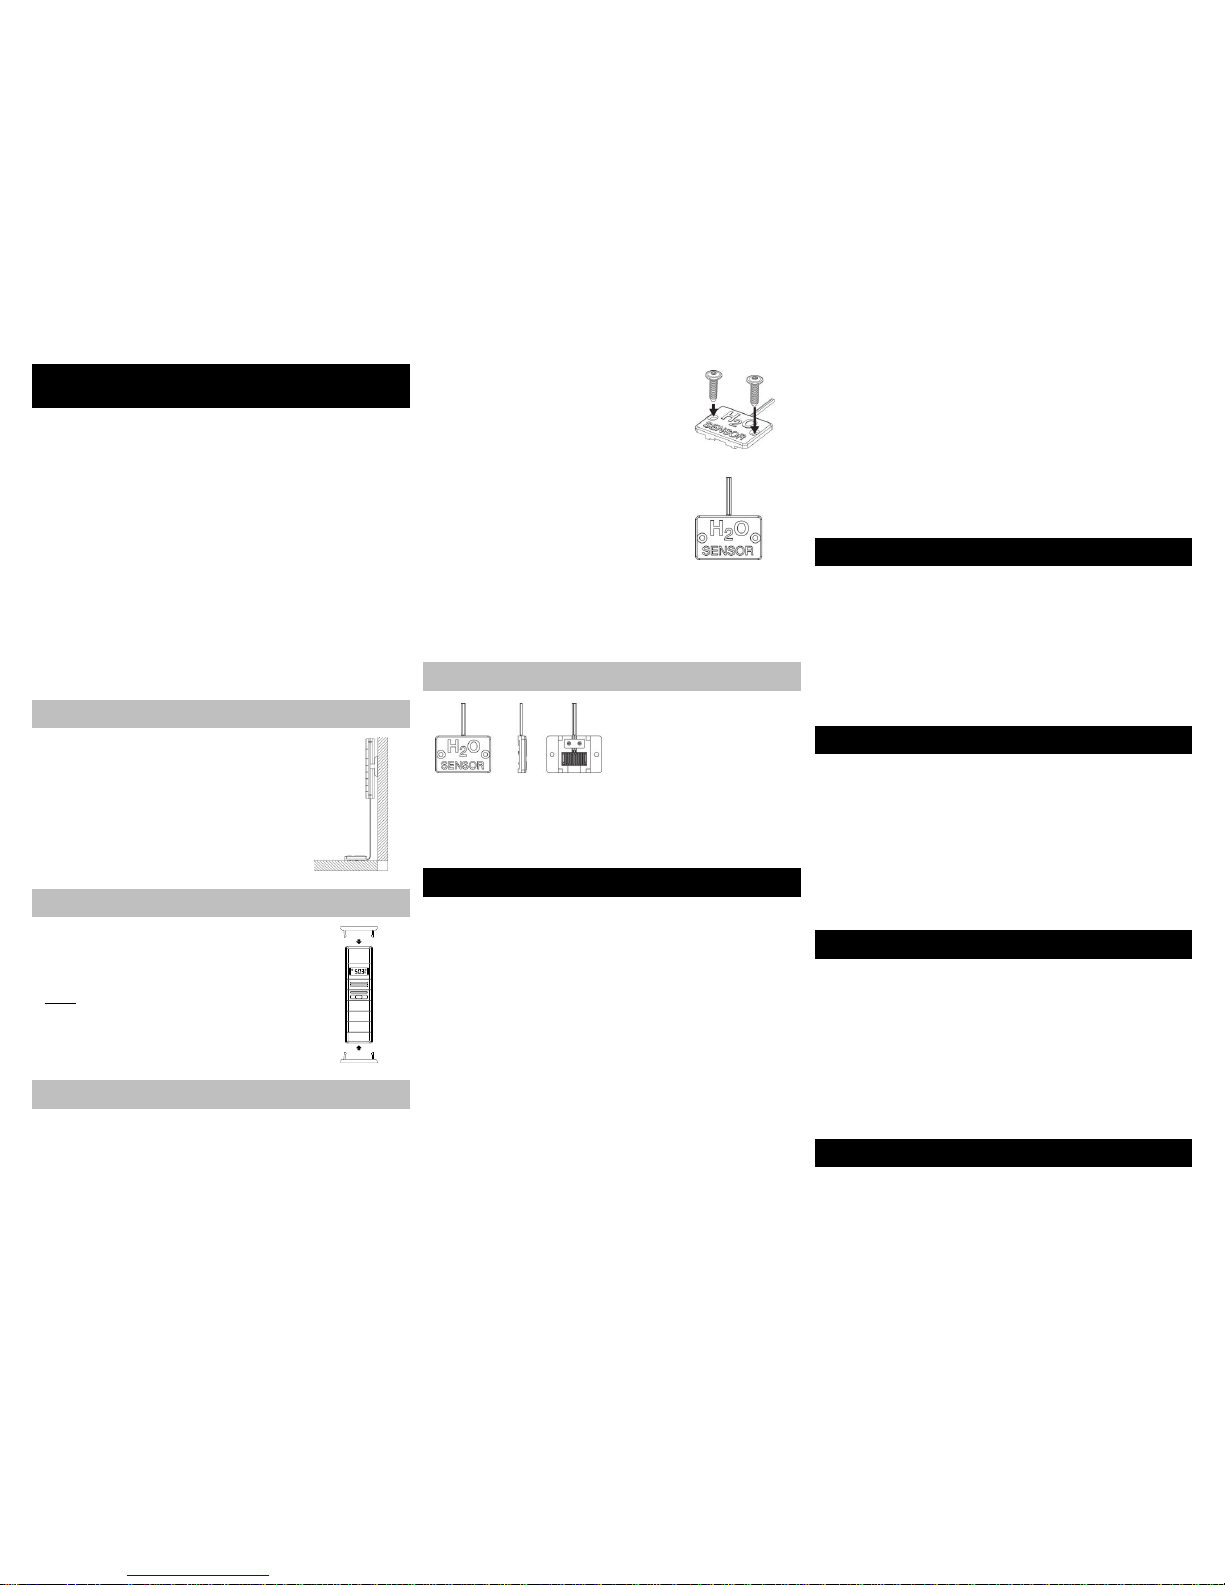
MOUNT TO WALL WITH SCREWS
1. Remove the mounting bracket from the
water detector.
2. Place the mounting bracket over the
desired location.
3. Mark mounting surface with a pencil
through the 2 holes of the bracket.
4. Screw mounting bracket onto surface and
tighten screws to bracket.
5. Insert the water detector into the bracket.
TABLE STAND AND OTHER MOUNTING OPTIONS
Attach the mounting bracket to the bottom or on
the top of the water detector and place it on any flat
surface.
Note: Before permanently mounting,
TEST the sensor in the selected location for at
least 1 hour to ensure good reception.
PLACEMENT OF THE H2O SENSOR
The H2O sensor should be placed on the dry floor or against the
wall near your foundation, water heater, sump, plumbing,
washer aquarium, or dish washer etc. to monitor for leaks.
FLOOR:
Place the H2O sensor (circuit board down)
on the dry floor within range of the water
detector with temperature / humidity that is
mounted on the wall or standing on a table.
Note: The water detector will sit 1/8 inch
from the floor in this position.
WALL:
Place the H2O sensor against the wall with
the edge touching the floor within range of
the water detector with temperature/humidity
that is mounted on the wall or standing on a
table.
The H2O sensor can be secured to the floor or wall with the
included screws & anchors or with two-sided tape (not
included).
Secure the 6 ft. H2O sensor cable to avoid tripping hazards:
Loosely coil and secure the extra cable with a twist tie.
CLEANING THE H2O SENSOR
Routine cleaning of the H2O
sensor is recommended to
ensure proper operation.
Use clean water and a soft cloth to clean dirt and debris from
the circuit board of the H2O sensor.
Note: When using two-sided tape, replace the tape after
cleaning the H2O sensor to maintain adhesiveness.
IMPORTANT SETUP & OPERATION NOTES
The water detector with temperature and humidity sensor
case should be placed in a dry, shaded area. Please avoid a
location with direct sun, as that will cause incorrect readings.
Fog and mist will not harm the temperature and humidity
sensor but direct rain must be avoided.
Note: Exposing the water detector and temperature and
humidity sensor case to extreme humidity may temporarily
disrupt data. The temperature and humidity sensor case
reads humidity, but should not be submerged in water. Attach
the H20 sensor on 6 ft. detachable cable to detect water on
floor or other location.
The H20 sensor on 6 ft. cable is not for use in a pool or hot
tub where chemicals may cause malfunction.
The water detector and temperature and humidity sensor has
a wireless range of 200 feet (60.96 m). Keep in mind that the
200 ft. range equates to open air with no obstructions, and
that radio waves DO NOT curve around objects. Actual
transmission range will vary depending on what is in the path
of the signal. Each obstruction (roof, walls, floors, ceilings,
etc.) will effectively cut signal range in half.
Metal, stucco, and some types of glass can reduce signal
range by as much as ¾ or more, compared to the ½
reduction typical of most obstructions. It is possible to
receive a signal through these materials, however maximum
range will be reduced due to their tendency to absorb or
reflect a much larger portion of the sensor’s signal.
The water detector and temperature and humidity sensor
measures and updates the temperature and humidity on the
LCD every 12 seconds.
Note: The new measurement is reported to your account at
intervals that you select using your online account.
BATTERY REPLACEMENT
1. Remove the battery cover by sliding the cover down.
2. Observing the correct polarity install 2-AAA batteries. The
batteries will fit tightly (to avoid start-up problems make sure
they do not spring free).
3. Do not mix old and new batteries.
4. Do not mix alkaline, lithium, standard or rechargeable
batteries.
5. Replace the battery cover by sliding upwards and check that
it is securely fitted.
LOW BATTERY INDICATOR
Low battery icon appears on LCD when batteries are low.
You will receive an e-mail or mobile text message alert when
the battery power of the sensor is low. Change the batteries
immediately.
Note: The LED light turns ON briefly after changing batteries.
The LED light turns OFF when not needed to save battery
power. The previously stored information in the temperature and
humidity sensor will not be affected or cancelled while you
change the batteries.
MAINTENANCE AND CARE
Avoid extreme temperatures, vibration and shock.
Clean the water detector and H20 sensor with a soft, damp
cloth. Do not use solvents or scouring agents.
Do not submerge the water detector case in water.
Avoid kinking the 6 ft. H20 sensor cable.
Secure the 6 ft. cable to avoid tripping hazards.
Immediately remove all low powered batteries to avoid
leakage and damage.
Opening the casings invalidates the warranty. Do not try to
repair the unit. Contact La Crosse Technology® for repairs.
DISCLAIMERS
* Disclaimers: La Crosse Technology, LTD. (“La Cross e”)
provides various alert and monitoring services to aid users. (1)
Page 3

Service providers may charge users for alert services. Standard
messaging and data rates apply and will be billed to the
customer’s wireless account. Cust omers may be unable to
receive text messaging or data service in some areas due to
unavailability of service. (2) La Crosse shall not be liable for
accuracy, usefulness or availability of data transmitted via the
service. Users are solely responsible for damages to persons or
property by service use.
SPECIFICATIONS
Temperature range: -40°F to 140°F with 0.2°F
resolution
“OFL” displayed if outside this
range.
Humidity measuring range: 3% to 99%
Transmission range: 200 feet (60.96 m) in open space
H20 Sensor on 6 Ft. Cable: 6 ft. detachable water sensor
cable that detects wet (H20) and
dry (DRY) conditions. Displays
last reading if probe is not
connected.
Sensor battery power 2 x AAA Alkaline, IEC LR03, 1.5V
Battery life cycle: Approximately 24 months
TX70U-IT size: 5.23" H x 0.76" W x 1.44" D
D000.104 H20 Sensor size .26” H x 1.77" W x 1.17" D
WARRANTY INFORMATION
La Crosse Technology, Ltd provides a 1-year limited warranty
on this product against manufacturing defects in materials and
workmanship.
This limited warranty begins on the original date of purchase, is
valid only on products purchased and used in North America
and only to the original purchaser of this product. To receive
warranty service, the purchaser must contact La Crosse
Technology, Ltd for problem determination and service
procedures. Warranty service can only be performed by a La
Crosse Technology, Ltd authorized service center. The original
dated bill of sale must be presented upon request as proof of
purchase to La Crosse Technology, Ltd or La Crosse
Technology, Ltd’s authorized s ervice center.
La Crosse Technology, Ltd will repair or replace this product, at
our option and at no charge as stipulated herein, with new or
reconditioned parts or products if found to be defective during
the limited warranty period specified above. All replaced parts
and products become the property of La Crosse Technology,
Ltd and must be returned to La Crosse Technology, Ltd.
Replacement parts and products assume the remaining original
warranty, or ninety (90) days, whichever is longer. La Crosse
Technology, Ltd will pay all expenses for labor and materials for
all repairs covered by this warranty. If necessary repairs are not
covered by this warranty, or if a product is examined which is
not in need or repair, you will be charged for the repairs or
examination. The owner must pay any shipping charges
incurred in getting your La Crosse Technology, Ltd product to a
La Crosse Technology, Ltd authorized service center. La
Crosse Technology, Ltd will pay ground return shipping charges
to the owner of the product to a USA address only.
Your La Crosse Technology, Ltd warranty covers all defects in
material and workmanship with the following specified
exceptions: (1) damage caused by accident, unreasonable use
or neglect (including the lack of reasonable and necessary
maintenance); (2) damage occurring during shipment (claims
must be presented to the carrier); (3) damage to, or
deterioration of, any accessory or decorative surface; (4)
damage resulting from failure to follow instructions contained in
your owner’s manual; (5) d amage resulting from the
performance of repairs or alterations by someone other than an
authorized La Crosse Technology, Ltd authorized service
center; (6) units used for other than home use (7) applications
and uses that this product was not intended or (8) the products
inability to receive a signal due to any source of interference..
This warranty covers only actual defects within the product
itself, and does not cover the cost of installation or removal from
a fixed installation, normal set-up or adjustments, claims based
on misrepresentation by the seller or performance variations
resulting from installation-related circumstances.
LA CROSSE TECHNOLOGY, LTD WILL NOT ASSUME
LIABILITY FOR INCIDENTAL, CONSEQUENTIAL, PUNITIVE,
OR OTHER SIMILAR DAMAGES ASSOCIATED WITH THE
OPERATION OR MALFUNCTION OF THIS PRODUCT. THIS
PRODUCT IS NOT TO BE USED FOR MEDICAL PURPOSES
OR FOR PUBLIC INFORMATION. THIS PRODUCT IS NOT A
TOY. KEEP OUT OF CHILDREN’ S REACH.
This warranty gives you specific legal rights. You may also have
other rights specific to your State. Some States do not allow the
exclusion of consequential or incidental damages therefore the
above exclusion of limitation may not apply to you. For
warranty work, technical support, or information, please
contact:
La Crosse Technology, Ltd
2817 Losey Blvd. S.
La Crosse, WI 54601
www.lacrossetechnology.com/support/alerts
Lost your Activation Key Card?
Contact Customer Support:
www.lacrossetechnology.com/support/alerts
Phone: (608) 785-7920
PROTECTED UNDER US PATENTS:
5,978,738 6,076,044 6,597,990
FCC STATEMENT
This device complies with part 15 of the FCC rules. Operation is
subject to the following two conditions:
1) This device may not cause harmful interference.
2) This device must accept any interference received,
including interference that may cause undesired operation.
All rights reserved. This handbook must not be reproduced in
any form, even in excerpts, or duplicated or processed using
electronic, mechanical or chemical procedures without written
permission of the publisher.
This handbook may contain mistakes and printing errors. The
information in this handbook is regularly checked and
corrections made in the next issue.
We accept no liability for technical mistakes or printing errors, or
their consequences. All trademarks and patents are
acknowledged.
LA CROSSE ALERTS MONITORS ONLINE
For online product information:
www.lacrossetechnology.com /alerts
All rights reserved. This handbook must not be reproduced in any form,
even in excerpts, or duplicated or processed using electronic, mechanical
or chemical procedures without written permission of the publisher.
This handbook may contain mistakes and printing errors. The
information in this handbook is regularly checked and corrections made
in the next issue.
We accept no liability for technical mistakes or printing errors, or their
consequences. All trademarks and patents are acknowledged.
EJMATX70L210
Printed in China
 Loading...