

Page 1
WIFI WIND & WEATHER STATION
WITH FORECAST
INSTRUCTION MANUAL
Welcome!
Congratulations on your new Wind & Weather Station and welcome
to the La Crosse Technology family! This product was designed with
you in mind by our hometown team of weather enthusiasts based in La
Crosse, Wisconsin.
Model: CA80550
DC: 082219
WI-FI WIND & WEATHER STATION Page | 1
Page 2

TABLE OF CONTENTS
3
Quick Setup
4
Quick Mounting Tips
4
Weather Station Icons
5
Connect to La Crosse View™ App
8
Benefits of Connecting to La Crosse View™
9
Enhanced Weather Forecasts w/La Crosse View™
9
Advanced Forecast & Chance Precipitation
10
AccuWeather Daily Forecasts
11
AccuWeather Hourly Forecasts
12
AccuWeather HI/LO Temperatures
12
AccuWeather Wind Direction
13
Custom Data Streams
14
Add Sensors to your app
14
Status Messages when Connected
16
Button Functions
16
Adjustable Backlight
17
Auto Dim Backlight
18
Settings Menu
19
Extra Sensor Area
21
Wind Speed Readings & History
23
Temperature/Humidity Readings
& HI/LO Records
Alerts
24
Feels Like Temperature
26
Temperature Trend Arrows
26
Relative Pressure Reading
27
Sensor Reception Indicators
27
Sensor ID and Search
28
Delete Sensors
29
Low Battery Indicators
29
Factory Restart Station
30
Detailed Sensor Setup
30
and Mounting
Join the Conversation
33
Care and Maintenance
33
Warranty and Support
33
Specifications
34
FCC Statement
35
Canada Statement
36
WI-FI WIND & WEATHER STATION Page | 2
Page 3
QUICK SETUP
1. Insert 2 - C batteries into your LTV-W1 Wind Sensor.
2. Insert 2 - AA batteries into your LTV-TH2 Thermo-Hygro Sensor.
3. Insert the power cord into your CA80550 station. Remove the yellow insulation tab from
the CR2032 battery compartment found on the back of your station.
4. Download the La Crosse View™ App (App Store or Google Play)
5. Follow along with our instructional videos to connect your station to the app:
http://bit.ly/LaCrosseView_Support_Vid_01_1
http://bit.ly/LaCrosseView_Support_Vid_01_2
6. Mount your sensors in appropriate locations.
WARNING:
1. This product contains a Button Cell Battery.
2. If swallowed, it could cause severe injury or death in just 2 hours.
3. Seek medical attention immediately.
WARNING - KEEP BATTERIES OUT OF REACH OF CHILDREN
1. Swallowing may lead to serious injury in as little as 2 hours or death, due to chemical
burns and potential perforation of the oesophagus.
2. If you suspect your child has swallowed or inserted a button battery, immediately seek
urgent medical assistance.
3. Examine devices and make sure the battery compartment is correctly secured, e.g. that
the screw or other mechanical fastener is tightened.
4. Do not use if compartment is not secure.
5. Dispose of used button batteries immediately and safely. Flat batteries can still be
dangerous.
6. Tell others about the risk associated with button batteries and how to keep their children
safe.
WI-FI WIND & WEATHER STATION Page | 3
Page 4
QUICK MOUNTING TIPS
WI ND SPEED
• Ensure the sensor is mounted vertically an unobstructed rooftop is ideal.
• Your wind sensor should be the tallest object in the area to avoid reduced wind speed values.
THERMO-HYGRO
• Keep out of direct sunlight and ensure the sensor is well-ventilated.
• We recommend mounting it on a north-facing wall under an eave or deck for best results.
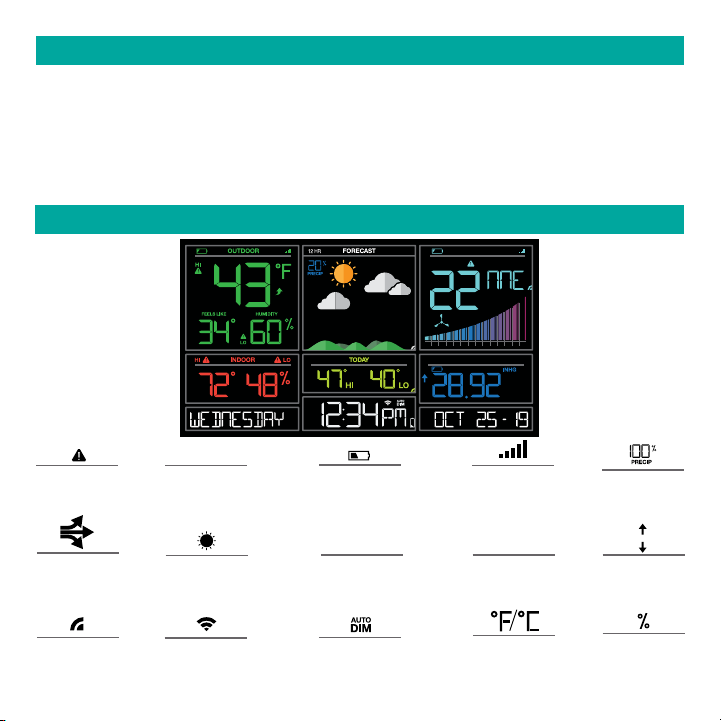
WEATHER STATION ICONS
WIND
DIRECTIO N
SPEED
MPH
10 2 3 4 5 6 7 8 9 10 15
20 25+
PRESSURE
12 HR
Alert
Indicator
Temperature
Trend Arrows
Internet
Indicator
12 Hour
Forecast
Forecast
Indicators
Wi-Fi
Indicator
Low Battery
Indicator
INHG / HPA
Inches of Mercury
or Hecto Pascal
Auto Dim
Indicator
Sensor
Reception
MPH / KMH
Miles or
Kilometres
Fahrenheit
Celsius
Chance of
Precipitation
Pressure
Trend Arrows
Percent
Humidity
WI-FI WIND & WEATHER STATION Page | 4
Page 5
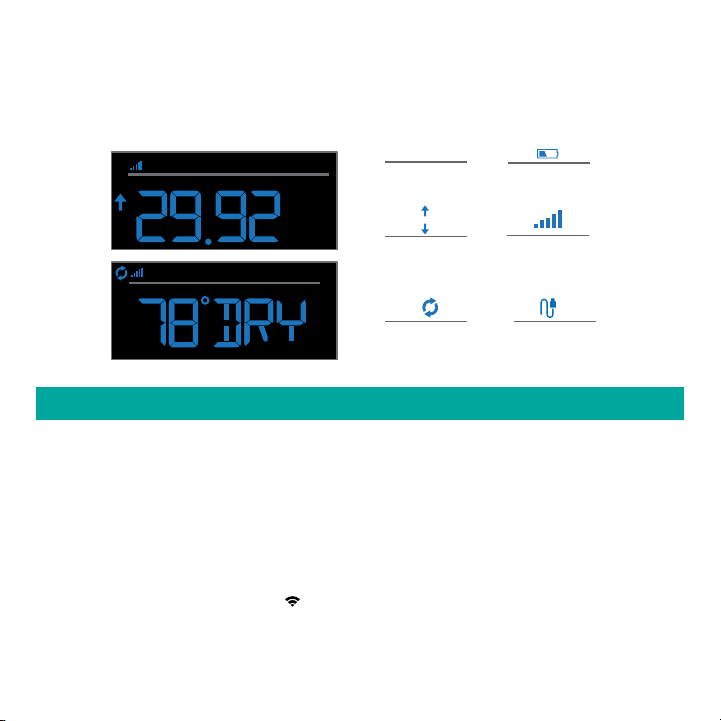
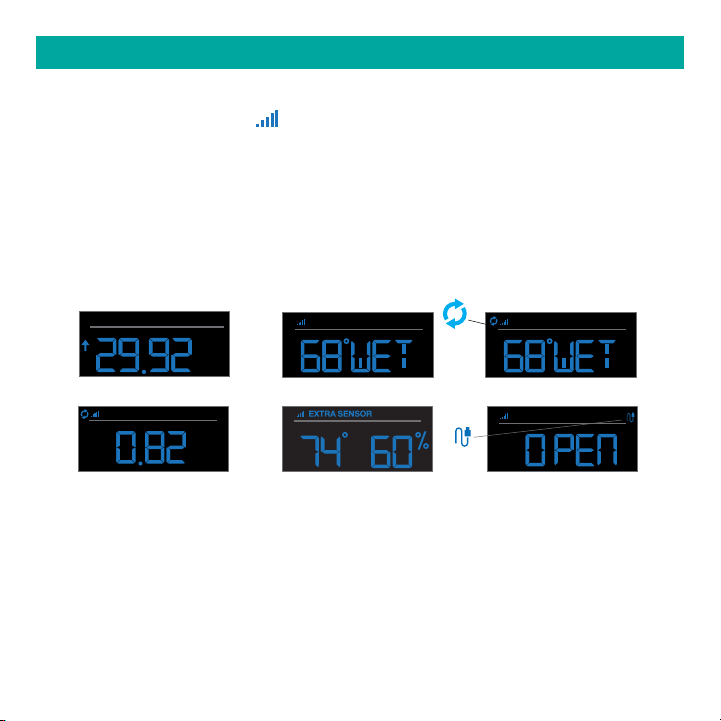
EXTRA SENSOR AREA ICONS:
• The Extra Sensor area of your station will default to Pressure when you first power up.
• When you choose to add additional sensors, the Sensor Reception Indicator will show in the
upper left corner whether Pressure or Sensor reading is displayed.
• Press and release the EXTRA button to view any additional sensors.
PRESSURE
INHG
INHG / HPA
Inches of Mercury
or Hecto Pascal
Low Battery
Indicator
Sensor
Reception
Probe
Reading
EXTRA SENSOR
Pressure
Trend Arrows
Auto Scroll
Pressure/Sensors
CONNECT TO LA CROSSE VIEW™ APP
MOBILE DEVICE REQUIREMENTS
iOS Requirements:
Mobile device with iOS with cellular or Wi-Fi service
Android Requirements:
Mobile device with Android OS with cellular or Wi-Fi service
GET YOUR STATION READY
Ensure your station’s Wi-Fi Indicator is flashing. If it is not, press and hold the Plus (+) and
Minus (–) buttons down together until it begins flashing. This tells you that your station is ready
to connect.
WI-FI WIND & WEATHER STATION Page | 5
Page 6
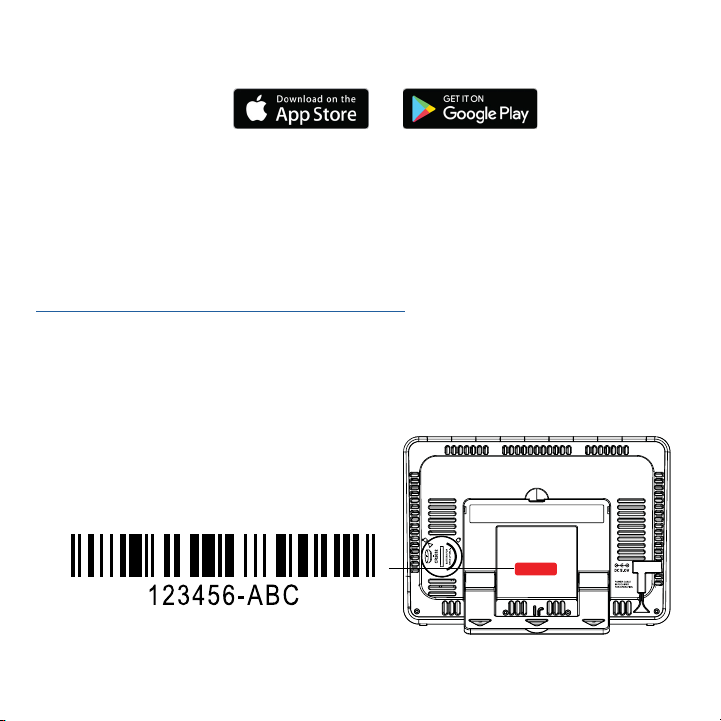
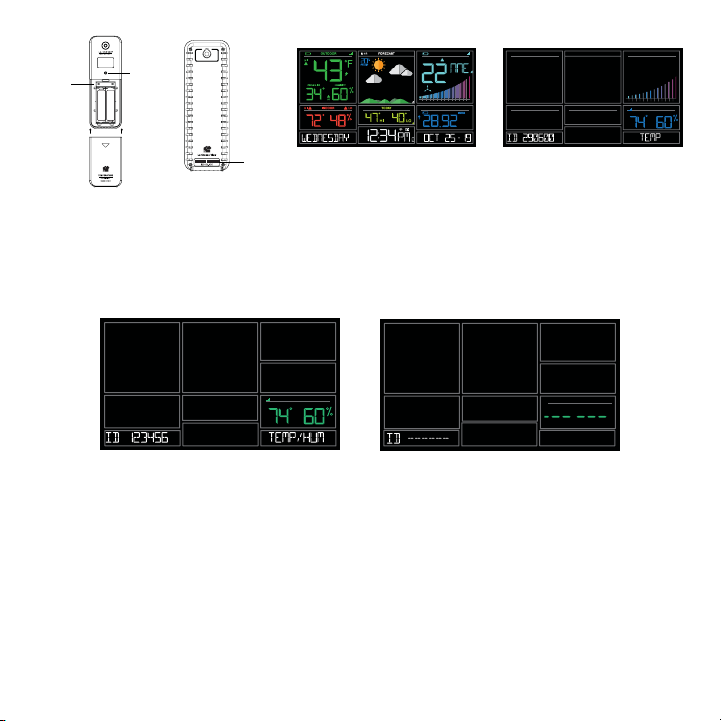
DOWNLOAD
Visit the App Store or Google Play Store to download the free LaCrosse View™ app onto your
mobile device.
LAUNCH & FOLLOW
Open the LaCrosse View™ app and follow the on-screen instructions.
HAVING TROUBLES CONNECTING?
Make sure your mobile device is connected to your router’s 2.4GHz Wi-Fi network, and
that you’ve correctly entered your Wi-Fi password.
For more troubleshooting tips and support visit:
www.lacrossetechnology.com/lacrosseviewsupport
• Your station’s device ID can be found on the back of the display.
• Within 15 minutes after your station connects to the La Crosse View app, you should receive
notifications to add your sensors. These will display in your app’s Notification Center.
Device ID
WI-FI WIND & WEATHER STATION Page | 6
Page 7
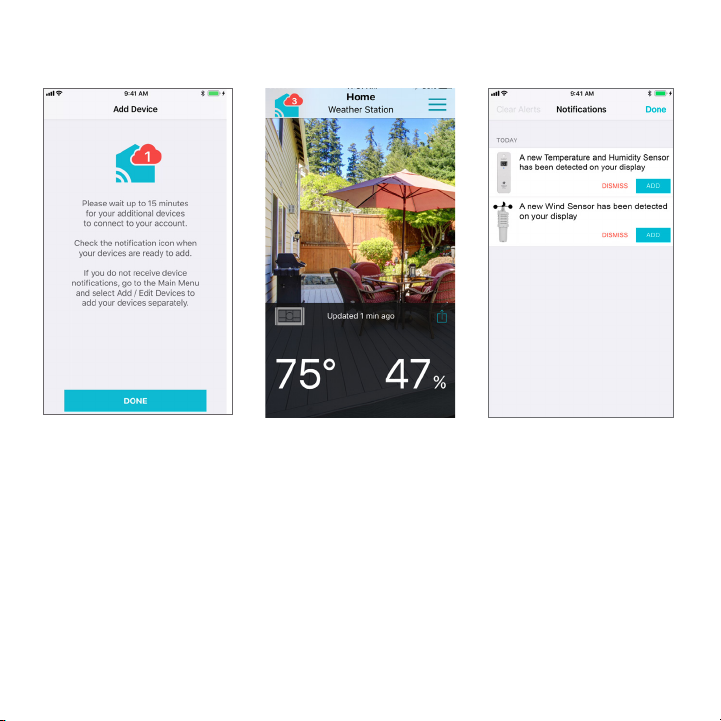
When your sensors are ready to be added, you’ll see your app’s cloud turn red.
Press this Cloud Icon to add your sensors.
WI-FI WIND & WEATHER STATION Page | 7
Page 8
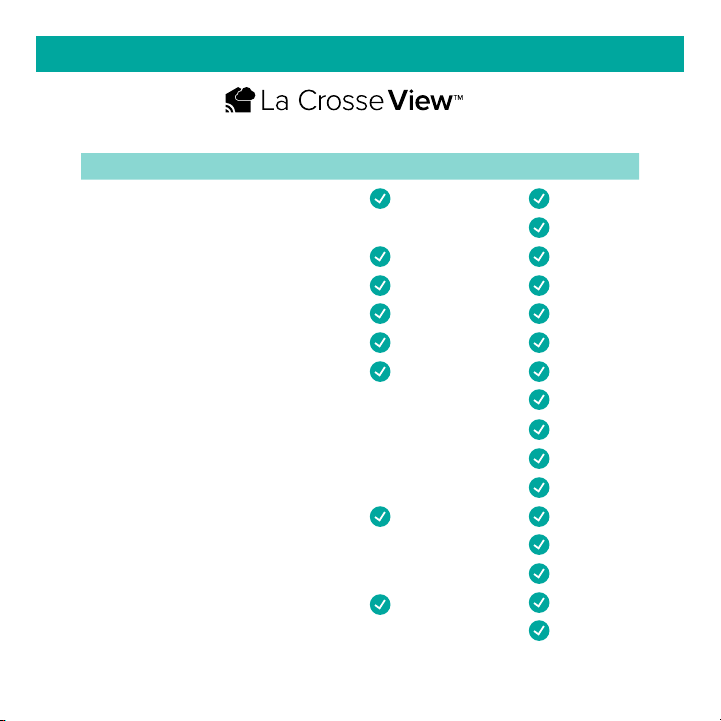
BENEFITS OF CONNECTING TO LA CROSSE VIEW™
Connecting You to Your Home Anytime, Anywhere.
FEATURES CONNECTEDSTANDALONE
Wind Speed
Internet Wind Direction
Indoor & Outdoor Temperature
“Feels Like” Temperature
Indoor & Outdoor Humidity
12-Hour Forecast
Barometric Pressure
Internet Time and Calendar
Advance Forecast Icons
Daily Forecast HIs & LOs
% Chance of Precipitation
Ability to Add Sensors
Data Stream Technology
Remote Monitoring
Set Alerts
View Graphs
WI-FI WIND & WEATHER STATION Page | 8
Page 9
ENHANCED LACROSSE VIEW CONNECTED FEATURES
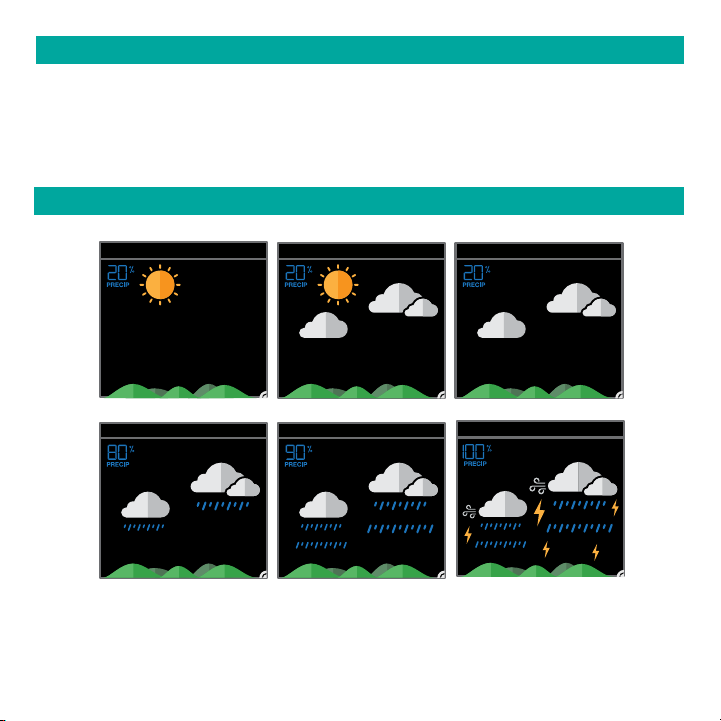
• Advanced Forecast Icons & Chance of Precipitation (12 Hour Forecast)
• AccuWeather Daily & Hourly Forecasts
• AccuWeather HI/LO Temperatures
• AccuWeather Wind Direction
• Custom Data Streams
ADVANCED FORECAST & CHANCE OF PRECIPITATION
SUNNY CLOUDSPARTLY SUNNY
12 HR
FORECAST
12 HR
FORECAST
12 HR
FORECAST
12 HR
LIGHT RAIN
FORECAST
12 HR
FORECAST
12 HR
T-STORMRAIN
FORECAST
WI-FI WIND & WEATHER STATION Page | 9
Page 10
LIGHT SNOW
12 HR
FORECAST
WIND FOGICE
12 HR
FORECAST
12 HR
12 HR
SNOW
FORECAST
FORECAST
ICE
12 HR
12 HR
FOG
WINTRY MIX
FORECAST
FORECAST
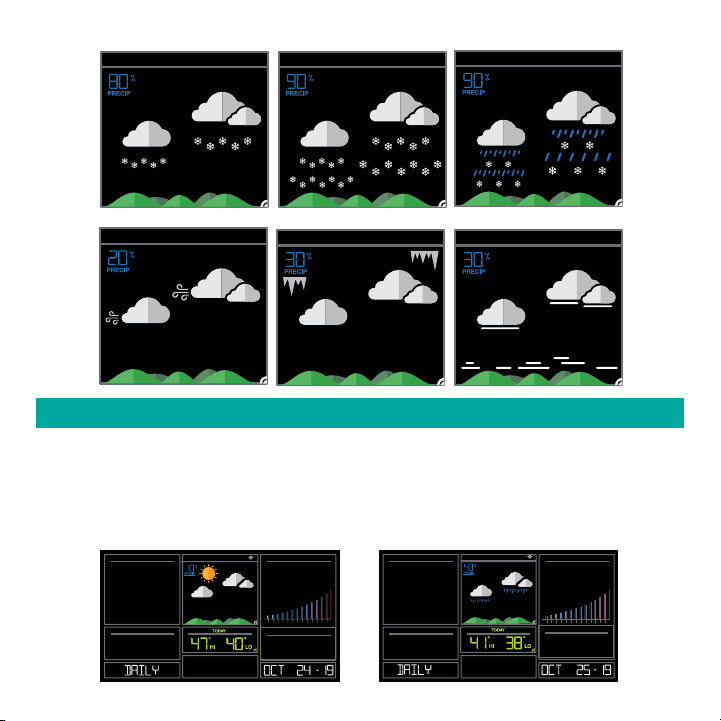
ACCUWEATHER DAILY FORECASTS
Press the DAY button on the side of your station to scroll through 7 days of future forecasts.
You’ll see changing forecast icons, HI/LO Temperature readings.
IMPORTANT: After viewing your Daily Forecast, the display will automatically revert back to
the default 12 hour forecast after 10 seconds.
12 HR
FORECAST
FORECAST12 HR
10 2 3 4 5 6 7 8 9 10 15
2025+
10 2 3 4 5 6 7 8 9 10 15
2025+
WI-FI WIND & WEATHER STATION Page | 10
Page 11
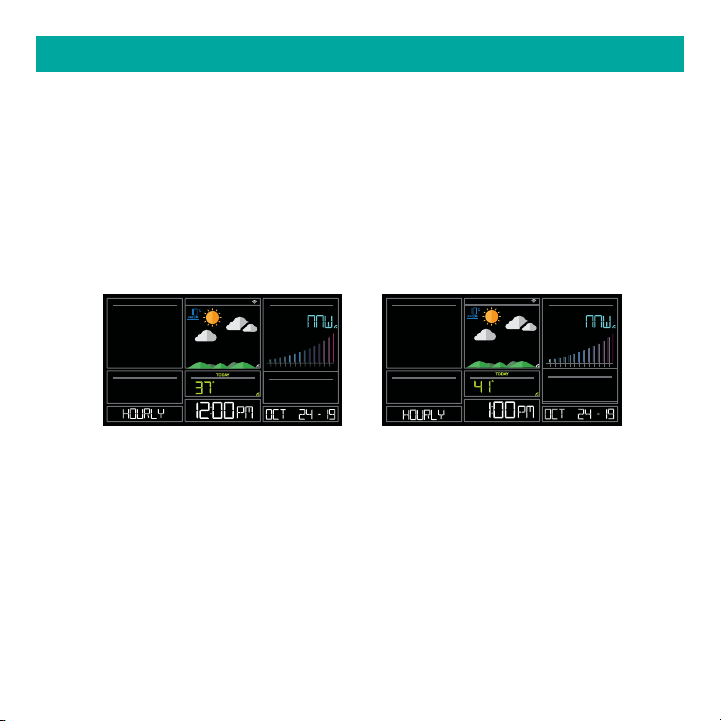
ACCUWEATHER HOURLY FORECAST
Press the HOUR button on the side of your station to scroll through 12 hours of future forecasts. You’ll see hourly changes in:
• Weather Icons
• Chance of Precipitation
• Temperature
• Wind Direction
IMPORTANT: After viewing your Hourly Forecast, the display will automatically revert back to
the default 12 hour forecast after 10 seconds.
FORECAST12 HR
WIND
DIRECTIO N
FORECAST12 HR
WIND
DIRECTIO N
10 2 3 4 5 6 7 8 9 10 15
2025+
10 2 3 4 5 6 7 8 9 10 15
2025+
Note: If you press the HOUR or DAY button when not connected, station will say CONNECT
TO WIFI. If your station is connected, but happens to lose connection with the weather
service, it will say WAIT FOR WEATHER when your HOUR or DAY button is pushed.
IMPORTANT:
There may be small discrepancies between data displayed on your station and data shown
through other AccuWeather services, such as their website and/or mobile app. This is common, as there are dierences in the timing in which forecast data is fetched by these items.
Our connected weather stations will receive forecast updates at least 4 times daily.
WI-FI WIND & WEATHER STATION Page | 11
Page 12
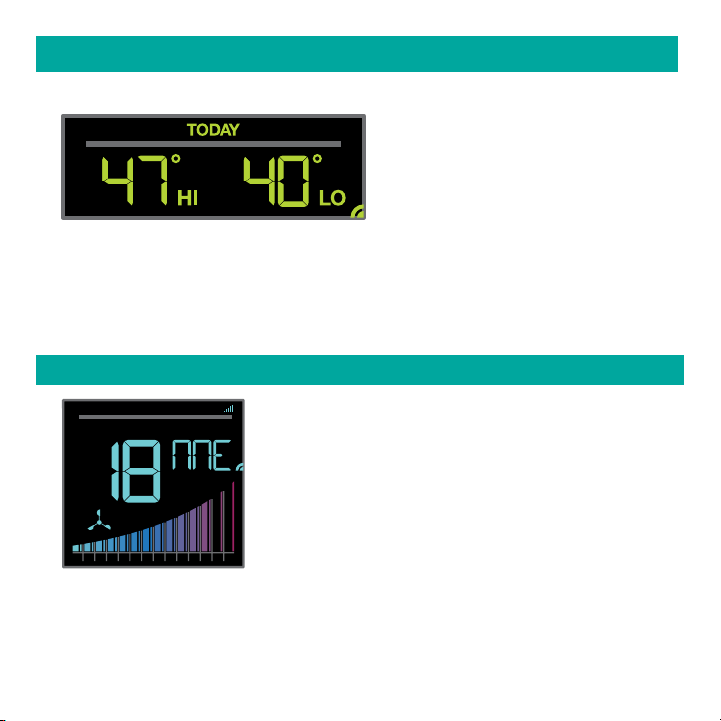
ACCUWEATHER HI/LO TEMPERATURES
TODAY Shows
Internet Indicator will appear in bottom
right corner when connected.
• When connected, your daily AccuWeather HI/LO Temperature predictions will display in this
section.
• If unconnected, this section will display your Outdoor Temperature Records registered daily
by your Thermo-Hygro Sensor. These will automatically reset at Midnight everyday.
ACCUWEATHER WIND DIRECTION
WIND
MP H
DIRECTIO N
Internet Indicator Appears and
Wind Direction replaces Top 1HR
SPEED
10 2 3 4 5 6 7 8 9 10 15
20 25+
WI-FI WIND & WEATHER STATION Page | 12
Page 13
CUSTOM DATA STREAMS
Use the Data Stream Menu in the La Crosse View™ app to select up to 3 items to stream on
your station.
1. Open the La Crosse View™ app and swipe until you find your station’s device page.
2. Scroll down to the Data Stream section and press the blue stream icon in the upper right.
3. Follow the app’s instructions to customize your “Data Stream” to display on your station
Note: Allow up to 10 minutes for new Data Stream selections to appear on your station.
Custom Data Stream
Data Stream Items:
Customizable Data Streams to enhance your in-home display:
Wind Speed Wind Direction Wind Gust UV Index Visibility Dew Point
Percentage of Clouds Sunrise Time Sunset Time Hours of Sunlight Moon Rise Time
Moon Set Time Temperature/Humidity and more!
Personal Messages
Enter up to 20 characters for special events or reminders, such as:
SOCCER TONIGHT ICE CREAM IN FREEZER GREAT JOB MATH TEST or anything you can
think of!
Note: Allow up to 10 minutes for new Data Stream selections to appear on your station.
WI-FI WIND & WEATHER STATION Page | 13
Page 14

ADD SENSORS TO YOUR APP
How to add Sensors to your La Crosse View App only:
1. Install batteries in the sensor, and if the sensor has a TX button, press the TX button to
force a signal.
2. Scan sensor bar code ID so it will read in the La Crosse View app.
Details: Open your La Crosse View app to add sensors. Watch the video for adding devices
to the La Crosse View app: http://bit.ly/LaCrosseView_Support_Vid_10
1. From Main Menu - select “Devices” under “Add/Edit”
2. On Edit Devices page - select “ADD DEVICE”
3. Scan Device ID - Scan the bar code on your sensor or choose “ADD MANUALLY” to type in
the number on the bar code. Select “CONTINUE”.
4. On Confirm Device page - Confirm the sensor image and select “YES”
5. On Enter Device and Location Name page - enter Device Name and select a location or
enter a Location Name for your sensor. Select “DONE”.
Repeat steps 1-5 for any additional sensors you wish to add.
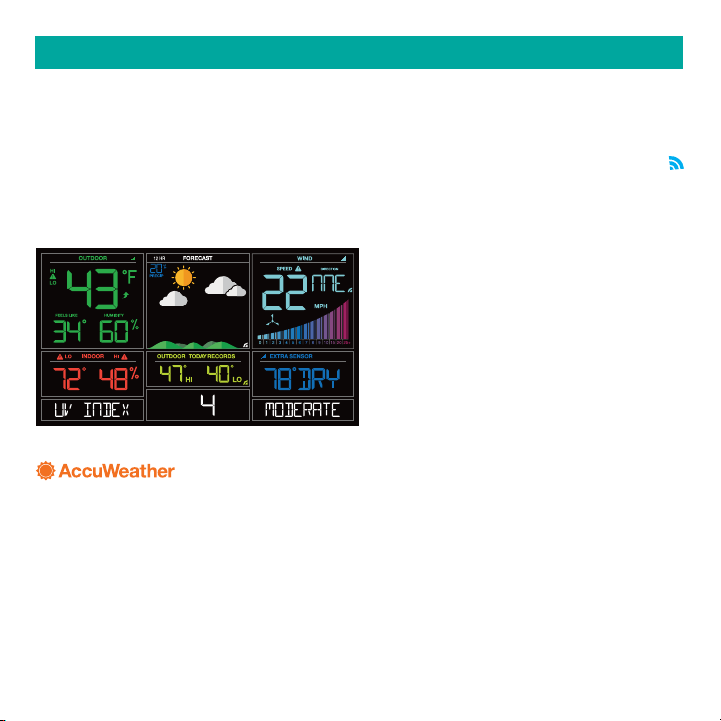
STATUS MESSAGES WHEN CONNECTED
Quick Tip:
• The Wi-Fi Icon indicates Wi-Fi connection- not necessarily app connection.
• The Internet Icons by your Forecast, Wind Direction and HI/LO Temperatures will indicate
connection to the La Crosse View App and Weather Server.
Status Messages on your station will let you know if there are issues.
Press and release the SET button to view the status of your station.
WI-FI WIND & WEATHER STATION Page | 14
Page 15
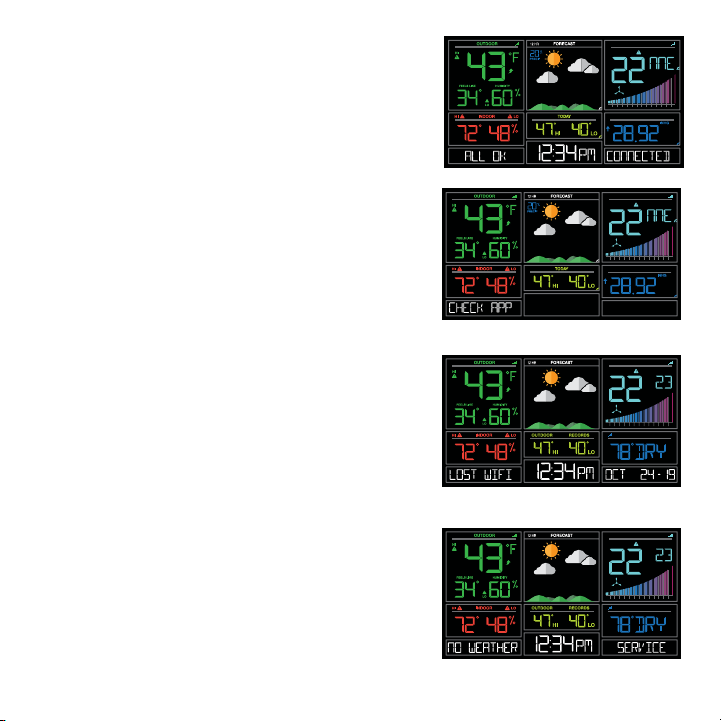
ALL OK CONNECTED
• Station is connected all the way through to the
La Crosse View app.
WIND
SPEE D
10 2 3 4 5 6 7 8 9 10 15
MPH
PRESSUR E
DIRECTIO N
2025+
CHECK APP
• The Wi-Fi router connection is working.
WIND
SPEE D
• Check your connection to the La Crosse View app.
• Check Notifications in the La Crosse View app
10 2 3 4 5 6 7 8 9 10 15
• Is there an update to install?
LOST WIFI
• Check your power cord connection (power cord
WIND
SPEE D
required to connect)
• When trying to reestablish your station’s Wi-Fi
connection, be sure your mobile device is on the
same 2.4GHz network you want your station to use.
10 2 3 4 5 6 7 8 9 10 15
EXTR A SENSOR
• Check your network connection.
• Hold the + and – buttons together for 3 seconds to
search for Wi-Fi.
NO WEATHER SERVICE
• Wi-Fi, and App are fine.
WIND
SPEE D
• Weather/Time service not connecting. This will be
resolved at the Weather Server. Please be patient.
• Weather Forecast, Precipitation and Internet
10 2 3 4 5 6 7 8 9 10 15
EXTR A SENSOR
HI/LO temperature will not be displayed.
WI-FI WIND & WEATHER STATION Page | 15
MPH
PRESSURE
MPH
MPH
DIRECTIO N
2025+
DIRECTION
1
HR
2025+
DIRECTIO N
1
HR
2025+
Page 16
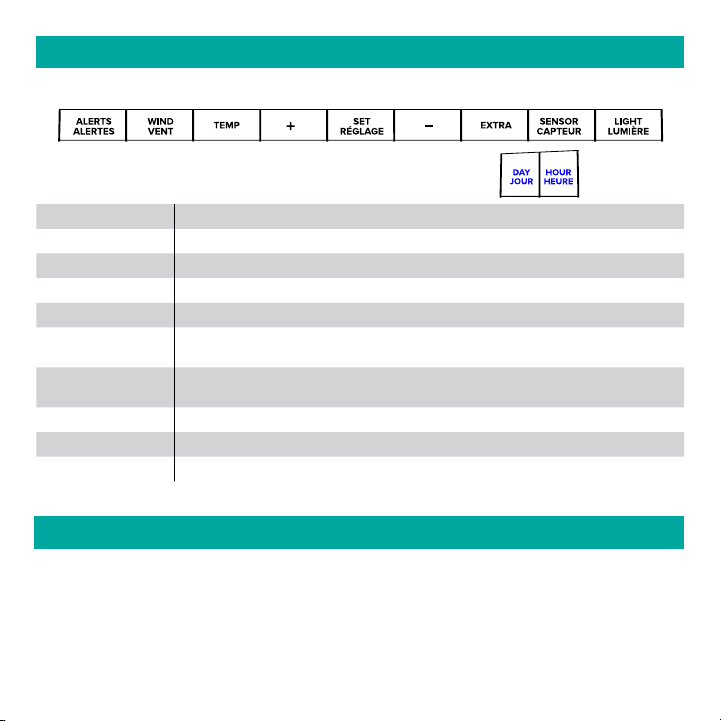
BUTTON FUNCTIONS
Buttons located on top of Professional Weather Station
Buttons located on the right side of Professional Weather Station
ALERTS Hold to enter Alert Set Mode.
WIND, TEMP Press to view history.
+ or Use + or – to adjust values in settings.
+ & Hold both buttons to search for Wi-Fi.
SET Hold for basic settings. Press to view Wi-Fi status.
EXTRA
SENSOR
LIGHT Press to adjust brightness. Hold to set Auto Dim.
ALERTS & LIGHT Hold both buttons to reset all sensor ID’s and Wi-Fi settings.
DAY, HOUR Press to see forecast. Must be connected to Wi-Fi.
Press to toggle through Extra Sensors & Barometric Pressure.
Hold to add Sensors.
Press to view sensor ID numbers, then hold PLUS (+) to search, or hold
MINUS (–) to remove.
ADJUSTABLE BACKLIGHT
Your station has 5 levels of brightness for the backlight:
• Press and release the LIGHT button to adjust the backlight at 5 levels of intensity.
Levels: OFF = 0% | level 1 = 1.5% | level 2 = 20% | level 3 = 50% | level 4 = 100%.
WI-FI WIND & WEATHER STATION Page | 16
Page 17
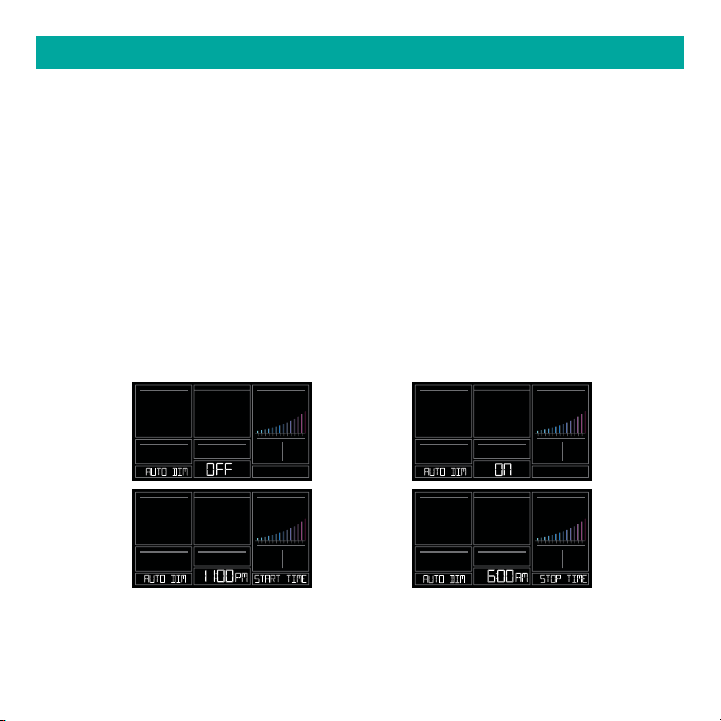
AUTO DIMMING BACKLIGHT
You can set your backlight to automatically dim to level 1 at a set hour for sleeping, then automatically return to full brightness when you wake.
Set Auto Dim (Hour only):
1. Hold the LIGHT button 2 seconds to enter dimmer set mode. AUTO DIM OFF will show.
2. Press the + or – buttons to turn dimmer (ON). AUTO DIM ON will show.
3. Press the LIGHT button to select start time (Hour) for dimmer. AUTO DIM START TIME and
the hour will flash.
4. Press the + or – buttons to change the hour for the dimmer to be low light level.
5. Press the LIGHT button to select start time for dimmer to be on High light level. AUTO DIM
STOP TIME and the hour will flash.
6. Press the + or – buttons to change the hour for the dimmer to be high light level.
7. Press the LIGHT button to confirm exit.
Note: Hold LIGHT button at any time to exit dimmer settings.
10 2 3 4 5 6 7 8 9 10 15
10 2 3 4 5 6 7 8 9 10 15
2025+
2025+
10 2 3 4 5 6 7 8 9 10 15
10 2 3 4 5 6 7 8 9 10 15
2025+
2025+
Note: If you press the LIGHT button to manually adjust the backlight, the Auto Dim feature will
resume at the next scheduled time to dim.
WI-FI WIND & WEATHER STATION Page | 17
Page 18
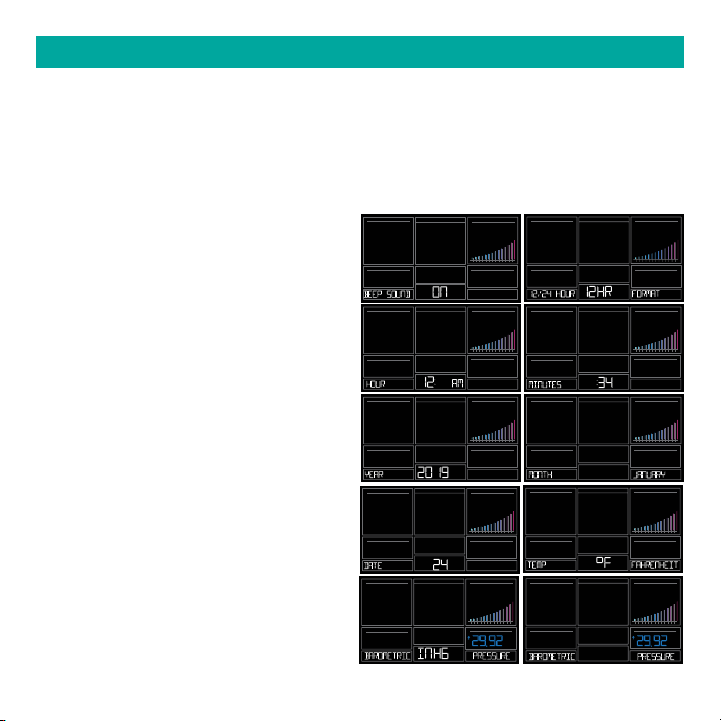
SETTINGS MENU
1. Hold the SET button for 3 seconds to enter settings menu.
2. Press and release the + or - buttons to adjust the flashing values. Hold to adjust quickly.
3. Press and release the SET button to confirm and move to the next item.
Note: Press and release the LIGHT button any time to exit settings.
Settings menu order:
• BEEP ON | OFF
• 12/24 hour format
• Hour
10 2 3 4 5 6 7 8 9 10 15
2025+
10 2 3 4 5 6 7 8 9 10 15
2025+
• Minutes
10 2 3 4 5 6 7 8 9 10 15
2025+
• Year
• Month
2025+
• Date
10 2 3 4 5 6 7 8 9 10 15
• Temperature Fahrenheit | Celsius
• Pressure: InHg / hPa
10 2 3 4 5 6 7 8 9 10 15
2025+
• Pressure number setting
Note: Weekday sets automatically as Year,
Month and Date are set.
10 2 3 4 5 6 7 8 9 10 15
2025+
PRESSURE
INHG
WI-FI WIND & WEATHER STATION Page | 18
10 2 3 4 5 6 7 8 9 10 15
10 2 3 4 5 6 7 8 9 10 15
10 2 3 4 5 6 7 8 9 10 15
10 2 3 4 5 6 7 8 9 10 15
2025+
2025+
2025+
2025+
PRESSURE
INHG
Page 19
EXTRA SENSOR AREA
The Extra Sensor area of your station will show Relative Pressure when you first power up.
The Sensor Reception indicator will display when additional sensors are connected.
Note: On power up the station will search for any additional sensors.
Optional Extra Sensors: Up to 4 additional Thermo-Hygro, Wind Speed, Rain, Water Leak or
any combination of these sensors can read to the EXTRA SENSOR area of your display.
Simply press and release the EXTRA button to view these sensors or turn on Auto Scroll.
Note: Not all sensors will read to the station. Be sure to check the website to see if a sensor
can read to the app only, or both station and app.
Relative Pressure (default)
EXTRA SENSOR
24 HR
24 Hr Rain
PRESSURE
INH G
Water Leak
Temperature/Humidity
Auto Scroll all Extra Sensors
EXTRA SENSOREXTRA SENSOR
Contact Probe
EXTRA SENSOR
Probe
Reading
Add Extra Sensors to your station:
1. Hold the EXTRA button 3 seconds, to add a sensor to the station.
2. Install batteries in the sensor, and if the sensor has a TX button, press the TX button to
force a signal.
3. Allow up to 3 minutes to view sensor and ID on station.
Note: Once sensor is found the search will stop. Sensor, ID, and type will show for 3
seconds then return to normal display.
4. Scan sensor bar code ID so it will read in the La Crosse View app.
5. Added sensors will be available for display in Extra Sensor area of station.
WI-FI WIND & WEATHER STATION Page | 19
Page 20
TX Button
Station normal display-Pressure showing
LED Light
-
+
AA
AA
+
-
Sensor
Barcode ID
WIND
SPEED
10 2 3 4 5 6 7 8 9 10 15
DIRECTION
MPH
2025+
PRESSURE
Temp/Humidity sensor added
10 2 3 4 5 6 7 8 9 10 15
EXTR A SENSOR
Delete Extra Sensors from your station:
1. Press and release the EXTRA button until you see the sensor and ID you wish to delete.
2. Hold the MINUS (-) button for 3 seconds to delete this sensor. The sensor readings and ID
will show dashes.
3. Sensor will no longer show in the Extra Sensor area.
2025+
EXTRA SENSOR
EXTRA SENSOR
Press and release the EXTRA button to view Pressure, and any Extra Sensors connected to
your station.
IMPORTANT: The sensors reading in the Extra Sensor area will not provide history. These will
be current readings only.
WI-FI WIND & WEATHER STATION Page | 20
Page 21
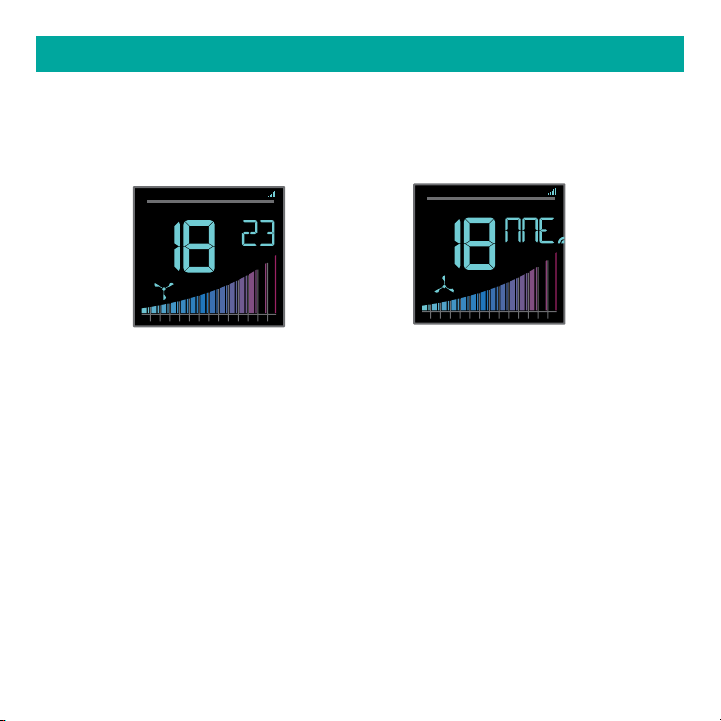
WIND SPEED READINGS & HISTORY
Current Speed: Highest wind speed in past 31 seconds. Samples every 3 seconds
Top Speed (1 HR): Highest wind speed in past 60 minute period.
Wind Direction: When connected wind direction in letters will replace Top 1HR. Top 1HR will
still be viewable in history. Internet Indicator will show next to the direction letters.
Not Connected: Current & Top Speed Connected: Current Speed & Internet Wind Direction
SPEED
WIND
MP H
TOP
1
HR
SPEED
WIND
DIRECTIO N
MP H
10 2 3 4 5 6 7 8 9 10 15
20 25+
10 2 3 4 5 6 7 8 9 10 15
20 25+
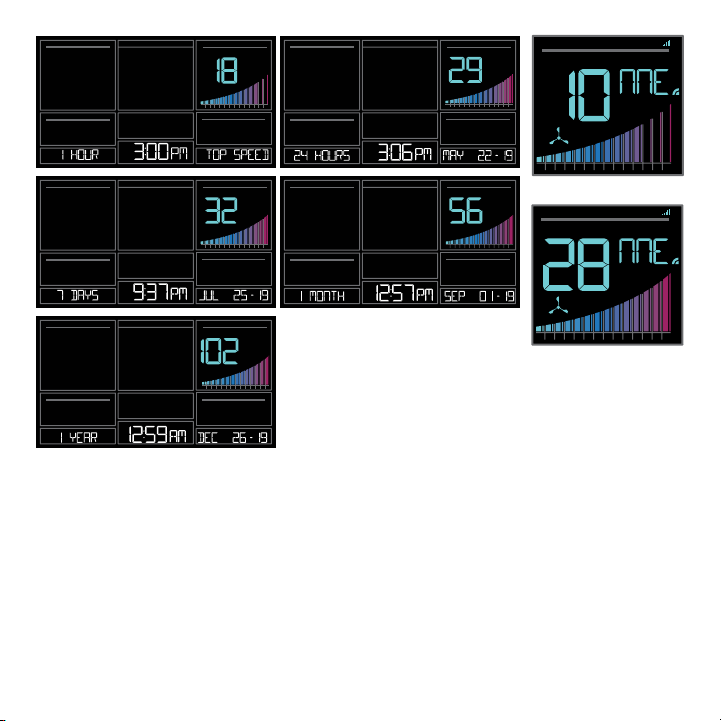
Wind Speed History:
1. Press and release the WIND button to view the maximum wind history values (Top
Speed).
2. When viewing MONTH history, press the PLUS button to toggle through the current
month and past 11 months top speed.
Note: All other readings will disappear for 5 seconds.
1 Hour: Highest wind speed in past 60 minute period.
24 Hours: Highest wind speed in past 24 hour period, from last record, with time/date
stamp. This is a running total.
7 Days: Highest wind speed in past 7-day period, from last record, with time/date stamp.
This is a running total.
Month: Highest wind speed in for the month with time/date stamp
o Current Month: First day to current day.
o Previous 11 months. Defined by Calendar Month i.e. January 1 - January 31
Year: Highest wind speed in Current Year. Defined by Calendar Year i.e.
January 1 - December 31 Top speed for the year with time/date stamp
WI-FI WIND & WEATHER STATION Page | 21
Page 22
WIND
MPH
10 2 3 4 5 6 7 8 9 10 15
WIND
MPH
10 2 3 4 5 6 7 8 9 10 15
TOP
2025+
TOP
1
HR
2025+
SPEED
WIND
DIRECTIO N
MP H
WIND
10 2 3 4 5 6 7 8 9 10 15
TOP
MPH
2025+
WIND
MPH
10 2 3 4 5 6 7 8 9 10 15
10 2 3 4 5 6 7 8 9 10 15
Graph 10 mph Wind Speed
TOP
2025+
SPEED
WIND
DIRECTIO N
MP H
WIND
10 2 3 4 5 6 7 8 9 10 15
TOP
MPH
2025+
10 2 3 4 5 6 7 8 9 10 15
Graph 28 mph Wind Speed
Reset Wind Speed History:
1. Press the WIND button to view individual wind speed readings.
2. Hold the MINUS button for five seconds to reset the individual value.
3. Wind speed reading will reset to current wind speed, time and date.
Wind Speed Graph
• The Wind Speed graph will fill with color as a visual indicator of wind speed.
• At speeds above 25MPH the graph will remain full.
WI-FI WIND & WEATHER STATION Page | 22
20 25+
20 25+
Page 23

TEMPERATURE/HUMIDITY READINGS & HI/LO RECORDS
Your current Indoor and Outdoor temperature and Humidity are constantly displayed on your
weather station. Your station records your HI and LO Temperature and Humidity with time and
date of occurrence.
1. Press and release the TEMP button to view your HI and LO records with time and date of
occurrence.
2. Any new HI or LO record will replace the existing record.
Viewing order:
• Outdoor HI Temp with Time/Date
• Outdoor LO Temp with Time/Date
• Outdoor HI Humidity with Time/Date
• Outdoor LO Humidity with Time/Date
• Indoor HI Temp with Time/Date
• Indoor LO Temp with Time/Date
• Indoor HI Humidity with Time/Date
• Indoor LO Humidity with Time/Date
• Feels Like HI Temp with Time/Date
• Feels Like LO Temp with Time/Date
• Outdoor Dew Point
2025+
10 2 3 4 5 6 7 8 9 10 15
HUMIDITY
LEVEL
10 2 3 4 5 6 7 8 9 10 15
10 2 3 4 5 6 7 8 9 10 15
10 2 3 4 5 6 7 8 9 10 15
HUMIDITY
LEVEL
2025+
2025+
2025+
10 2 3 4 5 6 7 8 9 10 15
10 2 3 4 5 6 7 8 9 10 15
10 2 3 4 5 6 7 8 9 10 15
10 2 3 4 5 6 7 8 9 10 15
2025+
2025+
2025+
2025+
Reset HI/LO Temperature/Humidity Records:
1. Press and release the TEMP button to view
10 2 3 4 5 6 7 8 9 10 15
2025+
individual temperature/humidity readings.
2. Hold the MINUS button for five seconds to reset the
individual value.
10 2 3 4 5 6 7 8 9 10 15
2025+
3. Temperature and Humidity readings will reset to
current temperature, humidity, time and date.
WI-FI WIND & WEATHER STATION Page | 23
10 2 3 4 5 6 7 8 9 10 15
2025+
Page 24

ALERTS
Set Alerts:
1. Hold the ALERTS button for 3 seconds to enter alert set mode.
• Alert ON:
1. Press the +/- buttons to arm the alert (ON).
2. Press the ALERTS button and the alert value will flash
3. Press the +/- buttons to set the alert value (Hold to set quickly).
4. Press ALERTS button to move to next alert.
• Alert OFF:
1. Alerts are OFF unless armed.
2. If you do not wish to set an alert, simply press the ALERTS button again to move to the
next alert.
Alert Setting Order:
• High Wind Speed
• Outdoor Low Temperature
• Outdoor High Temperature
• Outdoor Low Humidity
• Outdoor High Humidity
• Indoor Low Temperature
• Indoor High Temperature
• Indoor Low Humidity
• Indoor High Humidity
WI-FI WIND & WEATHER STATION Page | 24
Page 25

Alert Sounds:
• When armed alert value is reached, station will beep 5 times each minute, until out of alert
range.
• The flashing alert icon will indicate if it is a LO or HI alert.
• Press any button to stop the temp alert sound. The alert icon will flash while value is in alert
range.
WIND
SPEED
10 2 3 4 5 6 7 8 9 10 15
2025+
WIND
SPEED
10 2 3 4 5 6 7 8 9 10 15
MPH
HUMIDITY
LEVEL
2025+
10 2 3 4 5 6 7 8 9 10 15
HUMIDITY
LEVEL
2025+
10 2 3 4 5 6 7 8 9 10 15
2025+
10 2 3 4 5 6 7 8 9 10 15
10 2 3 4 5 6 7 8 9 10 15
10 2 3 4 5 6 7 8 9 10 15
10 2 3 4 5 6 7 8 9 10 15
2025+
2025+
2025+
2025+
10 2 3 4 5 6 7 8 9 10 15
10 2 3 4 5 6 7 8 9 10 15
10 2 3 4 5 6 7 8 9 10 15
10 2 3 4 5 6 7 8 9 10 15
2025+
2025+
2025+
HUMIDITY
LEVEL
2025+
10 2 3 4 5 6 7 8 9 10 15
10 2 3 4 5 6 7 8 9 10 15
10 2 3 4 5 6 7 8 9 10 15
HUMIDITY
LEVEL
2025+
2025+
2025+
10 2 3 4 5 6 7 8 9 10 15
10 2 3 4 5 6 7 8 9 10 15
10 2 3 4 5 6 7 8 9 10 15
2025+
2025+
2025+
WI-FI WIND & WEATHER STATION Page | 25
Page 26

FEELS LIKE TEMPERATURE
Your “Feels Like” Temperature is a combination of outdoor temperature,
humidity and wind speed. It is displayed in the Outdoor Temperature
area.
• When outdoor temperature is higher than 80˚F, your Feels Like
Temperature is showing Heat Index.
• When outdoor temperature is lower than 50˚F, your Feels Like
Temperature is showing Wind Chill.
• When outdoor temperature is between 50˚F and 80˚F, your Feels Like
Temperature will show Current Outdoor Temperature.
Note: When you have a high humidity reading, but the temperature is
not over 80°F, the Feels Like Temperature will remain the same as the
current outdoor temperature.
TEMPERATURE TREND ARROWS
Your Outdoor Temperature Trend Arrows update every 15 minutes. The trend reflects changes
over the past one hour period.
UP ARROW: For this to show, the temperature will have to rise by 2°F (1°C), or more
within the current hour.
RIGHT ARROW: Temperature is steady
DOWN ARROW: For this to show, the temperature will have to fall by 2°F (1°C), more
within the current hour.
WI-FI WIND & WEATHER STATION Page | 26
Page 27

RELATIVE PRESSURE READING
• Your station itself has a Pressure Sensor inside to provide accurate Relative Pressure
readings.
• The station will default to a Relative Pressure of 29.92 Inches of Mercury.
• Give it up to 3 days to automatically adjust to your environment.
• The Relative Pressure number is programmable in the Settings Menu.
• You can select INHG (Inches or Mercury) or HPA (Hecto Pascal) for Pressure units in the
Settings Menu.
• The UP and DOWN Arrows indicate the Pressure Tendency (rising or falling). This is
calculated when the average value of the current hour’s barometric pressure is compared
to the average of the past 3 hours. If the dierence is greater than +1hpa, the air pressure
trend will increase; if the dierence is less than -1hpa, the air pressure trend will decrease; if
it is between +1 and -1hpa, it will be flat.
Press the EXTRA button to switch between any extra sensor readings and Relative
Pressure reading.
PRESSURE
INHG
EXTRA SENSOR
SENSOR RECEPTION INDICATORS
There are Sensor Reception Indicators for your Temperature/Humidity Sensor, and Wind
Sensor.
• When indicator is solid, sensor is connected.
• When indicator is flashing, it is searching for the individual sensor.
• If there is no indicator, the sensor is not connected.
WI-FI WIND & WEATHER STATION Page | 27
Page 28

SENSOR ID & SENSOR SEARCH
Your station and each sensor have a unique ID number that will identify them in the La Crosse
View app. This has the added bonus of locking them into your weather station until you
manually delete them.
View ID numbers in station:
Press and release the SENSOR button. The ID number and type will show on the bottom of
the station.
• Station
• TH Sensor
• Wind Sensor
• Extra Sensor (if connected to station)
Search for Individual sensors:
1. Press and release the SENSOR button to view sensor type and ID.
2. Hold the PLUS (+) button to search for the sensor. The reception indicator will flash for up to
3 minutes.
3. Allow up to 3 minutes to view sensor and ID on station.
Note: Once sensor is found search will stop. The reception indication will stop flashing.
Sensor and ID will show for 3 seconds.
WIND
SPEED
HUMIDITY
LEVEL
10 2 3 4 5 6 7 8 9 10 15
2025+
MPH
10 2 3 4 5 6 7 8 9 10 15
10 2 3 4 5 6 7 8 9 10 15
DIRECTION
2025+
2025+
WI-FI WIND & WEATHER STATION Page | 28
Page 29

DELETE SENSORS
1. Press and release the SENSOR button to view sensor type and ID.
2. Hold the MINUS button to delete the sensor from the station.
3. Deleted sensor can no longer show on station. Batteries should be removed.
4. Station will automatically search for a replacement sensor of the same type.
Example: Delete a Wind sensor, the station will search for a new Wind sensor.
5. If replacing a sensor, insert batteries into the new sensor. Once station receives sensor,
press the SENSOR button to confirm sensor ID.
Note: Deleted, working, sensors with batteries installed, may still pass through to the app but
will no longer show on the station.
WIND
SPEED
MPH
10 2 3 4 5 6 7 8 9 10 15
DIRECTION
2025+
WIND
SPEED
MPH
10 2 3 4 5 6 7 8 9 10 15
2025+
LOW BATTERY INDICATORS
• Low battery by Outdoor Temperature, replace batteries in the TH sensor.
• Low battery by Wind, replace batteries in the Wind Sensor.
• Low Battery by Indoor Temperature, replace batteries in Station.
• Low Battery by Extra Sensor, replace batteries in the Extra Sensor.
WI-FI WIND & WEATHER STATION Page | 29
Page 30

FACTORY RESTART STATION
A factory restart of your station will remove all sensor ID numbers and Wi-Fi settings and
return it to its default settings and “out of the box” condition.
This may resolve connection issues with your sensors or Wi-Fi.
1. Hold the ALERTS and LIGHT buttons together for 5 seconds.
2. Your station will reset and search for all sensors.
3. Allow up to 3 minutes to reacquire all sensors.
4. You will need to reconnect to your La Crosse View app by selecting CONNECT WIFI from
the menu in your La Crosse View App and entering your Wi-Fi password.
DETAILED SETUP & MOUNTING
LTV-W1 Wind Speed Sensor
1. Turn the battery cover of your wind sensor to the left.
2. Install fresh “C” batteries.
3. Carefully align and turn battery cover right to tighten.
4. There is a blue LED light on the sensor that will flash when transmitting.
Wind Cups
LED
Light
Twist
Left
Battery
Cover
C
C
Side Mount
Option
Screws
Knob
Mounting
pole
Mounting
Bracket
WI-FI WIND & WEATHER STATION Page | 30
Page 31

Mounting:
• Position in an open area that will have the least amount of interference with wind speed.
• Mount your sensor vertically with the wind cups on top.
• The maximum wireless transmission range to the station is up to 400 feet (121 metres) in
open air, not including walls or trees.
1. Use screws through the bottom of the mounting bracket to attach.
2. Insert bottom of pole into mounting bracket. Tighten knob to secure
3. Insert the included mounting pole into your sensor.
4. Tighten screws.
Alternatively:
1. Insert your own mounting pole (no more than 1 inch outside diameter) into the sensor.
2. Tighten screws
LTV-TH2 Thermo-Hygro Sensor
1. Install 2-AA batteries according to polarity and replace
battery cover.
Mounting:
1. Use the hole at the top to hang your sensor from the back
using a nail. Or, insert one mounting screw through the
front of your sensor.
Press TX to send a signal
Press F/C to select Fahrenheit
or Celsius display on sensor.
LED Light
Battery Cover
2. Mount your sensor on a north-facing wall or in any shaded
area. Under an eave or deck rail is preferred.
3. The maximum wireless transmission range to the weather
station is up to 400 feet (121 metres) in open air, not
including walls or floors.
Hole for
mounting
4. Be sure your sensor is mounted vertically, to allow
moisture to drain out properly.
-
+
AA
AA
+
-
Note: Watch sensor mounting video:
bit.ly/TH_SensorMounting
WI-FI WIND & WEATHER STATION Page | 31
Page 32

CA80550 Weather Station:
1. Insert the power cord into a wall outlet, then into your station. Remove the insulation tab
from the CR2032 battery installed in the bottom of your weather station to maintain time/
date in the event of a power outage.
Mounting:
1. Place your station near an outlet. Power cord is required for operation.
2. Use the mounting holes on the back to place your station on a wall.
3. Use the pull down stand on the back of your station to place on a desk or counter.
4. Your station should remain in good Wi-Fi range of your wireless router to use all the remote
monitoring options using the La Crosse View app.
CR2032
Battery
Power
Cord
WI-FI WIND & WEATHER STATION Page | 32
Page 33

JOIN THE CONVERSATION
Ask questions, watch detailed setup videos, and provide feedback on our social media
outlets!
CARE & MAINTENANCE
• Do not mix old and new batteries.
• Do not mix Alkaline, Standard, Lithium, or Rechargeable Batteries.
• Always purchase the correct size and grade of battery most suitable for intended use.
• Replace all batteries of a set at the same time.
• Clean the battery contacts and also those of the device prior to battery installation.
• Ensure the batteries are installed with correct polarity (+ and -).
• Remove batteries from equipment when it is not used for an extended period of time.
• Promptly remove expired batteries.
WARRANTY & SUPPORT
LIMITED WARRANTY:
Springfield warrants this instrument to be free from defects in workmanship and material for
a period of 1 year from date of purchase, and will repair or replace it at our option, without
charge.
For warranty issues please contact Springfield Instruments, Inc.:
Phone: 1-844-687-4040
Email: info@springfieldinstruments.com
Springfield Instruments, Inc.
104 Barr Street
Saint-Laurent, QC H4T 1Y4
WI-FI WIND & WEATHER STATION Page | 33
Page 34

SPECIFICATIONS
CA80550 Temperature Range:
Humidity Range:
Relative Pressure:
Temperature Range:
Humidity Range:
Transmission Range:
Wind Speed Range:
Transmission Range:
Transmission: RF 2.4 GHz
CA80550 Station:
Battery Backup:
LTV-TH2 Thermo-hygro Sensor:
TV-W1 Wind Speed Sensor:
CA80550 Station:
LTV-TH2, LTV-W1, Sensors:
CA80550 Station:
LTV-TH2 Thermo-hygro Sensor:
LTV-W1 Wind Speed Sensor:
LTV-TH2 Thermo-hygro Sensor:
LTV-W1 Wind Speed Sensor:
WI-FI WIND & WEATHER STATION Page | 34
Indoor
32°F to 99°F (0°C to 37°C)
10% RH to 99%RH
23.62 to 32.48 InHg (800 to 1100 hPa)
Pressure is measured every 12 minutes
Thermo-hygro Sensor
-40°F to 140°F (-40°C to 60°C)
Note: Temperatures below -20°F (-29°C) require Lithium batteries in the
outdoor sensor.
10% RH to 99%RH
Up to 400 feet (121 metres) in open air, RF 915 MHz
Wind Speed Sensor
0-111 mph (0-178 kmh)
Up to 400 feet (121 metres) in open air, RF 915 MHz
Wi-Fi
Power
5.0 Volt power cord included (Required)
AC6: HX06-0500600-AU-001 (Input 100-240V)
CR2032 battery included, backup for time and date
2-AA batteries not included
2-C batteries not included
Battery Life
Over 24 months with power cord use
Over 24 months with reputable batteries.
Dimensions
8.22 in W x 1.18 in D x 5.83 in H (20.88 cm W x 2.99 cm D x 14.81 cm H)
1.97 in W x 0.75 in D x 5.73 in H (5.0 cm L x 1.91 cm W x 14.55 cm H)
7.10 in W x 7.10 in D x 18.57 in H (18.03 cm L x 18.03 cm W x 47.17 cm H)
with mounting bracket/pole
Sensor Update Intervals
Change of Temp +/- 0.5°C (0.9°F) , Hum +/- 2% RH or 3 minutes if no
change. Checks Temp/Humidity every 51 seconds
Change of 0.8kmh (0.5mph) Wind Speed or 3 minutes if no change
Checks for change in Wind Speed every 31 seconds, samples every
3 seconds
Page 35

FCC STATEMENT
This equipment has been tested and found to comply with the limits for a Class B digital device, pursuant to part 15 of the
FCC Rules. These limits are designed to provide reasonable protection against harmful interference in a residential
installation. This equipment generates, uses and can radiate radio frequency energy and, if not installed and used in accordance with the instructions, may cause harmful interference to radio communications. However, there is no guarantee that
interference will not occur in a particular installation.
If this equipment does cause harmful interference to radio or television reception, which can be determined by turning the
equipment o and on, the user is encouraged to try to correct the interference by one or more of the following measures:
• Reorient or relocate the receiving antenna.
• Increase the separation between the equipment and receiver.
• Connect the equipment into an outlet on a circuit dierent from that to which the receiver is connected.
• Consult the dealer or an experienced radio/TV technician for help.
This device must not be co-located or operating in conjunction with any other antenna or transmitter.
Operation is subject to the following two conditions:
(1 ) This device may not cause harmful interference, and
(2) This device must accept any interference received, including interference that may cause undesired operation.
Caution!
The manufacturer is not responsible for any radio or TV interference caused by unauthorized changes or
modifications to this equipment. Such changes or modifications could void the user authority to operate the
equipment. This equipment must be installed and operated in accordance with provided instructions and the
antenna(s) used for this transmitter must be installed to provide a separation distance of at least 20 cm from all persons and
must not be co-located or operating in conjunction with any other antenna or transmitter
All rights reserved. This manual may not be reproduced in any form, even in part, or duplicated or processed using electronic,
mechanical or chemical process without the written permission of the publisher.
This booklet may contain errors or misprints. The information it contains is regularly checked and
corrections are included in subsequent editions. We disclaim any responsibility for any technical error or printing error, or their
consequences.
All trademarks and patents are recognized.
WI-FI WIND & WEATHER STATION Page | 35
Page 36

CANADA STATEMENT
This device complies with Industry Canada’s licence-exempt RSSs. Operation is subject to the following two conditions:
(1 ) This device may not cause interference; and
(2) This device must accept any interference, including interference that may cause undesired
operation of the device.
Apple and the Apple logo are trademarks of Apple Inc., registered in the U.S. and other countries. App Store is a service mark
of Apple Inc.
Google Play and the Google Play logo are trademarks of Google Inc.
WI-FI WIND & WEATHER STATION Page | 36
Page 37

STATION MÉTÉO WI-FI AVEC ANÉMOMÈTRE
ET PRÉVISIONS
MANUEL D’INSTRUCTIONS
Bienvenue!
Félicitations pour l’achat de votre nouvelle station météo avec anémomètre
et bienvenue dans la famille La Crosse Technology! Ce produit a été
spécialement conçu pour des gens comme vous par notre équipe locale
de La Crosse, au Wisconsin, qui partagent votre passion pour la météo.
Modèle : CA80550
DC: 082219
WI-FI WIND & WEATHER STATION Page | 1
Page 38

TABLE DES MATIÈRES
3
Installation Rapide
4
Conseils pratiques d’installation
4
Icônes de la station météo
5
Connexion à l’application La Crosse ViewMC
8
Avantages de la connexion à La Crosse ViewMC
9
Fonctions améliorées de la connexion
La Crosse ViewMC
9
Prévisions détaillées et probabilités de
précipitations
10
Prévisions quotidiennes AccuWeather
11
Prévisions horaires AccuWeather
12
Maximums et minimums HI/LO de
température Accuweather
12
Direction du vent AccuWeather
13
Transmission en continu personnalisée
14
Ajout de capteurs à votre application
14
Messages d’état pendant la connexion
Fonctions des boutons
16
Rétroéclairage réglable
17
Atténuation automatique du rétroéclairage
18
Menu des réglages
19
Additionelle Capteurs
Mesures et historique de la vitesse
21
du vent
Mesures de temperature et
23
d’humidité et enregistrement des
maximums et minimums
Alertes
24
Température ressentie
26
Flèches de tendance de
26
température
Mesures de pression relative
27
Voyants de réception des capteurs
27
Identification et recherche des
28
capteurs
Retrait de capteurs
29
Voyants de pile faible
29
Réinitialisation d’usine de la station
30
Installation détaillée des capteurs
30
Joignez-vous à la conversation
33
Précautions et entretien
33
Garantie et soutien
33
Spécifications
34
Déclaration de conformité aux
35
règles de la FCC
Déclaration de conformité pour le
36
Canada
WI-FI WIND & WEATHER STATION Page | 2
Page 39

INSTALLATION RAPIDE
1. Insérez 2 piles C dans l’anémomètre LTV-W1.
2. Insérez 2 piles AA dans le capteur de température et d’humidité LTV-TH2.
3. Raccordez le cordon d’alimentation à votre station CA80550. Enlevez la languette isolante
jaune du compartiment de la pile CR2032 se trouvant au dos de la station.
4. Téléchargez l’application La Crosse ViewMC (App Store ou Google Play).
5. Suivez les instructions de notre vidéo pour connecter votre station à l’applications :
bit.ly/LaCrosseView_Support_Vid_01_1 bit.ly/LaCrosseView_Support_Vid_01_2
6. Installez vos capteurs dans des endroits appropriés.
MISE EN GARDE :
1. Cet appareil contient une pile de téléphone bouton.
2. Si cette pile est ingérée, elle peut causer de graves blessures et entraîner la mort en 2
heures seulement.
3. Consultez un médecin immédiatement.
ATTENTION : GARDEZ LES PILES HORS DE LA PORTÉE DES ENFANTS
1. Les piles ingérées peuvent causer de graves blessures – voire la mort – en 2 heures
seulement, en raison de brûlures chimiques et d’une possible perforation de l’œsophage.
2. Si vous pensez que votre enfant a pu avaler une pile bouton ou l’insérer dans une partie
de son corps, consultez d’urgence un médecin.
3. Examinez vos appareils et assurez-vous que les compartiments des piles sont bien fermés –
c’est-à-dire que les vis ou autres mécanismes de fermeture sont bien fixés et bien en place.
4. N’utilisez pas l’appareil si le compartiment des piles ne ferme pas bien.
5. Jetez immédiatement – et de façon sécuritaire – les piles boutons usagées. Les piles usagées
peuvent encore représenter un danger.
6. Parlez à ceux qui vous entourent du risque que représentent les piles boutons et de la manière
dont ils peuvent protéger leurs enfants.
WI-FI WIND & WEATHER STATION Page | 3
Page 40

CONSEILS PRATIQUES D’INSTALLATION
VITESSE DU VENT
• Assurez-vous d’installer le capteur à la verticale. Un toit sans obstructions constitue un endroit
idéal.
• Votre anémomètre devrait être l’objet le plus haut de la région afin d’éviter des valeurs de vitesse
du vent duites.
TEMPÉRATURE ET HUMIDITÉ
• Installez le capteur à l’écart de la lumière directe du soleil et assurez-vous qu’il est bien ventilé.
• Pour des résultats optimaux, nous recommandons de l’installer sur un mur faisant face au nord,
sous un avant-toit ou une terrasse.
ICÔNES DE LA STATION MÉTÉO
WIND
DIRECTIO N
SPEED
MPH
Flèches de tendance
de température
MPH / KMH
Milles ou
kilomètres
20 25+
PRESSURE
Voyants de
prévisions
Flèches de
tendance de
Fahrenheit
ou Celsius
Voyant d’atténuation
automatique de
l’éclairage
INHG / HPA
Pouces de
mercure ou
hectopascals
Voyant de
pile faible
Pourcentage
d’humidité
Voyant
Internet
Voyant du
Voyant
d’alerte
Réception
des capteurs
10 2 3 4 5 6 7 8 9 10 15
12 HR
Prévisions12
heures
Probabilité de
précipitations
pression
WI-FI WIND & WEATHER STATION Page | 4
Wi-Fi
Page 41

ICÔNES DE LA FENÊTRE D’AJOUT DE CAPTEURS :
• La fenêtre d’achage « Extra Sensor » (capteur additionnel) de votre station achera par
défaut la Pression quand vous mettrez l’appareil en marche pour la première fois.
• Si vous décidez d’ajouter des capteurs, le voyant « Sensor Reception » (réception des
capteurs) s’achera dans le coin supérieur gauche même si la lecture de la pression ou des
capteurs est achée.
• Pressez puis relâchez le bouton « EXTRA (additionnel) pour voir tout autre capteur.
PRESSURE
INHG
INHG / HPA
Pouces de mercure
ou hectopascals
Voyant de
pile faible
Réception
des capteurs
Lecture de la
sonde
EXTRA SENSOR
Flèches de ten-
dance de pression
Défilement
automatique Pression/
capteurs
CONNEXION À L’APPLICATION LA CROSSE VIEW
EXIGENCES LIÉES À L’APPAREIL MOBILE
Exigences relatives à iOS :
Appareil mobile avec iOS et service cellulaire ou Wi-Fi
Exigences relatives à Android :
Appareil mobile avec Android OS et service cellulaire ou Wi-Fi
PRÉPAREZ VOTRE STATION
Assurez-vous que le voyant Wi-Fi de votre station clignote. Dans le cas
contraire, appuyez et maintenez enfoncés ensemble les boutons (+) et (–)
jusqu’à ce que le voyant se mette à clignoter. À ce moment, votre station
sera prête pour la connexion.
WI-FI WIND & WEATHER STATION Page | 5
Page 42

TÉLÉCHARGEZ
Rendez-vous sur l’App Store ou sur Google Play pour télécharger
gratuitement l’application La Crosse View sur votre appareil mobile.
LANCEZ L’APPLICATION ET SUIVEZ LES INSTRUCTIONS
Lancez l’application La Crosse View et suivez les instructions qui
s’afficheront à l’écran.
LA CONNEXION VOUS DONNE DES PROBLÈMES?
Assurez-vous que votre appareil mobile est branché au réseau sans fil 2,4 GHZ de votre
routeur et que vous avez correctement entré votre mot de passe Wi-Fi.
Pour obtenir d’autres conseils de dépannage et du soutien, visitez :
www.lacrossetechnology.com/lacrosseviewsupport
• Le numéro d’identification de votre station se trouve au dos de l’écran.
• Dans les 15 minutes suivant la connexion de votre station à l’application La Crosse View,
vous devriez recevoir des notifications visant l’ajout de capteurs. Vous trouverez ces
notifications dans la section « Notification Center » (Centre des notifications) de votre
application.
Numéro d’identification
WI-FI WIND & WEATHER STATION Page | 6
Page 43

Vous saurez qu’il est temps d’ajouter vos capteurs quand le nuage sur votre application
devient rouge. Appuyez sur cette icône de nuage pour ajouter vos capteurs.
WI-FI WIND & WEATHER STATION Page | 7
Page 44

AVANTAGES DE LA CONNEXION À LA CROSSE
Restez connecté à la maison en tout temps, de partout.
FONCTION AVEC CONNEXIONSANS CONNEXION
Vitesse du vent
Direction du vent (Internet)
Températures intérieure et extérieure
Température ressentie
Humidité intérieure et extérieure
Prévision sur 12 heures
Pression barométrique
Heure et calendrier Internet
Icônes de prévisions détaillées
Maximums (HI) et minimums
% de probabilité de précipitations
Capacité d’ajouter des capteurs
Transmission de données en continu
(LO) prévus
Suivi à distance
Réglage des alertes
Graphiques
WI-FI WIND & WEATHER STATION Page | 8
Page 45

FONCTIONS AMÉLIORÉES DE LA CONNEXION LACROSSE VIEW
• Icônes de prévisions détaillées et de probabilité de précipitations (Prévisions sur 12 heures)
• Prévisions AccuWeather quotidiennes et horaires
• Maximums et minimums (HI/LO) de température AccuWeather
• Direction du vent AccuWeather
• Transmission personnalisée des données en continue
PRÉVISIONS DÉTAILLÉES ET PROBABILITÉS DE PRÉCIPITATIONS
ENSOLEILLÉ NUAGEUXPARTIELLEMENT ENSOLEILLÉ
12 HR
FORECAST
PLUIE LÉGÈRE ORAGEPLUIE
12 HR
FORECAST
12 HR
12 HR
FORECAST
FORECAST
12 HR
12 HR
FORECAST
FORECAST
WI-FI WIND & WEATHER STATION Page | 9
Page 46

NEIGE LÉGÈRE MÉLANGE NEIGE/PLUIENEIGE
12 HR
FORECAST
12 HR
FORECAST
12 HR
FORECAST
12 HR
FORECAST
12 HR
FORECAST
12 HR
FORECAST
ICE
FOG
PRÉVISIONS QUOTIDIENNES ACCUWEATHER
Appuyez sur le bouton « JOUR » (quotidiennes) pour voir les prévisions météorologiques pour
chacun des 7 prochains jours. Vous verrez changer les icônes de prévisions et les lectures de
températures maximums et minimums (HI/LO).
IMPORTANT : Après l’achage des prévisions quotidiennes, l’écran reviendra
automatiquement – après 10 secondes – à l’achage par défaut des prévisions sur 12 heures.
VENT BROUILLARDGLACE
FORECAST12 HR
2025+
10 2 3 4 5 6 7 8 9 10 15
WI-FI WIND & WEATHER STATION Page | 10
FORECAST12 HR
2025+
10 2 3 4 5 6 7 8 9 10 15
Page 47

PRÉVISIONS HORAIRES ACCUWEATHER
Appuyez sur le bouton « HOURLY » (horaires), sur le côté de la station, pour voir les prévisions
pour chacune des 12 prochaines heures. Vous verrez changer d’heure en heure :
• les icônes de température
• les probabilités de précipitations
• la température
• la direction du vent
IMPORTANT : Après l’achage des prévisions horaires, l’écran reviendra automatiquement –
après 10 secondes – à l’achage par défaut des prévisions sur 12 heures.
FORECAST12 HR
WIND
DIRECTIO N
FORECAST12 HR
WIND
DIRECTIO N
10 2 3 4 5 6 7 8 9 10 15
2025+
10 2 3 4 5 6 7 8 9 10 15
2025+
Remarque : Si vous appuyez sur les boutons « HEURE » ou « JOUR » quand la station n’est
pas connectée au Wi-Fi, vous verrez apparaître le message « CONNECT TO WIFI » (Connectez-vous au Wi-Fi). Si votre station est connectée mais que la connexion avec le service météo
est perdue, vous verrez le message « WAIT FOR WEATHER » (Attendez le service météo).
IMPORTANT:
Il peut y avoir de légères différences entre les données affichées par votre station et les
données affichées sur d’autres services AccuWeather, par exemple sur le site Web ou
l’application mobile. Cela se produit couramment, puisque les différents appareils reçoivent
les données météorologiques à différents moments. Nos stations météo connectées
reçoivent des prévisions mises à jour au moins 4 fois par jour.
WI-FI WIND & WEATHER STATION Page | 11
Page 48

MAXIMUMS ET MINIMUMS (HI/LO) DE TEMPÉRATURE ACCUWEATHER
TODAY » (aujourd’hui) s’ache
Le voyant Internet s’ache dans le coin inférieur droit
quand la station est connectée.
• Lorsque la station est connectée, vos maximums et minimums (HI/LO) de température
AccuWeather prévus pour la journée s’achent dans cette section.
• Lorsque la station n’est pas connectée, cette section ache vos lectures de températures
extérieures enregistrées quotidiennement par votre capteur de température et d’humidité.
Ces données sont automatiquement remises à zéro à minuit chaque jour.
DIRECTION DU VENT ACCUWEATHER
WIND
MP H
DIRECTIO N
Le voyant Internet s’ache et la direction du
vent remplace l’inscription « Top 1HR »
SPEED
10 2 3 4 5 6 7 8 9 10 15
20 25+
WI-FI WIND & WEATHER STATION Page | 12
Page 49

TRANSMISSION EN CONTINU PERSONNALISÉE
Utilisez le menu « Data Stream » (transmission en continu) de l’application La Crosse ViewMC
pour choisir jusqu’à 3 types de données à recevoir en continu sur votre station.
1. Lancez l’application La Crosse ViewMC et trouvez la page de votre station.
2. Faites défiler le menu jusqu’à la section « Data Stream » et appuyez sur l’icône bleue de
transmission en continu, qui se trouve dans le coin supérieur droit.
3. Suivez les directives pour personnaliser votre transmission en continu des données à
acher sur votre station.
Remarque : Prévoyez jusqu’à 10 minutes avant de voir apparaître sur votre station vos
nouveaux choix de transmission en continu.
Transmission en continu personnalisée
Données à transmission en continu :
Transmission en continu personnalisée pour optimiser vos prévisions :
• Vitesse du vent • Direction du vent • Rafale de vent • Indice UV • Visibilité • Point de rosée
• Pourcentage de nuages • Heure du lever du soleil • Heure du coucher du soleil
• Heures d’ensoleillement • Heure du lever de la lune • Heure du coucher de la lune
• Température/humidité • et plus encore!
Messages personnels
Entrez jusqu’à 20 caractères pour un événement spécial ou un rappel, par exemple :
• SOCCER CE SOIR • GLACE AU CONGÉLATEUR • BRAVO POUR TEST MATH ou tout autre
message!
Remarque : Prévoyez jusqu’à 10 minutes avant de voir apparaître sur votre station vos
nouveaux choix de transmission en continu.
WI-FI WIND & WEATHER STATION Page | 13
Page 50

AJOUT DE CAPTEURS À VOTRE APPLICATION
Comment ajouter des capteurs à votre application La Crosse View :
1. Installez des piles dans le capteur. S’il est muni d’un bouton TX, pressez-le pour forcer un
signal de transmission.
2. Scannez le code à barres d’identification du capteur afin qu’il soit lu par l’application
La Crosse View.
Information détaillée : Lancez votre application La Crosse View pour ajouter des capteurs.
Regardez la vidéo pour ajouter des appareils à l’application La Crosse View :
bit.ly/LaCrosseView_Support_Vid_10
1. Dans le menu principal, sélectionnez « Devices » (appareils) sous « Add/Edit » (ajouter/
modifier).
2. Sur la page « Edit Devices » (modifier appareils), sélectionnez « ADD DEVICE »
(ajouter appareil).
3. Scannez l’identification de l’appareil – Scannez le code à barres de votre capteur ou
sélectionnez « ADD MANUALLY » (ajouter manuellement) et tapez le numéro du code à
barres. Sélectionnez « CONTINUE » (continuer).
4. Sur la page « Confirm Device » (confirmer appareil), confirmer l’image du capteur et
sélectionnez « YES » (oui).
5. Sur la page « Enter Device and Location Name », entrez le nom de l’appareil et choisissez un
endroit, ou entrez le nom de l’endroit pour votre capteur. Sélectionnez « DONE » (fini).
Répétez les étapes 1 à 5 pour chaque capteur additionnel que vous souhaitez ajouter.
WI-FI WIND & WEATHER STATION Page | 14
Page 51

MESSAGES D’ÉTAT PENDANT LA CONNEXION
Conseils pratiques :
• L’icône du Wi-Fi indique la connexion Wi-Fi, mais pas nécessairement la connexion à l’application.
• Les icônes Internet dans les fenêtres « Forecast » (prévisions), « Wind Direction » (direction du vent)
et « HI/LO » (maximum et minimum de température) indiquent la connexion à l’application La Crosse View
et au serveur météo.
Des messages sur votre station vous indiqueront s’il y a un problème. Pressez et relâchez le bouton « SET »
(réglages) pour voir l’état de votre station.
BONNE CONNEXION
• La connexion est complète entre la station et l’application La Crosse
View.
VÉRIFIEZ L’APPLICATION
• La connexion entre le Wi-Fi et le routeur est bonne.
• Vérifiez votre connexion à l’application La Crosse View.
• Vérifiez les notifications dans l’application La Crosse View.
• Y a-t-il une mise à jour à faire?
PERTE DU WIFI
• Vérifiez si le cordon d’alimentation est bien branché (le
branchement par cordon d’alimentation est requis.)
• Avant d’essayer de rétablir la connexion Wi-Fi de la station,
assurez-vous que votre appareil mobile est branché sur le même
réseau 2,4 GHz que vous utilisez pour votre station.
• Vérifiez votre connexion réseau.
• Maintenez les boutons + et – enfoncés ensemble pendant 3
secondes pour rechercher le Wi-Fi.
PAS DE SERVICE MÉTÉO
• Le Wi-Fi et l’application fonctionnent bien.
• Le service météo/heure n’a pas de connexion. Ce problème sera
réglé au serveur météo. Veuillez patienter.
• Les prévisions météo, les probabilités de précipitations et
les températures maximum et minimum (HI/LO) d’Internet ne
s’acheront pas.
WI-FI WIND & WEATHER STATION Page | 15
WIND
SPEE D
10 2 3 4 5 6 7 8 9 10 15
WIND
SPEE D
10 2 3 4 5 6 7 8 9 10 15
WIND
SPEE D
10 2 3 4 5 6 7 8 9 10 15
EXTR A SENSOR
WIND
SPEE D
10 2 3 4 5 6 7 8 9 10 15
EXTR A SENSOR
DIRECTIO N
MPH
PRESSUR E
DIRECTIO N
MPH
PRESSURE
DIRECTION
MPH
DIRECTIO N
MPH
2025+
2025+
1
HR
2025+
1
HR
2025+
Page 52

FONCTIONS DES BOUTONS
Boutons situés sur le dessus de la station météo.
Boutons situés sur le côté droit de la station météo.
ALERTES Pressez pour accéder au mode de réglage des alertes.
VENT, TEMP Pressez pour voir l’historique.
+ OU Utilisez + ou – pour changer les réglages.
+ET Tenez les deux boutons pour accéder au Wi-Fi.
RÉGLAGE Pressez pour accéder aux réglages de base. Pressez pour voir l’état du Wi-Fi.
EXTRA
CAPTEUR
LUMIÈRE
ALERTES ET LUMIÈRE
JOUR, HEURE Pressez pour voir les prévisions. Connexion au Wi-Fi nécessaire.
Pressez pour alterner entre additionnels et Pression barométrique. Tenez pour ajouter des
capteurs.
Pressez pour voir les numéros d’identification des capteurs, puis maintenez enfoncé (+) pour
chercher, ou (–) pour enlever.
Pressez pour régler l’intensité lumineuse. Maintenez enfoncé pour régler la fonction
d’atténuation automatique de la luminosité.
Maintenez les deux boutons enfoncés pour réinitialiser les numéros de tous les capteurs et les
réglages du Wi-Fi.
RÉTROÉCLAIRAGE RÉGLABLE
Votre station a 5 niveaux d’intensité du rétroéclairage :
• Pressez et relâchez le bouton « LIGHT » (éclairage) pour régler l’intensité du rétroéclairage à
l’un de ces 5 niveaux : OFF = 0 % | level 1 = 1,5 % | level 2 = 20 % | level 3 = 50 % |
level 4 = 100 %.
WI-FI WIND & WEATHER STATION Page | 16
Page 53

ATTÉNUATION AUTOMATIQUE DU RÉTROÉCLAIRAGE
Vous pouvez régler votre rétroéclairage de sorte qu’il s’atténue automatiquement au niveau 1 (level 1) à une
heure préréglée (au moment de dormir, par exemple), et qu’il revienne automatiquement à son intensité
normale à votre réveil.
Réglage de la fonction d’atténuation automatique (Heure seulement) :
1. Maintenez enfoncé le bouton « LUMIÈRE » (éclairage) pendant 2 secondes pour accéder au mode de
réglage de l’atténuation de l’éclairage. L’indication « AUTO DIM OFF » s’achera.
2. Pressez les boutons + ou – pour actionner (ON) la fonction d’atténuation de l’éclairage. L’indication
«AUTO DIM ON » s’achera.
3. Pressez le bouton « LUMIÈRE » (éclairage) pour régler l’heure à laquelle la fonction d’atténuation de
l’éclairage sera actionnée. L’indication « AUTO DIM START TIME » et l’heure clignoteront.
4. Pressez les boutons + ou – pour changer l’heure à laquelle l’éclairage diminuera.
5. Pressez le bouton « LUMIÈRE » (éclairage) pour régler l’heure du début de l’éclairage fort. L’indication
«AUTO DIM STOP TIME » et l’heure clignoteront.
6. Pressez les boutons + ou – pour changer l’heure à laquelle l’éclairage sera fort.
7. Pressez le bouton « LIGHT » (éclairage) pour confirmer la sortie du mode de réglage.
Remarque : En tout temps, vous pouvez maintenir enfoncé le bouton « LIGHT » (éclairage) pour quitter le
mode de réglage de l’atténuation de l’éclairage.
10 2 3 4 5 6 7 8 9 10 15
10 2 3 4 5 6 7 8 9 10 15
2025+
2025+
10 2 3 4 5 6 7 8 9 10 15
10 2 3 4 5 6 7 8 9 10 15
2025+
2025+
Remarque : Si vous pressez le bouton « LIGHT » (éclairage) pour régler manuellement le rétroéclairage, la
fonction d’atténuation automatique sera activée de nouveau à l’heure préréglée de la prochaine diminution
de l’éclairage.
WI-FI WIND & WEATHER STATION Page | 17
Page 54

MENU DES RÉGLAGES
1. Maintenez le bouton « SET » (réglages) enfoncé pendant 3 secondes pour entrer dans le menu des
réglages.
2. Pressez et relâchez les boutons + ou – pour régler les valeurs qui clignotent. Maintenez-les enfoncés
pour un réglage rapide.
3. Pressez et relâchez le bouton « SET » (réglages) pour confirmer votre choix et passer au prochain
réglage.
Remarque : En tout temps, vous pouvez presser et relâcher le bouton « LUMIÈRE » (éclairage) pour quitter
le menu des réglages.
Ordre du menu des réglages :
• SIGNAL SONORE ACTIVÉ /DÉSACTIVÉ (ON |
OFF)
10 2 3 4 5 6 7 8 9 10 15
2025+
• Achage de l’heure sur 12 ou 24 heures
2025+
• Heures
10 2 3 4 5 6 7 8 9 10 15
• Minutes
• Année
2025+
• Mois
10 2 3 4 5 6 7 8 9 10 15
• Jour
• Température (Fahrenheit | Celsius)
2025+
• Pression : InHg / hPa
10 2 3 4 5 6 7 8 9 10 15
• Valeur de pression
Remarque : Le jour de la semaine est
automatiquement réglé par le réglage de l’année,
du mois et du jour.
10 2 3 4 5 6 7 8 9 10 15
2025+
PRESSURE
INHG
WI-FI WIND & WEATHER STATION Page | 18
10 2 3 4 5 6 7 8 9 10 15
10 2 3 4 5 6 7 8 9 10 15
10 2 3 4 5 6 7 8 9 10 15
10 2 3 4 5 6 7 8 9 10 15
10 2 3 4 5 6 7 8 9 10 15
2025+
2025+
2025+
2025+
2025+
PRESSURE
INHG
Page 55

FENÊTRE D’AJOUT DE CAPTEURS
La fenêtre d’achage « Extra Sensor » (capteur additionnel) de votre station achera la Pression relative
quand vous mettrez l’appareil en marche pour la première fois.
Le voyant « Sensor Reception » (réception des capteurs) s’achent quand des capteurs additionnels sont
connectés.
Remarque : Lorsqu’on la met en marche, la station cherche le signal des capteurs additionnels.
Capteurs additionnels (facultatifs) : La fenêtre d’achage « EXTRA SENSOR » (capteur additionnel) peut
acher les données provenant d’un maximum de 4 capteurs additionnels – de température et d’humidité,
de vitesse du vent, de pluie, de fuite d’eau, ou d’une combinaison de ces capteurs. Il sut de presser puis
de relâcher le bouton « EXTRA» pour voir les données de ces capteurs ou d’activer la fonction de
défilement automatique.
Remarque : La station n’ache pas nécessaire le signal de tous les capteurs. Consultez le site Web pour
vérifier si le signal d’un capteur peut s’acher sur l’application uniquement, ou sur la station comme sur
l’application.
Pression relative (defaut)
PRESSURE
INHG
Fuite d’eau
EXTRA SENSOR
Défilement automatique de
tous les capteurs additionnels
EXTRA SENSOR
Pluie sur 24 h
EXTRA SENSOR
24 HR
Ajout de capteurs additionnels à votre :
Température/Humidité
Lecture
de la
sonde
Sonde à contact
EXTRA SENSOR
1. Maintenez le bouton « EXTRA (capteur additionnel) enfoncé pendant 3 secondes pour ajouter un capteur
à la station.
2. Installez les piles dans le capteur. Si le capteur est muni d’un bouton TX, pressez-le pour forcer un signal
de transmission.
3. Il peut s’écouler jusqu’à 3 minutes avant de voir s’afficher le capteur et son numéro d’identification sur la
station.
WI-FI WIND & WEATHER STATION Page | 19
Page 56

Remarque : Une fois que le signal du capteur a été trouvé, la recherche s’arrête. L’affichage indiquera le
capteur, son numéro d’identification et son type pendant 3 secondes, puis reviendra à la normale.
4. Scannez le code à barres d’identification du capteur afin qu’il soit lu par l’application La Crosse View.
5. Les données des capteurs additionnels s’affichent dans la fenêtre d’affichage « Extra Sensor » (capteur
additionnel) de la station.
Voyant
Bouton
TX
DEL
-
+
AA
AA
+
-
Achage normal de la station -Pression achée
Code à barres
d’identification du
capteur
WIND
SPEED
10 2 3 4 5 6 7 8 9 10 15
Capteur de température et d’humidité ajouté
DIRECTION
MPH
2025+
PRESSURE
10 2 3 4 5 6 7 8 9 10 15
EXTR A SENSOR
Retrait de capteurs additionnels de la station :
1. Pressez et relâchez le bouton « EXTRA» (additionnel) jusqu’à ce que s’affichent le capteur et le numéro
d’identification que vous souhaitez effacer.
2.Maintenez enfoncé le bouton (-) pendant 3 secondes pour effacer ce capteur. Des tirets apparaîtront au l
ieu des données et du numéro d’identification du capteur.
3. Le capteur ne s’affichera plus dans la fenêtre « Extra Sensor ».
2025+
EXTRA SENSOR
EXTRA SENSOR
Pressez et relâchez le bouton « EXTRA (additionnel) pour voir s’acher la Pression, ainsi que tout capteur
additionnel connecté à votre station.
IMPORTANT : La fenêtre d’achage « Extra Sensor » (capteur additionnel) n’indique pas l’historique des
données; seulement les données courantes.
WI-FI WIND & WEATHER STATION Page | 20
Page 57

MESURE ET HISTORIQUE DE LA VITESSE DU VENT
Vitesse actuelle : la plus grande vitesse mesurée dans les 31 dernières secondes. Échantillonnage toutes
les 3 secondes
Top Speed (Vitesse de pointe du vent - 1 HR) : la plus grande vitesse mesurée dans les 60 dernières
minutes.
Direction du vent : Quand la station est connectée, la direction du vent (en lettres) remplace l’indication «
Top 1HR » (vitesse de pointe du vent dans la dernière heure). Vous pourrez voir cette information dans
l’historique. Le voyant Internet s’achera à côté des lettres indiquant la direction du vent.
Sans connexion : vitesses
courante et de pointe
WIND
SPEED
TOP
1
HR
MPH
WIND
DIRECTIO N
SPEED
MPH
Avec connexion : vitesse
courante et direction
du vent ( Internet)
10 2 3 4 5 6 7 8 9 10 15
20 25+
10 2 3 4 5 6 7 8 9 10 15
20 25+
Historique de la vitesse du vent :
1. Appuyez sur le bouton « WIND » (vent) pour voir les plus grandes vitesses du vent enregistrées.
2. Quand vous consultez l’historique par mois (MONTH), pressez le bouton + pour alterner entre la vitesse
de pointe du mois courant et celle des 11 mois passés.
Remarque : Toutes les autres données disparaîtront pendant 5 secondes.
1 Hour (1 heure) : la plus grande vitesse du vent mesurée dans les 60 dernières minutes.
24 Hours (24 heures) : la plus grande vitesse du vent mesurée dans les 24 dernières heures, suivant le
dernier enregistrement, avec indication de l’heure et de la date. C’est un total cumulatif.
7 Days (7 jours) : la plus grande vitesse du vent mesurée dans les 7 derniers jours, suivant le dernier
enregistrement, avec indication de l’heure et de la date. C’est un total cumulatif.
Month (mois) : la plus grande vitesse du vent mesurée dans le dernier mois, avec indication de l’heure et
de la date
o Mois courant : du premier jour au jour actuel.
o 11 mois précédents. Défini par les mois du calendrier, par exemple du 1er janvier au 31 janvier
WI-FI WIND & WEATHER STATION Page | 21
Page 58

Year (année) : la plus grande vitesse du vent mesurée dans la dernière année, selon le calendrier de
l’année civile, c’est-à-dire du 1er janvier au 31 décembre. Vitesse de pointe pour l’année enregistrée avec
indication de l’heure et de la date.
WIND
10 2 3 4 5 6 7 8 9 10 15
TOP
1
HR
MPH
2025+
WIND
10 2 3 4 5 6 7 8 9 10 15
SPEED
WIND
DIRECTIO N
MP H
TOP
MPH
2025+
WIND
20 25+
DIRECTIO N
WIND
10 2 3 4 5 6 7 8 9 10 15
TOP
MPH
2025+
WIND
10 2 3 4 5 6 7 8 9 10 15
10 2 3 4 5 6 7 8 9 10 15
Graphique de vitesse du
TOP
vent à 16 km/h (10 mi/h)
MPH
2025+
SPEED
MP H
WIND
TOP
20 25+
10 2 3 4 5 6 7 8 9 10 15
MPH
2025+
10 2 3 4 5 6 7 8 9 10 15
Graphique de vitesse du
vent à 45 km/h (28 mi/h)
Réinitialisation de l’historique de la vitesse du vent :
1. Appuyez sur le bouton « WIND » (vent) pour voir les mesures individuelles de la vitesse du vent.
2. Appuyez sur le bouton « - » pendant 5 secondes pour réinitialiser chaque valeur individuelle.
3. La mesure de la vitesse du vent sera réinitialisée à la vitesse actuelle du vent, avec l’heure et la date.
Graphique de la vitesse du vent
• Le graphique de la vitesse du vent (Wind Speed graph) se colorera pour donner une représentation de
la vitesse du vent.
• Si la vitesse du vent dépasse les 40 km/h (25 mi/h), le graphique est entièrement coloré.
WI-FI WIND & WEATHER STATION Page | 22
Page 59

MESURES DE TEMPÉRATURE ET D’HUMIDITÉ ET
ENREGISTREMENT DES MAXIMUS ET MINIMUMS
Votre station météo ache en tout temps la température et l’humidité intérieures et extérieures courantes.
La station enregistre aussi les maximums et les minimums de température et d’humidité, ainsi que l’heure
et la date à laquelle ils ont été mesurés.
1.Pressez et relâchez le bouton « TEMP » pour voir vos maximums (HI) et minimums (LO) enregistrés, ainsi
que l’heure et la date à laquelle ils ont été mesurés.
2. Tout nouveau maximum ou minimum remplace la valeur enregistrée précédemment.
Ordre d’achage :
• Maximum (HI) de température extérieure avec heure/date
• Minimum (LO) de température extérieure avec heure/date
10 2 3 4 5 6 7 8 9 10 15
2025+
• Maximum (HI) d’humidité extérieure avec heure/date
• Minimum (LO) d’humidité extérieure avec heure/date
• Maximum (HI) de température intérieure avec heure/date
HUMIDITY
LEVEL
10 2 3 4 5 6 7 8 9 10 15
HUMIDITY
LEVEL
2025+
• Minimum (LO) de température intérieure avec heure/date
• Maximum (HI) d’humidité intérieure avec heure/date
• Minimum (LO) d’humidité intérieure avec heure/date
10 2 3 4 5 6 7 8 9 10 15
2025+
• Maximum (HI) de température ressentie avec heure/date
• Minimum (LO) de température ressentie avec heure/date
• Point de rosée extérieur
Réinitialisation des maximums et minimums de température et
d’humidité enregistrés :
10 2 3 4 5 6 7 8 9 10 15
2025+
1. Pressez et relâchez le bouton « TEMP » pour voir les mesures
2025+
individuelles de températures et d’humidité.
10 2 3 4 5 6 7 8 9 10 15
2. Maintenez enfoncé le bouton (-) pendant cinq secondes pour
réinitialiser chaque valeur individuelle.
3. Les mesures de température et d’humidité seront
10 2 3 4 5 6 7 8 9 10 15
2025+
réinitialisées aux données actuelles de température,
d’humidité, ainsi qu’à l’heure et à la date courantes.
WI-FI WIND & WEATHER STATION Page | 23
10 2 3 4 5 6 7 8 9 10 15
10 2 3 4 5 6 7 8 9 10 15
10 2 3 4 5 6 7 8 9 10 15
10 2 3 4 5 6 7 8 9 10 15
10 2 3 4 5 6 7 8 9 10 15
2025+
2025+
2025+
2025+
2025+
Page 60

ALERTES
Réglage des alertes :
1. Appuyez sur le bouton « ALERTS » pendant 3 secondes pour accéder au mode de réglage des alertes.
• Activation de l’alerte (ON) :
1. Appuyez sur les boutons + ou - pour activer l’alerte (ON).
2. Appuyez sur le bouton « ALERTS » : la valeur de l’alerte clignotera.
3. Appuyez sur les boutons + ou - pour régler la valeur (maintenez-les enfoncés pour un réglage
rapide).
4. Appuyez sur le bouton « ALERTS » pour passer au réglage de l’alerte suivante.
• Désactivation d’une alerte (OFF) :
1. Les alertes sont désactivées (OFF), à moins qu’on ne les ait activées.
2. Si vous ne souhaitez pas régler une alerte, il suffit d’appuyer de nouveau sur le bouton « ALERTS
» pour passer à l’alerte suivante.
Ordre de réglage des alertes :
• Vitesse de vent fort
• Température extérieure basse
• Température extérieure élevée
• Humidité extérieure basse
• Humidité extérieure élevée
• Température intérieure basse
• Température intérieure élevée
• Humidité intérieure basse
• Humidité intérieure élevée
WI-FI WIND & WEATHER STATION Page | 24
Page 61

Alerte active :
• Lorsque la valeur d’une alerte activée est atteinte, la station émet 5 bips par minute, jusqu’à ce que la
mesure relative à cette alerte ne soit plus dans la plage d’alerte.
• L’icône d’alerte qui clignote indique s’il s’agit d’une alerte de valeur basse (LO) ou élevée (HI).
• Appuyez sur n’importe quel bouton pour arrêter l’alerte sonore. L’icône d’alerte clignote tant que la
mesure relative à cette alerte est dans la plage d’alerte.
WIND
SPEED
10 2 3 4 5 6 7 8 9 10 15
2025+
WIND
SPEED
10 2 3 4 5 6 7 8 9 10 15
MPH
HUMIDITY
LEVEL
2025+
10 2 3 4 5 6 7 8 9 10 15
HUMIDITY
LEVEL
2025+
10 2 3 4 5 6 7 8 9 10 15
2025+
10 2 3 4 5 6 7 8 9 10 15
10 2 3 4 5 6 7 8 9 10 15
10 2 3 4 5 6 7 8 9 10 15
10 2 3 4 5 6 7 8 9 10 15
2025+
2025+
2025+
2025+
10 2 3 4 5 6 7 8 9 10 15
10 2 3 4 5 6 7 8 9 10 15
10 2 3 4 5 6 7 8 9 10 15
10 2 3 4 5 6 7 8 9 10 15
2025+
2025+
2025+
HUMIDITY
LEVEL
2025+
10 2 3 4 5 6 7 8 9 10 15
10 2 3 4 5 6 7 8 9 10 15
10 2 3 4 5 6 7 8 9 10 15
HUMIDITY
LEVEL
2025+
2025+
2025+
10 2 3 4 5 6 7 8 9 10 15
10 2 3 4 5 6 7 8 9 10 15
10 2 3 4 5 6 7 8 9 10 15
WI-FI WIND & WEATHER STATION Page | 25
2025+
2025+
2025+
Page 62

TEMPÉRATURE RESSENTIE
La température ressentie (« Feels Like ») est une combinaison de la
température extérieure, de l’humidité et de la vitesse du vent. Elle s’ache
dans la fenêtre de température extérieure (« Outdoor »).
• Lorsque la température extérieure est supérieure à 27 °C (80 ˚F), l’écran
indique l’indice de chaleur.
• Lorsque la température extérieure est inférieure à 10 °C (50 ˚F), l’écran
indique le refroidissement éolien.
• Quand la température extérieure se situe entre 10 °C et 27 °C
(50 ˚F et 80 ˚F), l’écran indique la température extérieure actuelle.
Remarque : Si l’humidité est élevée mais que la température ne dépasse
pas 27 °C (80 °F), la température ressentie indiquée sera la même que la
température extérieure actuelle.
FLÈCHES DE TENDANCE DE LA TEMPÉRATURE
Les flèches de tendance de la température et de l’humidité extérieures sont actualisées toutes les
15 minutes. Ces flèches reflètent les changements au cours de la dernière heure.
VERS LE HAUT : Cette flèche apparaît lorsque la température monte de 1 °C (2 °F) ou plus
pendant ’heure en cours.
VERS LA DROITE : La température est stable.
VERS LE BAS : Cette flèche apparaît lorsque la température baisse de 1 °C (2 °F) ou plus
pendant l’heure en cours.
WI-FI WIND & WEATHER STATION Page | 26
Page 63

MESURES DE PRESSION RELATIVE
• Votre station est équipée d’un capteur de pression qui mesure précisément la pression relative.
• La station indique par défaut une pression relative de 29,92 pouces de mercure.
• Prévoyez jusqu’à 3 jours pour que la station s’adapte automatiquement à votre environnement.
• La valeur de la pression relative peut être programmée dans le menu « Settings » (réglages).
• Dans le menu « Settings » (réglages), vous pouvez choisir entre les unités INHG (pouces de
mercure) ou HPA (hectopascal) pour indiquer la pression.
• Les flèches pointant VEURS LE HAUT et VERS LE BAS indiquent la tendance de la pression (à la
hausse ou à la baisse). Cette tendance se calcule par la comparaison de la valeur moyenne de la
pression barométrique pendant l’heure en cours et de la valeur moyenne des 3 dernières heures.
Si la diérence est supérieure à +1 hPa, la tendance de la pression atmosphérique est à la hausse;
si la diérence est inférieure à -1 hPa, la tendance de la pression atmosphérique est à la baisse; si
la valeur se situe entre +1 et -1 hPa, la pression est stable.
Appuyez sur le bouton « EXTRA (additionnel) pour alterner entre l’achage des données de l’un ou
l’autre des capteurs additionnels ou celui de la pression relative.
PRESSURE
INHG
EXTRA SENSOR
VOYANTS DE RÉCEPTION DES CAPTEURS
Votre station est équipée de voyants de réception des capteurs pour les capteurs de température
et d’humidité et pour l’anémomètre.
• Quand le voyant ne clignote pas, le capteur est connecté.
• Quand le voyant clignote, la station recherche le signal du capteur.
• S’il n’y a pas de voyant, le capteur n’est pas connecté.
WI-FI WIND & WEATHER STATION Page | 27
Page 64

IDENTIFICATION ET RECHERCHE DES CAPTEURS
Votre station et chacun des capteurs ont un numéro d’identification (ID) unique qui permet de les
identifier dans l’application La Crosse View. Cela a l’avantage de les entrer dans votre station météo
jusqu’à ce que vous les effaciez manuellement.
Voyez les numéros d’identification (ID) sur la station :
Pressez et relâchez le bouton « SENSOR » (capteur). Le numéro d’identification et le type du capteur
s’afficheront au bas de la station.
• Station
• Capteur de température et d’humidité
2025+
WIND
SPEED
MPH
10 2 3 4 5 6 7 8 9 10 15
10 2 3 4 5 6 7 8 9 10 15
DIRECTION
2025+
• Anémomètre
• Capteur additionnel (si connecté à la station)
Recherche de capteurs individuels :
1. Pressez et relâchez le bouton « SENSOR » (capteur) pour voir le numéro d’identification et le type
du capteur.
2. Maintenez enfoncé le bouton (+) pour rechercher le signal du capteur. Le voyant de réception
clignotera.
3. Il peut s’écouler jusqu’à 3 minutes avant que le capteur et son numéro d’identification ne
s’affichent sur la station.
Remarque : Une fois que le signal du capteur est trouvé, la recherche s’arrête. Le voyant de
réception cesse de clignoter. Le numéro d’identification du capteur s’ache pendant 3 secondes.
HUMIDITY
LEVEL
10 2 3 4 5 6 7 8 9 10 15
2025+
WI-FI WIND & WEATHER STATION Page | 28
Page 65

RETRAIT DE CAPTEURS
1. Pressez et relâchez le bouton « SENSOR » (capteur) pour voir le numéro d’identification et le type
du capteur.
2. Maintenez enfoncé le bouton (-) pour effacer le capteur de la station.
3. Les données de ce capteur ne s’afficheront plus sur la station. Retirez les piles de ce capteur.
4. La station recherchera automatiquement le signal d’un autre capteur du même type.
Exemple : Après le retrait d’un capteur de vent, la station recherchera le signal d’un nouveau
capteur de vent.
5. Si vous remplacez un capteur, insérez des piles dans le nouveau capteur. Une fois que la station
a trouvé le signal du capteur, appuyez sur le bouton « SENSOR » (capteur) pour confirmer le
numéro d’identification (ID) du capteur.
Remarque : Il est possible que le signal des capteurs effacés qui sont en état de marche et qui ont
encore leurs piles puisse encore être reçu par l’application, mais il ne s’affichera plus sur la station.
WIND
SPEED
MPH
10 2 3 4 5 6 7 8 9 10 15
DIRECTION
2025+
WIND
SPEED
MPH
10 2 3 4 5 6 7 8 9 10 15
2025+
VOYANTS DE PILE FAIBLE
• Indication « Low battery » (pile faible) à côté de « Outdoor Temperature » (température extérieure) :
remplacez les piles du capteur de température et d’humidité.
• Indication « Low battery » (pile faible) à côté de « Wind » (vent) : remplacez les piles de
l’anémomètre.
• Indication « Low battery » (pile faible) à côté de « Indoor Temperature » (température intérieure) :
remplacez les piles de la station.
• Indication « Low battery » (pile faible) à côté de « Extra Sensor » (capteur additionnel) : remplacez
les piles du capteur additionnel.
WI-FI WIND & WEATHER STATION Page | 29
Page 66

FACTORY RESTART STATION
Une réinitialisation d’usine de votre station efface tous les numéros d’identification des capteurs et
les réglages du Wi-Fi et rétablit les réglages par défaut de l’appareil avant sa mise en marche. Elle
peut régler les problèmes de connexion des capteurs ou du Wi-Fi.
1. Appuyez simultanément sur les boutons « ALERTS » et « LIGHT » pendant 5 secondes.
2. Votre station se réinitialisera et recherchera le signal des capteurs.
3. Prévoyez jusqu’à 3 minutes pour retrouver le signal de tous les capteurs.
4. Vous devrez vous connecter de nouveau à l’application La Crosse View. Pour ce faire,
sélectionnez « CONNECT WIFI » dans le menu et entrez votre mot de passe pour le Wi-Fi.
INSTALLATION DÉTAILLÉE
Anémomètre LTV-W1
1. Tournez la partie supérieure de l’anémomètre vers la gauche.
2. Installez des piles C neuves.
3. Ramenez la partie supérieure de l’anémomètre vers la droite et alignez-la soigneusement pour la
resserrer.
4. Le voyant à DEL bleu situé sur l’anémomètre clignote quand le capteur transmet.
Wind Cups
LED
Light
Twist
Left
Battery
Cover
C
C
Side Mount
Option
Screws
Knob
Mounting
pole
Mounting
Bracket
WI-FI WIND & WEATHER STATION Page | 30
Page 67

Installation :
• Placez l’anémomètre dans un endroit libre d’obstructions où il y aura le moins d’interférence
possible au vent.
• Installez l’anémomètre à la verticale, en plaçant les coupelles sur le dessus.
• La portée maximale de la transmission sans fil à la station peut atteindre 121 mètres (400 pieds) en
champ libre, sans tenir compte des murs et des arbres.
1. Fixez l’anémomètre en insérant des vis au bas du support de montage.
2. Insérez le bas de la tige de montage dans le support de montage. Serrez le bouton pour fixer la
tige.
3. Insérez la tige de montage incluse dans l’anémomètre.
4. Serrez les vis.
Autre option d’installation :
1. Insérez votre propre tige de montage – pas plus de 2,5 cm (1 po) de diamètre extérieur – dans
l’anémomètre.
2. Serrez les vis.
Capteur de température et d’humidité LTV-TH2
1. Insérez deux piles AA en respectant la polarité et remettez le
couvercle en place.
Installation :
1. Plantez un clou et enfilez le capteur dessus par le trou dans le
haut du capteur, ou encore, vissez une vis à travers ce trou.
·Pressez TX pour envoyer
un signal
·Pressez F/C pour choisir
l’affichage en Fahrenheit ou
en Celsius.
2. Installez votre capteur sur un mur faisant face au nord ou dans
tout autre endroit ombragé. Le dessous d’un avant-toit ou
d’une balustrade de terrasse est un endroit idéal.
3. La portée maximale de la transmission sans fil à la station
Trou de
montage
météo peut atteindre 121 mètres (400 pieds) en champ libre,
sans tenir compte des murs et des planchers.
4. Assurez-vous d’installer votre capteur à la verticale pour
permettre à l’humidité de s’évacuer adéquatement.
Remarque : Regardez la vidéo d’installation des capteurs :
bit.ly/TH_SensorMounting
WI-FI WIND & WEATHER STATION Page | 31
Voyant à DEL
-
+
AA
AA
+
-
Couvercle des
piles
Page 68

Station météo CA80550 :
1. Branchez le cordon d’alimentation dans une prise de courant, puis dans la station météo. Enlevez
la languette isolante du compartiment de la pile CR2032 se trouvant au bas de la station météo
pour continuer de voir l’heure et la date pendant une panne de courant.
Installation :
1. Placez votre station près d’une prise de courant. L’utilisation du cordon d’alimentation est requise
pour son fonctionnement.
2. Utilisez les trous de montage au dos de la station pour la fixer au mur.
3. Utilisez le support s’étirant vers le bas qui se trouve au dos de la station pour la placer sur un
bureau ou un comptoir.
4. Installez votre station là où la portée du Wi-Fi est adéquate pour permettre à votre routeur sans fil
d’utiliser toutes les options de contrôle à distance qu’offre l’application La Crosse View.
Pile
CR2032
Cordon
d’alimentation
WI-FI WIND & WEATHER STATION Page | 32
Page 69

JOIGNEZ-VOUS À LA CONVERSATION
Posez des questions, regardez des vidéos d’installation détaillées et faites part de vos opinions et
observations sur les réseaux sociaux!
PRÉCAUTIONS ET ENTRETIEN
• Ne combinez pas de vieilles piles avec des neuves.
• Ne combinez pas des piles alcalines, standard, au lithium ou rechargeables.
• Achetez toujours des piles de la taille et du type qui conviennent à l’usage prévu.
• Remplacez toutes les piles d’un appareil en même temps.
• Avant d’installer les piles, nettoyez-en les contacts, ainsi que ceux de l’appareil.
• Assurez-vous de respecter la polarité des piles (+ / -).
• Retirez les piles d’un appareil dont vous ne comptez pas vous servir avant longtemps.
• Enlevez les piles usagées promptement.
GARANTIE ET SOUTIEN
GARANTIE LIMITÉE :
Springfield garantit ce produit contre tout vice de main-d’œuvre ou de matière pendant une période
de un (1) an à compter de la date d’achat et réparera ou remplacera gratuitement le produit, à sa
discrétion.
Pour toute question relative à la garantie, veuillez communiquer avec Springfield Instruments, Inc. :
Téléphone : 1 844 687-4040
Courriel : info@springfieldinstruments.com Site Web : www.lacrossetechnology.com/intl
Springfield Instruments, Inc.
104, rue Barr
Saint-Laurent (Québec) H4T 1Y4
WI-FI WIND & WEATHER STATION Page | 33
Page 70

SPÉCIFICATIONS
Intérieur
Plage de températures de la CA80550 : de 0 °C à 37 °C (32 °F à 99 °F)
Plage d’humidité : de 10 % à 99 % HR
Pression relative : de 800 à 1 100 hPa (23,62 à 32,48 InHg) La pression est mesurée toutes les 12 minutes.
Capteur de température/d’humidité
Plage de températures : de -40 °C à 60 °C (-40 °F à 140 °F)
Remarque : Pour des températures inférieures à -29 °C (-20 °F), il faut installer des piles au lithium dans le capteur extérieur.
Plage d’humidité : de 10 % à 99 % HR
Portée de transmission : jusqu’à 121 mètres (400 pi) en champ libre, RF 915 MHz
Plage de vitesse du vent : de 0 à 178 km/h (0 à 111 mi/h)
Portée de transmission : jusqu’à 121 mètres (400 pi) en champ libre, RF 915 MHz
Transmission: RF 2,4 GHz
Station CA80550 : cordon d’alimentation de 5,0 V inclus (requis) - AC6 : HX06-0500600-AU-001 (100-240 V)
Alimentation auxiliaire par piles : pile CR2032 incluse; alimentation auxiliaire pour l’heure et la date
Capteur de température/d’humidité LTV-TH2 : 2 piles AA non incluses
Anémomètre LTV-W1 2 piles C non incluses
Station CA80550 : plus de 24 mois avec utilisation du cordon d’alimentation
Capteurs LTV-TH2 et LTV-W1 : plus de 24 mois si des piles de bonne qualité sont utilisées
Station CA80550 : 20,80 cm L x 2,99 cm P x 14,81 cm H (8,22 po L x 1,18 po P x 5,83 po H)
Capteur de température/d’humidité LTV-TH2 : 5,0 cm L x 1,91 cm P x 14,55 cm H (1,97 po L x 0,75 po P x 5,73 po H)
Anémomètre LTV-W1 : 18,.03 cm L x 18,03 cm P x 47,17 cm H (7,10 po L x 7,10 po P x 18,57 po H) avec support/tige de montage
Capteur de température/d’humidité LTV-TH2 : Changement de temp. de +/- 0,5 °C (0,9 °F), d’humidité de +/- 2 % HR, ou aux
3 minutes s’il n’y a pas de changement. Vérifie la température/l’humidité toutes les 51 secondes.
Anémomètre LTV-W1 : Changement de vitesse du vent de 0,8 km (0,5 mi/h), ou aux 3 minutes s’il n’y a pas de changement.
Vérifie les changements de vitesse du vent toutes les 31 secondes; échantillonnage toutes les 3 secondes.
Capteur de température/d’humidité
Wi-Fi
Alimentation
Durée de vie des piles
Dimensions
Intervalles d’actualisation des capteurs
WI-FI WIND & WEATHER STATION Page | 34
Page 71

FCC STATEMENT
Ce produit a été testé et déclaré conforme aux limites relatives à un appareil numérique de classe B, en vertu de
la section 15 des règles de la FCC. Ces limites visent à assurer une protection raisonnable contre les interférences
nuisibles dans une installation résidentielle. Cet appareil génère, utilise et peut émettre de l’énergie sous forme de
fréquences radio et, s’il n’est pas installé et utilisé conformément aux instructions, peut causer des interférences perturbant les communications radio. Il n’y a toutefois aucune garantie qu’il ne se produira pas d’interférences dans une
installation donnée. Si cet appareil interfère avec la réception radiophonique ou télévisuelle, ce qui peut être vérifié
en éteignant puis en rallumant l’appareil, l’utilisateur est invité à essayer de corriger le problème en prenant une ou
plusieurs des mesures suivantes :
• changer l’orientation ou la position de l’antenne de réception;
• augmenter la distance entre l’appareil et le récepteur;
• brancher l’appareil dans une prise de courant se trouvant sur un circuit différent de celui sur lequel est branché le
récepteur;
• consulter le fournisseur ou un technicien d’expérience en radio/télévision afin d’obtenir de l’assistance.
Cet émetteur ne doit pas être placé à proximité immédiate d’une autre antenne ni d’un d’autre émetteur, et ne doit pas
être utilisé conjointement avec ceux-ci.
Son fonctionnement est soumis aux deux conditions suivantes :
(1 ) cet appareil ne doit pas causer d’interférences;
(2) cet appareil doit supporter toutes les interférences, y compris les interférences pouvant causer un fonctionnement
indésirable de l’appareil.
Mise en garde!
Le fabricant ne peut être tenu responsable d’aucune interférence radioélectrique (radio ou télévision) qui serait
causée par des modifications non autorisées apportées à l’appareil. De telles modifications pourraient annuler
l’autorisation accordée à l’utilisateur d’utiliser cet appareil. Cet équipement doit être installé et utilisé conformément
aux instructions fournies, et l’antenne utilisée pour cet émetteur doit être installée de façon à ce qu’une distance d’au
moins 20 cm soit maintenue entre elle et toute personne. En outre, elle ne doit pas être placée à proximité immédiate
d’une autre antenne ni d’un d’autre émetteur, et ne doit pas être utilisée
conjointement avec ceux-ci.
Tous droits réservés. Le présent manuel ne peut être reproduit sous aucune forme, même en partie, ni dupliqué, ni
traité par un procédé électronique, mécanique ou chimique sans l’autorisation écrite de l’éditeur.
Ce document peut contenir des erreurs ou des fautes d’impression. Les informations qu’il contient sont vérifiées
régulièrement et des corrections sont apportées dans les éditions subséquentes. Nous déclinons toute responsabilité
pour toute erreur technique ou erreur d’imprimerie, ou leurs conséquences.
Toutes les marques de commerce et brevets sont reconnus.
WI-FI WIND & WEATHER STATION Page | 35
Page 72

DÉCLARATION DE CONFORMITÉ POUR LE CANADA
This device complies with Industry Canada’s licence-exempt RSSs. Operation is subject to the following two conditions:
(1 ) This device may not cause interference; and
(2) This device must accept any interference, including interference that may cause undesired
operation of the device.
Apple et le logo Apple sont des marques de commerce d’Apple Inc., enregistrées aux É.-U. et dans d’autres pays. App Store est
une marque de service d’Apple Inc.
Google Play et le logo Google Play sont des marques de commerce de Google Inc.
WI-FI WIND & WEATHER STATION Page | 36
 Loading...