

Page 1
SC 5 EasyFix Premium Iron Plug
Operating Instructions
Please read the operating instructions
carefully before using the unit.
59682880
(05/19)
Page 2
1
2
3
4
5
4
5
6
7
8
9
10
11
12
13
10
14
15
16 17
18
16
19
20
21
22
23
24
25
26
27
28
33
38
39
29
30
34
35
36
37
43
44
45
46
47
48
49
42
40
41
31
32
A
2
Page 3
B C D
1.
2.
E F G
H
K L M
I J
3
Page 4
N O
1.
2.
Q R S
T
P
4
Page 5

Safety instructions Steam
cleaner
Please read and com-
ply with these original
instructions prior to the initial operation of your appliance and
store them for later use or subsequent owners.
You also need to take into
consideration the general
safety regulations and accident prevention guidelines of
the legislator in addition to the
notes in the operating instructions.
Warnings and information no-
tices attached to the device
provide important information
for hazard-free operation.
Hazard levels
DANGER
Indication of an imminent threat
of danger that will lead to severe
injuries or even death.
몇 WARNING
Indication of a potentially dangerous situation that may lead to
severe injuries or even death.
몇 CAUTION
Indication of a potentially dangerous situation that may lead to
minor injuries.
ATTENTION
Indication of a potentially dangerous situation that may lead to
damage to property.
General safety notes
DANGER
Risk of asphyxia-
tion. Keep packaging film out of
the reach of children.
몇 WARNING Only use the
device for its proper use. Take
into account the local conditions
and beware of third parties, in
particular children, when working with the device.
Only peo-
ple who have been instructed on
how to use the device, or have
proven their ability to operate it,
and have been explicitly instructed to use it, must use the
device. Persons with reduced
physical, sensory or mental capabilities, or those with a lack of
experience and knowledge, are
only allowed to use the appliance if they are supervised or
have been instructed with respect to using the appliance
safely, and understand the resultant dangers involved.
lChil-
dren must not operate the
device. Children must be supervised to prevent them from
playing with the appliance.
lKeep the device out of the
reach of children while it is
switched on and as long as it
has not cooled down.
몇 CAUTION Do not use the
device if it has been dropped beforehand, is visibly damaged or
if it is leaking. Safety devices
are provided for your own pro-
English 5
Page 6

tection. Never modify or bypass
safety devices.
Risk of electric shock
DANGER Never touch the
mains plug and socket with wet
hands. Only connect the device to alternating current. The
voltage indicated on the type
plate must match the voltage of
the power source. Do not direct the steam jet directly onto
equipment containing electrical
components, e.g. the interior
space of ovens. Do not fill the
devices with removable water
reservoir directly via the water
connection while they are connected to the mains power. Use
a receptacle for filling. Do not
use the device in swimming
pools which contain water.
The mains plug and extension
cable connection must not be in
water. 몇 WARNING Only
connect the device to an
electrical con-nection which
has been set up by a qualified
electrician as per IEC 60364-1.
Only operate the device in wet
rooms, e.g. bath-room,
connected to sockets with
upstream residual current device. Check the power supply
cable with mains plug for damage before operation each time.
Do not put the device into oper-
mediately by the authorised customer service / qualified
electrician.
Do not damage the
power supply and extension cable by running over it, crushing
or yanking it or similar. Protect
the power supply cable from
heat, oil and sharp edges. lUnsuitable electrical extension cables can be dangerous. Only
use electrical extension cables
with a splash guard and a diameter of at least 3x1 mm
2
. Only
replace couplings on the power
supply or extension cable with
those with the same splash
guard and the same mechanical
strength.
Clean tiled walls with
sockets carefully.
몇 CAUTION In case of longer
breaks in operation and after
use, switch off the device at the
main switch / device switch and
pull the mains plug.
Operation
DANGER Operation in ex-
plosive atmospheres is prohibited. When using the device in
hazard zones (e.g. service stations), adhere to the respective
safety regulations.
몇 WARNING Risk of scald-
ing. Never touch the steam jet
with your hand from a close distance, and do not direct it at people or animals.
ation with a damaged power
supply cable. Have a damaged
power supply cable replaced im-
6English
Page 7

Risk of scalding from high wa-
ter output if you tilt the due to
more than 30° to the side when
using it.
Applies to SC 1 devices only
Risk of scalding on the hot
steam boiler. Allow the steam
boiler to cool down before filling
it with water.
Does not apply to SC 3 devices
lNever disconnect accessories
from the device while steam is
being expelled.
Hot water may
drip out when disconnecting accessory parts. Allow the device
to cool down first. Never open
the maintenance / safety lock
during operation. Allow the device to cool down first. Do not
clamp the steam lever / steam
key during operation. Replace
a damaged steam hose immediately with a steam hose as recommended by the
manufacturer. lDo not steam any
objects which contain harmful
substances (e.g. asbestos).
몇 CAUTION Only operate or
store the device in accordance
with the description or figure.
lCheck the device and the accessories, in particular the power supply cable, safety lock and
steam hose, to make sure it is in
proper safe and reliable condition before operation each time.
Do not use the device if it is
damaged. Replace damaged
components immediately.
Only
switch on the device when water
is present in the steam boiler.
The device may otherwise overheat, see chapter Troubleshoot-
ing.
Accidents or damage due
to the device falling over. Before
all actions with or on the device,
you must make sure that it is stable.
ATTE NTI ON
Do not fill with
any cleaning agents or other
supplements. Do not operate
the device at temperatures below 0 °C.
Never leave the de-
vice unsupervised while it is in
operation.
Protect the device
from rain. Do not store the device outdoors. Device damage.
Never pour solvents, liquids
which contain solvents or diluted
acids (e.g. cleaning agent, petrol, paint thinner and acetone)
into the boiler / water reservoir.
For upright machines
몇 CAUTION In order to guar-
antee stability, place the device
on a firm, flat surface. Do not
carry the device when performing cleaning work.
English 7
Page 8

Care and service
몇 WARNING
Only carry out
servicing work when the mains
plug is pulled and the steam
cleaner has cooled down.
몇 CAUTION Have repair
work carried out by the authorised customer service only.
Descaling the steam boiler
Does not apply to SC 3 devices
몇 CAUTION Never screw the
safety lock onto the device while
descaling.
Do not use the
steam cleaner while there is
descaler in the boiler.
ATTENTION The descaler
may corrode sensitive surfaces.
Work carefully when filling and
emptying the steam cleaner with
descaler.
Steam cleaner accessories
(Depending on equipment)
Iron
몇 WARNING Risk of scald-
ing. Do not direct the steam jet
at people or animals. Risk of
burns on hot steam pressure
iron and hot steam jet. Alert other people to the hazard. Do
not touch any electrical cables
or combustible objects with the
hot steam pressure iron.
몇 CAUTION Do not use the
steam pressure iron if it has
been dropped, has visible damage or is leaking. You must
only operate or set down the
steam pressure iron on a stable
surface.
Steam turbo brush
몇 CAUTION
Longer periods of use of the
steam turbo brush may lead to
poor blood circulation in the
hands due to vibration. In case
of symptoms, e.g. tingling in the
fingers, cold fingers, take a
break. A general period of use
cannot be set, because this depends on several influencing
factors:
Personal tendency to suffer
from poor circulation (frequently cold fingers, tingling
sensation in the fingers).
Holding the device too tightly
hindering blood circulation.
Continuous operation is more
harmful than operation inter-
rupted by work breaks.
You should consult a doctor if
using the steam turbo brush regularly and for lengthy periods of
time, and in the event of repeated occurrences of symptoms
such as tingling in the fingers or
cold fingers.
8English
Page 9

Contents
General notes . . . . . . . . . . . . . . . . . . . . . . . . . . . . 9
Intended use. . . . . . . . . . . . . . . . . . . . . . . . . . . . . 9
Environmental protection . . . . . . . . . . . . . . . . . . . 9
Accessories and spare parts . . . . . . . . . . . . . . . . 9
Scope of delivery . . . . . . . . . . . . . . . . . . . . . . . . . 9
Warranty. . . . . . . . . . . . . . . . . . . . . . . . . . . . . . . . 9
Safety devices . . . . . . . . . . . . . . . . . . . . . . . . . . . 9
Device description . . . . . . . . . . . . . . . . . . . . . . . . 10
Installation . . . . . . . . . . . . . . . . . . . . . . . . . . . . . . 10
Operation . . . . . . . . . . . . . . . . . . . . . . . . . . . . . . . 11
Important application instructions . . . . . . . . . . . . . 12
How to use the Accessories . . . . . . . . . . . . . . . . . 12
Care and service . . . . . . . . . . . . . . . . . . . . . . . . . 14
Troubleshooting guide . . . . . . . . . . . . . . . . . . . . . 14
Technical data . . . . . . . . . . . . . . . . . . . . . . . . . . . 15
General notes
Please read and comply with these original instructions prior to the initial opera-
later use or subsequent owners.
tion of your appliance and store them for
Intended use
Only use the appliance in private households. The appliance is intended for cleaning with steam and can be
used with appropriate accessories as described in
these operating instructions. Detergents are not required. Observe the safety instructions.
Environmental protection
The packing materials can be recycled. Please
dispose of packaging in accordance with the environmental regulations.
Electrical and electronic appliances contain valuable, recyclable materials and often components
such as batteries, rechargeable batteries or oil,
which - if handled or disposed of incorrectly - can
pose a potential threat to human health and the environment. However, these components are required for the
correct operation of the appliance. Appliances marked
by this symbol are not allowed to be disposed of together with the household rubbish.
Notes on the content materials (REACH)
Current information on content materials can be found
at: www.kaercher.de/REACH
Accessories and spare parts
Only use original accessories and original spare parts.
They ensure that the appliance will run fault-free and
safely.
Information on accessories and spare parts can be
found at www.kaercher.com.
Scope of delivery
The scope of delivery for the appliance is shown on the
packaging. Check the contents for completeness when
unpacking. If any accessories are missing or in the
event of any shipping damage, please notify your dealer.
The warranty conditions issued by our relevant sales
company apply in all countries. We shall remedy possible malfunctions on your appliance within the warranty
period free of cost, provided that a material or manufacturing defect is the cause. In a warranty case, please
contact your dealer (with the purchase receipt) or the
next authorised customer service site.
(See overleaf for the address)
Safety devices
몇 CAUTION
Missing or modified safety devices
Safety devices are provided for your own protection.
Never modify or bypass safety devices.
Symbols on the appliance
(according to type of appliance)
Risk of burns, surface of appliance becomes hot during operation
Risk of scalding from steam
Read operating instructions
Warranty
The pressure controller keeps the pressure in the steam
boiler as constant as possible during operation. The
heating is switched off when the maximum operating
pressure is reached in the steam boiler and is activated
if there is a pressure drop in the steam boiler as a result
of a steam removal.
The safety thermostat prevents the device from overheating. If the pressure regulator and the boiler thermostat fail and the unit overheats, the safety thermostat
switches the unit off. Before resetting of the safety thermostat, contact the responsible KÄRCHER Customer
Service.
The boiler thermostat switches off the heating in the
event of a fault; for example, if there is no water in the
steam boiler and the temperature in the steam boiler rises.
As soon as you refill the water, the device is ready for
use again.
The maintenance lock seals the steam boiler from the
steam pressure present. The maintenance cap is also a
pressure relief valve. If the pressure regulator is defective and the steam pressure in the steam boiler rises,
the pressure relief valve opens and steam is escapes
through the lock.
Prior to restarting the device, contact the responsible
KÄRCHER Customer Service.
Pressure controller
Safety thermostat
Boiler thermostat
Maintenance lock
English 9
Page 10

The maximum amount of equipment is described in
Device description
these operating instructions. Depending on the model
used, there are differences in the scope of delivery (see
packaging).
For the figures, refer to the graphics page.
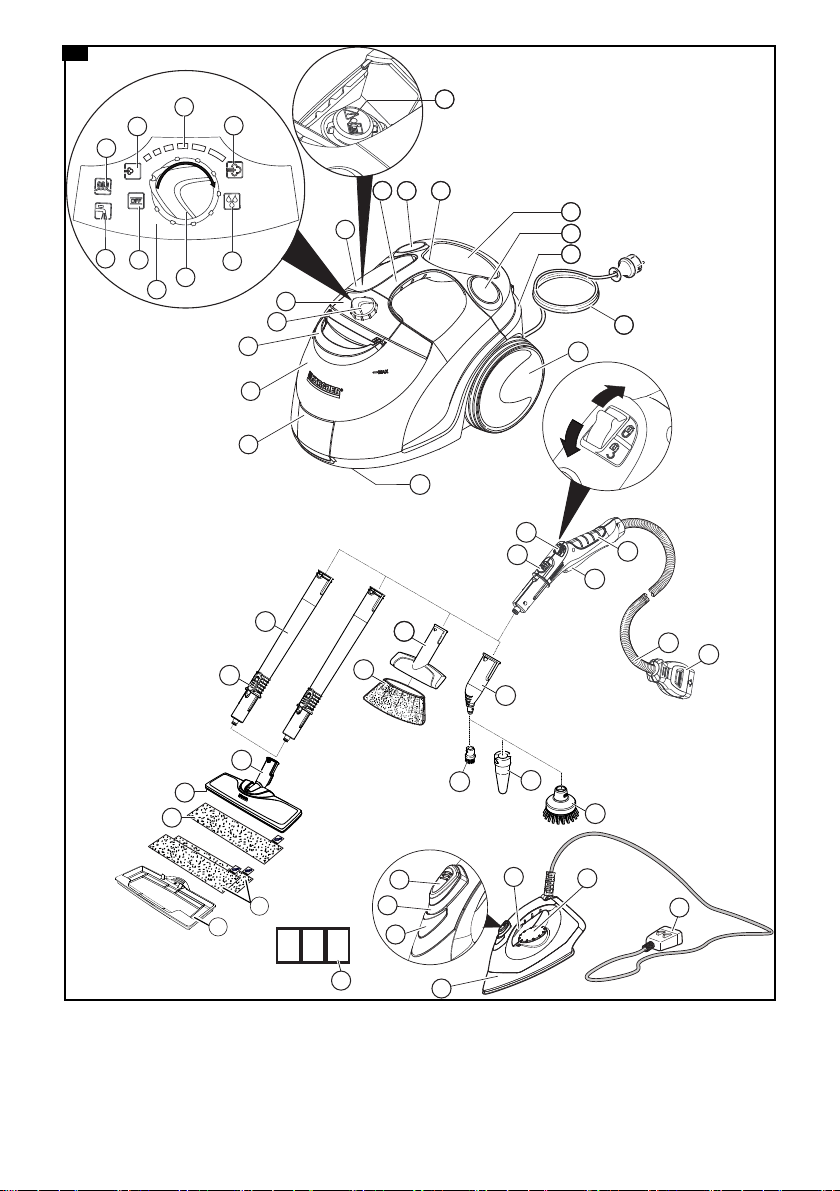
Illustration A
1 Unit plug with cover
2 Water reservoir
3 Carrying handle for the water reservoir
4 Selector switch
5 Control panel
6 Display - OFF position
7 Display - water shortage (red)
8 Display - heating (green)
9 Min. steam stage
10 Steam setting selection range
11 Max. steam stage
12 VapoHydro function steam stage
13 Cap for accessory compartment
14 Maintenance lock
15 Carrying handle
16 Holder for accessories
17 Accessory storage compartment
18 Mains connection storage compartment
19 Park bracket for floor nozzle
20 Mains connection cable with mains plug
21 Non-driven wheels (2 x)
22 Steering roller
23 Steam gun
24 Steam lever
25 Unlocking button
26 Child lock
27 Steam hose
28 Steam connector
29 Spotlight nozzle
30 Round brush (small)
31 **Power nozzle
32 **Round brush (large)
33 Manual nozzle
34 Manual nozzle microfibre cover
35 Extension tubes (2 x)
36 Unlocking button
37 Floor nozzle
38 Hook and loop fastener
39 Microfibre floor cloth (1 x)
40 **Microfibre floor cloth (2 x)
41 **Carpet glider
42 Descaler
43 **Steam pressure iron
44 **Steam switch (bottom)
45 **Indicator light (orange) - heating
46 **Steam switch (top)
47 **Lock for steam switch
48 **Temperature controller
49 **Steam connector
**Optional
Installation
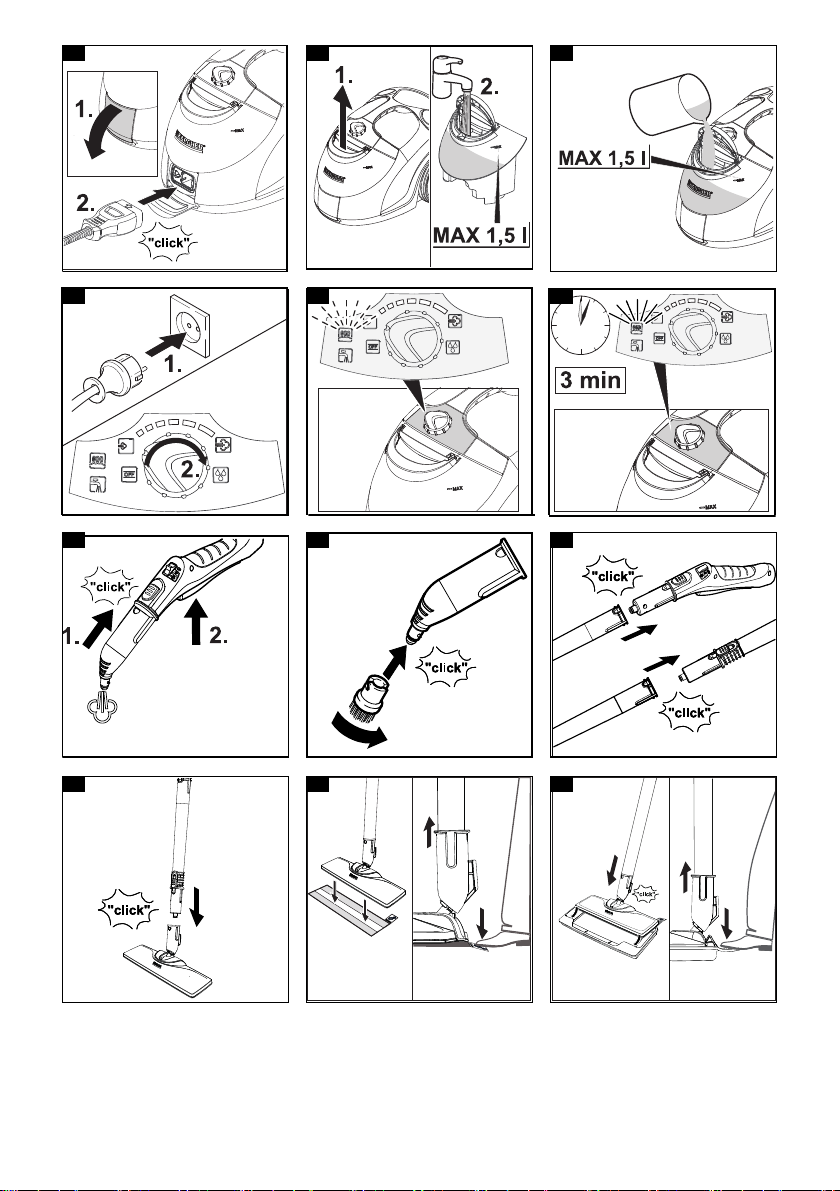
1. Open the cover on the device socket.
Illustration B
2. Connect the steam connector to the device socket
so that the steam connector audibly engages.
Illustration B
3. Push the open end of the accessory onto the steam
gun so that the unlocking button on the steam gun
engages.
Illustration H
4. Push the open end of the accessory onto the spotlight nozzle.
Illustration I
5. Connect the extension tubes with the steam gun.
a Push the first extension tube onto the steam gun
b Push the second extension tube onto the
Illustration J
6. Push the accessory and / or the floor nozzle onto the
free end of the extension tube.
Illustration K
The accessory is connected.
1. Set the child lock to the rear.
The steam lever is locked.
2. Push the cover on the device socket down and disconnect the steam connector from the device socket.
3. Push the unlocking button and pull the parts apart.
Illustration P
Installing accessories
so that the unlocking button on the steam gun engages.
The connection pipe is connected.
first extension tube.
The connection pipes are connected.
Disconnecting accessories
10 English
Page 11

Operation
The water reservoir can be removed at any time for filling or be filled directly at the device.
ATTENTION
Damage to the device
Unsuitable water can block the nozzles or damage the
water level indicator.
Do not fill in pure distilled water. Use a maximum of 50%
distilled water mixed with tap water.
Do not use condensation from the clothes dryer for filling.
Do not use collected rain water for filling.
Do not use cleaning agents or other additives (e.g.
scents) for filling.
Remove the water reservoir for filling
1. Pull the water reservoir vertically upwards.
Illustration C
2. Fill the water tank vertically with tap water or a mixture of tap water and no more than 50% distilled water up to the "MAX" mark.
3. Insert the water reservoir and press downwards until
it locks into place.
Filling the water reservoir directly on the device
1. Fill tap water or a mixture of tap water and no more
than 50% distilled water from a vessel into the filling
hole of the water reservoir up to the "MAX" mark.
Illustration D
Note
If there is no or too little water in the steam boiler, the
water pump starts to run and pumps water from the water reservoir into the steam boiler. The filling process
can take several minutes.
Note
The device briefly closes the valve every 60 seconds
causing an audible soft click. Closing prevents the valve
from clogging. This does not affect the steam output.
1. Place the device on a firm surface.
2. Insert the mains plug into a socket.
Illustration E
3. Turn the selector switch from the OFF position to the
steam setting selection range.
The green heating indicator light flashes.
Illustration F
4. Wait until the green heating indicator stays on.
Illustration G
5. Press the steam lever.
Illustration H
Steam leaks out.
Regulating the steam volume
The expelled steam volume is regulated using the selector switch for steam volume. The selector switch has
the setting options min. steam stage for light soiling to
max. steam stage for heavy soiling. The VapoHydro
function is for the removal of heavy soiling in areas that
are difficult to access.
1. Set the selector switch for the steam volume to required steam volume.
2. Press the steam lever.
3. Before starting cleaning, point the steam gun at a
cloth until steam is expelled evenly.
Filling water
Switch on the device
If there is not enough water, the water shortage indicator
lamp flashes red and a signal tone sounds.
Note
The water pump fills the steam boiler at intervals. If the
filling is successful, the red water shortage indicator
lamp goes out.
Note
If there is no or too little water in the steam boiler, the
water pump starts to run and pumps water from the water reservoir into the steam boiler. The filling process
can take several minutes.
ATT EN TIO N
Damage to the device
Unsuitable water can block the nozzles or damage the
water level indicator.
Do not fill in pure distilled water. Use a maximum of 50%
distilled water mixed with tap water.
Do not use condensation from the clothes dryer for filling.
Do not use collected rain water for filling.
Do not use cleaning agents or other additives (e.g.
scents) for filling.
1. Fill the water tank with tap water or a mixture of tap
water and no more than 50% distilled water up to the
"MAX" mark.
The device is ready for use.
Switching off the device
Refilling water
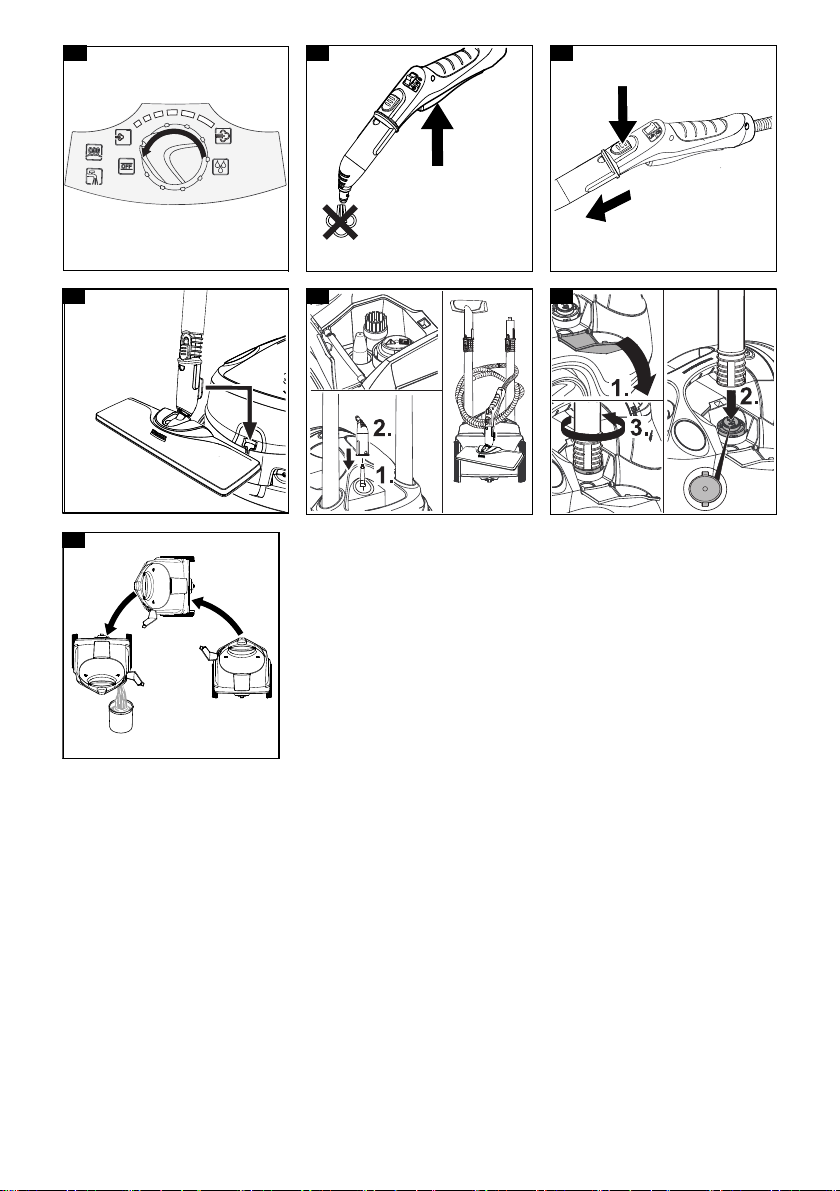
1. Turn the power switch to "OFF” position.
Illustration N
The device has been switched off.
2. Press the steam lever until no more steam flows out.
Illustration O
The steam boiler is depressurised.
3. Set the child lock to the rear.
The steam lever is locked.
4. Push the cap on the device socket down and disconnect the steam connector from the device socket.
5. Pull the mains plug out of the socket.
6. Drain the water reservoir.
Rinsing out the steam boiler
Rinse the device’s steam boiler out after every
eighth filling of the tank.
1. Switch the device off; see Chapter Switching off the
device.
2. Allow the device to cool down.
3. Drain the water reservoir.
4. Remove the accessory/accessories from the accessory holders.
5. Open the cap of the accessory compartment.
6. Remove the accessory/accessories from the accessory compartment.
7. Open the maintenance lock. To do this place the
open end of an extension tube on the maintenance
lock, insert this into the guide so it engages and
open it.
Illustration S
8. Fill the steam boiler with water and swing it around
vigorously. Lime residue which has been deposited
on the bottom of the steam boiler will be released as
a result.
9. Drain the water completely out of the steam boiler.
Illustration T
English 11
Page 12

1. Store the round brush in the accessory compartment.
2. Connect a manual nozzle to one extension tube.
3. Connect the extension tubes to the accessory holders.
4. Insert the spotlight nozzle in the storage for accessories.
5. Hang the floor nozzle in the park bracket.
Illustration Q
6. Wind the steam hose around the extension tube and
connect the steam gun to the floor nozzle.
Illustration R
7. Store the mains cable in the storage for the mains
cable.
8. Store the device in a dry location that is protected
from frost.
Important application instructions
Storing the device
We recommend sweeping the floor or vacuum cleaning
it before using the appliance. In this way the floor will be
cleared of dirt and loose particles before the wet cleaning.
Prior to using the appliance, always check the compatibility of the textiles at a concealed point: Steam down
the textile, allow it to dry and then check it for any
change in colour or shape.
ATTENTION
Damaged surfaces
Steam can loosen wax, furniture polish, plastic coatings
or paint and edge band from edges.
Do not direct the steam at glued laminated edges as the
edge band may loosen.
Do not use the appliance for cleaning unsealed wood or
parquet floors.
Do not use the appliance for cleaning painted or plastic
coated surfaces such as kitchen or living room furniture,
doors or parquet.
1. To clean these surfaces, steam a cloth briefly and
ATTENTION
Glass breakages and damaged surfaces
Steam can damage sealed points of the window frame
and, at low outside temperatures, lead to tension on the
surface of window panes and hence to glass breakages.
Do not direct the steam at sealed points on the window
frame.
At low outside temperatures, heat up the window panes
by gently steaming the full surface of the glass.
Clean the window area with a manual nozzle and
Cleaning the floor areas
Freshening up textiles
Cleaning coated or painted surfaces
use it to wipe over the surfaces.
Glass cleaner
cover. To remove the water, use a squeegee or wipe
the surfaces dry.
How to use the Accessories
The steam gun can be used for the following applications without accessories:
For removing slight creases from the hanging cloth-
ing items: Steam the clothing item from a distance of
10-20 cm.
For wiping damp dust: Steam a cloth briefly and use
it to wipe over the furniture.
Steam gun
The spotlight nozzle is suitable for cleaning areas, joins,
fittings, drains, sinks, WCs, blinds or radiators that are
difficult to access. The closer the spotlight nozzle is to
the soiled area, the greater the cleaning efficiency will
be as the temperature and steam volume are at their
highest at the nozzle opening. Larger lime deposits can
be treated before steam cleaning with a suitable detergent. Allow the detergent to soak in for
approx. 5 minutes and then steam it off.
1. Slide the spotlight nozzle onto the steam gun.
Illustration H
Round brush (small)
The small round brush is used for cleaning stubborn dirt.
Stubborn dirt can be removed more easily by brushing.
ATT EN TIO N
Damaged surfaces
The brush may scratch sensitive surfaces.
It is not suitable for cleaning sensitive surfaces.
1. Fit the round brush to the spotlight nozzle.
Illustration I
Round brush (large)
The large round brush is suitable for cleaning large
rounded surfaces, e.g. wash basin, shower tray, bath
tub, kitchen sink.
ATT EN TIO N
Damaged surfaces
The brush may scratch sensitive surfaces.
It is not suitable for cleaning sensitive surfaces.
1. Fit the large round brush to the spotlight nozzle.
Illustration I
Power nozzle
The power nozzle is used for cleaning stubborn dirt,
blowing down corners, joins etc.
1. Install the power nozzle onto the spotlight nozzle according to the round brush.
Illustration I
Manual nozzle
Spotlight nozzle
The manual nozzle is used for cleaning small areas that
can be washed down, shower cubicles and mirrors.
1. Push the manual nozzle onto the steam gun according to the spotlight nozzle.
Illustration H
2. Pull the cover over the manual nozzle.
Floor nozzle
The floor nozzle is used for cleaning washable wall and
floor coverings e.g. stone floors, tiles and PVC floors.
ATT EN TIO N
Damage due to build-up of steam
Heat and moisture can lead to damage.
Check the heat resistance and steam effect on an inconspicuous area using a minimal volume of steam prior to use.
Note
Detergent residue or care emulsions on the surface to
be cleaned can lead to streaks, which will disappear
however once these have been used several times.
We recommend sweeping the floor or vacuum cleaning
it before using the appliance. In this way the floor will be
cleared of dirt and loose particles before the wet cleaning commences. Work slowly on surfaces that are heavily soiled so that the steam can impact longer.
1. Connect the extension tubes with the steam gun.
Illustration J
12 English
Page 13

2. Push the floor nozzle onto the extension tube.
Illustration K
3. Fasten the floor cleaning cloth to the floor nozzle.
a Place the floor cleaning cloth with the hook and
loop strips pointing upwards on the floor.
b Place the floor nozzle onto the floor cleaning
cloth, applying slight pressure.
Illustration L
The floor cleaning cloth will stick to the floor nozzle
of its own accord due to the hook and loop fastening.
Removing the floor cleaning cloth
1. Place one foot on the bottom corner of the floor
cleaning cloth and lift the floor nozzle up.
Illustration L
Note
Initially, the floor cleaning cloth's hook and loop fastener strip is very strong and cannot be removed
from the floor nozzle easily. After the floor cleaning
cloth has been used several times and washed, it is
easier to remove from the floor nozzle and it has
reached the optimum adhesion.
1. Hang the floor nozzle in the park bracket during
breaks in work.
Illustration Q
Parking the floor nozzle
Carpet glider
The carpet glider is used for freshening up carpets.
ATTENTION
Beware of damaging the carpet glider and carpet
Contamination on the carpet glider, as well as heat and
moisture penetration, can result in the carpet being
damaged.
Prior to the application, also check the heat resistance
and impact of steam on the carpet at an insignificant
spot using as small an amount of steam as possible.
Observe the cleaning instructions from the carpet manufacturer.
Prior to using the carpet glider, make sure that the carpet has been vacuumed and that stains have been removed.
Prior to application and following operating pauses, remove any possible water accumulation (condensate) in
the appliance by means of evaporating the condensate
into a drain (without floor cleaning cloth / with accessories).
Only use the carpet glider with a floor cleaning cloth on
the floor nozzle.
Steam clean with a weak steam stage when using the
carpet glider.
In order to prevent too much moistening and to avoid
the risk of damage due to temperature effects, do not direct the steam continuously onto one spot (maximum
5 seconds).
Do not use the carpet glider on deep-pile carpets.
Fastening the carpet glider to the floor nozzle
1. For fastening the floor cleaning cloth to the floor
nozzle, please refer to chapter Floor nozzle.
Illustration L
2. Using a little force, allow the floor nozzle to slide into
the carpet glider and engage there.
Illustration M
3. Start cleaning the carpet.
Removing the carpet glider from the floor nozzle
몇 CAUTION
Beware of burns to your feet
The carpet glider can heat up during the steaming process.
Do not operate or remove the carpet glider bare-footed
or using open sandals.
Only operate or remove the carpet glider using suitable
footwear.
1. Press the strap on the carpet glider downwards using your toecap.
2. Lift the floor nozzle upwards.
Illustration M
Iron steam pressure
Note
We recommend using the KÄRCHER ironing board with
active steam suctioning. This ironing board is optimally
matched to the device you have acquired. It facilitates
and speeds up the ironing process. In any case, the
ironing board used should have a steam-permeable,
grid-like ironing base surface.
Note
Do not turn on the steam stage for the VapoHydro function when the steam pressure iron is plugged in, since
otherwise the ironing laundry will get wet.
Recommended steam stages
Stage Clothing fabrics
Min. steam stage Garments with few wrin-
Max. steam stage Jeans
1. Ensure that tap water or a mixture of tap water and
no more than 50% distilled water is in the steam boiler of the steam cleaner.
2. Insert the steam plug of the iron into the unit plug until it clicks into place.
3. Putting the steam cleaner into operation; see Chapter Switching on the device.
4. Wait until the steam cleaner is ready for use.
All fabrics can be ironed with steam. Iron sensitive fabrics or overprints on the reverse or, as the case may be,
according to manufacturer's instructions.
ATT EN TIO N
Damage to garments
Failure to observe the ironing information in the garment
may result in damage.
Observe the ironing information in the garment.
Note
For sensitive textiles, we recommend using the
KÄRCHER non-stick electric iron plate BE 6006.
Note
The iron plate must be hot to prevent steam from condensing on the sole plate and dripping onto the ironing
laundry.
The iron can be held vertically for steaming curtains,
dresses, etc.
1. Set the temperature controller of the iron within the
selected range ( /MAX).
As soon as the orange heating indicator light of the
iron goes out, ironing can be started.
2. Press the “steam” switch (top) or the “steam” switch
(bottom).
Steaming at intervals: Press the “steam” switch.
Steam flows out as long as the switch is pressed.
kles
Steam ironing
English 13
Page 14

Continuous steaming: Pull the lock for the
“steam” switch backwards until it engages. Steam
flows out continuously. To release, push the lock
forward.
3. Before ironing and after pauses in the ironing process, direct the blast of steam onto a cloth until the
steam flows evenly.
Dry ironing
ATTENTION
Damage to the device
Water shortage in the steam boiler leads to damage to
the device
Make sure that there is water in the steam boiler.
ATTENTION
Damage to garments
Failure to observe the ironing information in the garment
may result in damage.
Observe the ironing information in the garment.
1. Set the temperature controller of the iron in accordance with the garment.
Synthetics
Wool, silk
Cotton, linen
2. Wait until the iron’s heating indicator light goes out.
The iron is ready for ironing.
Care and service
Note
Since the lime clogs the appliance, we recommend descaling the appliance based on the number of times the
water reservoir is filled as specified in the table (TF=tank
fillings).
Hardness range °dH mmol/l TF
I soft 0-7 0-1.3 100
II Medium 7-14 1.3-2.5 90
III Hard 14-21 2.5-3.8 75
IV Very hard >21 >3.8 50
Note
Your water board or municipal utilities authority can provide information on hardness of tap water.
ATTENTION
Damaged surfaces
The descaler may corrode sensitive surfaces.
Fill and empty the appliance carefully.
1. Switch off the appliance, see Chapter Switching off
2. Allow the appliance to cool down.
3. Drain the water reservoir.
4. Remove the accessory/accessories from the acces-
5. Open the cap of the accessory compartment.
6. Remove the accessory from the accessory compart-
7. Open the maintenance lock. To do this place the
8. Drain the water completely out of the steam boiler.
Descaling the steam boiler
the device.
sory holders.
ment.
open end of an extension tube on the maintenance
lock, insert this into the guide so it engages and
open it.
Illustration S
Illustration T
ATT EN TIO N
Appliance damage due to descaler
An unsuitable descaler or incorrect dosing of the descaler may damage the appliance.
Only use KÄRCHER descaler.
Use 1 dosing unit of the descaler for 0.5 l water.
9. Apply descaler solution to the descaler according to
the details.
10. Fill the descaler solution into the steam boiler. Do
not seal the steam boiler.
11. Allow the descaler solution to take effect for
approx. 8 hours.
12. Drain descaler solution completely out of the steam
boiler.
13. Repeat the descaling process if necessary.
14. Rinse the steam boiler 2-3 times with cold water in
order to drain all the descaler solution residue.
15. Drain the water completely out of the steam boiler.
16. Dry the mounting for the grid connection cable.
17. Close the maintenance lock with an extension tube.
Care of accessories
(Accessories - depending on scope of deliv
Note
The micro fibre cloths are not suitable for dryer.
Note
When washing the cloths, observe the instructions on
the washing tag. Do not use any liquid softeners as
this will affect the ability of the cloths to pick up dirt.
1. Wash the floor cleaning cloths and covers at a
___max. temperature of 60 °C in the washing
___machine.
ery)
Troubleshooting guide
Malfunctions often have simple causes that you can
remedy yourself using the following overview. When in
doubt, or in the case of malfunctions not mentioned
here, please contact your authorised Customer Service.
몇 WARNING
Risk of electric shock and burns
Trying to eliminate faults while the appliance is connected to the mains or has not yet cooled down is always
dangerous.
Remove the mains plug.
Allow the appliance to cool down.
The water shortage indicator light flashes red and a
signal tone sounds
No water in the tank.
Fill the water reservoir up to the “MAX” marking.
The water shortage indicator light is lit in red
No water in the steam boiler. The pump’s overheat protection has triggered.
1. Switch the device off; see Chapter Switch off the device.
2. Fill the water reservoir.
3. Switch on the device; see Chapter Switching on the
device.
The water tank is not inserted correctly or is calcified.
1. Remove the water reservoir.
2. Rinse the water reservoir.
3. Insert the water reservoir and press downwards until
it locks into place.
The steam lever cannot be pressed
The steam lever is locked with the child lock.
Set the child lock to the front.
The steam lever is released.
14 English
Page 15

Long heating-up time
The steam boiler is scaled.
Descale the steam boiler.
High water output
The steam boiler is scaled.
Descale the steam boiler.
VapoHydro steam stage set.
Turn the selector switch to the steam setting selec-
tion range
The steam pressure iron “spits” water
Set the temperature controller to stage .
Rinse or descale the steam boiler of the steam
cleaner; see Chapter Descaling the steam boiler.
After ironing breaks, water droplets come out of the
steam pressure iron
During longer ironing breaks, steam can condense in
the steam line.
After pauses in the ironing process, direct the blast
of steam onto a cloth until the steam flows evenly.
.
Technical data
Electrical connection
Voltage V 220-240
Phase ~ 1
Frequency Hz 50
Protection class IPX4
Protection class I
Performance data
Heating capacity W 2200
Heating capacity of iron W 700
Maximum operating pressure MPa 0.42
Heating-up time Minutes 3
Continuous steaming g/min 60
Maximum steam blast g/min 150
VapoHydro steam volume g/min 250
Filling quantity
Water reservoir l 1.5
Steam boiler l 0.5
Dimensions and weights
Weight (without accessories) kg 6.0
Length mm 439
Width mm 301
Height mm 304
Subject to technical modifications.
Customer Service
Australia
KÄRCHER Pty. Ltd.
385 Ferntree Gully Road,
Mount Waverley, Victoria, AU. 3149
1800 675 714 (Free Call)
www.karcher.com.au
New Zealand
Karcher Ltd.
66 Allens Road,
East Tamaki, Aukland
(09) 274-4603
www.karcher.co.nz
English 15
Page 16

Page 17

Page 18

www.kaercher.com/dealersearch
Alfred Kärcher SE
Alfred-Kärcher-Str. 28-40
71364 Winnenden (Germany)
Tel.: +49 7195 14-0
Fax: +49 7195 14-2212
& Co. KG
 Loading...