

Page 1
HD 10/25 S USA
www.kaercher.com
5.961-067 A 2007321 01/04
Page 2

English
Français
Español
5
15
25
2
Page 3

Page 4
HD 10/25 S USA
4
Page 5

English Operatin g Instructions HD 10/25 S USA
IMPORTANT SAFETY
INSTRUCTIONS
WARNING - When us in g thi s pr oduct basic
precautions should alw ays be followed,
including the following:
1. Read all the instructions before using t he
product.
2. To reduce the risk of injury, close supervision is necessary wh en a pr oduct is
used near children.
3. Know how to stop th e pr oduct and bleed
pressures quickly. B e th or oughly familiar
with the controls.
4. Stay alert - watch what you are doing.
5. Do not operate the product when fatigued
or under the influence of alcohol or drugs.
6. Keep operating ar ea clear of all persons.
7. Do not overreac h or stand on unstable
support. Keep good footi ng and balance
at all times.
8. Follow the maintenance instructions
specified in the manua l.
"This Product Shall Only Be Connected To A
Power Supply Receptacle Protected By A
Ground Fault Circuit Interr upt er . "
"WARNING - Risk of Injection or Injury - Do
Not Direct Discharge Stream At Per sons."
GROUNDING INSTRUCTIONS
This product must be gro unded. If it should
malfunction or brea kdown, grounding
provides a path of least resistance for electric
current to reduce the ris k of electric shock.
This product is equipped with a cord having
an equipment-grou nding conductor and a
grounding plug. The plug must be plugged
into an appropriate outl et th at is pro per l y
installed and grounded in accordance with all
local codes and ordinances.
DANGER - Improper connection of the
equipment-grounding conductor can result in
a risk of electrocution . Che ck with a qualified
electrician or service personnel if you are in
doubt as to whether the outlet is properly
grounded. Do not modi f y th e pl ug provided
with the product - if it will not fit the outlet, have
a proper outlet installed by a qualified electrician. Do not use any type of adaptor with this
product.
GROUND FAULT CIRCUIT
INTERRUPTER PROTECTION
To comply with the National Electrical Code
(NFPA 70) and to provide ad dit io na l
protection from the risk of electric shock, this
pressure washer should only be connected to
a receptacle that is protected by a ground fault
circuit interrupter (GFCI).
5
Page 6

Operating Instructions HD 10/25 S USA English
EXTENSION CORDS
Use only 3-wire extension cords that have 3prong grounding-typ e pl ug s and 3-pole cord
connectors that accept the plug from the
product. Use only exte nsion cords that are
intended for outdoor use . Th ese extension
cords are identified by a marking "Acceptable
for use with outdoor appliances: store indoors
while not in use." Use only ex te nsion cords
having an electrical rat in g not less than the
rating of the product. Do not use damaged
extension cords. Exam i ne extension cord
before usi ng and replac e i f damaged. Do not
abuse extension cord and do not yank on any
cord to disconnect. Keep cord away from heat
and sharp edges. Alway s disconnect the
extension cord from th e re ceptacle before
disconnecting the product from the extension
cord.
WARNING - To reduce t he r is k of
electrocution, keep all connections dry and off
the ground. Do not touch plug with wet hands.
WARNING - To reduc e the r isk of fir e, el ectr ic
shock or injury:
Injection hazard: equipment can cause
serious injury if the spray penetrates the s kin.
Do not point the gun at anyone or any part of
the body. In case of penetration seek medical
aid immediately.
This system is capable of producing 250000
kPa. To avoid rupture an d in ju ry , do not
operate this pump with components rated less
than 250000 kPa working pressure (including
but not limited to spray gu ns, hose and hose
connections.)
Before serv icing, cleaning, or removal of any
part, shut off power and re lie ve pr essure.
High Pressure. Keep clear of nozzle.
Close cover before operating machine.
Warning: If connection is made to a potable
water system, the system shall be protected
against backflow.
This appliance is intended for commercial
use.
Do not spray electrical apparatus and wiring.
This machine has been designed for use with
cleaning chemicals supplied or recommended
by the manufacturer. The use of other
cleaning chemica ls ma y af fect the operation
of the machine and voi d th e wa rr anty.
SAVE THESE INSTRUCTIONS.
6
Page 7

English Operatin g Instructions HD 10/25 S USA
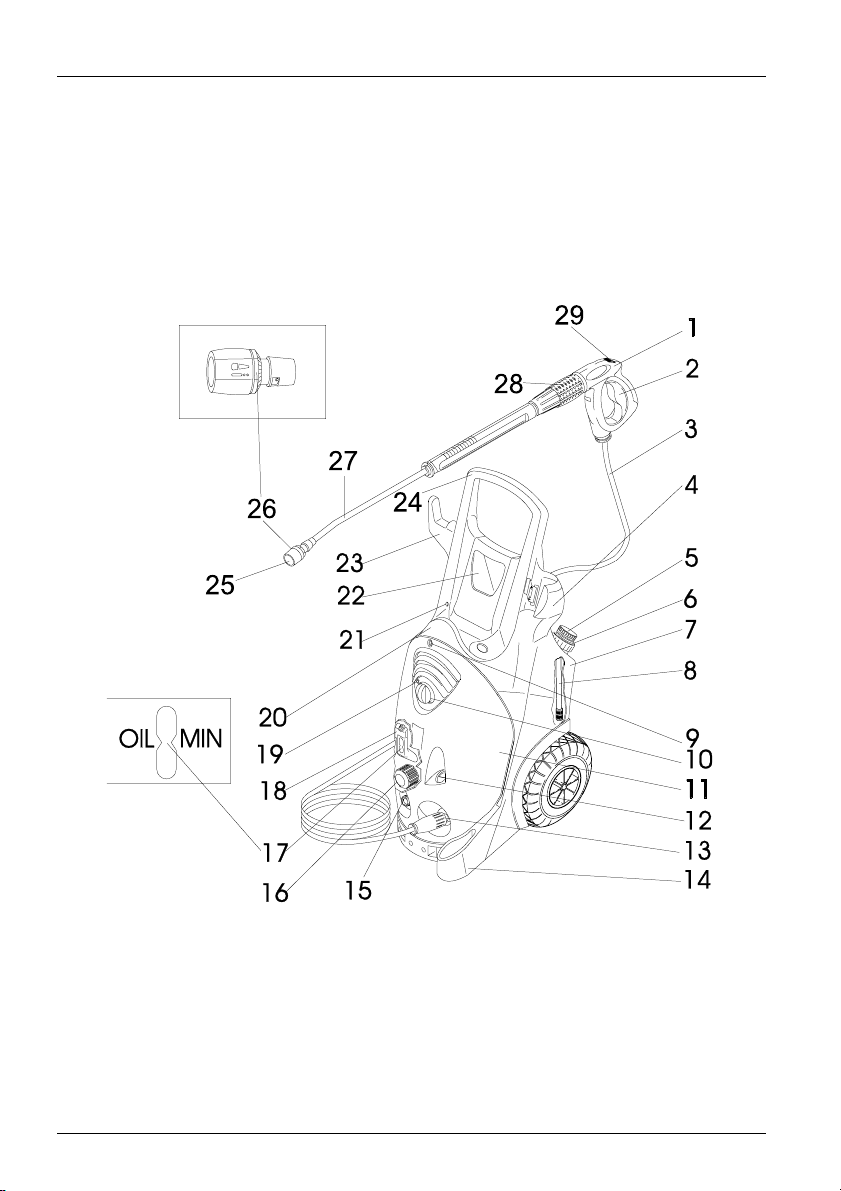
Unit components
Please fold out illustration page at the front
1 Hand-held spray gun
2 Lever of hand-held spr ay gun
3 High-pres sure hose
4 Handgun support
5 Detergent metering valve
6 Cap for de tergent rese rvoir
7 Detergent reservoir
8 Detergent suction-hose with filter
9 Fastening screw for hoo d
10 Unit switch
11 Hood
12 Pressure gauge
13 High-pressure outlet
14 Nozzle rest
15 Water connection
16 Fine filter
17 Oil level display
18 Oil reservoir
19 Indicator light
20 Hose rest
21 Detergent reservoir vent
22 Accessori es box
23 Cable holder
24 Handle
25 Nozzle
26 Marking of the nozzle
27 Spray lance
28 Pressure/flow cont rol
29 Safety catch of hand-held spray gun
For your safety
Before you use the cleaner for the first time,
read these operatin g in st ru ct ions and take
special note of the accom panying booklet
"Safety Instructio ns for High-Pressu re Cleaners" No. 5.951-949.
Use of the cleaner
Use this unit exclusiv el y f or
– cleaning with high-pr ess ure jet and deter-
gent (e.g. cleaning of machines, vehicles,
buildings, tools),
– cleaning with high-pressure jet without de-
tergent (e.g. cleaning f ac ades, terraces,
gardening equipmen t).
For stubborn dirt we recommend the dirt
blaster as an optiona l accessory.
Safety features
Relief valve with pressure
switch
On reducing the flow ra te wit h t he pr es sure
and flow control, the rel ie f va l ve opens and
part of t he wa ter runs ba ck t o th e suct io n si de
of the pump.
If the lever of the hand-held spray gun is released, th e pressure swit ch switches t he
pump off. If the lever is retracted, the pressure
switch switches the pump on again.
The overflow valve and pressure switch have
been set and sealed at th e f act or y.
Adjustments are m ade only by Customer
Service.
7
Page 8

Operating Instructions HD 10/25 S USA English
Preparing the unit for use
Unpack the unit
– When unpacking the un i t, che ck the con-
tents of the packaging. If there has been
any damage in transit info rm t he dealer.
– Do not dispose of the packa gi ng with the
household rubbish, ha nd i t in at th e appropriate collection point for recycling.
Check the oil level
Read the oil level displayed while unit is at
a standstill. The oil level must be above the
two indic ators.
Activate the oil reservoir vent
Unscrew the fastening screw of the hood
and remove the hood.
Cut off the tip on the cover to the oil res er -
voir.
Fasten the unit cover.
Mount the accessories
Mount nozzle on the spr ay lance (see
markings on the top of the setting ring).
Fit the spray lance to the hand- he l d spr ay
gun with pressure and flow control.
Lock cable clincher into bor e l at er al to the
handle.
Tighten the high-pressu re hose according-
ly.
Switching on the unit
Electrical connection
Caution!
The voltage specified on the mo del rating plate must corres po nd t o t he voltage supplied.
Caution!
The maximum tolerable mains
impedance at the el ect rical contact point (see
Technical Data) must not be exceeded.
Caution!
Use an extension cable with a sufficient
cable cross-section (see Technica l Specifications) and unwind it fully from the cable drum.
For connected load s see model rating plate/
Technical Specifications.
Caution!
It is essential that the unit is connected
to the power supply by means of a plug. An inseparable connec tion to the power supply is
prohibited. The plug is us ed to disconnect
from the mains.
Water connection/Suction feed
operation
Connection to water main
Caution!
Pay attention to the regulations of the
water supply company; according to DIN
1988, the unit may not be connected direct to
the public drinking water supply. A short-term
connection via a non- re tu rn val ve
(Order no. 6.412-578 ) is al low ed.
For connected loads see Technical Specifications.
Connect a supply hose (not supplied) to the
water outlet on the unit and to the water inlet (e.g. w ater tap).
Open water inlet.
8
Page 9

English Operatin g Instructions HD 10/25 S USA
!
Suctioning water from an open container
Screw suction hose with f ilter
(Order no. 4.440-238) to the w ater outlet.
Vent the unit before using.
To evacuate air from the unit, unscrew the
nozzle and leave the unit ru nning until water exits with no air bubbles.
Switch off the unit and screw th e nozzle
back on.
Operating the unit
Danger!
Observe the relative safety regulations
when using the unit at fillin g stat i ons or other
high-risk areas.
Caution!
Only clean engines in places which
have appropriate oil separators (protection of
the environment).
Caution!
Only wash animals with the lowpressure fan jet (see "Sel ecti ng the type of
spray").
Operating with high pre ssure
The unit is equipped with a pressure switch.
The motor only starts up when the lever is retracted.
Set the unit switch to "I". The indicator light
will go green.
Unlock the hand-held spray gun and retract
the lever of the gun.
Adjust operating pressu re and f low ra te
(+/–) by rotating the pressure/flow control
(infinitely variab le).
At the lowest flow rate the waste heat from
the motor will heat the wate r to approx.
15 °C.
Selecting the type of spray
The handgun must be cl osed.
Rotate the housing of the nozzle until the
desired symbol corresponds with the marking.
Select pencil jet or fan jet by contactless
changeover:
rotate the spray lance, whi ch is pointing
down at an angle of approx. 45°, to the left
or right.
Explanation of the symbol s
High-pressure pencil jet (0°),
for particularly st ubborn accumulation of grime.
High-pressure fan jet (25°), for
dirt accumulation over a la rge
surface.
Low-pressure fan jet (CHEM)
for operation with detergent or for
cleaning at low pressu re .
9
Page 10

Operating Instructions HD 10/25 S USA English
!
Operating with detergent
Caution!
Unsuitable deterge nt s can harm the
cleaner and the object which is to be cleaned.
Use only dete r gents which are released by
Kärcher. Proportions o f de tergent to be used
and accompanying instructions should be noted carefully. Use detergents sparingly out of
consideration for the environment.
Kärcher cleaning agen ts gua ra nt ee t ro ubl efree operation. Please seek advice or ask for
our catalogue of information sheets on cleaning agents.
Fill detergent reserv o ir.
Set nozzle to .
Set the detergent metering valve to the
desired concentration.
Concentr ation of dete r gent when flo w at
maximun:
Position of metering
valve
Recommended cleaning methods
Spray dete rgent with low pres sur e jet spar-
ingly over the dry surface to be cleaned and
let it take effect but not dry out .
Spray off (rinse off) the loosened dirt using
the high-pressure spr ay .
When you have finished the operation, set
detergent metering valve to "0" and switch
the unit on for about 1 minute and rinse it
clear of detergent.
1357
0.5%2.5%5.0%7.0
%
Interrupting the operation
Release lever of the handg un, th e un it
switches off. Retract le ver again and the
unit switches on agai n.
Availabi li ty time
Within the availability time, the unit starts
when the hand-held spr ay gun is opened.
The indicator light will go green.
If the spray gun remain s cl osed for
30 minutes, the availability time ends.
The indicator light will flash green.
Reset availability time
Switch off the unit switch.
Wait a moment.
Switch the unit back on again.
Customer Service ca n change the unit to
permanent operat io n.
Switching the unit off
Set unit switch to "0" and pull out pow er
plug.
Close water inlet.
Retract lever until the unit is with out pr es-
sure.
Push safety catch of the hand- he ld spr ay
gun forward to lock the lev er of the gun
from being actuated inadvertently.
Danger!
Risk of scalding due to hot water. Residual water contained in the switched off unit
can heat up. When re m ovi n g th e hose from
the water i nle t, th e he ater wate r ca n spur t ou t
and cause scal ds. Do not remov e t he hose
until the unit has cooled down.
Transporting the cleaner
To transport the cleaner over relatively long
stretches, take hold of it by the handle and
pull it along behind you.
Empty the detergent reservoir before trans-
porting it horizontal ly.
10
Page 11

English Operatin g Instructions HD 10/25 S USA
!
Storing the cleaner
Place the handgun in the support.
Reel in the high-pressure hose and hang it
over the hose rest.
or
Coil the connecting cable round the cable/
hose rest.
Frost protection
Caution!
Frost will destroy a unit that is not completely e mpty of wat er! St or e the un it where i t
will be free of frost.
If storage away from frost is not possible:
Empty the detergent tank (s ee care and
maintenance/As and when required).
Drain off the water and rinse t he un i t
through with anti-freeze.
Leave the unit to dry for max. 1 minute.
Use the standard glycol-based anti-freezes
for cars.
Follow the handling instructions of the anti-
freeze manufacturer.
Care and maintenance
Danger!
Before any care and maintenance work
on the unit draw out the main s plug.
Caution!
When changing the o il, dispose of any
waste oil only at authorised collection points.
Safety inspection/Maintenance
contract
You can arrange with your deal er to have a
regular safety inspection carried out or to
have a maintenance contract. Please seek
advice.
Before each use
Check connecting cable for damage (risk of
getting an electric shock), have a damaged
connectin g cable r eplaced w ithout d elay by
authorised Customer Service personnel or
an electrician.
Check high-pressure hose for damage
(danger of explosion), re place a damaged
high-pressure hose w i thout delay.
Check unit (pump) for any leaks.
Three drops per minute ar e all ow able and
can appear on the under si de of the unit.
Seek the help of Customer Service if leaks
are more serious.
Every week
Check oil level in oil reservoir: if the oil is
milky (water in oil), seek the help of Customer Service immediately.
Clean the fine filter.
– Unpressurize uni t .
– Unscrew the fastening screw of the hood
and remove the hood.
– Unscrew the cover with filter.
– Clean the filter with clean water or com-
pressed air.
– Reassemble in th e r everse order.
Clean the filter at the suction hose for de-
tergent.
Annually or after 500 operating
hours
Change the oil
– For oil quantity and type see Technical
Specifications.
– Undo the fastenin g sc rew, remove the
hood, unscrew the front oil drain plug on
the motor housing.
– Drain oil into a suitabl e container.
– Screw in the oil drain plug.
– Fill slowly with fresh oil; air bubbles have
to escape.
11
Page 12

Operating Instructions HD 10/25 S USA English
!
As and when required
Emptying and cleaning the detergent tank
– Pull out the screw cap and hose for the
detergent tank.
– Place the unit on its rear.
– Empty and clean the det ergent tank.
Troubleshooting
Danger!
Before any repair work is undertaken,
switch the unit off and pull out the power plug.
Have electrical compo nents checked and repaired only by authoris ed Customer Service
personnel.
For faults which are not identified in this chapter, or when in doubt or wh en expressly instructed to do so, cons ul t au t hor i sed
Customer Service perso nnel.
Indicator light
The indica tor li ght sh ows the operat ing st atus
(green) and faults (red).
To reset:
Switch off the unit switch.
Wait a moment.
Switch the unit back on agai n.
Operatin g status disp l ay
Constant green light:
– Unit is operational.
1 x flashing green:
– Operational readi nes s expired after
30 minutes.
– The unit switched off after 30 minutes of
permanent operation (safety feature in
the case of a burst high-pressure hose).
Fault disp l ay
1 x flashing red:
– High-pressure side leaking. Check high-
pressure hose, hose connections and
hand-held spray gun for leaks.
2 x flashing red:
– Motor too hot. Switch off the unit switch.
Leave unit to cool down. Switch the unit
back on again.
3 x flashing red:
– Fault in the power supply. Check the
mains connection. Check supply fuses.
4 x flashing red:
– Current consum pt io n t oo high. Consult
Customer Service
Unit does not wor k
Availability time has run out. The indicator
light will flash green. Switch the unit off and
then on again.
Check connecting cabl e fo r da m age.
Consult Customer Service if th er e is an
electrical fault.
Unit does not come up to pressure
Set nozzle to "high pressure".
Clean/replace nozzle.
Clean the fine filter, replace if required.
Evacuate air from the cleane r (see Switch-
ing on the unit).
Check water inlet volume (see Technical
Specifications).
Check all supply lines to the pump for le aks
or obstructions .
Seek the help of Custome r Service if nec-
essary.
12
Page 13

English Operatin g Instructions HD 10/25 S USA
Pump is leaky
Three drop s per minute ar e allowable and
can appear on the unders ide of th e unit.
Seek the hel p of Cust omer Serv ice i f lea ks
are more serious.
Pump makes a knocking noise
Check all supply lines as well as the deter-
gent system for leaks.
Evacuate air from the cleaner (see Switch-
ing on the unit).
Clean the fi ne filter.
Seek the help of Customer Ser vice if nec-
essary.
Detergent is not being drawn in
Set nozzle to "Chem".
Check detergent suction hose with filter for
leaks or obstructions and clean it if necessary.
Clean/renew non-return valve in detergent
suction-hose connect i on.
Open detergent metering valve or check it
for leaks/remove obstru ct io n. Als o cl ea n
the venting orifice in the hous i ng.
Seek the help of Customer Ser vice if nec-
essary.
Spare parts
You will find a list of spare parts at th e e nd of
these opera t i ng instruct ions.
Warranty
The warranty terms issued by our authorised
marketing company are valid in every country.
We remedy any fault in the unit free of charge
within the warranty period providing the cause
of the fault proves to be a ma te rial or m anufacturing error.
The warranty only be com es operative when
your dealer has compl et ed the reply card accompanying the sale of the unit, has stamped
and signed it and you have then sent the reply
card to the marketing com p any in your country.
Should you wish to call upon the guarantee,
please appl y to you r dea ler or near est auth orised Customer Service centre taking along
also the accessorie s and bill of sale.
13
Page 14

Operating Instructions HD 10/25 S USA English
Technical Specifications
HD 10/25 S USA
Mains connection
Voltage V 460
Type of current Hz 3 ~ 60
Connected load HP 10
Supply fuse (delayed-action, c har. C) A 16
Max. tolerable mains impedance Ω (0.145 + j0.090)
Extension cable 10 m mm
Extension cable 30 m mm
2
2
Water connectio n
Supply temperatur e max. °F 140
Supply volume min. gpm 5.3
Supply hose – minimum length m 7.5
Supply hose – minimum diameter inches 3/4
Suction height from an open cont ainer 20 °C m 0.5
Supply pressure max. psi 145
Performance data
Operating pressure psi 435 – 3190
Max. operating overpressure (safety valve) psi 3480
Flow rate
Detergent intake
gpm
gpm
Recoil force of the handgun N 62
Sound emission
Sound pressure level
dB (A)
(EN 60704-1)
Garanted sound pressure level
dB (A) 87
(2000/14/EC)
Vibrations of unit / total of vibrat ion (ISO 5349)
Handheld gun m/s
Spray lanc e m/s
2
2
Dimensions
Length mm 560
Width mm 500
Height mm 1090
Weight without accessories kg 62
Reservoir capacity, detergent l 6
Oil quantity, pump l 1.2
Oil type, pump SAE 90
2.5
4
2.2 – 4.5
0 – 0.3
72
2.2
2.0
14
Page 15

HD 10/25 S USA
 Loading...