

Page 1
QUICKSTART
B140R
Start up
A A Check if the battery plug is connected to the
1
Warning
These are only brief instructions! Please read and comply with these instructions prior to using or servicing your
appliance.
The non-compliance of the operating and safety instructions may lead to damages of the appliance and to dangers
for the operator and other persons.
appliance.
2
3
A B A Sit on the driver's seat.
Set main switch to “1”.
B Check battery status.
Note
The device is equipped with a safety mechanism
to prevent total discharge, i.e. when the permissible minimum capacity is reached, then the machine can only be driven and existing lamps can
be switched on. In such a case, the battery monitoring symbol on the control console glows red.
Drive the machine directly to the charging
station; avoid any steep gradients in the
process.
A B A Loosen the star handle screws.
B Push the seat back into the desired position.
Tighten star handle screws.
4
A
D
B C A Place the detergent bottle into the device.
Close the bottle lid.
Insert the suction hose of the dosaging
equipment into the bottle.
B Open the cover of the fresh water reservoir.
C Fill up fresh water (maximum 60 °C) until the
lower edge of filling nozzle.
Close the cover of the fresh water reservoir.
Model without dosing equipment "Dose"
D Pour in detergent.
Close the cover of the fresh water reservoir.
5.964-043.0 03/12
Page 2
QUICKSTART
1
Operation
A Starting the machine
A Sit on the seat and set main switch to "1".
2
3
A
D
B
E
C Driving
A Set programme switch to step 1 (driving).
B Drive forward
Set the drive direction using the drive
direction button at the operator console.
C Reverse drive
Set the drive direction using the drive
direction button at the operator console.
D Determine the driving speed by pressing
the drive pedal.
E Stop the machine: Release the drive pedal.
Cleaning Programs
A Scrubbing suction
Wet clean the floor and vacuum up dirt water.
4
B Wet scrubbing
Wet clean the floor and allow the detergent
to react.
C Vacuuming
Vacuum the wastewater.
D Polishing
Polishing the floor without the application
of liquid.
E Scrub the floor without applying water
(vacuum polishing)
Polish the floor without applying any fluid and
suck in the polishing dust.
F Manual cleaning
Apply liquid detergent using the wall-ceiling-
floor nozzle (optional) and vacuum it again.
A Info button
Use the Info button to select the menu items
and do the settings.
A Turning the button to the right/left scrolls
through the menus forward/ backward.
The selected setting gets accepted by
pressing the button.
5.964-043.0 03/12
Page 3

QUICKSTART
5
1
Operation
A Switch on the dosing equipment for
detergent (optional)
A Activate the switch for detergent dosing.
Detergent gets added automatically.
Finish operation
A Emptying waste container
A Only BR model: Remove bulk waste
container and empty it.
2
3
A
C D
A Charging battery
B Empty tanks.
몇 Warning
Please observe the local provisions regarding
the wastewater treatment.
A Take the water discharge hose from the
support and lower above a suited collection
device.
B Rinse the dirty water tank with clear water.
Take the water discharge hose from the
support and lower above a suited collection
device.
Leave the cover open to let it dry.
C Remove the suction hose coupling for
draining off the fresh water and hold it over
a suitable container.
D Select the cleaning program "manual dry"
via the program switch.
A Tilt the dirt water tank backwards.
Remove battery plug and join it to the
charging cable.
Connect the charger to the mains and turn
it on.
5.964-043.0 03/12
Page 4
QUICKSTART
Maintenance and care
1
2
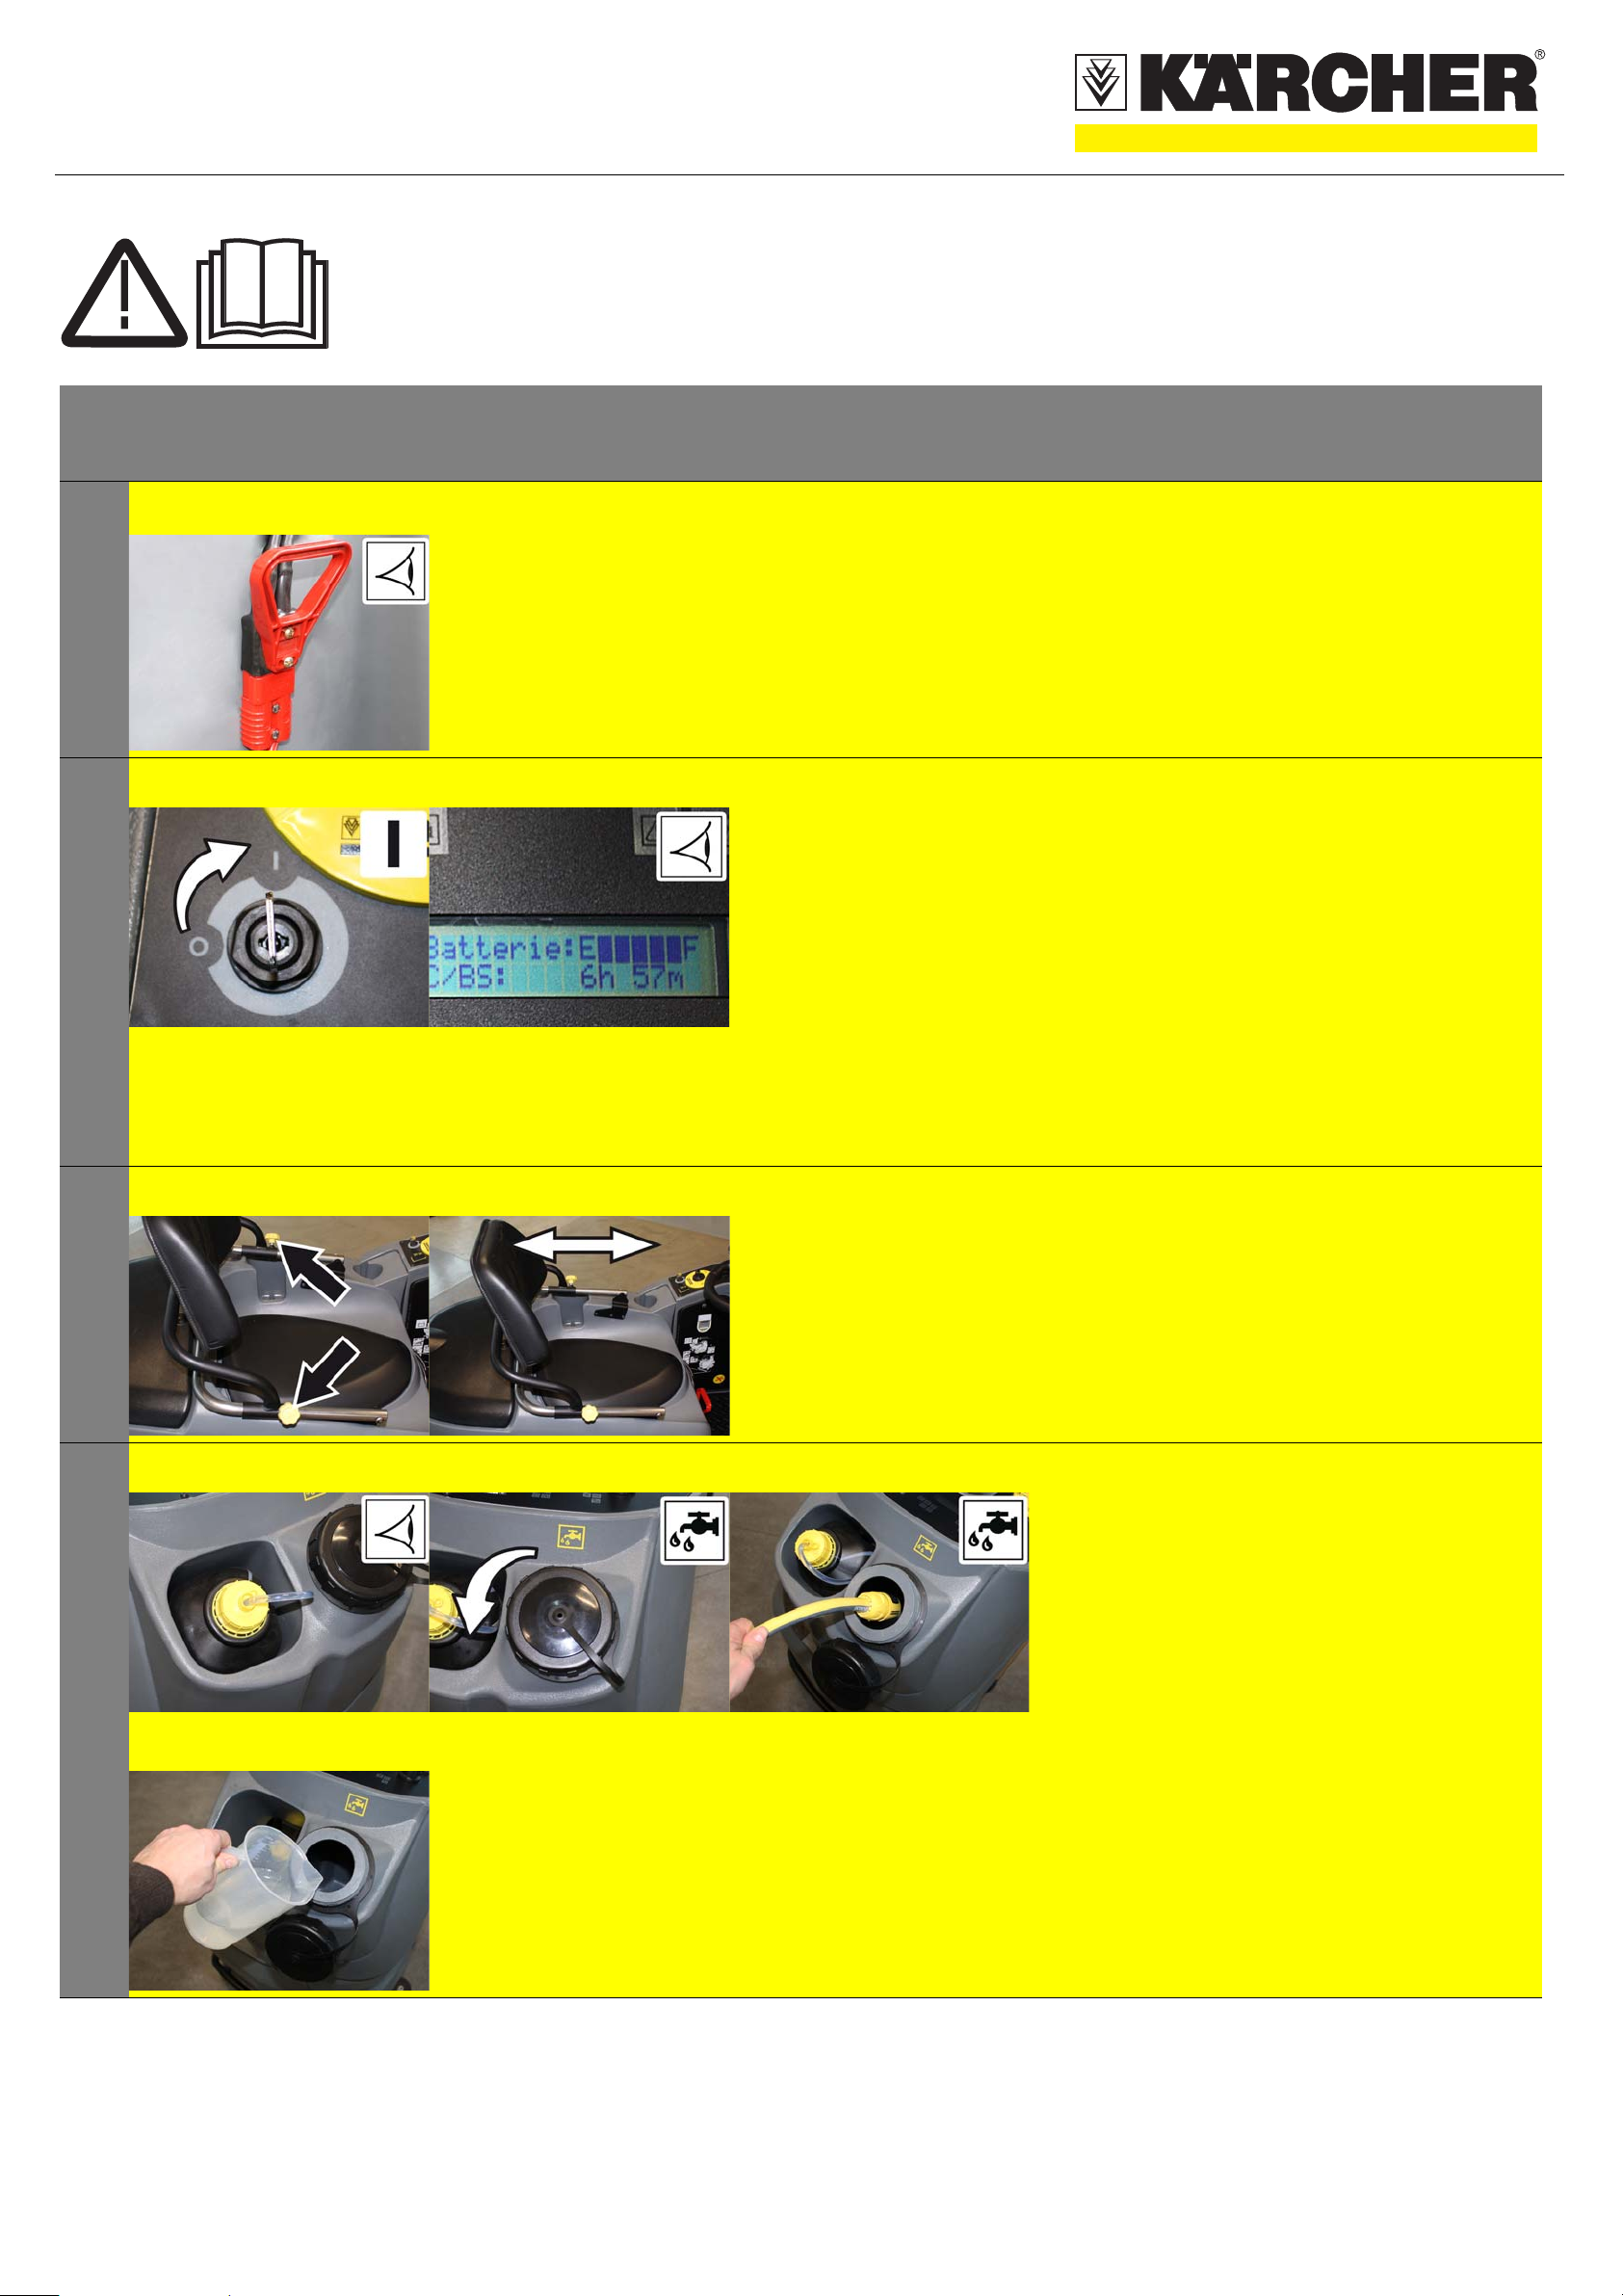
A A Check the fluff filter, clean if
required
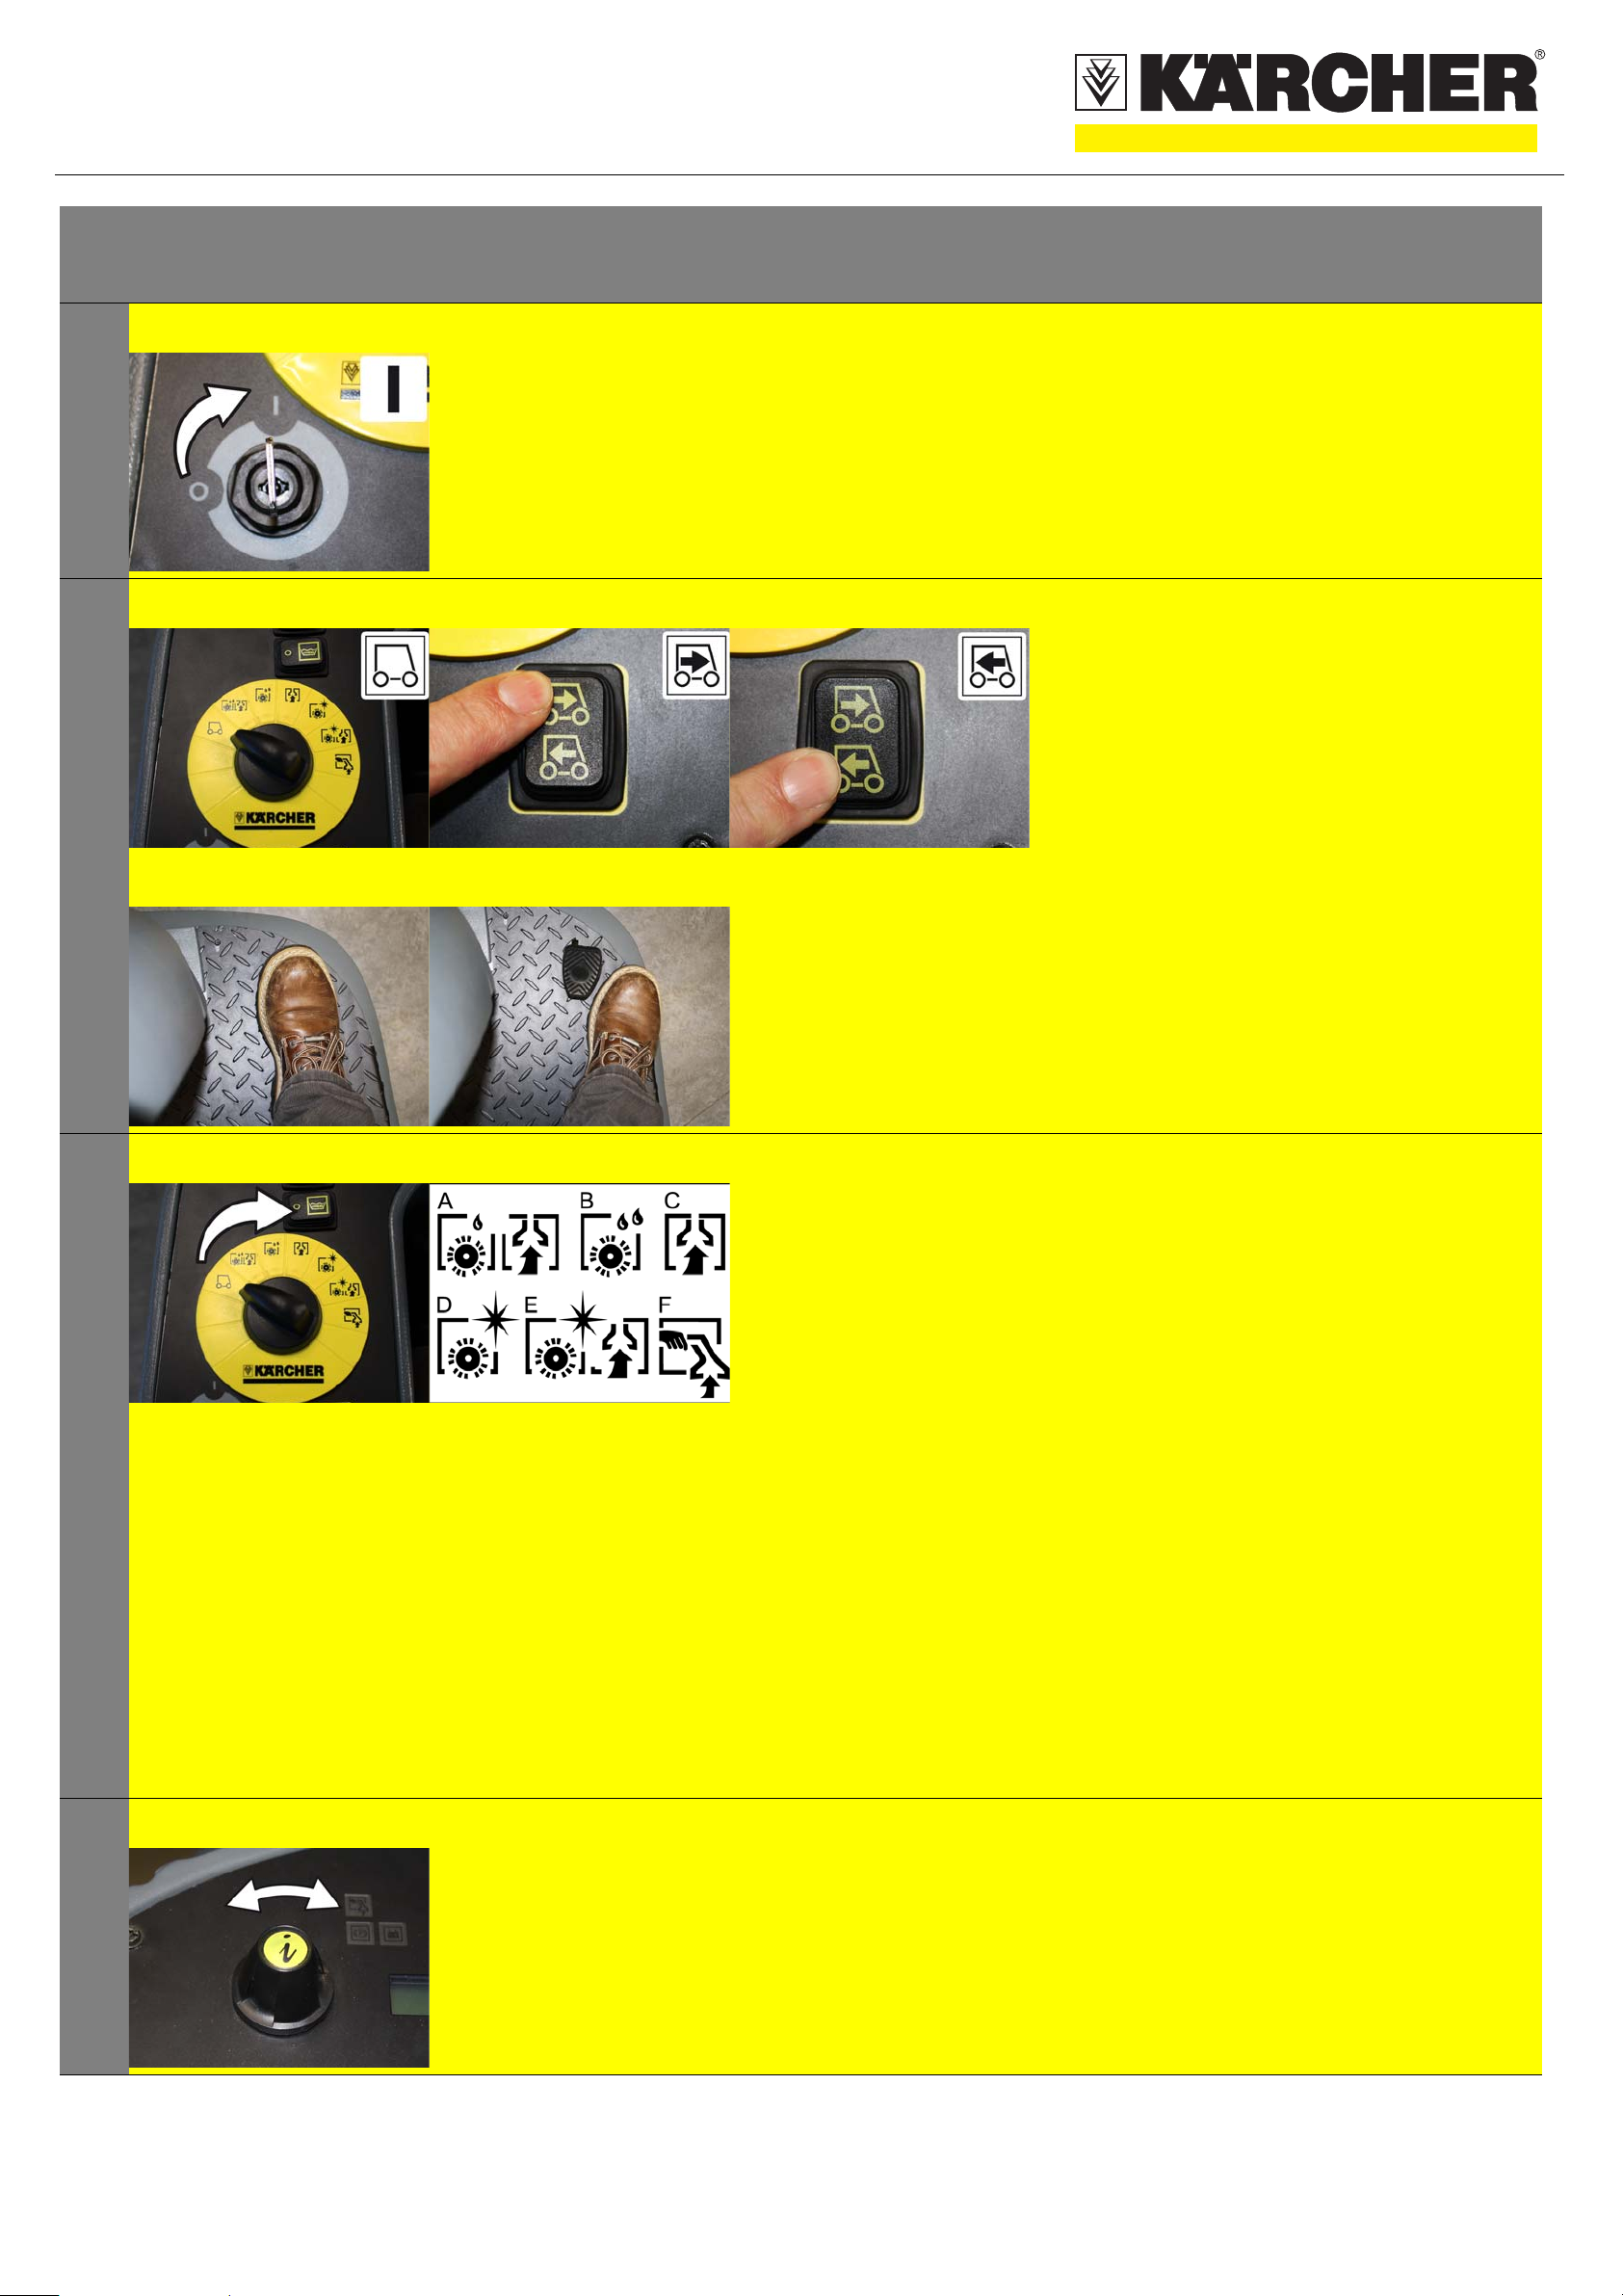
A B A Clean the vacuum lips and the
wiping lips, check for wear and
replace if required.
B Clean the suction channel.
daily
monthly
Kärcher Customer Service
3
4
5
6
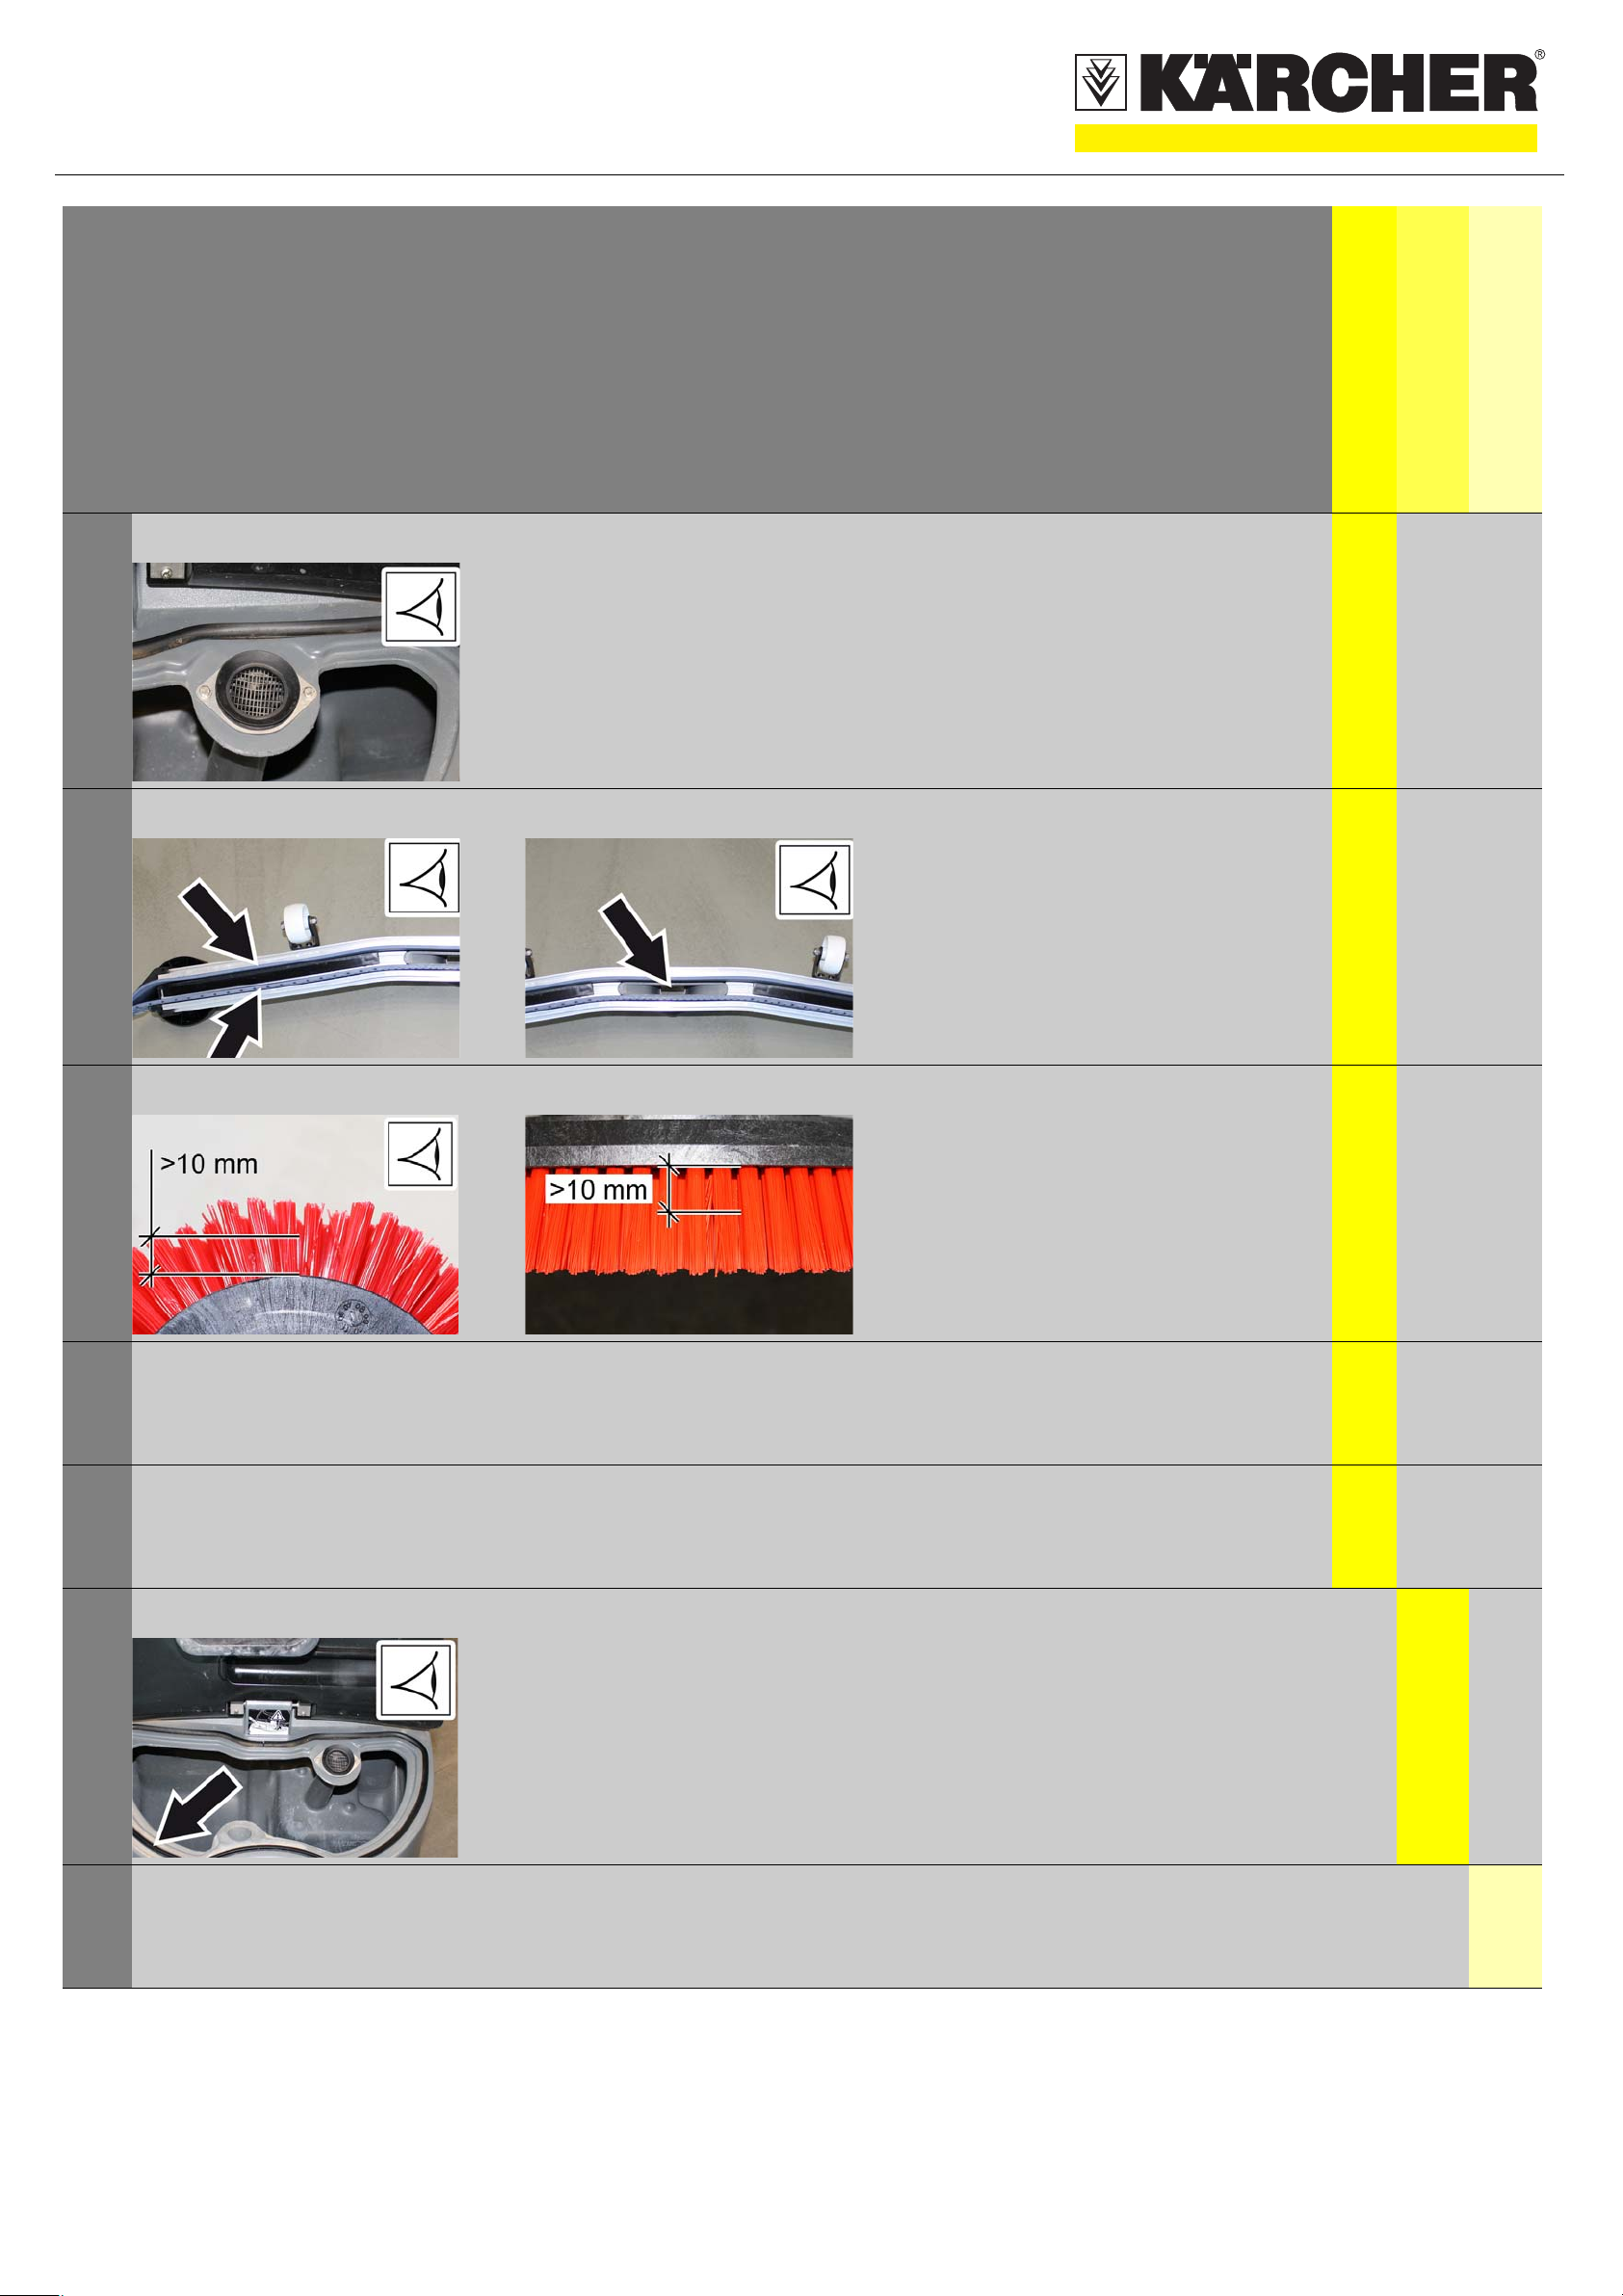
A A Check brush for wear and tear and
clean it.
Check the brushes for wear (bristle
length at least 10 mm), replace if
required.
Only with R cleaning head Remove
bulk waste container and empty it.
Clean the outside of the appliance with
a damp cloth which has been soaked in
mild detergent.
A A Clean the seals between dirt water
reservoir and cover and check for
tightness, replace if required.
7
Have the prescribed inspection carried
out by the customer service.
5.964-043.0 03/12
Page 5

QUICKSTART
1
Troubleshooting
A B C Appliance cannot be started
A Insert battery plug.
B Safety switch not activated, sit down on the
seat. Set main switch to “1”
C Check battery; charge it if required.
2
3
A
D
A Insufficient cleaning result
B C Insufficient vacuum performance
A Clean the seals between dirt water reservoir
and cover and check for tightness, replace if
required.
B Check the fluff filter, clean if required
C Clean the vacuum lips on the vacuum bar,
turn or replace if required.
D Check suction hose for blockages;
clean if required.
Check connection between suction hose and
suction bar and suction hose and wastewater
tank.
A Check brush for wear and tear and clean it.
Check the brushes for wear (bristle length at
least 10 mm), replace if required.
4
5
A B C Insufficient water quantity
A Check fresh water level, refill tank if
necessary.
B Check that the hose coupling for
draining the fresh water is connected.
C Clean the fresh water filter.
Open the ball tap.
A Brushes do not turn
A Reduce contact pressure.
– Check the brushes for blockage due to
foreign particles, remove them if found.
– Motor overload, allow to cool down. Set the
key switch to "0". Wait approx. 10 minutes
before turning the key switch to "1" again.
5.964-043.0 03/12
 Loading...