

Page 1

Printing System (X)
Operation Guide
Set-up Edition
Page 2

Page 3

Content s
1 Preparations
Names of Parts . . . . . . . . . . . . . . . . . . . . . . . . . . . . . . . . . . . . . . . . . . . . . . . . . . . . . . . . . . . . . 1-1
Main Body . . . . . . . . . . . . . . . . . . . . . . . . . . . . . . . . . . . . . . . . . . . . . . . . . . . . . . . . . . . 1-1
Operation Panel . . . . . . . . . . . . . . . . . . . . . . . . . . . . . . . . . . . . . . . . . . . . . . . . . . . . . . 1-2
Accessories . . . . . . . . . . . . . . . . . . . . . . . . . . . . . . . . . . . . . . . . . . . . . . . . . . . . . . . . . . . . . . . . 1-2
Items to be Prepared by the User . . . . . . . . . . . . . . . . . . . . . . . . . . . . . . . . . . . . . . . . . . . . . . . 1-3
2 Set-up
Installation Procedure for Local Printing . . . . . . . . . . . . . . . . . . . . . . . . . . . . . . . . . . . . . . . . . . 2-1
Connecting a USB Cable . . . . . . . . . . . . . . . . . . . . . . . . . . . . . . . . . . . . . . . . . . . . . . . 2-1
Loading Software . . . . . . . . . . . . . . . . . . . . . . . . . . . . . . . . . . . . . . . . . . . . . . . . . . . . . 2-3
Custom Installation . . . . . . . . . . . . . . . . . . . . . . . . . . . . . . . . . . . . . . . . . . . . . . . . . . . . 2-4
Installation Procedure for Network Printing . . . . . . . . . . . . . . . . . . . . . . . . . . . . . . . . . . . . . . . . 2-5
Connecting the Cables . . . . . . . . . . . . . . . . . . . . . . . . . . . . . . . . . . . . . . . . . . . . . . . . . 2-5
Loading Software . . . . . . . . . . . . . . . . . . . . . . . . . . . . . . . . . . . . . . . . . . . . . . . . . . . . . 2-6
Installing KMprint . . . . . . . . . . . . . . . . . . . . . . . . . . . . . . . . . . . . . . . . . . . . . . . . . . . . . . 2-6
Installing the Printer Driver . . . . . . . . . . . . . . . . . . . . . . . . . . . . . . . . . . . . . . . . . . . . . . 2-7
Installing Software Using Quick Setup . . . . . . . . . . . . . . . . . . . . . . . . . . . . . . . . . . . . . 2-8
Status Monitor . . . . . . . . . . . . . . . . . . . . . . . . . . . . . . . . . . . . . . . . . . . . . . . . . . . . . . . . 2-9
Configuration Tool . . . . . . . . . . . . . . . . . . . . . . . . . . . . . . . . . . . . . . . . . . . . . . . . . . . . . 2-9
Printing a Status Page . . . . . . . . . . . . . . . . . . . . . . . . . . . . . . . . . . . . . . . . . . . . . . . . . . . . . . . 2-10
Uninstalling Software . . . . . . . . . . . . . . . . . . . . . . . . . . . . . . . . . . . . . . . . . . . . . . . . . . . . . . . . 2-11
3Printing
Printing a Document . . . . . . . . . . . . . . . . . . . . . . . . . . . . . . . . . . . . . . . . . . . . . . . . . . . . . . . . . . 3-1
4 Troubleshooting
Basic Troubleshooting Chart . . . . . . . . . . . . . . . . . . . . . . . . . . . . . . . . . . . . . . . . . . . . . . . . . . . 4-1
Print Quality Problems . . . . . . . . . . . . . . . . . . . . . . . . . . . . . . . . . . . . . . . . . . . . . . . . . . . . . . . . 4-2
Pausing Printing . . . . . . . . . . . . . . . . . . . . . . . . . . . . . . . . . . . . . . . . . . . . . . . . . . . . . . . . . . . . . 4-2
Canceling Printing . . . . . . . . . . . . . . . . . . . . . . . . . . . . . . . . . . . . . . . . . . . . . . . . . . . . . . . . . . . 4-2
5 Options
Print Server (IB-110) . . . . . . . . . . . . . . . . . . . . . . . . . . . . . . . . . . . . . . . . . . . . . . . . . . . . . . . . . 5-1
6 Specifications
i
Page 4

ii
Page 5

Trademark Information
• Microsoft, Windows and WindowsNT are registered trademarks of Microsoft
Corporation of America and other countries.
• Windows Me and Windows XP are trademarks of Microsoft Corporation.
• Ethernet is a registered trademark of Xerox Corporation.
• Adobe, Adobe Acrobat and Adobe Reader are registered trademarks of Adobe Syste ms
Incorporated.
All other company and product names cont ain e d in this Ope ratio n Gu id e ar e tra d em a rks
or registered trademarks of their respective companie s. The designations ™ and
be used in this Operation Guide.
• This product has been certified by the USB Implementers Forum, Inc.
All rights reserved. No part of this material may be reproduced or transmitted in any form
or by any means, electronic or mechanical, including photocopying, recording or by any
information storage and retrieval system, without permission in writing from the Publisher.
Legal Restriction On Copying
• It may be prohibited to copy copyrighted material without permission of the copyright
owner.
• It is prohibited under any circumstances to copy domestic or foreign currencies.
• Copying other items may be prohibited.
About this Operation Guide
The Operation Guide Set-up Edition is meant to be read when using this machine as a local
printer or a network printer by installing a printer board. This Operation Guide explains how
to set up this machine.
®
will not
As the required set-up in order to use the pr inter a s a scan ner ma y differ dep en ding up on
the environment in use in the connected computer, please read those sections related to
your specific computer environment and perform the appropriate set-up procedures
explained there.
iii
Page 6
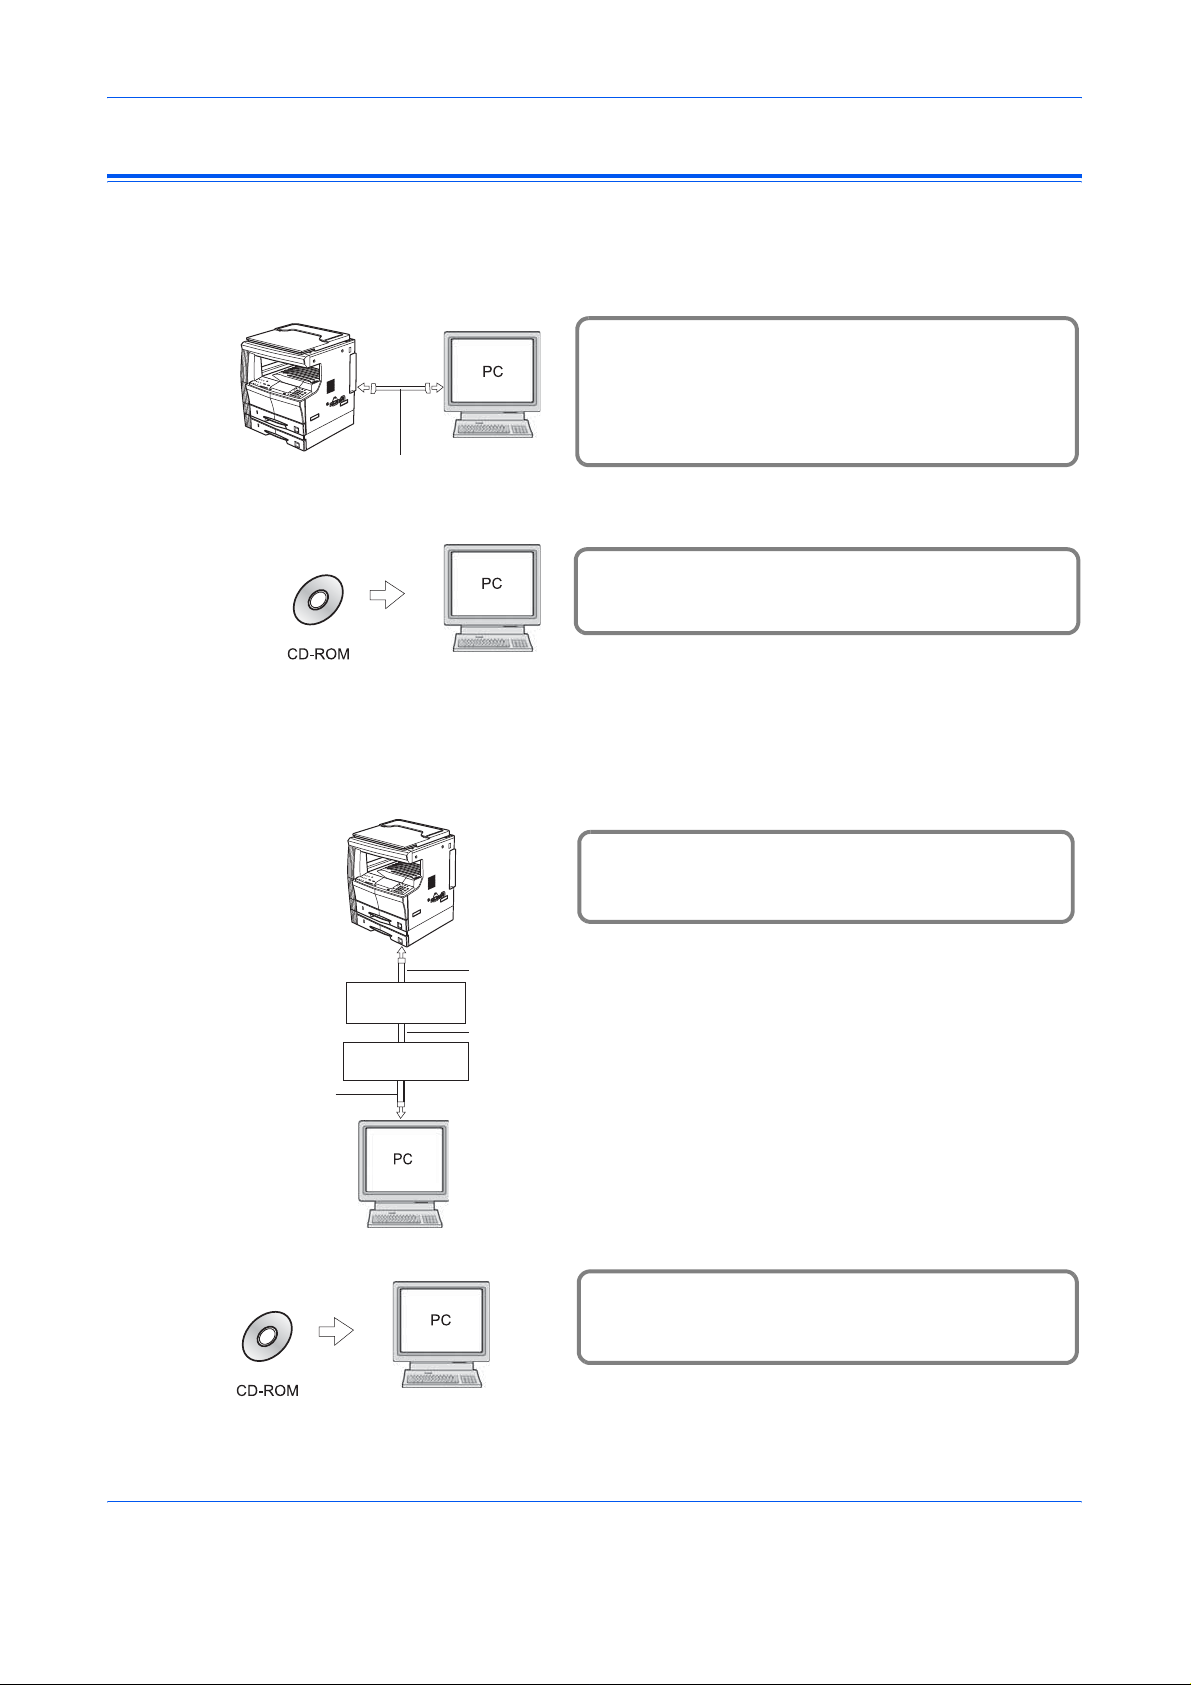
Getting Connected
For local connection of this machine (direct connection between a computer and the printer
through a USB cable)
Example connection
USB cable
Connect the computer and the printer
1
through a USB cable. If the Plug & Play
Auto Installation process starts, cancel it
and install the driver using the Product
Library CD.
Load and install the software in the
2
computer.
Page 2-1
Page 2-3
For network connection of this machine (connection of the printer through a network)
Example connection
Connect a network cable (100Base-TX,
1
10Base-T or the like) and IB-110 to the
printer.
USB cable
IB-110
(print server)
Network cable
Hub (connector)
Network cable
Load and install the software in the
2
computer.
Page 2-6
Page 2-6
iv
Page 7
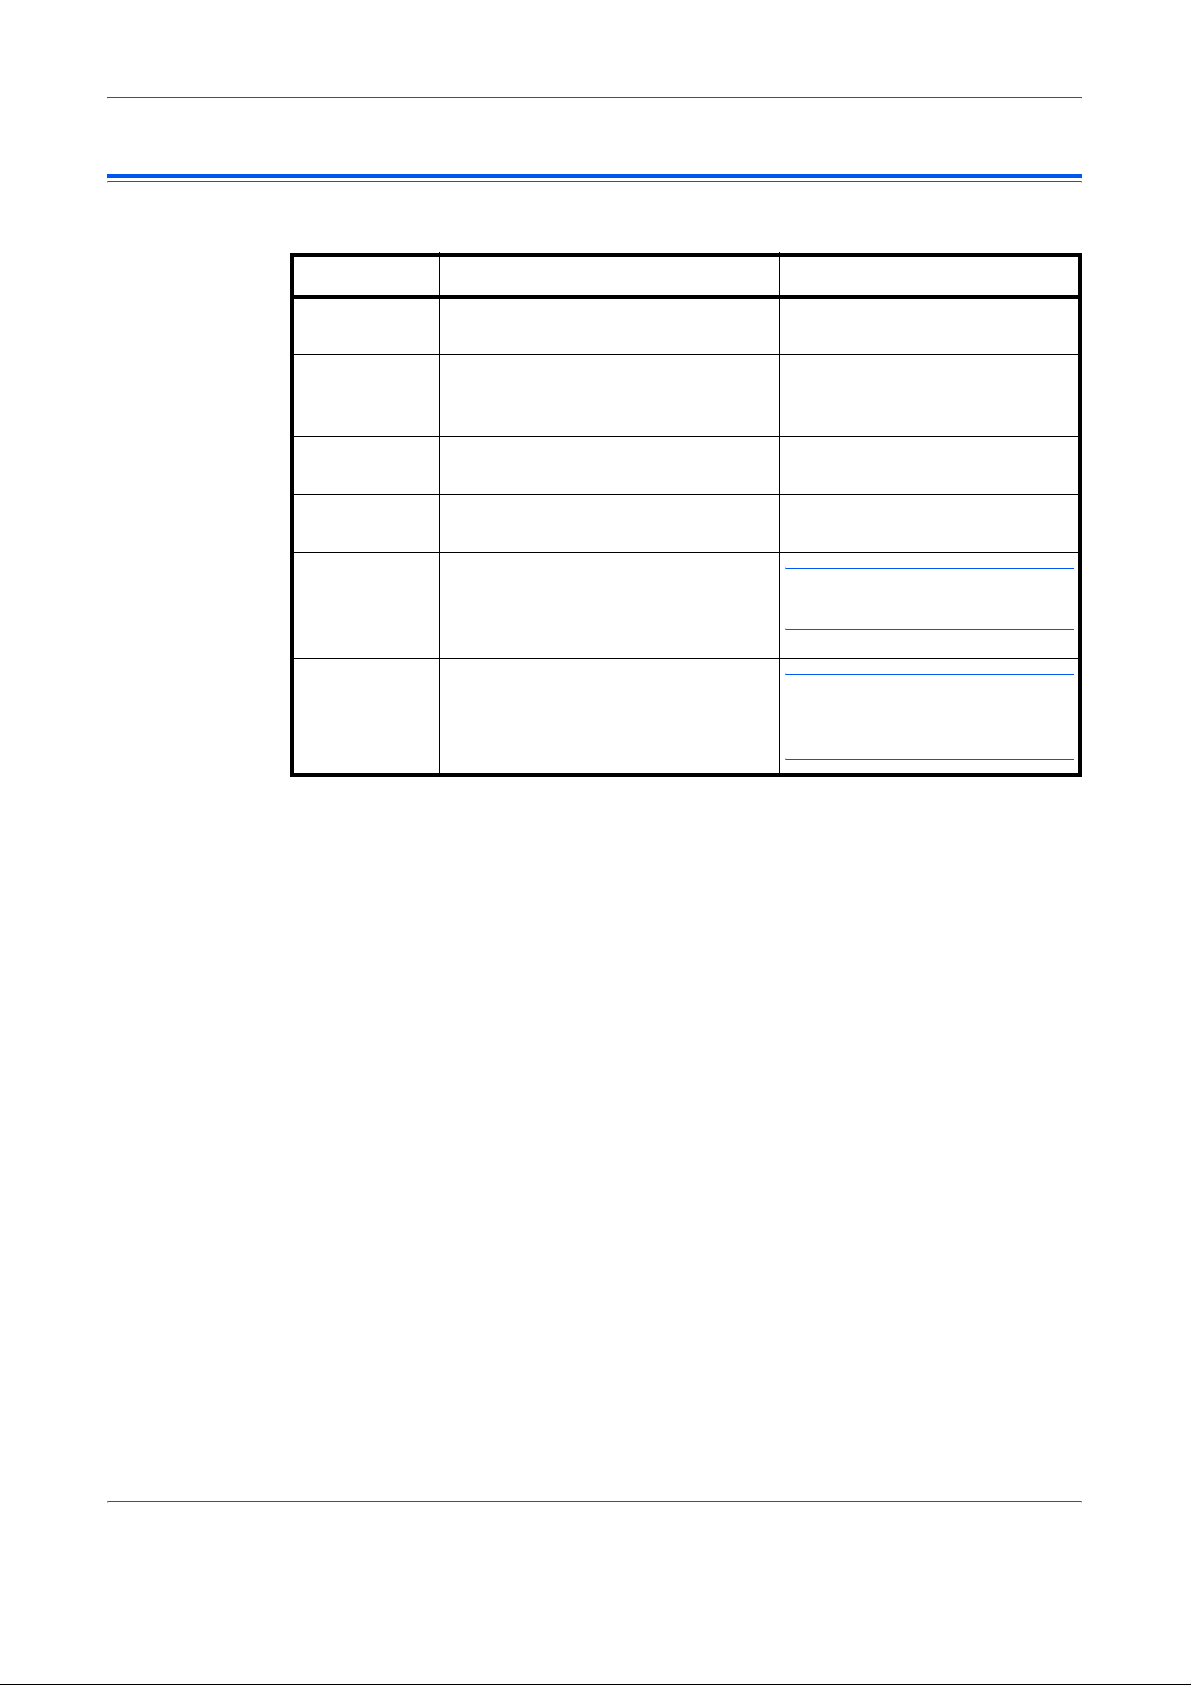
Conventions
This manual uses the following conventions:
Convention Description Example
Bracket Bold
Text Typeface
Bold Typeface Used to emphasize buttons or items
Italic Typeface Used for references to additional
Courier
Typeface
Notes Used to provide additional or useful
Important Used to provide important
Used to emphasize the selection of
the operation panel key.
to be selected in dialog boxes, and
titles displayed in dialog boxes.
information and other publications.
Used to denote messages or names
displayed on the operation panel.
information about a function or
feature. Can also contain references
to other publications.
information.
Press the [Print] key.
Click Next.
For details, refer to Custom
Installation on page 2-5.
Error occurred.
Press Printer.
NOTE: You can set the
emulation for each interface.
IMPORTANT: Formatting of the
memory card must be executed
from the printer.
v
Page 8

vi
Page 9
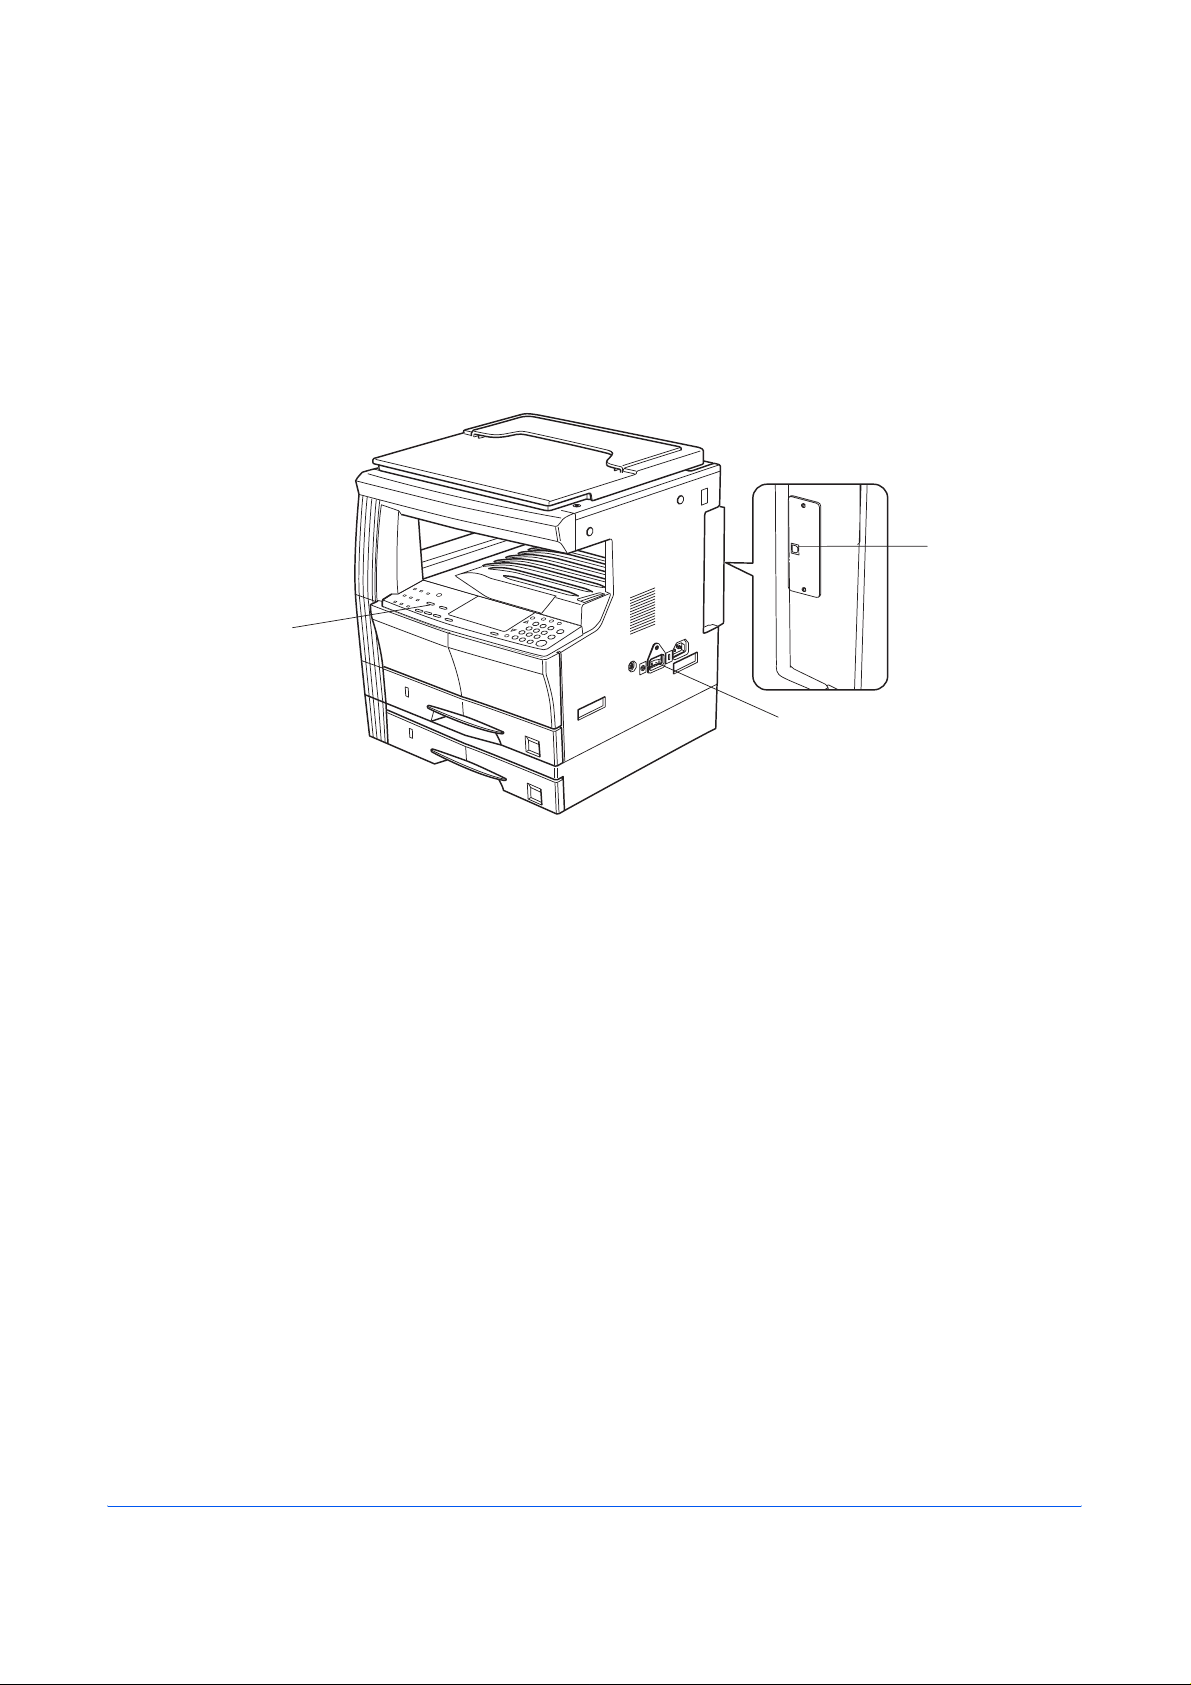
1 Preparations
Names of Parts
Main Body
3
1
2
1 USB interface connector - USB interface based on Hi-Speed USB. Use a USB
cable to connect to a USB port of a computer.
2 Main power switch - When using this machine, turn on the main power switch.
When connecting a printer cable or the like, turn off this switch.
3 Operation panel - When entering settings on this machine, use the operation panel.
1-1
Page 10
Preparations
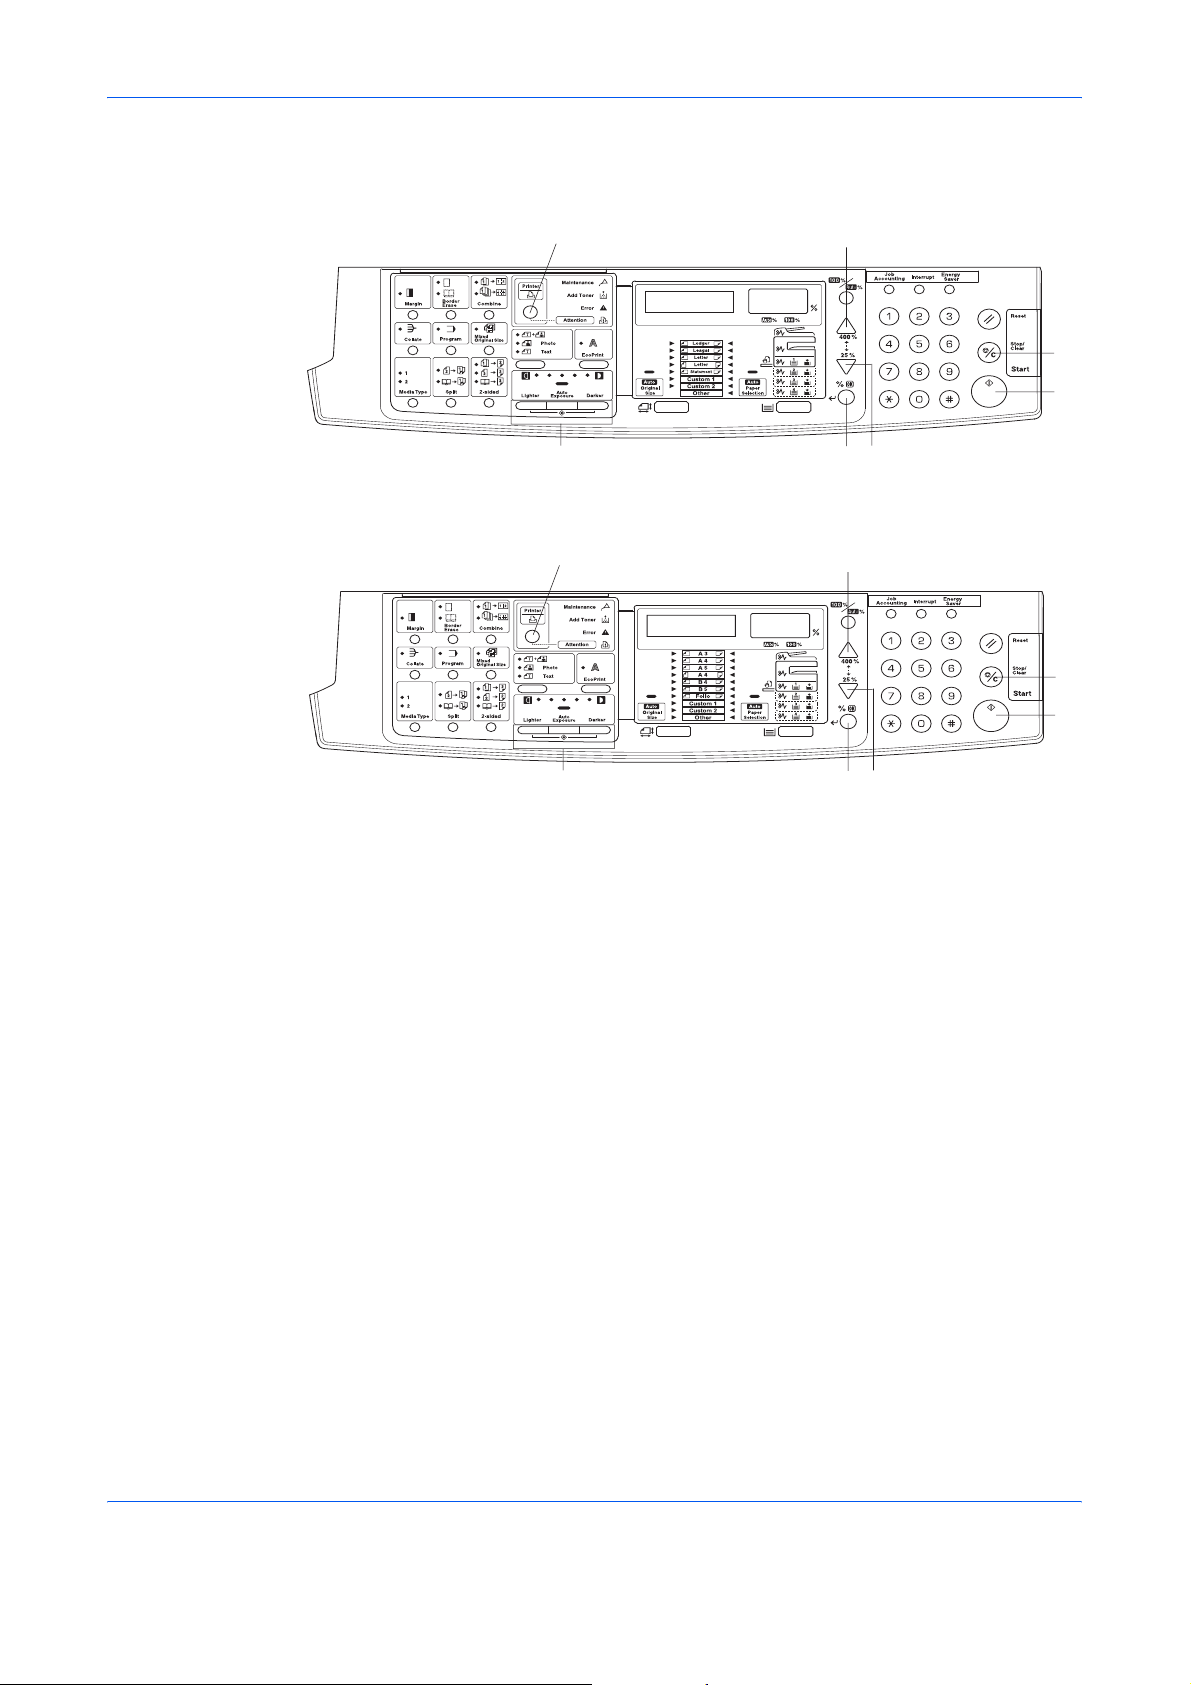
Operation Panel
Inch Specifications
Metric Specifications
1
7
1
7
4
3
2
5
6
4
3
2
5
6
Accessories
1 Printer key (S tatus indicator) - Press this key when selecting the printer mode. Press
this key when you want to pause or resume printing.
Lights up or blinks to show the status of this machine.
Light on: This machine is online but no data is being received.
Blinking: The machine is receiving the print job.
Turns off: This machine is offline.
2 Start key - Press this key to pause or resume printing.
3 Stop/Clear key - Press this key to cancel printing.
4 V - Press this key to display menu.
5 U - Press this key to display menu.
6 %/OK key - Press this key to determine the menu or settings.
7 Exposure Adjustment Key/Exposure Display - Press this key to print a Status Page.
• CD-ROM: 1 pcs.
• Operation Guide (this document)
1-2
Page 11

Items to be Prepared by the User
• For USB connection of the printer: USB2.0 compatible cable (based on High-Speed
USB, shorter than 5.0
• For network connection of the printer: Hub, IB-110 (option), and Network cable
(option, 10Base-T or 100Base-TX)
NOTE: When using a USB or 10Base-T or 100Base-TX cable, use a shielded cable.
m)
Preparations
1-3
Page 12

Preparations
1-4
Page 13

2 Set-up
Installation Procedure for Local Printing
When using this machine as a local printer, you can use a USB cable as a printer cable to
connect the machine to a computer.
Connecting a USB Cable
Turn on your PC.
1
Turn the main power switch of this machine ON
2
( | ).
Connect the USB cable to the USB Interface
3
Connector located on the rear right of this
machine.
NOTE: Use a USB cable with a rectangular
Type A plug and a square Type B plug. The
USB cable should be shielded and no longer
than 5 meters (16 feet) long.
2-1
Page 14

Set-up
Connect the other side of the USB cable to the computer's USB interface connector.
4
The Found New Hardware Wizard is displayed.
NOTE: If this wizard is not displayed, reconnect the USB cable between your computer and
printer. The Hardware Wizard will display when the printer is properly connected.
Click Cancel to close the Found New Hardware Wizard.
5
2-2
Page 15

Loading Software
Ensure the printer is plugged in and connected to the computer’s USB port before installing
software from the CD-ROM.
Set the CD-ROM into the optical drive of the computer. Once the installation program
1
launches, the License Agreement Notice is displayed.
NOTE: If the installation program fails to launch, use Windows Explorer to access the CD-ROM
and double-click the Setup.exe.
Click View License Agreement to display and read it.
2
Click Accept to proceed.
3
Click Install Printer Software. The Installation Wizard starts.
4
Click Next.
5
For the simple, default installation, select Express Mode (USB only) and click Next.
6
Set-up
The installation program installs the software.
NOTE: If you selected Custom Mode, select Universal Serial Bus (USB) to select the
connection method, and follow the on-screen instructions. For details, refer to
on page 2-4.
When installing software for Windows XP or 2000, if a software installation warning for an unsigned
device driver is displayed, click Continue Anyway to bypass the warning and install the driver. All
device drivers have been fully tested.
Custom Installation
When the installation is complete, the Installation Completed Successfully window is
7
displayed. Click Finish to leave the install program and return to the disc main menu.
2-3
Page 16

Set-up
Custom Installation
The Custom Mode is the user selection mode and allows users to customize the install
options.
Follow steps 1 to 6 of Loading Software on page 2-3.
1
Select Custom Mode and click Next.
2
Select the software packages you wish to install, and clear the ones you do not want
3
installed.
Click Next.
4
When the installation is complete, the Installation Completed Successfully dialog box is
5
displayed. Click Finish to leave the install program and return to the disc main menu.
At this point you may see a reminder to connect the printer to your computer and the Plug
& Play Auto Installation Process may start. The dialog box reminder to connect a USB
cable will be closed automatically when the driver is installed successfully.
2-4
Page 17

Installation Procedure for Network Printing
Network printing is an optional feature of this print system. When using this machine as a
network printer, prepare the following items to connect this machine to a network.
•Hub
•IB-110
• USB cable
• Network cable (10Base-T or 100Base-TX)
NOTE: When you connect the machine with a USB cable as a local printer, you cannot use this
machine as a network printer.
Connecting the Cables
Connect the network cable to the hub (concentrator).
1
Connect the other side of the network cable to the Network Interface Connector of the IB-
2
110.
Connect the USB cable to the USB Interface
3
Connector on the rear right of this machine.
Set-up
NOTE: Use a USB cable with a rectangular
Type A plug and a square Type B plug. The
USB cable should be shielded and no longer
than 5 meters (16 feet) long.
Connect the other side of the USB cable to the USB Interface Connector of the IB-110.
4
Connect the power supply cable to the connector near the USB Interface Conne ctor of the
5
machine.
Connect the other side of the power supply cab le to the co nn e cto r of th e IB- 11 0.
6
Turn the main power switch of this machine ON
7
( | ). Confirm that the indicator of the IB-110 is lit
green.
2-5
Page 18

Set-up
Loading Software
Ensure that the network connection is complete before installing software from the CDROM.
Turn on your PC.
1
NOTE: In Windows XP or 2000, you must be logged into the system with administrator privileges.
Set the CD-ROM into the optical drive of the computer. Once the installation program
2
launches, the License Agreement Notice is displayed.
NOTE: If the installation program fails to launch, use Windows Explorer to access the CD-ROM
and double-click Setup.exe.
Click View License Agreement to display and read it.
3
Click Accept to proceed.
4
Click Install Printer Software. The Instal la tion Wizard starts.
5
Click Next.
6
Select Custom Mode and click Next. The Connection Method dialog box is displayed.
7
Select Network Port and click Next. The Customized Installation dialog box is displaye d.
8
Select options you want to install, and click Next. The installer starts installing the
9
software. After a while the KMprint Install wizard is displayed. Proceed to Installing
KMprint.
NOTE: If your network does not include a DHCP server, select Quick Setup to enter the IP
address for the printer individually. For details of installing software using Quick Setup, refer to
Installing Software Using Quick Setup on page 2-8.
Installing KMprint
Follow these steps to install KMprint and add the KMPort. KMPort is a private port for
network printing using IB-110.
In KMprint Install wizard, click Next.
1
Click Next.
2
2-6
NOTE: If necessary, click Browse to change the destination directory of the software.
Specify a program folder where the program icons will be located. Click Next. Installation
3
of KMprint starts.
Page 19

Select Yes to create a KMPort, and click Finish. The KMPort Add Port Wizard is
4
displayed.
NOTE: Even if you selected No, you can specify a KMPrint port in step 4 of Installing printer driver.
Click Search to detect your printer name from the printer list, and click OK.
5
NOTE: If not displayed in the list, enter the printer’s MAC address. The MAC address may be
found on the network status page.
Click Next.
6
Enter the desired port name for the KMprint, and click Next.
7
Confirm the settings, and click Finish. The KMPort Add Port Wizard is completed, and the
8
Installation Wizard is displayed. Proceed to Installing printer driver.
Installing the Printer Driver
Set-up
Follow these steps to install the printer driver. This section explains how to install the pr inter
driver when you selected Local connection which enables a PC to be connected directly
to a network printer.
In Installation Wizard, click Next.
1
Select Local Connection or Network Connection.
2
Select the printer model, and click Next.
3
Select a KMPrint port from the port list, and click Next.
4
NOTE: If you have not created a KMprint port in step 4 of Installing KMprint on page 2-6, you can
specify it by selecting Create a new port and clicking Next. Follow steps 5 to 8 of Installing KMprint
on page 2-6.
Change the printer name if necessary.
5
Specify whether you use this printer as a default printer, and click Next.
6
Specify whether you share this printer, and click Next.
7
8
9
10
Specify whether you want to print a test page, and click Next.
If the settings are correct, click Install. Installation of the printer driver starts. Otherwise,
click Back to modify the settings.
If you wish to install another printer, select Yes. Otherwise, select No and click Finish.
The printer software installation is complete.
2-7
Page 20

Set-up
NOTE: If you select Configuration Tool and Status Monitor in step 9 of Loading software, each
installation starts. When the installation is complete, click Finish.
Installing Sof t ware Using Quick Setup
Quick Setup enables configuration of the most common networking settings. In addition,
after installing the printer driver, you can assign the new IP address to this machine using
Quick Setup.
Follow the steps 1 to 8 of Loading Software on page 2-6.
1
Select Quick Setup of the options and click Next. The Quick Setup wizard is displayed.
2
2-8
Select the machine you wish to install, and click Next.
3
NOTE: If the machine is not displayed in the list, enter the machine’s MAC address.
Confirm the TCP/IP configuration and click Next.
4
NOTE: If you wish to assign the new IP address to this machine or change the configuration, enter
the information into the field.
Confirm the configuration changes and click Finish. The KMprint Install wizard is
5
displayed.
Follow the steps 10 or later of Loading Software on page 2-6.
6
Page 21

Status Monitor
When you select Express Mode (USB only) in step 6 of Loading Software on page 2-3,
Status Monitor is automatically installed.
NOTE: If you select HBPS Utility from the options in step 3 of Custom Installation on page 2-4 or
step 9 of Loading Software on page 2-6, Status Monitor is installed.
The Status Monitor enables you to customize the printer’s monitoring settings to meet your
own requirements.
Configuration Tool
When you select Express Mode (USB only) in step 6 of Loading Software on page 2-3,
Configuration Tool is automatically installed.
NOTE: If you select HBPS Utility from the options in step 3 of Custom Installation on page 2-4 or
step 9 of Loading Software on page 2-6, Configuration Tool is installed.
The Configuration Tool enables you to customize the printer settings to meet your own
requirements.
Set-up
2-9
Page 22

Set-up
Printing a Status Page
This section explains the procedure for printing the status page. Th e status page is a list of
parameters and page counts of the printing system. You may be required to produce a
status page when requesting service for the machine.
Press and hold the [Exposure Adjustment] key (Lighter and Darker) for at least 3
1
seconds. The System Menu will be displayed.
Press the [V] or [U] key to display the 59.Printer Status.
2
Press the [OK] key twice.
3
2-10
Page 23

Uninstalling Software
You can uninstall the printer software from the CD-ROM.
Click Remove Printer Software. The Uninstall Wizard is displayed.
1
Select the software package to remove.
2
Click Uninstall. Uninstallation of the printer software starts.
3
When uninstallation is complete, click Finish.
4
Set-up
2-11
Page 24

Set-up
2-12
Page 25
3Printing
Printing a Document
The steps required to print a document crea t ed with an application are explained below.
You can select the printing paper size and output location.
NOTE: You can customize the settings of the Status Monitor and Configuration Tool.
Insert the proper paper size (such as A4) into the printer's paper cassette.
1
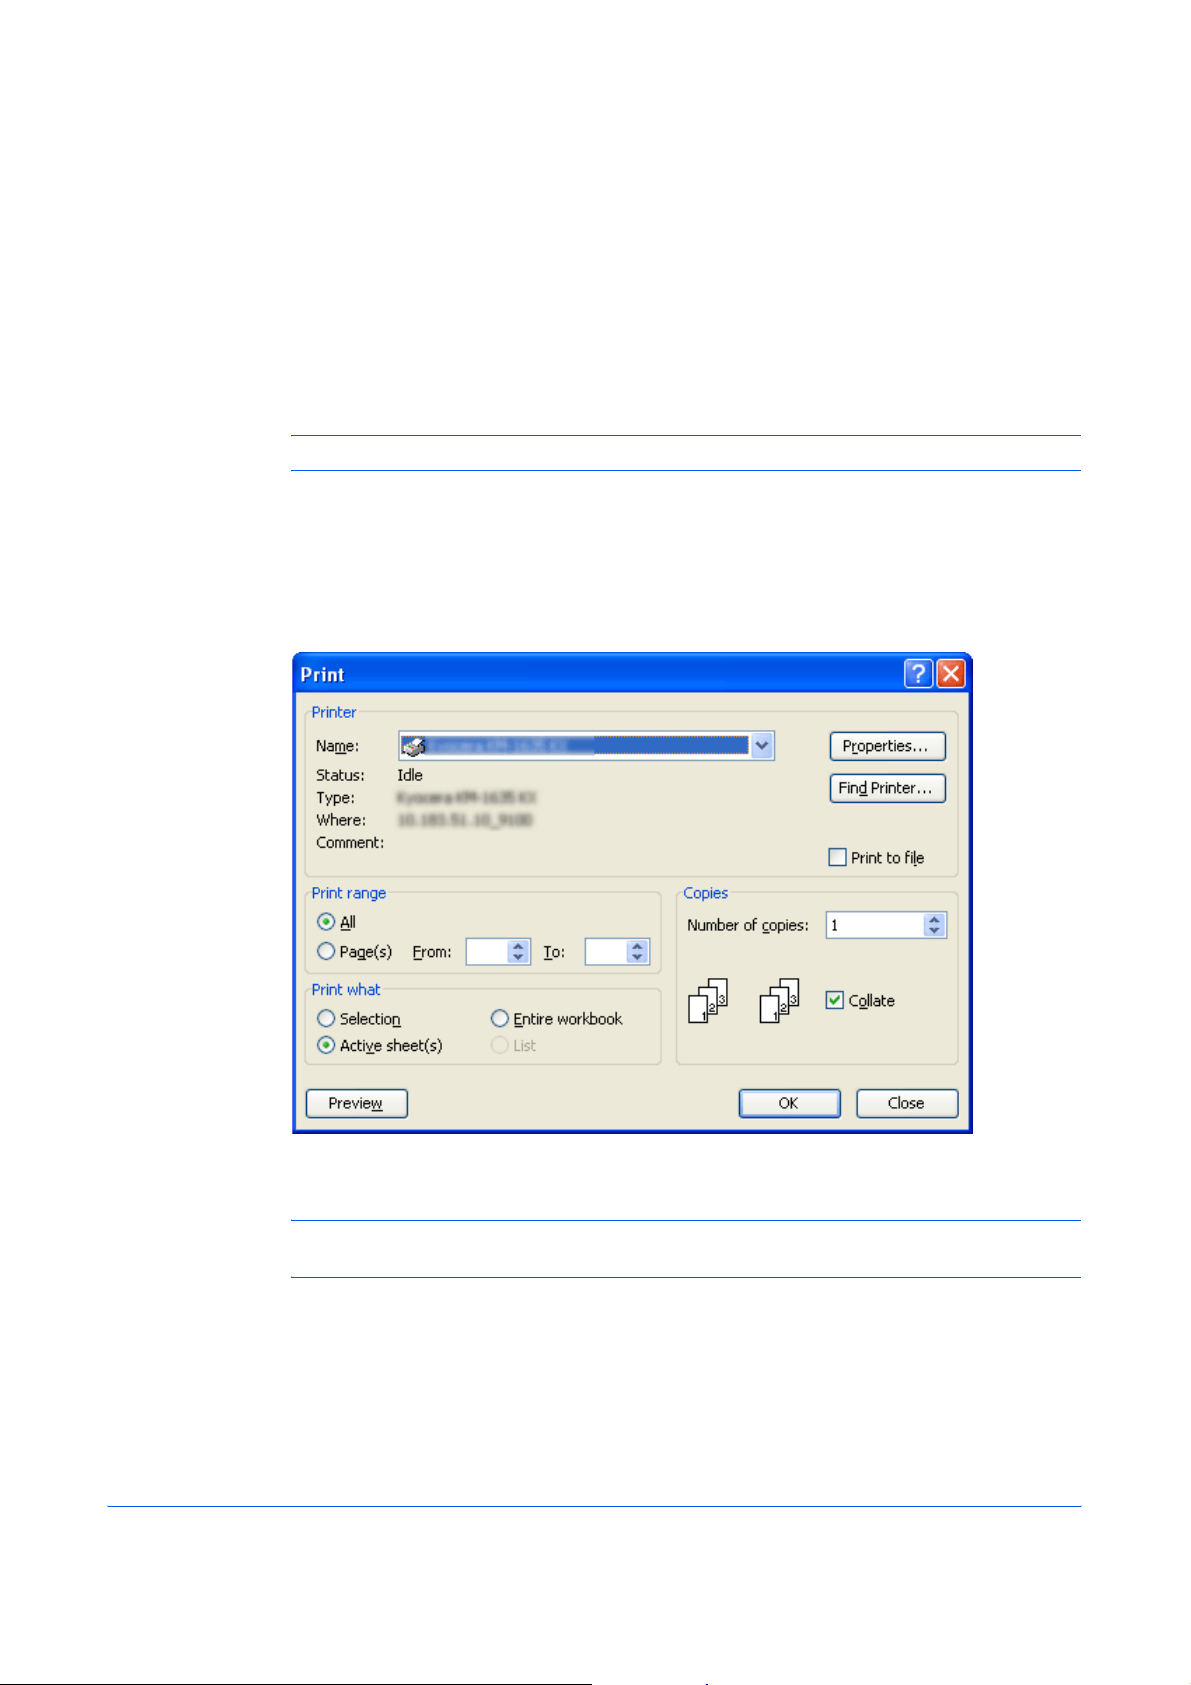
From the application’s File menu, select Print. The Print dialog box is displayed.
2
Click the Printer Name menu. All the installed printers are listed. Select the desired printer.
3
Specify the number of copies to print in the Number of copies field. You can print up to
4
999 copies. When printing two or more copies, enable the Collate check box for collation.
NOTE: When using Microsoft Word, we recommend that you click Options and select Use printer
settings for the default tray.
Click Properties to access the Properties dialog box.
5
On the Basic tab, click the Page Size to select the appropriate page size.
6
3-1
Page 26

Printing
NOTE: For best results when printing on transparencies or recycled paper (the back side of paper
which has already been printed on), click the Media Type menu and select the media type.
The printer automatically selects paper size that matches the size specified above. A message
displays asking you to fill the multi-purpose tray if the proper paper size is not available.
Click the Source drop-down list to specify the paper cassette for printing.
Choose either Portrait or Landscape to match the document page orientation. You can
7
rotate the document 180 degrees by enabling the Rotated check box.
Click OK to return to the Print dialog box.
8
Click OK to start printing.
9
3-2
Page 27

4 Troubleshooting
Basic Troubleshooting Chart
If you experience trouble while you are using this machine as a printer, refer to the table
below to perform minor adjustments. If trouble persists, contact your service representative
or an authorized service center
Problem Check point Procedure
Nothing is printed out Is the power cord loose? Connect the power cord securely to a power
Is the printer power on? Turn the main switch to the printer on.
Is the correct printer cable
used and is it connected
properly?
.
source.
Be sure to use a compliant printer cable and
make sure it is connected properly.
Did you connect the printer
cable after you turned the
printer power On?
Is the printer off-line? (Is the
Status Indicator flashing
amber?)
Is the printer assigned to
incorrect printer port such as
Kprint or Standard TCP/IP
port?
Text is not printed correctly Is the correct printer cable
used and is it connected
properly?
Is the setting configuration in
your computer correct?
Connect the printer cable before you turn the
printer power on.
Perform the appropriate procedure to put the
printer on-line.
Press the [Printer] key to switch to the printer
mode.
The Status Indicator light will turn off.
Assign the printer to a KMPrint port in the Ports
tab of the Properties window.
Be sure to use a compliant printer cable and
make sure it is connected properly.
Confirm the settings in the printer driver as well
as in the software application in use.
4-1
Page 28
Troubleshooting
Print Quality Problems
The table below describes potential print quality problems and the corrective action for
each problem.
Problem Procedure
All black pages Contact your service technician.
Dropouts, horizontal streaks or stray dots Clean the charger wire.
Black or white vertical streaks Check the toner container and replace it if necessary.
Clean the charger wire.
Make sure the charger cleaner is in its original position.
Faint or blurred printing Check the toner container and replace it if necessary.
Clean the charger wire.
Gray background Check the toner container and replace it if necessary.
Confirm that the developer unit and drum unit are installed
correctly.
Dirt on the top edge or back of the paper Check for toner on the registration roller.
Pausing Printing
Switch the printer from online to offline . You can temporarily stop the print job by switching
the printer off-line, perform the following procedure.
Press the [Printer] or [Start] key. (Offline) is displayed on Message Display. The
1
Status Indicator turns off and the printer switches to off-line.
NOTE: When off-line, the printer can receive data, but cannot print.
To resume processing of the prints, press the [Printer] or [Start] key again. The Status
2
Indicator starts blinking and the printer switches to on-line.
Canceling Printing
To cancel printing and clear the data, perform the following procedure.
NOTE: While printing copy jobs, the machine cannot cancel print Jobs.
Press the [Printer] key. The machine enters the printer mode.
1
Press the [Stop/Clear] key. Printing is canceled.
2
4-2
Page 29

5 Options
This machine has the following option available to satisfy your printing requirements.
Print Server (IB-110)
This print server enables an optional printing network so that all users on the network can
take advantage of the printing system capabilities. This print server's USB interface offers
easy external connections. Our original utility simplifies configuring your Ethernet network
to offer printing to users on many different platforms including Windows, UNIX, and
Macintosh.
For more specifications or functions of IB-110, refer to the User’s Guide of IB-110.
5-1
Page 30

Options
5-2
Page 31

6 Specifications
This printing system has following specifications.
NOTE: Specifications are subject to change without notice.
Item Specification
Printing speed
(A4/Letter , one-sided print)
First Print Out
(A4/Letter, 22°C, 60%RH)
Resolution 600 x 600dpi
Main memory Standard: 64MB
Compatible Operating
Systems
Interfaces Hi-speed USB, 1 port
16-ppm printer: 16 pages/minute
20-ppm printer: 20 pages/minute
6 seconds or less
Microsoft Windows 98/Me/2000/XP
6-1
Page 32

Specifications
6-2
Page 33

A1
Page 34

Rev. 1.0 2005.10
 Loading...