


FS-C5250DN
Table of contents
 Loading...

Legal Notes
Unauthorized reproduction of all or part of this guide is prohibited.
The information in this guide is subject to change for improvement without notice.
We cannot be held liable for any problems arising from the use of this product, regardless of the information herein.
Regarding Trademarks
Microsoft Windows is a registered trademark of Microsoft Corporation in the U.S. and/or other countries. KPDL is a
trademark of Kyocera Corporation. PCL is a trademark of Hewlett-Packard Company. TrueType is a registered trademark
of Apple Computer, Inc. Adobe, Acrobat, Adobe Reader, Photoshop and PostScript® are trademarks of Adobe Systems,
Incorporated.
All other brand and product names herein are registered trademarks or trademarks of their respective companies.
Examples of the operations given in this guide support the Windows 7 printing environment. Essentially the same
operations are used for Microsoft Windows Vista, Windows XP, Windows Server 2003, Windows Server 2008 and
Windows 2000 environments.
User Interface screen captures shown in this guide may differ depending on your printing device.
This user guide and its contents were developed for the 5.1 driver.
Models supported by the KX printer driver
FS-C5150DN
FS-C5250DN
© 2010 KYOCERA MITA Corporation

Table of Contents
Chapter 1 Installation
Preparing to Install the Driver ........................................................................................................ 1-1
Selecting an Installation Method ................................................................................................... 1-1
Installing Utilities ........................................................................................................................... 1-2
Upgrading Driver Components ...................................................................................................... 1-2
Express Installation ....................................................................................................................... 1-2
Installing in Express Mode ....................................................................................................... 1-2
Custom Installation ....................................................................................................................... 1-4
Installing in Custom Mode with a Network Connection using Discover ................................... 1-4
Installing in Custom Mode with a USB Connection using Discover ......................................... 1-5
Installing in Custom Mode with a Network Connection using Custom Select .......................... 1-7
Installing in Custom Mode with a USB Connection using Custom Select ................................ 1-8
Optional Printer Components ........................................................................................................ 1-9
Installing Optional Printer Components ................................................................................... 1-9
The Add Printer Wizard ............................................................................................................... 1-10
Installing a Printer Driver in Windows 7 and Windows Vista .................................................. 1-10
Installing a Printer Driver in Windows XP and Windows 2000 ............................................... 1-10
Printer Driver Settings Access ..................................................................................................... 1-10
Changing the Default Driver Settings .................................................................................... 1-11
Chapter 2 Device Settings
Accessing Device Settings ............................................................................................................ 2-1
Device Options .............................................................................................................................. 2-2
Setting Device Options ............................................................................................................ 2-2
Setting up Custom Boxes ........................................................................................................ 2-2
Auto Configure .............................................................................................................................. 2-3
Enabling Auto Configuration .................................................................................................... 2-3
Memory ......................................................................................................................................... 2-3
Setting the Memory ................................................................................................................. 2-4
RAM Disk ...................................................................................................................................... 2-4
Setting RAM Disk .................................................................................................................... 2-4
Administrator Settings ................................................................................................................... 2-4
Job Accounting ........................................................................................................................ 2-4
Show Quick Print Tab .............................................................................................................. 2-6
Send Count Information ........................................................................................................... 2-6
Send Application Name ........................................................................................................... 2-6
Administrator Password .......................................................................................................... 2-7
Associate Profile with Application ............................................................................................ 2-7
Lock Settings ........................................................................................................................... 2-7
SNMP ...................................................................................................................................... 2-9
User Settings .............................................................................................................................. 2-10
Identification .......................................................................................................................... 2-10
Units ...................................................................................................................................... 2-11
Language Preference ............................................................................................................ 2-11
PDL (Page Description Language) ............................................................................................. 2-11
PDL Options .......................................................................................................................... 2-12
KX DRIVER
i

PDF Options .......................................................................................................................... 2-13
XPS Driver .................................................................................................................................. 2-15
Compatibility Settings ................................................................................................................. 2-15
Media Source Enumeration ................................................................................................... 2-16
Ignore Application Collation ................................................................................................... 2-16
Combine Source and Media Type Lists ................................................................................. 2-16
Removing a Plug-in ..................................................................................................................... 2-17
Chapter 3 Quick Print
Quick Print Options ....................................................................................................................... 3-1
Common Printing Options ....................................................................................................... 3-1
Color Mode .............................................................................................................................. 3-2
Collate ..................................................................................................................................... 3-2
Duplex Printing ........................................................................................................................ 3-2
Multiple Pages per Sheet ........................................................................................................ 3-3
Edit Quick Print ........................................................................................................................ 3-3
Profiles .......................................................................................................................................... 3-4
Selecting a Profile .................................................................................................................... 3-4
Saving a Profile ....................................................................................................................... 3-4
Editing a Profile ....................................................................................................................... 3-5
Importing a Profile ................................................................................................................... 3-5
Exporting a Profile ................................................................................................................... 3-5
Application Based Printing ....................................................................................................... 3-6
Chapter 4 Basic
Basic Settings ............................................................................................................................... 4-1
Source and Media Types .............................................................................................................. 4-2
Print Size and Page Size ............................................................................................................... 4-2
Creating a Custom Page Size ................................................................................................. 4-3
Printing with Custom Size Pages ............................................................................................. 4-3
Duplex Printing .............................................................................................................................. 4-3
Printing in Duplex Mode .......................................................................................................... 4-4
Collate ........................................................................................................................................... 4-4
Printing Collated Documents ................................................................................................... 4-5
Printing in Color, Black & White, and EcoPrint .............................................................................. 4-5
Print Preview ................................................................................................................................. 4-5
Previewing a Print Job ............................................................................................................. 4-5
Kyocera Logo ................................................................................................................................ 4-6
Displaying Version Information ................................................................................................ 4-6
Displaying Plug-in Information ................................................................................................. 4-6
Chapter 5 Layout
Multiple Pages per Sheet .............................................................................................................. 5-1
Printing Multiple Pages per Sheet ........................................................................................... 5-1
Scaling .......................................................................................................................................... 5-2
Setting Scaling on the Page .................................................................................................... 5-2
Gutter ............................................................................................................................................ 5-2
Creating a Gutter ..................................................................................................................... 5-2
Booklet .......................................................................................................................................... 5-3
Printing a Booklet .................................................................................................................... 5-3
Poster ............................................................................................................................................ 5-3
Printing a Poster ...................................................................................................................... 5-4
Chapter 6 Imaging
Print Quality and EcoPrint ............................................................................................................. 6-1
ii
User Guide

Selecting Print Quality ............................................................................................................. 6-1
Selecting EcoPrint ................................................................................................................... 6-1
Trapping ........................................................................................................................................ 6-2
Gloss Mode ................................................................................................................................... 6-2
Fonts ............................................................................................................................................. 6-2
Font Settings ........................................................................................................................... 6-3
Selecting Font Settings ............................................................................................................ 6-3
Font Substitution ..................................................................................................................... 6-3
Disable Device Fonts ............................................................................................................... 6-4
Graphics ........................................................................................................................................ 6-4
Selecting Graphics Settings .................................................................................................... 6-4
Pattern Scaling ........................................................................................................................ 6-4
Inversion Settings .................................................................................................................... 6-5
Optimization Settings .............................................................................................................. 6-5
CIE Optimization ..................................................................................................................... 6-5
Image Compression Mode ...................................................................................................... 6-6
CMYK Processing ................................................................................................................... 6-6
Color Mode ................................................................................................................................... 6-6
Printer Profile ................................................................................................................................ 6-6
Color Correction ............................................................................................................................ 6-7
Setting a Default Color Profile ................................................................................................. 6-8
Adjusting Color .............................................................................................................................. 6-9
Adjusting HSL (Hue, Saturation, Lightness) ............................................................................ 6-9
Adjusting RGB (Red, Green, Blue) ........................................................................................ 6-10
Adjusting Grayscale .................................................................................................................... 6-10
Text and Graphics Effects ........................................................................................................... 6-11
Chapter 7 Publishing
Cover Mode .................................................................................................................................. 7-1
Printing Covers ........................................................................................................................ 7-1
Cover Mode Options ................................................................................................................ 7-2
Choosing Cover Media ............................................................................................................ 7-4
Page Insert .................................................................................................................................... 7-5
Printing Page Inserts ............................................................................................................... 7-5
Page Insertion Options ............................................................................................................ 7-6
Transparency Interleaving ............................................................................................................ 7-6
Inserting Backing Sheets Between Transparencies ................................................................ 7-7
Chapter 8 Job
Job Storage (e-MPS) .................................................................................................................... 8-1
Job Storage (e-MPS) options .................................................................................................. 8-1
Custom Box .................................................................................................................................. 8-2
Storing a Job in a Custom Box ................................................................................................ 8-2
Quick Copy ................................................................................................................................... 8-3
Printing a Quick Copy Job ....................................................................................................... 8-3
Proof and Hold .............................................................................................................................. 8-3
Printing a Proof and Hold Job .................................................................................................. 8-4
Private Print .................................................................................................................................. 8-4
Storing a Private Print Job ....................................................................................................... 8-4
Job Storage ................................................................................................................................... 8-5
Storing a Job Storage Job ....................................................................................................... 8-5
Job Name ...................................................................................................................................... 8-5
Don’t Use Application Name .................................................................................................... 8-5
Overwrite Job Name ................................................................................................................ 8-6
KX DRIVER
iii

Selecting a Job Name ............................................................................................................. 8-6
Chapter 9 Advanced
Prologue/Epilogue ......................................................................................................................... 9-1
Selecting a Prologue/Epilogue File .......................................................................................... 9-1
Editing a Prologue/Epilogue File ............................................................................................. 9-1
Deleting a Prologue/Epilogue File ........................................................................................... 9-2
Assigning a Prologue/Epilogue File ......................................................................................... 9-2
Unassigning a Prologue/Epilogue File ..................................................................................... 9-2
Specifying the Insertion Point .................................................................................................. 9-2
Watermark .................................................................................................................................... 9-3
Adding or Editing a Watermark ................................................................................................ 9-3
Selecting Pages for Watermark ............................................................................................... 9-4
Security Watermark ...................................................................................................................... 9-5
Adding or Editing a Security Watermark .................................................................................. 9-6
Adjusting Security Watermark Calibration ............................................................................... 9-7
Selecting Pages for Security Watermark ................................................................................. 9-7
Color Optimizer ............................................................................................................................. 9-8
Optimizing RGB Color for Printing ........................................................................................... 9-8
Configuring Status Monitor ............................................................................................................ 9-9
Setting Status Monitor Preferences ....................................................................................... 9-10
EMF Spooling ............................................................................................................................. 9-11
Selecting EMF Spooling ........................................................................................................ 9-11
Enable Client Profile .................................................................................................................... 9-11
Glossary ................................................................................................................................................................... v
iv
User Guide

1 Installation
A printer driver is an application that manages communication between a printer
and your computer. Once installed, the printer driver settings must be
configured in the printer Properties and Printing Preferences.
Note: In Windows operating systems, you must be logged in with
administrator rights to install the printer driver.
Preparing to Install the Driver
This section describes the initial steps to take before you install the printer
driver, and based on your operating system, the next procedure you can follow.
Turn on the computer and the printer.
1
In Windows 7 and Windows Vista with a USB connection, a driver installation
will be made from the Microsoft Windows Update site if a certified driver is
available and the system is connected to the web. We recommend you continue
with the steps to install the driver for an expanded feature set. In Windows, if the
Found New Hardware Wizard dialog box appears during the installation
process, click Cancel. If the Hardware Installation warning dialog box
appears, click Continue Anyway.
Insert the Product Library CD into the CD drive.
2
After the installation wizard begins, the Main Menu appears.
Note: If the Product Library fails to start after inserting the Product Library
CD into the CD drive, use Windows Explorer to locate Setup.exe on the local
drive and double-click to open.
Click View License Agreement to read the license agreement.
3
Click Accept to proceed.
4
To begin the installation, click Install Software.
5
Note: If the Windows Security warning dialog box appears at any point
during the installation process, click Install this driver software anyway.
The Installer wizard appears with several installation methods displayed.
6
Selecting an Installation Method
You can select Express Mode for a network or USB connection and the
installation wizard will discover your printers. You can also select Custom
KX DRIVER
1-1

Installation
Installing Utilities
Mode for a network or USB connection and either manually select installation
packages and specify utilities or let the installation wizard discover your printer.
Express Mode Installation
Installing in Express Mode on page 1-2
Custom Mode Installation
Installing in Custom Mode with a Network Connection using Discover on
page 1-4
Installing in Custom Mode with a USB Connection using Discover on page
1-5
Installing in Custom Mode with a Network Connection using Custom Select
on page 1-7
Installing in Custom Mode with a USB Connection using Custom Select on
page 1-8
Note: KPrint installs a client port monitor that lets Windows TCP/IP print
from any network card connected to a printing system. KPrint supports LPR
and IPP printing. For the KPrint Installation instructions, refer to your
Product Library CD. KPrint uses a stand-alone installer.
On the Installation Method page, click Utilities to install printer utilities. You
can also select utilities to install during the Custom Installation procedure.
Upgrading Driver Components
If the installation wizard detects older driver or utility components, the Software
Component Upgrade page appears.
Choose the component to upgrade. Click Next.
1
Confirm your upgrade settings. To start the upgrade, click Upgrade.
2
When the upgrade completes, click Next. The Installation Method page
3
appears.
Express Installation
Express Mode applies to driver installation for a USB or network connection
only. The installation wizard discovers printers that are turned on, and
connected by USB and network cable. In Custom Mode, you are able to select
the installation packages and specify the port.
Installing in Express Mode
1-2
This section describes the express installation procedure of the driver software
in Windows operating systems.
Ensure that your printer and computer are turned on and connected by USB or
1
network cable.
User Guide

Note: In Windows 7 and Windows Vista with a USB connection, a driver
installation will be made from the Microsoft Windows Update site if a certified
driver is available and the system is connected to the web. We recommend you
continue with the steps to install the KX Driver for an expanded feature set. In
Windows, if the Found New Hardware Wizard dialog box appears during the
installation process, click Cancel. If the Hardware Installation warning dialog
box appears, click Continue Anyway.
On the Installation Method page, click Express Mode.
2
The Discover Printing System page opens, searching for your printing
3
system.
If Discover finds your printing system, select your model from the list and click
Next.
If Discover does not find your printing system, a message appears. Remove
and reinsert the USB or network cable, and ensure it is connected properly.
Click Refresh to retry the discovery. If the system still cannot find your printing
system, contact your system administrator.
Select Use host name for port name to use a host name for the Standard
4
TCP/IP port. If the installation wizard still displays the IP address, contact your
system administrator. (Not available with a USB connection.)
Installation
Click Information if you want to open a dialog box with details about IP
5
Address, Host Name, Printer Model, Contact, Location, and Serial Number.
Click OK. Click Next. (Not available with a USB connection.)
On the Printer Settings page, you can assign a name to your printing system.
6
Note: With a first time USB connection, the Printer Settings page does not
appear.
You can also choose to share this printer with others or set this printer as the
default printer. Make your selections, and then click Next.
On the Confirm Settings page, click Install if the settings are correct. Click
7
Back to correct the settings.
The Installation Completed page appears displaying the following driver
8
options.
Print a test page
This selection verifies a connection with the printer and creates a print out of
the installed driver components.
Enable Status Monitor
The Status Monitor displays system status messages on your computer
screen during printing tasks. The Status Monitor button appears on the
Advanced tab.
Show Quick Print Tab
This selection lets you define basic print options into group profiles that can
be accessed easily. The Show Quick Print tab option also appears in the
Administrator Settings in Device Settings.
KX DRIVER
1-3

Installation
When the installation completes successfully, click Finish to exit the installation
wizard and return to the Product Library CD menu.
A message may appear if there is a software installation failure.
Click Finish, and retry the installation. If the same message appears again,
contact your system administrator.
The installation of the printer is now complete. If prompted, restart your
computer.
Custom Installation
Custom Mode applies to driver installation for a USB or network connection.
The installation wizard can discover printers that are turned on, and connected
by USB and network cable, or you can manually select the driver from drivers
that are available. You can specify the printer port, fonts, and the utilities you
want to install.
Printer drivers that ship with Windows operating systems are called minidrivers.
The minidriver is available separately for PCL and KPDL and provides basic
support for your printer.
The KX XPS DRIVER and XPS minidriver is only available for printing systems
used with Windows 7 and Windows Vista. The XPS driver is discussed in the
Device Settings chapter. Minidriver functionality is not documented in this user
guide.
Device Settings
Select the Device Settings check box to open Device Settings where you
can choose installed options for your printing system. (The Device Settings
check box appears only in Windows XP with a network connection.)
Installing in Custom Mode with a Network Connection using Discover
This section describes the custom installation procedure of the driver software
in Windows operating systems using a network connection.
Ensure that your printer and computer are connected to a network.
1
On the Installation Method page, select Custom Mode.
2
The Discover Printing System page opens searching for your printing system.
3
The Discover button is automatically selected. A list of models appears. Click
Next.
If Discover does not find your printing system, a message appears. Remove
and reinsert the network cable, and ensure it is connected properly. Click
Refresh to retry the discovery. If the system still cannot find your printing
system, contact your system administrator.
On the Custom Installation page, select the driver and software packages you
4
want to install from the Driver and Utility tabs, and clear those not intended for
installation. Click Next.
If you only select software packages from the Utility tab, you will skip to the
Confirm Settings page.
1-4
User Guide

On the Printer Settings page, you can assign a name for your printing system.
5
You can also choose to share this printer with others or set this printer as the
default printer. Make your selections, and then click Next.
On the Confirm Settings page, click Install if the settings are correct. Click
6
Back to correct the settings.
Note: If the Hardware Installation warning dialog box appears, click
Continue.
The Installation Completed page appears displaying the following driver
7
options.
Print a test page
This selection verifies a connection with the printer and creates a print out of
the installed driver components.
Enable Status Monitor
The Status Monitor displays system status messages on your computer
screen during printing tasks. The Status Monitor button appears on the
Advanced tab.
Show Quick Print Tab
This selection lets you define basic print options into group profiles that can
be accessed easily. The Show Quick Print tab option also appears in the
Administrator Settings in Device Settings.
Device Settings
Select the Device Settings check box to open Device Settings where you
can choose installed options for your printing system. (The Device Settings
check box appears only in Windows XP.)
When the installation completes successfully, click Finish to exit the installation
wizard and return to the Product Library CD menu.
A message may appear if there is a software installation failure.
Click Finish, and retry the installation. If the same message appears again,
contact your system administrator.
The installation of the printer is now complete. If prompted, restart your
computer.
Installation
KX DRIVER
Installing in Custom Mode with a USB Connection using Discover
This section describes the custom installation procedure of the driver software
in Windows operating systems using a USB connection. With Discover, all
devices available for the driver installation are found automatically. This is the
recommended Custom Mode USB installation method.
Ensure that your printer and computer are turned on and connected using a
1
USB cable.
Note: In Windows 7 and Windows Vista, a driver installation will be made from
the Microsoft Windows Update site if a certified driver is available and the
system is connected to the web. We recommend you continue with the steps to
install the KX Driver for an expanded feature set.
On the Installation Method page, select Custom Mode.
2
1-5

Installation
The Discover Printing System page opens, searching for your printing
3
system. The Discover button is automatically selected.
Select your device and click Next.
If Discover does not find your printing system, a message appears. Remove
and reinsert the USB cable, and ensure it is connected properly. Click Refresh
to retry the discovery. If the system still cannot find your printing system, contact
your system administrator.
On the Custom Installation page, select the driver and software packages you
4
want to install from the Driver and Utility tabs, and clear those not intended for
installation. Click Next.
If you only select software packages from the Utility tab, you will skip to the
Confirm Settings page.
On the Printer Settings page, you can assign a name to your printing system.
5
Note: With a first time USB connection, the Printer Settings page does not
appear.
You can also choose to share this printer with others or set this printer as the
default printer. Make your selections, and then click Next.
On the Confirm Settings page, click Install if the settings are correct. Click
6
Back to correct the settings.
Note: If the Hardware Installation warning dialog box appears, click
Continue Anyway.
The Installation Completed page appears displaying the following driver
7
options.
Print a test page
This selection verifies a connection with the printer and creates a print out of
the installed driver components.
Enable Status Monitor
The Status Monitor displays system status messages on your computer
screen during printing tasks. The Status Monitor button appears on the
Advanced tab.
Show Quick Print Tab
This selection lets you define basic print options into group profiles that can
be accessed easily. The Show Quick Print tab option also appears in the
Administrator Settings in Device Settings.
When the installation completes successfully, click Finish to exit the installation
wizard and return to the Product Library CD menu.
A message may appear if there is a software installation failure.
Click Finish, and retry the installation. If the same message appears again,
contact your system administrator.
The installation of the printer is now complete. If prompted, restart your
computer.
1-6
User Guide

Installation
Installing in Custom Mode with a Network Connection using Custom Select
This section describes the custom installation procedure of the driver software
in Windows operating systems using a network connection.
Ensure that your printer and computer are connected to a network.
1
On the Installation Method page, select Custom Mode.
2
The Discover Printing System page opens, searching for your printing
3
system. The Discover button is automatically selected. Choose Custom select
and click Next.
The Printing System page appears. Select your printing system model from
4
the list and click Next. If there is only one driver model, this page does not
appear. Proceed to the next step.
On the Printer Port page, select the port connected to your printing system, or
5
add a port connected to your system by clicking Add Port. Click Next.
On the Custom Installation page, select the driver and software packages you
6
want to install from the Driver and Utility tabs, and clear those not intended for
installation. Click Next.
If you only select software packages from the Utility tab, you will skip to the
Confirm Settings page.
On the Printer Settings page, you can assign a name for your printing system.
7
You can also choose to share this printer with others or set this printer as the
default printer. Make your selections, and then click Next.
On the Confirm Settings page, click Install if the settings are correct. Click
8
Back to correct the settings.
Note: If the Hardware Installation warning dialog box appears, click
Continue.
The Installation Completed page appears displaying the following driver
9
options.
Print a test page
This selection verifies a connection with the printer and creates a print out of
the installed driver components.
Enable Status Monitor
The Status Monitor displays system status messages on your computer
screen during printing tasks. The Status Monitor button appears on the
Advanced tab.
Show Quick Print Tab
This selection lets you define basic print options into group profiles that can
be accessed easily. The Show Quick Print tab option also appears in the
Administrator Settings in Device Settings.
Device Settings
KX DRIVER
1-7

Installation
Select the Device Settings check box to open Device Settings where you
can choose installed options for your printing system. (The Device Settings
check box appears only in Windows XP.)
When the installation completes successfully, click Finish to exit the installation
wizard and return to the Product Library CD menu.
A message may appear if there is a software installation failure.
Click Finish, and retry the installation. If the same message appears again,
contact your system administrator.
The installation of the printer is now complete. If prompted, restart your
computer.
Installing in Custom Mode with a USB Connection using Custom Select
This section describes the custom installation procedure of the driver software
in Windows operating systems using a USB connection. With the Custom
select option, you manually select the printing system and printer port to install.
In Custom mode, Custom Select is not recommended for USB in
environments where printing systems are connected and reconnected using
USB ports. The Discover method provides a more reliable installation path.
Ensure that your printer and computer are turned on and connected using a
1
USB cable.
Note: In Windows 7 and Windows Vista, a driver installation will be made from
the Microsoft Windows Update site if a certified driver is available and the
system is connected to the web. We recommend the Custom Mode using
Discover for USB connections to ensure a reliable installation.
On the Installation Method page, select Custom Mode.
2
The Discover Printing System page opens, searching for your printing
3
system. The Discover button is automatically selected. Choose Custom select
and click Next.
The Printing System page appears. Select your printing system model from
4
the list and click Next. If there is only one driver model, this page does not
appear. Proceed to the next step.
On the Printer Port page, select an existing port connected to your printing
5
system. Click Next.
On the Custom Installation page, select the driver and software packages you
6
want to install from the Driver and Utility tabs, and clear those not intended for
installation. Click Next.
If you only select software packages from the Utility tab, you will skip to the
Confirm Settings page.
1-8
On the Printer Settings page, you can assign a name to your printing system.
7
You can also choose to share this printer with others or set this printer as the
default printer. Make your selections, and then click Next.
User Guide

On the Confirm Settings page, click Install if the settings are correct. Click
8
Back to correct the settings.
Note: If the Hardware Installation warning dialog box appears, click
Continue Anyway.
The Installation Completed page appears displaying the following driver
9
options.
Print a test page
This selection verifies a connection with the printer and creates a print out of
the installed driver components.
Enable Status Monitor
The Status Monitor displays system status messages on your computer
screen during printing tasks. The Status Monitor button appears on the
Advanced tab.
Show Quick Print Tab
This selection lets you define basic print options into group profiles that can
be accessed easily. The Show Quick Print tab option also appears in the
Administrator Settings in Device Settings.
When the installation completes successfully, click Finish to exit the installation
wizard and return to the Product Library CD menu.
A message may appear if there is a software installation failure.
Click Finish, and retry the installation. If the same message appears again,
contact your system administrator.
The installation of the printer is now complete. If prompted, restart your
computer.
Installation
Optional Printer Components
You can expand the functionality of your printer driver by installing optional
components from the Product Library CD menu > Advanced Tools menu.
Installing Optional Printer Components
On the Product Library CD menu > Advanced Tools menu, select Optional
1
Printer Components.
Select a printer to install optional components, and click Next.
2
On all Select pages, choose your components, and click Next.
3
On the Confirm Settings page, click Install if the displayed settings are
4
correct. Click Back to correct any settings.
The Printer Components Installation Completed page appears. Click Finish.
5
When you have completed installing printers and optional components, restart
your computer if prompted.
KX DRIVER
1-9

Installation
The Add Printer Wizard
The Add Printer Wizard displays a series of pages that guide you through
printer installation. You are prompted to make installation choices on each
page.
Installing a Printer Driver in Windows 7 and Windows Vista
This section describes how to install a printer driver using the Add Printer
Wizard in Windows 7 and Windows Vista.
Click Start and click Devices and Printers (Windows 7), or click Control Panel
1
and double-click Printers (Windows Vista).
Click Add a printer.
2
The Add Printer Wizard appears. Click either Add a local printer or Add a
3
network, wireless or Bluetooth printer. Follow the instructions on each page,
and then click Next to proceed to the next page.
Note: If the Windows Security warning dialog box appears, click Install this
driver software anyway.
The last page of the wizard appears with a message that you’ve successfully
4
added the printer you selected. Installation of the printer driver is now complete.
Click Print a test page if you want to produce sample print output from the
newly installed printer. To close the Add Printer Wizard, click Finish.
Installing a Printer Driver in Windows XP and Windows 2000
This section describes how to install a printer driver using the Add Printer
Wizard in Windows XP and Windows 2000.
Click Start and Printers and Faxes.
1
Click Add a printer.
2
The Add Printer Wizard appears. Follow the instructions on each page, and
3
then click Next to proceed to the next page.
Note: If the Found New Hardware Wizard page appears, click Cancel. If the
Hardware Installation warning dialog box appears, click Continue Anyway.
When the Completing the Add Printer Wizard page appears, installation of
4
the printer driver is now complete. To close the Add Printer Wizard, click
Finish. If prompted, restart your computer.
Printer Driver Settings Access
The printer driver software can be accessed from the Print dialog box of an
application, or from Start. If accessed from an application, then changes made
to driver settings remain in effect until the application ends. If accessed from
Start, changes are maintained as the default printer settings.
1-10
User Guide

Changing the Default Driver Settings
Default driver settings apply to print jobs initiated from any application, but they
are overwritten by setting changes made within each application.
Click Start and click Devices and Printers (Windows 7), or click Control Panel
1
and double-click Printers (Windows Vista), or Printers and Faxes (Windows
XP).
Right-click on your printing system icon.
2
Click Printing Preferences.
3
In the Printing Preferences dialog box, select the desired features in all tabs.
4
Click OK to save the settings.
5
Installation
KX DRIVER
1-11
2 Device Settings
In Device Settings, you can select installed printing system options so the
associated features can be used with the printer driver. You can also match the
memory setting in the driver with the memory installed in your printing system,
which lets the driver manage font downloads more efficiently. Administrator,
User, PDL (Page Description Language), and Compatibility settings can also be
selected.
Accessing Device Settings
Device Settings can be accessed from Devices and Printers (Windows 7),
Printers (Windows Vista), or Printers and Faxes (Windows XP) folder.
Click Start and click Devices and Printers (Windows 7), or click Control Panel
1
and double-click Printers (Windows Vista), or Printers and Faxes (Windows
XP).
Right-click the desired printing system model.
2
Click Printer properties (Windows 7) or Properties (Windows Vista, Windows
3
XP).
Click Device Settings.
4
2-1
User Guide

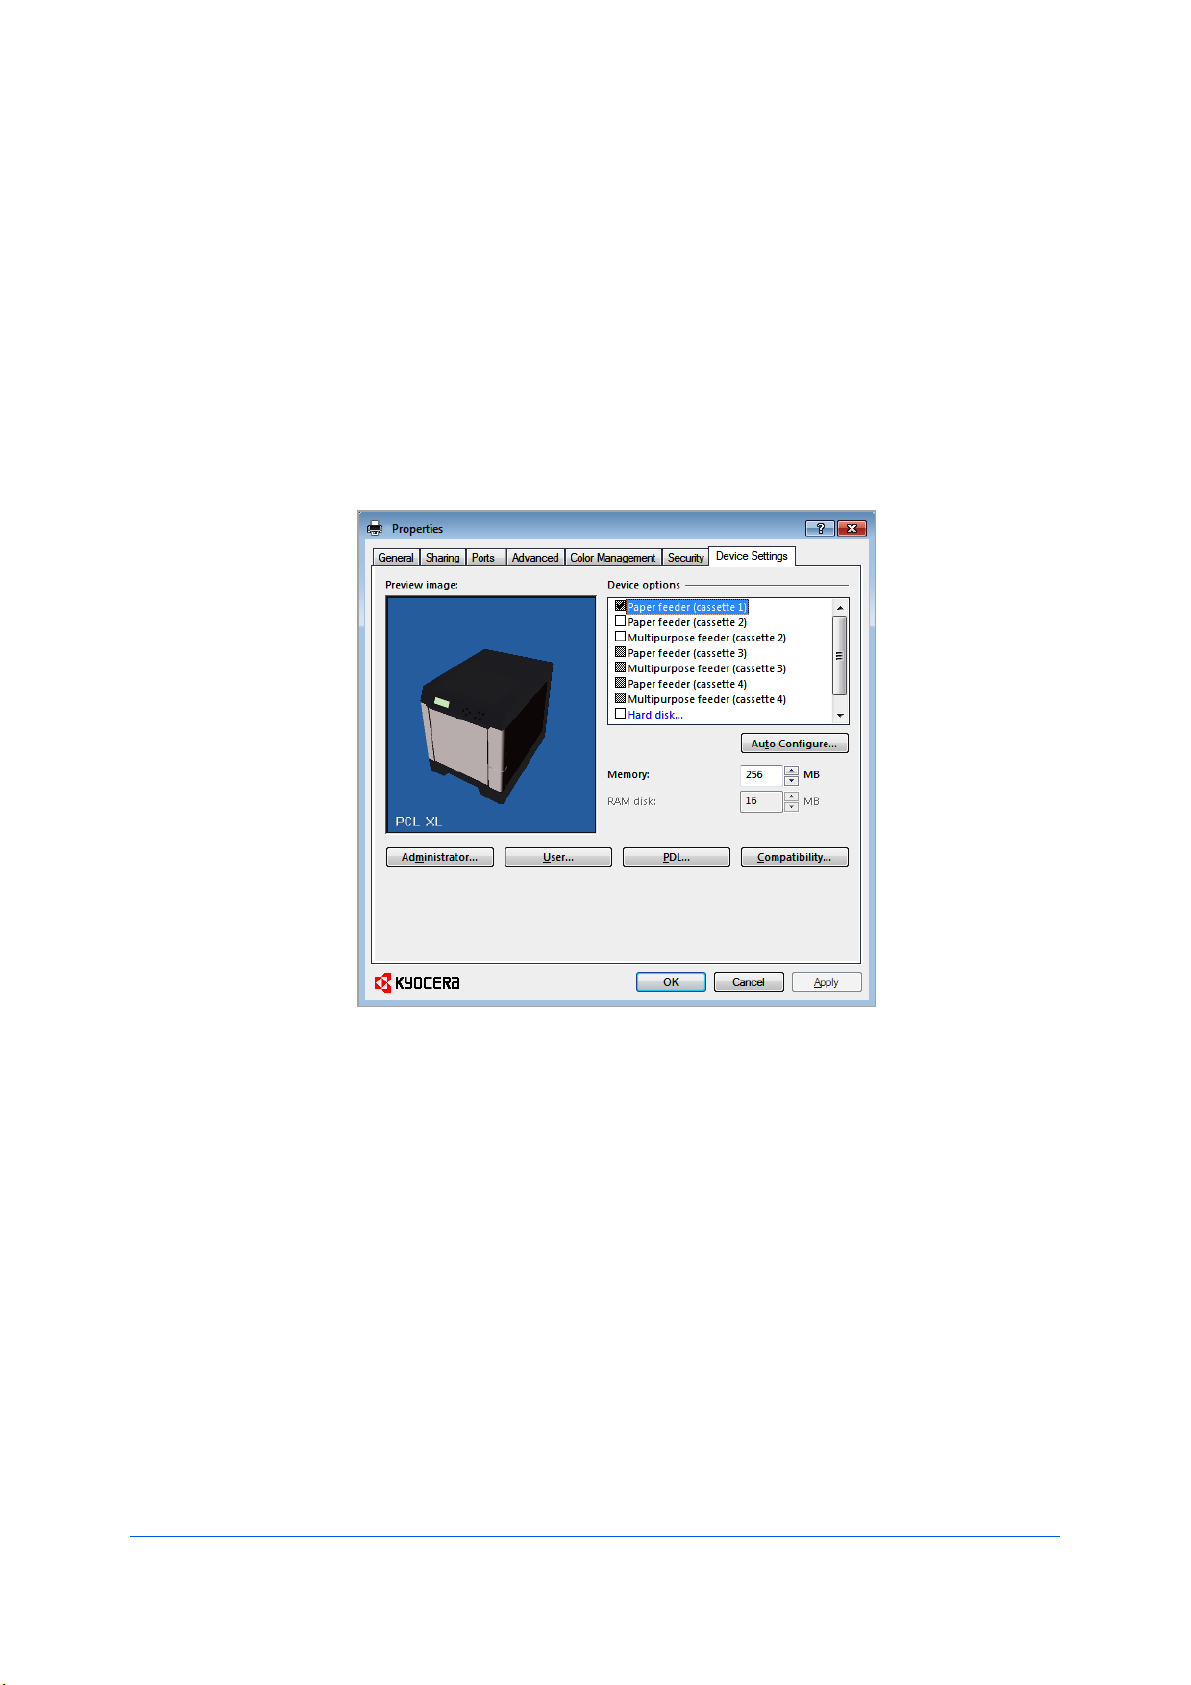
Device Options
Device Settings
Optional devices extend the capabilities of your printing system for source and
job storage.
In a client/server environment, this feature is unavailable to a client logged in as
a restricted user.
Setting Device Options
You can set the printer driver to match the optional devices installed on your
printing system.
In the Properties dialog box, click Device Settings.
1
In Device Settings > Device options, select the check boxes for all installed
2
devices.
Setting up Custom Boxes
You can create up to 1000 custom boxes for storing print jobs. Custom boxes
can be assigned to users who can print the jobs later from the printing system's
operation panel.
Note: Custom box is not available for some models.
In Device Settings, select Hard disk. Or if already selected, double-click Hard
1
disk.
In the Hard Disk Settings dialog box, click Add.
2
A new Box number and Box name appear in the Defined custom boxes list.
In the Defined custom boxes list, a new Box number and Box name appear.
3
If desired, change the number and name in the Box number and Box name
boxes. The number must be within a range of 1 to 1000, and the name length
can be up to 32 characters. You can also type a user name up to 20 characters.
Note: Shared box is selected by default, to enable all network users to save
jobs in the box.
To require users of a shared box to type a password before printing, select
4
Require password, and type a password up to 16 characters.
Click OK in the Hard Disk Settings and Properties dialog boxes.
5
The new custom box appears in the Custom Box dialog box when printing.
You can remove a custom box by selecting it in the Defined custom boxes
list and clicking Delete.
You can import a custom box list by clicking Import and browsing for a valid
custom box list file (.CSV or .KXU).
You can save the current custom box list (.CSV or .KXU) in your computer or
network by clicking Export. A saved list can be imported into another printer
driver.
KX DRIVER
2-2

Device Settings
Auto Configure
Auto Configure detects the devices installed on the printing system if it is
connected over a network. Auto Configure can detect printing system devices
such as input devices. When your computer is connected to the printing system
through a TCP/IP or WSD port, the Auto Configure button appears in Device
Settings. Auto Configure updates the Device options list, Memory, RAM
disk and preview images to keep the printer driver consistent with the printing
system configuration.
Not all installed devices are detected by using Auto Configure. Before
selecting OK in Device Settings, check the settings to make sure that they are
correct.
Note: The default setting for Windows XP Service Pack 2 is for the Windows
Firewall to be set to On. The setting can be changed to allow communication
between the printing system and your computer. In the Windows Security
Alert dialog box, click Unblock.
Silent Auto Configuration
Silent auto configuration checks the printing system every 10 minutes for
changes in optional devices or memory. When a change is detected, the driver
is automatically updated with the new settings. Silent auto configuration is
only available for printing systems installed in Windows 7 or Windows Vista.
In a client/server environment, this feature is unavailable to a client logged in as
a restricted user.
Enabling Auto Configuration
The Auto Configure button can be used to detect all available device options
when the printing system is connected to a network through a TCP/IP port.
Verify that all optional devices are attached to the printing system, and that it is
1
turned on and ready to print.
In Device Settings, click Auto Configure.
2
In Windows XP and Windows 2000, the driver settings are updated
immediately.
In Windows 7 and Windows Vista, the Auto Configure dialog box opens. Select
from Auto configure options:
Auto Configure Now
Click the button at any time to retrieve the current settings from the printing
system. It is recommended to do this when the driver is first installed and
when Silent auto configuration is turned off.
Silent auto configuration
Select to let the driver check the printing system every 10 minutes for any
changes in optional devices or memory. When a change is detected, the
driver is automatically updated with the new settings.
Memory
2-3
Memory is the amount of standard and optional memory installed in the printing
system. To maximize the downloading of printing system fonts, the driver must
be set to match the total printing system memory.
User Guide

RAM Disk
Device Settings
Setting the Memory
By default, the Memory setting matches the standard memory in the printing
system. If optional memory is installed, set the memory in the printer driver to
match the total amount of memory.
Install optional DIMM memory in the printing system.
1
In Device Settings > Memory, type or select the amount of total installed
2
memory by clicking the up and down arrows until the text box shows the correct
number of megabytes (MB).
If your printing system includes the Auto Configure feature, you can use it to
obtain information about the memory size.
The RAM disk functions as a virtual hard disk, saving print requests into the
printing system’s memory. Because the RAM disk is temporary memory, all data
stored there is lost when the power is turned off.
In a client/server environment, this feature is unavailable to a client logged in as
a restricted user.
If selected, the Ignore application collation feature in the Compatibility
Settings dialog box lets the driver control collation. RAM disk can then increase
the print speed of collated multiple copies by sending the print job just once.
Setting RAM Disk
You can set the RAM disk to save print requests into the printing system’s
memory.
At the printing system's operation panel, turn on RAM disk and set its size.
1
In Device Settings > Device options, select RAM disk.
2
In the RAM disk text box, type or select the desired RAM disk size. Click the up
3
and down arrows until the text box shows the correct number of megabytes
(MB) available physically on the operation panel.
The maximum RAM disk size depends on the amount of installed memory.
Administrator Settings
Administrator Settings lets you set options, varying by your model, that
include controlling accessibility, displaying features in the interface and setting a
password to control access to the Administrator Settings options.
In a client/server environment, this feature is unavailable to a client logged in as
a restricted user.
KX DRIVER
Job Accounting
Job accounting gives an administrator the ability to control usage of a printing
system. With Job accounting, an administrator can assign account IDs
(identification numbers) to users or departments, a specific account ID, or make
account ID input mandatory for printing. After account IDs are created, you can
2-4

Device Settings
view from the printing system operation panel the number of copies associated
with a specific ID as well as limit the number of copies for individual IDs.
Account IDs can be up to 8 digits.
Note: Job accounting must be set to On at the printing system. A maximum
of 20 account ID user names and passwords can be registered at the printing
system and 100 account IDs and passwords can be stored in the printer driver
for use with multiple printing systems.
Job Accounting Options
Job accounting supports the following options:
Use specific account ID
Select this option to track the print jobs of a user or group with an account ID.
It sends the account ID with each print job. An administrator can restrict a
user or group from changing their account ID by using the Password
protect administrator settings in the Administrator Settings dialog box.
Prompt for account ID
Select this option to track the print jobs of a user or group with an account ID
as well as prompt for an account ID. At the time a print job is sent, the user is
prompted to enter a Job Accounting ID.
Prompt for account ID and validate
Select this option to prompt for an account ID that is saved in the driver.
When sending a print job, type an account ID when prompted, then click OK
to print. The account ID is validated against the account ID list. If typed
incorrectly, you are prompted to type it again.
Display account ID list
Select this option to display the account ID list at the time of printing. The
print job can be assigned to a user or group. The account ID list is stored in
the driver and more than one ID must be established for the list to appear.
Account ID List
Select this option to display the account ID to manage the Account ID list.
Add, edit or delete account IDs from the list stored in the driver. Account IDs
descriptions match the user or group with an account ID. After an account ID
list is created, the list can be exported as a group by saving it as a text file
(.CSV). To import an account ID list, browse for an existing list and open it.
2-5
Printing with Job Accounting
After account IDs are assigned and Job accounting is set to On at the printing
system, the number of pages printed is added to the selected account ID total.
In Device Settings > Administrator Settings, select Job accounting.
1
Select a Job accounting option:
2
Use specific account ID
Prompt for account ID
The remaining Job accounting options become available when you create an
account ID list.
If you select the Use specific account ID or Prompt for account ID option,
proceed to step 5.
Select Account ID List to create and manage account ID lists.
3
User Guide

Device Settings
Select from the remaining Job accounting options:
4
Prompt for account ID and validate
Display account ID list
Click OK in all dialog boxes.
5
Print the document from the application.
6
For some options, when the Print Options dialog box appears, type or select
7
an account ID, and click OK.
Show Quick Print Tab
This option lets you control the display of the Quick Print tab. You can define
basic print options into group profiles that can be accessed quickly and easily.
With a cleared Show Quick Print tab check box, the tab does not appear in the
Printing Preferences dialog box.
To enable this feature, in Device Settings, click Administrator > Show Quick
Print tab.
With a selected Show Quick Print tab check box, the tab appears in the
Printing Preferences dialog box. When you select the Show Quick Print tab
check box, you can access additional check boxes:
Selecting Hide other tabs displays only the Quick Print tab to the user.
Selecting Set Quick Print tab as default opens to this tab when you access
Printing Preferences.
Selecting Hide Edit Quick Print control prevents users from customizing
the Quick Print tab.
Send Count Information
This option lets you embed count information in the print job, which can be used
by some applications for accounting purposes. Count information includes the
number of copies produced as well as duplex printing, multiple pages per sheet,
color mode, color page count, and paper size values.
When PDF is selected in the PDL settings dialog box, only color page count
information is sent with PDF.
To enable this feature, in Device Settings, click Administrator > Send Count
information.
Send Application Name
This option lets you send the application name with a print job, so that a
different printing process is used for each application. Some third party print
accounting programs use this information to calculate print totals based on
application type.
This option is unavailable when PDF is selected in the PDL Settings dialog box.
To enable this feature, in Device Settings, click Administrator > Send
Application name.
KX DRIVER
2-6

Device Settings
Administrator Password
You can set Password protect administrator settings in the Administrator
Settings dialog box to prevent unauthorized changes in this dialog box. When
selected, this setting prompts you to enter a password and confirm the
password. This password protection blocks access to all Administrator
Settings options.
Setting the Administrator Password
You can set a password to prevent unauthorized changes in the Administrator
Settings dialog box.
In Device Settings > Administrator Settings, select Password protect
1
administrator settings.
In the Password dialog box, enter a password, using at least 4 and no more
2
than 16 characters. Reenter the password in Confirm password and click OK.
Clearing the Administrator Password
You can remove the administrator password.
In Device Settings, click Administrator.
1
In the Enter Password dialog box, type the password and click OK.
2
In the Administrator Settings dialog box, clear the Password protect
3
administrator settings check box.
Click OK.
4
Associate Profile with Application
This option lets you set all printing from each installed application to use the
same driver settings as defined in a profile. Before using this feature:
A profile must be created in the Profiles dialog box, accessed from any
Printing Preferences tab.
An association must be created between a profile and an application in the
Application Based Printing dialog box, accessed from the Profiles dialog
box.
To enable this feature, in Device Settings, click Administrator > Associate
Profile with application.
Lock Settings
An administrator can specify settings at the tab or feature level in the driver, and
then lock them (so that the settings are applied to all print jobs, and changes are
restricted). The settings are locked in the Device Settings > Administrator
Settings > Lock Settings dialog box. For example, you can always set a
printing system to print duplex. This saves paper, resulting in cost savings and
ecological benefits.
Locking a setting also locks the feature where it appears in other tabs. For
example, selecting Lock Multiple pages per sheet selects and locks that
feature in the Quick Print and Layout tabs.
2-7
User Guide

Device Settings
The administrator can also set a password that is required to temporarily unlock
a feature.
In a client/server environment, this feature is unavailable to a client logged in as
a restricted user.
Lock Settings Options
The Lock Settings dialog box lists the following driver settings that can be
locked so that the settings are applied to all print jobs, and changes are
restricted:
Black & White mode
This option disables all color settings in the driver’s Quick Print, Basic, and
Imaging tab and prints all jobs with black toner only.
Lock EcoPrint
This option locks the current EcoPrint setting.
Lock Duplex
This option locks the current Duplex setting. Flip on long edge and Flip on
short edge options are not locked. Clicking the icon in the Quick Print tab,
or the selection in the Basic tab, switches between the flip options.
Lock Multiple pages per sheet
This option locks the current Multiple pages per sheet setting. The Pages
per sheet option is not locked.
Lock Profile with Application
This option can help standardize print jobs. It sets all printing from each
installed application to use the same driver settings as defined in a profile.
The administrator must first make selections in the Profiles and Application
Based Profile dialog boxes. The administrator can then ensure that all print
jobs use those settings by locking this feature. Selecting Lock Profile with
Application also prevents any user changes in the Application Based
Profile dialog box.
Lock Job tab
If the Job tab is among the available driver tabs, the administrator must first
make selections there for job name and storage. The administrator can then
ensure that all print jobs use those settings by locking this feature. Selecting
Lock Job tab also prevents any user changes in the Job tab.
Lock Security Settings
If the Security Watermark plug-in is installed, the administrator must first
make selections for the Security Watermark in the Advanced tab. The
administrator can then ensure that a security watermark is printed on all jobs
by locking this feature. Selecting Lock Security Settings also prevents any
user changes in the Security Watermark dialog box.
Password Settings
The administrator can also set a password that is required to temporarily
unlock a feature. If selected, this setting prompts you to enter a password
and confirm the password.
KX DRIVER
Locking Driver Settings
You can select driver settings to lock, so that the settings are applied to all print
jobs.
In Device Settings > Administrator Settings, click Lock Settings.
1
2-8

Device Settings
Select the check box for each driver feature to be locked.
2
Select the Password Settings check box if you wish to protect the settings with
3
a password, otherwise skip to the next step.
In the Password Settings dialog box, type a password of at least 4 but no more
than 16 characters. Retype the password in Confirm password, and click OK.
To unlock the password, clear the Password Settings check box. In the
Unlock Password dialog box, type the password, and click OK.
To save your Lock Settings selections, click OK at the bottom of the dialog
4
box.
When a password is set, the Unlock button appears in driver tabs where the
locked features appear. To unlock a feature and change its settings temporarily,
click Unlock and type the password.
SNMP
Simple Network Management Protocol (SNMP) is a set of rules that govern the
management of network devices, such as printing systems. SNMP settings
determine the level of security when using the Auto Configure feature, and
prevent unauthorized printing to the SNMPv3 printing system. SNMP settings
must be set in the printer driver and in the printing system’s Command Center.
The following SNMP options are available:
SNMPv1/v2c
This option ensures successful Auto Configure communication using Read
community name and Write community name.
SNMPv3
This option ensures secure Auto Configure communication using a user
name and password. Authentication and privacy options are available by
selecting Settings.
Apply to other models
This option displays a list of installed printing systems to apply the selected
SNMP settings.
2-9
SNMPv3 Options
You can select SNMPv3 options for secure communication with the printing
system.
Authentication
This option provides an algorithm to check that a transferred file has arrived
intact. Message Digest 5 (MD5) and Secure Hash Algorithm 1 (SHA1) are hash
algorithms used to authenticate packet data.
MD5
This option provides a cryptographic hash function with a 128–bit hash
value. It adds security and protection against Gateway Load Balancing
Protocol (GLBP)-spoofing software.
SHA1
This option produces a message digest that is 160 bits long. SHA1 is the
successor to MD5.
Privacy
User Guide

Device Settings
This option uses encryption for secure communication. It is available after you
select the Authentication option. You may select one privacy option.
DES
This option uses the Data Encryption Standard for encryption. DES turns
cleartext into ciphertext via an encryption algorithm. It encrypts and decrypts
data using 8-byte blocks and a 56-bit key.
AES
This option uses the Advanced Encryption Standard for encryption. AES is a
symmetric block cipher that can process data blocks of 128 bits, using cipher
keys with lengths of 128, 192, and 256 bits. It is more secure than DES.
Selecting SNMP Settings
SNMP settings in the driver must be set to match the settings in the printing
system’s Command Center.
In Device Settings > Administrator Settings, click SNMP Settings.
1
Select SNMPv1/v2c or SNMPv3.
2
For SNMPv1/v2c, type the Read community name and Write community
name, to a maximum of 32 characters, and click OK.
For SNMPv3, type a User name to a maximum of 32 characters, and a
Password from 8 to 32 characters.
User Settings
To set authentication and privacy options for SNMPv3, click Settings.
3
In the SNMPv3 dialog box, select from the available options.
4
Click OK in the SNMPv3 dialog box.
5
Optional: Under Apply to other models, you can click Select and choose from
6
available models. The SNMP settings are applied to all selected models.
User Settings lets you specify user and department names, select the default
unit of measure, and change the driver display language.
In a client/server environment, this feature is unavailable to a client logged in as
a restricted user.
Identification
Identification lets you identify your print job with a User name and
Department name, up to 31 characters, that can appear in the Operation
panel message. The User name can be used to identify a print job stored on
the hard disk.
KX DRIVER
Setting User Identification
You can type User name and Department information to be used with the Job
Storage (e-MPS) feature.
In Device Settings > User, type your preferred name in the User name text
1
box.
2-10

Device Settings
Type your department or group name in Department text box.
2
You can type up to 31 characters in the User name and Department text
boxes.
Click OK in the User Settings and Properties dialog box.
3
Units
You can set Inches or Millimeters as the unit of measurement. This is used for
the following settings:
Custom page size setting in the Page Sizes dialog box in the Basic tab.
Spacing setting in the Watermark Add and Edit dialog boxes in the
Advanced tab.
Poster settings and Gutter settings in the Layout tab.
Selecting a Unit of Measurement
You can select a unit for displaying measurements in the user interface.
In Device Settings > User Settings, select Inches or Millimeters.
1
Click OK in the User Settings and Properties dialog boxes.
2
Language Preference
The Language preference option specifies the user interface language of
Device Settings in Properties and all tabs of Printing Preferences.
Available languages vary depending on your locale and your computer settings.
Setting Language Preference
You can select a user interface language.
In Device Settings > User Settings, select the desired language from the
1
Select language list.
Click OK in the User Settings and Properties dialog boxes.
2
PDL (Page Description Language)
A Page Description Language (PDL) specifies the contents and layout of a
printed page. In Device Settings, you can choose from PCL XL, (Printer
Command Language XL), PCL 5c, KPDL (an emulation of PostScript printing),
or PDF (Portable Document Format). The printer default is PCL XL, which is
suitable for most printing purposes. When using the XPS driver in Windows 7
and Windows Vista, PCL XL is the only PDL selection. After you select a PDL,
the selection appears in the lower corner of the Preview image.
In GDI compatible mode, vector graphics are rasterized for printing as bitmap
images. Use the GDI compatible mode option to improve the output quality of
the graphic created by the application.
2-11
Note: To add PDF to the list of PDL choices, you must install the Output to
PDF plug-in.
User Guide

Device Settings
In a client/server environment, this feature is unavailable to a client logged in as
a restricted user.
PDL Options
The PDL options, available in the PDL Settings dialog box, are accessed in
Device Settings.
PCL XL
The most recent version of HP PCL and PCL 6. This PDL includes PCL 5c
features. PCL XL lacks backward compatibility with earlier PCL versions,
though it is enhanced over PCL 5c in these areas:
Reduced file size
Better print speed
Faster return to application
PCL 5c
Fully compatible with earlier PCL versions
Bidirectional communication support
Wide selection of fonts for use with Microsoft Windows applications
Complex graphics might not print as well
KPDL
KPDL is used when printing from applications that support PostScript 2 or 3.
An emulation of PostScript printing
Strong graphics reproduction
Print speeds may be slower than PCL 5c
Requires more printing system memory than PCL 5c
Enables native TrueType font downloading
Supports most Graphics settings options
PDF
Output to PDF is a plug-in feature that lets you print and save documents from
multiple sources to Adobe PDF. This feature can be used as an alternative to
existing commercial applications for creating PDF documents. Documents
saved as PDF retain their original appearance, and can be viewed and printed
with Adobe® Reader® on Windows, Mac OS®, and UNIX® platforms.
For a document using mixed paper sizes, all pages in the PDF use the size of
the first page.
Note: With PDF selected in the PDL Settings dialog box, only a limited set of
driver options are available.
PDL Settings
KX DRIVER
When you click the Settings button, the available options are:
PCL XL Settings or KPDL Settings
Enable smart duplex printing
This option automatically keeps a sheet of paper from being sent through the
duplex unit if the sheet will only be printed on one side. The duplex unit will
2-12
Loading...