

Page 1

Command Center RX
User Guide
Page 2

Legal Notes
Unauthorized reproduction of all or part of this guide is prohibited.
The information in this guide is subject to change without notice.
Examples of the operations given in this guide support the Windows 7 printing
environment. Essentially the same operations are used for Microsoft Windows
Vista, Windows XP, Windows 8, Windows 8.1, Windows 10, Windows Server
2003, Windows Server 2008, and Windows Server 2012 environments.
We cannot be held liable for any problems arising from the use of this product,
regardless of the information herein.
Regarding Trademarks
Microsoft Windows is a registered trademark of Microsoft Corporation in the U.S.
and/or other countries. KPDL is a trademark of Kyocera Corporation. PCL is a
trademark of Hewlett-Packard Company. Google, Google Cloud Print
trademarks and/or registered trademarks of Google Inc.
All other brand and product names herein are registered trademarks or
trademarks of their respective companies.
© 2016 KYOCERA Document Solutions Inc.
TM
are
Page 3

Table of Contents
Legal Notes ......................................................................................... 1
Regarding Trademarks........................................................................ 1
1 Introduction.............................................................................. 1
System Requirements ......................................................................... 1
Accessing the Embedded Server ........................................................ 1
2 The Embedded Server Home Page ........................................ 2
Login.................................................................................................... 2
Top Bar................................................................................................ 3
Navigation Menu ................................................................................. 4
Device Status ...................................................................................... 6
3 About Login.............................................................................. 7
Levels of Login .................................................................................... 7
4 Document Box ......................................................................... 9
Custom box ......................................................................................... 9
FAX Box ............................................................................................ 12
Sub Address Box............................................................................... 14
Polling Box ........................................................................................ 15
Job Box Settings ............................................................................... 16
5 Address Book ........................................................................ 17
Machine Address Book ..................................................................... 17
External Address Book Settings ........................................................ 19
One Touch Key ................................................................................. 21
6 Device Settings...................................................................... 23
Paper/Feed/Output............................................................................ 23
Original Document............................................................................. 25
Energy Saver/Timer .......................................................................... 26
Date/Time.......................................................................................... 28
System .............................................................................................. 29
7 Function Settings .................................................................. 32
Common/Job Default......................................................................... 32
Page 4

Copy .................................................................................................. 37
Printer................................................................................................ 37
E-mail ................................................................................................ 41
Scan to Folder ................................................................................... 43
DSM Scan ......................................................................................... 44
FAX/i-FAX ......................................................................................... 45
Send and Forward............................................................................. 51
RX/Forward Rules ............................................................................. 54
Operation Panel ................................................................................ 57
8 Network Settings ................................................................... 60
General.............................................................................................. 60
TCP/IP............................................................................................... 60
Protocol ............................................................................................. 71
Wireless LAN..................................................................................... 75
9 Security Settings ................................................................... 79
Device Security ................................................................................. 79
Network Security ............................................................................... 83
Certificates ........................................................................................ 86
10 Management Settings.......................................................... 88
Job Accounting.................................................................................. 88
Authentication.................................................................................... 90
ID Card .............................................................................................. 96
Notification/Report ............................................................................. 97
History Settings ................................................................................. 99
SNMP .............................................................................................. 102
System stamp.................................................................................. 103
Message Board ............................................................................... 105
Reset ............................................................................................... 106
11 Troubleshooting ................................................................ 108
Page 5

1 Introduction
Command Center RX (Remote eXtension), which will hereafter be referred to as the
embedded server, refers to the web server that is built into the printing device. It allows
you to verify the operating status of the device and make settings related to security,
network printing, E-mail transmission and advanced networking.
With the embedded server, the administrator can remotely track paper and toner usages
per user and the status of optional equipment installed. The embedded server also
configures device settings, monitors jobs, and manages document boxes and address
books.
System Requirements
The embedded server operates in the following environment. Check the following before
use.
Introduction
Protocol
• The TCP/IP protocol is installed on the PC.
• An IP address is assigned to the printing system.
Web browser
• Microsoft Internet Explorer 9.0 or later (Microsoft Internet Explorer operates on
Microsoft Windows XP/ Vista/7/8/8.1, and Microsoft Windows Server 2008/2012.)
• Microsoft Edge (Microsoft Edge operates on Microsoft Windows 10.)
• Mozilla Firefox 14.0 or later
• Safari 5.0 or later (Safari operates on Apple Mac OS X 10.4 or later.)
• Google Chrome 21.0 or later
Accessing the Embedded Server
Access the embedded server by entering the printing system's host name or IP address
in a web browser. Obtain the IP address from your network administrator.
Note: Do not access to other web sites for security reasons while operating the
Command Center RX.
1. Open a web browser.
2. Enter the device's host name or IP address as the URL. If you use the host name, you
must first specify the DNS server information. For example, https://192.168.10.1.
If the screen “There is a problem with this website's security certificate.” is displayed,
configure the certificate. For details, see Certificates on page 86. You can also continue
the operation without configuring the certificate.
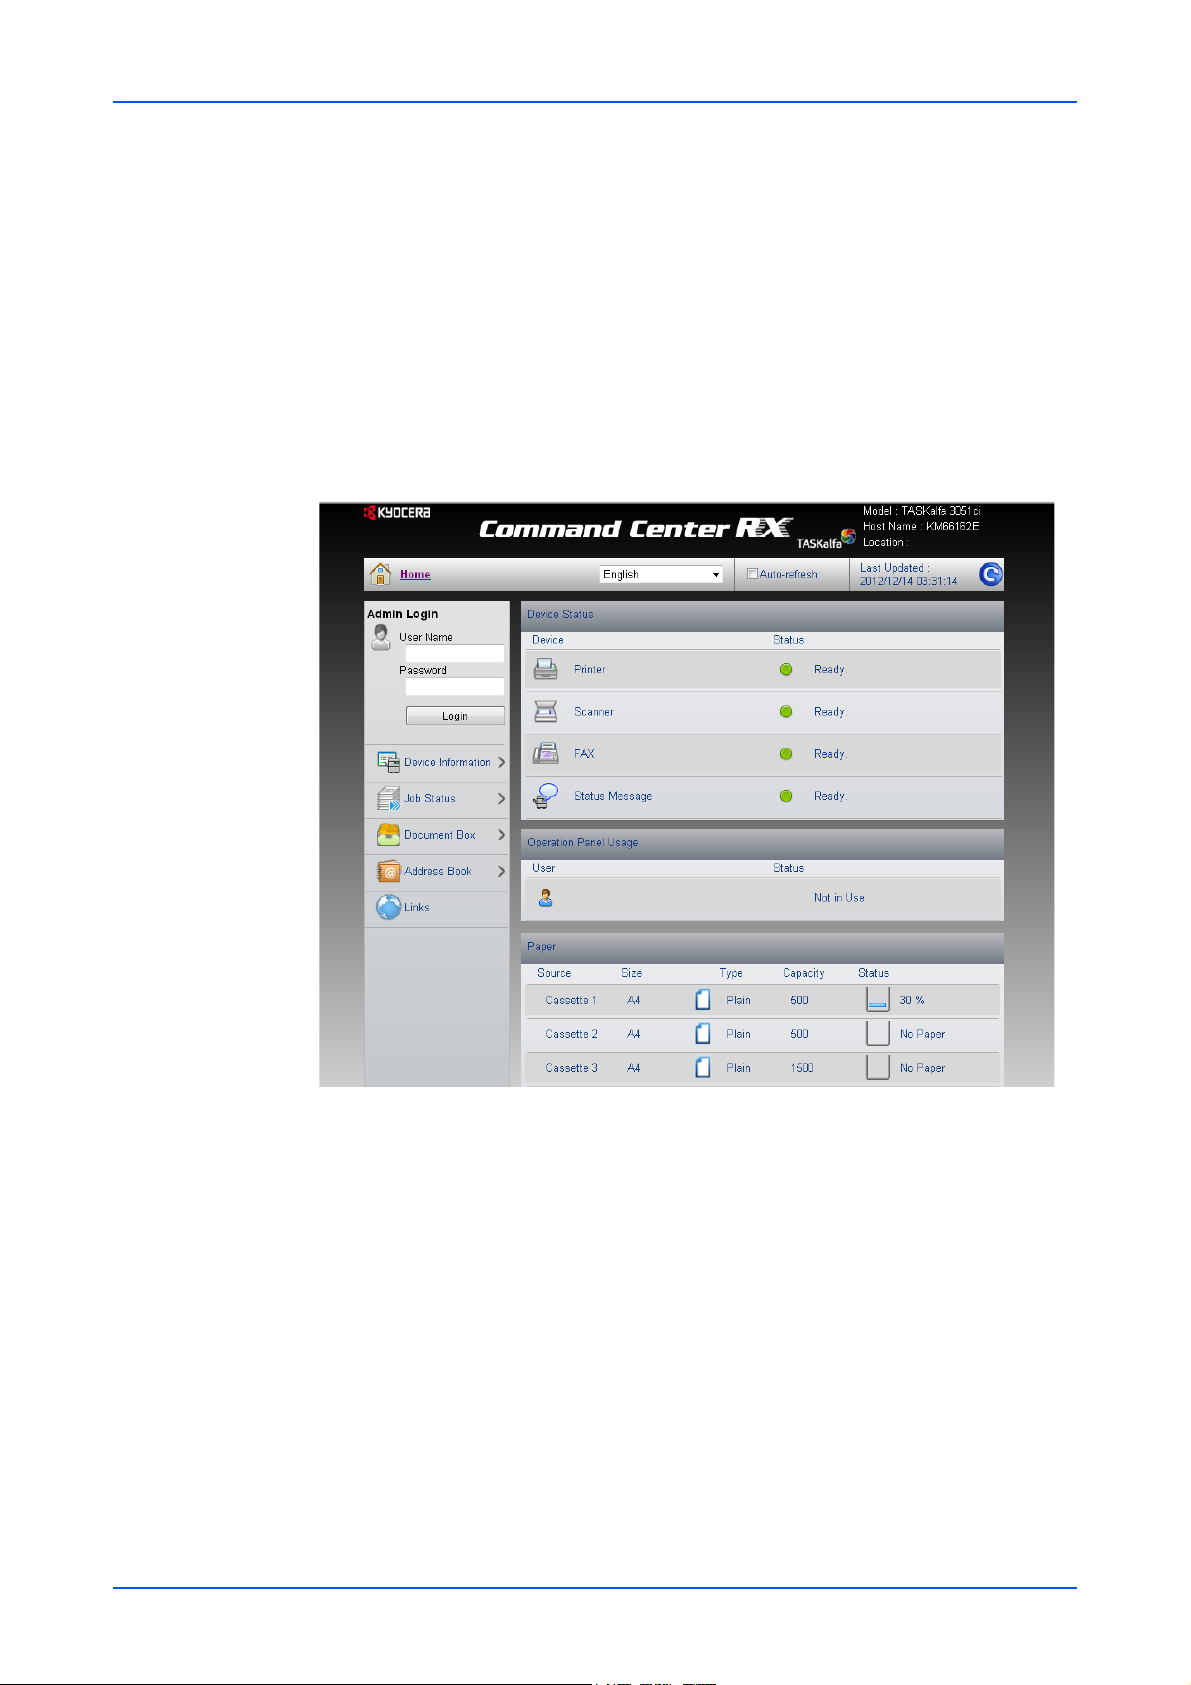
The embedded server's home page will be accessed and displayed.
For initial login, use the predefined “Admin” as the Use Name, and “Admin” as the
Password to access all the pages. For initial login, use the predefined Admin as the Use
Name, and Admin as the Password to access all the pages. This is set up internally.
User Guide 1
Page 6
The Embedded Server Home Page
2 The Embedded Server Home
Page
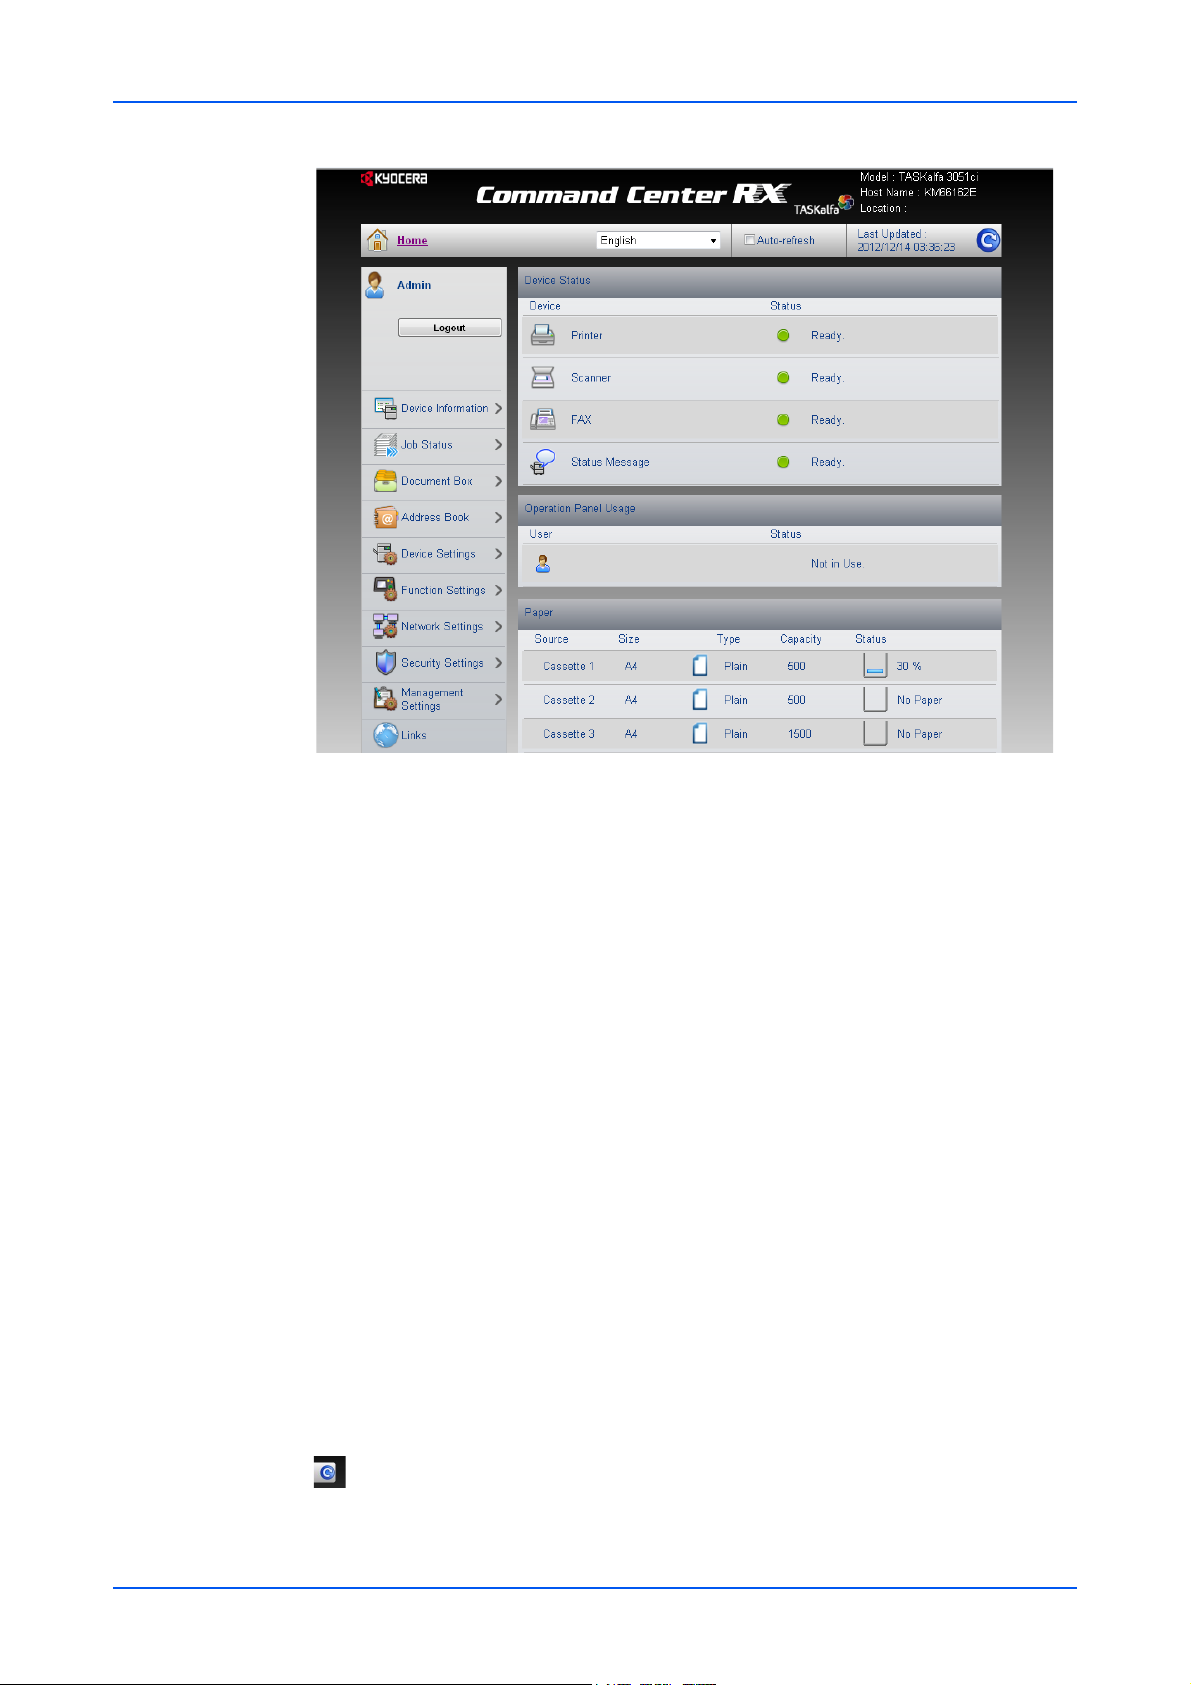
The embedded server's home page allows you to select a category from the navigation
menu on the left to view and set values for that category, as well as displaying
information on the device, user, and consumables on the right, which changes
according to the selection in the navigation menu.
Login
To fully access the features of the embedded server pages, enter the User Name and
Password and click Login. Entering the predefined administrator password allows the
user to access all pages, including Document Box, Address Book, and Device Settings
on the navigation menu.
2 Embedded Web Server
Page 7
The Embedded Server Home Page
Top Bar
To access the embedded server pages, the users can be identified by choosing one of
network authentication, local authentication, and job accounting authentication
methods. For details, see 3 About Login Levels of Login on page.
At the top of the home page, you can perform the following:
Home
To quickly return to this home page (top page) from any other server page, click
Home.
Select language
The embedded server supports multiple languages. To change the language that
the embedded server is displayed in, open the language drop down list and select
the appropriate language. If you attempt to view the embedded server with a character set other than the language that is used on the operation panel's display,
some characters may be garbled.
Auto-refresh
To continuously update the embedded server's pages to the most recent status,
select the Auto-Refresh check box.
Note: If checking [Auto-refresh] check box, the login state continues without the
automatic logout. Do not check [Auto-refresh] for the safe connection.
Refresh
Click this circular arrow icon to refresh the embedded server pages any time.
User Guide 3
Page 8

The Embedded Server Home Page
Navigation Menu
The navigation menu at the left of the home page divides the following functions onto
separate bars. By clicking each bar, you can jump to the desired page as outlined below:
My Information/User Properties
My Information or User Properties is accessible when you have logged in to the
embedded server with a general user or administrator privilege, and user authentication is enabled. This page summarizes the general settings to which access is
granted by the general user. This depends on the scope of the user's or group's
privileges. For example, if a user is allowed access to the document box, he/she
can add or delete documents in the document box shown in My Information.
Device Information
This page includes this machine's various information. After clicking on Device
Information, information is available in the following device information pages:
Configuration
This page includes this machine's various information that apply to the entire
machine, such as Device Defaults (basic, ID information, and capability) as well as
optional equipment installed, firmware, network parameters, and FAX parameters.
Counter
This page includes the printed pages and scanned pages. You can narrow details
by pulling down Typ e.
About Command Center RX
This page includes the firmware version and the list of web browsers supported by
the embedded server.
Job Status
This page includes information on all device jobs including job status for printing,
scanning, storing, and scheduled jobs as well as the job log. After clicking on Job
Status, information is available in the following job status pages: The displayed
items vary depending on the access level.
Printing Job Status, Sending Job Status, Storing Job Status
Displays details on each job. You can narrow details by pulling down Type. Click
Refresh to update the list. Click Cancel Job to abort the job. To see details of each
job in the log, click the Number or the Job Name.
Scheduled Jobs (when FAX is installed)
This page is populated with FAX jobs currently scheduled for transmission. Click
Refresh to update the list. Click Cancel Job to remove the FAX job from the list to
abort.
Printing Job Log, Sending Job Log, Storing Job Log
Displays logs to track jobs of each type. You can narrow details by pulling down
Type. Click Refresh at the right end of the Top Bar to update the list of logs. To see
details of each job in the log, click the Number or the Job Name.
Document Box
This page allows you to add, edit, or delete a document box, and delete documents
in a document box. This page allows you to add, edit, or delete a document box,
and delete documents in a document box. Under Document Box, Custom Box,
4 Embedded Web Server
Page 9

The Embedded Server Home Page
Fax Box, Sub Address Box, Polling Box, and Job Box Settings are included.
For more information, see Document Box on page 9.
Address Book
This page allows you to add, edit, or delete a contact address or a group of
addresses. Under Address Book, Machine Address Book, External Address
Book Settings, and One Touch Key are included. For more information, see
Address Book on page 17.
Device Settings
This page includes advanced settings that apply to the entire device. Under Device
Settings, Paper/Feed/Output, Original Document, Energy Saver/Timer, Date/
Time and System are included. For more information, see Device Settings on page
23.
Function Settings
This page includes advanced settings of each function that the device has. Under
Function Settings, Common/Job Defaults, Copy, Printer, E-mail, Scan to
Folder, DSM Scan, FAX/i-FAX, Send and Forward, RX/Forward Rules, and
Operation Panel are included. For more information, see Function Settings on
page 32.
Network Settings
This page includes advanced network settings that apply to the device. Under Network Settings, General, TCP/IP, and Protocol are included. For more information,
see Network Settings on page 60.
Security Settings
This page includes advanced security settings that apply to the device. Under
Security Settings, Device Security, Send Security, Network Security, and Certificates ar
Management Settings
This page includes advanced management settings that apply to the device. Under
Management Settings, Job Accounting, Authentication, ID Card, Notification/
Report, History Settings, SNMP, System Stamp, Message Board, and Reset are
included. For more information, see Management Settings on page 88.
Links
Links to our websites. Visit the following website for more information and downloads.
Download Drivers and Software
For downloading printer drivers and software:
KYOCERA Document Solutions - Download
http://www.kyoceradocumentsolutions.com/download/
e included. For more information, see Security Settings on page 79.
About KYOCERA Document Solutions
For more information about products:
KYOCERA Document Solutions Website
http://www.kyoceradocumentsolutions.com/
User Guide 5
Page 10

The Embedded Server Home Page
HyPAS Applications
The link information is displayed when the HyPAS applications are installed and
configuring their settings.
Network options
When the optional network interface kit (IB-50 or IB-51) is attached to the machine,
the link information to web page of IB-50 or IB-51 is displayed.
Device Status
The home page displays information on the status of the device, operation panel usage,
and consumables, to the right of the page. This page allows you to quickly verify the
device's current settings and statuses.
Status Displays
Shows the operating status of the printer, scanner, and/or FAX.
Operation Panel Usage
Shows the user currently logged in to the device from the operation panel and its
operating status. Note that settings made using the operation panel may override
those made using the embedded server.
Paper
Shows the size, type, maximum capacity, and the current supply by paper source.
Toner
Shows the toner supply by color. The status of the waste toner box is also shown.
Staple/Punch
Shows the amount of the remaining staples and the punch waste.
Information
Shows the message type, title and date modified when the Message Board is set to
On and the new message is described.
6 Embedded Web Server
Page 11

Levels of Login
About Login
3 About Login
This section provides information to help the administrator manage domain and local
users. The administrator can set authentication that allows the predefined users to
access the embedded server pages and set administrator passwords.
An administrator can configure the device to require a user login before it is accessed,
in either of three different ways of authentication as described in this section.
If you select local or network authentication, User Login must be turned on.
The default user name and password, or the local administrator account when User
Login is turned off, is Admin.
Local Authentication
Users are registered in this device and one-to-one authentication is performed
between this printing system and a PC. A local account user accesses the embedded server by entering a User Name and Password and selecting Local in the
drop-down list (if shown) below the entries, followed by clicking the Login button.
A user logged in with administrator privileges can gain access to My Information,
Device Information, Job Status, Document Box, Address Book, Device Settings, Function Settings, Network Settings, Security Settings, Management
Settings, and Links on the navigation menu.
A user logged in with a general user account cannot add or delete document boxes,
nor view the Address Book, Device Settings, Function Settings, Network Set-
tings, Security Settings, and Management Settings.
To add, delete or configure a locally authenticated user, see Authentication on page
90.
Network Authentication
If the device is configured for network authentication, the device and the relevant
PC's need to be under the management of a Windows domain network. Select the
domain you want to login to in the drop-down list, enter a User Name and Pass-
word, and then click the Login button.
A user logged in with administrator privileges can gain access to My Information,
Device Information, Job Status, Document Box, Address Book, Device Settings, Function Settings, Network Settings, Security Settings, Management
Settings, and Links on the navigation menu.
A user logged in with a general user account cannot add or delete document boxes,
nor view the Address Book, Device Settings, Function Settings, Network Set-
tings, Security Settings, and Management Settings.
To add, delete or configure a network authenticated user, see Authentication on
page 90.
User Guide 7
Page 12

About Login
Authentication Using Job Account ID
If the device is configured for job accounting but not for User Login, a user can be
authenticated by his/her job account ID. Enter the job account ID in Account Login
and click Login.
Note: If a user is registered as an Administrator on the Local User List, click
Admin Login. Enter a User Name and Password and click the Login button.
For access using a job account ID, My Information, Device Information, Job Sta-
tus, Document Box, Address Book, and Links are displayed in the navigation
menu.
8 Embedded Web Server
Page 13

Custom box
Document Box
4Document Box
This page is accessible when you have logged in using a general user or administrator
account. It allows you to add or delete a document box, as well as deleting documents
in a document box. A general user is not allowed to add or delete a document box.
There are several types of document boxes, which vary depending on models: Custom
Box, FAX Box, Sub Address Box, Polling Box, and Job Box Settings as described
below. Note that FAX Box, Sub Address Box, and Polling Box are available only if the
device is equipped with a FAX kit.
The users with a general user account can delete the documents which were created
and added in their own document boxes.
The section below explains how to add, edit or delete custom boxes as well as working
with their contents.
Adding a New Custom Box
1. Click Custom Box under Document Box on the navigation menu. The Custom Boxes
page opens.
2. Click Add icon. The New Box - Property page will open.
3. Make entries required to define the custom box, such as Number, Name, etc.
4. Click Submit button.
Editing a Custom Box
1. Click Custom Box under Document Box on the navigation menu. The Custom Boxes
page opens.
2. Select the custom box you want to edit by clicking on its Number or Box Name. The
documents contained in the custom box are displayed with its name, date of creation,
size, etc. You can choose List View or Thumbnail to view the box contents.
Alternatively, you can open the list of the user boxes, directly enter the box number in
the Box # window and click Go to, or enter the box name in the Box Name window and
click the magnifying glass icon, to quickly search the custom box.
3. Click Box Property. The Property page will appear.
4. Make entries required to modify the custom box properties such as Number, Name, etc.
5. Click Submit button.
Working with a Custom Box
You can delete, move, copy, join, download, E-mail or print documents in the custom
box.
User Guide 9
Page 14

Document Box
First select the document to apply any of the above actions by following the steps below:
1. Click Custom Box under Document Box on the navigation menu. The Custom Boxes
page opens.
2. Select the custom box you want to work with by clicking on its Number or Box Name. If
the box is password-protected, enter the password. The documents contained in the
custom box are displayed with its name, date of creation, size, etc. You can choose List
View or Thumbnail to view the box contents.
To search the document in the custom box, you can open the custom box, enter the
document name in the File Name window and click the magnifying glass icon.
3. In the custom box, select the check box next to the name of the document that you want
to apply the action. You can select more than one document simultaneously.
Deleting a Document
1. Select the document to delete as described above.
2. Click Delete icon.
Moving a Document from Box to Box
1. Select the document to move as described above.
2. Click Move icon. The Move Settings page opens. The selected file is shown in
Selected Files.
3. Select the box to move the document to in Destination. If the box is password-
protected, enter the password.
4. Click Move button. The document is moved to the box.
Copying a Document from Box to Box
1. Select the document to copy as described above.
2. Click Copy icon. The Copy Settings page opens. The selected file is shown in
Selected Files.
3. Select the box to store the copied document in Destination. If the box is password-
protected, enter the password.
4. Click Copy button. The document is copied into the box.
Joining Documents in One
1. Select the documents to join as described above.
2. Click Join icon. The Join Settings page opens. The selected file is shown in Selected
Files (Join Order).
3. If desired, change the order of the documents to be joined by clicking Top, Up, Down,
and Bottom. You can exclude a document from the Selected Files (Join Order) list by
clicking Delete.
4. Name the new document which the documents selected are joined in File Name.
5. Click Join button. The documents are joined in the new document.
10 Embedded Web Server
Page 15

Document Box
Downloading a Document to a PC
1. Select a document you want to download and store into your PC as described above.
You can download only one document at a time.
2. Click Download icon. The Download Settings page opens. The selected file is shown in
Selected Files.
If you want to download the selected page in a file, click Settings in Selected Files.
After selecting the desired pages, click Submit button.
3. Use the Color Selection drop-down list if you want to change the color of the document
after downloading. For example, you can download a color document as a monochrome
document when it is stored in a PC.
4. Use the File Format drop-down list to select the type of the document you want to send.
5. Click Download button to begin downloading. Enter the name and destination of the
document as you are prompted.
Note: If downloading is interrupted by the web browser's pop-up blocking, perform the
following:
• For example, on Internet Explorer 11, go to Too l s > Internet options > Privacy >
Pop-up Blocker, and disable Turn on Pop-up Blocker to turn off pop-up blocking.
Or, click Settings on Pop-up Blocker and enter the print system's IP address in
Allowed sites.
• If pop-up blocking is still engaged, on Internet Explorer 11, go to Tools > Internet
Options > Security > Custom level > Use Pop-up Blocker and select Disable.
• If downloading won't complete, try to turn off SmartScreen Filter by browsing to
Safety > Turn Off SmartScreen Filter on Internet Explorer 11.
Sending a Document to a Destination
1. Select a document you want to send as described above. You can send only one
document at a time.
2. Click Send icon. The Send Settings page opens. The selected file is shown in Selected
Files.
3. In Destination, select a destination from Address Book, E-mail, Folder, FAX and i-
FAX.
To select a destination, select Address Book to display the destinations currently
registered (depending on E-mail, Folders, FAX, i-FAX, or Groups). Note, however,
only Address Book is displayed if the entry of new addresses is prohibited in the
device's system menu.
To delete a destination from Destinations, click Delete icon. If you want to print the
selected page in a file, click Settings in Selected Files. After selecting the desired
pages, click Submit button.
4. Use the Color Selection drop-down list if you want to change the color of the document
to send. For example, you can send a color document as a monochrome document.
5. Name the document in File Name.
6. Enter the date of sending and job ID in Additional Information. These entries are
appended in the file name.
7. Use the File Format drop-down list to select the type of the document you want to send.
User Guide 11
Page 16

Document Box
8. Click Send button. If you are prompted to confirm sending, in case Confirmation
Screen is activated on the device's operation panel, make confirmation. The document
is sent to the destination.
Printing a Document
1. Select the document(s) to print as described above.
2. Click Print button. The Print Settings page opens. The selected file is shown in
Selected Files (Print Order).
3. If desired, change the order of the documents to be joined by clicking Top, Up, Down,
and Bottom. You can exclude a document from the Select Pages (Print Order) list by
clicking Delete.
If you want to print the selected page in a file, click Settings in Selected Pages to
Process. After selecting the desired pages, click Submit button.
4. Enter the number of copies to print in Copies. When clicking Delete after Print, the
document is deleted after printing.
5. Use the Paper Selection drop-down list if you want to change the paper source.
FAX Box
6. Use the Color Selection drop-down list if you want to change the color of the document
when it is printed.
7. In Functions, change settings for Duplex, Combine, EcoPrint, and Toner Save Level
as desired.
8. Click Print button. The document is printed.
Deleting a Custom Box
1. Click Custom Box under Document Box on the navigation menu. The Custom Boxes
page opens.
2. Click Delete icon once. This will not delete any custom box yet, but this will let the
checkboxes (Select) appear to the left.
3. Select the custom box you want to delete by selecting the checkbox to the left. You can
select only one custom box to delete at a time.
4. You can enter the box name in the Box Name window and click the magnifying glass
icon to quickly search the custom box.
5. Click Delete icon.
The section below explains how to add, edit or delete fax boxes as well as working with
their contents.
Adding a New Fax Box
1. Click Fax Box under Document Box on the navigation menu.
2. Click Add icon. The New Box - Property page opens.
3. Enter the property such as Number and Box Name.
12 Embedded Web Server
Page 17

Document Box
4. Click Submit button.
Editing a Fax Box
1. Click Fax Box under Document Box on the navigation menu.
2. Select the fax box you want to edit by clicking on its Number or Box Name. The
documents contained in the fax box are displayed with its name, date of creation, size,
etc. You can choose List View or Thumbnail to view the box contents.
Alternatively, you can directly enter the box number in the Box # window and click Go
to, or enter the box name in the Box Name window and click the magnifying icon, to
quickly search the fax box.
3. Click Box Property. The Property page will appear.
4. Make entries required to modify the fax box properties such as Number, Name, etc.
5. Click Submit button.
Working with a FAX Box
1. Click Fax Box under Document Box on the navigation menu.
2. Select the fax box you want to work with by clicking on its Number or Box Name. If the
box is password-protected, enter the password. The documents contained in the fax box
are displayed with its name, date of creation, size, etc. You can choose List View or
Thumbnail to view the box contents. To view details on a document in the fax box, click
its Name. The Property page opens and you can view the number of pages, resolution,
etc. You can also change the file name by clicking Change File Name or preview by
clicking Preview on this page.
To search the document in the fax box, you can open the fax box, enter the document
name in the File Name window and click the magnifying glass icon.
3. In the fax box, select the check box next to the name of the document that you want to
apply the action. You can select more than one document simultaneously.
4. Select either of Delete, Download, and Print to apply to the document. To perform
either of these actions, follow the same procedure as described in Custom box on page
9.
Deleting a FAX Box
1. Click Fax Box under Document Box on the navigation menu. The FAX Boxes page
opens.
2. Click Delete icon. This will not delete any fax box yet, but this will let the checkboxes
(Select) appear to the left.
3. Select the fax box you want to delete by selecting the check box to the left. You can
select only one fax box to delete at a time. You can enter the box name in the Box Name
window and click the magnifying glass icon to quickly search the custom box.
4. Click Delete icon once. If required, enter the password and click OK.
User Guide 13
Page 18

Document Box
Sub Address Box
The section below explains how to add, edit or delete sub address boxes as well as
working with their contents.
Adding a New Sub Address Box
1. Click Sub Address Box under Document Box on the navigation menu. The Sub
Address Boxes page opens.
2. Click Add icon and enter descriptions for the sub address box.
3. Click Submit button.
Editing a Sub Address Box
1. Click Sub Address Box under Document Box on the navigation menu. The Sub
Address Boxes page opens.
2. Select the sub address box you want to edit by clicking on its Number or Box Name.
The documents contained in the sub address box are displayed with its name, date of
creation, etc.
Alternatively, you can directly enter the box number in the Box # window and click Go
to, or enter the box name in the Box Name window and click the magnifying icon, to
quickly search the sub address box.
3. Click Box Property. The Property page will appear.
4. Make entries required to modify the sub address box properties such as Number, Name,
etc.
5. Click Submit button.
Working with a Sub Address Box
1. Click Sub Address Box under Document Box on the navigation menu. The Sub
Address Boxes page opens.
2. Select the sub address box you want to work with by clicking on its Number or Box
Name. If the box is password-protected, enter the password. The documents contained
in the sub address box are displayed with its name, date of creation, etc.
To search the document in the sub address box, you can open the sub address box,
enter the document name in the File Name window and click the magnifying glass icon.
3. In the sub address box, select the check box next to the name of the document that you
want to apply the action. You can select more than one document simultaneously.
4. Select either of Delete or Print to apply to the document. To perform either of these
actions, follow the same procedure as described in p.9.
Deleting a Sub Address Box
1. Click Sub Address Box under Document Box on the navigation menu. The Sub
Address Boxes page opens.
2. Click Delete icon once. This will not delete any sub address box yet but this will let check
boxes (Select) appear to the left.
14 Embedded Web Server
Page 19

Polling Box
Document Box
3. Select the sub address box you want to delete by selecting the check box to the left. You
can select only one box to delete at a time. You can enter the box name in the Box
Name window and click the magnifying glass icon to quickly search the box.
4. Click Delete icon once. If required, enter the password and click OK.
This page allows you to print or delete documents in polling boxes. Also, you can
determine whether documents are automatically deleted or retained after polling.
Polling Box Property
Polling Box Property determines after the document has been sent, whether you want
the document to be automatically deleted or to be retained (overwritten).
1. Click Polling Box under Document Box on the navigation menu. The Polling Box
page opens.
2. Click Box Property. The Polling Box - Property opens to select whether the document
which was sent is deleted, or overwritten and retained.
3. To configure the box so that documents are overwritten at updating, set Overwrite
Setting to Permit. To configure the box so that documents are automatically deleted
after transmission, set Delete after Transmit to On.
4. After confirming the settings, click Submit button.
Deleting Documents in Polling Box
To delete documents in a polling box, proceed as follows:
1. Click Polling Box under Document Box on the navigation menu. The Polling Box
page opens. You can choose List View or Thumbnail to view the box contents. To view
details on a document in the polling box, click its Name. The Property page opens and
you can view the number of pages, resolution, etc. You can also change the file name
by clicking Change File Name or preview by clicking Preview on this page.
2. Select the document(s) you want to delete by selecting the check box to the left. You
can select more than one check box to delete the documents simultaneously.
3. Click Delete icon once.
Printing Documents in Polling Box
To print documents in a polling box, proceed as follows:
1. Click Polling Box under Document Box on the navigation menu. The Polling Box
page opens. You can choose List View or Thumbnail to view the box contents. To view
details on a document in the polling box, click its Name. The Property page opens and
you can view the number of pages, resolution, etc. You can also change the file name
by clicking Change File Name or preview by clicking Preview on this page.
2. Select the document(s) you want to print by checking the checkbox to the left. You can
select more than one checkbox to print the documents in succession.
3. Click Print button. The Basic submenu will open.
User Guide 15
Page 20

Document Box
4. You can immediately start to print the documents in the order shown in Selected Files
by clicking Print. If you want to change the order of printing, highlight a document and
press Top, Up, etc. If you want to omit a document from the list, click Delete icon.
5. Click Print button.
Job Box Settings
The section below explains how to change the number of Quick Copy jobs and set
automatic delete times for temporary jobs in Job Box. Also, you can determine whether
documents are automatically deleted or retained after printing.
1. Click Job Box Settings under Document Box on the navigation menu. The Job Box
Settings page opens.
2. Enter the value in Quick Copy Job Retention. You can select Quick Copy jobs from 0
to 300.
3. Enter the value in Repeat Copy Job Retention. You can select Quick Copy jobs from
0 to 50.
4. To delete automatically the temporary retained jobs after printing, select 1 hour, 4
hours, 1 day, or 1 week on the Deletion of Job Retention drop-down list. If you do not
want to delete the jobs after printing, select Off on the Deletion of Job Retention drop-
down list.
5. After confirming the settings, click Submit button.
16 Embedded Web Server
Page 21

5 Address Book
This page is accessible when you have logged in using a general user or administrator
account.
Address Book contains Machine Address Book and External Address Book. You can
also specify the address quickly by assigning it to the One-Touch key.
Machine Address Book
This section explains you to add, edit or delete contacts in the machine address book.
Contacts
This subsection explains how to add, edit or delete contacts in the machine address
book.
Address Book
In the Addresses page, contacts and groups are listed together. Contacts are identified
by the single person icon and groups by the triple person icon. You can filter to display
only the contacts or groups by choosing Contact or Group on the Type drop-down list.
Adding a New Contact
1. Click Machine Address under Address Book on the navigation menu. The Addresses
page opens.
2. Click Add icon. The New Contact - Property page opens.
3. Enter the contact's Number, Name and E-mail.
You can also enter SMB and FTP access information for the contact including a shared
folder accessible from Microsoft Windows Network. Specify Host Name, Port Number,
Path to the shared folder, Login User Name, and Login Password for the contact.
When the Test button is pressed, this machine tries to connect to the SMB or FTP
server.
If you use the host name, you must first specify the DNS server information.
If the FAX system is installed or i-FAX is activated in the system, you can include a FAX
number and/or i-FAX address.
4. Click Submit button. To cancel, click Back button.
Editing a Contact
The steps below allow you to modify the number or name, e-mail address, SMB and FTP
information, FAX and i-FAX settings of a contact.
1. Click Machine Address under Address Book on the navigation menu. The Addresses
page opens.
2. Click the contact's Number or Name you want to edit. The Property page appears.
User Guide 17
Page 22

Address Book
Alternatively, you can directly enter the address number in the Address # window and
click Go to, or enter the address name in the Address Name window and click the
magnifying icon, to quickly search the contact.
3. Modify Number, Name, or E-mail of the contact. If the system is installed with a FAX
system or has i-FAX activated, you can modify these settings.
4. Modify the settings for SMB and FTP accesses as desired. When the Test button is
pressed, this machine tries to connect to the SMB or FTP server.
5. Click Submit button. To cancel, click Back button.
Deleting a Contact
1. Click Machine Address under Address Book on the navigation menu. The Addresses
page opens.
Select the contact(s) you want to delete by selecting the checkbox to the left.
2. If you want all contacts displayed on the page deleted, click Check All icon. To deselect
all, click None icon.
3. Click Delete icon once.
Adding a New Group
1. Click Machine Address under Address Book on the navigation menu. The Addresses
page opens.
2. Click Add Group button. The New Group - Property page opens.
3. Enter the group's Number, or leave it to the system to automatically assign a number,
and the group's Name.
4. Add contacts to the group by clicking the Add icon. The Addresses page appears.
5. Select the contact to join the group by checking the Select checkbox to the left. You can
select more than one document simultaneously. Note that the contacts to join must
already have been existent on the Addresses page.
6. Click Submit button. You are returned to the Property page. To delete a contact, select
a contact and click the Delete icon.
7. Click Submit button. Repeat the above steps to add more groups.
Edit Group
1. Click Machine Address under Address Book on the navigation menu. The Addresses
page opens.
2. Click the group’s Number or Name you want to edit. The Property page of the group
opens.
Alternatively, you can directly enter the group number in the Address # window and
click Go to, or enter the group name in the Address Name window and click the
magnifying icon, to quickly search the group.
3. Modify the group's Number and Name as desired.
4. Add contacts to the group by clicking the Add icon. The Addresses page appears.
18 Embedded Web Server
Page 23

Address Book
5. Select the contact to join the group by checking the Select checkbox to the left. You can
select more than one document simultaneously.
You can filter contacts by selecting E-mail, Folder, FAX, or i-FAX on the Type drop-
down list.
6. Click Submit button to add the contacts. You are returned to the Property page.
To delete a contact, select a contact and click Delete icon.
7. Click Submit button. You are returned to the Address page.
Delete group
1. Click Machine Address under Address Book on the navigation menu. The Addresses
page opens.
2. Select the group(s) you want to delete by selecting the check box to the left.
If you want all groups displayed on the page deleted, click Check All icon. To deselect
all, click None icon.
Note: Deleting a group does not delete the contacts joined in the group.
3. Click Delete once.
External Address Book Settings
This section explains how to use the external address book.
1. Click External Address Book Settings under Address Book on the navigation menu.
External Address Book Settings page opens.
2. Confirm that LDAP is set to On. If the LDAP is Off, make settings in Protocol.
3. Click On of the desired external address book(s), and then click Settings button.
External Address Book 1 (to 8) Settings page opens.
Note: External Address Book 5 (to 8) is used for sending a fax via FAX server.
4. If prompted, configure the following settings for External Address Book.
External Address Book Name
Enter the external address book name.
LDAP Server
Configure the LDAP server.
1. LDAP Server Name: Specifies a name or IP address for the LDAP server.
2. LDAP Port Number: Sets the port number used by LDAP. The default port is 389.
3. Search Timeout: Specifies the timeout in seconds after which a search on the
LDAP server expires.
4. Login User Name: Enter the name of the user to access the LDAP server.
5. Login Password: Enter the password of the user to access the LDAP server.
6. Max Search Results: Enter the maximum value of the search results using
Search Settings.
7. Search Base: Enter the basic information of search.
Entry example of Search Base is as follows.
To search through the "Users" container in the Active Directory
User Guide 19
Page 24

Address Book
"serv.example.com" domain:
cn=Users,dc=serv,dc=example,dc=com
To search through the "Sales div" Organizational Unit (OU) in the Active Directory
"serv.example.com" domain:
ou="Sales div",dc=serv,dc=example,dc=com
To search through the user's container "Hanako Yamada" which belongs to
"Sales2" Organizational Unit (OU) in the Active Directory "serv.example.com"
domain:
cn="Hanako Yamada",ou=Sales2,dc=serv,dc=example,dc=com
If there are one or more blank spaces in each of value, you have to enclose the
value in double quotation marks (").
8. LDAP Security: Configure this setting in the Protocol Settings page under
Network Settings.
9. Authentication Type: Select an authentication type from the drop-down list.
10.Connection Test: This will test one transmission for each press, attempting to
establish communication with the LDAP server.
Display Sequence
Select a Display Mode from Display from the first name and Display from the
family name on the drop-down list.
Search Settings 1 (to 2)
You can configure the following settings.
1. Search Criteria: Enter Display Name and LDAP Attribute as a search criteria.
2. Return Value: Enter LDAP Attribute as a return value and select Job Type from
the drop-down list.
3. Optional Return Value: Enter Display Name and LDAP Attribute as an optional
return value.
5. If prompted, configure the following settings for External Address Book (FAX Server).
External Address Book Name
Enter the external address book name.
LDAP Server Settings
Configure the LDAP server.
1. LDAP Server Name: Specifies a name or IP address for the LDAP server.
2. LDAP Port Number: Sets the port number used by LDAP. The default port is 389.
3. Search Timeout: Specifies the timeout in seconds after which a search on the
LDAP server expires.
4. Login User Name: Enter the name of the user to access the LDAP server.
5. Login Password: Enter the password of the user to access the LDAP server.
6. Max Search Results: Enter the maximum value of the search results using
Search Settings.
7. Search Base: Enter the basic information of search.
Entry example of Search Base is as follows.
To search through the "Users" container in the Active Directory
"serv.example.com" domain:
cn=Users,dc=serv,dc=example,dc=com
To search through the "Sales div" Organizational Unit (OU) in the Active Directory
"serv.example.com" domain:
ou="Sales div",dc=serv,dc=example,dc=com
20 Embedded Web Server
Page 25

Address Book
To search through the user's container "Hanako Yamada" which belongs to
"Sales2" Organizational Unit (OU) in the Active Directory "serv.example.com"
domain:
cn="Hanako Yamada",ou=Sales2,dc=serv,dc=example,dc=com
If there are one or more blank spaces in each of value, you have to enclose the
value in double quotation marks (").
8. LDAP Security: Configure this setting in the Protocol Settings page under
Network Settings.
9. Authentication Type: Select an authentication type from the drop-down list.
10.Connection Test: This will test one transmission for each press, attempting to
establish communication with the LDAP server.
Display Sequence Settings
Select a Display Mode from Display from the first name and Display from the
family name on the drop-down list.
Search Settings 1 (to 2)
You can configure the following settings.
1. Search Criteria: Enter Display Name and LDAP Attribute as a search criteria.
2. Return Value: Enter LDAP Attribute as a return value.
3. Optional Return Value: Enter Display Name and LDAP Attribute as an optional
return value.
6. After confirming the settings, click Submit button.
One Touch Key
Registering a new One Touch key
1. Click One Touch Key under Address Book on the navigation menu. One Touch Key
2. Click Settings of the One Touch Key which you want to register. The One Touch Key
3. Enter the Display Name and Destination in the One Touch Key Property. You can
This section explains how to register the address to the One Touch key.
List opens.
Property page opens.
call the address registered in the Address Book by clicking Address Book. You can
select the type of addresses using the Type drop-down list in the Addresses page.
Click No. or Name of the address you want to register. The address name and the
property information are shown. Select the contact you want to register by checking the
radio button to the left. You can check only one contact to assign at a time.
You can enter the address name in the Address Name window and click the magnifying
glass icon to quickly search the contact.
4. After confirming the settings, click Submit button.
Edit one touch key
1. Click One Touch Key under Address Book on the navigation menu. One Touch Key
List opens.
User Guide 21
Page 26

Address Book
2. Enter the key number in the Key # windows and click Go to. The Property page
appears.
3. Make entries required to modify the Display Name and the Destination. Click Delete to
delete the destination.
4. After confirming the settings, click Submit button.
Delete One Touch Key
1. Click One Touch Key under Address Book on the navigation menu. One Touch Key
List opens.
2. Click Delete of the One Touch Key which you want to delete.
22 Embedded Web Server
Page 27

6 Device Settings
This page is accessible when you have logged in the embedded server with
administrator privilege, while network authentication or local authentication is enabled.
If prompted, configure the following settings. See the sections below for detailed
information.
• Paper/Feed/Output
• Original Document
• Energy Saver/Timer
• Date/Time
• System
Paper/Feed/Output
This section includes settings that apply to paper size and media type for the paper
loaded in the MP tray and the cassettes, configuring cassette group, paper output, and
the other detailed properties.
Device Settings
Cassette Settings
1. Click Paper/Feed/Output under Device Settings on the navigation menu. The Paper/
Feed/Output Settings page opens.
2. Configure the paper size and media type for each cassette.
3. After confirming the settings, click Submit button.
MP Tray Settings
1. Click Paper/Feed/Output under Device Settings on the navigation menu. The Paper/
Feed/Output Settings page opens.
2. Configure the paper size and media type for MP Tray.
3. After confirming the settings, click Submit button.
Group Settings
1. Click Paper/Feed/Output under Device Settings on the navigation menu. The Paper/
Feed/Output Settings page opens.
2. Select the cassette(s) corresponding to your desired group arrangement.
3. After confirming the settings, click Submit button.
Paper Output Settings
1. Click Paper/Feed/Output under Device Settings on the navigation menu. The Paper/
Feed/Output Settings page opens.
User Guide 23
Page 28

Device Settings
2. Configure the default output tray. You can change the output tray for Copy/Custom
Box, Printer and FAX respectively.
3. After confirming the settings, click Submit button.
Other Settings
1. Click Paper/Feed/Output under Device Settings on the navigation menu. The Paper/
Feed/Output Settings page opens.
2. You can configure the following settings.
Default Paper Source
You can select the cassette or MP Tray feed the paper with priority.
Paper Selection
You can select Auto or Default Paper Source by clicking the drop-down list.
Auto Paper Selection
You can select Most Suitable Size or Same as Original Size by clicking the drop-
down list.
Special Paper Action
You can select Adjust Print Direction or Speed Priority by clicking the drop-down
list.
Media for Auto (Color)
You can select the media type when Auto is selected in Paper Selection for color
printing.
Media for Auto (B&W)
You can select the media type when Auto is selected in Paper Selection for black
and white printing.
Paper Source for Cover
You can select the cassette or MP Tray feed the cover.
Paper Size for Small Original
You can select Default Paper Size or the paper size by clicking the drop-down list
when an original of a small size, such as a card, which the scanner cannot detect is
printed.
Offset One Page Documents
You can select whether offset stacking (On) or not (Off) when printing documents
comprised of only one page.
Offset Documents Each Job
You can select whether offset stacking (On) or not (Off) when printing documents
comprised of each job.
24 Embedded Web Server
Page 29

Device Settings
Separator Sheet Paper Source
You can select the cassette or MP Tray feed the separator sheet by clicking the
drop-down list.
Message Paper Set
YYou can select whether display (On) or not (Off) the confirmation screen when
loading the paper in each paper source.
3. After confirming the settings, click Submit button.
Paper Detail Settings
1. Click Paper/Feed/Output under Device Settings on the navigation menu. The Paper/
Feed/Output Settings page opens.
2. Click Settings in Paper Detail Settings. The Paper Details Settings page opens.
You can configure the following settings.
Custom Page Size Settings
You can change the size of paper for cassette and MP tray . When you want to
change the settings, enter the length (X) and width (Y) of the Custom Paper.
Note: Some model type can select On and then specify the paper size.
Media Type Settings
You can select the paper weight for each media type by clicking the drop-down list.
When you select the Custom 1 to 4, you can select the paper weight as well as
specifying whether or not to use duplex printing and entering the custom paper
name.
3. After confirming the settings, click Submit button.
Original Document
This section explains how to configure the original.
Auto Detect Original Size
1. Click Original Document under Device Settings on the navigation menu. The Original
Document page opens.
2. You can configure the following settings.
System of Units
Select Metric or Inch as measurement of original document for auto detect. If you
select Inch, select an original size (Legal, OfficioII or 216 x 340 mm) from the dropdown list.
A6/Hagaki
Select A6 or Hagaki (postcard) as a original size for auto detect. When you select
Hagaki (postcard), only an original placed on a platen can be detected.
User Guide 25
Page 30

Device Settings
Folio
Select On when you want to detect the Folio-size document automatically.
11 x 15"
Select On when you want to detect the 11 x 15"-size document automatically.
Note: Some model type can detect all the originals automatically, or select the default
size of original placed on the platen.
3. You can select A6 or Hagaki for A6/Hagaki and On (auto detection) or Off for Folio and
11 x 15”, accrding to the machine type.
4. After confirming the settings, click Submit button.
Custom Original Size
1. Click Original Document under Device Settings on the navigation menu. The Original
Document page opens.
2. Select On or Off for each Custom Original (1 to 4). When you want to change the
settings, enter the length (X) and width (Y) of the Custom Paper.
Note: You can enter the length of Custom Paper without selecting On or Off according
to the machine.
3. After confirming the settings, click Submit button.
Energy Saver/Timer
This section explains how to configure the Energy Saver Settings and Timer Settings.
Energy Saver Settings
1. Click Energy Saver/Timer under Device Settings on the navigation menu. The Energy
Saver/Timer Settings page opens.
2. You can configure the following settings.
Sleep Level
Select Quick Recovery or Energy Saver. Even if you selected either sleep level,
the machine can recover from the sleep mode when you press any key on the operation panel or the machine received the print or fax job.
Quick Recovery recovers from the sleep mode faster than Energy Saver.
Energy Saver reduces power consumption even more than Quick Recovery, and
allows sleep mode to be set separately for each function. The time required for the
machine to wake up from the sleep mode and resume normal operation will be longer than for Quick Recovery.
Alternatively, on some models, the Sleeping page appears on the embedded web
server while the system is engaged in Energy Saver. You can click Start on the
Sleeping page.
26 Embedded Web Server
Page 31

Device Settings
Sleep Rule
If you have selected Energy Saver mode of sleeping, click On of the appropriate
radio button for the interface or device you would like to engage in Energy Saver.
Click Off if you do not want to engage Energy Saver for the interface or device. For
example, if you want the print data received by the network interface always to wake
the machine to continue printing, click Off next to Network.
Auto Sleep
Click Settings button to open the Auto Sleep Settings page. Click On if you want
to use Auto Sleep and click Submit button.
Sleep Timer
Specify the time period in the drop-down list, after that time period the system enters
Auto Sleep Mode.
Power Off Timer
Specifies the time from 1 hour to 1 week after which the system enters the power off
mode, where the device automatically turns off after a certain amount of time
elapses the device was last used.
Power Off Rule
Click On of the appropriate radio button for the interface or device you would like to
engage in power off mode. Click Off if you do not want to engage power off mode
for the interface or device.
Low power Timer
Specifies the time from 1 to 240 minutes after which the system enters the low
power mode, where it reduces the power consumption.
Energy Saver Recovery Level
Select Full Recovery, Normal Recovery, or Power Saving Recovery.
3. After confirming the settings, click Submit button.
Set Timer
1. Click Energy Saver/Timer under Device Settings on the navigation menu. The Energy
Saver/Timer Settings page opens.
2. This page allows the following settings:
Auto Panel Reset
Configures the panel to be automatically reset. Activate this setting to open Panel
Reset Timer and specify the time between 5 and 495 seconds after that the panel
will be automatically reset.
Interrupt Clear Time
This determines the time period before the machine reverts to normal mode, after
the interrupt copy mode has been engaged. The range is 5 to 495 seconds.
User Guide 27
Page 32

Device Settings
Date/Time
WSD scan timer
This determines the time period before the machine reverts to normal mode, after
WSD scan mode has been engaged. The range is 10 to 495 seconds (in 5-second
increments).
Weekly timer
This page allows the following settings: Activate or deactivate this setting. To make
advanced settings, click Settings. The Weekly Timer Settings page appears. In
Schedule, set to turn power on or off for each day of the week. Enter time for activation. To set the time of retries, specify the limit of retries in Retry Times and enter a
value in Retry Times and Retry Interval.
Auto File Deletion Time(Custom Box)
Set the time to automatically delete stored documents in the custom box.
3. After confirming the settings, click Submit button.
This section includes advanced settings on date and time.
Date/Timer Settings
1. Click Date/Time under Device Settings on the navigation menu. The Date/Time
Settings page opens.
The following items are displayed:
Current Local Time
Displays the time that is currently set in the machine.
Current Universal Time (UTC/GMT)
Displays the Greenwich Mean Time that is currently set in the machine.
2. Make changes in the settings if needed.
Select Date, Year, Month, Day, Time, Date Format, Time Zone, or Summer Time
which you want to make a change.
3. After confirming the settings, click Submit button.
Synchronize
1. Click Date/Time under Device Settings on the navigation menu. The Date/Time
Settings page opens.
2. Make changes in the settings if needed.
If a time server is used to synchronize the time as well, the current time can be adjusted
regularly and easily. Enter the host name or IP address of the time server and click the
Synchronize button.
If you use the host name, you must first specify the DNS server information.
28 Embedded Web Server
Page 33

System
Device Settings
Time information is required when you receive reports from this machine via E-mail. It
is recommended that you set the time when the report mail function is enabled.
3. Click Submit button.
This section includes advanced settings that apply to the system.
If the settings for the item marked with an asterisk (*) has been changed, you must
restart the machine or the network. To restart the machine, proceed to the Reset page.
Device Information
1. Click System under Device Settings on the navigation menu. The System Settings
page opens.
2. Make changes in the settings if needed.
Enter Host Name, Asset Number, and Location, accordingly.
If you use the host name, you must first specify the DNS server information.
3. Click Submit button.
General
1. Click System under Device Settings on the navigation menu. The System Settings
page opens.
2. Make changes in the settings if needed.
Language
Select the language.
RAM Disk Mode
When you use RAM disk mode, select On.
RAM Disk Size
Specify the RAM disk size.
Note: This item is displayed when an optional memory is installed.
Optional Memory
When an optional memory is installed, select the memory allocation pattern according to your purpose.
Software Keyboard Layout
Select an appropriate type of keyboard.
USB keyboard type
Select an appropriate type of USB keyboard.
User Guide 29
Page 34

Device Settings
Override A4/Letter
Specifies whether or not the A4 and Letter size paper should be interchangeable.
When turned On, for example, if the A4 paper is not in the tray, the Letter size paper
will be selected for printing. When turned Off, the Letter size paper will not be used
in place of the A4 paper, when A4 is selected for printing but the A4 tray is empty.
Measurement
Select the unit of measurement for entry.
Preset Limit
Specify the number of copies limited to print.
Default Screen
Select the screen to set as the default screen.
Default screen for Send/FAX
Select the screen to set as the default screen.
Default Address Book
Select the type of default addressbook to set.
Orientation Confirmation
Activate or deactivate the prompt that confirms the orientation of original documents.
Altitude Adjustment
Select an altitude from the drop-down list according to your operating environment.
Bluetooth
Specifies whether to use the bluetooth keyboard.
Numeric Keyboard Settings
You can configure the following settings.
1. Default Display (Copy/Box Print): Specifies whether to display the numeric
keyboard on Copy/Box print screen.
2. Default Display (HyPAS Application): Specifies whether to display the numeric
keyboard when using the HyPAS application.
3. Layout (HyPAS Application): Select the keyboard layout when activating the
HyPAS application.
NFC
Specifies whether to perform the wireless comminication using NFC.
3. Click Submit button.
Error Settings
1. Click System under Device Settings on the navigation menu. The System Settings
page opens.
2. Make changes in the settings if needed.
30 Embedded Web Server
Page 35

Device Settings
Action when color toner is empty
Select the action when color toner is empty, whether you want to cancel printing or
print forcibly in black and white mode.
MP tray empty
Activate or deactivate the attention display when the MP tray has become empty.
Error Clear Timer
Activate or deactivate automatic error clearing at an error. If activated, printing will
automatically resume after the time period that you can specify from 5 to 495 seconds.
Skip Error Job
Activate or deactivate automatic job skipping at an error. If activated, printing will
automatically resume by skipping the job in error after the time period that you can
specify from 5 to 90 seconds.
Low Toner Alert
Activate or deactivate the attention display when toner is running low. If activated,
the attention display will appear in a relative amount of remaining toner that you can
specify from 5 to 100.
Toner Waste Full Alert
Activate or deactivate the attention display when waste toner box is becoming full. If
activated, the attention display will appear in Toner Waste Full Alert Setting that
you can specify from 10 to 90.
Default Paper Source
Displays this item when a large capacity feeder is installed and selected as a default
paper source from Default Paper Source of Other Settings in Paper/Feed/Output
page.
3. Click Submit button.
User Guide 31
Page 36

Function Settings
7 Function Settings
This page is accessible when you have logged in the embedded server with
administrator privilege, while network authentication or local authentication is enabled.
If needed, make the following settings: See below for detailed information.
• Common/Job Default
•Copy
• Printer
•E-mail
• Sending Job - Folder
• DSM Scan
• FAX/i-FAX
• Send and Forward
• RX/Forward Requirements
• Operation Panel
Common/Job Default
In this section, you can make settings for the following items:
Common Settings
1. Click Common/Job Defaults under Function Settings on the navigation menu. The
Common/Job Default Settings page opens.
2. Make changes in the settings if needed.
Priority Setting
Activate or deactivate automatic zooming with priority.
OCR Text Recognition Action
You can select this item when the optional Scan Extension kit (A) is activated.
High comp. PDF image
You can prioritize to ensure smaller file sizes or better quality text representation in
high-compression PDF format.
3. Click Submit button.
Job Default Settings
1. Click Common/Job Defaults under Function Settings on the navigation menu. The
Common/Job Default Settings page opens.
2. You can make changes for the following items as required.
Document name
Name the default document used in the print job.
32 Embedded Web Server
Page 37

Function Settings
Additional Info.
Select the date, job number, etc.
3. Click Submit button.
Scan Default Settings
1. Click Common/Job Defaults under Function Settings on the navigation menu. The
Common/Job Default Settings page opens.
2. You can make changes for the following items as required.
Original Orientation (Copy)
You can select Auto, Top Edge on Top or Top Edge on Left as the original orienta-
tion.
Note: Auto can be configured when an optional OCR Expansion kit is installed.
Original Orientation (Send/Store)
You can select Auto, Top Edge on Top or Top Edge on Left as the original orienta-
tion.
Note: Auto can be configured when an optional OCR Expansion kit is installed.
Color Selection (Send/Store)
This selects color mode for scanning or storing. Auto Color (Color/Grayscale) and
Auto Color (Color/Black & White) allow you identify color for the original docu-
ment to scan. You can manually select Black & White to forcedly switch color
mode.
Scan Resolution
Specifies the resolution for scanning. The resolutions available differ depending on
the model, current color mode, and the saving format of files. To scan in full color or
grayscale with a solution of 400 dpi or greater, the internal memory must be
expanded for some models.
Original Image (Copy)
The original quality for scanning or storing must be selected according to the type of
the original. Select from Text+Photo (Printer), Text+Photo (Magazine), Photo
(Printer), Photo (Magazine), Photo (Photo Paper), Text, Text (Fine Line),
Graphic/Map (Printer), and Graphic/Map (Magazine).
Note: You can select Color table from the drop-down list when it is downloaded.
Original image (Send/Store)
The original quality for scanning or storing must be selected according to the type of
the original. Switch the original quality from Text+Photo, Photo, Tex t , Text (for
OCR), and Text (Fine Line).
Zoom %
This switches the zoom ratio between Auto and 100%. The default setting is 100%.
Background Density (Copy)
This removes dark background from originals, such as newspapers, when copying.
User Guide 33
Page 38

Function Settings
Background Density (Send/Store)
This removes dark background from originals, such as newspapers, when sending
or storing a job.
Continuous Scan (Copy)
Activates or deactivates Continuous Scan for copy.
Continuous Scan (Send/Store)
Activates or deactivates Continuous Scan for send or store.
Note: Some machine products disply Continuous Scan (Except FAX). Activates or
deactivates Continuous Scan except fax.
Continuous Scan (Fax)
Activates or deactivates Continuous Scan for fax.
Border Erase
Set the width of the outer and inner borders to erase in 0 to 50mm. You can set border erase for the reverse side.
Prevent Bleed-through (Copy)
Activate or deactivate Prevent Bleed-through for copying.
Prevent Bleed-through (Send/Store)
Activate or deactivate Prevent Bleed-through for sending and storing.
Skip Blank Page (Copy)
Activate or deactivate Skip Blank Page for copying.
Skip Blank Page (Send/Store)
Activate or deactivate Skip Blank Page for sending and storing.
Prevent Light Reflection
Activate or deactivate Prevent Light Reflection when using the Erase Shadowed
Areas feature.
3. Click Submit button.
Output Default Settings
1. Click Common/Job Defaults under Function Settings on the navigation menu. The
Common/Job Default Settings page opens.
2. You can make changes for the following items as required.
EcoPrint
Switches EcoPrint On or Off to control toner consumption for saving the printing
costs. The default setting is Off. When selecting On, you can select Toner Save
Level from 1 (Low) to 5 (High), according to the machine.
34 Embedded Web Server
Page 39

Function Settings
Margin
You increase or decrease the top and left gutters from -18 to +18mm.
JPEG/TIFF Print
This determines the physical size of JPEG images when printing them from a USB
flash device. Choices include Fit to Paper Size, Image Resolution, and Fit to
Print Resolution.
XPS Fit to Page
This determines the page size for printing XPS data. Turn On to fit print data over
the page size and turn Off to print in the original size.
Collate/Offset
Select the default collate/offset settings. When Collate is set to On, the documents
are collated by copy (Offset is set to Each Set). When Collate is set to Off, the
documents are collated by page (Offset is set to Off), according to the machine.
FAX TX Resolution
This selects the resolution to fax a document.
E-mail Template
This allows to create a template for entering a subject and body information of Email. Up to three templates can be created and configured with the default settings
according to the machine.
i-FAX Template
This allows to create a template for entering a subject and body information for iFAX.
3. Click Submit button.
Copy Default Settings
1. Click Common/Job Defaults under Function Settings on the navigation menu. The
Common/Job Default Settings page opens.
2. You can make changes for the following items as required.
Color Selection (Copy)
This selects color mode for copying. Auto Color automatically identifies a full color
or black and white original. You can manually select either Full Color or Black &
White to forcedly switch color mode.
Auto Image Rotation
Activate or deactivate automatic image rotation mode.
DP Read Action
You can prioritize to use the document processor either in faster scanning or better
quality scanning.
User Guide 35
Page 40

Function Settings
Platen Scan Action
You can prioritize to use the platen either in faster scanning or better quality scanning.
Repeat Copy
Enables additional copies in the desired quantity as necessary after a copy job is
completed.
Note: Repeat Copy is not displayed when an optional Data Security Kit is activated
or a Repeat Copy job is cleared.
Skip Blank Page
You can choose whether blank pages should be delivered or not.
3. Click Submit button.
File Default Settings
1. Click Common/Job Defaults under Function Settings on the navigation menu. The
Common/Job Default Settings page opens.
2. You can make changes for the following items as required.
File Format
The file format is available from PDF, TIFF, JPEG, XPS, and High Compression
PDF.
Image Quality
This determines the quality of the image when saved, from 1 Low Quality (High
Comp.) to 5 High Quality (Low Comp.).
PDF/A
Turns PDF/A-compliant format PDF/A-1a, PDF/A-1b, PDF/A-2a, PDF/A-2b, PDF/
A-2u or Off, when File Format above is PDF. PDF/A is an electronic file format for
long-term preservation of documents as addressed in the ISO 19005-1 specification.
OCR Text Recognition
You can convert the scanned document to the text data when you selected PDF or
High Compression PDF as the file format.
Primary OCR Language
You can choose the primary OCR language from the drop-down list.
Auto Image Rotation (OCR)
Rotates the image direction to read when setting to On.
Note: OCR Text Recognition, Primary OCR Language, and Auto Image Rotation
(OCR) can be configured when an optional OCR Expansion kit is installed.
Color TIFF Compression
This allows to select TIFF V6 or TTN2 format for compression of color TIFF images.
36 Embedded Web Server
Page 41

Copy
Function Settings
File Separation
This extract pages as separate files from an output file. You can specify the number
of file separation from 1 to 500 when setting to On according to the machine.
3. Click Submit button.
This section includes advanced settings for copying.
1. Click Copy under Function Settings on the navigation menu. The Copy Settings page
opens.
2. You can make changes for the following items as required.
Reserve Next Priority
Activate or deactivate to prioritize the next job reserved.
Auto Image Rotation Action
Printer
Select the behavior of automatic image rotation in three ways.
Color Table (Copy)
You can specify the color table name.
Note: Color table (Copy) is displayed only when it is downloaded.
3. Click Submit button.
Function Default
The default settings can be changed in Common/Job Defaults Settings page.
This section includes advanced settings for printing.
If the settings for the item marked with an asterisk (*) has been changed, you must
restart the machine or the network. To restart the machine, proceed to the Reset page.
General
1. Click Printer under Function Settings on the navigation menu. The Printer Settings
page opens.
2. You can make changes for the following items as required.
Emulation
Set the Emulation Mode.
Alternate Emulation
When you have selected KPDL(Auto) as emulation mode, you can switch between
KPDL and another emulation mode (alternative emulation) automatically according
to the data to print. This item can be displayed when an optional Emulation kit is
installed.
User Guide 37
Page 42

Function Settings
Paper Feed Mode
Determines the behavior of paper feed selection when the paper you requested of
size and/or type is not available in the current paper source. Auto lets the machine
to search for the matching paper including all the paper sources. Fixed does not
perform searching in the other paper sources.
Form Feed Timeout
Adjusts the form feed timeout between 5 and 495 seconds in 5-second increments.
A form feed will occur in the absence of data during this time period. The default setting is 30 seconds.
Job Name
Select the job number, job name, etc.
User Name
Activate or deactivate to use User Name.
Message Banner Print
Each time a banner page is printed, the machine halts and displays a message that
prompts you to continue banner printing. You can activate (On) or deactivate (Off)
this message.
Wide A4
Activate (On) or deactivate (Off) Wide A4 size for printing.
Auto Cassette Change
You can select the actions when the paper runs out in the paper source while printing.
When selecting Off, the machine displays message to load paper in paper cassette
and stops printing. Load the paper according to the paper source displayed to
resume printing. You can also select the desired paper source.
When selecting On, the machine continues printing automatically if the other paper
cassette contains the same paper as the currently-used paper cassette.
Remote Printing
Permit or prohibit remote printing.
3. Click Submit button.
AirPrint Settings
1. Click Printer under Function Settings on the navigation menu. The Printer Settings
page opens.
2. Click Settings button. The AirPrint Settings page opens.
You can make changes for the following items as required.
AirPrint
The default setting is On.
38 Embedded Web Server
Page 43

Function Settings
Bonjour Name
Enter the Bonjour name.
Location
Enter the location of the machine on Location of the System Settings page under
Device Settings.
Note: When you enter Location, the location appears under the printing device
name appears on the printer selection screen using the mobile device. The location
also appears on the title (upper right) of Command Center RX.
Geolocation
Specifies whether or not to set the geolocation information of the machine. If this
setting turns On, Latitude, Longitude and Altitude appear on the AirPrint page.
Note: Even if Geolocation is set to Off, AirPrint works properly.
Latitude
Enter the latitude of the machine from -90.000000 to 90.000000 degrees.
Longitude
Enter the longitude of the machine from -180.000000 to 180.000000 degrees.
Altitude
Enter the altitude of the machine from 0 to 10000 meters.
Google Cloud Print Settings
1. Click Printer under Function Settings on the navigation menu. The Printer Settings
page opens.
2. Click Settings button on Google Cloud Print Settings. The Google Cloud Print
Settings page opens.
3. You can configure settings for General. Make the following setting:
1. Printer Name: Displays the device name. You can modify the name as necessary.
2. Proxy: Click Settings button. The TCP/IP Settings page opens.
If you do not use a proxy server, set Proxy to Off.
If you configure the proxy, set Proxy to On, and specify the following items as
necessary. For details, see Proxy settings on page 61.
After configuing settings, return to the Google Cloud Print Settings page.
3. Proxy Authentication: Enter User Name and Password for proxy authentication.
4. You can configure settings for Google Cloud Print. Make the following settings:
1. Click Register button.
2. Click the URL to sign in to Google and claim printer for Google Cloud Print.
3. Enter the account (Gmail address and password) to sign in.
4. Click OK button. The device used for Google Cloud Print is registered.
5. You can make changes for the following items on Privet (Cloud Device Local
Discovery Protocol and API) as required.
1. Local Discovery: When selecting On, the browser discovers the devices on the
local network.
2. Available Network: Select the available network for Google Cloud Print.
User Guide 39
Page 44

Function Settings
3. Local Print: When selecting On, you can print from the device on the local
network, without cloud server.
6. Click Submit button.
Page Control Settings
1. Click Printer under Function Settings on the navigation menu. The Printer Settings
page opens.
2. You can make changes for the following items as required.
Duplex
Select 1-sided, 2-sided Bind Long Edge, or 2-sided Bind Short Edge as duplex
mode.
Copies
Select the number of copies to print.
Page Orientation
Switches Portrait or Landscape page orientation.
LF Action
Configures LF and CR actions.
CR Action
Configures LF and CR actions.
3. Click Submit button.
Print Quality Settings
1. Click Printer under Function Settings on the navigation menu. The Printer Settings
page opens.
2. You can make changes for the following items as required.
Gloss Mode
Sets Gloss Mode to On or Off. The default setting is Off. This is only available for
some color machines which support Gloss Mode.
Color Selection
Sets Color Mode to Color or Black & White. This is only available for some color
machines.
KIR
Switches KIR smoothing On or Off.
EcoPrint
Switches EcoPrint On or Off to control toner consumption for saving the printing
costs. The default setting is Off. When selecting On, you can select Toner Save
Level from 1 (Low) to 5 (High) according to the machine.
40 Embedded Web Server
Page 45

Function Settings
Resolution
Select the resolution from the drop-down list.
3. Click Submit button.
This section includes advanced settings for E-mail.
SMTP protocol
1. Click E-mail under Function Settings on the navigation menu. The E-mail Settings
page opens.
2. You can make changes for the following items as required.
SMTP Protocol
Display whether a SMTP connection is available or not. Configure SMTP in SMTP
(E-mail TX) on the Protocols Settings page.
SMTP Server Name
Enter the SMTP server name or its IP address. If entering the name, rather than the
IP address, a DNS server address must also be configured. The DNS server
address may be entered on the TCP/IP Settings page.
SMTP Port Number
Enter the port number that SMTP will use (default is 25). Normally, use port 25, but
you can change the port number to suit the email server’s application and operation.
For example, the default port number for SMTP connections over SSL is 465. The
default port number for SMTP authentication is 587.
SMTP Server Timeout
Sets the timeout in seconds during which this device tries to connect to the SMTP
server.
Authentication Protocol
Enables or disables the SMTP authentication protocol or sets POP before SMTP as
the authentication type. When selecting On or POP before SMTP, you can select
user on the drop-down list. When selecting Other from Authentication as, you can
specify Login User Name and Login Password.
SMTP Security
Displays SMTP Security. This item appears when SSL/TLS or STARTTLS is
selected on SMTP Security of the Protocol Settings page.
POP before SMTP Timeout
Sets the timeout in seconds during which this device tries to connect to the POP3
server. You can configure this item when you selected POP before SMTP as
Authentication Protocol.
User Guide 41
Page 46

Function Settings
Connection Test
Tests to confirm that the settings on this page are correct. When Test button is
clicked, this machine tries to connect to the SMTP server.
Domain Restriction
Activate or deactivate to restrict domains. Click Domain List button to configure.
Enter a domain name that is permitted or rejected. You can also specify the E-mail
addresses.
3. Click Submit button.
POP3
1. Click E-mail under Function Settings on the navigation menu. The E-mail Settings
page opens.
2. You can make changes for the following items as required.
POP3 Protocol
Display whether a POP3 connection is available or not. Set to On on POP3 (E-mail
RX) of the Protocol Settings page. If Remote Printing is prohibited, E-mail print-
ing is unavailable. Configure Remote Printing in Printer Settings page.
Check Interval
Displays the interval, in minutes, for connecting to the POP3 server to check for
incoming e-mails at specific interval. Specify the interval of performing checks in the
range from 3 minutes to 60 minutes. The default is 15 minutes.
Run once now
Click Receive button to immediately receive E-mail from the POP3 server. When
Remote Printing is set to Permit, the machine prints the received E-mail.
Domain Restriction
Activate or deactivate to restrict domains. Click Domain List button to configure.
Enter a domain name that is permitted or rejected. You can also specify the E-mail
addresses.
POP3 User Settings
Click Settings button and configure the following user settings. Up to three users
can be set.
1. User Profile 1 (to 3): Enables or disables the user.
2. E-mail Address: Enter the E-mail address.
3. POP3 Server Name: Enter the POP3 server host name or IP address. If you use
the host name, you must first specify the DNS server information.
4. POP3 Port Number: Enter the port number that POP3 will use (default is 110).
Normally, use port 110, but you can change the port number to suit the email
server’s application and operation. For example, the default port number for POP3
over SSL is 995.
5. POP3 Server Timeout: Enter the timeout in seconds during which this machine
tries to connect to the POP3 server.
6. Login User Name: Enter the login name of the user for the POP3 account.
7. Login Password: Enter the password to log in the POP3 account.
42 Embedded Web Server
Page 47

Function Settings
8. Use APOP: Enables or disables APOP. APOP is an encryption mechanism used
for encrypting the Login Password during communication with the POP3 server.
When Use APOP is Off, the Login Password is sent using plain ASCII text. When
Use APOP is On, the Login Password is encrypted, therefore cannot be read.
APOP requires that the POP3 server supports APOP, and has APOP enabled.
9. POP3 Security: Enables or disables POP3 Security. When this protocol is
enabled, either SSL/TLS or STARTTLS must be selected. To enable POP3
security, the POP3 port may have to be changed according to the server settings.
10.Connection Test: This will test one transmission for each press, attempting to
establish communication with the POP3 server.
11. Delete e-mail after retrieval: Enables or disables the Delete E-mail after retrieval
function. When this item is set to On, the retrieved E-mail is deleted from the
POP3 server. When this item is set to Off, the E-mail will not be deleted after
retrieved from the POP3 server.
12.E-mail Size Limit: Enter maximum E-mail size in kilobytes. When the value is 0,
the limitation for E-mail size is disabled.
13.Cover Page: Specifies whether to print the body of an E-mail in addition to the
attached files. When this item is set to On, the attached files and the body of an Email are printed. When no attached files exist, only the body of an E-mail is printed.
When this item is set to Off, only the attached files are printed. When no attached
files exist, nothing is printed.
3. Click Submit button.
E-mail Send Settings
1. Click E-mail under Function Settings on the navigation menu. The E-mail Settings
page opens.
2. You can make changes for the following items as required.
E-mail Size Limit
Enter the maximum size of E-mail that can be sent in kilobytes. When the value is 0,
the limitation for E-mail size is disabled.
Sender Address
Displays the sender address used for E-mails sent from this machine.
Signature
Displays the signature to be inserted in the end of the E-mail body.
Function Default
The default settings can be changed in Common/Job Default Settings page.
3. Click Submit button.
Scan to Folder
This section includes advanced settings for copying.
FTP Settings
1. Click Scan to Folder under Function Settings on the navigation menu. The Scan to
Folder Settings page opens.
User Guide 43
Page 48

Function Settings
2. This allows you to verity the current settings which follow.
FTP
Display whether a FTP connection is available or not. Set FTP Client (Transmission) to On on the Protocol Settings page.
FTP Port Number
Display the FTP port number. Enter Port Number on the Protocol Settings page.
SMB Settings
1. Click Scan to Folder under Function Settings on the navigation menu. The Scan to
Folder Settings page opens.
2. This allows you to verity the current settings which follow.
SMB
Display whether an SMB connection is available or not. Set SMB to On on the Protocol Settings page.
DSM Scan
SMB Port Number
Display the SMB port number. Enter Port Number on the Protocol Settings page.
Function Defaults
1. Click Scan to Folder under Function Settings on the navigation menu. The Scan to
Folder Settings page opens.
2. The default settings can be changed in Common/Job Default Settings page.
DSM (Distributed Scan Management) is a Microsoft definition of scanner management
systems over the Windows networks. The administrator can use the Windows Server
2008 R2 scan management to obtain ScanProcess for each user and add them to Active
Directory. This will allow the user to execute scanning according to the scan process.
General
1. Click DSM Scan under Function Settings on the navigation menu. The DSM Scan
Settings page opens.
2. You can make changes for the following items as required.
DSM Scan
Display whether a DSM connection is available or not. Set DSM Scan to On on the
Protocol Settings page.
Location
Display the DSM location. Enter the location on System Settings page.
44 Embedded Web Server
Page 49

Function Settings
DSM Scan Client Certificate
Displays whether the certificate is active. To make advanced settings, click Settings
button and select a certificate. Make settings for the device certificate in Certifi-
cates page of Security Settings.
3. Click Submit button.
LDAP Settings
1. Click DSM Scan under Function Settings on the navigation menu. The DSM Scan
Settings page opens.
2. You can make changes for the following items as required.
LDAP Server Name
Specifies a name or IP address for the LDAP server. This is required only if Active
Directory which contains Scan Process is unidentical with the server for the network
authentication.
LDAP Port Number
Sets the port number used by LDAP The default port is 389.
Search Timeout
Specifies the timeout time after which a search on the LDAP server expires.
LDAP Security (DSM Scan)
Display whether a LDAP security is available or not. Select the LDAP security from
LDAP Security (DSM Scan) drop-down list on the Protocol Settings page.
Authentication Type
Selects either the Simple or SASL for the authentication type.
3. Click Submit button.
Certificate Status
1. Click DSM Scan under Function Settings on the navigation menu. The DSM Scan
Settings page opens.
2. The status of the Root Certificates 1 (to 5) and DSM Client Certificate is shown. Make
settings for the Root Certificate in Certificates page.
FAX/i-FAX
This section includes advanced settings for FAX/i-FAX.
If the settings for the item marked with an asterisk (*) has been changed, you must
restart the machine or the network. To restart the machine, proceed to the Reset page.
Common Settings
1. Click FAX/i-FAX under Function Settings on the navigation menu. The FAX/i-FAX
Settings page opens.
User Guide 45
Page 50

Function Settings
2. You can configure settings for Transmission. Make the following settings:
1. Local FAX Name: Specifies your FAX system name.
2. TTI: Selects On or Off whether to send the TTI (Transmit Terminal Identifier)
information to the other party.
3. TTI Position: Selects the position of the TTI to be printed on the transmitted
documents.
4. Account as Local FAX Name: Set to On to use the account name as the local
FAX name. The account name appears in place of the local FAX name.
5. Retry Times: Specify the Retry Times from 0 to 14 times.
3. You can configure settings for Reception. Make the following settings:
1. Media Type: Sets the media type to print the received documents.
2. Use MP Tray: Selects whether or not to include the MP (multi-purpose) tray for
auto media selection when printing received documents. When turned On, the MP
tray will be included as an option for auto media selection, and when turned Off,
only the cassettes will be selected.
3. Reduced RX Size: Specifies the printing configuration for printing a document,
which is larger than the selected paper size. When Same Size Override is
selected, the document will be printed on multiple sheets of paper without reducing
the text. When Reduction Override is selected, the document will be printed on
one sheet whenever possible.
4. Receive Data/Time: Selects On or Off whether to print the reception information
such as the received date, the received time, the transmitting party's information
and the number of transmitted pages on the top of the received documents.
5. Duplex Printing: Specifies whether or not to use the Duplex mode.
6. 2 in 1 Printing: Enables or disables 2 in1 reception.
7. Batch Print: Selects whether or not perform batch print of the received
documents.
4. Click Submit button.
Fax Settings
1. Click FAX/i-FAX under Function Settings on the navigation menu. The FAX/i-FAX
Settings page opens.
2. You can configure settings for General. Make the following settings:
1. Local FAX Number: Specifies your FAX system number.
2. Local FAX ID: Specifies your FAX ID.
3. Speaker Volume: Sets the volume of the internal speaker that allows you to listen
to the other party or to verify the conditions on the telephone line when the On-
Hook key was pressed. Select the speaker volume from 0 (Mute) to 5
(Maximum).
4. Monitor Volume: Sets the volume of the internal speaker that allows you to verify
the FAX tones during FAX communication. Select the speaker volume from 0
(Mute) to 5 (Maximum).
3. You can configure settings for Transmission. Make the following settings:
1. Dialing Mode: According to the type of telephone line you are contracted with,
select Tone (DTMF), Pulse (10PPS), or Pulse (20PPS).
2. TX Start Speed: Selects the speed rate at starting transmission from 33600bps,
14400bps, and 9600bps. Once communication is established, the speed rate that
is slower than the other is employed.
46 Embedded Web Server
Page 51

Function Settings
3. ECM TX: Turns error correction mode on which corrects errors that may happen
during communication. To let the ECM feature to take effect, error correction mode
must be enabled on both parties in prior.
4. You can configure settings for Reception. Make the following settings:
1. FAX Receive: Selects the FAX reception mode. The choices are Auto (Normal,
FAX/Tel, TAD or DRD) or Manual. (The selectable option is different depending on
the destination.)
2. Number of Rings (Normal): Specifies the number of rings when FAX Receive is
Auto (Normal). The range is 1 to 15.
3. Number of Rings (FAX/Tel): Specifies the number of rings when FAX Re ceive is
Auto (FAX/Tel). The range is 0 to 15.
4. Number of Rings (TAD): Specifies the number of rings when FAX Receive is
Auto (TAD). The range is 1 to 15.
5. Remote Switching Dial Number: Specifies the FAX remote switching dial
number. The range is 00 to 99. Remote switching allows you to initiate FAX
reception from a telephone connected to the FAX system.
6. Encryption Key No.: Sets the encryption key number used for encrypted
communication.
7. RX Start Speed: Selects the speed rate at starting reception from 33600 bps,
14400 bps, and 9600 bps. Once communication is established, the speed rate that
is slower than the other is employed.
8. ECM RX: Turns error correction mode on which corrects error that may happen
during communication. To let the ECM feature to take effect, error correction mode
must be enabled on both parties in prior.
5. You can configure settings for Encryption Key. Make the following settings:
1. Encryption Key Registration: Click Settings button. The Encryption Key
Registration page opens. Specifies the encryption key in hexadecimal. The length
of the encryption key is 16 digits. Enter the encryption key including the numbers
0-9 and the letters A-F.
2. Click Submit button.
6. You can configure settings for Remote Settings. Make the following settings:
1. FAX Remote Diagnostics: Activate or deactivate the remote FAX diagnosis.
2. Remote Diagnostics ID: Enter the ID (four digits) specified from the customer
center when you activate the FAX Remote Diagnostics.
7. You can configure settings for TX/RX Restriction. Make the following settings:
1. Transmit Restriction: Selects the transmitting restriction from Off and Permit
List + Address Book.
2. Receive Restriction: Selects the reception restriction from Off, Permit List +
Address Book, and Reject List.
3. Unknown Number Reception: Selects Reject or Permit when you select Reject
List from Receive Restriction.
4. Permit No. List: Permit No. List page allows to add the permitted fax numbers
and delete the fax numbers specified. Clicking List will display Permit No. List
page. Enter the FAX number to add, then click Submit button. To delete a fax
number from Permit No. List, delete the number from Permit No. List page, then
click Submit button.
5. Permit ID List: Permit ID List page allows to add the permitted fax IDs and delete
the fax IDs specified. Clicking List will display Permit ID List page. Enter the FAX
ID to add, then click Submit button. To delete a fax ID from Permit ID List, delete
the fax ID from Permit ID List page, then click Submit button.
User Guide 47
Page 52

Function Settings
6. Reject No. List: Reject No. List page allows to add the prohibited fax numbers
and delete the prohibited fax numbers specified. Clicking List will display the
Reject No. List page. Enter the FAX number to add, then click Submit button. To
delete a fax number from Reject No. List, delete the number from Reject No. List
page, then click Submit button.
8. You can configure settings for FAX Server. Make the following settings:
1. FAX Server: Select On when you use the FAX Server and configure the settings.
2. Click Submit button. The FAX Server Settings page appears.
3. Address Settings: Configure the address information of the fax server.
a) Prefix: Enter the prefix of fax server.
b) Suffix: Enter the suffix of fax server.
c) Domain Name: Enter the domain name of fax server.
d) File Format: Select the file format to which sends the fax server, from the dropdown list.
4. SMTP: Configure these settings when you send the fax via SMTP server.
a) Use E-mail SMTP Settings: Select On when you use an email SMTP settings
to the fax server. When you select Off, configure the following settings.
b) SMTP Server Name: Enter the SMTP server name or its IP address. If entering
the name, rather than the IP address, a DNS server address must also be
configured. The DNS server address may be entered on the TCP/IP Settings
page.
c) SMTP Port Number: Enter the port number that SMTP will use (default is 25)
d) SMTP Server Timeout: Sets the timeout in seconds during which this device
tries to connect to the SMTP server.
e) Authentication Protocol: Enables or disables the SMTP authentication
protocol or sets POP before SMTP as the authentication type. When selecting On
or POP before SMTP, you can select user on the drop-down list. When selecting
Other from Authentication as, you can specify Login User Name and Login
Password.
f) SMTP Security: Displays SMTP Security. This item appears when SSL/TLS or
STARTTLS is selected on SMTP Security of the Protocol Settings page.
g) POP before SMTP Timeout: Sets the timeout in seconds during which this
device tries to connect to the POP3 server. You can configure this item when you
selected POP before SMTP as Authentication Protocol.
h) Connection Test: Tests to confirm that the settings on this page are correct.
When Test button is clicked, this machine tries to connect to the SMTP server.
i) Domain Restriction
List button to configure. Enter a domain name that is permitted or rejected. You
can also specify the E-mail addresses.
5. POP3 Settings: Configure POP3 Settings. Make the following settings:
a) POP3 Server Name: Enter the POP3 server host name or IP address. If you
use the host name, you must first specify the DNS server information.
b) POP3 Port Number: Enter the port number that POP3 will use (default is 110).
Normally, use port 110, but you can change the port number to suit the email
server’s application and operation. For example, the default port number for POP3
over SSL is 995.
c) POP3 Server Timeout: Enter the timeout in seconds during which this machine
tries to connect to the POP3 server.
d) Login User Name: Enter the login name of the user for the POP3 account.
e) Login Password: Enter the password to log in the POP3 account.
f) Use APOP: Enables or disables APOP. APOP is an encryption mechanism used
for encrypting the Login Password during communication with the POP3 server.
When Use APOP is Off, the Login Password is sent using plain ASCII text. When
Use APOP is On, the Login Password is encrypted, therefore cannot be read.
APOP requires that the POP3 server supports APOP, and has APOP enabled.
: Activate or deactivate to restrict domains.
Click Domain
48 Embedded Web Server
Page 53

Function Settings
g) Connection Test: This will test one transmission for each press, attempting to
establish communication with the POP3 server.
6. E-mail Send Settings: Configure the email send settings as necessary, then click
Submit button.
a) E-mail Size Limit: Enter the maximum size of E-mail to send in Kilobytes.
When the value is 0, the limitation for E-mail size is disabled.
b) Sender Address: Displays the sender address used for E-mails sent from this
machine. To configure a Sender Address, go to E-mail Address on the POP3
User Settings page.
c) Signature: Displays the signature to insert in the end of the E-mail body. To
configure a signature, go to E-mail Send Settings on the E-mail Settings page.
7. Default Address Book: Select an external address book from a drop-down list.
For details on settings of the external address book, see External Address Book
Settings on page 19.
8. Function Default: The default settings can be changed in Common/Job Default
Settings page.
9. Click Submit button.
i-FAX Settings
1. Click FAX/i-FAX under Function Settings on the navigation menu. The FAX/i-FAX
Settings page opens.
2. You can configure settings for TX/RX. Make the following settings:
1. i-FAX Protocol: Display whether an i-FAX connection is available or not. Set iFAX (SMTP & POP3) to On on the Protocol Settings page.
3. Configures SMTP. Make the following settings:
1. SMTP Server Name: Enter the SMTP server name or its IP address. If entering
the name, rather than the IP address, a DNS server address must also be
configured. The DNS server address may be entered on the TCP/IP Settings
page.
2. SMTP Port Number: Enter the port number that SMTP will use (default is 25).
Normally, use port 25, but you can change the port number to suit the email
server’s application and operation. For example, the default port number for SMTP
connections over SSL is 465. The default port number for SMTP authentication is
587.
3. SMTP Server Timeout: Sets the timeout in seconds during which this device tries
to connect to the SMTP server.
4. Authentication Protocol: Enables or disables the SMTP authentication protocol
or sets POP before SMTP as the authentication type. When selecting On or POP
before SMTP, you can select user on the drop-down list. When selecting Other
from Authentication as, you can specify Login User Name and Login
Password.
5. POP before SMTP Timeout: Sets the timeout in seconds during which this device
tries to connect to the POP3 server. You can configure this item when you selected
POP before SMTP as Authentication Protocol.
6. Connection Test: Tests to confirm that the settings on this page are correct. When
Test button is clicked, this machine tries to connect to the SMTP server.
7. Domain Restriction: Activate or deactivate to restrict domains. Click Domain List
button to configure. Enter a domain name that is permitted or rejected. You can
also specify the E-mail addresses.
4. Configure POP3 Settings. Make the following settings:
User Guide 49
Page 54

Function Settings
1. Check Interval: Displays the interval, in minutes, for connecting to the POP3
server to check for incoming e-mails at specific interval. Specify the interval of
performing checks in the range from 3 minutes to 60 minutes. The default is 15
minutes.
2. Run once now: Click Receive button to immediately receive E-mail from the
POP3 server. When Remote Printing is set to Permit, the machine prints the
received E-mail.
3. Domain Restriction: Activate or deactivate to restrict domains. Click Domain List
button to configure. Enter a domain name that is permitted or rejected. You can
also specify the E-mail addresses.
4. POP3 User Settings: Click Settings button and configure the following user
settings.
a) E-mail Address: Enter the E-mail address.
b) POP3 Server Name: Enter the POP3 server host name or IP address. If you
use the host name, you must first specify the DNS server information.
c) POP3 Port Number: Enter the port number that POP3 will use (default is 110).
Normally, use port 110, but you can change the port number to suit the email
server’s application and operation. For example, the default port number for POP3
over SSL is 995.
d) POP3 Server Timeout: Enter the timeout in seconds during which this machine
tries to connect to the POP3 server.
e) Login User Name: Enter the login name of the user for the POP3 account.
f) Login Password: Enter the password to log in the POP3 account.
g) Use APOP: Enables or disables APOP. APOP is an encryption mechanism
used for encrypting the Login Password during communication with the POP3
server. When Use APOP is Off, the Login Password is sent using plain ASCII text.
When Use APOP is On, the Login Password is encrypted, therefore cannot be
read. APOP requires that the POP3 server supports APOP, and has APOP
enabled.
h) Connection Test: This will test one transmission for each press, attempting to
establish communication with the POP3 server.
i) E-mail Size Limit: Enter maximum E-mail size in kilobytes. When the value is 0,
the limitation for E-mail size is disabled.
j) Cover Page: Specifies whether to print the body of an E-mail in addition to the
attached files. When this item is set to On, the attached files and the body of an Email are printed. When no attached files exist, only the body of an E-mail is printed.
When this item is set to Off, only the attached files are printed. When no attached
files exist, nothing is printed.
5. You can configure settings for Transmission. Make the following settings:
1. Transmission Type: Allows to choose a method of sending from Specify for
Each Destination, Via Server - On, and Via Server - Off (Direct SMTP).
2. Direct SMTP Sender Address: Enters the sender address who send the E-mail
used by Direct SMTP.
3. Direct SMTP Port Number: Enter the port number used by Direct SMTP. The
default port number is 25.
4. Direct SMTP Timeout: Sets the timeout time in seconds during which this device
retries to connect to the SMTP server.
6. You can configure settings for Reception. Make the following settings:
1. Direct SMTP Port Number: Enter the port number used by Direct SMTP. The
default port number is 25.
2. Direct SMTP Timeout: Sets the timeout time in seconds during which this device
retries to connect to the SMTP server.
7. You can configure settings for E-mail Send Settings. This section includes the
following items for configuration:
50 Embedded Web Server
Page 55

1. E-mail Size Limit: Enter the maximum size of E-mail to send in Kilobytes. When
2. Sender Address: Displays the sender address used for E-mails sent from this
3. Signature: Displays the signature to insert in the end of the E-mail body. To
4. Function Default: The default settings can be changed in Common/Job Default
8. Click Submit button.
Send and Forward
When sending a FAX, FTP, SMB, i-FAX or a E-mail job, Send and Forward
automatically forwards the same job to a destination specified.
General
1. Click Send and Forward under Function Settings on the navigation menu. The Send
and Forward Settings page opens.
Function Settings
the value is 0, the limitation for E-mail size is disabled.
machine. To configure a Sender Address, go to E-mail Address on the POP3
User Settings page.
configure a signature, go to E-mail Send Settings on the E-mail Settings page.
Settings page.
2. This section includes the following items for configuration.
Send and Forward
Switches Send and Forward On or Off.
Rule
Selects any of E-mail, Folder (SMB), Folder (FTP), FAX, i-FAX (Via server - On),
and i-FAX (Via server - Off) to apply the Send and Forward.
3. Click Submit button.
Destination
1. Click Send and Forward under Function Settings on the navigation menu. The Send
and Forward Settings page opens.
2. This section includes the following items for configuration.
Address Book
Click Address Book icon and select a type and a name of the address on the
address page.
E-mail
Email forwards the E-mail to the E-mail address entered. Click E-mail icon to specify an E-mail address. You can change the address by clicking Address Book. Click
Submit button to finalize settings.
Folder
Forwards and saves a job in a folder (SMB or FTP). Enter the Host Name, Port
Number, path to a folder, Login User Name, and the Login Password. You can confirm the connection status by clicking Test button. You can also edit an address by
clicking Address Book. Click Submit button to finalize settings.
User Guide 51
Page 56

Function Settings
If you use the host name, you must first specify the DNS server information.
52 Embedded Web Server
Page 57

Function Settings
Delete
Deletes the address selected.
3. Click Submit button.
Forward Job Settings
1. Click Send and Forward under Function Settings on the navigation menu. The Send
and Forward Settings page opens.
2. This section includes the following items for configuration.
Color Selection
This selects color mode for scanning and storing. Auto Color (Color/Grayscale)
and Auto Color (Color/B & W) allow you identify color for the original document to
scan. You can manually select Full Color, Grayscale, or Black & White to forcedly
switch color mode.
Scan Resolution
Specifies the resolution for scanning. The resolutions available differ depending on
the model, current color mode, and the saving format of files. To scan in full color or
grayscale with a solution of 400 dpi or greater, the internal memory must be
expanded for some models.
File Format
Selects file type to stored the scanned document.
Image Quality
Selects the image quality when saving a scanned document 1 Low Quality (High
Comp.) to 5 High Quality (Low Comp.).
PDF Encryption
Apply encryption to the PDF files to send-and-forward. When turned On, this page
allows the following settings:
1. Compatibility: You can change the PDF version by choosing a compatibility
option when you save a job in PDF.
2. Password to Open Document: When you set a Document Open password,
anyone who tries to open the PDF must type in the password you specify. Set to
On and enter a Document Open password.
3. Password to Edit/Print Document: You can set a password to restrict recipients
to print or edit the document, or copy its contents, such as images. Recipients
don't need a password to open the document, but they must type the password to
accomplish one of these restricted actions to the document, respectively.
4. Printing Allowed: Restrict printing of the document.
5. Change Allowed: Restrict editing of the document.
6. Copying of Text/Images/Others: Allow copying objects including images and text
for pasting into other document.
PDF/A
Turns PDF/A-compliant format Off, PDF/A-1a, PDF/A-1b, PDF/A-2a, PDF/A-2b,
PDF/A-2u or when File Format above is PDF. PDF/A is an electronic file format for
long-term preservation of documents as addressed in the ISO 19005-1 specification.
User Guide 53
Page 58

Function Settings
File Separation
E-mail Subject
FTP Encryption TX
3. Click Submit button.
RX/Forward Rules
Conditional reception/forwarding is a function for automatically forwarding documents
received by FAX or i-FAX to other FAX machines, sending them as attachments to Email, or saving them into a fax box instead of printing if they satisfy the specified
conditions.
Scans a multi page document and saves each page as a separate file.
The Subject is entered here.
This enables or disables encryption for communication. When turned On, the
encryption algorithm that is selected by Network Security Settings page is used.
For example, you can forward faxes from particular customers received during business
hours to the E-mail addresses of the people responsible for those customers, print and
save them in a fax box if they are received outside business hours, and forward faxes
from outside of your business area to the business office nearest to the sender's fax
number.
For models that do not support RX/Forward Requirements, the documents received are
forwarded to a forward destination or printed.
Enabling RX/Forward Rules
To use the RX/Forward Rules function, enable this setting.
1. Click RX/Forward Rules under Function Settings on the navigation menu. The
Settings page opens.
If your machine only supports the forward rules, select On. Forward Rules Settings
page opens.
2. Click Settings button. RX/Forward Rules Settings page opens.
Select Off, Use Rule for Specific RX, or Rule for All RX from the drop-down list.
When you select Rule for All RX, you can configure Schedule, File Name, Forward
Settings and Print Settings as rules. For details, refer to Add Rule shown below.
If Forward Rules Settings page opens, configure the detailed information of the rules.
3. Click Submit button.
Add Rule
1. Click Add Rule button. The New Rule - Property page appears.
2. This section includes the following items for configuration.
Use Rule
Select On when you use the new rule.
54 Embedded Web Server
Page 59

Function Settings
General
Configure the general information on the rule.
1. Rule Number: Enter the rule number from 001 to 100.
2. Rule Name: Enter the rule name.
3. Priority: Select the priority of the rule from the drop-down list.
Rule Settings
Configure the rule settings.
1. Rule Type: Select FAX Sub Address, FAX Number, Reception Port or i-FAX
Address.
2. Sub Address: Displays when you select FAX Sub Address as Rule Type. Enter
the sub address.
3. FAX Number: Displays when you select FAX Number as Rule Type. After
selecting rule, enter the fax number.
4. Reception Port: Displays when you select Reception Port as Rule Type. Select
Port 1 or Port 2.
5. i-FAX Address: Displays when you select i-FAX Address as Rule Type. After
selecting rule, enter the i-FAX address.
Schedule
Configure the schedule for the specified rule.
1. Schedule: Select All Day or Preset Time.
2. Start Time, End Time: You can configure the setting when you select Preset Time
as Schedule. Specify the time table from the drop-down list.
File Name
Configure the file name created when forwarding.
1. File Name: Enter the file name.
2. Additional Information: Select the additional information on the file name from
the drop-down list.
Forward Settings
Configure the forward destination.Select the destination on the list, and then click
the Delete icon.
1. Forwarding: Select On and click the desired address button to specify the
forwarding destination.
2. Address Book: Click
the desired Address Book and click Submit button.
3. E-mail: Click E-mail button to open the E-mail page. Enter E-mail Address and Email Address (Confirmation), and then click Submit button.
4. Folder: Click Folder button to open the Folder page.
Protocol: Select SMB or FTP.
Host Name: Enter the host name. If you use the host name, you must first specify
the DNS server information.
Port Number: Enter the port number from 1 to 65535.
Path: Enter the path of the folder.
Login User Name: Enter the login user name.
Login Password: Enter the login password.
Connection Test: ClickTes t button to confirm the connection to the folder.
5. FAX: Click FAX button to open the FAX page.
FAX Number: Enter the fax number.
Sub Address: Enter the sub address.
Password: Enter the password for the sub address.
TX Start Speed: Select 33600 bps, 14400 bps, or 9600 bps.
ECM: Select On to use ECM communication.
Address Book
button to open the Addresses page. Select
User Guide 55
Page 60

Function Settings
Encryption: Select Off, Key 1 to Key 20. You can select Key 1 to Key 20 when
registering the encryption key in FAX Settings page under Function Settings.
Encryption Box: Select On to use the encryption box. You can configure this setting when the encryption key is selected on Encryption.
Encryption Box No.: Enter the box number (4 digits). You can configure this setting when the encryption key is selected on Encryption and Encryption Box is
set to On.
6. i-FAX: Click i-FAX button to open the i-FAX page.
i-FAX Address: Enter the i-FAX address.
Via Server: Select On to send i-FAX via server.
Connection Mode: Select Simple or Full.
Resolution: Select 200 x 100 dpi, 200 x 200 dpi, 200 x 400 dpi, 400 x 400 dpi or
600 x 600 dpi.
Compression: Select MH, MR, MNR, or JBIG.
Paper Size: Select A4/Letter, B4, or A3/Ledger.
7. File Format: Select PDF, TIFF, XPS or OpenXPS as the file format from the drop-
down list.
8. PDF Encryption: Select On to use PDF encryption function. Configure the
following settings as necessary.
Compatibility: Select Acrobat 3.0 and later or Acro
Password to Open Document: Select On to set the password to open the docu-
ment, enter the password, and enter the password again for confirmation.
Password to Edit/Print Document: Select On to set the password to edit or print
the document, enter the password, and enter the password again for confirmation.
Select Printing Allowed or Changes Allowed from the drop-down list. Select
Enable to permit to copying of text or images on Copying of Text/Images/Others.
9. PDF/A: You can configure the setting If PDF Encryption is Disable. Select Off,
PDF/A-1a, PDF/A-1b, PDF/A-2a, PDF/A-2b, PDF/A-2u or from the drop-down list.
10.File Separation: Select Each Page or Off.
11. E-mail Subject Additional Info.: Select the additional information from the dropdown list.
12.FTP Encryption TX: Select On to use the FTP encryption transmission function. If
you use this setting, activate SSL on the Network Security page under Security
Settings.
bat 5.0 and later.
Print Settings
Configure the print settings for received documents with rules.
1. Print: Select On to print the received documents with rules.
2. Copies: You can configure this setting when Print is set to On. Enter the copies of
documents to print.
Storing in FAX Box Settings
Configure the storing settings to the fax box.
1. Storing in FAX Box: Select On to store the received documents with rules to the
fax box.
2. FAX Box: You can configure this setting when Storing in FAX Box is set to On.
Click Box List button to open the FAX Boxes page and select the fax box.
3. Click Submit button.
Edit Property of the Rule
1. Click the Rule No. or Rule Name. The Property page opens.
2. Edit the settings of the rule as necessary.
3. Click Submit button.
56 Embedded Web Server
Page 61

Function Settings
Edit Other Property of the Rule
1. Click Settings on the Rule for Specific RX page. The Other - Property page opens.
2. Edit the settings of the rule as necessary.
3. Click Submit button.
Delete Rule
1. Click the checkbox o the left of the Rule No. and click Delete icon.
Click Check All icon to select all the rules and click None icon to deselect all the rules.
2. A confirmation message appears. Click OK.
Change Priority of the Rule
1. Click the checkbox on the left of the Rule No. and select the rule.
2. Click Raise Priority or Lower Priority button.
Operation Panel
This section explains how to customize the operation panel.
Customize Status Display
1. Click Operation Panel under Function Settings on the navigation menu. The
Customize Operation Panel page opens.
2. This section includes the following items for configuration.
Printing Jobs
Sending Jobs
Stored jobs
In Column 1 and Column 2, enter the job name, user name, print pages x copies,
color/black & white, or printed pages, respectively.
In Column 1 and Column 2, enter the destination, job name, user name, original
pages or color/black & white, respectively.
In Column 1 and Column 2, enter the job name, user name, original pages or color/
black & white, respectively.
3. Click Submit button.
Function Key Settings
1. Click Operation Panel under Function Settings on the navigation menu. The
Customize Operation Panel page opens.
2. This section includes the following items for configuration.
User Guide 57
Page 62

Function Settings
Function Key 1
The copy function is assigned as a default setting. You can register the other function on this key.
Function Key 2
The send function is assigned as a default setting. You can register the other function on this key.
Function Key 3
The fax function (option) is assigned as a default setting. You can register the other
function on this key.
Note: Some machine products appears Copy Function, Send Function, and FAX
Function respectively as a default setting instead of Function Key 1 (to 3) . You
can enable or disable the each key on the machine.
Copy Function
You can enable or disable the Copy key on the machine.
Sending Function
You can enable or disable the Send key on the machine.
FAX Function
You can enable or disable the Fax key on the machine.
3. Click Submit button.
Home
1. Click Operation Panel under Function Settings on the navigation menu. The
Customize Operation Panel page opens.
2. This section includes the following items for configuration.
Customize Desktop
Click Add function, Add Program, then Add Application button, and add an item.
Up to 8 items can be added per screen, 40 in total. Click Submit button to finalize
settings. Click Delete icon to delete the items that are not needed. Up and Down
button allow to interchange the items in order.
Customize Taskbar
Specifies the items to show in the task bar. Activate and deactivate each of Status/
Job Cancel, Device Information, Language, Paper Settings, Wi-Fi Direct, System Menu, Favorites, Help, Program, Accessibility Screen, and Message
Board.
Note: The supported value will change accrding to the model type.
Background
Allows you to change the background image of the Home screen. Select an image
from the Picture 1 to Picture 8 on the drop-down list.
3. Click Submit button.
58 Embedded Web Server
Page 63

Function Settings
Quick Setup Registration
1. Click Operation Panel under Function Settings on the navigation menu. The
Customize Operation Panel page opens.
2. This section includes the following items for configuration. By default, each function is
assigned with its standard items.
Copy
Each of Key 1 to Key 6 is assigned with one of the copying functions. Select an
item from the drop-down list.
Send
Each of Key 1 to Key 6 is assigned with one of the sending functions. Select an
item from the drop-down list.
Fax
Each of Key 1 to Key 6 is assigned with one of the fax functions. Select an item
from the drop-down list.
Store Document in Box
Each of Key 1 to Key 6 is assigned with one of the Store Document in Box functions. Select an item from the drop-down list.
Print Document in Box
Each of Key 1 to Key 6 is assigned with one of the Print Document in Box functions.
Send Document in Box
Each of Key 1 to Key 6 is assigned with one of the Send Document in Box functions. Select an item from the drop-down list.
3. Click Submit button.
User Guide 59
Page 64

Network Settings
General
8 Network Settings
This page is accessible when you have logged in the embedded server with
administrator privilege, while network authentication or local authentication is enabled.
If needed, make the following settings: See below for detailed information.
• General
• TCP/IP
•Protocols
This section includes basic settings for networking.
1. Click General under Network Settings on the navigation menu. The General page
opens.
TCP/IP
2. Select Wired Network, Optional Network or Wi-Fi from the Primary Network (Client)
drop-down list
3. The current communication status is shown in Host Name. Configure the host name on
the System Settings page of Device Settings.
4. The host name is shown in NetBIOS Name. You can modify the name as necessary.
5. Select Auto, 10BASE-Half, 10BASE-Full, 100BASE-Half, 100BASE-Full and
1000BASE-T from the LAN Interface drop-down list depending on your network
environment.
6. The current status is shown in Client Certificate. To make advanced settings, click
Settings button. Select the appropriate certificate on the Certificate Settings page that
will open. When you click Certificates, its content is displayed.
Click Submit button.
Configure the device certificate on the Certificates page.
7. Click Submit button.
This section includes advanced settings for the TCP/IP protocol.
* If the settings for the item marked with an asterisk (*) has been changed, you must
restart the machine or the network. To restart the machine, proceed to the Reset page.
General Settings (Wired Network)
1. Click TCP/IP under Network Settings on the navigation menu. The TCP/IP Settings
page opens.
2. Select On to use TCP/IP on the wired network.
60 Embedded Web Server
Page 65

Network Settings
3. Click Submit button.
General Settings (Wireless Network)
1. Click TCP/IP under Network Settings on the navigation menu. The TCP/IP Settings
page opens.
2. Select On to use TCP/IP on the wireless network.
3. Click Submit button.
General Settings (Common)
1. Click TCP/IP under Network Settings on the navigation menu. The TCP/IP Settings
page opens.
2. When an IP address that was mapped by the DNS server has been changed, Dynamic
DNS automatically remaps the host name to the IP address. To activate the Dynamic
DNS Settings, set Dynamic DNS to On.
3. Click Submit button.
Proxy settings
1. Click TCP/IP under Network Settings on the navigation menu. The TCP/IP Settings
page opens.
2. To configure the proxy, set Proxy to On, and specify the following items as necessary.
Automatically Detect
Select On when you detect the proxy server automatically.
Use Automatic Configuration Script
Select On and enter the address when you use the automatic configuration script.
Proxy Server (HTTP)
Enter the host name or IP address for the proxy server (HTTP). If you use the host
name, you must first specify the DNS server information.
Port Number
Enter the port number for the proxy server (HTTP).
Use the Same Proxy Server for All Protocols
Select On when you use the same proxy server for all protocols.
Proxy Server (HTTPS)
Enter the host name or IP address for the proxy server (HTTPS). If you use the host
name, you must first specify the DNS server information.
Port Number
Enter the port number for the proxy server (HTTPS).
User Guide 61
Page 66

Network Settings
Do Not Use Proxy for Following Domains
Enter the domain address which do not use the proxy. Use a semicolon (;) between
multiple addresses.
3. Click Submit button.
IPv4 settings (Wired Network)
1. Click TCP/IP under Network Settings on the navigation menu. The TCP/IP Settings
page opens.
2. This section includes the following items for configuration.
DHCP/BOOTP
Specifies whether or not to automatically obtain an IP address using DHCP or
BOOTP.
Auto-IP
When the Auto-IP is set to On, the IP address from 169.254.0.1 through
169.254.255.254 will usually be generated by itself. But if the IP address using
DHCP server or Manual settings has been decided and becomes a candidate as
the result of configuration, the Auto-IP address isn’t generated and decided even
when the Auto-IP is set to On.
If the IP address has already been entered in IP Address using Manual settings,
delete the address.
To enable the settings, restart network. Automatically-generated IP address
appears on Confuguration page under Device Information on navigation menu.
IP Address
If DHCP/BOOTP is set to Off, then a static IPv4 address can be entered in this field
as part of the system network settings. When DHCP/BOOTP is set to On, a
dynamic IPv4 address is assigned to the device, and the field is grayed out. The format of the IPv4 address is a sequence of numbers separated by dots.
For example: 192.168.110.171
Subnet Mask
Specifies the subnet mask. When DHCP/BOOTP is turned On, a dynamic IPv4
address is assigned to the device, and the field is grayed out.
Domain Name
Specifies the domain name of the domain to which the printing system belongs. It
should not contain the host printer name, for example, "abcde.com". abcde.com.
When DHCP/BOOTP is turned On, a dynamic IPv4 address is assigned to the
device, and the field is grayed out.
3. Click Submit button.
IPv4 settings (Wireless Network)
1. Click TCP/IP under Network Settings on the navigation menu. The TCP/IP Settings
page opens.
2. This section includes the following items for configuration.
62 Embedded Web Server
Page 67

Network Settings
DHCP/BOOTP
Specifies whether or not to automatically obtain an IP address using DHCP or
BOOTP.
Auto-IP
When the Auto-IP is set to On, the IP address from 169.254.0.1 through
169.254.255.254 will usually be generated by itself. But if the IP address using
DHCP server or Manual settings has been decided and becomes a candidate as
the result of configuration, the Auto-IP address isn’t generated and decided even
when the Auto-IP is set to On.
If the IP address has already been entered in IP Address using Manual settings,
delete the address.
To enable the settings, restart network. Automatically-generated IP address
appears on Confuguration page under Device Information on navigation menu.
IP Address
If DHCP/BOOTP is set to Off, then a static IPv4 address can be entered in this field
as part of the system network settings. When DHCP/BOOTP is set to On, a
dynamic IPv4 address is assigned to the device, and the field is grayed out. The format of the IPv4 address is a sequence of numbers separated by dots.
For example: 192.168.110.171
Subnet Mask
Specifies the subnet mask. When DHCP/BOOTP is turned On, a dynamic IPv4
address is assigned to the device, and the field is grayed out.
Domain Name
Specifies the domain name of the domain to which the printing system belongs. It
should not contain the host printer name, for example, "abcde.com". abcde.com.
When DHCP/BOOTP is turned On, a dynamic IPv4 address is assigned to the
device, and the field is grayed out.
3. Click Submit button.
IPv4 settings (Common)
1. Click TCP/IP under Network Settings on the navigation menu. The TCP/IP Settings
page opens.
2. This section includes the following items for configuration.
Default Gateway
Specifies the IP address of the default gateway. When DHCP/BOOTP is turned On,
a dynamic IPv4 address is assigned to the device, and the field is grayed out.
DNS Server (Primary, Secondary)
Specifies the IP addresses of the primary and secondary DNS (Domain Name System) servers. When DHCP/BOOTP is turned On and Use DNS Server from DHCP
is selected, you can select to use the DNS server obtained via DHCP. When DHCP/
BOOTP is turned On and Use following DNS Server is selected, you can enter
static DNS server information in the Primary and Secondary fields provided.
User Guide 63
Page 68

Network Settings
DNS Search Suffix (Primary, Secondary)
Specifies the primary and secondary DNS (Domain Name System) search suffix.
When DHCP/BOOTP is turned On, you can select DNS Search Suffix (Primary) or
Use following DNS Search Suffix. When DHCP/BOOTP is turned On and Use
following DNS Search Suffix is selected, you can enter static DNS search suffix in
the Primary and Secondary fields provided.
WINS Servers (Primary, Secondary)
Specifies the IP addresses of the primary and secondary WINS (Windows Internet
Name Service) servers. When DHCP/BOOTP is turned On and Use WINS Server
from DHCP is selected, you can select to use the WINS server obtained via DHCP.
When DHCP/BOOTP is turned On and Use following WINS Server is selected,
you can enter static WINS server information in the Primary and Secondary fields
provided.
Host Name
Specifies how to get a host name. When you want to get a host name from the
DHCP server, select Use Host Name from DHCP. When you want to get a host
name using device setting, select Use Host Name from Device Setting.
3. Click Submit button.
IPv6 Settings (Wired Network)
1. Click TCP/IP under Network Settings on the navigation menu. The TCP/IP Settings
page opens.
2. This section includes the following items for configuration.
IPv6
Specifies whether or not to enable the IPv6 protocol. Select On to use the IPv6 protocol.
IP Address
TA static IPv6 address can be entered in this field for the device as part of the system network settings. Assigns an IPv6 address to the printing system network component. The format of the IPv6 address is a sequence of numbers (128 bit in total)
separated by colons, e.g. 2001:db8:3c4d:15::1a2c:1a1f.
Prefix Length
Specifies the IPv6 prefix length. It can be a decimal value between 0 and 128.
RA(Stateless)
When the RA(Stateless) is set to On and the network infra-structure provides the
IPv6 address prefix in the Router Advertise information, the IPv6 stateless address
will be generated on the print system.
DHCPv6 (Stateful)
When the DHCPv6(Stateful) is set to On and the network infra-structure prodives
the "Managed address configuration", the IPv6 stateful address (128-bit length) will
be assigned to the print system by DHCPv6 server.
64 Embedded Web Server
Page 69

Network Settings
Domain Name
Specifies the domain name of the domain to which the printing system belongs. You
can enter the domain name when DHCPv6 (Stateful) is turned Off.
3. Click Submit button.
IPv6 Settings (Wireless Network)
1. Click TCP/IP under Network Settings on the navigation menu. The TCP/IP Settings
page opens.
2. This section includes the following items for configuration.
IPv6
Specifies whether or not to enable the IPv6 protocol. Select On to use the IPv6 protocol.
IP Address
TA static IPv6 address can be entered in this field for the device as part of the system network settings. Assigns an IPv6 address to the printing system network component. The format of the IPv6 address is a sequence of numbers (128 bit in total)
separated by colons, e.g. 2001:db8:3c4d:15::1a2c:1a1f.
Prefix Length
Specifies the IPv6 prefix length. It can be a decimal value between 0 and 128.
RA(Stateless)
When the RA(Stateless) is set to On and the network infra-structure provides the
IPv6 address prefix in the Router Advertise information, the IPv6 stateless address
will be generated on the print system.
DHCPv6 (Stateful)
When the DHCPv6(Stateful) is set to On and the network infra-structure prodives
the "Managed address configuration", the IPv6 stateful address (128-bit length) will
be assigned to the print system by DHCPv6 server.
Domain Name
Specifies the domain name of the domain to which the printing system belongs. You
can enter the domain name when DHCPv6 (Stateful) is turned Off.
3. Click Submit button.
IPv6 Settings (Common)
1. Click TCP/IP under Network Settings on the navigation menu. The TCP/IP Settings
page opens.
2. This section includes the following items for configuration.
Default Gateway
Specifies the IPv6 address of the default gateway.
User Guide 65
Page 70

Network Settings
DNS Server (Primary, Secondary)
Specifies the IP addresses of the primary and secondary DNS (Domain Name System) servers. When DHCPv6 (Stateful) is turned On and Use DNS Server from
DHCP is selected, you can select to use the DNS server obtained via DHCP. When
DHCPv6 (Stateful) is turned On and Use following DNS Server is selected, you
can enter static DNS server information in the Primary and Secondary fields provided.
DNS Search Suffix (Primary, Secondary)
Specifies the primary and secondary DNS (Domain Name System) search suffix.
When DHCPv6 (Stateful) is turned On, you can select DNS Search Suffix (Pri-
mary) or Use following DNS Search Suffix. When DHCP/BOOTP is turned On
and Use following DNS Search Suffix is selected, you can enter static DNS
search suffix in the Primary and Secondary fields provided.
3. Click Submit button.
Bonjour Settings
1. Click TCP/IP under Network Settings on the navigation menu. The TCP/IP Settings
page opens.
2. This section includes the following items for configuration.
Bonjour
Select On or Off, anfd then select Wired Network, Wi-Fi or Wi-Fi Direct as Available Network.
Bonjour Name
When Bonjour is turned On, Bonjour Name is shown. You can modify the name
as necessary.
3. Click Submit button.
IP Filter (IPv4)
This page allows you to configure IP filters. IP filters restrict access to the printing
system based on the IP addresses and protocols.
Specify the IP addresses or network addresses of the hosts to which access is granted.
If nothing is specified on this page, access from all hosts is allowed.
1. Click TCP/IP under Network Settings on the navigation menu. The TCP/IP Settings
page opens.
2. Click Settings button. The IP Filters (IPv4) page opens.This section includes the
following items for configuration.
IP Address (IPv4)
Specifies the IP address or network address to be permitted.
Subnet Mask
Specifies the subnet mask to be permitted. When there are no entries, access is
allowed to all.
66 Embedded Web Server
Page 71

Network Settings
To allow access to a network, enter the network IPv4 address, and the subnet mask.
An example of the data format for the .CSV file is: To permit access from all hosts on
network 192, enter "192.0.0.0" for the IP address and "255.0.0.0" for the subnet
mask. Subnet mask can be left blank.
To allow access to a single IP address, enter the IPv4 address, and
"255.255.255.255" for the subnet mask.
Protocols
Specifies the protocol by which an access is granted. The following protocols can be
selected.
•LPD
•FTP
•IPP
• ThinPrint
•HTTP
•Raw
•SNMP
• IPP over SSL
•HTTPS
Note: ThinPrint appears only when an optional ThinPrint is activated.
3. Click Submit button.
IP Filter (IPv6)
This page allows you to configure IP filters. IP filters restrict access to the printing
system based on the IP addresses and protocols.
Specify the IP addresses or network addresses of the hosts to which access is granted.
If nothing is specified on this page, access from all hosts is allowed.
1. Click TCP/IP under Network Settings on the navigation menu. The TCP/IP Settings
page opens.
2. Click Settings button. The IP Filters (IPv6) page opens.This section includes the
following items for configuration.
IP Address(IPv6)
Specifies the IP addresses to which access is granted. When there are no entries,
access is allowed to all. The number of addresses that can be specified depends on
the IPv6 network address along with the prefix length setting. IPv6 address filtering:
To filter a single IPv6 address: Enter the desired IPv6 address, along with a prefix
length of 128.
Prefix Length
Specifies the IPv6 prefix length. It can be a decimal value between 0 and 128.
Protocols
Specifies the protocol by which an access is granted. The following protocols can be
selected.
•LPD
•FTP
•IPP
• ThinPrint
•HTTP
User Guide 67
Page 72

Network Settings
•Raw
•SNMP
• IPP over SSL
•HTTPS
Note: ThinPrint appears only when an optional ThinPrint is activated.
3. Click Submit button.
Logical printers
This page allows you to configure the Logical Printers. This machine can be used as a
virtual printer for converting ASCII print data to PostScript data or for adding and/or
replacing a character strings (commands) at the beginning or end of job data. Up to four
logical printers can be set.
Logical Printer is used with one of the following print protocols: FTP, LPR, IPP, IPPS,
SMB (NetBEUI) and RAW. If no port is specified for printing, the default port used will
be Logical Printer 1 (LP1), port 9100.
1. Click TCP/IP under Network Settings on the navigation menu. The TCP/IP Settings
page opens.
2. Click Settings button. The Logical Printers page opens.This section includes the
following items for configuration
TCP/IP Port Number
Specifies the port number for the logical printer as well as the TCP raw port number
(9100, etc.). Conversion is applied to data that is input to the specified raw port in
accordance with the selected logical printer. This port is invalid if it is given a port
number that is the same as that of an already specified port (For example, FTP or
LPD).
Bi-directional Printing
Bi-directional Printing can be set to On or Off when printing to the TCP/IP RAW
port. When Bi-directional Printing is Off, all Send data is discarded.
In order to have the data that is received from the printer returned to the client when
printing with PostScript, PJL and other such commands, it is necessary to set Bidirectional Printing is On.
Start of Job String
Specifies the character string sent to the printer after output, directly to the output
port (lp port). This character string is used when it is necessary to transmit a control
code before the print data is sent.
End of Job String
Specifies the character string sent to the printer after output, directly to the output
port (lp port). This character string is used when it is necessary to transmit a control
code after the print data is sent.
3. Click Submit button.
IPSec Settings
1. Click TCP/IP under Network Settings on the navigation menu. The TCP/IP Settings
page opens.
68 Embedded Web Server
Page 73

This section allows you to set access restrictions for IPSec protocol-based
communication.
Specifies whether or not to enable the IPSec protocol. Select On to use the IPv6
protocol. Select Off when encryption is not used.
2. This section includes the following items for configuration.
Expiration Verification
When this option is enabled, the expiration of the server certificate is verified at
communicating. If found expired, communication will fail. When it is disabled, the
expiration will not be verified.
Restriction
Specifies the default policy for non-IPSec packets. Select Allow to allow communication with all hosts and networks including those not permitted by the rules. Select
Deny to allow communication only with the hosts and networks permitted by the
rules. Allowed means normal traffic (not defined by the IPSec rules) will be allowed
to reach the device. Denied means only IPSec traffic (as defined by the IPSec
rules) will be allowed to reach the device and all other traffic (not defined by the
IPSec rules) will be denied to reach the device.
Network Settings
Root Certificate
Displays whether the certificate is active. Root Certificate 1 Subject through Root
Certificate 5 Subject are displayed. Configure the device certificate on the Certifi-
cates page.
IPSec Rules
Allows to validate the rule used for communication using the IPSec protocol. Rule 1
through Rule 10 are displayed. To activate this item, click Settings button and configure the following on the IPSec Rule Settings page.
1. Policy
Rule: Select whether the rules for IPSec communication are used or not.
Key Management Type: Select a type of the key used for the rule from IKEv1,
IKEv2, and Manual.
Encapsulation Mode: Transport encapsulates an encrypted data and transmits
along with an IP header. This is the simplest method when both the transmitting
host and receiving host have the IPSec protocol supported. Tunnel uses a gate-
way provided in the network. The gateway receives the IP packets sent by the
transmitting host, encrypt the entire IP packet which is then encapsulated by
IPSec, then transmits along with a new IP header.
Select whether the rules for IPSec communication are used or not.
2. IP address
IP Version: Specifies the IP version of the other end. Select IPv4 or IPv6.
IP Address (IPv4): Specifies the IPv4 addresses of the hosts or network with
which the print system is connecting via IPSec. When you are restricting the scope
of IPSec, be sure to specify the IP addresses. If this field is blank, all IPv4
addresses will be allowed to connect the print system.
Subnet Mask: When IPv4 is selected for IP Version, this specifies the subnet
mask of the hosts or network with which the print system is connecting via IPSec.
If this field is blank, the specified addresses are considered to be host addresses.
IP Address (IPv6): Specifies the IPv6 addresses of the hosts or network with
which the print system is connecting via IPSec. When you are restricting the scope
of IPSec, be sure to specify the IP addresses. If this field is blank, all IPv6
addresses will be allowed to connect the print system.
User Guide 69
Page 74

Network Settings
Prefix Length: When IPv6 is selected for IP Version, this specifies the prefix
length of the hosts or network with which the print system is connecting via IPSec.
If this field is blank, the specified addresses are considered to be host addresses.
Remote Peer Address: If Tunnel is selected in Encapsulation Mode, assign an
IP address that is remotely controlled.
3. Authentication: Configures the local side authentication when IKEv1 is selected
as Key Management Type. To set a character string as the shared key and use it
for communication, select Pre-shared Key and enter the string of the pre-shared
key in the text box. To use the CA-issued Device Certification or Root Certificate,
select the Certificates. When Certificates is selected, the availability of the
device certificate is shown. To make advanced settings, click Settings button and
select a certificate. Configure the device certificate on the Certificates page of
Security Settings.
Configures the local side and remote side authentication when IKEv2 is selected
as Key Management Type. Configure Authentication Type, Local ID Type,
Local ID, Devoce Certificate and Pre-shared Key on Local Side, and Authentication Type, Remote ID Type, Remote ID and Pre-shared Key on Remote Side.
4. Key Exchange (IKE phase1): When using IKE phase1, a secure connection with
the other end is established by generating ISAKMP SAs. Configure the following
items so that they meet the requirement of the other end.
Mode: Configures this item when IKEv1 is selected as Key Management Type.
Main Mode protects identifications but requires more messages to be exchanged
with the other end. Aggressive Mode requires fewer messages to be exchanged
with the other end than Main Mode but restricts identification protection and narrows the extent of the parameter negotiations. When Aggressive Mode is
selected and Pre-shared Key is selected for Authentication Type, only host
dresses can be specified for IP addresses of the rule.
ad
Hash: Selects the hash algorithm.
Encryption: Selects the encryption algorithm.
Diffie-Hellman Group: The Diffie-Hellman key-sharing algorithm allows two hosts
on an unsecured network to share a private key securely. Select the Diffie-Hellman
group to use for key sharing.
Lifetime (Time): Specifies the lifetime of an ISAKMP SA in seconds.
5. Data Protection (IKE phase2)
In IKE phase2, IPSec SAs such as ESP or AH are established by using SAs established in IKE phase1. Configure the following items so that they meet the requirement of the other end.
Protocol: Select ESP or AH for the protocol. ESP protects the privacy and integrity of the packet contents. Select the hash algorithm and encryption algorithm
below. AH protects the integrity of the packet contents using encryption checksum.
When you select AH as Protocols, you cannot use the AES-GCM-128, 192, or
256. Select the hash algorithm below.
Hash: Selects the hash algorithm. When you select AES-GCM-128, 192, or 256
on Encryption, you have to select the AES-GCM-128, 192, or 256 or the AESGMAC-128, 192, or 256 corresponding to the same bit.
Encryption: Selects the encryption algorithm. (When ESP is selected under Protocol.) When you select the AES-GCM-128, 192, or 256 on Hash, you have to
select the AES-GCM-128, 192, or 256 corresponding to the same bit. When you
select the AES-GMAC-128, 192, or 256 on Hash, you have to select the AESGCM-128, 192, or 256 corresponding to the same bit. If you do not select any
algorithm, the machine authenticates without encryption.
PFS: When PFS is turned On (enabled), even if a key is decrypted, the decrypted
key cannot be used to decrypt the other keys generated after the decryption. This
improves the safety, but imposes a heavy burden because of more key-generation
processes.
Diffie-Hekkman Group: When PFS is turned On (enabled), select the Diffie-Hekkman Group to use.
Lifetime Measurement: Select Time or Time & Data Size.
70 Embedded Web Server
Page 75

Protocol
Network Settings
Lifetime (Time): Configure the lifetime of IPSec SA in seconds.
Lifetime (Data Size): Configure this item when is Time & Data Size selected as
Lifetime Measurement. Configure the lifetime (data size) of IPSec SA in kilo-
bytes.
Extended Sequence Number: Determines whether a sequence number is 64-bit
extended by IPSec. To execute, select On.
6. Manual: If Key Management Type is set to Manual, configure:
Protocol, Hash, Encryption, SPI Format, SPI for Inbound, SPI for Outbound,
Key Format, Authentication Key for Inbound, Authentication Key for Outbound, Encryption Key for Inbound, Encryption Key for Outbound.
Click Submit button to finalize settings.
3. Click Submit button.
This section includes advanced settings for various protocols used as the
communication procedures and communication protocols.
*: If the settings for the item marked with an asterisk (*) has been changed, you must
restart the machine or the network. To restart the machine, proceed to the Reset page.
1. Click Protocol under Network Settings on the navigation menu. The Protocol
Settings page opens.
2. This section includes the following items for configuration.
Print Protocols
Configure the protocols used for printing. This section includes the following items
for configuration:
1. NetBEUI: The NetBEUI protocol allows Peer-to-peer printing (SMB Print). With
this protocol enabled, the printing system is created in Windows Network
Neighborhood. NetBEUI is an enhanced version of the NetBIOS protocol, which is
used for transport of SMB protocol.
Enables or disables the NetBEUI protocol. If NetBEUI is turned On, the name resolution by NetBIOS (NMB) becomes available.
Available Network: Select Wired Network, Wi-Fi and Wi-Fi Direct as the avail-
able network for NetBEUI protocol.
Workgroup: Workgroup represents the workgroup which will appear in Entire
Network in "Windows Network Neighborhood."
Comment: You can enter comments here. (This can be left blank.)
2. LPD: To enables the LDAP protocol, turn this item On.
Available Network: Select Wired Network, Wi-Fi and Wi-Fi Direct as the avail-
able network for LPD protocol.
3. FTP Server (Reception): FTP is a communications protocol for transmitting files
over a Network. To enables the FTP protocol, turn this item On.
Available Network: Select Wired Network, Wi-Fi and Wi-Fi Direct as the avail-
able network for FTP protocol.
4. IPP: IPP is a protocol which performs transmission and reception of printing data
and configuration of printing systems through TCP/IP networks including the
Internet. To enables the IPP protocol, turn this item On.
Available Network: Select Wired Network, Wi-Fi and Wi-Fi Direct as the avail-
able network for IPP protocol.
Port Number: Enter the port number. Typically, this should be 631.(e.g. http://(IP
address):631/printers/lp1)
User Guide 71
Page 76

Network Settings
5. IPP over SSL: A certificate can be added for communication using the IPP
protocol. To enable the IPP protocol, turn this item On. To enable this protocol,
select On on SSL of the Network Security Settings page.
Available Network: Select Wired Network, Wi-Fi and Wi-Fi Direct as the avail-
able network for IPP over SSL.
Port Number: Enter the port number. Typically, this should be 443. The status of
IPP over SSL Certificate is shown. To make advanced settings, click Settings
button and select a certificate. Click Submit button to finalize settings.
Configure the device certificate on the Certificates page of Security Settings.
This Certificate can be used in common with IPP over SSL and HTTPS.
6. IPP Authentication: When selecting On, the device performs user authentication
at printing to avoid unauthorized use. To enable this item, select Local
Authentication or Network Authentication as Authentication on the
Authentication Settings page under Management Settings and restart the
device. Turn this item On and enter Default User Name.
7. Raw: RAW employs another method of printing over the network like LPR.
Typically, RAW uses port 9100 to remotely administer the printer via using SNMP
or MIB. To enables the RAW protocol, turn this item On.
Available Network: Select Wired Network, Wi-Fi and Wi-Fi Direct as the avail-
able network for Raw protocol.
8. ThinPrint: Configure this setting whether to use the ThinPrint. Turn this item On
Available Network: Select Wired Network, Wi-Fi and Wi-Fi Direct as the avail-
able network for ThinPrint.
Port Number: When you set ThinPrint to On, enter the port number. Typically,
this should be 4000. To use ThinPrint over SSL, select On on
work Security Settings page. Click Settings button to select the Device Certificate. Click Submit button to determine the setting.
Note: ThinPrint appears only when an optional ThinPrint is activated.
9. WSD Print: WSD is a new networking protocol provided with Windows Vista for
discovery of the printing systems and data exchange for printing. To enable the
WSD protocol, turn this item On.
Available Network: Select Wired Network, Wi-Fi and Wi-Fi Direct as the avail-
able network for WSD protocol.
10.POP3 (E-mail RX): POP3 is a standard protocol for retrieval of E-mail. POP3 is a
standard protocol used by local e-mail clients including the printing system to
retrieve E-mail from a remote server over a TCP/IP connection. To enable the
POP3 protocol to retrieve E-mail, turn this item On. To configure the POP3
protocol, go to the E-mail Settings page under Function Settings. To use E-mail
printing, activate remote printing on the Printer Settings page under Function
Settings.
Select a method for POP3 Security (User 1 (to 3)) from STARTTLS, or SSL/TLS,
or Off on the drop-down list. To enable this protocol, activate SSL on the Network
Security Settings page under Security Settings.
SSL of the Net-
Send Protocols
Configure the protocols used for sending E-mail. This section includes the following
items for configuration:
1. SMTP (E-mail TX): SMTP is an Internet standard for E-mail transmission across
Internet Protocol (IP) networks. To enable E-mail transmission using SMTP, turn
this item On. To configure the detailed settings, go to the E-mail Settings page
under Function Settings.
Select a method for SMTP Security (User #) from Off, STARTTLS, and SSL/TLS
on the drop-down list. To enable this protocol, activate SSL on the Network Secu-
rity Settings page under Security Settings.
2.
SMTP (FAX Server): T
On. To configure the detailed settings, go to the E-mail Settings page under
Function Settings.
72 Embedded Web Server
o enable E-mail transmission using fax server, turn this item
Page 77

Network Settings
Select a method for SMTP Security (User #) from Off, STARTTLS, and SSL/TLS
on the drop-down list. To enable this protocol, activate SSL on the Network Secu-
rity Settings page under Security Settings.
3. FTP Client (Transmission): FTP (File Transfer Protocol) is a standard network
protocol used to transfer files from one host or to another host over a TCP-based
network, such as the Internet. To enables the FTP protocol, turn this item On. Port
Number: Enter the port number. Typically, this should be 21. By selecting On on
FTP Encryption TX, the file transmission is implemented with the algorithms
configured in the following. To enable this protocol, activate SSL on the Network
Security Settings page under Security Settings.
4. SMB: SMB is a network protocol applied to shared access to files, printers, serial
ports, etc.. To enables the SMB protocol, turn this item On.
Port Number: Enter the port number. Typically, this should be 445.
5. i-FAX (SMTP and POP3): To enable i-FAX, turn this item On. To configure i-FAX,
go to the FAX/i-FAX Settings page under Function Settings.
6. WSD Scan: WSD is a new networking protocol provided with Windows Vista for
discovery of the printing systems and data exchange for printing. To enable the
WSD protocol, turn this item On.
7. DSM Scan: DSM allows the distributed scan management. The system
administrator can use DSM to manage scan services over organizations which
have a large number of users. To enable DSM scan, turn this item On. To
configure DSM scan, go to the DSM Scan Settings page under Function
Settings. To enable this item, select Network Authentication on the
Authentication Settings page under Management Settings.
Select a method for LDAP Security (DSM Scan) from Off, STARTTLS, or SSL/
TLS on the drop-down list. To enable this item, activate SSL on the Network
Security Settings page under
8. eSCL: eSCL is a n
computer. To enables the eSCL protocol, turn this item On.
Available Network: Select Wired Network, Wi-Fi and Wi-Fi Direct as the avail-
able network for eSCL protocol.
9. eSCL over SSL: A certificate can be added for communication using the eSCL
protocol. To enable the eSCL over SSL, turn this item On. To enable this protocol,
select On on SSL of the Network Security Settings page.
Available Network: Select Wired Network, Wi-Fi and Wi-Fi Direct as the avail-
able network for eSCL over SSL.
eSCL over SSL Certificate: The status of eSCL over SSL Certificate is shown.
To make advanced settings, click Settings button and select a certificate. Click
Submit button to finalize settings.
Configure the device certificate on the Certificates page of Security Settings.
This Certificate can be used in common with ThinPrint, HTTPS/IPP over SSL,
Enhanced WSD over SSL, eSCL over SSL, and so on.
etwork protocol used for remote scanning from Mac OS X
Security Settings.
Other Protocols
This section allows to configure other network protocols. This section includes the
following items for configuration:
1. SNMPv1/v2c: The SNMP protocol provides and transfers management
information within the network environment. Should an error occur such as Add
Paper, the printing system automatically generates a trap, an error message sent
to up to two predetermined trap recipients. To enable the SNMPv1/v2 protocol,
turn this item On. To configure the SNMPv1/v2 protocol, go to the SNMP Settings
page under Management Settings.
Available Network: Select Wired Network, Wi-Fi and Wi-Fi Direct as the avail-
able network for SNMP protocol.
2. SNMPv3: The SNMP protocol provides and transfers management information
within the network environment. To enable the SNMPv3 protocol, turn this item On.
User Guide 73
Page 78

Network Settings
To configure the SNMPv3 protocol, go to the SNMP Settings page under
Management Settings.
3. HTTP: HTTP is the protocol to exchange or transfer hypertext between the World
Wide Web and web browsers. To enable the HTTP protocol, turn this item On.
Available Network: Select Wired Network, Wi-Fi and Wi-Fi Direct as the avail-
able network for HTTP protocol.
4. HTTPS: HTTPS (Hypertext Transfer Protocol Secure) is a widely-used
communications protocol for secure communication over the Internet. It provides
bidirectional encryption of communications between a client web browser and a
web server. To enable the HTTPS protocol, turn this item On. To enable this item,
activate SSL on the Network Security Settings page under Security Settings.
The current status of the certificate is shown in HTTPS Certificate. To make
advanced settings, click Settings button and select a device certificate. Click
Submit button to finalize settings.
Configure the device certificate on the Certificates page under Security Settings.
This Certificate can be used in common with IPP over SSL and HTTPS.
5. Enhanced WSD: Enhanced WSD is an API to simplify connections to web service
enabled devices, such as Printers, Scanners and File Shares. To enable
Enhanced WSD, turn this item On.
Available Network: Select Wired Network, Wi-Fi and Wi-Fi Direct as the avail-
able network for Enhanced WSD protocol.
6. Enhanced WSD over SSL: Enhanced WSD (SSL) is a communication security
protocol that provides encryption, authentication, and anti-tampering integrity over
the Internet. To enable Enhanced WSD (SSL), turn this item On. To enable this
item, activate SSL on the Network Security Settings page under Security
Settings.
Available Network: Select Wired Network, Wi-Fi and Wi-Fi Direct as the avail-
able network for Enhanced WSD over SSL.
Enhanced WSD over SSL Certificate: The status of the Enhanced WSD over
SSL certificate is shown. To make advanced settings, click Settings button and
select a device certificate. Click Submit button to finalize settings.
Configure the device certificate on the Certificates page under Security Settings
7. LDAP: Th
server as an external address book and assign a FAX number and E-mail address
to the destination. To enables the LDAP protocol, turn this item On. To configure
the External Address Book, go to the External Address Book Settings page
under Address Book. To configure advanced settings, go to Authentication
Settings page under Management Settings.
Select a method for LDAP Security from STARTTLS, SSL/TLS, and Off on either
the External Address Book # or Network Authentication drop-down list. To
enable this item, activate SSL on the Network Security Settings page under
Security Settings.
8. IEEE802.1X: IEEE802.1X is a security protocol that allows login to the secured
networks based on a client certificate. To enable the IEEE802.1X protocol, turn this
item On.
To make advanced settings, click Settings button. The status of this protocol is
shown in IEEE802.1X Settings page. This section includes the following items for
configuration:
e printing system can refer to the address book which is on the LDAP
.
IEEE802.1X
Effective Encryption: Select a method of encryption from EAP-TLS, EAP-TTLS,
EAP-FAST and PEAP(EAP-MS-CHAPv2) on the drop-down list.
Tunneled Authentication Protocol: This protocol is activated when EAP-TTLS
has been selected for encryption. Select a method of authentication from
MSCHAPV2, MSCHAP, CHAP, and PAP on the drop-down list.
Login User Name: Enter the name of the user to access the printing system. The
IEEE802.1X client certificate of this user must be valid.
74 Embedded Web Server
Page 79

Network Settings
Password: This protocol is activated when EAP-TTLS, EAP-FAST, or
PEAP(EAP-MS-CHAPv2) has been selected for encryption. Enter the password.
Common Name: This protocol is activated when EAP-TTLS, EAP-FAST, or
PEAP(EAP-MS-CHAPv2) has been selected for encryption. Specifies the com-
mon name of the server certificate if the server is required to be authenticated.
Match Rule of Common Name: This protocol is activated when EAP-TTLS, EAPFAS T, or PEAP(EAP-MS-CHAPv2) has been selected for encryption. When the
server certificate is verified, the common name specified under Common Name is
compared with the common name on the server certificate. This item allows you to
specify whether the common names are considered to be matched if they exactly
or partially match.
Expiration Verification: When this option is enabled, the expiration of the server
certificate is verified at communicating. If the certificate is expired, communication
will fail. When it is disabled, the expiration will not be verified.
IEEE802.1X Client Certificate: The current status is shown in IEEE802.1X Client
Certificate. To make advanced settings, click Settings button and select a device
certificate. Click Submit button to finalize settings. Configure the device certificate
on the Certificates page under Security Settings.
Certificate Status
Root Certificate 1 (to 5), IEEE802.1X Client Certificate: The content of the certif-
icate is shown. Make settings for the Root Certificate on the Certificates page
under Security Settings.
9. LLTD: LLTD is a protocol that provides network topology discovery and quality of
service diagnostics. To enable the LLTD protocol, turn this item On.
Available Network: Select Wired Network, Wi-Fi and Wi-Fi Direct as the available network for LLTD protocol.
10.REST: REST is an architecture for the web application suitable for the multiple
software linkage in the distributed network system. To enables the REST protocol,
turn this item On.
Available Network: Select Wired Network
able network for REST protocol.
11. REST over SSL: A certificate can be added for communication using the REST
protocol. To enable the REST over SSL, turn this item On. To enable this protocol,
select On on SSL of the Network Security Settings page.
Available Network: Select Wired Network, Wi-Fi and Wi-Fi Direct as the available network for REST over SSL.
eSCL over SSL Certificate: The status of eSCL over SSL Certificate is shown.
To make advanced settings, click Settings button and select a certificate. Click
Submit button to finalize settings.
Configure the device certificate on the Certificates page of Security Settings.
This Certificate can be used in common with ThinPrint, HTTPS/IPP over SSL,
Enhanced WSD over SSL, eSCL over SSL, and so on.
-Fi and Wi-Fi Direct as the avail-
, Wi
3. Click Submit button.
Wireless LAN
This section includes advanced settings for the Wi-Fi and Wi-Fi Direct.
* If the settings for the item marked with an asterisk (*) has been changed, you must
restart the machine or the network. To restart the machine, proceed to the Reset page.
Wi-Fi Settings
1. Click Wireless LAN under Network Settings on the navigation menu. The Wireless
LAN Settings page opens.
User Guide 75
Page 80

Network Settings
2. This section includes the following items for configuration.
Wi-Fi
Select On when you use the wireless LAN communication using Wi-Fi.
Network Name (SSID)
Enter the SSID (Service Set Identifier) of wireless LAN connects to the device.
Network Authentication
Select the network authentication method from the drop-down list.
Encryption
Configure the encryption method. If you select Open in Network Authentication,select Disable or WEP.
If you select WPA2/WPA-PSK or WPA2/WPA-EAP in Network Authentication,select AES or Auto.
If you select WPA2-PSK or WPA2-EAP in Network Authentication, AES is
applied as Encryption.
WEP Key Index
Enter the WEP key index when you select Open in Network Authentication, and
WEP in Encryption.
WEP Key
Enter the WEP key index when you select Open in Network Authentication, and
WEP in Encryption.
Pre-shared Key
Enter the pre-shared key index when you select WPA2/WPA-PSK or WPA2-PSK in
Network Authentication.
3. Click Submit button.
IEEE802.1X
This setting appears when WPA2/WPA-EAP or WPA2-EAP is selected in Network
Authentication.
1. Click Wireless LAN under Network Settings on the navigation menu. The Wireless
LAN Settings page opens.
2. This section includes the following items for configuration.
Effective Encryption
Select a method of encryption from EAP-TLS, EAP-TTLS, EAP-FAST and
PEAP(EAP-MS-CHAPv2) on the drop-down list.
Tunneled Authentication Protocol
This protocol is activated when EAP-TTLS has been selected for encryption. Select
a method of authentication from MSCHAPV2, MSCHAP, CHAP, and PAP on the
drop-down list.
76 Embedded Web Server
Page 81

Network Settings
Login User Name
Enter the name of the user to access the printing system. The IEEE802.1X client
certificate of this user must be valid.
Password
This protocol is activated when EAP-TTLS, EAP-FAST, or PEAP(EAP-MSCHAPv2) has been selected for encryption. Enter the password.
Common Name
This protocol is activated when EAP-TTLS, EAP-FAST, or PEAP(EAP-MSCHAPv2) has been selected for encryption. Specifies the common name of the
server certificate if the server is required to be authenticated.
Match Rule of Common Name
This protocol is activated when EAP-TTLS, EAP-FAST, or PEAP(EAP-MSCHAPv2) has been selected for encryption. When the server certificate is verified,
the common name specified under Common Name is compared with the common
name on the server certificate. This item allows you to specify whether the common
names are considered to be matched if they exactly or partially match.
Expiration Verification
When this option is enabled, the expiration of the server certificate is verified at
communicating. If the certificate is expired, communication will fail. When it is disabled, the expiration will not be verified.
IEEE802.1X Client Certificate
The current status is shown in IEEE802.1X Client Certificate. To make advanced
settings, click Settings button and select a device certificate. Click Submit button to
finalize settings. Configure the device certificate on the Certificates page under
Security Settings.
3. Click Submit button.
Certificate Status
1. Click Wireless LAN under Network Settings on the navigation menu. The Wireless
LAN Settings page opens.
2. This section includes the following items for configuration.
Root Certificate 1 (to 5), IEEE802.1X Client Certificate
The content of the certificate is shown. Make settings for the Root Certificate on
the Certificates page under Security Settings.
Wi-Fi Direct Settings
1. Click Wireless LAN under Network Settings on the navigation menu. The Wireless
LAN Settings page opens.
2. This section includes the following items for configuration.
Wi-Fi Direct
Select On when you use the wireless LAN communication using Wi-Fi Direct.
User Guide 77
Page 82

Network Settings
Device Name
Enter the device name (host name).
IP Address
The device's IP address appears.
Persistent Group
Select On when you use the persistent group.
Click Reset button to reset the password for Wi-Fi Direct connection.
Note: You can confirm the password on the Configuration page to click Configura-
tion under Device Information on the navigation menu. You can also confirm the
password on the control panel of the machine and the network status page.
Auto Disconnect
Select On when you want to automatically disconnect the handheld device connected using Wi-Fi Direct. Select the desired Day, Hour and Minute from the dropdown list.
3. Click Submit button.
78 Embedded Web Server
Page 83

Device Security
Security Settings
9 Security Settings
This page is accessible when you have logged in the embedded server with
administrator privilege, while network authentication or local authentication is enabled.
If needed, make the following settings: See below for detailed information.
•Device Security
• Send Security
•Network Security
• Certificates
This section includes settings for device security.
Interface Block
This page allows you to restrict access from each interface.
1. Click Device Security under Security Settings on the navigation menu. The Device
Security Settings page opens.
2. This section includes the following items for configuration.
Network
Access from the network interface cannot be restricted. Access should be restricted
depending on the protocol. For more details, see the Protocol Settings page under
Network Settings.
USB Device
To block accesses from the devices connected to the USB port, select Block.
USB Host
To block accesses from the USB host devices, select Block.
USB Storage
To block accesses from the storages connected to the USB port, select Block.
Parallel I/F
To block accesses from the parallel interface, select Block.
Option Interface 1
To block accesses from the Option 1 interface, select Block.
Option Interface 2
To block accesses from the Option 2 interface, select Block.
3. Click Submit button.
User Guide 79
Page 84

Security Settings
Lock Operation Panel
Restricts access from the operation panel.
1. Click Device Security under Security Settings on the navigation menu. The Device
Security Settings page opens.
2.
Select the drop-down list, click
Partial Lock, Off
or
Each model depends on the display.
Note:
This section includes the following items for configuration.
On or Lock
Settings related to execution of input and output, jobs and paper are prohibited. To
limit partial-use the following Partial lock 1 (-3).
Partial lock 1
Settings related to input/output, such as network settings, system settings, document settings are prohibited. (e.g. the registration/edit of Address book and Document box)
or
Unlock
On
or
Lock, Partial lock 1, Partial lock 2, Partial lock 3
in the operation remain.
Partial lock 2
Settings related to the run job panel settings, printer settings, in addition to Partial
lock 1 limit will be banned. (e.g. stop key use the job cancel)
Partial lock 3 or Partial Lock
Settings related to paper, in addition to the limit of Partial lock 2 is prohibited. (e.g.
Cassette Settings, MP Tray Settings)
Off or Unlock
All keys are permitted to use.
3. Click Submit button.
Display Status /Log
Job status, job histories, and FAX communication histories are restricted.
1. Click Device Security under Security Settings on the navigation menu. The Device
Security Settings page opens.
2. This section includes the following items for configuration.
Display Jobs Detail Status
This enables to restrict the progress of job processing in detail. You can select Hide
All to allow only the administrators who logged in using administrator privilege to
see the jobs status. Show All allows all administrators and users to see the jobs
status. Selecting My Jobs Only only allows the user to see the jobs log of his/her
own.
80 Embedded Web Server
Page 85

Security Settings
Display Jobs Log
This enables to restrict the progress of job processing in detail. You can select Hide
All to allow only the administrators who logged in using administrator privilege to
see the jobs log. Show All allows all administrators and users to see the jobs log.
Selecting My Jobs Only only allows the user to see the jobs log of his/her own.
Display FAX Log
This enables to restrict the history of fax communications. You can select Hide All
to allow only the administrators who logged in using administrator privilege to see
the history of fax communications. Show All allows all administrators and users to
see the logs of fax communications.
3. Click Submit button.
Edit Restriction
The addition, deletion and edition of address book and one touch key are restricted.
1. Click Device Security under Security Settings on the navigation menu. The Device
Security Settings page opens.
2. This section includes the following items for configuration.
Address Book
This enables to restrict the editorial control of address book. When you select Off,
all user can edit the address book regardless of user priviledges. When you select
Administrator Only, only the user with an administrator priviledges can edit the
address book.
One Touch Key
This enables to restrict the editorial control of one touch key. When you select Off,
all user can edit the one touch key regardless of user priviledges. When you select
Administrator Only, only the user with an administrator priviledges can edit the
one touch key.
3. Click Submit button.
Authentication Security Settings
This section allows to configure the passwords and user accounts for security. These
settings can be made when the local authentication is enabled.
1. Click Device Security under Security Settings on the navigation menu. The Device
Security Settings page opens.
2. This section includes the following items for configuration.
Password Policy Settings
Sets the password policy.
1. Password Policy: To set the password policy, set this to On and configure the
following.
2. Maximum password age: Turn to On and select the valid period in the number of
days from the drop-down list. 1 – 180 days
User Guide 81
Page 86

Security Settings
3. Maximum password length: Turn to On and select the length in the number of
characters from the drop-down list. 1 – 64 characters.
4. Password complexity: Select the password complexity from No more than two
consecutive identical char, At least one uppercase letter (A-Z), At least one
lowercase letter (a-z), At least one number (0-9), or At least one symbol.
5. Password Policy Violated User List: Clicking the User List button will display a
list of users that are in violation of the password policy.
User Account Lockout Settings
You can assign a specific user account that you want to exclude.
1. Lockout Policy: To set the password policy, set this to On and configure the
following.
2. Number of Retries until Locked: Select the number of password retries until the
account is locked, from the drop-down list (1 – 10 times).
3. Lockout Duration: Select the time period in minutes until the account is excluded,
from the drop-down list (1 – 60 minutes).
4. Lockout Target: Select the users that you want to exclude, either All or Remote
Login Only.
5. Locked out Users List: Clicking the User List button will display a list of users
that are excluded.
3. Click Submit button.
Unusable Time Setting
This determines the time period during which the machine is restricted for use.
1. Click Device Security under Security Settings on the navigation menu. The Device
Security Settings page opens.
2. This section includes the following items for configuration.
Unusable Time
Set On to use it. When this is On, the machine is unusable during the time period
from Start Time to End Time. To use the machine during this period, an unlock
code must be entered.
Start Time
Select the time of beginning of unusable time, from the drop-down list.
End Time
Select the time of ending of unusable time, from the drop-down list.
Unlock Code
Define an unlock code that you can use to temporarily deactivate the unusable time.
Enter a digit from 0000 to 9999.
Data Security Settings
This setting appears when an optional Data Security kit is activated. Click Settings
button to open the Password page. Enter the password and click OK button to
enable the data security function.
82 Embedded Web Server
Page 87

Security Settings
Document Guard Settings
This setting appears when an optional Printed Document Guard Kit(B) is activated.
Select On to use the Document Guard.
3. Click Submit button.
Send Security
This section includes settings for security for Sending.
1. Click Send Security under Security Settings on the navigation menu. The Send
Security Settings page opens.
2. This section includes the following items for configuration.
Dest. Check before Send
This enables the front panel message which prompts you to confirm the destination
to forward the scan data. To enable, select On. The message is displayed when the
machine's Start key is pressed to start scanning.
Entry Check for New Dest.
When enabled, this determines whether re-entry of a destination for confirmation is
required when adding a new destination. To enable, select On.
New Destination Entry
Determines whether an entry of a new destination is allowed. Permit activates the
entry of a new destination. Prohibit deactivates the entry of a new destination.
New Destination Entry (FAX)
This entry becomes active when New Destination Entry has been set to Permit.
Permit activates the entry of a new fax destination. Prohibit deactivates the entry
of a new fax destination.
Recall Destination
Enables or disables recalling the destination. Permit activates the entry of a destination to recall. Prohibit deactivates the entry of a destination to recall.
Broadcast
Enables or disables broadcast transmission. Permit activates the broadcast transmission. Prohibit deactivates the broadcast transmission.
3. Click Submit button.
Network Security
This section includes settings for network security.
*: If the settings for the item marked with an asterisk (*) has been changed, you must
restart the machine or the network. To restart the machine, proceed to the Reset page.
User Guide 83
Page 88

Security Settings
Network Security Settings
1. Click Network Security under Security Settings on the navigation menu. The
Network Security Settings page opens.
2. This section includes the following items for configuration.
SSL
SSL is a cryptographic protocol that provides communication security between a PC
and the machine. To enable, select On. Off deactivates the SSL protocol for communication.
Serverside Settings
Configures security settings on the server side. This section includes the following
items for configuration:
1. TLS Version: TLS, as well as SSL, is a cryptographic protocol that provides
communication security between a PC and the machine. Select the version of TLS
that you want to use from SSL3.0/TLS1.0, TLS1.1, and TLS1.2. You can use more
than one algorithm at a time.
2. Effective Encryption: Select an algorithm that you want to use from ARCFOUR,
DES, 3DES, AES and AES-GCM. You can use more than one algorithm at a time.
3. Hash: Select a Hash algorithm of either SHA1 or SHA2(256/384). You can use
more than one algorithm at a time.
4. HTTP Security: Specifies the security level for HTTP.
Secure Only (HTTPS): Encrypts all HTTP protocol communications. Only the
URLs that begin with https://. are accessible. If a URL beginning with http:// is
specified, it will be automatically redirected to "https://."
Not Secure (HTTPS & HTTP): Enables access for both encrypted and unencrypted HTTP protocol communication. URLs beginning with either “https://” or
“http://” are accessible. The former URL establishes encrypted communication and
the latter establishes unencrypted communication.
5. IPP Security: Specifies the security level for IPP.
Secure Only (IPPS): Encrypts all HTTP protocol communications.
Not Secure (IPPS & IPP): Enables access for both encrypted and unencrypted
IPP protocol communications.
6. Enhanced WSD Security: Specifies the security level for Enhanced WSD.
Secure Only (Enhanced WSD over SSL): Encrypts all Enhanced WSD over SSL
protocol communications.
Not Secure (Enhanced WSD over SSL & Enhanced WSD): Enables access for
both Enhanced WSD over SSL and Enhanced WSD protocol communications.
7. eSCL Security: Specifies the security level for eSCL.
Secure Only (eSCL over SSL): Encrypts all eSCL over SSL protocol communications.
Not Secure (eSCL over SSL & eSCL): Enables access for both eSCL over SSL
and eSCL protocol communications.
8. REST Security: Specifies the security level for REST.
Secure Only (REST over SSL): Encrypts all REST over SSL protocol communications.
Not Secure (REST over SSL & eSCL): Enables access for both REST over SSL
and REST protocol communications.
Clientside Settings
Configures security settings on the client (PC) side. This section includes the following items for configuration:
1. TLS V
84 Embedded Web Server
ersion: TLS, as well as SSL, is a cryptographic protocol that provides
communication security between a PC and the machine. Select the version of TLS
Page 89

Security Settings
that you want to use from SSL3.0/TLS1.0, TLS1.1, and TLS1.2. You can use more
than one algorithm at a time.
2. Effective Encryption: Select an algorithm that you want to use from ARCFOUR,
DES, 3DES, AES and AES-GCM. You can use more than one algorithm at a time.
3. Hash: Select a Hash algorithm of either SHA1 or SHA2(256/384). You can use
more than one algorithm at a time.
When more than one algorithm are selected, the machine selects one algorithm to
automatically connect to the server.
4. Certificate Verification: When set to On, this verifies the expiration of the server
certificate during communication. If the certificate is expired, communication will
fail. When set Off, the expiration will not be verified.
Note: When the SSL is set to On and HTTP Security is set to Secure Only
(HTTPS), the document boxes cannot be accessed by the TWAIN driver.
3. Click Submit button.
Network Access Settings
1. Click Network Security under Security Settings on the navigation menu. The
Network Security Settings page opens.
2. This section includes the following items for configuration.
Filtering/ Firewall
Filtering and firewall settings can restrict the network access to the device so that
only the specific network addresses are allowed. For details, see the IP Filter(IPv4)
Settings and IP Filter(IPv6) Settings pages of the TCP/IP Settings page under
Network Settings.
SNMPv1/v2c
The SNMP Read and Write Community settings function as passwords to control
read and write access to the device via SNMP. For more information, see the SNMP
Settings page under Management Settings.
SNMPv3
The SNMPv3 communication settings are used to control the authentication and
encryption communication that occur via SNMP. For more information, see the
SNMP Settings page under Management Settings.
SSL
To enable SSL, settings for Secure Protocols must be made. For more information,
see SSL of the Network Security Settings page.
IEEE802.1X
To enable IEEE802.1X, you must first make the IEEE802.1X settings. For more
information, see the IEEE802.1X Settings page of the Protocol Settings page
under Network Settings.
IPSec
To enable IPSec, you must first make the IPSec settings. For more information, see
the TCP/IP Settings page under Network Settings.
3. Click Submit button.
User Guide 85
Page 90

Security Settings
Certificates
This page allows you to create, update, or check details on a certificate. After you have
changed this setting, you must restart the network or this machine.
When you browse the Embedded Web Server by entering "https", a screen which
confirms whether or not to authenticate the security certificate of the web site appears.
You can select the following to solve the problem by configuring certificate.
• Tempolary solution: Permit every time the attention message displayed with first
access to the Embedded Web Server.
• Permanent solution: Import the device certificate or root certificate as the trusted
certificate into the client PC. The Web Browser will authenticate the Embedded Web
Server's certificate automatically in advance.
*: If the settings for the item marked with an asterisk (*) has been changed, you must
restart the machine or the network. To restart the machine, proceed to the Reset page.
Device Certificate
1. Click Certificates under Security Settings on the navigation menu. The Certificates
page opens.
2. A list of the device certificates will be shown, allowing you to check the following: Device
Certificate 1 is automatically issued by default. The automatically issued certificate has
the country code, common name, and a validity period of about 10 years already
configured.
Status
Displays whether the certificate is active.
Subject
Displays the country code and common name.
Expiration
Displays the validity period of the certificate.
Protocol
Displays the protocols available (HTTPS, IPP over SSL, Enhanced WSD (SSL),
IEEE802.1X, ThinPrint, DSM Scan, IPsecRuleX, and other protocols).
3. This section includes the following items for configuration.
Device Certificate 1 (to 5)
This sections allows you to modify the initial settings, add a new one, and delete the
existing settings.
Click Settings button of Device Certificate 1 (to 5). The Device Certificate 1 (to 5)
page opens to show the current status. This page allows the following settings:
Status: Displays whether the certificate is active.
Expiration: Displays the validity period of the certificate.
View Certificate: Click View button to view the details of the certificate.
Create Self Certificate: Click Create button to open the Certificate Settings page.
Enter or select the information for settings. Country Code, State/Province, Locality Name, Organization Name, Organization Unit Name, Common Name, E-
86 Embedded Web Server
Page 91

Security Settings
mail Address, Current Universal Time (UTC/GMT), Validity Period, and Key
Length are displayed automatically. Key Length is the information needed to gen-
erate encryption, in length of either 1024 or 2048 bits. Click Submit button to finalize settings.
Edit Certificate: Click Edit button to open the Expiration Settings page. Enter the
validity period. Current Universal Time (UTC/GMT) is displayed automatically.
Click Submit button to finalize settings.
Delete Certificate: When you click Delete button, the certificate is displayed.
Delete the content.
Export Certificate: When you click Export button, the dialog screen is displayed.
Save the certificate.
Root Certificate 1 (to 5)
Allows you to create, configure, register, or delete the certificate.
1. Click Settings button of Root Certificate 1 (to 5). The Root Certificate 1 (to 5)
Settings page opens to show the current status. This page allows the following
settings:
Status: Displays whether the certificate is active.
Expiration: Displays the validity period of the certificate.
Import Certificate: Click Import button to open the File Import page. Click
Browse button and select a file to import in Import Root Certificate 1 (to 5) file.
Click Submit button to finalize settings.
2. To delete a device certificate of Device Certificate 2 (to 5), highlight the certificate
and click Delete button.
Note: A certificate can be assigned to a protocol or a configuration.
User Guide 87
Page 92

Management Settings
10 Management Settings
This page is accessible when you have logged in the embedded server with
administrator privilege, while network authentication or local authentication is enabled.
If needed, make the following settings: See below for detailed information.
• Job Accounting
• Authentication
•ID Card
• Notification/Report
• History Settings
•SNMP
• System Stamp
• Message Board
• Reset
Job Accounting
Settings
1. Click Job Accounting under Management Settings on the navigation menu. The
2. Click Settings button. The Job Accounting Settings page opens. This section
This section includes advanced settings for Job Accounting.
To enable Job Accounting, you must first make the Job Accounting settings.
Settings page opens.
includes the following items for configuration.
Job Accounting
Turn to On to activate Job Accounting.
Job Accounting Access
To execute Job Accounting using network authentication, select Network.
Action Settings
This section includes the following items for configuration:
1. Apply Limit: Select the behavior of processing a job when the maximum print
pages have been reached, from Immediately, Subsequently, and Alert Only.
2. Copier/Printer Count: You can select how the copying and printing page counts
are shown – either the total of both or each of copying and printing individually.
3. Unknown ID Job: Select the behavior of processing a job that has an unknown
account ID or has no account ID, from Permit and Reject.
3. If you have set Job Accounting to On in step 2 above, Default Counter Limit and
Count by Paper Size are displayed.
Note: Only Default Counter Limit is displayed accrding to the machine.
88 Embedded Web Server
Page 93

Management Settings
4. You can configure settings for Default Counter Limit. Enter the initial value for the
counter limit, from 1 to 9999999.
5. Configures Count by Paper Size. If needed, make the following settings for Paper 1 to
5:
1. Paper 1 (to 5): To aggregate printed pages depending on the size, select On.
2. Page Size: Select a paper size to aggregate the printed pages, from the dropdown list.
3. Media Type: Select a media type to aggregate the printed pages, from the drop-
down list.
6. Click Submit button.
Local Job Accounting List
This section includes settings for adding and deleting an account and for departmental
accounting.
Add Account
To aggregate pages by a department or all departments, accounts must be added.
1. Click Add Account icon. The New Account - Property page opens.
2. You can configure settings for Account Property. This section includes the following
items for configuration:
Account Name
Enter the account name.
Account ID
Enter the Account ID.
3. You can configure settings for Restriction.
1. Select how the functionalities are restricted for use, from Off, Counter Limit, and
Reject Usage.
2. Enter the initial value for restricting functionalities, from 1 to 9999999.
4. Click Submit button.
Delete
1. Click the checkbox to the left of the Account ID. To select all items at once, click Check
All.
2. Click Delete icon once.
Counter
1. Click the checkbox to the left of Account ID.
2. Click Counter icon once. The total number of copies accounted for the account is
displayed.
3. You can view the results of accounting.
User Guide 89
Page 94

Management Settings
4. Click Counter button of Other Account or Total Account to view the result accounting.
Printed Pages
From the drop-down list, select Printed Pages by Function, Printed Pages by
Paper Size, or Printed Pages by Layout as needed for assign a limit.
Scanned Page Counts
Shows the total scanned pages of Copy, FAX, and Other Scan.
FAX Counter
Shows the total pages and times of sending faxes.
Counter Reset
Click Reset button to reset the counters.
Other Account
The total number of copies accounted for other account is displayed.
Total Account
Authentication
Settings
1. Click Authentication under Management Settings on the navigation menu. The
2. Click Settings button. The Authentication Settings page opens. This section includes
The total number of copies accounted for all account is displayed.
This section includes advanced settings for authentication.
To enable authentication, you must first make the authentication settings.
Settings page opens.
Note: Administrator Information page opens according to the machine. You can
configure the login user name and password from the page.
the following items for configuration.
General
For Authentication, select one of Off, Local Authentication and Network
Authentication from the drop-down list.
Action Settings
For processing unknown ID jobs, select either Permit or Reject. To configure this,
go to the Job Accounting Settings page.
3. If you have selected Local Authentication in General in step 2 above, switch Local
Authorization On or Off.
If you have selected Network Authentication in General in step 2 above, configure the
following settings.
1. Configure the Network Authentication Server.
90 Embedded Web Server
Page 95

Management Settings
Host Name: Enter the host name or IP address of the network authentication
server. If you use the host name, you must first specify the DNS server information.
Port Number: Enter the port number of the network authentication server.
Server Type: Select the server type from the drop-down list. When you use ID
Card, select Ext..
Default Domain: Click Domain List button to open the Domain List page. Enter
the domain name and click Submit button. If you have entered the several domain
names, you can select it from the drop-down list.
2. Configure the PIN Login Settings. You can configure this setting if you select Ext.
as a server type.
PIN Login: Select On or Off.
3. Configure the Network User Settings.
Obtain Network User Property: Select On or Off.
4. Click Server Settings button to configure the server settings.
LDAP: Confirm that LDAP is set to On. If the setting is Off, switch to On in the
Protocol Settings page under Network Settings.
LDAP Server Name: Enter the LDAP server name or IP address.
LDAP Port Number: Enter the LDAP port number.
Search Timeout: Enter the search timeout in seconds.
LDAP Security: Configure this setting in the Protocol Settings page under Network Settings.
5. Configure the Acquisition of User Information. Enter Name 1, Name 2, or Email Address.
6. Click Submit button.
7. If you configure the Group Authorization Settings, select On in Group
Authorization, and click Group List button.Select the group for authorization, click
Submit button.
4. You can configure settings for Group Authorization Settings.
Group Authorization
Switches Group Authorization On or Off.
Group List
Click Group List button to open the Group List page. Click a group name to authorize from the Group List. The Property page opens.
5. You can configure settings for Group Property.
Group ID
Change the group ID as desired.
Group Name
Change the group name as desired.
Access Level
Select Administrator or User as an access level.
6. You can configure settings for Authorization.
Copy Restriction
Select Off or Reject Usage as desired.
User Guide 91
Page 96

Management Settings
Copy Restriction (Color)
Select Off or Reject Usage as desired.
Copy Restriction (Full Color)
Select Off or Reject Usage as desired.
Print Restriction
Select Off or Reject Usage as desired.
Print Restriction (Full Color)
Select Off or Reject Usage as desired.
Duplex Restriction
Select Off or Permit 2-sided Only as desired.
Combine Restriction
From the drop-down list, select Off, Permit 2 in 1 and 4 in 1 Only, or Permit 4 in 1
Only.
EcoPrint Restriction
Select Off or Permit EcoPrint Only as desired.
Send Restriction
Select Off or Reject Usage as desired.
FAX Restriction
Select Off or Reject Usage as desired.
Storing Restriction in Box
Select Off or Reject Usage as desired.
Storing Restriction in Memory
Select Off or Reject Usage as desired.
7. Click Submit button, and then Back button.
8. You can configure settings for Guest Authorization Settings.
Guest Authorization
Switches Guest Authorization On or Off.
Guest Settings
Click Guest Settings button to configure advanced settings for guests.
9. You can configure settings for Guest Property.
1. User Name: Type a User name.
2. Access Level: Select User if the user is not an administrator.
3. Account Name: From the drop-down list that is displayed by clicking Account
List button, select an account name followed by Submit button.
92 Embedded Web Server
Page 97

4. Click Submit button.
10. You can configure settings for Authorization.
Copy Restriction
Select Off or Reject Usage as desired.
Copy Restriction (Color)
Select Off or Reject Usage as desired.
Copy Restriction (Full Color)
Select Off or Reject Usage as desired.
Print Restriction
Select Off or Reject Usage as desired.
Print Restriction (Full Color)
Select Off or Reject Usage as desired.
Management Settings
Duplex Restriction
Select Off or Permit 2-sided Only as desired.
Combine Restriction
From the drop-down list, select Off, Permit 2 in 1 and 4 in 1 Only, or Permit 4 in 1
Only.
EcoPrint Restriction
Select Off or Permit EcoPrint Only as desired.
Send Restriction
Select Off or Reject Usage as desired.
FAX Restriction
Select Off or Reject Usage as desired.
Storing Restriction in Box
Select Off or Reject Usage as desired.
Storing Restriction in Memory
Select Off or Reject Usage as desired.
11. Click Submit button, and then Back button.
12. You can configure settings for Unknown User Settings.
Unknown ID Job
For processing unknown ID jobs, select either Permit or Reject.
User Guide 93
Page 98

Management Settings
13. You can configure settings for Unknown User Property.
14. You can configure settings for Authorization.
Unknown User Settings
Click Unknown User Settings button. The Unknown User-Property page opens.
User Name
Change the user name as desired.
Account Name
Click Account List button to open the Account page. Select an account and click
Submit button.
Note: Account Name is displayed when Job Accounting is seto to On.
Print Restriction
Select Off or Reject Usage as desired.
Print Restriction (Full Color)
Select Off or Reject Usage as desired.
15. Click Submit button, and then Back button.
16. You can configure settings for Simple Login Settings.
Simple Login
Switches Simple Login On or Off.
Simple Login Key List
Click Simple Login Key List button to open the Simple Login Key List page.
17. Click Settings button of Key 1 (to 20). Configure the following settings as necessary.
Display Name
Enter the user name displayed on the Simple Login Key List.
Icon
Select the user icon displayed on the Simple Login Key List from the drop-down list.
Password
Select On or Off.
Authentication
For Authentication, select one of Local Authentication and Network Authentication from the drop-down list.
User
When selecting Local Authentication from Authentication drop-down list, click
User List button to open the User List page. Select the user from the list and click
Submit button.
94 Embedded Web Server
Page 99

Login User Name
When selecting Network Authentication from Authentication drop-down list,
enter the login user name to access the authentication server.
Login Password
When selecting Network Authentication from Authentication drop-down list,
enter the login password to access the authentication server.
Domain
When selecting Network Authentication from Authentication drop-down list,
select the domain from the drop-down list.
18. Click Submit button, and then Back button.
Local User List
The user information can be added or modified on the local user list.
Add User
Management Settings
This adds a new user. Up to 1000 users can be registered.
1. Click Add User icon. The New User - Property page opens.
2. You can configure settings for User Property. This section includes the following items
for configuration:
User Name
Enter the name displayed on the user list (up to 32 characters).
Login User Name
Enter the user ID to log in (up to 64 characters). You cannot duplicate a login user
name to register.
Password
Enter the password to log in (up to 64 characters).
Confirm Password
To confirm the password, enter the same password that was entered in Password.
Access Level
Select either Administrator or User for privilege.
Account Name
From the drop-down list that is displayed by clicking Account List button, select an
account name followed by Submit button.
E-mail Address
Add a user's e-mail address. To enable sending e-mail, add your e-mail address.
The e-mail address will be automatically selected whenever an e-mail notice is
required by functionality.
User Guide 95
Page 100

Management Settings
Language
Select either English, Deutsch, Français, Español, Italiano, Nederlands or
РУССКИЙ for the user interface language, from the drop-down list.
Default Screen
Select an item for the default screen from the drop-down list.
Default Screen (Send/FAX)
In Default Screen (Send/FAX), when clicking FAX or Send to open a drop-down
list, this item appears. Select either Destination, Machine Address Book or Exter-
naml Address Book from the drop-down list.
Note: If the optional fax kit is not installed, Default Screen (Send) appears.
Address Book may appear instead of Machine Address Book according to the
machine type.
Address Book Type
In Default Screen (Send/FAX), click Address Book to open a drop-down list.
Select either Machine Address Book or External Address Book.
Note: Ext Address Book1(to 4) reflects the external address book names configured on the External Address Book 1(to 4) Settings page.
ID Card
Authorization
Configure settings for Authorization by referring step 7 of Settings on page 90.
3. Click Submit button.
Delete
1. Click the checkbox to the left of the user name. To select all items at once, click Check
All icon.
2. Click Delete icon once.
This section includes advanced settings for ID Card authentication.
ID Card Settings
To use the ID Card authentication, you must first make the ID Card settings.
1. Click ID Card under Management Settings on the navigation menu. The ID Card
Settings page opens.
2. Configure the Authentication Settings.
Keyboard Login
For keyboard login, select Prohibit or Permit.
Additional Authentication
Select Off, Use Password or Use PIN.
Note: Password Authentication appears instead of Additional Authentication
according to the machine type. Select On to use the password authentication.
96 Embedded Web Server
 Loading...