

Page 1

15. ELECTRICAL EQUIPMENT
15-0
YUP 5 0
15
__________________________________________________________________________________
__________________________________________________________________________________
__________________________________________________________________________________
__________________________________________________________________________________
__________________________________________________________________________________
ELECTRICAL EQUIPMENT
__________________________________________________________________________________
SERVICE INFORMATION........................................................ 15- 1
TROUBLESHOOTING.............................................................. 15- 1
CHARGING SYSTEM............................................................... 15- 3
BATTERY................................................................................ 15- 4
IGNITION SYSTEM ................................................................. 15- 7
STARTING SYSTEM................................................................ 15-11
15
Page 2
15. ELECTRICAL EQUIPMENT
15-1
YUP 5 0
SERVICE INFORMATION
GENERAL INSTRUCTIONS
• It is not necessary to check the battery electrolyte or fill with distilled water.
• Remove the battery from the motorcycle for charging. Do not remove the electrolyte cap..
• Do not quick charge the battery. Quick charging should only be done in an emergency..
• Charge the battery according to the charging current and time specified on the battery.
• When charging, check the voltage (open voltage) with an electric tester.
• When replacing the battery, do not use a traditional battery.
SPECIFICATIONS
YUP 50
Capacity
12V3AH
Voltage
13.0_ 13.2V
Charging
Standard
0.4A/5H~10H
Battery
current
Quick
4A/0.5H
Spark plug
(NGK)
BR8HSA
Spark plug gap
0.6_ 0.7mm
Primary coil
0.2_ 0.3Ω
Secondary coil
(with plug cap)
7.0_ 8.4KΩ
Ignition coil resistance
Secondary coil
(without plug cap)
2.5_ 3.2KΩ
Pulser coil resistance (20¢J)
80_ 160Ω
Ignition timing
13.5°±1.5°BTDC/3000rpm
TROUBLESHOOTING
CHARGING SYSTEM
No power Intermittent power
• Dead battery • Loose battery cable connection
• Disconnected battery cable • Loose charging system connection
• Fuse burned out • Loose connection or short circuit in ignition system
• Faulty ignition switch • Loose connection or short circuit in lighting system
Low power Charging system failure
• Weak battery • Loose, broken or shorted wire or connector
• Loose battery connection • Faulty regulator/rectifier
• Charging system failure • Faulty A.C. generator
• Faulty regulator/rectifier
Page 3

15. ELECTRICAL EQUIPMENT
15-2
YUP 5 0
IGNITION SYSTEM
No spark at plug Engine starts but turns poorly
• Faulty spark plug • Ignition primary circuit
• Poorly connected, broken or shorted wire —Faulty ignition coil
—Between A.C. generator and CDI unit —Poorly connected wire or connector
—Between CDI unit and ignition coil • Ignition secondary circuit
—Between CDI unit and ignition switch —Faulty ignition coil
—Between ignition coil and spark plug —Faulty spark plug
• Faulty ignition switch —Poorly insulated plug cap
• Faulty ignition coil • Improper ignition timing
• Faulty CDI unit —Battery voltage too low (6V max.)
• Faulty A.C. generator —Faulty CDI unit
STARTING SYSTEM
Starter motor won‘t turn Lack of power
• Fuse burned out • Weak battery
• Weak battery • Loose wire or connection
• Faulty ignition switch • Foreign matter stuck in starter motor
• Faulty starter switch
or pinion
• Faulty front or rear stop switch
Starter motor rotates but engine does
• Faulty starter relay not start
• Poorly connected, broken or shorted wire • Faulty starter pinion
• Faulty starter motor • Starter motor rotates reversely
• Faulty starter clutch
• Weak battery
Page 4
15. ELECTRICAL EQUIPMENT
15-3
YUP 5 0
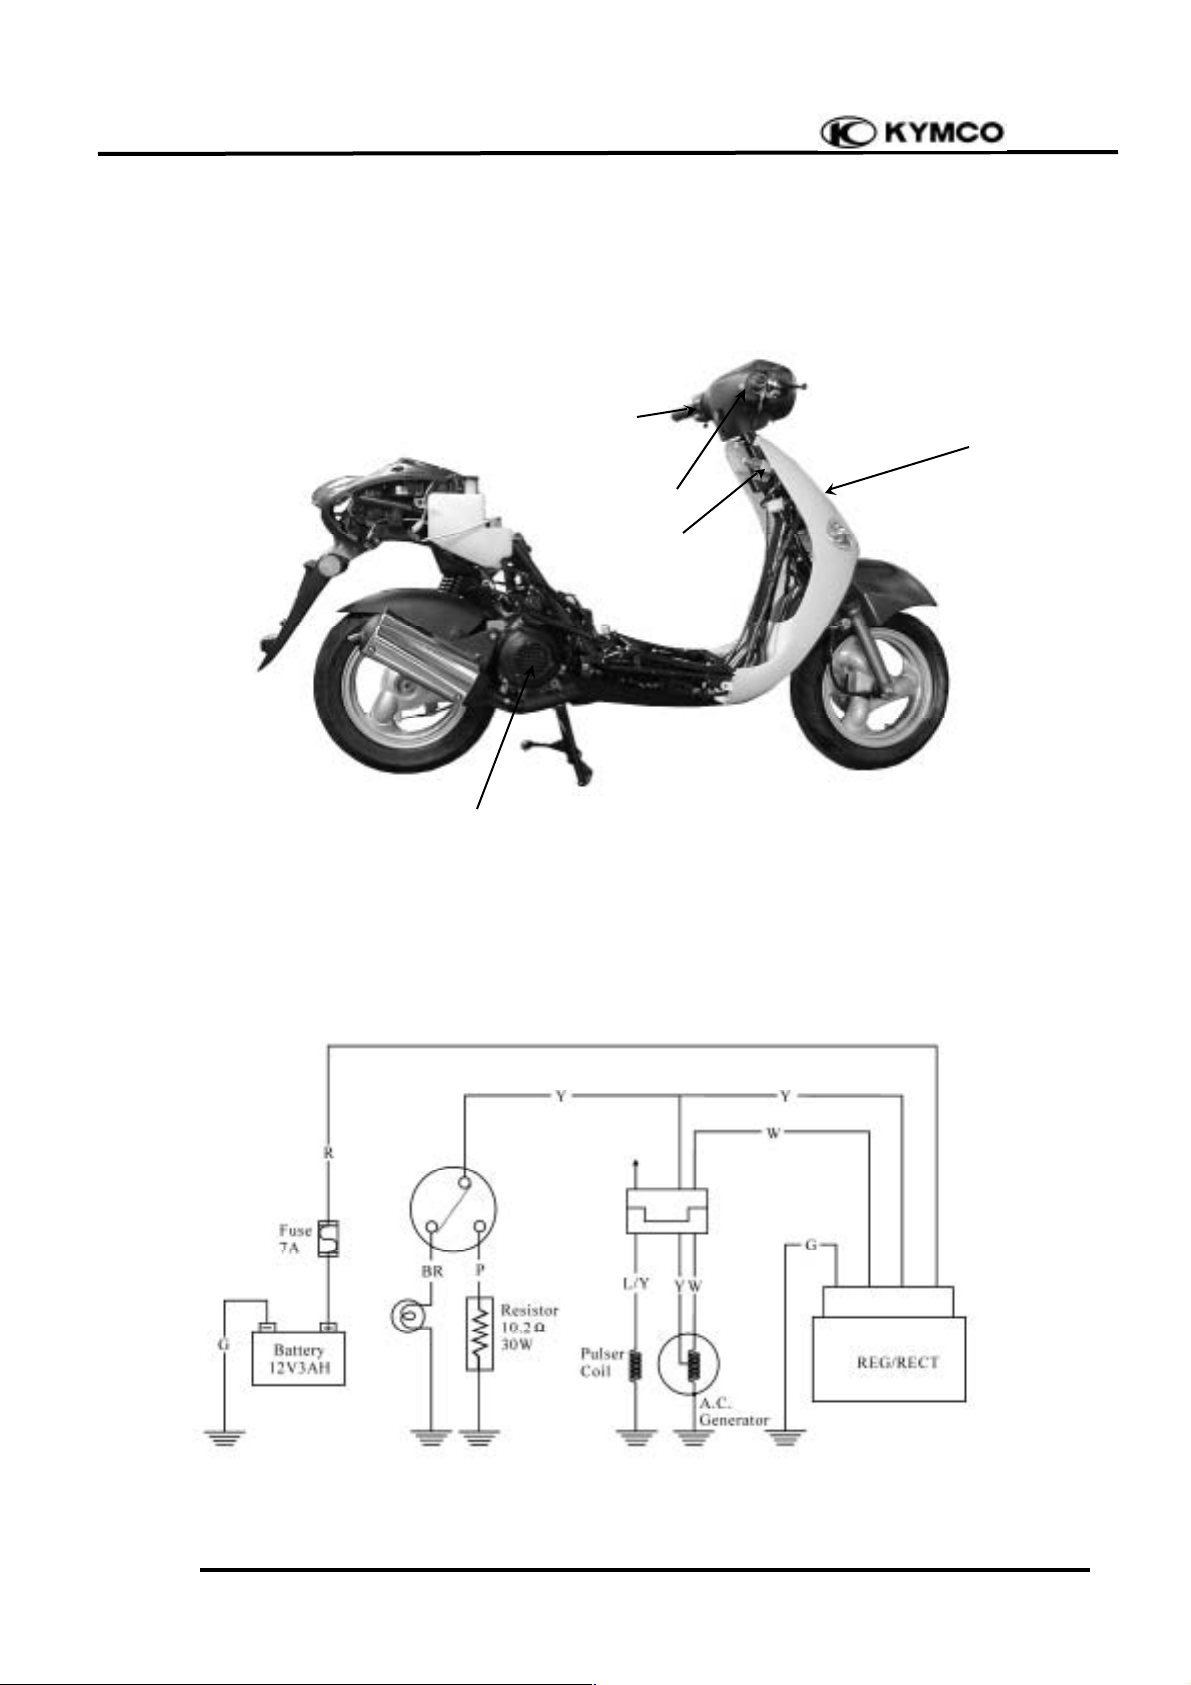
CHARGING SYSTEM
A.C. Generator
Dimmer Switch
Headlight Switch
Resistor
Ignition Switch
Page 5

15. ELECTRICAL EQUIPMENT
15-4
YUP 5 0
BATTERY
BATTERY REMOVAL
Open the battery cover.
Disconnect the battery cables .
Remove the battery.
The installation sequence is the reverse of
removal
BATTERY CHARGING (OPEN CIRCUIT
VOLTAGE) INSPECTION
Remove the battery cover and disconnect the
battery cables.
Measure the voltage between the battery
terminals.
Fully charged : 13.0V_ 13.2V
Undercharged : 12.3V max.
CHARGING METHOD
Connect the charger positive (+) cable to the
battery positive (+) cable.
Connect the charger negative (-) cable to the
battery negative (-) cable.
Charging current : Standard : 0.4A
Quick : 4A
Charging time : Standard : 5 hours
Quick : 0.5 HOUR
After charging: Open circuit voltage: 12.8V min.
Battery charging inspection must be
performed with an electric tester.
°Ø
• Quick charging should only be done in
an emergency.
• During quick charging, the battery
temperature should not exceed 45¢J.
• Measure the voltage 30 minutes after
the battery is charged.
°Ø
• Keep flames and sparks away
from a charging battery.
• Turn power ON/OFF at the
charger, not at the battery terminals to
prevent sparks near the battery.
• Charge the battery according to
the current specified on the battery
surface.
°Ø
First disconnect the battery negative (-)
cable and then the positive (+) cable.
°Ø
Battery
Red
Black
Battery
Page 6

12. FRAME COVERS
15-5
PERFORMANCE TEST
Warm up the engine.
Remove the floor mat and front tool box cover.
Stop the engine and open the fuse box.
Disconnect the wire lead from the fuse
terminal. Connect an ammeter between the
wire lead and fuse terminal as shown.
Connect the battery positive (+) terminal to the
voltmeter positive (+) probe and battery
negative (-) terminal to the voltmeter negative () probe.
Start the engine, gradually increase engine speed
to test the output:
Position
RPM
Day
Night
2500
1.3A min.
1.0A min.
6000
2.0A min.
2.0A min.
Charging Limit Voltage: 14.5±0.5V/8000rpm
If the limit voltage is not within the specified
range, check the regulator/ rectifier.
A.C. GENERATOR (CHARGING
COIL) INSPECTION
Remove the met-in box. (12-4)
Disconnect the A.C. generator connector.
Measure the resistances between the charging
coil terminals (white–green) and lighting coil
terminals (yellow–green).
Resistances:
Charging coil
white–green
0.2_ 8.0Ω
Lighting coil
yellow–green
0.3_ 5.0Ω
Refer to 7-3 for A.C. generator removal.
Use a fully charged battery to check the
charging system output.
°Ø
Inspect with the engine installed.
°Ø
A.C. Generator Connector
Page 7

15. ELECTRICAL EQUIPMENT
15-6
YUP 5 0
RESISTOR INSPECTION
Remove the frame front cover. (12-3)
Measure the resistance between the resistor B
pink wire and ground.
Measure the resistance between the resistor A
green/black wire and ground.
Resistances:
Resistor A: 9.9_ 12.0Ω
Resistor B: 5.6_ 7.2Ω
REGULATOR/RECTIFIER
INSPECTION
Remove the front cover. (12-3)
Disconnect the regulator/rectifier wire coupler
and remove the nut to remove the
regulator/rectifier.
Measure the resistances between the terminals.
Replace the regulator/rectifier if the readings are
not within the specifications in the table below.
Model
Brand
Range
SP-10D
Sanwa
KΩ
TH-5H
Kowa
100Ω
Probe⊕
Probe(-)
A (R)
B (W)
C (Y)
D (G)
A (R)°€°€
°€
B (W)
2-10KΩ
°€
°€
C (Y)°€°€
10-35KΩ
D (G)
°€
°€
10-35KΩ
• Due to the semiconductor in circuit, it
is necessary to use a specified tester
for accurate testing. Use of an
improper tester in an improper range
may give false readings.
°Ø
Faulty resistor is the cause of faulty
operation of the auto bystarter.
°Ø
Coupler
A (Red)
C (Yellow)
D (Green)
B (White)
Resister A
Resister B
Regulator/Rectifier
Nut
Page 8

12. FRAME COVERS
15-7
IGNITION SYSTEM
Ignition Coil
Pulser Coil
Ignition Switch
Spark Plug
A.C. Generator (Exciter Coil)
Page 9

15. ELECTRICAL EQUIPMENT
15-8
YUP 5 0
IGNITION COIL INSPECTION
Continuity Test
Remove the met-in box. (12-4)
Measure the resistance between the ignition
coil primary coil terminals.
Resistance (20¢J ): 0.153_ 0.187Ω
Measure the secondary coil resistance between
the spark plug cap and the primary coil
terminal as Figure A shown.
Resistance (20¢J ) (with plug cap):
7.0_ 8.4KΩ
Measure the secondary coil resistance between
the ignition coil terminal and the primary coil
terminal as Figure B shown.
Resistance (20¢J) (without plug cap):
2.5_ 3.2KΩ
This test is to inspect the continuity of
ignition coil.
°Ø
Figure A
Figure B
Ignition Coil
Green
Black
Page 10

12. FRAME COVERS
15-9
Performance Test
Remove the ignition coil.
Inspect the ignition coil with an ignition coil
tester.
1. Turn the changeover switch to 12V and
connect the ignition coil to the tester.
2. Turn the power switch ON and check the
spark from the watch window.
_Good : Normal and continuous spark
_Faulty : Weak or intermittent spark
A.C. GENERATOR
Exciter Coil/Pulser Coil Inspection
Remove the met-in box. (12-4)
Disconnect the A.C. generator wire connector.
Measure the pulser coil resistance between the
blue/yellow wire and ground.
Resistance (20¢J ): 100_ 150Ω
This test is performed with the stator
installed in the engine.
°Ø
Follow the ignition coil tester manufacturer‘s instructions.
°Ø
The test is performed at both conditions
that the ignition coil is cold and hot.
°Ø
Ignition Coil
Blue/Yellow
Page 11

15. ELECTRICAL EQUIPMENT
15-10
YUP 5 0
CDI UNIT INSPECTION
Remove the battery cover.
Disconnect the CDI coupler and remove the
CDI unit.
CDI CIRCUIT INSPECTION
Measure the resistance between the terminals.
Replace the CDI unit if the readings are not
within the specifications in the table below.
Use the x KΩ range for the Sanwa Tester.
Use the x 100Ω range for the Kowa Tester.
Unit: KΩ
Probe⊕
(-)Probe
Black/
Yellow
Black/
Red
Black/
White
Blue/
Yellow
Green
Black/
Yellow
°€°€°€
°€
Black/
Red
°€
1-10°€°€
Black/
White
°€°€°€
°€
Blue/
Yellow
°€
3-40
80-120
10-30
Green
°€
2-10
10-30
°€
• Due to the semiconductor in circuit, it is
necessary to use a specified tester for
accurate testing. Use of an improper
tester in an improper range may give
false readings.
• Use a Sanwa Electric Tester or Kowa
Electric Tester (TH-5H).
• In this table, “Needle swings then
returns” indicates that there is a charging
current app lied to a condenser. The needle
will then remain at “°€ ” unless the
condenser is discharged.
°Ø
CDI Unit
Blue/ Yellow
Green
Black/ Yellow
Black/ Red
Coupler
Black/
White
Page 12

12. FRAME COVERS
15-11
STARTING SYSTEM
Starter Button
Starter Motor
Ignition Switch
Page 13

15. ELECTRICAL EQUIPMENT
15-12
YUP 5 0
STARTER RELAY INSPECTION
Remove the rear fender.
Disconnect the starter relay coupler and then
remove the starter relay.
Connect the starter relay green/yellow terminal
to the 12V battery positive (+) terminal and the
relay yellow/red terminal to the battery
negative (-) terminal. Check for continuity
between the starter relay red and red/white
terminals. The relay is normal if there is
continuity.
STARTER MOTOR REMOVAL
Disconnect the starter motor cable.
Remove the two bolts attaching the starter
motor and remove the starter motor.
The installation sequence is the reverse of
removal.
Starter Relay
Green/Yellow
Starter Motor
Red/White
Bolts
Yellow/Red
Red
 Loading...