

Kymco MO X500 Service Manual - chap 03 (manutenzione)

3. INSPECTION/ADJUSTMENT
XCITING 500
3
__________________________________________________________________________________
__________________________________________________________________________________
__________________________________________________________________________________
INSPECTION/ADJUSTMENT
__________________________________________________________________________________
SERVICE INFORMATION-------------------------------------------------- 3- 1
MAINTENANCE SCHEDULE---------------------------------------------- 3- 3
FUEL LINE--------------------------------------------------------------------- 3- 5
THROTTLE OPERATION--------------------------------------------------- 3- 5
AIR CLEANER ---------------------------------------------------------------- 3- 6
CRANKCASE BREATHER ------------------------------------------------- 3- 7
SPARK PLUG------------------------------------------------------------------ 3- 7
VALVE CLEARANCE------------------------------------------------------- 3- 9
ENGINE OIL------------------------------------------------------------------- 3-10
ENGINE OIL FILTER CARTRIDGE -------------------------------------- 3-13
ENGINE IDLE SPEED ------------------------------------------------------- 3-14
RADIATOR COOLANT ----------------------------------------------------- 3-15
COOLING SYSTEM---------------------------------------------------------- 3-16
SECONDARY AIR SUPPLY SYSTEM ----------------------------------- 3-17
TRANSMISSION OIL-------------------------------------------------------- 3-17
BRAKE FLUED --------------------------------------------------------------- 3-18
BRAKE PAD WEAR --------------------------------------------------------- 3-19
BRAKE SYSTEM ------------------------------------------------------------- 3-19
BRAKE LOCK OPERATION -----------------------------------------------3-20
HEADLIGHT AIM-------------------------------------------------------------3-21
SIDE STAND---------- ---------------------------------------------------------3-22
SUSPENSION-------------------------------------------------------------------3-22
NUTS, BOLTS, FASTENERS------------------------------------------------3-23
WHEELS/TIRES--------------------------------------------------------- ------3-23
STEERING HEAD BEARINGS----------------------------------------------3-24
3
3-0

3. INSPECTION/ADJUSTMENT
y
XCITING 500
SERVICE INFORMATION
GENERAL
Place the scooter on al level ground before starting any work.
Gasoline is extremely flammable and is explosive under certain conditions.
Work in a well ventilated area. Smoking or allowing flames or sparks in the work area or where
the gasoline is stored can cause a fire or explosion.
If the engine must be running to do some work, make sure the area is well ventilated. Never run
the engine in an enclosed area.
The exhaust contains poisonous carbon monoxide gas that may cause loss of consciousness and
may lead to death. Run the engine in an open area or with an exhaust evacuation sustem in and
enclosed area.
SPECIFICATIONS
ITEM SPECIFICATIONS
Throttle free play 2-6 mm (1/16 – 1/4 in)
Spark plug NGK CR8E
Spark plug gap 0.6 – 0.7 mm (0.024 – 0.028 in)
IN 0.1 mm (0.004 in)Valve clearance
EX 0.1 mm (0.004 in)
At draining 2.0 liter (2.1 US pt, 1.8 lmp qt)
Engine oil capacity
Recommended engine oil
Engine idle speed 1400±100 rpm
Final reduction oil capacit
Recommended final reduction oil SAE 90
Recommended brake fluid DOT 4
Parking brake lever stroke 3 – 6 notch
Tire size
Tire air pressure
Minimum tire tread depth
At draining/oil filter change 2.1 liter (2.2 US pt, 1.9 lmp qt)
Total amount 2.5 liter (2.6 US pt, 2.3 lmp qt)
KYMCO 4-stroke oil or equivalent
motor oil API service classification: SJ
Viscosity: 5W50
At draining 0.45 liter (0.48 US pt, 0.4 lmp qt)
Total amount 0.55 liter (0.57 US pt, 0.5 lmp qt)
Front 120/70-15
Rear 150/70-14
Solo riding
Two up riding
Front 200 kPa (2 kgf/cm2, 29 psi)
Rear 250 kPa (2.5 kgf/cm
Front 225 kPa (2.25 kgf/cm2, 32 psi)
Rear 250 kPa (2.5 kgf/cm
2
, 36 psi)
2
, 36 psi)
Front 1.6 mm (0.06 in)
Rear 2.0 mm (0.08 in)
3-1

3. INSPECTION/ADJUSTMENT
TORQURE VALUES
Engine oil drain plug 25 N•m (2.5 kgf•m, 18 lbf•ft)
Oil strainer screen cap 15 N•m (1.5 kgf•m, 11 lbf•ft)
Apply oil to the threads and seating surface.
Oil filter cartridge 10 N•m (1 kgf•m, 7 lbf•ft)
Apply oil to the threads and seating surface.
Transmission oil drain bolt 24 N•m (2.4 kgf•m, 18 lbf•ft)
Transmission oil filler bolt 24 N•m (2.4 kgf•m, 18 lbf•ft)
Spark plug 12 N•m (1.2 kgf•m, 9 lbf•ft)
Tappet adjust nut 9 N•m (0.9 kgf•m, 6 lbf•ft)
SPECIAL TOOLS
Tappet adjuster E036
Oil filter cartridge wrench E052
XCITING 500
3-2
3. INSPECTION/ADJUSTMENT
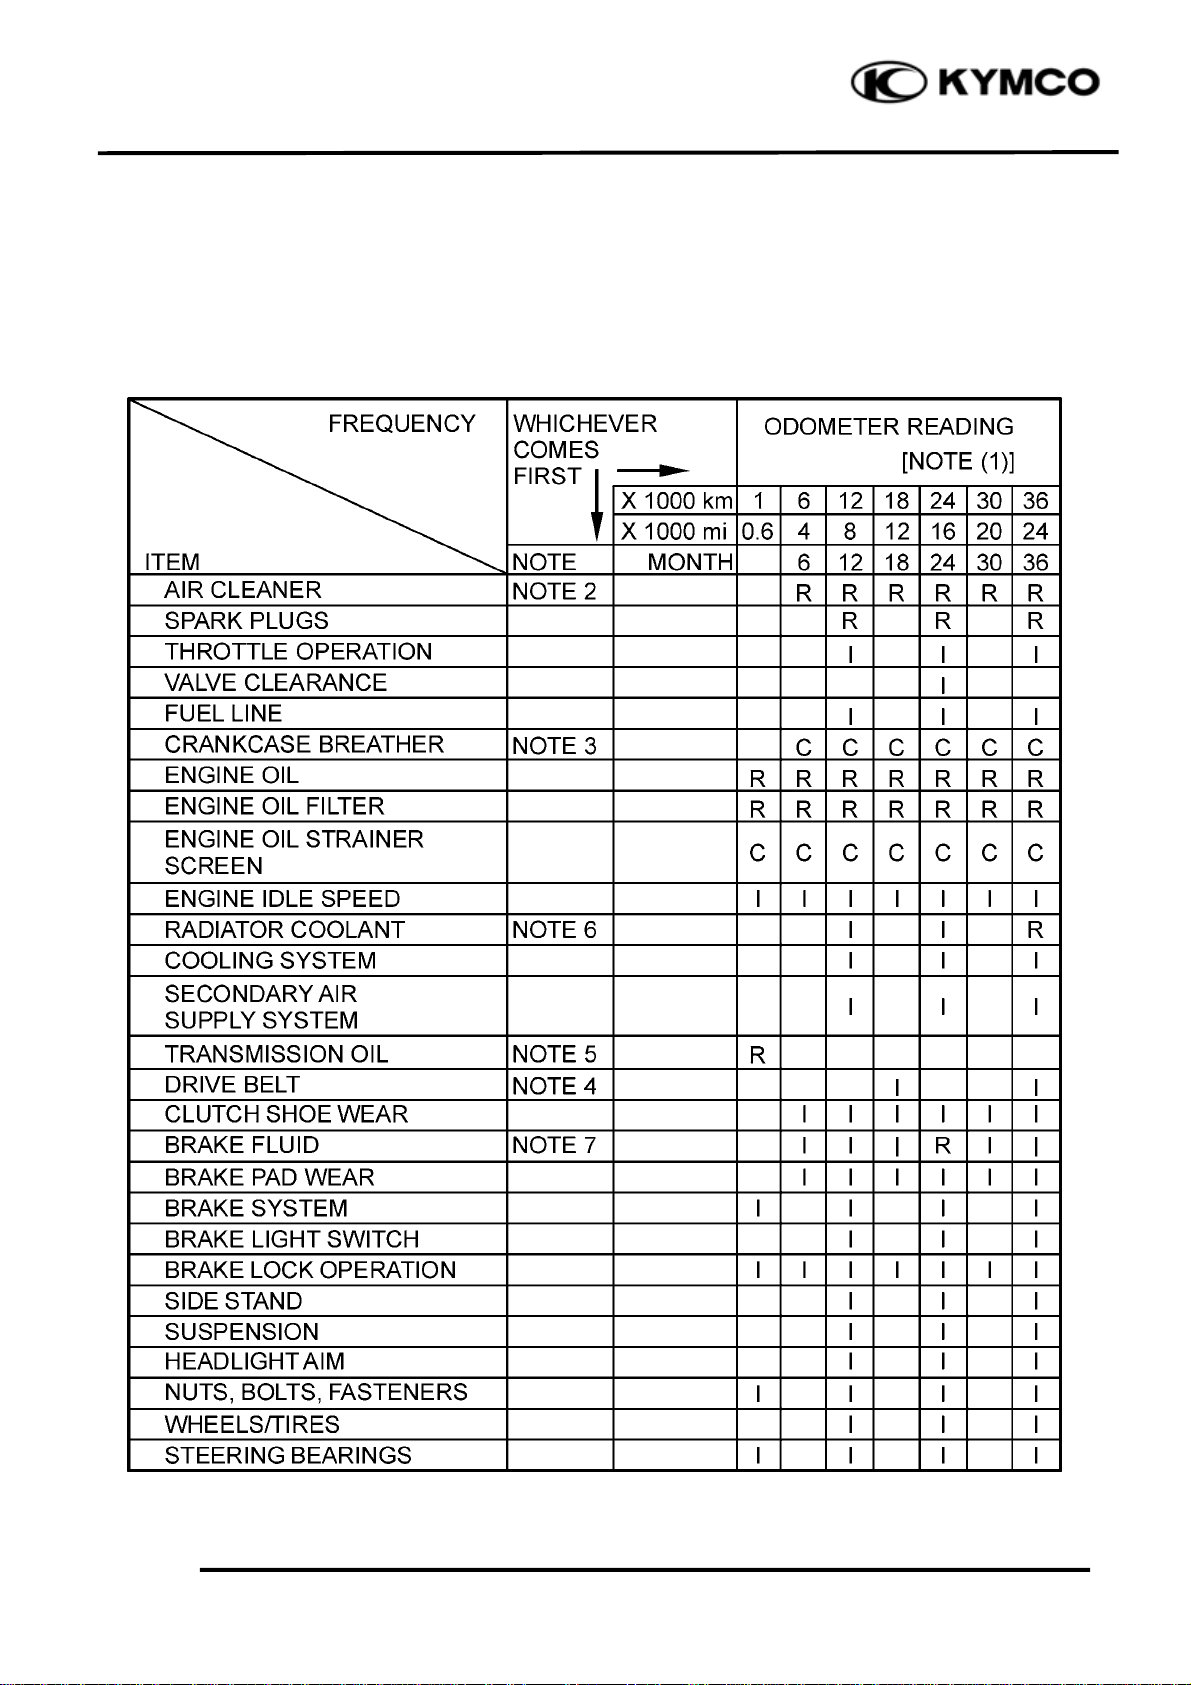
MAINTENANCE SCHEDULE
Perform the pre-ride inspection in the owner’s manual at each scheduled maintenance period.
This interval should be judged by odometer reading or months, whichever comes first.
I: INSPECT AND CLEAN, ADJUST, LUBRICATE OR REPLACE IF NECESSARY
C: CLEAN R: REPLACE A: ADJUST L: LUBRICATE
XCITING 500
3-3

3. INSPECTION/ADJUSTMENT
NOTE:
1 At higher odometer readings, repeat at the frequency interval established here.
2 Service more frequently if the scooter is ridden in unusually wet or dusty areas.
3 Service more frequently when riding in rain or at full throttle.
4 Inspect every 18000 km (12000 mi) after replacement.
5 Replace every 1 year, or every 10000km (6000mi), whichever comes first.
6 Replace every 2 year, or at indicated odometer interval, whichever comes first.
7 Replace every 2 years. Replacement requires mechanical skill.
XCITING 500
3-4
3. INSPECTION/ADJUSTMENT
r
r
FUEL LINE
Remove the floorboard. (
Check the fuel lines for deterioration, damage
or leakage. Replace the fuel line if necessary.
*
• Do not smoke or allow flames o
sparks in your working area.
FUEL FILTER
Visually check the fuel filter. If accumulation
of sediment or clogging is found, replace the
fuel filter with a new one.
page 2-6
THROTTLE OPERATION
Check for smooth throttle grip full opening
and automatic full closing in all steering
positions.
Check the throttle cables and replace them if
they are deteriorated, kinked or damaged.
Lubricate the throttle cables, if throttle
operation is not smooth.
).
XCITING 500
Fuel Lines
Fuel Filte
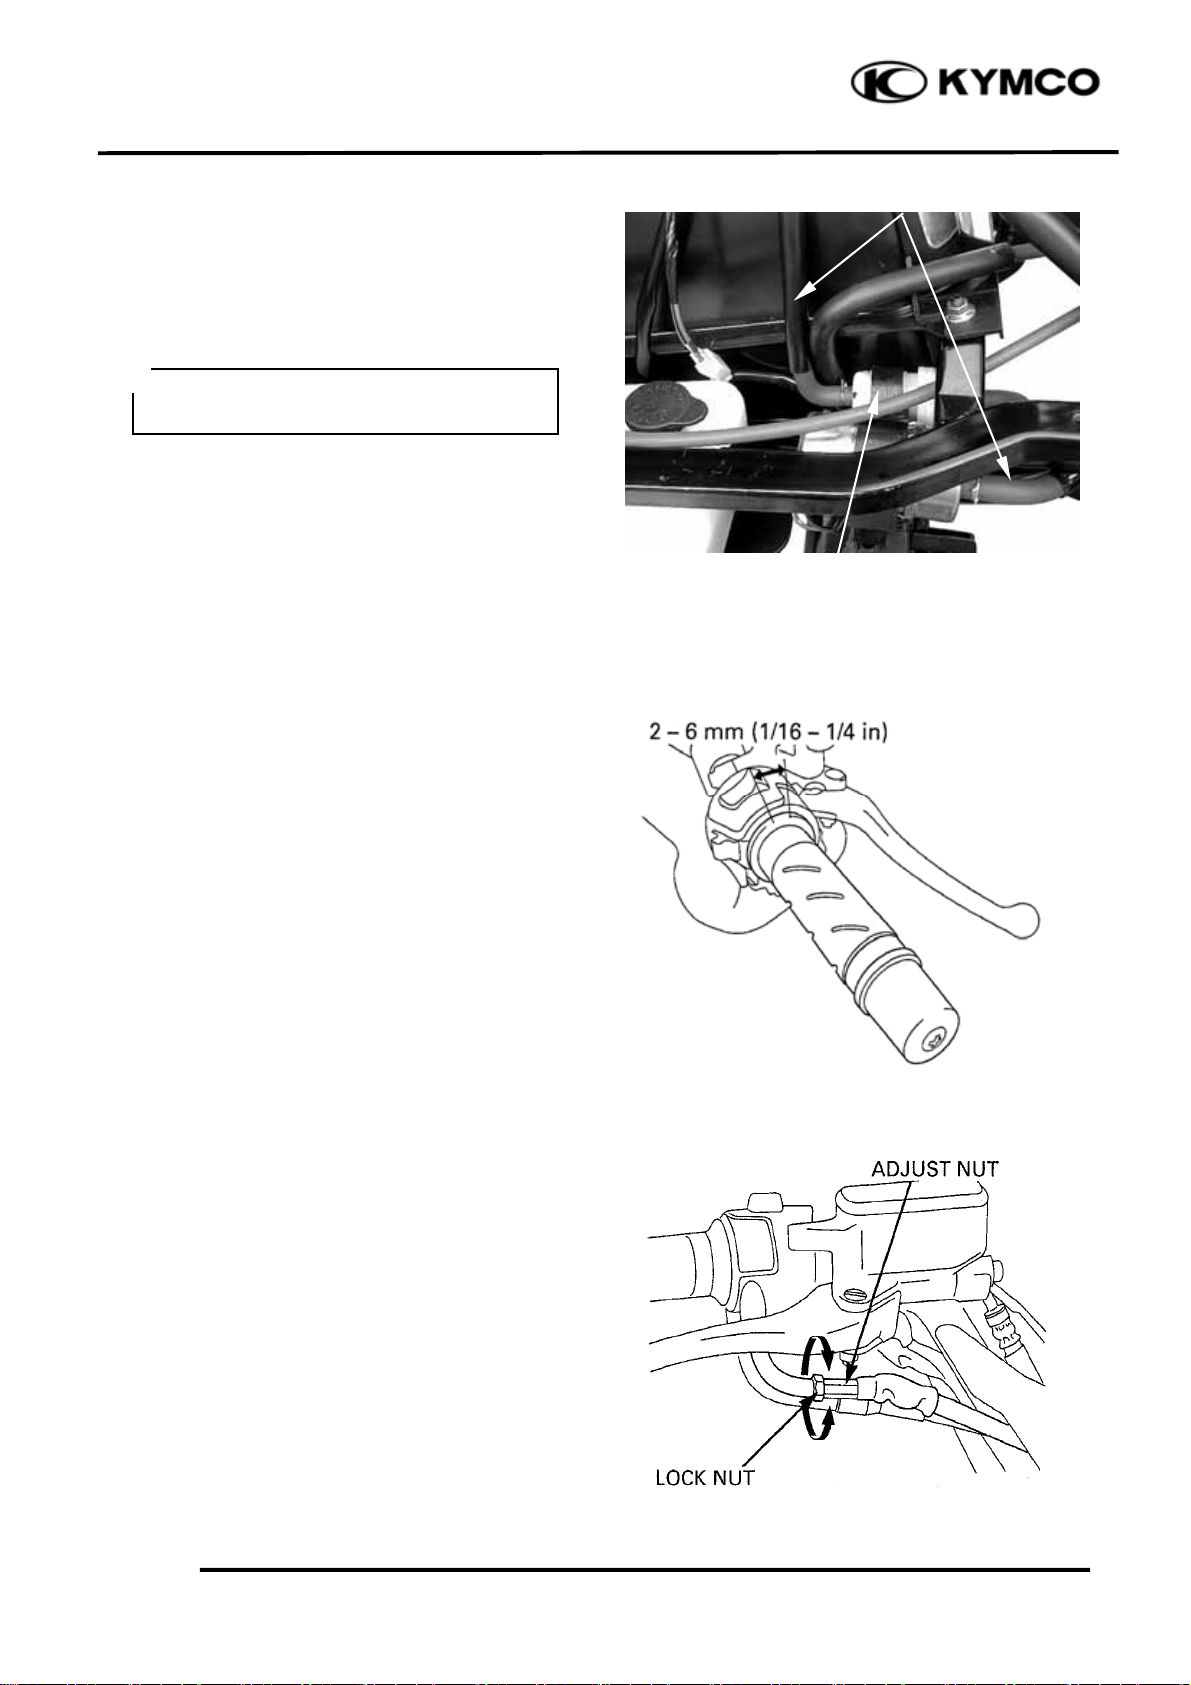
Measure the throttle grip free play.
Free Play: 2~6 mm (1/16~1/4 in)
Throttle grip free play can be adjusted at
either end of the throttle cable.
Minor adjustment is made with the upper
adjuster.
Slide the rubber sleeve back to expose the
throttle cable adjuster.
Adjust the free play by loosening the lock nut
and turning the adjuster.
3-5
3. INSPECTION/ADJUSTMENT
r
r
t
t
XCITING 500
Major adjustments are made with the lower
adjuster.
Remove the seat luggage box (page 2-3).
Adjust the free play by loosening the lock nut
and turning the adjuster.
After adjustment, tighten the lock nut
securely.
Recheck the throttle operation.
Replace any damaged parts, if necessary.
AIR CLEANER
The air cleaner should be serviced at regular
intervals. Service more frequently when
riding in unusually wet or dusty areas.
Adjust Nu
Lock Nu
Unlock the seat with the ignition key.
Open the seat.
Remove the air cleaner cover.
Remove the screws and air cleaner housing
cover
Air Cleaner Cove
Air Cleaner Housing Cove
3-6

3. INSPECTION/ADJUSTMENT
t
Remove the air cleaner element by pull it out.
Discard the air cleaner element.
Install a new air cleaner element. Use the
KYMCO genuine air cleaner element or an
equivalent air cleaner element specified for
your model. Using the wrong. KYMCO air
cleaner element or a non-KYMCO air cleaner
which is not of equivalent quality may cause
premature engine wear or performance
problems.
Install the removed parts in the reverse order
of removal.
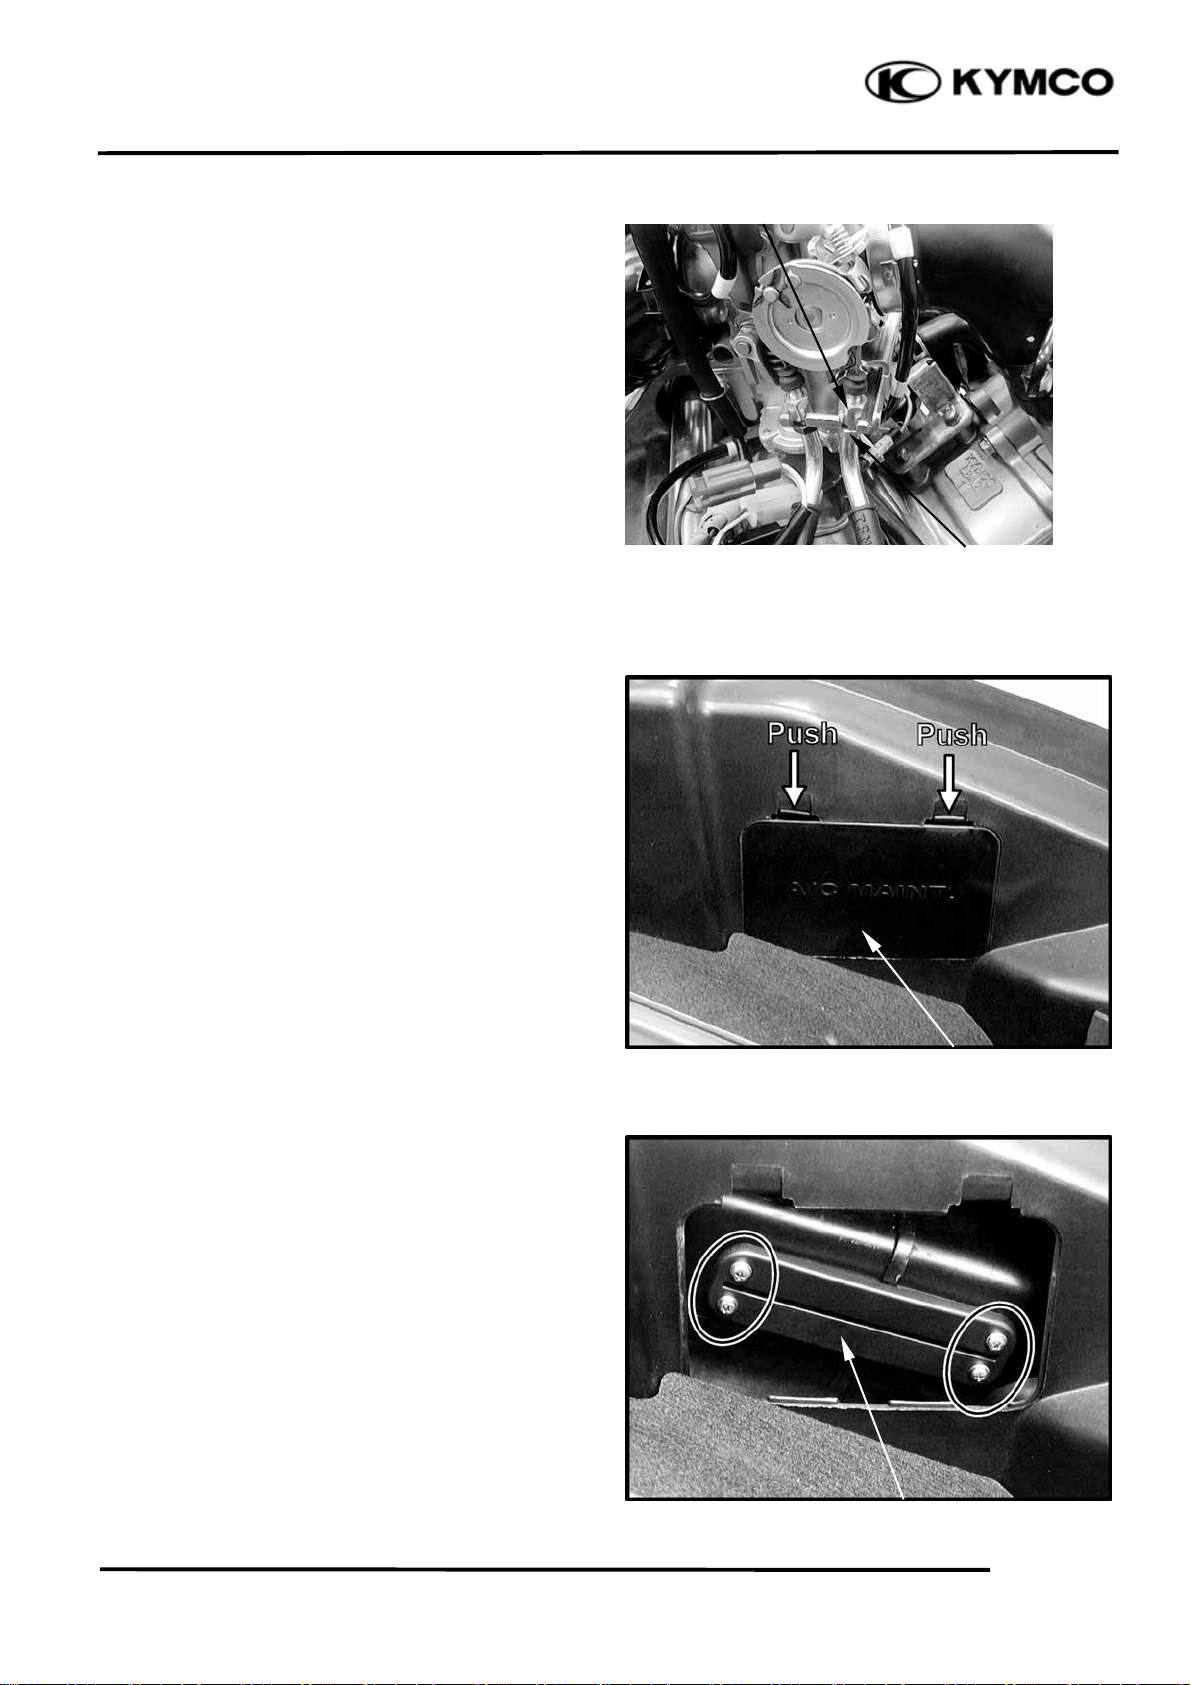
CRANKCASE BREATHER
XCITING 500
Screws
Air Cleaner Elemen
Remove the crankcase breather tube plug
from the tube and drain deposits into a
suitable container.
Reinstall the crankcase breather tube plug.
Service more frequently when riding in rain,
at full throttle, or after the scooter is washed
or overturned. Service if the deposit level can
be seen in the transparent section of the drain
tube.
SPARK PLUG
REMOVAL
Remove the spark plug maintenance lid (page
2-4).
Disconnect the spark plug cap and clean
around the spark plug base.
*
Clean around the spark plug base with
compressed air before removing, and be
sure that no debris is allowed to enter the
combustion chamber.
3-7
Spark Plug Cap
 Loading...