

Page 1
13. REAR WHEEL/REAR BRAKE/
REAR SUSPENSION
13-0
PEO PLE 12 5/ 15 0
13
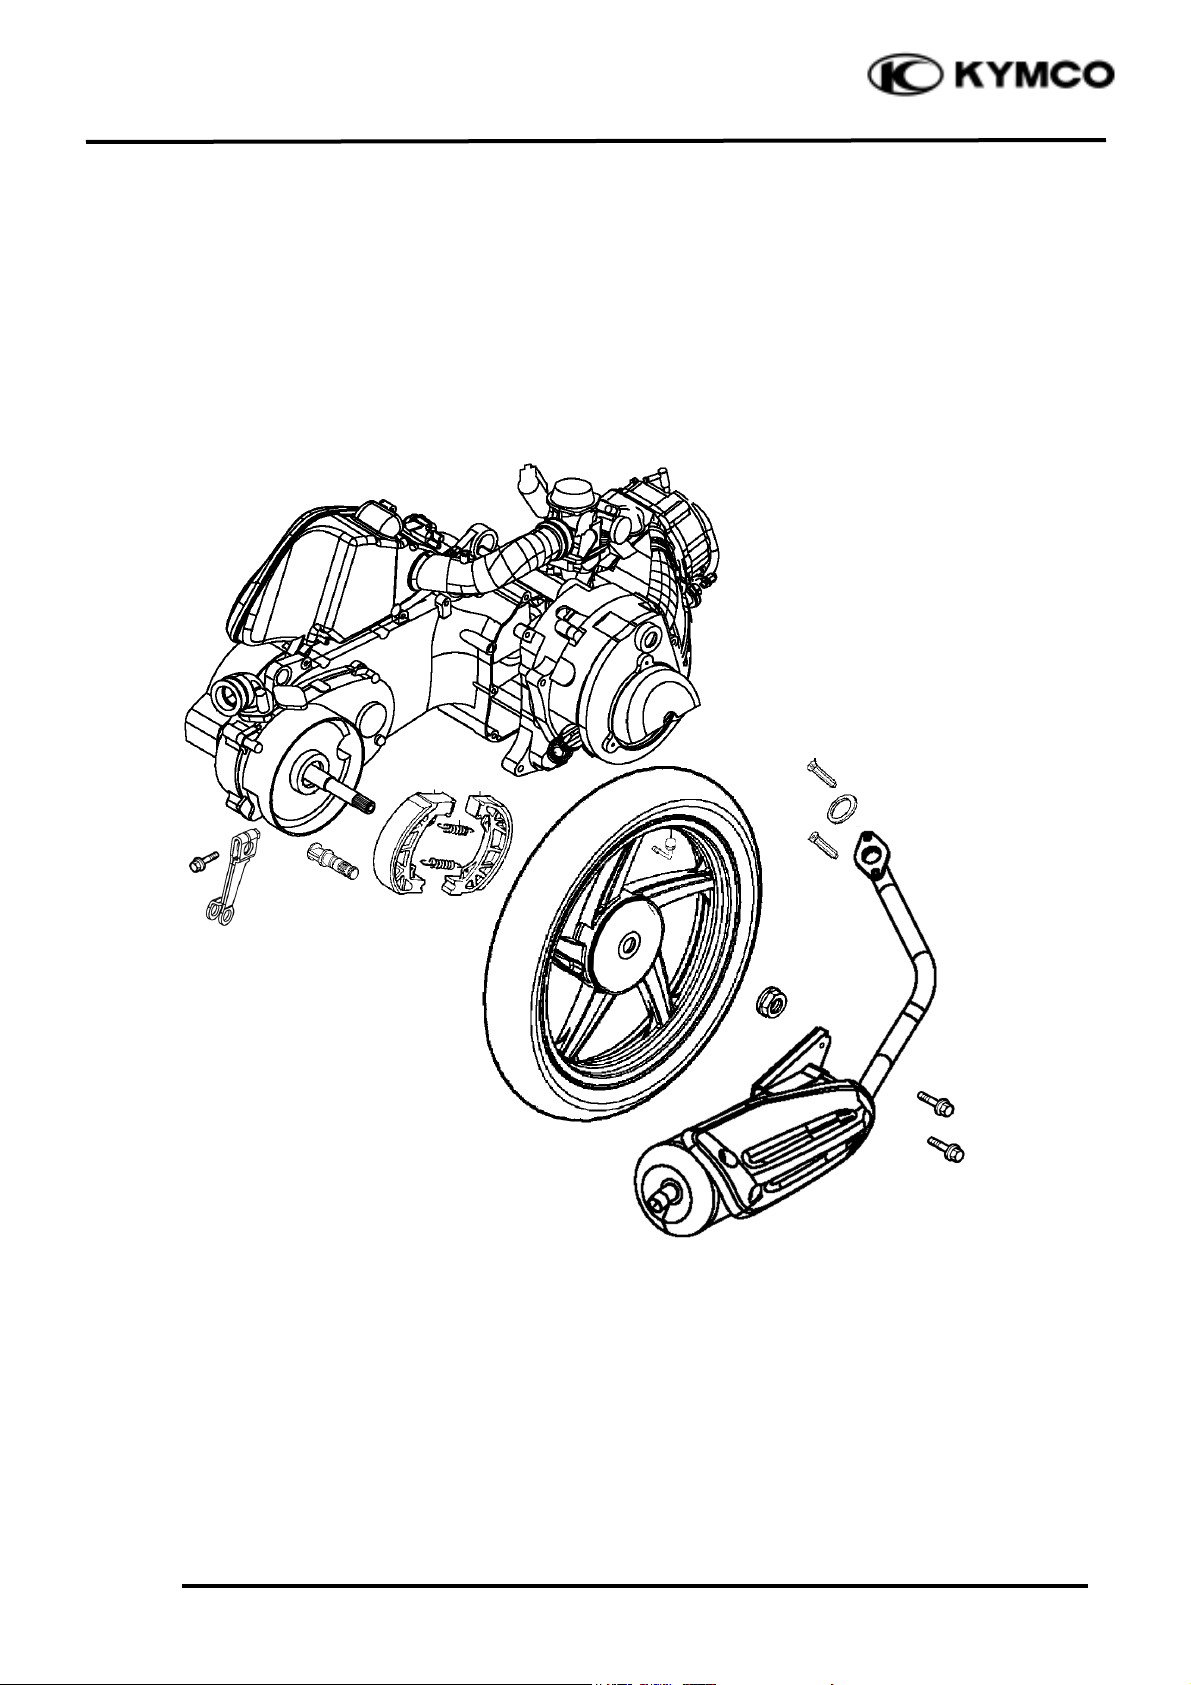
REAR WHEEL/REAR BRAKE/ REAR SUSPENSION
SERVICE INFORMATION........................................................ 13-2
TROUBLESHOOTING.............................................................. 13-2
REAR WHEEL.......................................................................... 13-3
REAR BRAKE........................................................................... 13-4
REAR SHOCK ABSORBER ...................................................... 13-5
ADJUSTABLE REAR CUSHION............................................... 13-6
13
Page 2
13. REAR WHEEL/REAR BRAKE/
REAR SUSPENSION
13-1
PEO PLE 125/150
3.5kg-m
1.0kg-m
12.0kg-m
2.2kg-m
Page 3

13. REAR WHEEL/REAR BRAKE/
REAR SUSPENSION
13-2
PEO PLE 125/150
SERVICE INFORMATION
GENERAL INSTRUCTIONS
• During servicing, keep oil or grease off the brake drum and brake linings.
SPECIFICATIONS
Item
Standard (mm)
Service Limit (mm)
Radialæ2.0
Rear wheel
Rim runout
Axial
æ
2.0
Rear brake drum I.D
130
131
Rear brake lining thickness
4.204
2.102
Rear shock absorber spring free length
200.5
194
TORQUE VALUES
Rear axle nut 11.0_ 13.0kg-m
Rear shock absorber upper mount bolt 4.0kg-m
Rear shock absorber lower mount bolt 2.5kg-m
Exhaust muffler joint lock nut 1.2kg-m
Exhaust muffler lock bolt 3.5kg-m
Brake arm bolt 1.0kg-m
TROUBLESHOOTING
Rear wheel wobbling Poor brake performance
• Bent rim • Brake not adjusted properly
• Faulty tire • Worn brake linings
• Axle not tightened properly • Worn brake shoes at cam contacting area
Soft rear shock absorber • Worn brake cam
• Weak shock absorber spring • Worn brake drum
• Faulty damper
Page 4

13. REAR WHEEL/REAR BRAKE/
REAR SUSPENSION
13-3
PEO PLE 125/150
REAR WHEEL
REMOVAL
Remove the exhaust muffler joint lock nuts
and exhaust muffler lock bolts.
Remove the exhaust muffler. (!2-6)
Remove the rear axle nut.
Remove the rear shock absorber.
Remove the link flake.
Remove the rear wheel.
INSPECTION
Measure the rear wheel rim runout.
Service Limits:
Radial: 2.0mm replace if over
Axial: 2.0mm replace if over
If the rim runout exceeds the specified service
limits, check the final shaft bearing for
excessive play and the final shaft for bending.
Inspect the rear wheel and wheel rim for
runout.
Turn the inner race of each bearing with your
finger to see if they turn smoothly and
quietly. Also check if the outer race fits
tightly in the hub.
Replace the bearings if the races do not turn
smoothly, quietly, or if they fit loosely in the
hub.
INSTALLATION
Install the rear wheel and apply SAE30#
engine oil to the axle shaft threads. Then,
tighten the rear axle nut.
Torque: 11.0_ 13.0kg-m
Install the exhaust muffler. (!2-6)
Tighten the exhaust muffler joint lock nuts
and exhaust muffler lock bolt.
Torque:
Exhaust muffler joint lock nut: 1.2kg-m
Exhaust muffler lock bolt: 3.5kg-m
Rear Axle Nut
Rear Axle Nut
Link Flake
Page 5

13. REAR WHEEL/REAR BRAKE/
REAR SUSPENSION
13-4
PEO PLE 125/150
REAR BRAKE
Remove the rear wheel. (!13-3)
Inspect the rear brake drum.
Measure the rear brake drum I.D.
Service Limits: 131mm replace if over
BRAKE LINING INSPECTION
Measure the brake lining thickness.
Service Limit: 2.0mm replace if below
REAR BRAKE DISASSEMBLY
Remove the rear brake adjusting nut and
disconnect the rear brake cable.
Remove the rear brake shoes.
Remove the brake arm bolt to remove the
brake arm.
Remove the brake cam.
Adjusting Nut
Brake Shoe
Keep oil or grease off the brake linings.
*
Page 6

13. REAR WHEEL/REAR BRAKE/
REAR SUSPENSION
13-5
PEO PLE 125/150
REAR BRAKE ASSEMBLY
Apply grease to the anchor pin.
Apply grease to the brake cam and install it.
Install the brake shoes.
Apply engine oil to the felt seal and install it
to the brake cam.
Install the brake arm.
Install and tighten the brake arm bolt.
Torque: 1.0kg-m
Install the brake arm return spring.
Install the brake arm pin.
Connect the brake cable and install the
adjusting nut.
Install the rear wheel. (!13-3)
Adjust the rear brake lever free play. (!3-8)
REAR SHOCK ABSORBER
REMOVAL
Remove the frame body cover. (!2)
Remove the air cleaner case. (!5-13)
Adjusting Nut
Brake Arm Pin
Brake Cable
Brake Cam
Brake Arm
Brake Arm
Align the wide groove on the wear
indicator plate with the wide tooth of the
brake cam.
*
Align the scribed line on the brake arm
with the punch mark on the brake cam.
*
Bolt
Bolt
Bolt
Page 7

13. REAR WHEEL/REAR BRAKE/
REAR SUSPENSION
13-6
PEO PLE 125/150
Remove the rear shock absorber upper and
lower mount bolts.
Remove the rear shock absorber.
ADJUSTABLE REAR CUSHION
To suit scooter behaviour to load condition
rear cushion could be adjusted in spring
prelocad.
It is possible to adjust rear cushion in three
positions:
A position “soft”
B position “medium”
C position “hard”
When you adjust rear cushion, the spring
preload of rear cushions must be the same.
INSTALLATION
Install the rear shock absorber. First install
the upper mount bolt and then the lower
mount bolts and tighten them.
Install the air cleaner case and tighten the two
bolts.
Install the frame body cover.
Torque:
Upper Mount Bolt: 4.0kg-m
Lower Mount Bolt: 2.5kg-m
Bolt
Adjust Position
Bolt
 Loading...