


10.FINAL REDUCTION/
TRANSMISSION SYSTEM
MXU 250
10
__________________________________________________________________________________
__________________________________________________________________________________
__________________________________________________________________________________
__________________________________________________________________________________
__________________________________________________________________________________
FINAL REDUCTION/TRANSMISSION SYSTEM
__________________________________________________________________________________
SERVICE INFORMATION------------------------------------------------ 10- 2
TROUBLESHOOTING----------------------------------------------------- 10- 2
TRANSMISSION CASE COVER --------------------------------------------- 10- 3
TRANSMISSION------------------------------------------------------------ 10- 5
SPEEDOMETER GEAR --------------------------------------------------- 10-15
10
10-0
10.FINAL REDUCTION/
TRANSMISSION SYSTEM
MXU 250
10-1

10.FINAL REDUCTION/
TRANSMISSION SYSTEM
SERVICE INFORMATION
GENERAL INSTRUCTIONS
• The transmission system can be serviced with the engine installed in the frame.
• When replacing the drive shaft, use a special tool to hold the bearing inner race for this operation.
SPECIFICATIONS
Specified Oil: GEAR OIL SAE 90#
Oil Capacity: At change : 0.3 liter (0.264 lmp qt, 0.318 US qt)
At disassembly : 0.4 liter (0.352 lmp qt, 0.424 US qt)
TORQUE VALUES
Transmission case cover bolt 2.7 kgf-m (27 Nm, 20 lbf-ft)
MXU 250
TROUBLESHOOTING
Engine starts but motorcycle won‘t move
• Damaged transmission
• Seized or burnt transmission
Oil leaks
• Oil too rich
• Worn or damaged oil seal
10-2

10.FINAL REDUCTION/
TRANSMISSION SYSTEM
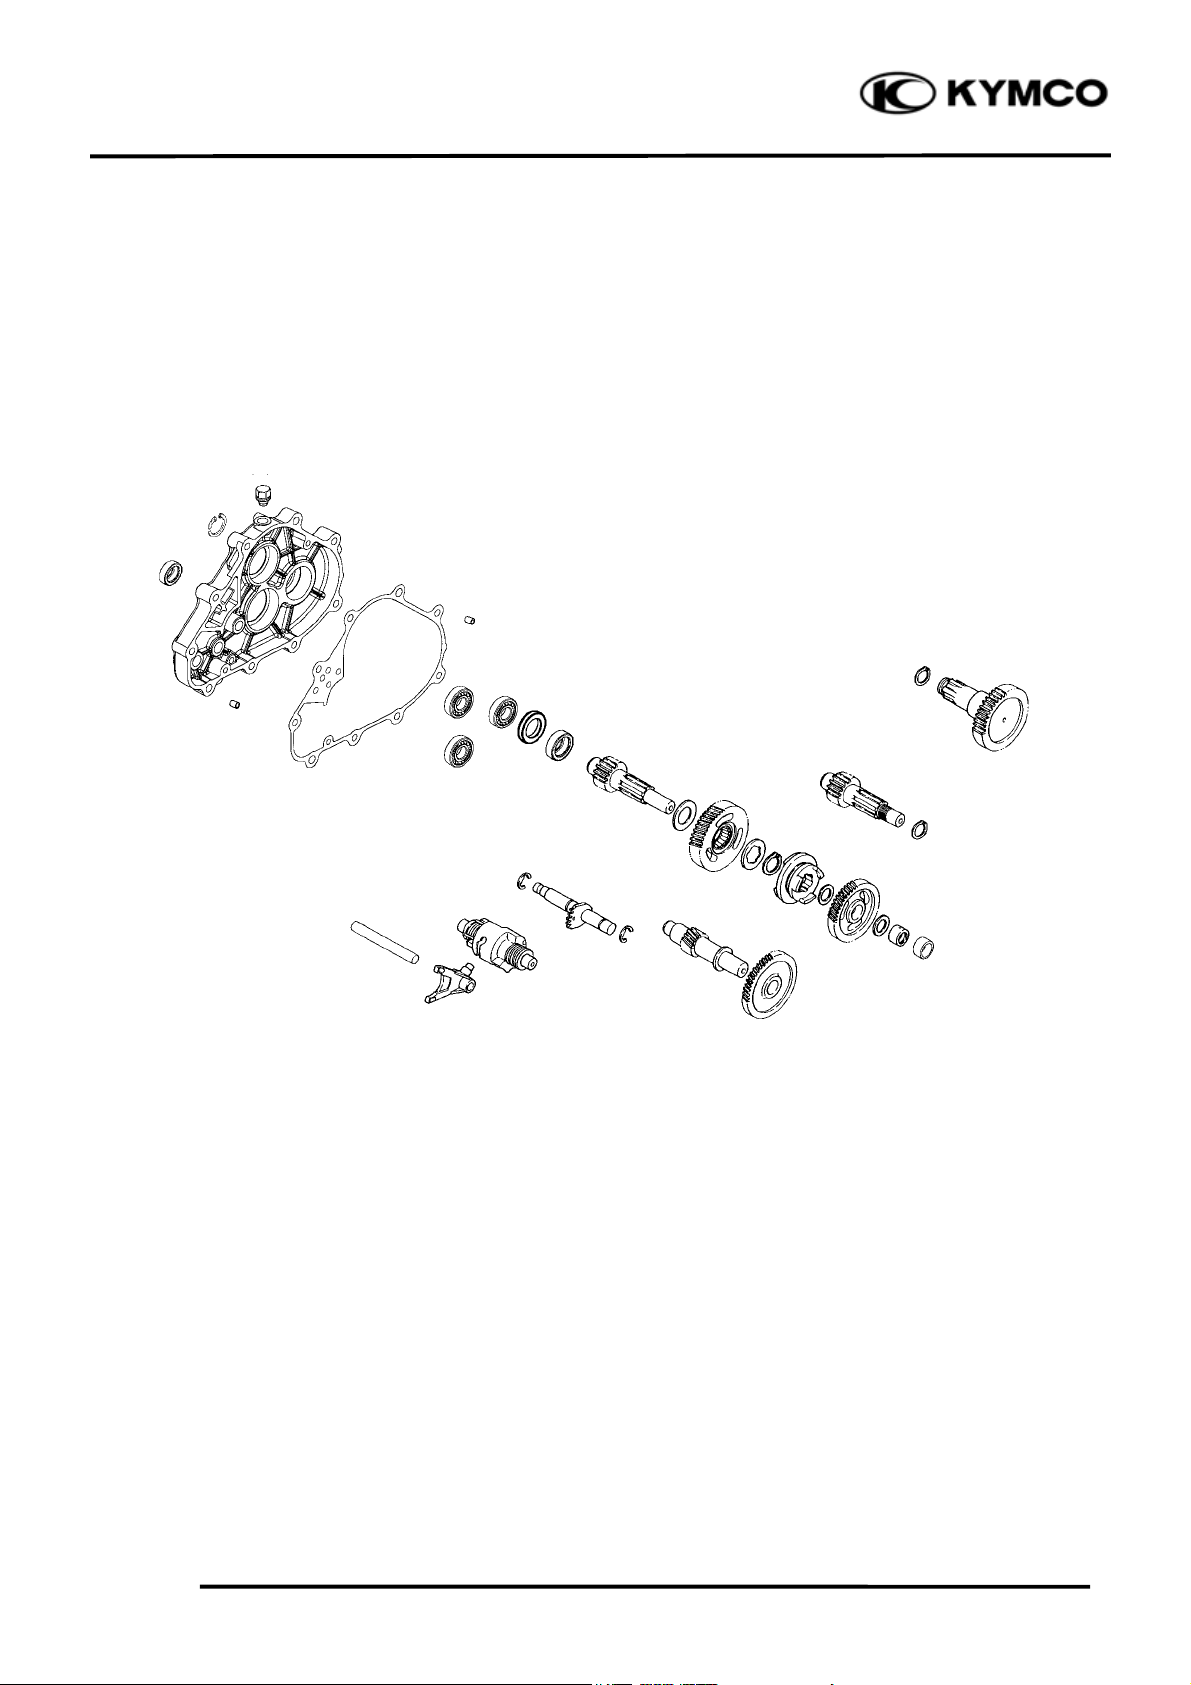
TRANSMISSION CASE COVER
REMOVAL
Drain transmission gear oil into a clean
container. (Refer to the “TRANSMISSION
OIL REPLACEMENT” section in the chapter
3)
Remove the three bolts and then remove the
drive sprocket cover (see page 6-3).
Remove the two bolts and then remove the
washer and drive sprocket (see page 6-3).
Remove the bolt and then disconnect the
drive shift arm from the shift shaft (see page
6-3).
Disconnect the speedometer cable (see page
6-3).
MXU 250
Remove the transmission case cover
attaching bolts.
Remove the transmission case cover, dowel
pins and gasket.
Bearings
Bolts
Transmission Case Cover
Inspect the bearings for allow play in the
transmission case cover or the bearings turn
roughly.
If any defects are found, replace the bearing
with a new one.
10-3
10.FINAL REDUCTION/
TRANSMISSION SYSTEM
MXU 250
TRANSMISSION CASE COVER
DISASSEMBLY
Remove the drive axle circlip.
Remove the drive axle from the transmission
case cover.
Remove the bearing circlip for remove the
bearing.
Inspect the bearing for allow play in the
transmission case cover or the bearing turns
roughly.
If any defects are found, replace the bearing
with a new one.
Inspect the drive axle gear teeth for wear or
damage.
Bearing Circlip
Drive Axle Circlip Drive Axle
Bearing
Remove the bearing to expose the oil seal.
Inspect the oil seal for wear or damage.
If any defects are found, replace the oil seal
with a new one.
Oil Seal
10-4
10.FINAL REDUCTION/
N
N
TRANSMISSION SYSTEM
MXU 250
Inspect the needle bearing for allow play in
the transmission case cover or the bearing
turns roughly.
If any defects are found, replace the bearing
with a new one.
ASSEMBLY
Install the needle bearing.
Install the oil seal and bearing.
Install the bearing circlip.
Install the drive axle and drive axle cirelip.
eedle Bearing
eedle Bearing
TRANSMISSION
REMOVAL
Remove the transmission cover. (Refer to the
“TRANSMISSION CASE COVER REMOVAL” in
the chapter 10)
Check the transmission operation.
Unsmooth operation → Repair.
Bearing
10-5
10.FINAL REDUCTION/
r
r
TRANSMISSION SYSTEM
MXU 250
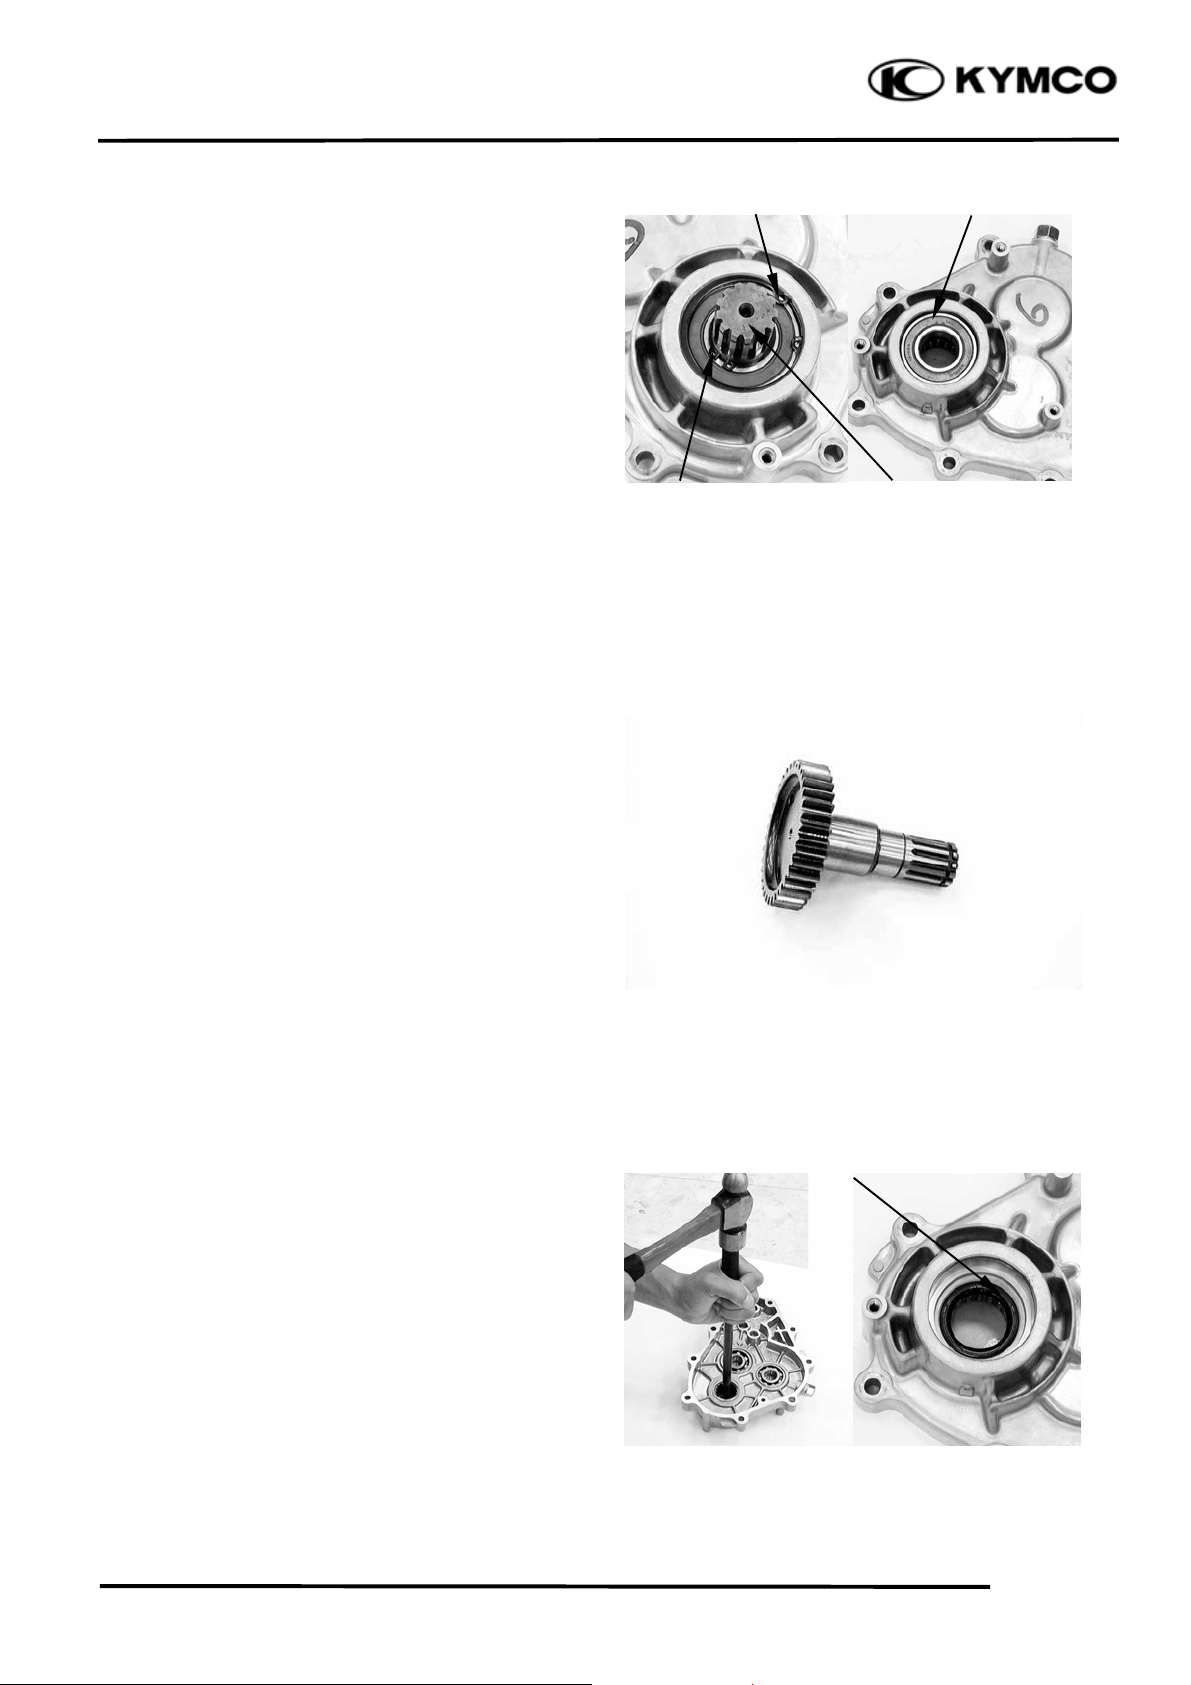
Remove the shift shaft.
Remove the stopper plug.
Shift Shaft
Remove spring, washer and shift cam
stopper.
Shift Cam Stoppe
Spring
Plug
Wash e
Plug
10-6

10.FINAL REDUCTION/
m
TRANSMISSION SYSTEM
MXU 250
Remove the transmission guide bar.
Remove shift cam.
Guide Bar
Shift Ca
Remove the shift fork.
10-7
Shift Fork

10.FINAL REDUCTION/
r
TRANSMISSION SYSTEM
Measure the guide bar runout.
Out of specification → Replace.
Service Limit:
Less than 0.03 mm (0.0012 in)
*
Do not attempt to straighten a bent guide
bar.
MXU 250
Inspect the shift fork cam follower and shift
fork pawl.
Scoring/beads/wear → Replace.
Check the shift cam groove and shift cam
gear.
Wear or damage → Replace.
Shift Fork Cam Followe
Shift Fork Cam Pawl
10-8

10.FINAL REDUCTION/
r
r
r
r
hif
TRANSMISSION SYSTEM
Inspect shift shaft gear.
Damage → Replace.
Inspect shift shaft.
Damage/bends/wear → Replace.
Shift Shaft Gea
MXU 250
S
t Shaft
Remove the main axle.
MAIN AXLE DISASSEMBLY
Remove the washers, collar, primary driven
gear, bush and clutch dog.
Colla
Main Axle
Clutch Dog
10-9
Wash e
Primary Driven Gea

10.FINAL REDUCTION/
r
r
N
r
TRANSMISSION SYSTEM
MXU 250
Remove the circlip and then remove the
washers, reverse wheel gear and needle
bearing.
Collar
Wash ers
Primary Driven Gear
Clutch Dog
Reverse Wheel Gea
Bush
Main Axle
Circlip Wash e
Reverse Wheel Gea
Circlip
Wash ers
eedle Bearing
Main Axle
10-10

10.FINAL REDUCTION/
N
r
TRANSMISSION SYSTEM
Inspect the gear teeth.
Blue discoloration/pitting/wear → Replace.
Inspect the mated dogs.
Rounded edges/cracks/missing portions
→ Replace.
MXU 250
MAIN AXLE ASSEMBLY
Reverse the “MAIN AXLE
DISASSEMBLY” procedures.
Reverse Wheel Gear
Main Axle
Wash e
eedle Bearing
Washer
Circlip
Clutch Dog
Primary Driven Gear
Wash er
Wash er
Wash er
Bush
Collar
10-11

10.FINAL REDUCTION/
p
TRANSMISSION SYSTEM
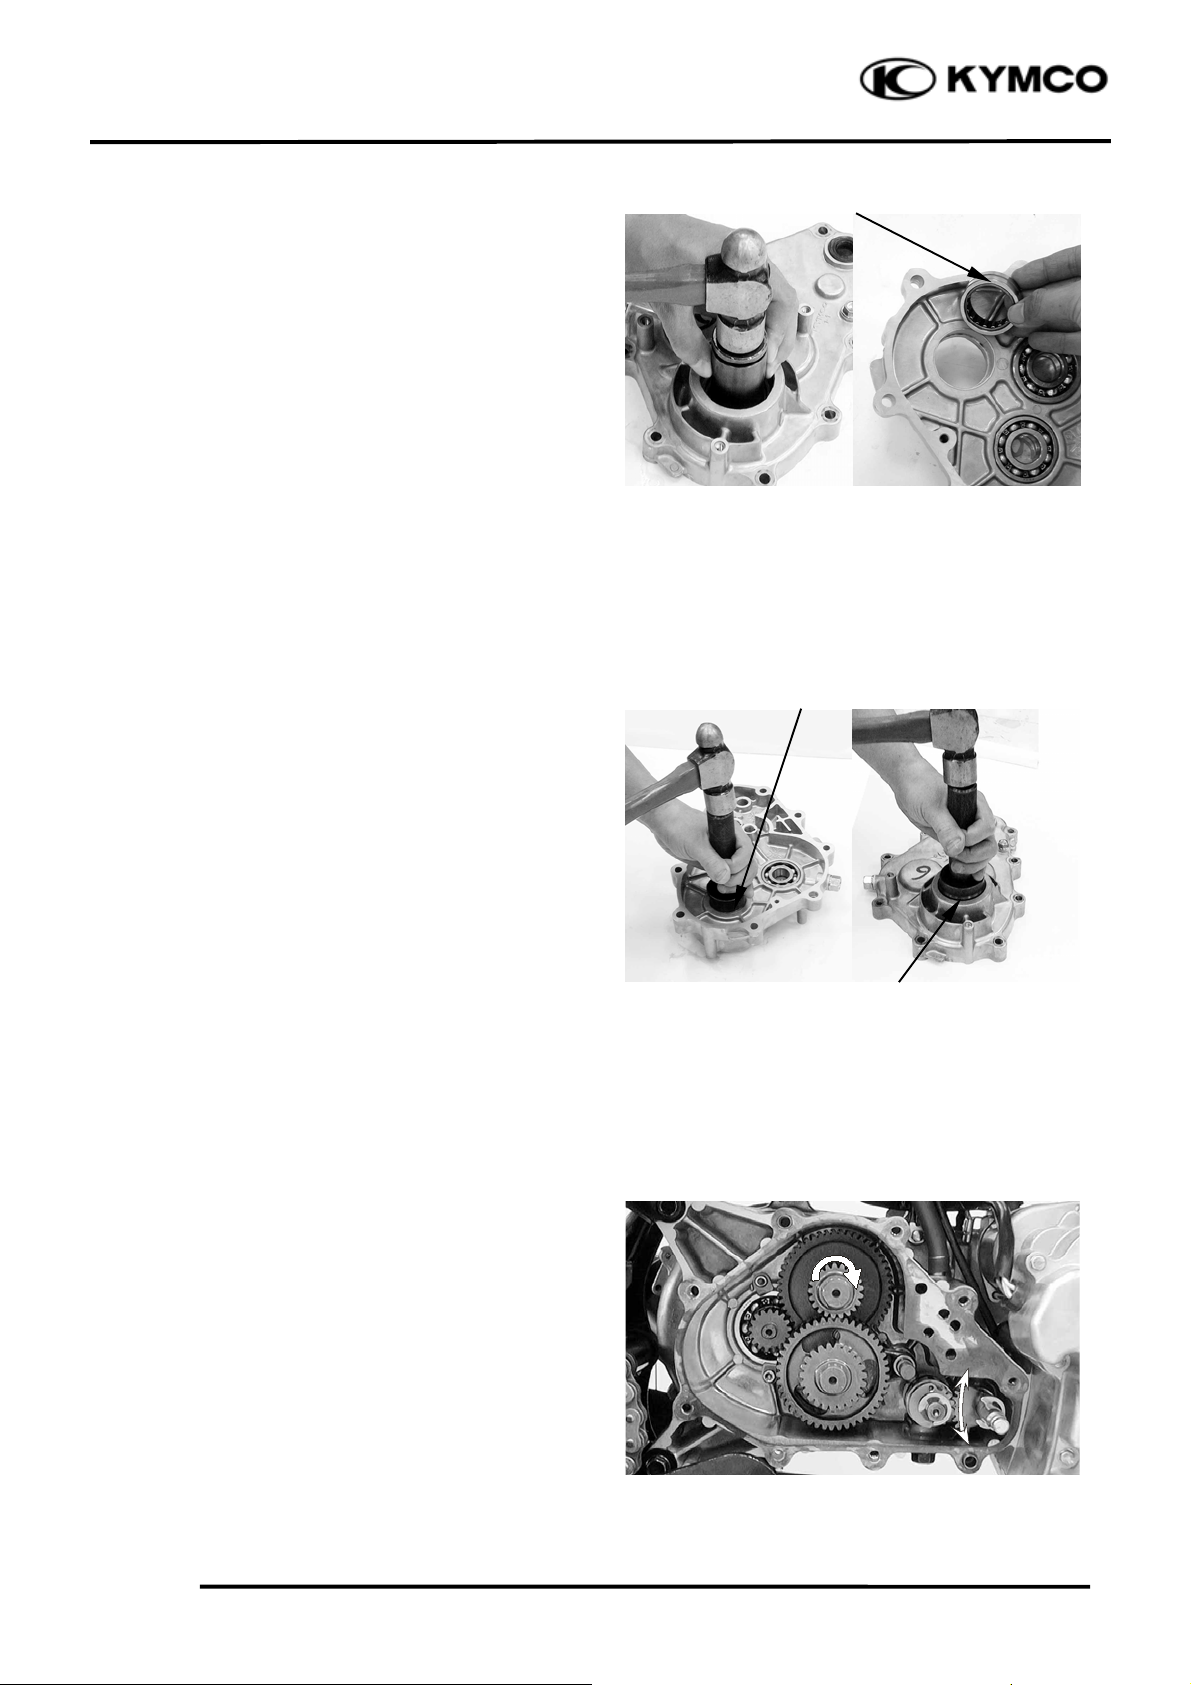
Remove the counter axle.
MXU 250
Counter Axle
Inspect the gear teeth.
Blue discoloration/pitting/wear → Replace.
PRIMARY DRIVE AXLE REMOVAL
Remove the clutch/driven pulley. (Refer to
the chapter 9)
Bolts
Primary Drive Axle
Oil Seal
Remove the oil seal, circlip, bolts and plates.
Remove the primary drive axle.
Plates Circli
10-12

10.FINAL REDUCTION/
r
TRANSMISSION SYSTEM
Inspect the bearings for allow play in the
transmission case cover or the bearing turns
roughly.
If any defects are found, replace the bearing
with a new one.
MXU 250
Bearings
INSTALLATION
Reverse the “TRANSMISSION REVOVAL”
section procedures.
Install the main drive axle. (Reverse the
“MAIN DRIVE AXLE” procedures.)
Install the counter axle.
Install the main axle washer.
Install the main axle.
Washe
10-13
Main Axle

10.FINAL REDUCTION/
r
TRANSMISSION SYSTEM
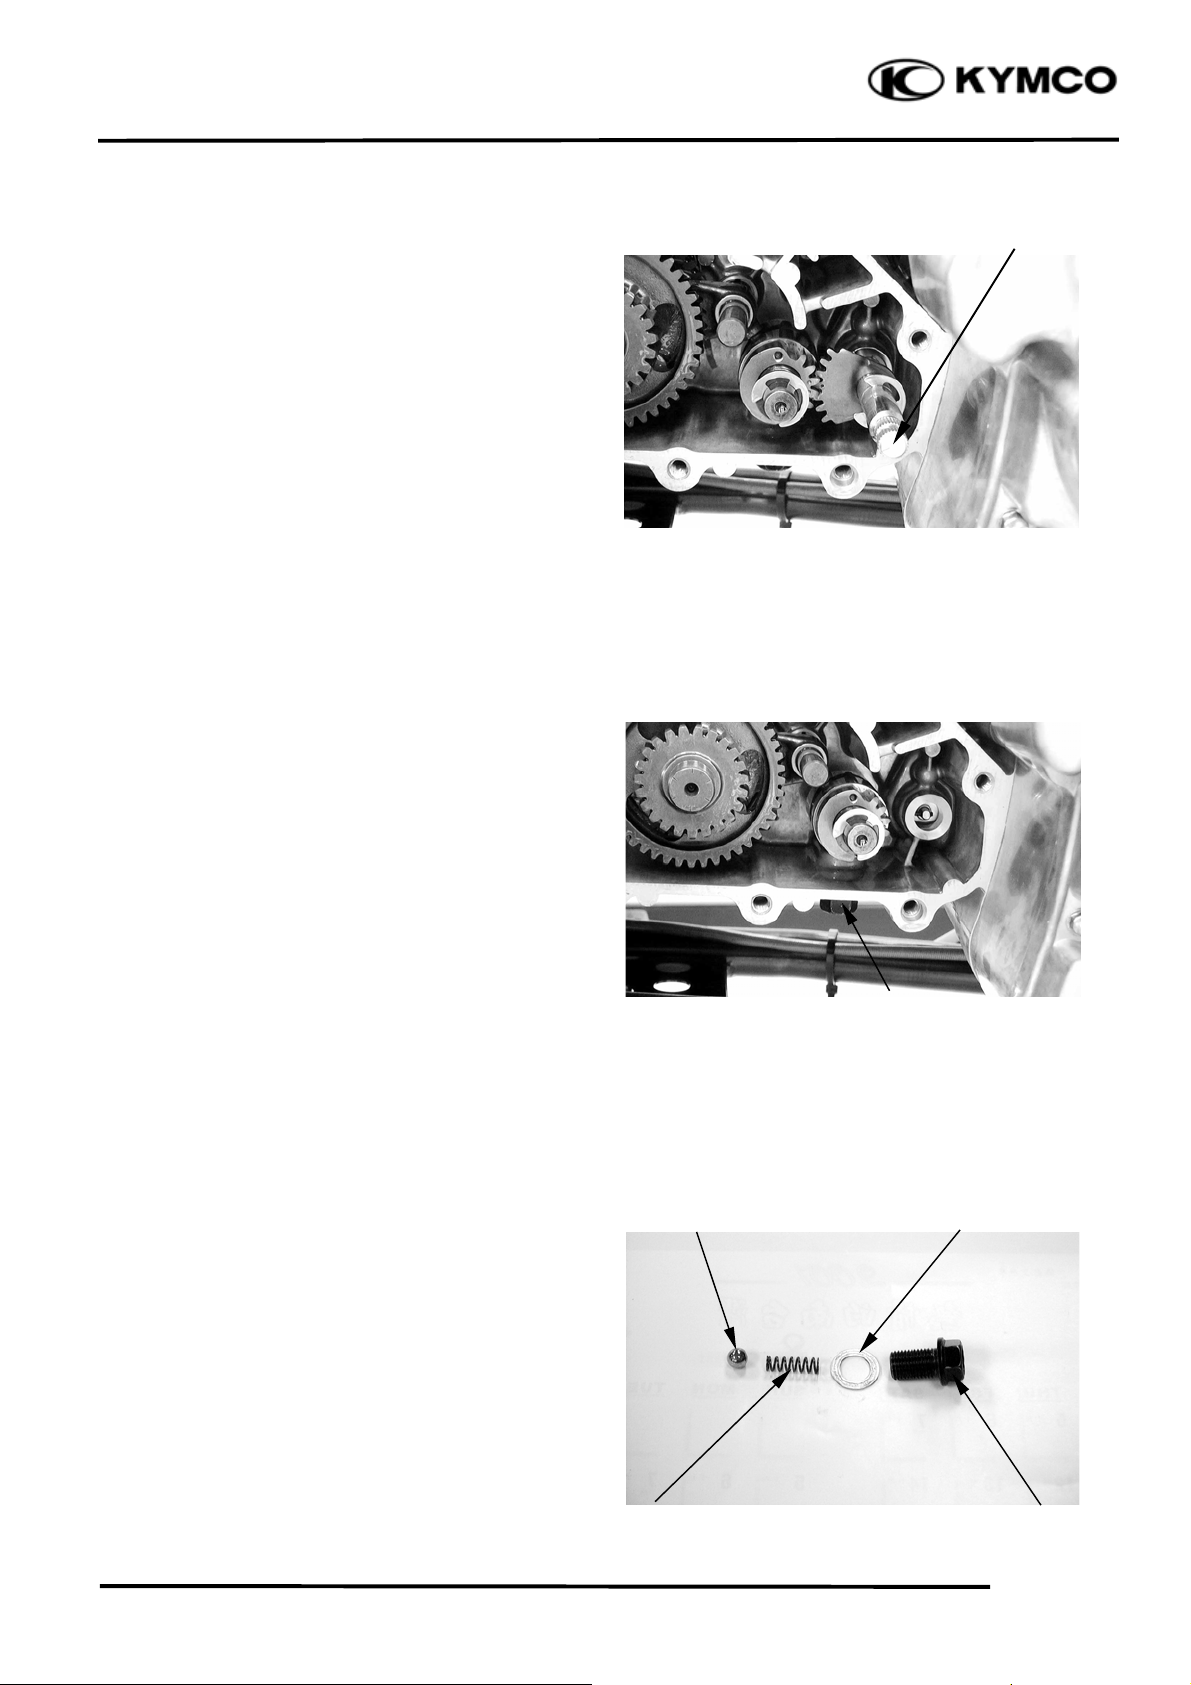
Install the shift cam.
Install the shift fork.
Install the guide bar.
Install the shift shaft.
*
Make sure that the lever on the gea
change switch correctly engages with the
locating slot on the shift shaft.
Align the mark on the shift shaft gear
with the mark on the shift cam gear.
Install the shift cam stopper and tighten the
plug.
Torque: 4.8 kgf-m (48 Nm, 35 lbf-ft)
MXU 250
Gear Change Switch
Install the dowel pins and a new gasket onto
the right crankcase.
Install the transmission case cover and tighten
the transmission case cover bolt.
Torque: 2.7 kgf-m (27 Nm, 20 lbf-ft)
Fill the engine with oil and install the oil
filler bolt. (Refer to the “TRANSMISSION
OIL REPLACEMENT” section in the chapter
3)
Specified Gear Oil:
KYMCO SIGMA GEAR OIL 90#
Oil Capacity:
At disassembly:
0.4 liter (0.352 lmp qt, 0.424 US qt)
At change:
0.3 liter (0.264 lmp qt, 0.318 US qt)
Dowel Pins
Gasket
10-14

10.FINAL REDUCTION/
r
r
TRANSMISSION SYSTEM
SPEEDOMETER GEAR
REMOVAL
Disconnect the speedometer cable (see page
6-3).
Remove the speedometer gear plug, washer
and speedometer gear shaft.
MXU 250
Plug
INSPECTION
Inspect the speedometer gear teeth.
pitting/wear → Replace.
Remove the transmission case cover (see
page 10-3).
Inspect the speedometer driver gear teeth on
the main axle.
Pitting/wear → Replace.
Plug
Washe
Speedometer Gea
10-15

10.FINAL REDUCTION/
TRANSMISSION SYSTEM
Inspect the oil seal for wear or damage.
If any defects are found, replace the oil seal
with a new one.
MXU 250
Oil Seal
INSTALLATION
Reverse the “REMOVAL” procedures.
10-16
 Loading...