


Musician’s Guide
©2007 All rights reserved. SP2 is a trademark of Kurzweil. All other products and brand names are trademarks or registered trademarks of their respective companies. Product features and specifications are subject to change without notice.
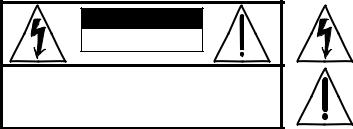
CAUTION
RISK OF ELECTRIC SHOCK
DO NOT OPEN
CAUTION: TO REDUCE THE RISK OF ELECTRIC SHOCK,
DO NOT REMOVE THE COVER
NO USER SERVICEABLE PARTS INSIDE
REFER SERVICING TO QUALIFIED SERVICE PERSONNEL
The lightning flash with the arrowhead symbol, within an equilateral triangle, is intended to alert the user to the presence of uninsulated "dangerous voltage" within the product's enclosure that may be of sufficient magnitude to constitute a risk of electric shock to persons.
The exclamation point within an equilateral triangle is intended to alert the user to the presence of important operating and maintenance (servicing) instructions in the literature accompanying the product.
IMPORTANT SAFETY & INSTALLATION INSTRUCTIONS
INSTRUCTIONS PERTAINING TO THE RISK OF FIRE, ELECTRIC SHOCK, OR INJURY TO PERSONS
WARNING: When using electric products, basic precautions should always be followed, including the following:
1.Read all of the Safety and Installation Instructions and Explanation of Graphic Symbols before using the product.
2.Do not use this product near water - for example, near a bathtub, washbowl, kitchen sink, in a wet basement, or near a swimming pool, or the like.
3.This product should only be used with a stand or cart that is recommended by the manufacturer.
4.This product, either alone or in combination with an amplifier and speakers or headphones, may be capable of producing sound levels that could cause permanent hearing loss. Do not operate for a long period of time at a high volume level or at a level that is uncomfortable. If you experience any hearing loss or ringing in the ears, you should consult an audiologist.
5.The product should be located so that its location or position does not interfere with its proper ventilation.
6.The product should be located away from heat sources such as radiators, heat registers, or other products that produce heat.
7.The product should be connected to a power supply only of the type described in the operating instructions or as marked on the product.
8.This product may be equipped with a polarized line plug (one blade wider than the other). This is a safety feature. If you are unable to insert the plug into the outlet, contact an electrician to replace your
obsolete outlet. Do not defeat the safety purpose of the plug.
9.The power supply cord of the product should be unplugged from the outlet when left unused for a long period of time.When unplugging the power supply cord, do not pull on the cord, but grasp it by the plug.
10.Care should be taken so that objects do not fall and liquids are not spilled into the enclosure through openings.
11.The product should be serviced by qualified service personnel when:
A.The power supply cord or the plug has been damaged;
B.Objects have fallen, or liquid has been spilled into the product;
C.The product has been exposed to rain;
D.The product does not appear to be operating normally or exhibits a marked change in performance;
E. The product has been dropped, or the enclosure damaged.
12.Do not attempt to service the product beyond that described in the user maintenance instructions. All other servicing should be referred to qualified service personnel.
13.WARNING: Do not place objects on the product’s power supply cord, or place the product in a position where anyone could trip over, walk on, or roll anything over cords of any type.
Do not allow the product to rest on or be installed over cords of any type. Improper installations of this type create the possibility of a fire hazard and/or personal injury.
RADIO AND TELEVISION INTERFERENCE
WARNING: Changes or modifications to this instrument not expressly approved by Young Chang could void your authority to operate the instrument.
IMPORTANT: When connecting this product to accessories and/or other equipment use only high quality shielded cables.
NOTE: This instrument has been tested and found to comply with the limits for a Class B digital device, pursuant to Part 15 of the FCC Rules. These limits are designed to provide reasonable protection against harmful interference in a residential installation. This instrument generates, uses, and can radiate radio frequency energy and, if not installed and used in accordance with the instructions, may cause harmful interference to radio communications. However, there is no guarantee that interference will not occur in a particular installation. If this instrument does cause harmful interference to radio or television reception, which can be determined by turning the instrument off and on, the user is encouraged to try to correct the interference by one or more of the following measures:
•Reorient or relocate the receiving antenna.
•Increase the separation between the instrument and the receiver.
•Connect the instrument into an outlet on a circuit other than the one to which the receiver is connected.
•If necessary consult your dealer or an experienced radio/television technician for additional suggestions.
NOTICE
This apparatus does not exceed the Class B limits for radio noise emissions from digital apparatus set out in the Radio Interference Regulations of the Canadian Department of Communications.
AVIS
Le present appareil numerique n’emet pas de bruits radioelectriques depassant les limites applicables aux appareils numeriques de la class B prescrites dans le Reglement sur le brouillage radioelectrique edicte par le ministere des Communications du Canada.
SAVE THESE INSTRUCTIONS
Young Chang Distributors
Contact the nearest Young Chang office listed below to locate your local Young Chang/Kurzweil representative.
Kurzweil Headquarters
9FL, 102 Dong, I’PARK, jeoungja Dong, Buandan Gu, Seongnam Si, Gyeonggi Do, Korea 463 859
Tel : 001 82 31 786 7900
Fax : 001 82 31 785 2703 Web : www.yapiano.co.kr
YCNA(Young Chang North America)
19060 S Dominguez Hills, Dr Rancho Dominguez, CA 90220, U.S.A Tel : 1 310 637 2000
Fax : 1 310 637 2025
Web : www.youngchang.com
YCRDI(Young Chang R&D Institute)
1432 Main Street Waltham, MA02451, U.S.A Tel : 1 781 890 2929
Fax : 1 781 890 2014
Web : www.kurzweilmusicsystems.com
Official distributors in other countries are listed on the web site.
World Wide Web Home Page
http://www.kurzweilmusicsystems.co

Contents
SP2 Quick Start Guide.............................................................................. |
1 |
CHAPTER ........................................................................................ |
-1 |
Introduction .................................................................................... |
-1 |
Main Features ............................................................................ |
-1 |
Options .................................................................................... |
-2 |
Do I Have Everything?.................................................................. |
-3 |
How To Use This Book ................................................................. |
-3 |
CHAPTER ........................................................................................ |
-1 |
Getting Started................................................................................ |
-1 |
Setup....................................................................................... |
-1 |
Basic Connections...................................................................... |
-2 |
Basic MIDI connection ................................................................. |
-6 |
Powering Up............................................................................ |
-13 |
Playing the Demo Songs............................................................. |
-14 |
Troubleshooting........................................................................ |
-15 |
CHAPTER ........................................................................................ |
-1 |
Performance Features ....................................................................... |
-1 |
Overview................................................................................... |
-1 |
Front Panel ............................................................................... |
-2 |
Rear Panel ................................................................................ |
-4 |
Program Sound .......................................................................... |
-5 |
Setups ..................................................................................... |
-6 |
Rhythm Patterns and Metronome.................................................... |
-7 |
Using Quick Access Bank ........................................................... |
-10 |
Using Multi Function Knobs......................................................... |
-12 |
CHAPTER ........................................................................................ |
-1 |
Programming Your SP2...................................................................... |
-1 |
Easy Editing (Auto Layer / Split) ..................................................... |
-2 |
Changing Effect Setting ............................................................... |
-4 |
Editing Setups............................................................................ |
-8 |
Assigning Knobs ...................................................................... |
-12 |
CHAPTER ........................................................................................ |
-1 |
Global ........................................................................................... |
-1 |
Entering Global Mode .................................................................. |
-1 |
Local ....................................................................................... |
-2 |
Touch ...................................................................................... |
-2 |
Drum Map................................................................................. |
-3 |
Tuning ..................................................................................... |
-4 |
Dump....................................................................................... |
-4 |
MIDI Scope ............................................................................... |
-5 |
Reset....................................................................................... |
-6 |
1

Kurzweil SP2 |
|
Contents |
|
CHAPTER ........................................................................................ |
-1 |
Software Upgrades ........................................................................... |
-1 |
Miscellaneous Menus................................................................... |
-4 |
CHAPTER ........................................................................................ |
-1 |
Why Use Effects?............................................................................. |
-1 |
Description................................................................................ |
-1 |
Controlling Effect........................................................................ |
-1 |
Routing Effect............................................................................ |
-2 |
Selecting Effect.......................................................................... |
-2 |
Wet/Dry Mix............................................................................... |
-3 |
Bypassing Effect ........................................................................ |
-3 |
CHAPTER ........................................................................................ |
-1 |
Tutorials......................................................................................... |
-1 |
Programming with Layers.............................................................. |
-1 |
Splitting in Program mode............................................................. |
-4 |
CHAPTER ........................................................................................ |
-1 |
Troubleshooting / FAQ (Frequently Asked Questions)................................ |
-1 |
Maintenance.............................................................................. |
-1 |
Appendix A ............................................................................................. |
1 |
Parameter Reference ............................................................................. |
2 |
Appendix B ............................................................................................. |
1 |
SP2 Programs and Controller Assignments.................................................. |
1 |
Appendix C ............................................................................................. |
1 |
Normal ............................................................................................... |
2 |
GM ReMap .......................................................................................... |
3 |
Index................................................................................................. |
-1 |
2

SP2 Quick Start Guide
Thank you for purchasing a Kurzweil/Young Chang SP2 stage piano. Here’s a brief description of all the essential operations you need to know to get started with your SP2 immediately. Through this manual, [ ] means “Button”. For an example, [Yes] means you need to press the “Yes” button from the front panel of your SP2.
Q-1

CHAPTER
Introduction
Thank you for purchasing a Kurzweil/Young Chang stage piano SP2 instrument. With its 32 megabytes of high quality Kurzweil ROM sounds and an array of MIDI control features, your SP2 is an ideal suit for both stage and studio work. The USB port on the rear panel enables the immediate use of your SP2 as a MIDI controller in studios.
Also, the logical and friendly user interface really shines whenever you’re at a gig or in the recording studio.
This chapter will help you...
overview the main features of the SP2
check the components of the SP2 package
Please, refer to the following list for information you need.
◄Main features. . . . . . . . . . . . . . . . . . . . . . . . . . . . . . . . . . . . . . . . . . . . . . . . . . . . . . . . 1 1
◄Options. . . . . . . . . . . . . . . . . . . . . . . . . . . . . . . . . . . . . . . . . . . . . . . . . . . . . . . . . . . . . 1 2
◄Do I Have Everything?. . . . . . . . . . . . . . . . . . . . . . . . . . . . . . . . . . . . . . . . . . . . . . . 1 3
◄How to use this manual. . . . . . . . . . . . . . . . . . . . . . . . . . . . . . . . . . . . . . . . . . . . . . . 1 3
For people who do not want to read manuals
We recommend that you read at least chapter 1&2, just to get comfortable with your SP2 more quickly. Even if you’re an experienced keyboard player, your will learn about the advanced features of the SP2 and most likely, discover some new ideas. Also, the information about upgrades and service will be very valuable for you.
Main Features
The Sound
The SP2 offers 64 voices of polyphony and features balanced left and right analog audio outputs. There are 64 factory programs and 60 preset rhythm patterns. The programs includes stereo triple strike Grand Piano, Wurlitzer electric piano, stereo strings, brasses, guitars, basses, drums and percussion sounds, as well as the world renowned A cappella group Take 6 vocal samples. The rhythm patterns include various styles of drum grooves such as ballad, pop, r&b, dance, rock, funk, country, latin, jazz, and world. Setup mode makes the SP2 an amazingly flexible MIDI controller as well as a powerful live instrument. In this mode, you can divide the SP2’s keyboard into four different zones, each of which can cover part or all of the keyboard. Each zone can use a different MIDI channel, play a different program and have its own controller assignments. Also, you can program the SP2 to start rhythm patterns automatically. The SP2 comes with 16 factory setups and user programmed setups can be stored in the quick access ( Q. Access ) bank for instant use.
-1
Chapter 1
SP2 Introduction
Keyboard and Controllers
The SP2 has a fully weighted 88 key piano action. The array of physical controllers include pitch wheel, modulation wheel and 4 knobs on the front panel as well as jacks for continuous and switch pedal on the rear panel. Because all of them are fully programmable, the SP2 can be not only a performance keyboard, but also a MIDI controller in a studio. You can use the SP2 as a sound module receiving MIDI data from a computer based sequencer or external MIDI device, too.
Effects
To perfect the ROM sounds, the SP2 provides over 64 multiple effects and 64 reverbs. These effects can be applied to both setups and programs and the wet/dry mix can be controlled in real time very easily. You can also program the internal multi effect and reverbs for even more control in performance and recording.
Options
Your SP2 can use various optional devices. Ask your Kurzweil dealer about the following options.
Pedal
The SP2 has two jacks for optional pedals on the rear panel. One is for a switch pedal ( for functions like sustain or program change ) and the other is for a continuous control pedal ( for functions like volume/expression control ).
The compatible pedals from Kurzweil are;
FS 1 / Standard box shaped switch pedal
KP 1 / Single piano style switch pedal
CC 1 / Continuous pedal
Kurzweil KP-1 |
Kurzweil CC-1 |
-2
Chapter 1
SP2 Introduction
Do I Have Everything?
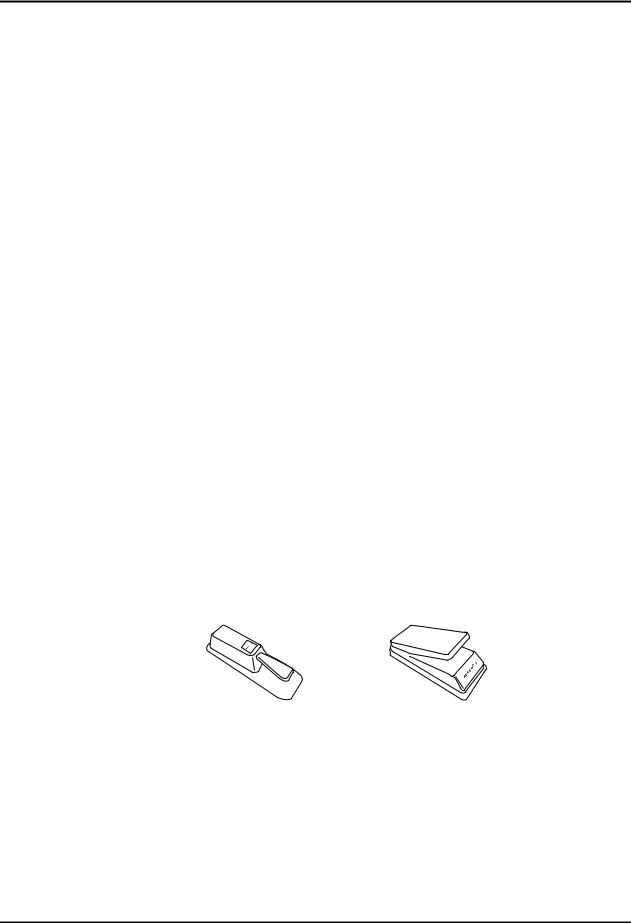
Your SP2 carton should include all of the following components.
•The SP2 Stage Piano
•AC adapter (9VAC, 2.0A)
•Single Switch Pedal
•This manual
•Warranty Card
•Four adhesive backed rubber feet
Be sure to keep the box and packing materials during the warranty periods, in case you need to ship the unit for any reason.
How To Use This Book
This manual will greatly help you learn and use the various features of the SP2. If you know electronic instruments and MIDI already, you might want to start from Chapter 2, “Getting Started” on page 2 1. If you need more help on using the SP2’s many features, you should read all of Chapter 3 and 4. Chapters 5 and 6 give more information on global functions and description of some typical applications. The remaining chapters provide troubleshooting and reference materials that can be referred to when needed. Chapter 8 provides a few easy to follow tutorials which will help you understand your instrument more quickly. Finally, don’t underestimate the index. When you need quick access to certain topics, the index will be the next best thing to a search engine! For any late breaking information on the SP2 and other Kurzweil products, visit our web site.
http://www.ycpiano.co.kr/
http://www.kurzweilmusicsystems.com/
Above all, enjoy, and make great music with your SP2
-3
CHAPTER
Getting Started
This chapter will help you hook up the SP2 to your sound and MIDI system. Also, you will learn how to play the demonstration songs. To find specific information, refer to the following list.
◄Setup. . . . . . . . . . . . . . . . . . . . . . . . . . . . . . . . . . . . . . . . . . . . . . . . . . . . . . . . . . . . . . . 2 1
◄Basic Connections. . . . . . . . . . . . . . . . . . . . . . . . . . . . . . . . . . . . . . . . . . . . . . . . . . . . 2 2
◄Powering UP. . . . . . . . . . . . . . . . . . . . . . . . . . . . . . . . . . . . . . . . . . . . . . . . . . . . . . . . .2 13
◄Playing the Demo Songs. . . . . . . . . . . . . . . . . . . . . . . . . . . . . . . . . . . . . . . . . . . . . . . 2 14
◄Software Upgrades. . . . . . . . . . . . . . . . . . . . . . . . . . . . . . . . . . . . . . . . . . . . . . . . . . . 2 15
◄Troubleshooting. . . . . . . . . . . . . . . . . . . . . . . . . . . . . . . . . . . . . . . . . . . . . .. . . . . . . . 2 15
Setup
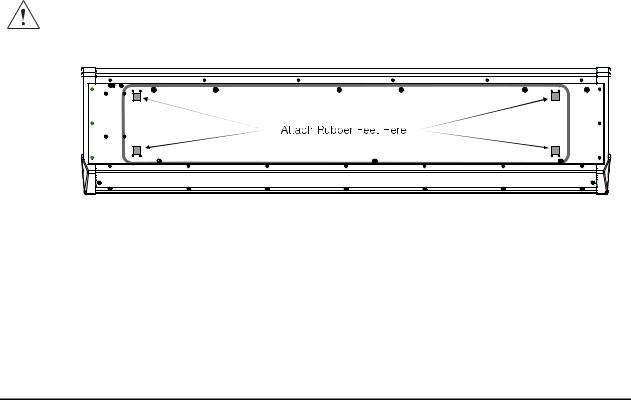
Attaching rubber feet
After you unpack the carton and make sure that all of the components are in the box, attach the four stick on rubber feet to the bottom. < Figure 2 1 > shows the best places to attach the feet.
Caution! : The applied rubber feet could interfere with some keyboard stands’ supports, so check how the SP2 fits on your stand before attaching the rubber feet.
< Figure 2 1 Placement of Rubber Feet >
-1
Chapter 2
SP2 Getting Started
Basic Connections
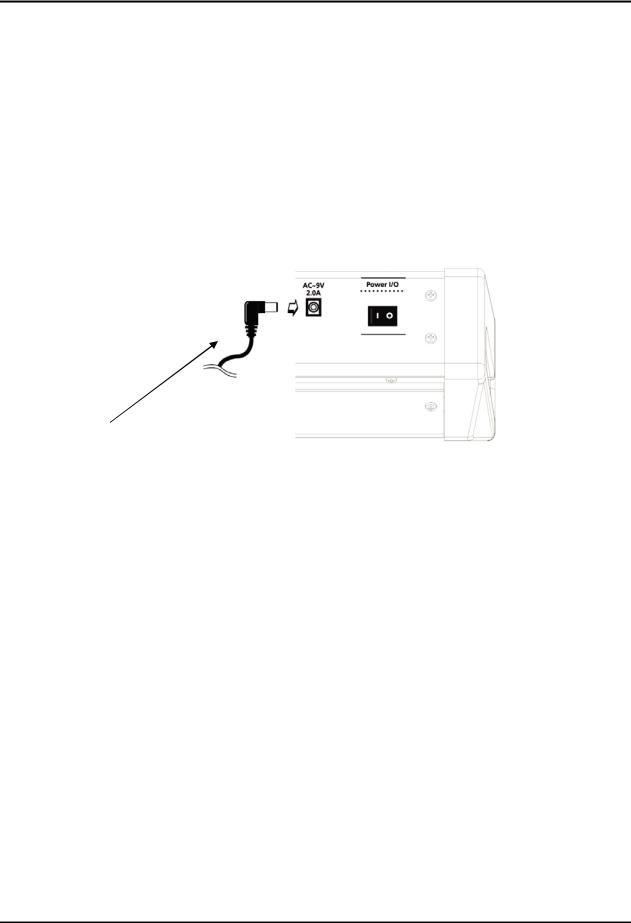
Connecting Power Supply
Before connecting the power supply, make sure your SP2 is off. After that, connect the plug to the AC In connector on the rear panel.
For your safety, place the power supply somewhere dry and out of the way. Also, to prevent overheating, do not cover the power supply with anything.
Caution : Use only the power supply that comes with your SP2.
Using a different power supply can cause serious damage to your instrument!
AC Adapter (9VAC, 2.0A)
< Figure 2 2 > Connecting Power Supply
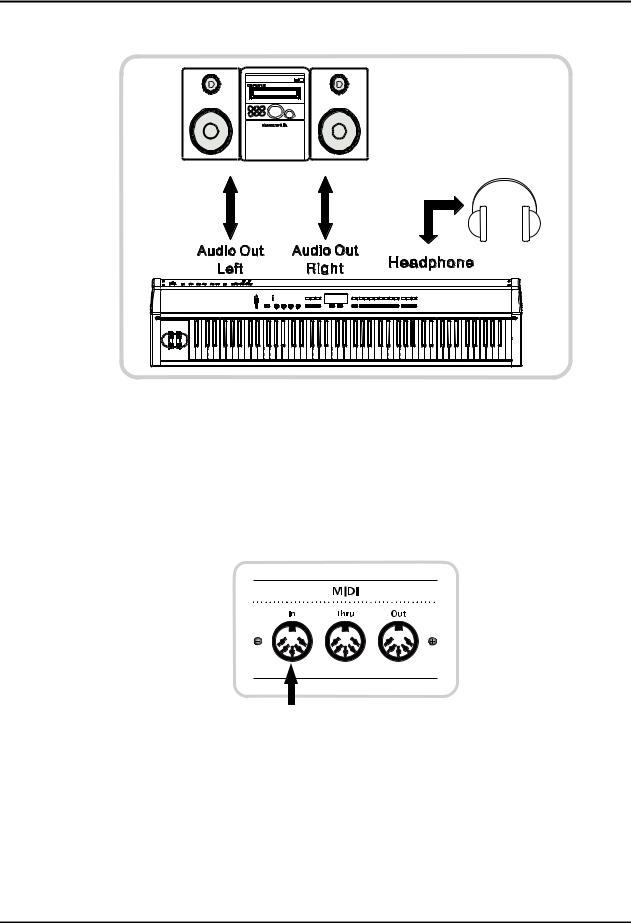
Connecting to Your Audio System
The SP2 features balanced left and right analog audio outputs. For the best results, use balanced cables to connect to balanced, line level inputs on your mixer or sound system.
It is very important to use proper type of cables. The cables should have each 1/4 inch stereo ( tip ring sleeve ) plugs on one end to connect to the SP2 and the other end of cable should have the same 1/4 inch stereo plugs or XLR plugs. Using balanced cables will greatly reduces noise.
For the best audio quality
1.Set the volume level of your sound system to its minimum. Be cautious! Not doing so may cause damage to your sound system such as speakers.
2.Set the SP2’s volume level to its maximum.


 When you connect audio cables, make sure to turn down the level on your sound system.
3.Adjust the volume of your sound system to the appropriate level.
4.The SP2 has a headphone jack which duplicates the signal from the main outputs. Plugging into the headphone jack does not mute the other audio outputs. You can also use the headphone jack as an unbalanced stereo line level output. In this case, just connect a stereo cable from the headphone jack to a stereo input on any sound system.
-2

Chapter 2
SP2 Getting Started
◄ connecting powered speakers
< Figure 2 3 connecting powered speakers >
◄ connecting an audio mixer
< Figure 2 4 connecting an audio mixer >
-3
Chapter 2
SP2 Getting Started
◄ connecting a home audio system
< Figure 2 5 connecting a home audio system >
Connecting MIDI
MIDI IN
The MIDI In port is for receiving MIDI data. When another MIDI device sends MIDI data to control the SP2, this makes the SP2 a MIDI slave, which enabling you to use the SP2 as a sound module. MIDI In port also can be used for upgrading software via system exclusive data.
< Figure 2 6 SP2 as a MIDI slave >
-4

Chapter 2
SP2 Getting Started
MIDI OUT
The MIDI Out port is for transmitting MIDI data that the SP2 generates. MIDI data does not contain any audio signal. It carries digital “performance data” such as the pitch, note velocity, control signals, etc.
< Figure 2 7 SP2 as a MIDI master >
By connecting a MIDI cable from the MIDI Out port of the SP2 to the MIDI In port of another MIDI device, you can use the SP2 as a MIDI master to play and control its slaves.
MIDI Thru
< Figure 2 8 MIDI Thru jack >
The MIDI Thru port sends MIDI data being sent to the SP2’s MIDI In port. MIDI Thru port does not transmit the MIDI information that the SP2 itself generates.
-5
Chapter 2
SP2 Getting Started
Basic MIDI connection
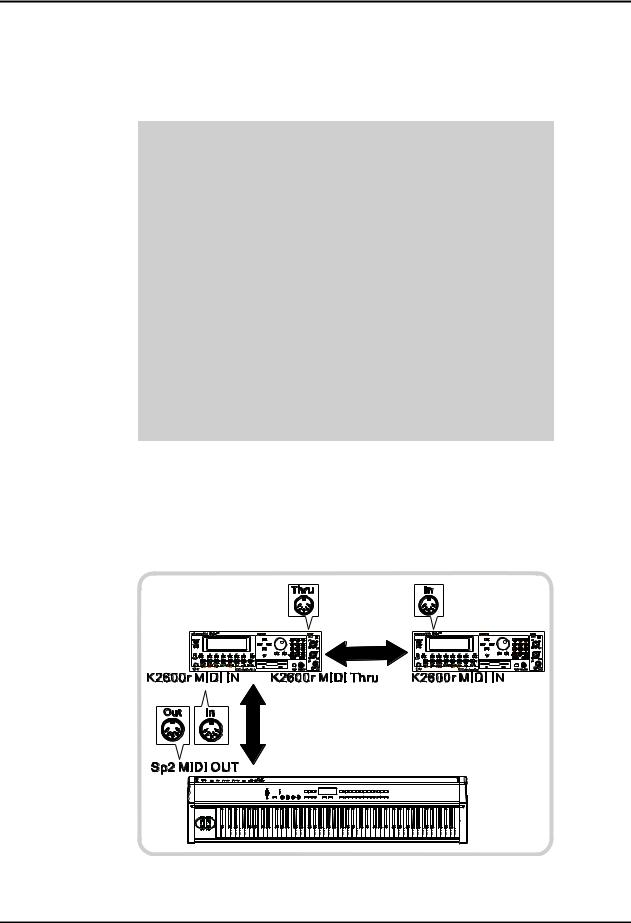
The simplest application of MIDI is to connect and control an external sound module for more sounds, more polyphony, and more timbre control than the internal sound module offers. The following figure shows how simple this can be.
< Figure 2 9 SP2 connected to an external sound module (K2600r) via MIDI >
Connecting More Sound Modules
With MIDI, you are not limited to just one add on sound module; You can connect 2, 3, or even more using the basic method illustrated below. The SP2 can play independent sounds on 1 multi timbral or 2 mono timbral modules at once.
< Figure 2 10 SP2 connected to Module A and Module B >
-6
Chapter 2
SP2 Getting Started
Connecting to a Computer via USB
Without a MIDI interface, the SP2 can be connected to a computer via USB. A single USB cable can carry incoming and outgoing MIDI data between the SP2 and a computer. You don’t even need to install any additional driver.
Though the SP2 can use MIDI port and USB port at the same time, it may cause problems with running out of polyphony. So, we recommend you to use either MIDI port or USB port at a time.
What is USB?
USB is the abbreviation for Universal Serial Bus, which is a serial bus standard to interface devices. The SP2 support “Plug and Play” feature of Windows XP.
How to Install Device Driver?
What you need
1)Any PC, Windows XP installed. ( recommend Service Pack 2 )
2)Working SP2 unit with OS V1.0( or later ) installed.
3)Type A, USB cable.
4)Go to our download page below, get “sp2series.inf”. http://www.kurzweilmusicsystems.com/downloads.html
How to install
1)Make sure where sp2series.inf file located.
2)Power up SP2.
3)After power up, connect USB cable between PC and SP2.
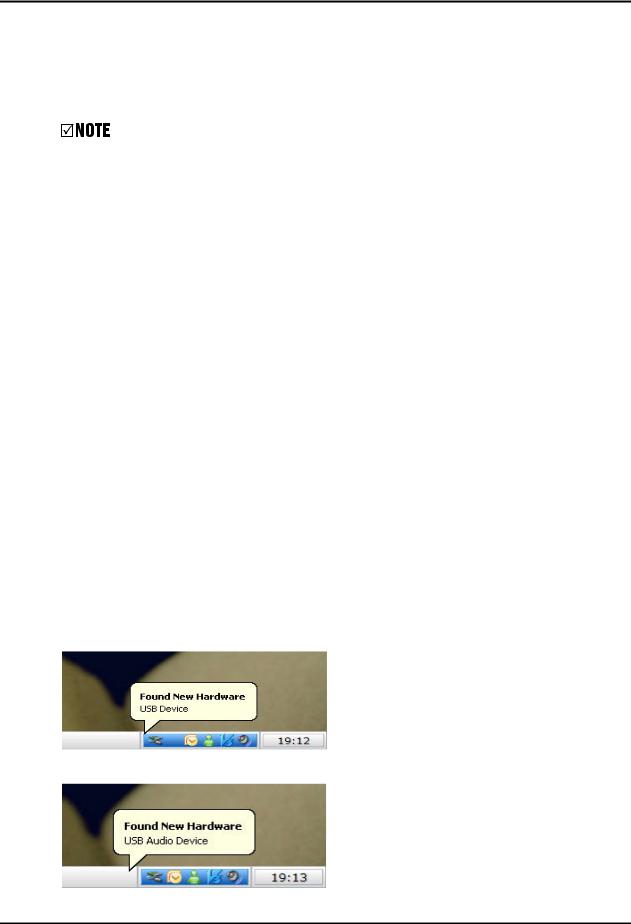
4)Shortly after, you might hear “ding” sound, and in the system tray Found new hardware popup open.
5) After a while, you can see popup about new audio device.
-7
Chapter 2
SP2 Getting Started
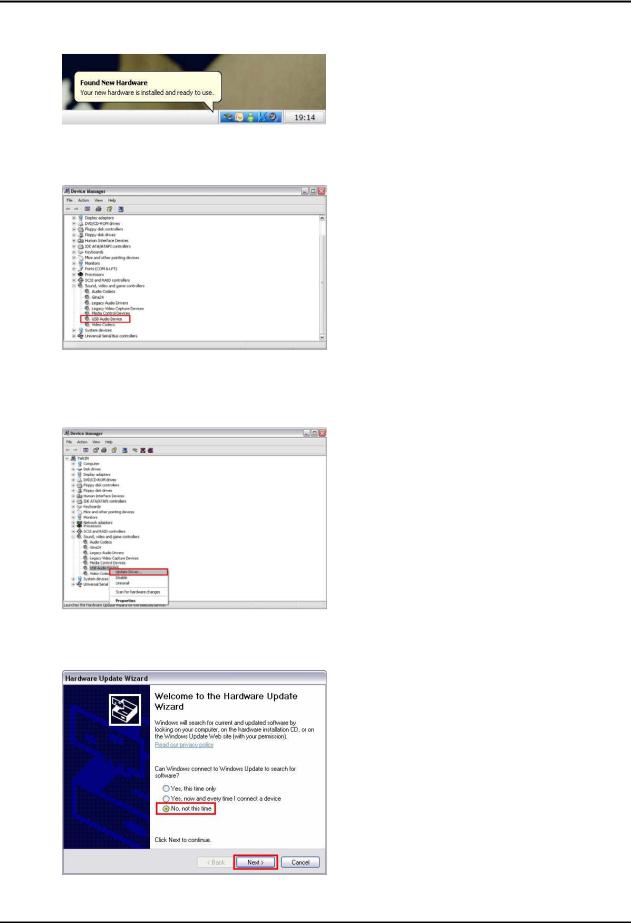
6) After finished enumeration with host, PC displays following message.
7) As you see in the device manager, SP2 connected as “USB Audio Device”.
8) For install device driver, you need to update device driver of “USB Audio Device”. Select “USB Audio Device” and press right mouse button and Select “Update Driver” popup menu.
9) Now, you might see new hardware wizard, select “No, not this time” radio button click next.
-8
Chapter 2
SP2 Getting Started
10) And next step, select “Install a list of specification(Advanced)” radio button and click next.
11) Now select “Don’t search, I will choose driver to install” and click next.
12) Click “Have Disk…” button.
13) Ok, next press “browse” button.
-9
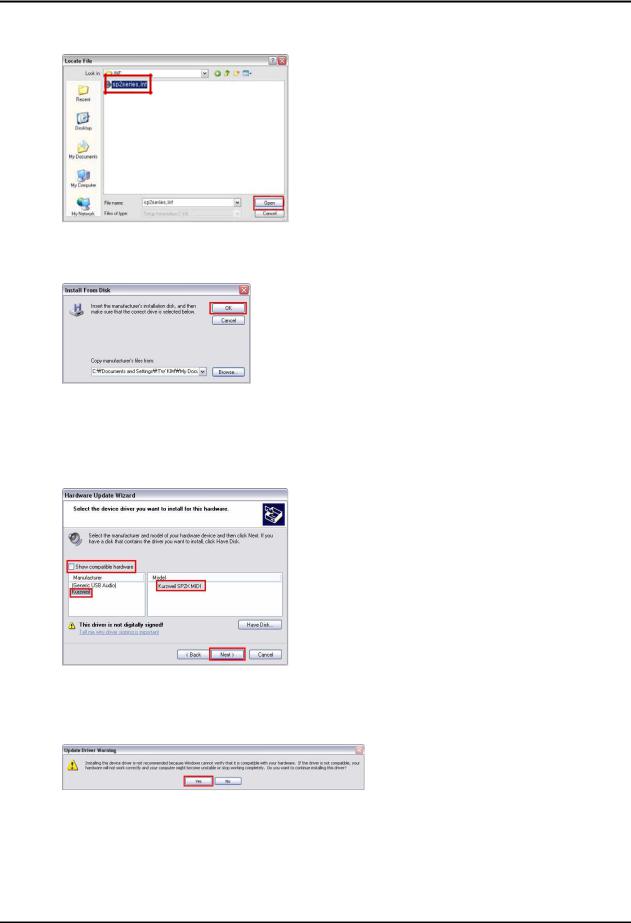
Chapter 2
SP2 Getting Started
14) Find out where “sp2series.inf” located and press “Open” button for open it.
15) Press “OK” button again for further steps.
16) Now make sure uncheck “Show compatible hardware”. Select “Kurzweil”
in manufacturer, and select “Kurzweil SP2X MIDI” for SP2X or select “Kurzweil SP2 MIDI” for SP2. Finally press “Next” button.
17) You can see warning window, because this driver is not signed by Microsoft, It’s ok ignore it. Click “Yes” button.
-10

Chapter 2
SP2 Getting Started
18) You can see the warning box again, press “Continue Anyway” button.
19) Driver install is in progress.
20) After a while Install finished, press “Finish” button.
21) In the device manager, you can see new device name “Kurzweil SP2 Series MIDI”.
-11
Chapter 2
SP2 Getting Started
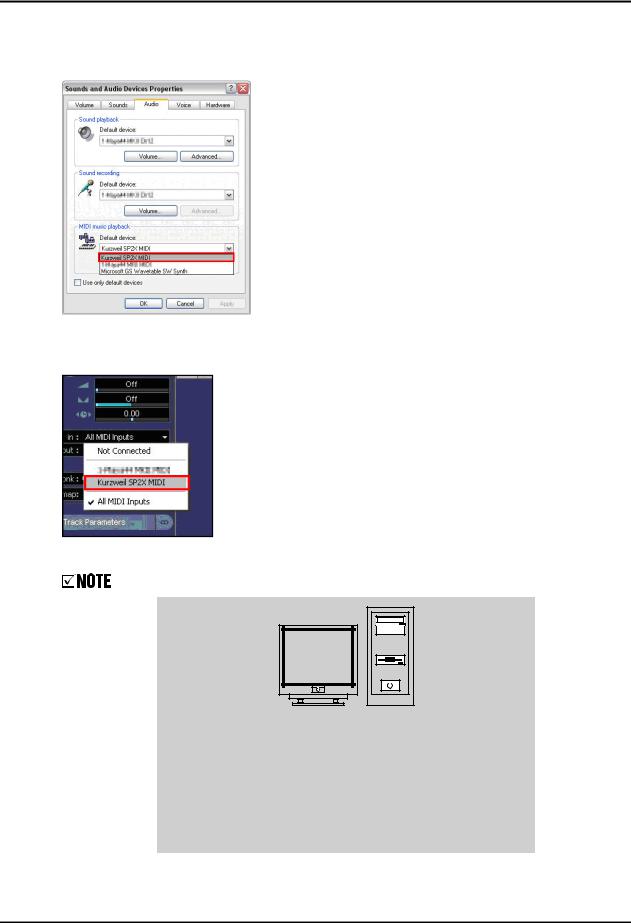
22) You can also see a new device name in “Sound and Audio Devices Properties”.
23) Now, you can also see a new device name in any sequencer software. (Nuendo in picture)
Use USB Type A cable which is the most widely used type.
< Figure 2 11 Connecting to a Computer via USB >
-12
Chapter 2
SP2 Getting Started
Connecting Pedals
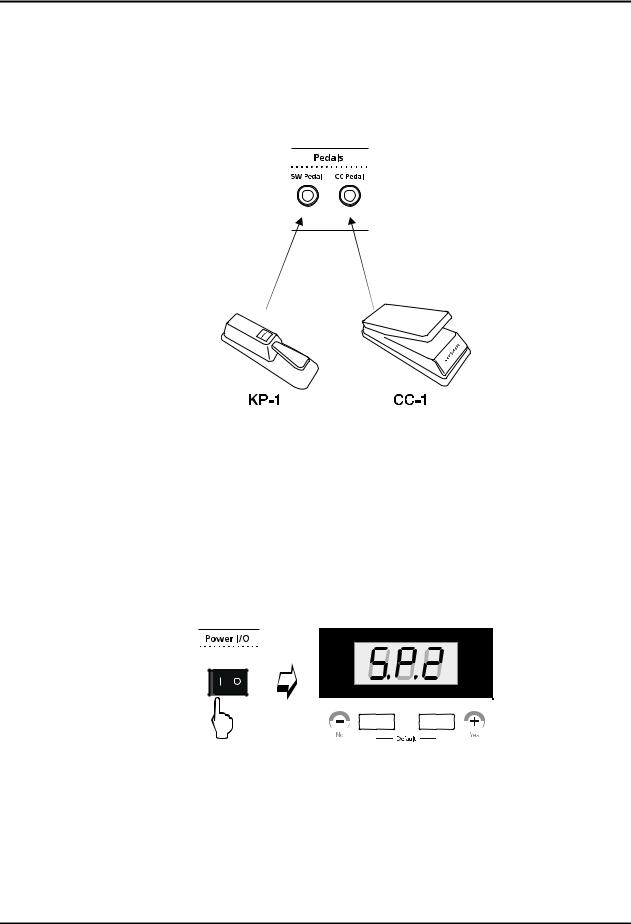
Plug your switch or continuous pedals into the corresponding jacks on the SP2’s rear panel. Although we recommend using the Kurzweil pedals described on page 1 2, you can use almost any switch or continuous pedal, as long as it adheres to the following specifications..
•switch pedals 1/4 inch tip sleeve plugs
•continuous pedals 10k Ohm linear taper potentiometer 1/4 inch tip sleeve plug


 When using non Kurzweil pedal, make sure it’s connected before you turn on your SP2. Also, do not press any of your pedals while powering up, or it might work backwards because the SP2 verifies each pedal’s orientation during power up.
Powering Up
When you’ve made all your connections, turn on the SP2. After the LEDs on the front panel flash, the numeric display on the front panel will show a series of information. When the SP2 is ready to play, the display will look like following:
< Figure 2 12 Initial Display >
To prevent any damage to your sound system, set the SP2’s master volume slider all the way down before you turn on the SP2. And then, gradually push up the slider while playing the keyboard
-13
Chapter 2
SP2 Getting Started
Playing the Demo Songs
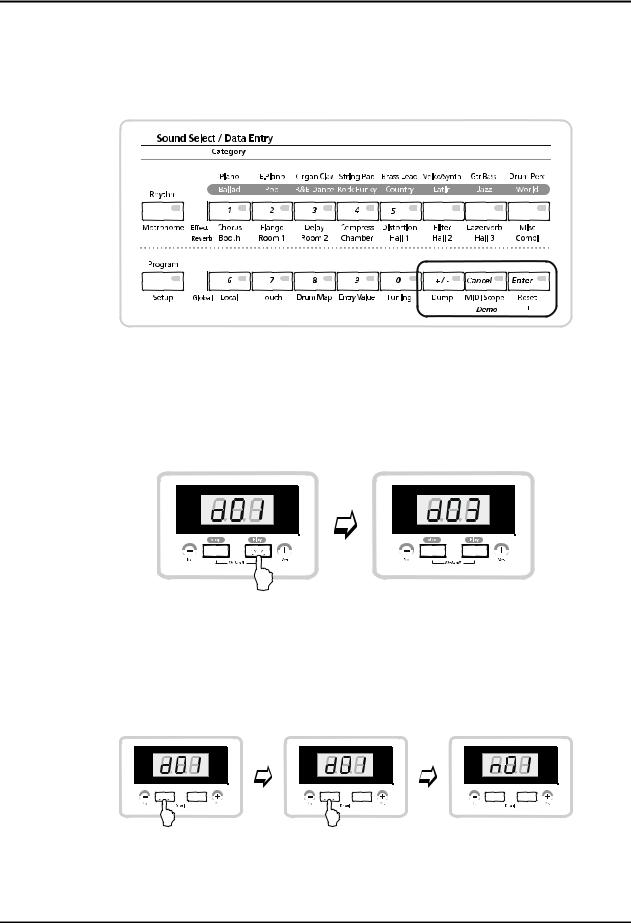
1.Press [+/ ] button and [Enter] simultaneously to enter Demo mode.
<Figure 2 13 Demo mode >
2.[Play] button below the display starts the demo song. There are three demo songs. Press numeric button in Sound Select/Data Entry region to select one of the demo songs like
<Figure 2 14 >.
<Figure 2 14 Starting Demo Songs >
3.If you want to stop the demo before it finishes, press [Stop] button below the display to stop the demo song. To exit Demo mode, press [Stop] button when the demo songs are not playing.
< Figure 2 15 Stop and Exiting Demo mode >
-14

Chapter 2
SP2 Getting Started
Software Upgrades
Beause the SP2 contains flash ROM, the system software can be upgraded via MIDI. You can get software upgrades for your SP2 from authorized Kurzweil dealers or our home page (http://www.kurzweilmusicsystems.com/). For software installation instructions, refer to Chapter 6, Software Upgrades.
Troubleshooting
• No Text in Display
If no messages are displayed when you turn on the power on your SP2 and no LEDs light, check the power adapter connections at the AC outlet and the SP2 Adapter In jack. For more information about troubleshooting, see Chapter 9, troubleshooting.
-15

CHAPTER
Performance Features
In this chapter, you will learn how to get the most out of your SP2’s internal voices. The overview introduces a few basic concepts and the important features of your instrument. The SP2 has two different type of internal voices: Programs and Setups. Use the following list to find specific information more quickly.
◄Overview. . . . . . . . . . . . . . . . . . . . . . . . . . . . . . . . . . . . . . . . . . . . . . . . . . . . . . . . . . . .3 1
◄Front Panel, Rear Panel. . . . . . . . . . . . . . . . . . . . . . . . . . . . . . . . . . . . . . . . . . . . . . . . 3 2
◄Programs. . . . . . . . . . . . . . . . . . . . . . . . . . . . . . . . . . . . . . . . . . . . . . . . . . . . . . . . . . . 3 5
◄Setups. . . . . . . . . . . . . . . . . . . . . . . . . . . . . . . . . . . . . . . . . . . . . . . . . . . . . . . . . . . . . . .3 6
◄Rhythm Patterns and Metronome. . . . . . . . . . . . . . . . . . . . . . . . . . . . . . . . . . . . . . . 3 7
◄ Using Quick Access Bank . . . . . . . . . . . . . . . . . . . . . . . . . . . . . . . . . . . . . . . . . . . . ..3 10
◄ Transpose Function . . . . . . . . . . . . . . . . . . . . . . . . . . . . . . . . . . . . . . . . . . . . . . . . . . .3 11
◄ Multi Function Knob . . . . . . . . . . . . . . . . . . . . . . . . . . . . . . . . . . . . . . . . . . . . . . . . ..3 12
Overview
The SP2 provides a wide variety of features. For logical and friendly operation, the front panel is divided into three different regions.
zThe Performance / Effect region provides real time controllers for modifying your sound as you play. You can control the volume level of each zone, MIDI control messages, effect wet/dry level and the tempo of rhythm patterns with 4 assignable Knobs.
zIn the Sound Select / Data Entry region, you make selection of desired instrumental category, sounds, rhythm patterns and metronome sounds. Also, the buttons in this region let you enter numeric values for Global parameter or MIDI control numbers.
zIn the Edit region, you can modify the timbre of existing sounds to your taste and store them into Quick Access bank for easy usage.
-1

Chapter 3
SP2 Performance Features
Performance / Effect
< Figure 3 1 >
XMIDI controller mode
Knobs A D control MIDI control change depending on the current program.
YZone Volume mode
Knobs A D control volume level of each layer.
ZEffect Wet / Dry mode
Knobs A D control the wet / dry mix of FX blocks.
[Knob Mode / Tap Tempo Button
Knob Mode / Tap Tempo button is used for selecting Knob Mode or setting the tempo of the internal metronome / rhythm patterns in realtime by tapping it.
Global
The Global menu provides several parameters that you can control the SP2 with. In the Global menu, you can make changes that affect the entire SP2, for example, Local on / off, Drum Map, Drum Channel, Tuning, SysEX dump, MIDI scope, Reset, and more.
Effect (Effect, Reverb)
The SP2 provides more than 50 types of effects including reverb, delay, chorus, flanger, phaser, tremolo, panner, distortion, compressor, rotary speaker simulator, sound enhancer, waveform shaper, and more. There are 30 of preset reverb. For more detailed information, please read page 7 1
Front Panel
-2
 Loading...