


Stage Piano
User’s Guide
©1999 All rights reserved. Kurzweil is a product line of Young Chang Co.; V.A. S. T. is a registered trademark, and Kurzweil, SP76, SP88, and K2600 are trademarks of Young Chang Co. All other products and brand names are trademarks or registered trademarks of their respective companies. Product features and specifications are subject to change without notice.
Part Number: 910329 Rev. A
CAUTION
RISK OF ELECTRIC SHOCK
DO NOT OPEN
CAUTION: TO REDUCE THE RISK OF ELECTRIC SHOCK, DO NOT REMOVE THE COVER
NO USER SERVICEABLE PARTS INSIDE
REFER SERVICING TO QUALIFIED SERVICE PERSONNEL
The lightning flash with the arrowhead symbol, within an equilateral triangle, is intended to alert the user to the presence of uninsulated "dangerous voltage" within the product's enclosure that may be of sufficient magnitude to constitute a risk of electric shock to persons.
The exclamation point within an equilateral triangle is intended to alert the user to the presence of important operating and maintenance (servicing) instructions in the literature accompanying the product.
IMPORTANT SAFETY & INSTALLATION INSTRUCTIONS
INSTRUCTIONS PERTAINING TO THE RISK OF FIRE, ELECTRIC SHOCK, OR INJURY TO PERSONS
WARNING: When using electric products, basic precautions should always be followed, including the following:
1.Read all of the Safety and Installation Instructions and Explanation of Graphic Symbols before using the product.
2.This product must be grounded. If it should malfunction or break down, grounding provides a path of least resistance for electric current to reduce the risk of electric shock. This product is equipped with a power supply cord having an equipment-grounding conductor and a grounding plug. The plug must be plugged into an appropriate outlet which is properly installed and grounded in accordance with all local codes and ordinances.
DANGER: Improper connection of the equipment-grounding conductor can result in a risk of electric shock. Do not modify the plug provided with the product - if it will not fit the outlet, have a proper outlet installed by a qualified electrician. Do not use an adapter which defeats the function of the equipmentgrounding conductor. If you are in doubt as to whether the product is properly grounded, check with a qualified serviceman or electrician.
3.WARNING: This product is equipped with an AC input voltage selector. The voltage selector has been factory set for the mains supply voltage in the country where this unit was sold. Changing the voltage selector may require the use of a different power supply cord or attachment plug, or both. To reduce the risk of fire or electric shock, refer servicing to qualified maintenance personnel.
4.Do not use this product near water - for example, near a bathtub, washbowl, kitchen sink, in a wet basement, or near a swimming pool, or the like.
5.This product should only be used with a stand or cart that is recommended by the manufacturer.
6.This product, either alone or in combination with an amplifier and speakers or headphones, may be capable of producing sound levels that could cause permanent hearing loss. Do not operate for a long period of time at a high volume level or at a level that is uncomfortable. If you experience any hearing loss or ringing in the ears, you should consult an audiologist.
7.The product should be located so that its location or position
does not interfere with its proper ventilation.
8.The product should be located away from heat sources such as radiators, heat registers, or other products that produce heat.
9.The product should be connected to a power supply only of the type described in the operating instructions or as marked on the product.
10.This product may be equipped with a polarized line plug (one blade wider than the other). This is a safety feature. If you are unable to insert the plug into the outlet, contact an electrician to replace your obsolete outlet. Do not defeat the safety purpose of the plug.
11.The power supply cord of the product should be unplugged from the outlet when left unused for a long period of time. When unplugging the power supply cord, do not pull on the cord, but grasp it by the plug.
12.Care should be taken so that objects do not fall and liquids are not spilled into the enclosure through openings.
13.The product should be serviced by qualified service personnel when:
A.The power supply cord or the plug has been damaged;
B.Objects have fallen, or liquid has been spilled into the product;
C.The product has been exposed to rain;
D.The product does not appear to be operating normally or exhibits a marked change in performance;
E.The product has been dropped, or the enclosure damaged.
14.Do not attempt to service the product beyond that described in the user maintenance instructions. All other servicing should be referred to qualified service personnel.
15.WARNING: Do not place objects on the product’s power supply cord, or place the product in a position where anyone could trip over, walk on, or roll anything over cords of any type. Do not allow the product to rest on or be installed over cords of any type. Improper installations of this type create the possibility of a fire hazard and/or personal injury.
RADIO AND TELEVISION INTERFERENCE
WARNING: Changes or modifications to this instrument not expressly approved by Young Chang could void your authority to operate the instrument.
IMPORTANT: When connecting this product to accessories and/or other equipment use only high quality shielded cables.
NOTE: This instrument has been tested and found to comply with the limits for a Class B digital device, pursuant to Part 15 of the FCC Rules. These limits are designed to provide reasonable protection against harmful interference in a residential installation. This instrument generates, uses, and can radiate radio frequency energy and, if not installed and used in accordance with the instructions, may cause harmful interference to radio communications. However, there is no guarantee that interference will not occur in a particular installation. If this instrument does cause harmful interference to radio or television reception, which can be determined by turning the instrument off and on, the user is encouraged to try to correct the interference by one or more of the following measures:
• Reorient or relocate the receiving antenna.
•Increase the separation between the instrument and the receiver.
•Connect the instrument into an outlet on a circuit other than the one to which the receiver is connected.
•If necessary consult your dealer or an experienced radio/ television technician for additional suggestions.
NOTICE
This apparatus does not exceed the Class B limits for radio noise emissions from digital apparatus set out in the Radio Interference Regulations of the Canadian Department of Communications.
AVIS
Le present appareil numerique n’emet pas de bruits radioelectriques depassant les limites applicables aux appareils numeriques de la class B prescrites dans le Reglement sur le brouillage radioelectrique edicte par le ministere des Communications du Canada.
SAVE THESE INSTRUCTIONS
ii

Young Chang Distributors
Contact the nearest Young Chang office listed below to locate your local Young Chang/ Kurzweil representative.
Young Chang America, Inc.
P.O. Box 99995
Lakewood, WA 98499-0995
Tel: (253) 589-3200
Fax: (253) 984-0245
Young Chang Co.
178-55 Gajwa-Dong
Seo-Ku, Inchon, Korea 404-714
Tel: 011-82-32-570-1380
Fax: 011-82-32-570-1218
Young Chang Akki Europe GmbH
Industriering 45
D-41751 Viersen
Germany
Tel: 011-49-2162-4491
Fax: 011-49-2162-41744
Young Chang Canada Corp.
250 Shields Court, Unit #11
Markham, Ontario L3R 9W7
Tel: (905) 948-8052
Fax: (905) 948-8172
iii

Contents
Young Chang Distributors ....................................................................... iii
Chapter 1 Introducing the Stage Piano
Welcome! .................................................................................................. |
1-1 |
Stage Piano Overview ............................................................................ |
1-1 |
Sound, Internal Voices Setup, MIDI Setup ................................... |
1-1 |
The Keyboard........................................................................................... |
1-2 |
The Front Panel........................................................................................ |
1-2 |
The Ribbon Controllers .......................................................................... |
1-2 |
Other Controllers..................................................................................... |
1-2 |
Connectors................................................................................................ |
1-3 |
Modes........................................................................................................ |
1-3 |
How to Use This Book............................................................................ |
1-3 |
Chapter 2 Getting Started
Unpacking the Instrument..................................................................... |
2-1 |
Quick Start................................................................................................ |
2-1 |
Playing the Demo.................................................................................... |
2-2 |
Placement and Support .......................................................................... |
2-2 |
The Rear Panel ......................................................................................... |
2-2 |
Power Switch .................................................................................... |
2-3 |
Power Jack......................................................................................... |
2-3 |
Audio Jacks ....................................................................................... |
2-3 |
Phones Jack ....................................................................................... |
2-3 |
Switch Pedal Jack ............................................................................. |
2-3 |
Control Pedal Jack............................................................................ |
2-3 |
MIDI Ports......................................................................................... |
2-4 |
Connecting Switch Pedals .............................................................. |
2-4 |
A Special Note About Switch Pedals............................................. |
2-4 |
Connecting a Control Pedal............................................................ |
2-4 |
Connecting to Your Audio System....................................................... |
2-5 |
Changing to Mono Output ............................................................. |
2-5 |
Connecting Headphones........................................................................ |
2-6 |
Connecting MIDI..................................................................................... |
2-6 |
Basic MIDI Hookup ......................................................................... |
2-6 |
Connecting More Sound Modules................................................. |
2-7 |
Connecting to a Computer Sequencer .......................................... |
2-8 |
Full System...................................................................................... |
2-10 |
The Front Panel....................................................................................... |
2-11 |
v

The Kurzweil Stage Piano User’s Guide
Sound and Setup Select Buttons |
...................................................2-11 |
The Numeric Display ..................................................................... |
2-11 |
Mode LEDs ..................................................................................... |
2-12 |
Parameter Editing Buttons............................................................ |
2-12 |
The Parameter Display.................................................................. |
2-12 |
The Info Strip .................................................................................. |
2-12 |
Button Combinations..................................................................... |
2-13 |
Direct Select ............................................................................. |
2-13 |
Panic.......................................................................................... |
2-13 |
Demo Song............................................................................... |
2-13 |
What Mode Am I In? ............................................................................ |
2-14 |
Chapter 3 Internal Voices Mode
Selecting Internal Voices Mode ............................................................. |
3-1 |
Selecting Sounds .............................................................................. |
3-1 |
Modifying Effects............................................................................. |
3-2 |
Saving a Sound’s Effects Settings.......................................................... |
3-3 |
Modifying The MIDI Transmit Channel .............................................. |
3-3 |
Sending a MIDI Program Change......................................................... |
3-4 |
Modifying Other Internal Voice Parameters ....................................... |
3-4 |
MIDI Program .................................................................................. |
3-4 |
MIDI Bank Sel Lo ............................................................................. |
3-4 |
MIDI Channel ................................................................................... |
3-5 |
Destination ........................................................................................ |
3-5 |
Internal Effect.................................................................................... |
3-5 |
Transpose........................................................................................... |
3-5 |
Velocity Curve .................................................................................. |
3-5 |
Reverb Wet/Dry, Chorus Wet/Dry ............................................... |
3-5 |
A Ribbon............................................................................................ |
3-5 |
Hold or Center.................................................................................. |
3-5 |
B Ribbon Up, B Ribbon Down........................................................ |
3-5 |
Hold or Zero ..................................................................................... |
3-6 |
Control Slider, Control Pedal ......................................................... |
3-6 |
Switch Pedal R, Switch Pedal L...................................................... |
3-6 |
Editing Basics........................................................................................... |
3-6 |
Edit vs. Play Mode ........................................................................... |
3-7 |
Selecting a Parameter ...................................................................... |
3-7 |
Increment/Decrement Editing....................................................... |
3-7 |
Direct Numerical Editing................................................................ |
3-8 |
Cancelling Edits................................................................................ |
3-8 |
Saving The Edited Parameters ....................................................... |
3-8 |
vi

The Kurzweil Stage Piano User’s Guide
Chapter 4 MIDI Setups Mode
Selecting Setups....................................................................................... |
4-1 |
Zones......................................................................................................... |
4-2 |
Editing MIDI Setups ............................................................................... |
4-3 |
Saving a Modified MIDI Setup.............................................................. |
4-3 |
Sending a MIDI Program Change ........................................................ |
4-4 |
Parameter Summary ............................................................................... |
4-4 |
Internal Sound .................................................................................. |
4-4 |
MIDI Program .................................................................................. |
4-4 |
MIDI Bank Sel Lo, MIDI Bank Sel Hi............................................ |
4-4 |
MIDI Channel ................................................................................... |
4-4 |
Destination ........................................................................................ |
4-5 |
Internal Effect.................................................................................... |
4-5 |
Key Range Lo, Key Range Hi ......................................................... |
4-5 |
Transpose........................................................................................... |
4-5 |
Velocity Curve .................................................................................. |
4-6 |
Reverb Wet/Dry, Chorus Wet/Dry ............................................... |
4-6 |
A Ribbon............................................................................................ |
4-6 |
Hold or Center.................................................................................. |
4-6 |
B Ribbon Up, B Ribbon Down........................................................ |
4-7 |
Hold or Zero ..................................................................................... |
4-7 |
Control Slider, Control Pedal ......................................................... |
4-7 |
Switch Pedal R, Switch Pedal L...................................................... |
4-7 |
MIDI Controller Destinations................................................................ |
4-7 |
Continuous Controller Destinations .................................................... |
4-8 |
Switch Controller Destinations ............................................................. |
4-9 |
More on Keyboard Splits....................................................................... |
4-11 |
Changing Setups: Special Considerations ......................................... |
4-11 |
Chapter 5 Global Parameters
Access to the Global Parameters........................................................... |
5-1 |
What the Global Parameters Do .................................................... |
5-1 |
Local............................................................................................ |
5-1 |
Stereo .......................................................................................... |
5-1 |
Touch .......................................................................................... |
5-2 |
Effect ........................................................................................... |
5-3 |
MIDI In ....................................................................................... |
5-3 |
Set Change Channel ................................................................. |
5-3 |
Tune ............................................................................................ |
5-3 |
Saving Global Parameters............................................................... |
5-4 |
vii

The Kurzweil Stage Piano User’s Guide
Chapter 6 Advanced Applications |
|
External Sound Modules........................................................................ |
6-1 |
Example: The Kurzweil MicroPiano ............................................ |
6-1 |
Example: The Kurzweil K2600R ................................................... |
6-2 |
Computer Sequencers............................................................................. |
6-2 |
MIDI Hookup ................................................................................... |
6-3 |
Local Control Off and Patch Thru On........................................... |
6-3 |
Basic Sequencer Operations............................................................ |
6-3 |
Saving Setup Memory ..................................................................... |
6-4 |
Reloading Setup Memory ............................................................... |
6-5 |
External MIDI Processors....................................................................... |
6-5 |
Receive Program Change................................................................ |
6-6 |
Example: The Kurzweil ExpressionMate .................................... |
6-6 |
Chapter 7 Troubleshooting
Maintenance............................................................................................. |
|
|
7-1 |
Common Problems ................................................................................. |
|
|
7-1 |
Power Problems ............................................................................... |
|
|
7-1 |
Audio Problems................................................................................ |
|
|
7-2 |
MIDI Problems ................................................................................. |
|
|
7-3 |
Switch Pedal Problems.................................................................... |
|
|
7-3 |
Control Pedal Problems .................................................................. |
|
7-4 |
|
Use the Right Impedance, Taper, and Range ........................ |
7-5 |
||
If None of the Above… |
................................................................... |
|
7-5 |
Service Centers ........................................................................................ |
|
|
7-5 |
Restoring Factory Defaults .................................................................... |
|
|
7-6 |
Diagnostics ............................................................................................... |
|
|
7-6 |
Starting Diagnostics......................................................................... |
|
|
7-6 |
Main Diagnostic Menu.................................................................... |
|
|
7-6 |
Player Control Diagnostic........................................................ |
|
7-7 |
|
Testing the Keyboard ........................................................ |
|
7-7 |
|
Testing the Ribbons ........................................................... |
|
7-7 |
|
Testing the Switch Pedals ................................................. |
|
7-7 |
|
Testing the Control Pedal ................................................. |
|
7-7 |
|
Testing the Buttons and LEDs.......................................... |
7-8 |
||
CPU Diagnostics ....................................................................... |
) |
|
7-8 |
ROM Test ( |
|
7-8 |
|
rom |
|
7-8 |
|
EEPROM Test ( |
) ...................................................... |
|
|
MIDI Test ( |
eer |
|
7-8 |
).............................................................. |
|
||
mid |
|
7-8 |
|
Timers Test ( |
)........................................................... |
|
|
tim |
|
7-9 |
|
Burnin Test ( |
) .......................................................... |
|
|
bur |
) |
7-9 |
|
Initialize EEPROM ( |
|||
|
ini |
|
|
viii

|
|
|
The Kurzweil Stage Piano User’s Guide |
Sound Board Diagnostics......................................................... |
7-9 |
||
Interface Test ( |
|
)........................................................ |
7-9 |
inf |
7-9 |
||
ROM Test ( |
).............................................................. |
|
|
rom |
|
7-9 |
|
RAM Test ( |
).............................................................. |
|
|
ram |
) |
7-9 |
|
Timers Test ( |
|
||
tim |
7-9 |
||
Sound ROM Test ( |
) ................................................. |
||
|
snr |
7-9 |
|
Sound Chip Test ( |
).................................................. |
||
|
snc |
7-10 |
|
Delay RAM Test ( |
) ................................................ |
||
Sine Wave Test ( |
drm |
7-10 |
|
|
)................................................... |
||
sin |
7-10 |
||
Burnin Test ( |
|
)......................................................... |
|
bur |
|
||
Jumper Settings Display ........................................................ |
7-10 |
||
Exiting Diagnostics................................................................. |
|
|
7-10 |
Chapter 8 Reference |
|
|
|
Display Characters.................................................................................. |
|
|
8-1 |
Factory Default Internal Voices Setup ................................................. |
8-2 |
||
Internal Voices Parameters ............................................................. |
|
8-2 |
|
The Internal Voices .......................................................................... |
|
|
8-3 |
Factory Default MIDI Setups................................................................. |
|
|
8-4 |
MIDI Setup Parameters................................................................... |
|
|
8-4 |
Factory Default Global Parameters ...................................................... |
8-5 |
||
Stage Piano Effects .................................................................................. |
|
|
8-5 |
MIDI Implementation Chart.................................................................. |
|
|
8-6 |
Default MIDI Controller Assignments................................................. |
8-7 |
||
Specifications ........................................................................................... |
|
|
8-8 |
Controllers......................................................................................... |
|
|
8-8 |
Standard ..................................................................................... |
|
|
8-8 |
Optional...................................................................................... |
|
|
8-8 |
User Interface.................................................................................... |
|
|
8-8 |
Display........................................................................................ |
|
|
8-8 |
Buttons........................................................................................ |
|
|
8-8 |
Audio ................................................................................................. |
|
|
8-8 |
Output Connections ................................................................. |
|
|
8-8 |
Impedance.................................................................................. |
|
|
8-8 |
Electrical Requirements................................................................... |
|
|
8-9 |
Environment ..................................................................................... |
|
|
8-9 |
Operating ................................................................................... |
|
|
8-9 |
Storage ........................................................................................ |
|
|
8-9 |
Physical Dimensions........................................................................ |
|
|
8-9 |
SP76............................................................................................. |
|
|
8-9 |
SP88............................................................................................. |
|
|
8-9 |
Index
ix
Chapter 1
Introducing the Stage Piano
Welcome!
Congratulations, and thank you for purchasing a Kurzweil / Young Chang Stage Piano. You’ve got your hands on an excellent-sounding and flexible—yet economical—performance instrument and MIDI controller.
This manual will get you started with your new instrument. You’ll definitely want to keep the manual handy as you become an advanced user, also.
Stage Piano Overview
The Stage Piano is a great live performance instrument. It has many excellent keyboard sounds (voices), including the famous Kurzweil Grand Piano, already programmed and ready to go. It is also a flexible MIDI controller ideally suited for controlling additional sound modules and as input to a sequencer.
Sound, Internal Voices Setup, MIDI Setup
We’ll use these three terms throughout this manual. They’re the components of the Stage Piano’s performance features.
Sounds are the 32 internal voices of the Stage Piano: pianos, organs, strings.
The Internal Voices Setup is the basic configuration of your Stage Piano for standalone performance (no external sound modules or sequencers). The Internal Voices Setup specifies which sound you’ll hear, and with which audio effect (if any) applied to it. It specifies several other performance features as well:
•What the physical controllers (like ribbons and pedals) do
•Transposition
•MIDI channel
•MIDI Program Change commands
There’s one Internal Voices Setup, and it’s programmable—that is, you can change these specifications, and save those changes to the Stage Piano’s memory.
There are 32 MIDI Setups, each of which controls the same features as the Internal Voices Setup. When you’re using a MIDI Setup, the Stage Piano’s keyboard has two zones, which can be anywhere on the keyboard (even overlapping). This enables you to play the Stage Piano and control two external MIDI instruments at the same time. You can edit and save each MIDI Setup.
Introducing the Stage Piano
The Keyboard
The Keyboard
Depending on model, the keyboard has 76 keys (E1–G7) or a full 88 keys (A0–C8). These are full-sized, weighted keys, the equal of keyboards found on more expensive synthesizers and controllers. The keyboard is velocity-sensitive, meaning the harder (faster) you press a key, the louder the voice (except for organ voices which, realistically, are not velocity-sensitive).
As a MIDI controller, the keyboard is also release-velocity-sensitive, meaning that MIDI signals expressing how rapidly a key is released get sent to external equipment.
The Front Panel
The front panel has a 3-digit numeric display, 10 mode and editing status LEDS, 16 sound/setup select buttons with dual-color LEDs, and 4 editing buttons. The sound/ setup select buttons make random selection of 32 different sounds or MIDI Setups quick and easy while the display and LEDs shows the unit’s present status at a glance.
The Ribbon Controllers
The Stage Piano also has 3 ribbon controllers, which take the place of conventional wheels and offer significant advantages. The A ribbon (the one on the left) typically performs a pitch bending function with the upper half bending pitch upwards and the lower half bending pitch downwards. Pressing the center bar restores pitch to normal.
The B ribbon is actually split into upper and lower sections. Each section can control a different characteristic of the sound simultaneously. This is like having two conventional modulation wheels. Pressing the center bar removes both modulations.
NOTE: The sounds of the Stage Piano do not respond to pitch bending, or to the lower section of the B ribbon. External MIDI devices may respond to the signals sent by these controllers.
An advantage of ribbons over conventional wheels is that their mode is programmable. A conventional pitch wheel is spring-loaded so that it always returns to its center position (no pitch change) when released. Conventional modulation wheels usually do not spring back, and remain where they were when released. Likewise these are the default modes of the A and B ribbons respectively, but each can also be set to operate in the opposite mode. See Hold or Center and Hold or Zero on page 3-6 for details.
Other Controllers
The Volume/Controller slider is actually a general purpose control. Although its default setting is to control volume (MIDI Volume), it can be set to control any aspect of the sound. See Control Slider, Control Pedal on page 3-6 for more information.
One Control Pedal can be plugged into the rear panel to permit foot control over the sound. The foot controller can be set to control volume, modulation, or other sound parameters. See Control Slider, Control Pedal on page 3-6 for details.
A single or dual switch pedal (piano pedal) can also be plugged into the rear panel. By default, a single pedal or the right half of a dual pedal will perform a sustain (or damper) function while the left half of a dual pedal will perform sostenuto. See
Connecting Switch Pedals on page 2-4 and A Special Note About Switch Pedals on page 2-4 for more.
1-2

Introducing the Stage Piano
Connectors
Connectors
The rear panel has a total of 8 connectors:
•Left and Right audio jacks accept standard 1/4-inch mono plugs connected to your stereo audio system. (See Changing to Mono Output on page 2-5 for how to obtain a mono output.)
•Headphone jack accepts a standard 1/4-inch stereo plug.
•MIDI In and Out jacks for connecting to external sound modules or a computer.
•Control pedal jack for connecting to a continuous-control pedal.
•Switch pedals jack for connecting to a single or dual piano-pedal unit.
•DC power jack for receiving 12V DC power from the supplied power adapter.
Connecting to and using all of these connectors is described thoroughly in the following sections.
Modes
The Stage Piano operates in one of two fundamental modes.
When in Internal Voices mode, the Stage Piano is an easy to understand and operate, stand-alone performance instrument. To change sounds, just press one of the 16 sound select buttons. The entire keyboard will always play the sound named on the sound select button. See Chapter 3 for more on Internal Voices mode.
When in MIDI Setups mode, the Stage Piano becomes a sophisticated MIDI controller with a built-in sound module. The keyboard can be split into 2 sections or zones, each going to a different MIDI channel. Up to 32 different MIDI setups can be defined and stored in the built-in nonvolatile memory. You can quickly select these setups with the 16 sound/setup select buttons. In MIDI Setups mode, any sound (or none at all) can be associated with each setup. See Chapter 4 for details about MIDI Setups mode.
How to Use This Book
This Stage Piano User’s Guide is designed to help you get up and running quickly. If you know electronic instruments and MIDI already and you know pretty much what you want to do with your Stage Piano, at least read Quick Start on page 2-1. If you need some more help on using the Stage Piano’s many features, you should also read all of Chapters 3 and 4. Chapters 5 and 6 give more information on global functions and describe some typical applications. The remaining chapters provide troubleshooting and reference material that can be referred to when needed. Finally, don’t underestimate the index. We’ve tried to think of every word and topic you may need quick access to—it’s the next best thing to a search engine!
Also, don’t forget to check our web site for any late-breaking information on the Stage Piano and other Kurzweil products:
http://www.youngchang.com/kurzweil
Above all, have fun, and make lots of great music with your Stage Piano!
1-3

Chapter 2
Getting Started
This chapter will help you hook up your Stage Piano and learn its basic functions.
Unpacking the Instrument
The box that your Stage Piano ships in contains the following:
•The Stage Piano
•AC Adapter (12V DC, 0.5A)
•Single switch pedal
•Four adhesive-backed rubber feet
•This manual
•Warranty card
Be sure to keep the box and packing materials, at least during the warranty period, in case you need to ship the unit for any reason.
Quick Start
We recommend that you read through this whole chapter at some point. However, if you want to start exploring your new instrument right away, follow these steps:
1.Carefully remove all the contents of the box.
2.Set the Stage Piano on a keyboard stand or table. For optimum stability, particularly of the 88-key model, make sure the ends are supported, not just the middle.
3.Turn the power switch (at the rear of the unit) off then plug the power adapter into the unit and into the wall. If you’re not in the USA, check that the linevoltage rating of the adapter matches line voltage in your area.
4.Plug a pair of headphones into the Phones jack on the back of the unit—or connect the Left and Right audio outputs to your audio system or mixer. The outputs are unbalanced line-level (approximately 1V), so use the line or aux inputs to your audio system.
5.Plug the included switch pedal into the rear panel jack marked Switch Pedals.
6.Turn the power switch to the On position. The display and all of the LEDs should light briefly, then the Internal Voices and Grand Piano LEDs should light.
7.Play away. Use the Volume/Controller slider or your audio system’s volume control to vary the volume. Press a sound/setup select button once to hear the red sound; twice to hear the green. See Sound and Setup Select
Buttons on page 2-11 if you don’t understand about red and green sounds.
Read on for more details about each of these steps.
Getting Started
Playing the Demo
Playing the Demo
To play the demonstration song, press the left-most two buttons (Internal/Setup and MIDI Prog Change) at the same time. You’ll hear a short demonstration of the sounds and effects. The unit must be in Play mode (all LEDs to the left of the display off) for this to work. The demo can be stopped before it is complete by pressing any button.
NOTE: MIDI signals from the demo song will not be sent.
Placement and Support
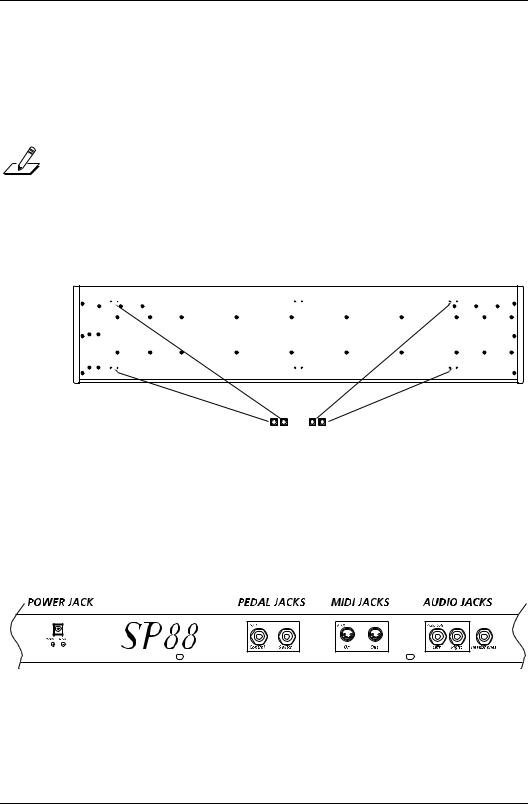
The Stage Piano is designed to be used on a keyboard stand or on a flat table. For tables, we recommend attaching the included rubber feet to the bottom to avoid scratching the table when moving the unit. Refer to Figure 2-1 for the best places to attach the feet.
Figure 2-1 |
Placement of Rubber Feet |
The Stage Piano will feel most stable when supported along its entire length, especially at both ends. Place it on a hard flat surface to keep it from rocking. If desired, it can be tilted without affecting the feel of the keyboard.
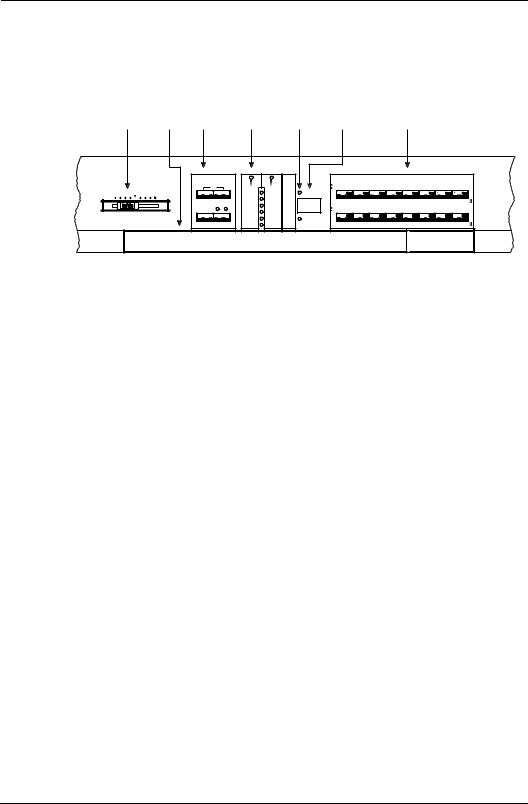
The Rear Panel
Here are descriptions of the rear-panel connectors, as illustrated in Figure 2-2.
Figure 2-2 |
Stage Piano Rear Panel |
2-2
Getting Started
The Rear Panel
Power Switch
Press the white dot to turn the Stage Piano on or the blank area to turn it off. If it will be off for a long period of time, unplug the power adapter from the wall. The Stage Piano’s hi-tech EEPROM memory is like a computer’s hard drive and needs no power or battery to retain information. So there is no advantage in leaving the power on.
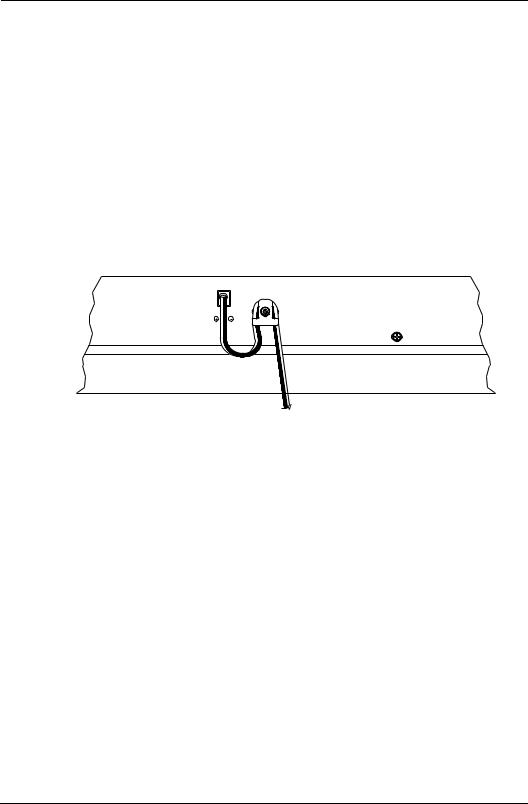
Power Jack
Plug the cord from the included power adapter into this jack. Try to always use the adapter supplied with the unit. However, if it should become lost or forgotten, refer to Specifications on page 8-8 for information about possible substitutes.
To help prevent the power cord from being pulled out accidentally, a cord retainer is mounted near the power jack. To use, just wrap a 3/4 loop around it as illustrated.
12VDC |
0.5A |
SP88 |
Figure 2-3 |
Power Cord Retainer |
Audio Jacks
The left and right audio jacks are used to connect to your audio system. See Connecting to Your Audio System on page 2-5 for connection details.
Phones Jack
Plug your headphones in here. You’ll need a “1/4 -inch to-1/8-inch” (or “phone-to-mini”) adapter plug when using headphones that have a mini plug. See Connecting Headphones on page 2-6 for additional information.
Switch Pedal Jack
Use this jack to plug in the single piano pedal that came with your Stage Piano. For this pedal to work properly, it must be plugged in before power is turned on. See A Special Note About Switch Pedals on page 2-4 for info about using aftermarket single or dual pedals.
Control Pedal Jack
You can plug a control pedal in here but be careful, not every kind will work well. See
Connecting a Control Pedal on page 2-4 for details.
2-3

Getting Started
The Rear Panel
MIDI Ports
Use the MIDI Out port to connect to an external sound module like a Kurzweil K2600R. Use the MIDI In port to connect to a computer for use in sequencer applications. See page 2-6 through page 2-10 for more possibilities.
Connecting Switch Pedals
The included single switch pedal will, by default, act like a piano damper pedal and will control sustain. Of course this can be changed by programming as described in Chapters 3 and 4.
The jack will also accept a dual switch pedal having a single stereo plug which is available separately (Kurzweil KFP-2M). The plug should be wired so that the left pedal connects to the ring contact and the right pedal to the tip contact. It’s also possible to use two single pedals. First buy a 1/4-inch stereo-to-dual-mono Y adapter. This will have two mono 1/4-inch phone jacks and a stereo 1/4-inch plug. Combinations of adapters can be used if that exact item is not available. Then plug the pedal you wish to use for sustain into the left jack and your sostenuto pedal into the right jack. Note that the “left” pedal goes into the right jack and vice-versa—one of those confusing facts of life.
By default, the right pedal will control sustain as before and the left pedal will control the sostenuto function. If you’re not familiar with traditional piano technique, the sostenuto (center) pedal on a grand piano allows one to hold chords in the bass while continuing to play the melody without the latter notes sustaining. Any keys that are down when you depress the pedal will sustain when you let go of the keys, but new notes played afterward will not be sustained. Releasing the pedal puts things back to normal. Of course it too can be programmed to do other functions as well.
A Special Note About Switch Pedals
If you choose to use aftermarket switch pedals, be aware that there are two kinds: normally-open (like the included one) and normally-closed. Much Japanese equipment uses the latter type. The Stage Piano will automatically adapt to either type—if it is plugged in before the power is turned on; just don’t step on it until the power-up sequence is complete. If you find that your pedal has become schizoid, simply turn power off for a couple of seconds then back on and it will adapt.
CAUTION: Be sure not to step on the switch pedals when powering up your Stage Piano!
Connecting a Control Pedal
A control pedal can be very useful for controlling volume, vibrato, or other effect by foot. The Kurzweil CC-1 control pedal will plug in directly and work perfectly but it is also possible to use aftermarket “control” pedals designed for synthesizers. A volume pedal may or may not be satisfactory depending on how it is constructed. See Control Pedal Problems on page 7-4 for pedal specifications or if you are having trouble with your control pedal.
2-4

Getting Started
Connecting to Your Audio System
Connecting to Your Audio System
The Audio Output jacks are professional 1/4-inch “phone” jacks so if you are connecting to an audio system with “RCA” jacks, you will need two “phone plug-to- RCA plug” adapter cables. Remember: always lower the volume of your audio system when changing audio connections—or better yet, turn the power off!
CAUTION: Be sure to lower the volume of your audio system or switch it off when changing audio connections!
The source impedance of the audio output jacks is 1000 ohms, so they can drive relatively long cables if needed. If connecting to a mixer, use a high-impedance, unbalanced line input. If using a keyboard amplifier, its normal input should be fine. If using a home stereo system, inputs marked Aux should work well but Tuner and CD inputs are generally OK. A guitar amplifier may work if it has Line or Aux inputs. Avoid using a Guitar input though, it will likely be way too noisy and may distort your sound.
Changing to Mono Output
By default, the Stage Piano produces stereo audio signals. In cases requiring a mono signal, use the following procedure to change the outputs to mono:
1.Make sure you are starting from Internal Voices Play mode. This is the default right after power on. Only the Internal Voices LED and one of the sound LEDs will be on.
2.Press the Play/Edit button once.
3.Press the Col Select (Column Select) button twice. Both of the parameter- column LEDs should be off after doing so. (See The Parameter
Display on page 2-12 if you don’t know what we mean by “parameter-column LEDs.”)
4.The top parameter-row LED should be blinking and the display should show ste(stereo) or mon(mono). If not, press Row Select repeatedly until this is achieved.
5.To change the selection, press the Up arrow button or the Down arrow button.
6.If you would like for this change to be remembered next time power is turned on, press the Store button twice. Otherwise it will revert to the previous setting next time power is turned on.
7.Press Play/Edit to return to Play mode.
The above sequence may seem complicated, but after reading Chapter 3 it will seem quite simple and logical. When in mono mode, the left and right jacks produce the same signal.
2-5
Getting Started
Connecting Headphones
Connecting Headphones
The Phones jack is designed to drive 100 ohm or greater headphones. Lower impedance is safe too but the volume level can be reduced. You can also use a stereo Y adapter and connect two headphones at the same time if they are 100 ohms or greater.
You can use headphones and an audio system at the same time; plugging in the phones does not affect the line outputs at all. Note that if the instrument is switched to mono mode as described above, the phones signal will also be mono, that is, the same signal is heard from left and right.
The signal at the phones jack is just as high a quality as that at the line output jacks described above. So if you prefer to use a single stereo cable to your audio system and do not intend to use headphones, you can use the headphones output to drive your audio system.
Connecting MIDI
The Stage Piano is a great live performance instrument all by itself but you can expand its capabilities almost endlessly by using its MIDI (Musical Instrument Digital Interface) connectors.
Basic MIDI Hookup
The simplest application of MIDI is to connect and control an external sound module for more sounds, more polyphony, and more timbre control than the internal sound module offers. The drawing below shows how simple this really is to do.
MIDI |
L |
R |
|
In |
|
|
|
MIDI |
|
L |
R |
Out |
|
SP88 |
MIXER |
Built-In Effects |
|
Award Winning Soungs |
|
Flexible MIDI Controller |
|
Stage Piano
Figure 2-4 |
MIDI Connections to External Module |
The external sound module can be almost anything: a K2000R, K2500R, K2600R, Kurzweil MicroPiano, and a world of other possibilities from alternative manufacturers. It could be another keyboard synthesizer or large digital piano as well, in fact nearly anything with a MIDI In connection.
With this simple setup you may be able to play up to 3 sounds at once; one from the Stage Piano’s sounds and 2 from the external module, if it is multitimbral. The external module can make use of more of the Stage Piano’s MIDI controls as well such as the A Ribbon, lower B ribbon, and control pedal. MIDI Setups mode, which is covered in Chapter 4, is used to control a setup like this.
2-6
Getting Started
Connecting MIDI
Connecting More Sound Modules
With MIDI, you’re not limited to just one add-on sound module; you could connect 2, 3, or even more using the basic method illustrated below. Although your Stage Piano will be able to play independent sounds on only 1 multitimbral or 2 monotimbral modules at once, you can address up to 16 different external sounds using MIDI Setups, all from your Stage Piano’s front panel!
In |
Thru |
In |
|
|
|
In |
|
|
|
|
|
|
|
Thru |
Thru |
|
|
|
|
Module A |
Module B |
|
Module C |
Out
SP88
Built-In Effects
Award Winning Soungs
Flexible MIDI Controller
Stage Piano
Figure 2-5 |
MIDI Connections to Additional Modules |
2-7

Getting Started
Connecting MIDI
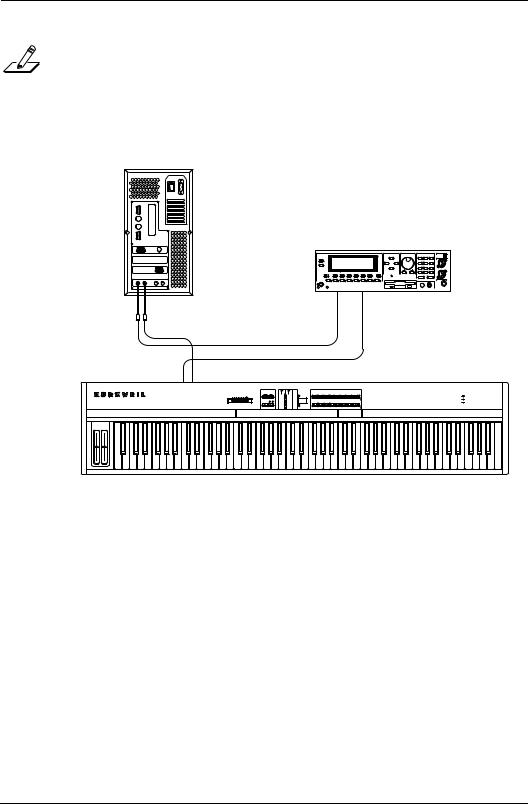
Connecting to a Computer Sequencer
If you have a computer with a MIDI interface and MIDI sequencing software, your Stage Piano can become an integral part of a home MIDI recording studio. The basic connection pattern is shown below.
Computer
Mixer
Sound Card
MIDI |
Audio |
Out In
In Out |
L R |
SP88
Built-In Effects
Award Winning Soungs
Flexible MIDI Controller
Stage Piano
Figure 2-6 |
MIDI Connections: Computer and Sound Card |
The cable from the Stage Piano’s MIDI Out to the Computer’s MIDI In allows the sequencing software to “hear” and record what you are playing. Likewise the cable from the computer’s MIDI Out to the Stage Piano’s MIDI In allows the computer to “play” the sounds of your Stage Piano.
NOTE: Depending on the sound card or MIDI interface in your computer, you may need to buy a special cable to make MIDI connections. See the manual that came with your computer or sound card.
When using a sequencer, you need to make two important configuration settings to avoid doubled notes when you are playing. First, the Local parameter (one of the global parameters) should be set to a value of Off. This disconnects the internal path from the keyboard (and other controls) to the sounds. Also you should be sure that MIDI In (another global parameter) is set to Normal (nrm) to avoid creating a MIDI loop. If you’re just starting out, that shouldn’t be a problem because nrmis the default setting. See page Local Control Off and Patch Thru On on page 6-3 for information about changing the values of the Local and MIDI In parameters.
Second, the sequencer should be set to Through mode which means that it passes on what it hears at the computer’s MIDI input to the computer’s MIDI output. From there the MIDI signal goes to the Stage Piano’s MIDI input where it will activate the sounds. If the sequencer is not in Through mode, you won’t hear anything as you play the Stage Piano.
2-8
Getting Started
Connecting MIDI
NOTE: Different sequencer applications use different terms for what we’re calling Through mode. For example, the sequencer may have a Patch Thru or Soft Thru parameter, which you should set to On in this case.
If you want to use an external sound module with your Stage Piano and a sequencer, it should be connected into the loop before the Stage Piano, as illustrated below:
Computer
Sound Card
MIDI |
Audio |
|
MIDI |
In |
Thru |
|
|
|
Out |
In |
Module B |
|
|
In Out
SP88
Built-In Effects
Award Winning Soungs
Flexible MIDI Controller
Stage Piano
Figure 2-7 |
MIDI Connections: Computer and Sound Module |
2-9

Getting Started
Connecting MIDI
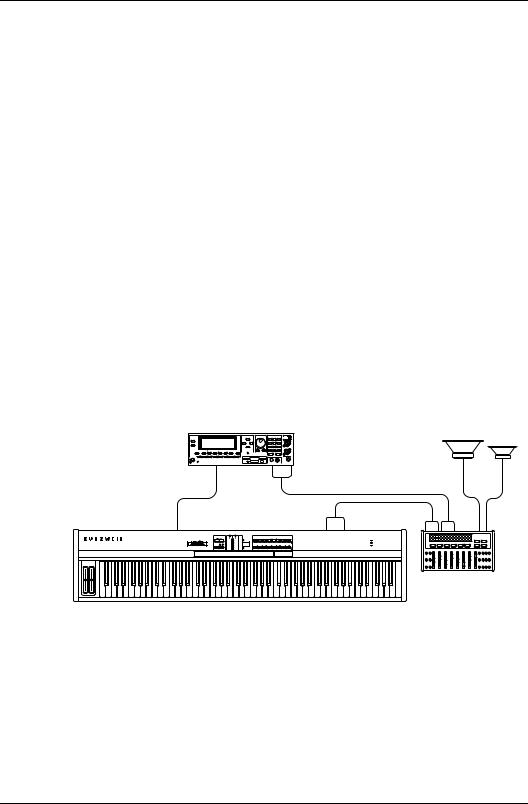
Full System
Even more complex setups are possible. Below is just one possibility using a Kurzweil ExpressionMate MIDI processor and K2600R to provide unprecedented expressive control over a vast palette of sounds.
Computer
|
|
|
|
MIDI |
|
Sound Module |
|
|
Processor |
|
|
|
|
|
|
|
|
|
ExpressionMate |
Sound Card |
|
|
|
|
MIDI |
Audio |
|
|
|
|
In |
Thru |
In |
Out |
|
|
|
Out In
In Out
SP88
Built-In Effects
Award Winning Soungs
Flexible MIDI Controller
Stage Piano
Figure 2-8 |
MIDI Connections: Compute, Module, Processor |
With this setup, note signals from the Stage Piano first pass through the ExpressionMate where they can be processed into additional zones, have automatic arpeggiation added to them, or be processed in other ways as well. MIDI signals from the Stage Piano’s controllers are also modified and combined with the ExpressionMate’s own unique controls. Note and control signals then travel to the computer where they can be optionally recorded, then finally to the K2600R module and the Stage Piano’s internal sound module. As always when using with a computer sequencer, set the Stage Piano’s Local parameter to Off. See Example: The Kurzweil ExpressionMate on page 6-6 for more about what this example system can do.
2-10
Getting Started
The Front Panel
The Front Panel
The Stage Piano’s front panel is illustrated in detail below.
Control |
Info |
Editing |
|
Parameter |
|
Mode |
Numeric |
|
|
Sound / Setup |
|
|
|||
Slider |
Strip |
Buttons |
|
Display |
|
LEDs |
Display |
|
|
Select Buttons |
|
|
|||
|
|
Mode Select / Param Edit |
Parameter |
|
|
|
Sound / Setup Select |
|
|
|
|
|
|
||
|
|
Panic |
|
|
|
Global |
|
Grand Pno 1 |
Stage Pno 1 |
Bright Pno |
Piano & Str 1 |
Tack Piano |
Bright E Grand |
Classic EP |
Dyno EP |
|
|
|
|
|
|
|
Grand Pno 2 |
Stage Pno 2 |
Sustain Pno |
Piano & Str 2 |
Tite E Grand |
Warm E Grand |
Dig E Grand |
Hard Dyno EP |
|
|
|
|
|
Intemal Sound |
Reverb Wet / Dry |
Local |
Internal Voices |
1 |
2 |
3 |
4 |
5 |
Ld/Dmp |
No |
Yes |
Volume / Controller |
|
|
|
MIDI Program |
Chorus Wet / Dry |
Stereo |
|
||||||||
|
|
|
|
MIDI Bank Sel Lo |
A Ribbon |
Touch |
|
|
|
|
|
|
|
|
|
|
|
Internal/Steup |
Row Select |
MIDI Bank Sel Hi |
Hold or Center |
|
|
1 |
3 |
5 |
7 |
9 |
11 |
13 |
15 |
|
|
|
|
|
|
|
|
2 |
4 |
6 |
8 |
10 |
12 |
14 |
16 |
|
|
|
|
MIDI Channel |
B Ribbon Up |
Effect |
|
|
|
|
|
|
|
|
|
|
|
|
|
Destination |
Hold or Zero |
|
|
|
|
|
|
|
|
|
|
|
|
L |
|
R |
|
|
|
Trem Dig EP |
Digital EP |
Rock Org 1 |
Ballad Org 1 |
Perc Org |
Fast Str 1 |
Touch Str |
St Slo Str Pad |
|
|
|
Zone |
Intemal Effect |
B Ribbon Down |
MIDI In |
|
St Hard EP |
Dig EP & Str Pad |
Rock Org 2 |
Ballad Org 2 |
Org & Piano |
Fast Str 2 |
St Slo Strings |
Slow Dig Pad |
|
|
|
Hold or Zero |
|
|
|
|
|
|
|
|
|
|||
|
|
|
|
Key Range Lo |
Control Slider |
|
|
6 |
7 |
8 |
9 |
0 |
+/- |
Cancel |
Enter |
|
|
|
|
Set Chg Chan |
MIDI Setups |
|
|
|
|
|
|
|
|
||
|
|
|
|
Key Range Hi |
Control Pedal |
|
|
|
|
|
|
|
|
||
|
|
MIDI Prog Chg |
Play |
Transpose |
Switch Pedal R |
Tune |
|
17 |
19 |
21 |
23 |
25 |
27 |
29 |
31 |
|
|
Store |
Edit |
|
18 |
20 |
22 |
24 |
26 |
28 |
30 |
32 |
|||
|
|
|
|
Velocity Curve |
Switch Pedal L |
|
|
||||||||
Destinations: |
|
|
|
|
|
|
|
|
|
|
|
|
|
|
|
|
|
Effects: |
|
|
||
0 |
- Bank Select MSB |
5 |
- Portamento Time |
10 - Pan |
16 to 19 |
- Gennral Control 1 to 4 |
65 |
- Portamento Switch |
70 |
- Sound Variation |
75 to 79 |
- Sound Control 6 to 10 |
92 |
- Effects 2 Depth |
97 |
- Data Decrement |
102 to 119 - Undefined |
0 |
- None |
5 |
- Hall & Chorus |
|
1 |
- Modulation Wheel |
6 |
- Data Entry MSB |
11 - Expression |
20 to 31 |
- Undefined |
66 |
- Sostenuto Pedal |
71 |
- Timbre Control |
80 tp 83 |
- General Control 5 to 8 |
93 |
- Chorus Depth |
98 |
- Non-Reg Parm LSB |
120 to 127 - Channel Mode Set |
1 |
- Room & Chorus |
6 |
- Bright Hall & Chorus |
|
2 |
- Breath Controller |
7 |
- Volume |
12 - Effect Control 1 |
32 - Bank Select LSB |
67 |
- Soft Peal |
72 |
- Release Time |
84 - Portamento Control |
94 |
- Effects 4 Depth |
99 |
- Non-Reg Parm MSB |
128 |
- Send as Pitch Bend |
2 |
- Bright Room & Chorus |
7 |
- Large Hall & Chorus |
||
3 |
- Undefined |
8 |
- Balance |
13 - Effect Control 2 |
33 to 63 |
- LSB for 1 to 31 |
68 |
- Legato Switch |
73 |
- Attack Time |
85 to 90 |
- Undefined |
95 |
- Effects 5 Depth |
100 |
- Registered Parm LSB |
129 |
- Send as Pressure |
4 |
- Bright Stage & Chorus |
8 |
- Large Bright Hall & Chorus |
4 |
- Foot Controller |
9 - Undefined |
14 to 15 - Undefined |
64 - Sustain Pedal |
69 |
- Hold Pedal |
74 |
- Brightness |
91 - Reverb Depth |
96 |
- Data Increment |
101 |
- Registered Parm MSB |
101 |
- Registered Parm MSB |
4 |
- Foot Controller |
9 |
- Deep Space |
|||
|
|
|
|
|
|
|
|
|
|
|
|
|
|
|
|
|
|
|
|
|
|
|
Figure 2-9 Stage Piano Front Panel
Sound and Setup Select Buttons
To the right of the display are the 16 sound and setup select buttons. When in Internal Voices mode (indicated by the LED over the display being on), each button can select the two sounds named in the label above the button. Press a button the first time, it’ll glow red, and you’ll get the “red” sound (the sound that’s in the row that has a red arrow pointing to it). Press the same button again; it will turn green, and you’ll get the green sound. In this way you can very quickly select any of the Stage Piano’s 32 builtin sounds (voices).
When in MIDI Setups mode (indicated by the LED under the display being on), these same buttons allow you to select one of 32 possible MIDI Setups. For these, you’ll want to use the numbers under the button; odd for red and even for green. Note that the sound associated with each setup is programmable and may be different from the sound named on the button.
In Edit mode (indicated by some of the LEDs to the left of the display being on), the sound or setup is frozen and these buttons serve a variety of data entry functions as marked on the buttons themselves. Refer to Chapter 3 for details on their use with the editors.
The Numeric Display
The numeric display is in the center of the panel and is better described as a 3- character display because sometimes it will also display stylized letters. The display shows 4 kinds of information depending on mode as follows:
1.In Internal Voices Play mode, it shows the current Sound Number, 1–32.
2.In MIDI Setups Play mode, it shows the current Setup Number, also 1–32.
3.In Edit mode, it shows the current parameter value, which may be a positive number, a negative number, or a string of 3 characters depending on the parameter.
4.Sometimes, regardless of mode, the display may show a message or even ask a question.
2-11

Getting Started
The Front Panel
Each character in the display also has a small dot at the bottom right. If these dots are on, it means that the current setup has been edited but the change has not yet been made permanent by storing it into memory.
Mode LEDs
The two fundamental modes of the Stage Piano are Internal Voices mode and MIDI Setups mode. The mode LEDs above and below the display indicate which mode is current. One of them will always be on. Internal Voices Play mode is always selected when you first turn your Stage Piano on.
Parameter Editing Buttons
The 4 parameter-editing buttons are to the left of the display; most of them have dual markings. The top marking is active when in Play mode and the bottom marking when in Edit mode. One exception is Row Select, whose single marking is for Edit mode. The Play/Edit button is used to shift between Play mode and Edit mode.
The Parameter Display
Your Stage Piano has a total of 30 parameters, whose values determine sound selection, effects, what the player controls do, keyboard split, and a host of other options. The active parameter is indicated by 8 LEDs arranged around a list of the 30 parameter names.
The 30 parameters are arranged into 3 columns. The two column-designator LEDs identify the active column as follows:
Left column LED on Left parameter column is active
Right column LED on Center parameter column is active
Both column LEDs off Right (global) parameter column is active
Each column of parameters has 6 rows of (usually) two paired parameters each.
Each column of parameters consists of 6 rows, with two parameters for each row (except for the Effect parameter). There is a row-designator LED for each pair. If the row LED is on continuously, the upper parameter of the pair is active. If the row LED is blinking, then the lower parameter of the pair is active. The LED for the Efect parameter (left column, 4th row) always lights continuously when the Effect parameter is selected.
Use the Col Select and Row Select buttons to navigate to the parameter that you want to view or edit.
The Info Strip
This long strip below all of the buttons, LEDs, and display contains useful reference information. Most of the strip tells what each of the 128 possible MIDI destination numbers does. The remainder lists the 10 effects by number and name. Chapters 3 and 4 tell you how to use the information on the strip.
2-12
 Loading...