

Page 1

sound
GETTING STARTED GUIDE
Including
is Getting Started Guide will give you a quick overview of the SP6. A full manual with additional
information is available from www.kurzweil.com.
Features of the SP6
• FlashPlay technology utilizing 2GB of instrument samples including:
• Optimized German D and Japanese C7 Pianos, Triple Strike Piano, 73 Electric Piano,
Clavinets, Harpsichords, Celeste, Bowed and Hit Crotales, Vector Synthesis Waveforms
• Rock, Synth and Orchestral sounds from Kurzweil’s Forte SE, PC3, and KORE64
• 10 Categories of Programs (Piano, E. Piano, Clav, Organ, Strings/Pads, Brass/Winds,
Voices/Misc, Leads/Synths, Guitar/Bass, Drums/Perc)
• Space for 1024 Factory and 1024 User Programs and Multis
• KSR: Kurzweil String Resonance (Piano String Resonance Simulation)
• Support for optional Half-Damper pedal
• KB3 Organ simulations with control of 9 drawbars
• Arpeggiator with dedicated On/O and Tap Tempo buttons (up to 4 simultaneous in Multi Mode)
• High quality audio eects with dedicated knob assignments
• 4 knobs with Shift button (3 shift rows for 12 assignments per Program)
• Support for up to 4 switch pedals
• 128 voices of polyphony
• 16 MIDI Channels for multitimbral applications
• 4 Zone MIDI Controller
®
®
It’s the
.
Page 2

Quick Start
Setting Up the SP6
Quick Start
Be sure to check the Kurzweil website at www.kurzweil.com for new sounds, documentation
and software updates.
Setting Up the SP6
1. If your SP6 keyboard has been out in the cold during shipping, give it time to warm up
to room temperature before powering it on, since condensation may have formed inside.
2. Place the SP6 on a keyboard stand or on a hard, at, level surface.
3. Connect the DC power adaptor to the SP6 DC Power jack.
4. Make sure your power outlet is compatible with the included power adaptor, then plug the
power cable into the power outlet.
5. Plug the included Switch Pedal into the SW1 (SUSTAIN) jack on the SP6 rear panel.
6. If you have an additional switch pedal, plug it into the SW2 jack for sostenuto control.
GETTING STARTED GUIDE
7. If you have a MIDI CC pedal (also known as a MIDI expression or volume pedal), plug it
into the CC (VOLUME) jack for volume control.
8. If you are using speakers, turn the master volume all the way down on your amplier
or mixer. Using standard (1/4-inch) audio cables, rst plug into the input jacks of your
amplier or mixer, then plug the other end of the cables into the SP6 AUDIO OUT
jacks. (Connecting in this order minimizes the possibility of static discharge damage.) For
a mono signal, only use the LEFT (MONO) jack, and leave the RIGHT jack unplugged.
Balanced (“TRS” or “Stereo”) cables are recommended if your mixer or amp supports
balanced inputs.
9. If you are using headphones, connect stereo headphones to the headphone jack on the rear
panel.
10. Turn the SP6 VOLUME knob (on the far left side of the front panel) to MIN.
Powering On the SP6
1. Power on the SP6 by pressing the POWER button on the right rear panel.
2. If you are using speakers, turn up the volume on your amplier or mixer.
3. Slowly turn up the SP6 VOLUME knob and play some notes to check the volume level.
(If you have a CC pedal plugged into the CC (VOLUME) jack, make sure it is set to the
maximum volume position).
4. If you are using speakers and the SP6 is not loud enough, turn up the volume on your
amplier or mixer.
2
Page 3

GETTING STARTED GUIDE
5. If you are using a mixer and hear distortion, reduce the gain level on the mixer, or use the
mixer’s Pad button if it has one (a button that typically decreases the audio input level by
20dB).
6. After using the SP6, if you are using speakers, turn the master volume all the way down on
your amplier or mixer before powering o the SP6.
Auditioning SP6 Sounds
1. e SP6 starts up in Program Mode. Use the PREVIOUS and NEXT buttons, ALPHA
WHEEL, or CATEGORY buttons to select a dierent Program. See “SP6 Sounds” on
page 11 for more details on selecting Programs or Multis.
1. To hear a Program Demo song for the current Program, press the KEYPAD and ENTER
buttons simultaneously.
2. To hear the capabilities of the SP6, you can play the multi-channel demo songs. Press the
KEYPAD and DRUMS/PERC buttons simultaneously to listen to a multi-channel demo
song.
The Front Panel
Auditioning SP6 Sounds
3. To switch between auditioning Programs or Multis, press the PROGRAM or MULTI
Mode button under the MODE label to the right of the LCD display.
Automatic Power Saving
e SP6 has an automatic power saving feature (Auto Power O) that can automatically power
o the SP6 after a period of inactivity, in order to conserve electricity. e Auto Power O
feature is enabled by default. e default Power O Time is 8 hours, which will cause the SP6
to power o after 8 hours of inactivity.
A count down timer warning will be shown in the LCD display a few minutes before the SP6
is powered o. At any time, touching any SP6 control or playing a note will cause the SP6 to
remain powered on, until the SP6 has been inactive for the set Power O Time.
Auto Power O can be disabled in Global Mode. e Power O Time can also be adjusted in
Global Mode.
3
Page 4
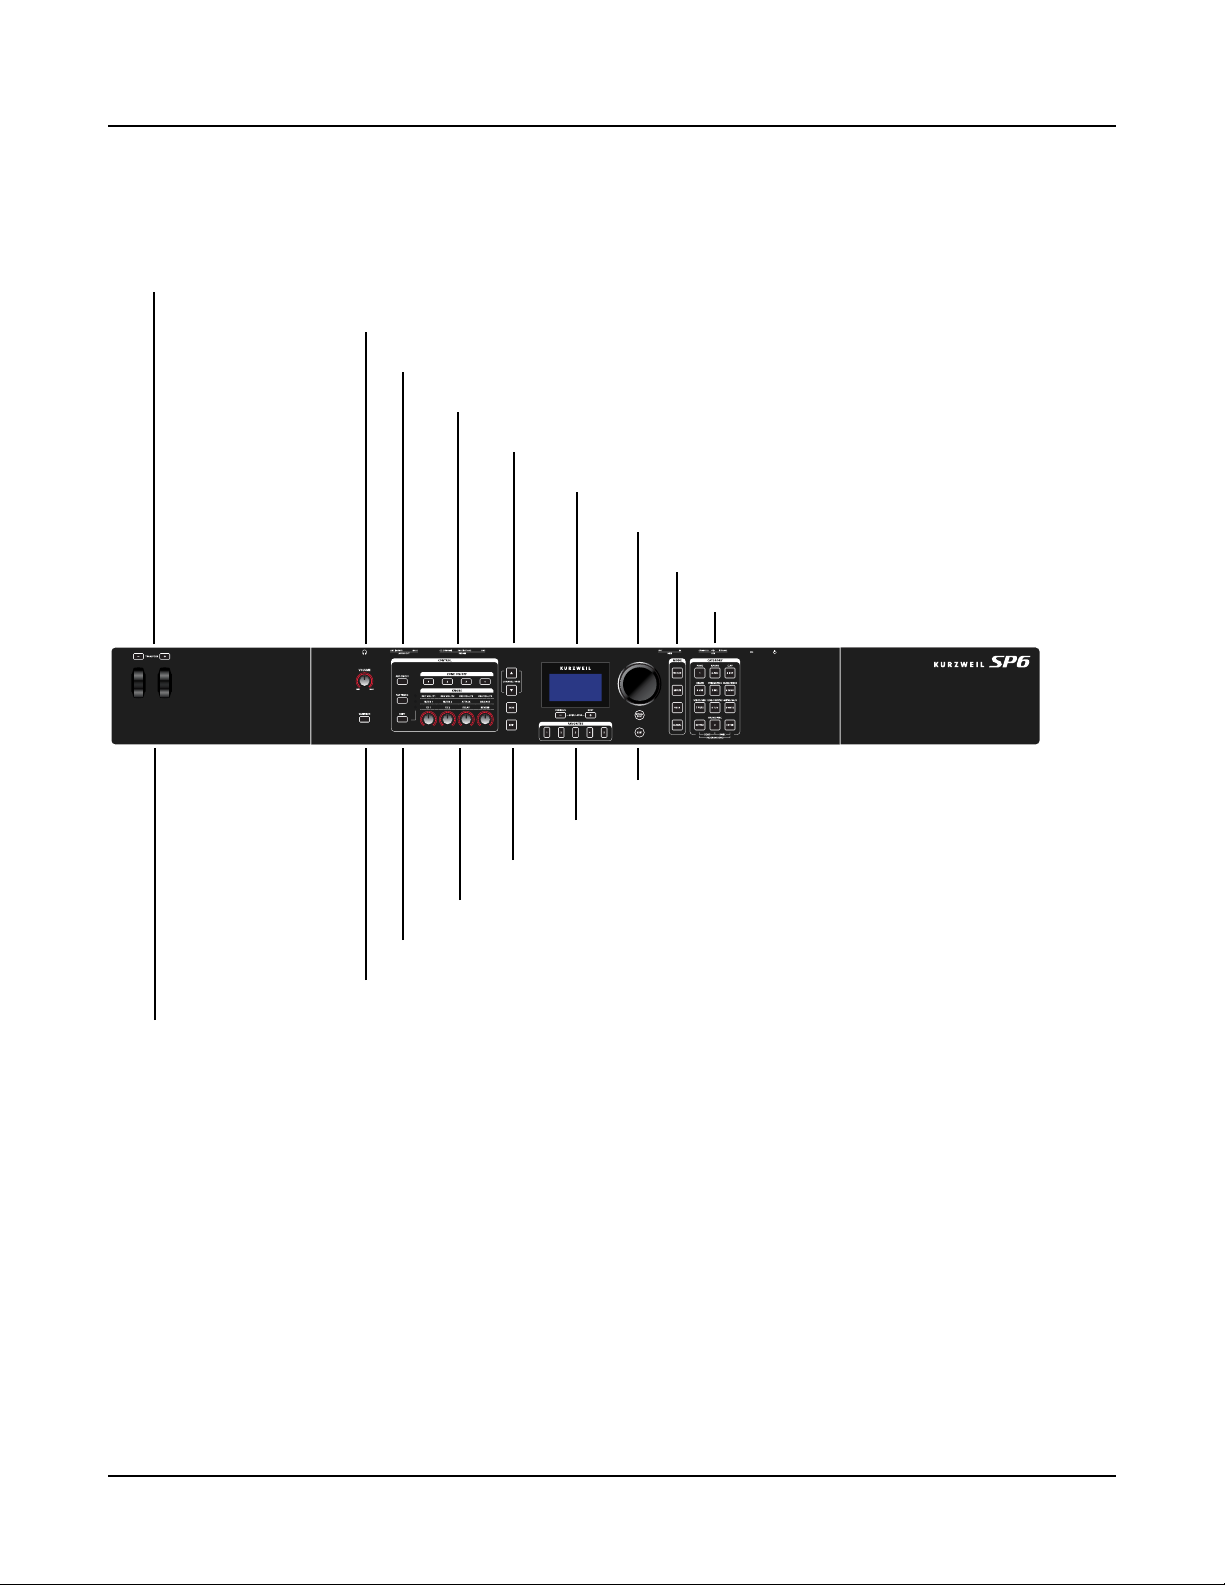
The Front Panel
VOLUME Knob
The Front Panel
TRANSPOSE Buttons
VOLUME Knob
ARP ON/OFF Button and TAP TEMPO Button
ZONE ON/OFF Buttons
GETTING STARTED GUIDE
CHANNEL/PAGE Buttons
LCD Display
ALPHA WHEEL
MODE Buttons and USER Button
CATEGORY Buttons
PREVIOUS/NEXT Buttons and FAVORITES Buttons
SAVE Button and EDIT Button
KNOBS
SHIFT Button
VARIATION Button
PITCH WHEEL and MODULATION WHEEL
VOLUME Knob
e VOLUME knob controls the volume level of the AUDIO OUT and HEADPHONE
jacks.
LCD Display
e LCD display is the main user interface for the SP6. Use the LCD display to view Program
and Multi names, controller assignments, and editing functions.
LOCAL DEST Button and EXIT Button
4
Page 5

GETTING STARTED GUIDE
ALPHA WHEEL
In Program and Multi Mode, use the ALPHA WHEEL to navigate through the Program or
Multi list.
In Program Edit or Multi Edit Mode, use the ALPHA WHEEL to scroll through the list of
values for the currently selected parameter. Turn the ALPHA WHEEL counter-clockwise or
clockwise to select the previous or next value. Turn the ALPHA WHEEL slowly to change the
value by one increment, or turn it quickly to jump several increments.
PREVIOUS and NEXT Buttons
In Program and Multi Mode, use the PREVIOUS and NEXT buttons to navigate through the
Program or Multi list.
In Program and Multi Mode, press the PREVIOUS and NEXT buttons simultaneously to
access the Split/Layer function.
In Program Edit or Multi Edit Mode, use the PREVIOUS and NEXT buttons to navigate to
each parameter on the current page.
The Front Panel
ALPHA WHEEL
MODE Buttons
Press the MODE buttons to access PROGRAM, MULTI or GLOBAL Mode. See “Modes” on
page 14 for a description of each Mode.
CATEGORY Buttons
In Program Mode, the CATEGORY buttons allow you to select and browse Programs in 10
categories of instruments. Engaging the KEYPAD button allows you to use the CATEGORY
buttons as an alphanumeric keypad. e KEYPAD button is always on in Multi Mode, and
where needed for editing parameter values.
FAVORITES Buttons
e FAVORITES buttons can be used to instantly recall your favorite Programs and Multis.
To assign the currently selected Program or Multi to a FAVORITES button, press and hold the
desired FAVORITES button for a few seconds until the LCD display indicates that the favorite
has been saved. Press a FAVORITES button to instantly select the stored Program or Multi.
TRANSPOSE Buttons
e TRANSPOSE buttons can be used to change the tuning of notes played on the SP6
keyboard in semitones (also known as half steps). e current transpose amount is shown
in the LCD display (for example, the default is “Xp:0st”). Press both TRANSPOSE buttons
simultaneously to reset the transposition to 0.
5
Page 6

The Front Panel
PITCH WHEEL and MODULATION WHEEL
GETTING STARTED GUIDE
PITCH WHEEL and MODULATION WHEEL
Use each wheel to respectively perform pitch bends or vary the modulation amount. e
MODULATION WHEEL will perform a pre-assigned modulation for each Program or Multi.
e name of the current assignment is shown in the LCD display when the wheel is moved.
VARIATION Button
Pressing the VARIATION button will perform a pre-assigned variation for each Program or
Multi. e name of the current assignment is shown in the LCD display when the button is
pressed.
e VARIATION button has two states, o (not lit) and on (lit). e VARIATION button
will typically modify the sound by adding an orchestral string section or synth pad layer, or
enabling an eect.
For KB3 Organ Programs, the VARIATION button controls the Rotary Speaker speed,
changing between fast and slow. e LCD display shows “KB3” when a KB3 Program is
selected.
KNOBS
e KNOBS are used to control various Program and Multi parameters. Press the SHIFT
button to shift between 3 rows of 4 knob assignments.
In Program Mode: e top row of knob assignments control user-assignable parameters, and
the bottom two rows of knob assignments perform the functions labeled on the front panel.
e top row of user-assignable parameters can be adjusted in Program Edit Mode.
In Multi Mode: e top row of knob assignments control Multi Zone volumes, and the
bottom two rows of knob assignments perform the functions labeled on the front panel. For
the bottom two rows of KNOBS, value scaling and oset can be adjusted per Zone for each
knob in Multi Edit Mode. is allows each knob range to be adjusted or disabled per Zone.
In Program and Multi Mode: When a KB3 Organ Program is selected, some of the knobs
may perform Organ drawbar functions instead of the functions labeled on the front panel. e
LCD display shows “KB3” when a KB3 Program is selected.
SHIFT Button
e SHIFT button allows you to shift between 3 groups of knob assignments. e available
knob assignments are labeled in 3 rows below the knobs. Press the SHIFT button to shift to
the next assignment group, indicated by a lit LED to the left of each row.
ARP ON/OFF Button
Use the ARP ON/OFF button to turn on and o the SP6’s Arpeggiator.
6
Page 7

GETTING STARTED GUIDE
TAP TEMPO Button
Use the TAP TEMPO button to set the rate of the Arpeggiator or tempo synced FX (such as
Delay). Press the TAP TEMPO button a few times at the desired rate to set the tempo.
You can also set a tempo by pressing the TAP TEMPO button, then using the ALPHA
WHEEL or PREVIOUS/NEXT buttons to set a tempo, or use the keypad function of the
CATEGORY buttons to type a numeric value followed by pressing the ENTER button.
ZONE ON/OFF Buttons
In Multi Mode, these buttons allow you to turn each of the 4 Zones on or o. When a Zone
is on, the corresponding button is lit. When a Zone is o, the corresponding button is not lit.
Press each Zone button to turn each Zone on or o.
SAVE and EDIT Buttons
ese buttons are used when editing Programs or Multis to create User sounds. In Program
Mode, press the SAVE button to save a User Program with the current controller settings.
The Front Panel
TAP TEMPO Button
EXIT Button
In Program Edit Mode, Multi Mode, or Global Mode, press the EXIT button to return to
Program Mode. In Multi Edit Mode, press the EXIT button to return to Multi Mode.
USER Button
Press and enable the USER button to access previously saved User Programs and Multis. Press
and disable the USER button to access all Programs and Multis (Factory and User).
CHANNEL/PAGE Buttons
Use the CHANNEL/PAGE buttons to change the current MIDI Channel in Program Mode,
or the current page in Program Edit or Multi Edit Mode.
LOCAL DEST Button
e LOCAL DEST button controls the destination of MIDI notes produced by playing the
SP6 keyboard. Pressing the LOCAL DEST button will step through the options, LOCAL,
MIDI, or LOCAL + MIDI. When the LOCAL DEST button is pressed, the current setting is
briey shown in the LCD display. e color of the LOCAL DEST button changes depending
on the current setting.
LOCAL + MIDI: MIDI notes will be sent to the local SP6 sound engine, as well as the MIDI
OUT and USB Computer ports.
LOCAL: MIDI notes will only be sent to the local SP6 sound engine.
MIDI: MIDI notes will only be sent to the MIDI OUT and USB Computer ports.
7
Page 8

The Rear Panel
POWER Button
The Rear Panel
POWER Button
Press the POWER button to power the SP6 on or o.
DC Power Jack
Plug the included power adaptor into the DC Power jack.
USB Ports
GETTING STARTED GUIDE
Use the USB ports to connect the SP6 to a computer/tablet or USB hard drive in order to do
the following:
• Use the SP6 as a MIDI controller to play software instruments on a computer/tablet.
• Use a computer/tablet to sequence multi-channel songs on the SP6.
• Backup and restore User Programs and Multis on a computer/USB hard drive.
• Update the software and sounds of the SP6.
MIDI IN and OUT Ports
Use the MIDI ports to communicate with other MIDI modules and controllers. e OUT
port is the MIDI transmitting port, and the IN port is the MIDI receiving port.
To use the SP6 as a MIDI controller for another sound module, use a MIDI cable to connect
the SP6’s MIDI OUT port to the MIDI input port of the module that you want to control.
To control the SP6 using another MIDI controller, use a MIDI cable to connect the SP6’s
MIDI IN port to the MIDI output port of the controller that you will be using.
SW1 (SUSTAIN) and SW2 Jacks
Use the SW1 (SUSTAIN) and SW2 jacks to connect switch pedals. One switch pedal is
included with the SP6.
In Program Mode, SW1 (SUSTAIN) defaults to controlling sustain, and SW2 defaults to
controlling sostenuto. (For KB3 Organ Programs, SW1 (SUSTAIN) defaults to controlling
the Rotary Speaker speed, changing between fast and slow. is assignment can be changed in
Global Mode. e LCD display shows “KB3” when a KB3 Program is selected.)
8
Page 9

GETTING STARTED GUIDE
In Multi Mode, pedal assignments can vary per Multi. Pedal assignments can be adjusted for
each Zone by using Multi Edit Mode.
Global Mode can be used to set pedal overrides, which can change the pedal assignments for
all Programs and Multis.
NOTE : Switch pedals must be plugged in before powering on the SP6.
Do not to step on the switch pedals when powering on the SP6, as the
state of the pedals is detected as part of the start up sequence.
Dual Switch Pedals
The Rear Panel
SW1 (SUSTAIN) and SW2 Jacks
e SW1 (SUSTAIN) and SW2 jacks can be connected to dual switch pedals (2 pedals per
jack), allowing up to four switch pedals to be used. Compatible pedals should use a single 1/4
inch tip-ring-sleeve plug.
Pedals plugged into the SW1 (SUSTAIN) jack are referred to as SW1a and SW1b, and pedals
plugged into the SW2 jack are referred to as SW2a and SW2b. In Program Mode the default
assignments are:
SW1a
SW1b
SW2a
SW2b
To emulate the 3 pedals of an acoustic piano, plug a single switch pedal into the SW1
(SUSTAIN) jack, and a dual switch pedal into the SW2 jack.
Sustain
Sostenuto
Sostenuto
Soft Pedal
Continuous Switch Pedals (Half-Damper)
e SW1 (SUSTAIN) jack is also compatible with continuous switch pedals (Half-Damper)
that use a 1/4 inch tip-ring-sleeve plug (such as the Kurzweil KP-1H). When connected to the
SW1 (SUSTAIN) jack, a Half Damper pedal enables ner control of sustain than a standard
switch pedal. Half Damper control is enabled for Programs in the Piano category. Programs
outside of the Piano category will respond to a Half Damper pedal as if it is a standard switch
pedal.
9
Page 10

The Rear Panel
CC (VOLUME) Jack
GETTING STARTED GUIDE
CC (VOLUME) Jack
Use the CC (VOLUME) jack to connect a MIDI CC pedal (also known as a MIDI expression
or volume pedal). By default this pedal is assigned to control Program and Multi volume (preFX).
For KB3 Organ Programs, the CC (VOLUME) pedal controls organ swell. Organ swell is
similar to Program volume, except volume can not be turned all the way down to silence. e
LCD display shows “KB3” when a KB3 Program is selected.
For User Multis, the CC pedal can be assigned to a dierent function for each Zone by using
Multi Edit Mode.
e optional Kurzweil CC-1 continuous control pedal will work best with the SP6, but it is
also possible to use third-party continuous control pedals designed for keyboards. Compatible
pedals should use a 10 kΩ linear-taper potentiometer, with a 1/4 inch tip-ring-sleeve (stereo)
plug with the wiper connected to the tip.
AUDIO OUT LEFT (MONO) and RIGHT Jacks
Use the AUDIO OUT jacks to connect to an amplier or mixer. See “Quick Start” on page
2 for details.
HEADPHONE Jack
Use the HEADPHONE jack located on the left rear panel of the instrument to listen to
the SP6 on stereo headphones. You will need a 1/8-inch-to-1/4-inch adapter in order to use
headphones that have a smaller mini plug connector.
When headphones are plugged in, audio is still transmitted from the AUDIO OUT jacks.
10
Page 11

GETTING STARTED GUIDE
SP6 Sounds
e SP6 contains Programs and Multis. A Program is typically a single instrument sound such
as a Piano, Organ, or Synth. Programs are organized by instrument type in 10 categories.
A Multi is a combination of Programs arranged as layers and/or splits across the keyboard.
Multis are not categorized by instrument type, so the KEYPAD button is always on when in
Multi Mode.
Selecting Programs
In Program Mode, use any of the methods below to select a Program.
Browse All Programs:
Make sure the USER button is o, then use the ALPHA WHEEL or PREVIOUS and NEXT
buttons to select a Program from all of the available Programs.
Select a Program by Category:
SP6 Sounds
Selecting Programs
Make sure the KEYPAD button is o, then press one of the CATEGORY buttons to select the
rst Program of a category. e selected CATEGORY button will turn on. Use the ALPHA
WHEEL or PREVIOUS and NEXT buttons to select Programs from the selected category.
Select a Previously Saved User Program:
Press and turn on the USER button, then use the ALPHA WHEEL or PREVIOUS and NEXT
buttons to browse only User Programs. To return to browsing Factory and User Programs,
press and turn o the USER button.
Select a Program by ID Number:
Press and turn on the KEYPAD button. e keypad button allows you to use the numbers
labeled on the CATEGORY buttons to select Programs or Multis by ID number. Type an ID
number followed by pressing the ENTER button to select the associated Program.
Select a Category Default Program:
Each category has a Category Default Program (the Program which is selected when each
CATEGORY button is pressed). By default the Category Default Program is set to the rst
Program of each category. To set a dierent Category Default Program, select a Program, make
sure the KEYPAD button is o, then press and hold the currently lit CATEGORY button.
11
Page 12

SP6 Sounds
Selecting Multis
Selecting Multis
In Multi Mode, use any of the methods below to select a Multi.
Browse All Multis:
Make sure the USER button is o, then use the ALPHA WHEEL or PREVIOUS and NEXT
buttons to select a Multi from all of the available Multis.
Select a Multi by ID Number:
e KEYPAD button allows you to use the numbers labeled on the CATEGORY buttons to
select Multis by ID number. Use the CATEGORY buttons to type an ID number followed by
pressing the ENTER button. Multis are not organized by category, so the KEYPAD button is
always on in Multi Mode.
Select a Previously Saved User Multi:
Press and turn on the USER button, then use the ALPHA WHEEL or PREVIOUS and
NEXT buttons to browse only user Multis. To return to browsing Factory and User Multis,
press and turn o the USER button.
GETTING STARTED GUIDE
Controllers
e Knobs, Wheels, Pedals and Buttons can control each of the Factory Programs and Multis,
to produce variations to the sound. Don’t forget to try these out as you explore the Factory
sounds on the SP6.
Generally, each control will perform the assignment labeled on the front panel, although some
controls may have dierent assignments per Program or Multi. When a controller is moved,
the name of the current assignment is shown in the LCD display. Controller assignments can
be adjusted in Program and Multi Edit Mode.
Favorites
Use the FAVORITES buttons to quickly store and recall a set of 5 favorite Programs and/or
Multis while in Program or Multi Mode.
To recall a favorite Program or Multi, simply press one of the FAVORITES buttons. e
FAVORITES buttons work from both Program or Multi Mode, and pressing a FAVORITES
button will automatically bring you to Program Mode or Multi Mode if required.
To assign the currently selected Program or Multi to a FAVORITES button, press and hold
the desired FAVORITES button for a few seconds until the LCD display indicates that the
favorite has been saved.
12
Page 13

GETTING STARTED GUIDE
Splits and Layers
e Split and Layer function can be used to Split or Layer the current Program or Multi.
Dierent keyboard regions can play dierent Programs, or multiple Programs can be played
from the same region. To Split or Layer a Multi, it must contain at least one Zone which is
unused (O).
In Program or Multi Mode, press the PREVIOUS and NEXT buttons simultaneously to view
the Split/Layer page. You will then be able to congure up to three additional Programs to
create a Split or Layered Multi containing up to four Programs.
Press the SAVE button once to view the Save Dialog. e Save Dialog allows you to choose an
ID number and name for the Split/Layer Multi you are saving. Use the CHANNEL/PAGE
buttons to switch between ID selection and naming pages. On the Multi Save page, press the
SAVE button again to save the Split/Layer Multi.
After saving the Split or Layer as a Multi, additional Multi Controller and FX settings can be
edited in Multi Edit Mode.
SP6 Sounds
Splits and Layers
13
Page 14

Modes
Program Mode
Modes
Program Mode
e SP6 always powers up in Program Mode, where single instrument sounds can be played
directly from the keyboard, or multitimbrally via MIDI.
Saving Programs
If you make changes to the current Program using any of the controllers (Knobs, Wheels or
Buttons), the SAVE button turns on to indicate that a change has been made to that Program.
To save a copy of the Program with the changes you’ve made, press the SAVE button once
to view the Save Dialog. e Save Dialog allows you to choose an ID number and name
for the Program you are saving. Use the CHANNEL/PAGE buttons to switch between ID
selection and naming pages. On the Program Save page, press the SAVE button again to save
the Program as a User Program.
GETTING STARTED GUIDE
Program Edit Mode
Program Edit Mode allows you adjust the current Program’s Arpeggiator settings, select
parameters for the 4 assignable knobs, and adjust other Program parameters. See above for
details on saving an edited Program as a User Program.
Multi Mode
Multi Mode allows you to play Multis, which are arrangements of up to 4 Programs split and/
or layered in Zones across selected ranges of the keyboard. e volume of the Program in each
Zone can be easily adjusted while playing by using the top row of knobs assignments, and each
Zone can be turned on or o by using the ZONE ON/OFF buttons above these knobs.
e bottom two rows of knob assignments control the Program parameters. Controller settings
can be adjusted in Multi Edit Mode.
Multi Edit Mode
Multi Edit Mode is used to modify the many parameters that make up Multis, including
Program Selection, Key Range, Volume, Pan, and Controller assignments. Use Multi Edit
Mode to create custom sound combinations.
14
To save a copy of the Multi with the changes you’ve made, press the SAVE button once to
view the Save Dialog. e Save Dialog allows you to choose an ID number and name for the
Multi you are saving. Use the CHANNEL/PAGE buttons to switch between ID selection and
naming pages. On the Multi Save page, press the SAVE button again to save the Multi as a
User Multi.
Page 15

GETTING STARTED GUIDE
Global Mode
Use Global Mode to adjust common settings that are shared between all Modes, such as
velocity sensitivity and power saving options. Global Mode is also used for storing or loading
user backup les, and restoring Factory default settings. Some of the more common settings
are summarized below.
Info
e Info page shows the currently installed operating system and sound object versions. Use
this page to check if your SP6 is up to date with the most recent software and sounds posted
at www.kurzweil.com.
Reset
You can return the SP6 to the Factory default state by doing a System Reset.
NOTE : System Reset will erase ALL User Programs and Multis, so it is
important to back up your User sounds before doing a System Reset.
Factory Program/Multis are not affected.
Modes
Global Mode
Saving to External Storage
Programs and Multis that you have created can be saved to a USB Flash Drive or a computer.
Loading from External Storage
Programs and Multis can be loaded onto the SP6 from USB Flash Drives or a computer. is
allows you to load new sounds from Kurzweil or other developers, or to load sounds that you
have previously saved.
15
Page 16

It’s the sound.
®
®
©2017 Young Chang Co., Ltd. All rights reserved. Kurzweil® is a product line of Young Chang Co., Ltd. Kurzweil®, Young Chang® and SP6 are
trademarks of Young Chang Co., Ltd. All other trademarks and copyrights are property of their respective companies. Product features and specications are subject to change without notice.
You may legally print up to two (2) copies of this document for personal use. Commercial use of any copies of this document is prohibited. Young
Chang Co. retains ownership of all intellectual property represented by this document.
Rev C - Part Number 910583-003
 Loading...