

Page 1

It’s the
sound
®
®
.
Rev. C - For software release v1.13 and OS 3.86.30622
Part Number 910584-003
i
Page 2
CAUTION
RISK OF ELECTRIC SHOCK
DO NOT OPEN
The lightning flash with the arrowhead symbol, within an equilateral
triangle is intended to alert the user to the presence of uninsulated
"dangerous voltage" within the product's enclosure that may be of
sufficient magnitude to constitute a risk of electric shock to persons.
CAUTION: TO REDUCE THE RISK OF ELECTRIC SHOCK,
REFER SERVICING TO QUALIFIED SERVICE PERSONNEL.
DO NOT REMOVE THE COVER.
NO USER SERVICEABLE PARTS INSIDE.
The exclamation point within an equilateral triangle is intended
to alert the user to the presence of important operating and
maintenance (servicing) instructions in the literature
accompanying the product.
IMPORTANT SAFETY & INSTALLATION INSTRUCTIONS
INSTRUCTIONS PERTAINING TO THE RISK OF FIRE ELECTRIC SHOCK , OR INJURY TO PERSONS
WARNING: When using electric products, basic precautions should
always be followed, including the following:
1. Read all the Safety and Installation Instructions and Explanation
of Graphic Symbols before using the product.
2. This product must be grounded. If it should malfunction or
break down, grounding provides a path of least resistance for
electric current to reduce the risk of electric shock. This product
is equipped with a power supply cord having an equipmentgrounding conductor and a grounding plug. The plug must be
plugged into an appropriate outlet which is properly installed and
grounded in accordance with all local codes and ordinances.
DANGER: Improper connection of the equipment-grounding
conductor can result in a risk of electric shock. Do not modify the
plug provided with the product – if it will not t the outlet, have a
proper outlet installed by a qualied electrician. Do not use an
adaptor which defeats the function of the equipment-grounding
conductor. If you are in doubt as to whether the product is properly
grounded, check with a qualied serviceman or electrician.
3. Do not use this product near water – for example, near a bathtub,
washbowl, kitchen sink, in a wet basement, or near a swimming
pool, or the like.
4. This product should only be used with a stand or cart that is
recommended by the manufacturer.
5. This product, either alone or in combination with an amplier and
speakers or headphones, may be capable of producing sound
levels that could cause permanent hearing loss. Do not operate
for a long period of time at a high volume level or a level that is
uncomfortable. If you experience any hearing loss or ringing in
the ears, you should consult an audiologist.
6. This product should be located so that its location or position
does not interfere with its proper ventilation.
7. The product should be located away from heat sources such as
radiators, heat registers, or other products that produce heat.
8. The product should be connected to a power supply only of the
type described in the operating instructions or as marked on the
product.
9. This product may be equipped with a polarized line plug (one
blade wider than the other). This is a safety feature. If you are
unable to insert the plug into the outlet, contact an electrician to
replace your obsolete outlet. Do not defeat the safety purpose of
the plug.
10. The power supply cord of the product should be unplugged
from the outlet when left unused for a long period of time. When
unplugging the power supply cord, do not pull on the cord, but
grasp it by the plug.
11. Care should be taken so that objects do not fall and liquids are
not spilled into the enclosure through openings.
12. The product should be serviced by qualied service personnel
when:
A. The power supply, power cord or plug have been damaged;
B. Objects have fallen, or liquid has been spilled into the
product;
C. The product has been exposed to rain;
D. The product does not appear to be operating normally or
exhibits a marked change in performance;
E. The product has been dropped, or the enclosure damaged.
13. Do not attempt to service the product beyond that described in
the user maintenance instructions. All other servicing should be
referred to qualied service personnel.
14. WARNING: Do not place objects on the product’s power supply
cord, or place the product in a position where anyone could trip
over, walk on, or roll anything over cords of any type. Do not
allow the product to rest on or be installed over cords of any type.
Improper installations of this type create the possibility of a re
hazard and/or personal injury.
RADIO AND TELEVISION INTERFERENCE
WARNING: Changes or modications to the instrument not expressly
approved by Young Chang could void your authority to operate the
instrument.
IMPORTANT: When connecting this product to accessories and/or
other equipment use only high quality shielded cables.
NOTE: This instrument has been tested and found to comply with the
limits for a Class B digital device, pursuant to Part 15 of the FCC Rules.
These limits are designed to provide reasonable protection against
harmful interference in a residential installation. This instrument
generates, uses, and can radiate radio frequency energy and, if not
installed and used in accordance with the instructions, may cause
harmful interference to radio communications. However, there is no
guarantee that interference will not occur in a particular installation. If
this instrument does cause harmful interference to radio or television
reception, which can be determined by turning the instrument off and
on, the user is encouraged to try to correct the interference by one or
more of the following measures:
• Reorient or relocate the receiving antenna.
SAVE THESE INSTRUCTIONS
ii
• Increase the separation between the instrument and the receiver.
• Connect the instrument into an outlet on a circuit other than the
one to which the receiver is connected.
• If necessary consult your dealer or an experienced radio/television
technician for additional suggestions.
The normal function of the product may be disturbed by strong
electromagnetic interference. If so, simply reset the product to resume
normal operation by following the instructions in the manual. If normal
function does not resume, please use the product in another location.
NOTICE
This apparatus does not exceed the Class B limits for radio noise
emissions from digital apparatus set out in the Radio Interference
Regulations of the Canadian Department of Communications.
AVIS
Le present appareil numerique n’emet pas de bruits radioelectriques
depassant les limites applicables aux appareils numeriques de la
class B prescrites dans le Reglement sur le brouillage radioelectrique
edicte par le ministere des Communications du Canada.
Page 3

IMPORTANT SAFETY INSTRUCTIONS
1) Read these instructions.
2) Keep these instructions.
3) Heed all warnings.
4) Follow all instructions.
5) Do not use this apparatus near water.
6) Clean only with dry cloth.
7) Do not block any of the ventilation openings. Install in accordance with the manufacturer’s instructions.
8) Do not install near any heat sources such as radiators, heat registers, stoves, or other apparatus (including
ampliers) that produce heat.
9) Do not defeat the safety purpose of the polarized or grounding-type plug. A polarized plug has two
blades with one wider than the other. A grounding type plug has two blades and a third grounding
prong. e wide blade or the third prong are provided for your safety. If the provided plug does not t
into your outlet, consult an electrician for replacement of the obsolete outlet
10) Protect the power cord and power supply adapter from being walked on or pinched, particularly at plugs,
convenience receptacles, and the point where they exit from the apparatus.
11) Only use power adapters and attachments/accessories specied by the manufacturer.
12) Use only with a cart, stand, tripod, bracket, or table specied by the manufacturer,
or sold with the apparatus. When a cart is used, use caution when moving the cart/
apparatus combination to avoid injury from tip-over.
13) Unplug this apparatus during lightning storms or when unused for long periods of
time.
14) Refer all servicing to qualied service personnel. Servicing is required when the apparatus has been
damaged in any way, such as power-supply cord or plug is damaged, liquid has been spilled or objects
have fallen into the apparatus, the apparatus has been exposed to rain or moisture, does not operate
normally, or has been dropped.
Warning: To reduce the risk of re or electric shock, do not expose this apparatus to rain or moisture. Do not
expose this equipment to dripping or splashing and ensure that no objects lled with liquids, such as vases, are
placed on the equipment.
To completely disconnect this equipment from the AC Mains, disconnect the power supply cord plug from
the AC receptacle.
©2018 Young Chang Co., Ltd. All rights reserved. Kurzweil® is a product line of Young Chang Co., Ltd. Kurzweil®, Young Chang®,
V. A. S. T.®, and SP6® are trademarks of Young Chang Co., Ltd. All other trademarks and copyrights are property of their respective companies.
Product features and specications are subject to change without notice.
You may legally print up to two (2) copies of this document for personal use. Commercial use of any copies of this document is prohibited.
Young Chang Co. retains ownership of all intellectual property represented by this document.
iii
Page 4

Kurzweil International Contacts
Contact the Kurzweil oce listed below to locate your local Kurzweil representative.
US Customers:
American Music & Sound
925 Broadbeck Dr #220
Newbury Park, CA 91320
Tel: 800-431-2609
Fax: 818-597-0411
Email: info@americanmusicandsound.com
www.kurzweil.com
Customers outside the US:
Young Chang Co., LTD.
178-55, Gajwa-Dong, Seo-Ku
Incheon, Korea
Post Code: 404-714
Tel: +82-32-570-1576
Fax: +82-32-576-2340
iv
support@kurzweil.com
www.facebook.com/kurzweilmusicsystems/
www.twitter.com/KurzweilMusic
www.youtube.com/user/KurzweilTutorials
Page 5

Table of Contents
Table of Contents
Getting Started .................................................................. 1-1
Features of the SP6 ...................................................................................................... 1-1
Quick Start .................................................................................................................... 1-2
The Front Panel ............................................................................................................ 1-4
The Rear Panel.............................................................................................................. 1-9
SP6 Sounds ................................................................................................................. 1-12
Modes .......................................................................................................................... 1-15
Program Mode .................................................................. 2-1
Selecting Programs ...................................................................................................... 2-1
Program Demo .............................................................................................................. 2-2
The LCD ......................................................................................................................... 2-2
Favorites........................................................................................................................ 2-3
Controllers .................................................................................................................... 2-3
SPLIT/LAYER ................................................................................................................ 2-7
Program Save Dialog ..................................................................................................2-11
Changing the MIDI Channel ....................................................................................... 2-13
PANIC ........................................................................................................................... 2-13
Program Edit Mode ........................................................... 3-1
Assignable Params Page ............................................................................................. 3-1
Arpeggiator Page .......................................................................................................... 3-2
Master Page .................................................................................................................. 3-5
All Parameters Page ..................................................................................................... 3-7
Save User Programs .................................................................................................... 3-8
Multi Mode ......................................................................... 4-1
Selecting Multis ............................................................................................................ 4-1
The LCD ......................................................................................................................... 4-2
Favorites........................................................................................................................ 4-2
Controllers .................................................................................................................... 4-2
TOC-i
Page 6

Table of Contents
SPLIT/LAYER ................................................................................................................ 4-6
Multi Save Dialog ........................................................................................................ 4-10
PANIC ........................................................................................................................... 4-12
Multi Edit Mode ................................................................. 5-1
Main Page ...................................................................................................................... 5-1
Mixer Page..................................................................................................................... 5-2
Key/Velocity Page ......................................................................................................... 5-3
Transpose/Bend Page .................................................................................................. 5-4
FX Page ......................................................................................................................... 5-5
Buttons Page ................................................................................................................ 5-5
Switch Pedals Page ...................................................................................................... 5-6
CC Pedal Page .............................................................................................................. 5-7
Controllers Page ........................................................................................................... 5-8
Channel Page .............................................................................................................. 5-10
Common Page .............................................................................................................5-11
Save User Multis ......................................................................................................... 5-12
Global Mode ...................................................................... 6-1
Settings Page ................................................................................................................ 6-1
Overrides Page ............................................................................................................. 6-6
File Page ........................................................................................................................ 6-8
Delete Page ................................................................................................................. 6-10
Info Page ......................................................................................................................6-11
Reset Page ...................................................................................................................6-11
Troubleshooting ............................................................... 7-1
Maintenance .................................................................................................................. 7-1
Power On Problems ..................................................................................................... 7-1
Audio Problems ............................................................................................................ 7-2
MIDI Problems ............................................................................................................... 7-3
Pedal Problems............................................................................................................. 7-4
Kurzweil Support .......................................................................................................... 7-5
MIDI Implementation ........................................................A-1
MIDI Control ..................................................................................................................A-2
TOC-ii
Page 7

Table of Contents
Physical Specications....................................................B-1
Programs ...........................................................................C-1
Multis .................................................................................D-1
Index ...........................................................................Index-1
TOC-iii
Page 8

Getting Started
Features of the SP6
Chapter 1
Getting Started
is chapter will give you a quick overview of the SP6. Be sure to keep this manual on hand as you
familiarize yourself with the features and functions of the SP6.
Features of the SP6
• FlashPlay technology utilizing 2GB of instrument samples including:
• Optimized German D and Japanese C7 Pianos, Triple Strike Piano, 73 Electric Piano,
Clavinets, Harpsichords, Celeste, Bowed and Hit Crotales, Vector Synthesis Waveforms
• Updated Rock, Synth and Orchestral sounds from Kurzweil’s Forte SE, PC3, and KORE64
• 10 Categories of Programs (Piano, E. Piano, Clav, Organ, Strings/Pads, Brass/Winds,
Voices/Misc, Leads/Synths, Guitar/Bass, Drums/Perc)
• Space for 1024 Factory and 1024 User Programs and Multis
• KSR: Kurzweil String Resonance (Piano String Resonance Simulation)
• Support for optional Half-Damper pedal
• KB3 Organ simulations with control of 9 drawbars
• Arpeggiator with dedicated On/O and Tap Tempo buttons (up to 4 simultaneous in Multi Mode)
• High quality audio eects with dedicated knob assignments
• 4 knobs with Shift button (3 shift rows for 12 assignments per Program)
• Support for up to 4 switch pedals
• 128 voices of polyphony
• 16 MIDI Channels for multitimbral applications
• 4 Zone MIDI Controller
1-1
Page 9

Getting Started
Quick Start
Quick Start
Be sure to check the Kurzweil website at www.kurzweil.com for new sounds, documentation
and software updates.
Setting Up the SP6
1. If your SP6 keyboard has been out in the cold during shipping, give it time to warm up
to room temperature before powering it on, since condensation may have formed inside.
2. Place the SP6 on a keyboard stand or on a hard, at, level surface.
3. Connect the DC power adaptor to the SP6 DC Power jack.
4. Make sure your power outlet is compatible with the included power adaptor, then plug
the power cable into the power outlet.
5. Plug the included Switch Pedal into the SW1 (SUSTAIN) jack on the SP6 rear panel.
6. If you have an additional switch pedal, plug it into the SW2 jack for Sostenuto control.
7. If you have a MIDI CC pedal (also known as a MIDI expression or volume pedal), plug
it into the CC (VOLUME) jack for volume control.
8. If you are using speakers, turn the master volume all the way down on your amplier
or mixer. Using standard (1/4-inch) audio cables, rst plug into the input jacks of your
amplier or mixer, then plug the other end of the cables into the SP6 AUDIO OUT
jacks. (Connecting in this order minimizes the possibility of static discharge damage.) For
a mono signal, only use the LEFT (MONO) jack, and leave the RIGHT jack unplugged.
Balanced (“TRS” or “Stereo”) cables are recommended if your mixer or amp supports
balanced inputs.
9. If you are using headphones, connect stereo headphones to the headphone jack on the
rear panel.
10. Turn the SP6 VOLUME knob (on the far left side of the front panel) to MIN.
Powering On the SP6
1. Power on the SP6 by pressing the POWER button on the right rear panel.
2. If you are using speakers, turn up the volume on your amplier or mixer.
1-2
3. Slowly turn up the SP6 VOLUME knob and play some notes to check the volume level.
(If you have a CC pedal plugged into the CC (VOLUME) jack, make sure it is set to the
maximum volume position).
Page 10

4. If you are using speakers and the SP6 is not loud enough, turn up the volume on your
amplier or mixer.
5. If you are using a mixer and hear distortion, reduce the gain level on the mixer, or use
the mixer’s Pad button if it has one (a button that typically decreases the audio input level
by 20dB).
6. After using the SP6, if you are using speakers, turn the master volume all the way down
on your amplier or mixer before powering o the SP6.
Auditioning SP6 Sounds
1. e SP6 starts up in Program Mode. Use the PREVIOUS and NEXT buttons, ALPHA
WHEEL, or CATEGORY buttons to select a dierent Program. See SP6 Sounds on page
1-12 for more details on selecting Programs or Multis.
1. To hear a Program Demo song for the current Program, press the KEYPAD and ENTER
buttons simultaneously.
Getting Started
The Front Panel
2. To hear the capabilities of the SP6, you can play the multi-channel demo songs. Press the
KEYPAD and DRUMS/PERC buttons simultaneously to listen to a multi-channel demo
song.
3. To switch between auditioning Programs or Multis, press the PROGRAM or MULTI
Mode button under the MODE label to the right of the LCD display.
Automatic Power Saving
e SP6 has an automatic power saving feature (Auto Power O) that can automatically
power o the SP6 after a period of inactivity, in order to conserve electricity. e Auto Power
O feature is enabled by default. e default Power O Time is 8 hours, which will cause the
SP6 to power o after 8 hours of inactivity.
A count down timer warning will be shown in the LCD display a few minutes before the SP6
is powered o. At any time, touching any SP6 control or playing a note will cause the SP6 to
remain powered on, until the SP6 has been inactive for the set Power O Time.
Auto Power O can be disabled in Global Mode. e Power O Time can also be adjusted
in Global Mode.
1-3
Page 11
Getting Started
The Front Panel
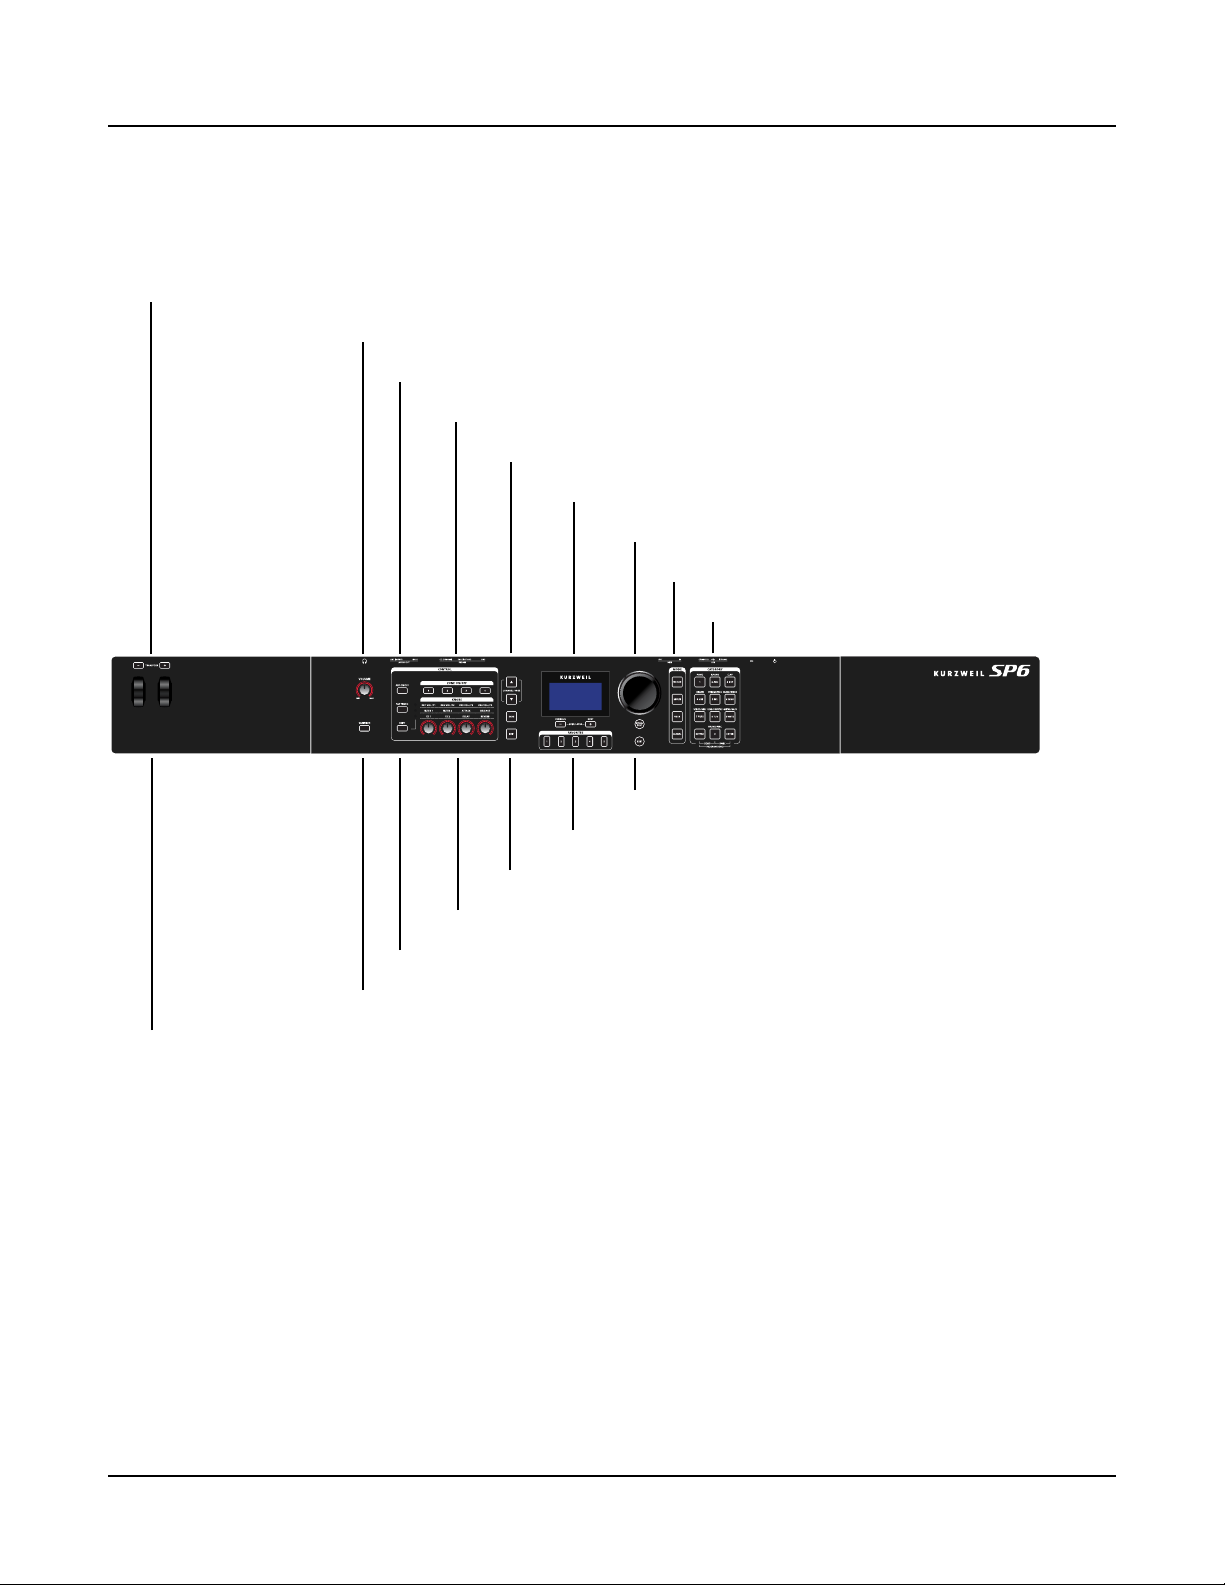
The Front Panel
TRANSPOSE Buttons
VOLUME Knob
ARP ON/OFF Button and TAP TEMPO Button
ZONE ON/OFF Buttons
CHANNEL/PAGE Buttons
LCD Display
ALPHA WHEEL
MODE Buttons and USER Button
CATEGORY Buttons
PREVIOUS/NEXT Buttons and FAVORITES Buttons
SAVE Button and EDIT Button
KNOBS
SHIFT Button
VARIATION Button
PITCH WHEEL and MODULATION WHEEL
VOLUME Knob
e VOLUME knob controls the volume level of the AUDIO OUT and HEADPHONE
jacks.
LCD Display
e LCD display is the main user interface for the SP6. Use the LCD display to view
Program and Multi names, controller assignments, and editing functions.
LOCAL DEST Button and EXIT Button
1-4
Page 12

ALPHA WHEEL
In Program and Multi Mode, use the ALPHA WHEEL to navigate through the Program or
Multi list.
In Program Edit or Multi Edit Mode, use the ALPHA WHEEL to scroll through the list of
values for the currently selected parameter. Turn the ALPHA WHEEL counter-clockwise or
clockwise to select the previous or next value. Turn the ALPHA WHEEL slowly to change
the value by one increment, or turn it quickly to jump several increments.
PREVIOUS and NEXT Buttons
In Program and Multi Mode, use the PREVIOUS and NEXT buttons to navigate through
the Program or Multi list.
In Program and Multi Mode, press the PREVIOUS and NEXT buttons simultaneously to
access the Split/Layer function.
In Program Edit or Multi Edit Mode, use the PREVIOUS and NEXT buttons to navigate to
each parameter on the current page.
Getting Started
The Front Panel
MODE Buttons
Press the MODE buttons to access PROGRAM, MULTI or GLOBAL Mode. See Modes on
page 1-15 for a description of each Mode.
CATEGORY Buttons
In Program Mode, the CATEGORY buttons allow you to select and browse Programs in 10
categories of instruments. Engaging the KEYPAD button allows you to use the CATEGORY
buttons as an alphanumeric keypad. e KEYPAD button is always on in Multi Mode, and
where needed for editing parameter values.
FAVORITES Buttons
e FAVORITES buttons can be used to instantly recall your favorite Programs and Multis.
To assign the currently selected Program or Multi to a FAVORITES button, press and hold
the desired FAVORITES button for a few seconds until the LCD display indicates that the
favorite has been saved. Press a FAVORITES button to instantly select the stored Program or
Multi.
1-5
Page 13

Getting Started
The Front Panel
TRANSPOSE Buttons
e TRANSPOSE buttons can be used to change the tuning of notes played on the SP6
keyboard in semitones (also known as half steps). e current transpose amount is shown
in the LCD display (for example, the default is “Xp:0st”). Press both TRANSPOSE buttons
simultaneously to reset the transposition to 0.
PITCH WHEEL and MODULATION WHEEL
Use each wheel to respectively perform pitch bends or vary the modulation amount. e
MODULATION WHEEL will perform a pre-assigned modulation for each Program or
Multi. e name of the current assignment is shown in the LCD display when the wheel is
moved.
VARIATION Button
Pressing the VARIATION button will perform a pre-assigned variation for each Program or
Multi. e name of the current assignment is shown in the LCD display when the button is
pressed.
e VARIATION button has two states, o (not lit) and on (lit). e VARIATION button
will typically modify the sound by adding an orchestral string section or synth pad layer, or
enabling an eect.
For KB3 Organ Programs, the VARIATION button controls the Rotary Speaker speed,
changing between fast and slow. e LCD display shows “KB3” when a KB3 Program is
selected.
KNOBS
e KNOBS are used to control various Program and Multi parameters. Press the SHIFT
button to shift between 3 rows of 4 knob assignments.
In Program Mode: e top row of knob assignments control user-assignable parameters, and
the bottom two rows of knob assignments perform the functions labeled on the front panel.
e top row of user-assignable parameters can be adjusted in Program Edit Mode.
In Multi Mode: e top row of knob assignments control Multi Zone volumes, and the
bottom two rows of knob assignments perform the functions labeled on the front panel. For
the bottom two rows of KNOBS, value scaling and oset can be adjusted per Zone for each
knob in Multi Edit Mode. is allows each knob range to be adjusted or disabled per Zone.
1-6
In Program and Multi Mode: When a KB3 Organ Program is selected, some of the knobs
may perform Organ drawbar functions instead of the functions labeled on the front panel.
e LCD display shows “KB3” when a KB3 Program is selected.
Page 14

SHIFT Button
e SHIFT button allows you to shift between 3 groups of knob assignments. e available
knob assignments are labeled in 3 rows below the knobs. Press the SHIFT button to shift to
the next assignment group, indicated by a lit LED to the left of each row.
ARP ON/OFF Button
Use the ARP ON/OFF button to turn on and o the SP6’s Arpeggiator.
TAP TEMPO Button
Use the TAP TEMPO button to set the rate of the Arpeggiator or tempo synced FX (such as
Delay). Press the TAP TEMPO button a few times at the desired rate to set the tempo.
You can also set a tempo by pressing the TAP TEMPO button, then using the ALPHA
WHEEL or PREVIOUS/NEXT buttons to set a tempo, or use the keypad function of the
CATEGORY buttons to type a numeric value followed by pressing the ENTER button.
Getting Started
The Front Panel
ZONE ON/OFF Buttons
In Multi Mode, these buttons allow you to turn each of the 4 Zones on or o. When a Zone
is on, the corresponding button is lit. When a Zone is o, the corresponding button is not
lit. Press each Zone button to turn each Zone on or o.
SAVE and EDIT Buttons
ese buttons are used when editing Programs or Multis to create User sounds. In Program
Mode, press the SAVE button to save a User Program with the current controller settings.
EXIT Button
In Program Edit Mode, Multi Mode, or Global Mode, press the EXIT button to return to
Program Mode. In Multi Edit Mode, press the EXIT button to return to Multi Mode.
USER Button
Press and enable the USER button to access previously saved User Programs or Multis. Press
and disable the USER button to access all Programs or Multis (Factory and User).
1-7
Page 15

Getting Started
The Front Panel
CHANNEL/PAGE Buttons
Use the CHANNEL/PAGE buttons to change the current MIDI Channel in Program Mode,
or the current page in Program Edit or Multi Edit Mode.
LOCAL DEST Button
e LOCAL DEST button controls the destination of MIDI notes produced by playing the
SP6 keyboard. Pressing the LOCAL DEST button will step through the options, LOCAL,
MIDI, or LOCAL + MIDI. When the LOCAL DEST button is pressed, the current
setting is briey shown in the LCD display. e color of the LOCAL DEST button changes
depending on the current setting.
LOCAL + MIDI: MIDI notes will be sent to the local SP6 sound engine, as well as the
MIDI OUT and USB Computer ports.
LOCAL: MIDI notes will only be sent to the local SP6 sound engine.
MIDI: MIDI notes will only be sent to the MIDI OUT and USB Computer ports.
1-8
Page 16

The Rear Panel
POWER Button
Press the POWER button to power the SP6 on or o.
DC Power Jack
Plug the included power adaptor into the DC Power jack.
Getting Started
The Rear Panel
USB Ports
Use the USB ports to connect the SP6 to a computer/tablet or USB hard drive in order to do
the following:
• Use the SP6 as a MIDI controller to play software instruments on a computer/tablet.
• Use a computer/tablet to sequence multi-channel songs on the SP6.
• Backup and restore User Programs and Multis on a computer/USB hard drive.
• Update the software and sounds of the SP6.
MIDI IN and OUT Ports
Use the MIDI ports to communicate with other MIDI modules and controllers. e OUT
port is the MIDI transmitting port, and the IN port is the MIDI receiving port.
To use the SP6 as a MIDI controller for another sound module, use a MIDI cable to connect
the SP6’s MIDI OUT port to the MIDI input port of the module that you want to control.
To control the SP6 using another MIDI controller, use a MIDI cable to connect the SP6’s
MIDI IN port to the MIDI output port of the controller that you will be using.
1-9
Page 17
Getting Started
The Rear Panel
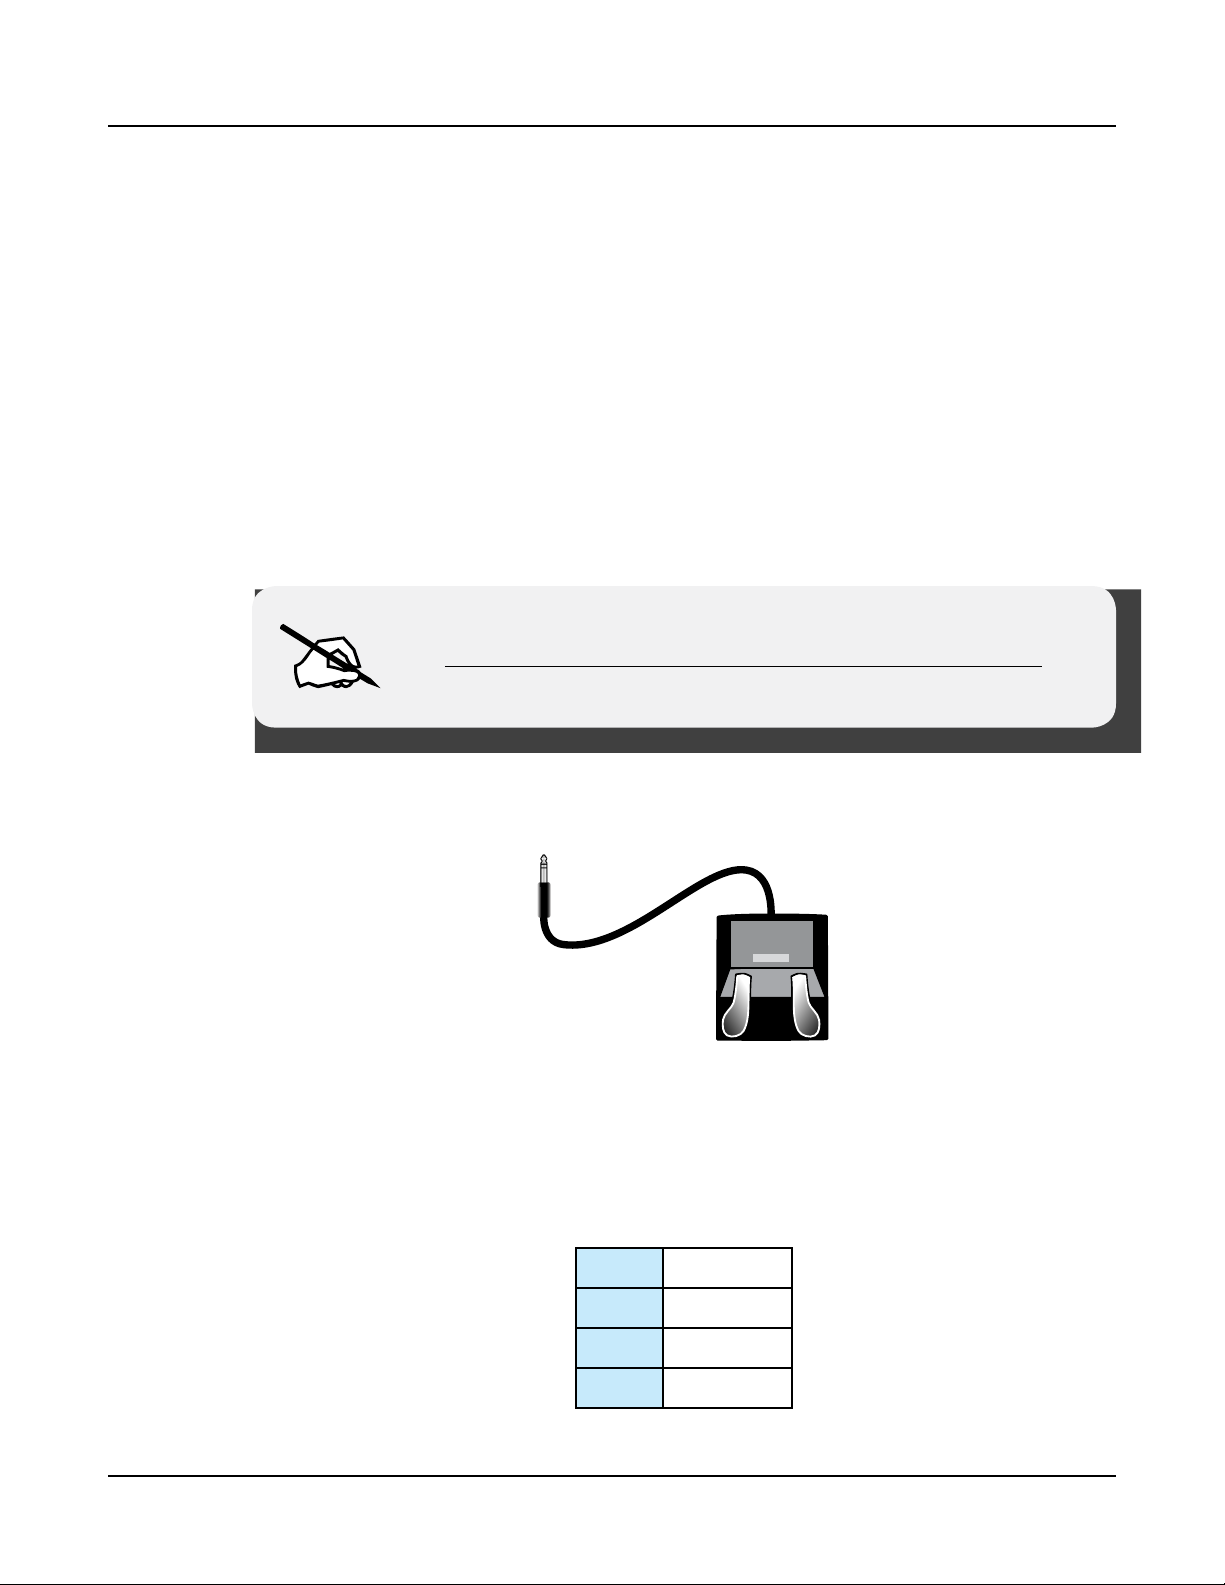
SW1 (SUSTAIN) and SW2 Jacks
Use the SW1 (SUSTAIN) and SW2 jacks to connect switch pedals. One switch pedal is
included with the SP6.
In Program Mode, SW1 (SUSTAIN) defaults to controlling Sustain, and SW2 defaults to
controlling Sostenuto. (For KB3 Organ Programs, SW1 (SUSTAIN) defaults to controlling
the Rotary Speaker speed, changing between fast and slow. is assignment can be changed
in Global Mode. e LCD display shows “KB3” when a KB3 Program is selected.)
In Multi Mode, pedal assignments can vary per Multi. Pedal assignments can be adjusted for
each Zone by using Multi Edit Mode.
Global Mode can be used to set pedal overrides, which can change the pedal assignments for
all Programs and Multis.
NOTE : Switch pedals must be plugged in before powering on the
SP6. Do not to step on the switch pedals when powering on the SP6,
as the state of the pedals is detected as part of the start up sequence.
Dual Switch Pedals
e SW1 (SUSTAIN) and SW2 jacks can be connected to dual switch pedals (2 pedals per
jack), allowing up to four switch pedals to be used. Compatible pedals should use a single
1/4 inch tip-ring-sleeve plug.
Pedals plugged into the SW1 (SUSTAIN) jack are referred to as SW1a and SW1b, and
pedals plugged into the SW2 jack are referred to as SW2a and SW2b. In Program Mode the
default assignments are:
SW1a Sustain
SW1b Sostenuto
SW2a Sostenuto
SW2b Soft Pedal
1-10
Page 18

To emulate the 3 pedals of an acoustic piano, plug a single switch pedal into the SW1
(SUSTAIN) jack, and a dual switch pedal into the SW2 jack.
Continuous Switch Pedals (Half-Damper)
e SW1 (SUSTAIN) jack is also compatible with continuous switch pedals (Half-Damper)
that use a 1/4 inch tip-ring-sleeve plug (such as the Kurzweil KP-1H). When connected
to the SW1 (SUSTAIN) jack, a Half Damper pedal enables ner control of Sustain than a
standard switch pedal. Half Damper control is enabled for Programs in the Piano category.
Programs outside of the Piano category will respond to a Half Damper pedal as if it is a
standard switch pedal.
CC (VOLUME) Jack
Use the CC (VOLUME) jack to connect a MIDI CC pedal (also known as a MIDI
expression or volume pedal). By default this pedal is assigned to control Program and Multi
volume (pre-FX).
Getting Started
The Rear Panel
For KB3 Organ Programs, the CC (VOLUME) pedal controls organ swell. Organ swell is
similar to Program volume, except volume can not be turned all the way down to silence.
e LCD display shows “KB3” when a KB3 Program is selected.
For User Multis, the CC pedal can be assigned to a dierent function for each Zone by using
Multi Edit Mode.
e optional Kurzweil CC-1 continuous control pedal will work best with the SP6, but
it is also possible to use third-party continuous control pedals designed for keyboards.
Compatible pedals should use a 10 kΩ linear-taper potentiometer, with a 1/4 inch tip-ringsleeve (stereo) plug with the wiper connected to the tip.
AUDIO OUT LEFT (MONO) and RIGHT Jacks
Use the AUDIO OUT jacks to connect to an amplier or mixer. See Quick Start on page
1-2 for details.
HEADPHONE Jack
Use the HEADPHONE jack located on the left rear panel of the instrument to listen to
the SP6 on stereo headphones. You will need a 1/8-inch-to-1/4-inch adapter in order to use
headphones that have a smaller mini plug connector.
When headphones are plugged in, audio is still transmitted from the AUDIO OUT jacks.
1-11
Page 19

Getting Started
SP6 Sounds
SP6 Sounds
e SP6 contains Programs and Multis. A Program is typically a single instrument sound
such as a Piano, Organ, or Synth. Programs are organized by instrument type in 10
categories.
A Multi is a combination of Programs arranged as layers and/or splits across the keyboard.
Multis are not categorized by instrument type, so the KEYPAD button is always on when in
Multi Mode.
Selecting Programs
In Program Mode, use any of the methods below to select a Program.
Browse All Programs
Make sure the USER button is o, then use the ALPHA WHEEL or PREVIOUS and
NEXT buttons to select a Program from all of the available Programs.
Select a Program by Category
Make sure the KEYPAD button is o, then press one of the CATEGORY buttons to select
the rst Program of a category (or the current Category Default Program). e selected
CATEGORY button will turn on. Use the ALPHA WHEEL or PREVIOUS and NEXT
buttons to select Programs from the selected category.
Select a Previously Saved User Program
Press and turn on the USER button, then use the ALPHA WHEEL or PREVIOUS and
NEXT buttons to browse only User Programs. To return to browsing Factory and User
Programs, press and turn o the USER button.
Select a Program by ID Number
Press and turn on the KEYPAD button. e keypad button allows you to use the numbers
labeled on the CATEGORY buttons to select Programs or Multis by ID number. Type an ID
number followed by pressing the ENTER button to select the associated Program.
Select a Category Default Program
Each category has a Category Default Program (the Program which is selected when each
CATEGORY button is pressed). By default the Category Default Program is set to the rst
Program of each category. To set a dierent Category Default Program, select a Program,
make sure the KEYPAD button is o, then press and hold the currently lit CATEGORY
button.
1-12
Page 20

Selecting Multis
In Multi Mode, use any of the methods below to select a Multi.
Browse All Multis
Make sure the USER button is o, then use the ALPHA WHEEL or PREVIOUS and
NEXT buttons to select a Multi from all of the available Multis.
Select a Multi by ID Number
e KEYPAD button allows you to use the numbers labeled on the CATEGORY buttons to
select Multis by ID number. Use the CATEGORY buttons to type an ID number followed
by pressing the ENTER button. Multis are not organized by category, so the KEYPAD
button is always on in Multi Mode.
Select a Previously Saved User Multi
Press and turn on the USER button, then use the ALPHA WHEEL or PREVIOUS and
NEXT buttons to browse only User Multis. To return to browsing Factory and User Multis,
press and turn o the USER button.
Getting Started
SP6 Sounds
Controllers
e Knobs, Wheels, Pedals and Buttons can control each of the Factory Programs and
Multis, to produce variations to the sound. Don’t forget to try these out as you explore the
Factory sounds on the SP6.
Generally, each control will perform the assignment labeled on the front panel, although
some controls may have dierent assignments per Program or Multi. When a controller
is moved, the name of the current assignment is shown in the LCD display. Controller
assignments can be adjusted in Program and Multi Edit Mode.
Favorites
Use the FAVORITES buttons to quickly store and recall a set of 5 favorite Programs and/or
Multis while in Program or Multi Mode.
To recall a favorite Program or Multi, simply press one of the FAVORITES buttons. e
FAVORITES buttons work from both Program or Multi Mode, and pressing a FAVORITES
button will automatically bring you to Program Mode or Multi Mode if required.
To assign the currently selected Program or Multi to a FAVORITES button, press and hold
the desired FAVORITES button for a few seconds until the LCD display indicates that the
favorite has been saved.
1-13
Page 21

Getting Started
SP6 Sounds
Splits and Layers
e Split and Layer function can be used to Split or Layer the current Program or Multi.
Dierent keyboard regions can play dierent Programs, or multiple Programs can be played
from the same region. To Split or Layer a Multi, it must contain at least one Zone which is
unused (O).
In Program or Multi Mode, press the PREVIOUS and NEXT buttons simultaneously to
view the Split/Layer Page. You will then be able to congure up to three additional Programs
to create a Split or Layered Multi containing up to four Programs.
Press the SAVE button once to view the Save Dialog. e Save Dialog allows you to choose
an ID number and name for the Split/Layer Multi you are saving. Use the CHANNEL/
PAGE buttons to switch between ID selection and naming pages. On the Multi Save Page,
press the SAVE button again to save the Split/Layer Multi.
After saving the Split or Layer as a Multi, additional Multi Controller and FX settings can be
edited in Multi Edit Mode.
1-14
Page 22

Modes
Program Mode
e SP6 always powers up in Program Mode, where single instrument sounds can be played
directly from the keyboard, or multitimbrally via MIDI.
Saving Programs
If you make changes to the current Program using any of the controllers (Knobs, Wheels
or Buttons), the SAVE button turns on to indicate that a change has been made to that
Program.
To save a copy of the Program with the changes you’ve made, press the SAVE button once to
view the Save Dialog. e Save Dialog allows you to choose an ID number and name for the
Program you are saving. Use the CHANNEL/PAGE buttons to switch between ID selection
and naming pages. On the Program Save Page, press the SAVE button again to save the
Program as a User Program.
Getting Started
Modes
Program Edit Mode
Program Edit Mode allows you adjust the current Program’s Arpeggiator settings, select
parameters for the 4 assignable knobs, and adjust other Program parameters. See above for
details on saving an edited Program as a User Program.
Multi Mode
Multi Mode allows you to play Multis, which are arrangements of up to 4 Programs split
and/or layered in Zones across selected ranges of the keyboard. e volume of the Program
in each Zone can be easily adjusted while playing by using the top row of knobs assignments,
and each Zone can be turned on or o by using the ZONE ON/OFF buttons above these
knobs.
e bottom two rows of knob assignments control the Program parameters. Controller
settings can be adjusted in Multi Edit Mode.
Multi Edit Mode
Multi Edit Mode is used to modify the many parameters that make up Multis, including
Program Selection, Key Range, Volume, Pan, and Controller assignments. Use Multi Edit
Mode to create custom sound combinations.
1-15
Page 23

Getting Started
Modes
To save a copy of the Multi with the changes you’ve made, press the SAVE button once to
view the Save Dialog. e Save Dialog allows you to choose an ID number and name for the
Multi you are saving. Use the CHANNEL/PAGE buttons to switch between ID selection
and naming pages. On the Multi Save Page, press the SAVE button again to save the Multi as
a User Multi.
Global Mode
Use Global Mode to adjust common settings that are shared between all Modes, such as
velocity sensitivity and power saving options. Global Mode is also used for storing or loading
User backup les, and restoring Factory default settings. Some of the more common settings
are summarized below.
Info
e Info Page shows the currently installed operating system and sound object versions. Use
this page to check if your SP6 is up to date with the most recent software and sounds posted
at www.kurzweil.com.
Reset
You can return the SP6 to the Factory default state by doing a Reset.
NOTE : Reset will erase ALL User Programs and Multis, so it is
important to back up your User sounds before doing a Reset. Factory
Program/Multis are not affected.
Saving to External Storage
Programs and Multis that you have created can be saved to a USB Flash Drive or a computer.
Loading from External Storage
Programs and Multis can be loaded onto the SP6 from USB Flash Drives or a computer. is
allows you to load new sounds from Kurzweil or other developers, or to load sounds that you
have previously saved.
1-16
Page 24

1-17
Page 25

Chapter 2
Program Mode
Use Program Mode to play a Program directly from the keyboard, or to play up to 16
Programs multitimbrally via MIDI. Programs typically contain a single instrument sound,
although some Programs may contain multiple instrument sounds.
e SP6 always powers on with Program Mode selected. To enter Program Mode from
another Mode, press and turn on the PROGRAM Mode button, or press the EXIT button
repeatedly until you reach Program Mode.
e SP6 powers on with Program 1 selected, or the Program that was selected the last time
Global Mode was exited.
Program Mode
Selecting Programs
Selecting Programs
In Program Mode, use any of the methods below to select a Program.
Browse All Programs
Make sure the USER button is o, then use the ALPHA WHEEL or PREVIOUS and
NEXT buttons to select a Program from all of the available Programs.
Select a Program by Category
Make sure the KEYPAD button is o, then press one of the CATEGORY buttons to select
the rst Program of a category (or the current Category Default Program). e selected
CATEGORY button will turn on. Use the ALPHA WHEEL or PREVIOUS and NEXT
buttons to select Programs from the selected category.
Select a Previously Saved User Program
Press and turn on the USER button, then use the ALPHA WHEEL or PREVIOUS and
NEXT buttons to browse only User Programs. To return to browsing Factory and User
Programs, press and turn o the USER button.
2-1
Page 26
Program Mode
Program Demo
Select a Program by ID Number
Press and turn on the KEYPAD button. e keypad button allows you to use the numbers
labeled on the CATEGORY buttons to select Programs or Multis by ID number. Type an ID
number followed by pressing the ENTER button to select the associated Program.
Select a Category Default Program
Each category has a Category Default Program (the Program which is selected when each
CATEGORY button is pressed). By default the Category Default Program is set to the rst
Program of each category. To set a dierent Category Default Program, select a Program,
make sure the KEYPAD button is o, then press and hold the currently lit CATEGORY
button.
Program Demo
To hear a Program Demo song for the current Program, press the KEYPAD and ENTER
buttons simultaneously.
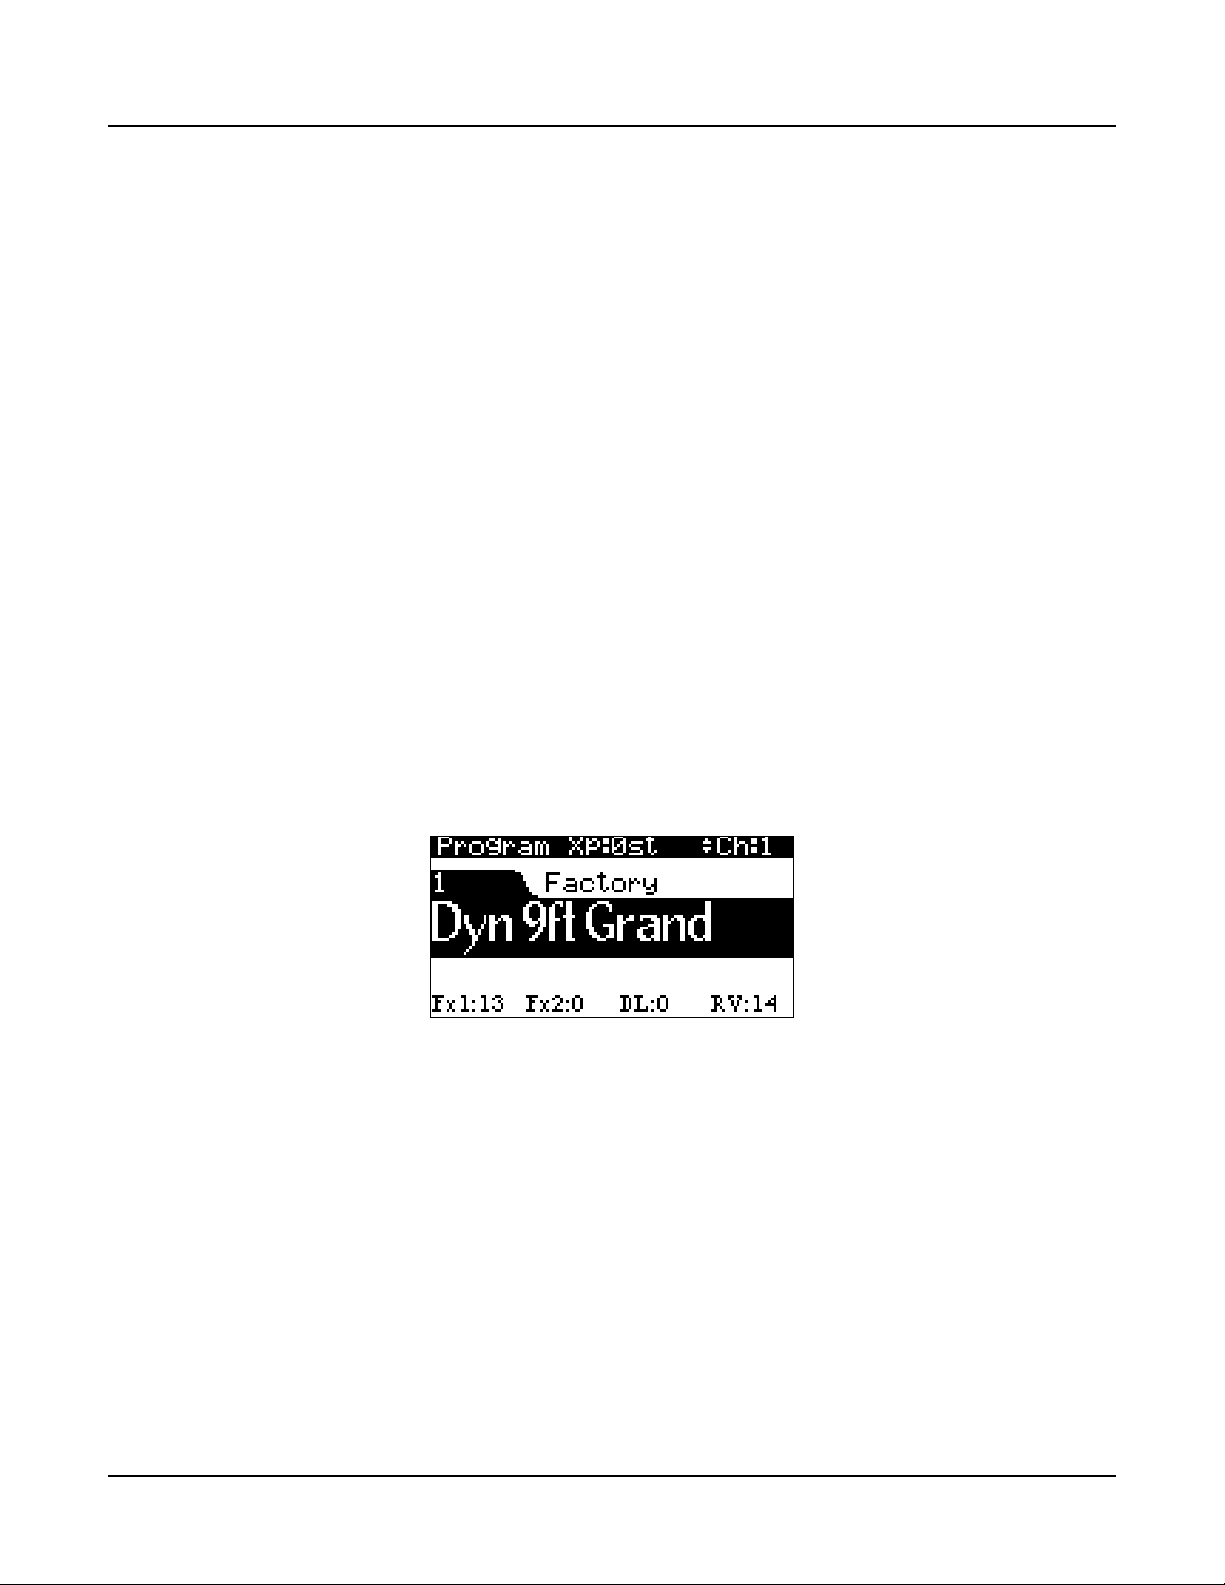
The LCD
In Program Mode, the top line of the LCD shows the current Mode, MIDI transposition,
and MIDI Channel.
e Program ID number and name are displayed in the center of the LCD.
When a controller is moved, the controller assignment and value is briey displayed below
the Program ID and name.
e values of the KNOBS currently selected by the SHIFT button are displayed at the
bottom of the LCD.
2-2
Page 27

Favorites
Use the FAVORITES buttons to quickly store and recall a set of 5 favorite Programs and/or
Multis while in Program or Multi Mode.
To recall a favorite Program or Multi, simply press one of the FAVORITES buttons. e
FAVORITES buttons work from both Program or Multi Mode, and pressing a FAVORITES
button will automatically bring you to Program Mode or Multi Mode if required.
To assign the currently selected Program or Multi to a FAVORITES button, press and hold
the desired FAVORITES button for a few seconds until the LCD display indicates that the
favorite has been saved.
Controllers
In Program Mode, you can use the SP6 physical controllers (the Knobs, Buttons, Wheels,
and Pedals) to modify an instrument sound during a performance to add variation or
expression.
Program Mode
Favorites
e basic function of each controller is labeled on the front panel. For some controllers
(MODULATION WHEEL, Variation Button, P1 through P4, FX 1 and FX 2) the assigned
parameter will vary for each Program. Move a controller to view the assigned parameter
name and value in the LCD display.
If you make changes to the current Program using any of the controllers, the SAVE button
lights up to indicate that a change has been made to that Program. For more information on
the SAVE button, see Program Save Dialog on page 2-11.
TRANSPOSE Buttons
e TRANSPOSE buttons can be used to change the tuning of notes played on the SP6
keyboard in semitones (also known as half steps). is is a convenient way to change the key
of a song without learning to play it in a dierent key.
e current transpose amount is shown in the LCD display (for example, the default is
“Xp:0st”). Press both TRANSPOSE buttons simultaneously to reset the transposition to 0.
e TRANSPOSE buttons also transpose MIDI notes sent to the USB and MIDI Out ports.
PITCH WHEEL
Use the PITCH WHEEL to perform pitch bends. e Bend Up and Bend Down amount
can be adjusted for each Program in Program Edit Mode.
2-3
Page 28

Program Mode
Controllers
MODULATION WHEEL
Use the MODULATION WHEEL to vary the modulation amount. e MODULATION
WHEEL will perform an assigned modulation for each Program. e name of the current
assignment is shown in the LCD display when the wheel is moved.
VARIATION Button
Pressing the VARIATION button will perform an assigned variation for each Program. e
name of the current assignment is shown in the LCD display when the button is pressed.
e VARIATION button has two states, o (not lit) and on (lit). e VARIATION button
will typically modify the sound by adding an orchestral string section or synth pad layer, or
enabling an eect.
For KB3 Organ Programs, the VARIATION button controls the Rotary Speaker speed,
changing between fast and slow. e LCD display shows “KB3” when a KB3 Program is
selected.
ARP ON/OFF Button
Use the ARP ON/OFF button to turn on and o the SP6’s Arpeggiator.
e Arpeggiator takes note input from the keyboard and outputs a rhythmic and/or melodic
pattern of MIDI notes. e Arpeggiator can aect both the internal Programs and external
MIDI instruments.
e Arpeggiator settings can be adjusted in Program Edit Mode.
TAP TEMPO Button
Use the TAP TEMPO button to set the rate of the Arpeggiator or tempo synced FX (such as
Delay). Press the TAP TEMPO button a few times at the desired rate to set the tempo.
You can also set a tempo by pressing the TAP TEMPO button, then using the ALPHA
WHEEL or PREVIOUS/NEXT buttons to set a tempo, or use the keypad function of the
CATEGORY buttons to type a numeric value followed by pressing the ENTER button.
KNOBS
2-4
Press the SHIFT button to shift between 3 rows of 4 knob assignments.
Page 29

Program Mode
Controllers
e top row of knob assignments control user-assignable parameters (P1 through P4). Move
a knob to see the assigned parameter and value in the LCD display. ese assignments can be
adjusted in Program Edit Mode.
e bottom two rows of knob assignments perform the functions labeled on the front panel:
e FILTER 1 knob is usually assigned to lter frequency. e FILTER 2 knob is usually
assigned to lter resonance. ese knobs may be assigned to dierent lter parameters for
each Program. Move a knob to see the assigned parameter and value in the LCD display.
e ATTACK knob is assigned to amplitude attack time (the time it takes for each note to
reach its full volume). When the ATTACK knob is set to a low value, the attack time will be
fast, and each note will quickly reach its full volume. When the ATTACK knob is set to a
high value, the attack time will be slow, and each note will slowly fade up to its full volume.
is can be useful for making acoustic instrument Programs sound like synth “pad” sounds.
e RELEASE knob is assigned to amplitude release time (the time it takes for each note
to fade to silence after a key is released). When the RELEASE knob is set to a low value,
the release time will be fast, and each note will quickly fade to silence. When the RELEASE
knob is set to a high value, the release time will be slow, and each note will slowly fade to
silence.
e FX 1 and FX 2 knob assignments vary for each Program. e knobs are usually
assigned to eects such as Chorus, Phaser, Flanger, Tremolo, or Distortion. Move a knob
to see the assigned parameter and value in the LCD display. For most FX 1 and FX 2 knob
assignments, setting the knob to a low value will disable the eect, and setting the knob to a
high value will increase the amount of the eect that is heard.
e DELAY knob is assigned to Delay amount, which controls an echo eect. Setting the
knob to a low value will disable the eect, and setting the knob to a high value will increase
the amount of the eect that is heard. Tap the TAP TEMPO button at the desired rate to
change the delay time of the eect. You may be able to control additional Delay parameters
(such as feedback amount) by using Program Edit Mode to change the assignments of the
user-assignable parameters.
e REVERB knob is assigned to Reverb amount, which controls a reverb eect. Reverb
can give the impression of playing in a large room or concert hall. Setting the knob to a low
value will disable the eect, and setting the knob to a high value will increase the amount
of the eect that is heard. You may be able to control additional Reverb parameters (such as
Reverb Time) by using Program Edit Mode to change the assignments of the user-assignable
parameters.
When a KB3 Organ Program is selected, some of the knobs may perform Organ drawbar
functions instead of the functions labeled on the front panel. e LCD display shows “KB3”
when a KB3 Program is selected. Move a knob to see the assigned parameter and value in the
LCD display.
2-5
Page 30

Program Mode
Controllers
SW1 (SUSTAIN) and SW2 Pedals
e SW1 (SUSTAIN) pedal defaults to controlling Sustain, which will sustain any note that
is played while the pedal is pressed, for as long as the pedal is held.
e SW1 (SUSTAIN) jack is compatible with continuous switch pedals (Half-Damper) that
use a 1/4 inch tip-ring-sleeve plug (such as the Kurzweil KP-1H). When connected to the
SW1 (SUSTAIN) jack, a Half Damper pedal enables ner control of Sustain than a standard
switch pedal. Half Damper control is enabled for Programs in the Piano category. Programs
outside of the Piano category will respond to a Half Damper pedal as if it is a standard switch
pedal.
For KB3 Organ Programs, the SW1 (SUSTAIN) pedal controls the Rotary Speaker speed,
changing between fast and slow. e LCD display shows “KB3” when a KB3 Program is
selected.
e SW2 pedal defaults to controlling Sostenuto, which will sustain notes from any keys that
are being held when the pedal is pressed, for as long as the pedal is held.
Global Mode can be used to set pedal overrides, which can change the pedal assignments for
all Programs.
CC (VOLUME) Pedal
e CC (VOLUME) pedal is assigned to control Program volume (pre-FX).
For KB3 Organ Programs, the CC (VOLUME) pedal controls organ swell. Organ swell is
similar to Program volume, except volume can not be turned all the way down to silence.
e LCD display shows “KB3” when a KB3 Program is selected.
2-6
Page 31

SPLIT/LAYER
Press the PREVIOUS and NEXT buttons simultaneously to access the Split/Layer function.
e Split and Layer functions have identical parameters, but produce dierent results.
e Split function allows you to quickly create a Multi such that keys in one range of the
keyboard produce dierent sounds than another range.
e Layer function allows you to layer Programs and Multis such that more than one
instrument sound can be produced by playing one key.
e Split and Layer functions allow you to quickly create Multis without using Multi Edit
Mode to congure Zone key ranges, Programs, and volumes. After creating and saving a Split
or Layer Multi, you can edit additional Multi parameters in Multi Edit mode.
Program Mode
SPLIT/LAYER
SPLIT
When you create a Split in Program Mode, you are creating a Multi with two Zones set to
On.
e Program you were using in Program Mode is used in the right hand of the Split as the
Zone 1 Program. You can choose a Program that will be used in the left hand of the Split as
the Zone 2 Program.
Follow these steps to create a Split:
1. In Program Mode, select a Program for the right hand of the Split.
2. Press the PREVIOUS and NEXT buttons simultaneously to access the “Split or Layer”
Page.
2-7
Page 32

Program Mode
SPLIT/LAYER
3. On the “Split or Layer” Page, use the PREVIOUS or NEXT buttons to select “Split
4. On the “Split” Page, Zone 2 is selected with a default Bass Program selected for the left
5. Additional Split parameters are described in Split/Layer Parameters on page 2-9.
6. Press the SAVE button to save your Split as a Multi (See below for details on saving).
LAYER
<ENTER>”, then press the ENTER button.
hand of the Split. Use the ALPHA WHEEL or CATEGORY buttons to select a dierent
Program for the left hand of the Split.
Use the CHANNEL/PAGE buttons to navigate between each of the 3 Split function
pages. Use the PREVIOUS or NEXT buttons to select each parameter, and the ALPHA
WHEEL or CATEGORY buttons to change the value of each parameter.
After saving your Split Multi, you can edit additional Multi parameters in Multi Edit
mode.
When you create a Layer in Program Mode, you are creating a Multi with two Zones set to
On.
e Program you were using in Program Mode is used for the Zone 1 Program. You can
choose a Program that will be used as the layered Zone 2 Program.
Follow these steps to create a Layer:
1. In Program Mode, select a Program that you wish to layer.
2. Press the PREVIOUS and NEXT buttons simultaneously to access the “Split or Layer”
Page.
3. On the “Split or Layer” Page, use the PREVIOUS or NEXT buttons to select “Layer
<ENTER>”, then press the ENTER button.
4. On the “Layer” Page, Zone 2 is selected with a default layer Program selected for the
layered Zone 2 Program. Use the ALPHA WHEEL or CATEGORY buttons to select a
dierent Program for the layered Zone 2 Program.
2-8
Page 33

5. Additional Layer parameters are described in Split/Layer Parameters on page 2-9.
Use the CHANNEL/PAGE buttons to navigate between each of the 3 Layer function
pages. Use the PREVIOUS or NEXT buttons to select each parameter, and the ALPHA
WHEEL or CATEGORY buttons to change the value of each parameter.
6. Press the SAVE button to save your Layer as a Multi (See below for details on saving).
After saving your Layer Multi, you can edit additional Multi parameters in Multi Edit
mode.
Split/Layer Parameters
e following parameters are available for each of the 4 Zones. e ZONE ON/OFF
parameters are controlled by using the front panel ZONE ON/OFF buttons.
e remaining parameters are accessed on each of the pages listed below. Use the
CHANNEL/PAGE buttons to navigate between each of the 3 Layer or Split function pages.
On these pages, the left hand Zn column indicates the Zone number associated with each of
the 4 rows of parameters.
Program Mode
SPLIT/LAYER
ZONE ON/OFF
While creating a Split or Layer, Zones 3 and 4 can be turned On by turning on the ZONE
ON/OFF 3 and 4 buttons. By default the keyrange of Zones 3 and 4 cover the whole
keyboard range, allowing these Zones to be used as additional layers.
Split Page / Layer Page
Program
e default Split or Layer Program will appear in Zone 2. Use the ALPHA WHEEL or
CATEGORY buttons to select a dierent Program for Zone 2.
2-9
Page 34

Program Mode
SPLIT/LAYER
Split Mixer Page / Layer Mixer Page
Volume
e Volume parameter sets the volume of each Zone. To change the volume of a Zone:
1. Select a Volume parameter for the desired Zone by using the PREVIOUS and NEXT
2. Change the volume by using the ALPHA WHEEL, or use the keypad function of the
buttons.
CATEGORY buttons to type a volume value (0-127) followed by pressing the ENTER
button.
A value of “None” can also be selected, which will use the last volume value used by the
Zone’s MIDI channel. (is volume values is often set by the expression pedal.) A value of
“None” can be entered by using the ALPHA WHEEL to scroll below 0.
Pan
e Pan parameter sets the panning (left/right stereo placement) of each Zone. To change the
panning of a Zone:
1. Select a Pan parameter for the desired Zone by using the PREVIOUS and NEXT
buttons.
2. Change the panning by using the ALPHA WHEEL, or use the keypad function of the
CATEGORY buttons to type a pan value (0-127) followed by pressing the ENTER
button.
A value of 0 is full left, 64 is center, and 127 is full right. Other values will move the stereo
placement in between these positions.
A value of “None” can also be selected, which will use the last pan value used by the Zone’s
MIDI channel. A value of “None” can be entered by using the ALPHA WHEEL to scroll
below 0.
2-10
Page 35

Program Mode
Program Save Dialog
Split Key Range Page / Layer Key Range Page
Key Low / Key High
e Key Low and Key High parameters set the keyboard ranges for each Zone. Using Split
sets the boundary between Zone 1 and Zone 2 to E3. Using Layer sets the Zone 2 keyboard
range to C1 - G9. Change these parameters for each Zone to create custom Split and Layer
key ranges.
Values for the currently selected Key Low or Key High parameter can be selected by holding
down the ENTER button and then playing the desired key on the keyboard. Values can
also be selected by using the ALPHA WHEEL, or by using the keypad function of the
CATEGORY buttons, followed by pressing the ENTER button.
Program Save Dialog
If you make changes to the current Program using any of the controllers (Knobs, Wheels
or Buttons), the SAVE button turns on to indicate that a change has been made to that
Program.
To save a copy of the Program with the changes you’ve made, press the SAVE button once to
view the Save Dialog. e Save Dialog allows you to choose an ID number and name for the
Program you are saving. Use the CHANNEL/PAGE buttons to switch between ID selection
and naming pages. On the Program Save Page, press the SAVE button again to save the
Program as a User Program.
Changing ID Numbers
e display shows the rst available ID number and the current Program name. You can save
Programs with ID numbers from 1025 to 2048.
2-11
Page 36

Program Mode
Program Save Dialog
If you are saving a Program that has not been previously edited, the next available unused ID
number will be selected.
If you are saving a previously edited User Program, the ID number that the Program was last
saved with will be selected.
Press the PREVIOUS and NEXT buttons simultaneously to toggle between selecting the ID
number that the Program was last saved with and the next available unused ID number.
To change the ID number, use the ALPHA WHEEL, or use the keypad function of the
CATEGORY buttons to type an ID number (1025-2048) followed by pressing the ENTER
button. If you select an ID number that is already used by another Program, the bottom of
display will show a message to warn that you are going to replace a Program.
Naming a User Program
In the Save Dialog, you can name a Program by using the Program Name Page.
Use the CHANNEL/PAGE buttons to select the Program Name Page.
e display shows the current Program name. Program names can total 16 characters in
length.
To name a Program:
1. Use the PREVIOUS and NEXT buttons to move the cursor to each character.
2. Change the current character by using the ALPHA WHEEL, or use the keypad function
of the CATEGORY buttons to type a character.
To insert a space before the selected character, press and hold the NEXT button. e selected
character and all characters to the right will move one space to the right.
To delete the selected character, press and hold the PREVIOUS button. All the characters to
the right of the selected character will move one space to the left.
After naming the Program, press the SAVE button to return to the Program Save Page. On
the Program Save Page, press the SAVE button again to save the Program as a User Program.
2-12
Page 37

Changing the MIDI Channel
Saving a User Program
To save a User Program, select the Program Save Page and press the SAVE button, (or press
the EXIT button to exit without saving). e display will show a brief message to conrm
that the Program was saved.
After successfully saving, the Program will be selected in Program Mode in the User ID range
(1025-2048). To nd the Program again later, make sure to press the USER button.
Changing the MIDI Channel
e current MIDI channel is shown on the right side of the top line of the display. Use the
CHANNEL/PAGE buttons to change the MIDI channel. Pressing both CHANNEL/PAGE
buttons simultaneously will reset the current MIDI channel to 1.
A dierent Program can be selected for each MIDI Channel. All channels can be played
simultaneously from an external MIDI sequencer or computer.
Program Mode
One Reverb eect is shared between Programs on all channels. e Reverb settings (such as
Reverb Time) of the Program on the currently selected MIDI Channel is used for Programs
on all Channels. Programs on each channel can adjust the amount of Reverb used by using
the REVERB knob.
e MIDI OUT and USB ports will also transmit MIDI to the selected Channel when the
keyboard is played. is is useful for playing external MIDI instruments or software on a
computer/tablet.
PANIC
Pressing the 0 and ENTER buttons simultaneously performs the PANIC function. PANIC
deactivates all sounding notes and resets controller values by sending an “All Notes O ”
message and a “Reset All Controllers” message on all 16 MIDI channels.
2-13
Page 38

Chapter 3
Program Edit Mode
Program Edit Mode allows you to edit and customize Programs. Any Program can be edited
in Program Edit Mode and saved to one of the 1024 User IDs.
To enter Program Edit Mode, rst press the PROGRAM Mode button to enter Program
Mode, then press the EDIT button.
In Program Edit Mode, the top line of the display shows the current page name and number.
Navigate to each page by using the CHANNEL/PAGE buttons.
Navigate to each parameter on the current page by using the PREVIOUS and NEXT
buttons.
Program Edit Mode
Assignable Params Page
Change the value of the selected parameter by using the ALPHA WHEEL, or use the keypad
function of the CATEGORY buttons to type a numeric value followed by pressing the
ENTER button.
Assignable Params Page
Use the Assignable Params Page to view and edit the 4 user assignable parameters of the
knobs (P1 through P4). e left column shows the name of the parameter assigned to each
of the 4 knobs. e right column shows the current value of each parameter.
Parameter Column
When the Parameter column is selected with the cursor, change the parameter assignment for
the selected knob by using the ALPHA WHEEL.
For all Programs, the assignable parameters can be set to control EQ parameters, panning,
Delay time and feedback parameters, and Reverb time. Each Program may also have
additional parameters that are specic to the Program’s FX or instrument category.
3-1
Page 39

Program Edit Mode
Arpeggiator Page
Value Column
e Value column shows the current value (0-127) of each parameter. e values that are
shown when the Program is saved will be recalled each time the Program is selected.
To adjust the value of each parameter by using the knobs, use the SHIFT button to select the
top row of knob assignments.
When the Value column is selected with the cursor, change the value of the selected
parameter by using the ALPHA WHEEL, or use the keypad function of the CATEGORY
buttons to type a numeric value followed by pressing the ENTER button.
A value of “None” can be selected by using the ALPHA WHEEL to scroll below 0. When
a parameter is set to a value of “None”, the parameter will not be set to a default value
when the Program is selected. is allows the parameter to use the last value it had in the
previously selected Program (if the previously selected Program had the same parameter).
Arpeggiator Page
3-2
Use the Arpeggiator Page to edit the settings of the Program’s Arpeggiator.
Latch
Use the Latch parameter to set how the Arpeggiator responds to played keys. Select from the
following settings:
Standard: Press and hold a key to add it to the arpeggiation. Release a key to remove it from
the arpeggiation.
Autohold: Autohold is useful for arpeggiating chords. When you play a chord, it continues
arpeggiating after you release the chord. When you play another chord, the previous chord
stops arpeggiating, and the new chord begins arpeggiating. You can use the ARP ON/OFF
button to stop arpeggiation at any time.
Page 40

Beats
e Beats parameter sets the rate of the arpeggiator, based on a measure of 4 beats. Select
from the following settings:
Program Edit Mode
Arpeggiator Page
1/1 1 note per measure (whole notes)
1/2 2 notes per measure (half notes)
1/4 4 notes per measure (quarter notes)
1/8 8 notes per measure (eighth notes)
1/12 12 notes per measure (eighth note triplets)
1/16 16 notes per measure (sixteenth notes)
1/24 24 notes per measure (sixteenth note triplets)
1/32 32 notes per measure (thirty-second notes)
Play Order
e Play Order parameter determines the order in which the arpeggiator plays notes of
pressed keys. Select from the following settings:
Played: Notes play in the chronological order in which you played them.
Upwards: Notes play from lowest to highest pitch.
Downwards: Notes play from highest to lowest pitch.
UpDown: Notes play from lowest to highest pitch, then from highest to lowest pitch.
Shue: Notes play in random order.
Simul: Notes play simultaneously.
3-3
Page 41

Program Edit Mode
Arpeggiator Page
Velocity
e Velocity parameter determines how the arpeggiator processes the attack velocity of the
played notes. Select from the following settings:
Constant: All notes play at the velocity of the rst played note.
Played: Each note plays at the velocity which you played.
Human1 through Human4: ese settings randomly change played note velocities within a
range in order to make arpeggiation sound more human like, with each note varying slightly
in velocity. e Human settings use the velocity received from the rst note played as the
center of the randomization range. Each note of the arpeggiator will randomly choose a
velocity within a range, with Human1 having the smallest range, and Human4 having the
largest range.
Chimp1 through Chimp4: ese settings function in a similar fashion to the Human
settings (see above). Like the Human settings, the Chimp settings randomly change played
note velocities within a range, but the Chimp settings have larger randomization ranges.
e Chimp settings use the velocity received from the rst note played as the center of the
randomization range. Each note of the arpeggiator will randomly choose a velocity within a
range, with Chimp1 having the smallest range, and Chimp4 having the largest range.
MissNotes1 through MissNotes9: ese settings make the arpeggiator randomly miss
playing a percentage of inputted notes. With MissNotes1 missing the fewest notes, and
MissNotes9 missing the most notes. Each of these settings also randomly changes some of
the inputted velocities, with the purpose of simulating a more human played sound. e
MissNotes settings use the velocity received from the rst note played as the center of the
velocity randomization range.
Duration
Duration determines how long each arpeggiated note plays, based on the current Beats value.
For example, 100% means that a note sustains until the next one sounds. 50% means that
the note lls half the space between itself and the next note. is parameter has no eect on
percussion sounds or other sounds whose duration is xed.
Shift
e Shift parameter sets how much transposition will occur for each cycle of notes. Setting
Shift to 12 and ShiftLimit to 12 or 24 creates an arpeggio that repeats the same pattern of
notes in dierent octaves.
3-4
Page 42

Shift Limit
When the Shift parameter is set to a value other than 0, Shift Limit determines how far up or
down the Arpeggiator can shift the arpeggiated notes.
Limit Option
e Limit Option parameter determines what the Arpeggiator does when it has shifted the
currently arpeggiated notes up (or down) to the value set by the Shift Limit parameter. Select
from the following settings:
Reset: When the Arpeggiator reaches the Shift Limit, the Arpeggiator returns to its original
pitch.
Unipolar: When the Arpeggiator reaches the Shift Limit, the Arpeggiator begins shifting
notes in the opposite direction, until it reaches the original pitch. When the Arpeggiator
reaches the original pitch, it reverses direction again.
Bipolar: When the Arpeggiator reaches the Shift Limit, the Arpeggiator begins shifting notes
in the opposite direction, until it reaches the shift limit in the opposite direction, where it
reverses direction again.
Program Edit Mode
Master Page
Master Page
Use the Master Page to control overall settings of the current Program.
PBendUp and PBendDwn
Use these parameters to set how much the pitch will change when you move the PITCH
WHEEL up or down. For both Pitch Bend parameters, positive values will cause the pitch to
bend up, while negative values will cause the pitch to bend down.
Pitch bend values are set in cents (ct), where 100 cents equals 1 semitone (also known as a
half step).
Large positive values can cause samples to bend to their maximum upward pitch before the
PITCH WHEEL is fully up (or down). is will not happen when bending pitch down.
3-5
Page 43

Program Edit Mode
Master Page
Mono
When the Mono parameter is set to O, the Program is polyphonic—it can play multiple
notes at a time. When the Mono parameter is set to On, the Program will play only one note
at a time. e Mono parameter is not available for KB3 Organ programs.
When the Mono parameter is selected and set to On, press the EDIT button to view the
Mono Parameters Page. See below for details.
Mono Parameters Page
Legato
When Legato is on, a note will play its attack amplitude envelope only if no other notes are
being held.
Portamento
When the Portamento parameter is set to On, pitch will glide between played notes.
Port Rate
When the Portamento parameter is set to On, the Port Rate parameter determines how many
seconds a note takes to glide one semitone to the next played note (in keys per second). For
example, at a setting of 12 keys/second the pitch would glide an octave every second.
Port Attk
When the Portamento parameter is set to On and the Port Attk parameter is set to O, pitch
will only glide between notes when two keys are held at once.
When the Portamento parameter is set to On and the Port Attk parameter is set to On, pitch
will always glide between notes.
MonoSamp X
3-6
When the Portamento parameter is set to On, setting the MonoSamp X parameter to On can
create a smoother sound when using certain sample based Programs.
Page 44

OutGain
Use the OutGain parameter to adjust the overall volume of a Program.
Category
is parameter sets the category that the Program will be grouped into when you press one of
the CATEGORY buttons in Program Mode.
For example, if you were to edit a Program in the VOICES/MISC category that you want
to use primarily as a Synth, you could make it appear in the LEADS/SYNTHS category by
changing this parameter to Leads/Synths.
All Parameters Page
Program Edit Mode
All Parameters Page
When the Global Mode Show Params parameter is set to Yes, the All Parameters page appears
in Program Edit Mode. See Show Params on page 6-6 for details.
e All Parameters page is useful for advanced users who wish to view or change MIDI
assignments for SP6 programs. is can be useful when using an external MIDI sequencer or
controller. e All parameters page can also be useful for viewing or changing default values
for each Parameter.
Parameter Column
Use the Parameter column to select a parameter for the current Program.
When the Parameter column is selected, you can select a parameter by using the ALPHA
WHEEL, or by holding the ENTER button and moving the currently assigned controller..
When any column is selected, you can use the PREVIOUS/NEXT buttons to navigate
through all parameters in the current row until a parameter in the next row is selected.
3-7
Page 45

Program Edit Mode
Save User Programs
Control Column
Use the Control column to assign an SP6 control or MIDI CC number for the Parameter in
that row. Use the PREVIOUS/NEXT buttons to navigate to the Control column.
To assign an SP6 control, select the Control column for the desired Parameter, then hold
the ENTER button and move the desired SP6 control (knob, VARIATION button,
MODULATION WHEEL, or pedal).
When the Control column is selected, you can also select a MIDI CC number by using
the ALPHA WHEEL, or use the keypad function of the CATEGORY buttons to type a
numeric value followed by pressing the ENTER button. MIDI CC numbers used by SP6
controls will show the SP6 control name instead of the MIDI CC number. See SP6 Physical
Controllers on page A-2 for a list of MIDI CC numbers used by SP6 controls.
Val Column
e Val column shows the current value (0-127) of each parameter. e values that are
shown when the Program is saved will be recalled each time the Program is selected. Use the
PREVIOUS/NEXT buttons to navigate to the Val column.
To set a value, select the Val column for the desired Parameter, then change the value by
using the ALPHA WHEEL, or use the keypad function of the CATEGORY buttons to type
a numeric value followed by pressing the ENTER button. If an SP6 control or MIDI CC
number is assigned to a parameter, moving the assigned SP6 control or sending a MIDI CC
from an external MIDI device will set the value.
A value of “None” can be selected by using the ALPHA WHEEL to scroll below 0. When
a Parameter is set to a value of “None”, the parameter will not be set to a default value
when the Program is selected. is allows the Parameter to use the last value it had in the
previously selected Program (if the previously selected Program had the same parameter).
Save User Programs
For details on saving User Program, see Program Save Dialog on page 2-11.
3-8
Page 46

Chapter 4
Multi Mode
Use Multi Mode to play up to 4 split or layered Programs directly from the keyboard. Each
of the 4 Zones in a Multi can have a dierent Program, controller settings, and MIDI
transmit channel. Zones can also control external sound modules or computer software
through a MIDI or USB cable.
To enter Multi Mode from another Mode, press and turn on the MULTI Mode button.
e SP6 powers on with Multi 1 selected, or the Multi that was selected the last time Global
Mode was exited.
Selecting Multis
Multi Mode
Selecting Multis
In Multi Mode, use any of the methods below to select a Multi.
Browse All Multis
Make sure the USER button is o, then use the ALPHA WHEEL or PREVIOUS and
NEXT buttons to select a Multi from all of the available Multis.
Select a Multi by ID Number
e KEYPAD button allows you to use the numbers labeled on the CATEGORY buttons to
select Multis by ID number. Use the CATEGORY buttons to type an ID number followed
by pressing the ENTER button. Multis are not organized by category, so the KEYPAD
button is always on in Multi Mode.
Select a Previously Saved User Multi
Press and turn on the USER button, then use the ALPHA WHEEL or PREVIOUS and
NEXT buttons to browse only User Multis. To return to browsing Factory and User Multis,
press and turn o the USER button.
4-1
Page 47

Multi Mode
The LCD
The LCD
In Multi Mode, the top line of the LCD shows the current Mode and MIDI transposition.
e Multi ID number and name are displayed in the center of the LCD.
When a controller is moved, the controller assignment and value for each Zone is briey
displayed below the Multi ID and name.
e values of the KNOBS currently selected by the SHIFT button are displayed at the
bottom of the LCD.
Favorites
Use the FAVORITES buttons to quickly store and recall a set of 5 favorite Programs and/or
Multis while in Program or Multi Mode.
To recall a favorite Program or Multi, simply press one of the FAVORITES buttons. e
FAVORITES buttons work from both Program or Multi Mode, and pressing a FAVORITES
button will automatically bring you to Program Mode or Multi Mode if required.
To assign the currently selected Program or Multi to a FAVORITES button, press and hold
the desired FAVORITES button for a few seconds until the LCD display indicates that the
favorite has been saved.
Controllers
In Multi Mode, you can use the SP6 physical controllers (the Knobs, Buttons, Wheels, and
Pedals) to modify an instrument sound during a performance to add variation or expression.
e basic function of each controller is labeled on the front panel. For some controllers
(MODULATION WHEEL, Variation Button, FX 1 and FX 2) the assigned parameter will
vary for each Multi. Move a controller to view the assigned parameter name and value for
each Zone in the LCD display.
4-2
Some controllers can also be disabled or reassigned for each Zone in Multi Edit Mode.
Because of this, controllers may function dierently for each Zone in each Multi.
Page 48

ZONE ON/OFF Buttons
e ZONE ON/OFF buttons allow you to turn each of the 4 Zones on or o. When a Zone
is on, the corresponding button is lit, and you can hear the Program in the Zone. When a
Zone is o, the corresponding button is not lit, and the Program in the Zone is silent. Press
each Zone button to turn each Zone on or o.
TRANSPOSE Buttons
e TRANSPOSE buttons can be used to change the tuning of notes played on the SP6
keyboard in semitones (also known as half steps). is is a convenient way to change the key
of a song without learning to play it in a dierent key.
e current transpose amount is shown in the LCD display (for example, the default is
“Xp:0st”). Press both TRANSPOSE buttons simultaneously to reset the transposition to 0.
e TRANSPOSE buttons also transpose MIDI notes sent to the USB and MIDI Out ports.
Multi Mode
Controllers
PITCH WHEEL
Use the PITCH WHEEL to perform pitch bends. e Bend Up and Bend Down amount
can be adjusted for each Zone in Multi Edit Mode.
MODULATION WHEEL
Use the MODULATION WHEEL to vary the modulation amount. e MODULATION
WHEEL will perform an assigned modulation for the Program in each Zone. e name and
value of the current assignment for each Zone is shown in the LCD display when the wheel
is moved. e modulation amount can be adjusted for each Zone in Multi Edit Mode.
VARIATION Button
Pressing the VARIATION button will perform an assigned variation for the Program in each
Zone. e name of the current assignment for each Zone is shown in the LCD display when
the button is pressed. e VARIATION button can be enabled or disabled for each Zone in
Multi Edit Mode.
e VARIATION button has two states, o (not lit) and on (lit). e VARIATION button
will typically modify the sound by adding an orchestral string section or synth pad layer, or
enabling an eect.
4-3
Page 49

Multi Mode
Controllers
ARP ON/OFF Button
TAP TEMPO Button
Use the ARP ON/OFF button to turn on and o the Arpeggiator in each Zone. Each Zone
in a Multi has an arpeggiator, allowing up to 4 simultaneous arpeggiations. e ARP ON/
OFF button can be enabled or disabled for each Zone in Multi Edit Mode.
e Arpeggiator takes note input from the keyboard and outputs a rhythmic and/or melodic
pattern of MIDI notes. e Arpeggiator can aect both the internal Programs and external
MIDI instruments.
e Arpeggiator settings for the Program in each Zone can be adjusted in Program Edit
Mode.
Use the TAP TEMPO button to set the rate of the Arpeggiator or tempo synced FX (such as
Delay). Press the TAP TEMPO button a few times at the desired rate to set the tempo.
You can also set a tempo by pressing the TAP TEMPO button, then using the ALPHA
WHEEL or PREVIOUS/NEXT buttons to set a tempo, or use the keypad function of the
CATEGORY buttons to type a numeric value followed by pressing the ENTER button.
KNOBS
Press the SHIFT button to shift between 3 rows of 4 knob assignments.
In Multi Mode, the top row of knob assignments (ZN1 VOL through ZN4 VOL) control
the volume of each Zone. Move a knob to see the selected Zone volume value in the LCD
display. e Zone volume value can be adjusted for each Zone in Multi Edit Mode.
e bottom two rows of knob assignments perform the functions labeled on the front panel
(see below for details). e amount of each function applied can be adjusted for each Zone
in Multi Edit Mode. Because of this, the bottom two rows of knob assignments may function
dierently for each Zone in each Multi.
e FILTER 1 knob is usually assigned to lter frequency. e FILTER 2 knob is usually
assigned to lter resonance. ese knobs may be assigned to dierent lter parameters for
each Program. Move a knob to see the assigned parameter and value for each Zone in the
LCD display.
e ATTACK knob is assigned to amplitude attack time (the time it takes for each note to
reach its full volume). When the ATTACK knob is set to a low value, the attack time will be
fast, and each note will quickly reach its full volume. When the ATTACK knob is set to a
high value, the attack time will be slow, and each note will slowly fade up to its full volume.
is can be useful for making acoustic instrument Programs sound like synth “pad” sounds.
4-4
Page 50

Multi Mode
Controllers
e RELEASE knob is assigned to amplitude release time (the time it takes for each note
to fade to silence after a key is released). When the RELEASE knob is set to a low value,
the release time will be fast, and each note will quickly fade to silence. When the RELEASE
knob is set to a high value, the release time will be slow, and each note will slowly fade to
silence.
e FX 1 and FX 2 knob assignments vary for each Program. e knobs are usually assigned
to eects such as Chorus, Phaser, Flanger, Tremolo, or Distortion. Move a knob to see the
assigned parameter and value for each Zone in the LCD display. For most FX 1 and FX 2
knob assignments, setting the knob to a low value will disable the eect, and setting the knob
to a high value will increase the amount of the eect that is heard.
e DELAY knob is assigned to Delay amount, which controls an echo eect. Setting the
knob to a low value will disable the eect, and setting the knob to a high value will increase
the amount of the eect that is heard. Tap the TAP TEMPO button at the desired rate to
change the delay time of the eect. You may be able to control additional Delay parameters
(such as feedback amount) by using Program Edit Mode to change the assignments of the
user-assignable parameters.
e REVERB knob is assigned to Reverb amount, which controls a reverb eect. Reverb
can give the impression of playing in a large room or concert hall. Setting the knob to a low
value will disable the eect, and setting the knob to a high value will increase the amount
of the eect that is heard. You may be able to control additional Reverb parameters (such as
Reverb Time) by using Program Edit Mode to change the assignments of the user-assignable
parameters.
When a KB3 Organ Program is selected in a Zone, some of the knobs may perform Organ
drawbar functions instead of the functions labeled on the front panel. Move a knob to see the
assigned parameter and value for each Zone in the LCD display.
SW1 (SUSTAIN) and SW2 Pedals
e SW1 (SUSTAIN) pedal defaults to controlling sustain, which will sustain any note that
is played while the pedal is pressed, for as long as the pedal is held.
For KB3 Organ Programs, the SW1 (SUSTAIN) pedal controls the Rotary Speaker speed,
changing between fast and slow. e LCD display shows “KB3” when a Multi containing a
KB3 Program is selected.
e SW2 pedal defaults to controlling Sostenuto, which will sustain notes from any keys that
are being held when the pedal is pressed, for as long as the pedal is held.
e SW1 (SUSTAIN) and SW2 pedals can be enabled, disabled, or reassigned for each Zone
in Multi Edit Mode. Because of this, the pedals may function dierently for each Zone in
each Multi.
Global Mode can be used to set pedal overrides, which can change the pedal assignments for
all Multis.
4-5
Page 51

Multi Mode
SPLIT/LAYER
CC (VOLUME) Pedal
e CC (VOLUME) pedal defaults to control Program volume (pre-FX).
For KB3 Organ Programs, the CC (VOLUME) pedal controls organ swell. Organ swell is
similar to Program volume, except volume can not be turned all the way down to silence.
e LCD display shows “KB3” when a Multi containing a KB3 Program is selected.
e CC (VOLUME) pedal can be enabled, disabled, or reassigned for each Zone in Multi
Edit Mode. Because of this, the pedals may function dierently for each Zone in each Multi.
SPLIT/LAYER
Press the PREVIOUS and NEXT buttons simultaneously to access the Split/Layer function.
e Split and Layer functions have identical parameters, but produce dierent results.
e Split function allows you to quickly create a Multi such that keys in one range of the
keyboard produce dierent sounds than keys in another range.
e Layer function allows you to layer Programs and Multis such that more than one
instrument sound can be produced by playing one key.
e Split and Layer functions allow you to quickly create Multis without using Multi Edit
Mode to congure Zone key ranges, Programs, and volumes. After creating and saving a Split
or Layer Multi, you can edit additional Multi parameters in Multi Edit mode.
SPLIT
4-6
When you create a Split in Multi Mode, you are creating a copy of the selected Multi with a
new Zone which covers the left hand of the keyboard.
Page 52

Multi Mode
SPLIT/LAYER
To create a Split in Multi Mode, the selected Multi must have at least one ZONE ON/
OFF button set to o (an inactive Zone). When creating a Split in Multi Mode, the lowest
numbered inactive Zone will be used for the new left hand Zone.
You can choose a Program that will be used in the new left hand Zone of the Split Multi.
Follow these steps to create a Split:
1. In Multi Mode, select a Multi for the right hand of the Split. e selected Multi must
have at least one ZONE ON/OFF button set to o (an inactive Zone).
2. Press the PREVIOUS and NEXT buttons simultaneously to access the “Split or Layer”
Page.
3. On the “Split or Layer” Page, use the PREVIOUS or NEXT buttons to select “Split
<ENTER>”, then press the ENTER button.
4. On the “Split” Page, the lowest numbered inactive Zone is selected with a default
Bass Program selected for the left hand of the Split. Use the ALPHA WHEEL or
CATEGORY buttons to select a dierent Program for the left hand of the Split.
5. Additional Split parameters are described in Split/Layer Parameters on page 4-8.
Use the CHANNEL/PAGE buttons to navigate between each of the 3 Split function
pages. Use the PREVIOUS or NEXT buttons to select each parameter, and the ALPHA
WHEEL or CATEGORY buttons to change the value of each parameter.
6. Press the SAVE button to save your Split as a Multi (See below for details on saving).
After saving your Split Multi, you can edit additional Multi parameters in Multi Edit
mode.
LAYER
When you create a Layer in Multi Mode, you are creating a copy of the selected Multi with a
new Zone which covers the entire keyboard.
To create a Layer in Multi Mode, the selected Multi must have at least one ZONE ON/
OFF button set to o (an inactive Zone). When creating a Layer in Multi Mode, the lowest
numbered inactive Zone will be used for the new Layer Zone.
You can choose a Program that will be used in the new Zone of the Layer Multi.
4-7
Page 53

Multi Mode
SPLIT/LAYER
Follow these steps to create a Layer:
1. In Multi Mode, select a Multi that you wish to layer. e selected Multi must have at
least one ZONE ON/OFF button set to o (an inactive Zone).
2. Press the PREVIOUS and NEXT buttons simultaneously to access the “Split or Layer”
Page.
3. On the “Split or Layer” Page, use the PREVIOUS or NEXT buttons to select “Layer
<ENTER>”, then press the ENTER button.
4. On the “Layer” Page, the lowest numbered inactive Zone is selected with a default
layer Program selected for the layered Zone 2 Program. Use the ALPHA WHEEL or
CATEGORY buttons to select a dierent Program for the layered Zone 2 Program.
5. Additional Layer parameters are described in Split/Layer Parameters on page 4-8.
Use the CHANNEL/PAGE buttons to navigate between each of the 3 Layer function
pages. Use the PREVIOUS or NEXT buttons to select each parameter, and the ALPHA
WHEEL or CATEGORY buttons to change the value of each parameter.
6. Press the SAVE button to save your Layer as a Multi (See below for details on saving).
After saving your Layer Multi, you can edit additional Multi parameters in Multi Edit
mode.
Split/Layer Parameters
e following parameters are available for each of the 4 Zones. e ZONE ON/OFF
parameters are controlled by using the front panel ZONE ON/OFF buttons.
e remaining parameters are accessed on each of the pages listed below. Use the
CHANNEL/PAGE buttons to navigate between each of the 3 Layer or Split function pages.
On these pages, the left hand Zn column indicates the Zone number associated with each of
the 4 rows of parameters.
ZONE ON/OFF
While creating a Split or Layer, inactive Zones can be turned On by turning on the ZONE
ON/OFF buttons.
4-8
Page 54

Multi Mode
SPLIT/LAYER
Split Page / Layer Page
Program
e default Split or Layer Program will appear in the lowest numbered inactive Zone. Use
the ALPHA WHEEL or CATEGORY buttons to select a dierent Program for the selected
Zone.
Split Mixer Page / Layer Mixer Page
Volume
e Volume parameter sets the volume of each Zone. To change the volume of a Zone:
1. Select a Volume parameter for the desired Zone by using the PREVIOUS and NEXT
buttons.
2. Change the volume by using the ALPHA WHEEL, or use the keypad function of the
CATEGORY buttons to type a volume value (0-127) followed by pressing the ENTER
button.
A value of “None” can also be selected, which will use the last volume value used by the
Zone’s MIDI channel. (is volume values is often set by the expression pedal.) A value of
“None” can be entered by using the ALPHA WHEEL to scroll below 0.
Pan
e Pan parameter sets the panning (left/right stereo placement) of each Zone. To change the
panning of a Zone:
1. Select a Pan parameter for the desired Zone by using the PREVIOUS and NEXT
buttons.
4-9
Page 55

Multi Mode
Multi Save Dialog
2. Change the panning by using the ALPHA WHEEL, or use the keypad function of the
A value of 0 is full left, 64 is center, and 127 is full right. Other values will move the stereo
placement in between these positions.
A value of “None” can also be selected, which will use the last pan value used by the Zone’s
MIDI channel. A value of “None” can be entered by using the ALPHA WHEEL to scroll
below 0.
Split Key Range Page / Layer Key Range Page
CATEGORY buttons to type a pan value (0-127) followed by pressing the ENTER
button.
Key Low / Key High
e Key Low and Key High parameters set the playable key range of each Zone by setting
the lowest and highest playable key of each Zone. Keys played within this range will trigger a
note for the selected Zone.
Using Split sets the boundary between the left hand and right hand Zones to E3. Using
Layer sets the new Layer Zone keyboard range to C1 - G9. Change these parameters for each
Zone to create custom Split and Layer key ranges.
Values for the currently selected Key Low or Key High parameter can be selected by holding
down the ENTER button and then playing the desired key on the keyboard. Values can
also be selected by using the ALPHA WHEEL, or by using the keypad function of the
CATEGORY buttons, followed by pressing the ENTER button.
Multi Save Dialog
Press the SAVE button to save a Split or Layer Multi as a User Multi, or to save a Multi with
the current state of the ZONE ON/OFF buttons.
e current state of the VARIATION button and/or the ARP ON/OFF button is saved if
any of the Arp and/or Variation parameters are set to Yes on the Multi Edit Buttons Page. To
save changes made by using the MODULATION WHEEL or any of the Knobs, you must
set the value of each controller on the Multi Edit Mode Controllers Page.
4-10
Page 56

To save a copy of the Multi, press the SAVE button once to view the Save Dialog. e Save
Dialog allows you to choose an ID number and name for the Multi you are saving. Use the
CHANNEL/PAGE buttons to switch between ID selection and naming pages. On the Multi
Save Page, press the SAVE button again to save the Multi as a User Multi.
Changing ID Numbers
e display shows the rst available ID number and the current Multi name. You can save
Multi with ID numbers from 1025 to 2048.
If you are saving a Multi that has not been previously edited, the next available unused ID
number will be selected.
Multi Mode
Multi Save Dialog
If you are saving a previously edited User Multi, the ID number that the Multi was last saved
with will be selected.
Press the PREVIOUS and NEXT buttons simultaneously to toggle between selecting the ID
number that the Multi was last saved with and the next available unused ID number.
To change the ID number, use the ALPHA WHEEL, or use the keypad function of the
CATEGORY buttons to type an ID number (1025-2048) followed by pressing the ENTER
button. If you select an ID number that is already used by another Multi, the bottom of
display will show a message to warn that you are going to replace a Multi.
Naming a User Multi
In the Save Dialog, you can name a Multi by using the Multi Name Page.
Use the CHANNEL/PAGE buttons to select the Multi Name Page.
e display shows the current Multi name. Multi names can total 16 characters in length.
4-11
Page 57

Multi Mode
PANIC
Saving a User Multi
To name a Multi:
1. Use the PREVIOUS and NEXT buttons to move the cursor to each character.
2. Change the current character by using the ALPHA WHEEL, or use the keypad function
of the CATEGORY buttons to type a character.
To insert a space before the selected character, press and hold the NEXT button. e selected
character and all characters to the right will move one space to the right.
To delete the selected character, press and hold the PREVIOUS button. All the characters to
the right of the selected character will move one space to the left.
After naming the Multi, press the SAVE button to return to the Multi Save Page. On the
Multi Save Page, press the SAVE button again to save the Multi as a User Multi.
To save a User Multi, select the Multi Save Page and press the SAVE button, (or press the
EXIT button to exit without saving). e display will show a brief message to conrm that
the Multi was saved.
After successfully saving, the Multi will be selected in Multi Mode in the User ID range
(1025-2048). To nd the Multi again later, make sure to press the USER button.
PANIC
Pressing the 0 and ENTER buttons simultaneously performs the PANIC function. PANIC
deactivates all sounding notes and resets controller values by sending an “All Notes O ”
message and a “Reset All Controllers” message on all 16 MIDI channels.
4-12
Page 58

Chapter 5
Multi Edit Mode
Multi Edit Mode allows you to edit and customize Multis. Any Multi can be edited in Multi
Edit Mode and saved to one of the 1024 User IDs.
To enter Multi Edit Mode from another Mode, press and turn on the MULTI Mode button
to enter Multi Mode, then press and turn on the EDIT button.
In Multi Edit Mode, the top line of the display shows the current page name and number.
Navigate to each page by using the CHANNEL/PAGE buttons.
Navigate to each parameter on the current page by using the PREVIOUS and NEXT
buttons.
Multi Edit Mode
Main Page
Change the value of the selected parameter by using the ALPHA WHEEL, or use the keypad
function of the CATEGORY buttons to type a numeric value followed by pressing the
ENTER button.
Many parameters apply only to one of the 4 Zones (Zone specic parameters). Pages with
Zone specic parameters show “Zn” in the top left of the page and list Zone numbers 1-4 on
the lines below. is indicates that the parameters in lines 1-4 each respectively apply only to
Zones 1-4.
Main Page
Use the Main Page to select a Program for each of the 4 Zones.
Only one KB3 Organ Program can be loaded at a time. e Main Page shows “KB3” to the
left of the Program name when a KB3 Program is loaded in a Zone. See KB3 Chan on page
5-12 for details.
Use any of the methods below to select a Program for each Zone.
5-1
Page 59

Multi Edit Mode
Mixer Page
Browse All Programs
Make sure the USER button is o, then use the ALPHA WHEEL or PREVIOUS and
NEXT buttons to select a Program from all of the available Programs.
Select a Program by Category
Make sure the KEYPAD button is o, then press one of the CATEGORY buttons to select
the rst Program of a category (or the current Category Default Program). e selected
CATEGORY button will turn on. Use the ALPHA WHEEL or PREVIOUS and NEXT
buttons to select Programs from the selected category.
Select a Previously Saved User Program
Press and turn on the USER button, then use the ALPHA WHEEL or PREVIOUS and
NEXT buttons to browse only User Programs. To return to browsing Factory and User
Programs, press and turn o the USER button.
Select a Program by ID Number
Press and turn on the KEYPAD button. e keypad button allows you to use the numbers
labeled on the CATEGORY buttons to select Programs or Multis by ID number. Type an ID
number followed by pressing the ENTER button to select the associated Program.
Mixer Page
Use the Mixer Page to set the Volume and panning for each Zone.
Volume
5-2
e Volume parameter sets the volume of each Zone. Change the volume of a Zone by using
the ALPHA WHEEL, or use the keypad function of the CATEGORY buttons to type a
volume value (0-127) followed by pressing the ENTER button.
Page 60

Pan
Multi Edit Mode
Key/Velocity Page
A value of “None” can be selected by using the ALPHA WHEEL to scroll below 0. is
is useful if you wish to manually set Zone volumes with the SP6 knobs, rather than using
default values when the Multi is selected. A value of “None” will use the last volume value
used by the Zone’s MIDI channel (a MIDI channel from the previously selected Multi, or
from Program Mode).
e Pan parameter sets the panning (left/right stereo placement) of each Zone. Change
the panning of a Zone by using the ALPHA WHEEL, or use the keypad function of the
CATEGORY buttons to type a pan value (0-127) followed by pressing the ENTER button.
A value of 0 is full left, 64 is center, and 127 is full right. Other values will move the stereo
placement in between these positions.
A value of “None” can be selected by using the ALPHA WHEEL to scroll below 0. A value
of “None” will use the last pan value used by the Zone’s MIDI channel (a MIDI channel
from Program Mode or from the previously selected Multi).
Key/Velocity Page
Key Low / Key High
e Key Low and Key High parameters set the playable key range of each Zone by setting
the lowest and highest playable key of each Zone. Keys played within this range will trigger
a note for the selected Zone. (You can also set a range where playing keys will not trigger a
note, by setting Key Low to a higher key than Key High).
A Value for the currently selected Key Low or Key High parameter can be selected by
holding down the ENTER button and then playing the desired key on the keyboard. Values
can also be selected by using the ALPHA WHEEL, or by using the keypad function of the
CATEGORY buttons, followed by pressing the ENTER button.
5-3
Page 61

Multi Edit Mode
Transpose/Bend Page
Velocity Low / Velocity High
e Velocity Low and Velocity High parameters set the playable velocity range of each Zone
by setting the lowest and highest playable velocity of each Zone. Velocities within this range
will trigger a note for the selected Zone. (You can also set a range where playing velocities
will not trigger a note, by setting Velocity Low to a higher velocity than Velocity High).
Transpose/Bend Page
Xpose
e Xpose parameters set the transposition of each Zone. e Xpose parameters change the
pitches generated by each Zone, without changing the Key Low and Key High range on the
keyboard. is is done by changing the MIDI note numbers generated by the keys in the
Zone.
If you transpose out of the range of the selected Program in the selected Zone, notes from
that Zone’s Program will not produce sound, though MIDI notes will still be transmitted
from the Zone.
Bend Up / Bend Down
e Bend Up and Bend Down parameters set the pitch bend up and pitch bend down range
of the PITCH WHEEL for each Zone. Use these parameters to set how much the pitch will
change when you move the PITCH WHEEL up or down. Change the Bend Up or Bend
Down values by using the ALPHA WHEEL, or use the keypad function of the CATEGORY
buttons to type a value (0-88) followed by pressing the ENTER button.
A value of “Prog” can also be selected, which will use the respective PBendUp or PBendDwn
value of the Program in the selected the Zone. A value of “Prog” can be entered by using the
ALPHA WHEEL to scroll below 0.
5-4
Bend Up values greater than 12 can cause samples to bend to their maximum upward pitch
before the PITCH WHEEL is fully up.
Page 62

FX Page
Use the FX Page to enable or disable the FX of the Program in each Zone. Each Zone can
be set to Y to enable eects, or to N to disable eects. Some Zones set to Y may be displayed
as (Y). is means that there are not enough eects resources available for that Zone, and
that Zone’s eects are not loaded. If you want to use the FX for a Zone displayed as (Y), try
setting other Zones to N to make more FX resources available.
Buttons Page
Multi Edit Mode
FX Page
Arp
e Arp parameters set whether the ARP ON/OFF button is functional for the Program in
each Zone.
When a Zone’s Arp parameter is set to Yes, the Arpeggiator for the Program in that Zone will
be controlled by the ARP ON/OFF button. When a Zone’s Arp parameter is set to No, the
Arpeggiator for the Program in that Zone is set to O.
Variation
e Variation parameters set whether the VARIATION button is functional for the Program
in each Zone.
When a Zone’s Variation parameter is set to Yes, the variation for the Program in that Zone
will be controlled by the VARIATION button. When a Zone’s Variation parameter is set to
No, the variation for the Program in that Zone is set to O.
5-5
Page 63

Multi Edit Mode
Switch Pedals Page
Switch Pedals Page
Use the Switch Pedals Page to select an assignment for each switch pedal in each Zone.
When a switch pedal is plugged into the SW1 (SUSTAIN) and/or SW2 jacks, use the
parameters in the SW1a and SW2a columns to select an assignment for the switch pedals in
each Zone.
When a dual switch pedal is plugged into the SW1 (SUSTAIN) jack, use the parameters
in the SW1a and SW1b columns to select an assignment for the dual switch pedals in each
Zone.
When a dual switch pedal is plugged into the SW2 jack, use the parameters in the SW2a and
SW2b columns to select an assignment for the switch pedals in each Zone.
Note: If a Switch Pedal Override has been selected in Global Mode, Multi Edit Mode will
display overridden functions with an asterisk “*” to indicate that the selected function has
been overridden. See Switch Pedal Overrides on page 6-6 for details on Switch Pedal
Overrides.
Each switch pedal can be assigned to these functions:
OFF
When OFF is selected, the selected pedal is disabled in the selected Zone.
Sust / Rota
When Sust is selected, the selected pedal is assigned to the Sustain function in the selected
Zone. Pedals assigned to Sust will sustain any note that is played in the selected Zone while
the pedal is pressed, for as long as the pedal is held.
For Zones containing KB3 Organ Programs, the Rota function is available instead of Sust.
e Rota assignment controls the Rotary Speaker speed, changing between fast and slow.
5-6
Page 64

Sost
When Sost is selected, the selected pedal is assigned to the Sostenuto function in the selected
Zone. Pedals assigned to Sost will sustain notes from any keys that are being held in the
selected Zone when the pedal is pressed, for as long as the pedal is held.
Soft
When Soft is selected, the selected pedal is assigned to the Soft pedal function in the selected
Zone. Pedals assigned to Soft will perform the Soft pedal function for Piano category
Programs in the selected Zone. For Programs in the Piano category, the Soft pedal function
simulates applying dampers to the piano strings. Soft will dampen any Piano note that is
played in the selected Zone while the pedal is pressed.
CC Pedal Page
Multi Edit Mode
CC Pedal Page
CC Pedal Assignments
Use the CC Pedal Page to select an assignment for the CC pedal in each Zone. e CC pedal
can be assigned to these functions:
OFF
When OFF is selected, the CC pedal is disabled in the selected Zone.
Expression / Swell
Expression controls the pre-FX Program volume, scaling between silence and the current
Zone volume. e Expression assignment can also be used to send MIDI CC 11 to external
MIDI devices.
For Zones containing KB3 Organ Programs, the Swell function is available instead of
Expression. Organ swell is similar to Program volume, except volume can not be turned all
the way down to silence. e Multi Edit Main Page shows “KB3” to the left of the Program
name when a KB3 Program is loaded in a Zone.
5-7
Page 65

Multi Edit Mode
Controllers Page
Foot
e Foot assignment controls a wah eect for some Programs. Usually the wah eect must be
enabled with the VARIATION button. e Foot assignment can also be used to send MIDI
CC 4 to external MIDI devices.
Pan
e Pan assignment controls panning (left/right stereo placement). e Pan assignment can
also be used to send MIDI CC 10 to external MIDI devices.
Value
Use the Value parameter to set a default value (0-127) for the CC Pedal, which will be
applied whenever the Multi is selected.
When the Value parameter is selected, you can set a value by using the ALPHA WHEEL, or
by using the keypad function of the CATEGORY buttons to type a value (0-127) followed
by pressing the ENTER button.
A value of “None” can be selected by using the ALPHA WHEEL to scroll below 0. A value
of “None” allows the CC pedal assignment in each Zone/MIDI channel to use the last
value it had in the previously selected Multi (if the previously selected Multi had the same
assignments in the same Zones/MIDI channels). For example, when controlling the volume
of your Multis with the Expression assignment, a value of “None” is useful so that the
Expression value does not get set to a default value when selecting a new Multi.
Controllers Page
Use the Controllers Page to adjust controller settings for each Zone. Settings can be adjusted
for the MODULATION WHEEL, as well as the KNOBS assignments.
5-8
Page 66

Ctl
Use the Ctl parameter to select a controller. When the Ctl parameter is selected, you can
select a controller by using the ALPHA WHEEL, or by holding the ENTER button and
moving the MODULATION WHEEL or one the KNOBS.
Value
Use the Value parameter to set a value (0-127) for the selected controller.
When the Value parameter is selected, you can set a value by using the ALPHA WHEEL, or
by using the keypad function of the CATEGORY buttons to type a value (0-127) followed
by pressing the ENTER button.
When the Value parameter is selected, you can also set a value by holding the ENTER
button and moving the MODULATION WHEEL or one the KNOBS.
Multi Edit Mode
Controllers Page
State
Use the State parameter to enable or disable the selected controller in the selected Zone.
When a Zone’s State parameter is set to Yes, the selected controller is active.
When a Zone’s State parameter is set to No, the Program in that Zone will not be controlled
by the selected controller. e Program in that Zone will use the controller setting that the
Program was saved with in Program Mode.
Scale
Use the Scale parameter to scale the value of the selected controller for each Zone. e Scale
parameter multiplies the current value of the controller by the selected Scale amount (-300%
through 300%). Press the MULTI Mode button to quickly apply the selected value.
e Scale parameter eectively allows you to apply dierent values to each Zone, while
maintaining a single value for each controller. For example, with the Ctl parameter set to
Reverb, you could set the Zone 1 Scale parameter to 100%, and the Zone 2 Scale parameter
to 50%. With the REVERB knob set to 127, Zone 1 would have a Reverb value of 127, and
Zone 2 would have a Reverb value of 63. With the REVERB knob set to 64, Zone 1 would
have a Reverb value of 64, and Zone 2 would have a Reverb value of 32.
5-9
Page 67

Multi Edit Mode
Channel Page
Add
Use the Add parameter to oset the value of the selected controller for each Zone. e
Add parameter osets the current value of the controller by the selected Add amount (-128
through 127). Press the MULTI Mode button to quickly apply the selected value.
e Add parameter eectively allows you to apply dierent values to each Zone, while
maintaining a single value for each controller. For example, with the Ctl parameter set to
Reverb, you could set the Zone 1 Add parameter to 0, and the Zone 2 Add parameter to 10.
With the REVERB knob set to 0, Zone 1 would have a Reverb value of 0, and Zone 2 would
have a Reverb value of 10. With the REVERB knob set to 15, Zone 1 would have a Reverb
value of 15, and Zone 2 would have a Reverb value of 25.
Channel Page
Use the Channel Page to select a MIDI Channel and Destination for each Zone.
e Chan and Destination parameters are useful when using the SP6 to send MIDI to
external equipment, or when receiving MIDI from external equipment. If you are not using
external MIDI equipment, these parameters can be left at their default values.
Chan
e Chan parameters set the MIDI transmit and receive channel for each Zone.
For most uses, each Zone should be set to a dierent MIDI channel. If you set multiple
Zones to the same MIDI channel, the same Program will be used for each of those Zones.
Destination
e Destination parameters determine where MIDI data generated from each Zone is sent
when playing the SP6 keyboard and moving the SP6 controllers. MIDI data from each
Zone can be sent to a SP6 Program (LOCAL), to the MIDI OUT port (MIDI), to the USB
COMPUTER port (USB), or to any combination of these destinations.
5-10
Page 68

e Destination parameters work in combination with the LOCAL DEST button on the
front panel. e Destination parameters and the LOCAL DEST button each act like lters.
For example, if the Zone 1 Destination parameter is set to LOCAL, and the LOCAL DEST
button is set to LOCAL + MIDI, MIDI data from Zone 1 will be sent to LOCAL only.
Common Page
Tempo
Multi Edit Mode
Common Page
Use the Tempo parameter to set the rate of the Arpeggiator or tempo synced FX (such as
Delay). You can set a value by using the ALPHA WHEEL, or by using the keypad function
of the CATEGORY buttons to type a value followed by pressing the ENTER button.
e value of the Tempo parameter can also be set by tapping the TAP TEMPO button at the
desired rate.
Clock Src
Use the Clock Src (Clock Source) parameter to set whether the selected Multi will use its
own tempo, or whether it will sync with the tempo from an external MIDI device.
Set the Clock Src parameter to Internal to use the tempo set by the Tempo parameter.
Set the Clock Src parameter to External to use the tempo from an external MIDI device.
When the Clock Src parameter is set to External, an external MIDI device must be sending
MIDI clock data to the USB or MIDI in port.
Revrb Chan
Use the Revrb Chan (Reverb Channel) parameter to set the MIDI channel which will be
used for Reverb. e Reverb eect of the Program loaded in the selected MIDI channel will
be used for all Programs in the current Multi. To view the MIDI Channel of each Zone, see
Channel Page on page 5-10.
5-11
Page 69

Multi Edit Mode
Save User Multis
KB3 Chan
Use the KB3 Chan (KB3 Channel) parameter to set the MIDI channel which will be used
for KB3 organ Programs. Only one KB3 Program can be loaded at a time. If KB3 Programs
are selected for more than one Zone, this parameter species which MIDI channel has
priority to load a KB3 Program. If you want a KB3 Program to play in a Zone, set KB3
Chan to the channel of the Zone. To view the MIDI Channel of each Zone, see Channel
Page on page 5-10.
Save User Multis
For details on saving User Multis, see Multi Save Dialog on page 4-10.
5-12
Page 70

Chapter 6
Global Mode
Global Mode allows you to adjust performance settings which aect all Programs and Multis.
Global Mode also allows you to Store, Load, and Delete Programs and Multis, or restore
factory defaults by performing a Reset.
Navigate to each page by using the CHANNEL/PAGE buttons.
Navigate to each parameter on the current page by using the PREVIOUS and NEXT
buttons.
Change the value of the selected parameter by using the ALPHA WHEEL, or use the keypad
function of the CATEGORY buttons to type a numeric value followed by pressing the
ENTER button.
Global Mode
Settings Page
Settings Page
Tune
Use the Tune parameter to adjust the ne tuning of all Programs and Multis.
VelocityMap
e VelocityMap parameter determines the way the SP6 generates MIDI velocity
information. Dierent maps generate dierent MIDI velocity values for the same physical
key strike velocity.
e default map (Linear) provides the widest range of velocity expression, but you may want
to choose a dierent map if the default does not suit your playing style. You can select from
any of the following settings:
6-1
Page 71

Global Mode
Settings Page
Light3
Light2
Light1
Linear
Hard1
Hard2
Hard3
PianoTouch
EasyTouch
GM Receive
IntonatMap
Makes it increasingly easier to produce high MIDI velocity values for the
same key strike velocity (with Light3 being the easiest). These maps
work best for those with a light touch.
The default map. Linear, allows MIDI velocities to pass unchanged. It
follows a linear response.
Makes it increasingly harder to produce high MIDI velocity values for the
same key strike velocity (with Hard3 being the hardest). These maps
work best for those with a heavy touch.
Simulates the general velocity response of an acoustic piano, and is
best suited for playing acoustic piano Programs.
Similar to the Light1/Light2/Light3 settings. Makes higher velocities
easier to play, but allows more sensitive control over playing high
velocities by not boosting the MIDI velocity for fast strike velocities as
much as it does for medium strike velocities.
Mimics the velocity response commonly used by keyboards that use the
General MIDI (GM) sound set. The GM Receive map makes medium
strike velocities produce higher MIDI velocities compared to the Linear
map.
Most modern western music uses what is known as equal temperament. is means that
the interval between each semitone of the 12 tone octave is precisely the same as every other
semitone.
However, many dierent intonation intervals have evolved over the centuries and across
cultures and instruments, so equal temperament will not sound appropriate for certain styles
of music. e SP6 supplies you with 18 dierent factory intonation maps which are useful
for a range of dierent styles. Each of these maps denes dierent intervals between each of
the semitones in a single octave (used for all octaves) by setting pitch osets for each note in
cents.
Like many instruments before the adaptation of equal temperament, most of these
intonation maps were designed to sound best in one specic key. ough some may have
historically been in a dierent key, all of the SP6’s factory intonation maps are set to root
note C by default. You can change the root key of the current intonation map by using the
IntonatKey parameter (see the IntonatKey section below).
0 None No intonation map is used, intonation is equal.
1 Equal No detuning of any intervals. The standard for modern western music.
2 Just
3 Just/b7th Similar to Just, but with the Dominant 7th atted an additional 15 cents.
Tunings are dened based on the ratios of the frequencies between
intervals. The original tuning of Classical European music.
6-2
Page 72

Global Mode
Settings Page
4 Harmonic The perfect 4th, Tritone, and Dominant 7th are heavily atted.
5 JustHarm Approximation of a historical intonation.
6 Werkmeiste
7 1/5thCmma Approximation of a historical intonation based on the comma system.
8 1/4thCmma Approximation of a historical intonation based on the comma system.
9 IndianRaga Based on the tunings for traditional Indian music.
10 Arabic Oriented toward the tunings of Mid-Eastern music.
11 BaliJava1 Based on the pentatonic scale of Balinese and Javanese music.
12 BaliJava2 A variation on BaliJava1, slightly more subtle overall.
13 BaliJava3 A more extreme variation.
14 Tibetan Based on the Chinese pentatonic scale.
15 Carlos A
16 Pyth/aug4
17 Pyth/dim5
18 EastMed Eastern Mediterranean. The Major 3rd and Major 7th are at by 50 cents.
Named for its inventor, Andreas Werkmeister, it was developed to enable
transposition with less dissonance than classic equal temperament.
Developed by Wendy Carlos, an innovator in microtonal tunings, this
intonation map ats each interval increasingly, resulting in an octave with
quarter-tone intervals.
This is a Pythagorean tuning, based on the Greek pentatonic scale. The
tritone is 12 cents sharp.
This is a Pythagorean tuning, based on the Greek pentatonic scale. The
tritone is 12 cents at.
IntonatKey
Use the IntonatKey parameter to set the tonic (or base note) from which the currently
selected intonation map calculates its intervals. If you select G as the intonation key, for
example, and the intonation map you select tunes the minor 2nd down by 50 cents, then
G# will be a quartertone at relative to equal intonation. If you change the intonation key to
D, then D# will be a quartertone at. If you use nonstandard intonations, you’ll want to set
IntonatKey to the key you’re playing in.
If the Intonation parameter is set to Equal, changing IntonatKey has no eect.
Local Chan
e Local Chan parameter enables an external MIDI keyboard to function as if it is the SP6’s
keyboard and physical controllers. is allows all Channels/Zones of a Multi to be played
simultaneously from an external MIDI keyboard transmitting on a single MIDI channel
(or a single MIDI channel of a sequencer), with split and layered Zones laid out across the
external MIDI keyboard. To do this, set Local Chan to the same MIDI channel that your
external MIDI keyboard or sequencer is transmitting.
6-3
Page 73

Global Mode
Settings Page
AutoPwrOff
If you are not using an external MIDI device to play Multis, you can ignore this parameter
and leave it set to None. When Local Chan is set to None, an external MIDI device
transmitting on one channel will only play one Channel/Zone of a Multi.
In Program Mode, an external MIDI keyboard or sequencer transmitting on the Local Chan
will always play the Program on the currently selected Program Mode MIDI channel.
e SP6 has an automatic power saving feature (Auto Power O) that can automatically
power o the SP6 after a period of inactivity, in order to conserve electricity.
Use the AutoPwrO parameter to enable or disable the automatic power saving feature.
When the AutoPwrO parameter is set to On, the SP6 will automatically power o after
the Power O Time has expired, from the last key press (physical or MIDI), button press,
controller movement, or USB MIDI activity.
A count down timer warning will be shown in the LCD display a few minutes before the SP6
is powered o. At any time, touching any SP6 control or playing a note will cause the SP6 to
remain powered on, until the SP6 has been inactive for the set Power O Time.
APwrOffTime
Use the APwrOTime parameter to set the Power O Time. If the AutoPwrO parameter is
set to On, then the SP6 will automatically power o after the Power O Time has expired,
from the last key press (physical or MIDI), button press, controller movement, or USB
MIDI activity.
A count down timer warning will be shown in the LCD display a few minutes before the SP6
is powered o. At any time, touching any SP6 control or playing a note will cause the SP6 to
remain powered on, until the SP6 has been inactive for the set Power O Time.
MultiChange
Use the MultiChange parameter to set the behavior of how Multis are loaded when selecting
a Multi in Multi Mode.
When MultiChange is set to Immediate, a selected Multi will be loaded immediately.
When MultiChange is set to AllKeysUp, a selected Multi will be loaded when you’ve released
all currently held notes.
6-4
Page 74

SysEx ID
e SysEx ID parameter sets the ID number for the unit if you are using more than one
device with the same MIDI manufacturer ID number. You can set this parameter to any
number from 0 to 127.
Unless you have multiple SP6 keyboards receiving SysEx messages from a single source, you
will not need to change the SysEx ID from the default setting of 0.
If you do have multiple SP6s receiving SysEx messages from a single source, make sure each
SP6 has a dierent SysEx ID. is will allow you to direct SysEx messages to the appropriate
SP6 by specifying which unit with the SysEx ID byte that’s included with every SysEx
message.
To have the unit respond to SysEx messages regardless of the SysEx ID, set SysEx ID to 127.
LCDContras
Use the LCDContras parameter to adjust the contrast of the LCD display.
Global Mode
Settings Page
BankMode
e BankMode parameter determines the MIDI controller number(s) that will be used to
select MIDI Program Banks.
When using an external MIDI device to send MIDI bank change messages to the SP6,
dierent manufacturers may use dierent MIDI controller numbers for sending bank change
messages (usually 0, 32, or both 0 and 32). You can use the BankMode parameter to ensure
that the SP6 responds to bank change messages from external MIDI devices. Set BankMode
to any of the following settings:
Ctl 0 MIDI Bank change messages are received with controller number 0.
Ctl 32 MIDI Bank change messages are received with controller number 32.
Ctl 0/32 MIDI Bank change messages are received with both controller numbers 0 and 32.
FXMode
e FXMode parameter determines how eects resources are used in Program Mode.
Use the Perform setting when playing a single Program in Program Mode. With FXMode
set to Perform, the SP6 minimizes disruption of eects when changing Programs or MIDI
channels in Program Mode.
When controlling the SP6 from an external sequencer to play multiple channels in Program
Mode, setting FXMode to MultiTrk allows eects to be loaded on more MIDI channels,
although eects may be momentarily disrupted when changing Programs or MIDI channels.
6-5
Page 75

Global Mode
Overrides Page
Show Params
When the Show Params parameter is set to Yes, the All Parameters page appears in Program
Edit Mode. See All Parameters Page on page 3-7 for details.
When the Show Params parameter is set to No, the All Parameters page is hidden in Program
Edit Mode.
KB3 Trigger
KB3 Trigger determines whether KB3 organ notes are triggered by the high or low velocity
switch of each key.
When set to “Low” : Each key must be pressed all the way down to trigger a note.
When set to “High” : Notes are triggered near the top of the key travel. is permits faster
note triggering because each key only has to be pressed down slightly, however this can also
result in unwanted false triggers.
e default setting is “Low”, which generally produces better results for most playing styles.
Overrides Page
Switch Pedal Overrides
e Switch Pedal Override parameters (SW1a through SW2b) allow the assignments for
the Switch Pedals to be changed for all Programs and Multis. (KB3 organ Programs have
a separate override for the SW1a pedal, see the KB3 Rotary section below for details). e
alternative assignments available for the Switch Pedal Overrides include the standard piano
pedal controls of Sustain, Sostenuto and Soft as well as DataInc, DataDec, FavoriteInc and
FavoriteDec, which can be used to change Programs, Multis or Favorites by using a pedal.
e Arp On/O and Arp Latch assignments allow for easy control of arpeggiator functions.
6-6
Use the DataInc and DataDec assignments (data increment/decrement) to select the next or
previous ID when you depress the pedal. If you are in Program mode, DataInc and DataDec
will select the next or previous Program. If you are in Multi mode, DataInc and DataDec will
select the next or previous Multi.
Page 76

Global Mode
Overrides Page
Use the FavoriteInc and FavoriteDec assignments (Favorite increment/decrement) to
select the next or previous Favorite when you depress the pedal. If you are not playing any
Favorites, FavoriteInc and FavoriteDec will select the rst Favorite, or the last Favorite that
was selected since turning on the SP6.
Use the Arp On/O and Arp Latch assignments to easily control arpeggiator functions.
e Arp On/O assignment allows you to toggle the arpeggiator on and o by pressing
a switch pedal. e Arp Latch assignment allows you to latch held notes to be played by
the arpeggiator by holding down a switch pedal. When using the Arp Latch assignment,
make sure the arpeggiator is turned on. Play the notes you wish to latch, press and hold the
assigned pedal, then release the notes. e notes will continue to arpeggiate until the pedal is
released.
In Multi Edit Mode, if a pedal is selected which has a pedal override enabled in Global
mode, Multi Edit Mode will display the original assignment with an asterisk (*) to remind
you that the Global mode pedal override settings are being used instead of the Multi mode
pedal settings.
In Multi Edit Mode, setting a Pedal assignment to “OFF” will disable the override for that
Pedal in the selected Zone. It can be useful in Multi Mode to disable the Pedal Override for
some Zones. For example, you may want to use a Pedal Override to control Sustain in all
Zones of a Multi, but disable Sustain for one Zone.
KB3 Rotary
By default KB3 organ Programs have the Slow/Fast speed control for the Rotary speaker
eect assigned to the VARIATION button and the SW1 (SUSTAIN) pedal (the
“Button+Ped” setting). Setting the KB3 Rotary parameter to “Button” allows the Sustain
pedal to function as sustain for all KB3 Programs, instead of Rotary Slow/Fast. e
VARIATION button will always control the Rotary speed, regardless of this parameter’s
setting.
6-7
Page 77

Global Mode
File Page
File Page
e File Page allows you use a USB Device (such as a thumb drive) or a computer to store
and load backup les of User Objects (Programs and Multis), or to load new sounds. On the
File Page, press the ENTER button to go to the File Options Page.
File Options
On the File Options Page, use the PREVIOUS and NEXT buttons to select Load or Store,
then press the ENTER button to continue to the Load Device Page or Store Method Page.
While using the File Options Page, the playing of notes is disabled.
Load / Load Device
Use the Load Device Page to select the device you wish to load from.
Load a File from a Computer
1. Connect a USB cable from your computer to the USB COMPUTER port on the rear
panel of the SP6.
2. On the Load Device Page, use the PREVIOUS and NEXT buttons to select PC Drive,
then press the ENTER button.
3. Add a le to the SP6 drive on your computer, then eject the drive from your computer.
4. When the drive has been ejected from you computer, press the ENTER button on the
Load Page.
5. On the Load File Page, use the PREVIOUS and NEXT buttons to select the le in the
list, then press the ENTER button.
6. On the Load Method Page, use the PREVIOUS and NEXT buttons to select a load
method. See the Load Method section below for details.
6-8
Load a File from a USB Device
1. Connect a USB Device (such as a thumb drive) containing your le to the USB
STORAGE port on the rear panel of the SP6.
Page 78

Global Mode
File Page
2. On the Load Device Page, use the PREVIOUS and NEXT buttons to select USB
Device, then press the ENTER button.
3. On the Load File Page, use the PREVIOUS and NEXT buttons to select the le in the
list, then press the ENTER button.
4. On the Load Method Page, use the PREVIOUS and NEXT buttons to select a load
method. See the Load Method section below for details.
Load Method
On the Load Method Page, use the PREVIOUS and NEXT buttons to select a load method,
then press the ENTER button. See below for details on each method.
All: Use All to load all of the objects from the selected le. Objects will be loaded into the
lowest User ID numbers that are currently unused in your SP6. Used User IDs will not be
overwritten.
Some: Use Some to load some of the objects from the selected le. You will be brought to
the Load Some Page, where you can select objects from a list.
On the Load Some Page, use the PREVIOUS and NEXT buttons or ALPHA WHEEL to
scroll through the list. Use the LOCAL DEST button to select or de-select objects in the list.
Selected objects are marked with an asterisk (*).
Press the ENTER button to load the selected objects, or press the EXIT button to cancel.
Objects will be loaded into the lowest User ID numbers that are currently unused in your
SP6. Used User IDs will not be overwritten.
All-Ovrwrte: Use All-Ovrwrte to delete all of the User Objects in your SP6, then load all of
the objects from the selected le using the ID numbers stored in the le.
All-Ovrwrte will delete all of the User Objects in your SP6 before loading the objects
from the selected le. is cannot be undone. Before using All-Ovrwrte, you may wish
to use the File Page to store your existing User Objects to a computer or USB Device.
Deleted User Objects can not be recovered.
Store / Store Method
On the Store Method Page, use the PREVIOUS and NEXT buttons to select a store
method, then press the ENTER button. See below for details on each method.
All: Use All to store all User Objects from the SP6.
Some: Use Some to store some of the objects from the SP6. You will be brought to the Store
Some Page, where you can select objects from a list.
On the Store Some Page, use the PREVIOUS and NEXT buttons or ALPHA WHEEL to
scroll through the list. Use the LOCAL DEST button to select or de-select objects in the list.
Selected objects are marked with an asterisk (*).
6-9
Page 79

Global Mode
Delete Page
Press the ENTER button to store the selected objects, or press the EXIT button to cancel.
Store Device
After selecting a store method, use the Store Device Page to select the device you wish to
store to.
Store a File to a Computer
1. Connect a USB cable from your computer to the USB COMPUTER port on the rear
panel of the SP6.
2. On the Store Device Page, use the PREVIOUS and NEXT buttons to select PC Drive,
then press the ENTER button to go to the File Name Page.
3. On the File Name Page, use the PREVIOUS and NEXT buttons to move the cursor to
each character. Change the current character by using the ALPHA WHEEL, or use the
keypad function of the CATEGORY buttons to type a character. After naming the le,
press the ENTER button to store the le to the PC Drive.
4. On your computer, copy the stored le from the SP6 drive to your computer, then eject
the drive from your computer.
Store a File to a USB Device
1. Connect a USB Device (such as a thumb drive) to the USB STORAGE port on the rear
panel of the SP6.
2. On the Store Device Page, use the PREVIOUS and NEXT buttons to select USB
Device, then press the ENTER button.
3. On the File Name Page, use the PREVIOUS and NEXT buttons to move the cursor to
each character. Change the current character by using the ALPHA WHEEL, or use the
keypad function of the CATEGORY buttons to type a character. After naming the le,
press the ENTER button to store the le to the USB Device.
Delete Page
6-10
Use the Delete Page to delete selected Programs and Multis from the SP6. On the Delete
Page, press the ENTER button to view a list of User Objects.
Page 80

While viewing the list of User Objects, use the PREVIOUS and NEXT buttons or ALPHA
WHEEL to scroll through the list. Use the LOCAL DEST button to select or de-select
objects in the list. Selected objects are marked with an asterisk (*).
Press the ENTER button to delete the selected objects, or press the EXIT button to cancel.
Info Page
e Info Page shows currently installed Operating System version (OS) and Objects version.
To make sure that you have the latest Operating System and sound Objects, go to the
Kurzweil website at www.kurzweil.com.
Global Mode
Info Page
Select the About parameter and press the ENTER button to see a list of credits and
acknowledgments.
Reset Page
Use the Reset Page to reset the SP6 to its original factory settings. Press the ENTER button
to restore all Global Mode settings to their factory defaults, and delete all User Programs and
Multis.
All User Programs and Multis will be permanently erased. is cannot be undone.
Before using the Reset Page, you may wish to use the File Page to store your existing
User Objects to a computer or USB Device. Deleted User Objects can not be recovered.
6-11
Page 81

6-12
Page 82

Chapter 7
Troubleshooting
Use this chapter to learn how to maintain your SP6 and solve operational problems.
Maintenance
Clean the SP6 with a soft cloth dampened with water. Never use abrasives or solvents as they
may damage the SP6.
Power On Problems
Troubleshooting
Maintenance
is is the normal power on sequence:
1. e LCD backlight turns on.
2. “Loading...” appears in the LCD for a few seconds.
3. e SP6 enters Program Mode with Program 1 or the default boot up Program selected.
If your SP6 does not follow the normal power on sequence, check the problems and
solutions below:
Problem The SP6 does not power on
Solutions Plug the power cable securely into the wall outlet.
Plug the power cable securely into the SP6 power jack.
Use a different wall outlet, power strip, or extension cord.
Problem The SP6 powers on but operation is abnormal
Solution Try plugging the power cable into a different wall outlet on a
different circuit.
Problem The SP6 powers on but the LCD is difcult to read
Solution Go to the Global Mode Settings page and adjust the LCDContras
parameter.
7-1
Page 83

Troubleshooting
Audio Problems
Audio Problems
CAUTION: To protect your ears, do not troubleshoot audio problems while
wearing headphones. Additionally, always set the SP6 and connected
audio system or mixer to a low volume level when troubleshooting audio
problems.
NOTE: When solving audio problems, playing the SP6 Demo Songs is an easy way to test
if the audio is working properly. To play the SP6 Demo Songs, press the KEYPAD and 0
buttons simultaneously.
Problem The SP6 functions normally but does not produce sound or
has low volume
Solutions If the VOLUME knob is turned down, slowly turn the VOLUME
knob up.
If an expression pedal is plugged into the CC1 jack, try to turn up
the volume using the expression pedal.
Use the MIDI Panic function by simultaneously pressing the 0
and ENTER buttons to reset the MIDI Volume and Expression
values for all MIDI Channels.
Press the LOCAL DEST button until the LCD shows “Destination
LOCAL+MIDI”.
If the volume control on your audio system or mixer is turned
down, slowly turn the volume control up.
If your audio cables are not securely plugged into the SP6, audio
system, or mixer, set the volume of the audio or mixer to the
lowest level, securely plug in the audio cables on both ends, and
then slowly turn up the volume.
Try using different audio cables. Obtain and securely connect
the correct type of audio cables. The SP6 accepts both balanced
(TRS) and unbalanced (TS) 1/4-inch audio cables.
If the signal source selection on your audio system or mixer is
incorrect, set the volume of the audio or mixer to the lowest level,
select the correct signal source, and then slowly turn up the
volume.
If the input to your audio system or mixer is set for low
impedance, set the volume of the audio or mixer to the lowest
level, change the impedance setting to high, and then slowly turn
up the volume of the audio system or mixer.
7-2
If the input trim to your audio system or mixer is set too low,
slowly turn up the trim on your audio system or mixer.
Page 84

MIDI Problems
Problem Sending MIDI messages to a computer or external MIDI
device is not working
Solutions Make sure the MIDI channel being used by the SP6 matches the
MIDI channel being used by the external device.
Press the LOCAL DEST button until the LCD shows “Destination
MIDI.”
If using a MIDI cable, make sure the MIDI cable is plugged into
the SP6 MIDI OUT port and the external MIDI device MIDI IN
port.
Make sure the USB or MIDI cable being used is securely
plugged in at both ends.
Try using a different USB or MIDI cable.
Troubleshooting
MIDI Problems
Problem Receiving MIDI messages from a computer or external MIDI
device is not working
Solutions Make sure the MIDI channel being used by the SP6 matches the
MIDI channel being used by the external device.
If using a MIDI cable, make sure the MIDI cable is plugged into
the SP6 MIDI IN port and the external MIDI device MIDI OUT
port.
Make sure the USB or MIDI cable being used is securely
plugged in at both ends.
Try using a different USB or MIDI cable.
7-3
Page 85

Troubleshooting
Sleeve Ring Tip
Left Pedal Right Pedal
Pedal Problems
Pedal Problems
Switch Pedal Problems
Problem Sustain or Sostenuto pedals are stuck “on”, or functioning
backwards (“on” when up instead of down)
Solution Always plug pedals in before powering on the SP6, and do not
press the pedals before the SP6 has powered on. Turn power
off, then on, if necessary.
Problem A switch pedal is not doing the expected function
Solutions Check the Global Mode Overrides page to see if you have
applied any pedal overrides.
If you have pedal problems in Multi Mode, use the Multi Edit
Mode Switch Pedals page to check the pedal settings for each
Zone in each Multi.
Problem A dual switch pedal is not working correctly
Solution A dual switch pedal must be wired as shown below. Any other
wiring pattern will not work correctly.
7-4
Page 86

Troubleshooting
Increasing Foot Pressure
Kurzweil Support
Continuous Control (Expression) and Half
Damper Pedal Problems
Problem A Continuous Control (Expression) or Half Damper pedal is
not working correctly
Solution For best results, use a Kurzweil CC-1 Continuous Control pedal,
available from your dealer. See below for specications when
using Continuous Control pedals from other manufacturers.
A Continuous Control (Expression) or Half Damper pedal must be wired to a single stereo
1/4-inch plug as follows:
• Wiper to Tip
• Top end of resistance element to Ring
• Bottom end of resistance element to Sleeve
ese connections are shown schematically below:
A continuous control pedal should have an impedance between 5,000 and 100,000 ohms.
An impedance less than 5,000 may overload the reference voltage source in the SP6 and
interfere with operation of other controls. An impedance more than 100,000 may result in
electrically noisy operation, which may cause your SP6 to send unwanted MIDI controller
messages.
e taper of the control should be linear for easy, predictable control. Pedals designed for
volume control typically have an exponential (or anti log) taper, which results in most of
their range being concentrated in the upper half of pedal’s path of travel.
Pedals may have a control range that is less than 100%. Make sure that when the pedal is
in the fully down position, its impedance is 0, and when it is in the fully up position, the
impedance is at its maximum rating.
Kurzweil Support
Sleeve Ring Tip10KOhm Linear Taper
For additional help, contact Kurzweil support at kurzweil.com/support. You may also nd
unocial help at some of the internet communities listed at kurzweil.com/community.
7-5
Page 87

Appendix A
MIDI Implementation
Function Transmitted Recognized Remarks
Basic Channel
Mode
Note Number
Velocity
Aftertouch
Pitch Bender O O
Control Change
Program Change
System Exclusive O O
System Common
System Real Time
Aux Messages
Notes
Mode 1: Omni On, Poly
Mode 3: Omni Off, Poly
Default 1 1
Changed 1–16 1–16
Default Mode 3 Mode 3
Messages
Altered
0–127
True Voice 0–127 0–127
Note ON O O
Note OFF O O
Keys X O
Channels X O
O 0–31
32–63 (LSB)
64–127
0 to 2,097,151 0–511
True # 0–127 0–127
Song Pos. X X
Song Sel. X X
Tune X X
Clock O O
Messages O O
Local Control O O
All Notes Off O O
Active Sense X X
Reset X X
Manufacturer’s ID = 07
Device ID: default = 0;
programmable 0–127
Mode 2: Omni On, Mono
Mode 4: Omni Off, Mono
O 0–31
32–63 (LSB)
64–127
Memorized
For multi-timbral applications, set the Global
Mode “FXMode” parameter to “MultiTrk” (see
FXMode on page 6-5 for details)
Standard and custom formats
MIDI Implementation
O = Yes
X = No
A-1
Page 88

MIDI Implementation
MIDI Control
MIDI Control
SP6 Physical Controllers
In Program and Multi Mode the SP6 physical controllers can send MIDI messages to
an external MIDI device. e parameters assigned to each of these physical controllers
can be controlled by an external MIDI device by sending the appropriate message on the
appropriate channel. is is useful for controlling SP6 parameters when using the SP6 with
an external sequencer or computer.
SP6 Physical Controller Program Mode MIDI Message Multi Mode MIDI Message
PITCH BEND WHEEL Pitch Wheel Pitch Wheel
MODULATION WHEEL CC 1 CC 1
VARIATION Button CC 29 CC 29
KNOBS: ZN1 VOL/P1 CC 71 CC 7
KNOBS: ZN2 VOL/P2 CC 72 CC 7
KNOBS: ZN3 VOL/P3 CC 73 CC 7
KNOBS: ZN4 VOL/P4 CC 79 CC 7
KNOBS: FILTER 1 CC 12 CC 12
KNOBS: FILTER 2 CC 13 CC 13
KNOBS: ATTACK CC 22 CC 22
KNOBS: RELEASE CC 23 CC 23
KNOBS: FX 1 CC 25 CC 25
KNOBS: FX 2 CC 26 CC 26
KNOBS: DELAY CC 27 CC 27
KNOBS: REVERB CC 28 CC 28
PEDALS: SW1a (SUSTAIN) CC 64 CC 64
PEDALS: SW1b CC 66 CC 66
PEDALS: SW2a CC 66 CC 66
PEDALS: SW2b CC 67 CC 67
PEDALS: CC (VOLUME) CC 11 CC 11
A-2
SP6 MIDI Channel Functions
In Program and Multi Mode, certain SP6 MIDI channel functions can be controlled by an
external MIDI device by sending the appropriate message on the appropriate channel. is
is useful for controlling SP6 MIDI channel parameters when using the SP6 with an external
sequencer or computer.
SP6 MIDI Channel Function MIDI Message
MIDI Channel Volume CC 7
MIDI Channel Pan CC 10
Page 89

Physical Specications
Appendix B
Physical Specications
Keyboard: 88 note fully-weighted hammer-action with velocity sensitive keys
Display: 128x64 pixel monochrome LCD with front-panel contrast adjust
Polyphony: 128 Voice Polyphony, dynamically allocated
Multitimbral: 16 parts (one per MIDI channel)
Quick Split / Layer: Easy access with adjustable volume and panning
Programs: Space for 1024 Factory and 1024 User Programs (in 10 instrument Categories)
Multis:
Effects Resources: 32 DSP units
Controllers:
Analog Outputs:
Headphones:
MIDI: IN, OUT
USB:
Height: (5.75”) (14.6cm)
Depth: (15”) (38.1cm)
Length: (52.5”) (133.35cm)
Weight: (27.25 lb.) (12.36 kg)
Power: External Power Supply, 15VDC 2.5A
Space for 1024 Factory Multis, plus 1024 User Multi locations with up to 4 programmable Zones for
splits and layers
• Pitch wheel
• Modulation wheel
• Volume knob
• 4 knobs with Shift button (3 shift rows for 12 assignments per Program)
• 4 Zone On/Off buttons
• Variation button
• Arpeggiator On/Off button
• Tap Tempo button
• 2 switch pedal inputs, each supporting a dual switch pedal or single half damper pedal (for up to
4 switch pedals)
• Continuous control pedal input
• 2 Transpose buttons
• 5 Favorites buttons
Two 1/4” TRS Balanced Outputs (Stereo Pair)
24-bit D-to-A Converters
Frequency Response 20Hz-20kHz +/- 0.1dB
+21dBu Maximum Output Level
-113dB Signal-to-Noise Ratio (A-weighted)
0.003% THD+N (1kHz @ -1 dBFS)
1/4” Rear-Mounted Stereo Headphone Output
Frequency Response 20Hz-20kHz +/- 0.5dB
Maximum Output Power 130mW into 32 Ohms
-100dB Signal-to-Noise Ratio (A-weighted)
0.03% THD+N (1kHz @ 100mW Output into 32 Ohm Load)
Output Impedance: < 1 Ohms
Load Impedance: > 24 Ohms
Complete MIDI functionality over USB
User Program / Multi le transfer to/from PC / Mac / USB Flash Drives
Operating System updates from PC / Mac / USB Flash Drive
Specications subject to change without notice
B-1
Page 90

Appendix C
Programs
Object Version 1.01.8
Programs
PIANO
1 Dyn 9ft Grand
2 Rich Grand 7ft
3 Bright Jazz 9ft
4 Intimate Pno 7ft
5 Punchy Edge
6 Studio Grand 7ft
7 Smooth Grand 9ft
8 Solo Grand 7ft
9 RubensteinComp
10 Stereo Pno K26
11 Upright Piano
12 Indie Piano 2
13 R&B Stack
14 Piano & Strings
15 Dark & Distant
16 Film Piano
27 Walrus Pianet
28 She'sNotThere
29 E-cousticGrand
30 VidKilledRadio
31 FM EP
32 Thick FM Digital
CLAV
33 Clavi AC
34 Clavi BC
35 Clavi Phaser
36 Clavi Auto Wah
37 BC Clav Tube
38 Slap Wah Clav
39 Flange Clav
40 SMS Clav
41 Deep Fuzz
42 Stevie Fuzz
52 Gimme Some
53 VAST-ly Organ
54 VAST Bars
55 OleTime Gospel
56 Funky Perc
57 Mr. Smith
58 D-Vox Organ
59 Far Draws
60 Pipe Stops
61 Pipes & Voices
62 Chapel Organ
63 AllStps AllVox
64 Cmbo Accordian
STRINGS/PADS
65 Arco Strings
66 Dulcet Strings
67 Punchy Strings
E.PIANO
17 Suitcase EP
18 EZ Tube EP
19 Phase EP
20 Bright EP
21 Dyno EP
22 Broken EP
23 Mtron EP
24 EP Reed
25 ACL EP Reed
26 SlyBallad EP
43 PPG Comp
44 RMI & Harpsi
45 Classic Harpsi
46 HarpsiTar
47 HarpSeccoRd
48 HarpsiVibe
ORGAN
49 Big Leslie B3
50 Classic B3
51 SoulPercOrgan
68 Bass & Violins
69 AdagioTutti 8ves
70 SloMuted Strings
71 Marmalade Stgs
72 Proper Pizzicato
73 WheelBow Fiddle
74 WheelBow Cello
75 Electric Bow
76 Space Oddity
77 ELOStringSection
78 BritishMT String
C-1
Page 91

Programs
79 Adagio Magic
80 Gliss/Arp Harp
81 Pedal Pad
82 Square Pad
83 Evolving Pad
84 Water Buffalo
85 JunoWhatIMean
86 Warm Encounter
87 Prophet Pad
88 Arpeggi Pad
89 Ancient Calling
90 Omni Strings
91 Pan Strings
92 Film Score Pad
93 5th-Scape
94 OBX Pad
95 Slow Rhythm Pad
96 Pan Motion Pad
VOICES/MISC
113 In A Good Place
114 Choir Redux
115 Aaahlicious
116 EnvelopingVoices
117 Haah Singers
118 Swept Voices
119 Swell Choir
120 Voice Waves
121 Bandpass Choir
122 Melotron Vox
123 NYC Voices
124 Ooh So G'oohD
125 Oody Oody
126 Strings & Winds
127 Slow Interlude
128 Vox & Strings
129 Full Fellowship
149 Armonica Reed EP
150 Whale Call
151 Fisher Cove
152 Upstream
153 Sense Delay
154 Polyphon
155 Kinderklavier
156 Space Agogos
157 The Peddler
158 Enigmatism
159 Throat Siren
160 VoxtronMachine
161 ArpHollow Bells
162 Crimson Jungle
163 80'sMovieMusic
164 Magic Mbira
165 Blues Harmonica
166 Insta - Spooky
BRASS/WINDS
97 Lucid Brass
98 Epic Low Brass
99 Solo Trbn/Trpt
100 Almost Muted
101 Lead FrenchHorn
102 Dyn French Horns
103 Dyn Orch Tuba
104 Sax Section
105 SaxSplits+Flute
106 Clarinet/Flute
107 Bassoon&Oboe
108 Solo Eng Horn
109 AcidJazzFlute
110 Fruity Floot
111 Ocarina
112 Mellotron Flutes
130 Gothic Climax
131 Pastoral DblRds
132 Pastoral Pizzi
133 H'Arps & Harp
134 Bartok Ensemble
135 Poltergeist Trem
136 Pizz & Perc
137 Matadores
138 Singapore Sling
139 Dream Session
140 3waySplit Mtron
141 Post Rock
142 Ambience
143 JetSet Martini
144 Sci-Fi Movie
145 Celeste Palette
146 After 3pm
147 Shokudo Enka
148 Warszawa
167 Suspense Scene
168 Creepy Crawlies
LEADS/SYNTHS
169 Micromoog Plus
170 MW Lead
171 HipHop Lead
172 E-Bow Mono
173 80's Lead Synth
174 Brassy Lead
175 Fitty-Fitty
176 AK Wild Lead
177 ProphetV Lead
178 Liquid T Lead
179 Soy Incident
180 Chirp Lead
181 Square Lead
182 Seongdeok Lead
183 Mayhem Wheel
C-2
Page 92

Programs
184 Robin's Lead
185 D'tuned Polysyn
186 AM SquareSynth
187 Prophesied Six
188 Vintage Woobler
189 Quadra Comp
190 Punch Synth
191 Super Saw Stabs
192 Clone Bandit
193 Square Bell
194 PolyVector Lead
195 PWM Synth
196 Cosmic Intervals
197 Last Challenge
198 Pattern Machine
199 Radio Googoo
200 Ion Drive
219 MiniFunk Bass
220 Squeeze Mini
221 Skool Bass
222 Dolby Bass
223 Poppit SynBass
224 Classic Mini
225 KneeDeep Mini
226 Rave Bass
227 Instaprince
228 DistBass Solo
229 Alias Bass
230 Dub Wob
231 Rhythms
232 Uptown Bass
DRUMS/PERC
233 Los Angeles Kit
234 East Space Kit
254 Tabla Arp
255 Soft Bell Keys
256 Blue PVC Tubes
UTILITY
1021 Click Track
1022 Silent Program
1023 Editor Template
1024 Clear Program
GUITAR/BASS
201 Real Nylon
202 Steel String
203 Dulciliere
204 Rob's Caster
205 Twin Peaks
206 Les Grit
207 Dist Comper
208 Chunky Vintage
209 Acoustic Bass
210 Washtub Bass
211 Finger Bass
212 P-Bass
213 Squire's Rick
214 Flea/Bootsy
215 Jaco Fretless
216 Eberhardt Frtls
217 The Way It Is
235 Ring-tone Kit
236 Ziga Funk
237 Drum&Bass Kit
238 DoorKnocker Kit
239 Rhythmcon Kit
240 Marley Kit
241 Supery Kit
242 ScratchMe Kit
243 ElectroBeat Kit
244 BrushStroke Kit
245 Essential Perc
246 Orchestral Perc
247 Celeste
248 Chimes Pad
249 Bowed Crotales
250 Real Vibes
251 Stereo Marimba
252 Xylophone
218 Smooth Mooger
253 Steel Drum
C-3
Page 93

Appendix D
Multis
Object Version 1.01.8
Multis
1 Arp & Pad
2 Metallicscape
3 Wine GLASSical
4 Triumphant!
5 M'drnApparatus
6 Plucky EP Tine
7 Pno Bass & Ride
8 EP & E-Bass
9 Organ Bass Funk
10 Bass/Brass/EP
11 EP & SynthBass
12 Organ Bass Soul
13 FunkyBass&Organ
14 Funky Bass&Clav
15 EPClar&Marimba
16 Organ & EP
17 EP Reed & Organ
18 Jazz EP & Flute
30 80s Power
31 Synth & Lead
32 Gleam Cake
33 Tranquil Moods
34 Dream Segue
35 Expansive Pad
36 Apollo
37 Ugokukokoro
38 Lakeside
39 Synth & Strings
40 Pads & Strings
41 SunrizerSynth
42 Vintage Synths
43 AOR Pad
44 Synthetic Pad
45 Pad Organ
46 Org/Bass Wrap
47 LoFi Lead
59 Celestial Fears
60 Pulsing Xenia
61 African Wash
62 Sea Breeze
63 Noxlumos
64 Planet J
65 Breath of Aura
66 Silky Pad
67 Quadraphobia
68 Liquid Sand
69 ForgottenTeaPot
70 Nile of Poodle
71 Motion News
72 Timed Divination
73 Storm Chaser
74 10 Past 10
75 Synth-Kestra
76 GrainCloud3Bells
19 Pianet & MTron
20 Clav & MTron
21 ClavPnoBassMW
22 Gospel B3 & Pno
23 Flutey Organ
24 Organ Bass Vox
25 Pipes & Choir
26 Pipes Flute Strs
27 Pno Vox & Synth
28 Synth/Bass Split
29 Bass/Synth/Lead
48 Hollow Keys
49 Alias Fuzz Grand
50 Guitar Bass Pad
51 Cinematic Sitar
52 Burning Dragster
53 Torched Tubes
54 Guitar Dream
55 Artful Intellect
56 Vangalic
57 Effervescence
58 Bells & Synth
77 MbiraPad Pattern
78 Marimba Traces
79 City Reich
80 Rhythmic Pad
81 Dream Catcher
82 Pink Panda
83 Candy Synths
84 Last Split 12
85 Last Split 22
86 Old Timey Ens
87 Rock Jam 1
D-1
Page 94

Multis
88 Rock Jam 2
89 No Cry
90 Jazz Quartet
91 Bluegrass Group
92 Boingo Ens
93 New Music Ens
94 AnyNote Jam
95 Hallelujah!
96 Netromantic
97 Royal Splits
98 Baroque Ens
99 Wind Strgs Horn
100 Harp & Strings
101 HarpStrsCeleste
102 Reedy Arp Pad
103 Passive Ensemble
104 Wind Pizz & Perc
105 Chamber Orch
125 AccOrgian Circus
126 Calypso Ens
127 Bwow Theme
128 Magnetic Horns
129 Lo-volt Sax
130 Helter Skelter
253 Split Default
254 Layer Default
256 Clear Multi
106 Trem & Mute Str
107 Strs Wind Harp
108 AccentualStrings
109 Strings & Voices
110 Angelic Pad
111 Rhythmic Choir
112 Dummer Dudes
113 FullBallad Piano
114 Creamy Piano
115 ElectroPop Piano
116 Dyn Reed EP Fall
117 Ice & Mist Grand
118 Buzzy FM
119 Rubberband Clav
120 Plastic Baroque
121 Soft Landing
122 Syrup Bellini
123 Purple Concrete
124 Child's Toys
D-2
Page 95

Index
Index
A
ALPHA WHEEL 1-5
Auto Power Off 6-4
Auto Power Off Time 6-4
C
CATEGORY Buttons 1-5
CC (VOLUME) Jack 1-11
CHANNEL/PAGE Buttons 1-8
Continuous Switch Pedals (Half-Damper) 1-11
Contrast 6-5
Controllers
in Multi Mode 4-2
in Program Mode 2-3
D
Delete 6-10
Dual Switch Pedals 1-10
E
EDIT Button 1-7
F
FAVORITES Buttons 1-5
Front Panel 1-4
G
Glide 3-6
H
Half-Damper Pedal 1-11, 2-6
Headphones 1-11
K
KB3
Global Rotary Override 6-7
in Multi Edit Mode 5-1, 5-6, 5-7, 5-12
in Program Mode 2-4, 2-5, 2-6
KNOBS 2-5
VARIATION Button 2-4
KNOBS 1-6
in Program Mode 2-4
KB3 2-5
P1 through P4 2-5
L
Load 6-8
LOCAL DEST Button 1-8, 7-2
in Multi Edit Mode 5-11
M
MIDI Bank Change 6-5
MIDI Channel 6-3
in Multi Edit Mode 5-10
MIDI IN and OUT Ports 1-9
MIDI PANIC 2-13, 4-12
MODE Buttons 1-5
MODULATION WHEEL 1-6
P
PANIC 2-13, 4-12
Pedals
Continuous Controller (CC) Pedal 1-11
Dual Switch Pedal 1-10
Global Overrides 6-6
Half-Damper Pedal 1-11
in Multi Edit Mode 5-6
in Multi Mode 4-5
in Program Mode 2-6
Switch Pedal 1-10
Programs
Selecting 2-1
Index-1
Page 96

Index
R
Reverb
in Multi Edit Mode 5-11
in Program Mode 2-13
S
Save a Multi 4-10
Save a Program 2-11
SAVE Button 1-7
Selecting Multis 4-1
Selecting Programs 2-1
SHIFT Button 1-7
SPLIT/LAYER
in Multi Mode 4-6
in Program Mode 2-7
Store 6-9
Support 7-5
SW1 (SUSTAIN) and SW2 Jacks 1-10
T
TAP TEMPO Button 1-7
TRANSPOSE Buttons 1-6
Tune 6-1
Tuning 1-6
U
USB Ports 1-9
USER Button 1-7
V
VARIATION Button 1-6
Velocity Map 6-1
Z
ZN1 VOL through ZN4 VOL 4-4
ZONE ON/OFF Buttons 1-7, 4-3
Index-2
 Loading...