

Page 1
KP120A
Page 2
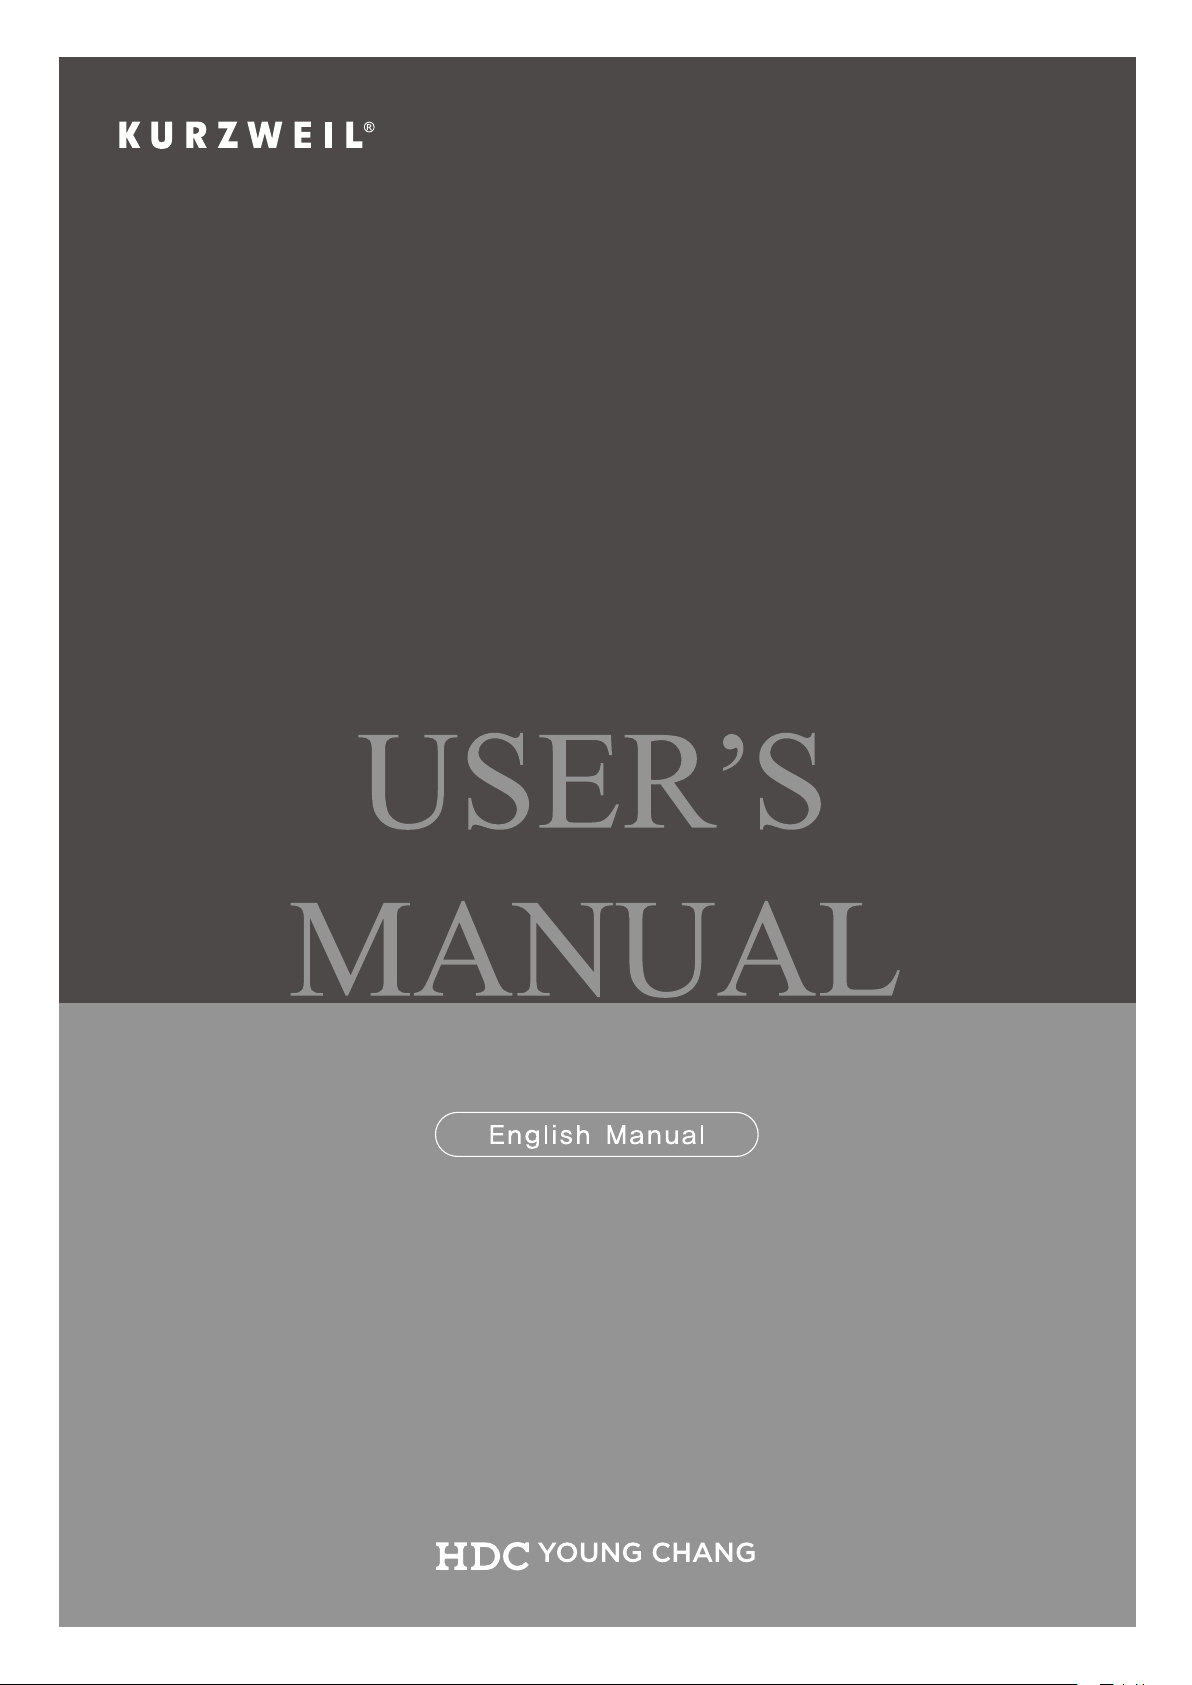
PANEL DISPLAY INDICATIONS
Your instrument features a large multi-function display (MULTI DISPLAY) that shows all
important settings for the instrument. The section below briey explains the various icons
and indications in the display.
(1) Message Display - This section displays the demo song, voice or style name and
number you have selected.
(2) Active Input - When you play the instrument, you need to change the voice, style,
demo. The arrow point to which is the active section.
(3) Finger Select - This arrow tells you which nger mode is selected and if the keyboard is
split into two parts or not.
(4) Note Display - When you play a key on the keyboard, the note will be displayed.
(5) Voice Eect - These icons display the Dual, Sustain, Touch and Eect function is turned
ON/OFF.
(6) Track Volume - It displays the volume of each track dynamically when the demo song
or style is played.
(7) Transpose - Display the current transpose status of the keyboard. The number 00
indicates No transpose.
(8) Chord Type - Display current chord type you play on the keyboard accompaniment
section when the keyboard is in the Single or Fingered mode.
(9) Measure - Display the measure of the demo song, style or record/play back have
played.
(10) Tempo - Display the tempo of the demo song, lesson, style or record/play.
(11) Song Memory - Display the record and play track during recording and play back.
(12) Record and Play - Display the record and play status.
(13) Demo - Display the demo is playing.
(14) Style - Display the accompaniment is playing.
(15) Piano - Display if the current voice name is Piano.
3
Page 3
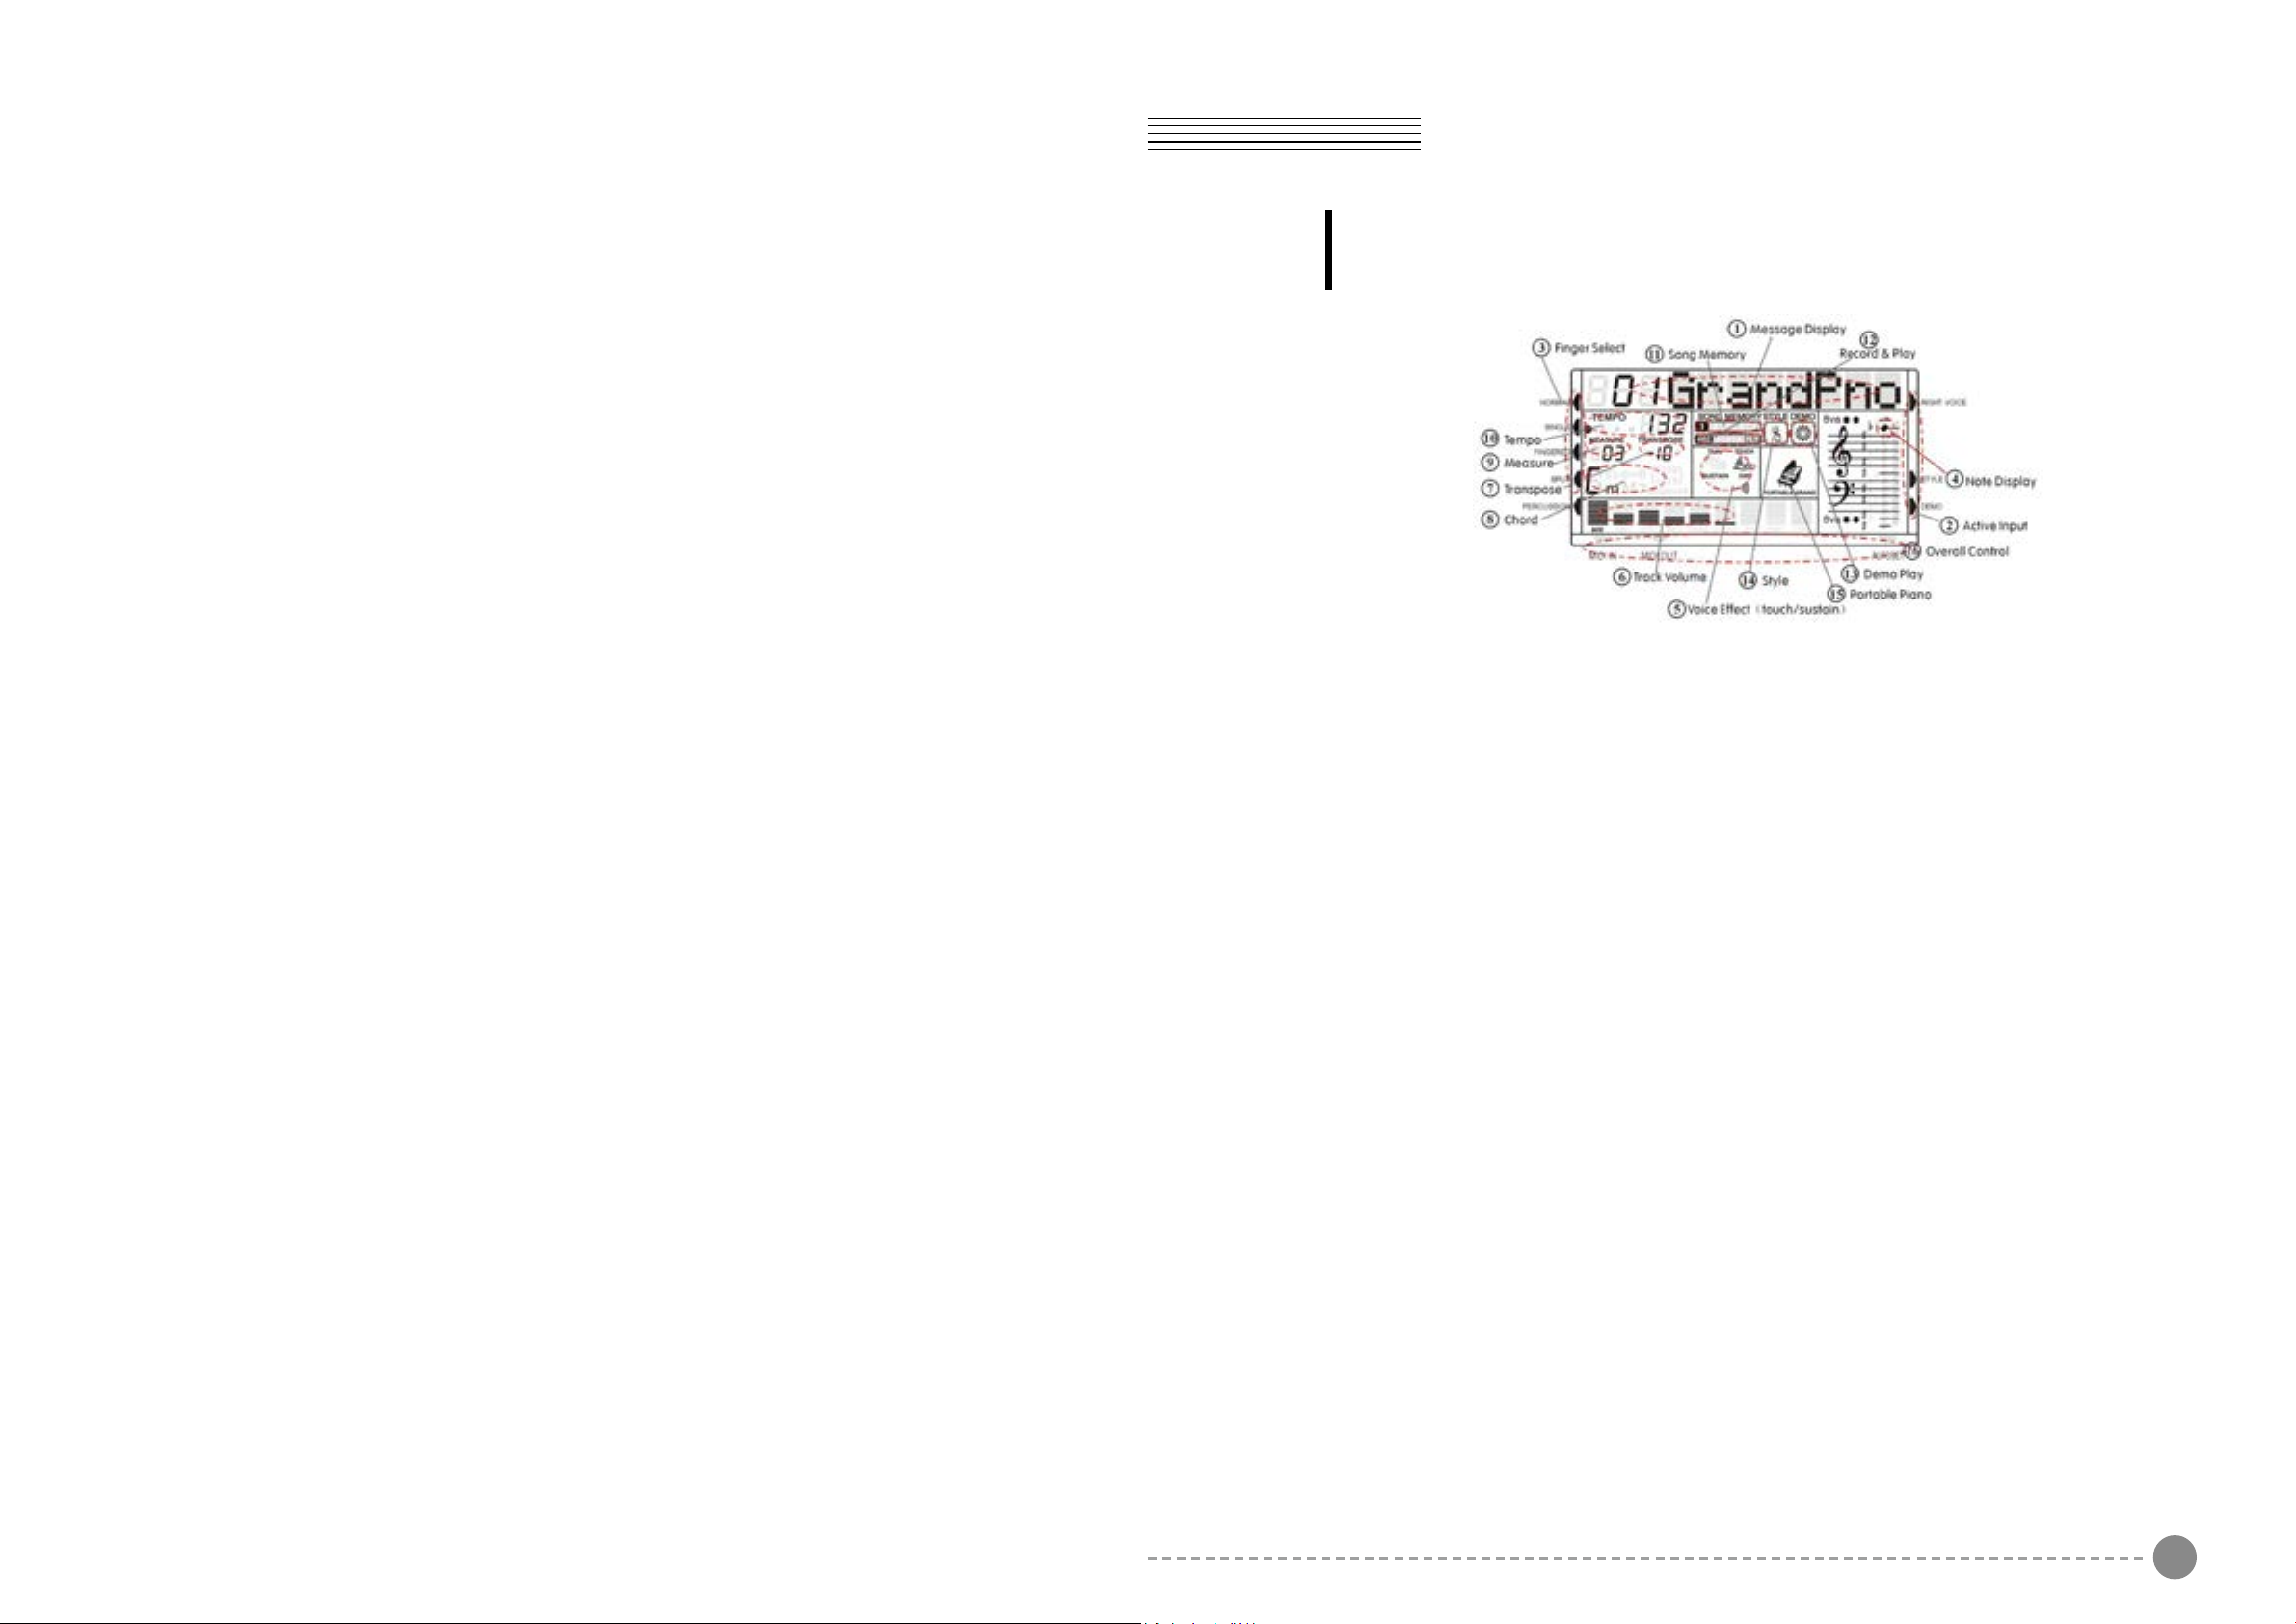
DEMO SONGS AND FX BUTTONS
Listen to the pre-programmed demonstration songs - they'll give you a good idea of what the
instrument can do.
- Turn the Power ON and Set the Master Volume at half way.
- Press DEMO/SONG button to start the DEMO. The number of the selected DEMO will
appear on the MULTI DISPLAY. You can select the demonstration song by the [+/-] buttons.
Press the FX buttons to play the sound effects stored in the three buttons.
MULTI PADS
The MULTI PADS have a factory set of 4 different sounds. These four sounds can be replaced
with other sounds available in any of the available Drum Kits (150 –159)or Arabic Drum Kits (158 –
159) or in the Effect Sound Bank (160). Press one of the Multipad to play the sounds stored in the
buttons.
SELECTING AND PLAYING THE VOICES
Your instrument has 128 sounds in the internal sound library numbered from 01 to 128, and 10
Drum Kits numbered from 150 to 159. Sound 160 is the SOUND EFFECT preset.
It is possible to play up to two sounds for the right hand (DUAL) and one sound for the left hand
(SPLIT).
The available sounds can be played in three dierent modes: Main, Dual and Split.
MAIN - plays a single voice over the entire range of the keyboard.
DUAL - mixes two dierent voices together for rich, complex sounds.
SPLIT - you can select one sound for the Left and up to two sounds to the Right part of the
keyboard.
Here nd the sounds available listed in Sound Groups. Later in the manual is available a detailed
Sound list
01- 08 Piano 81-88 Synth Lead
09-16 Chromatic Percussions 89-96 Synth Pad
17-24 Organ 97-104 Synth Eects
25-32 Guitar 105-112 Ethnic
33-40 Bass 113-120 Percussive
41-48 Strings 121-128 Sound Eects
49-56 Ensemble 129-149 Arabic Sounds
57-64 Brass 150-157 Drum Kits
65-72 Reeds 158-159 Arabic Drum Kits
73-80 Pipe 160 Eects
To program new Drum Sounds in the Multipads:
- Select the Drum Kit or the Effect bank (150 - 160)
- Press the STORE button at the same time with the Multipad button number 1 and release
both buttons. The display shows: 1 SavePad.
- As soon as the two buttons are released the display shows: - - SavePad
- Press now again the Multipad number 1 button together with the key on the keyboard related
to the desired sound. The display shows: 1 SavePad.
- The new sound effect is now stored in the Multipad button.
It is possible to reprogram all the four Multipads.
SELECT A MAIN VOICE
Press the VOICE button - the voice mode is selected and the current voice number and name will
be indicated on the Message Display section.
Press the numeric key-pad buttons, or the [+/-] buttons to select the desired voice number
according to the Voice List.
To select a sound which number is between 1 and 99, for example 65, press the [+/-] buttons
until the number 65 is selected on the display.
To select the sound 65 using the numeric key-pad buttons follow the instructions:
- press the number 6 button and than the number 5 to select the sound.
- the sound number 65 Soprano Sax, is now selected
To select a sound which number is higher than 99, for example 129 KANOUN, press the [+/-]
buttons until the number 129 is selected on the display.
To select the sound 129 using the numeric key-pad buttons follow the instructions:
- press the number 1 button and hold it until the number 1 followed by two lines ( 1 _ _ )
appears on the display
- press than the number 2 and the number 9 buttons to select the sound.
- the sound number 129 KANOUN, is now selected.
4 5
Page 4
SETTING THE ARABIC SCALE
These 12 buttons allows to select in real time the desired Arabic Scale. Each one of the buttons is
related to one of the 12 semitones of the Octave. Press the desired buttons and the related notes
of the instrument keyboard, or the right part of the keyboard when in Split or Auto Accompaniment
mode, will be lowered by a ¼ of a tone.
It is possible to change the scale while playing in real time or store your favourite scales in the 6
Panel Memories available the instrument and recall them at the touch of a button.
We will see how to store this in the related paragraph.
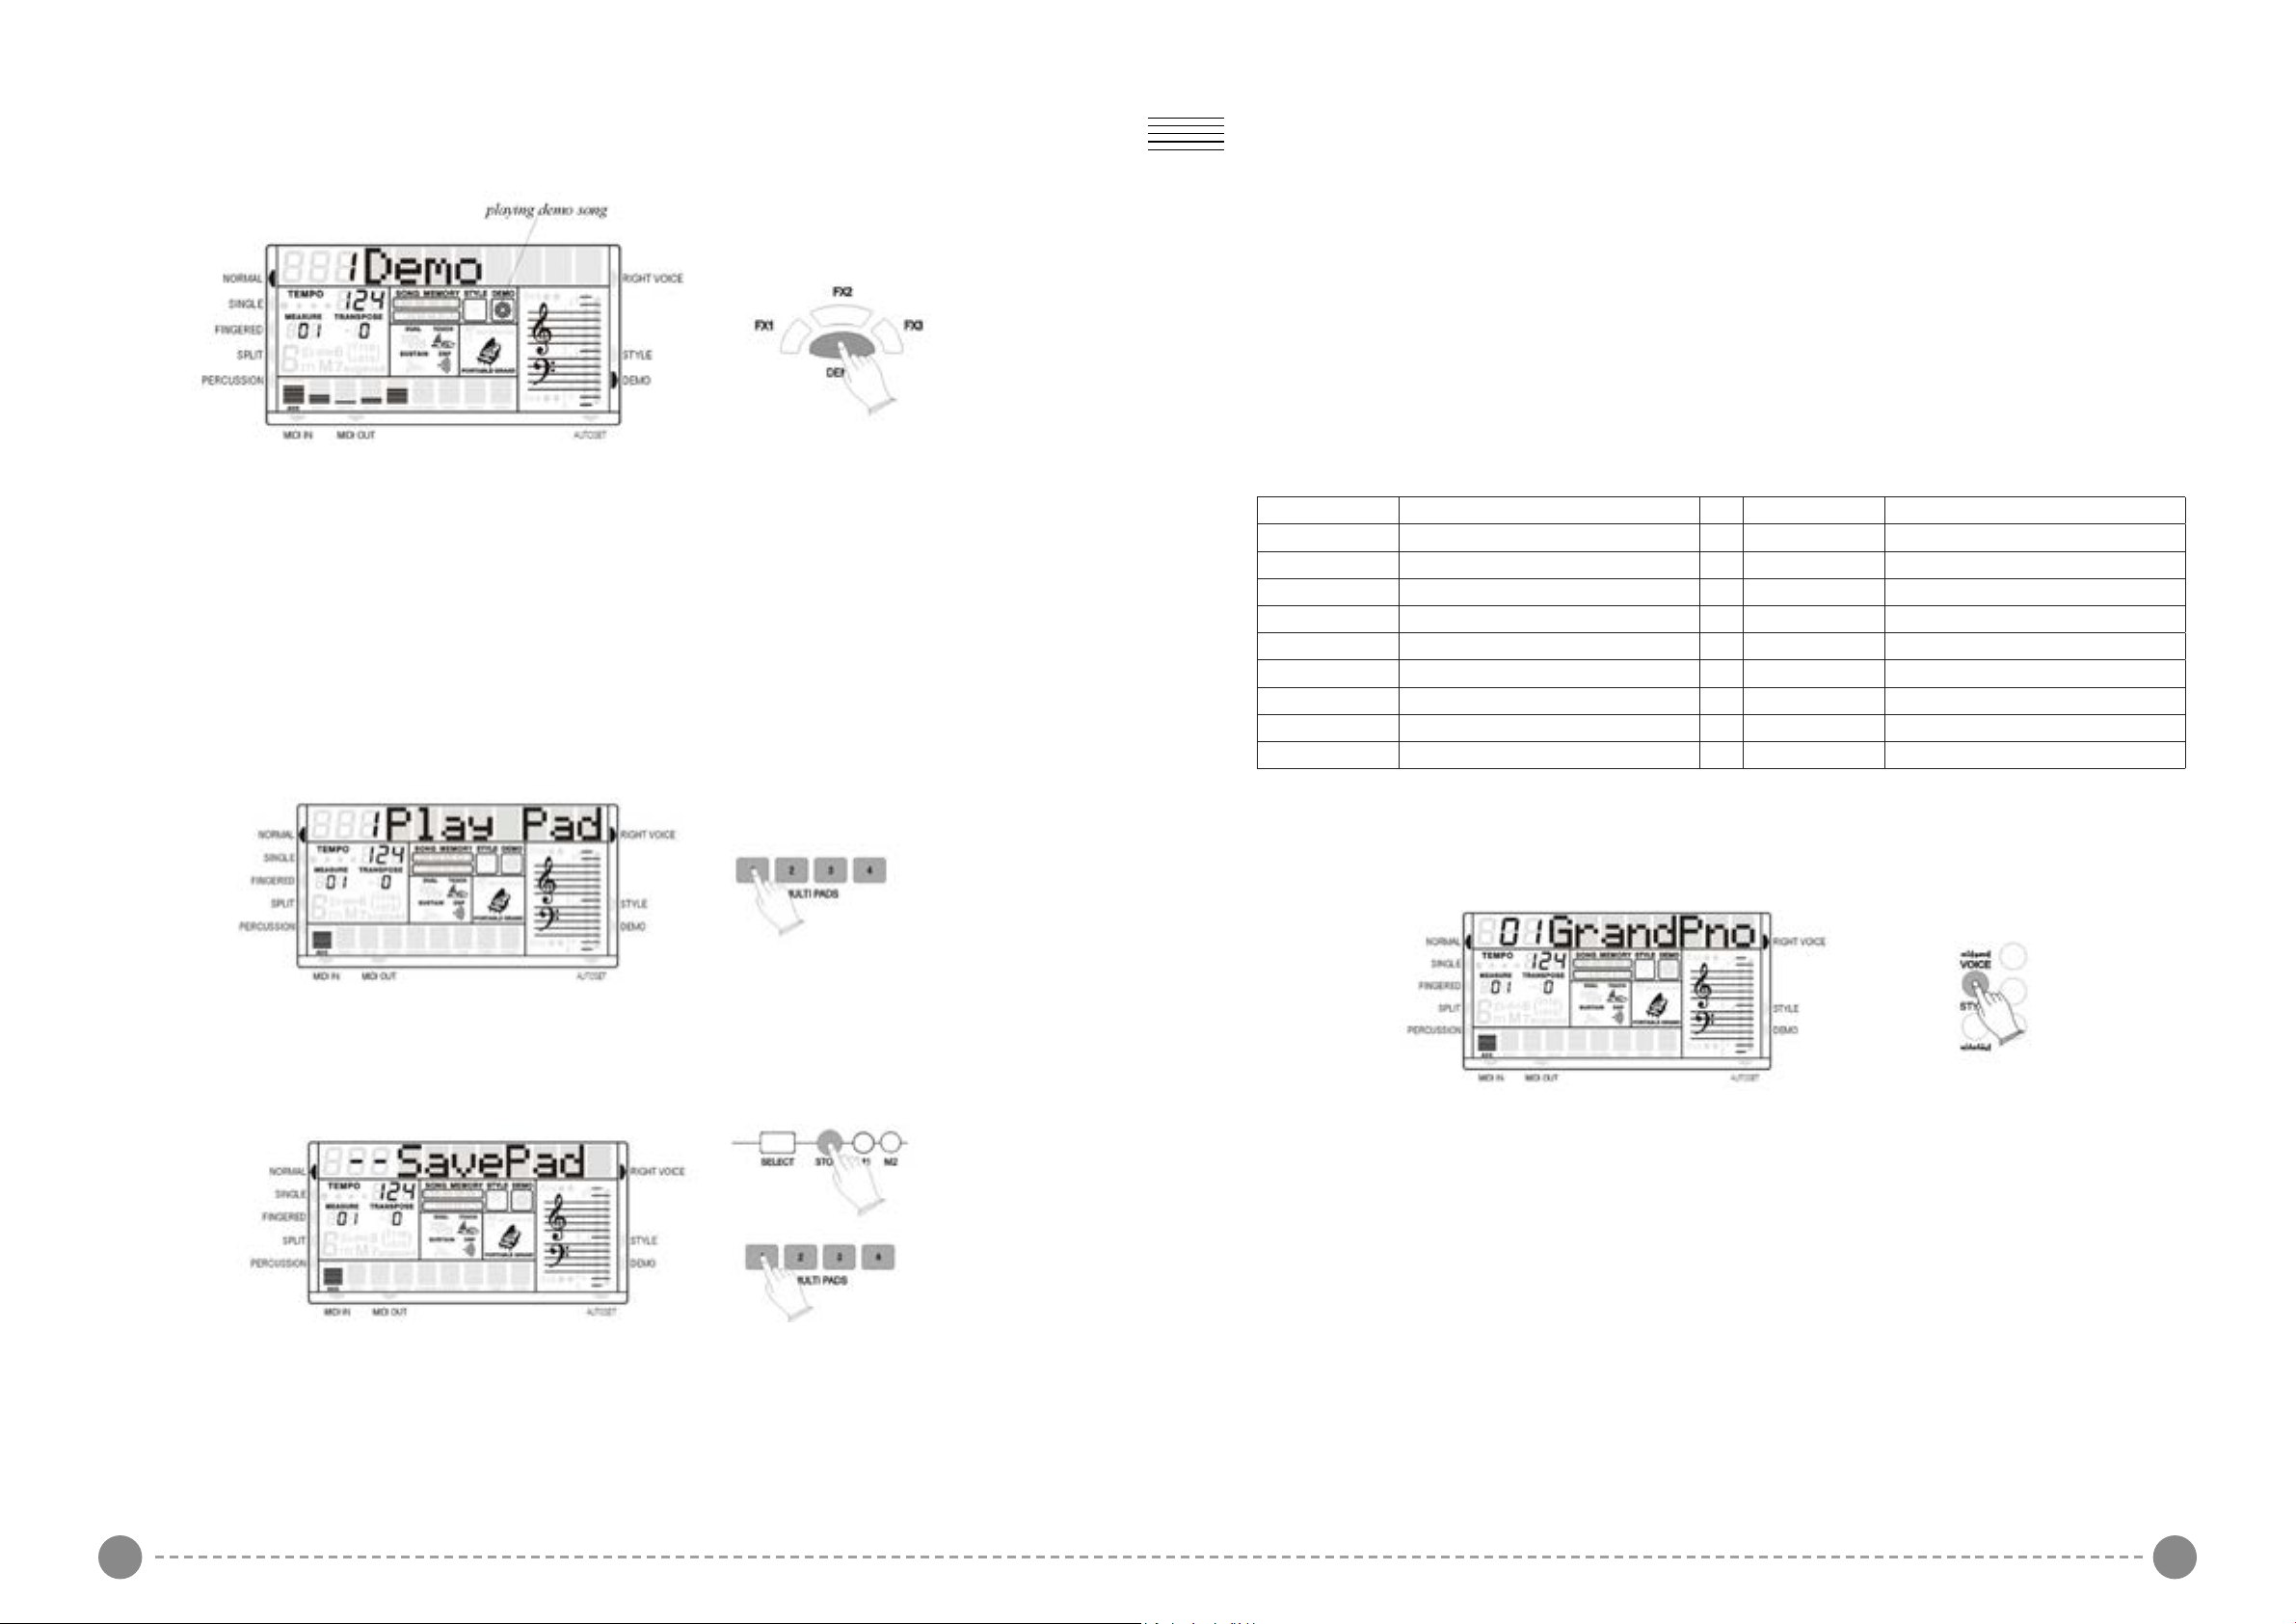
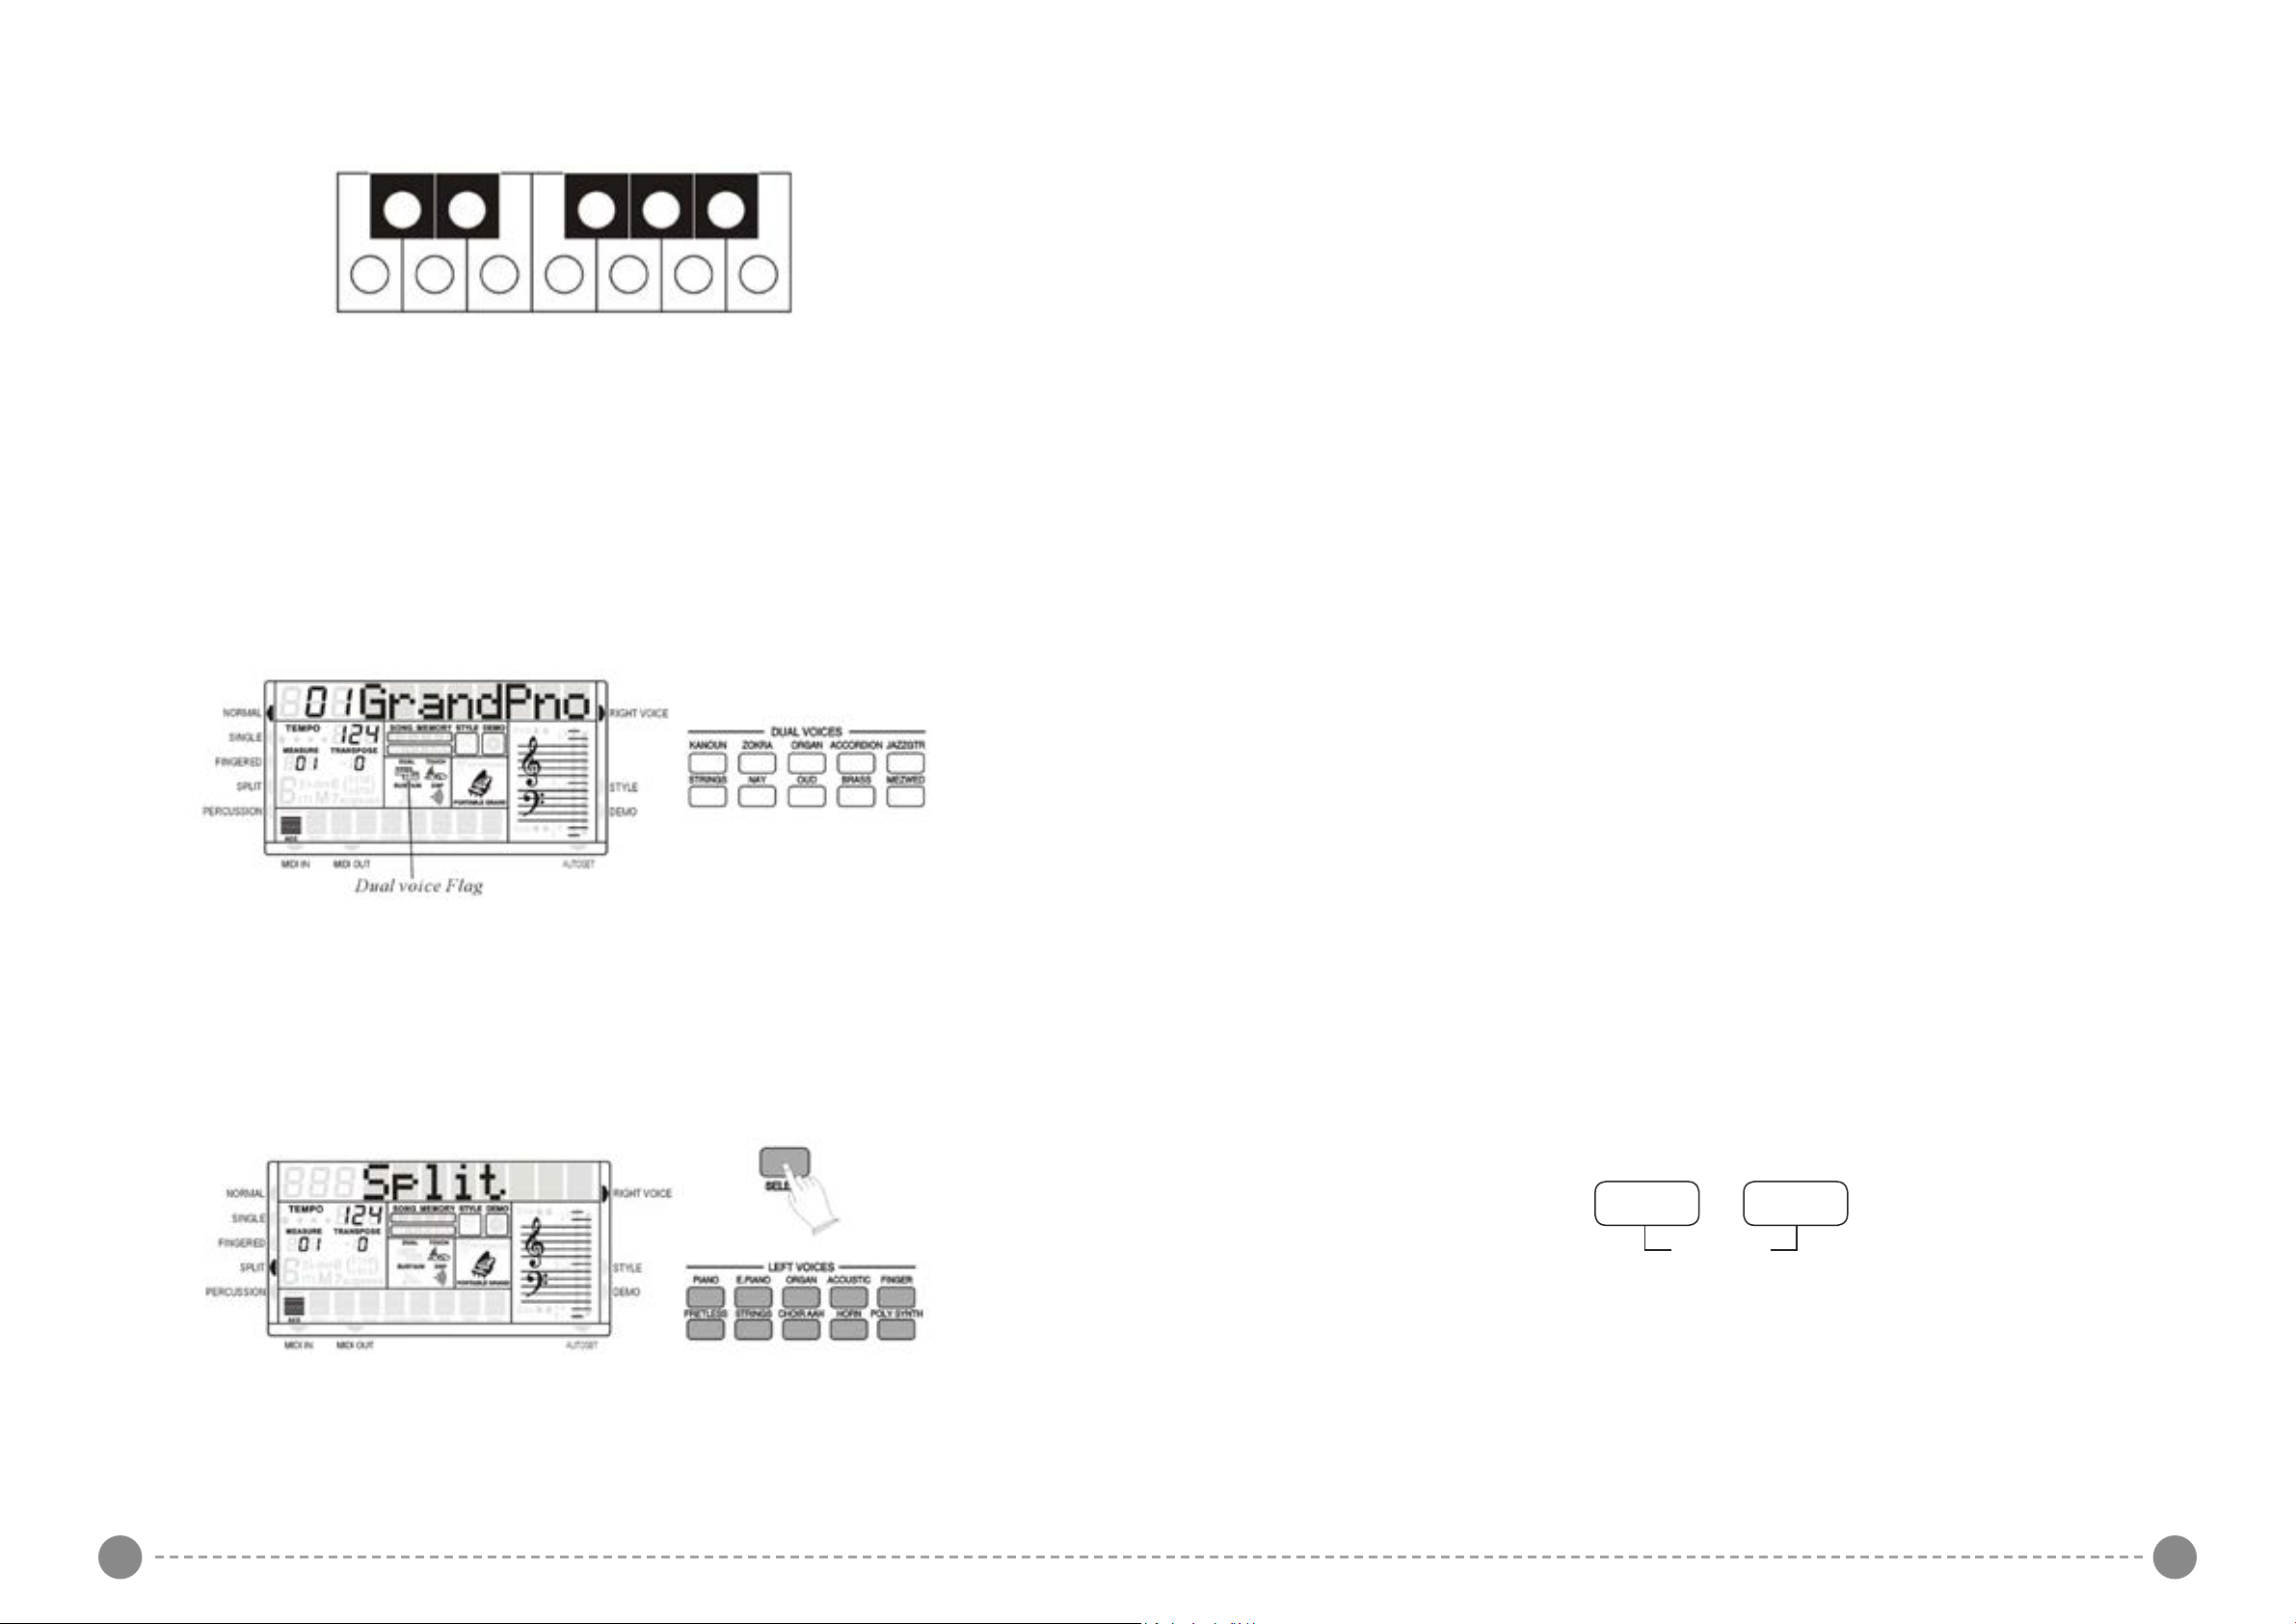
SELECT A DUAL VOICE
There are 10 sounds available for the Dual Voice function.
SPLIT POINT
The default Left Sound Split point and Auto Accompaniment Split point are in the same position:
the G1 key.
The Left Sound Split point can be set to any other key as follows:
- Using the SELECT button select the SPLIT function on the display and when in the SPLIT
position hold the SELECT button pressed.
- Press now the key on the keyboard where the new Left Sound Split point is desired.
Note that sometimes it is necessary to press the key more than one time to set the new Split
point. This may depend by the status of the internal computer.
- The display shows the new Split point
- Release the SELECT button.
The Auto Accompaniment Split point can be set to any other key as follows:
- Using the SELECT button select the SINGLE or FINGERED function on the display and when
in the SINGLE or FINGERED position hold the SELECT button pressed.
- Press now the key on the keyboard where the new Auto Accomp. Split point is desired.
Note that sometimes it is necessary to press the key more than one time to set the new
Split point. This may depend by the status of the internal computer.
- The display shows the new Split point
- Release the SELECT button.
- Press one of the buttons, the dual voice flag will appear on the multi display. In this mode,
you can play two different voices by pressing one key.
- Press the button again to turn Dual Voice off, press other button to select other Dual Voices.
SELECT A LEFT VOICE
There are 10 sounds available for the Left Voice function.
The new Split Point is now set.
For standard use, when changing the Split point always set the Left Sound Split point and the
Auto Accomp. Split point in the same position.
DRUM KITS AND EFFECTS
Your instrument has 8 different Standard Drum kits that can be played on the keyboard when
selecting voice numbers, 150 through to 157:
150 Standard, 151 Room, 152 Power, 153 Electric, 154 Synth, 155 Jazz, 156 Brush, 157 Classic It
also has 2 different Arabic Drum kits, 158 through to 159:
The Sound number 160 is the Sound Effects preset.
DIGITAL REVERB
To select the Reverb effect press [SUSTAIN]+[TOUCH] button at the same time, the REVERB
effect will turn on/off.
SUSTAIN TOUCH
REVERB
Use the [+/-] buttons to select the Reverb types form: : Room 1, Room 2, Room 3, Hall 1, Hall 2,
Plate, Delay, Pan Delay
- Press one of the buttons, the Split arrow appear on the multi display. In this mode, you can play
a sound together with the automatic accompaniment.
- Press the button again to turn Left Voice off, press other button to select other Left Voices.
6 7
TOUCH SENSITIVITY
Just like an acoustic piano, your instrument has a keyboard with velocity control. This means the
level of the audio signal will be in proportion with the velocity of the key pressed. If you play soft
you will have a quiet sound, while if you play very hard you will have a much louder sound.
Page 5
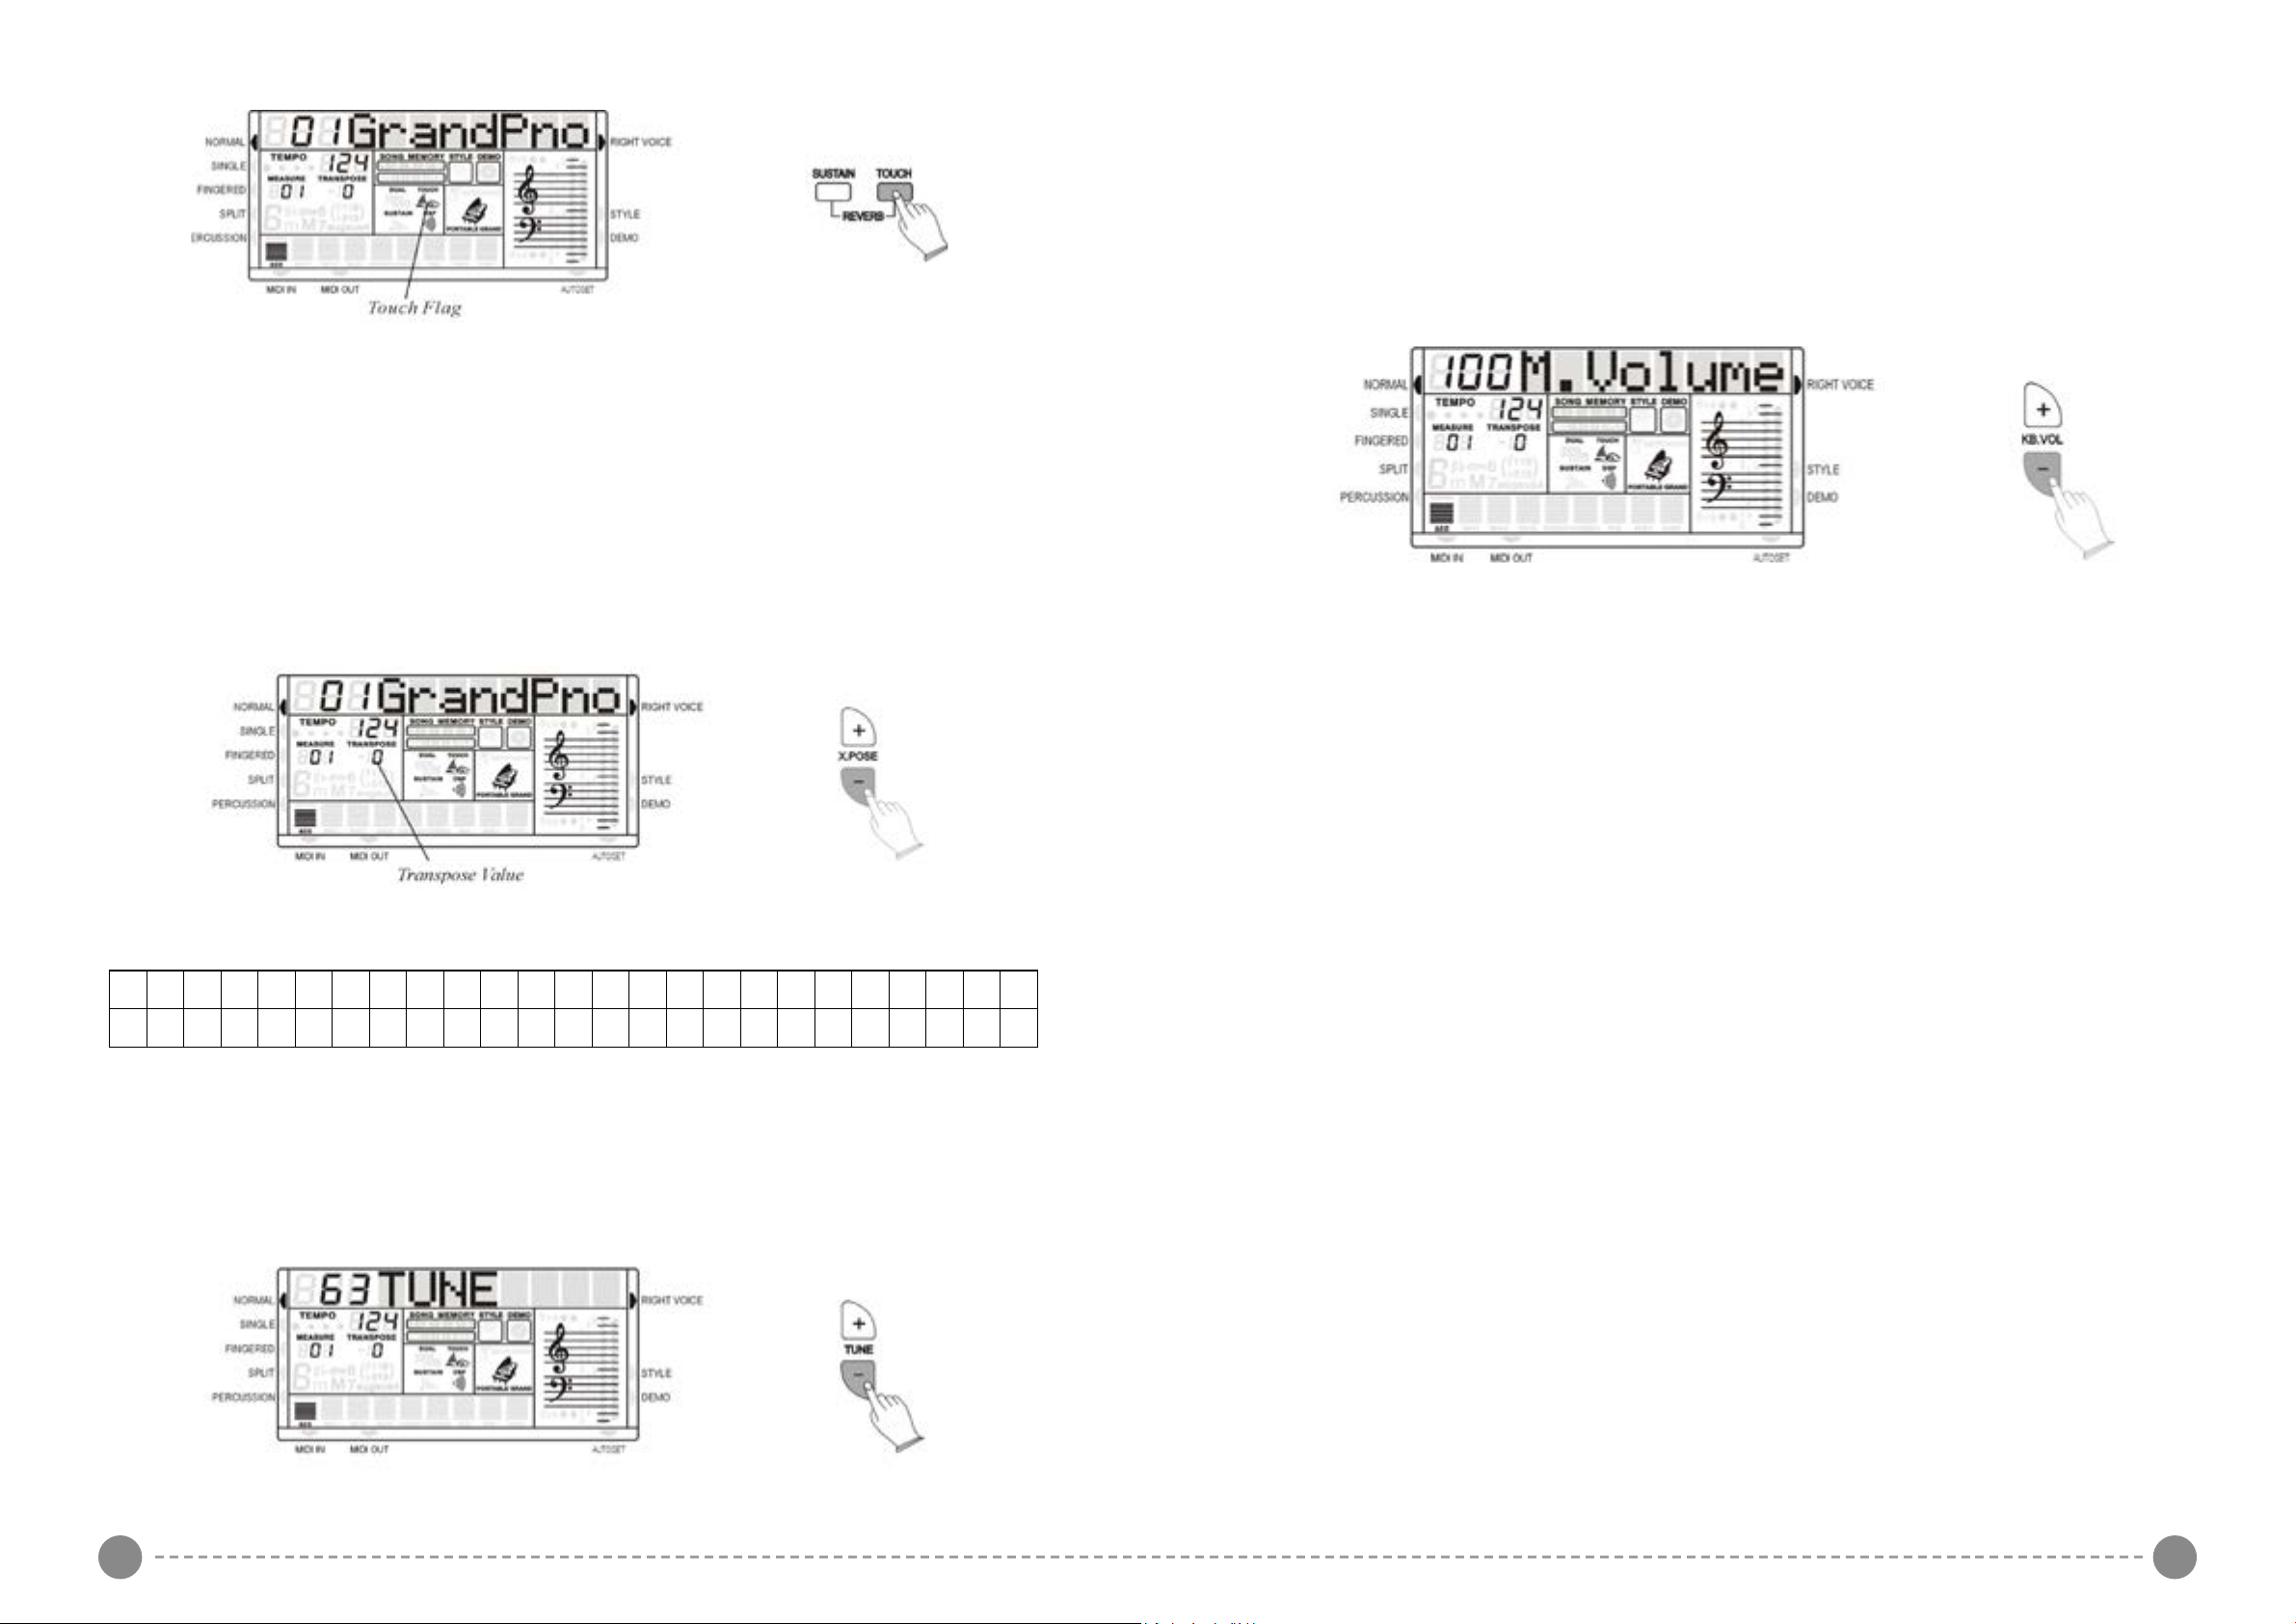
Press [TOUCH] button, you can turn ON/OFF the touch function. When the touch function is
ON, the volume will be varied according to how hard you play on the keyboard.
SUSTAIN
Press SUSTAIN button so that its flag appears to turn Sustain ON. It can be used as a damper
pedal. Turning Sustain on to sustain notes after the keys are released. Press SUSTAIN button
again to turn sustain OFF.
- The display indicates all changes. The PITCH value on the display can be changed
between –64 ant +63.
- The normal pitch value (00) can be recalled by pressing both the two [Tune] buttons at the
same time.
MAIN VOICE VOLUME
The volume of the MAIN VOICE can be controlled with the related volume buttons.
TRANSPOSE
It is possible to Transpose the natural key ( C ) of your instrument up or down.
To change the key of the instrument use the TRANSPOSE [+] or [-] buttons as many time as
indicated as C0 in the following table,
C C# D D# E F F# G G# A A# B
-12 -11 -10 -9 -8 -7 -6 -5 -4 -3 -2 -1
- Press the Transpose [+] button to select number 4 to transpose the instrument into E key.
- Press the Transpose [-] button to select number 2 to transpose the instrument into A# key.
- Press both Transpose [-] [+] buttons to restore the C key.
C# D D# E F F# G G# A A# B C
C
+1 +2 +3 +4 +5 +6 +7 +8 +9 +10 +11 +12
0
The volume range is from 00 (no sound) to 127 (maximum volume).
Press the two buttons at the same time to restore the Volume default value at 100.
PITCH BEND
The PITCH BEND wheel is located on the left side of your keyboard and can be used to tune the
pitch of the keyboard. By pushing the wheel upwards, the keyboard pitch will be increased. By
pulling the wheel downwards the keyboard pitch will be decreased.
Push the wheel to the top position for approximately 2 seconds. The LCD will display the pitch
range. You can use the data wheel to set the pitch response: 1~12 semitones. When the power is
turned ON, the default sensitivity is +/- 2 semitones.
TUNE
The TUNE feature enables the player to tune the pitch of the instrument to match other instruments.
- Press the Tune [+] or [-] button to adjust the pitch.
8 9
Page 6

AUTO ACCOMPANIMENT
Your instrument has 130 (01-130) accompaniment styles which can be used to provide fullyorchestrated Auto Accompaniment. When the Auto Accompaniment function is turned ON, the left
part of the keyboard will be used to play automatic accompaniments with orchestrated chords and
bass lines, the right part of the keyboard is available for normal playing.
SELECT A STYLE
Press the STYLE button to enter the style select function. The current style number and name will
appear on the Display.
Use the numeric-key pad [0]-[9] or the [+/-] buttons to set the desired style number.
To select a style which number is between 1 and 99, for example 27 RAI, press the [+/-]
buttons until the number 27 is selected on the display.
To select the style 27 using the numeric key-pad buttons follow the instructions:
- press the number 2 button and than the number 7 to select the style.
- the style number 27 RAI, is now selected
To select a style which number is higher than 99, for example 124 Standard Waltz, press the [+/-]
buttons until the number 124 is selected on the display.
To select the style 124 using the numeric key-pad buttons follow the instructions:
- press the number 1 button and hold it until the number 1 followed by two lines ( 1 _ _ )
appears on the display
- press than the number 2 and the number 4 buttons to select the style.
- the style number 124 Standard Waltz, is now selected
- Press the SELECT button one time to select SINGLE function in the display.
- See a sequence of C chords using SINGLE FINGER mode
C Major Press the key C.
C minor Press the key C + any black key to the left
C Seventh Press the key C + any white key to the left
C minor 7th Press the key C + any black + any white key to the left
C chord - press C key C minor - press C + any black key to left
C 7th - press C + any white key to left C minor 7th - press C + any black and any white to left
The Auto Accompaniment will continue playing even if you lift your fingers from the Auto
Accompaniment keys. You only need to press the Auto Accompaniment keys when changing
chords.
Here find the styles listed in Style Groups. Later in the manual is available a detailed Style list.
01 - 30 Arabic 78 - 82 Blues & Gospel
31 - 36 8 Beat 83 - 88 Country
37 - 42 16 Beat 89 - 95 Latin 1
43 - 49 Ballad 96 - 105 Latin 2
50 - 55 Dance 106 - 114 Ballroom
56 - 61 Disco 115 - 123 Traditional
62 - 70 Big Band 124 - 130 Waltz
71 - 77 Rock & Boogie
SINGLE FINGER MODE
The SINGLE FINGER Mode fingering makes it simple to produce beautifully orchestrated auto
accompaniment using major , seventh , minor and minor-seventh chords by pressing a minimum
number of keys.
10 11
Page 7

FINGERED
- Press the SELECT button to select FINGERED function in the display.
- Play the desired chords using the standard configurations with three or more fingers.
- The keyboard recognize the following chords:
C chord - press C key C minor - press C + 3rd key to right
C 7th - press C + 2nd key to left C m 7th - press C + 2nd key to left and 3rd to right
The Auto Accompaniment will continue playing even if you lift your fingers from the keyboard.
You only need to press the keys when changing chords.
AUTO ACCOMPANIMENT CONTROLS
Your instrument provides a range of accompaniment features:
Start/Stop, Sync. Start, Intro, Main, Fill-In, Ending
START/STOP
The START/STOP button starts the selected accompaniment style immediately.
Select the Fingered or Single mode on the display to turn ACCOMPANIMENT on before starting
the style.
The accompaniment will start with the rhythm drum sound when the START/STOP button is
pressed, then the bass and chord parts will play as soon as the first note or chord is played on the
accompaniment part of the keyboard.
STYLE SELECTION
A different accompaniment style can be selected at any time while the accompaniment is playing.
The style number and name on the Message Display will change as soon as the selection is made,
but the new style will start from the beginning of the next bar. The tempo will not change when the
new style is running.
Note that when in Fingered mode the keyboard will recognizes the chords also played with a
second different Single Finger system. This will help the players that are used to this second Single
Finger system.
C Major Press the key C.
C minor Press the key C + the 3rd key to the right
C Seventh Press the key C + the 2nd key to the left
C Diminished Press the key C + the 3rd key to the right + 4th key to the left
12 13
SYNCHRO START
Press the SYNCHRO-START button if you want the auto accompaniment to start when you play
the first note or chord on the AUTO ACCOMPANIMENT section of the keyboard.
If you press the SYNCHRO-START button, the BEAT indicator dots on the display will flash at the
current tempo.
Page 8

INTRO/ENDING
If you press the Intro button before you start the rhythm, the normal rhythm pattern will be preceded
by a special introduction (INTRO). If you press the Ending button when the rhythm is already
running, the instrument plays a final variation (ENDING) and the style will stop automatically.
Any of your instrument accompaniment patterns can be started with an appropriate introduction by
pressing the INTRO button directly. When the intro finishes playing, the accompaniment change to
the main style.
If you press the SYNC-START button and then the INTRO button, the accompaniment will start
from the introduction as soon as a chord is detected in the AUTO ACCOMPANIMENT section of
the keyboard.
Use the [ACC+/-] buttons to set the desired volume. The volume range is from 0 (no sound) to 31
(Max volume). The default volume value (28) can be recalled instantly by pressing both the [ACC+/-]
buttons at the same time.
METRONOME CONTROL
The metronome feature is activate by pressing the METRONOME button.
FILL-IN
The fill-in button let you add dynamic variations and breaks in the rhythm of the accompaniment, to
make your performance sound even more professional.
Simply press the FILL IN button as you play, and the fill-in plays automatically.
VARIATIONS
There are three different levels of accompaniment in the instrument. Variation 1 provides a simple
basic arrangement for any kind of music. Variation 2 extra feeling to the accompaniment.
TEMPO
The [-TEMPO+] buttons can be used to control the tempo of the Auto Accompaniment section, the
DEMO songs and the record/play back of a song recording.
Press the [-TEMPO+] buttons to set the desired tempo value (20-280). The current tempo (beats
per minute) will appear on the Message Display.
Press the [TEMPO+] and [TEMPO-] buttons simultaneously to restore the default tempo setting.
ACCOMPANIMENT VOLUME CONTROL
The [ACC+/-] buttons can be used to adjust the volume of the selected accompaniment.
When this is set to ON, the beat indicator flashes at the current tempo.
To select the metronome type (3/4, 4/4) it is necessary to select a related style:
Select a Waltz for the (3/4) , select a 8 Beat for (4/4). Use the Tempo buttons to control the
Metronome speed.
AUTOMATIC SET UP
This function allows you to recall the best registration for each rhythm and when a style is selected
and the AUTOMATIC SET-UP activated (the icon appears on the bottom right part of the display), a
nice registration for both the left hand and right hand parts will be automatically selected.
The AUTOMATIC SET-UP will also select the optimum tempo for the style selected. An indicator
illuminates in the Message Display when the system is activated. When the registration is changed
with the AUTO SET UP activated, the instrument will accept the changes but the registration will
not be changed in the internal memory.
A good way to start exploring the keyboard is to play using the AUTOMATIC SET-UP’s for all the
rhythms. By selecting the desired rhythm with the AUTOMATIC SET-UP system ON, you will hear
130 nice registrations. The AUTOMATIC SET UP system can be switched ON and OFF by pressing
the AUTOSET button.
14 15
Page 9

REGISTRATION MEMORY
RECORDING FUNCTION
Your instrument REGISTRATION MEMORY can be used to store six sets of VOICE and AUTO
ACCOMPANIMENT settings that can be recalled during you playing at the touch of a button. It is
possible to reprogram the settings to suite your personal taste.
The new settings will be stored in the internal memory and remembered when the instrument is
switched off.
It is also possible to store your favourite Arabic Scale settings in the 6 panel memories.
MEMORIZING THE SETTINGS
The panel settings can be stored to any one of the six REGISTRATION MEMORY position.
YYour instrument allows you to record and playback what you have played on the keyboard.
Four melody tracks and one accompaniment track can be recorded separately and they can be
addressed using the number [1] to [5] in the numeric key pad: nr. [1] is for the auto accompaniment
and number [2] to [5] to address four separate melody tracks.
We strongly suggest to record first the Accompaniment track using your favourite style and Auto
Accompaniment and afterwards the Melody track/s.
ACCOMPANIMENT TRACK RECORD
- Set the style and Fingered or Single mode.
- Press the [RECORD] button and number [1] button in the numeric key pad at the same time and
its icon flash to indicate this track is ready. The beat point flash on the current tempo.
- Press a key on the left hand section on the keyboard to start the recording.
- The [START/STOP] button can start the recording also, but the bass and chord can not be
started until the key is pressed on the keyboard.
- Press the [RECORD] button or the [ENDING] button to stop the recording.
Prepare your favourite settings selecting the sounds and the style you like, balance the sounds
and select the effects. Select also, if necessary, the desired Arabic Scale setting by selecting On
the notes in the Arabic Scale Keypad.
To store new settings in the memory positions [M1] - [M6]:
- Press and hold the [STORE] button.
- Press the Memory button [M1] - [M6] to store the new settings.
- The selection is confirmed when [1Store]-[6Store] will appear on the MULTI DISPLAY.
Please note that whenever you store a new registration in one of the REGISTRATION MEMORY
position, all settings previously stored in that position will be erased and replaced by the new
settings.
RECALLING THE SETTINGS
The settings stored to a REGISTRATION MEMORY can be recalled by simply pressing the
appropriate button. The [01Load]-[06Load] will appear on the MULTI DISPLAY.
MELODY TRACK RECORD
- Select the desired sound for the melody.
- Press and hold the [RECORD] button and then press the number [2] - [5] button, the related
track icon flashes to indicate its track is ready. Now the beat point flash at the current tempo.
If the accompaniment track is already recorded, it will play when the recording is started.
- The recording is started once a key is pressed on the keyboard.
- Press this [RECORD] button again, the recording is end.
Note: If the memory is full, the recording will be stopped automatically.
PLAY
Press [PLAY] button, you can enjoy the song you have recorded. Now you can follow the song
by playing the keyboard and change the tempo of the song.
16 17
Page 10

Press and holding [PLAY] button and then press [1] - [5] number buttons, can be able to turn on or
off that corresponding track.
Press [PLAY] button or all the song is played, the playing will be ended.
MIDI
MIDI, the Musical Instrument Digital Interface, is a world-standard communication interface that
allows MIDI-compatible musical instruments and equipment to share musical information and
control one another.
This makes it possible to create "systems" of MIDI instruments and equipment that offer far greater
versatility and control than is available with isolated instruments.
Your instrument MIDI IN connector receives MIDI data from an external
MIDI device which can be used to control yours. The MIDI OUT
connector transmits MIDI data generated by your instrument (e.g.Note
and velocity data produced by playing the keyboard ).
MIDI OUT
Use the [MIDI OUT] button to select:
- No MIDI Out, the display will indicate "MOUT OFF".
- Select the left-hand Midi Out channel, the display will indicate "MOUTLTrk".
Use the numeric key-pad buttons or [+/-] buttons to select the channel.
- Select the right-hand Midi Out channel, the display will indicate "MOUTRTrk", then use the
numeric key-pad buttons or [+/-] buttons to select the channel.
RESET
If it should be necessary to completely erase the internal RAM memory, a very simple reset feature
is provided.
1 - Make sure that the instrument is switched off.
2 - Press and hold the [+] and [-] buttons
3 - Switch on the instrument holding the [+] and [-] buttons down.
4 - The display shows Reseting
Do not reset the instrument if is not necessary. All your information you have programmed
will be automatically erased from the internal RAM memory. The factory set programs will
be automatically restored.
18 19
MIDI IN
Press [MIDI IN] button, you can control the Midi In on/off.
Page 11

KP120A SOUND LIST
1 Grand Piano 51 Synth Strings 1 101 Brightness
2 Brigth Piano 52 Synth Strings 2 102 Goblins
3 Electric Grand 53 Choir Aahs 103 Echoes
4 Honky Tonk 54 Choir Oohs 104 Sci-Fi
5 El. Piano 1 55 Synth Voice 105 Sitar
6 El. Piano 2 56 Orchestral Hit 106 Banyo
7 Harpsichord 57 Trumpet 107 Shamisen
8 Clavinet 58 Trombone 108 Koto
9 Celesta 59 Tuba 109 Kalimba
10 Glockenspiel 60 Muted Trumpet 110 Bag Pipe
11 Music Box 61 French Horn 111 Fiddle
12 Vibraphone 62 Brass Section 112 Shanai
13 Marimba 63 Synth Brass 1 113 Thinkle Bell
14 Xylophone 64 Synth Brass 2 114 Agogo
15 Tubolar Bells 65 Soprano Sax 115 Steel Drum
16 Dulcimer 66 Alto Sax 116 Wood Block
17 Drawbar Organ 67 Tenore Sax 117 Taiko Drum
18 Percussive Org. 68 Baritone Sax 118 Melodic Tom
19 Rock Organ 69 Oboe 119 Synth Drum
20 Church Organ 70 English Horn 120 Reverse Cymbal
21 Reed Organ 71 Basson 121 Guit. Fret Noise
22 Accordion 72 Clarinet 122 Breath Noise
23 Harmonica 73 Piccolo 123 Seashore
24 Tango Accord. 74 Flute 124 Birds
25 Nylon Guitar 75 Recorder 125 Telephone
26 Steel Guitar 76 Pan Flute 126 Helicopter
27 Jazz Guitar 77 Blown Bottle 127 Applause
28 Clean Guitar 78 Shakuhachi 128 Gunshot
29 Muted Guitar 79 Whistle 129 KANOUN
30 Overdriven Guit. 80 Ocarina 130 KANOUN TREM.
34 Distortion Guitar 81 Square 131 KANOUN METAL
32 Guitar Harmaon. 82 Sawthooth 132 KANOUN.MET.TR.
33 Acoustic Guitar 83 Calliope 133 OUD
34 Finger Bass 84 Chi 134 OUD TREMOLO
35 Pick Bass 85 Charang 135 N AY
36 Fretless Bass 86 Voice 136 KAWALA
37 Slap Bass 1 87 Fifths 137 RABABA
38 Slapp Bass 2 88 Bass+Lead 138 ZORNA
39 Synth Bass 1 89 New Age 139 MIZMAR
40 Synth Bass 2 90 Warm Pad 140 BOUZOUK
41 Violin 91 Polisynth 141 AC. SAZ
42 Viola 92 Choir 142 EL. SAZ
43 Cello 93 Bowed Pad 143 AR. ACCORDEON
44 Contrabass 94 Metallic Pad 144 MIJWEZ
45 Tremolo Strings 95 Halo Pad 145 MEZWED
46 Pizzicato Strings 96 Sweep Pad 146 ZOKRA
47 Orchestral Harp 97 Rain 147 GUASBA
48 Timpani 98 Sound Track 148 AWTAR
49 String Ensem. 1 99 Crystal 149 OR. ORGAN
50 String Ensem. 2 100 Atmospere
KP120A Style L ist
ARABIC DANCE LATIN 2
01 SAIDI 50 Swing House 96 Rhumba 1
02 FALLEHI 51 Club Latin 97 Rhumba 2
03 WEHDA KABIRA 52 UK Pop 98 Beguine
04 WEHDA SAGHIRA 53 HH Groove 99 Disco Mambo
05 MAKSOUM 54 Club Dance 100 Cha Cha
06 MAKSOUM.S 55 Techno Party 101 Bolero
07 KATAKOFTI DISCO 102 Meneito
08 BALADI 56 70’ Disco 103 Bamba
09 MALFOUF 57 Philly 104 Gipsy
10 MASMOUDI KABIR 58 Latin Disco 105 Reggae
11 WALTZ ,M 59 Disco BALLROOM
12 ZAFFAH 60 Pick Up 106 Tango 1
13 AYOUB 61 Soul 107 Tango 2
14 IBRAHIMI BIG BAND & SWING 108 Pasodoble
15 10/8 SAMAI 62 Big Band Ballad 109 Charleston
16 KHALIJI 63 Big Band Fast 110 Slow Fox
17 ADNI 64 Show Ballad 111 Slow Ballad
18 RHUMBA.M 65 Jazz Club 112 Fox Trot
19 RAI 66 Piano Bar 113 Quick Step
20 FAZZENI 1 67 Rag Time 114 Easy Quick
21 FAZZENI 2 68 Dixie 1 TRADITIONAL
22 6/8GHITA 69 Dixie 2 11 5 March
23 ZABY 70 Hully Gully 11 6 March 6/8
24 SALLEMI ROCK & BOOGIE 117 Tarantella
25 JERBI 71 Rock 118 Polka
26 BONAWARA 72 Rock & Roll 119 Party Polka
27 BOUSIGUA 73 Jazz Rock 120 Ober Polka
28 ALLEJI 74 Boogie 121 Reel 6/8
29 WAHRANI 75 Jive 122 Hawaiian
30 HADHRA 76 Shue 123 Slow 6/8
8 BEAT 77 Twist WALTZ
31 8 Beat 1 BLUES & GOSPEL 124 Standard Waltz
32 8 Beat 2 78 Bluesy 125 Slow Waltz
33 8 Beat 3 79 Blues 126 Jazz Waltz
34 Folk Pop 80 Rhythm & Blues 127 Musette
35 8 Beat Modern 81 Bluesman 128 Mazurka
36 60’s 8 Beat 82 Gospel 129 Traditional Waltz
16 BEAT COUNTRY 130 Viennese
37 16 Beat 1 83 Country
38 16 Beat 2 84 Slow Country
39 16 Beat 3 85 Country Waltz
40 Pop Shue 86 Country Rock 1
41 Guitar Pop 87 Bluegrass
42 Kool Shue 88 70’ Shue
BALLAD LATIN 1
43 Nice & Easy 89 Bossa
44 Soft Ballad 90 Slow Bossa
45 New Ballad 91 Latin Jazz 1
46 Love Song 92 Latin Jazz 2
47 Pop Ballad 93 Samba 1
48 Slow Rock 1 94 Samba Pop
49 Slow Rock 2 95 Samba 2
20 21
Page 12

Oriental Percussions
Arab Mix Arab Percussions
24 - C1 Bass Drunm03
25 - C#1 Snare07 Zarb 1
26 - D1 Snare01 Zarb 2
27 - D#1 Clap3 Zarb 3
28 - E1 Snare02 Zarb 4
29 - F1 Tom01 Zarb 5
30 - F#1 Closed Hihat01 Dadol1
31 - G1 Tom02 Zarb 6
32 - G#1 Closed Hihat02 Dadol2
33 - A1 Tom03 Zarb 7
34 - A#1 Open Hihat01 Dadol4
35 - B1 Tom04 Zarb8roll
36 - C2 Tom05 Clap1
37 - C#2 Crash Cymbal04 Zaghrouta1
38 - D2 Bf Dom Clap2
39 - D#2 Bf Roll Zaghrouta2
40 - E2 Bf Link Clap3
41 - F2 Bf Tak Tabel Tak
42 - F#2 Bf Saq Saghat1
43 - G2 Dw Dom Tabel Dom
44 - G#2 Dw Roll Saghat2
45 - A2 Dw Link1 Tabel Tak2
46 - A#2 Dw Link2 Saghat3
47 - B2 Dw Tak Rek1
48 - C3 Df Dom Rek2
49 - C#3 Df Roll Rek3
50 - D3 Df Link Rek4
51 - D#3 Df Tak Rek5
52 - E3 Df Saq Rek6
53 - F3 Davol1 Rek7
54 - F#3 Davol2 Rek8
55 - G3 Davol3 Rek9roll
56 - G#3 Bandirwdom Rek10
57 - A3 Bandirwess Rek11
58 - A#3 Bandirwtak1 Rek12
59 - B3 Bandirwtak2 Rek13
60 - C4 Saghat Open Rek14
61 - C#4 Saghatclosed Rek15
62 - D4 Saghatclose 2 Rek16
63 - D#4 Saghatclose 3 Rek17
64 - E4 Saghatclose 4 Rek18
65 - F4 Khj Kit F5 Dof1
66 - F#4 Khj Kit F#5 Dof2
67 - G4 Khj Kit G5 Dof3
68 - G#4 Khj Kit G#5 Dof4
69 - A4 Khj Kit A2 Dof5
70 - A#4 Khj Kit A#5 Dof6
71 - B4 Khj Kit B5 Dohola1
72 - C5 Khj Kit C6 Dohola2
73 - C#5 Khj Kit C#6 Dohola3
74 - D5 Khj Kit D6 Dohola4
75 - D#5 Khj Kit D#6 Dohola5
76 - E5 Khj Kit E6 Tabla1rak
77 - F5 Khj Kit F6 Tabla2dom
78 - F#5 Khj Kit F#6 Tabla3roll
79 - G5 Khj Kit G6 Tabla4rak
80 - G#5 Khj Kit G#6 Tabla5rak
81 - A5 Khj Kit A6 Tabla6rak
82 - A#5 Khj Kit A#6 Tabla7rak
83 - B5 Khj Kit B6 Tabla8rak
84 - C6 Khj Kit C7 Tabla9rak
85 - C#6 Zaghrouta Tun Tabla10rak
86 - D6 Tabla11mute
87 - D#6 Tabla12sak
88 - E6 Tabla13mute
89 - F6 Tabla14rak
90 - F#6 Tabla15rak
91 - G6 Tabla16rak
92 - G#6
93 - A6
94 - A#6
95 - B6
96 - C7
97 - C#7
GM Drum Kit - a -
STANDARD PC=1 ROOM PC=9 POWER PC=17 ELECTRIC PC=25 TR-808 PC=26
24 - C1 Fingers Snap Left Fingers Snap Left Fingers Snap Left Fingers Snap Left Fingers Snap Left
25 - C#1 Finger Snap Right Finger Snap Right Finger Snap Right Finger Snap Right Finger Snap Right
26 - D1 Snare Roll Snare Roll Snare Roll Snare Roll Snare Roll
27 - D#1 High Q High Q High Q High Q High Q
28 - E1 Slap Slap Slap Slap Slap
29 - F1 Scratch Push Scratch Push Scratch Push Scratch Push Scratch Push
30 - F#1 Scratch Pull Scratch Pull Scratch Pull Scratch Pull Scratch Pull
31 - G1 Sticks Sticks Sticks Sticks Sticks
32 - G#1 Square Click Square Click Square Click Square Click Square Click
33 - A1 Metron. Click Metron. Click Metron. Click Metron. Click Metron. Click
34 - A#1 Metron. Bell Metron. Bell Metron. Bell Metron. Bell Metron. Bell
35 - B1 Bass Drum 2 Bass Drum 2 Bass Drum 2 El. Bass Drum 2 808 Bass Drum 2
36 - C2 Bass Drum 1 Bass Drum 1 Bass Drum 1 El. Bass Drum 1 808. Bass Drum 1
37 - C#2 Side Stick Side Stick Side Stick Side Stick Side Stick
38 - D2 Snare Drum 1 Snare Drum 1 Gated Snare El. Snare Drum 1 808 Snare Drum
39 - D#2 Hand Clap Hand Clap Hand Clap Hand Clap Hand Clap
40 - E2 Snare Drum 2 Snare Drum 2 Snare Drum 2 Gated Snare Snare Drum 2
41 - F2 Low Floor Tom Room Low Tom 2 Room Low Tom 2 El. Low Tom 2 808 Low Tom 2
42 - F#2 Close Hi-Hat Close Hi-Hat Close Hi-Hat Close Hi-Hat 808 Close Hi-Hat
43 - G2 H. Floor Tom Room Low Tom 1 Room Low Tom 1 El. Low Tom 1 808 Low Tom 1
44 - G#2 Pedal Hi-Hat Pedal Hi-Hat Pedal Hi-Hat Pedal Hi-Hat 808 Pedal Hi-Hat
45 - A2 Low Tom Room Mid Tom 2 Room Mid Tom 2 El. Mid Tom 2 808 Mid Tom 2
46 - A#2 Open Hi-Hat Open Hi-Hat Open Hi-Hat Open Hi-Hat 808 Open Hi-Hat
47 - B2 Low Mid Tom Room Mid Tom 1 Room Mid Tom 1 El. Mid Tom 1 808 Mid Tom 1
48 - C3 Hi Mid Tom Room Hi Tom 2 Room Hi Tom 2 El. Hi Tom 2 808 Hi Tom 2
49 - C#3 Crash Cymbal1 Crash Cymbal1 Crash Cymbal1 Crash Cymbal1 808 Crash Cymbal1
50 - D3 High Tom Room Hi Tom 1 Room Hi Tom 1 El. Hi Tom 1 808 Hi Tom 1
51 - D#3 Ride Cymbal 1 Ride Cymbal 1 Ride Cymbal 1 Ride Cymbal 1 Ride Cymbal 1
52 - E3 Chinese Cymbal Chinese Cymbal Chinese Cymbal Reverse Cymbal Chinese Cymbal
53 - F3 Ride Bell Ride Bell Ride Bell Ride Bell Ride Bell
54 - F#3 Tambourine Tambourine Tambourine Tambourine Tambourine
55 - G3 Splash Cymbal Splash Cymbal Splash Cymbal Splash Cymbal Splash Cymbal
56 - G#3 Cowbell Cowbell Cowbell Cowbell 808 Cow bell
57 - A3 Crash Cymbal2 Crash Cymbal2 Crash Cymbal2 Crash Cymbal2 Crash Cymbal2
58 - A#3 Vibraslap Vibraslap Vibraslap Vibraslap Vibraslap
59 - B3 Ride Cymbal 2 Ride Cymbal 2 Ride Cymbal 2 Ride Cymbal 2 Ride Cymbal 2
60 - C4 Hi Bongo Hi Bongo Hi Bongo Hi Bongo Hi Bongo
61 - C#4 Low Bongo Low Bongo Low Bongo Low Bongo Low Bongo
62 - D4 Mute Hi Conga Mute Hi Conga Mute Hi Conga Mute Hi Conga 808 Mute Hi Conga
63 - D#4 Open Hi Conga Open Hi Conga Open Hi Conga Open Hi Conga 808 Open Hi Conga
64 - E4 Conga Low Conga Low Conga Low Conga Low 808 Low Conga
65 - F4 High Timbale High Timbale High Timbale High Timbale High Timbale
66 - F#4 Low Timbale Low Timbale Low Timbale Low Timbale Low Timbale
67 - G4 High Agogo High Agogo High Agogo High Agogo High Agogo
68 - G#4 Low Agogo Low Agogo Low Agogo Low Agogo Low Agogo
69 - A4 Cabasa Cabasa Cabasa Cabasa Cabasa
70 - A#4 Maracas Maracas Maracas Maracas 808 Maracas
71 - B4 Short Whistle Short Whistle Short Whistle Short Whistle Short Whistle
72 - C5 Long Whistle Long Whistle Long Whistle Long Whistle Long Whistle
73 - C#5 Short Guiro Short Guiro Short Guiro Short Guiro Short Guiro
74 - D5 Long Guiro Long Guiro Long Guiro Long Guiro Long Guiro
75 - D#5 Claves Claves Claves Claves 808 Claves
76 - E5 Hi Woodblok Hi Woodblok Hi Woodblok Hi Woodblok Hi Woodblok
77 - F5 Low Woodblok Low Woodblok Low Woodblok Low Woodblok Low Woodblok
78 - F#5 Mute Cuica Mute Cuica Mute Cuica Mute Cuica Mute Cuica
79 - G5 Open Quica Open Quica Open Quica Open Quica Open Quica
80 - G#5 Mute Triangle Mute Triangle Mute Triangle Mute Triangle Mute Triangle
81 - A5 Open Triangle Open Triangle Open Triangle Open Triangle Open Triangle
82 - A#5 Shaker Shaker Shaker Shaker Shaker
83 - B5 Jingle Bell Jingle Bell Jingle Bell Jingle Bell Jingle Bell
84 - C6 Bell Tree Bell Tree Bell Tree Bell Tree Bell Tree
85 - C#6 Castanets Castanets Castanets Castanets Castanets
86 - D6 Mute Surdo Mute Surdo Mute Surdo Mute Surdo Mute Surdo
87 - D#6 Open Surdo Open Surdo Open Surdo Open Surdo Open Surdo
22 23
Page 13

GM Drum Kit - b -
JAZZ PC=33 BRUSH PC=41 ORCHES. PC=49 SOUND FX PC=57
24 - C1 Fingers Snap Left Fingers Snap Left Fingers Snap Left xxxxxxxxxxxxx
25 - C#1 Finger Snap Right Finger Snap Right Finger Snap Right xxxxxxxxxxxxx
26 - D1 Snare Roll Snare Roll Snare Roll xxxxxxxxxxxxx
27 - D#1 High Q High Q Closed Hi-hat xxxxxxxxxxxxx
28 - E1 Slap Slap Pedal Hi-Hat xxxxxxxxxxxxx
29 - F1 Scratch Push Scratch Push Open Hi-Hat xxxxxxxxxxxxx
30 - F#1 Scratch Pull Scratch Pull Ride Cymbal xxxxxxxxxxxxx
31 - G1 Sticks Sticks Sticks xxxxxxxxxxxxx
32 - G#1 Square Click Square Click Square Click xxxxxxxxxxxxx
33 - A1 Metron. Click Metron. Click Metron. Click xxxxxxxxxxxxx
34 - A#1 Metron. Bell Metron. Bell Metron. Bell xxxxxxxxxxxxx
35 - B1 Bass Drum 2 Bass Drum 2 Bass Drum 2 xxxxxxxxxxxxx
36 - C2 Bass Drum 1 Bass Drum 1 Bass Drum 1 xxxxxxxxxxxxx
37 - C#2 Side Stick Side Stick Side Stick xxxxxxxxxxxxx
38 - D2 Jazz Snare 2 Brush Tap Concert SD xxxxxxxxxxxxx
39 - D#2 Hand Clap Brush Slap Castanets High Q
40 - E2 Jazz Snare 1 Bush Swirl Concert SD Slap
41 - F2 Low Floor Tom Low Floor Tom Timpani F Scratch Push
42 - F#2 Close Hi-Hat Close Hi-Hat Timpani F# Scratch Pull
43 - G2 H. Floor Tom H. Floor Tom Timpani G Sticks
44 - G#2 Pedal Hi-Hat Pedal Hi-Hat Timpani G# Square Click
45 - A2 Low Tom Low Tom Timpani A Metronome Click
46 - A#2 Open Hi-Hat Open Hi-Hat Timpani A# Metronome Bell
47 - B2 Low Mid Tom Low Mid Tom Timpani B Guitar Slide
48 - C3 Hi Mid Tom Hi Mid Tom Timpani C Guitar Cut Noise 1
49 - C#3 Crash Cymbal1 Crash Cymbal1 Timpani C# Guitar Cut Noise 2
50 - D3 High Tom High Tom Timpani D Double Bass Slap
51 - D#3 Ride Cymbal 1 Ride Cymbal 1 Timpani D# Key Click
52 - E3 Chinese Cymbal Chinese Cymbal Timpani E Laughing
53 - F3 Ride Bell Ride Bell Timpani F Screaming
54 - F#3 Tambourine Tambourine Tambourine Punch
55 - G3 Splash Cymbal Splash Cymbal Splash Cymbal Heart Beat
56 - G#3 Cowbell Cowbell Cowbell Foot Step 1
57 - A3 Crash Cymbal2 Crash Cymbal2 Concert Cymb. 2 Foot Step 2
58 - A#3 Vibraslap Vibraslap Vibraslap Applause
59 - B3 Ride Cymbal 2 Ride Cymbal 2 Concert Cymb. 1 Door Creaking
60 - C4 Hi Bongo Hi Bongo Hi Bongo Door Closing
61 - C#4 Low Bongo Low Bongo Low Bongo Scratch
62 - D4 Mute Hi Conga Mute Hi Conga Mute Hi Conga Wind Chime
63 - D#4 Open Hi Conga Open Hi Conga Open Hi Conga Car Start
64 - E4 Conga Low Conga Low Conga Low Car Breaking
65 - F4 High Timbale High Timbale High Timbale Carr Pass
66 - F#4 Low Timbale Low Timbale Low Timbale Car Crash
67 - G4 High Agogo High Agogo High Agogo Police
68 - G#4 Low Agogo Low Agogo Low Agogo Train
69 - A4 Cabasa Cabasa Cabasa Jet
70 - A#4 Maracas Maracas Maracas Helicopter
71 - B4 Short Whistle Short Whistle Short Whistle Starship
72 - C5 Long Whistle Long Whistle Long Whistle Gun Shot
73 - C#5 Short Guiro Short Guiro Short Guiro Machine Gun
74 - D5 Long Guiro Long Guiro Long Guiro Laser
75 - D#5 Claves Claves Claves Explosion
76 - E5 Hi Woodblok Hi Woodblok Hi Woodblok Dog
77 - F5 Low Woodblok Low Woodblok Low Woodblok Horse
78 - F#5 Mute Cuica Mute Cuica Mute Cuica Birds
79 - G5 Open Quica Open Quica Open Quica Rain
80 - G#5 Mute Triangle Mute Triangle Mute Triangle Thunder
81 - A5 Open Triangle Open Triangle Open Triangle Wind
82 - A#5 Shaker Shaker Shaker Seashore
83 - B5 Jingle Bell Jingle Bell Jingle Bell Bubble
84 - C6 Bell Tree Bell Tree Bell Tree Yeah
85 - C#6 Castanets Castanets Castanets xxxxxxxxxxxxx
86 - D6 Mute Surdo Mute Surdo Mute Surdo xxxxxxxxxxxxx
87 - D#6 Open Surdo Open Surdo Open Surdo xxxxxxxxxxxxx
88 - E6 Applause
KP120A Midi Chart
Function Transmitted Recognized Remarks
Basic Default
Channel Changed
Mode Default
Messages
Altered
Note
Number :True voice
Velocity Note ON
Note OFF
Control Change 0,32
1
5
6
7
10
11
64
65
66
67
80,81
91,93
100,101
120
121
122
Programe
Change : True
System Exclusive X O
System : Song Position
: Song Select
Common : Tune
Aux : Local on/off
: All Notes Off
Messages : Active Sense
: Reset
Mode1 : OMNI ON,POLY Mode2 : OMNI ON,MONO O : Yes
Mode3 : OMNI OFF,POLY Mode4 : OMNI OFF,MONO X : NO
*1: Registered parameter number:
#0 : Pitch sensivity
#1 : Fine tuning in cents
#2 : Coarse tuning in half-tones
*2: Keyboard midi out:
Main Voice Default channel 1
Split Voice Default channel 2
Dual Voice Default channel 3
Percussion Default channel 10
Main Voice,Split Voice,Percussion Voice Channel Can be Changed to 1-16CH
(*2)
(*2)
Mode 3
X
********
0~127
********
O 9nH,v=1~127
O 9nH,v=0 or 8nh
O
X
X
O
O
O
X
O
X
X
X
O
O
O
O
X
X
O 0-127
**********
X
X
X
X
O
X
X
1-16CH
1-16CH
Mode 3
X
X
0~127
0~127
O 9nH,v=1~127
O 9nH,v=0 or 8nh
X X s'yeK retffA
O O redneB hctiP
O
O
O
O
O
O
O
O
O
O
O
O
O
O (*1)
O
O
O
O 0-127
0-127
X
X
X
O
O
O
O
Bank Select
Modulation
Portamento time
Data Entry
Volume
Pan
Expression
Sustain
Portamento
Sostenuto
Soft pedal
DSP TYPE
DSP DEPTH
RPN LSB,MSB
All sound off
Reset all Controllers
Local control
24 25
Page 14

NOTENOTE
Page 15

196, Bongsu-daero, Seo-gu,
Incheon, Korea
 Loading...