

Page 1
Front Panel Quick Reference
Front Panel
Chapter 1
Front Panel
Front Panel Quick Reference
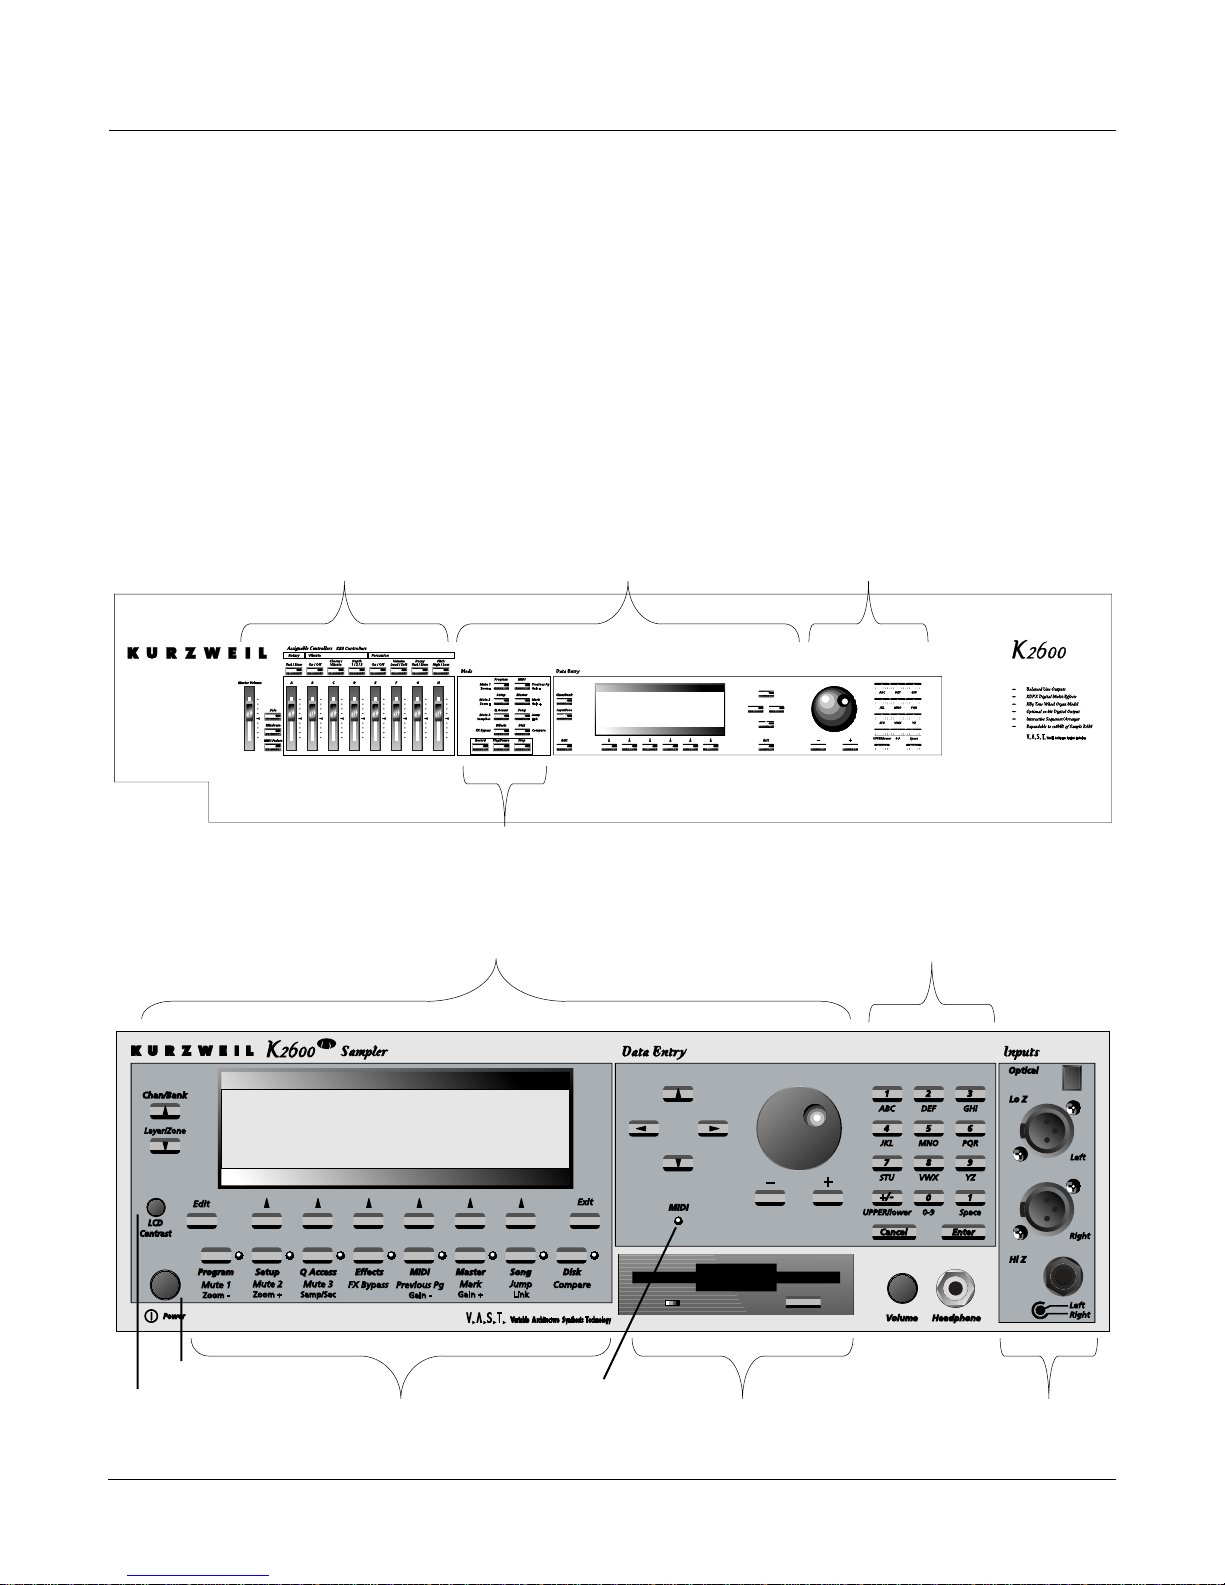
This section describes features that, unless speciÞed otherwise, are common to both the rack
versions of the K2600 (K2600R and K2600RS) as well as the keyboard versions of the K2600
(K2600, K2600S, K2600X, and K2600XS). The buttons and sliders that are unique to the keyboard
models are described on page 1-4.
Control
Navigation Data Entry
Power switch
LCD contrast
Mode Selection
Navigation Data Entry
Mode Selection
MIDI LED
Disk Drive
Audio Inputs
1-1
Page 2
Front Panel
Front Panel Quick Reference
Volume Knob/ Slider
Controls mixed audio outputs and headphone jack only. Does not send MIDI Volume (MIDI 07).
Mode Buttons
Press any of these eight buttons to enter the corresponding mode.
Chan/Bank Buttons
Scroll through the layers of the current program while in the Program Editor. Scroll through the
zones in the current setup while in Setup mode. Scroll through the Quick Access banks while in
Quick Access mode.
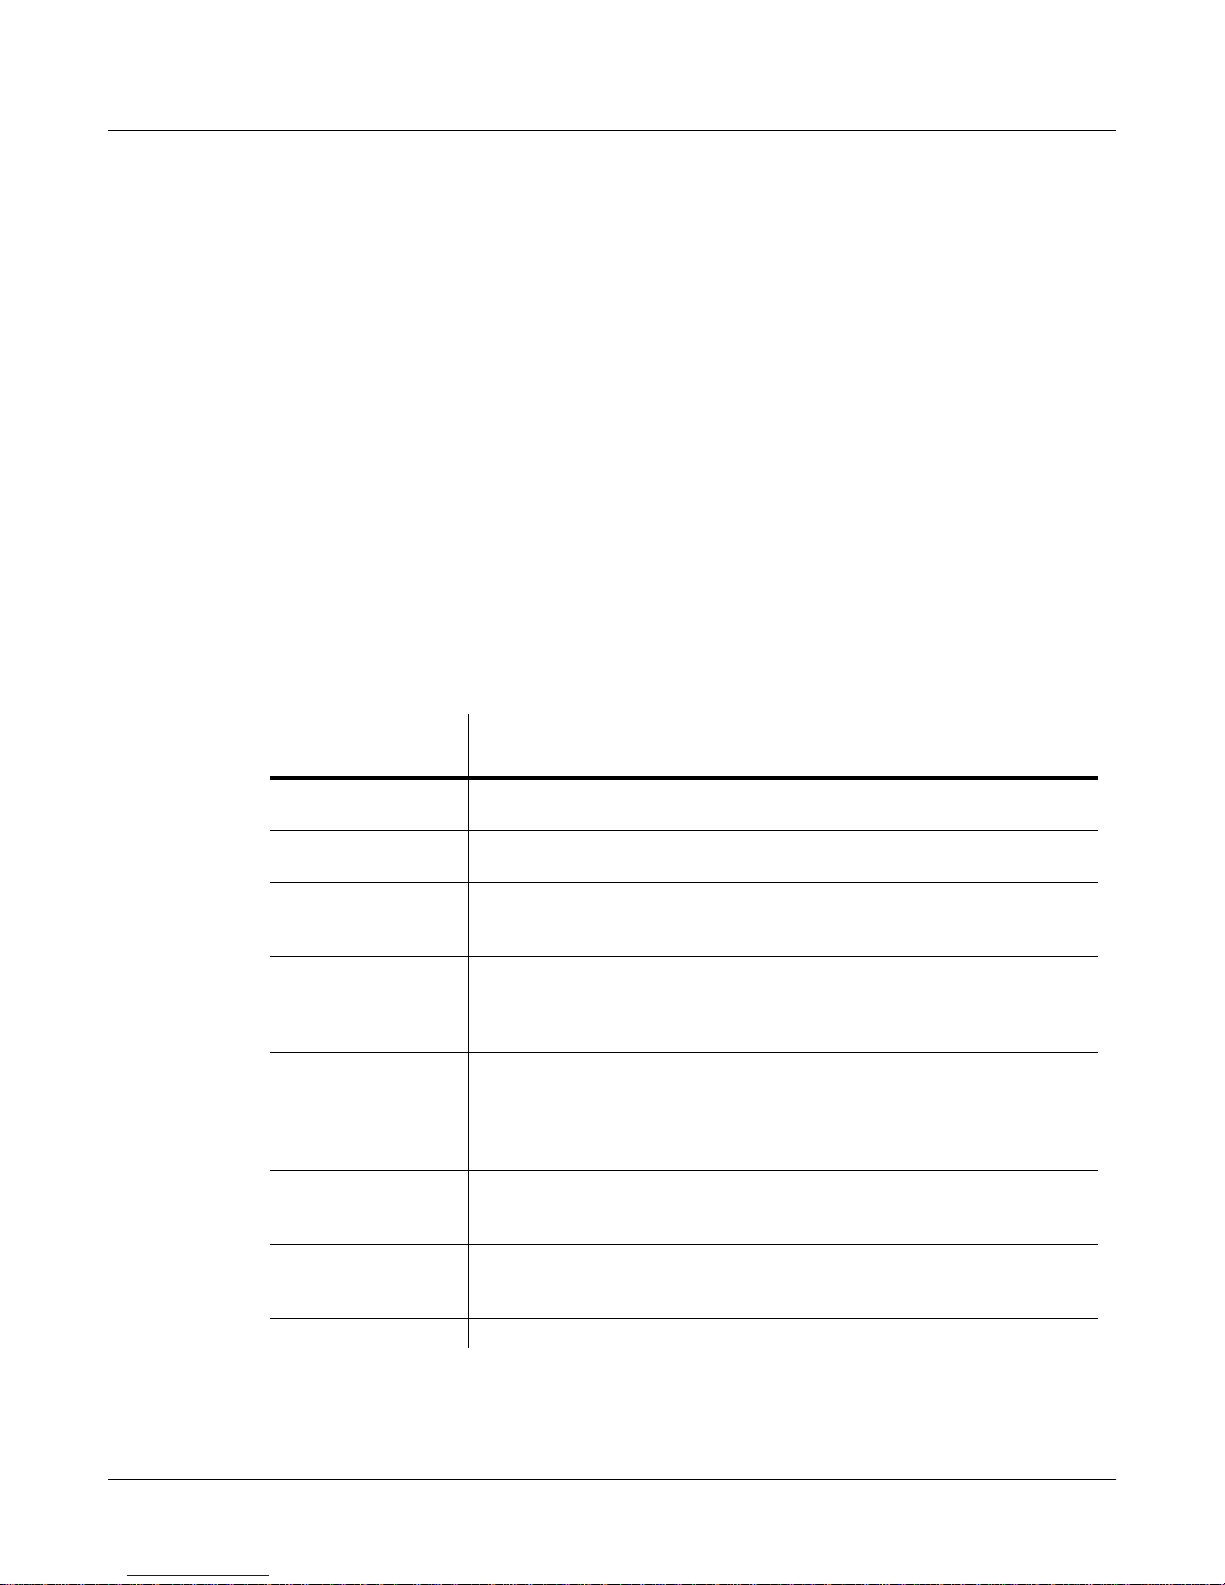
Edit Button
Functional in most modes. Press Edit to modify the currently selected object or parameter. If itÕs
not editable, pressing Edit will do nothing.
There are editors available from every mode but Disk mode. The effect of pressing Edit in each
of the modes is listed below.
When in this
mode
Program mode …enters the Program Editor, where you can edit the currently selected
program. Chapter 6 in the
Setup mode …enters the Setup Editor, where you can edit the currently selected setup.
Chapter 7 in the
Quick Access mode …enters the Quick Access Editor, where you can change the program or
setup assigned to the bank slot that was selected when you entered the
Quick Access Editor. See Chapter 8 in the
Effects mode …if the Studio parameter is highlighted, enters the Studio Editor, where y ou
can edit the currently selected studio. Chapters 9 and 15 in the
Guide
explain studios, the Studio Editor, FX presets, and the FX Preset
Editor.
MIDI mode …enters the Velocity Map or Pressure Map Editor if the Velocity or
Pressure Map parameter is selected on either the TRANSMIT page or the
RECEIVE page. See Chapter 18 in the
Program Editor if the Program parameter is selected on the CHANLS page.
See Chapter 6 in the
Master mode …enters the Velocity Map, Pressure Map, or Intonation Table Editor if the
VelTouch, PressTouch, or Intonation parameter is selected. See
Chapter 18 in the
Song mode …enters the Song Editor. The Song Editor is discussed in Chapter 12 in the
Musician’s Guide
parameter is highlighted when Edit is pressed.
Disk mode …has no effect.
Pressing the Edit button…
Musician’s Guide
Musician’s Guide
Musician’s Guide
Musician’s Guide
. Takes you to the Program Editor if the Program
describes the Setup Editor.
.
covers the Program Editor.
Musician’s Guide
Musician’s Guide
.
. Takes you to the
.
Musician’s
Table 1-1 Navigating with the Edit Button
1-2
Page 3

Soft Buttons
Functions change depending on current display page. Function of each button is displayed on
bottom line of display.
Exit Button
Press to leave various editors. If youÕve made any changes while in the editor, you will be
prompted to save them.
Cursor Buttons
Press the corresponding button to move the cursor up, down, left, or right in the display.
Different parameter values will be highlighted as buttons are pressed.
Alpha Wheel
For data entry. Rotate clockwise to increase value of currently selected parameter,
counterclockwise to decrease.
Plus / Minus Buttons (- and +)
Under the Alpha Wheel. Press to increase or decrease the value of the currently selected
parameter by the smallest possible amount. DonÕt confuse this with the +/- button on the
alphanumeric buttonpad.
Front Panel
Front Panel Quick Reference
Alphanumeric Buttonpad
For Numeric Characters
Enter the value numerically instead of using the Alpha Wheel or Plus / Minus buttons. Press
Enter when Þnished. Press Cancel to restore a parameter to its previous value. Pressing Clear is
equivalent to pressing 0 without pressing Enter .
For Alphabetic Characters
When naming objects, you can use the alphanumeric pad to enter letters instead of numbers. If
youÕre renaming a program, for example, just position the cursor under the character you want
to change, then press the corresponding numeric button, as labeled. Press the button as many
times as necessary to enter the desired character. Pressing Clear will enter a space before the
selected character. The 0 button will enter the numerals 0Ð9 when pressed repeatedly.
HereÕs an example. To enter the letter C in a blank space, press 1 three times. You can press the
+/- button before or after entering the letter.
The Cancel button is equivalent to the >>> soft button, and Enter is the same as OK . The Clear
button replaces the currently selected character with a space. The +/Ð button toggles between
uppercase and lowercase letters.
When you press the +/Ð button on the alphanumeric pad, the currently selected character (the
one with the cursor under it) will switch from upper case to lower case, and vice versa. The +/Ð
button is a toggle; that is, if you switch from lower to upper case, all further entries will be in
upper case until you press the +/Ð button again.
1-3
Page 4

Front Panel
Special Keyboard Functions
There are several punctuation characters available as well, but they can be entered only with the
Alpha Wheel or Plus/Minus buttons. The punctuation characters are between z (lower case)
and 0 .
Special Alphanumeric Buttonpad Functions
When youÕre in Quick Access mode, the Alphanumeric buttonpad can be used to select the
entries in the current Quick Access bank. The layout of the alphanumeric buttonpad
corresponds to the layout of Quick Access bank entries as seen on the Quick Access-mode page.
ThereÕs also a shortcut for selecting different QA banks while in QA mode. Just press the +/Ð or
Clear button on the alphanumeric pad, and youÕll be prompted to enter a bank number. Type
the desired number on the alphanumeric pad, then press Enter . The bank will be selected, and
youÕll return to the Quick Access page.
You can also use the alphanumeric pad to select strings to search for in the currently selected list
of objects, and to enter new strings to search for. The search function is described fully on
page 3-8 of the
Lastly, rack users can play notes from the numeric keypad by holding down the Cancel button
while pressing alphanumeric buttons. This is described fully on page 3-10 of the MusicianÕs
Guide .
MusicianÕs Guide .
The Display
You may want to adjust the contrast of the display for different lighting conditions. On keyboard
models, the adjustment knob is on the rear panel, between the MIDI ports and the continuous
controller pedal jacks. On rack models, itÕs on the front panel, above the power switch.
MIDI LED (Rack Models Only)
Lights when the K2600 is receiving MIDI information at its MIDI In port.
Special Keyboard Functions
This section describes the buttons and sliders that are unique to the keyboard models of the
K2600. Features common to both rack and keyboard models are described starting on page 1-1.
Programmable controllers:
Sliders A–H, and the buttons
above them,
Pitch Wheel and Mod Wheel
Panel switches (Buttons 9 and 10)
Large and small ribbons
Two continuous control pedals (or
one pedal and one breath
controller)
Four foot switches
1-4
Page 5

Solo Button
Mutes all zones in setup except the current one. The button of the zone being soloed glows red.
Mixdown Button
Brings up the Mixdown page, as shown in the following diagram. From this page you can
choose how the K2600Õs physical sliders function during MIDI mixdown. In the example below,
Sliders A-H will control the volume level of MIDI channels 1-8. By pressing the Pan soft button,
you would change the function of the sliders to control panning for channels 1-8; or, you could
press the 9-16 soft button to have the sliders affect channels 9-16.
You can also use the cursor buttons to highlight the pan or volume control for a channel and use
the Alpha Wheel or
for example, you could use the Alpha Wheel to control panning on channel 9 at the same time
that you are using the sliders to control volume on channels 1-8.
Shows whether
physical sliders
control pan or
volume.
Mixdown||||<>Prog:|36|DuckWalk||||||||||
|||WXWXWXWX|WXWXWXWX|WXWXWXWX|WXWXWXWX||
|||wxwxC{wx|wxwxwxwx|wxwxwxwx|wxwxwxwx||
>>||z|z}~|z||z|z|z|z||z|z|z|z||z|z|z|z||
||||_|_|_|_||_|_|_|_||_|_|_|_||_|_|_|_||
||||||||||||||||||||||||||||||||||||||||
|||*****************||||||||||||||||||||
|Pan|||Volume|Ch|1-8|Ch9-16|||||||||Done
Special Keyboard Functions
Plus/Minus buttons to change the pan or volume level. In the screen below,
Front Panel
Shows which channels are affected
by physical sliders.
Figure 1-1 Mixdown Control
MIDI Faders button
When you press the MIDI Faders button, the K2600Õs sliders take on the functions assigned on
the current MIDI Faders page. From the MIDI Faders display you can deÞne four different pages
that deÞne how the K2600Õs physical sliders will work. In the display shown below, for example,
the eight sliders are each deÞned to send MIDI 6 (Data) on Channels 9 through 16. Press one of
the Page soft buttons to use (or create) a different page of MIDI fader assignments. Use the Send
soft button to transmit values without moving the faders.
The MIDI Faders pages is saved as part of the Master table object.
MIDI|Faders:Page2|||||||||||||||||||||||
Chan|:|9|||10||11||12|||13|||14||15||16|
Ctl||:|6|||6|||6|||6||||6||||6|||6|||6||
Value:|0|||0|||0|||0||||0||||0|||0|||0||
||||||||||||||||||||||||||||||||||||||||
||||||\]||}~||\]||}~||||\]||}~||\]||}~||
|||||||_|||_|||_|||_|||||_|||_|||_|||_||
Page1||Page2||Page3||Page4|||Send|||Done
Soft buttons for indicating
which channels are affected
by physical sliders.
1-5
Page 6

Front Panel
Special Button Functions
Assignable Controllers (Buttons 1–8 and Sliders A–H)
The function of these controllers will depend on how theyÕve been deÞned within a setup.
Buttons 1Ð8 control either zone muting or KB3 features, depending on the value of the value of
the Mutes parameter on the COMMON page in the Setup Editor. The SLIDER and SLID/2 pages
conÞgure the functions of Sliders AÐH.
PSw1, PSw2 (Buttons 9 and 10)
The function of these controllers depends on how theyÕve been deÞned on the SWITCH page in
the Setup Editor.
Record, Play/Pause, Stop
These buttons duplicate the functions of the corresponding soft buttons in Song mode, allowing
you to conveniently record, play, pause, and stop the current song.
Special Button Functions
The Mode buttons and the Chan/Bank Down button have additional functions, depending on
the mode or editor youÕre in. When youÕre in the Program or Setup Editor, they function
according to the blue labeling under each button. They also work as track mutes on the MIX
page of Song mode.
When youÕre in the Sample Editor, the Program, Setup, Q Access, MIDI, Master, and Song
mode buttons function according to the orange labeling near each button. Table 1-2 describes all
of the special button functions. This table also appears as Table 5-1 on page 5-8 of the MusicianÕs
Guide.
Button Mode or Editor
White
Blue
Orange
Program
Mute 1
Zoom-
Setup
Mute 2
Zoom+
Q Access
Mute 3
Samp / Sec
Effects
FX Bypass
Mutes Layer 1 of current program, or
mutes current layer of current drum
program
Mutes Layer 2 of current program, or
solos current layer of current drum
program
Mutes Layer 3 of current program, or
solos current layer of current drum
program
Bypasses (mutes) current program’s FX
preset (plays program dry)
Program Editor (Blue) Setup Editor (Blue) Song Mode
Mutes Zone 1 of current
setup if 3 or fewer zones;
mutes current zone of
current setup if more than 3
zones
Mutes Zone 2 of current
setup if 3 or fewer zones;
solos current zone of
current setup if more than 3
zones
Mutes Zone 3 of current
setup if 3 or fewer zones;
solos current zone of
current setup if more than 3
zones
Bypasses (mutes) current
setup’s studio (plays studio
dry)
On MIX page,
mutes T rack 1
or 9
On MIX page,
mutes T rack 2
or 10
On MIX page,
mutes T rack 3
or 11
On MIX page,
mutes T rack 4
or 12
Sample Editor
(Orange)
On TRIM and LOOP
pages, decreases
horizontal dimension of
current sample in
display
On TRIM and LOOP
pages, increases
horizontal dimension of
current sample in
display
Toggles between units
used to identify location
within sample— either
number of samples from
start, or time in seconds
from start
Table 1-2 Special Button Functions
1-6
Page 7

Button Mode or Editor
Front Panel
Special Button Functions
White
Blue
Orange
MIDI
Previous Pg
Gain -
Master
Mark
Gain +
Song
Jump
Link
Disk
Compare
Chan / Bank
Layer / Zone
Edit Whenever cursor is highlighting an editable object or parameter, takes you to corresponding editor or programming page
Successive presses take you back to
four most recent editor pages; 5th press
takes you to ALG page
“Remembers” current editor page, so
you can recall multiple pages with Jump
button; asterisk appears before page
name to indicate that it’s marked;
unmark pages by pressing Mark when
page is visible
Jumps to marked pages in order they
were marked
Negates effect of unsaved edits and
plays last-saved (unedited) version of
object being edited
In Program Editor, these two buttons scroll through layers of current
program; in Effects Editor, scroll through FX presets; in Keymap Editor,
scroll through velocity levels of current keymap; in Setup Editor, scroll
through zones of current setup; in Quick Access mode, scroll through
entries in current Quick Access bank
Program Editor (Blue) Setup Editor (Blue) Song Mode
Successive presses take
you back to four most
recent editor pages; 5th
press takes you to CH/PRG
page
Same as for Program
Editor; pages common to
both editors are marked or
unmarked for
Jumps to marked pages in
order they were marked
Same as for Program
mode; display reminds you
that you’re comparing;
press any button to return
to edited version
both
editors
On MIX page,
mutes T rack 5
or 13
On MIX page,
mutes T rack 6
or 14
On MIX page,
mutes T rack 7
or 15
On MIX page,
mutes T rack 8
or 16
Change
recording
track
Sample Editor
(Orange)
On TRIM and LOOP
pages, decreases
vertical dimension of
current sample in
display
On TRIM and LOOP
pages, increases
vertical dimension of
current sample in
display
Preserves interval
between Start, Alt,
Loop, and End points of
current sample; press
again to unlink
Table 1-2 Special Button Functions (Continued)
1-7
Page 8

Front Panel
Special Button Functions: Double Button Presses
Special Button Functions: Double Button Presses
Pressing two or more related buttons simultaneously executes a number of special functions
depending on the currently selected mode. Make sure to press them at exactly the same time.
The following table also appears as Table 3-1 on page 3-6 of the MusicianÕs Guide.
In this
mode or
editor…
Program
mode
Master mode Chan/Bank Enables Guitar/Wind Controller mode.
Song mode
Disk mode
Program
Editor
Keymap
Editor
Sample
Editor
Any Editor
Save Dialog Plus/Minus buttons Toggle between next free ID and original ID.
…pressing these buttons
simultaneously…
Octav-, Octav+ Reset MIDI transposition to 0 semitones. Doub le-press again to
go to previous transposition.
Chan–, Chan+ Set current MIDI channel to 1.
Plus/Minus Step to next Program bank (100, 200, etc.)
Left/Right cursor buttons Toggle between Play and Stop.
Up/Down cursor buttons Toggle between Play and Pause.
Chan/Bank Select all tracks on any TRACK page in Song Editor.
2 leftmost soft buttons Issue SCSI Eject command to currently selected SCSI device.
Chan/Bank Hard format SCSI device. List selected objects when saving
objects.
Left/Right cursor buttons Select all items in a list. Move cursor to end of name in naming
dialog.
up/down cursor buttons Clear all selections in a list. Move cursor to beginning of name
in naming dialog.
Chan/Bank Select Layer 1.
Plus/Minus With cursor on the Coarse Tune parameter, toggles between
default Coarse Tune of sample root and transposition of sample
root.
2 leftmost soft buttons Toggle between default zoom setting and current zoom setting.
Plus/Minus buttons Set the value of the currently selected parameter at the next
zero crossing.
Plus/Minus Scroll through the currently selected parameter’s list of v alues in
regular or logical increments (varies with each parameter).
2 leftmost soft buttons Reset MIDI transposition to 0 semitones. Doub le-press again to
go to previous transposition.
Center soft buttons Select Utilities menu (MIDIScope, Stealer, etc.).
2 rightmost soft buttons Sends all notes/controllers off message on all 16 channels
(same as Panic soft button).
Left/Right cursor buttons Toggle between Play and Stop of current song.
Up/Down cursor buttons Toggle between Play and Pause of current song.
…does this:
Table 1-3 Double Button Presses
1-8
 Loading...