

Page 1
E S P R E S S E R I A A U T O M AT I C X P 9 0 0 0
APPLIANCE READY
SELECT BEVERAGE
ENGLISHFRANÇAISESPAÑOL
Operating instructions
For household use only
Check warranty card for details of warranty in
your country with a maximum of 5,000 cycles
per year. This product is for domestic use only
and is not suitable for trade or professional
purposes. Any non-household use is not covered
by the manufacturers warranty. The warranty
1 866 668 0325
does not cover breakdown or poor functioning
of the machine resulting from failure to carry
out descaling or machine damaged by foreign
objects in grinding mill (e.g. wood, stones,
plastic parts, etc.).
1 800 418 3325
01 800 11 28 325
Page 2
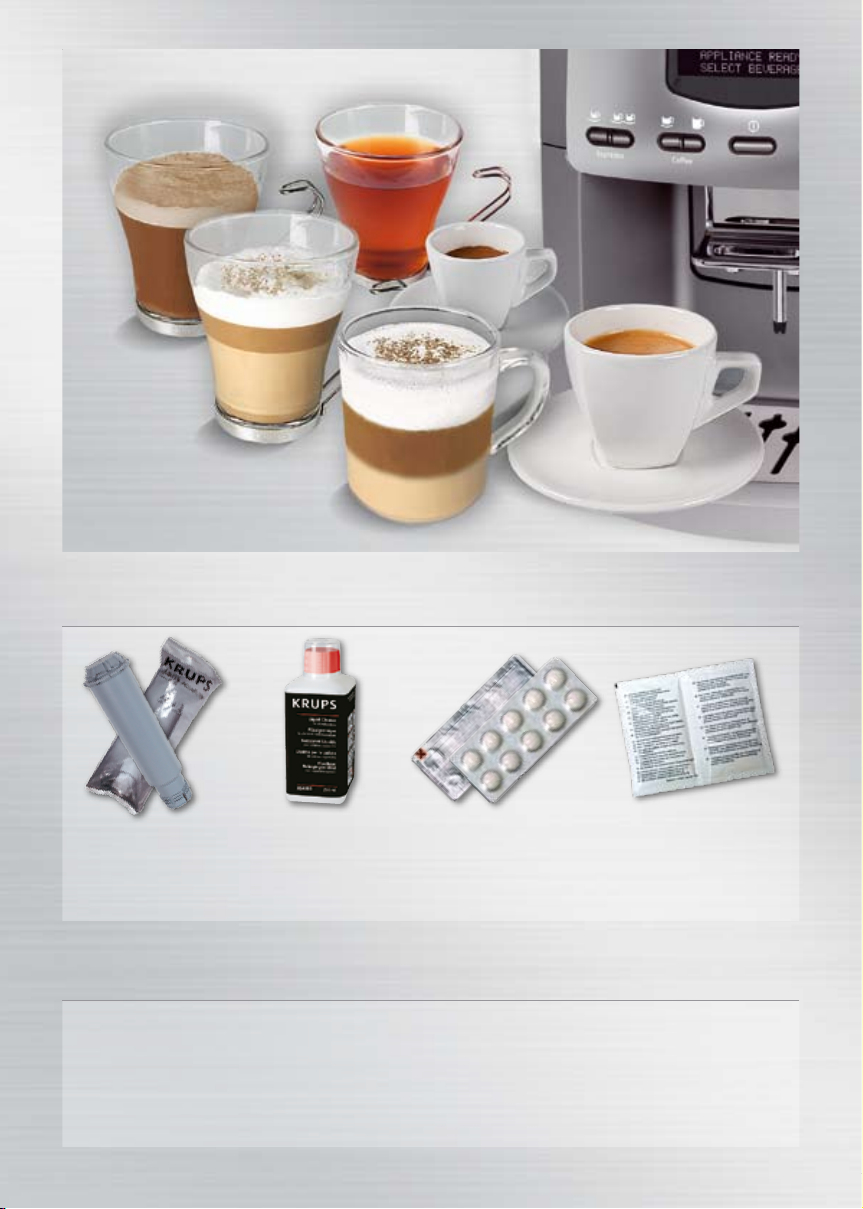
ACCESSORIES SOLD FOR YOUR KRUPS XP 9000 MACHINE
F 088
Aqua Filter System.
1 included with the
machine
XS 4000
Cleaning fluid for
steam nozzle. Not
included with the
machine.
XS 3000
Cleaning tablets.
2 tablets included
with the machine
BEFORE USING FOR THE FIRST TIME
Please read these operating instructions and the
safety instructions before using the machine
for the first time. It is important to note that
these instructions should be passed on to
anyone else using the machine and should be
kept handy at all times. (A special holder for
the operating instructions is provided at the
rear of the machine).
F 054
Descaling powder.
2 packs included
with the machine
Page 3

IMPORTANT SAFEGUARDS
When using this espresso machine, basic safety precautions should always be followed to reduce
the risk of fire, electric shock, and/or injury to persons including the following :
1. Read all instructions prior to first use.
2. Do not touch hot surfaces. Use handles or knobs.
3. To protect against fire, electric shock and injury to
persons, do not immerse cord, plugs or machine in
water or other liquid, keeps hands and utensils out of the
bean container while grinding and when the machine is
plugged in.
4. Do not put water into the coffee bean container and/or
under the servicing flap.
5. Not intended for use by children.
6. Close supervision is necessary when any machine is used
near children. Keep machine out of reach of children.
7. Burns can occur from touching hot plate, hot water or
steam. Exercise caution.
8. Exercise caution when using the steam nozzle as steam
can cause scalding.
9. Unplug machine from outlet as soon as you stop using
it over a prolonged period and when you clean it. Allow
to cool before putting on or taking off parts, before
cleaning the machine, and before storing.
10. All machines are subject to stringent quality control.
Practical tests using machines taken at random are
conducted and this may explain any slight marks or
coffee residue showing prior to use.
11. Do not operate any machine with a damaged cord or plug
or after the machine malfunctions, or has been damaged
in any manner. Return machine to the nearest Krups
Service Center for examination, repair or adjustment.
12.
To reduce the risk of injury do not drape cord over the
counter top or table top where it can be pulled on by
children or tripped over unintentionally.
13. Do not let cord hang over edge of table or counter, or
touch hot surfaces.
14. The use of accessory attachments not recommended
by Krups may result in fire, electric shock or injury to
persons.
15. Do not use outdoors.
16. Do not place on or near a hot gas or electric burner, or in
a heated oven.
17. To disconnect the machine, turn the control to “off” then
remove plug from wall outlet. Do not yank cord, instead
grasp plug and pull to disconnect.
18. Do not use the machine for other than intended use.
19. Do not pour liquids other than water and descaling
solutions specified in this manual into the water tank.
20. Protect the machine against humidity and freezing.
21. This machine is for household use only.
22. This appliance is not intended for use by persons
(including children) with reduced physical, sensory or
mental capabilities, or lack of experience and knowledge,
unless they have been given supervision or instruction
concerning use of the appliance by a person responsible
for their safety. Children should be supervised to ensure
that they do not play with the appliance.
ENGLISHFRANÇAISESPAÑOL
SAVE THESE INSTRUCTIONS - CAUTION
This machine is for household use only. Any servicing
other than cleaning and user maintenance should be
performed by the nearest authorized Krups Service
Center.
Visit our website at www.krups.com or contact our
Consumer Service department for the service center
nearest to you.
To reduce the risk of fire or electric shock, do not
dismantle the machine. Repair should be done by an
authorized Krups Service Center only. Check voltage to
be sure that the voltage indicated on the name plate
agrees with your voltage.
SHORT CORD INSTRUCTIONS
A. We do not recommend using an extension cord with
this device.
B. If an extension cord is absolutely necessary,
1) the marked electrical rating of the extension cord
should be at least as great as the electrical rating of
the machine,
2) the longer cord should be arranged so that
it will not drape over the counter top or table top
where it can be pulled on by children or tripped
over.
C. This machine has a grounded plug. To reduce the
risk of electric shock, this plug is intended to fit into
a grounded outlet only. If the plug does not fit into
the outlet, contact a qualified electrician. Do not
attempt to modify the plug in any way.
3
Page 4

LIMITED WARRANTY
This Krups’ product is warranted for 1 year with a maximum of 5,000 cycles (to check the nb of cycles, see page 16)
from the date of purchase against defects in material and workmanship. During this period, Krups will, at its option,
either repair or replace a defective product or any component found to be defective, at no cost. If a replacement
product is sent, it will carry the remaining warranty of the original product. This warranty does not apply to any
defect arising from misuse of the product, negligence, failure to follow Krups’ instructions on use and maintenance,
use on current of voltage other than that stamped on the product, or alterations or repairs not authorized by Krups.
This warranty does not cover products that have been used for commercial purposes or normal wear and tear such
as valves and seals that need to be replaced in the ordinary course, or if objects other than coffee beans are put
through the grinder.
THE DURATION OF ANY IMPLIED WARRANTY WHATSOEVER, INCLUDING BUT NOT LIMITED TO THE
WARRANTIES OF MERCHANTABILITY AND FITNESS FOR A PARTICULAR PURPOSE, SHALL BE LIMITED TO
THE DURATION OF THE EXPRESS WARRANTY PROVIDED HEREIN.
KRUPS SHALL NOT BE LIABLE FOR ANY INCIDENTAL OR CONSEQUENTIAL DAMAGES WHATSOEVER.
Some states do not allow limitation on how long an implied warranty lasts or do not allow the exclusion of incidental
or consequential damages, so the above limitations may not apply to you. This warranty gives you specific legal
rights, and you may also have other rights, which vary from state to state.
If you believe your product is defective, take the product (or send it postage prepaid) along with proof of purchase
to the nearest authorized Krups Service Center. (To find the nearest authorized Krups Service Center visit the Krups
website or contact Consumer Service in your country indicated below)
Krups Service Center locations can be found by visiting the website www.krupsUSA.com in the USA or
www.krups.ca in Canada.
When shipping the product to the service center please include a note explaining the issue, a copy of the sales receipt
and provide a valid return address on the outside of the shipping box (no PO Boxes). If the product is out of warranty
or warranty can’t be validated, the service center will send an estimate of repair for your approval.
CONSUMER SERVICE
If you have additional questions, please call our Consumer Service Department. It is helpful to have the
product available at the time of your call and to know the model number that can generally be found on
the base of the product.
USA
Phone 1 866 668 0325
Hours*
Monday - Friday from 8:00 a.m. - 6:30 p.m. (EST)
Letters should be addressed to:
Krups
196 Boston Avenue
Medford, MA 02155
Only letters can be accepted at this address.
Packages without a return authorization
number will be refused or forwarded to
a Service Center.
*Please note hours are subject to change.
4
CANADA
Phone 1 800 418 3325
Hours* Monday - Friday 8:30 a.m. - 4:30 p.m. (EST)
Letters should be addressed to:
Groupe SEB Canada Inc.
455 Finchdene Square
Scarborough, Ontario M1X 1B7
Page 5
CONGRATULATIONS
on your purchase of this Krups Espresseria
Automatic. In order ensure proper operation
of the machine, please read the operating
instructions carefully and keep them in a
safe place.
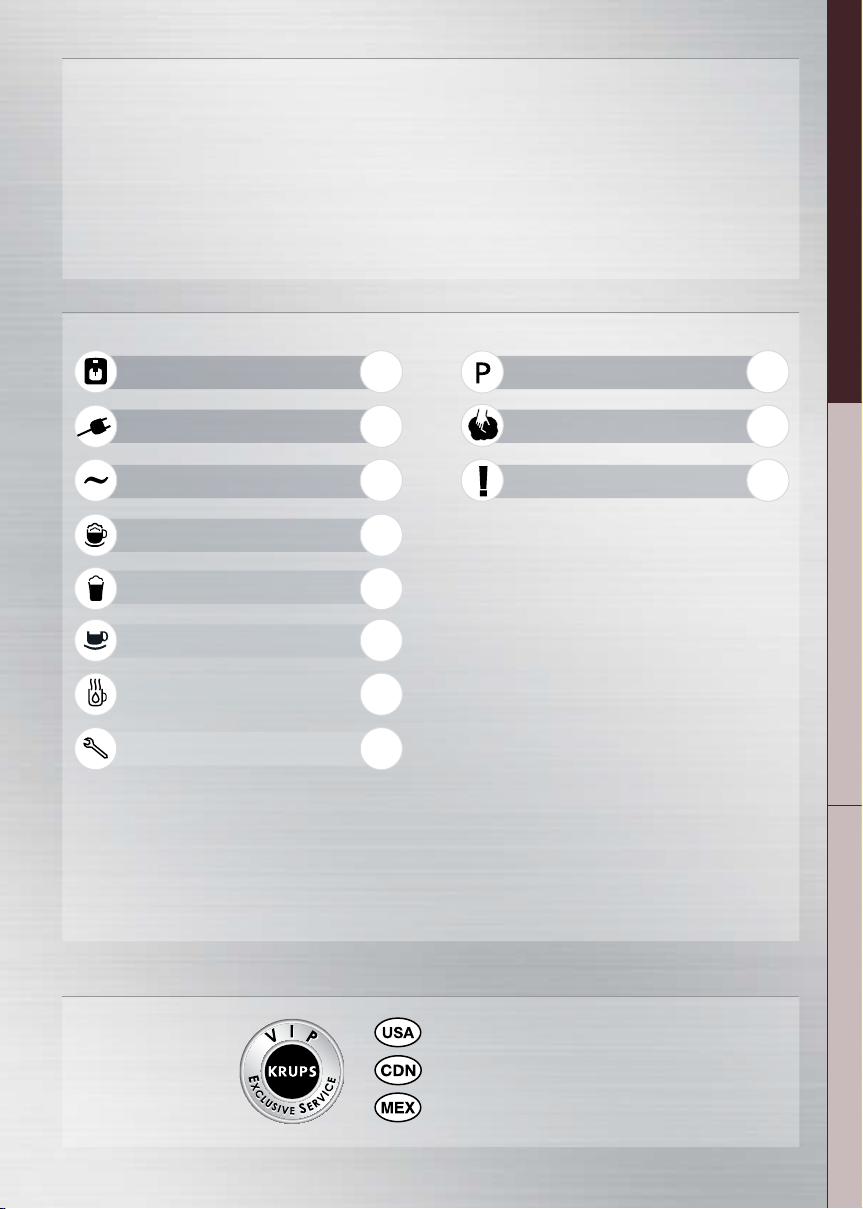
Machine & parts
First use
Technical specifications
Automatic Cappuccino
Automatic Caffe Latte
Coffee & Espresso
Hot water & Steam
6
7
9
10
11
12
13
A special holder is provided for this purpose
at the rear of the machine. Should you
require further information or if problems
arise, please contact your respective
countries Krups Exclusive Service hotline.
Overview of program-setting
Maintenance
troubleshooting
17
18
18
ENGLISHFRANÇAISESPAÑOL
Servicing functions
Rinsing
Cleaning
Descaling
Information
Messages
14
1 866 668 0325
1 800 418 3325
01 800 11 28 325
Page 6
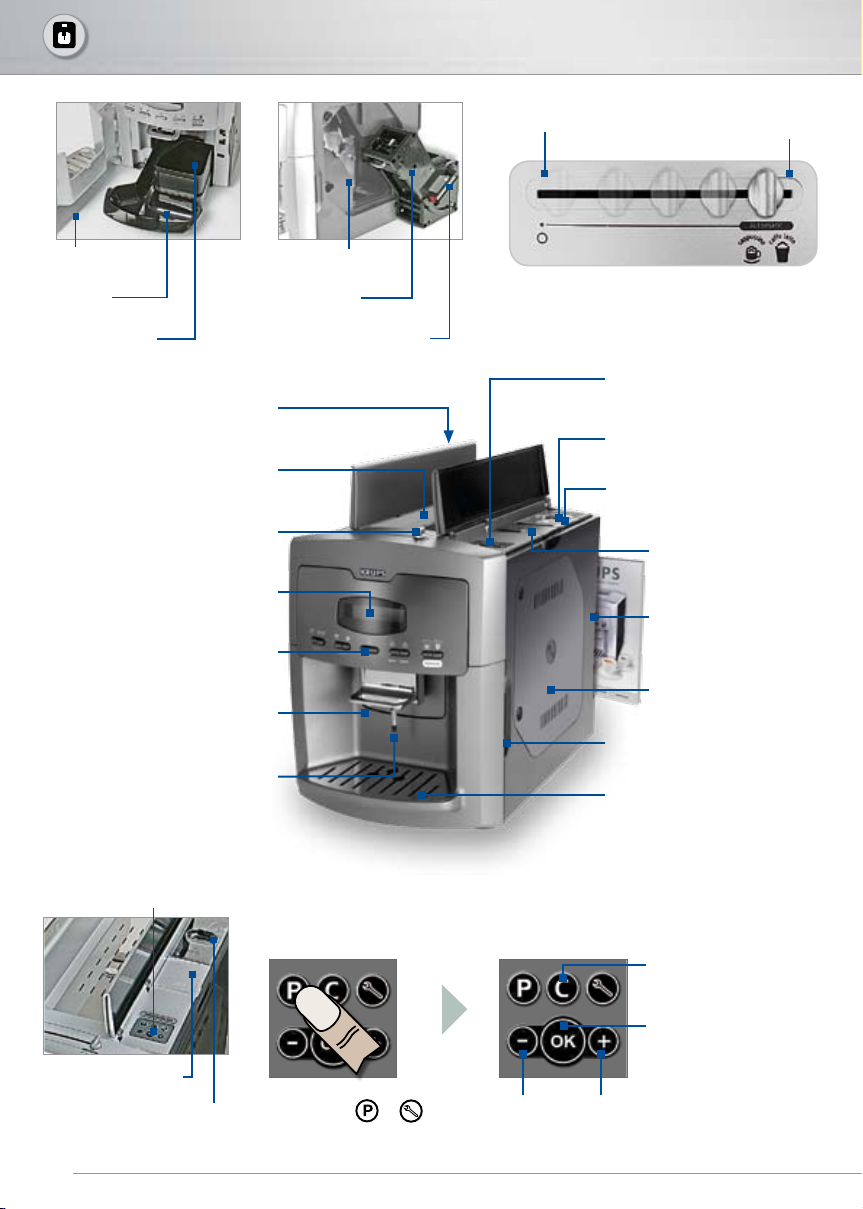
MACHINE & PARTS
Front door
Drip tray
Coffee grounds
collector
Lowering device for nozzle
Push-button panel
Water tank
Cup holder
Display
Servicing door
Brewing unit
Release/locking handle
Nozzle retracted
Lowering device for nozzle
Program-setting panel
Adjuster for fineness
of coffee grounds
Container for coffee beans
Coffee grounds shaft
Holder for operating
instructions
Servicing door
Nozzle extended
(Door blocked)
Coffee outlets
Hot water and steam
(2 positions) nozzle
Program-setting panel
Coffee grounds shaft
Container for coffee beans
6
GOING INTO
PROGRAM MODE
Press button or
Opener for front door
Drip tray grid
NAVIGATING
Go back/cancel
Select/confirm
Scroll / select
Page 7

MACHINE & PARTS
1 Espresso
Coffee, mug
ENGLISHFRANÇAISESPAÑOL
Steam
2 Espresso
Coffee
ON / OFF
Hot water
Automatic
Cappuccino
Automatic
Caffe Latte
Selected output can be stopped by pressing any key on the operating panel!
FIRST USE
1
Remove protective film from display and drip tray grid
Turn main switch on Switch on machine
by pressing button
2
Plug machine into outlet
543
CHOOSE LANGUAGE
ENGLISH OK/+/-
Select language by pressing
confirm by pressing
/
6
VOLUME UNIT
ml OK/+/-
Select unit of measure
by pressing
confirm by pressing
/
7 8
TIME FORMAT
24H OK/+/-
Select time system
by pressing
confirm by pressing
/
TIME SETTING
--:-- OK/+/-
Set time by pressing
confirm by pressing
Go to Page 8
/
7
Page 8

FIRST USE
9
AUTOMATIC START
--:-- OK/+/-
Set automatic switch-on
time by pressing / ,
confirm by pressing
11
Determining water hardness
LEVEL 0
10
AUTOMATIC STOP
--:-- OK/+/-
after 15min - 8h
Set automatic switch-off
time by pressing / ,
confirm by pressing
LEVEL 1 LEVEL 2 LEVEL 3 LEVEL 4
Immerse water-hardness strip in water for one second. Take a reading of water hardness after one minute.
12
13
If NO í go to steps 19-22
WATER HARDNESS
LEVEL 4 OK/+/-
Set water hardness
by pressing /
USE OF WATER FILTER
YES OK/+/-
Select use of water filter by pressing / , confirm by pressing
If YES í go to steps 14-22
confirm by pressing
At any time you can change the settings by pressing (Program Mode) and then to return
Aqua Filter System F 088
Place water filter in right side
of water tank. Screw it slowly
clockwise to insert it
1514
Fill water tank with fresh
water and refit onto machine
16
Place receptacle
(min. capacity: 350 ml /11.2 oz)
under steam nozzle
8
Page 9
FIRST USE
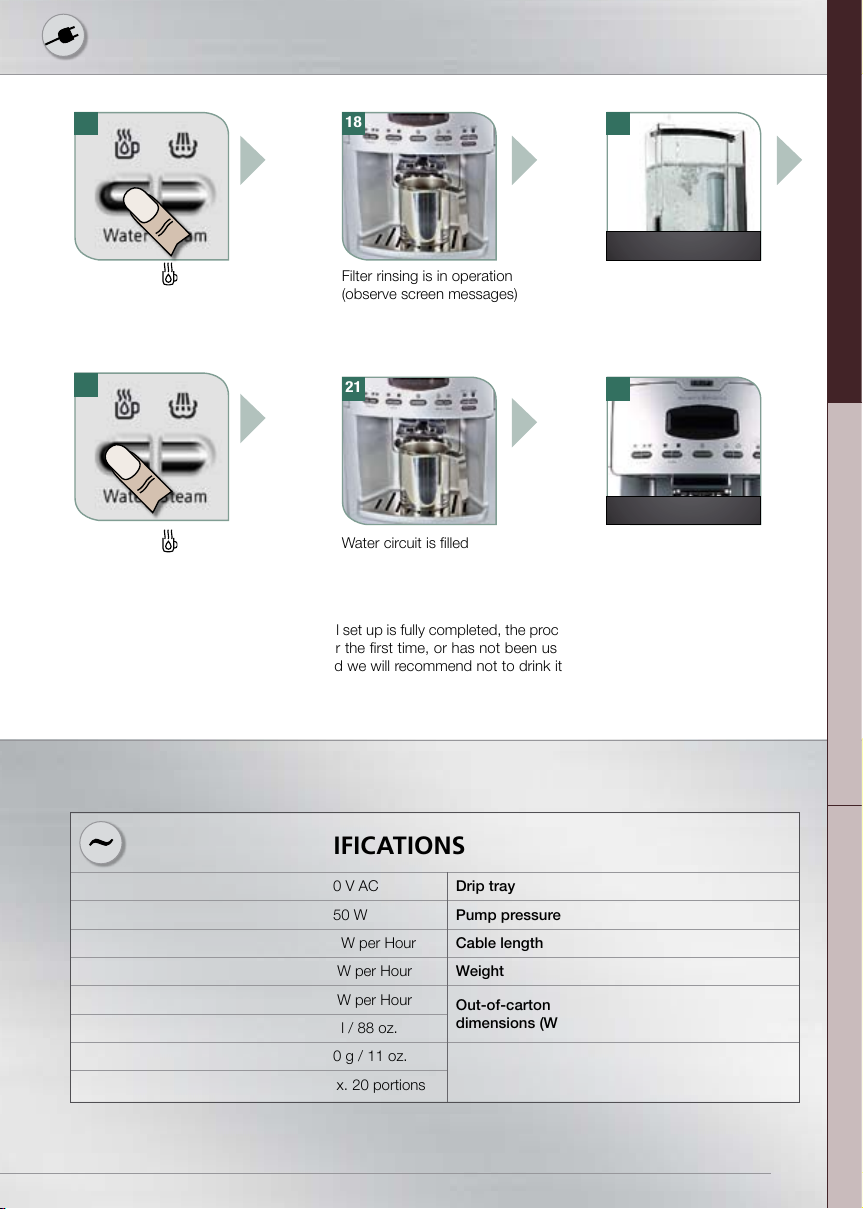
1817
Press button to start
20
Press button
If the machine is switched off before initial set up is fully completed, the process must be re-started from the
beginning. When the machine is used for the first time, or has not been used for some time, the first cups
of coffee will not have the full aroma, and we will recommend not to drink it. Discard the first cup of coffee
and brew again for great tasting coffee.
Filter rinsing is in operation
(observe screen messages)
21 22
Water circuit is filled
19
FILL WATER TANK
Fill water tank if necessary
07:30
SELECT BEVERAGE
Machine is now ready
for use
ENGLISHFRANÇAISESPAÑOL
TECHNICAL SPECIFICATIONS
Voltage 120 V AC Drip tray max. 900 ml / 30 oz
Power rating 1450 W Pump pressure Static, max. 15 bar
Standby 2.3 W per Hour Cable length 1.2 m /47 inch.
Coffee readiness 21 W per Hour Weight 11.3 kg / 25 pound
Coffee readiness with cold start 37 W per Hour
Water tank 2.6 l / 88 oz.
Coffee-bean container 300 g / 11 oz.
Container for coffee grounds max. 20 portions
Out-of-carton
dimensions (W x H x D)
29 x 40 x 48 cm
11 x 15 x 19 inch.
9
Page 10

AUTOMATIC
CAPPUCCINO
Fill up coffee beans container (Max. 300 g / 11 oz.) or grounds shaft (min. 1 spoon, max 2 spoons) as necessary.
You can select from the following recipes
1
Recipes
A cappuccino is made up
of the following proportions:
1/3 milk + 1/3 coffee + 1/3 frothed milk
Milk / Steam time /Coffee
Large 60 ml - 2 oz / 15 s / 60 ml - 2 oz
Small 40 ml - 1 oz / 10 s / 40 ml - 1 oz
For individual program-setting, see page 13
Press button
2 3 4
Pour in appropriate
recipe by choosing /
Be sure that the steam tube is in its lower position (see page 13 – paragraph «Steam»)
amount of cold milk
Place cup under outletYou may change the
Process now runs automatically
While the cycle is in process, the
6
Machine warms up & grinds coffee
7
Milk is frothed
8
Coffee is served
9
quantity of coffee or length of
time for steam preparation can be
adjusted by pressing
Process is complete. Lift nozzle,
10
remove cup and ensure to clean
the steam nozzle
Cleaning steam nozzle (automatically alert to clean after 4 min.)
21 3
CLEAN STEAM NOZZLE
PRESS OK
5
Lower steam nozzle
/
Confirm by pressing
For even better cleaning,
we recommend our XS 4000
cleaning fluid (see Page 14)
10
Confirm by pressing .
Place cup of warm water
under the steam nozzle
Lower steam nozzle,
process starts
Process is complete.
Lift the nozzle
Page 11

Caffe Latte, sometimes also known as
Latte Macchiato, consists roughly
of the following proportions:
3/5 milk + 1/5 coffee + 1/5 frothed milk
Fill up coffee beans container (Max. 300 g / 11 oz.) or grounds shaft (min. 1 spoon, max 2 spoons) as necessary.
You can select from the following recipes
1
Recipes
Large
Milk / Steam time / Coffee
120 ml - 4 oz / 30 s / 40 ml - 1 oz
AUTOMATIC
CAFFE LATTE
Small 90 ml - 3 oz / 25 s / 30 ml - 1 oz
For individual program-setting, see page 13
Press button
42 53
ENGLISHFRANÇAISESPAÑOL
You may change the
recipe by choosing /
Be sure that the steam tube is in its lower position (see page 13 – paragraph «Steam»)
Pour in appropriate
amount of cold milk
Place cup under spout Lower steam nozzle
Process now runs automatically
While the process is in operation,
6
Machine warms up & grinds coffee
7
Milk is frothed
8
Coffee is served
9
the quantity of coffee or length of
time for steam preparation can be
adjusted by pressing
Process is complete. Lift nozzle,
10
remove cup and ensure to clean
the steam nozzle
Cleaning and removing steam nozzle
1 2
Turn lower part of nozzle
in the direction of the
arrow above and remove
Clean nozzle under
running water
3 4
Wipe nozzle dry with
a soft cloth
/
Reassemble nozzle
and refit
11
Page 12

ESPRESSO
20 ml - 70 ml
0.5 oz - 2 oz
COFFEE
80 ml - 300 ml
2.5 oz - 10 oz
Whole bean coffee (Fill up bean container Max. 300 g/ 11 oz.)
1
Place cup under spout
2
Select coffee or espresso
1 Espresso
2 Espresso
1 Coffee
1 Coffee mug
Ground coffee
If you have opened the flap by mistake, you can cancel the beverage by pressing button C
1. Put ground coffee into shaft using the spoon and close flap
1 2
Do not fill the grounds shaft with whole beans, instant coffee or other powdered drinks! If no drink comes
out after 90 seconds, the brewing chamber empties automatically. The machine automatically goes into
rinsing mode!
Do not put your fingers into the grinding mechanism! Do not use glazed, flavored or caramelised coffee beans,
or beans that have been treated with additives containing sugar, otherwise this will clog the grinding mechanism.
1 spoon 1 Espresso
1/2
1
spoon 1 Coffee
2 spoons 1 Coffee mug / 2 Espresso
Setting the grinder fineness setting.
Only adjust during grinding!
The finer the setting for coffee grinding, the stronger and
creamier, flavored the coffee. The setting takes effect after
2 cups, allowing that coffee from the previous setting is
still in the machine.
Light roast: finer setting. Dark roast: coarser setting
Setting the quantity during brewing
After selecting the desired beverage
(espresso, coffee, steam, hot water)
the quantity or duration can be adjusted
by pressing
min. 1 spoon, max. 2 spoons
Select coffee or espresso
/
For permanent quantity settings, see P. 17 : prog 1
12
Page 13

AUTOMATIC CAPPUCCINO AUTOMATIC CAFFE LATTE
CUSTOMIZED PROGRAM SETTINGS
For customized cappuccino and caffe latte
Press button Select INDIV. in recipe menu by pressing / Confirm by pressing
PROGRAM
CAPPUCCINO OK/+/-
Setting the quantity of coffee and milk Setting the steam time
40 ml 200 ml
to
1 oz 6.5 oz
to
CAPPUCCINO
VOLUME OK/+/-
CAPPUCCINO
PERSONALIZED OK/+/-
10 s 90 s
to
HOT WATER
ENGLISHFRANÇAISESPAÑOL
1
Place receptacle under
spout
STEAM
Dual-position frother allows you to steam milk for cappuccino, latte and other espresso based beverages
(see picture 1) or you can simply adjust to heat milk without any froth (see picture 2). While adjusting the external
steam tube, maintain the lowering device.
1 2
Steam tube in lower position
for frothing and heating
3
2
For permanent quantity settings, see P. 17 : Prog. 6
Can be used for heating drinks (e.g. hot chocolate etc...)
Steam tube in upper posisition
for heating without frothing
4
Caution! Hot water and steam can
cause scalding!
Start hot water delivery by pressing button ,
Machine stops after delivery of desired quantity.
You can stop the flow at anytime by pressing
any button.
5
Place filled receptacle
under spout
Press button , lower
steam nozzle
Machine stops after desired time, Lift steam
nozzle. Be sure to rinse the steam nozzle after
each use
For permanent quantity settings, see P. 17 : prog 7
13
Page 14

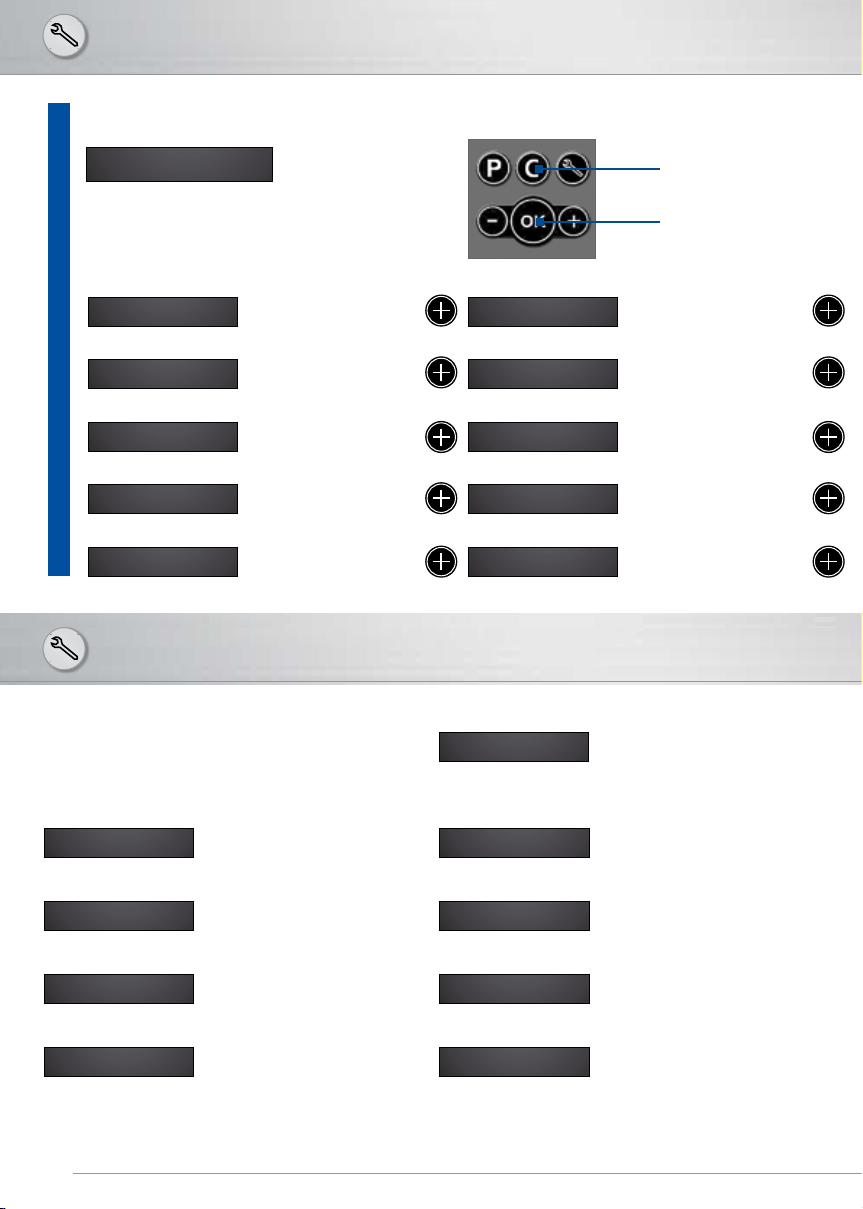
SERVICING FUNCTIONS
GOING INTO PROGRAM MODE NAVIGATING
1
Press button
Rinsing
1
RINSE
When machine is switched off it will
automatically rinse.
Cleaning (approx. 10 min.)
2
CLEANING PROCEDURE
XS 3000
OK/+/-
OK/+/-
2
1
Confirm by pressing
1
Confirm by pressing
Go back/cancel
Select/confirm
Scroll/select
2
07:30
SELECT BEVERAGE
Rinsing complete, machine is ready
Follow instructions in display
2
until the following appears ...
CLEANING FINISHED
MACHINE READY
Keep cleaning tablets out of the reach of children. Store with care.
Cleaning steam nozzle (with XS 4000) (approx. 3 min.)
3
14
CLEAN STEAM NOZZLE
PRESS OK
+
XS 4000
max. 15 ml
/ 0.50 oz
Keep cleaning fluid out of the reach of children. Store with care.
Hot water
250 ml / 8.5 oz
1
Put liquid cleaner
and warm water into
receptacle and place
under steam nozzle
Follow instructions in display
2
until the following appears ...
07:30
SELECT BEVERAGE
Repeat procedure with fresh
water for rinsing, as shown
by the display!
Page 15

SERVICING FUNCTIONS
Never descale with vinegar or vinegar-based agents! Always use a Krups descaling powder (F054). When
descaling, cover your work surface below the machine because descaling agents, which contain acid,
can attack these surfaces. This applies especially to work surfaces made of stone, wood and marble.
Always descale without the water filter.
Descaling (approx. 30 min.)
4
DESCALING PROCEDURE
1
OK/+/-
2
3
ENGLISHFRANÇAISESPAÑOL
Confirm by pressing Empty water tank and
4
Calc
Add water and descaling powder as far as Calc mark in the water tank
Never interrupt the descaling program! Keep a number of receptacles handy. Keep descaling
powder out of the reach of children. Store with care. If your product is equipped with our Claris Aqua Filter System cartridge F088 - please remove this cartridge during the descaling operation.
Changing the water filter Automatic message appears when filter needs changing
5
CHANGE WATER FILTER
PRESS OK
Press / to select use
of water filter, confirm by
pressing
40 gr.
F 054
Empty drip tray and
container for used coffee
grounds, and put back
Follow instructions in display until the following appears ...
5
DESCALING FINISHED
APPLIANCE READY
PUT NEW
WATER FILTER OK
remove water filter
If NO ímachine is ready
If YES í go to pages 8/9,
steps 14-22
Select use of water filter by pressing / , confirm by pressing .
The Claris Aqua Filter System is effective for two months. If machine does not display
“Change filter” to begin with, then this must be done after every 2 months.
15
Page 16
SERVICING FUNCTIONS
You can obtain the following information:
6
INFORMATION MACHINE
INFORMATION MACHINE
COFFEES X
INFORMATION MACHINE
CLEANING X
INFORMATION MACHINE
LAST CLEANING X
INFORMATION MACHINE
NEXT CLEANING X
INFORMATION MACHINE
DESCALING X
MESSAGES
Information messages
=
i
Must be done without fail!
=
!
OK/+/-
Number of portions
of coffee served
Number of cleaning
operations done
Most recent cleaning
before X portions served
Next cleaning operation
after X portions served
Number of descaling
operations done
INFORMATION MACHINE
LAST DESCALING X
INFORMATION MACHINE
NEXT DESCALING X
INFORMATION MACHINE
CHANGE FILTER X
INFORMATION MACHINE
LAST FILTER X
INFORMATION MACHINE
NEXT FILTER X
i
CLEANING NECESSARY
IN X COFFEES
2 x button C: cancel
OK button: confirm
Most recent descaling
operation before X litres
delivered
Next descaling operation
after x litres delivered
Number of times water
filter has been changed
Most recent change of
water filter before X litres
delivered
Next change of water filter
after X litres delivered
Cleaning should be done before
X coffee preparations have been
made
i !
CHANGE WATER FILTER
IN X COFFEES
! !
CHANGE WATER FILTER
PRESS OK
i !
DESCALING NECESSARY
IN X COFFEES
! !
DESCALING NECESSARY
PRESS OK
Filter should be changed
before X coffee preparations
have been made
Change filter and press OK Insert brewing unit and lock
Descaling should be done
before X coffee preparations
have been made
Press OK and start descaling
program now
16
CLEANING NECESSARY
PRESS OK
BREWING UNIT
IS MISSING
SERVICE 1
CONTACT HOTLINE
SERVICE 2
CONTACT HOTLINE
Press OK and start cleaning
program now
Call Hotline
Call Hotline
Page 17

GENERAL OVERVIEW OF PROGRAM-SETTING
There are 13 programs at your disposal / Select by pressing / ,
confirm by pressing
1
PROGRAM COFFEE
VOLUME OK/+/-
2
COFFEE STRENGTH
3
COFFEE TEMPERATURE
OK/+/-
OK/+/-
ESPRESSO
VOLUME OK/+/-
COFFEE
VOLUME OK/+/-
LONG COFFEE
VOLUME OK/+/-
LEVEL 2 LEVEL 3 LEVEL 1
20 ml 70 ml
0.5 oz 2 oz 1.5 oz
80 ml 300 ml
2,5 oz 10 oz
80 ml 300 ml
2.5 oz 10 oz
to
to
to
to
to
Factory
settings
50 ml
100 ml
3 oz
200 ml
6.5 oz
ENGLISHFRANÇAISESPAÑOL
NORMALMILD STRONG NORMAL
LEVEL 2
PROGRAM
4
CAPPUCCINO
PROGRAM
5
CAFFE LATTE
HOT WATER VOLUME
6
STEAM TIME
7
8
WATER HARDNESS
9
AUTOMATIC STOP
11
TIME SETTING
12
CHOOSE LANGUAGE
ENGLISH
OK/+/-
OK/+/-
OK/+/-
OK/+/-
OK/+/-
OK/+/-
OK/+/-
OK/+/-
CAPPUCCINO
VOLUME OK/+/-
CAPPUCCINO
STRENGTH OK/+/-
CAFFE LATTE
VOLUME OK/+/-
CAFFE LATTE
STRENGTH OK/+/-
30 ml 300 ml
1 oz 10 oz
10 s 90 s
LEVEL 1 LEVEL 3 LEVEL 4 LEVEL 5 LEVEL 2 LEVEL 2
Hours Minutes Hours Minutes
02:-- 02:30
Hours Minutes
12:-- 12:05
DEUTSCH ENGLISH
to
to
to
SMALL
MILD STRONG NORMAL
SMALL
MILD STRONG NORMAL
10
AUTOMATIC START
NEDERLANDS
PERSONAL*
BIG
PERSONAL*
BIG
FRANCAIS ITALIANO
12:-- 12:05
SMALL
NORMAL
BIG
NORMAL
200 ml
6.5 oz
30 s
DEUTSCH
13
PROGRAM
OK/+/-
TIME DISPLAY
OK/+/-
VOLUME UNIT
OK/+/-
TIME FORMAT
24H
OK/+/-
17
Page 18
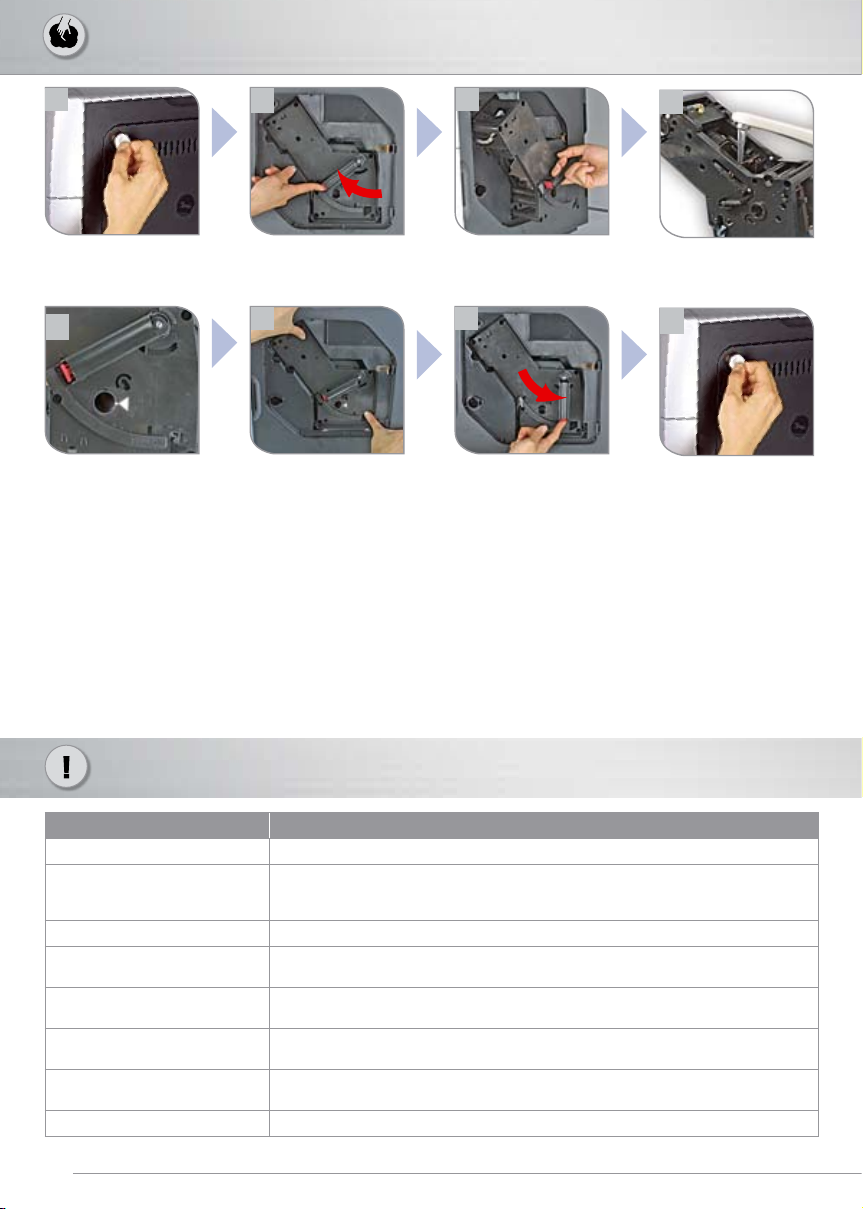
PERIODIC MAINTENANCE
1
Open servicing door
(release with coin)
5
Check that the markings
line up together. If they
are not lined up, press
red button and align.
CHANGING THE FILTER The Claris Aqua Filter System is effective for two months. If machine does not display “change filter”
to begin with, then this must be done after 2 months.
TRANSPORTING MACHINE Use only original packaging or suitable alternative packaging. Krups is not liable for damage in
transit resulting from improper packaging.
GENERAL Wipe machine with a soft damp cloth. Do not wash accessories in a dishwasher. Descale and clean as shown by
the machine. Important: failure to clean or descale will result in no claim being accepted under guarantee. The system should
be emptied if it has not been used for any length of time or is to be transported. Switch off the machine and keep the
hot-water button pressed for three seconds.
2 3
Release brewing unit:
press red button, turn
handle upwards
6
Replace brewing unit
(Push unit so that white
line is visible)
Remove brewing unit
gently
7
Secure brewing unit,
locking mechanism
must be easy to move
4
Clean the brewing group
under running water and
leave to dry
8
Close service door
TROUBLESHOOTING
PROBLEM WHAT TO DO
Coffee is not hot enough Preheat cups with hot water or place them on cup holder
Coffee only drips out
or almost not all
Coffee has no crema Coffee not fresh or unsuitable brand of coffee. Change coffee or brand.
Too little froth, or froth too
runny
No steam/hot water
from nozzle
Grinder is noisy
“check drip tray” is
continually displayed
Doors cannot be opened Lift nozzle so that the door latch is released
18
- Set grinding to coarser grade or if using ready-ground coffee use coarser granules
- Clean brewing unit as described (see above)
- Clean machine as described on page 14-15
Use very fresh, very cold milk (ideally 6-8°C / 42-46°F and minimum 1.5% fat)
Nozzle is blocked - unscrew, clean and prick the opening in the central outlet
with a pin and fit back into place (see Page 11)
During further preparations check whether noise persists;
if so, use only ground coffee. Contact Krups customer service
- Insert drip tray correctly
- Clean metal contacts in rear area
 Loading...