

Page 1
Automatski espresso aparat EA 8025/8050
ESPRESSERIA AUTOMATIC
ENGLISHDEUTSCH
РУССКИЙ
Украï нська
POLSKI
ČESKY
ENGLISHDEUTSCH
Namijenjen isključivo za kućnu uporabu
Jamstvo ne vrijedi ako uređaj ne radi ili radi nepravilno uslijed neredovitog čišćenja, grešaka prilikom
otklanjanja kamenca ili prisutnosti stranih tijela u mlincu za kavu.
U slučaju potrebe za pomoći obratite se na telefon: 01 30 28 226
Page 2

SADRŽAJ
STRANICE
2. Opis
3. Informacije o espresso kavi
Sigurnosne preporuke
4. PRIJE PRVE UPORABE
Mjerenje tvrdoće vode
Postavljanje filtera
5.-6. PRIPREMA APARATA
Prva uporaba / određivanje parametara
Ispiranje tokova kojim kava kruži
Priprema mlinca za kavu
6.-7. PRIPREMA ESPRESSO I UOBIČAJENIH KAVA
Priprema espressa (od 20 do 70 ml)
Priprema uobičajene kave (od 80 do 220 ml)
Priprema duge kave (od 120 do 240 ml)
Priprema 2 šalice kave
7.-8. PRIPREMA PARE
Pjena od mlijeka
Postavljanje i uporaba Auto-Capuccino nastavka
8. UPORABA VRUĆE VODE
9. ODRŽAVANJE VAŠEG APARATA
Pražnjenje spremnika iskorištene kave, čišćenje spremnika za otpatke i
spremnika za kapanje vode.
Ispiranje dijelova kuda kava kruži
Automatski program čišćenja
10. Automatsko uklanjanje kamenca
Opće održavanje
11. OSTALE FUNKCIJE
Održavanje
Postavke
12. Informacije o proizvodu
Demo mod
POMICANJE APARATA
ELEKTRIČNI ILI ELEKTRONSKI APARAT NA KRAJU SVOG ŽIVOTNOG VIJEKA
13. MOGUĆI PROBLEMI I ISPRAVNI POSTUPCI
14. RECEPTI
Page 3
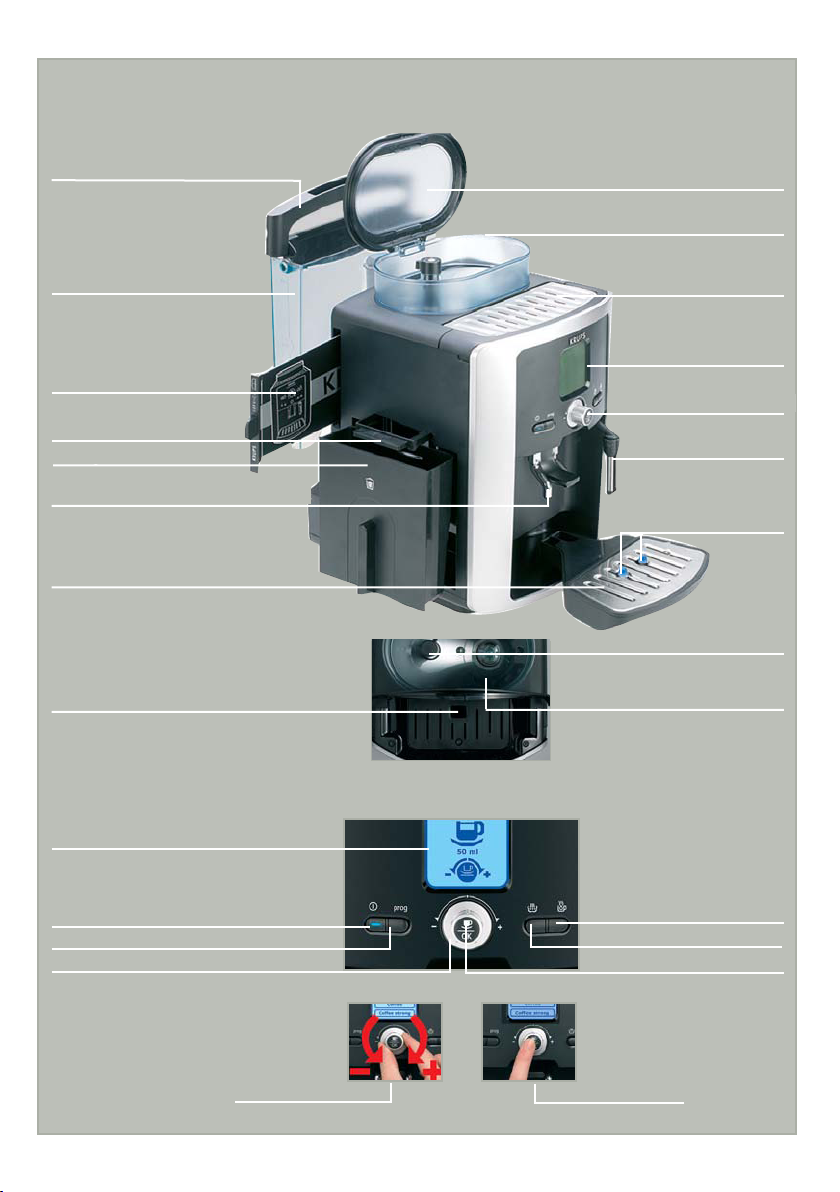
2
Hot water key
OK validation key
Steam button
Rotating button
Setting key
Top view
Cleaning pellet pipe
DESCRIPTION
Cleaning tray
Water tank
Select
Metal grinding wheel
Special servicing instructions
Steam nozzle
Rotating button
Removable drip grid and tray
Display screen
Display screen
Water tank handle/lid
Ručica spremnika za vodu
Spremnik za vodu
Posebne upute o
održavanju
Posuda za otpatke
Posuda za sakupljanje
iskorištene kave
Cjevčice za proticanje kave s
pomičnom ručicom
Pomična posuda u koju kaplje voda
Otvor za ubacivanje tablete
za čišćenje
Poklopac spremnika za kavu u zrnu
Spremnik za kavu u zrnu
Grijač za šalice
Zaslon
Rotirajuća tipka
Cjevčica za paru
Indikatori razine vode
Tipka za namještanje
finoće mljevenja
Metalni kotač za
mljevenje
Zaslon
„On/off“ žaruljica i tipka
Tipka za podešavanje
Rotirajuća tipka
Odaberi
Tipka za vrelu vodu
Tipka za paru
„Ok“ tipka
Potvrdi
Page 4

Thank you for having purchased this Krups Espresseria Automatic. We are sure you will enjoy both the quality of the coffee
it makes and how easy it is to use.
Whether you want a short, strong shot of a ristretto, a good espresso, a bigger and milder lungo, or a creamy cappuccino,
your automatic coffee / espresso machine has been designed so you can enjoy the same quality at home as at the bistro,
whatever the time of day and right through the week.
Thanks to its Thermoblock System, its 15 bar pump and because it uses real coffee beans that are ground just before the
coffee is made, your Espresseria Automatic will give you a drink containing maximum aroma, with a fine creamy golden
brown top produced by the natural oils contained in coffee beans.
Drink your espresso from small porcelain cups rather than the usual coffee cup or mug.
To obtain an espresso at just the right temperature and a nice compact creamy top, we advise you to pre-heat your cup.
After a few trial runs you will find the type of mix and roast of the coffee beans that suits your taste. The quality of the water
used is obviously another essential factor in the coffee you get.
Make sure the water has come fresh out of the tap (contact with the air tends to make it stagnate), that it is free from
chlorine odours and relatively cold.
Espresso coffee is richer in aroma than a conventional filter coffee. Despite its stronger, longer-lasting taste, espresso in
fact contains less caffeine than filter coffee (about 60 to 80 mg a cup as compared with 80 to 100 mg a cup). This is due
to the shorter percolation time.
Due to the visibility of the containers and its automatic cleaning and scale removal programs, your Espresseria Automatic is
extremely easy to use.
Important: Safety instructions
� Read the instructions for use carefully before first using your appliance and keep them for reference: Incorrect use of the
appliance will release KR UPS from any responsibility.
� Place on a flat, stable, heat-resistant surface.
� Connect the appliance only to an earthed mains socket. Check that the power supply voltage shown on the appliance’s rating
plate corresponds to that of your electrical installation.
� Make certain not to place the appliance on a hot surface such as a hot-plate or use it close to a bare flame.
� Immediately take the plug out of the socket if you notice any problem while coffee is being made.
� Do not pull the power supply cord to remove the plug.
� Do not let the power supply cord hang down from a table or work surface.
� Do not put your hand or the power supply cord on the hot parts of the appliance.
� Never soak the appliance, the power cord or the electric plug in water or any other liquid.
� Keep the appliance out of reach of children and do not let the power supply cord hang down.
� Do not use the appliance if the power supply cord or the appliance itself is damaged.
� For safety reasons, do not use the appliance if the power supply cord or plug are damaged. Only have the power supply cord
replaced by an authorised KRUPS service centre.
� Always refer to the instructions when removing scale from the appliance.
� Protect the appliance against humidity and freezing.
� Do not use the appliance if it does not run correctly or if it has been damaged. In this case, have the appliance examined by a
KRUPS authorized service centre (see list in KRUPS Service handbook).
� Apart from cleaning and scale removal in accordance with the appliance’s user instructions, any intervention on the appliance
must be performed by a certified KRU PS service centre.
� In the interests of safety, only use accessories and consumables certified by KRUPS for your appliance.
� Any error in connection negates the warranty.
� Disconnect the appliance as soon as you stop using it over a prolonged period and when you clean it.
� All appliances are subject to stringent quality control. Practical tests using appliances taken at random are conducted and this
may explain any marks showing prior use.
� You are advised against using multiple plugs and/or extensions.
� Do not put water into the coffee bean container and/or under the servicing flap.
� Be careful of the direction of the steam nozzle as steam can cause scalding.
� Failure to ensure scale removal, cleaning and regular maintenance or the presence of foreign bodies in the grinder will mean that
warranty will not be valid.
Limits to use
This Espresso machine must only be used to prepare espressos or coffee, to froth up milk and heat liquids. This product has been
designed for domestic use only. Any commercial use inappropriate use or failure to comply with the instructions, the manufacturer
accepts no responsability and the guarantee will not apply.
FALCON DISPLAY ANGLAIS 26/10/05 8:56 Page 3
Zahvaljujemo se na kupnji Krups espresso aparata. Sigurni smo da ćete uživati ujedno i u kvaliteti pripremljene
kave, kao i u jednostavnosti pripreme.
Svejedno je da li želite kratku kavu, jaču, dobar espresso, dužu kavu ili kremasti cappuccino, Vaš digitalni
espresso aparat napravljen je da uživate u istoj kvaliteti kave kod kuće, kao što bi uživali u kafiću, bilo koji dan
u tjednu ili u bilo koje doba dana.
Zahvaljujući sustavu protiv pregrijavanja, pumpi od 15 bara i tome što se kava melje neposredno pred kuhanje,
Vaš aparat vam pruža maksimalnu aromu, sa kremastom pjenom, od prirodnih ulja u zrnima kave.
Svoj espresso pijte iz malih porculanskih šalica, radije nego iz uobičajenih šalica za kavu.
Da biste dobili espresso prave temperature, kao i kremastu pjenu, preporučujemo da zagrijete šalice prije
uporabe.
Nakon par puta, znati ćete koja kava odgovara Vašem ukusu. Kvaliteta vode je još jedan bitan faktor u kavi koju
pravite.
Uvijek koristite svježu vodu iz slavine (u kontaktu sa zrakom, voda postaje ustajala), bez klora i da je hladna.
Espresso kava ima bogatiju aromu od filter kave. Usprkos jačini kave, okus duže traje i kava ima manje kofeina
nego filter kava (oko 60 do 80 mg po šalici usporedivo sa 80-100 mg po šalici). Ovo je zbog kraćeg vremena
filtriranja.
Zbog vidljivog spremnika za vodu i mogućnosti automatskog čišćenja i uklanjanja kamenca, Vaš aparat je
nevjerojatno lagan za uporabu.
Važno: Sigurnosne upute
• Prijep rveuporabepa žljivopr očita jteuputezauporabuisaču vajteih.N epravi lnokori štenjea parat a,oslobađaKRU PSbilo
kakve odgovornosti.
• Uređa jpostav itenarav nu,sta bilnuiter moizol iranupodlogu .
• Uređa juključujteisk ljučivouuzemlje nuutič nicu.Provjerit edalinapo nstruj euređajaodgova raVašojelekrič nojinstalaci ji.
• Uređa jnestavl jajteubl iziniizvoratopl ine,električ noggrijačailiplamena .
• Odmahi sključiteure đajizstr ujeakouo čitebiloko jiproblempril ikomprik ljučivanja.
• Nepovla čitezapriklju čnivodka kobisteis ključi liuređa jizstru je.
• Neosta vljajtep riklj učnivoddavisi.
• Nestav ljajter ukeuutičn icuilinav rućedijeloveur eđaja .
• Nikadn estavljajteure đaj,pri ključnivodiliut ikačuvodui linekudr uguteku ćinu.
• Uređaj držite dalje od djece i ne ostavljajte priključni vod da visi.
• Nekoris titeuređajakojep riklj učnivodil iutikačo štećen.Zamij enitepr iključ nivodkodovl ašten ogKRUPSs ervisa.
• Uvije ksepridr žavajteuputstavapril ikomuklanjanj akamenc aizuređ aja.
• Zašt ititeuređajodvl ageihlad noće.
• Nerabiteuređ ajakoneradiispra vnoiliakoj eošteće n.Uovomslu čaju,ob ratites eovlaštenomKRUPSser visu.
• Svakad rugaint erven cijaosi mčišćen jaiukla njanjak amenca,koris tećiprit omuputs tvazaup orabu ,morabit iobavljenaod
strane ovlaštenog KRUPS servisa.
• Dabist esačuva liVašapar at,koristitesamoorig inalnedijelove .
• Svakap ogreškaprili komprik ljučiva njaure đajponi štavaja mstvo.
• Isklj učiteur eđajkadanijeuupo rabiipr ilikomčišćenj a.
• Svidod acisupod vrgnu tikontrolikval itete.
• Prepo ručuje modanekor istitem ultiuti čniceil iproduž niprik ljučnivo d.
• Neulijevajtevod uuspremn ikzakavuin a/is podgri jačazaš alice
• Obratitepozor nostnas mjerpare,jerpa ramožeiz azvatiopekli ne.
• Pogre škepriuk lanjan jukame nca,čišćenju ,redovitoodržavanjeilip risut noststr anihti jelaumli ncuzakavu,poniš tavaju
jamstvo.
Ograničenja uporabe
Ovaj espresso aparat mora biti korišten samo za pravljenje espressa ili kave, za zagrijavanje mlijeka i tekućine. Aparat je
namijenjen samo za kućnu uporabu. Za svaku javnu uporabu, nepravilnu uporabu ili uporabu koja nije u skladu sa uputama za
uporabu, proizvođač se neće smatrati odgovornim i jamstvo ne vrijedi.
Uređaj je namijenjen samo za kućnu uporabu. Nije dizajniran za profesionalnu ili javnu uporabu.
Prije nego što je izašao iz t vornice, Vaš uređaj je bio provjeren i testiran pomoću prave kave u zranu. Međutim, unatoč
temeljitom čišćenju moguće je da unutar uređaja još ima tragova kave i kapljica vode. Mi ja mčimo da su takvi uređaji potpuno
novi. Stoga je naš a preporuka da prije prve uporabe napravite jedan do dva ciklusa ispiranja kao i da ponovite ispiranje svaki
put kad ne rabite uređaj duže od nekoliko dana .
33
Page 5
BEFORE FIRST USE
FALCON DISPLAY ANGLAIS 26/10/05 8:56 Page 4
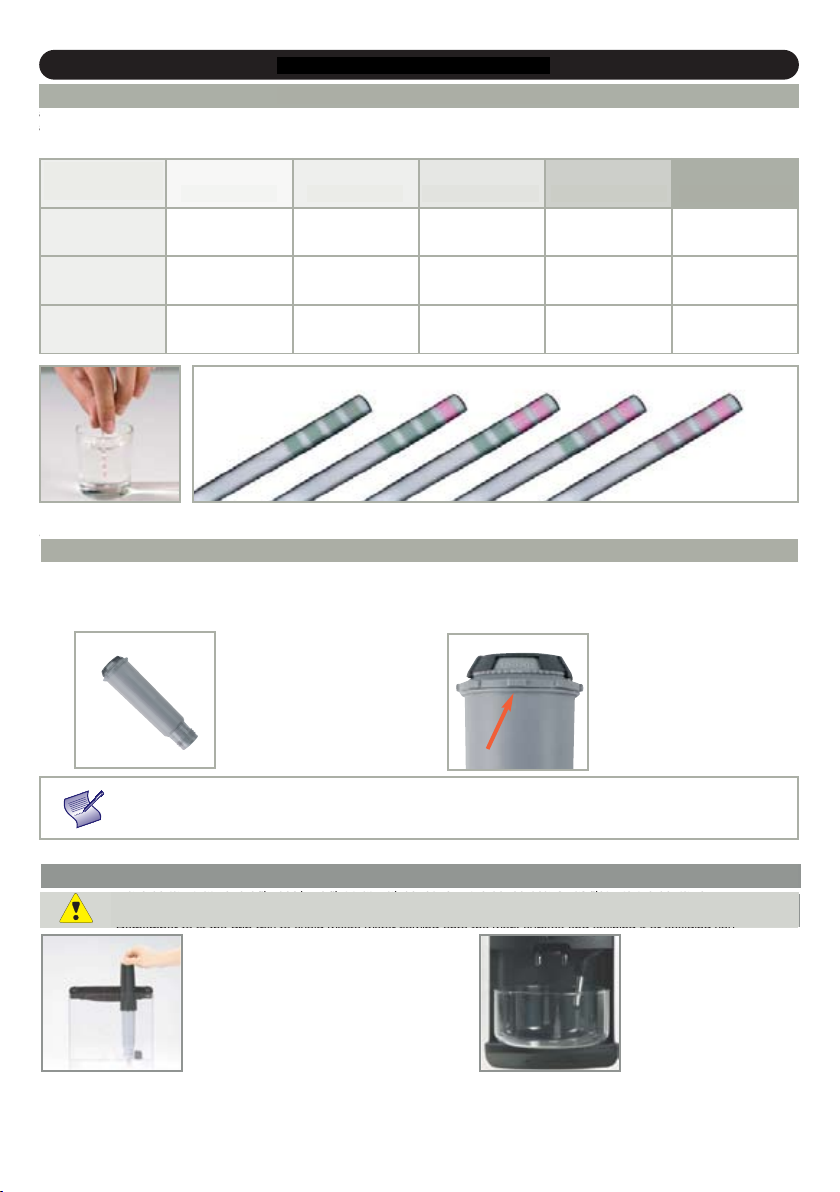
To get the best taste from your coffee and extend your appliance’s service life, we advise you to use the Claris - Aqua Filter
System cartridge sold as an accessory.
It comprises a scale-removing substance and activated carbon that reduces chlorine, impurities, lead, copper, pesticides, etc.
that are present in the water. Minerals and trace elements will then be preserved.
Before using the appliance for the first time or if you have noted a change in water hardness, it is advisable to adapt the
appliance to the observed water hardness. To determine the water hardness, use the measuring stick delivered with the
appliance or get in contact with your water board. The appliance will ask you for the hardness of your water on first use
(see First use / Setting machine parameters section)
BEFORE FIRST USE
After 1 minute the hardness measurement will appear
(moderately hard water)
Filter the water using the
Claris - Aqua Filter System
cartridge to reduce
carbonate hardness by as
much as 75 %*
Chlorine – up to 85 %*
Lead – up to 90 %*
Copper – up to 95 %*
Aluminium – up to 67 %*
To fit the cartridge, also
refer to the “First use”
section.
Your appliance will give you a message telling you when to replace your Claris - Aqua Filter System cartridge.
The Claris cartridge needs to be replaced for about every 50 litres of water or every two months at least.
Fill a glass with water
and immerse a stick
in it
Degree of
hardness
0
very soft
1
soft
2
moderately hard
3
hard
4
extremely hard
°f
<5,4° >7,2° >12,6° >25,2° > 37,8°
° dH
<3° >4° >7° >14° > 21°
° TH
<3,75° >5° >8,75° >17,5° > 26,25°
1 sec.
0 12
3
4
MEASURING WATER HARDNESS
CLARIS - AQUA FILTER SYSTEM F 088 CARTRIDG E (SOLD SEPARATELY)
* indications provided by the manufacturer
F 088
Installing the cartridge in
the machine.
On first use, screw the filter
cartridge into the bottom of
the water tank.
Mechanism to memorise the
month the cartridge was
fitted and when to replace it
(after 2 months at most).
FALCON DISPLAY ANGLAIS 26/10/05 8:56 Page 4
Before using the appliance for the first time or if you have noted a change in water hardness, it is advisable to adapt the
appliance to the observed water hardness. To determine the water hardness, use the measuring stick delivered with the
appliance or get in contact with your water board. The appliance will ask you for the hardness of your water on first use
(see First use / Setting machine parameters section)
BEFORE FIRST USE
After 1 minute the hardness measurement will appear
(moderately hard water)
Fill a glass with water
and immerse a stick
Degree of
hardness
0
very soft
1
soft
2
moderately hard
3
hard
4
extremely hard
°f
<5,4° >7,2° >12,6° >25,2° > 37,8°
° dH
<3° >4° >7° >14° > 21°
° TH
<3,75° >5° >8,75° >17,5° > 26,25°
1 sec.
0 12
3
4
MEASURING WATER HARDNESS
FALCON DISPLAY ANGLAIS 26/10/05 8:56 Page 4
To get the best taste from your coffee and extend your appliance’s service life, we advise you to use the Claris - Aqua Filter
System cartridge sold as an accessory.
It comprises a scale-removing substance and activated carbon that reduces chlorine, impurities, lead, copper, pesticides, etc.
that are present in the water. Minerals and trace elements will then be preserved.
Before using the appliance for the first time or if you have noted a change in water hardness, it is advisable to adapt the
appliance to the observed water hardness. To determine the water hardness, use the measuring stick delivered with the
appliance or get in contact with your water board. The appliance will ask you for the hardness of your water on first use
(see First use / Setting machine parameters section)
BEFORE FIRST USE
After 1 minute the hardness measurement will appear
(moderately hard water)
Fill a glass with water
and immerse a stick
in it
Degree of
hardness
0
very soft
1
soft
2
moderately hard
3
hard
4
extremely hard
°f
<5,4° >7,2° >12,6° >25,2° > 37,8°
° dH
<3° >4° >7° >14° > 21°
° TH
<3,75° >5° >8,75° >17,5° > 26,25°
1 sec.
0 12
3
4
MEASURING WATER HARDNESS
CLARIS - AQUA FILTER SYSTEM F 088 CARTRIDG E (SOLD SEPARATELY)
F 088
FALCON DISPLAY ANGLAIS 26/10/05 8:56 Page 4
BEFORE FIRST USE
After 1 minute the hardness measurement will appear
(moderately hard water)
0
1
soft
2
moderately hard
3
hard
4
extremely hard
0 12
3
4
MEASURING WATER HARDNESS
To get the best taste from your coffee and extend your appliance’s service life, we advise you to use the Claris - Aqua Filter
System cartridge sold as an accessory.
It comprises a scale-removing substance and activated carbon that reduces chlorine, impurities, lead, copper, pesticides, etc.
that are present in the water. Minerals and trace elements will then be preserved.
Before using the appliance for the first time or if you have noted a change in water hardness, it is advisable to adapt the
appliance to the observed water hardness. To determine the water hardness, use the measuring stick delivered with the
appliance or get in contact with your water board. The appliance will ask you for the hardness of your water on first use
(see First use / Setting machine parameters section).
BEFORE FIRST USE
After 1 minute the hardness measurement will appear (moderately hard water)
Filter the water using the
Claris - Aqua Filter System
cartridge to reduce
carbonate hardness by as
much as 75 %*
Chlorine – up to 85 %*
Lead – up to 90 %*
Copper – up to 95 %*
Aluminium – up to 67 %*
Your appliance will give you a message telling you when to replace your Claris - Aqua Filter System cartridge.
The Claris cartridge needs to be replaced for about every 50 litres of water or every two months at least.
Fill a glass with water
and immerse a stick
into it.
Degree of
hardness
0
very soft
1
soft
2
moderately hard
3
hard
4
extremely hard
° f
<5,4° >7,2° >12,6° >25,2° > 37,8°
° dH
<3° >4° >7° >14° > 21°
° TH
<3,75° >5° >8,75° >17,5° > 26,25°
1 sec.
0 12
3
4
MEASUR ING WATER HARDNESS
* indications provided by the manufacturer
F 088
Mechanism to memorise the
month the cartridge was
fitted and when to replace it
(after 2 months at most).
CLARIS - AQUA FILTER SYSTEM F 088 CARTRIDGE (SOLD SEPARATELY)
PUTTING THE FILTER IN PLACE
Screw the filtering cartridge
into the bottom of the
water tank using the span-
ner provided.
Place a 0.5 L recipient
underneath the steam
nozzle.
Using for the first time : Choose the “YES” option in the “FILTER” function and follow the instructions on the screen.
When using later or replacing the cartridge
: Select the "FILTER" function using the Prog button : :
Maintenance -OK - Filter - OK - Place or change -OK - and follow the instructions on the screen.
To ensure that your machine and filtering cartridge work properly, please follow the cartridge installation procedure carefully.
ENGLISH
BEFORE FIRST USE
MEASURING WATER HARDNESS
FALCON DISPLAY ANGLAIS 26/10/05 8:56 Page 4
Pull out and fill the
water tank.
Put it back in place by
pressing firmly and
close the lid again.
Open the coffee bean
container lid. Add the
coffee beans (250 g
maximum).
Close the coffee bean
container lid again.
Make certain that no foreign body like grit that may be found in the coffee beans has got into the container.
Any damage due to foreign bodies that have got into the coffee container is outside the warranty.
Do not put water into the coffee bean container.
Do not fill the water tank with hot water, mineral water, milk or any other liquid. If you turn on the appliance when the
water tank is not in place or not correctly filled (under the “min.” level,), the “fill water tank” light will come on and
making an espresso or a cup of coffee will be made impossible.
Never put ground coffee in the coffee container.
PREPARING THE APPLIANCE
PRIJE PRVE UPORABE
MJERENJE TVRDOĆE VODE
Prije prve upor abe ure đaja ili ako imate za bilježene promjene u tvrdoći vode preporučljivo je postaviti uređaj na ut vrđenu tvrdoću
vode. Da bi odredili tvrdoću vode, koristite mjerni štapić koji ste dobili s uređajem ili kontaktirajte poduzeće koja vam isporučuje
vodu. Uređaj će vas pitati prilikom prve uporabe podatke o tvrdoći vode (vidi prva uporaba / dio postavljanje parametara uređaja)
Stupanj tvrdoće
vode
Napunite čašu vode i
umočite štapić.
CLARIS – FILTER ZA PROČIŠĆAVANJE VODE F088 (PRODAJE SE POSEBNO)
Da biste dobili bolji okus kave i da biste produžili vijek trajanja Vašeg uređaja, savjetujemo Vam da koristite Claris- filter za vodu, koji
se prodaje kao dodatak uređaju.
Sadrži sustav z a otklanjanje kamenca i aktivni ugljen koji smanjuje klor, nečistoću, bakar i pesticide koji su prisutni u vodi. Minerali i
elementi u tragovima će biti sačuvani.
*indeksi pribavljeni od strane proizvođača
Prva uporaba: Izaberite “YES” opciju pod funkcijom “FILTER” i pratite upute koje se pojavljuju na zaslonu.
Svaka slijedeća uporaba ili zamjena:
Odaberite funkciju “FILTER” rabeći tipku “Prog” : Pr og- Maintenance - OK - Filter - OK - Place or change - OK - i zatim
slijedite upute koje se pojavljuju na zaslonu.
Claris filter treba biti zamijenjen nakon svakih 50 litara vode, odnosno svaka dva mjeseca.
Kako biste bili sigurni da će aparat i filter ispravno r aditi, pomno slijedite navedene upute.
Vrlo meka voda Meka voda Umjereno tvrda voda Tvrda voda Vrlo tvrda voda
Navijte filter na dno spremnika
za vodu rabeći priloženi alat.
Pročistite vodu koristeći
Claris sustav da smanjite
prisustvo karbona za 75%
*Klor a - za 85 %
*Olovo - za 90%
*Bakar - za 95 %
*Aluminij – za 67%*
Prije mjerenja tvrdoće vode. Nakon 1 min. Pojaviti će se
mjera t vrdoće (umjereno tvrda voda)
POSTAVLJANJE FILTERA
4
Mehanizam za označavanje
mjeseca kada je filter
postavljen i kada se treba
zamijeniti (na kon 2 mjeseca
najviše)
Postavite posudu od 0,5 l
ispod cjevčice za paru.
Page 6

Pull out and fill the
water tank.
Select
Confirm
Put it back in place by
pressing firmly and
close the lid again.
Open the coffee bean
container lid. Add the
coffee beans (250 g
maximum).
Close the coffee bean
container lid again.
Make certain that no foreign body like grit that may be found in the coffee beans has got into the container.
Any damage due to foreign bodies that have got into the coffee container is outside the warranty.
Do not put water into the coffee bean container.
Remember to fit the drip tray to avoid waste water flowing onto the work surface and staining it or scalding you.
Do not fill the water tank with hot water, mineral water, milk or any other liquid. If you turn on the appliance when the
water tank is not in place or not correctly filled (under the “min.” level,), the “fill water tank” light will come on and
making an espresso or a cup of coffee will be made impossible.
Never put ground coffee in the coffee container.
When you first use your appliance, it will ask you to
set several parameters. If you disconnect your
appliance, you will again be asked for some of these
parameters.
Use the rotating button
to choose a language
(highlighted). Press the
OK key to validate.
Press “On / Off” to turn
your appliance on.
Follow the instructions
that appear on the
“choice of language”
screen.
Use the rotating button to select a function, increase or reduce values. Confirm your choice using the OK key.
PREPARING THE APPLIANCE
FIRST USE / SETTING MACHINE PARAMETERS
The appliance will ask you to set:
FALCON DISPLAY ANGLAIS 26/10/05 8:56 Page 5
PRIPREMA APAR ATA
Pull out and fill the
water tank.
Select
Confirm
Put it back in place by
pressing firmly and
close the lid again.
Open the coffee bean
container lid. Add the
coffee beans (250 g
maximum).
Close the coffee bean
container lid again.
Make certain that no foreign body like grit that may be found in the coffee beans has got into the cont ainer.
Any damage due to foreign bodies that have got into the coffee container is outside the warranty.
Do not put water into the coffee bean container.
Remember to fit the drip tray to avoid waste water flowing onto the work surface and staining it or scalding you.
Do not fill the water tank with hot water, mineral water, milk or any other liquid. If you turn on the appliance when the
water tank is not in place or not correctly filled (under the “min.” level,), the “fill water tank” light will come on and
making an espresso or a cup of coffee will be made impossible.
Never put ground coffee in the coffee container.
When you first use your appliance, it will ask you to
set several parameters. If you disconnect your
appliance, you will again be asked for some of these
parameters.
Use the rotating button
to choose a language
(highlighted). Press the
OK key to validate.
Press “On / Off” to turn
your appliance on.
Follow the instructions
that appear on the
“choice of language”
screen.
Use the rotating button to select a function, increase or reduce values. Confirm your choice using the OK key.
PREPARING THE APPLIANCE
FIRST USE / SETTING MACHINE PARAMETERS
The appliance will ask you to set:
Language
Measurement unit
Date
Clock
Auto-off
Auto-on
Water hardness
Filter
You can select your chosen language from those offered.
Choose either ml or oz as your measurement unit
You must set the date.
You can choose between 12 hour or 24 hour time display.
You can choose the period after which your appliance will stop
automatically, from 30 minutes to 4 hours by 30 minute increments.
You can automatically start pre-heating of your appliance at your
chosen time.
You must set your water hardness between 0 and 4. See “Water
hardness measurement” section.
You must indicate whether a filter is fitted or not (Claris – Aqua
Filter System cartridge)
Pull out and fill the
water tank.
Put it back in place by
pressing firmly and
close the lid again.
Open the coffee bean
container lid. Add the
coffee beans (250 g
maximum).
Close the coffee bean
container lid again.
Check that the coffee beans do not contain any foreign particles such as grit, as any damage caused by the presence of
foreign particles will negate the guarantee.
Do not put water into the coffee bean container.
Remember to fit the drip tray to avoid waste water flowing onto the work surface and staining it or scalding you.
Check that your water tank is clean.
Do not fill the water tank with hot water, mineral water, milk or any other liquid. If you turn on the appliance
when the water tank is not in place or not correctly filled (under the “min.” level,), the “fill water tank” light will come on and
making an espresso or a cup of coffee will be made impossible.
Use the rotating button to select a function, increase or reduce values. Confirm your choice using the OK key.
PREPARING THE APPLIANCE
FIRST USE / SETTING MACHINE PARAMETERS
NEVER PUT GROUND COFFEE IN THE COFFEE CONTAINER.
It is recommended that you do not use oily, caramelised or flavoured coffee beans for this machine. These kinds of beans
may damage the machine.
Pull out and fill the
water tank.
Put it back in place by
pressing firmly and
close the lid again.
Open the coffee bean
container lid. Add the
coffee beans (250 g
maximum).
Close the coffee bean
container lid again.
Make certain that no foreign body like grit that may be found in the coffee beans has got into the container.
Any damage due to foreign bodies that have got into the coffee container is outside the warranty.
Do not put water into the coffee bean container.
Do not fill the water tank with hot water, mineral water, milk or any other liquid. If you turn on the appliance when the
water tank is not in place or not correctly filled (under the “min.” level,), the “fill water tank” light will come on and
making an espresso or a cup of coffee will be made impossible.
Never put ground coffee in the coffee container.
PREPARING THE APPLIANCE
FALCON DISPLAY ANGLAIS 26/10/05 8:56 Page 5
Izvucite i napunite
spremnik za vodu.
Spremnik za vodu nemojte puniti vrelom vodom, mineralnom vodom, mlijekom ili nekom drugom tekućinom. Ako
uključite uređaj a spremnik za vodu nije dobro postavljen ili napunjen („min“ nivo), „fill water tank“žaruljica će se
upaliti i pravljenje kave biti će onemogućeno.
Vratite ga na mjesto,
pažljivim pritiskom
i zatvorite poklopac
ponovo.
Otvorite poklopac
spremnika za kavu.
Dodajte kavu (250 g
maksimum)
Nikada ne stavljajte mljevenu kavu u spremnik za kavu.
Koristite rotirajuću tipku da odaberete funkciju, smanjite ili povećate vrijednosti. Potvrdite izbor tipkom „OK“.
da uključite Vaš uređaj.
Slijedite upute koje se
pojave na zaslonu
( „izbor jezika“).
Uređaj će od Vas tražiti slijedeća podešavanja:
Provjerite da nema stranih tijela u mlinu za kavu, kao što su prašina u kavi. Svaka šteta prouzrokovana stra nim tijelima
u spremniku za kavu, poništava jamstvo. Ne stavljajte vodu u spremnik za kavu. Ne zaboravite postaviti posudu za
kapljevinu kako biste onemogućili prskanje vode po radnim površinama.
Preporučujemo vam da ne r abite masnu, karameliziranu ili aromatiziranu kavu u zrnu jer možete oštetiti uređaj.
PRVA UPORABA/ODREĐIVANJE PARAMETARA UREĐAJA
Ukoliko prvi put rabite aparat moguće je da će vas pitati da napunite spremnik vode. U tom slučaju jednostavno
slijedite upute koje će se pojaviti na zaslonu.
Jedinica mjere
Auto-isključenje
Auto-uključenje
Koristite rotirajuću
tipku da odaberete jezik
(svjetlije). Pritisnite ok
da potvrdite.
Jezik
Datum
Sat
Tvrdoća vode
Filter
Odaberite jezik
Odaberite jedinicu mjere
Morate namjestiti datum
Možete od abriti između 12 i 24 satnog vremen a.
Možete od abrati v rijeme ka da će se aparat sa m isključiti od 3 0 minuta do 4h.
Možete au tomatsk i započeti pre dzagrijavanje Vašeg aparata u željeno vrijeme
Morate p odesiti tvrd oću vode izm eđu 0 i 4. Pogledajte „ Mjerenje tvrdo će
vode “.
Morate o dabrati post avku, bez obzira da li je filter namješten ili ne. (Claris -filter
za pročišćavanj e vode).
Odaberite PotvrditePritisnite „ON/off“ tipku
Kada pr vi put uporabljavate uređaj, potrebno je
podesiti određene parametre. Ako isk ljučite uređaj, biti
će potrebno ponovo namjestiti određene parametre.
5
Zatvorite pok lopac
spremnika za kavu
ponovo.
Page 7

It is best to perform rinsing after the appliance has remained unused for several days.
You can rinse the coffee-making
system once the appliance has
been turned on and pre-heating
has been completed.
Place a recipient under the coffee
outlets then select “YES” from the
menu proposed. The rinsing cycle
will stop automatically after
about 40 ml.
Press at any time to display menus to perform rinsing and then select MAINTENANCE => OK => RI NSING.
Use a 0.5 litre recipient, choose the “Yes” option in the “Filter” function and follow the instructions on the screen.
INSTALLING THE FILTER (CLARIS – AQUA FILTER SYSTEM CARTRIDGE)
COFFEE-MAKING SYSTEM RINSING
FALCON DISPLAY ANGLAIS 26/10/05 8:56 Page 6
6
It is best to perform rinsing after the appliance has remained unused for several days.
You can rinse the coffee-making
system once the appliance has
been turned on and pre-heating
has been completed.
Place a recipient under the coffee
outlets then select “YES” from the
menu proposed. The rinsing cycle
will stop automatically after
about 40 ml.
Press at any time to display menus to perform rinsing and then select MAINTENANCE => OK => RI NSING.
Use a 0.5 litre recipient, choose the “Yes” option in the “Filter” function and follow the instructions on the screen.
Adjust the fineness of your coffee grinding to set the strength of your coffee. The finer the grind setting, the stronger and
creamier the coffee will be.
Turn the “Grinding fineness setting” button to set the degree of grinding fineness.
CHANGE TH E SETTI NG DU RING GRINDING.
NEVER FORCE THE GRI NDI NG FINENESS SETTING B UTTON.
Turn anticlockwise
for a finer grind.
Turn clockwise
for a coarser
grind.
INSTALLING THE FILTER (CLARIS – AQUA FILTER SYSTEM CARTRIDGE)
COFFEE-MAKING SYSTEM RINSING
PREPARING THE GRINDER
PREPARING EXPRESSO AND ORDINARY COFFEE
YOUR APPLIANCE IS DES IGNED TO MAKE COFFEE FROM COFFEE BEAN S ONLY.
When you first make coffee with the machine or after a long period of absence or a cleaning or
scale removal procedure, a little steam and hot water will come out of the steam nozzle (priming).
Splashing or scalding may occur if the coffee outlets are set too high in relation to the size
of the cups.
PREPARING AN EXPRESSO (FROM 20 TO 70 M L)
The quantity of water for an espresso must be between 20 and 70 ml.
The quantity of water for a cup of coffee must be between 80 and 220 ml.
PREPARING A CUP OF COFFEE (FROM 80 TO 220 ML)
RINSING OF CIRCUITS
ENGLISH
Pull out and fill the
water tank.
Put it back in place by
pressing firmly and
close the lid again.
Open the coffee bean
container lid. Add the
coffee beans (250 g
maximum).
Close the coffee bean
container lid again.
Make certain that no foreign body like grit that may be found in the coffee beans has got into the container.
Any damage due to foreign bodies that have got into the coffee container is outside the warranty.
Do not put water into the coffee bean container.
Do not fill the water tank with hot water, mineral water, milk or any other liquid. If you turn on the appliance when the
water tank is not in place or not correctly filled (under the “min.” level,), the “fill water tank” light will come on and
making an espresso or a cup of coffee will be made impossible.
Never put ground coffee in the coffee container.
PREPARING THE APPLIANCE
Place a recipient under the coffee
outlets then select “YES” from the
menu proposed. The rinsing cycle
will stop automatically after
about 40 ml.
Turn clockwise
for a coarser
grind.
ISPIRANJE TOKOVA KOJIM KAVA KRUŽI
Uključite uređaj. Nakon
početnog zagrijavanja
možete započeti
proces ispiranja.
Pritisnite „Prog“ kada želite pokrenuti ovaj proces, zatim odaberite MAINTENANCE=>OK=>RINSING.
Jačinu kave možete odabrati namještanjem polugice mlinca za kavu. Što je polugica bolje namještena, jača i kremastija kava će biti.
Namjestite mlinac kolutićem „Grinding fineness setting“.
Količina vode za šalicu kave mora biti između 20 i 70 ml.
Količina vode za šalicu kave mora biti između 80 i 220 ml.
Količina vode za šalicu mora biti između 120 i 240 ml. Aparat automatski provodi dvostruki ciklus, ne pomičite šalicu dok proces ne
završi u potpunosti.
Ispiranje je najbolje započeti kada uređaj nije korišten određeno vrijeme.
KADA JE PROCES ISPIRANJA U TIJEKU VRUĆA VODA PROLAZI KROZ CJEVČICE: PAZITE KAKO SE NE BISTE OPEKLI.
Okrenite lijevo za
finije mljevenje
POSTAVKE MIJENJAJTE PRILIKOM MLJEVENJA. NIKADA SILOM NE PRITIŠĆITE TIPKU ZA FINO MLJE VENJE .
VAŠ APARAT JE DIZ AJNIRAN DA RADI KAVU ISKLJUČIVO POMOĆU KAVE U ZRNU.
Kada pravite kavu prvi put nakon uklanjanja kamenca ili nakon što uređaj niste dugo koristili, malo pare i vrele vode
će iscuriti iz cjevčice za paru. Prskanje ili para mogu se pojaviti ako su cjevčice za kavu namještene previsoko u
odnosu na šalicu kave.
PRIPREMA ESPRESSO I UOBIČAJENIH KAVA
PRIPREMA ESPRESSA (OD 20-70 ml)
PRIPREMA ŠALICE KAVE (OD 80-220 ml)
PRIPREMA DUGE KAVE (OD 120 DO 240 ML)
Ispi ranje tokova koji ma kru ži
kava:
Postavi te spremn ik od 350 ml
ispod cjevčica za k avu i cjevči ce
za paru te i zaber ite “YES” iz
predloženog izb ornika . Ciklus
ispiranja će se au tomatsk i
zaust aviti nakon 40 ml.
PRIPREMA MLINCA ZA KAVU
Okrenite desno za grublje
mljevenje
6
Ispi ranje tokova koji ma
prol azi par a:
Pritis nite tipku (s taviti ikoni cu
iz origi nalnih upu ta) kako
biste isp rali tok koji m kruži
para. C iklus isp iranja će s e
automat ski zaus taviti nako n
što istek ne količin a vode
prika zana na za slonu.
Page 8

7
Press the button, wait for the end of pre-heating and perform a rinsing operation if you wish.
You can change the
volume of water at any
time using the rotating
button.
Use the rotating button
to select your drink and
confirm by pressing the
OK key.
The drink selection
menu will be displayed.
The ground coffee is first moistened with a little hot water after the grinding stage.
A few moments later, percolation as such starts.
You can use your appliance to make 2 cups of coffee or espresso. Remember not to remove the cups after the first cycle.
You have now prepared your appliance. The drink select menu will be displayed.
Put two cups under the cof-
fee outlets.
You can lower or raise the
coffee outlets to suit the
size of your cups.
Put a cup under the coffee
outlets.
You can lower or raise the
coffee outlets to suit the
size of your cups.
Select your drink and confirm by
clicking twice on the OK key. A
message will appear to tell you
that you have chosen two cups.
If the tray is full or the water tank is empty while preparing the first coffee, the second cycle will not be run.
You will then have to restart your second cycle after you have seen to things.
The appliance will
automatically sequence 2
complete coffee-making
cycles.
To stop coffee flowing into the cup, you can either again press a key or turn the rotating button to reduce
volume.
x 2
TWO-CUP FUNCTION
There is a temperature setting function to control how hot your coffee is (see Settings).
PREPARING STEAM
Steam froths up the milk to make a cappuccino or a caffe latte, for example, and also heats up liquids. As you need a higher
temperature to produce steam than to make an espresso, the appliance runs an additional pre-heating phase for steam.
While the screen displays the drink selection menu, press the “steam” key . A screen
will inform you that the appliance is being pre-heated. Once the pre-heating phase has
been completed, a message will ask you to place a recipient under the steam nozzle.
Press the “steam” key again to start generating steam. A little water will be produced
first and then steam will start. Use the same key to stop steam generation.
Pritisnite O tipku, pričekajte da se zagrijavanje aparata završi i pristupite funkciji ispiranja ako želite.
Press the button, wait for the end of pre-heating and perform a rinsing operation if you wish.
Each time you plug your machine in, it will carry out an initialisation cycle.
Press the button, wait for the end of pre-heating and perform a rinsing operation if you wish.
You can change the
volume of water at any
time using the rotating
button.
Use the rotating button
to select your drink and
confirm by pressing the
OK key.
The drink selection
menu will be displayed.
The ground coffee is first moistened with a little hot water after the grinding stage.
A few moments later, percolation as such starts.
Put a cup under the coffee
outlets.
You can lower or raise the
coffee outlets to suit the
size of your cups.
To stop coffee flowing into the cup, you can either again press a key or turn the rotating button to reduce
volume.
FALCON DISPLAY ANGLAIS 26/10/05 8:56 Page 7
Pull out and fill the
water tank.
Put it back in place by
pressing firmly and
close the lid again.
Open the coffee bean
container lid. Add the
coffee beans (250 g
maximum).
Close the coffee bean
container lid again.
Make certain that no foreign body like grit that may be found in the coffee beans has got into the container.
Any damage due to foreign bodies that have got into the coffee container is outside the warranty.
Do not put water into the coffee bean container.
Do not fill the water tank with hot water, mineral water, milk or any other liquid. If you turn on the appliance when the
water tank is not in place or not correctly filled (under the “min.” level,), the “fill water tank” light will come on and
making an espresso or a cup of coffee will be made impossible.
Never put ground coffee in the coffee container.
PREPARING THE APPLIANCE
Press the button, wait for the end of pre-heating and perform a rinsing operation if you wish.
You can change the
volume of water at any
time using the rotating
button.
Use the rotating button
to select your drink and
confirm by pressing the
OK key.
The drink selection
menu will be displayed.
The ground coffee is first moistened with a little hot water after the grinding stage.
A few moments later, percolation as such starts.
You can use your appliance to make 2 cups of coffee or espresso. Remember not to remove the cups after the first cycle.
You have now prepared your appliance. The drink select menu will be displayed.
Put a cup under the coffee
outlets.
You can lower or raise the
coffee outlets to suit the
size of your cups.
The appliance will
automatically sequence 2
complete coffee-making
cycles.
To stop coffee flowing into the cup, you can either again press a key or turn the rotating button to reduce
volume.
x 2
TWO-CUP FUNCTION
There is a temperature setting function to control how hot your coffee is (see Settings).
Izbor kave će biti
prika zan na zaslonu
Postavite šalicu ispod
cjevčica za kavu. Možete
podići ili spustiti cjevčice,
ovisno o veličini šalice.
Koristite rotirajuću tipku
da odaberete kavu
koju želite i potvrdite
pritiskom na „OK“ tipku.
Količinu vode možete
promijeniti bilo kada
koristeći rotirajuću
tipku.
Mljevena kava je najprije ovlažena vrelom vodom nakon mljevenja. Par trenutaka kasnije, filtriranje počinje.
Da biste zaustavili proces pravljenja kave, možete ponovo pritisnuti tipku ili okrenuti rotirajuću tipku.
Aparat će automatski
završiti 2 ciklusa pravljenja
kave.
Postoji i funkcija podešavanja temperature kave. (Pogledajte „Podešavanja“).
Možete koristiti aparat da pripremate dvije šalice kave ili espressa. Zapamtite da ne pomičete šalice nakon prvog mljevenja.
Pripremili ste aparat i izbor kave će biti prikazan na zaslonu.
Pritisnite O tipku, pričekajte da se zagrijavanje aparata završi i pristupite funkciji ispiranja ako želite.
PRIPREMA KAVE ZA DVIJE ŠALICE
Press the button, wait for the end of pre-heating and perform a rinsing operation if you wish.
You can change the
volume of water at any
time using the rotating
button.
Use the rotating button
to select your drink and
confirm by pressing the
OK key.
The drink selection
menu will be displayed.
The ground coffee is first moistened with a little hot water after the grinding stage.
A few moments later, percolation as such starts.
You can use your appliance to make 2 cups of coffee or espresso. Remember not to remove the cups after the first cycle.
You have now prepared your appliance. The drink select menu will be displayed.
Put two cups under the cof-
fee outlets.
You can lower or raise the
coffee outlets to suit the
size of your cups.
Put a cup under the coffee
outlets.
You can lower or raise the
coffee outlets to suit the
size of your cups.
Select your drink and confirm by
clicking twice on the OK key. A
message will appear to tell you
that you have chosen two cups.
If the tray is full or the water tank is empty while preparing the first coffee, the second cycle will not be run.
You will then have to restart your second cycle after you have seen to things.
The appliance will
automatically sequence 2
complete coffee-making
cycles.
To stop coffee flowing into the cup, you can either again press a key or turn the rotating button to reduce
volume.
x 2
TWO-CUP FUNCTION
There is a temperature setting function to control how hot your coffee is (see Settings).
PREPARING STEAM
Steam froths up the milk to make a cappuccino or a caffe latte, for example, and also heats up liquids. As you need a higher
temperature to produce steam than to make an espresso, the appliance runs an additional pre-heating phase for steam.
While the screen displays the drink selection menu, press the “steam” key . A screen
will inform you that the appliance is being pre-heated. Once the pre-heating phase has
been completed, a message will ask you to place a recipient under the steam nozzle.
Press the “steam” key again to start generating steam. A little water will be produced
first and then steam will start. Use the same key to stop steam generation.
Izbor kave će biti
prika zan na zaslonu
Postavite šalicu ispod
cjevčica za kavu. Možete
podići ili spustiti cjevčice,
ovisno o veličini šalice.
Koristite rotirajuću tipku
da odaberete kavu
koju želite i potvrdite
pritiskom na „OK“ tipku.
Količinu vode možete
promijeniti bilo kada
koristeći rotirajuću
tipku.
Mljevena kava je najprije ovlažena vrelom vodom nakon mljevenja. Par trenutaka kasnije, filtriranje počinje.
Ako je spremnik korištene kave pun ili ako je spremnik za vodu prazan prilikom pripremanja prve kave, slijedeće
mljevenje neće početi. Drugo mljevenje može započeti nakon što ste ispraznili spremnik korištene kave ili nakon što
ste dopunili spremnik za vodu.
Da biste zaustavili proces pravljenja kave, možete ponovo pritisnuti tipku ili okrenuti rotirajuću tipku.
Postavite dvije šalice ispod
cjevčica za kavu. Možete
podići ili spustiti cjevčice za
kavu ovisno od veličine šalica.
Izaberite kavu i potvrdite pritiskom
na „OK“ tipku.Pojaviće se poruka
na zaslonu da potvrdi da ste
izabrali dvije šalice kave.
Aparat će automatski
završiti 2 ciklusa pravljenja
kave.
Postoji i funkcija podešavanja temperature kave. (Pogledajte „Podešavanja“).
Možete koristiti aparat da pripremate dvije šalice kave ili espressa. Zapamtite da ne pomičete šalice nakon prvog mljevenja.
Pripremili ste aparat i izbor kave će biti prikazan na zaslonu.
Para zagrijava mlijeko za pravljenje cappuccina ili kave s mlijekom ili za zagrijavanje tekućine. Ako želite višu temperaturu nego što
je temperatura Vaše kave, uređaj posjeduje sustav predzagrijavanja pare.
Dok zaslon prikazuje izbor kava , pritisnite „steam“ tipku (___). Uređaj će Vas obavijestiti da je
proces zagrijavanja u tijeku. Kada je zagrijavanje završeno, poruka će Vas pitati da postavite
posudu ispod cjevčice za paru. Pritisnite „Steam“ (___) tipku ponovo. Najprije će isteći malo
vode, a zatim para. Istom tipkom prekidate proces.
Pritisnite O tipku, pričekajte da se zagrijavanje aparata završi i pristupite funkciji ispiranja ako želite.
PRIPREMA PARE
PRIPREMA KAVE ZA DVIJE ŠALICE
Izbor kave će biti
prika zan na zaslonu
Da biste zaustavili proces pravljenja kave, možete ponovo pritisnuti tipku ili okrenuti rotirajuću tipku.
Postoji i funkcija podešavanja temperature kave. (Pogledajte „Postavke“).
Možete koristiti aparat da pripremate dvije šalice kave ili espressa. Zapamtite da ne pomičete šalice nakon prvog mljevenja.
Pripremili ste aparat i izbor kave će biti prikazan na zaslonu.
Postavite dvije šalice ispod
cjevčica za kavu. Možete
podići ili spustiti cjevčice za
kavu ovisno od veličine šalica.
Para zagrijava mlijeko za pravljenje capuccina ili kave s mlijekom ili za zagrijavanje tekućine. Ako želite višu temperaturu nego što je
temperatura Vaše kave, uređaj posjeduje sustav predzagrijavanja pare.
Mljevena kava je najprije ovlažena vrelom vodom nakon mljevenja. Par trenutaka kasnije, filtriranje počinje.
NE ODVAJAJTE SPREMNIK VODE PRIJE ZAVRŠETKA CIKLUSA (otprilike 15 s nakon što je kava prestala istjecati).
Ako je spremnik korištene kave pun ili ako je spremnik za vodu prazan prilikom pripremanja prve kave, slijedeće
mljevenje neće početi. Drugo mljevenje može započeti nakon što ste ispraznili spremnik korištene kave ili nakon što
ste dopunili spremnik za vodu.
Postavite šalicu ispod
cjevčica za kavu. Možete
podići ili spustiti cjevčice,
ovisno o veličini šalice.
PRIPREMA KAVE ZA DVIJE ŠALICE
Dok zaslon prikazuje izbor kava , pritisnite „steam“ tipku (___). Uređaj će Vas obavijestiti da je
proces zagrijavanja u tijeku. Kada je zagrijavanje završeno, poruka će Vas pitati da postavite
posudu ispod cjevčice za paru. Pritisnite „Steam“ (___) tipku ponovo. Najprije će isteći malo
vode, a zatim para. Istom tipkom prekidate proces.
Izaberite kavu i potvrdite pritiskom
na „OK“ tipku.Pojaviće se poruka
na zaslonu da potvrdi da ste
izabrali dvije šalice kave.
PRIPREMA PARE
Koristite rotirajuću tipku
da odaberete kavu
koju želite i potvrdite
pritiskom na „OK“ tipku.
Količinu vode možete
promijeniti bilo kada
koristeći rotirajuću
tipku.
Aparat će automatski
završiti 2 ciklusa pravljenja
kave.
Page 9

8
FROTHING MILK
We advise you to use very fresh milk.
The milk and its recipient must be cold, ideally between 6 and 10 °C.
We therefore advise you against putting the recipient under hot water before using it.
Check that the steam
nozzle is correctly fit-
ted.
Pour the milk into your
milk jug. Only half fill it.
Immerse the nozzle in the
milk.
Press the “steam” key
and follow the
instructions on the
screen.
Once your milk is frothy
enough…,
again press the “steam”
key to stop the cycle.
To remove any remaining
milk from the steam
nozzle, place a recipient
under the nozzle and press
the “steam” key .
Let the steam escape for
at least 10 seconds and
then again press the
“steam” key to stop
steam generation.
To interrupt the steam function, just press any key.
If the nozzle is blocked, clean it out with a fine needle.
The maximum duration for production of steam per cycle is limited to 2 minutes.
SET AUTO-CAPPUCCINO XS 6000 (SOLD SEPARATELY)
The auto-cappuccino accessory makes it easy to prepare a cappuccino
or a caffe latte. It comprises a special nozzle with two-positions /
markings and a brushed stainless steel milk jug and tubes.
Just join the various components to each other (photo on left) and put
your cup or glass under the autocappuccino nozzle.
To prevent the milk drying on the auto-cappuccino accessory, be sure to clean it with a moist cloth.
You are advised to wash it immediately by running a cycle with water to clean the inside.
XS 6000
You can remove the steam nozzle for thorough cleaning. Wash it
using a brush with water and a little non-abrasive washing up
liquid. Rinse and dry it. Before re-fitting, make certain that the air
inlet holes are not clogged by milk residues. Clean out the holes
with a needle if necessary.
PREPARING HOT WATER
While the screen displays the drink selection menu, press the “hot water” key .
A message will invite you to place a recipient under the steam nozzle. Again press
the “hot water” key to produce hot water.
To interrupt the steam function, just press any key.
If the nozzle is blocked, clean it out with a fine needle.
The maximum amount of hot water per cycle is limited to 300 ml.
Ispiranje je najbolje započeti kada uređaj nije korišten određeno vrijeme.
Provjerite da li je
cjevčica za paru
pravilno namještena .
Ulijte mlijeko u posudu za
mlijeko. Napunite samo
do pola. Cjevčicu za paru
uronite u mlijeko.
PJENA OD MLIJEKA
Aktivirajte „steam“
(___) tipku prateći
upute na zaslonu.
Kada je Vaše mlijeko
dovoljno kremasto...
...ponovo pritisnite
„Steam“ (__ ) tipku da
zaustavite paru.
Da biste uklonili ostatke
mlijeka sa cjevčice,
postavite posudu ispod
cjevčice i pritisnite „steam“
(___) tipku.
Da prekinete funkciju pare, pritisnite bilo koju tipku. Ako je cjevčica slučajno blokirana, očistite je iglom. Maksimalno
korištenje pare u jednom procesu je ograničeno na 2 minute.
POSTAVLJANJE I UPORABA AUTO-CAPUCCINO NASTAVKA (PRODAJE SE POSEBNO)
Pustite da para teče oko 10
sekundi i ponovo pritisnite
„steam“ (___) tipku da
zaustavite proces.
Dodaci za auto-capuccino olakšavaju pripremanje capuccino ili kave
s mlijekom. Opremljeni su specijalnom cjevčicom sa dvije pozicije /
označavanje i čelične posude za mlijeko i cjevčice.
Samo postavite komponente jednu na drugu (slika lijevo) i postavite Vašu
šalicu ili čašu ispod auto-capuccino cjevčice.
Za što bolje čišćenje, cjevčica može biti odstranjena sa uređaja.
Očistite je vodom, neabr azivnom tekućinom i četkicom. Isperite i
osušite. Prije postavljanja na mjesto, provjerite da li su rupice za
zrak prohodne. Očistite ih iglom ako je potrebno.
Da biste izbjegli da se mlijeko osuši na ovim dodacima, očistite ih vlažnom krpom. Savjetujemo Vam da očistite
aparat funkcijom ispiranja.
UPORABA VRUĆE VODE
Dok zaslon prikazuje izbor kava , pritisnite „hot water“ tipku (___). Poruka će Vas pitati
da postavite posudu ispod cjevčice za paru. Pritisnite „hot water“ (___) tipku ponovo da
pokrenete vrelu vodu.
Da prekinete funkciju pare, pritisnite bilo koju tipku. Ako je cjevčica slučajno blokirana, očistite je iglom. Maksimalan
kapacitet vode u jednom procesu je ograničen na 300 ml.
Page 10

9
If the above message
appears, remove, empty
and clean the drip tray.
The drip tray receives waste water and the coffee grounds collector receives used coffee grounds.
The coffee cleaning tray allows you to eliminate any deposits of coffee grounds above the percolation chamber.
Remove, empty and
clean the coffee
grounds collector.
The drip tray is equipped
with floats to tell you
when to empty it.
The warning message will remain displayed if the coffee grounds collector is not slotted in fully or not fitted correctly.
If the coffee grounds collector is fitted within less than 8 seconds, the appliance will ask you to confirm that you have
correctly emptied it. You cannot make espresso or coffee while the warning message is displayed.
The coffee grounds collector has a maximum capacity of 12 coffees.
MAINTAINING YOUR APPLIANCE
As soon as you remove the coffee grounds collector, you will have to empty it completely to avoid any overflow.
Remove the coffee
cleaning tray.
Clean it under water
and dry thoroughly
before re-fitting.
EMPTYING THE COFFEE GROUNDS COLLECTOR, THE COFFEE CLEANING TRAY AND THE DRIP TRAY
RINSING THE COFFEE-MAKING SYSTEM - SEE “BEFORE FIRST USE” SECTION
AUTOMATIC CLEANING PROGRAM – TOTAL DURATION: ABOUT 20 MINUTES
You should perform the cleaning program about every 360 preparations of espresso or coffee.
The appliance will let you know when you need to proceed with cleaning through the ‘clean’ light coming on.
Caution! To benefit from the warranty conditions, it is essential to perform the appliance cleaning cycle
when informed to do so. Be sure to follow the order of operations.
You can continue to use the appliance, but you are advised to perform the program as soon as possible.
To perform the cleaning program, you will need a recipient with minimum capacity of 0.6 litres and a KR UPS (XS 3000) cleaning
tablets.
The automatic cleaning program
is in three parts – the cleaning
cycle itself, then 2 rinsing cycles.
This program lasts about 20
minutes.
Press to perform cleaning
at any time and then choose
MAINTENANCE => OK =>
CLEANING from the menus dis-
played.
Press the key
to start the
automatic cleaning pro-
gram when the
“Cleaning needed”
message is displayed.
Just follow the
instructions
shown on the
screen.
If you press the ‘On/Off’ key during cleaning or in the event of power failure, the cleaning program will start
again right from the beginning. You will not be able to postpone this operation. This is essential due to water
system rinsing reasons. In this case, you will need to use another cleaning tablet. Be sure to complete the entire
cleaning cycle to avoid any risk of irritation (seek medical advice if cleaning solutions are accidently swallowed.
The cleaning cycle is a discontinuous cycle. Do not put your hands under the coffee outlets during the cycle.
Only use KRUPS (XS3000) cleaning tablets. We cannot be held responsible for any damage that may result
from the use of tablets from other brands.
You can obtain cleaning tablets from KRUPS Service Centres.
Make certain to protect your work surface during cleaning cycles, especially if they are made of
marble, stone or wood.
ODRŽAVANJE VAŠEG APARATA
The drip tray receives waste water and the coffee grounds collector receives used coffee grounds. The coffee cleaning tray
allows you to eliminate any deposits of coffee grounds above the percolation chamber.
MAINTAINING YOUR APPLIANCE
EMPTYING THE COFFEE GROUNDS COLLECTOR, THE COFFEE CLEANING
TRAY AND THE DRIP TRAY
If the above message
appears, remove, empty
and clean the drip tray.
The drip tray receives waste water and the coffee grounds collector receives used coffee grounds. The coffee cleaning tray
allows you to eliminate any deposits of coffee grounds above the percolation chamber.
Remove, empty and
clean the coffee
grounds collector.
The drip tray is equipped
with floats to tell you
when to empty it.
The warning message will remain displayed if the coffee grounds collector is not slotted in fully or not fitted correctly.
If the coffee grounds collector is fitted within less than 8 seconds, the appliance will ask you to confirm that you have
correctly emptied it. You cannot make espresso or coffee while the warning message is displayed.
The coffee grounds collector has a maximum capacity of 12 coffees.
MAINTAINING YOUR APPLIANCE
As soon as you remove the coffee grounds collector, you will have to empty it completely to avoid any overflow.
Remove the coffee
cleaning tray.
Clean it under water
and dry thoroughly
before re-fitting.
EMPTYING THE COFFEE GROUNDS COLLECTOR, THE COFFEE CLEANING
TRAY AND THE DRIP TRAY
RINSING OUT THE COFFEE CIRCUIT: SEE PAGE 5
MACHINE CLEANING PROGRAM – TOTAL DURATION: ABOUT 20 MINUTES
You should perform the cleaning program about every 350 preparations of espresso or coffee.
The appliance will let you know when you need to proceed with cleaning through the ‘clean’ light coming on.
Caution! To benefit from the guarantee conditions, it is essential to perform the appliance cleaning cycle
when informed to do so. Be sure to follow the order of operations.
You can continue to use the appliance, but you are advised to perform the program as soon as possible.
To perform the cleaning program, you will need a recipient with minimum capacity of 0.6 litres and a KR UPS (XS 3000) cleaning tablet.
Press the
key to start the
automatic cleaning
program when the
“Cleaning needed”
message is dis-
played.
Just follow the
instructions
shown on the
screen.
The automatic cleaning program is in
three parts – the cleaning cycle itself,
then 2 rinsing cycles. This program
lasts about 20 minutes.
Press to perform cleaning at
any time and then choose MAINTE-
NANCE => OK => CLEANING from
the menus displayed.
Remove, empty and
clean the coffee
grounds collector.
The drip tray is equipped
with floats to tell you
when to empty it.
Clean it under water
and dry thoroughly
before re-fitting.
TRAY AND THE DRIP TRAY
Just follow the
instructions
shown on the
screen.
The automatic cleaning program is in
three parts – the cleaning cycle itself,
then 2 rinsing cycles. This program
lasts about 20 minutes.
Press to perform cleaning at
any time and then choose MAINTE-
NANCE => OK => CLEANING from
the menus displayed.
PRAŽNJENJE SPREMNIKA ISKORIŠTENE K AVE, SPREMNIK A ZA OTPATKE I POSUDE U KOJU KAPA VODA
Posuda u koju voda kaplje skuplja prljavu vodu i spremnik iskorištene kave skuplja iskorištenu kavu.
Ladica za čišćenje nedozvoljava skupljanje kave iznad komore
Ako se na zaslonu prikaže ova poruka,uklonite,
ispra znite i očistite posudu u koju voda kaplje.
Čim uklonite spremnik iskorištene kave, morati ćete ga isprazniti do kraja da izbjegnete bilo kakvo prosipanje.
Poruka upozorenja će ostati na zaslonu ako spremnik korištene kave nije ispražnjen, namješten ili ako nije vraćen za 8
sekundi. Apar at će Vas pitati da potvrdite da ste ga ispraznili. Ne možete praviti kavu ili espresso ako je poruka i dalje
prika zana na zaslonu. Spremnik ima kapacitet od maksimalno 12 napravljenih kava.
Program čišćenja trebalo bi da pokrenete nakon svakih 350 napravljenih kava. Aparat će Vas obavijestiti da je vrijeme
za čišćenje, jer će se „clean“ lampica upaliti.
ISPIRANJE DIJELOVA KOJIM KAVA KRUŽI - POGLEDAJTE DIO „PRIJE PRVE UPORABE“
Za program čišćenja biti će Vam potrebna posuda minimalnog kapaciteta 0,6l i KRUPS (XS3000) tablete za čišćenje.
!!!Upozore nje: Ka da Vas ur eđaj up ozori d a je vrij eme za č išćen je, pri državajte se u puta d a ne bis te poni štil i
jams tvo. Vodite rač una da pratit e uput e za upor abu, ko rak po ko rak. Možete nastaviti koristiti Vaš uređaj iako je
žaruljica upaljena, ali preporučujemo čišćenje što je prije moguće.
Uklonite spremnik za
otpatke.
AUTOMATSKO ČIŠĆENJE – VRIJEME TRAJANJA: OKO 20 MINUTA
Pritisnite „Prog“ tipku
da započnete proces
automatskog čišćenja ,
kada se na zaslonu
pojavi „cleaning needed“
poruka.
Isperite ga pod vodom
i osušite pažljivo prije
ponovnog namještanja.
Ako pritisnete „On/off“ tipku tokom procesa čišćenja ili ako nestane struje, proces čišćenja će početi ponovo.
Nećete biti u mogućnosti odgoditi ovu operaciju. U ovom slučaju, trebati će Vam druga tableta z a čišćenje. Nastojte
u potpunosti završiti proces čišćenja da biste izbjegli rizik od iritacije (potražite savjet liječnika ako su preparati za
čišćenje slučajno progutani) Ciklus čišćenja je nastavljajući ciklus. Ne stavljajte ruke pod cjevčice za kavu u tijeku
procesa.
!!! Koristite samo KRUPS ( XS3000) tablete za čišćenje. Mi ne odgovaramo za štete ukoliko koristite neke druge
tablete. Tablete za čišćenje možete naći u KRUPS servisu.
Osig urajt e da su ra dne pov ršin e zašt ićene t ijekom proce sa čišć enja , naroč ito ako su o d mram ora, ka mena i li
drveta.
Uklonite, ispraznite
i očistite spremnik
iskorištene kave.
Jednostavno
slijedite upute
na zaslonu.
Program automatskog čišćenja je
trodijelni proces. Proces čišćenja
i dva procesa ispiranja. Program
traje oko 20 minuta. Tipkom „Prog“
možete započeti proces čišćenja
bilo kada. Nakon toga odaberite
MAINTENANCE=>OK=>CLEANING
iz menu-i na zaslonu.
Posuda u koj u voda kaplje je
opreml jena sa pokazivačima
koji Vam pokazuju kad a je
trebate ispraz niti.
Page 11
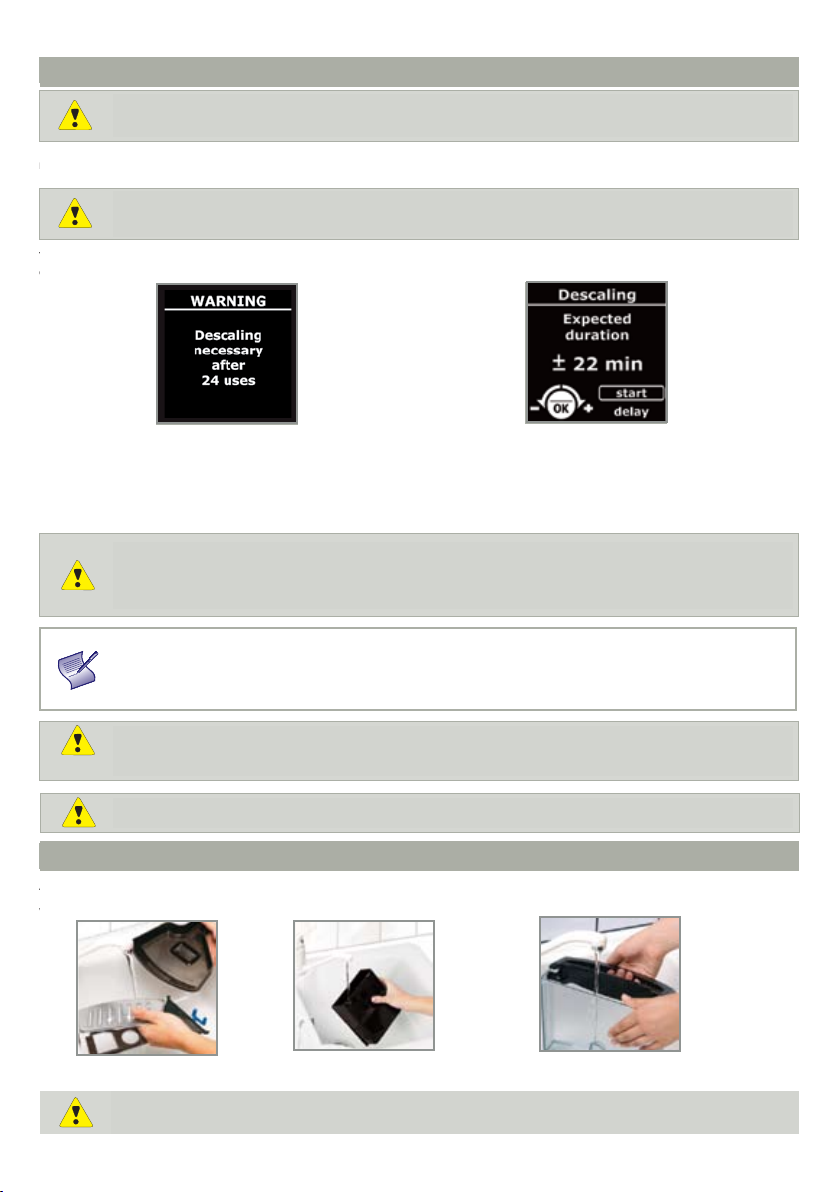
AUTOMATIC SCALE REMOVAL PROGRAM – TOTAL DURATION: ABOUT 22 MINUTE S
The quantity of scale deposited depends on the hardness of the water used. The appliance will automatically warn you with a
message when you need to proceed with scale removal.
To perform the cleaning program, you will need a recipient with minimum capacity of 0.6 litres and a KR UPS F 054 (40 g)
cleaning sachet.
The scale removal program is in three parts – the scale removal cycle itself, then 2 rinsing cycles.
Press to perform cleaning at any time and then choose MAINTENANCE => OK => SCALE REMOVAL from the
menus displayed.
Caution! To benefit from the warranty conditions, it is essential to perform the appliance scale
removal cycle when the appliance tells you to do so. Be sure to follow the order of operations.
You can continue to use the appliance but you are advised to perform the operation as soon as possible.
Press the key to start the automatic
cleaning program when the “Scale removal
needed” message is displayed.
Only use KRUPS scale removal products, citric acid or tartaric acid. You can obtain scale removal products from
KRUPS Service Centres. In no event must you use conventional starchy sulphonic acid or other products containing
that acid.
The manufacturer may not be held responsible for damage to the appliance through use of other products.
Be sure to complete the entire scale removal cycle to avoid any risk of intoxication.
The scale removal cycle is a discontinuous cycle. Do not put your hands under the coffee outlets during the
cycle.
Make certain to protect your work surface during scale removal cycles, especially if they are made
of marble, stone or wood.
Just follow the instructions shown on the
screen, making sure the sachet dissolves
fully.
If the coffee grounds collector is not fitted you will be warned by a message being displayed. Fit the collector
again for the cycle to continue automatically.
If a power failure occurs during the cycle, you will have to start it again right from the beginning. You will not be
able to postpone this operation.
GENERAL MAINTENANCE
Always remove the power supply cord from the socket and let your appliance cool down before cleaning it.
Do not use utensils or cleaning products likely to scratch or corrode the appliance.
If your product is equipped with our Claris - Aqua Filter System cartridge F088 - Please remove this
cartridge during the descaling operation.
FALCON DISPLAY ANGLAIS 26/10/05 8:56 Page 10
PROGRAM ZA UKLANJANJE KAMENCA- VRIJEME TRAJANJA: OKO 22 MINUTE
ENGLISH
ENGLISH
Just follow the instructions shown on the
screen, making sure the sachet dissolves
fully.
GENERAL MAINTENANCE
ENGLISH
ENGLISH
To perform the cleaning program, you will need a recipient with minimum capacity of 0.6 litres and a KR UPS F 054 (40 g)
cleaning sachet.
The scale removal program is in three parts – the scale removal cycle itself, then 2 rinsing cycles.
Caution! To benefit from the guarantee conditions, it is essential to perform the appliance scale
removal cycle when the appliance tells you to do so. Be sure to follow the order of operations. You
can continue to use the appliance but you are advised to perform the operation as soon as possible. YOU MUST
REMOVE YOUR CLARIS-AQUA FILTER CARTRIDGE BE FORE STARTING THIS PROGRAM.
Press the key to start the automatic
cleaning program when the “Scale removal
needed” message is displayed.
Only use KRUPS scale removal products, citric acid or tartaric acid. You can obtain scale removal products from
KRUPS Service Centres. In no event must you use conventional starchy sulphonic acid or other products containing
that acid. The manufacturer may not be held responsible for damage to the appliance through use of other products.
If your product is equipped with our Claris - Aqua Filter System cartridge F088 - Please remove this
cartridge during the descaling operation.
Just follow the instructions shown on the
screen, making sure the sachet dissolves
fully.
If the coffee grounds collector is not fitted you will be warned by a message being displayed. Fit the collector
again for the cycle to continue automatically.
If a power failure occurs during the cycle, you will have to start it again right from the beginning. You will not be
able to postpone this operation.
Be sure to complete the entire scale removal cycle to avoid any risk of intoxication. The scale removal cycle is a conti
nuous cycle and the pump can be heard intermittently. Do not put your hands under the coffee outlets during the cycle.
Make certain to protect your work surface during scale removal cycles, especially if they are made
of marble, stone or wood.
AUTOMATIC SCALE REMOVAL PROGRAM – TOTAL DURATION: ABOUT 22 MINUTES
The quantity of scale deposited depends on the hardness of the water used. The appliance will automatically warn you with a
message when you need to proceed with scale removal.
GENERAL MAINTENANCE
Always remove the power supply cord from the socket and let your appliance cool down before cleaning it.
Do not use utensils or cleaning products likely to scratch or corrode the appliance.
Wipe the body of the appliance on the outside using a moist cloth.
ENGLISH
Pull out and fill the
water tank.
Put it back in place by
pressing firmly and
close the lid again.
Open the coffee bean
container lid. Add the
coffee beans (250 g
maximum).
Close the coffee bean
container lid again.
Make certain that no foreign body like grit that may be found in the coffee beans has got into the container.
Any damage due to foreign bodies that have got into the coffee container is outside the warranty.
Do not put water into the coffee bean container.
Do not fill the water tank with hot water, mineral water, milk or any other liquid. If you turn on the appliance when the
water tank is not in place or not correctly filled (under the “min.” level,), the “fill water tank” light will come on and
making an espresso or a cup of coffee will be made impossible.
Never put ground coffee in the coffee container.
PREPARING THE APPLIANCE
!!!A ko je Vaš uređaj op remlj en Cla ris filt erom za vodu F088, mo limo Vas d a ga uklo nite t ijekom ovog proc esa.
Količina kamenca ovisi o t vrdoći vode. Uređaj će Vas automatski upozoriti porukom na zaslonu kada trebate
uklonite kamenac.
!!!Upozore nje: Ka da Vas ur eđaj up ozori d a je vrij eme za č išćen je, pri državajte se u puta d a ne bis te poni štil i
jams tvo. Vodite rač una da slijed ite upu te za up orabu , korak p o korak . Možete nastaviti koristiti Vaš ure đaj iako je
Za program uklanjanja kamenca biti će Vam potrebna posuda minimalnog kapaciteta 0,6l i KRUPS F054 (40 g) sredstvo za
čišćenje.
Program automatskog čišćenja je trodijelni proces. Proces uklanjanja kamenca i dva procesa ispiranja. Tipkom „Prog“
možete započeti proces čišćenja bilo kada. Nakon toga odaberite MAINTENANCE=>OK=>SCALE REMOVAL iz menija na
zaslonu.
žaruljica upaljena, ali preporučujemo čišćenje što je prije moguće.
Pritisnite „prog“ tipku da biste započeli
progr am ukla njanja kamenca. „Scale removal
needed“ poruka će se prikazati.
!!! Koristite samo KRUPS proizvode za uklanjanje kamenca, limunsku kiselinu ili vinsku kiselinu. Proces čišćenja
možete uraditi i u KRUPS servisu. Možete koristiti sulfatnu kiselinu ili proizvod koji sadrži sulfatnu kiselinu. Proizvođač
se neće smatrati odgovornim za štete ukoliko koristite neke druge preparate za čišćenje.
Pratite upute na z aslonu i provjerite da li se
sredstvo za čišćenje razgradilo.
Uvijek isključite uređaj iz utičnice i ostavite ga da se ohladi prije nego pristupite čišćenju.
Nemojte koristiti proizvode koji bi mogli oštetiti ili korozirati aparat.
Obrišite tijelo aparata koristeći vlažnu krpu.
Ako posuda za sakupljanje iskorištene kave nije ispravno namještena, poruka na zaslonu će Vas upozoriti. Namjestite
posudu i odstranjivanje kamenca će se nastaviti. Ako dođe do pada električne energije, morati ćete proces započneti
ispočetka.
!!!Završite cijeli proces uklanjanja kamenca da biste izbjegli rizik od trovanja. Proces uklanjanja kamenca je
neprekidan proces. Ne stavljajte ruke ispod cjevčica za kavu tijekom procesa.
Osig urajt e da su ra dne pov ršin e zašt ićene t ijekom proce sa čišć enja , naroč ito ako su o d mram ora, ka mena i li
drveta.
Očistite posudu u koju voda kapa, posudu za otpatke i spremnik
iskorištene kave i očistite vrućom vodom i tečnim deterdžentom.
Ovi dijelovi nisu podobni za pranje u perilici posuđa
OPĆE ODRŽAVANJE
Isperite spremnik za vodu
svježom vodom.
10
Page 12

11
You can use all the following options to start selected programs. Then follow the instructions on screen
Maintenance
Settings
Product information
Demonstration
Quit
PROG
MAINTENANCE
Rinsing
Cleaning
Scale removal
Filter
Quit
MAINTENANCE
Press the key from the drinks choice screen to access the appliance’s other functions menu. Use the rotating button to
browse through menus and options for all settings and validate your choice using the OK button. Press the button to
cancel a choice and go back to the drink selection menu.
To access maintenance
To access settings
To access product information
To access demonstration mode
To quit
To access rinsin
To access cleaning
To access scale removal
To access filter mode
To quit
OTHER FUNCTIONS: KEY
SETTINGS
Language
Screen contrast
Date
Clock
Auto-off
Auto-on
Measurement unit
Water hardness
Coffee temperature
Quit
OPTIONS
You can select your chosen language from those offered.
You can set screen contrast for comfort.
You need to set the date, especially if you use an anti-scale
cartridge.
You can choose between 12 hour or 24 hour time display.
You can choose the period after which your appliance will stop
automatically, from 30 minutes to 4 hours by 30 minute
increments.
You can automatically start pre-heating of your appliance at
your chosen time
Choose either ml or oz as your measurement unit
You must set your water hardness between 0 and 4. See
“Water hardness measurement” section.
You can set the temperature of your espresso or coffee to one
of three levels.
To return to the previous menu.
OSTALE FUNKCIJE: „Prog“ TIPKA
You can use all the following options to start selected programs. Then follow the instructions on screen
Maintenance
Settings
Product information
Demonstration
Quit
PROG
MAINTENANCE
Rinsing
Cleaning
Scale removal
Filter
Quit
MAINTENANCE
Press the key from the drinks choice screen to access the appliance’s other functions menu. Use the rotating button to
browse through menus and options for all settings and validate your choice using the OK button. Press the button to
cancel a choice and go back to the drink selection menu.
To access maintenance
To access settings
To access product information
To access demonstration mode
To quit
To access rinsin
To access cleaning
To access scale removal
To access filter mode
To quit
OTHER FUNCTIONS: KEY
FALCON DISPLAY ANGLAIS 26/10/05 8:56 Page 11
Pritisnite „prog“ tipku kada Vam je ponuđen odabir kave, da biste pristupili drugim funkcijama menija. Koristite rotirajuću tipku za
pretraživanje menija i odabr ane opcije, potvrđujući odabir „OK“ tipkom. Pritisnite „prog“ tipku da biste prekinuli proces i za povrat
na izbor kave.
Services
Settings
Machine info
Demo mode
Exit
„MAINTENANCE“ - ODRŽAVANJE – Za pristup održavanju
Možete koristiti sve prikazane opcije da započnete odabrani program. Zatim slijedite upute na zaslonu.
SERVICES
„SETTINGS“ - POSTAVKE – Za pristup postavkama
SETTINGS
Display contrast
Volume unit
Time
Exit
JEZIK – izaberite jezik
KONTRAST ZASLONA – izaberite po želji
DATUM – morate namjestiti datum, posebno ako koristite
sredstvo za uklanjanje kamenca
VRIJEME - Možete odabrati između 12 i 24 satnog vremena.
Auto-isključenje – Možete odabrati vr ijeme kada će se aparat
sam isk ljučiti od 30 minuta do 4h.
Auto-uključenje - Možete automatski započeti
predzagrijavanje Vašeg aparata u željeno vrijeme
JEDINICA MJERE – izaberite mjer nu jedinicu
TEMPER ATURA K AVE – podesite temperaturu kave na jedan
od tri nivoa.
DEMONSTRACIJA – za pristup demonstraciji
PREKID – za prekid
ODRŽ AVANJE – Za pr istup održavanju
POSTAVKE – Za pristup postavkama
INFORMACIJE O PROIZVODU – za pristup
informacijama o proiz vodu
DEMONSTRACIJA – za pristup demonstraciji
PREKID – za prekid
ISPIRANJE – za pristup ispiranju
ČIŠĆENJE – za pristup čišćenju
FILTER – za pristup filteru
PREKID – za prekid
Page 13

Coffee cycles
Water cycles
Steam cycles
Rinsing
Cleaning
Last
Next
Clean
PRODUCT
INFORMATION
PRODUCT INFORMATION
Displays the total number of coffees the machine has made.
Displays the total number of hot water cycles the machine has
performed.
Displays the total number of steam cycles the machine has
performed.
Displays the total number of rinsing cycles the machine has
performed.
Displays the total number of coffees made
since last cleaning.
Displays the number of coffees that can be
made before next cleaning.
Starts the cleaning program.
FALCON DISPLAY ANGLAIS 26/10/05 8:56 Page 12
Last
Last
Last
Next
Clean
Next
Scale remova l
Next
Fit
Displays the total number of coffees the machine has made.
Displays the total number of hot water cycles the machine has
performed.
Displays the total number of steam cycles the machine has
performed.
Displays the total number of rinsing cycles the machine has
performed.
Displays the total number of coffees made
since last cleaning.
Displays the number of coffees that can be
made before next cleaning.
Starts the cleaning program.
Displays the total number of coffee
equivalents made since last scale removal.
Displays the number of coffee equivalents
that can be made before next scale removal.
Starts the scale removal program.
Displays the date of the last filter change*
and the quantity of water that has run through.
Displays the date for the next filter change*
and the quantity of water to run through.
Starts the filter change procedure.
Last
Last
Last
Next
Clean
Next
Scale remova l
Next
Displays the total number of coffees the machine has made.
Displays the total number of hot water cycles the machine has
performed.
Displays the total number of steam cycles the machine has
performed.
Displays the total number of rinsing cycles the machine has
performed.
Displays the total number of coffees made
since last cleaning.
Displays the number of coffees that can be
made before next cleaning.
Starts the cleaning program.
Displays the total number of coffee
equivalents made since last scale removal.
Displays the number of coffee equivalents
that can be made before next scale removal.
Starts the scale removal program.
Displays the date of the last filter change*
and the quantity of water that has run through.
Displays the date for the next filter change*
and the quantity of water to run through.
Coffee cycles
Water cycles
Steam cycles
Rinsing
Cleaning
Last
Last
Last
Next
Clean
Scale removal
Next
Scale remova l
Filter information
Next
Fit
PRODUCT
INFO
RMATION
PRODUCT INFORMATION
Displays the total number of coffees the machine has made.
Displays the total number of hot water cycles the machine has
performed.
Displays the total number of steam cycles the machine has
performed.
Displays the total number of rinsing cycles the machine has
performed.
Displays the total number of coffees made
since last cleaning.
Displays the number of coffees that can be
made before next cleaning.
Starts the cleaning program.
Displays the total number of coffee
equivalents made since last scale removal.
Displays the number of coffee equivalents
that can be made before next scale removal.
Starts the scale removal program.
Displays the date of the last filter change*
and the quantity of water that has run through.
Displays the date for the next filter change*
and the quantity of water to run through.
Starts the filter change procedure.
FALCON DISPLAY ANGLAIS 26/10/05 8:56 Page 12
Coffee cycles
Water cycles
Steam cycles
Rinsing
Cleaning
Last
Last
Last
Next
Clean
Descaling
Next
Filter
Next
Install
MACHINE
INFO
Exit
Exit
PRODUCT INFORMATION
Exit
Exit
Displays the total number of coffees the machine has made.
Displays the total number of hot water cycles the machine has
performed.
Displays the total number of steam cycles the machine has
performed.
Displays the total number of rinsing cycles the machine has
performed.
Displays the total number of coffees made
since last cleaning.
Displays the number of coffees that can be
made before next cleaning.
Starts the cleaning program.
Return to the previous menu.
Displays the total number of hot water or
steam cycles made since last scale remo-
val.
Displays the number of hot water or steam cycles
that can be made before next scale removal.
Starts the scale removal program.Return to
the previous menu.
Displays the date of the last filter change* and
the quantity of water that has run through.
Displays the date for the next filter change*
and the quantity of water to run through.
Starts the filter change procedure.
Return to the previous menu.
ENGLISH
12
Coffee cycles
Water cycles
Steam cycles
Rinsing
Cleaning
Last
Last
Last
Next
Clean
Scale removal
Next
Scale remova l
Filter information
Next
Fit
PRODUCT
INFORMATION
PRODUCT INFORMATION
* You must first have correctly installed a filter through the program accessible via MAINTENANCE => FILTER =>
INSTALL before being able to access the first two options of the filter information sub-menu.
Displays the total number of coffees the machine has made.
Displays the total number of hot water cycles the machine has
performed.
Displays the total number of steam cycles the machine has
performed.
Displays the total number of rinsing cycles the machine has
performed.
Displays the total number of coffees made
since last cleaning.
Displays the number of coffees that can be
made before next cleaning.
Starts the cleaning program.
Displays the total number of coffee
equivalents made since last scale removal.
Displays the number of coffee equivalents
that can be made before next scale removal.
Starts the scale removal program.
Displays the date of the last filter change*
and the quantity of water that has run through.
Displays the date for the next filter change*
and the quantity of water to run through.
Starts the filter change procedure.
DEMONSTRATION MODE
When this mode is activated and the screen displays the drink selection menu, the appliance will scroll the various functions
available at regular intervals, so you can access them.
Use this sub-menu to disable or activate this function.
MOVING THE APPLIANCE
Keep the packing and use it again to move the appliance.
If the unpacked appliance is dropped, it is advisable to take it back to an authorized service centre to avoid any
risk of fire or electrical problems.
Let’s all help protect the environment!
Your appliance contains many recyclable materials that can be re-used.
Take it to a civic waste collection point.
ELECTRICAL OR ELECTRON IC PRODUCT AT END OF SERVICE LIFE
FALCON DISPLAY ANGLAIS 26/10/05 8:56 Page 12
Coffee cycles
Water cycles
Steam cycles
Rinsing
Cleaning
Last
Last
Last
Next
Clean
Descaling
Next
Filter
Next
Install
Exit
Exit
PRODUCT INFORMATION
Exit
Exit
Displays the total number of coffees the machine has made.
Displays the total number of hot water cycles the machine has
performed.
Displays the total number of steam cycles the machine has
performed.
Displays the total number of rinsing cycles the machine has
performed.
Displays the total number of coffees made
since last cleaning.
Displays the number of coffees that can be
made before next cleaning.
Starts the cleaning program.
Return to the previous menu.
Displays the total number of hot water or
steam cycles made since last scale remo-
val.
Displays the number of hot water or steam cycles
that can be made before next scale removal.
Starts the scale removal program.Return to
the previous menu.
Displays the date of the last filter change* and
the quantity of water that has run through.
Displays the date for the next filter change*
and the quantity of water to run through.
Starts the filter change procedure.
Return to the previous menu.
Use this sub-menu to disable or activate this function.
DEMONSTRATION MODE
ENGLISH
Last
Last
Last
Next
Clean
Next
Scale remova l
Next
Fit
Displays the total number of coffees the machine has made.
Displays the total number of hot water cycles the machine has
performed.
Displays the total number of steam cycles the machine has
performed.
Displays the total number of rinsing cycles the machine has
performed.
Displays the total number of coffees made
since last cleaning.
Displays the number of coffees that can be
made before next cleaning.
Starts the cleaning program.
Displays the total number of coffee
equivalents made since last scale removal.
Displays the number of coffee equivalents
that can be made before next scale removal.
Starts the scale removal program.
Displays the date of the last filter change*
and the quantity of water that has run through.
Displays the date for the next filter change*
and the quantity of water to run through.
Starts the filter change procedure.
Last
Last
Last
Next
Clean
Next
Scale remova l
Next
Fit
Displays the total number of coffees the machine has made.
Displays the total number of hot water cycles the machine has
performed.
Displays the total number of steam cycles the machine has
performed.
Displays the total number of rinsing cycles the machine has
performed.
Displays the total number of coffees made
since last cleaning.
Displays the number of coffees that can be
made before next cleaning.
Starts the cleaning program.
Displays the total number of coffee
equivalents made since last scale removal.
Displays the number of coffee equivalents
that can be made before next scale removal.
Starts the scale removal program.
Displays the date of the last filter change*
and the quantity of water that has run through.
Displays the date for the next filter change*
and the quantity of water to run through.
Starts the filter change procedure.
„PRODUCT INFORMATION“ - INFORMACIJE O PROIZVODU – za pristup informacijama o proizvodu
MACHINE INFO
CIKLUS K AVA – pr ikazuje ukupan broj koliko je aparat napravio kava
„CLEAN ING“ – ČIŠĆENJE
„SCALE RE MOVAL“ –
UKLA NJANJE KAMEN CA
„FILTER INFO RMATION“ –
INFORM ACIJE O FILTERU
* Filter mora te prav ilno postav iti kroz prog ram MAI NTENA NCE=> FILTER=>I NSTALL pr ije neg o pris tupit e dvjema prv im
funkc ijama fi lter menija .
Kada je od abrana ova funkcij a i kada zas lon prik azuje izbor kave, možete pristupiti demonstraciji, pr etraživajući meni rotirajućom
tipkom.
Sačuva jte ambalažu i iskoristite je ponovo kada premje štanje aparat.
! Ako Vam je ispao još neotpakirani uređ aj, odnesite ga ovlaštenom s ervis u da biste izbjegli opasnost od elekt ričnog
udara ili zapaljenja.
ELEKTRONSKI ILI ELEKTRIČNI APARATI PRI KRAJU VIJEKA TRAJANJA
!Sud jelujm o u zašt iti okol iša!
Vaš uređaj se sastoji od broj nih vrijednih materijala koji se mogu reciklirati i ponovno upot rijebiti.
Odnesite uređa j na mjesto predviđeno za odl aganje sličnog ot pada.
Koristite pod-meni da ak tivirate ili deak tivirate ovu
funkciju.
PREMJEŠTANJE APARATA
CIKLUS VODE - prika zuje ukupan broj koliko je ap arat propustio vode
CIKLUS PAR E - prikazuje ukupan broj koliko je apar at propustio pare
ISPIRANJE – prikazuje ukupan broj ispiranja
Exit
DEMO MOD
Exit
Install
Install
Exit
prika zuje broj napravljenih kava od trenu tka
poslje dnjeg či šćenja
prika zuje koliko se još kava može napraviti
prije slijedećeg čišćenja
započinjanje procesa čišćenja
povratak na prethodni izbornik
prika zuje broj naprav ljenih kava od trenutka
zadnjeg uklanjanja kamenca
prika zuje koliko se još kava može napraviti
prije slijedećeg uklanjanja kamenca
započinjanje procesa i povratak na
prethodni izbornik.
prika zuje datum kada je filter posljednji put
promijenjen* i količinu is korištene vode.
prika zuje datum kadaslijedeći put tre bate
promijeniti filter* i količinu iskorištene vode.
Započinjanje procesa zamjene filtera.
povratak na prethodni izbornik
Page 14

13
TROUBLESHOOTING, CORRECTIVE ACTIONS
The appliance fails to come on when you
press the On/Off key.
The espresso or coffee is not hot enough.
The coffee is too weak or not strong
enough.
The coffee flows too slowly.
The coffee is not creamy enough.
You used ground coffee instead of coffee
beans.
The coffee does not come out of the outlet
holes.
The grinder makes a strange noise
The grind setting button of the mill is hard
to turn
Steam does not come out of the nozzle.
Not enough froth on the milk.
The milk froth is too bubbly
The Auto-Cappuccino accessory does not
suck in the milk (accessory sold separately).
You have filled the water tank, but the
warning message remains displayed.
The cleaning program refuses to start.
The scale removal program refuses to start.
You have emptied the coffee grounds
collector, but the warning message remains
displayed.
You have washed the cleaning tray, but the
warning message remains displayed.
A power failure occurred during a cycle.
There is water or coffee under the
appliance.
A “Fault No. XX” message appears.
Check that the power supply cord plug is correctly inserted in the socket.
Heat the cups by rinsing them in hot water
Change the coffee temperature setting.
Check that the coffee bean container contains coffee.
Reduce the volume of coffee selected using the rotating button.
Select the strong coffee key.
Turn the grinding fineness button to the left to obtain a finer grind.
Turn the grinding fineness button to the right to obtain a coarser grind (may
depend on the type of coffee used).
Turn the grinding fineness button to the left to obtain a finer grind(may depend
on the type of coffee used). Ensure coffee beans are fresh.
Use your vacuum cleaner to remove the ground coffee in the coffee bean
container.
The outlet hole is blocked by dry coffee. Use a fine needle to clear the holes.
There are foreign bodies in the grinder
Contact your Krups service centre.
Change the mill setting only when in operation.
First turn off your appliance and let it cool down:
- Clean out the outlet hole with a needle
- Clean out the steam nozzle support pipe with a needle.
Check that the steam really comes out of the nozzle and dry the hole.
Use a recipient and cold milk at the temperature it comes out of the refrigera-
tor. Change the type or brand of milk as appropriate.
Check that the two ends of the small stainless steel tube fit correctly into the
steam nozzle seal.
Check that the tube immersed in the milk is not blocked.
Check for correct joining of the flexible tube with the accessory to avoid any
air leakage.
First turn off your appliance and let it cool before clearing the Auto-
Cappuccino accessory outlet hole.
Check for correct positioning of the tank in the coffee maker.
Check that the float at the bottom of the tank moves freely.
Rinse the accessory and if necessary remove scale.
Disconnect the appliance for a few moments then turn on again.
Disconnect the appliance for a few moments then turn on again.
Remove the collector, make certain that it is empty, wait for 8 seconds and
then fit it again.
Check that the collector is correctly pushed in.
Remove the tray, wait 8 seconds and then fit it again.
Check that the cleaning tray is correctly pushed in.
The appliance will re-initialise automatically when power is turned on and be
ready for a new cycle.
The drip tray is overflowing. Empty and clean the cleaning tray.
Check for correct positioning of the drip tray.
Disconnect the appliance for a few moments then bring it back into service.
If the failure persists, note the fault number and contact the
Krups service centre.
MOGUĆI PROBLEMI I ISPRAVNI POSTUPCI
Uređaj se neće uključiti i kada pritisnete „On/off“ tipku. Provjerite da li je uređaj pravilno uključen u struju.
Espresso ili kava nije dovoljno vrela.
Kava je preslaba ili nije dovoljno jaka.
Kava protiče previše sporo. Namjestite polugicu za fino mljevenje prema desno.
Kava nije dovoljno kremasta.
Koristili ste mljevenu umjesto kavu u zrnu. Pomoću usisivača uklonite mljevenu kavu.
Kava ne izlazi iz cjevčica za kavu.
Mlinac proizvodi čudan zvuk.
Kolutić za stupanj mljevenja je teško pokrenuti. Pomičite kolutić prilikom mljevenja.
Para ne izlazi kroz cjevčicu za paru.
Nema dovoljno pjene u mlijeku.
U pjeni ima previše mjehurića.
Dodatak za auto-cappuccino ne uvlači mlijeko
(dodatak se prodaje posebno)
Program čišćenja ne započinje.
Program uklanjanja kamenca ne počinje.
Spremnik za vodu je pun, ali žaruljica „fill water tank“ i
dalje svijetli.
Spremnik iskorištene kave je prazan, ali „empty coffee
grounds collector“ žaruljica i dalje svijetli.
Nestalo je struje u tijeku procesa.
Voda ili kava je ispod uređaja.
„Fault No. XX“ poruka se pojavila na zaslonu.
Zagrijte šalice pod vrelom vodom. Promijenite
temperaturu kave.
Provjerite da li u spremniku za kavu ima kave. Smanjite
jačinu kave rotirajućom tipkom.Izaberite tipku za jaču
kavu. Okrenite polugicu za fino mljevenje prema lijevo.
Namjestite polugicu za fino mljevenje prema lijevo.
Provjerite da je kava u zrnu svježa.
Cjevčice su blokirane suhom kavom. Koristite iglu da
očistite rupice.
Strano tijelo se nalazi u mlincu. Kontaktirajte Krups
servis.
Isključite uređaj i pričekajte da se ohladi:Očistite rupicu
iglom.Očistite cjevčicu iglom.
1. Provjerite da li para izlazi kroz cjevčicu, osušite
rupicu na gornjem dijelu cjevčice.
2. Rabite posudu i hladno mlijeko iz hladnjaka.
3. Rabite svježe mlijeko.
4. Promijenite proizvođača mlijeka.
Provjerite da li su dva kraja male čelične cjevčice
pravilno postavljeni u cjevčicu za paru.
Provjerite da cjevčica uronjena u mlijeko nije
začepljena. Provjerite da li je cjevčica pravilno
namještena sa dodatkom da biste izbjegli curenje.
Najprije isključite aparat i pričekajte da se ohladi prije
nego pristupite čišćenju rupice.
Isključite uređaj iz utičnice, pričekajte nekoliko
trenutaka i uključite ga ponovo.
Isključite aparat iz utičnice, pričekajte nekoliko
trenutaka i uključite ga ponovo.
Provjerite da li je spremnik za vodu pravilno postavljen.
Provjerite da li se posuda na dnu aparata pomiče
lagano. Isperite dijelove uređaja i ako je potrebno,
uklonite kamenac.
Uklonite spremnik iskorištene kave, uvjerite se
da je prazan, pričekajte 8 sekundi i vratite ga na
mjesto.Provjerite da li je posuda za otpatke pravilno
postavljena.
Uređaj će započeti s radom kada ga ponovo uključite i
biće spreman za ponovni proces.
Posuda u koju voda kapa je prepuna. Ispraznite je.
Provjerite da li je pravilno postavljena.
Isključite uređaj i odnesite ga u servis.Ako greška
potraje, zapamtite broj koji se pojavljuje na zaslonu
ispod poklopca za šalice i kontaktirajte Krups servis.
Page 15

14
Here are some recipes you can make using your Espresseria Automatic:
• Cappuccino
For a cappuccino in the rules of the art, the ideal proportions are as follows: 1/3 hot milk, 1/3 coffee, 1/3 milk froth.
• Caffe Latte
To make coffee with milk, also often called Latte Macchiato, the proportions are as follows: 3/5 hot milk, 1/5 coffee, 1/5 milk
froth.
• For these milk-based preparations, it is best to use cold skimmed milk straight from the refrigerator
(ideally between 6 and 8° C).
• To finish off, you can sprinkle with cocoa.
• Café Crème
• Prepare a conventional espresso in a large cup.
• Add a little cream to get a café crème.
• Café corretto*
• Prepare a cup of espresso as usual.
• Then add 1/4 or 1/2 of a liqueur glass of Cognac to taste.
You can also use anisette, brandy, Sambuca, Kirsch or Cointreau.
There are many other ways to give some punch to your espresso.
Just use your imagination.
• Coffee liqueur*
• Mix 3 cups of espresso, 250 g of brown sugar candy and 1/2 litre of Cognac or Kirsch in an empty 0.75 litre bottle.
• Leave the mixture to macerate for at least 2 weeks.
You will obtain a delicious liqueur. A real treat for coffee lovers
• Italian style iced coffee
4 scoops of vanilla ice-cream, 2 cups of espresso with sugar to taste, 1/8 l milk, fresh cream, grated chocolate.
• Mix the cold espresso with the milk.
• Serve the scoops of ice-cream into the glasses, pour the coffee onto them and decorate with fresh cream and
grated chocolate.
• Coffee à la frisonne*
• Add a small glass of rum to a cup of sweetened espresso.
• Decorate with a good layer of fresh cream and serve.
• Flambéed espresso*
2 cups of espresso, 2 small glasses of Cognac, 2 teaspoons of brown sugar, fresh cream.
• Pour the Cognac into heat-resistant glasses, heat and light.
• Add the sugar, mix, pour in the coffee and decorate with fresh cream.
• Espresso parfait*
2 cups of espresso, 6 egg yolks, 200g sugar, 1/8 litre of sweetened fresh cream, 1 small glass of orange liqueur.
• Beat the egg yolks with the sugar until it forms a thick, frothy mass.
• Add the cold espresso and the orange liqueur.
• Then mix in the whipped fresh cream.
• Pour the mix into saucer champagne glasses or ordinary.
• Put the champagne glasses in the freezer.
(*: Remember, over-indulgence in alcohol is bad for the health.)
Predstavljamo Vam nekoliko recepata koje možete iskoristiti koristeći Vaš aparat:
· Capuccino
Za capuccino, idealne ,mjere su: 1/3 vrućeg mlijeka, 1/3 kave, 1/3 mliječne pjene.
· Caf fe Lat te
Da napravite kavu s mlijekom,, često zvanu Latte Macchiato, mjere su: 3/5 vrućeg mlijeka, 1/5 kave, 1/5
mliječne pjene. Za ove mliječne pripravke, najbolje je upotrijebiti obrano mlijeko iz hladnjaka (između 6 i 8 ¨C) Za
ukrašavanje, možete posuti kakaom.
· Café C réme
Pripremite uobičajeni espresso u velikoj šalici. Dodajte malo šlaga da napravite Café Créme.
· Café Corretto*
Napravite šalicu kave kao obično. Dodajte ¼ ili ½ čaše za liker Cognac-a. Možete koristiti brandy, sambuku,
višnjevaču ili Cointroe. Postoji mnogo načina da obogatite Vaš espresso. Samo upotrijebite maštu.
· Cof fee liquer*
Izmiješajte 3 šalice espressa, 250 gr. smeđeg šećera i ½ litre konjaka ili višnjevače u praznu bocu 0,75. Ostavite
mješavinu najmanje 2 tjedna. Dobiti ćete ukusan liker. Pravi užitak za ljubitelje kave.
· Ledena kava na talijanski način
4 kugle vanilija sladoleda, 2 šalice espresso zaslađene kave po ukusu, 1/8 mlijeka, svježi šlag, ribana čokolada.
Izmiješajte hladan espresso sa mlijekom. Poslužite kugle sladoleda u čaši, prelijte kavom i ukrasite svježim
šlagom i ribanom čokoladom.
· Kava la frissone
Dodajte malu čašicu ruma u zaslađenu šalicu espressa. Ukrasite svježim šlagom i poslužite.
· Flambira ni espresso*
2 šalice espressa, 2 čašice Cognac-a, 2 žličice smeđeg šećera, svježi šlag. Ulijte Cognac u vatrostalnu čašu,
zagrijte i zapalite. Dodajte šećer, ulijte kavu i ukarasite svježim šlagom.
· Espresso p arfait*
2 šalice espressa, 6 žumanjka, 200 gr. šećera, 1/8 l slatkog vrhnja, 1 čašica likera od naranče. Izmješajte žumanjke
sa šećerom dok ne dobijete ujednačenu, pjenastu masu. Dodajte hladan espressso i liker od naranče. Sve to
promiješajte u izmješano slatkom vrhnju. Mješavinu ulijte u čašu za šampanjac ili u običnu čašu. Stavite čašu u
hladnjak.
(*Prevelika količina alkohola je štetna za zdravlje)
 Loading...