

Page 1
OperationGuide
E 1
i
Page 2

About this manual
Thank you for purchasing the Korg NAUTILUS. To help you get the most out of your new instrument, please read this
manual carefully.
The owner’s manuals and how to use them
These manuals apply to all NAUTILUS models. The front
panel and rear panel illustrations show the NAUTILUS-61,
but they apply identically to the other models.
The NAUTILUS comes with the following manuals.
• Quick Start Guide (printed and PDF)
• Operation Guide (PDF)
• Parameter Guide (PDF)
• Voice Name List (PDF)
A printed copy is included only for the Quick Start Guide.
You can download these PDF manuals from the Korg
website (www.korg.com).
Quick Start Guide
Please read this first. It introduces all of the basic features of
the NAUTILUS, and is designed to get you up and running
quickly.
Operation Guide (this document)
Put simply, the Operation Guide is designed to answer the
question, “How do I do this?”
It explains the names and functions of each part of the
NAUTILUS, basic operation, an overview of each mode,
how to edit sounds, record on the sequencer, sample, and so
on. This guide also explains the basics of effects,
arpeggiator, Wave Sequences, and Drum Kits.
Finally, it also contains a troubleshooting guide and
supplemental information such as specifications.
Parameter Guide
The Parameter Guide is designed to answer the question,
“What does this do?”
Organized by mode and page, the Parameter Guide includes
information on each and every parameter in the NAUTILUS.
Conventions in this manual
Abbreviations for the manuals: QSG, OG, PG, VNL
In the documentation, references to the manuals are
abbreviated as follows.
QSG: Quick Start Guide
OG: Operation Guide
PG: Parameter Guide
VNL: Voice Name List
Symbols , , Note, Tips
These symbols respectively indicate a caution, a MIDIrelated explanation, a supplementary note, or a tip.
Example screen displays
The parameter values shown in the example screens of this
manual are only for explanatory purposes, and may not
neccessarily match the values that appear in the LCD screen
of your instrument.
MIDI-related explanations
CC# is an abbreviation for Control Change Number.
In explanations of MIDI messages, numbers in square
brackets [ ] always indicate hexadecimal numbers.
* Linux is a trademark or registered trademark of Linus
Torvalds in the United States and in other countries.
* All product names and company names are the trademarks or
registered trademarks of their respective owners.
Voice Name List
The Voice Name List lists all of the sounds and setups that
are in the NAUTILUS when it is shipped from the factory,
including Programs, Combinations, Multisamples,
Drumsamples, Drum Kits, Arpeggio Pattern, Wave
Sequences, Drum Track Patterns, Template Songs, and
Effect Presets.
PDF versions
The NAUTILUS PDF manuals are designed for easy
navigation and searching. They include extensive PDF
contents information, which generally appears on the side of
the window in your PDF reader and lets you jump quickly to
a specific section. All cross-references are hyper-links, so
that clicking on them automatically takes you to the source
of the reference.
ii
Page 3

Contents
About this manual . . . . . . . . . . . . . . . . . . . . . . . . . . . ii
Introduction to NAUTILUS. . . . . . . . . . . . . 1
Front and rear panels. . . . . . . . . . . . . . . . . . . . . . . . . 1
Front panel . . . . . . . . . . . . . . . . . . . . . . . . . . . . . . . . . . 1
Rear panel . . . . . . . . . . . . . . . . . . . . . . . . . . . . . . . . . . . 5
TouchView user interface . . . . . . . . . . . . . . . . . . . . . . . 7
Basic information . . . . . . . . . . . . . . . . . . . . . . . . . . . 10
About the NAUTILUS’ modes . . . . . . . . . . . . . . . . . . 10
About the NAUTILUS’ PCM memory. . . . . . . . . . . . 13
About polyphony. . . . . . . . . . . . . . . . . . . . . . . . . . . . . 13
Basic operations . . . . . . . . . . . . . . . . . . . . . . . . . . . . . 14
Setup . . . . . . . . . . . . . . . . . . . . . . . . . . . . . . . . . . . . . . 18
Turning the power on/off . . . . . . . . . . . . . . . . . . . . . . 18
Connections. . . . . . . . . . . . . . . . . . . . . . . . . . . . . . . . . 20
Playing and editing Programs . . . . . . . . 25
Playing Programs . . . . . . . . . . . . . . . . . . . . . . . . . . . 25
Selecting Programs . . . . . . . . . . . . . . . . . . . . . . . . . . . 25
Using Controllers . . . . . . . . . . . . . . . . . . . . . . . . . . . . 29
Easy Program Editing. . . . . . . . . . . . . . . . . . . . . . . . 32
Quick edits using the RT control knobs . . . . . . . . . . . 32
Quick Layer/Split. . . . . . . . . . . . . . . . . . . . . . . . . . . . 35
Quick Layer example:
adding strings to a piano sound. . . . . . . . . . . . . . . . . . 36
Quick Split example:
adding left-hand bass to a piano . . . . . . . . . . . . . . . . . 38
Detailed Program Editing. . . . . . . . . . . . . . . . . . . . 40
Editing HD-1 Programs . . . . . . . . . . . . . . . . . . . . . . . 40
Using LFOs and Envelopes (EGs) . . . . . . . . . . . . . . . 43
Using Alternate Modulation (AMS)
and the AMS Mixers . . . . . . . . . . . . . . . . . . . . . . . . . . 44
Controlling Pitch . . . . . . . . . . . . . . . . . . . . . . . . . . . . . 45
Using Filters . . . . . . . . . . . . . . . . . . . . . . . . . . . . . . . . 46
Using the Amp section . . . . . . . . . . . . . . . . . . . . . . . . 48
Using EXi . . . . . . . . . . . . . . . . . . . . . . . . . . . . . . . . . . 50
Using Vector Synthesis . . . . . . . . . . . . . . . . . . . . . . . . 52
Effects . . . . . . . . . . . . . . . . . . . . . . . . . . . . . . . . . . . . . 53
Playing and editing Combinations . . . .55
Playing Combinations . . . . . . . . . . . . . . . . . . . . . . . 55
Selecting Combinations . . . . . . . . . . . . . . . . . . . . . . . 55
Easy Combination editing . . . . . . . . . . . . . . . . . . . 58
Changing the Programs within a Combi . . . . . . . . . . . 58
Adjusting the mix . . . . . . . . . . . . . . . . . . . . . . . . . . . . 58
Quick Layer/Split . . . . . . . . . . . . . . . . . . . . . . . . . . . . 59
Quick Layer example:
adding strings to a piano Combination . . . . . . . . . . . . .59
Quick Split example:
adding a lead synth to a Combination . . . . . . . . . . . . .61
Detailed Combination editing . . . . . . . . . . . . . . . . 63
Combination overview . . . . . . . . . . . . . . . . . . . . . . . . .64
Layers, Splits, and Velocity Switches . . . . . . . . . . . . .65
MIDI Settings . . . . . . . . . . . . . . . . . . . . . . . . . . . . . . . .66
Altering Programs to fit within a Combination . . . . . .67
Editing Programs from within a Combination or
Song . . . . . . . . . . . . . . . . . . . . . . . . . . . . . . . . . . . . . . .68
Effects. . . . . . . . . . . . . . . . . . . . . . . . . . . . . . . . . . . . . . 69
Saving your edits . . . . . . . . . . . . . . . . . . . . . . . . . . . . .70
Creating songs (SEQUENCER mode) . . .71
Playing Songs . . . . . . . . . . . . . . . . . . . . . . . . . . . . . . . 73
Playback . . . . . . . . . . . . . . . . . . . . . . . . . . . . . . . . . . . .73
MIDI recording . . . . . . . . . . . . . . . . . . . . . . . . . . . . . . 76
Preparations for recording . . . . . . . . . . . . . . . . . . . . . .76
Recording MIDI in real-time . . . . . . . . . . . . . . . . . . . .79
MIDI step recording . . . . . . . . . . . . . . . . . . . . . . . . . . .83
Recording the sound of a Combination or Program. . . 85
Recording multiple MIDI tracks from
an external sequencer . . . . . . . . . . . . . . . . . . . . . . . . . .86
Recording System Exclusive events. . . . . . . . . . . . . . .87
Recording patterns . . . . . . . . . . . . . . . . . . . . . . . . . . . .89
Other ways to record . . . . . . . . . . . . . . . . . . . . . . . . . .90
Audio recording. . . . . . . . . . . . . . . . . . . . . . . . . . . . . 91
Audio recording overview . . . . . . . . . . . . . . . . . . . . . .91
Audio input settings and recording source selection . .93
Recording procedure . . . . . . . . . . . . . . . . . . . . . . . . . .95
Other variations of audio track recording. . . . . . . . . .101
Placing a WAVE file in an audio track . . . . . . . . . . . 102
Song editing . . . . . . . . . . . . . . . . . . . . . . . . . . . . . . . 104
Using RPPR (Realtime Pattern Play/Record) . . 106
Creating RPPR data . . . . . . . . . . . . . . . . . . . . . . . . . .106
RPPR playback . . . . . . . . . . . . . . . . . . . . . . . . . . . . . .107
Recording an RPPR performance. . . . . . . . . . . . . . . .108
Sampling in SEQUENCER mode. . . . . . . . . . . . . . 109
Saving your Song . . . . . . . . . . . . . . . . . . . . . . . . . . 109
Other notes about SEQUENCER mode. . . . . . . . 110
NAUTILUS sequencer file formats . . . . . . . . . . . . . .110
The Compare function . . . . . . . . . . . . . . . . . . . . . . . .111
Memory Protect . . . . . . . . . . . . . . . . . . . . . . . . . . . . .111
About MIDI . . . . . . . . . . . . . . . . . . . . . . . . . . . . . . . .112
iii
Page 4

Set Lists . . . . . . . . . . . . . . . . . . . . . . . . . . . 113
Set List Overview . . . . . . . . . . . . . . . . . . . . . . . . . . 113
Selecting and playing sounds . . . . . . . . . . . . . . . 114
Selecting Set Lists. . . . . . . . . . . . . . . . . . . . . . . . . . . 114
Selecting Slots. . . . . . . . . . . . . . . . . . . . . . . . . . . . . . 115
Using the Comment Pad . . . . . . . . . . . . . . . . . . . . . . 116
Editing Set Lists. . . . . . . . . . . . . . . . . . . . . . . . . . . . 117
Selecting and re-arranging sounds . . . . . . . . . . . . . . 117
Detailed Set List editing . . . . . . . . . . . . . . . . . . . . . . 119
Smooth Sound Transitions . . . . . . . . . . . . . . . . . 121
Overview. . . . . . . . . . . . . . . . . . . . . . . . . . . . . . . . . . 121
Using Smooth Sound Transitions . . . . . . . . . . . . . . . 121
Sampling (Open Sampling System) . . 123
Sampling overview . . . . . . . . . . . . . . . . . . . . . . . . 123
About sampling on the NAUTILUS. . . . . . . . . . . . . 123
Preparations for sampling . . . . . . . . . . . . . . . . . . 126
Audio Settings. . . . . . . . . . . . . . . . . . . . . . . . . . . . . . 126
Sampling and editing in SAMPLING mode . . . 132
Creating multisample indexes and
sampling–Recording . . . . . . . . . . . . . . . . . . . . . . . . . 132
Basic examples of sampling . . . . . . . . . . . . . . . . . . . 134
Editing loops . . . . . . . . . . . . . . . . . . . . . . . . . . . . . . . 138
Using Time Slice . . . . . . . . . . . . . . . . . . . . . . . . . . . 140
Sample waveform editing . . . . . . . . . . . . . . . . . . . . . 142
Multisample editing . . . . . . . . . . . . . . . . . . . . . . . . . 143
Saving, converting to Programs, and Comparing. . . 144
Sampling in PROGRAM and COMBINATION
modes. . . . . . . . . . . . . . . . . . . . . . . . . . . . . . . . . . . . . 145
Overview. . . . . . . . . . . . . . . . . . . . . . . . . . . . . . . . . . 145
Resampling a Arpeggiator phrase in
PROGRAM mode. . . . . . . . . . . . . . . . . . . . . . . . . . . 145
Mixing a Scene drum phrase with a live guitar input,
and sampling the result . . . . . . . . . . . . . . . . . . . . . . . 146
Sampling a guitar from the audio inputs,
while listening to a Scene drum phrase . . . . . . . . . . 147
Sampling in SEQUENCER mode . . . . . . . . . . . . . 148
In-Track Sampling . . . . . . . . . . . . . . . . . . . . . . . . . . 148
Resampling a song to create a Wave file . . . . . . . . . 149
User Sample Banks. . . . . . . . . . . . . . . . . . . . . . . . . 151
Overview. . . . . . . . . . . . . . . . . . . . . . . . . . . . . . . . . . 151
Saving User Sample Banks . . . . . . . . . . . . . . . . . . . . 152
Loading User Sample Banks. . . . . . . . . . . . . . . . . . . 154
Editing User Sample Banks . . . . . . . . . . . . . . . . . . . 155
User Sample Bank IDs and limitations. . . . . . . . . . . 156
Arpeggiator function . . . . . . . . . . . . . . . 157
Arpeggiator functions and scene settings. . . . 157
Selecting a scene, playing with the arpeggiator and
drum track or step sequencer . . . . . . . . . . . . . . . . . . . 158
Setting the scenes . . . . . . . . . . . . . . . . . . . . . . . . . . . . 160
Arpeggiator settings in COMBINATION and
SEQUENCER modes . . . . . . . . . . . . . . . . . . . . . . . . .164
Regarding arpeggiator synchronization . . . . . . . . . . . 167
Creating Drum Track patterns. . . . . . . . . . . . . . . 169
Global Settings, Wave Seq., Drum Kits
. . . . . . . . . . . . . . . . . . . . . . . . . . . . . . . . . . . 171
GLOBAL mode overview . . . . . . . . . . . . . . . . . . . . 171
Global Settings . . . . . . . . . . . . . . . . . . . . . . . . . . . . 172
Basic Setup . . . . . . . . . . . . . . . . . . . . . . . . . . . . . . . . . 172
Global audio settings . . . . . . . . . . . . . . . . . . . . . . . . . 174
MIDI settings . . . . . . . . . . . . . . . . . . . . . . . . . . . . . . . 174
Pedal and other controller settings . . . . . . . . . . . . . . .175
Configuring the QUICK ACCESS buttons . . . . . . . . 176
Creating user scales . . . . . . . . . . . . . . . . . . . . . . . . . .178
Setting Category Names for Programs, and
Combinations . . . . . . . . . . . . . . . . . . . . . . . . . . . . . . . 178
Automatically loading sample data. . . . . . . . . . 179
Using the KSC Auto-Load list to select
which samples to load . . . . . . . . . . . . . . . . . . . . . . . . 179
Creating and saving .KSC files . . . . . . . . . . . . . . . . .180
Connecting to computers
via USB Ethernet and FTP . . . . . . . . . . . . . . . . . . . 182
Using Wave Sequences . . . . . . . . . . . . . . . . . . . . . 183
Wave Sequence Overview . . . . . . . . . . . . . . . . . . . . .183
Programming Basics . . . . . . . . . . . . . . . . . . . . . . . . .184
Adjusting the sound of an individual step . . . . . . . . .186
Using rhythmic Wave Sequences. . . . . . . . . . . . . . . . 188
Creating smooth, evolving timbres . . . . . . . . . . . . . . 190
Modulating Wave Sequences . . . . . . . . . . . . . . . . . . . 190
Saving Wave Sequences. . . . . . . . . . . . . . . . . . . . . . .192
Using Drum Kits. . . . . . . . . . . . . . . . . . . . . . . . . . . . 193
Drum Kit Overview . . . . . . . . . . . . . . . . . . . . . . . . . . 193
Before you start editing… . . . . . . . . . . . . . . . . . . . . . 194
Editing Drum Kits . . . . . . . . . . . . . . . . . . . . . . . . . . . 194
Saving Drum Kits. . . . . . . . . . . . . . . . . . . . . . . . . . . . 196
Editing arpeggio patterns . . . . . . . . . . . . . . . . . . 197
Creating a user arpeggio pattern. . . . . . . . . . . . . . . . . 197
Saving the arpeggio pattern . . . . . . . . . . . . . . . . . . . . 201
iv
Page 5

Loading & saving data . . . . . . . . . . . . . .203
Saving data . . . . . . . . . . . . . . . . . . . . . . . . . . . . . . . . 203
Overview. . . . . . . . . . . . . . . . . . . . . . . . . . . . . . . . . . 203
Writing to internal memory. . . . . . . . . . . . . . . . . . . . 205
Saving to internal drive, CDs, and USB media. . . . . 209
Loading data from disk . . . . . . . . . . . . . . . . . . . . . 213
Loading Songs, sounds, and samples together . . . . . 213
Loading individual banks from a .PCG file . . . . . . . 215
Loading data by individual item or bank . . . . . . . . . 216
Loading the samples required by Programs or
Combinations . . . . . . . . . . . . . . . . . . . . . . . . . . . . . . 217
Using Effects . . . . . . . . . . . . . . . . . . . . . . .219
Effects overview . . . . . . . . . . . . . . . . . . . . . . . . . . . 219
Effects basics. . . . . . . . . . . . . . . . . . . . . . . . . . . . . . . 219
Effect I/O. . . . . . . . . . . . . . . . . . . . . . . . . . . . . . . . . . 220
Effects in each mode . . . . . . . . . . . . . . . . . . . . . . . . . 221
Effects selection and routing. . . . . . . . . . . . . . . . 223
Using effects in Programs . . . . . . . . . . . . . . . . . . . . . 223
Using effects in Combinations and Songs . . . . . . . . 225
Using effects in SAMPLING mode . . . . . . . . . . . . . 227
Using effects with the audio inputs. . . . . . . . . . . . . . 229
Detailed effects editing. . . . . . . . . . . . . . . . . . . . . 230
Dynamic modulation (Dmod) . . . . . . . . . . . . . . . . . . 230
MIDI/Tempo Sync . . . . . . . . . . . . . . . . . . . . . . . . . . 231
Common FX LFO . . . . . . . . . . . . . . . . . . . . . . . . . . . 231
Effect Presets. . . . . . . . . . . . . . . . . . . . . . . . . . . . . . . 232
Error and confirmation messages. . . . . . . . . . . . 242
A (ADC–Are You Sure) . . . . . . . . . . . . . . . . . . . . . . .242
B (Buffer) . . . . . . . . . . . . . . . . . . . . . . . . . . . . . . . . . .242
C (Can’t calibrate–Completed). . . . . . . . . . . . . . . . . .242
D (Destination–Disk) . . . . . . . . . . . . . . . . . . . . . . . . .243
E (Error–Exceeded) . . . . . . . . . . . . . . . . . . . . . . . . . .244
F (File–Front) . . . . . . . . . . . . . . . . . . . . . . . . . . . . . . .245
H . . . . . . . . . . . . . . . . . . . . . . . . . . . . . . . . . . . . . . . . .246
I (Illegal–Index) . . . . . . . . . . . . . . . . . . . . . . . . . . . . .246
K . . . . . . . . . . . . . . . . . . . . . . . . . . . . . . . . . . . . . . . . .247
M (Master–Multisample) . . . . . . . . . . . . . . . . . . . . . .247
N (No data–Not enough song memory) . . . . . . . . . . .248
O (Obey copyright rules–Oscillator) . . . . . . . . . . . . .250
P (Pattern–Program) . . . . . . . . . . . . . . . . . . . . . . . . . .250
Q (Quick Layer/Split function) . . . . . . . . . . . . . . . . .250
R (Rear sample–Root) . . . . . . . . . . . . . . . . . . . . . . . .251
S (Sample–Source) . . . . . . . . . . . . . . . . . . . . . . . . . . .251
T (The clock–/TEMP folder detected) . . . . . . . . . . . .252
U (Unable to create directory–USB Hub) . . . . . . . . .252
W (Wave) . . . . . . . . . . . . . . . . . . . . . . . . . . . . . . . . . .253
Y (You). . . . . . . . . . . . . . . . . . . . . . . . . . . . . . . . . . . .253
Internal drive and Media information. . . . . . . .254
Types of media supported by the NAUTILUS. . . . . .254
Operations that the NAUTILUS can perform on
media . . . . . . . . . . . . . . . . . . . . . . . . . . . . . . . . . . . . .254
Restoring the factory settings . . . . . . . . . . . . . . . . . . .255
Specifications . . . . . . . . . . . . . . . . . . . . . . . . . . . . . .256
MIDI Implementation Chart . . . . . . . . . . . . . . . . . 262
Appendices . . . . . . . . . . . . . . . . . . . . . . . .233
Troubleshooting . . . . . . . . . . . . . . . . . . . . . . . . . . . 233
Power supply. . . . . . . . . . . . . . . . . . . . . . . . . . . . . . . 233
LCD screen . . . . . . . . . . . . . . . . . . . . . . . . . . . . . . . . 233
Audio input and output . . . . . . . . . . . . . . . . . . . . . . . 234
Programs and Combinations . . . . . . . . . . . . . . . . . . . 235
Knobs . . . . . . . . . . . . . . . . . . . . . . . . . . . . . . . . . . . . 236
Songs. . . . . . . . . . . . . . . . . . . . . . . . . . . . . . . . . . . . . 236
Set Lists. . . . . . . . . . . . . . . . . . . . . . . . . . . . . . . . . . . 237
Sampling . . . . . . . . . . . . . . . . . . . . . . . . . . . . . . . . . . 238
Arpeggiator function . . . . . . . . . . . . . . . . . . . . . . . . . 239
Drum Track/Step Sequence . . . . . . . . . . . . . . . . . . . 239
X-Y control . . . . . . . . . . . . . . . . . . . . . . . . . . . . . . . . 239
Drum Kits . . . . . . . . . . . . . . . . . . . . . . . . . . . . . . . . . 239
Wave Sequences . . . . . . . . . . . . . . . . . . . . . . . . . . . . 239
Effects . . . . . . . . . . . . . . . . . . . . . . . . . . . . . . . . . . . . 240
MIDI . . . . . . . . . . . . . . . . . . . . . . . . . . . . . . . . . . . . . 240
Internal drive, CDs, and USB Media . . . . . . . . . . . . 240
Other problems . . . . . . . . . . . . . . . . . . . . . . . . . . . . . 241
v
Page 6

vi
Page 7

Introduction to NAUTILUS
13. SW 1&2
14. Joystick
1. MASTER VOLUME
3. MODE
4. PAGE
11. OCTAVE
2. VALUE controllers
15. TouchView
display
7. RT control knobs, SELECT
12. AUDIO IN
6. SHIFT
9. Arpeggiator, Drum track, Step sequencer
10. Eectors
8. DYNAMICS
5. QUICK ACCESS
Front and rear panels
Front panel
1. MASTER VOLUME slider
This adjusts the volume of the main L/R audio outputs, as
well as the volume of the headphone jack.
2. VALUE controllers
When you’ve selected a parameter on the TouchView
display, you can edit it using the dial or buttons of the frontpanel:
VALUE dial
Use this dial to edit the selected
parameter’s value. This control
is convenient when you want to
scroll through a very long list of
selections.
− and + buttons
These are used to increase or
decrease the parameter value by
individual steps. They’re
convenient for making fine
parameter adjustments.
ENTER button
Press the ENTER button to accept the values you input or to
execute a variety of shortcut commands.
Special functions of the ENTER button
Press the ENTER button to execute a variety of shortcut
commands. For instance, on parameters for inputting note
numbers and velocity values, you can input data in the usual
way or input data directly using the ENTER button and the
keyboard of the NAUTILUS, by following the steps below.
1. Select the parameter for which you will enter a note
number or velocity value.
2. Play a key on the keyboard while holding down the
ENTER button to directly input the note number or
velocity value.
You can use the ENTER button to jump into the editing
pages of a Program from within a COMBINATION or
SEQUENCER—while still hearing all of the other Timbres
or Tracks. To do so, go to the Mixer page, hold down the
ENTER button, and touch the Program select field in the
display. For more information, see “Editing Programs from
within a Combination or Song” on page 68.
EXIT button
Returns to the main page of the current mode. Each time you
press the button, you’ll move between pages in the following
way.
Returns to the Home page of the current mode. Each time
you press the button, you’ll move between pages in the
following way.
Last selected (tab) page of the Home page group →
first (tab) page of the Home page group →
specified parameter (such as “Program Select”) in each
mode
When a dialog box is open, pressing this button cancels the
dialog box settings and closes the dialog box, just like
pressing the Cancel button. If a pop-up menu for the Page
menu is open, pressing EXIT closes the menu.
1
Page 8
Introduction to NAUTILUS
3. MODE button
The NAUTILUS uses seven modes. To select each mode,
press the MODE button and choose using the Mode Select
page that is displayed.
To close the menu, press the Close button or the EXIT
button.
4. PAGE button
When you press this button, a list of the pages within the
selected mode will appear in the display. Press the button of
the desired page. (see page 14)
5. QUICK ACCESS: A–F buttons
Select a combination of button functions that corresponds to
how you will operate the NAUTILUS. These buttons can be
used to jump to the pages you set, and to select the modes.
They can also be used as playback, stop, record and other
buttons in SEQUENCER mode.
The button function settings can be accessed from the Quick
Access page in GLOBAL mode. (see “Configuring the
QUICK ACCESS buttons” on page 176)
6. SHIFT button
By using the SHIFT button together with another button or
control, you can access alternate functions assigned to that
button or control. The main functions that can be set are
shown below.
• SHIFT + OCTAVE −/+ button:
The range of pitches assigned to the keys can be changed
in semitone steps, up or down.
• SHIFT + AUDIO IN button:
Displays the Analog Input Setup dialog box, where you
can configure the input level and so on.
• SHIFT + MFX or TFX button:
Shows the MFX1 or TFX1 page for the current mode.
• SHIFT + ARP button:
Shows the ARP DRUM page for the current mode.
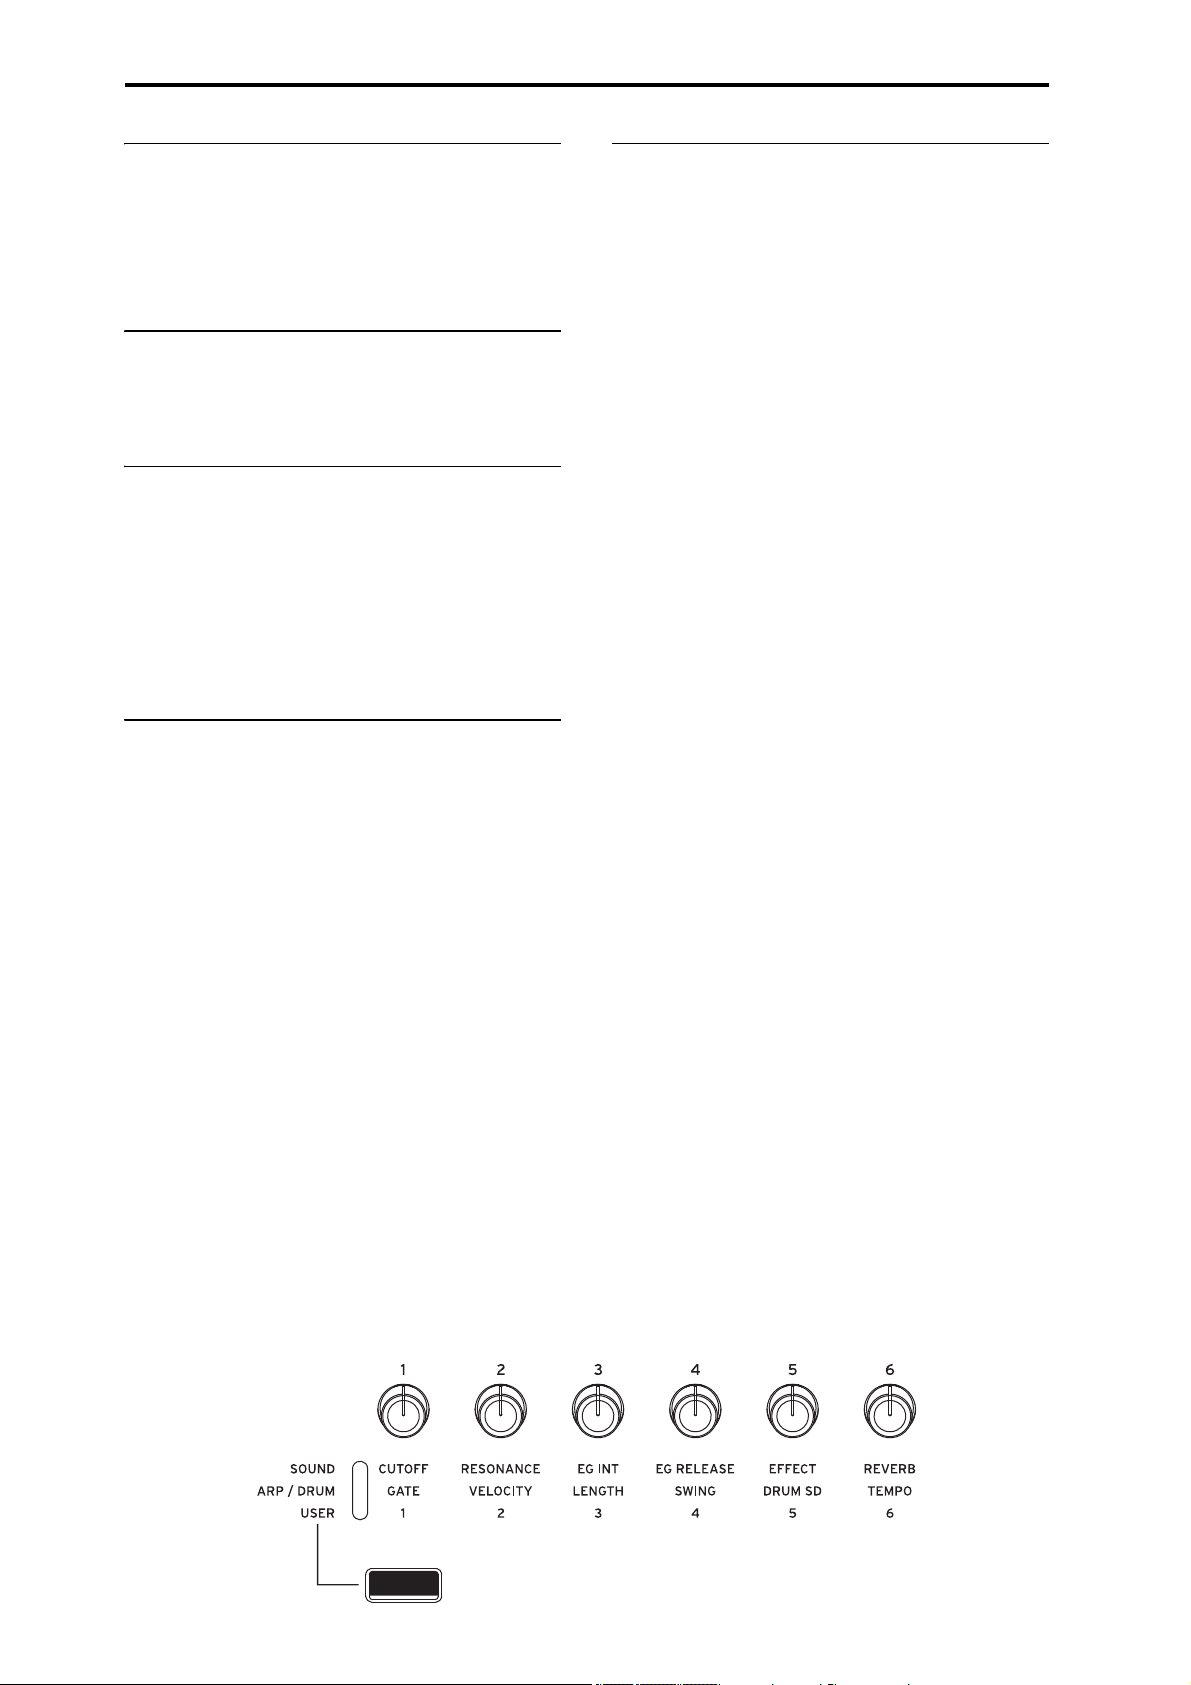
7. RT control knobs, SELECT button
When you’re playing a program or combination, you can use
these controls to adjust the sound or the effects in real time,
or to make simple edits. These controls can also be used to
adjust the tempo of the arpeggiator, sequencer and so on.
Tip: Pressing these knobs will set them flush into the panel
so that they cannot be touched accidentally. This way, only
the knobs you will use will remain sticking out, which
makes them easier to operate.
Here’s how to use the RT control knobs to set the tempo.
1. Press the SELECT button a number of times to make
the ARP/DRUM LED light.
Note: The selection you make using the SELECT button is
saved for each program, combination or song.
2. Turn the RT control knob 6 to adjust the tempo.
Parameters that can be operated using the RT
control knobs
The various parameters that can be controlled using the RT
control knobs are shown below.
SOUND
1. CUTOFF
Adjusts the cutoff frequency of the filter. Varies the
brightness of the sound.
2. RESONANCE
Adjusts the resonance level of the filter. Raising the filter
resonance level gives a distinctive character to the sound.
3. EG INT
This adjusts the filter EG intensity (the depth of how the EG
affects the filter).
4. EG RELEASE
Adjusts the envelope release times of the filter and amp. This
specifies the time from note-off until the sound fades to
silence.
5. EFFECT
Adjusts how much the insert effects are applied.
6. REVERB
Adjust the amount of reverb.
ARP/DRUM
1. GATE
Adjusts the note length (gate time) for the arpeggiator or step
sequencer.
2. VELOCITY
Adjusts the strength (velocity) of the notes played by the
arpeggiator or step sequencer.
2
Page 9

Front and rear panels Front panel
3. LENGTH
Adjusts the length of the arpeggiator pattern and the step
sequencer’s sequence.
4. SWING
Adjusts the pattern of the arpeggiator or drum track, or the
shuffle feel of the sequence played by the step sequencer.
5. DRUM SD
Changes the pattern of the drum track, or the snare drum
sound used in the sequence played by the step sequencer.
6. TEMPO
Adjusts the overall tempo. The tempo setting will control the
following.
• Arpeggiator
•Drum Track
• Step sequencer
• Songs in SEQUENCER mode
• Tempo sync LFO
• Tempo sync (BPM) delay effects
USER
This lets you control the functions set for each program and
combination. (see “Assigning functions to RT control knobs
1–6” on page 33)
8. DYNAMICS
DYNAMICS button and knob
Pressing the button to turn DYNAMICS ON (the button will
light) will activate the knob.
This adjusts how the volume and tone will be changed in
response to how hard the keys are played (velocity) on this
keyboard.
Turning the knob to the left will cause the sound to play
softer in response to the strength of the keys played.
This is good for playing highly inflected passages from
pianissimo (very soft) to fortissimo (very loud), such as solo
piano or in band ensembles.
Turning the knob to the right will cause the sound to play
louder in response to the strength of the keys played.
This is good for generally making your sound stand out
when playing backing parts in a band ensemble, or when
playing a solo.
The sound will not change when the knob is in center
position.
For layered and split sounds, the dynamics effect will be
applied to both sounds.
Note: The effect controlled may differ, depending on the
program. The dynamics will have no effect on programs that
do not change in volume or tone with velocity, such as organ
sounds or some synth sounds.
Note: The dynamics settings can only be saved in a set list.
When in SET LIST mode, the values saved in each slot will
be used. When in a mode other than Set List, the front panel
settings (these are off when the power is turned on) will be
used.
Note: The effect will be applied to the velocity curve
(→p.172) that is selected.
9. Arpeggiator (ARP)
LATCH button
When latch is turned on, the arpeggiator will keep generating
patterns and phrases, even after you stop playing the
keyboard and take your hands off, or after a MIDI note
on/off message is received.
ARP button
Switches the arpeggiator function on/off. The button’s LED
will light when this is on.
DRUM button
Switches the drum function on/off. The drums operate as
either a drum track or as a step sequencer, depending on the
current scene selected. When this is on, the button will light
and the drum track pattern will start playing. If the button is
blinking when the drum function is on, the drum track
pattern will enter standby mode. The drum track pattern will
start when you play the keyboard or a MIDI note-on is
received. (see page 158)
TAP button
This button lets you enter tempos simply by tapping your
finger on the button. Two taps are enough to change the
tempo; for greater accuracy, you can continue tapping, and
the tempo will be averaged over the most recent 16 taps.
You can use the tap feature to change the ARP and other
tempo settings in PROGRAM, COMBINATION and
SEQUENCER modes. In SEQUENCER mode, you can use
this to control the song’s tempo.
Lightly tap the TAP button several times at the desired
tempo during playback. The tempo will change in real time
to follow your taps. This is a convenient way to adjust the
playback tempo to a different speed in real time.
Note: You can also tap tempos using a foot switch. For more
information, see “Foot Switch Assignments” on page 917 of
the PG.
Note: If “MIDI Clock” (GLOBAL) is set to “External
MIDI” or “External USB”, or if it is set to “Auto MIDI” or
“Auto USB” and a MIDI clock is currently being received,
the TAP button will not have any effect.
Press the TAP button while holding down the SHIFT button
to hear the click sound.
Note: You cannot use this operation to turn the click on/off
when you are in SEQUENCER mode.
3
Page 10
Introduction to NAUTILUS
10. Effectors
MFX button
TFX button
These buttons turn the master effects and total effects on/off.
When the buttons are on (LED lit), the effect settings for the
program, combination, or song will be enabled. When the
buttons are off (LED unlit), the corresponding effects will be
off.
The on/off status of these buttons is remembered even when
you switch programs, combinations, or songs.
11. OCTAVE buttons
OCTAVE −/+ buttons
The range of pitches assigned to the keys can be changed in
one-octave steps, up or down. Press the OCTAVE − and +
buttons together to return to the standard pitch. Hold down
the SHIFT button and press the OCTAVE −/+ buttons to
change the range of pitches assigned to the keys in semitone
steps, up or down.
12. AUDIO IN button
Enables the input from the Audio Input 1, 2 jacks on the rear
panel. Press the AUDIO IN button while holding down
SHIFT to display the Analog Input Setup dialog box, where
you can configure the input level and so on.
For more on input settings, see “2. Analog audio input
connections” on page 21.
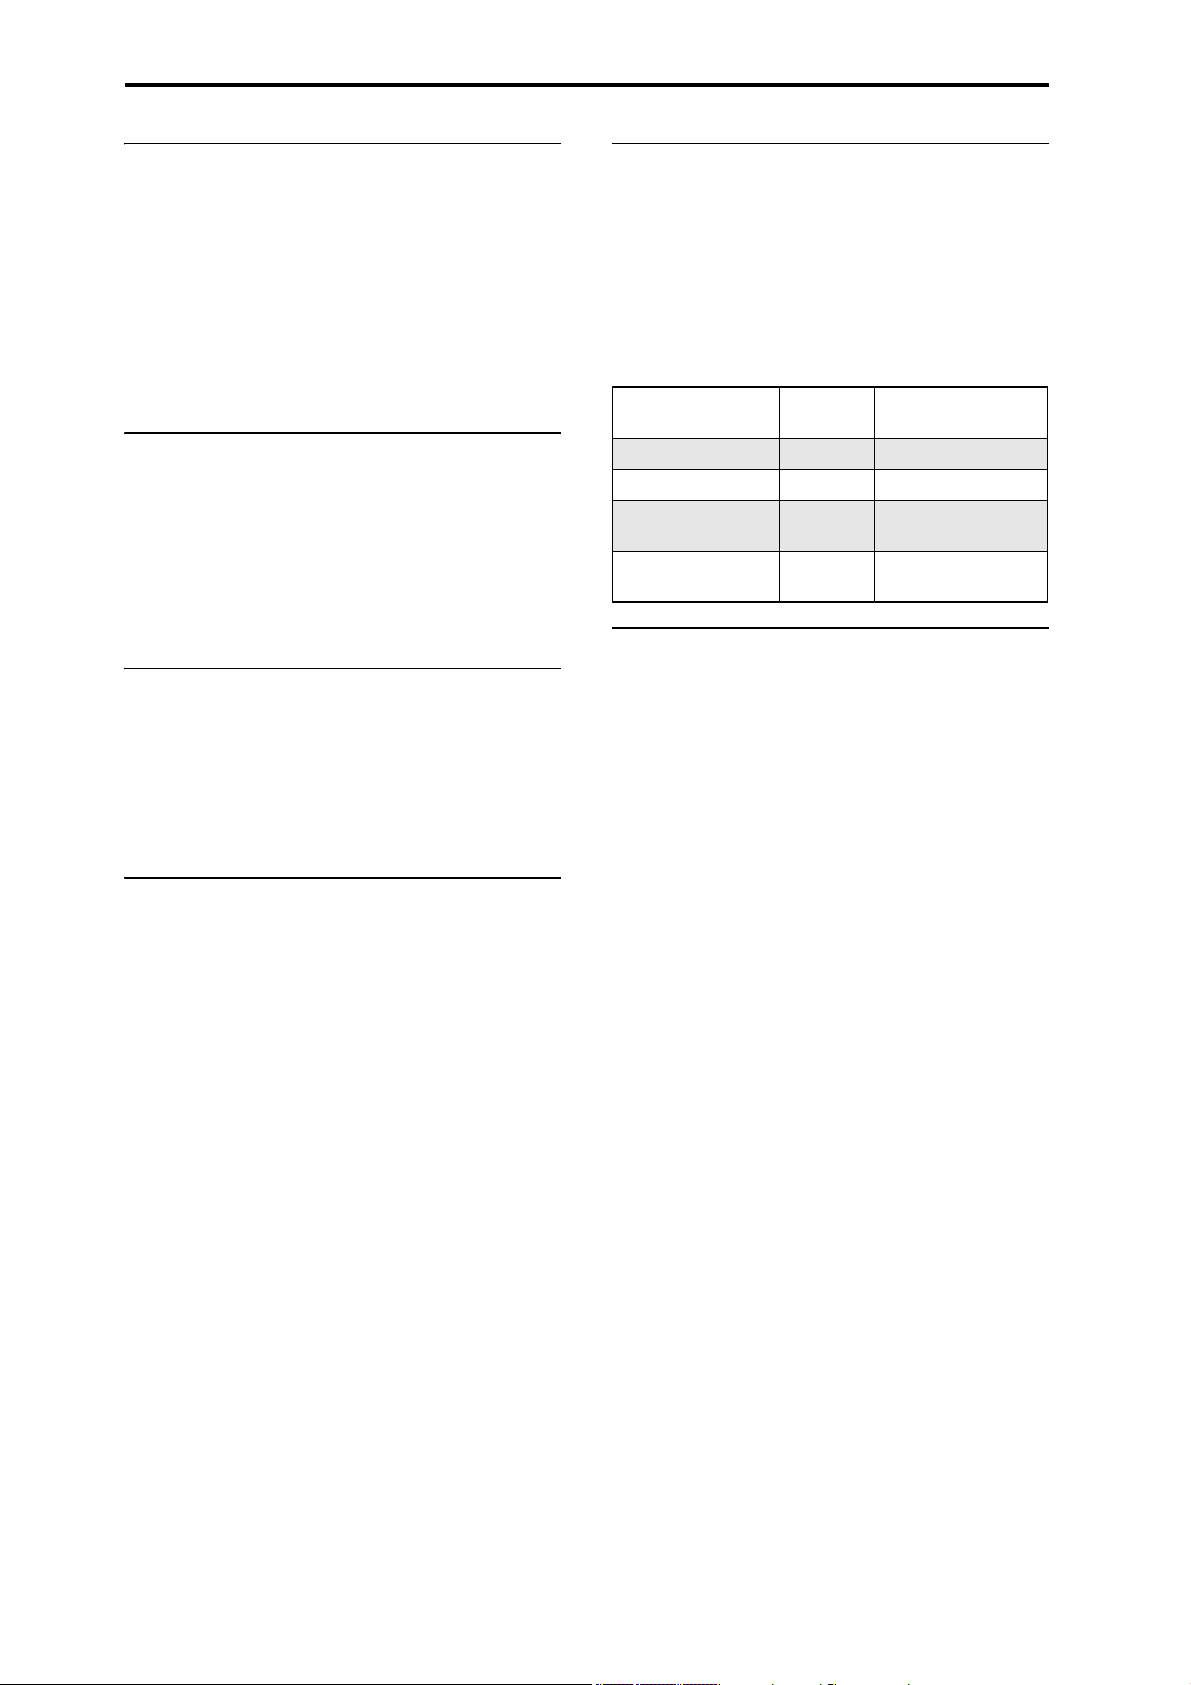
14. Joystick
The joystick moves in four directions: left, right, forwards
(away from yourself), and backwards (towards yourself).
Each of the four directions can be used to control different
program or effects parameters.
The specific assignments can change depending on the
current Program, Combi, or Song. Generally, though, they
will do something like the functions shown below:
Standard Joystick functions
Move the
joystick…
Left JS–X Pitch bend down
Right JS+X Pitch bend up
Forw ards
(away from yourself)
Backwards
(towards yourself)
Controller
Name
JS+Y Vibrato
JS–Y Filter LFO (wah)
Normally controls…
15. TouchView display
The NAUTILUS features our exclusive TouchView graphic
interface, based on a touch-panel LCD screen.
By touching objects displayed in the LCD screen, you can
select pages, set parameter values, move sliders and knobs,
enter text, connect virtual patch cables, and more.
13. SW1 and SW2
These on/off buttons can perform a number of different
functions, such as modulating sounds or locking the
modulation values of the joystick.
Also, each one may work either as a toggle, or as a
momentary switch. In toggle mode, each press alternates
between on and off; in momentary mode, the button only
changes for as long as you hold it down.
Each button has an LED, which lights up when the button is
on.
Each Program, Combination, and Song stores its own
settings for what the buttons will do, and whether each
button defaults to being on or off.
4
Page 11
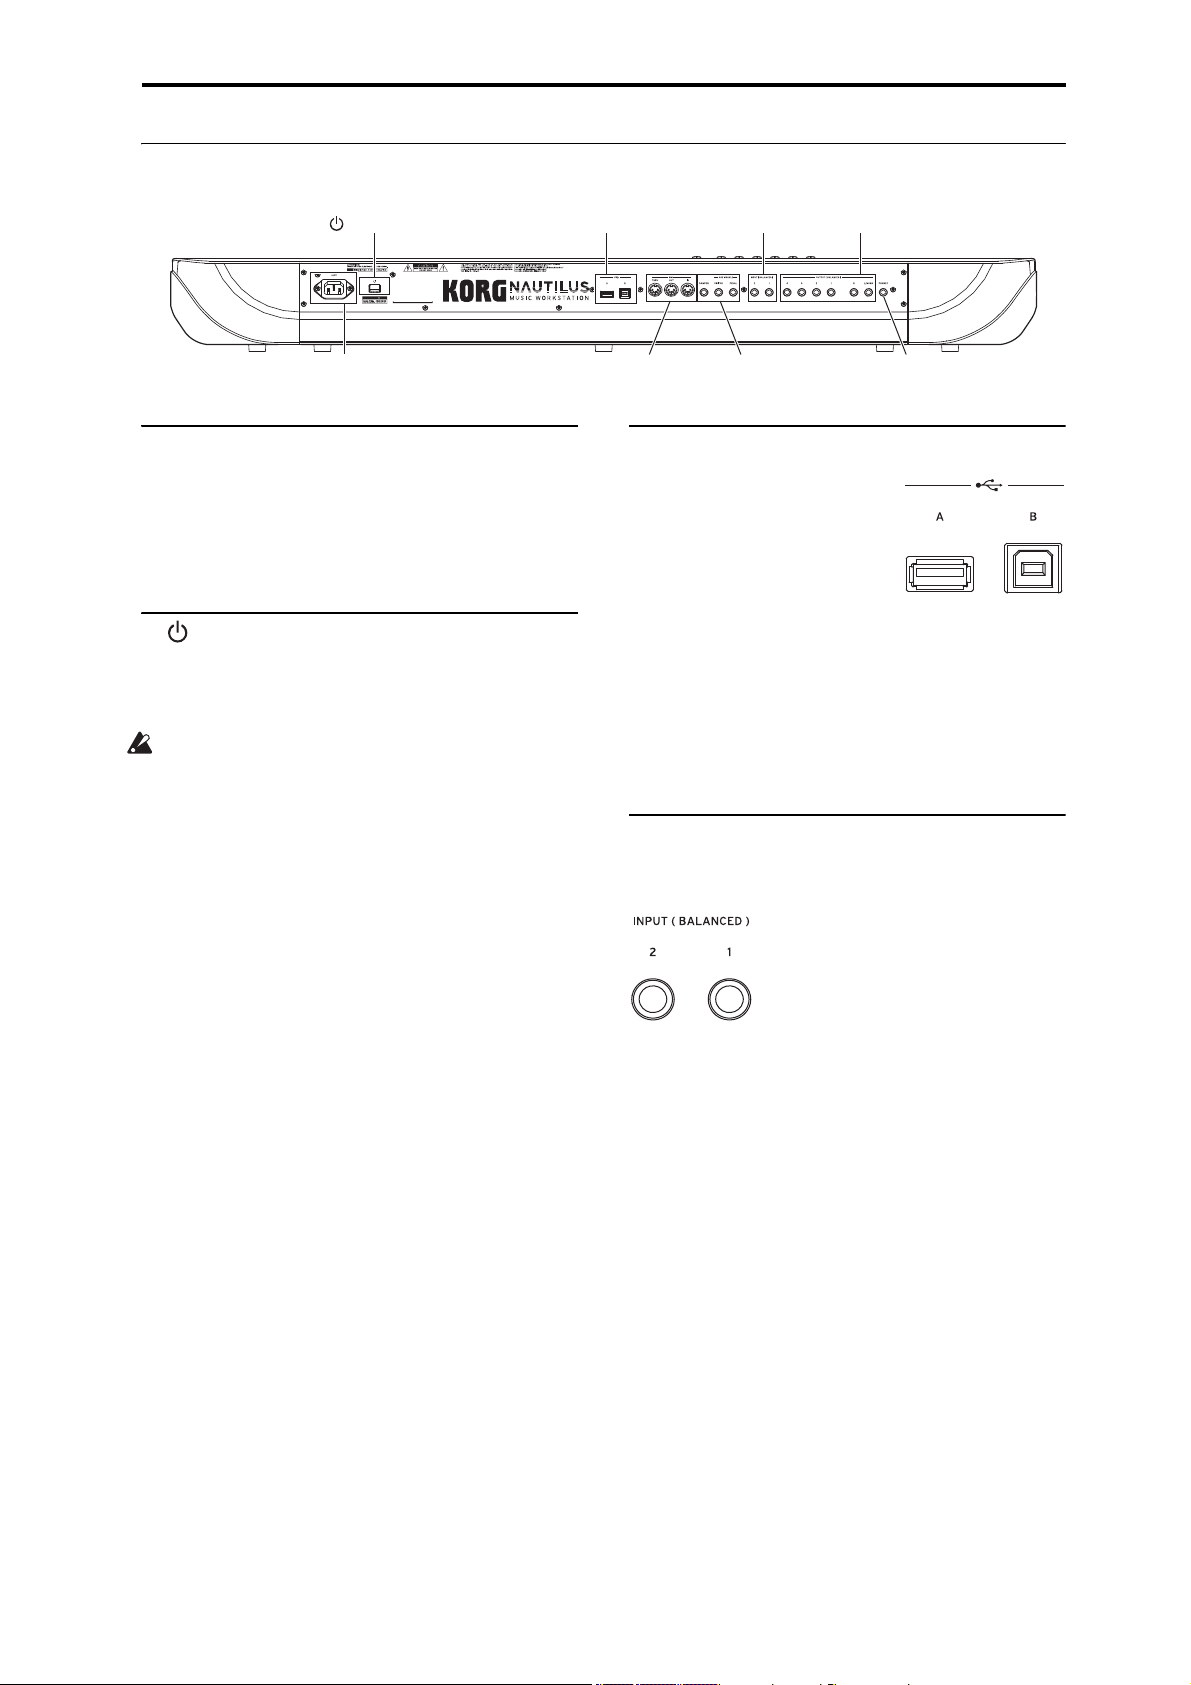
Rear panel
5. Analog Audio Outputs4. Analog Audio Inputs
8. Pedals7. MIDI
3. USB
6. PHONES
2. (power button)
1. AC Power connector
Front and rear panels Rear panel
1. AC Power connector
Connect the included power cable here.
We recommend that you first connect the power cable to the
NAUTILUS, and then connect the other end of the cable to
an AC outlet (see “1. Connecting the power cable” on
page 18).
2. (power button)
This button turns the power on and off. Before turning
NAUTILUS off, make sure that you’ve saved any edits to
your Programs, Combis, Songs, or other user data.
After turning the power off, please wait for at least ten
seconds before you turn the power on again.
Auto power-off
The NAUTILUS has an auto power-off function that
automatically turns off the power when the keyboard or front
panel buttons are not used for a certain length of time*.
* This does not include the MASTER VOLUME slider.
Note: Auto power-off will not operate when the display or
front panel controls are used, when you play the
NAUTILUS, when MIDI is transmitted or received, or when
the drive is accessed (including communication via FTP).
When the power turns off, the settings you had been editing
will be lost. If you want to keep the edited settings, you must
save them first.
You can change the time it takes for the NAUTILUS to turn
off automatically, or disable the auto power-off feature
entirely.
To do so:
1. Select “Auto Power-Off Setting…” in the page menu
commands on the GLOBAL > Basic Setup - Basic
page.
2. Set how long it will take for the power to turn off. Set
this to “Disabled” if you do not want to use this
function.
3. Press “Done” to finish making the settings.
Note: The factory default setting is four hours.
3. USB
USB A port
There is an external, high-speed
USB 2.0 port. You can use it to
connect storage media such as
hard disks, flash media, etc, as
well as class-compliant USB
MIDI controllers. For more
information, see “4. Connecting USB devices” on page 22.
USB B port
This high-speed USB 2.0 port lets you connect to a Mac or
Windows PC, for sending and receiving MIDI and audio.
For more information, see “6. Connecting to computers via
USB” on page 23.
4. Analog Audio Inputs
You can use the audio inputs for recording, sampling, and
real-time mixing through the built-in effects.
INPUT 1 & 2
Inputs 1 and 2 provide 1/4" TRS balanced connectors. You
can use these for either microphone-level or line-level
signals. You can toggle between mic and line level in the
GLOBAL settings.
To adjust the input gain (Gain) and other values, use the
AUDIO IN page of each mode. (see page 21)
For more information for how to make connections and
settings, see “2. Analog audio input connections” on
page 21.
5
Page 12
Introduction to NAUTILUS
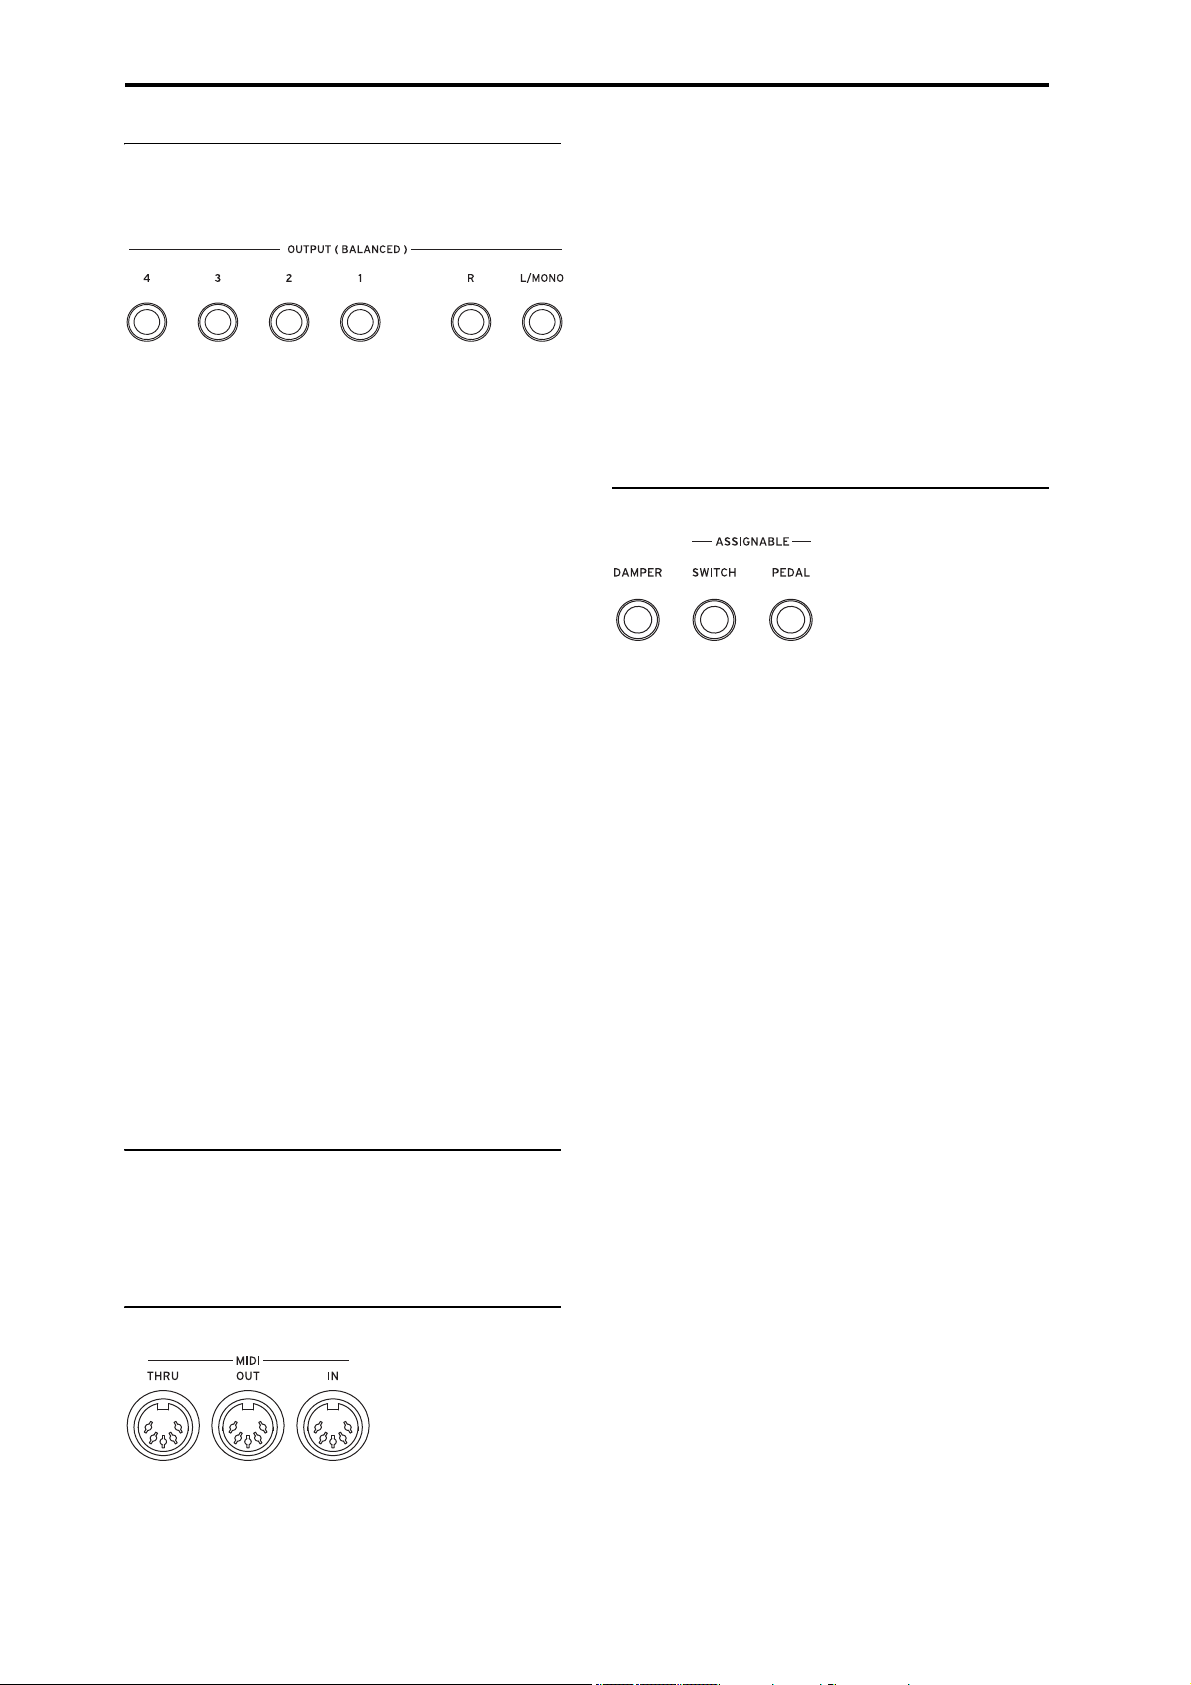
5. Analog Audio Outputs
All of the analog audio outputs use balanced TRS 1/4" phone
jacks, referenced to a +4 dBu signal level.
Connect these outputs to the input jacks of your amp or
mixer. In addition to the L/MONO and R main stereo audio
outputs, the NAUTILUS provides four individual audio
outputs.
The sound from each oscillator, drum, timbre/track, or insert
effect can be freely routed to any output. Additionally, you
can route the metronome sound to an individual output, to
separate it from the stereo mix. For more information, see
“Effects selection and routing” on page 223.
(Main) L/MONO, R
These are the main stereo outputs; their volume is controlled
by the MASTER VOLUME slider. All of the factory
Programs and Combis are programmed to play through these
outputs.
When editing sounds, or when setting up a Song in
SEQUENCER mode, you can access the main outputs by
setting Bus Select to L/R.
If no cable is connected to the R output, L/MONO will carry
a mono summation of the stereo signal. So, if you are
connecting to a device which does not have stereo inputs
(such as a simple keyboard amp), use the L/MONO output.
(Individual) 1…4
These 4 additional audio outputs let you isolate sounds,
audio inputs, or audio tracks for recording or complex live
sound setups.
These can be used as stereo or mono outputs, in any
combination. You can also use the Global Audio page LR
Bus Indiv. Assign parameter to map the main stereo outputs
to any of these output pairs, if you like.
Note that the individual outputs are not affected by the
MASTER VOLUME slider.
6. Headphone jack
You can connect headphones to this jack (stereo 1/4"). This
jack outputs the same signal as the Audio (OUTPUT)
L/MONO and R jacks. Use the MASTER VOLUME slider
to control the headphone volume.
7. MIDI
MIDI THRU connector
MIDI data received at the MIDI IN connector is retransmitted without change from the MIDI THRU connector.
You can use this to chain multiple MIDI devices together.
MIDI OUT connector
This connector transmits MIDI data. Use this to control
external MIDI devices, or to record into an external
sequencer.
MIDI IN connector
This connector receives MIDI data. Use this to play the
NAUTILUS from another MIDI device, or from an external
sequencer.
8. Pedals
DAMPER jack
For the damper–also known as the sustain pedal– you can
connect either a standard footswitch, or Korg’s special halfdamper pedal, the optional DS-1H.
The DS-1H half-damper pedal allows a finer degree of
control compared to switch-type pedals. Set the pedal
polarity so that the half-damper pedal will function correctly.
1. Set the polarity in “Damper Polarity” (GLOBAL >
Controllers/Scales–Controller page) as appropriate.
With the KORG DS-1H, use the (–) KORG Standard
setting.
2. After setting the polarity, calibrate the pedal using the
“Half Damper Calibration” page menu command
(GLOBAL > Basic Setup page).
ASSIGNABLE SWITCH jack
This lets you connect a simple on/off footswitch, such as the
optional Korg PS-1. The footswitch can perform a wide
variety of functions, such as modulating sounds and effects,
tap tempo, sequencer start/stop, etc.
The switch’s function is set in GLOBAL > Controllers tab of
the Controllers/Scales page, so that it always works the same
regardless of the current Program, Combi, or Song. For more
information, see “Setting up the Assignable Switch and
Pedal” on page 175.
ASSIGNABLE PEDAL jack
This lets you connect a continuous controller pedal, such as
the Korg EXP-2 foot controller or Korg XVP-20 EXP/VOL
pedal, to use as an assignable modulation source.
Like the ASSIGNABLE SWITCH, the pedal’s function is
set in GLOBAL mode. For more information, see “Setting
up the Assignable Switch and Pedal” on page 175.
MIDI lets you connect NAUTILUS to computers or other
MIDI devices, for sending and receiving notes, controller
gestures, sound settings, and so on. For more information on
MIDI connections, see “MIDI applications” on page 929 of
the PG.
6
Page 13
TouchView user interface
h: Page tab
a: Current page
d: Edit cell
b: Category popup button
b: Popup button
e: Knob
f: Slider
i: Page menu buttonCheck-boxMode name Page Group name
a-2
a-1
a-3
b-2
b-1
b-3
Front and rear panels TouchView user interface
The NAUTILUS uses Korg’s TouchView graphical user
interface. By touching objects displayed in the LCD screen,
you can select pages, set parameter values, move sliders and
knobs, enter text, connect virtual patch cables, and more.
a: Current page
This is the current page for the selected mode.
To select a page, press the PAGE button, use the page
selector to choose a page group and then select the desired
page from the lower row of tabs.
The mode name > page group name is displayed on the top
left of the current page.
b: Popup button & menu
Press the desired value or item in the pop-up menu.
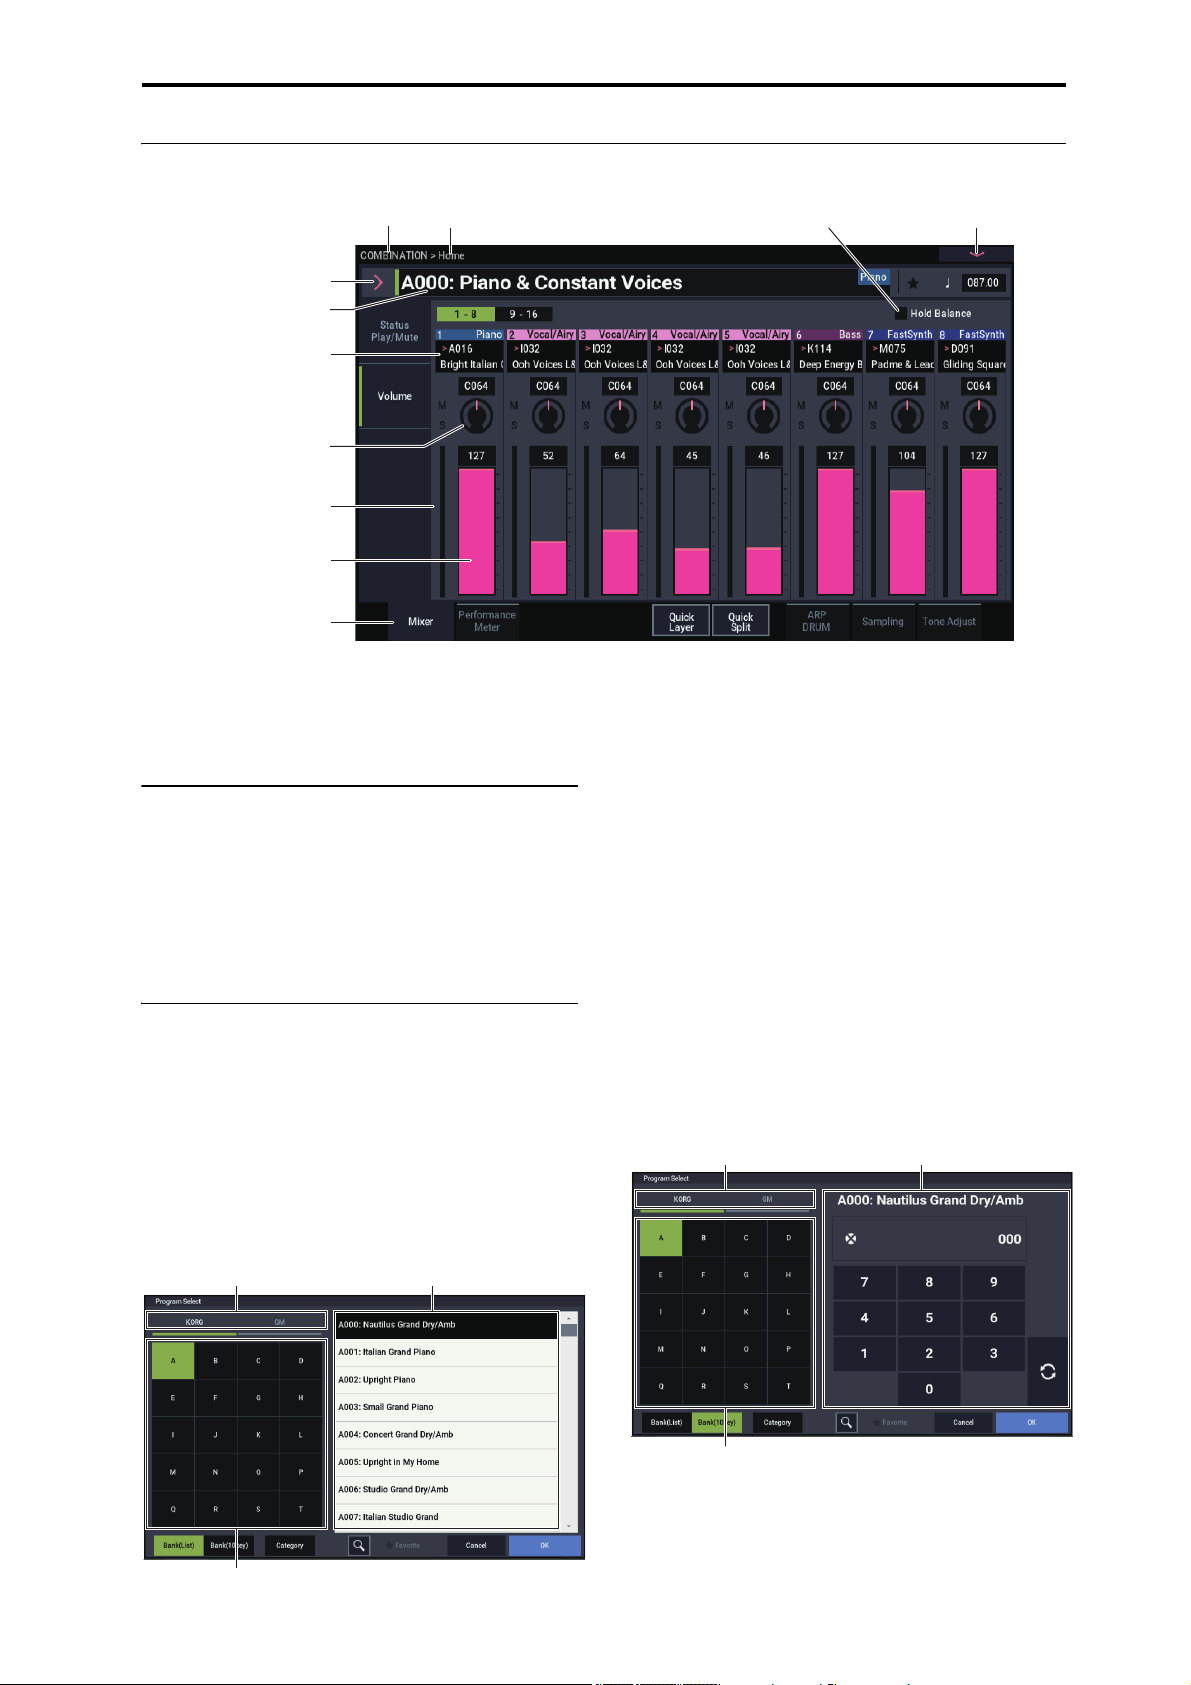
PROGRAM, COMBINATION selection
pop-up menu
This pop-up menu is used to select program and combination
sounds.
a: Bank (List)
The program and combination sounds are listed in banks.
a-1: Bank Select button
This button is used to select banks. This switches between
a-3: Sound list.
a-2: PROGRAM Bank Type button
Displays when selecting a PROGRAM sound.
This button switches between KORG format and GM format
bank lists.
a-3: Sound list
This is a list of sounds for the selected bank.
When using Program Select (in PROGRAM mode) or
Combination Select (in COMBINATION mode), the list
displays in a single column; and when using Timbre (Track)
Program Select and so on in SEQUENCER mode, this list
displays in two columns.
Note: When in bank (list) display mode, the sounds will not
switch until you select an item from the list.
b: Bank (10Key)
7
Page 14
Introduction to NAUTILUS
Press here and slide to left or right
to scroll to the desired location.
Press here to scroll to left or right.
Press here to scroll to the
corresponding location.
b-1: Bank Select button ( a-1)
b-2: PROGRAM Bank Type button ( a-2)
b-3: 10 Key
Use these keys to input a sound number for a sound in the
selected bank. The sound will switch when you press the
update ( ) button.
The sound will be updated and the dialog box will close even
if you press the OK button without pressing the update
button.
Note: In Bank (10Key) display mode, the sound will change
right after you select a bank using Bank Select.
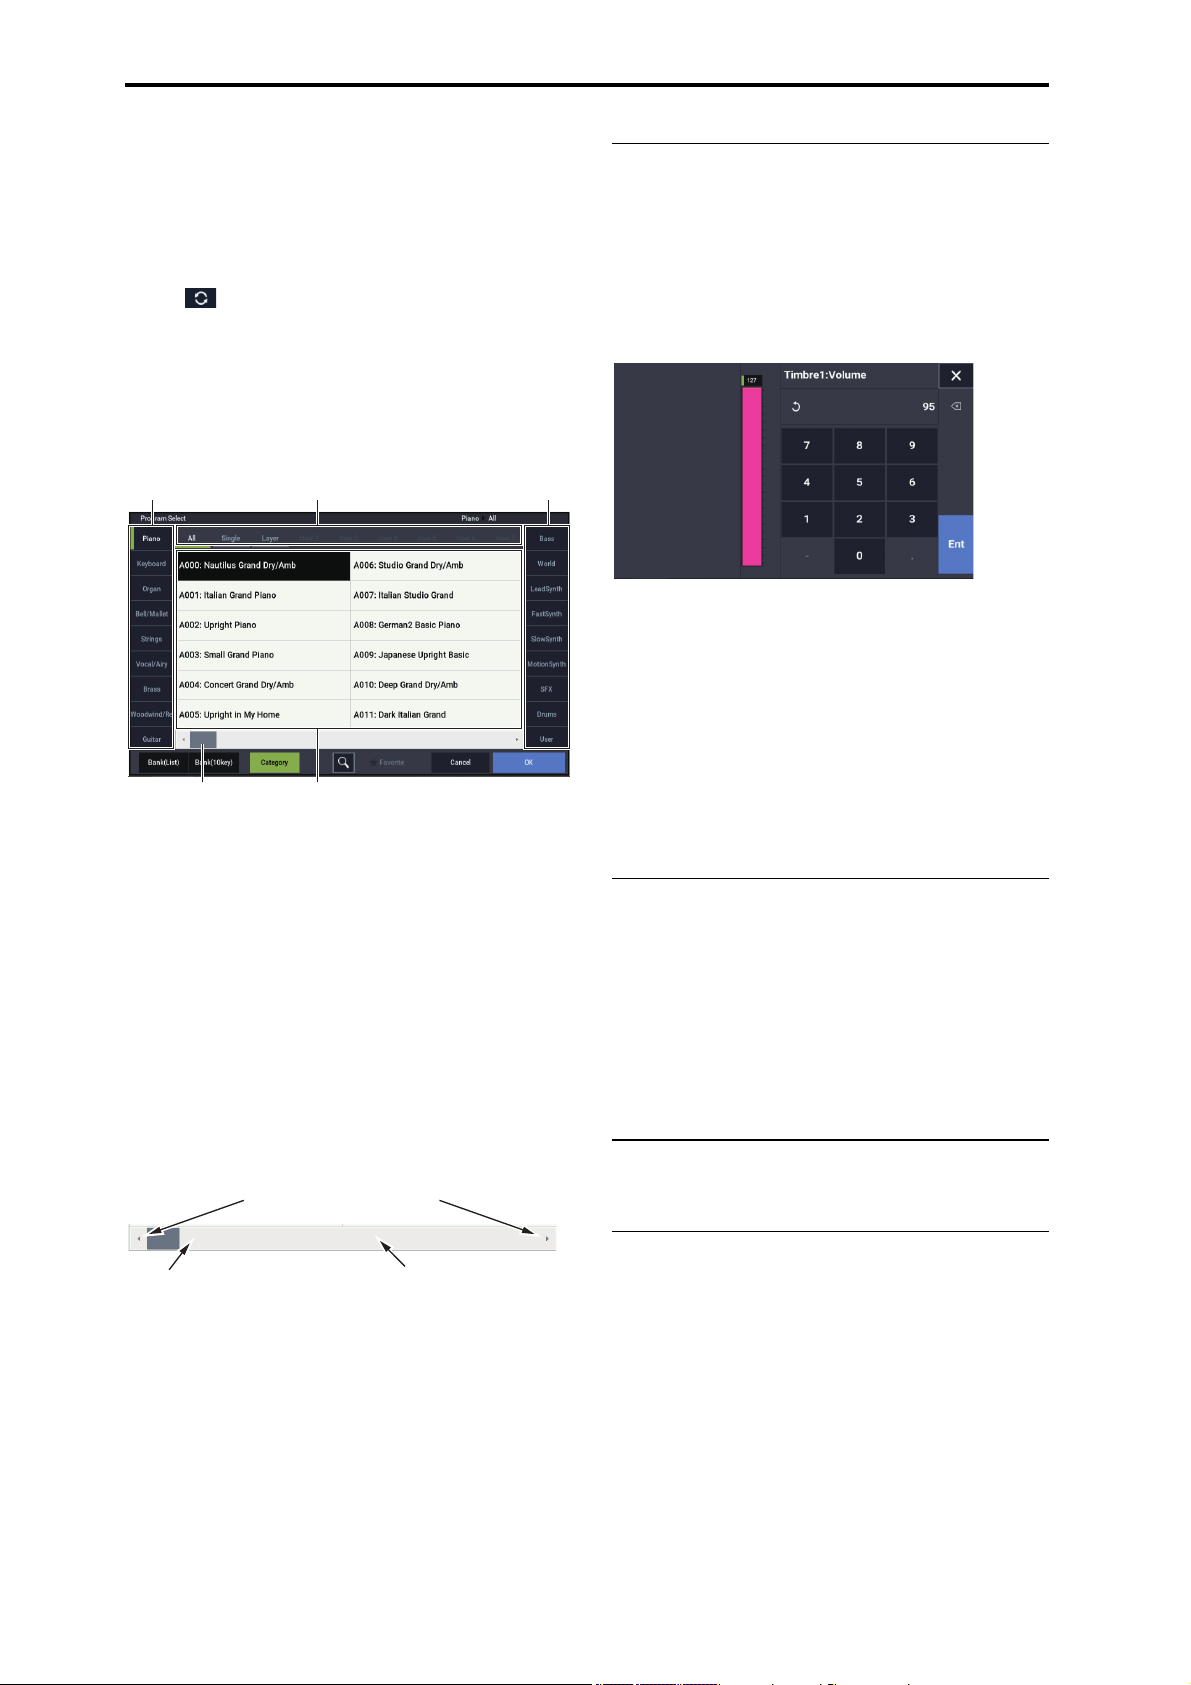
c: Category select
c-1 c-1
c-4 c-3
c-1: Category tabs
These tabs represent the sound categories.
c-2
d: Edit cell
The “edit cell” is shown as a black background in the
parameter or parameter value display. Press this to make
settings, either by pop-up or by inputting a value.
When this is pressed, the edit cell will be selected as
indicated by a green highlight. On some cells you can press
the selected edit cell a number of times to display the
numeric keypad and input a numerical value.
The parameter value of the edit cell can be modified using
the VALUE controllers. (see page 15)
In most cases you can edit the value by touching the edit cell
and dragging your finger up or down. (A few parameters
don’t support this editing method.) If your hand is obscuring
the parameter value on the screen, you can drag your finger
to the left or right before editing; as long as you don’t lift
your finger from the screen, the parameter will stay selected.
For parameters that accept a note number or a velocity value,
you can also hold down the ENTER button and play a note
on the keyboard to enter the note number or velocity value.
c-2: Sub Category buttons
Use these buttons to filter down the sound category you
selected in c-1 by sub-category.
c-3: Sound list
Note: The categories and sub-categories set in “Global
Category” will be displayed (→p.178).
c-4: Scroll bar
When a list is too long for all items to fit on the screen at
once, the popup includes scroll bars. You can touch in the
empty areas of the scroll bar to move back and forth in the
list, or touch and drag the scroll handle.
e & f: On-screen sliders, knobs, and meters
To edit an on-screen slider or knob, simply touch it and then
drag to change its value. Knobs can generally be turned by
both up-down and right-left gestures.
Alternatively, you can first touch the slider or knob and then
use the VALUE controllers to modify the value.
On-screen meters show audio levels for Combination
Timbres, Sequencer Tracks, insert, master, and total effects,
and the main output.
h: Page tabs
Press tabs to select the page.
i: Page menu button
When this button is pressed, a list of menu commands will
appear. The available commands will vary depending on the
current page. To select a command, just touch it.
The page menu will close when you press the LCD screen at
a location other than the page menu, or when you press the
EXIT button.
Even though each page may have its own unique menu
commands, the menus are standardized as much as possible.
For instance, WRITE is almost always the first menu item in
PROGRAM, COMBINATION, SET LIST, and GLOBAL
modes.
8
Page 15
Front and rear panels TouchView user interface
Cancel button OK button
Radio button
Check box
Dialog box
Many menu commands use dialog boxes to make additional
settings. The dialog box that appears will depend on the
currently selected menu command.
You can also use the VALUE controller (→p.15) to input a
number when selecting a program, combination number or
other value in a dialog box.
Pressing the program name may also show the text edit
dialog (→p.206). Whatever the case, follow the message
shown in the dialog box.
To confirm settings in a dialog box, press the OK button. To
exit without making changes, press the Cancel button. After
pressing either OK or Cancel, the dialog box will close. The
EXIT button corresponds to the Cancel, Done and Exit
buttons.
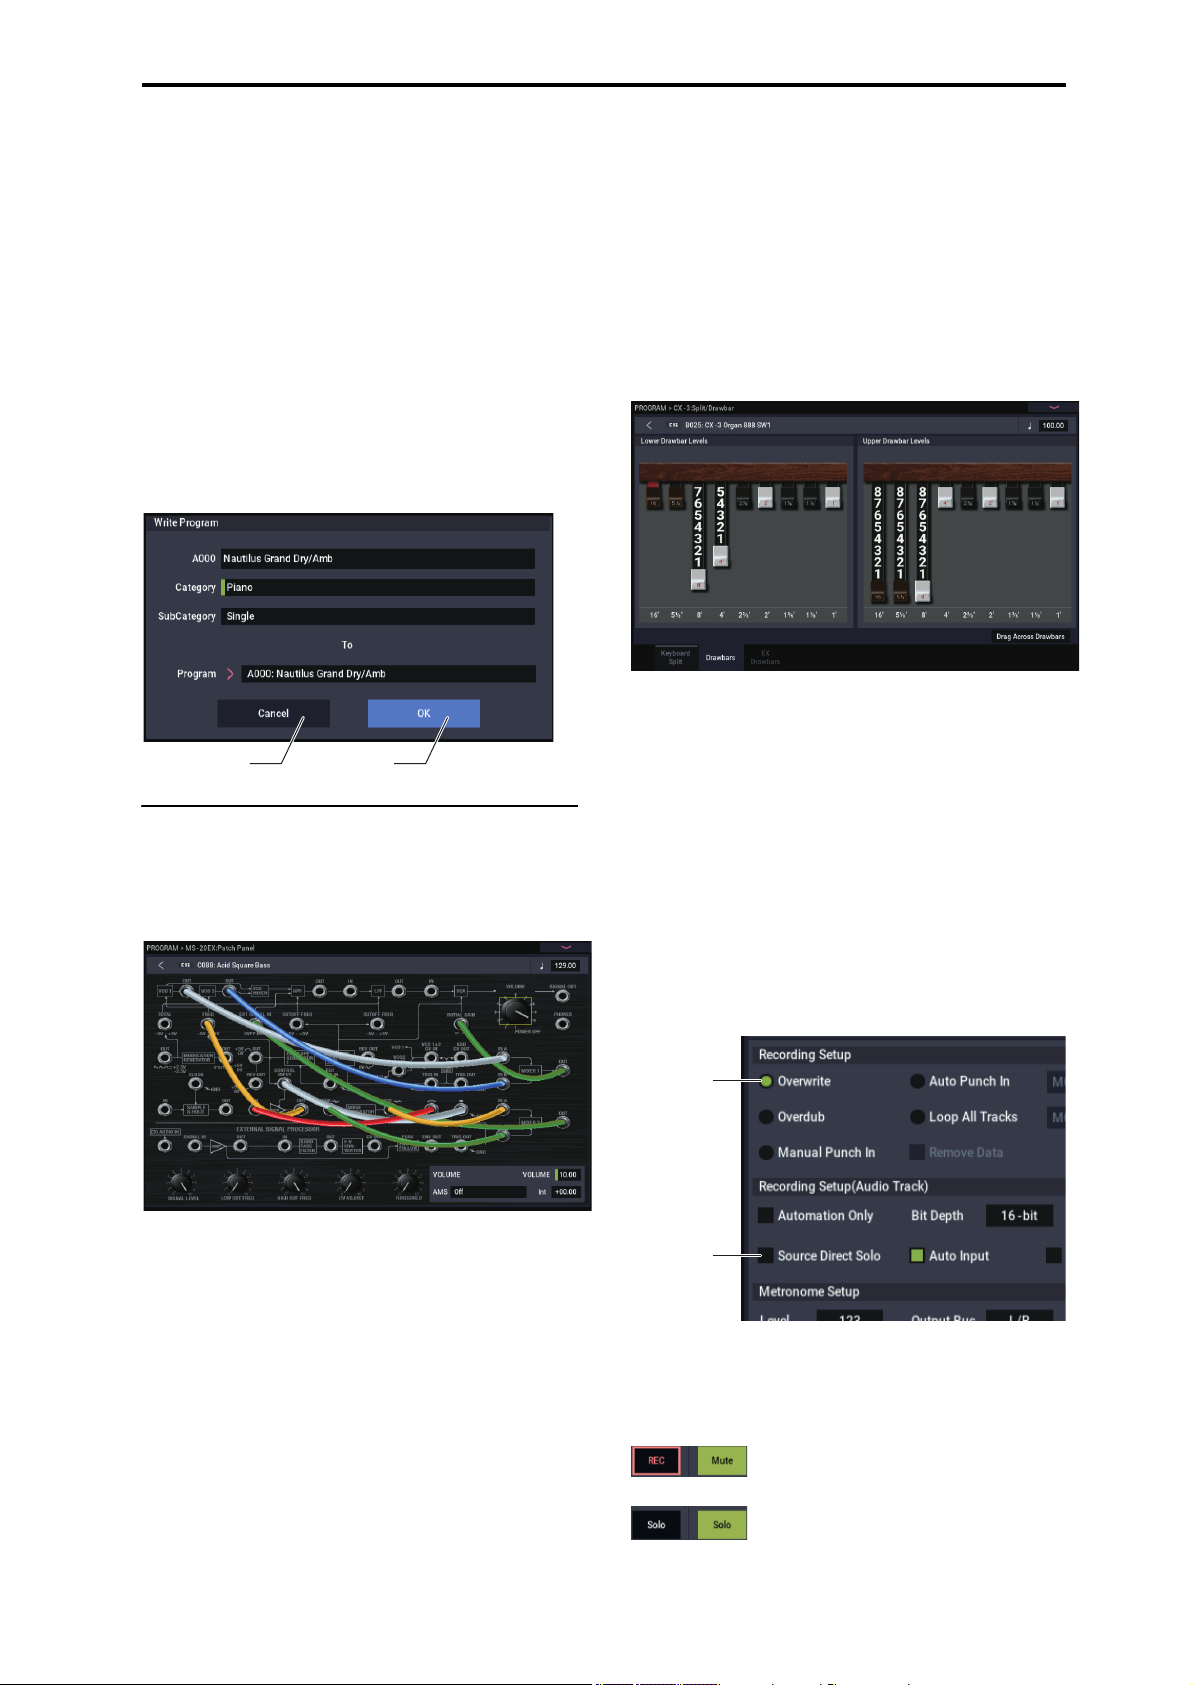
Program Home page Overview/Jump graphics
The PROGRAM > Home page features an interactive
overview of the most important parameters, such as
oscillators, filters, envelopes, LFOs, and so on. Just touch
any of these overview areas, and you’ll jump to the
corresponding edit page.
CX-3 Drawbars
You can edit CX-3 drawbars just as you would other slider
controls, by touching and dragging the individual drawbars
one by one.
There’s also a special feature that allows you to drag shapes
across all of the drawbars at once. To use this feature, enable
the Drag Across Drawbars check-box in the lower right of
the Drawbars page. Then, drag a shape across all of the
drawbars horizontally.
Other objects
Patch panel
The MS-20EX and MOD-7 use on-screen patch panels to
route audio and control signals.
To make a connection between two patch points:
• Touch one of the two jacks (either input or output),
and drag your finger across the screen to the second
jack.
A yellow line appears as you drag across the screen, and is
replaced by a patch cable once the connection is made.
To delete a connection between two patch points:
• Touch the input jack, and drag off of the jack.
The selected connection will be deleted.
Check box
Each time you press a check box, it alternates between the
checked (green) and unchecked states.
The parameter will be active if it is checked, and inactive if it
is unchecked.
Radio button
Press a radio button to select one value from two or more
choices.
Toggle buttons
This type of button will change its function or button on/off
each time it is pressed.
Play/Rec/Mute buttons in SEQUENCER mode:
Solo On/Off buttons in SEQUENCER mode:
9
Page 16

Introduction to NAUTILUS
Basic information
About the NAUTILUS’ modes
The NAUTILUS has a large number of features that let you
play and edit programs and combinations, record and play
sequence data, record and play back samples, and manage
data on drive. The largest unit used to organize these features
is called a mode.
The NAUTILUS has seven modes.
SET LIST mode
Set Lists make it simple to play and organize any of the
sounds loaded into the NAUTILUS, without regard for what
bank they’re stored in or whether they’re Programs,
Combinations, or even Songs.
Large on-screen buttons make sound selection fast and
foolproof, and the Program Up or Down footswitch
assignments can be used for hands-free sound changes. Cut,
copy, paste, and insert tools make re-ordering a snap.
Smooth Sound Transitions (SST) let the previous sound and
its effects ring out naturally, making it easy to change sounds
during a live performance. SST is active in all of the
NAUTILUS modes, but Set Lists give you greater control
over the transitions. You can fine-tune the ring-out time for
each sound, so that (for instance) one sound fades out very
quickly, while another sound’s delays continue to repeat for
ten or twenty seconds.
Set Lists are great for live performance, but they’re also
handy for organizing sounds in general. For example, you
could create a Set List with all of your favorite String
sounds, including both Programs and Combinations.
PROGRAM mode
Programs are the basic sounds of NAUTILUS. In
PROGRAM mode, you can:
• Select and play Programs
• Edit Programs
Make detailed settings for oscillators, filters, amps, EGs,
LFOs, effects, arpeggiator function (including drum
track, step sequence), vector synthesis, etc. The specific
parameters will vary depending on the synthesis type:
HD-1, AL-1, CX-3, STR-1, MS-20EX, PolysixEX,
MOD-7, EP-1, or SGX-2
• Create drum programs using drum kits (as created in
GLOBAL mode)
• Use one arpeggiator
• You can play back drum track patterns while you
perform with a program. You can also use the step
sequencer as an alternative to drum tracks to play back a
phrase while you are performing
• The arpeggiator, drum track/step sequencer variations
can be managed through four scenes
• Sample and resample
For example, you can sample an external audio source, or
you can play a Program and resample your performance.
COMBINATION mode
Combinations are sets of up to 16 Programs that can be
played simultaneously, letting you create sounds more
complex than a single Program. In COMBINATION mode,
you can:
• Select and play Combinations
• Use NAUTILUS as a 16-track multitimbral tone
generator
• Edit Combinations
Assign Programs to each of the 16 Timbres, each with
separate volume, pan, EQ, and keyboard and velocity
zones; make settings for effects, vector synthesis,
arpeggiator function (drum track, step sequence)
• Use two arpeggiators
• The arpeggiator, drum track/step sequencer variations
can be managed through four scenes
• Sample or resample
For example you can sample an external audio source, or
resample a performance you play using a combination.
SEQUENCER mode
SEQUENCER mode lets you record, play back, and edit
MIDI tracks and audio tracks. You can:
• Select and play Songs
• Edit Songs
Assign Programs to each of the 16 MIDI Tracks, with
separate volume, pan, EQ, and keyboard and velocity
zones; make settings for effects, vector synthesis,
arpeggiator function (drum track, step sequence)
• Record up to sixteen MIDI tracks simultaneously
• Record up to four of the sixteen audio tracks
simultaneously, mix using automation, and import
WAVE files
• Use two arpeggiators
• The arpeggiator, drum track/step sequencer variations
can be managed through four scenes
• Sample or resample
You can sample an external audio input source while
playing a song, and use In-Track Sampling to
automatically create a note event that triggers the sample
at the same time as it was recorded
• Use NAUTILUS as a 16-track multitimbral tone
generator
• Record patterns and assign them to individual keys,
using RPPR (Realtime Pattern Play/Recording)
• Create your own Drum Track Patterns
10
Page 17

SAMPLING mode
SAMPLING mode lets you record and edit your own
Samples and Multisamples. For example, you can:
• Record samples from external audio sources, including
sampling through effects
• Edit the recorded samples, or samples loaded from
MEDIA mode; set loop points, truncate, time-slice, etc.
• Create and edit Multisamples, which consist of one or
more Samples spread out across the keyboard
• Quickly convert Multisamples into Programs
• Create massive sounds using the generous internal RAM:
if you like, a single Multisample can use about 6 hours of
sampling time
• Load a number of these huge Multisamples at once, via
User Sample Banks and Virtual Memory
GLOBAL mode
GLOBAL mode lets you make overall settings for the entire
NAUTILUS, and edit wave sequences and drum kits. For
instance, you can:
• Make settings that affect the entire NAUTILUS, such as
master tune and global MIDI channel
• Set up sample auto-loading at startup
• Manage currently loaded samples
• Create user scales
• Create user Drum Kits and Wave Sequences using
samples from ROM, EXs, User Sample Banks or
SAMPLING mode
• Create Arpeggio Patterns
• Rename Program, and Combination categories
• Set the function of the assignable pedals and assignable
switches
• Transmit MIDI System Exclusive data dumps
Basic information About the NAUTILUS’ modes
MEDIA mode
MEDIA mode lets you save, load, and manage data using the
internal disk and external USB 2.0 storage devices. You can:
• Save and load Programs, Combinations, Songs, Samples,
and Global setup data
• Format disks and storage media, copy and rename files,
etc.
• Load AKAI, SoundFont 2.0, AIFF, and WAVE samples,
and export RAM samples in AIFF or WAVE formats
• Export and import sequences to and from SMF (Standard
MIDI Files)
• Use the Data Filer function to save or load MIDI System
Exclusive data
11
Page 18
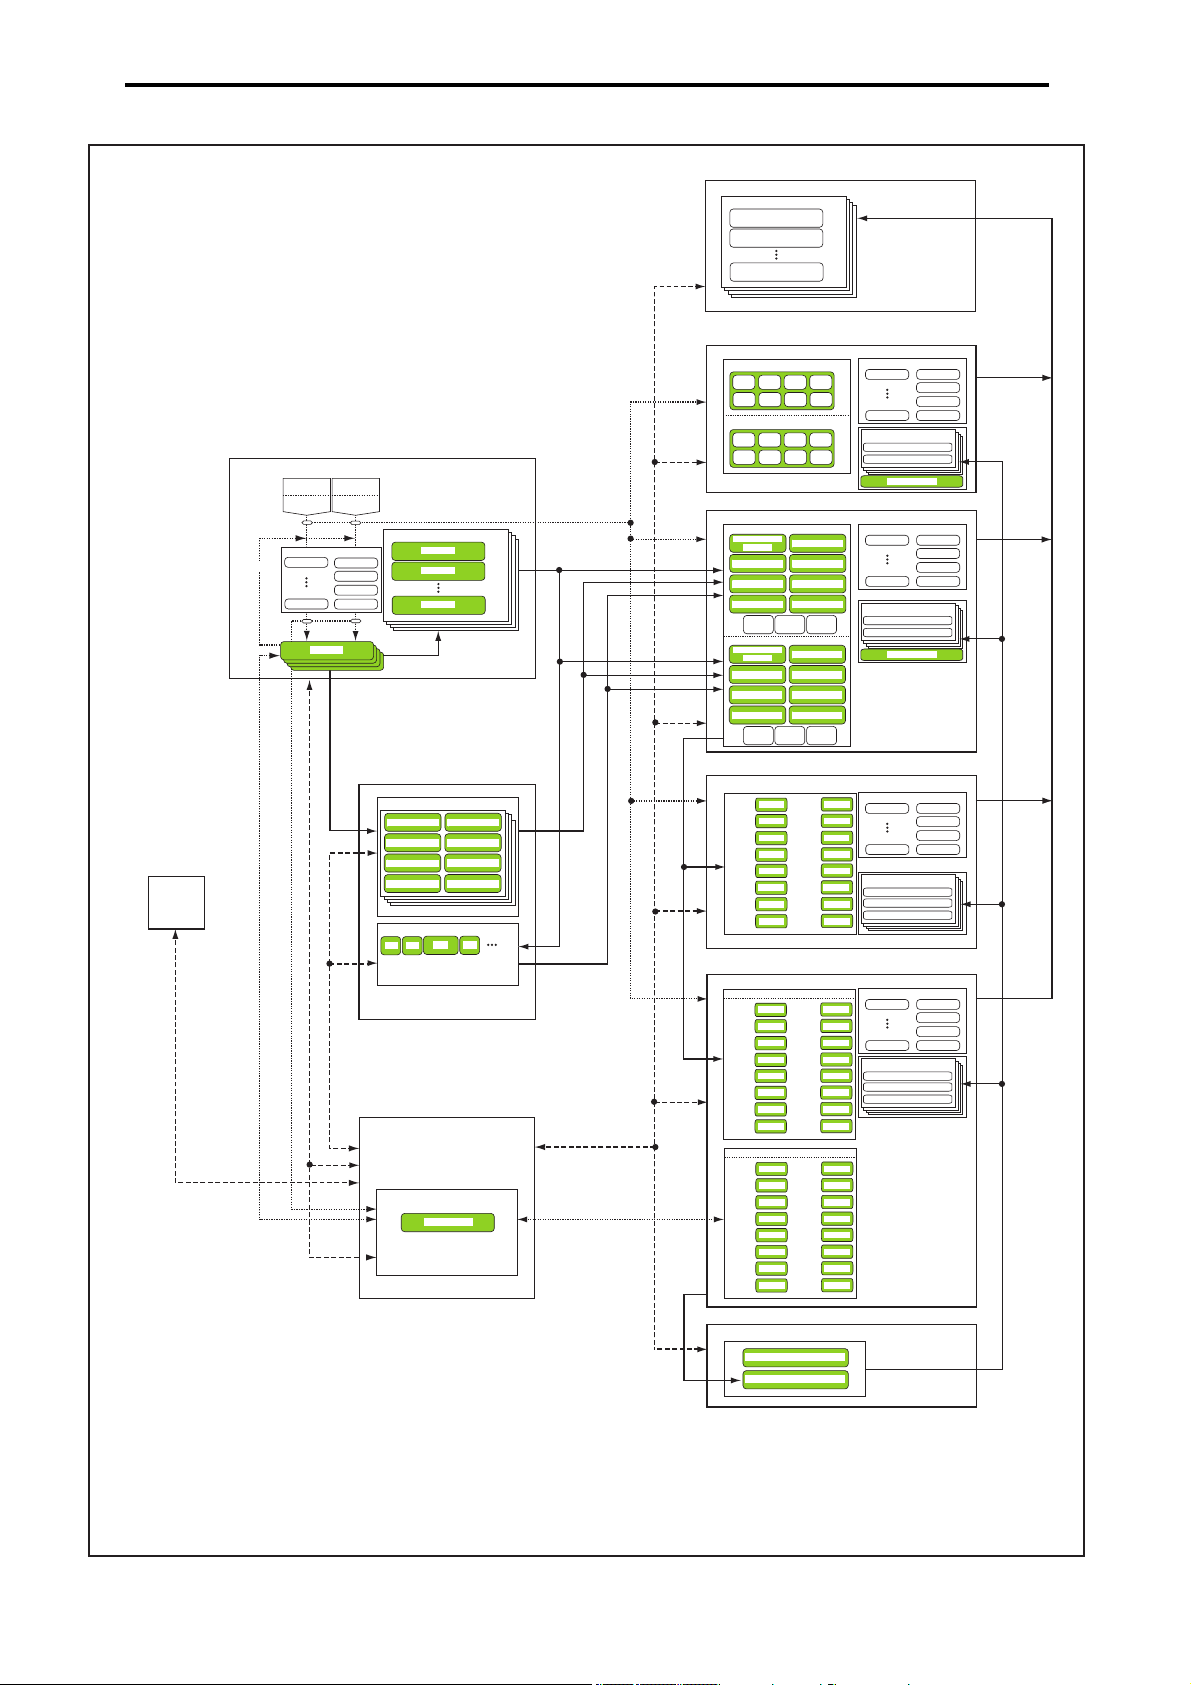
Introduction to NAUTILUS
MEDIA MODE
OSC 1
PITCH1
FILTER1
AMP1/
DRIVER1
OSC 2
PITCH2
FILTER2
AMP2/
DRIVER2
PROGRAM (HD-1)
TRACK 1
TRACK 8
TRACK 2
TRACK 3
TRACK 4
TRACK 5
TRACK 6
TRACK 7
PROGRAM
PROGRAM
PROGRAM
PROGRAM
PROGRAM
PROGRAM
PROGRAM
PROGRAM
SEQUENCER
TRACK 9
TRACK 16
TRACK 10
TRACK 11
TRACK 12
TRACK 13
TRACK 14
TRACK 15
COMBINATION
GLOBAL MODE
Key Assign
WAVE SEQUENCE
DRUM KIT
SAMPLING MODE
Multisample
Sample
Sample
Sample
Sample
Sample
Sample
Sample
Multisample
AUDIO INPUT
1
AUDIO INPUT
2
USB DRIVE
Resampling
INTERNAL DRIVE
PROGRAM
PROGRAM
PROGRAM
PROGRAM
PROGRAM
PROGRAM
PROGRAM
PROGRAM
TIMBRE1
TIMBRE8
TIMBRE2
TIMBRE3
TIMBRE4
TIMBRE5
TIMBRE6
TIMBRE7
PROGRAM
PROGRAM
PROGRAM
PROGRAM
PROGRAM
PROGRAM
PROGRAM
PROGRAM
TIMBRE9
TIMBRE16
TIMBRE10
TIMBRE11
TIMBRE12
TIMBRE13
TIMBRE14
TIMBRE15
PROGRAM
PROGRAM
PROGRAM
PROGRAM
PROGRAM
PROGRAM
PROGRAM
PROGRAM
MIDI TRACK 1...16
TRACK 1
TRACK 8
TRACK 2
TRACK 3
TRACK 4
TRACK 5
TRACK 6
TRACK 7
REGION
REGION
REGION
REGION
REGION
REGION
REGION
REGION
TRACK 9
TRACK 16
TRACK 10
TRACK 11
TRACK 12
TRACK 13
TRACK 14
TRACK 15
REGION
REGION
REGION
REGION
REGION
REGION
REGION
REGION
AUDIO TRACK 1...16
MS MS
MS MS
IFX 1
IFX 12
MFX 1
MFX 2
TFX 1
TFX 2
Insert / Master / Final Eect
WAVE FILES
IFX 1
IFX 12
MFX 1
MFX 2
TFX 1
TFX 2
Insert / Master / Total Eect
EXi 1
EXi 2
PROGRAM (EXi)
IFX 1
IFX 12
MFX 1
MFX 2
TFX 1
TFX 2
Insert / Master / Total Eect
IFX 1
IFX 12
MFX 1
MFX 2
TFX 1
TFX 2
Insert / Master / Total Eect
Audio Recording
Multisample
Drum Kit
Wave Seq.
PCG / SNG
PCG
KSC
Preset Drum Track Pattern
User Drum Track Pattern
DRUM TRACK PATTERN
EP-1
PolysixEX
STR-1AL-1
SGX-2
MOD-7
MS-20EX
CX-3
EP-1
PolysixEX
STR-1AL-1
SGX-2
MOD-7
MS-20EX
CX-3
MS1 (MS/WS)
Drum Kit
MS5 (MS/WS)
MS2 (MS/WS) MS6 (MS/WS)
MS3 (MS/WS) MS7 (MS/WS)
MS4 (MS/WS) MS8 (MS/WS)
MS1 (MS/WS)
Drum Kit
MS5 (MS/WS)
MS2 (MS/WS) MS6 (MS/WS)
MS3 (MS/WS) MS7 (MS/WS)
MS4 (MS/WS) MS8 (MS/WS)
USB AUDIO IN1USB AUDIO IN
2
SET LIST
Multisample
Slot 127
Slot 001
Slot 000
Set List 000 ... 127
DS1 (DS/Sample)
DS5 (DS/Sample)
DS2 (DS/Sample)
DS6 (DS/Sample)
DS3 (DS/Sample)
DS7 (DS/Sample)
DS4 (DS/Sample)
DS8 (DS/Sample)
Arpeggiator A
Drum Track / Step Sequencer
Drums Program
Scene1...4
Arpeggiator A
Drum Track / Step Sequencer
Drums Program
Scene1...4
Arpeggiator A
Arpeggiator B
Drum Track / Step Sequencer
Scene1...4
IFX 1
IFX 12
MFX 1
MFX 2
TFX 1
TFX 2
Insert / Master / Total Eect
Arpeggiator A
Arpeggiator B
Drum Track / Step Sequencer
Scene1...4
12
Page 19

Basic information About the NAUTILUS’ PCM memory
About the NAUTILUS’ PCM memory
“PCM” is another way of saying “samples.” The
NAUTILUS has several types of PCM banks, as described
below: ROM, EXs, User Sample Banks, and Sampling Mode
Data.
For more information on the contents of the included ROM
and EXs sample data, see the Voice Name List (VNL).
ROM
The NAUTILUS ROM contains the basic multisamples and
samples, and is always loaded and available.
EXs
EXs stands for EXpansion Samples. These can be loaded or
not, as you wish. The NAUTILUS comes with a number of
EXs libraries, including multiple gigabytes of samples.
User Sample Banks
User Sample Banks may be sounds that you create yourself,
or load from imported Akai or SoundFont 2.0 libraries, or
WAV or AIFF files.
Sampling Mode Data
SAMPLING mode is used to create and edit samples. When
you save Sampling Mode Data, it becomes available as a
User Sample Bank.
Using samples in your own sounds
You can use any of these bank types, together or separately,
when making your own sounds. Simply set the Bank as
desired in the Program or Wave Sequence Step’s
Multisample Select fields, or the Drum Kit Drumsample
Select fields. For more information, see:
• Program: “Bank (Multisample),” on page 51 of the PG
• Wave Sequence: “Bank (Multisample),” on page 662 of
the PG
• Drum Kit: “Bank,” on page 669 of the PG
Lossless compression
When EXs data is loaded into RAM, the NAUTILUS uses a
lossless compression technique. This yields a modest
reduction in size; for instance, EXs1 uses 284MB of RAM
for 313MB of data.
You’ll notice that this is much milder than the dramatic size
reductions of mp3, or the PCM compression sometimes
found in other synthesizers. There is a strong advantage over
these other methods, however: the NAUTILUS compression
is completely lossless, and causes absolutely no degradation
in audio quality.
Loading samples at startup
The NAUTILUS can load your favorite samples
automatically at startup. For more information, see
“Automatically loading sample data” on page 179.
User sampling RAM capacity
The NAUTILUS is equipped with 3 GB of RAM.
Approximately 1 GB of this RAM is used by the operating
system and ROM sample data. The remainder is shared
between the samples in EXs, User Sample Banks, and
SAMPLING mode.
This means that the size of the currently loaded EXs and
User Sample Banks trades off against the memory available
for SAMPLING mode. The more space used by EXs and
User Sample Banks, the less is available for SAMPLING
mode.
Using Virtual Memory for EXs and User Sample Banks
generally lets you load more samples at once, but may still
use a substantial amount of RAM.
Note: To check the amount of sample RAM available, see
“0–1f: Free Sample Memory/Locations” on page 579 of the
PG.
For more information, see “Free RAM and approximate
sampling times” on page 123.
About polyphony
Most hardware synthesizers offer a single, fixed method of
synthesis, a predetermined number of voices, and a fixed
amount of effects processing power for a specific number of
effects. NAUTILUS is different; it has no fixed synthesis
method, its polyphony varies depending on which synth
engines are being used, some synth engines provide
additional effects (augmenting the 16 normal effects slots),
and there are sometimes trade-offs of processing power
between voices and effects.
This flexibility means that the system can deliver power
where you need it the most. As you play different sounds
from different synth engines, the NAUTILUS automatically
divides its processing power appropriately.
Unlike most computer-based systems, NAUTILUS also
monitors the overall processing power, reducing the overall
number of voices if necessary, to make sure that there are
never problems with the audio.
Normally, you shouldn’t need to think about this at all; it will
just happen automatically. Sometimes, however, it can be
convenient to know how the system is allocating its
resources. The Performance Meters page shows this
information; you can find it on the Perf Meters tab of Home
in PROGRAM, COMBINATION, and SEQUENCER
modes. For more information, see “0–2: Performance
Meter” on page 13 of the PG.
13
Page 20
Introduction to NAUTILUS
Page tab
Basic operations
After you’ve turned on the NAUTILUS, here’s how to
perform basic operations such as selecting modes and pages.
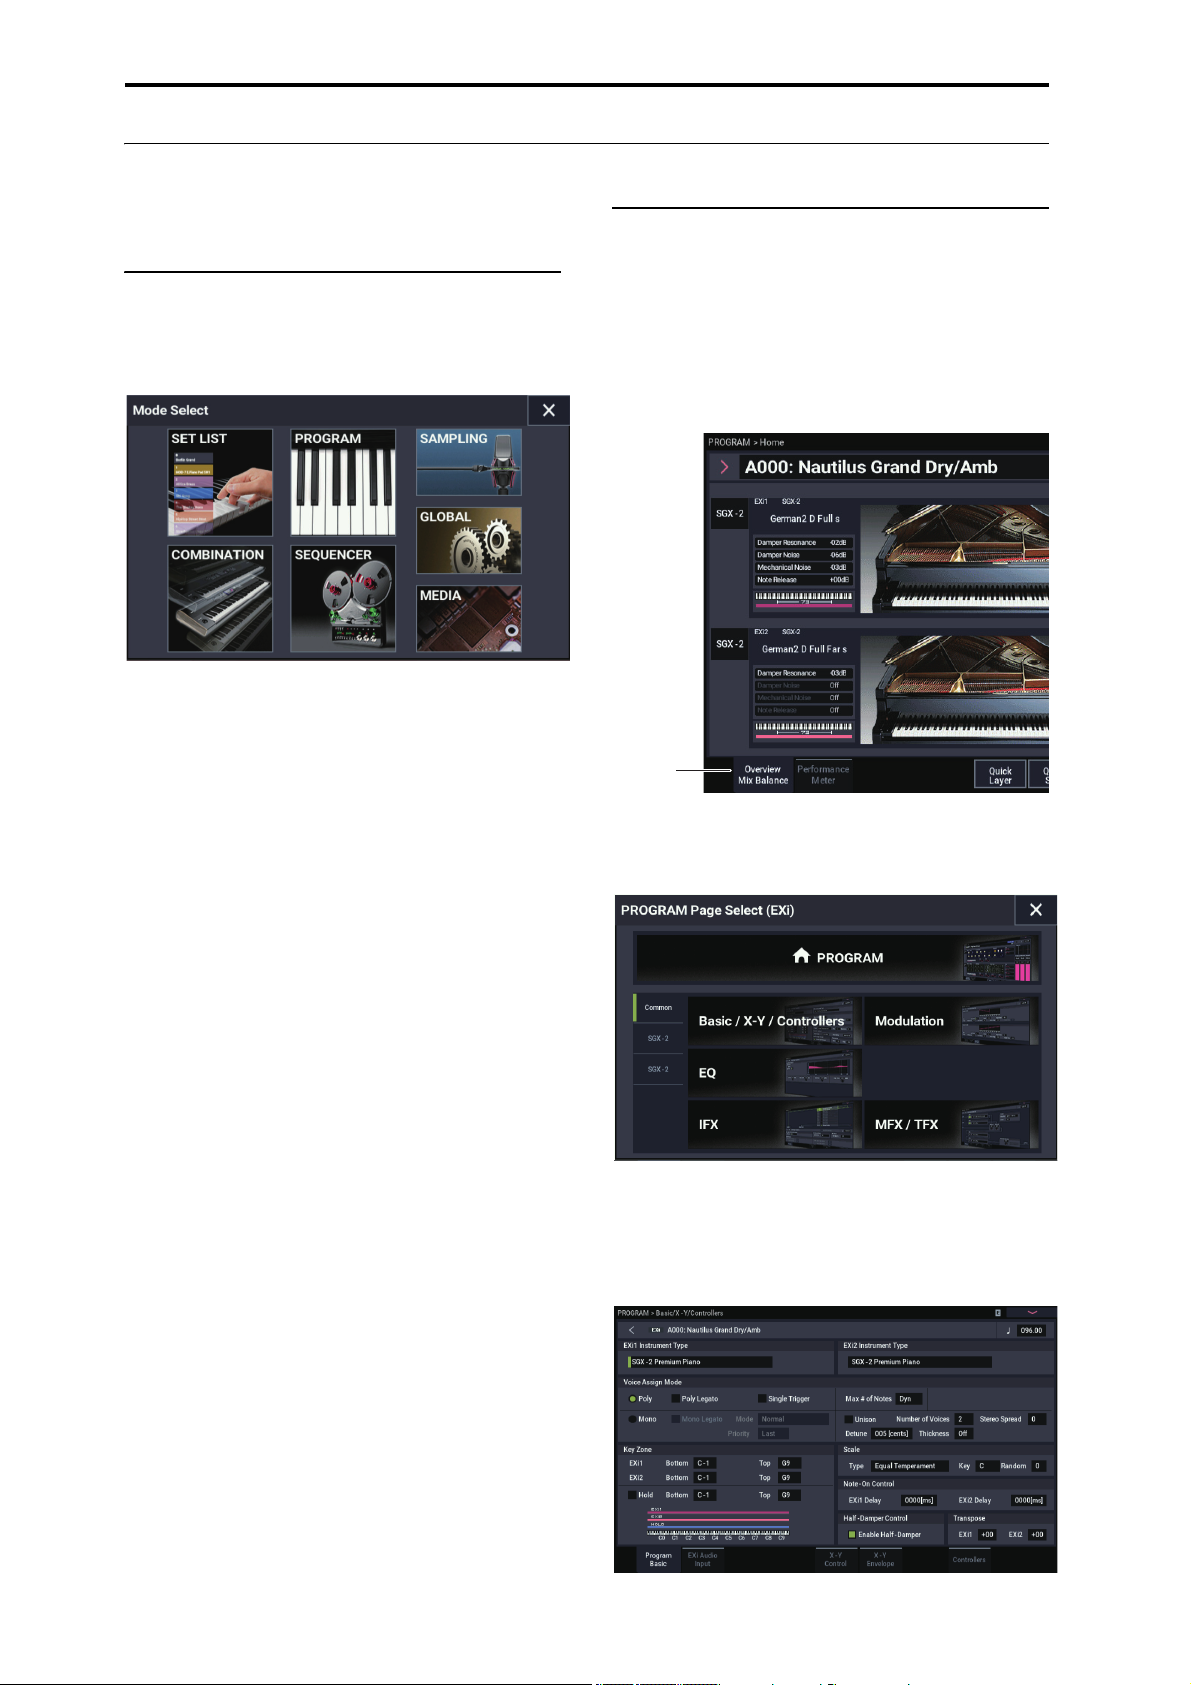
1. Selecting modes
To enter each mode, press the MODE button and then the
respective mode button in the Mode menu on the display.
The NAUTILUS features seven operating modes.
SET LIST button
This selects SET LIST mode. Set Lists make it simple to
play and organize any of the sounds loaded into the
NAUTILUS, without regard for what bank they’re stored in
or whether they’re Programs, Combinations, or even Songs.
PROGRAM button
This selects PROGRAM mode, for playing and editing basic
sounds.
2. Selecting pages
Each mode has a large number of parameters, which are
grouped into pages. These are further subdivided by tabs into
up to nine tab pages.
1. Select the desired mode, as described above.
We’ll use PROGRAM mode as an example for our
explanation. Press the MODE button to select the
PROGRAM mode.
2. Press the PAGE button to go to the Page Select.
As an example here, select the Basic/X-Y/Controllers
button.
COMBINATION button
This selects COMBINATION mode, for playing and editing
complex splits and layers of Programs.
SEQUENCER button
This selects SEQUENCER mode, for recording, playing,
and editing audio and MIDI tracks.
SAMPLING button
This selects SAMPLING mode, for recording and editing
audio samples and multisamples.
GLOBAL button
This selects GLOBAL mode, for making overall settings,
editing Wave Sequences and Drum Kits, and more.
MEDIA button
This selects MEDIA mode, for saving and loading data to
and from the internal disk or external USB storage devices.
3. The current page indication in the upper left of the
LCD screen will indicate “PROGRAM > Basic/XY/Controllers,” and the page group will change.
When you press the EXIT button, you will return to Home
from any page.
14
Page 21
Basic information Basic operations
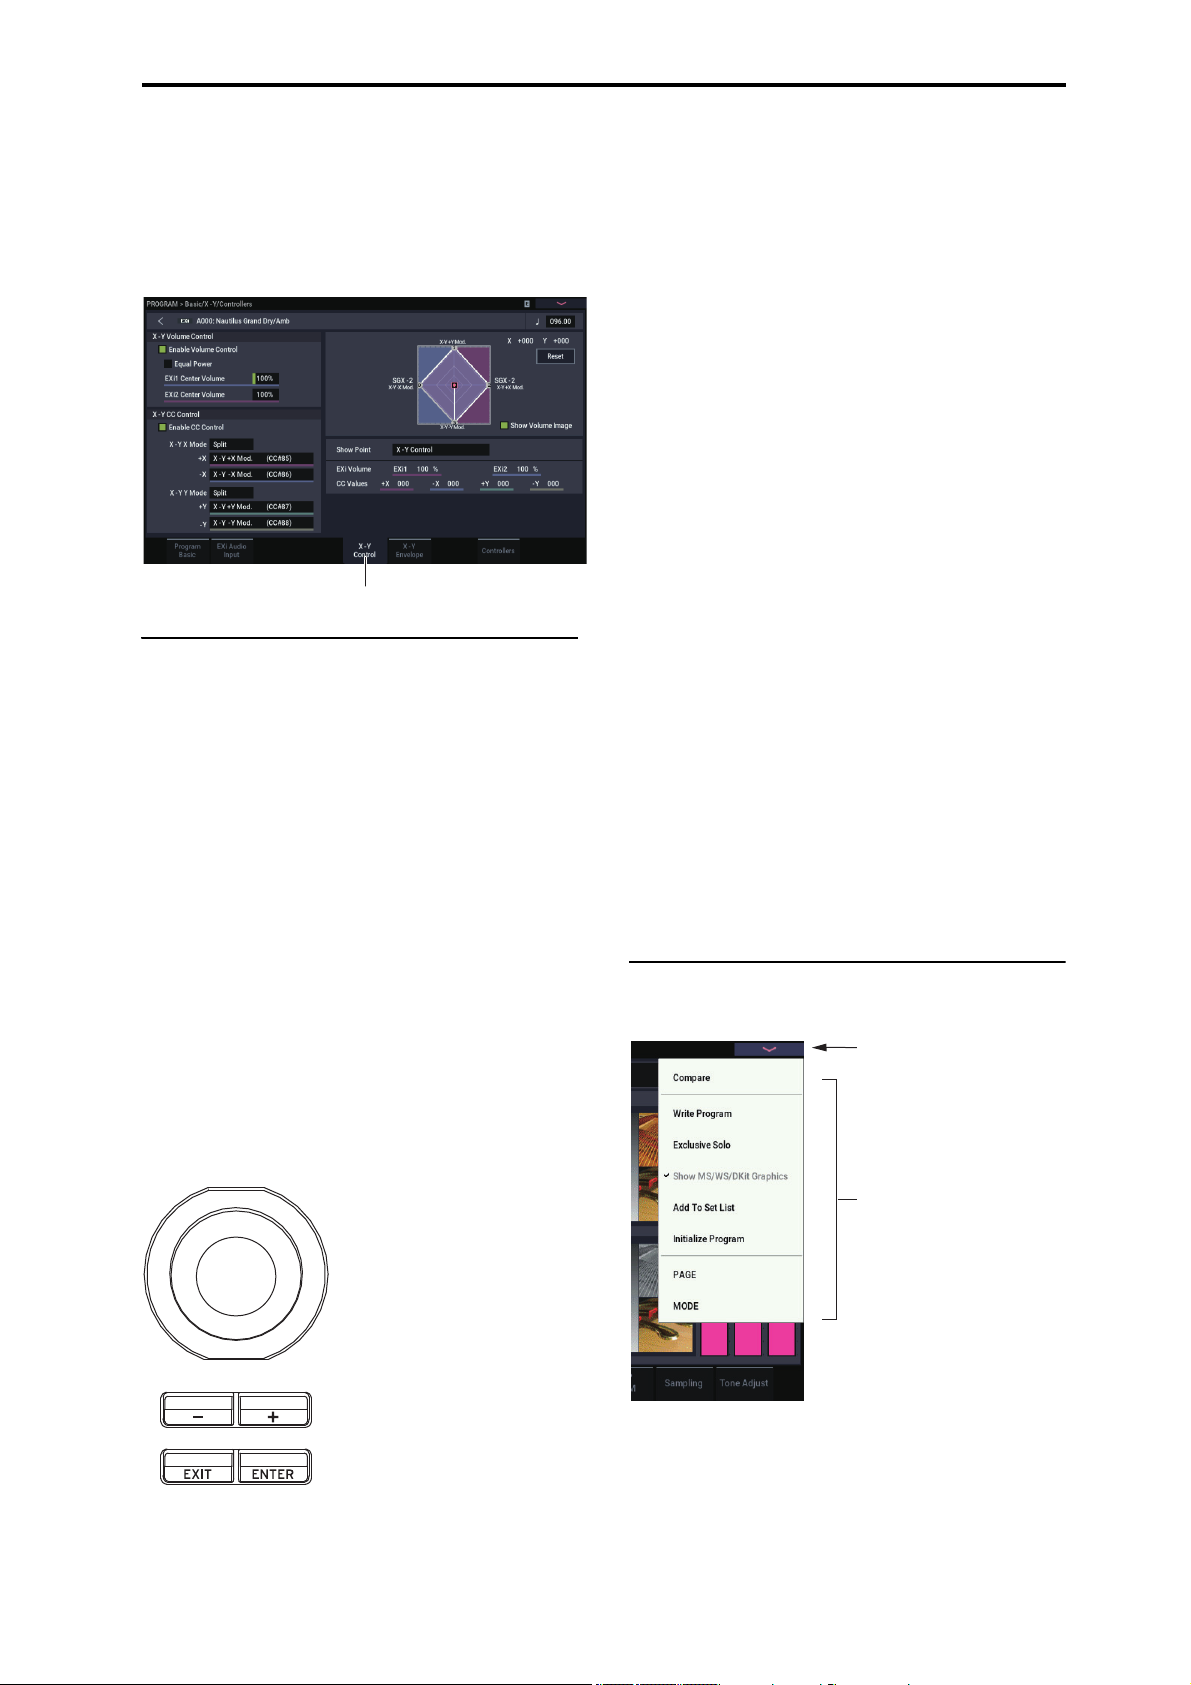
X-Y Control tab
Menu
Menu commands button
4. Press a tab (page tabs) to select a page.
As an example here, press the X-Y Control tab. The current
page indication in the upper left of the LCD screen will stay
the same.” You’ve selected the X-Y Control page.
Note: In some cases, there may not be any tabs in the upper
line.
3. Selecting and changing parameters
1. Press the parameter that you want to edit.
A green line will appear to the left of the parameter (edit
cell).
2. The parameter value in the edit cell can be edited
using touch-drag or with the VALUE controllers
(including the VALUE dial, the −/+ buttons, the
ENTER button and so on). For edit cells that can
accept numerical input, input the number by selecting
the edit cell, and then touching the same edit cell again
to display the numeric keypad.
Note: The way that the value will change depends on the
type of parameter or object.
For example, the values on a checkbox object can be
switched by pressing that object. To input a note and
velocity number using the keyboard, play a key while
holding down the ENTER button.
Note: You can use the Compare page menu command to
compare the sound you’re editing with the original unedited
sound.
+/− buttons
VALUE dial
Use this when you wish to make large changes in a value.
To make detailed changes to the values, turn the dial while
holding down the ENTER button.
How the values change when using the −/+ buttons or the
dial when inputting the tempo
120.00 → 121.00 → 122.00 → ...
How the values change when using the −/+ buttons or the
dial while holding down the ENTER button
120.00 → 120.01 → 120.02 → ...
Popup buttons and popup menus
You can press a popup button to access a popup menu, and
then set parameter values.
Numeric keypad
After you select an edit cell that accepts numeric input, touch
the same cell again to display the numeric keypad.
Keyboard input
When entering a note number or a specific velocity as the
value of a parameter, you can use the keyboard to input the
setting. Hold down the ENTER button and play the note that
you wish to enter as a value. The note number or velocity
value will be input.
When the GLOBAL > Drum Kit page is displayed, you can
hold down the ENTER button and play a note to recall the
settings that have been assigned to that note. (If the
parameter you’ve selected expects you to enter a velocity
value, the velocity you played will be entered.)
In SAMPLING mode, you can hold down the ENTER
button and play a note to recall the index that is assigned to
that note.
4. Selecting and executing menu
commands
VALUE controller
The menu provides commands that are specific to each page,
such Write (save) or Copy. The available functions will
depend on the current page.
For example, the utility functions in PROGRAM mode let
you write (save) the settings, perform convenient editing
operations such as copying settings between oscillators or
effects, “Sync” EGs so that you can edit two of them at once,
and so on.
15
Page 22

Introduction to NAUTILUS
1. In the upper right of the display, press the menu
button.
A list of menu commands will appear.
2. Select a menu command by pressing it with your
finger.
A dialog box for the selected menu command will appear.
Check-type commands will not display a dialog box; their
status will be switches, and the list will close.
• To close the list without selecting a command, press the
display somewhere other than the list, or press the EXIT
button.
3. For a parameter in a dialog box, select it by pressing it
with your finger, and use the VALUE dial or +/−
buttons to enter its value.
4. To execute the command, press the OK or ENTER
button. If you decide not to execute the command,
press the Cancel button or the EXIT button.
The dialog box will close.
Compare command
Use this when you wish to compare the edits you have made
to a program or combination’s sound with the un-edited
original (i.e., the sound that is written into memory).
When editing a program or combination, execute the
command, and the last-written settings for that program
number or combination number will be recalled. When you
execute the command once again, you will return to the
settings that you were editing.
If compare command will not appear on the page menu
command, you cannot return to the settings that you were
editing.
In SEQUENCER mode, you can use the command to make
“before and after” comparisons immediately after using
realtime recording or step recording to record a song, or after
performing a track edit operation.
For example, this can be used effectively when realtimerecording a track for a song.
1. Realtime-record a MIDI track. (Take 1)
2. Once again, realtime-record on the same track.
(Take 2)
3. Execute the command, and take 1 will be recalled.
4. Execute the command once again, and take 2 will be
recalled.
5. If at step 3 you once again realtime-record on the
same track (take 3), the object of the Compare
function will now be take 1.
If at step 4 you once again realtime-record on the same track
(take 3), the object of the Compare function will be take 2.
In this way, the Compare function lets you recall the
previous recording or the previous state of event editing.
5. Using the Quick Access buttons
Select a combination of button functions that corresponds to
how you will operate the NAUTILUS. These buttons can be
used to jump to the pages you set, and to select the modes.
They can also be used as playback, stop, record and other
buttons in SEQUENCER mode.
The button function settings can be accessed from the Quick
Access page in GLOBAL mode. (See “Configuring the
QUICK ACCESS buttons” on page 176.)
When you press a QUICK ACCESS button along with a
different button, the buttons serve as a shortcut to the page
jump and page menu commands.
MODE button + A...F buttons
This works as a shortcut to switch between modes.
MODE button + A: SET LIST mode
MODE button + B: PROGRAM mode
MODE button + C: COMBINATION mode
MODE button + D: SEQUENCER mode
MODE button + E: SAMPLING mode
MODE button + F: GLOBAL mode/MEDIA mode
(toggles between modes)
ENTER button + A...F buttons
Six functions (except for “Compare”) from the page menu
command that is displayed from up to down are selected,
each corresponding to the mode buttons.
PAGE button + A...F buttons
Jumps to a pre-allocated page in the current mode.
EXIT button + A...F buttons
Activates the following functions, but only in SEQUENCER
mode.
EXIT button + A button: SEQUENCER PLAY/STOP button
EXIT button + B button: SEQUENCER REC/WRITE button
EXIT button + C button: SEQUENCER LOCATE button
EXIT button + D button: SEQUENCER REW button
EXIT button + E button: SEQUENCER FF button
EXIT button + F button: SEQUENCER PAUSE button
16
Page 23

6. Writing and saving
After you edit, you should write or save your changes as
necessary. For example if you’ve edited a program, your
changed will be lost if you select another program or turn off
the power. The same applies to a combination. Settings you
edit in GLOBAL mode will be remembered as long as the
power is on, but your changes will be lost when you turn off
the power.
For details on the Write operations, see the following pages.
• Programs: see “Saving your edits” on page 34
• Combinations: see “Saving your edits” on page 70
• Effect presets: see “Saving Effect Presets” on page 232
• Global settings: see “Writing Global settings” on
page 208
• Arpeggio Pattern: see “Saving the arpeggio pattern” on
page 201
• Wave Sequences: see “Saving Wave Sequences” on
page 192
• Drum kits: see “Saving Drum Kits” on page 196
• User Drum Track patterns: see “Creating Drum Track
patterns” on page 169
Preset/user Drum Track patterns are saved in internal
memory even when the power is turned off. Patterns you
create in SEQUENCER mode can be converted into user
Drum Track patterns and saved in internal memory.
• User template songs: see “Saving your own Template
Songs” on page 78
Preset/user template songs are saved in internal memory
even when the power is turned off. Track settings and effect
settings of a song you create can be saved in internal
memory by the menu command Save Template Song.
• Writing to internal memory →p.205
Basic information Basic operations
For more information about saving, refer to the following
page.
• Saving to internal drive, CDs, and USB media →p.209
Note: On the NAUTILUS, the action of writing into internal
memory is called “Writing,” and the action of saving to an
external USB storage device is called “Saving.”
17
Page 24
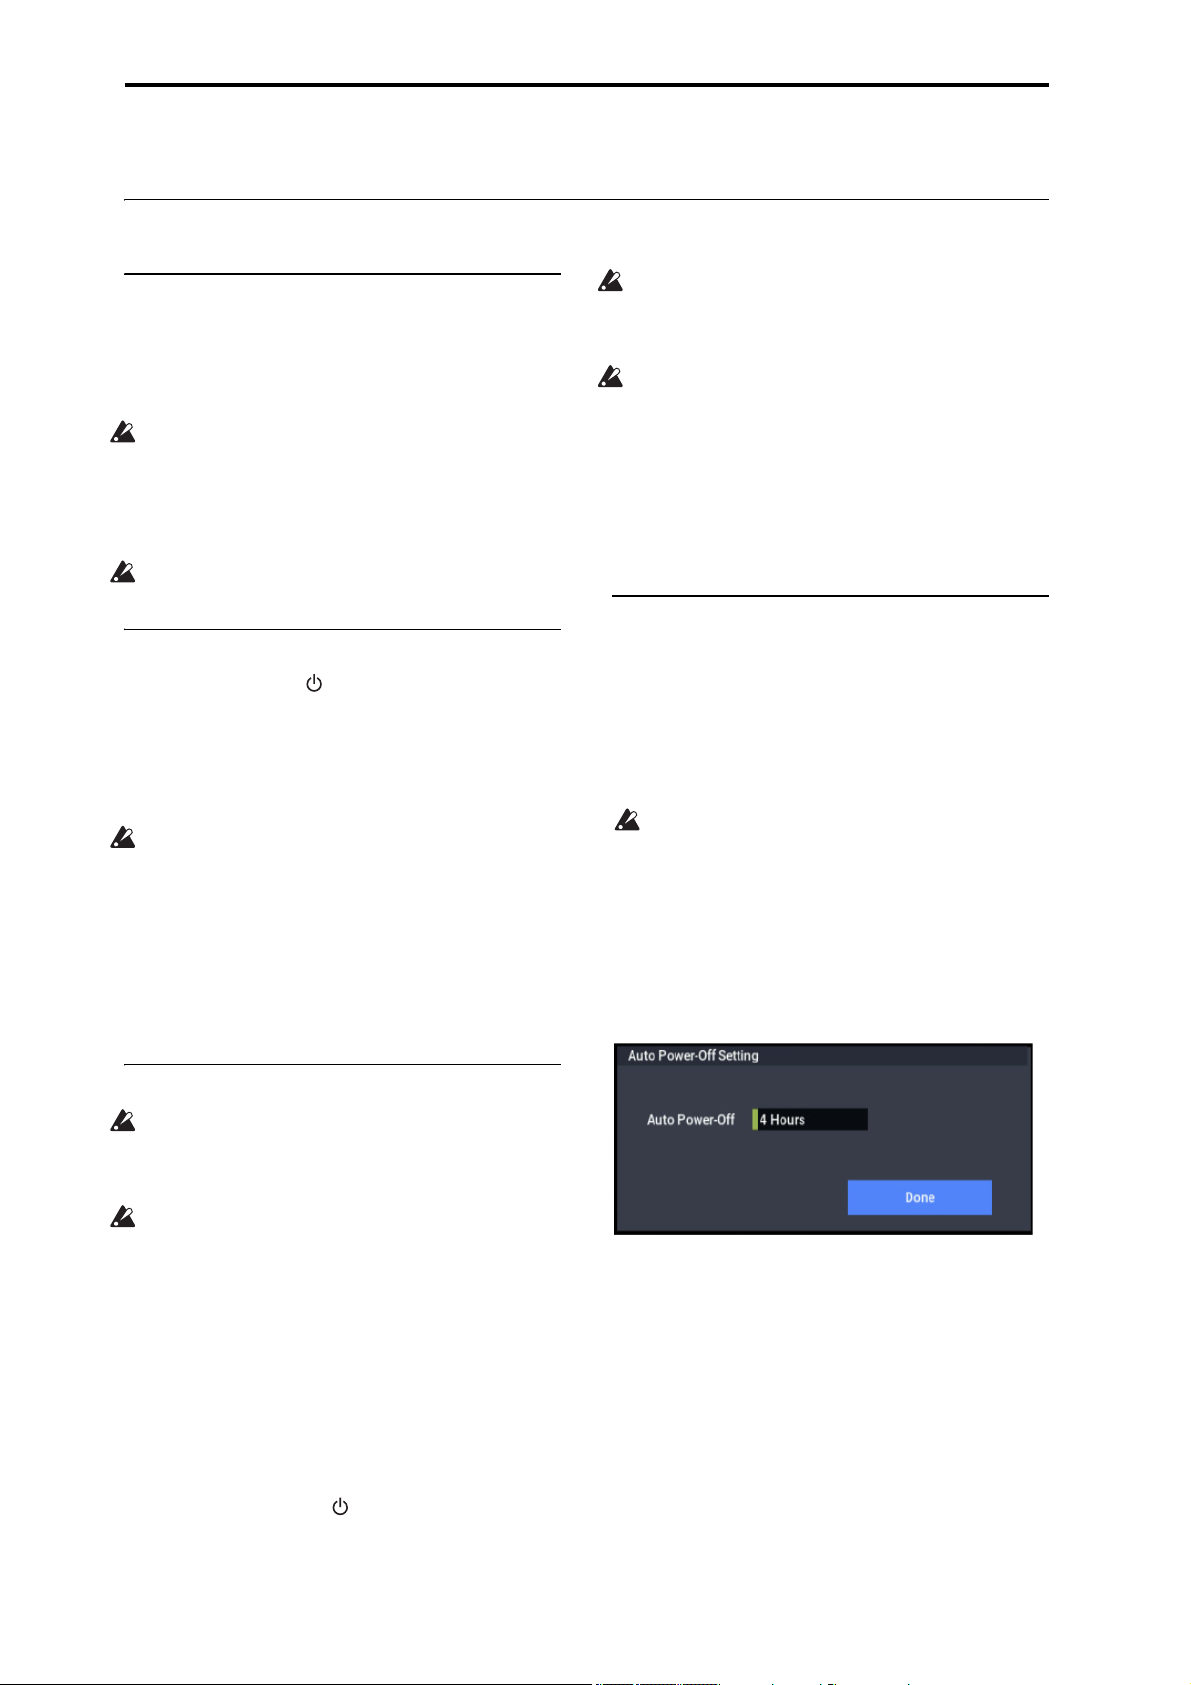
Introduction to NAUTILUS
Setup
Turning the power on/off
1. Connecting the power cable
1. Connect the included power cable to the NAUTILUS’
rear panel AC power inlet.
2. Connect the other end of the power cable to the AC
power outlet.
If your power cable uses a separate ground wire, you
must connect this ground wire before inserting the plug
into the AC outlet. When disconnecting, you must first
disconnect the plug before you disconnect the ground
wire. If you are unsure of how to make connections,
please contact your Korg Distributor.
Make sure that your AC outlet is the correct voltage for
your instrument.
2. Turning the power on
1. Press the rear panel (power button) to turn on the
power.
2. Turn on your powered monitors or stereo amp.
3. Turn the NAUTILUS’s MASTER VOLUME slider all
the way down to an appropriate level, and adjust the
volume of your powered monitors or stereo amp.
After you’ve turned off the power, you must wait
approximately ten seconds before turning the power on
again.
Tip : You can set the Power On Mode (GLOBAL > Basic
Setup– Basic page) so that the mode and page that had been
selected when you turned the power off will appear when the
power is turned on.
For more information, see “Recalling the last-selected mode
and page at power-on” on page 173.
Never turn off the power while data is being written into
internal memory. The display will show the message
“Now writing into internal memory” when this is in
progress.
Never turn off the power while media such as the internal
drive is being accessed, such as while recording or
playing audio tracks, or sampling to disk for an
extended time. Turning off the power while disk access
is occurring may render the media unusable. The DISK
LED shows when the internal drive is being accessed.
If you’ve turned off the power and want to turn the power on
again, wait for about 10 seconds after turning the
NAUTILUS off.
Auto Power-Off
The NAUTILUS can be set to automatically turn off the
power when the system has not been active for a certain
length of time.
Note: “Activity” includes using the TouchView display and
most front panel controls, playing sounds, sending or
receiving MIDI, local or ftp drive activity, etc. It does not
include usage of the MASTER VOLUME slider, however.
When the power turns off, any un-saved edits or settings
will be lost. Make sure that you save important settings
before this occurs.
You can control the amount of time before the system turns
off, or disable Auto Power-Off entirely. To do so:
1. Go to the GLOBAL > Basic Setup– Basic page.
2. In the menu, select the Auto Power-Off Setting…
command.
The dialog box below will appear.
3. Turning the power off
When you turn off the power, the programs and
combinations etc. will revert to their unedited state. If you
want to keep your edits, you’ll need to Write them. For
more information, see “Saving data” on page 203.
Similarly, the user multisample and sample data will be
erased when you turn off the power. If you want to use
these again, save the data before turning off the power,
and then reload the data when you restart the
NAUTILUS.
Note: You can set the samples and multisamples to be
reloaded automatically when the NAUTILUS is powered
up. See “Automatically loading sample data” on page 179.
1. Turn the NAUTILUS’s MASTER VOLUME slider all
the way down, minimizing the volume.
2. Turn off the power of your powered monitor or stereo
amp.
3. Press the NAUTILUS’s (power button) to turn off
the power.
After you press the power button, you can let go once all
of the LEDs on the panel buttons have gone dark.
18
3. Press the Auto Power-off popup button to select the
length of idle time after which the power will turn off.
If you don’t want the power to turn off automatically,
set this to Disabled.
4 hours is the default.
You can also reach this dialog box from the two warning
dialogs associated with Auto Power-Off, as described
below.
Page 25

Changing the Auto Power-off setting at startup
If Auto Power-off is enabled, a dialog box indicating the
time until automatic power-off will appear immediately after
start-up.
The dialog box will close automatically after a few seconds.
The clock icon shows the time left before the dialog box
closes. Press the clock icon to keep the dialog box open.
Press the Change Setting or OK button to close this dialog
box.
1. To change the auto power-off setting, press the
Change Setting button.
The Auto Power-Off Setting dialog box will appear, just
as if you’d selected the Global menu command described
above.
Setup Turning the power on/off
Auto power-off warning message
When the specified length of time has elapsed without any
user input on the NAUTILUS, a message will appear,
warning you that the auto power-off function is about to turn
off the power.
If you want to continue using the system, press the keyboard,
a button, or some part of the display such as the Extend
button. The Auto power-off function will be reset. If the
specified length of time again elapses with no user input, the
same message will appear again. You can also use the
Change Setting button to bring up the Auto Power-Off
Setting dialog, as described above.
19
Page 26

Introduction to NAUTILUS
Connections
Connections must be made with the power turned off.
Please be aware that careless operation may damage your
speaker system or cause malfunctions.
6. Connecting to computers via USB
4. Connecting USB devices
CD-R/RW, hard disks,
removable disk, etc.
USB MIDI Controller
to an AC outlet
Computer
USB
USB cable
AC power supply
Power cable (Included)
2. Analog audio input connections
Eect unit
Power button
INPUT
MicGuitar
USB A USB B
1. Analog audio output connections
Monitor
OUTPUT
AUDIO
INPUT
MixerPowered monitors, etc.
ASSIGNABLE
PEDAL
ASSIGNABLE
SWITCH
DAMPER
AUDIO
OUTPUT
Headphone
PHONES
5. MIDI Connections to equipment
& Computers
1. Analog audio output connections
Here’s how to connect the NAUTILUS to your analog amp
or mixer.
If you’re using a home stereo system, be aware that
playing at high volume may damage your speakers. Be
careful not to raise the volume excessively.
Audio Outputs (main) L/MONO and R
These are the main outputs, accessed by setting Bus Select
to L/R. All of the factory sounds use these outputs, and the
Master and Total Effects are always routed here as well.
All of the NAUTILUS analog outputs use 1/4" balanced
TRS jacks. For best results, use balanced connections to
your audio system.
1. Connect the Audio Outputs (main) L/MONO and R
outputs to the inputs of your amp or mixer.
If you’re using NAUTILUS in stereo, use both the (main)
L/MONO and R jacks. If you’re using NAUTILUS in
mono, use only the (main) L/MONO jack.
Synthesizer
3. Connecting Foot Pedals
and Switches
2. Use the MASTER VOLUME slider to adjust the
volume.
The MASTER VOLUME slider affects only the main
stereo outputs and the headphones; it does not affect the
individual outputs, or the USB output.
Audio Outputs (individual) 1…4
These are 4 additional analog outputs, which can be used as
individual mono outputs, stereo pairs, or any combination of
the two. Almost any signal source can be routed to these
outputs, including:
• Each note in a Drum Kit
• Insert Effect outputs
• Individual Programs in a Combination or Song (or the
sum of the Program’s oscillators in PROGRAM mode)
• Audio tracks
• Audio inputs
You can use these to isolate or group together sounds for
recording, or for complex live performance setups.
1. Connect the (individual) 1…4 outputs to the your amp
or mixer inputs.
20
Page 27
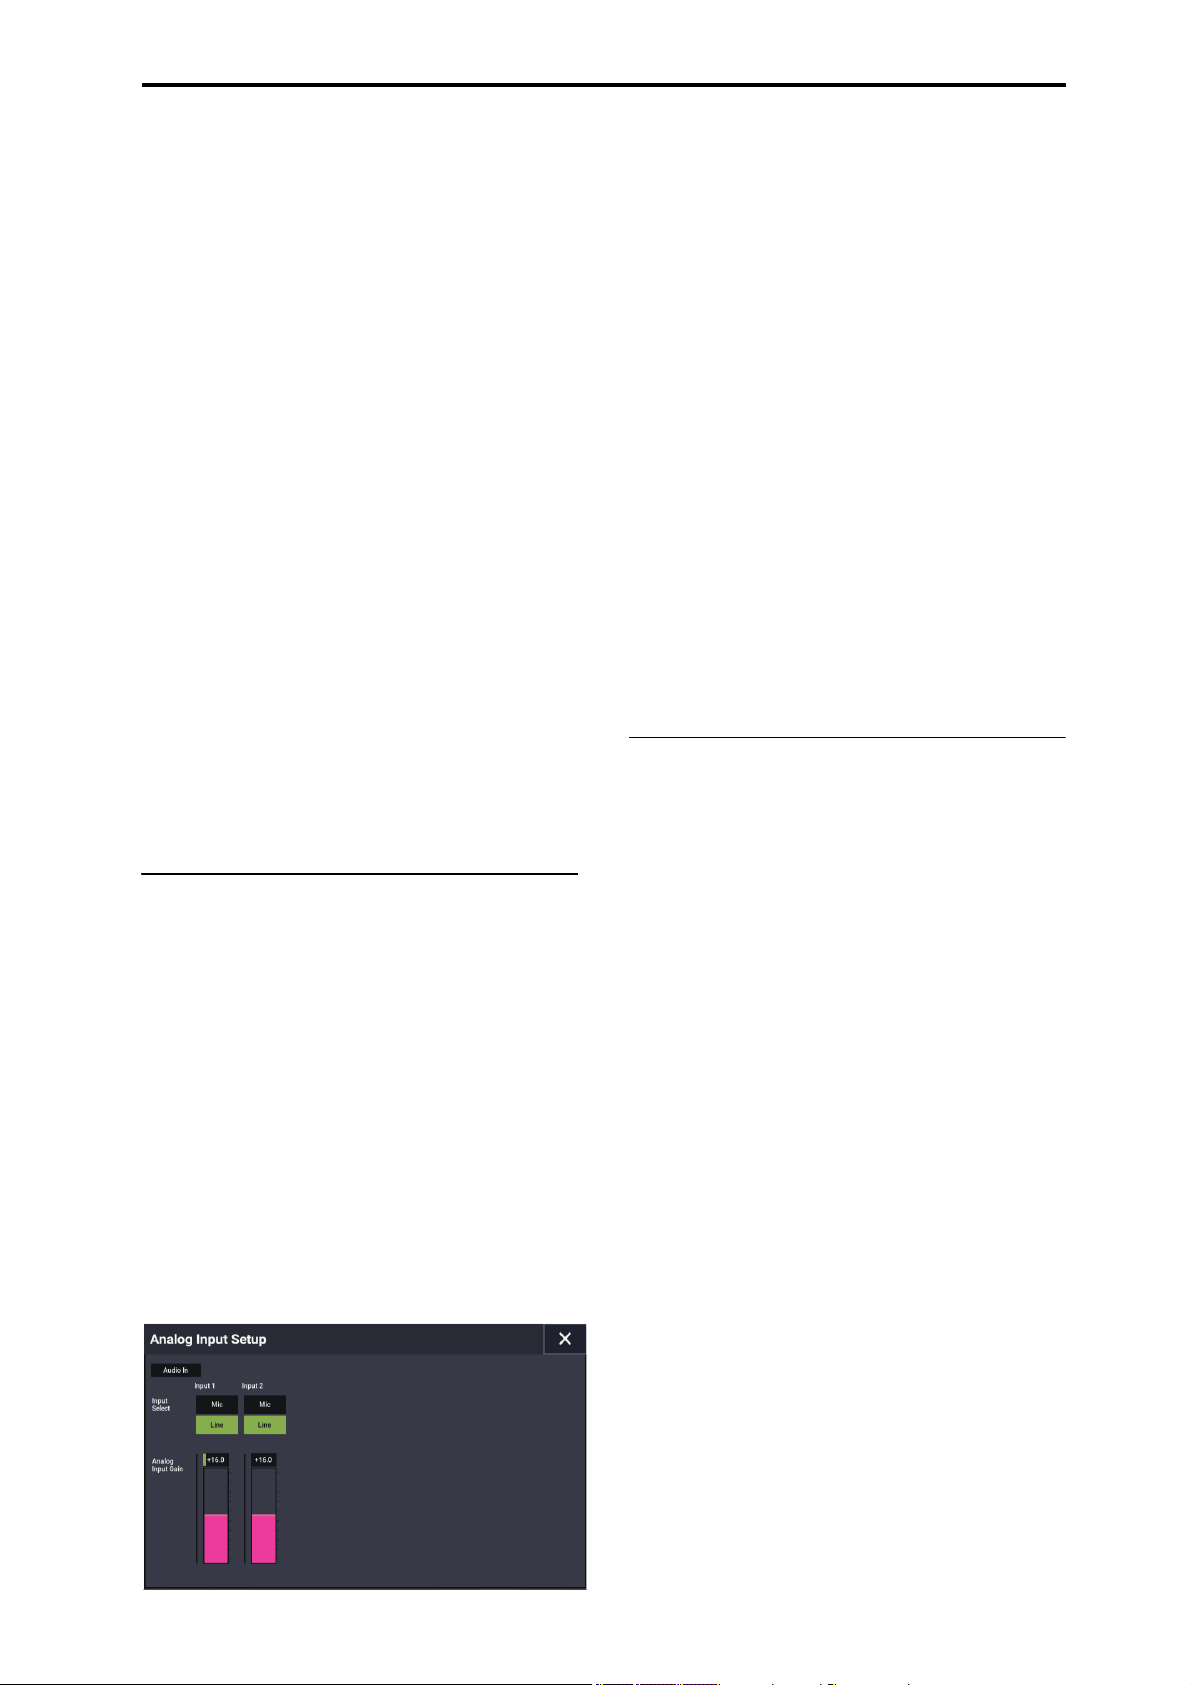
Setup Connections
2. Use the Bus Select parameters to send the desired
sounds, audio tracks, inputs, or effects to the
individual outputs, as either mono (1…4) or stereo
(1/2 and 3/4) signals.
If the signal is going through one or more insert effects, the
output is set at the last IFX in the chain, via the Bus Select
parameter on the IFX– Insert FX page.
If a Program, Timbre, or Track is not going through any
insert effects, the output is set using the Bus Select
parameters on the Routing page.
To assign audio inputs directly to outputs, use Bus Select
parameters in the Sampling page.
In GLOBAL mode, the Basic Setup– Audio page L/R Bus
Indiv. Assign setting lets you mirror the MAIN stereo L/R
output on any pair of individual outputs. You can use this to
create a private monitoring setup in live and studio
environments. For more information, see “L/R Bus Indiv.
Assign” on page 638 of the PG.
Note: The MASTER VOLUME slider doesn’t affect the
volume of the individual outputs.
Headphones
1. If you’re using headphones, connect them to the
NAUTILUS’ headphone jack.
2. Use the MASTER VOLUME slider to adjust the
volume of the headphones. The NAUTILUS’
headphone jack outputs the same signal as the (main)
L/MONO and R jacks.
Tip: To monitor the signals from the individual outputs, use
an external mixer.
2. Analog audio input connections
You can bring external analog audio sources into the
NAUTILUS for sampling, recording, or processing through
the internal effects.
Audio Inputs 1, 2
These two inputs use 1/4" TRS balanced jacks, and include
preamps with adjustable gain. To set up the audio inputs:
1. Connect your mics or the output jacks of your
external audio sources to the Input 1 and 2 jacks.
2. With the Audio Input param eter o n the PROG RAM >
Home– Sampling page, set Bus Select of Input 1 and
Input 2 to “L/R”.
3. Press the Audio In button while holding down the
SHIFT button to display the Analog Input Setup
dialog box. Switch “Input Select” to “Mic” or “Line”
according to the device that is connected, and adjust
the Analog Input Gain.
Choose the Mic setting only when connecting a mic. Note
that some microphones, such as condensers, may require
external phantom power, which is not supplied by the
NAUTILUS.
Choose the Line setting if you’ve connected a mixer,
computer, audio system, signal processor, or another
synthesizer.
Note: Guitars with active pickups can be connected directly.
Guitars with passive pickups (i.e., guitars that do not have
an internal preamp) can be used, but the impedance
mismatch will cause both a change in tone and a reduction in
volume. For best results, route such guitars through a preamp or effects unit before connecting them.
4. Adjust the output level on any connected external
equipment.
5. After turning on the power, use the Audio Input page
to set up the volume, pan, bus routing, and send levels
for the inputs, as desired.
For more information, see
• “Audio Input settings” on page 93
• “Audio Settings” on page 126
• “0–8: Sampling” on page 22 of the PG
• “0–2: Audio” on page 637 of the PG
3. Connecting Foot Pedals and Switches
Connecting a damper pedal
The damper pedal is also sometimes called the sustain pedal.
It acts like the similarly-named pedal on an acoustic piano;
when you hold down the pedal, notes will continue to sustain
even when you lift your hands off of the keyboard.
1. Connect an optional DS-1H damper pedal to the
DAMPER jack. If you’ve connected a DS-1H, you’ll
be able to obtain half-damper effects.
After turning the power on:
2. Go to the GLOBAL > Controllers/Scales– Controller
page, and use the Damper Polarity parameter to set
the damper polarity.
3. Go to the GLOBAL > Basic Setup– Basic page, and
use the Half Damper Calibration menu command to
adjust the sensitivity if desired.
For more information, see “Damper Pedal (Sustain)” on
page 31, and “Damper Polarity” on page 675 of the PG.
Connecting a foot switch
You can use a connected foot switch to perform functions
such as controlling sostenuto, soft pedal on/off, ARP on/off,
selecting Programs, Combinations, or Set List Slots,
starting/stopping the sequencer, and controlling tap tempo.
1. Connect a foot switch such as the optional PS-1 to the
ASSIGNABLE SWITCH jack.
2. After turning the power on, use GLOBAL >
Controllers/Scales– Controller “Foot Switch Assign”
and “Foot Switch Polarity” to assign the function
controlled by the foot switch and to specify the
polarity.
For more information, see “5–1a: Foot Switch &
Pedal/Damper” on page 675 of the PG.
21
Page 28
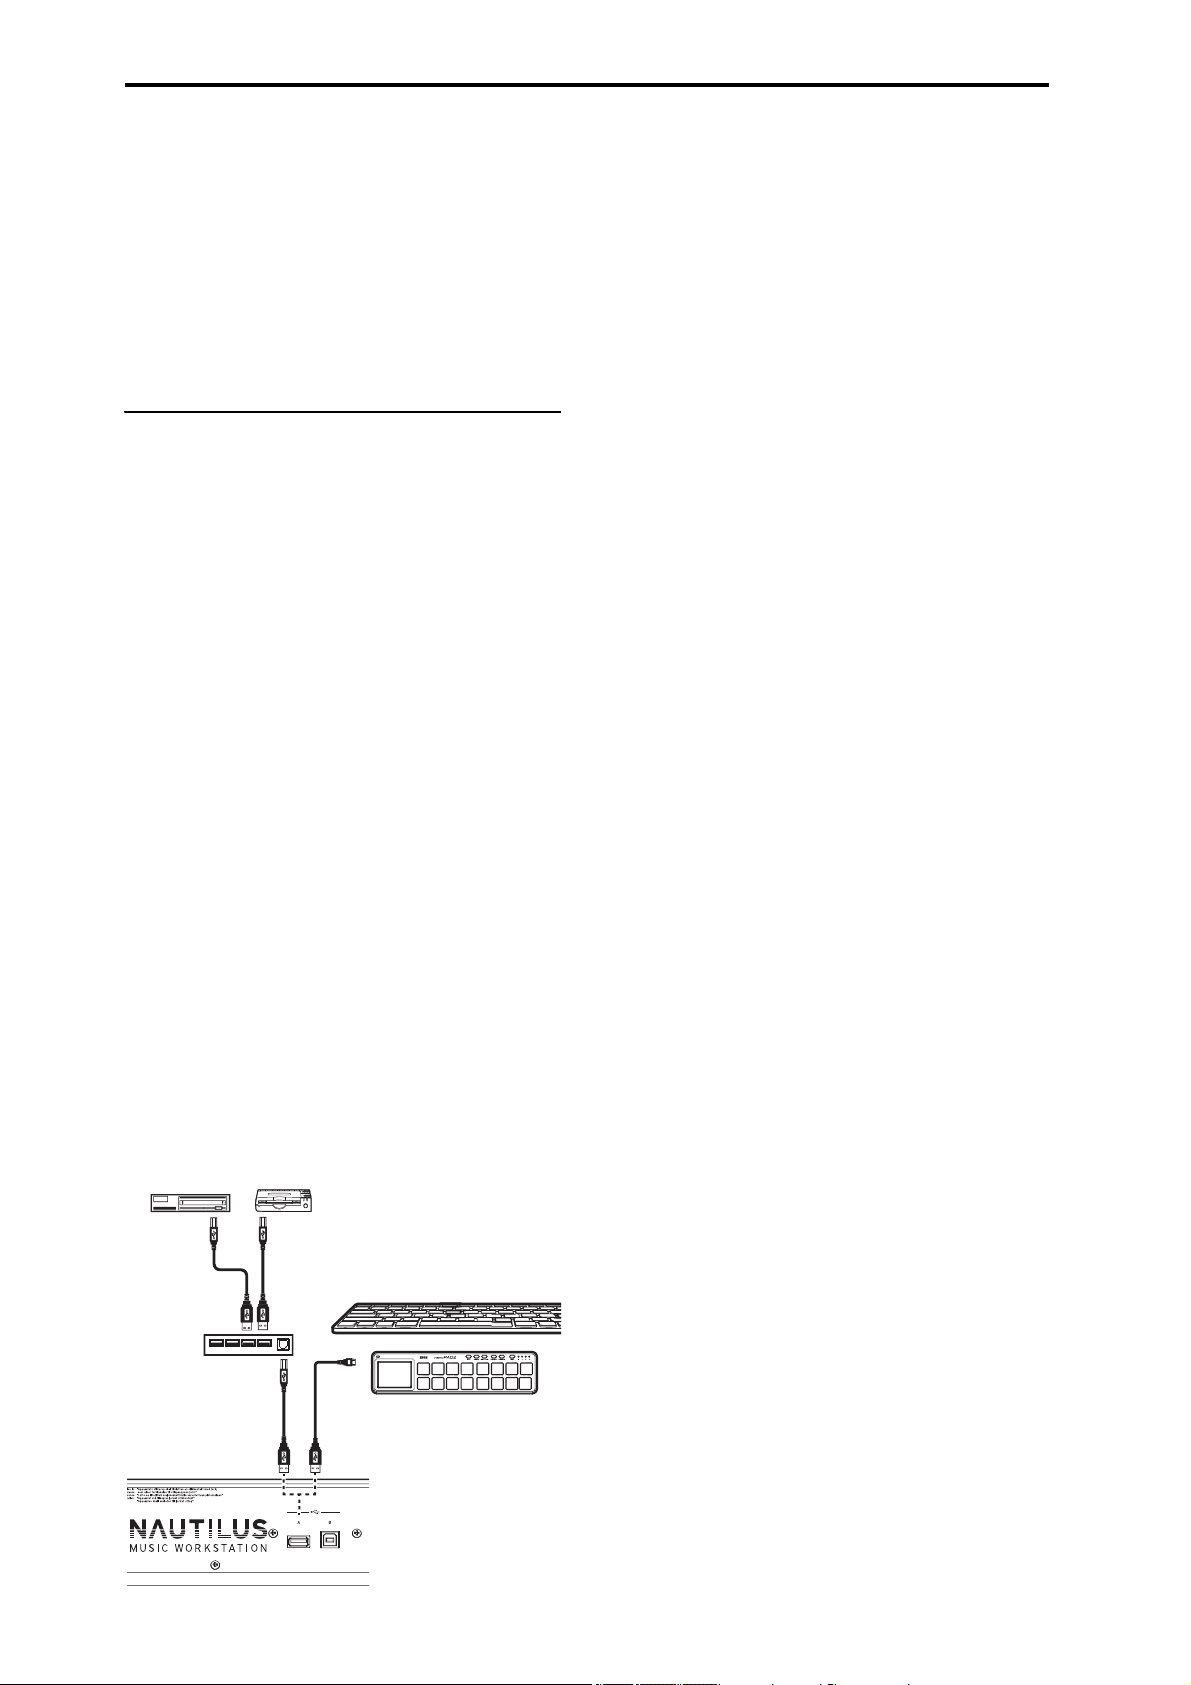
Introduction to NAUTILUS
NAUTILUS
CD-R/RW,
hard disk,
removable disk, etc.
Type A
Type A
Type B
Type B
USB cable
USB hub
USB MIDI Controller
USB QWERTY Keyboard
Connecting a foot pedal
You can use a connected foot pedal to control volume,
modulation, or other functions.
1. Connect an optional XVP-20 or EXP-2 etc. to the
ASSIGNABLE PEDAL jacks.
2. After turning the power on, use GLOBAL >
Controllers/Scales– Controller “Foot Pedal Assign” to
assign the function controlled by the foot pedal.
For more information, see “Foot Pedal Assign” on page 675
of the PG.
4. Connecting USB devices
The NAUTILUS supports high-speed USB 2.0 for
connecting to storage devices, such as hard drives, flash
media, and CD-R/RW drives, as well as class-compliant
USB MIDI controllers.
USB storage devices
You can save and load samples, sounds, sequences, and other
data to and from USB 2.0 storage devices for backup,
transferring to computers, etc.
Note that HDR tracks must be played from and recorded
onto the internal disk. You can back them up to USB
devices, however.
The maximum supported capacity depends upon the format
of the USB device. With FAT16 format, the maximum
capacity is 4 GB; with FAT32, the maximum is 2 TB
(2,000 GB).
1. Use a USB cable to connect your USB storage device
to one of the NAUTILUS’s USB A ports.
Standard USB cables have a different connector at each
end. Plug the flat, rectangular connector into the
NAUTILUS, and plug the square-ish connector into the
external USB storage device.
Note: If the device you are using does not support hotplugging, make connections with the device powered-off,
and then turn on the power of your device.
2. Wait a few seconds for the device to be recognized.
3. Use the MEDIA mode Drive Select screen to check the
connection.
For more information, see “Loading & saving data” on
page 203.
USB MIDI controllers
You can connect class-compliant USB MIDI controllers
directly to the NAUTILUS, and use them just as you would
controllers connected to the 5-pin MIDI jacks. To do so:
1. Use a USB cable to connect your USB MIDI controller
to one of the NAUTILUS’s USB A ports.
If the controller is set to a different MIDI channel than the
NAUTILUS’s Global MIDI Channel, you can use it to
play a different sound than the local keyboard in
Combinations or Songs, as controlled by the Timbre or
Track MIDI settings.
USB alphanumeric keyboards
Anywhere that you can enter text, you can use a connected
USB alphanumeric keyboard as an alternative to the touchscreen keyboard. The standard US “IBM PC” QWERTY
keyboard layout is recommended.
Hot-plugging
The NAUTILUS supports USB hot-plugging. This means
that you can connect or disconnect the USB cable while the
power is on.
Note: In order to use hot-plugging, the USB device you are
connecting must also support hot-plugging.
8 USB devices maximum
NAUTILUS has USB 2.0 ports, and can support up to 8
USB devices simultaneously. Note that it doesn’t matter how
the devices are connected; even if you use hubs or different
ports, the maximum is always 8 devices.
USB Power
Some USB devices get their power from the USB
connection. These are called “bus-powered” devices, and
they are supported by the NAUTILUS.
Other USB devices may require a separate power source, in
addition to the USB connection; in this case, you’ll need to
use an appropriate power adaptor for the device.
There is a limitation to the total current supplied to all
connected USB devices, as defined by the USB
specification. If the total current consumption of the
connected devices exceeds this limit, the NAUTILUS may
not correctly recognize the connected USB devices. If this
happens, the error message “USB Hub Power Exceeded!”
will appear.
To avoid this problem, if you connect more than one USB
device, please use a self-powered USB hub in self-powered
mode. For details on connections and settings for your hub,
please refer to its documentation.
For details on the electrical current used by a specific USB
device, refer to its owner’s manual.
22
Page 29

5. MIDI connections to equipment &
computers
Connections to MIDI equipment
The keyboard, controllers, and sequencer etc. of the
NAUTILUS can be used to control an external MIDI tone
generator. Conversely, another MIDI keyboard or sequencer
can control the tone generator of NAUTILUS to produce
sound.
• Use MIDI cables to connect the MIDI connectors of
NAUTILUS with the MIDI connectors of your external
device.
For more information, see “Connecting MIDI devices &
computers” on page 929 of the PG.
Connections to a computer via MIDI
In conjunction with MIDI software on your computer, you
can use the NAUTILUS as a MIDI controller, and transmit
the NAUTILUS sequencer playback as MIDI data. You can
also play the NAUTILUS sounds from the computer. To do
so:
• Use a MIDI interface to connect the MIDI connectors of
NAUTILUS to the MIDI connectors of your computer.
For more information, see “Connecting MIDI devices &
computers” on page 929 of the PG.
Note: Some USB-MIDI interfaces may not be able to
transmit or receive the NAUTILUS’s MIDI System
Exclusive messages.
Setup Connections
6. Connecting to computers via USB
The NAUTILUS’s USB B port lets you connect to a USBequipped Mac or Windows PC, for sending and receiving
MIDI and audio, and for connecting to the NAUTILUS
Editor.
For USB audio, the NAUTILUS uses the standard USB
audio driver that comes with Windows or macOS, so you
don’t need to install a separate audio driver.
Installing the KORG USB-MIDI driver
The NAUTILUS cannot be used by multiple applications
simultaneously when you are using the standard USB-MIDI
driver included with the Windows operating system. If you
want to use the NAUTILUS with multiple applications
simultaneously, you must install the Korg USB-MIDI driver.
Even if the NAUTILUS will not be used with multiple
applications, we recommend installing the KORG USBMIDI driver, as it may offer improved operating stability.
Download the “Korg USB-MIDI driver” from the Korg
website, and install it as described in the accompanying
documentation.
Note: See the Korg website for the latest information on OS
support.
https://www.korg.com/support/os/
Note: When you first connect the NAUTILUS to your
computer, the USB-MIDI driver included with the operating
system will be installed automatically.
23
Page 30

Introduction to NAUTILUS
24
Page 31

Playing and editing Programs
Playing Programs
What’s a Program?
Programs are the basic sounds of the NAUTILUS. You can
play them by themselves, layer them together in
Combinations, or play a different Program on each of the 16
MIDI tracks, either from the internal sequencer or from
external computer-based sequencers.
Selecting Programs
There are several different ways to select Programs. Each
one is convenient in a different way:
• Using the VALUE controller, you can select Programs
quickly via physical controls
Selecting by Bank and number (via the touch-screen) lets
you browse through all of the Programs in memory, to
find the one that you want
Selecting by Program category (via the touch-screen) lets
you filter Programs by sound type, such as Pianos or
Drums
• Using Find (via the on-screen magnifying-glass icon)
lets you search for Programs by name
• Using a foot-switch lets you change Programs even
while both hands are busy playing on the keyboard –
convenient for live applications
• MIDI program change messages let you select Programs
remotely, from either a MIDI sequencer or an external
MIDI controller
This section of the manual takes a quick look at playing
Programs, including how to select programs and basic
editing techniques.
Selecting a program by operating the
NAUTILUS
1. Press the MODE button and select PROGRAM on the
display to enter PROGRAM mode.
2. The Overview/Mix Balance tab page on the Home
page will be displayed.
“PROGRAM > Home” will be displayed on the top row
of the display, and the Overview/Mix Balance tab on the
bottom row will be selected.
If a different page is shown, press the EXIT button
several times.
3. Check that the program name is selected.
If the program name (“Program Select”) is not selected,
press the program name on the PROGRAM > Home page
to select it.
4. Use the VALUE controller to select the number of the
program you want to play.
Set Lists
Programs can also be selected in Set Lists, along with
Combinations and Songs. For more information, see “Set
Lists” on page 113.
You can use the following methods to select a Program.
•Turn the VA L U E dial.
• Press the + or − buttons.
Overview: Program Banks
NAUTILUS ships from the factory with over 2,000
Programs loaded into memory. All of the factory Programs
can be over-written with your own edits, if desired–except
for the GM banks.
1,024 of other Program slots are left open for your own
programming or additional sound libraries. The exact
contents may differ depending on the NAUTILUS model.
Programs are organized into 32 Banks, as described below.
You can also store many more Programs on the internal
disk(s), or on external USB 2.0 devices. Additional banks of
sounds may already be on the internal disk as shipped from
the factory.
Bank M is the default location for Programs created by
resampling.
25
Page 32
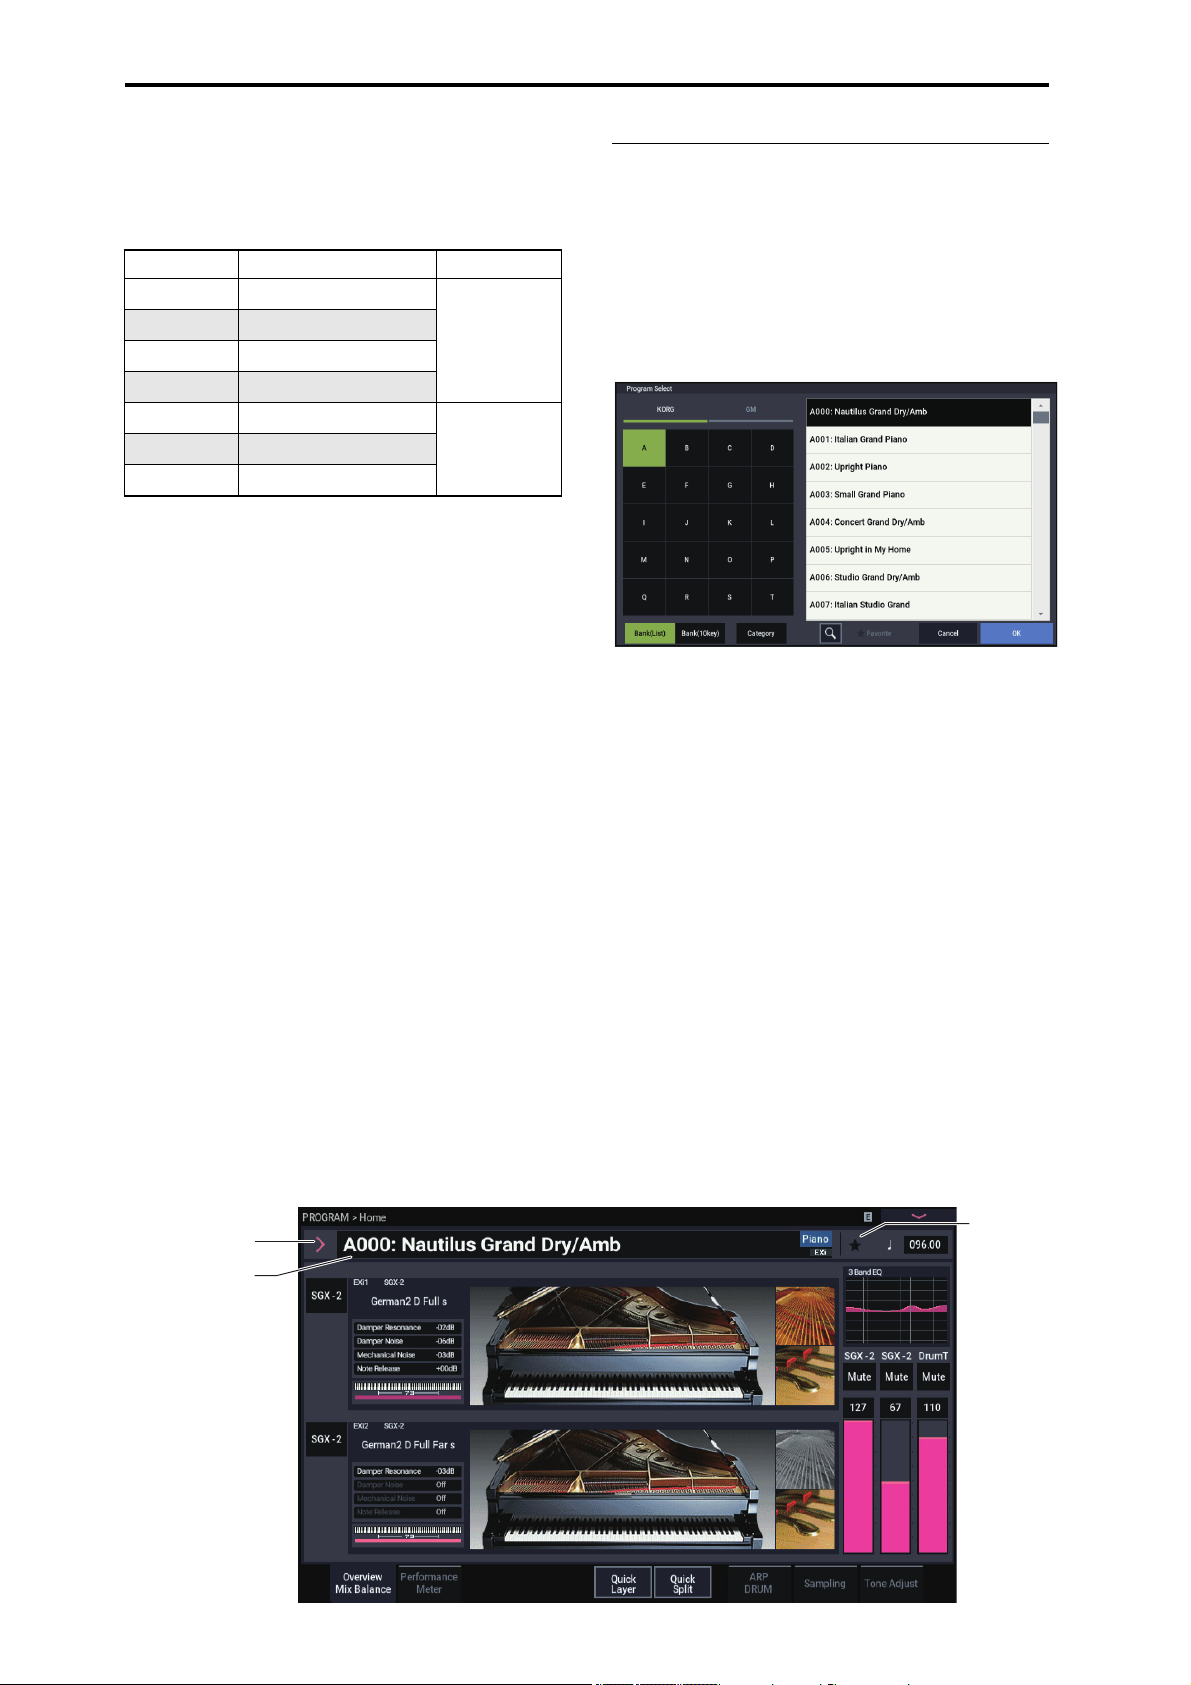
Playing and editing Programs
Program Select
Program Select
popup button
Favo rite
Program Bank Contents
As shipped from the factory, the contents of the Program
Banks are as follows:
Program bank contents
Bank Contents Bank Type
A...E EXi sounds
F. .. O HD-1 sounds
P...R Initialized EXi Programs
S, T Initialized HD-1 Programs
GM GM2 main Programs
g(1)…g(9) GM2 variation Programs
g(d) GM2 drum Programs
Bank type can
be set to either
HD-1 or EXi
GM
Changing the Program Bank Types
Banks can contain either HD-1 Programs or EXi Programs,
but not both. This assignment can be set separately for each
bank. To do so:
1. Press the front-panel MODE button to enter
GLOBAL mode.
2. Press the PAGE button to select the Basic Setup and
go to the Basic Setup page.
3. Press the page menu button, and select Set Program
Bank Type.
4. Change the Type for the desired banks. Leave all of
the other banks set to “No Change.”
Important: Setting a bank’s type will erase all of the
Program data in the bank - so make sure that you’re not
erasing any Programs you want to keep!
5. Press the OK button.
An “Are You Sure ?” dialog appears.
6. If you’re certain of the change, press OK again.
The selected banks will now be initialized to use the new
Program types.
Selecting by bank and number
You can select Programs from a list organized by Program
bank.
1. Press the Program Select popup button.
The Program Select dialog appears.
Press the Bank(List) button to display the Bank/Program
Select menu.
Bank/Program Select menu
In this illustration, bank A is selected. The list on the
right shows the Programs contained in that bank.
2. Press one of the Program names in the list to select a
Program.
The selected Program will be highlighted, and the
keyboard will immediately switch to the new sound.
3. If you like, play a few notes to hear the new Program.
You can play the new Program while the menu is still
showing, without needing to press OK.
4. When you are satisfied with the selected Program,
press the OK button to close the popup menu.
If you press the Cancel button, the selection you made
here will be discarded, and you will return to the program
that had been selected before you opened the menu.
26
Page 33

Playing Programs Selecting Programs
Selecting by Category
You can select Programs from within a category, such as
keyboard, organ, bass, and drums. When shipped from the
factory, the Programs are organized into 16 categories, each
with several sub-categories. There are also 2 more
categories, initially named User 16 and User 17, which you
can use and rename as desired.
1. Press the Program Select pop-up button.
The Program Select menu appears.
Press the Category button to display the
Category/Program Select menu.
Category/Program Select menu
In the illustration above, the Motion Synth category is
selected. The list on the right shows the Programs which
belong to that category.
2. Press the tabs on the left and right sides of the display
to selecting a different category.
The name of the selected category will be displayed in
full in the upper right of the display.
3. Optionally, focus on a more specific group of sounds
by selecting a sub-category from the upper row of
tabs.
The full name of the sub-category also appears in the
upper right of the display.
4. Press one of the names in the center area to select a
Program.
The selected Program will be highlighted.
5. When you are satisfied with the selected program,
press the OK button to close the popup menu.
If you press the Cancel button, your selection will be
discarded, and you will return to the Program that had
been selected when you opened the popup menu.
Using the Find feature
At the bottom of the Program Select menu screen, you’ll see
a button marked with a magnifying glass. Pressing this
button brings up the Find dialog. You can use Find to search
for Programs by name. To do so:
1. Press the magnifying glass to open the Find dialog.
2. Enter the text to search for.
For instance, you can enter “Pian” to search for Programs
with “piano” in the name. Ignore Case is enabled by
default; disable this if you want the find function to
distinguish between upper and lower case.
In addition to the on-screen keyboard, you can use a USB
alphanumeric keyboard to enter text. For more
information, see “Editing names and entering text” on
page 206.
3. Press Find to find matches to the entered text.
The names of Programs which match the provided text
will appear, displayed one at a time.
4. Use the Next and Previous buttons to step through the
Programs. Alternatively, use the front-panel +/−
buttons.
You can audition the Programs by playing on the
keyboard.
5. To select a found Program, press the OK button. To
exit without selecting a new Program, press the
Cancel button.
Find is available throughout the system
Find is also available at the bottom right of the selection
dialogs for Programs, Combinations, Songs, Set Lists,
Samples, Multisamples, Wave Sequences, Drum Kits,
Effects, and MOD-7 algorithms.
Using the Favorites check-box
The Bank and Category select pop-ups both include a
Favorite check-box at the bottom of the screen. This lets
you trim the list to show only Programs you’ve marked as
favorites.
If the selected Bank or Category contains no Programs
marked as Favorites, the check-box will be grayed out and
unavailable. When shipped from the factory, no Programs
will be marked (we leave that up to you, since they should be
your favorites!).
To mark a Program as a Favorite:
1. Go to the Home page.
27
Page 34

Playing and editing Programs
2. Press the (Favorite) to the left of the Tempo
parameter. The turns green. (this shows that the
box is “checked”)
3. Write the Program.
This is an important step. If you don’t write the Program,
the change to the Favorites check-box won’t be retained.
For details on how to write Programs, see “Saving your
edits” on page 34.
Using a footswitch to select Programs
You can assign a footswitch to step through Programs one
by one, either going up (0, 1, 2, 3, etc.) or going down (3, 2,
1 etc.). This lets you change Programs without using your
hands–great for quick Program changes in live performance
situations.
There are two ways of doing this: by assigning the
footswitch to Program Up/Down, or to Value +/−. Program
Up/Down is recommended for normal use, while Value +/−
is a special-purpose setting, as described below.
Note: These settings apply to Set Lists and Combinations, as
well.
Assigning the footswitch to Program Up/Down
Assigning the footswitch to Program Up or Program Down
lets you directly control Program changes from the
footswitch.
To set this up:
1. Connect a foot switch to the rear-panel
ASSIGNABLE SWITCH input.
Use a simple on/off footswitch, such as the optional Korg
PS-1.
2. Press the MODE button to select GLOBAL mode.
3. Go to the GLOBAL > Controllers/Scales– Controllers
page.
4. Set the Foot Switch Polarity parameter to match the
connected switch.
5. At the top of the page, set the Foot Switch Assign
parameter to Program Up (or Program Down).
For this setting to persist after power-down, you need to
write the Global settings.
6. Open the menu, and select the Write Global Setting
command.
The Write Global Setting dialog will appear.
7. Press the MODE button to select PROGRAM mode.
The Home page will be displayed, and you can step
through the programs one at a time with the foot
switch.
Note: This setting applies to selecting Combinations, as
well.
Assigning the footswitch to Value +/−
This lets you use the Assignable Foot Switch to duplicate the
functions of the front-panel + or − button.
This is a special-case setting, but it may be convenient if you
like to keep the Bank or Category select windows open as
you play, so that you can see the list of available Programs or
Combinations. While the window is open, the Program
Up/Down assignments still change sounds as usual, but the
window does not update to show the currently selected
sound. However, assigning the Foot Switch to the + or −
button lets you step through the items in the list, one by
one—just like pressing the front-panel buttons.
To set this up:
1. Follow steps 1-4 under “Assigning the footswitch to
Program Up/Down,” above.
2. At the top of the page, set the Foot Switch Assign
parameter to Value + (or Value −).
For this setting to persist after power-down, you need to
write the Global settings.
3. Open the menu, and select the Write Global Setting
command.
The Write Global Setting dialog will appear.
4. Press OK, and then OK again to confirm.
Now, the foot switch will act just like pressing the frontpanel + or − button.
Note: The footswitch will work like this for the entire
NAUTILUS–not just when the Program or Combination
Select window is open.
Assigning incoming MIDI CCs to Program
Up/Down or Value +/−
In addition to using the built-in footswitch input, you can
also map incoming MIDI CCs to Program Up/Down or
Value +/−. This allows you to assign multiple switches to the
different functions—for instance, one for Program Up and a
second for Program Down—using an external MIDI or USB
MIDI foot controller. For more information, see “5–3:
Function Assign” on page 678 of the PG.
Selecting Programs via MIDI
You can select any Program from any bank by using MIDI
Program Change messages in conjunction with MIDI Bank
Select messages. When you select Programs from the front
panel, the appropriate MIDI messages are sent automatically
(unless MIDI filters are active; see below).
If you are entering the MIDI messages manually into a
sequencer, note that the Bank Select message needs to come
before the Program Select message.
In PROGRAM mode, use the Global MIDI Channel
With the exception of the Drum Track, all transmission and
reception of MIDI data in PROGRAM mode is performed
on the Global MIDI Channel. You can set this on the
GLOBAL > MIDI page.
Bank Map
Bank Select messages can work in one of two ways, as
controlled by the Bank Map parameter on the GLOBAL >
Basic Setup– Basic page. The factory default setting will
work for most standard applications, and most people will
never need to change it. If you use General MIDI sequences,
the alternative GM(2) setting may be helpful. For more
information, see “Bank Map” on page 633 of the PG.
MIDI filters
You can use MIDI filters to control whether or not Program
Change and Bank Select messages will be transmitted and/or
received. The filters are set up on the GLOBAL > MIDIMIDI page. For more information, see “1–1c: MIDI Filter”
on page 655 of the PG.
28
Page 35
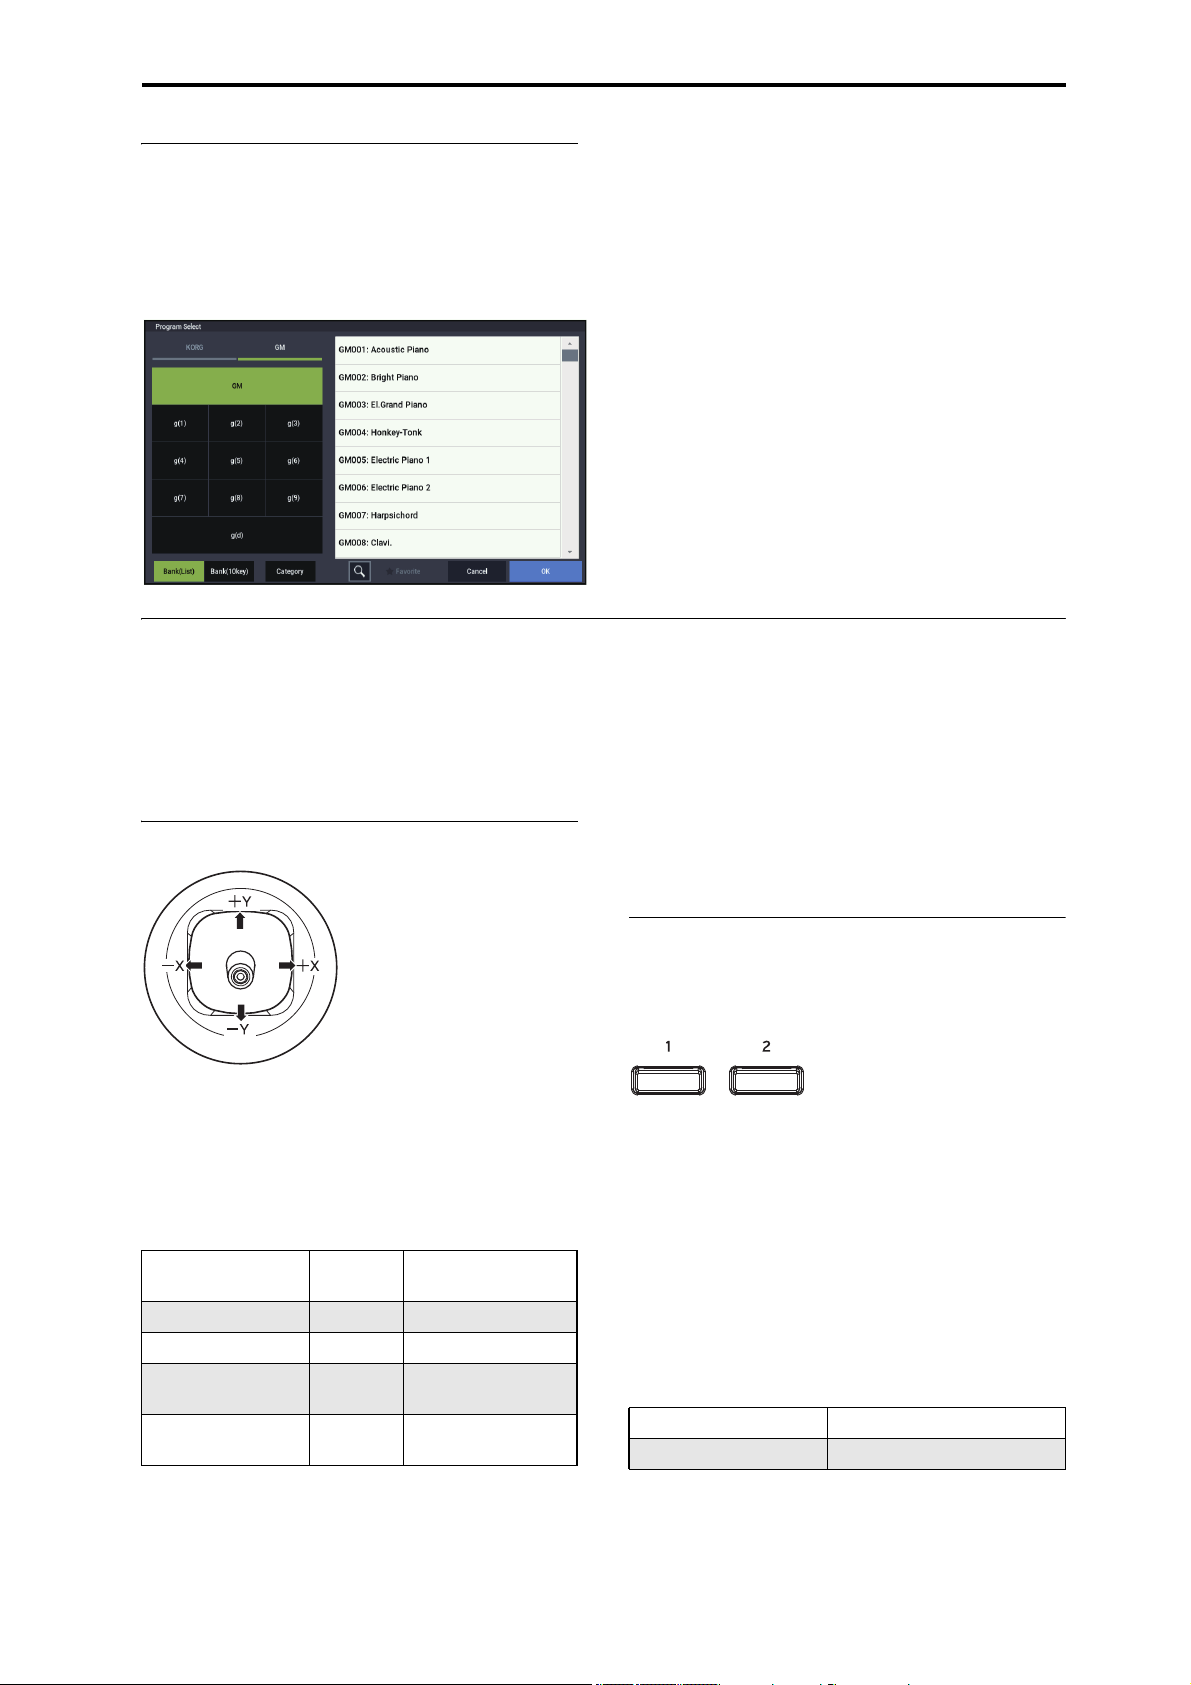
General MIDI Programs
Internal bank G contains a full set of General MIDI 2
Programs, as well as sub-banks g(1)–g(9) (GM2 variation
programs), and bank g(d) (drums).
When you select Programs using the Bank/Program Select
menu, press the GM button to select GM Bank.
Playing Programs Using Controllers
Using Controllers
The NAUTILUS provides a lot of hands-on ways to control
the sound–the mod and pitch-bend joystick, two buttons
(SW1 and SW2), and the RT control knobs.
These controls let you modify the tone, pitch, volume,
effects, etc. in realtime while you play.
Joystick
The joystick moves in four directions: left, right, forwards
(away from yourself), and backwards (towards yourself).
Each of the four directions can be used to control a different
function, such as modulating Program or effects parameters.
These assignments can be different for every Program, but
generally, they do the following:
Standard Joystick functions
Move the
joystick…
Left JS–X Pitch bend down
Right JS+X Pitch bend up
Forw ards
(away from yourself)
Backwards
(towards yourself)
Controller
Name
JS+Y Vibrato
JS–Y Filter LFO (wah)
Normally controls…
Joystick Lock
The joystick is spring-loaded, so that it automatically returns
to the center position when you let go.
However, you can use either of the two front-panel buttons
(SW1 or SW2), or a foot-switch, to “lock” the current
position of the joystick. This leaves your hands free to play
on the keyboard, or to use other controllers. For more
information, please see “Using the Lock function” on
page 30.
SW1 and SW2
You can use SW1 and SW2 to control program parameters
via AMS (Alternate Modulation Source), or effect
parameters via DMod (Dynamic Modulation).
They can also transpose the keyboard by octaves, turn
portamento on/off, or lock the modulation values of the
joystick.
Each button may work as either as a toggle or a momentary
switch. In Toggle mode, each press alternates between on
and off; in Momentary mode, the button only changes for as
long as you hold it down.
Each Program, Combination, and Song stores its own
settings for what the buttons will do, and whether each
button is on or off.
In all modes, you can edit the assignments on the
Controllers– Switch page.
Programs (HD-1 and EXi) Basic/X-Y/Controllers
Combinations and Songs EQ/X-Y/Controllers
29
Page 36

Playing and editing Programs
An example of settings in a Program
EXi : Controllers Page
(PAGE button → Common: Basic/X-Y/Controllers →
Controllers tab)
When using SW1/2 for AMS or Dmod, the default settings
are SW1 Mod.:CC#80 and SW2 Mod.:CC#81.
For an example, see “Using Dmod to change the feedback
level via SW1” on page 230. For a complete list of the
possible assignments, see “SW1/2 Assignments” on
page 915 of the PG.
Note: If you wish to keep these settings after the power is
turned off, you must save the Program, Combination, or
Song. Settings for SAMPLING mode cannot be saved.
Using the Lock function
Locking the Joystick
1. Using the factory sounds, select Program F073: Real
Suit E.Piano, and play the keyboard.
2. Move the joystick away from yourself (the +Y
direction).
The vibrato effect will deepen.
3. While holding the joystick away from yourself, press
the SW2 button.
When you press the button, its LED will light up, and the
modulation effect at this point will be maintained.
RT control knobs
The RT control has 6 knobs. You can use these for many
different tasks:
• Easy Program Editing
• Controlling Arpeggiator
1. Select a function you want to control using SELECT
button.
Select “SOUND” to adjust the parameters for the
currently selected program, such as CUTOFF,
RESONANCE and EG INT.
Select ARP/DRUM to adjust the arpeggiator settings.
Selecting “USER” with the SELECT button will let you
operate the functions that are configured in the
PROGRAM > Basic/X-Y/Controllers– Controllers page.
You can freely change back and forth between the different
functions, without losing any of your edits.
2. Control functions by using RT control knobs.
Keyboard
Velocity
Velocity is a measure of how hard you play a note on the
keyboard. This can be used to modulate many different
aspects of the sound, such as volume, brightness, or the
character of the attack.
Note Number
Sounds can be programmed to change in character based on
the note being played. As you play higher or lower on the
keyboard, the note number can modulate the timbre–such as
becoming brighter as you play higher. Envelopes may also
become faster or slower; the volume may change; and so on.
4. Release the joystick, and play the keyboard.
The modulation will stay the same as it was when SW2
was pressed. Moving the joystick away from yourself
will not affect the sound.
5. Press the SW2 key once again to release the Lock
function.
30
Page 37

Playing Programs Using Controllers
Foot Pedals and Switches
Damper Pedal (Sustain)
The damper pedal is also sometimes called the sustain pedal.
It acts like the similarly-named pedal on an acoustic piano;
when you hold down the pedal, notes will continue to sustain
even when you lift your hands off of the keyboard.
Footswitch vs. Half-Damper Pedal
You can use either a standard footswitch (such as the Korg
PS-1) or a special half-damper pedal (such as the Korg
DS-1H) as the Damper.
If you use a footswitch, it will work like a normal
synthesizer sustain pedal: notes will sustain forever, as long
as the pedal is held down.
A half-damper pedal is a special type of continuous
footswitch (normal footswitches won’t work properly for
this application). It offers more subtle control of sustain,
which can be especially useful for piano sounds.
The off and full-on positions of the half-damper work just
like the footswitch, but intermediate positions modulate the
release time to increase sustain without making it infinite.
The NAUTILUS will automatically sense when a halfdamper is connected to the rear-panel DAMPER input. For
proper operation, you will also need to calibrate the pedal,
using the Calibrate Half-Damper command in the GLOBAL
page menu.
Assignable Foot Pedal
This lets you use a continuous controller pedal, such as the
Korg EXP-2 foot controller or Korg XVP-20 EXP/VOL
pedal, as an assignable controller.
Like the Assignable Foot Switch, described above, the Foot
Pedal can be used for many different functions, including:
• Master Volume
• Channel Volume, Pan, or Expression
• Assignable sound modulation, as several different AMS
or Dmod sources (convenient for CX-3 expression)
• Effects Send level control
• Duplication of many front panel controls, including the
modulation joystick, RT control knobs, SW 1/2
The pedal’s function is set globally (on the Controllers tab of
the GLOBAL > Controllers/Scales– Controllers page), so
that it always works the same regardless of the current
Program, Combi, or Song.
For more information, please see “Setting up the Assignable
Switch and Pedal” on page 175.
Damper and MIDI
The Damper Pedal is sent and received as MIDI CC #64. In
COMBINATION and SEQUENCER modes, you can “filter”
CC# 64 so that it only affects some of the sounds in the
Combi or Song.
Assignable Foot Switch
This lets you use a simple footswitch, such as the Korg PS-1,
as an assignable controller. The footswitch can perform a
wide variety of functions, such as:
• An assignable source for modulating sounds and effects
• Portamento on/off
• Una Corda on/off (convenient for the SGX-2)
• Program select up or down
• Sequencer start/stop or punch in/out
•Tap Tempo
• ARP on/off, or ARP Latch on/off
• Drum on/off
• Duplication of many front panel controls, including the
modulation joystick, RT control knobs, SW 1/2
The switch’s function is set in GLOBAL mode (on the
Controllers tab of the Controllers/Scales– Controllers page),
so that it always works the same regardless of the current
Program, Combi, or Song.
For more information, please see “Setting up the Assignable
Switch and Pedal” on page 175.
31
Page 38

Playing and editing Programs
99
00
CC Value
Parameter
Value
As Programmed
640 127
Easy Program Editing
Quick edits using the RT control knobs
You can edit any of the Programs shipped with NAUTILUS,
or you can start with an initialized Program to create sounds
from scratch.
You can do many basic edits directly from the front panel
RT control knobs without ever delving deeper into the LCD
interface. For instance, you can use the knobs to change
CUTOFF and RESONANCE, and so on.
The RT control knobs will do different things, depending of
the SELECT setting. For editing Programs, select SOUND.
Editing sounds & effects with the
RT control knobs
The RT control knobs are a traditional feature of Korg
workstations, combining modulation, quick edits, and handson control.
1. Press the SELECT button to select SOUND.
2. Knobs 1-6 have dedicated functions, All of these
correspond to standard MIDI CCs.
RT control knob functions
Knob MIDI CC Normally controls…
1 74 Filter Cutoff Frequency
2 71 Filter Resonance
3 79 Filter EG Intensity
4 72 EG Release Time
5 Often Effect Depth - but can vary per Program
6 Often Reverb Depth - but can vary per Program
When you move a knob, it sends out the corresponding
MIDI CC. Also, when the CC is received via MIDI, the knob
value changes to match the CC value.
Generally, the knobs “scale” the Program’s internal settings.
When the knob is in the center, the settings are as
programmed. To move the settings to their maximum value,
turn the knob all the way to the right; to move them to their
minimum value, turn the knob all the way to the left.
Knob scaling
For example:
1. Select Program F092: Smooth Operators.
This is an electric piano sound; let’s see what we can do
to make it sound a bit different.
2. Press the SELECT button to choose SOUND.
3. While playing the sound, turn knob 1 (Filter CutOff
Frequency) to the right, slowly, to about 3 o’clock.
Notice how the piano becomes a sort of synth sweep.
4. Next, turn knob 2 (Filter Resonance) to the right, also
to about 3 o’clock.
5. With knob 2 in that position, try moving knob 1 back
and forth as you play.
With the resonance increased, it now sounds like you’re
playing through a wah pedal.
Next, let’s say that you decide that’s not really what you
wanted–so, we’ll set the knobs back to their default values.
You could move them back to the straight-up, 12 o’clock
position.
Knob edits can be saved
The RT control knobs are great for modulating sounds in
performance, or for recording. If you like, you can also save
the edited version of the sound, using the normal Write
Program command (see “Saving your edits” on page 34).
Internally, a single knob usually affects several different
parameters. When you write a Program, the edits are saved
into the individual parameters, and not to the knob itself.
After writing the Program, you’ll notice that the knobs have
returned to their center positions–since the old “edited”
values are now the new “saved” values.
32
Page 39

Easy Program Editing Quick edits using the RT control knobs
Assigning functions to RT control knobs 1–6
Settings for the knob functions are made in each mode for
programs, combinations, and songs. These settings are
adjusted on the Controller– Knob page in each mode.
Note: You can use the RT control knobs as alternate
modulation or effect dynamic modulation sources to control
program parameters or effect parameters.
Here’s an example of how to set up knob 5 to control a
Program’s filter and amp EG attack time:
1. Press the MODE button to select PROGRAM mode.
2. Press the PAGE button to select Basic/XY/Controllers, and then press the Controllers tab.
3. Press the Knob tab on the left side, and set the
“Target” of Knob5 to “RT Control”. Set the “RT
Control” to “Knob Mod. 5”.
4. Press the SELECT button to choose USER.
5. Turn knob 5 (USER 5) to control the filter and amp
EG attack.
Note: If you wish to keep these settings after the power is
turned off, you must save the Program, Combination, or
Song.
Slider 13 is assigned to Amp EG Attack; slider 14 is
assigned to Amp EG Decay; and slider 16 is assigned to
Amp EG Release.
4. Raise each of the three sliders so that they are about
4/5 of the way to the top.
Using Tone Adjust
You can edit the program parameters in “Tone Adjust” on
the PROGRAM > Home page. You can assign a Tone
Adjust parameter to each of the 16 switches and the 17
sliders.
The specific parameters available through Tone Adjust will
vary depending on the type of Program. For more
information, see:
“Common Tone Adjust Parameters” on page 31 of the PG.
“HD-1 Tone Adjust Parameters” on page 32 of the PG.
“AL-1: Tone Adjust” on page 180 of the PG.
“CX-3: Tone Adjust” on page 203 of the PG.
“STR-1: Tone Adjust” on page 251 of the PG.
“MS-20EX: Tone Adjust” on page 279 of the PG.
“PolysixEX: Tone Adjust” on page 294 of the PG.
“MOD-7: Tone Adjust” on page 345 of the PG.
“SGX-2: Tone adjust” on page 356 of the PG.
“EP-1: Tone Adjust” on page 375 of the PG.
Editing HD-1 sounds
1. Select Program F092: Smooth Operators.
2. Go to the PROGRAM > Home - Tone Adjust page.
On this page you can check the parameter assignments
and values, and adjust the sound.
3. Press the Sliders 9–17 buttons to look at the
assignments for sliders 13, 14 and 16.
The LCD should show their values as between +60 and
+70. In other words, you’ve just edited the amp envelope
so that the attack, decay, and release are all much longer
than they were before.
5. Play a few notes.
Notice that the sound has changed from an electric piano
into a soft pad. Now, let’s try adding clarity to the sound.
6. Press the Switches 1–16 button to look at the
assignments 9 and 10 buttons.
These are programmed to raise the Filter Cutoff and
Filter Resonance, respectively. Buttons are just on/off,
but you can set a specific value for the On position;
notice the +10 and +40 in the button’s value boxes.
7. Press the two buttons, one by one.
The sound now has a more interesting character, due to
the filters. Since it’s brighter, we’ve also restored some of
the electric piano character.
Note: Depending on the parameter, you may sometimes
hear glitches in the sound as you edit with Tone Adjust.
33
Page 40

Playing and editing Programs
Using Compare command
When you’re in the process of editing a sound, executing the
Compare command on Menu command will recall the saved
version of the sound, as it was before you started editing.
Executing the Compare command again returns you to the
version you are editing.
If you edit after having executed the Compare command,
your previous edits will be lost.
Saving your edits
Once you’ve tweaked the sound to perfection, you’ll want to
save your work. To save your edits:
1. Select the Write Program command from the page
menu, at the upper right-hand corner of the screen.
This brings up a dialog box which allows you to save the
Program. Optionally, you can also select a new location,
change the Program’s name, and assign it to a sound
category (such as keyboard, guitar, etc.).
2. Press the Program’s name to bring up the text edit
dialog.
You can give the Program a descriptive name using the
on-screen keyboard.
3. After entering the name, press OK.
The text edit window will disappear, returning you to the
main Write dialog.
4. To set the category and sub-category, press the
“Category” and “Sub Category” pop-up buttons and
select the categories/sub-categories from the list.
5. To select the bank and number to save, press the
“Program” pop-up button, select the save destination
in the list and press the OK button.
You can write to any location in banks A-T. To avoid
overwriting the factory sounds, it’s safer to use a slot in
one of the Banks P-T.
Important: HD-1 Programs can only be written to HD-1
Banks, and EXi Programs can only be written to EXi
Banks. For more information on the default Bank types,
and on how to change them, please see “Program Bank
Contents” on page 26, and “Changing the Program Bank
Types” on page 26.
6. After selecting the location, press OK.
7. Press OK again to start the write process.
8. If you’re sure you want to write to this location, press
OK again.
After that, you’re done!
For more information, see “Writing Programs and
Combinations” on page 205.
Saving edits to GM Programs
You can edit GM Programs, but you must then save them to
other banks; the GM Programs themselves cannot be overwritten.
Saving to media
You can also save and manage Programs on the internal
drive and USB storage devices. For more information, see
“Saving to internal drive, CDs, and USB media” on
page 209.
34
Page 41

Quick Layer/Split
[Main Program] Piano
[Layer Program] Strings
[Main Combination] Piano
[Layer Program] Strings
Quick Layer :
Layer two programs, or a combination and a program.
Example: two programs
Example: a combination and a program
[MainProgram] Piano
[SplitProgram] Strings
Quick Split :
Split two programs, or a combination and a program,
to left and right.
Example: two programs
[MainCombination ] Piano
[SplitProgram ] LeadSynth
Example: a combination and a program
Quick Layer Quick Split
Quick Layer/Split Quick edits using the RT control knobs
The Quick Layer/Split feature makes it easy to create simple
layers and splits. Starting with either a Program or
Combination, you can add another Program as a layer, or
split the keyboard so that the current sound plays on one side
of the keyboard (either upper or lower), and a different
Program plays on the other.
All of the Quick Layer/Split controls are non-destructive and
reflected immediately when playing on the keyboard. You
can experiment with different settings, and fine-tune until
you find the perfect sound.
While you can start with either a Program or a Combination,
the additional split or layer sound must always be a Program,
and the results of Quick Layer/Split are always saved as a
new Combination. After saving, you can then edit the new
Combination as desired.
Quick Layer
A “layer” is when playing a single note causes two or more
sounds to be heard simultaneously. The Quick Layer
function lets you layer two Programs, or one Combination
and one Program.
For example, you could layer piano with strings, using two
Programs:
Main: Piano program
Layer: Strings program
Quick Split
Split lets you play different sounds in different regions of the
keyboard. The Quick Split function lets you split two
Programs, or one Combination and one Program.
For example, you can do this:
Main: piano Program (right hand)
Split: bass Program (left hand)
or this:
Main: piano Combination (Piano + E.Piano layer) (left
hand)
Split: lead synth Program (right hand)
Or, you could add strings to a Combination which is itself a
layer:
Main: Piano Combination (Piano + E.Piano layer)
Layer: Strings Program
Limitations of the Quick Layer/Split function
Note: You may not be able to copy the settings due to
limitations on the number of timbres and effects, which may
create difference in the sounds. Also, the settings of either
ARP/DRUM can be copied, but not both.
Quick Layer and Quick Split buttons
To use Quick Layer/Split, press the Quick Layer or Quick
Split buttons in the Home page of either PROGRAM or
COMBINATION mode. The Quick Layer or Quick Split
dialog box will appear, and you can then create the layer or
split sound that you want.
Quick Layer and Quick Split buttons
35
Page 42
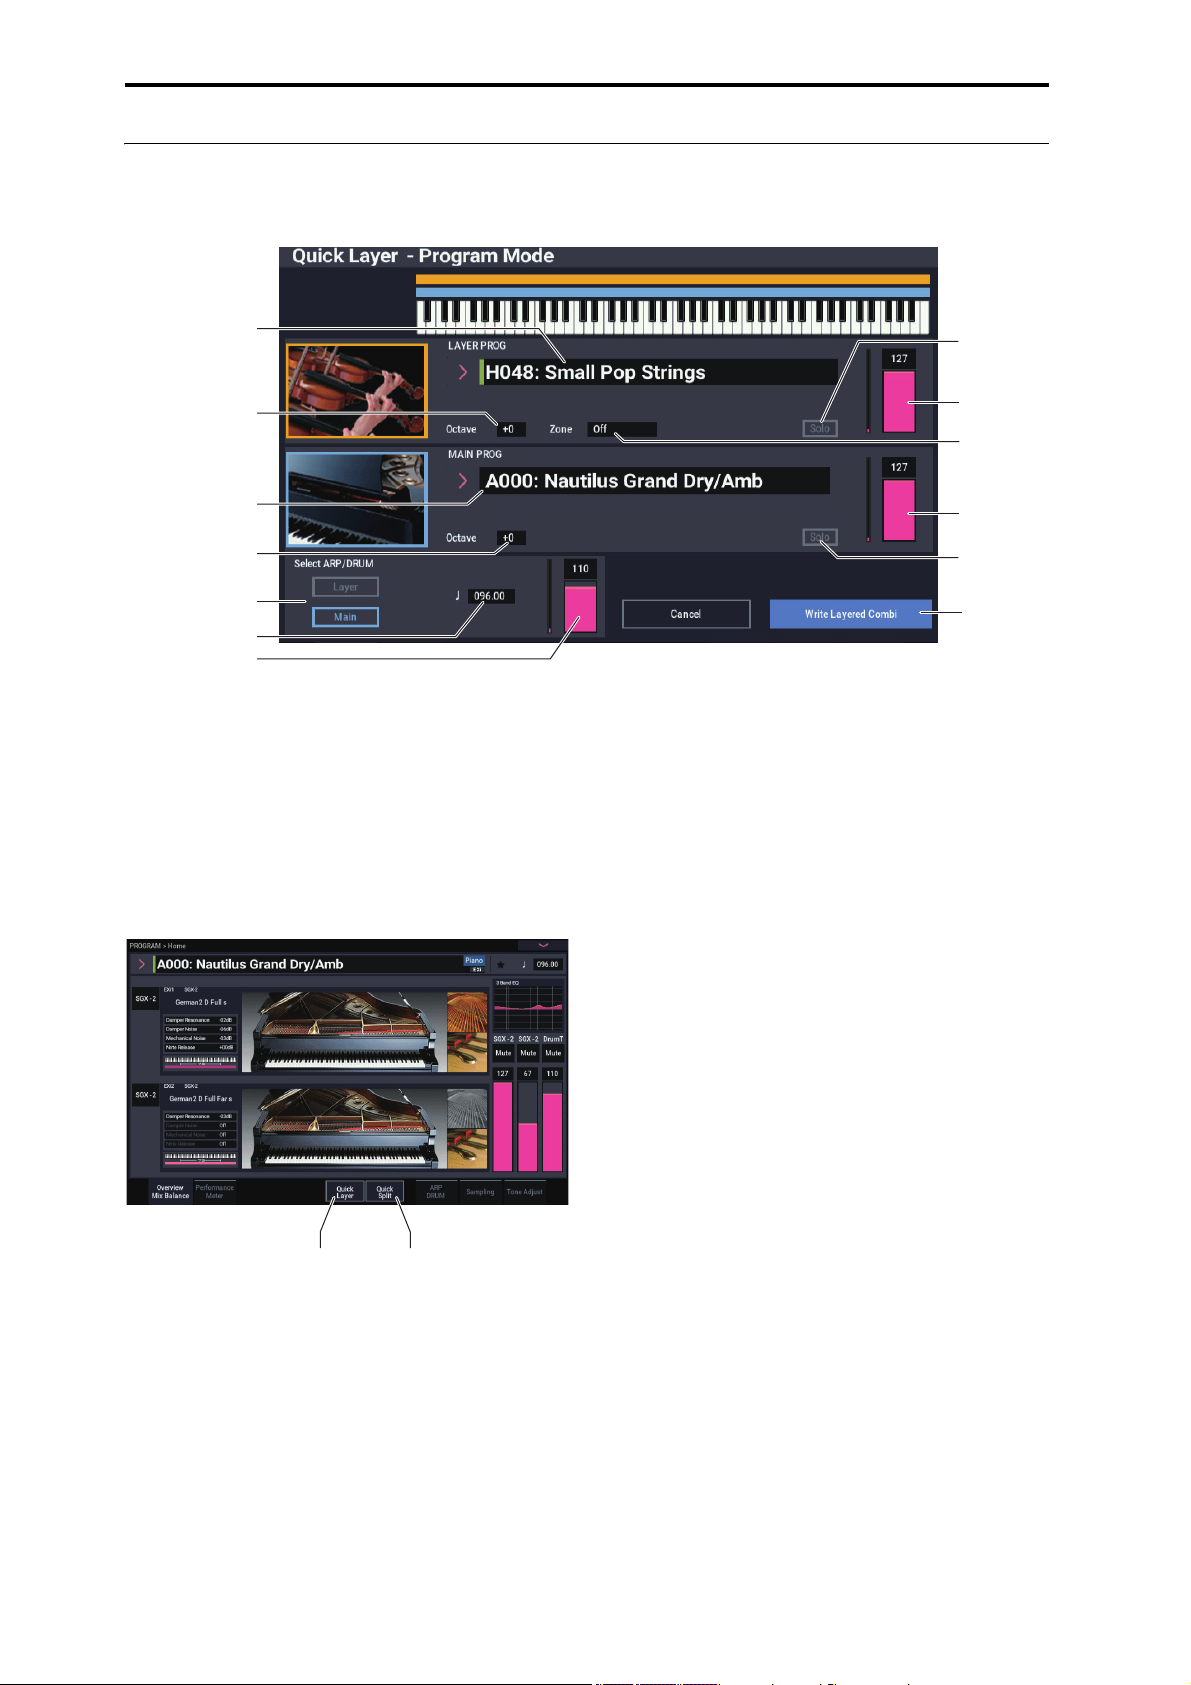
Playing and editing Programs
Program Select (Layer)
Program Select (Main)
Volume Drum Track
Octave (Main)
Tempo
Octave (Layer)
Write Layered
Combi
Zone
Solo (Layer)
Solo (Main)
Select ARP/DRUM
Layer/Main
Volume (Layer)
Volume (Main)
Quick Layer example: adding strings to a piano sound
Quick Layer dialog
Here, we’ll walk through a typical use of Quick Layer:
adding a string layer to a piano sound. To do so:
1. In PROGRAM mode, select a piano sound-for
instance, A000: Nautilus Grand Dry/Amb.
For details on how to select a Program, see “Selecting
Programs” on page 25.
2. Press the Quick Layer button, to the right of the Perf
Meters tab.
Quick Layer and Quick Split buttons
Quick Layer Quick Split
The Quick Layer dialog box opens (see the “Quick Layer
dialog,” above).
This dialog box lets you make all of the basic settings for
the new layered sound. First, we’ll select a strings
Program to layer with the piano.
3. Press the Category Select Popup in the LAYER
PROG section.
4. Choose the Strings category, select the Program H048:
Small Pop Strings, and press OK.
When you play the keyboard, you’ll now hear a layered
sound with piano and strings. The strings will sound close
to the way that they do in PROGRAM mode, including
their insert effects (IFX), but they will now use the
Master and Total Effects (MFX and TFX) of the piano
Program.
You can also select Programs by bank and number, or by
using Find. For more information, see “Selecting by bank
and number” on page 26, “Selecting by Category” on
page 27, and “Using the Find feature” on page 27.
If you like, you can also select a different Main Program,
using the controls in the MAIN PROG section.
5. Set the Volume and Octave of the two Programs as
desired.
You can adjust the relative levels of the piano and strings,
and change the octave transposition of one or both
sounds. For example, you could reduce the volume of the
strings, and set them to play an octave above the piano.
6. Under “Select ARP/DRUM,” choose to use the
ARP/DRUM from either the Main or Layer Program,
and adjust the volume as desired.
By default, the ARP/DRUM settings of the main program
will be copied.
Note: When the ARP button is turned on, the notes that
play will be controlled by the ARP function.
When the DRUM button is turned on, the notes that play
will be controlled by the Drum function. Use the Volume
control to adjust the volume of the drum track program.
Either the ARP or DRUM settings will be assigned.
Note that you can’t use both ARP/DRUMs
simultaneously.
36
Page 43

Quick Layer/Split Quick Layer example: adding strings to a piano sound
Writing the results
1. When you’ve finished editing your layered sound,
press the Write Layered Combi button to save it as a
combination.
The Write Combination dialog box appears.
2. Press the popup button next to Combination to bring
up the save location dialog, and select a location to
save the edited Combination.
3. Set the name and category as desired.
The system automatically creates a new name based on
the names of the two original sounds. You can edit this
name as desired.
4. Press the OK button to write the Combination.
A confirmation message appears. Press the OK button
once again to complete the Write operation.You’ll enter
COMBINATION mode, with the new Combination
selected.
For more information, see “Writing Programs and
Combinations” on page 205.
If you press the Cancel button, the save operation is
canceled.
37
Page 44

Playing and editing Programs
Solo (Lower)
Volume Drum Track
Tempo
Select Split Mode
Octave (Lower)
Write Split Combi
Program Select
(Lower)
Select ARP/DRUM
Lower/Main
Volume (Lower)
Split Point
Octave (Main)
Solo (Main)
Program Select
(Main)
Volume (Main)
Quick Layer Quick Split
Quick Split example: adding left-hand bass to a piano
Quick Split dialog
38
Quick Split makes it easy to create common setups, such as
piano for the right hand and bass below for the left, or
electric piano for the left hand and a lead synth for the right.
Let’s walk through the first example: a bass and piano split.
1. In PROGRAM mode, select a piano sound-for
instance, A000: Nautilus Grand Dry/Amb.
For details on how to select a Program, see “Selecting
Programs” on page 25.
Note: To save the original main program while you are
editing, use “Write Program” to save the main program
before using the Quick Layer function.
2. Press the Quick Split button, to the right of the Perf
Meters tab.
The Quick Split dialog box appears.
3. Under Select Split Mode, press the Lower | Main
button.
This assigns the Split Program to the left-hand (lower)
side of the keyboard, and the Main Program—in this
case, the piano—to the right-hand (upper) side.
Alternatively, you could press the Main | Upper button
to assign the Split Program to the right-hand side of the
keyboard—useful for lead sounds. For this example, let’s
stick with Lower | Main.
4. Press the Category Select Popup in the LOWER
PROG section.
5. Choose the Bass category, select the Program K059:
JB Finger Bass 1, and press OK.
You can also select Programs by bank and number, or by
using Find. For more information, see “Selecting by bank
and number” on page 26, “Selecting by Category” on
page 27, and “Using the Find feature” on page 27.
When you play the keyboard, the lower region plays a
bass sound, and the upper region plays a piano sound.
The bass will sound close to the way that it does in
PROGRAM mode, including its insert effects (IFX), but
it will now use the Master and Total Effects (MFX and
TFX) of the piano Program.
If you like, you can also select a different main Program,
using the controls in the MAIN PROG section.
6. Press and hold the ENTER button, and play a note on
the keyboard to set the split point.
The split point sets the lowest key of the Upper range; the
default is C4.
You can also edit the Split Point by holding the ENTER
button and then touching the keyboard graphic.
7. Adjust the Volume and Octave of the main and split
Programs as desired.
8. Under “Select ARP/DRUM,” choose to use the
ARP/DRUM from either the Main or Split Program,
and adjust the volume as desired.
The Tempo is initially set to match the selected
ARP/DRUM; you can then change it as desired. Note that
you can’t use both ARP/DRUMs simultaneously.
9. When you’ve finished editing, press the Write Split
Combi button to save the new sound.
For more details, see “Writing the results” on page
37
,
and “Writing Programs and Combinations” on page 205.
Page 45

Quick Layer/Split Quick Split example: adding left-hand bass to a piano
Writing the results
1. When you’ve finished editing your splitted sound,
press the Write Split Combi button to save it as a
combination.
The Write Combination dialog box appears.
2. Press the popup button next to Combination to bring
up the save location dialog, and select a location to
save the edited Combination.
3. Set the name and category as desired.
The system automatically creates a new name based on
the names of the two original sounds. You can edit this
name as desired.
4. Press the OK button to write the Combination.
A confirmation message appears. Press the OK button
once again to complete the Write operation.You’ll enter
COMBINATION mode, with the new Combination
selected.
For more information, see “Writing Programs and
Combinations” on page 205.
If you press the Cancel button, the save operation is
canceled.
39
Page 46
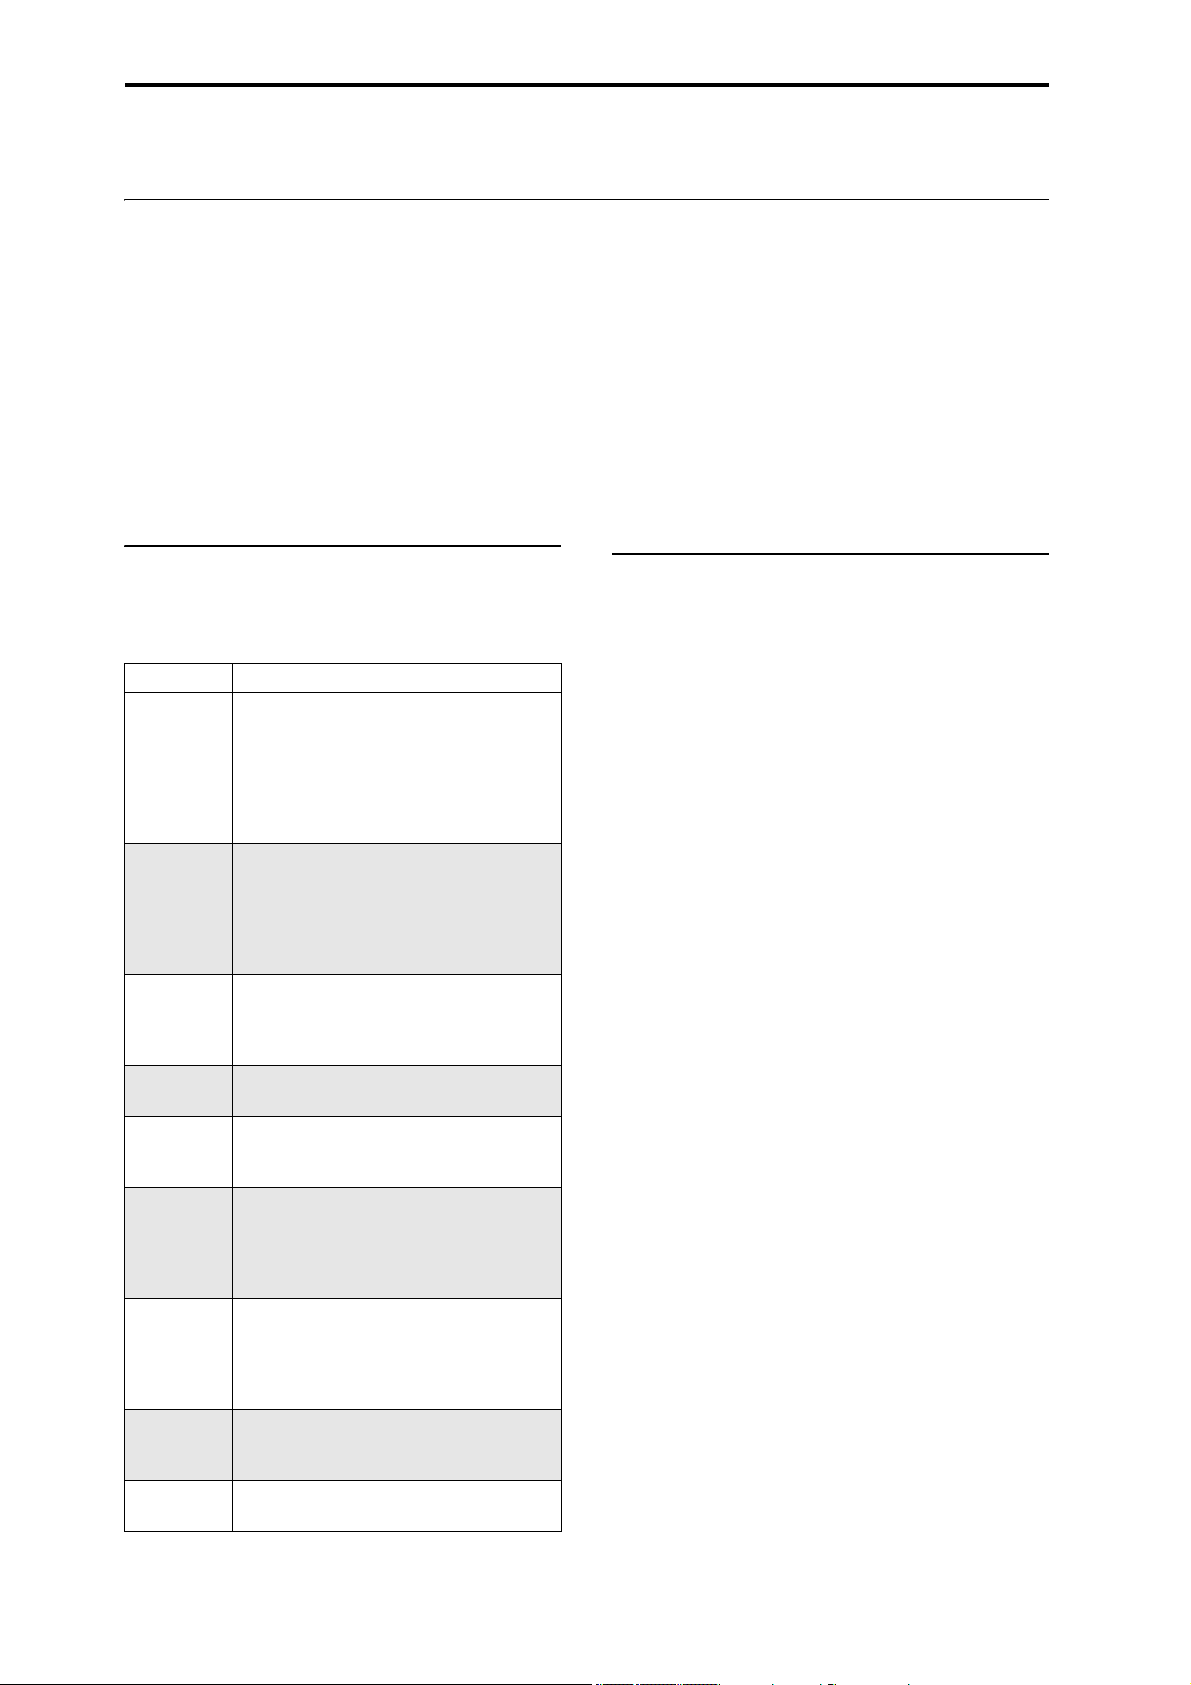
Playing and editing Programs
Detailed Program Editing
Editing HD-1 Programs
Creating your own Programs
You can create your own original HD-1 sounds by editing
the factory Programs, or by initializing a Program and
starting from scratch. You can save these Programs into any
bank other than GM (which contains General MIDI
Programs).
You can also create Programs using your own Multisamples,
either from SAMPLING mode or User Sample Banks. In
addition, you can play a Program and resample your
performance, or sample an external audio source while
listening to the sound of a Program.
Overview of editing pages
PROGRAM > Home page is where you select and play
programs, and adjust the ARP/DRUM settings. The other
pages let you modify the sound in more detailed ways.
Page Main features
• Select and play Programs
• Perform easy edits using the RT control knobs,
and Tone Adjust
Home
Basic/X-Y/
Controllers
Osc/Pitch
Filter
Amp/EQ
LFO
AMS Mixer/
Common
KeyTrack
IFX
MFX/TFX
• Adjust mix parameters including volume, pan,
EQ, and send levels
• ARP/DRUM settings
• Quick sampling and re-sampling
• Set the Program to Single, Double, Single
Drum, or Double Drum
• Select Mono or Poly voice allocation
• Select a scale (e.g., Equal Temperament)
• Set up controllers
• Set up Vector synthesis
• Select Multisamples, Wave Sequences. or
Drum Kits
• Settings related to the pitch, including the
pitch EG
• Settings related to the filter (tone), including
the filter EG
• Settings related to the amplifier (volume),
including amp EG and pan
• Settings for the 3-band EQ
• For each of the two LFOs provided for each
oscillator, select the LFO type and speed, etc.
(Settings in the pitch, filter, and amp pages
determine how much the LFOs affect the
sound.)
• Mix and modify AMS sources using the two
AMS mixers provided for each oscillator
• Set up how the Common Key Track output
changes as you play up and down the
keyboard
• Select insert effects and make settings for
them. Specify send levels to the Master effects
and routing to the outputs
• Select Master send effects and Total effects,
and adjust their settings
For details on how to select the different pages, see “Basic
operations” on page 14.
You can sample from within PROGRAM mode—including
resampling the Program itself. For more information, see
“Sampling in PROGRAM and COMBINATION modes” on
page 145.
You can also mix in live audio inputs, and process them
through effects. For more information, see “Using effects
with the audio inputs” on page 229.
Note that the page and parameter structures of EXi Programs
are different than those of HD-1 Programs.
Basic HD-1 Structure
Multisamples and Wave Sequences
The sound of the HD-1 starts with one or more
Multisamples. These can be recordings of instruments like
piano, bass, guitar, strings, organs, analog synths, and so on,
or purely digitally-created timbres.
You can play these Multisamples directly, or use them
through Wave Sequences, which play a series of different
Multisamples over time to create rhythms or complex,
evolving timbres.
Oscillator Mode
HD-1 Single Programs have one oscillator, and Double
Programs have two oscillators. Each oscillator includes a
complete synthesis voice, with velocity-switched
Multisamples, dual filters, EGs, LFOs, and so on.
Single and Double Drum modes are similar, but use Drum
Kits (as created in GLOBAL mode) instead of Multisamples.
Single and Single Drum Programs use one oscillator, for a
maximum of 140-note polyphony.
Double and Double Drum Programs use two oscillators, for
a maximum of 70-note polyphony.
A note about polyphony
Polyphony means the number of notes that you can play at a
time. This number will vary depending on the particular
sound being played, and how that sound is produced.
Generally speaking:
• Double Programs use twice as many voices as Single
Programs.
• Wave Sequences use twice as many voices as
Multisamples.
• Stereo Multisamples use twice as many voices as Mono
Multisamples, and Stereo Wave Sequences use twice as
many voices as Mono Wave Sequences.
• If the X-Y Envelope is enabled, the number of voices
used increases slightly.
40
Page 47

Detailed Program Editing Editing HD-1 Programs
Basic/X-Y/Controllers - Program Basic
OSC/Pitch -
LFO - Common LFO
OSC/Pitch - OSC1 Basic
OSC1 Pitch
OSC/Pitch - Pitch EG
Oscillator / Pitch
LFO - OSC1 LFO1
Filter - Filter Key Track
Filter - Filter1 Mod.
Filter1 LFO Mod.
Filter -
Filter - Filter1(A/B)
Filter
LFO - OSC1 LFO2
Amp/EQ - Amp1 Mod
Filter - Filter1 EG
Common KeyTrack
AMS Mixer
Amp/EQ -
Amp1/Driver1
Amp/EQ - Amp1 EG
Amplier
OSC 1
OSC 2
Voice Assign Mode
The Voice Assign Mode selects whether the Program will
play polyphonically (Poly) or monophonically (Mono).
When this is set to Poly, you can play both chords and
melody lines. When this is set to Mono, only one note will
sound even if you play a chord.
Normally you’ll set this to Poly, but Mono is useful when
playing sounds such as synth basses, synth leads, and other
solo instruments. Try switching between Poly and Mono,
and listen to the results.
Using Drum Kits
You can create and edit Drum Kits in GLOBAL mode. For
each note on the keyboard, you can select up to eight
velocity-crossfaded Drumsamples, make filter and amp
settings, and specify routing to the effects and to the
individual audio outputs.
For more information, see “Using Drum Kits” on page 193.
In Programs, once you’ve set the Oscillator Mode to Single
or Double Drums, you can select between the 152 userprogrammable Drum Kits, plus an additional 9 GM2 kits.
For more information on the factory sounds, see the Voice
Name List.
Copying settings between OSC1 & OSC2
Many of the Program parameters can be set differently for
OSC1 and OSC2. These include all of the parameters on:
• All of the tabs on the OSC/Pitch page, except for the
Pitch EG
• All of the tabs on the Filter page
• All of the tabs on the Amp page, except for EQ
• All of the tabs on the LFO page, except for Common
LFO
• The AMS Mixer tabs
You can use the page menu’s Copy Oscillator command to
copy these parameters from one Oscillator to another. You
can even copy parameters from an Oscillator in a different
Program.
This command is useful when you want to set both
Oscillators to the same settings, or when you want to
duplicate settings you’ve used before.
Amp/EQ - EQ
EQ
IFX - Routing
OSC1, 2
Insert Eects
Master Eects
Individual Outputs
REC Bus
FX Control Bus
X-Y Control
Controllers
Tone Adjust
IFX -
IFX1-12
Eects
Arpeggiator
Drum Track/Step Seq
MFX/TFX -
MFX 1, 2
Audio Input
Sampling
MFX/TFX -
TFX 1, 2
Working with Multisamples
As described above, the sound of the HD-1 starts with one or
more Multisamples. You can play these Multisamples
directly, or use them through Wave Sequences, which play a
series of different Multisamples over time to create rhythms
or complex, evolving timbres.
In Single and Double modes, each Oscillator can play up to
eight Multisamples or Wave Sequences. In Single and
Double Drums modes, each Oscillator plays a Drum Kit.
Multisamples, Wave Sequences, and Drum Kits
Multisamples, Drum Kits, and Wave Sequences allow you to
play samples in different ways.
• Multisamples lay out one or more samples across the
keyboard. For instance, a very simple guitar Multisample
might have six samples–one for each string.
• Wave Sequences play back a series of different
Multisamples over time. These Multisamples may
crossfade to create smooth, evolving timbres, or change
abruptly to create rhythms.
• As the name suggests, Drum Kits are optimized for
playing Drumsamples.
Velocity splits, crossfades, and layers
As mentioned above, unless you’re in Single or Double
Drum mode, each Oscillator has eight velocity zones, named
MS1 (the highest velocity) through MS8 (the lowest). This
means that the Program can play different Multisamples or
Wave Sequences, depending on how hard you play.
Each of these zones has separate settings for Level, Start
Offset, and so on. Also, each of the zones can fade into the
next, to create smooth velocity transitions. Zones can even
be layered together, two at a time.
Selecting Multisamples
Let’s create a simple velocity crossfade between two
Multisamples, using just OSC1.
1. Go to the OSC1 Basic tab of the PROGRAM >
OSC/Pitch page.
2. Set the MS1 and MS2 Type parameters to Multi
(Multisample).
3. Set the Types for MS3…8 to Off.
AUDIO OUTPUT
L/MONO, R
AUDIO OUTPUT
INDIVIDUAL 1, 2, 3, 4
41
Page 48

Playing and editing Programs
Type Bank CurveMultisample
Bottom Velocity
Xfade Range
4. Select ROM Stereo as the Multisample Bank for MS1
and MS2.
There are four main types of Multisample Banks: ROM,
SAMPLING mode, EXs, and User Sample Banks. For
each type, you can also choose between looking at mono and
stereo Multisamples. Note that stereo Multisamples will
require twice as many voices as mono Multisamples.
ROM Multisamples are the built-in “factory” sounds, and
are always available. These are organized by category, such
as pianos, guitars, bells, etc.
SAMPLING mode (Smp) Multisamples are the ones that
you can see and edit in SAMPLING mode. These may
include Akai, SoundFont 2.0, AIFF or WAV files loaded
from drive, or native NAUTILUS samples (including thirdparty sound libraries and samples that you create yourself).
Anything that can be used in SAMPLING mode can also be
loaded as a User Sample Bank.
EXs Multisample banks are PCM expansion sets created
especially for the NAUTILUS. Each has its own unique
number; for instance, the ROM Expansion is EXs1, and the
Concert Grand Piano is EXs2. Only the currently loaded
EXs banks will appear in this menu.
User Sample Banks bring the benefits of EXs to your own
sample libraries. You can load and play gigabytes of your
custom or converted samples at once, using Virtual Memory.
They are shown as a path to a file on an internal drive,
including the file name and the names of all enclosing
directories. Only the currently loaded User Sample Banks
will appear in this menu. For more information, see “User
Sample Banks” on page 151.
5. Press the Multisample popup for MS1.
This brings up a list of Multisamples, organized by
category. Use the tabs at the left of the screen to browse
through the different categories.
6. Select a Multisample by touching its name in the list.
7. Press the OK button to confirm your selection.
8. Do the same for MS2.
Now that you’ve assigned Multisamples to MS1 and
MS2, let’s set up the velocity ranges and crossfades.
9. Set MS2’s Bottom Vel (Velocity) to 001, and its Xfade
Range to Off.
10.Set MS1’s Bottom Vel (Velocity) to 80.
Now, MS2 will sound when you play softly, at velocities
of 79 or less–and MS1 will sound when you play harder,
with velocities of 80 or more.
You can also see this split visually, in the graphic on the
right side of the LCD.
11.Next, set MS1’s Xfade Range to 20, and its Curve to
Linear.
Notice that the graphic now shows the two ranges
tapering into one another. Between 80 and 100, MS2 will
fade out, and MS1 will fade in, creating a g
radual
velocity transition instead of a hard split.
12.If you like, adjust the Levels for the two Multisamples.
Rev. (Reverse) check box
Rev. (Reverse) lets you play the selected Multisample
backwards, without looping. This can produce interesting
results for sound effects or other unusual timbres. Reverse
applies only to Multisamples; when the Typ e is set Wave
Sequence, this is grayed out.
Note: This does not apply to samples from EXs or User
Sample Banks whose Load Method is set to Virtual
Memory.
42
Page 49

Detailed Program Editing Using LFOs and Envelopes (EGs)
Level
Time
Attack Time
Decay Time
Slope Time
Release Time
Attack Level
Start Level
Sustain Level
Break Level
note-on note-o
Release Level
Using LFOs and Envelopes (EGs)
Using LFOs
Each Oscillator has two LFOs: LFO1 and LFO2. There is
also a single Common LFO, shared by both Oscillators.
While LFO1 and LFO2 are separate for each voice, the
Common LFO is shared by all voices in the Program. This
makes it useful when you want all of the voices to have an
identical LFO effect.
You can use these LFOs to modulate different Program
parameters, including:
• Pitch (for vibrato)
• Filters (for wah effects)
• Volume (for tremolo)
• Pan (for auto-panning)
The LFOs can modulate many other parameters, in addition
to those listed above.
Basic LFO programming
The NAUTILUS LFOs are very powerful, and offer lots of
control for the power user. It’s simple to get started with
them, though–and the graphics on the LCD show how the
parameters affect the sound. Let’s take a brief tour.
1. Go to the OSC1 LFO1 tab of the PROGRAM > LFO
page.
2. Select the Waveform parameter.
3. Use the [+] or [−] buttons to scroll through the
different waveforms, and look at their shapes in the
graphic display.
5. Select the Shape parameter, and change settings, from
-99 to +99.
Notice how the shape of the waveform becomes more
curved, and how -99 emphasizes the lower part of the
shape, and +99 emphasizes the upper part.
6. Select the Start Phase parameter to sweep through its
range of values.
Notice how the waveform shifts from side to side.
Among other things, this lets you offset the LFOs from
one another in time, which can create interesting organic
effects.
7. Use the Frequency parameter to set the speed of the
LFO.
8. Use the Fade and Delay settings to control the way the
LFO sounds at the beginning of the note.
For more information on LFOs, see “PROGRAM > LFO” on
page 83 of the PG.
All of these parameters control the way that the LFO itself
works. In order for the LFO to actually affect the sound, you
can use the dedicated LFO routings on the Filter, Pitch, and
Amp pages, or use the LFOs as AMS sources for a wide
variety of parameters.
Frequency Modulation
AMS can be used to vary the LFO speed. This lets you
change the LFO speed by operating a controller, or by the
EG or Keyboard Track settings.
MIDI/Tempo Sync.
If MIDI/Tempo Sync is checked, the Frequency setting
will be ignored, and the LFO will synchronize to the system
tempo or external MIDI clocks.
This lets you produce vibrato, wah, auto-pan, or tremolo
effects that lock to the Drum Track, ARP, Wave Sequences,
the internal sequencer, or external MIDI sequencers.
There are a number of waveforms to choose from. Each are
suited to different applications:
• Triangle and Sine are the classic LFO shapes for
vibrato, tremolo, panning, and filter wah effects.
• Square is useful for gated filter and amp effects, and
creates a police siren effect when modulating pitch.
• The Guitar waveform is designed especially for guitar
vibrato, since it bends only upwards from the base value.
• Saw and Exponential Saw Down are good for rhythmic
filter and amp effects.
effect, which is great for modulating a resonant filter.
4. After looking at the different waveforms, select
• Random 1 (S/H) creates the classic sample-and-hold
Triangle.
EGs (Envelope Generators)
An envelope creates a modulation signal by moving from
one level to another over a specified time, and then moving
to another level over another period of time, and so on.
The HD-1 includes three EGs, for Pitch, Filter, and Amp.
These produce time-varying changes in pitch, tone, and
volume respectively. They can also be used to modulate a
number of other Program parameters via AMS.
43
Page 50
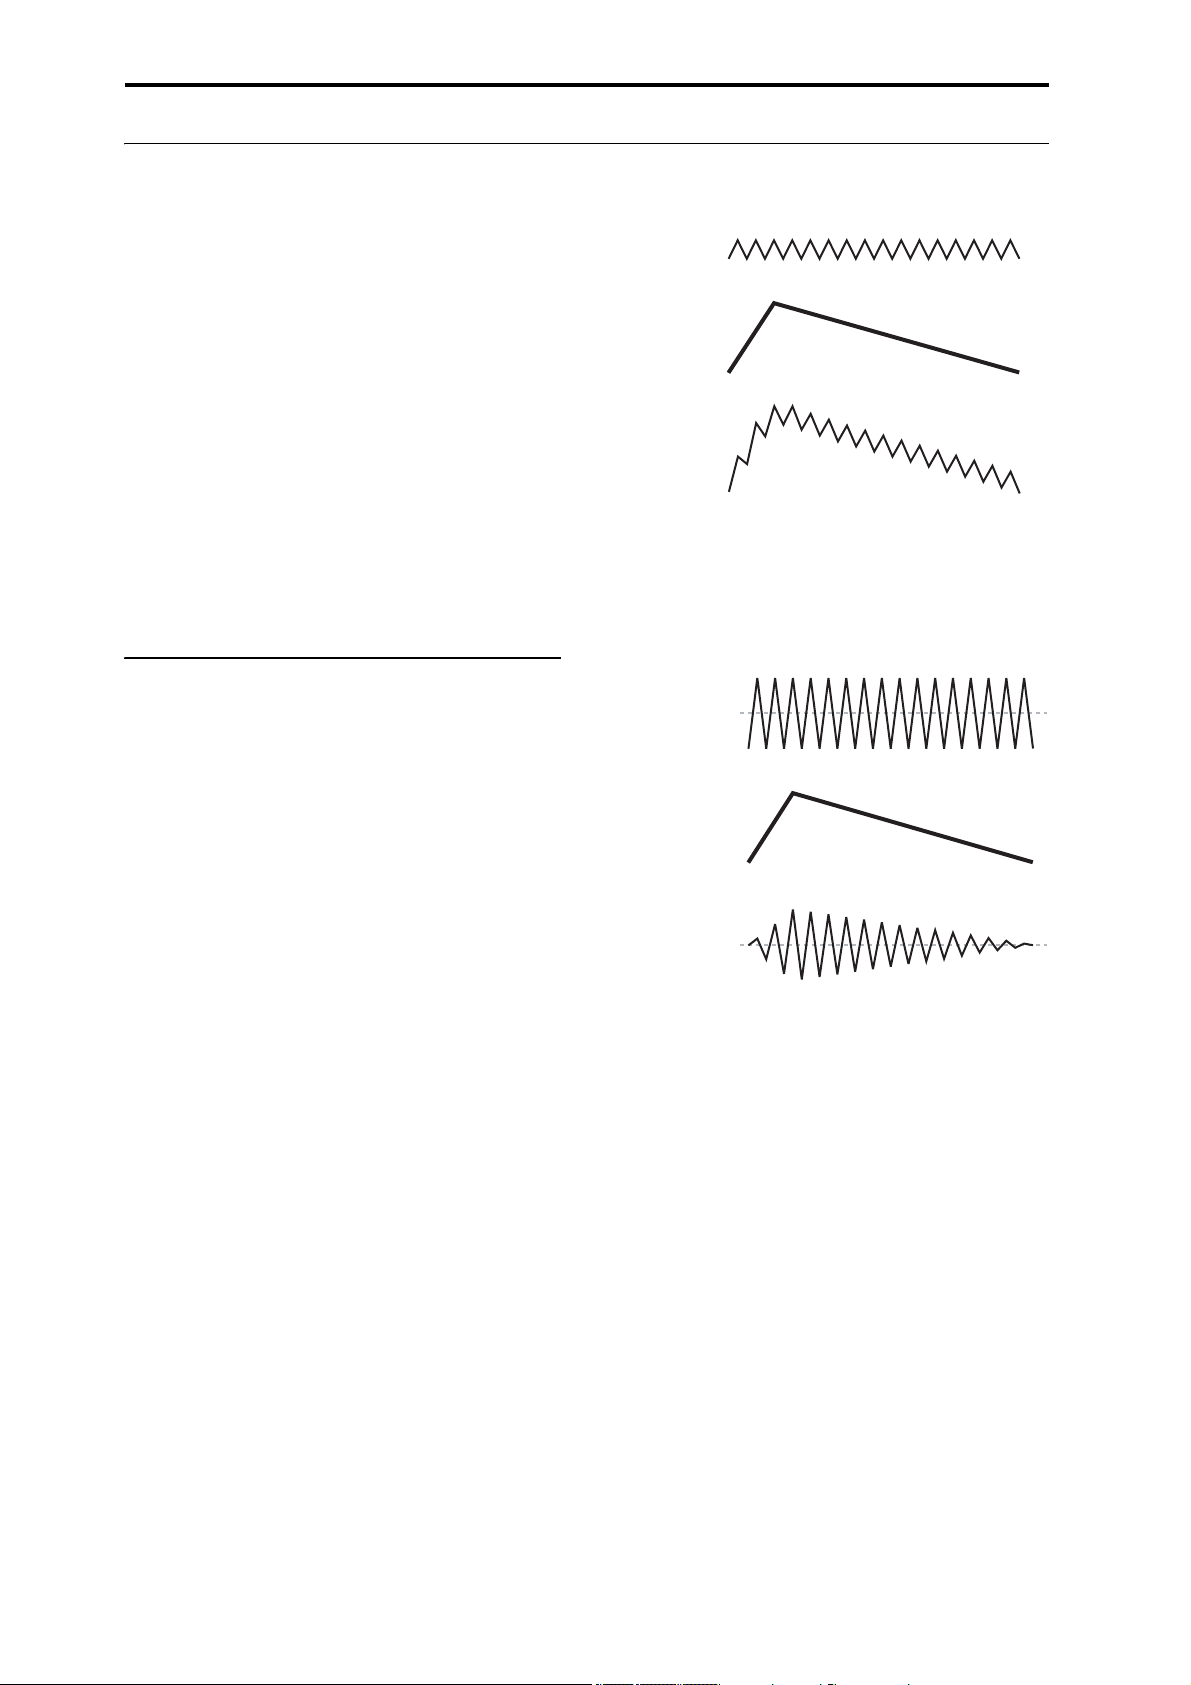
Playing and editing Programs
AMS A: LFO
AMS B: EG
A+B Output
Using Alternate Modulation (AMS) and the AMS Mixers
AMS (Alternate Modulation Source) refers to any of the
assignable modulation sources in NAUTILUS, including:
• Built-in physical controllers, such as the Joystick, and
RT control knobs
• Incoming MIDI controllers, or MIDI controllers
generated by the X-Y Envelope
• Modulators such as the Filter, Pitch, and Amp EGs, the
LFOs, or the AMS Mixers
Intensity is a parameter that sets the degree (speed, depth,
amount etc.) to which AMS will control the modulation.
A number of frequently-used modulation routings, such as
using the joystick to vary the pitch, are provided as
additional, dedicated routings, separate from AMS.
Note that not all AMS sources may be available for some
modulation destinations.
For details on alternate modulation and AMS, see “Alternate
Modulation Sources (AMS),” on page 901 of the PG.
Using the AMS Mixers
The AMS Mixers combine two AMS sources into one, or
process an AMS source to make it into something new.
For instance, they can add two AMS sources together, or use
one AMS source to scale the amount of another. You can
also use them to change the shapes of LFOs and EGs in
various ways, modify the response of realtime controllers,
and more.
The AMS Mixer outputs appear in the list of AMS sources,
just like the LFOs and EGs.
This also means that the original, unmodified inputs to the
AMS Mixers are still available as well. For instance, if you
use LFO 1 as an input to a AMS Mixer, you can use the
processed version of the LFO to control one AMS
destination, and the original version to control another.
Finally, you can cascade the two AMS Mixers together, by
using AMS Mixer 1 as an input to AMS Mixer 2.
Adding two AMS sources together
AMS mixers will do different things depending on their
Typ e setting. The A+B setting merges two AMS sources
into one. This can be handy when you need to add one more
modulation source to a parameter, but you’ve already used
up all of the available AMS slots.
For instance, let’s say that you’re using an LFO to modulate
Filter Resonance, and then you decide that it would be
interesting to scale that parameter with an EG as well.
Resonance has only a single AMS input, but you can easily
merge the LFO and the EG together using the A+B AMS
Mixer:
1. Assign the LFO to AMS A.
2. Assign the EG to AMS B.
3. Assign the AMS Mixer as the Filter Resonance AMS
source.
AMS Mixer A+B example
Scaling one AMS source with another
When the Typ e is set to Amt A x B, the mixer uses the AMS
B input to scale the amount of AMS A. For instance, you can
control the amount LFO1 with the Filter EG, or control the
amount of the Pitch EG with the foot pedal.
AMS Mixer Amt AxB example
AMS A: LFO
AMS B: EG
Amt A×B Output
Smoothing
The Smoothing Typ e smooths out the AMS input, creating
more gentle transitions between values. You have separate
control of the amount of smoothing during the attack (when
the signal is increasing) and decay (when it’s decreasing).
Low settings provide subtle controller smoothing, creating
more gradual joystick, for instance. Higher settings create
auto-fade effects, transforming a quick gesture into a longer
fade-in and/or fade-out event.
Smoothing can also be used to alter the shape of
programmable mod sources, such as LFOs and EGs. For
instance, you can turn a “blip” into a simple envelope shape,
as shown below.
44
Page 51

Detailed Program Editing Controlling Pitch
AMS Mixer Smoothing examples
Original AMS A:
Smoothing with Short Attack & Long Release:
Smoothing with Long Attack
and Short Release:
More AMS Mixer features
There are more mixer Types, including Offset, Shape, and
Quantize, which offer even more possibilities for creative
programming. For more details, see these sections in the
Parameter Guide:
• “6–1: OSC 1 AMS Mix” on page 89
• “Using SW 1/2 to turn an AMS source on and off” on
page 90
• “Muting individual Wave Sequence steps with SW1” on
page 91
• “Converting from bipolar to unipolar” on page 91
• “Converting from unipolar to bipolar” on page 91
• “Selective pitch-bend, using only the joystick” on
page 94
• “Generating a static value” on page 94
Suggestions on using AMS
When making settings for alternate modulation, think of the
effect that you wish to produce, what type of modulation will
be necessary to produce that effect, and what parameter of
the oscillator, filter, or amplifier needs to be controlled.
Next, select a source (AMS) and set the Intensity. If you
proceed logically in this way, you will achieve the desired
effect.
For example, if you want to control a guitar sound so that it
approaches feedback when you move the joystick, you might
set up the joystick to modulate the filter frequency and
resonance.
Controller Setup page
For each program, PROGRAM > Basic/X-Y/Controllers–
Controllers page lets you make settings for the SW1 and
SW2 key, and for RT control knobs 1–6. For more
information, see “SW1 and SW2” on page 29, and “1–8:
Controllers,” on page 48 of the PG.
Controlling Pitch
Parameters for controlling pitch are located on the
OSC/Pitch page, as shown below.
Pitch bend
The JS (+X) and JS(–X) settings specify the amount of pitch
change (in semitones) that will occur when MIDI pitch bend
messages are received or when the joystick is moved to left
or right. A setting of +12 allows the pitch to be controlled a
maximum of one octave upward; a setting of –12 allows the
pitch to be controlled a maximum of one octave downward.
Creating Vibrato
You can use an LFO to create vibrato.
LFO 1/2 Intensity sets the depth to which the selected LFO
will affect the pitch. With a setting of +12.00, vibrato will
produce a maximum of ±1 octave of pitch change.
JS+Y Int specifies the amount of vibrato that the LFO will
produce when the joystick is pushed away from yourself.
Intensity (AMS Intensity) specifies the depth of vibrato that
will be applied by the LFO when modulated by the selected
AMS (Alternate Modulation Source). For example, if LFO1
AMS is set to After Touch and you set an appropriate value
for Intensity, vibrato will be applied when MIDI aftertouch
messages are received.
As another example, if SW1 is set to SW1 Mod. (CC#80)
on the Set Up Controllers page, LFO1 AMS is set to
SW1Mod. (CC#80), and the AMS Intensity is set to an
appropriate value, vibrato is applied when you turn on SW1
or when MIDI CC#80 is received.
Pitch EG
When the Intensity value is set to +12.00, the pitch EG
specified in the Pitch EG page will produce a maximum of
±1 octave of pitch change.
To realistically simulate the slight change in pitch that
occurs when a string is plucked or at the attack of a brass or
vocal sound, you can use the EG to create a subtle change in
pitch at the attack.
Portamento
Portamento makes the pitch change smoothly when you play
the next note before releasing the previous note.
The Time parameter controls how long it take the pitch to
change. As this value is increased, the pitch will change over
a longer time. With a value of 000, there will be no
portamento.
You can turn Portamento on and off via SW1 or SW2, by
assigning them to Porta.SW CC#65.
45
Page 52
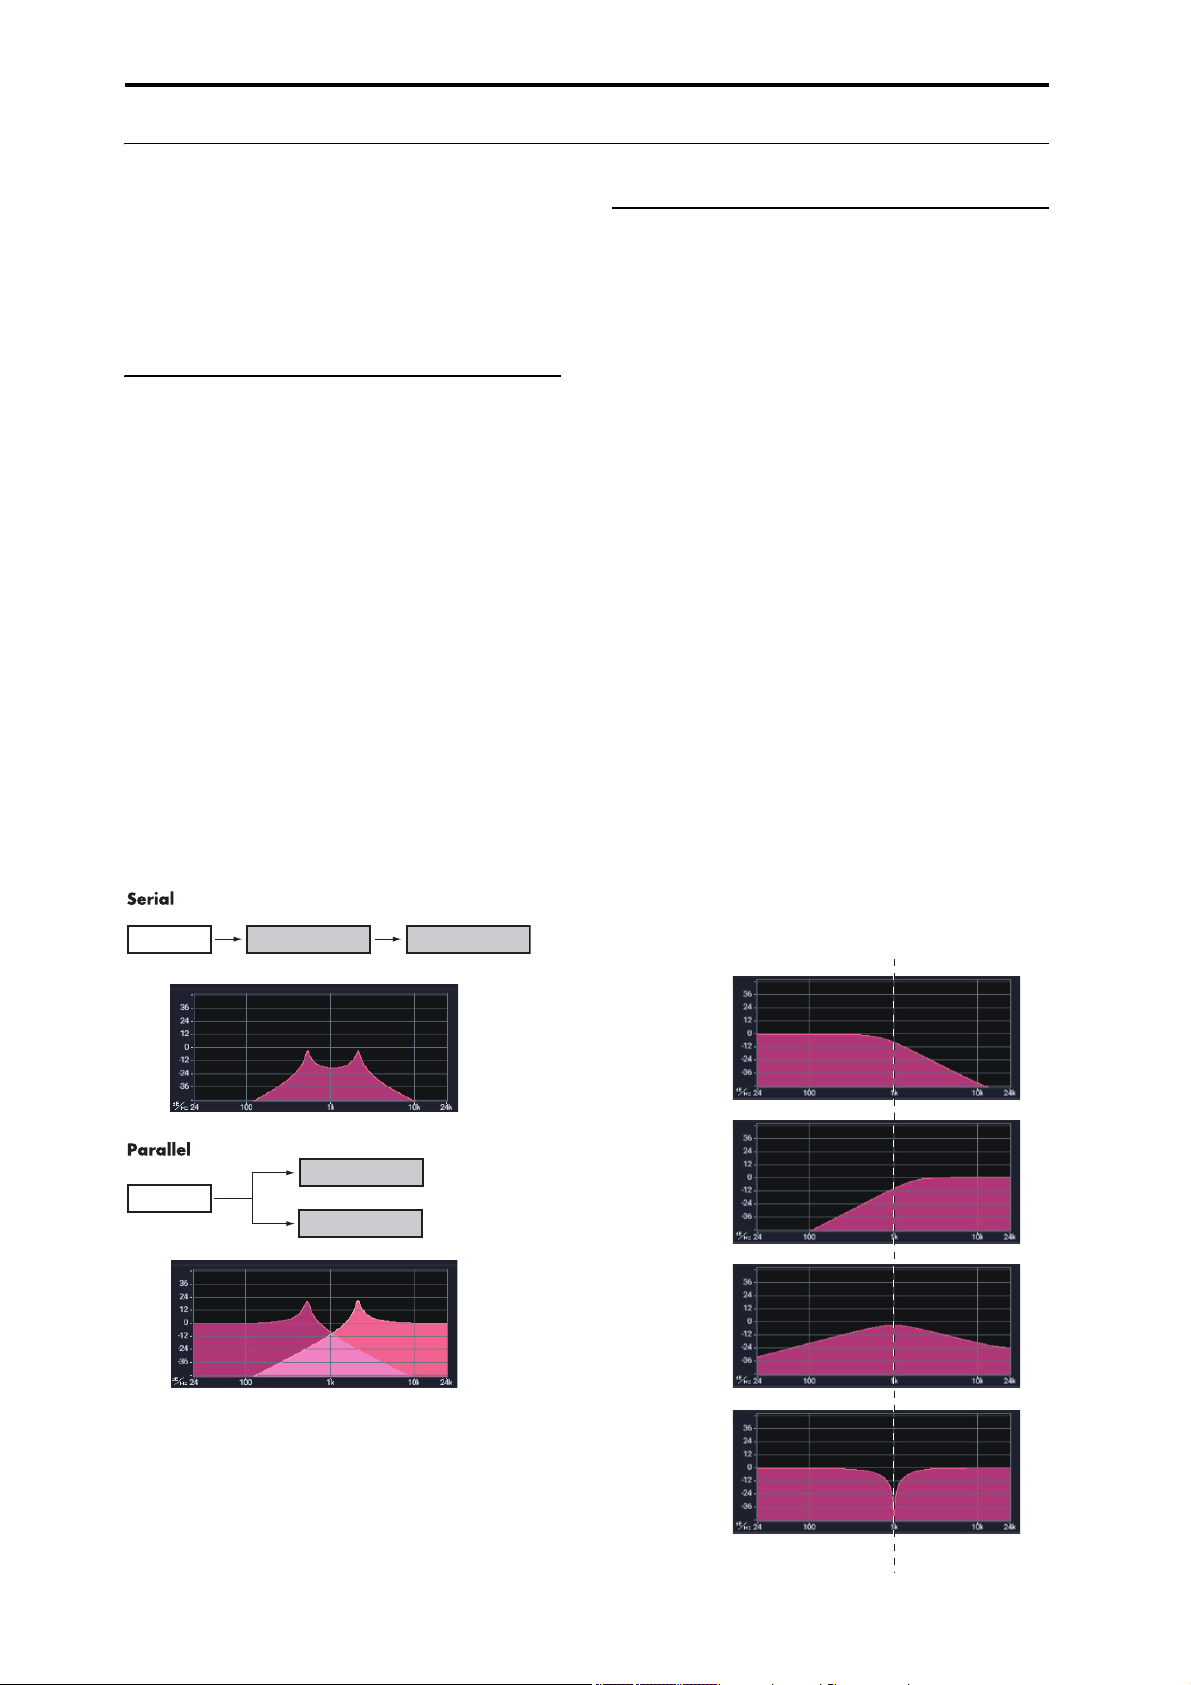
Playing and editing Programs
Using Filters
The filters allows you to diminish or emphasize specified
frequency areas of the sound.
The tone of the sound will depend significantly on the filter
settings.
The basic filter settings, including the routing, type, cutoff
frequency, and resonance, are set on the Filter page.
Filter Routing
Each oscillator has two filters, Filter A and Filter B. The
Routing parameter controls whether one or both of the
filters are used, and if both are used, it controls how they are
connected to each other.
The Single routing uses only Filter A as a single 2-pole,
12dB/octave filter (6dB for Band Pass and Band Reject).
The Serial routing uses both Filter A and Filter B. The
oscillator first goes through Filter A, and then the output of
Filter A is processed through Filter B.
Parallel also uses both Filter A and Filter B. The oscillator
feeds both filters directly, and the outputs of the two filters
are then summed together.
The 24dB/4-pole routing merges both filters to create a
single 4-pole, 24dB/octave filter (12dB for Band Pass and
Band Reject). In comparison to Single, this option produces
a sharper roll-off beyond the cutoff frequency, as well as a
slightly more delicate resonance. Many classic analog synths
used this general type of filter.
Serial and Parallel Routing
Filter A (Low Pass)Oscillator Filter B (High Pass)
Filter Types
This selects the parts of the sound which will be affected by
the filter, as described below. With the Serial and Parallel
routings, you can independently set the types for Filter A and
Filter B.
The filters will produce very different results depending on
the selected filter type. The selections will change slightly
according to the selected Filter Routing, to show the correct
cutoff slope in dB per octave.
Low Pass. This cuts out the parts of the sound which are
higher than the cutoff frequency. Low Pass is the most
common type of filter, and is used to make bright timbres
sound darker.
High Pass. This cuts out the parts of the sound which are
lower than the cutoff frequency. You can use this to make
timbres sound thinner or more buzzy.
Band Pass. This cuts out all parts of the sound, both highs
and lows, except for the region around the cutoff frequency.
Since this filter cuts out both high and low frequencies, its
effect can change dramatically depending on the cutoff
setting and the oscillator’s multisample.
With low resonance settings, you can use the Band Pass
filter to create telephone or vintage phonograph sounds.
With higher resonance settings, it can create buzzy or nasal
timbres.
Band Reject. This filter type–also called a notch filter–cuts
only the parts of the sound directly around the cutoff
frequency. Try modulating the cutoff with an LFO to create
phaser-like effects.
Filter Types and Cutoff Frequency
Oscillator
Filter A (Low Pass)
Filter B (High Pass)
Low Pass
High Pass
Band Pass
Band Reject
Cuto Frequency
46
Page 53

Detailed Program Editing Using Filters
Low resonance
High resonance
Resonance
Resonance emphasizes the frequencies around the cutoff
frequency, as shown in the diagram below.
When this is set to 0, there is no emphasis, and frequencies
beyond the cutoff will simply diminish smoothly.
At medium settings, the resonance will alter the timbre of the
filter, making it sound more nasal, or more extreme. At very
high settings, the resonance can be heard as a separate,
whistling pitch.
To make the resonance track the keyboard pitch, see “Key
Follow,” on page 67 of the PG.
Modulating the filters
Filter EG
The Filter EG is a multi-stage envelope, which you can use
to modulate the filter (naturally!) as well as other Program
parameters. The EG itself is set up on the Filter EG tab; the
way that it affects the filters is controlled by the parameters
described below, on the Filter Mod tab:
The Intensity to A and Intensity to B settings control the
basic amount of EG modulation for filter frequencies A and
B, respectively, before other modulation.
The Velo ci ty to A and Vel o ci ty to B settings let you use
velocity to scale the amount of EG modulation.
The AMS setting selects a AMS modulation source to scale
the amount of the Filter EG applied to Filters A and B. The
two filters share a single AMS source, with separate
intensity settings.
LFO modulation
You can modulate the filter via LFO1, LFO2, and the
Common LFO. Among other applications, LFO modulation
of the filter can produce the classic “auto-wah” effect.
The Filter LFO Mod tab lets you set up the following
parameters separately for each LFO:
Intensity to A and Intensity to B specify how much the
LFO changes the tone.
JS-Y Intensity to A and JS-Y Intensity to B specify the
depth of the wah effect produced by the LFO when the
joystick is moved toward yourself, or when CC#2 is
received.
The AMS setting selects a AMS modulation source to scale
the amount of the LFO applied to Filters A and B. The two
filters share a single AMS source, with separate intensity
settings.
For example, if “AMS” is set to “After Touch”, aftertouch
will be received via MIDI and an auto-wah effect will be
applied.
As another example, if SW1 is set to SW1 Mod. (CC#80)
on the Set Up Controllers page, and AMS is set to
SW1Mod. (CC#80), and the AMS Intensity is set to an
appropriate value, an auto-wah effect is applied when you
turn on SW1.
You can modulate the filter cutoff frequency using the Filter
EG, the LFOs, keyboard tracking, and other built-in and
MIDI controllers. This is a great way to add a rich variety of
tonal change to the sound.
Keyboard Track
Most acoustic instruments get brighter as you play higher
pitches. At its most basic, keyboard tracking re-creates this
effect by increasing the cutoff frequency of a lowpass filter
as you play higher on the keyboard. Usually, some amount
of key tracking is necessary in order to make the timbre
consistent across the entire range.
The NAUTILUS keyboard tracking can also be much more
complex, since it allows you to create different rates of
change over up to four different parts of the keyboard. For
instance, you can:
• Make the filter cutoff increase very quickly over the
middle of the keyboard, and then open more slowly–or
not at all–in the higher octaves.
• Make the cutoff increase as you play lower on the
keyboard.
• Create abrupt changes at certain keys, for split-like
effects.
47
Page 54
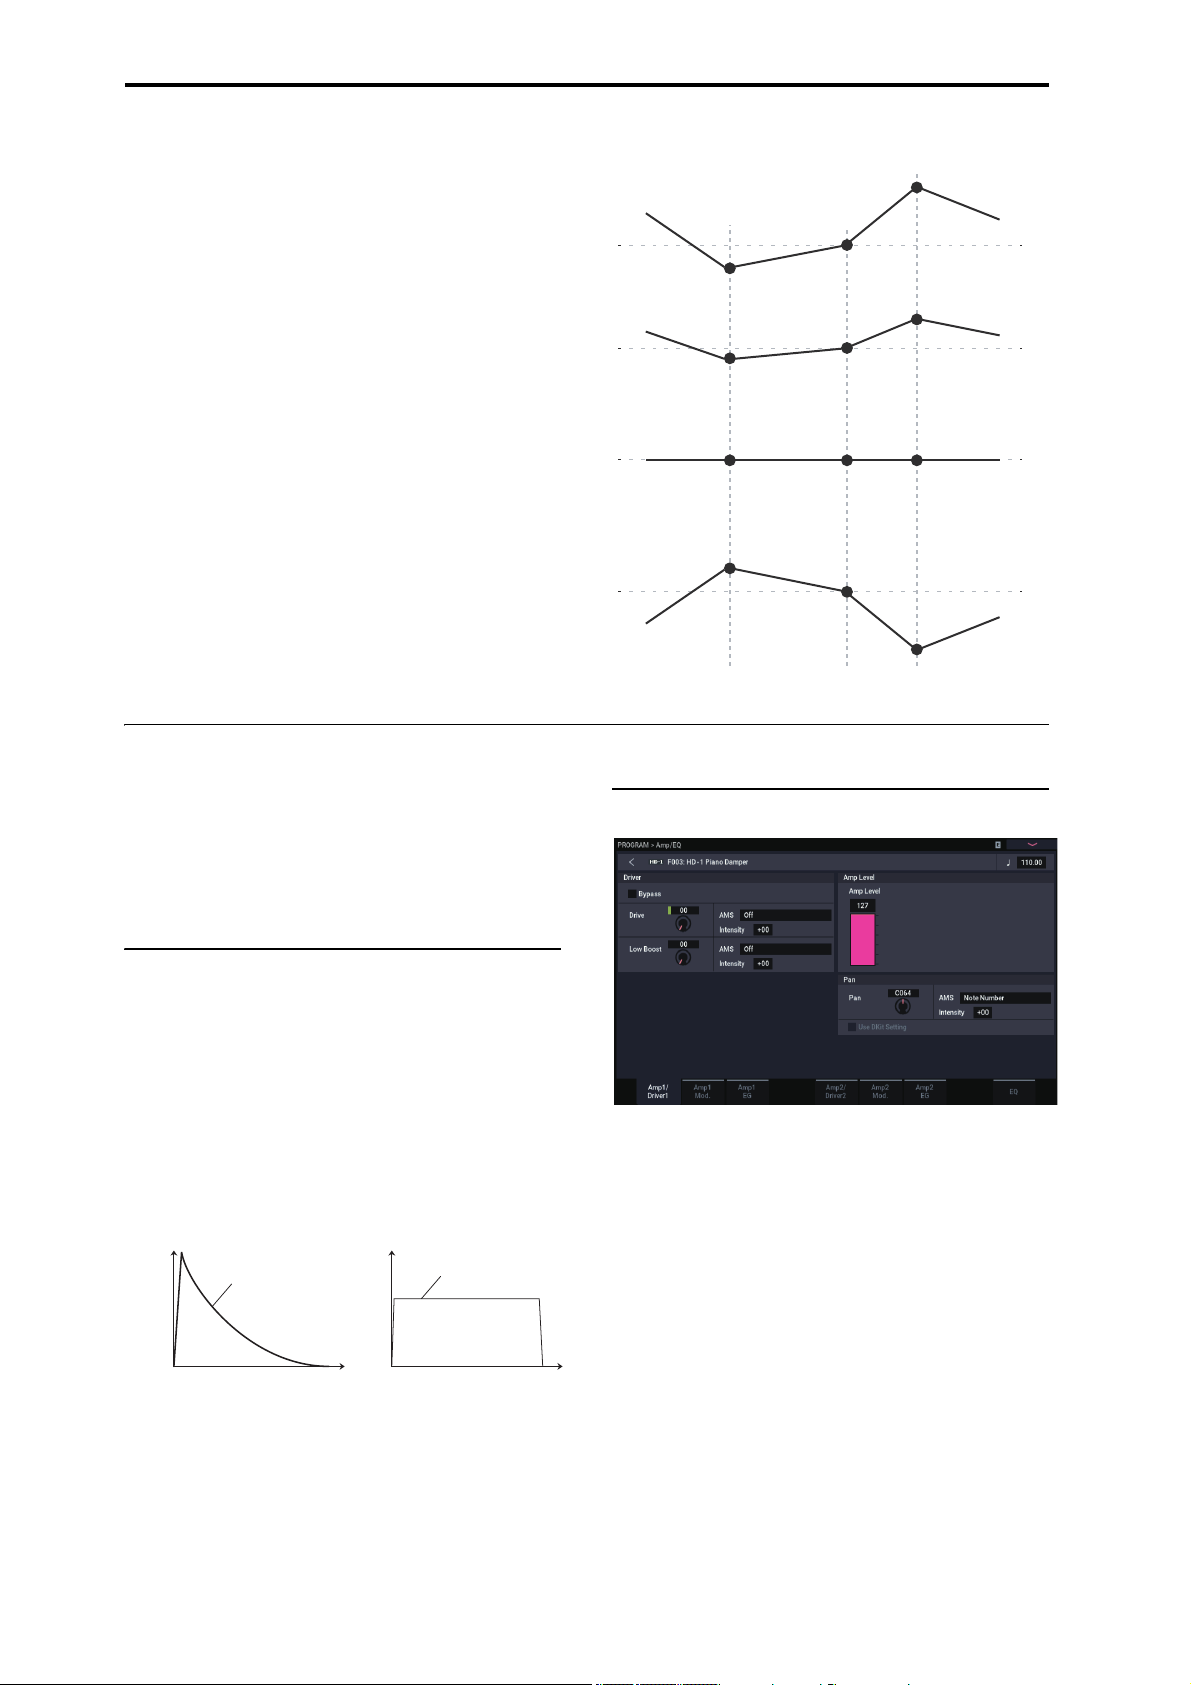
Playing and editing Programs
Low Break Key Center Key High Break Key
Intensity = +99 (Original Shape)
Intensity = –99 (Inverted)
Intensity = +50 (Less Eect)
Intensity = 0 (No Eect)
How Key Track works: Keys and Ramps
The keyboard tracking works by creating four ramps, or
slopes, between five keys on the keyboard. The bottom and
top keys are fixed at the bottom and top of the MIDI range,
respectively. You can set the other three keys–named Low
Break, Center, and High Break–to be anywhere in between.
The four Ramp values control the rate of change between
each pair of keys. For instance, if the Low-Center Ramp is
set to 0, the value will stay the same between the Low Break
key and the Center key.
You can think of the resulting shape as being like two
folding doors attached to a hinge in the center. At the Center
key (the main hinge), the keyboard tracking has no effect.
The two folding doors swing out from this center point to
create changes in the higher and lower ranges of the
keyboard.
Intensity to A and Intensity to B adjust the effect that
keyboard tracking will have on filters A and B. For more
information, see “3–2a: Keyboard Track,” on page 65 of the
PG.
AMS Modulation
In addition to the EG, LFOs, and Key Track, you can use
two AMS sources to modulate the filters.
Keyboard Track Shape and Intensity
Using the Amp section
The Amp section includes controls for volume, pan, and the
driver circuit. You can control the volume using the Amp
EG, LFO 1/2, Key Track, and velocity, along with other
AMS sources.
Each Oscillator has its own Amp section: Amp1 for OSC1,
and Amp2 for OSC2.
Background: what does “Amp” mean?
Different sounds have characteristic shapes to their volume
levels.
For example, the volume of a piano note begins at a high
volume the instant you play the note, and then decreases
gradually.
The volume of an organ note, on the other hand, remains
constant as long as you continue pressing the key.
The volume of a note on a violin or wind instrument can be
varied during the note by the musician (i.e., by regulating the
amount of pressure on the bow or the force of the breath).
Volume
Piano
Volume decays gradually
Time
Volume
Organ
Volume remains constant
until note is released
Time
Pan
Pan
The main Pan parameter controls the stereo position after
the signal has passed through the oscillator, filter, and amp.
Normally you’ll set this to C064, so that the sound is
centered equally between the left and right speakers.
To create a stereo effect when Oscillator Mode is set to
Double, set the Amp1/Driver 1 page Pan to L001, and the
Amp2/Driver2 page Pan R127. This will make OSC1 go to
the left speaker, and OSC2 go to the right speaker.
With a setting of Random, the pan will change randomly
each time you play a note on NAUTILUS, producing an
interesting effect.
48
Page 55

Detailed Program Editing Using the Amp section
Pan AMS and Intensity
Intensity specifies the depth of the pan modulation from the
selected AMS source.
If you set AMS to Note Number, the pan will change
according to the keyboard position of each note played. With
a setting of LFO1 or 2, the sound will sweep from side to
side, creating an auto-pan effect. Other settings allow you to
move the oscillator pan by using a RT controller, an
envelope, or other modulation sources.
Pan - Use DKit Setting
Use DKit Setting applies when Oscillator Mode is set to
Drums. If this is checked, the Program can use a different
pan position for each drum sound, as specified by the Drum
Kit. If this is unchecked, all drum sounds will use the
Program’s pan position. The factory presets and GM drum
kits use individual pan positions for the different drums, so
normally it’s best to leave this checked.
Amp modulation
The basic volume level is set by the Amp Level parameter.
You can then alter this using the modulation sources below:
Keyboard Track
This lets you vary the volume relative to the note you play.
For more information, see “Keyboard Track” on page 47.
Amp Modulation
Velocity Intensity is used by most programs to decrease the
volume of softly played notes and increase the volume of
strongly played notes, and the Amp Modulation parameter
adjusts the depth of this control. Normally you will set Amp
Modulation to positive (+) values. As this setting is
increased, there will be greater volume difference between
softly played and strongly played notes.
Amp EG
The Amp EG lets you control how the volume changes over
the course of a note.
Every instrument has its own characteristic volume
envelope. This is part of what gives each instrument its
identifiable character.
Conversely, by changing the volume contour—for instance,
applying a string-like Amp EG curve to an organ
multisample—you can produce interesting and unusual
sounds.
Piano
Organ
Strings
Drive
The Drive circuit adds saturation and overdrive to the sound,
for everything from subtle fattening to drastic distortion.
Unlike an overdrive effect, Drive processes each voice
individually, so the timbre stays the same regardless of how
many voices are being played.
The two main parameters, Drive and Low Boost, work
together to create the overall effect.
Drive controls the amount of edge and bite in the timbre.
Low settings will produce mild saturation, and higher
settings create more obvious distortion.
Often, it’s useful to increase the Low Boost along with the
Drive.
Note: Even when the Drive amount is set to 0, the Drive
circuit still affects the timbre. If your goal is a completely
pristine sound, use the Bypass control instead.
Low Boost is a special low-frequency EQ which controls the
body character of the sound. The specific EQ frequencies
affected will change with the Drive setting.
Higher amounts increase the bass boost, and will also
intensify the effect of the Drive parameter.
LFO1/2
Specifies how the LFOs will produce cyclic changes in
volume (tremolo effect).
The volume will be affected by the LFO(s) for which you set
an LFO1 Intensity, LFO2 Intensity value.
Intensity (AMS Intensity) adjusts the depth by which the
tremolo effect produced by the LFO will be affected when
you assign an AMS (LFO1 AMS, LFO2 AMS).
For example if you set AMS to JS-Y (CC #02), tremolo will
be applied when you move the joystick of NAUTILUS
toward yourself, or when CC#02 is received.
49
Page 56

Playing and editing Programs
Using EXi
In EXi Programs, you can select one or two EXi to be split or
layered together. Each EXi has its own sonic character and
different pages of parameters.
To select different EXi:
1. Select an EXi Program.
Note: EXi Programs are stored in EXi Banks, separate
from HD-1 Programs. Depending on settings, any bank
except for INT-G may be an EXi bank.
2. Press the PAGE button, and then press the PAGE
SELECT Common button.
3. Press the Basic/X-Y/Controllers button.
4. Press the Program Basic tab.
The Program Basic page appears.
5. Under EXi 1 Instrument Type, at the top left of the
display, select any of the EXi.
You can also select a second EXi under EXi 2 Instrument
Type, but for now let’s concentrate on EXi 1.
6. Press the PAGE button, and then press the EXi 1
button, such as the PAGE SELECT SGX-2.
SGX-2 Premium Piano
Redefining the workstation piano
You’ve never heard a piano like this on a workstation. Every
note is sampled in stereo at up to 12 velocity levels with no
loops, for smooth response and natural decays—plus
multiple velocity layers of true damper resonance, along
with modeled string resonance. Additionally, some sounds
include dedicated Una Corda samples.
The SGX-2 also provides the exceptionally high polyphony
that real acoustic piano sounds require—up to 100 dualstereo notes, the equivalent of 400 mono voices.
String Resonance
When a note is played on a piano, any other un-damped
strings will resonate slightly, with an intensity corresponding
to their harmonic relationship to the played note. An extreme
example of this is heard when the damper pedal is down, at
which point all of the strings resonate together. However, it
also happens whenever a note is played while one or more
other harmonically related notes are held—even when the
damper pedal is off. For instance, if you hold C2 and then
sharply play and release C3, you’ll hear a faint echo of the
C3 ringing from the C2 string.
The SGX-2’s modeled string resonance can be turned on and
off for each individual Program. To turn it on, go to the
PROGRAM > SGX-2: String Resonance/Una Corda page,
enable the String Resonance check-box, and set the Depth as
desired. For more information, see “5–1a: String Resonance”
on page 354 of the PG.
50
The pages for the selected EXi appear.
Page 57

Detailed Program Editing Using EXi
EP-1 MDS Electric Piano
New technology, classic sounds
The EP-1 provides incredible recreations of six classic tine
and reed electric pianos, along with modeled vintage effects.
Based on Korg’s Multi-Dimensional Synthesis (MDS), the
EP-1 delivers natural real-time expression without the
limitations of ordinary sample playback. For instance, you’ll
appreciate the natural decay and astonishingly smooth
gradation of dynamics from pp to ff, without tell-tale split
points - just like the real instruments.
RT control over noise elements, including mechanical keyoff noises controlled by release velocity, gives your
performances even greater realism and detail.
CX-3 Tonewheel Organ
Modeled organ with drawbar control
Based on Korg’s ground-breaking CX-3 keyboard (with
additional refinements), the CX-3 is a detailed tone-wheel
organ model with live drawbar control,
Perfect tone-wheel phase coherency means solid, powerful
sounding chords just like the real thing. A choice of tone
wheel types, adjustable overtones, leakage, noise, and keyclick modeling provide unparalleled realism.
Amp modeling, Vibrato/Chorus, and Rotary Speaker effects
are built in. EX mode lets you introduce additional drawbar
and percussion harmonics, for new timbres unavailable on
traditional organs.
AL-1 Analog Modeling Synthesizer
PolysixEX
Rich-sounding, versatile, and easy-to-use synth
With its self-oscillating four-pole filter, smooth analog
oscillator and sub-oscillator, and rich, built-in chorus and
ensemble effects, the PolysixEX proves you don’t have to be
fancy in order to be great.
Based on the classic Korg Polysix analog synth, its timbre is
distinctly different from the AL-1 and the MS-20EX, but we
didn’t stop there; we added modulation of every control on
the front panel, for a world of sounds impossible on the
original.
It’s also very well-suited to hands-on control with Tone
Adjust for almost all of the original Polysix controls. As a
bonus, it’s also capable of extremely high polyphony—up to
180 voices!
STR-1 Plucked String
Physical modeling, from the real to the fantastic
Physics has brought us lasers, cell phones, electric cars—and
now the STR-1. What would it sound like to play harmonics
on a metal bar “plucked” by a piano, or to sing into a guitar
string? Play with the STR-1 and discover.
In addition to unique, experimental timbres, the STR-1 is
great for traditional instruments from guitars, basses, harps,
and world/ethnic sounds to clavinets, harpsichords, bells,
and electric pianos.
You can also process samples and live audio input through
the physical model—including audio feedback from any of
the NAUTILUS effects.
Modern virtual analog synth
The AL-1 is our feature-packed, modern virtual analog
synth. Its patented ultra-low-aliasing oscillators (using
completely different technology than the HD-1) recreate all
the power and glory of true analog synthesis—without the
artifacts that can plague lesser instruments.
Morphing waveforms allow you to change the oscillator
shapes in real-time. Resonance modeling lets you choose
between classic filter sounds, and the extraordinarily flexible
MultiFilter lets you create your own hybrid filter shapes.
Hard sync, analog-style FM, drive, low-boost, and ring
modulation offer plenty of tone-twisting power.
MS-20EX
Patch-panel synth with unique, aggressive tone
A dramatic expansion of Korg’s classic MS-20 analog synth,
the MS-20EX puts modular patch cables under your
fingertips. Modulate filters with audio-rate oscillators; turn
audio inputs into control signals; control all of the original
knobs with mod sources including additional envelopes,
LFOs, and RT controllers.
It’s a tweaker’s dream, but even without the patch panel, the
MS-20EX would make waves with its unique, aggressive
tone—due in large part to its unusual filters, which are
completely different from those in either the AL-1 or the
PolysixEX.
MOD-7 Waveshaping VPM Synthesizer
Patch-panel VPM/waveshaping/PCM processor
Combine Variable Phase Modulation (VPM), waveshaping,
ring modulation, samples, and subtractive synthesis with a
modular patch-panel system, and you have the MOD-7.
Exceptionally versatile, it offers everything from classic FM
keyboards, bells and basses (including the ability to import
sounds from vintage DX synths) to rhythmic soundscapes
and sparkling, epic pads.
Vast sample-mangling capabilities, with incredible
flexibility and power, let you create incredibly rich
processing environments: combine multiple stages of
filtering, waveshaping, and ring modulation, even use
samples as FM modulators, all patched together however
you like.
51
Page 58

Playing and editing Programs
X-Y CC Control
X-Y CC MIDI Output
Vector Synthesis System
X-Y Volume Control
X-Y Envelope
X-Y control
X-Y control
MIDI In
X-Y X and Y modes
Program switch:
Enable CC control
Program switch:
Enable Volume control
Global switch (GLOBAL > MIDI):
X-Y MIDI Out
X-Y control
X-Y CC Control
scale
X+/– and Y+/–
CC Assignments
X-Y CC Modulation of
Program and FX Parameters
X-Y Modulation of
Oscillator Volume
Osc 1/2 Center Volume
and Equal Power settings
X-Y CC MIDI Output
Global Controllers
MIDI CC Assignments
Defaults: X=118, Y=119
+127
+127–127
Y-Axis
X-Axis
0
0
Using Vector Synthesis
Vector Synthesis lets you control Program and Effects
parameters by using the programmable X-Y Envelope set by
X-Y pad on the display.
What does Vector mean?
Modulation generally works by moving a single control. like
a slider, in a straight line. At one end of the control, the
modulation is at its minimum; at the other end, it’s at its
maximum.
Vector Synthesis is a little different. It works by moving
around a point on a two-dimensional plane, both left-right
and up-down.
You can think of this point as being positioned on two
different lines at once: a left-right line (the X axis), and an
up-down line (the Y axis).
In other words, instead of just having one value (like a
slider), each X-Y point has two values: one for X, and one
for Y. See the graphic below for an example.
X-Y Point and X and Y axis values
X-Y Point
+127
Y value: +50
Y-Axis
0
X value: –90
0
X-Axis
+127–127
You can also use the X-Y Envelope to move its position
automatically over time, as shown below.
X-Y Envelope moving the X-Y Point
52
Page 59

X-Y control Volume Control and CC Control
The X-Y control does two main things: it can control the
relative volume of the two Oscillators in PROGRAM mode
(or of up to 16 Programs at once in COMBINATION mode),
and it can generate CCs for controlling Program and Effects
parameters.
X-Y control and MIDI
The X-Y control features interact with MIDI through the XY CC Control.
The X-Y CC Control is generated by the X-Y position.
Normally, this will only affect internal sounds and effects. If
you like, however, you can also enable a Global parameter to
send these generated CCs to external MIDI devices.
For more information on Vector Synthesis, see “1–5: X-Y
Control” on page 41 of the PG.
Effects
Effects are covered in their own section of the manuals, so
we won’t go into too much detail here. See the crossreferences below for more information.
Detailed Program Editing Effects
Insert Effects
Insert Effects let you send either individual Oscillators or the
entire Program through up to 12 effects, in series. You can
use any type of effects, from distortions and compressors to
choruses and reverbs. The Insert Effects can be routed to the
main outputs, or to any of the individual outputs.
For more information, see “Insert effects” on page 223.
Master Effects
There are two Master Effects, which are accessed through
Sends 1 and 2. These are best-suited to effects such as
reverbs and delays, but you can use them with any type of
effect.
For more information, see “Master effects” on page 224.
Tota l Ef fec ts
The two Total Effects are dedicated to processing the main
L/R outputs. They’re ideally suited to overall mix effects,
such as compression, limiting, and EQ–but as with the other
effects sections, you can use any type of effect that you like.
For more information, see “PROGRAM > MFX/TFX” on
page 107 of the PG.
53
Page 60

Playing and editing Programs
54
Page 61
Playing and editing Combinations
Playing Combinations
What’s a Combination?
Combinations, or “Combis” for short, let you split and layer
up to 16 Programs at once.
A Combi is made up of 16 Timbres. Each Timbre has a
Program, along with parameters for key and velocity zones,
mixer settings, MIDI channel and controller filtering, and so
on.
Selecting Combinations
Overview: Combination Banks
NAUTILUS ships from the factory with 256 of factoryprogrammed Combinations. You can create your own
original combinations by editing these factory-set
combinations, or by initializing a combination and starting
“from scratch.”
You can use 1792 combinations to store sounds that you’ve
created, or to add optional sound libraries.
These Combinations are organized into 14 Banks of 128
Combinations each, as described below. You can also store
many more Combinations on the internal drive, or on
external USB 2.0 devices.
For more details on the factory Combinations, please refer to
the Voice Name List.
Combination bank contents
Bank No. Description
A, B 000…127 Factory Combinations
C...N 000…127 User Combinations
As with Programs, each Combi has 12 Insert Effects, 2
Master Effects, and 2 Total Effects, for shaping and
transforming the sounds of the individual Timbres. Finally,
combis can use two arpeggiators and drum tracks or step
sequences.
Selecting Combination with the frontpanel and LCD
1. Press the MODE button and select COMBINATION
on the display to enter COMBINATION mode.
2. Go to the COMBINATION > Home– Mixer page.
“PROGRAM > Home” will be displayed on the top row
of the display, and the Overview/Mix Balance tab on the
bottom row will be selected.
If a different page is shown, press the EXIT button
several times.
The Mixer page shows the selected Program, status, pan,
and volume for timbres 1–16.
3. Make sure that the Combination name is selected.
If it is not selected, touch the COMBINATION > Home
page and touch the Combination’s name, so that it’s
selected.
4. Use the VALUE controllers to select the Combination
number that you wish to play.
There are several different ways to select Combinations.
Each one is convenient in a different way:
• Using the VALUE controllers, you can select
Combinations quickly via physical controls
• Selecting by Bank and number (via the touch-screen) lets
you browse through all of the Combinations in memory,
to find the one that you want
• Selecting by Combination category (via the touchscreen) lets you filter Combinations by sound type, such
as Pianos or Drums
• Using Find (via the on-screen magnifying-glass icon)
lets you search for Combinations by name
• Using a foot-switch lets you change Combinations even
while both hands are busy playing on the keyboard convenient for live applications
• MIDI program change messages let you select
Combinations remotely, from either -a MIDI sequencer
or an external MIDI controller
Set Lists
Combinations can also be selected in Set Lists, along with
Programs and Songs. For more information, see “Set Lists”
on page 113.
You can use the following methods to select a Combination.
•Turn the VA L U E dial.
• Press the + or − buttons.
55
Page 62

Playing and editing Combinations
Combination Select
popup button
Combination Select
Pan
Volume
Program Select
Timbre 01
Favo rite
Selecting by Bank and number
You can select Combinations from a list organized by
Combination bank.
1. Press the Combination Select popup button.
Press the Bank(List) button at the bottom of the screen.
The Bank/Combination Select dialog appears.
Bank/Combination Select menu:
In this illustration, bank A is selected. The list on the
right shows the Combinations contained in that bank.
2. Press the buttons on the left side of the display to
select a bank.
3. Press one of the names in the list to select a
Combination.
The selected Combination will be highlighted, and the
keyboard will immediately switch to the new sound.
Press the “Bank (10key)” button to switch the list to a
numeric keypad, where you can input the number to
select.
4. If you like, play a few notes to hear the new
Combination.
You can play the new Combination while the menu is
still showing, without needing to press OK.
5. When you are satisfied with the selected Combination,
press the OK button to close the popup menu.
If you press the Cancel button, the selection you made
here will be discarded, and you will return to the
Combination that had been selected before you opened
the menu.
56
Page 63

Playing Combinations Selecting Combinations
Selecting by Category
You can select Combinations from within a category, such as
keyboard, organ, bass, and drums. When shipped from the
factory, the Combinations are organized into 16 categories,
each with several sub-categories. There are also 2 more
categories, initially named User 16 and User 17, which you
can use and rename as desired.
1. Press the Combination Select popup button.
Press the Category button at the bottom of the screen.
The Category/Combination Select dialog appears.
Category/Combination Select menu
In the illustration above, the Keyboard category is
selected. The combinations included in that category will
be shown.
2. Press the tabs located to the left and right sides of the
display to select a different category.
The name of the selected category will be displayed in
full in the upper right of the display.
3. Optionally, focus on a more specific group of sounds
by selecting a sub-category from the upper part of the
display.
The full name of the sub-category also appears in the
upper right of the display.
4. Press one of the Combination names in the center area
to select a Combination.
The selected Combination will be highlighted.
5. Play the keyboard to hear the combination you
selected.
While the menu is displayed, you can switch
combinations without pressing the OK button to check
out different sounds.
6. Select the
menu to show all combinations for which the favorites
function has been turned on.
The check box will be disabled if there are no
combinations in the selected category that have their
favorite settings turned on.
7. When you are satisfied with the selected Combination,
press the OK button to close the popup menu.
If you press the Cancel button, your selection will be
discarded, and you will return to the Combination that
had been selected when you opened the popup menu.
(Favorite) check box at the top of the
Using the Find feature
On the Bank/Combination Select menu, and
Category/Combination Select menu, you’ll see a button
marked with a magnifying glass. Pressing this button brings
up the Find dialog. You can use Find to search for
Combinations by name.
Using the Favorites check-box
The Bank and Category select pop-ups both include a
Favorite check-box at the bottom of the screen. This lets
you trim the list to show only Combinations you’ve marked
as favorites. For more information, see “Using the Favorites
check-box” on page 27.
Using a footswitch to select
Combinations
You can assign a footswitch to step through Combinations
one by one, either going up (0, 1, 2, 3, etc.) or going down
(3, 2, 1 etc.). This lets you change Combinations without
using your hands–great for quick Program changes in live
performance situations.
For more information, see “Using a footswitch to select
Programs” on page 28.
Selecting Combinations via MIDI
You can send MIDI Program Change messages to
NAUTILUS from external MIDI devices, such as computer
sequencers or other MIDI controllers. In conjunction with
MIDI Bank Select, you can use these to select any
Combination from all 14 Banks.
For more information, see “Selecting combinations,” on
page 932 of the PG.
57
Page 64

Playing and editing Combinations
Easy Combination editing
Changing the Programs within a Combi
Changing the Programs assigned to the 16 Timbres is a
quick way to dramatically alter the sound of the
Combination.
Selecting Programs for Combi Tracks
To change the Program assigned to a Timbre:
1. Go to the COMBINATION > Home– Mixer page.
This page shows all 16 Timbres at once, including their
Program assignments, volume, pan, play/mute, solo, and
more.
2. Press Program Select of Timbre 1.
3. Select program using +, − buttons or VALUE dial.
Note that the new Program is now selected for Timbre 1.
4. Press Program Select of Timbre 1 again.
It brings up a window which lets you select Programs by
Category or, Bank–again, just like the similar window in
PROGRAM mode.
5. Select a different Program, and press OK.
The Program in the Timbre is now changed to the one
you just selected.
Adding a timbre
You can add timbres when selecting an InitCombi to make a
new combination, or when the combination is not using all
16 timbres.
1. Press an unused timbre (a timbre on which the “+”
button is displayed).
2. Change the program and each setting of the timbre
you added.
For timbres that have been added, the “Status” will be set
to “INT”, and “MIDI” will be set to “Gch”.
Note: To disable a timbre, turn its “Status” to “Off” on
the COMBINATION > Home– Mixer– Status Play/Mute
page. (See “Status” on page 379 of the PG.)
Adjusting the mix
You can set the volume, pan, and EQ settings for each
Timbre.
Setting the volume and pan for each
Timbre
1. Go to the VOLUME tab on the COMBINATION >
Home– Mixer page.
This page shows the volume, pan, play/mute, solo, and
Program assignments for all 16 Timbres.
2. Select the on-screen Volume slider for Timbre 1.
3. Use the VALUE dial, or the numeric keypad
displayed by pressing the same number to set the
volume as desired.
58
4. Select the on-screen Pan knob for Timbre 1, and edit
its value as desired.
Timbre pan interacts with the pan stored in the Program. A
setting of C064 reproduces the Program’s oscillator pan
settings. Adjusting the Timbre Pan will move the sound to
left or right while preserving the pan relationship between
the oscillators. A setting of L001 is far left, and R127 is far
right.
Page 65

Quick Layer/Split
Quick Layer Quick Split
Quick Layer/Split Quick Layer example: adding strings to a piano Combination
The Quick Layer/Split feature makes it easy to create simple
layers and splits. Starting with either a Program or
Combination, you can add another Program as a layer, or
split the keyboard so that the current sound plays on one side
of the keyboard (either upper or lower), and a different
Program plays on the other.
All of the Quick Layer/Split controls are non-destructive and
While you can start with either a Program or a Combination,
the additional split or layer sound must always be a Program,
and the results of Quick Layer/Split are always saved as a
new Combination. After saving, you can then edit the new
Combination as desired.
For more basic details on Quick Layer/Split, see “Quick
Layer/Split” on page 35.
reflected immediately when playing on the keyboard. You
can experiment with different settings, and fine-tune until
you find the perfect sound.
Quick Layer example: adding strings to a piano Combination
Quick Layer dialog
Program Select (Layer)
Octave (Layer)
Solo (Layer)
Volume (Layer)
Zone
Combination Select
(Main)
Octave (Main)
Select ARP/DRUM
Layer/Main
Tempo
Volume Drum Track
Here, we’ll walk through a typical use of Quick Layer:
adding a string layer to a piano sound. Many of the steps are
identical to the Quick Layer functionality in PROGRAM
mode, but there are a few differences unique to
COMBINATION mode. Let’s start with the piano:
1. In COMBINATION mode, select a piano sound-for
instance, A000: Piano & Constant Voices.
For details on how to select a Combination, see
“Selecting Combinations” on page 55.
Quick Layer and Quick Split buttons
Volume (Main)
Solo (Main)
Write Layered
Combi
2. Press the Quick Layer button.
The Quick Layer dialog box opens (see the “Quick Layer
dialog,” above).
This dialog box lets you make all of the basic settings for
the new layered sound. First, we’ll select a strings
Program to layer with the piano.
3. Press the Program Select P opup in the LAYER PROG
section, and choose the Strings category. Select the
Program H048: Small Pop Strings, and press OK.
You can also select Programs by bank and number, or by
using Find. For more information, see “Selecting by bank
and number” on page 26, “Selecting by Category” on
page 27, and “Using the Find feature” on page 27.
When you play the keyboard, you’ll now hear a layered
sound with piano and strings. The strings will sound close
to the way that they do in PROGRAM mode, including
their insert effects (IFX), but they will now use the
Master and Total Effects (MFX and TFX) of the piano
Combination. For more information, see “Limitations of
Quick Layer/Split” on page 62.
If you like, you can also select a different Main
Combination, using the controls in the MAIN COMBI
section.
59
Page 66

Playing and editing Combinations
4. Set the Volume and Octave of the Main Combination
and the Layer Program as desired.
You can adjust the relative levels of the piano and strings,
and change the octave transposition of one or both
sounds. For example, you could reduce the volume of the
strings, and set them to play an octave above the piano.
The Main Combination Volume adjusts the overall
volume while maintaining the balance between individual
Timbres. Internally, it does so by controlling the Timbre
Volume sliders. In order to maintain the original balance,
the editing range when increasing volume is
automatically restricted; once any of the Timbres reaches
its maximum volume setting, the overall volume will not
rise any further.
Since this is a relative adjustment, the parameter will
always start at the default of +000 (no change).
+001...-127 lowers the volume, and +001...+127 raises
the volume.
5. Under “Select ARP/DRUM,” choose to use the
ARP/DRUM from either the Main Combination or
Layer Program.
Note: When the ARP button is turned on, playing with
the arpeggiator will be enabled. The notes that play will
follow the selected ARP/DRUM settings. When the
DRUM button is turned on, the notes that play will be
controlled by the Drum function.
The Tempo is initially set to match the selected Drum;
you can then change it as desired. Note that you can’t use
both ARP/DRUMs simultaneously.
6. Adjust the Drum Volume as desired.
If the Drum Track plays only one Timbre, that Timbre’s
volume is adjusted directly. If the Drum Track plays
multiple Timbres, the overall volume is adjusted while
maintaining the balance between the Timbres, just like
the Main Combination Volume as described above.
Writing the results
1. When you’ve finished editing your layered sound,
press the Write Layered Combi to save it as a
combination.
The Write Combination dialog box appears.
2. Press the popup button next to Combination to bring
up the save location dialog, and select a location to
save the edited Combination.
3. Set the name and category as desired.
The system automatically creates a new name based on
the names of the two original sounds. You can edit this
name as desired.
4. Press the OK button to write the Combination.
A confirmation message appears. Press the OK button
once again to complete the Write operation.You’ll return
to COMBINATION mode, with the new Combination
selected.
For more information, see “Writing Programs and
Combinations” on page 205.
If you press the Cancel button, the save operation is
canceled.
60
Page 67
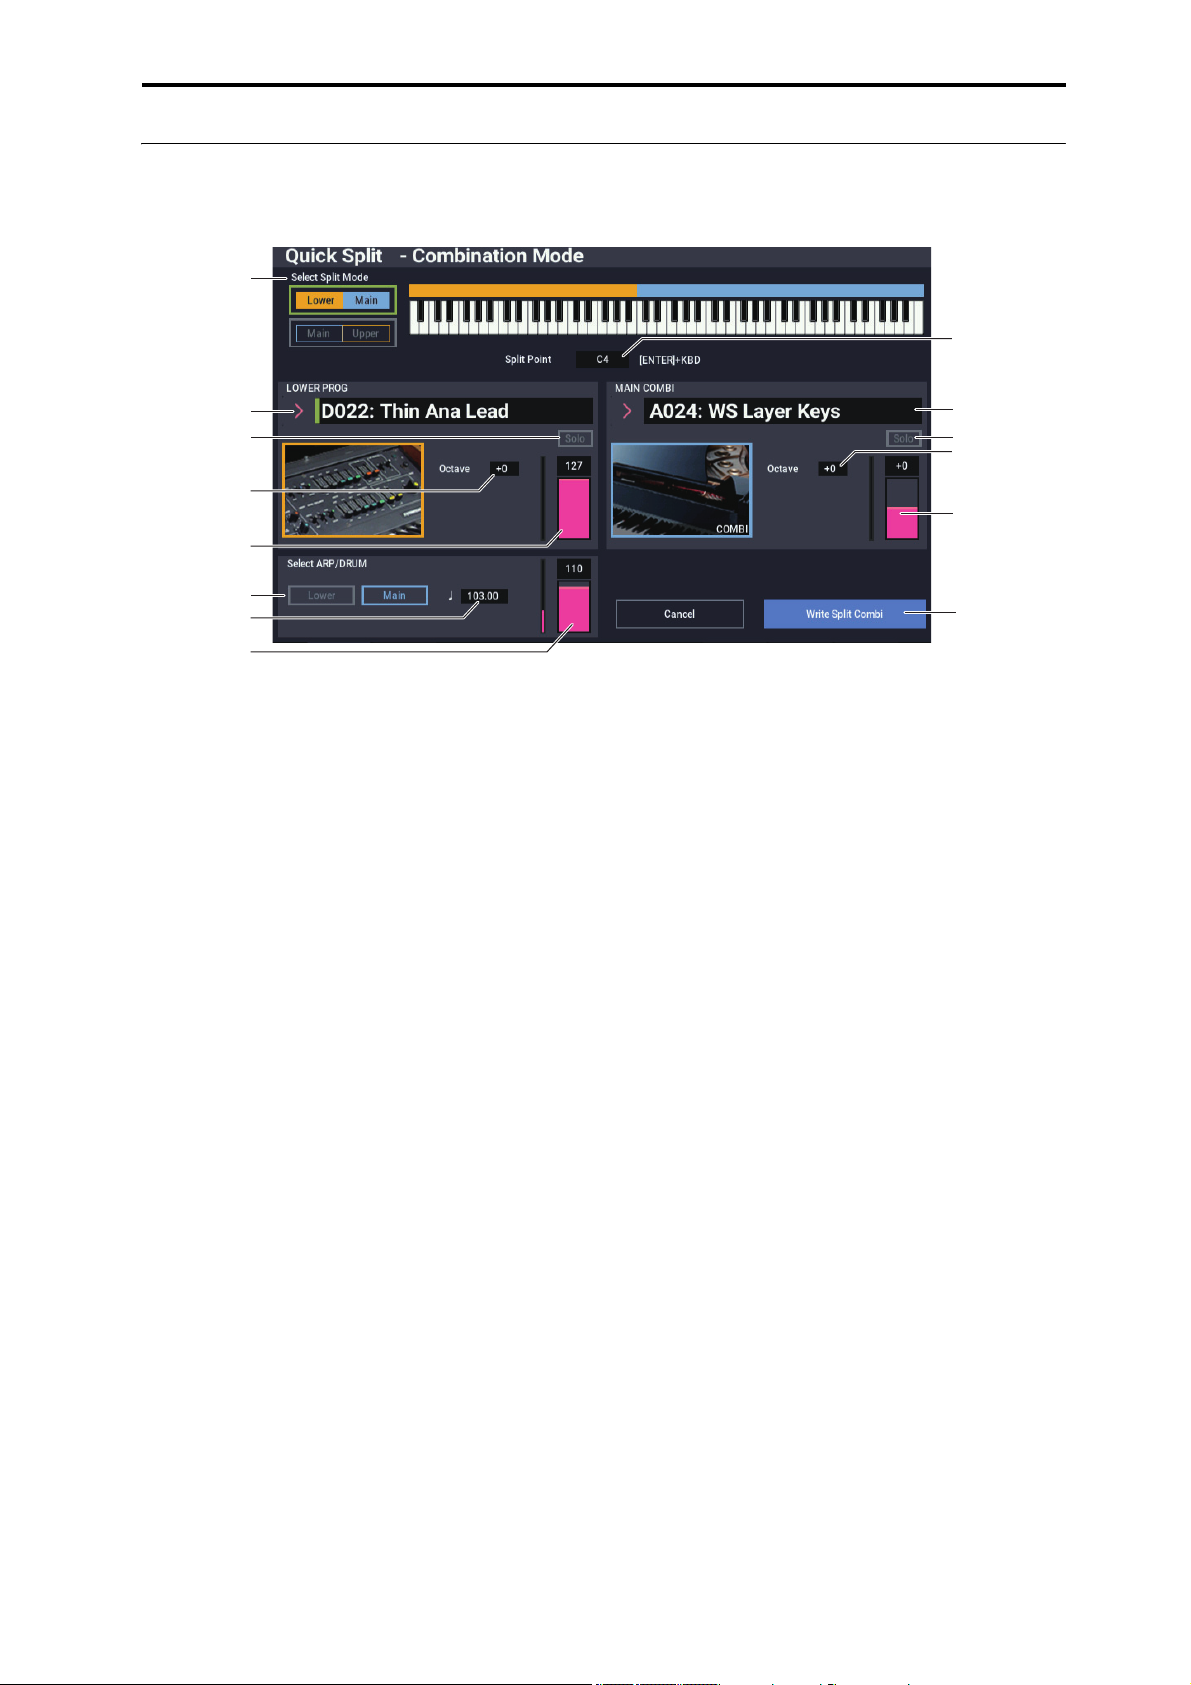
Quick Layer/Split Quick Split example: adding a lead synth to a Combination
Solo (Lower)
Volume Drum Track
Tempo
Select Split Mode
Octave (Lower)
Write Split Combi
Program Select
(Lower)
Select ARP/DRUM
Lower/Main
Volume (Lower)
Split Point
Octave (Main)
Solo (Main)
Combination Select
(Main)
Volume (Main)
Quick Split example: adding a lead synth to a Combination
Quick Split dialog
Quick Split makes it easy to create common setups, such as
piano for the right hand and bass below for the left, or piano
for the left hand and a lead synth for the right. Let’s walk
through the second example: a piano and lead split.
1. In COMBINATION mode, select a piano sound-for
instance, A024: WS Layer Keys.
For details on how to select a Combination, see
“Selecting Combinations” on page 55.
2. Press the Quick Split button, to the right of the Perf
Meters tab.
The Quick Split dialog box appears.
3. Under Select Split Mode, press the Main / Upper
button.
This assigns the Split Program to the right-hand (upper)
side of the keyboard, and the Main Combination—in this
case, the piano—to the left-hand (lower) side.
Alternatively, you could press the Lower / Main button
to assign the Split Program to the left-hand (lower) side
of the keyboard—useful for bass sounds. For this
example, let’s stick with Main /Upper.
4. Press the Category Select Popup in the UPPER PROG
section.
5. Choose the Lead Synth category, select the Program
D022: Thin Ana Lead, and press OK.
You can also select Programs by bank and number, or by
using Find. For more information, see “Selecting by bank
and number” on page 26, “Selecting by Category” on
page 27, and “Using the Find feature” on page 27.
When you play the keyboard, the lower region plays the
original piano sound, and the upper region plays a synth
lead. The lead will sound close to the way that it does in
PROGRAM mode, including its insert effects (IFX), but
it will now use the Master and Total Effects (MFX and
TFX) of the piano Combination. For more information,
see “Limitations of Quick Layer/Split” on page 62.
If you like, you can also select a different main
Combination, using the controls in the MAIN COMBI
section.
6. Press and hold the ENTER button, and play a note on
the keyboard to set the split point.
The split point sets the lowest key of the Upper range; the
default is C4.
You can also edit the Split Point by holding the ENTER
button and then touching the keyboard graphic.
7. Adjust the Volume and Octave of the Main
Combination and Split Program as desired.
8. Select the ARP/DRUM settings you want to use with
“Select ARP/DRUM”.
Select which ARP/DRUM settings to use for the main
combination or the split program.
Note: When the ARP button is turned on, playing with
the arpeggiator will be enabled. The notes that play will
follow the selected ARP/DRUM settings. When the
DRUM button is turned on, the notes that play will be
controlled by the Drum function.
the Volume control to adjust the volume of the drum
Use
track program.
Note: Both ARP/DRUM settings cannot be used
simultaneously.
61
Page 68

Playing and editing Combinations
Writing the results
1. When you’ve finished editing your splitted sound,
press the Write Split Combi button to save it as a
combination.
The Write Combination dialog box appears.
2. Press the popup button next to Combination to bring
up the save location dialog, and select a location to
save the edited Combination.
3. Set the name and category as desired.
The system automatically creates a new name based on
the names of the two original sounds. You can edit this
name as desired.
4. Press the OK button to write the Combination.
A confirmation message appears. Press the OK button
once again to complete the Write operation.You’ll return
to COMBINATION mode, with the new Combination
selected.
For more information, see “Writing Programs and
Combinations” on page 205.
If you press the Cancel button, the save operation is
canceled.
Limitations of Quick Layer/Split
For combinations that are created using the Quick
Layer/Split function in PROGRAM mode, three timbres
(Main, Layer/Split and DRUM) are always used. In this way,
you will never run out of timbres.
In contrast, when you are using the Quick Layer/Split
function in COMBINATION mode, you may run into a
situation where the main combination is already using all of
the timbres and none are available.
In this case, the layer/split program will automatically be
overwritten by certain parts of the timbre in use. For this
reason, the main combination will not sound exactly the
same.
When the split points of the main combination and split
program fall within the range of the main combination’s
keyboard zone slope, the “Top Slope” and “Bottom Slope”
values will be automatically adjusted when possible to their
optimum values. The main combination may not sound the
same in this case.
Also, the value of “Timbre Zone Bypass” for the arpeggiator
will be automatically adjusted if possible; and again, the
main combination might not sound the same.
62
Page 69

Detailed Combination editing Quick Split example: adding a lead synth to a Combination
Detailed Combination editing
You can edit any of the Combinations shipped with
NAUTILUS, or you can start with an initialized
Combination to create sounds from scratch.
Naturally, you can use the factory Programs to create new
Combis, or use your own custom Programs. If you’re in the
process of editing a Program in PROGRAM mode, and you
use the Program in a Combi, you’ll hear the edited version in
COMBINATION mode as well.
As with Programs, y ou can do many basic edits directly from
the RT control knobs, without ever delving deeper into the
LCD interface. For instance, you can use the RT control
knobs to change release time, make sounds brighter or
darker, alter effects depths, add Arpeggiator phrase, and so
on. For details on how these work in PROGRAM mode, see
“Quick edits using the RT control knobs” on page 32.
A suggested approach for editing
First, select a Program for each Timbre, on the Mixer tab of
the Home page. (Note that you don’t have to use all 16
Timbres!)
Next, create any desired keyboard or velocity splits, layers,
or crossfades between the different Timbres. You can do this
on the Keyboard Zones and Velocity Zones tabs of the MIDI
Filter/Zones page.
After this, adjust the volumes of the Timbres (back on the
Prog Select/Mixer tab), and set up any other Timbre
parameters as desired.
To add finishing touches to the sound, set up the Insert,
Master, and Total Effects as desired (on the IFX and
MFX/TFX pages, respectively.) These effects can be
different from those of the individual Programs in
PROGRAM mode, if desired.
In addition, you can make Scene settings (on the Home–
ARP DRUM page) and controller settings (on the EQ/XY/Controllers– Controllers page) to create the finished
Combination.
Using Compare
When you’re in the process of editing a sound, executing
Compare page menu command will recall the saved version
of the sound, as it was before you started editing.
While editing a combination, you can execute the Compare
command (menu command) to recall the settings that were
last saved. Use the “Compare” command once more to
return the settings to how they were before.
If you edit the settings that you recalled with the Compare
command, (i.e., the settings that were saved), you will not be
able to return to the settings used before the command was
executed.
63
Page 70
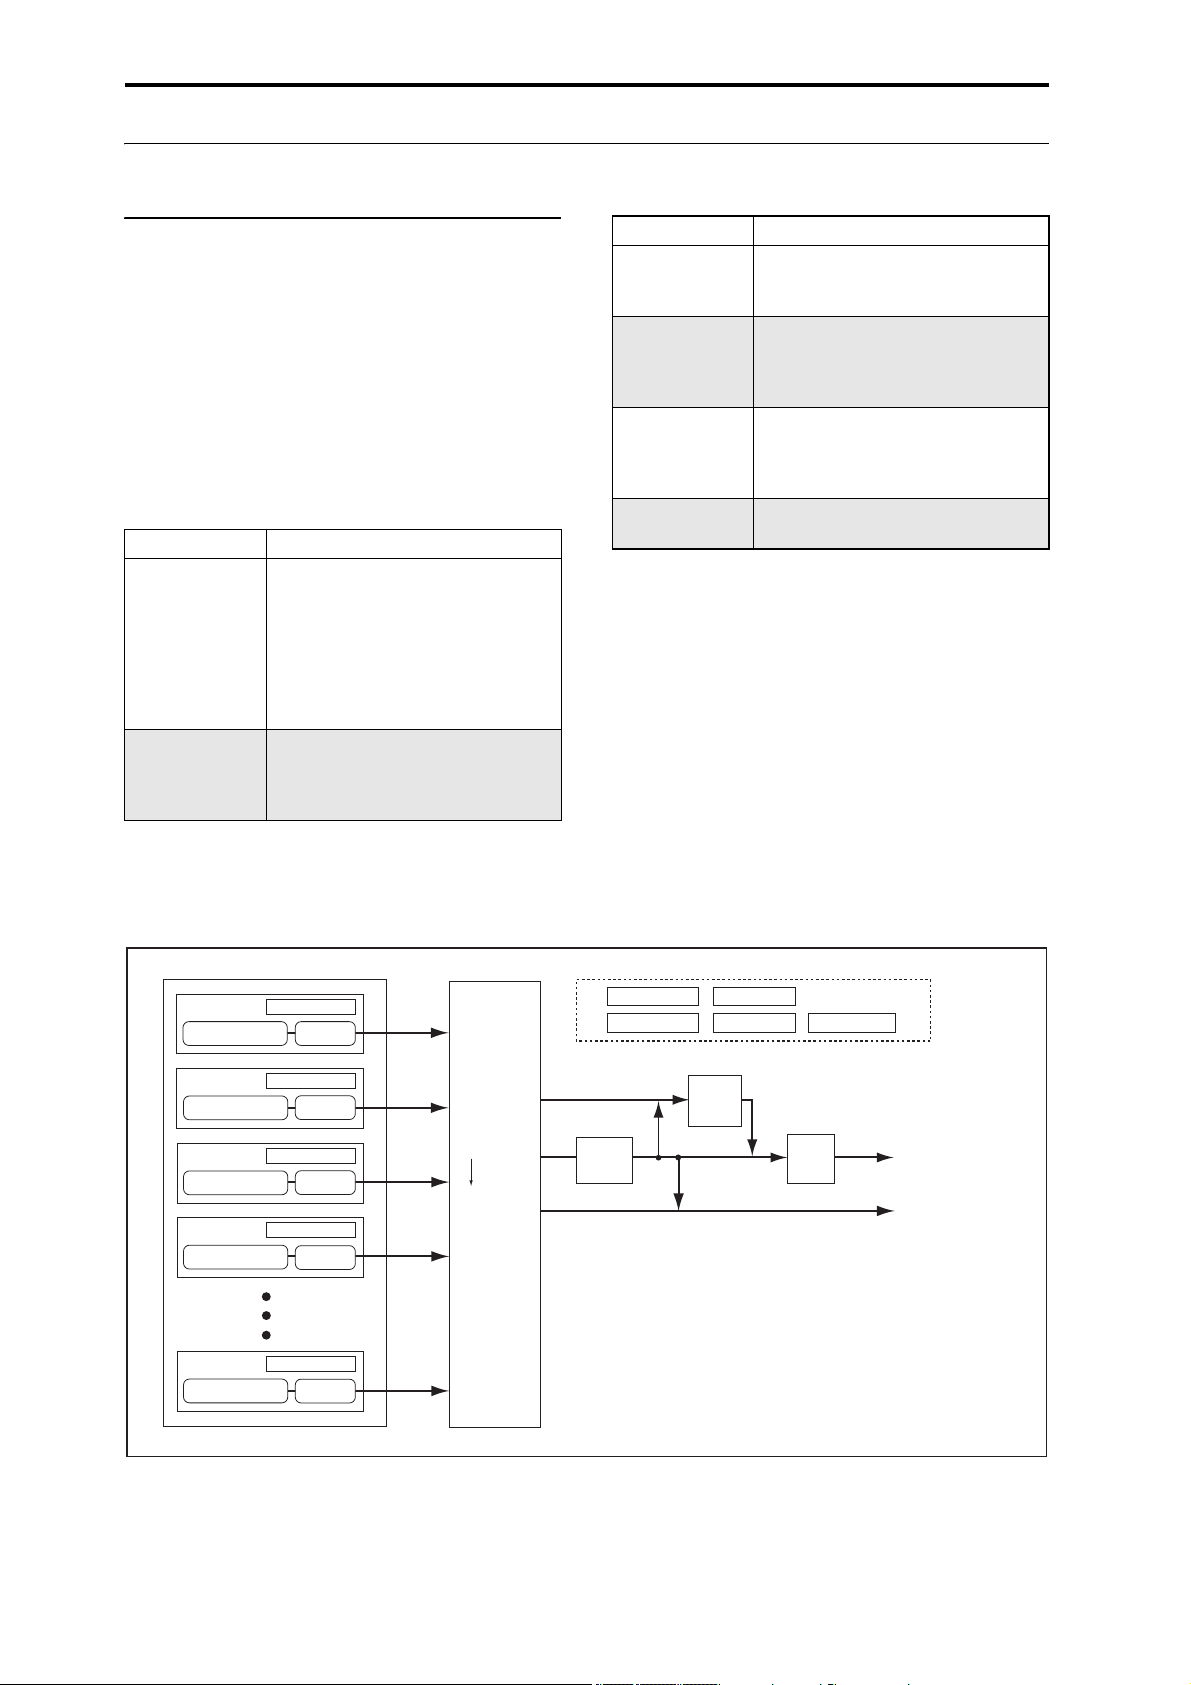
Playing and editing Combinations
Parameters
Parameters
Parameters
Parameters
Timbre2
Timbre3
Timbre16
Timbre4
Timbre1
Parameters
Program
Program
Program
Program
Program
AUDIO OUTPUT
INDIVIDUAL 1, 2, 3, 4
AUDIO OUTPUT
L/MONO, R
Master
Eects
1, 2
Total
Eects
1, 2
Insert
Eects
1…12
Controllers
X-Y Control
Audio Input ARP/DRUM
Timbre
Insert Eects
Master Eects
Individual Outputs
REC Bus
FX Control Bus
Routing
Tone Adjust
3Band EQ
3Band EQ
3Band EQ
3Band EQ
3Band EQ
Combination overview
Combination page structure
The COMBINATION > Home page offers access to the
most important aspects of Combis, including:
• Selecting and playing Combinations
• Selecting individual Programs
• Making settings for Arpeggiator function
• Quick sampling and resampling
The detailed editing pages, Home through MFX/TFX, give
you more in-depth access to the Combi’s powerful key and
velocity zones, MIDI filtering, Vector Synthesis, and
Effects.
Page Main features
• Select and play Combinations
• Perform easy edits using the RT control
knobs, and Tone Adjust
Home
EQ/X-Y/Controllers
• Adjust mix parameters including
volume, pan, EQ, and send levels
•Set up ARP/DRUM
• Select a Program for each timbre
• Quick sampling and re-sampling
• Adjust EQ settings for each Timbre
• Assign functions to SW1/2 and RT
control knobs 1-6
• Set up Vector synthesis
Page Main features
Timbre Parameter
MIDI Filter/Zone
IFX
MFX/TFX
• Set various parameters for each timbre,
such as MIDI channel, OSC select, Pitch
etc.
• Set up MIDI transmission/reception
filters for each Timbre.
• Set up keyboard and velocity zones for
each Timbre.
• Select insert effects and make settings
for them. Specify send levels to the
Master effects and routing to the
outputs.
• Select Master send effects and Total
effects, and adjust their settings.
For details on how to access each mode and page, please see
“Basic operations” on page 14.
You can sample from within COMBINATION mode—
including resampling the Combination itself. For more
information, see “Sampling in PROGRAM and
COMBINATION modes” on page 145.
You can also mix in live audio inputs, and process them
through effects. For more information, see “Using effects
with the audio inputs” on page 229.
Combination structure and corresponding pages
64
Page 71

Detailed Combination editing Layers, Splits, and Velocity Switches
Program B
Program A
Layer:
Two or more programs sound
simultaneously.
Program B
Program A
Split:
Dierent programs will sound in
dierent areas of the keyboard.
Program A
Program B
Keyboard playing
dynamics
Strong
Soft
Velocity Switch:
Keyboard playing dynamics
(velocity) switches between
dierent programs.
Program C
Program D
Program B
Program A
Keyboard playing
dynamics
Strong
Soft
Example:
B and C/D are split. In the lower
keyboard range, A and B are
layered. In the higher keyboard
range, C and D are switched by
velocity and layered with A.
Program A
Program B
Keyboard X-Fade (keyboard
crossfade):
As you play from low notes to
high notes, the volume of A
will fade out, and the volume
of B will fade in.
T
T
T
Layers, Splits, and Velocity Switches
Within a Combination, you can use note number and
velocity to determine which Timbres will sound.
The Programs assigned to each Timbre can sound in three
ways: as part of a layer, a split, or a velocity switch. A
Combination can be set to use any one of these methods, or
to use two or more of these methods simultaneously.
Layer
Layers cause two or more Programs to sound simultaneously
when a note is played.
Split
Splits cause different Programs to sound on different areas of
the keyboard.
Velocity Switch
Velocity Switches cause different Programs to sound
depending on the velocity (how hard you play the notes).
Creating Key Splits and Layers
Let’s create a Combi which combines both splits and layers,
like the diagram below:
imbre 1
imbre 2
imbre 3
Brass
Strings
C2C-1… C4 C7 …G9B3
1. Go to the COMBINATION > Home– Mixer page.
2. Select a piano sound for Timbre 1, a brass sound for
Timbre 2, and a strings sound for Timbre 3.
3. Go to the MIDI tab of the Timbre Parameters page.
4. For Timbres 1-3, set Status to INT and MIDI Channel
to Gch (the Global Channel).
5. Go to the Keyboard Zones tab of the MIDI
Filter/Zones page.
6. Set Timbre 1’s Top Key to G9, and its Bottom Key to
C4.
7. Set Timbres 2 and 3 to a Top Key of B3, and a Bottom
Key of C-1.
You can also enter these values by selecting the
parameter, and then holding down the ENTER key and
playing a note on the keyboard.
Piano
On NAUTILUS, you can use a different Program for each of
up to sixteen Timbres, and combine two or more of the
above methods to create even more complex setups.
As an additional possibility, you can set the slope for a key
zone or velocity zone so that the volume diminishes
gradually. This lets you change a split into a keyboard
crossfade, or a velocity switch into a velocity crossfade.
Key Zone Slope
In addition to “hard” splits, in which the sound changes
abruptly, you can use the Slope parameters to gradually fade
a sound in or out over a range of keys.
In the example above, you could set the Bottom Key of
timbre 1 to G3, and set the Top Key of timbre 2 to G4, so
that these two timbres overlap.
Next, if you set the Bottom Slope of timbre 1 to 12, and set
the Top Slope of timbre 2 to 12, the sound will change
gradually instead of changing suddenly.
Creating Velocity Switches
Next, let’s create a simple velocity switched Combination,
like the diagram below:
Timbre 1
Timbre 2
Brass
Strings
1. Go to the COMBINATION > Home– Mixer page.
2. Select a brass sound for Timbre 1, and a strings sound
for Timbre 2.
3. Go to the MIDI tab of the Timbre Parameters page.
4. For Timbres 1 and 2, set Status to INT and MIDI
Channel to Gch (the Global Channel).
5. Go to the MIDI Filter/Zones– Velocity Zones page.
6. Set Timbre 1’s Top Velocity to 127, and its Bottom
Velocity to 64.
7. Set Timbre 2 to a Top Velocity of 63, and a Bottom
Ve lo ci t y o f 1.
127
64
63
1
Velocity
switch
65
Page 72

Playing and editing Combinations
Velocity Zone Slope
Similar to Key Zone Slopes, as described above, these let
you fade in and fade out sounds gradually over a velocity
range, instead of a simple hard switch.
In the case of the above example, you could set the velocity
zones of the two Timbres so that they partially overlap.
Then, set the Top Slope and Bottom Slope so that the sound
changes gradually, instead of changing suddenly between
velocity values of 63 and 64.
MIDI Settings
Timbre Parameters MIDI page
Status
This controls the status of MIDI and the internal tone
generator for each Timbre. Normally, if you’re playing an
internal Program, this should be set to INT.
If the status is set to Off, EXT, or EX2, that internal sounds
will not be played. Off simply disables the Timbre entirely.
The EXT and EX2 settings allow the Timbre to control an
external MIDI device. For more information, see “Status” on
page 405 of the PG.
Bank Select (when status=EX2)
When the Status is set to EX2, these parameters allow you
to transmit MIDI Bank Select messages for changing banks
on external MIDI devices.
MIDI Channel
Timbres that you wish to play from NAUTILUS’s keyboard
must be set to the global MIDI channel. Your playing on the
keyboard is transmitted on the global MIDI channel, and will
sound any timbre that matches this channel. Normally you
will set this to Gch. When this is set to Gch, the MIDI
channel of the timbre will always match the global MIDI
channel, even if you change the global MIDI channel.
MIDI filter settings
For each MIDI Filter item, you can specify whether or not
the corresponding MIDI message will be transmitted and
received. The checked items will be transmitted and
received.
The MIDI filters don’t turn the functions themselves on or
off. Instead, the filter just controls whether or not that MIDI
message will be transmitted and received.
For example, if portamento is on, portamento will be applied
to the internal NAUTILUS sound even if Portamento SW
CC#65 is unchecked.
As another example, let’s say that you’ve selected a bass
Program for Timbre 1, and a piano Program for Timbre 2,
with the goal of creating a bass/piano split. You could make
the following settings so that pressing the damper pedal
affects only Timbre 2’s piano sound:
1. Go to the MIDI Filter/Zones– MIDI Filter 1 page.
2. Un-check the Enable Damper box for Timbre 1.
3. Check the Enable Damper box for Timbre 2.
66
Page 73

Detailed Combination editing Altering Programs to fit within a Combination
Altering Programs to fit within a Combination
You can make various changes to Programs within the
context of a particular Combination, to make them fit better
with other Programs, or to create particular sonic effects.
These changes do not affect the original Programs, or how
those Programs sound in other Combinations.
Timbre Parameters: OSC
Force OSC Mode
Normally this should be set to PRG, so that the sound will
play as set by the original Program.
If you wish to force a polyphonic program to sound
monophonically, set this either to Mono or Legato.
Conversely, set this to Poly if you wish to force a
monophonic program to play polyphonically.
For more information, see “Force OSC Mode,” on page 406
of the PG.
OSC Select
Normally, this should be set to Both.
If the timbre is using a program whose Oscillator Mode is
Double or Double Drums, and you want only OSC1 or
OSC2 (not both) to sound, set this to OSC1 (only OSC1 will
sound) or OSC2 (only OSC2 will sound).
Portamento
Normally, this should be set to PRG.
If the Program uses portamento, but you’d like to disable this
for the current Combination, set this parameter to Off.
Conversely, if you want to force the portamento to be on, or
just to change the portamento time, set this to a value of
001–127. The portamento will change to use the newly
specified time.
Timbre Parameters: Pitch
Transpose, Detune (BPM Adjust)
These parameters adjust the pitch of the timbre.
• In a layer-type combination, you can set two or more
timbres to the same program, and create a richer sound
by using Transpose to shift their pitch apart by an
octave or by using Detune to create a slight difference in
pitch between the two.
• In split-type combinations, you can use Transpose to
shift the pitch (in semitone units) of the programs
specified for each key zone.
• If you wish to change the playback pitch of a drum
program, use Detune. If you change the Transpose
setting, the relationship between notes and drum sounds
will change.
Adjusting the BPM of multisamples or
samples created in SAMPLING mode
If a timbre’s program uses multisamples or samples that you
created in SAMPLING mode (or loaded in MEDIA mode) at
a specific BPM value, you can use the page menu command
Detune BPM Adjust to call up a new BPM value. This
changes the BPM by adjusting the playback pitch.
For more information, see “Detune BPM Adjust,” on
page 437 of the PG.
Use Program’s Scale, Scale
This specifies the scale for each timbre. If you check Use
Program’s Scale, the scale specified by the program will be
used. Timbres for which this is not checked will use the
Scale setting.
Delay
You can set some Timbres so that they don’t sound
immediately at note-on. This can create cool effects, and
more dramatic layers.
You can specify the delay for each Timbre either in
milliseconds (ms), or in rhythmic values which sync to the
system tempo.
If you set the Delay to Key Off, the Timbre will sound when
the note is released.
67
Page 74

Playing and editing Combinations
Editing Programs from within a Combination or Song
If you want to dive in deeper than Tone Adjust allows, you
can also go directly into the editing pages of a Program from
within a Combination or Song—while still hearing all of the
other Timbres or Tracks.
Tone Adjust lets you change the way the Program sounds
in a specific Combination or Song without affecting the
original Program. In contrast, the method described
below changes the original Program, and will affect any
Combinations or Songs which use that Program.
To edit a Program within a Combination or Song:
1. Go to the Home– Mixer page.
2. Select any parameter in the column of the Timbre or
Track which contains the Program you’d like to edit,
and then select the Edit Program command from the
Page Menu Command.
The system will then display the Home page for the
selected Program.
3. Edit as desired.
Eventually, if you want to keep your changes, you’ll need
to Write the Program. However, while you’re working,
you can go back and forth between the edited Program
and the Combination or Song.
You’ll notice that some Program pages and tabs will be
grayed out; for more information, see “Parameters
unavailable while editing in context,” below.
To return to the COMBINATION or SEQUENCER
mode:
4. Press the MODE buttons.
The normal rules of editing apply: if you select another
Program, all edits to the previous Program will be lost.
So, make sure to save your work:
5. While on the Program edit pages, use the Write menu
command to save your edits.
Note that you must be on the Program edit pages in order
to Write the Program edits. Writing the Combination or
Song will not affect the Program.
If you Write the Program to different bank/number, the
Combination Timbre or Song Track selected in step 2,
above, will be updated to reference the new location. In
this case, if other Timbres or Tracks use the Program,
they will not be updated automatically (since you may
want them to continue to play the original Program); you
can change them manually if desired.
Parameters unavailable while editing in context
When editing a Program in context, you’ll hear the
Combination or Song’s effects, EQ, and ARP/DRUM.
Because of this, related pages, tabs, parameters, and
functions within the Program will be grayed out and
unavailable, including:
• Home: EQ, or ARP/DRUM
• Audio Input/Sampling
• Controllers
• Program EQ (HD-1: EQ or EXi: EQ)
• EXi Program: Program Basic: EXi1 and 2 Instrument
Type
•IFX
•MFX/TFX
•Tempo
Playing the Program during editing, from the
keyboard and MIDI
While editing a Program in context, input from the keyboard
and MIDI continues to play the Combination or Song
exactly as it did before. For instance, MIDI Channels, Key
and Velocity Zones, Solo and Mute, etc. continue to apply.
This is important, since it lets you hear the Program exactly
as it will play in the finished Combination or Song.
Note that this means that if the local keyboard does not play
the selected Program in COMBINATION or SEQUENCER
modes (for instance, if you’re in a Combi and the Timbre is
not on the Global MIDI Channel), then the keyboard will
still not play the Program during editing. If the sound is
being played by other means—for example, from the
NAUTILUS sequencer, ARP, or an external DAW or MIDI
controller—then this may not matter. If necessary, you can
use various means to route the keyboard to the Program,
such as:
• Use MIDI Thru on an external DAW
• In SEQUENCER mode, set the Keyboard Track to play
the desired Track
• In COMBINATION mode, temporarily change the
Timbre/Track’s MIDI channel, and/or adjust Key or
Velocity zones
Of course, if you want to edit the Program by itself,
unaffected by the context of the Combination or Song,
simply go to PROGRAM mode and edit the sound there!
68
Page 75

Effects
Effects are covered in their own section of the manuals, so
we won’t go into too much detail here.
Insert Effects
Insert Effects let you send either individual Oscillators or the
entire Program through up to 12 effects, in series. You can
use any type of effects, from distortions and compressors to
choruses and reverbs. The Insert Effects can be routed to the
main outputs, or to any of the individual outputs.
For more information, see “Insert effects” on page 223.
Master Effects
There are two Master Effects, which are accessed through
Sends 1 and 2. These are best-suited to effects such as
reverbs and delays, but you can use them with any type of
effect.
For more information, see “Master effects” on page 224.
Detailed Combination editing Effects
Tota l Ef fec ts
The two Total Effects are dedicated to processing the main
L/R outputs. They’re ideally suited to overall mix effects,
such as compression, limiting, and EQ–but as with the other
effects sections, you can use any type of effect that you like.
69
Page 76

Playing and editing Combinations
Saving your edits
Once you’ve tweaked the sound to perfection, you’ll want to
save your work. To save your edits:
1. Select the Write Combination command from the
page menu, at the upper right-hand corner of the
screen.
This brings up a dialog box which allows you to save the
Combination. Optionally, you can also select a new
location, or change the Combination’s name.
2. Press the Combination’s name to bring up the text
edit dialog.
You can give the Combination a descriptive name using
the on-screen keyboard.
After entering the name, press OK.
The text edit window will disappear, returning you to the
main Save dialog.
3. To set the category and sub-category, press the
“Category” and “Sub Category” pop-up buttons and
select the categories/sub-categories from the list.
4. Under “To” at the bottom of the dialog, press the
popup button next to Combination to bring up the
save location dialog.
Select a location to save the edited Combination.
You can write to any location in banks A–N. To avoid
overwriting the factory sounds, it’s safer to use a slot in
one of the empty User banks.
After selecting the location, press OK.
5. Press OK again to start the write process.
6. If you’re sure you want to write to this location, press
OK again.
After that, you’re done!
For more information, see “Writing Programs and
Combinations” on page 205.
Saving to media
You can also save and manage Combinations on the internal
drive and USB storage devices. For more information, see
“Saving to internal drive, CDs, and USB media” on
page 209.
70
Page 77

Creating songs (SEQUENCER mode)
Sequencer overview
About the NAUTILUS’ sequencer
The NAUTILUS’ sequencer can hold up to 200 songs and
400,000 MIDI events or 300,000 audio events. It consists of
a 16-track MIDI sequencer and a 16-track audio recorder,
giving you a total of 32 tracks.
Via MIDI, you can record from and play through external
MIDI devices, as well as the NAUTILUS keyboard, physical
controllers, and internal sounds.
The 24-bit, 48kHz audio recorder supports 16 tracks of
playback and four simultaneous channels of recording.
Audio tracks can record external audio sources such as
guitars and vocals as well as the NAUTILUS’ internal
sounds. You can even record mix automation for volume and
pan.
With its broad range of capabilities such as In-track
Sampling, Time Stretch/Slice, Arpeggiator, high-quality
effects, and physical controllers, the NAUTILUS is the ideal
environment for music production or live performance.
Sequencer edits must be saved to disk
When you turn off the power, the SEQUENCER mode
settings, the recorded songs and other data will automatically
be saved. The data that was saved will automatically be
reloaded next time you turn on the power, and the
SEQUENCER mode settings will be restored.
You can also edit audio tracks in a variety of ways including
Event Editing operations that let you insert or delete audio
events, and Region Editing operations.
Region Editing allows you to select WAVE files and to edit
the start/end addresses of a WAVE file in single-sample
units.
Patterns
There are two types of patterns: preset patterns and user
patterns.
• Preset patterns: Patterns suitable for drum tracks are
preset in internal memory, and can be selected for any
song.
• User patterns: Each song can have up to 100 patterns.
When using a pattern in a different song, use the Utility
menu commands Copy Pattern or Copy From Song
etc. to copy the pattern. You can set the pattern length to
one or more measures, as desired.
Patterns always contain only a single track of musical data.
If you want to use patterns on multiple tracks, you’ll need to
use a separate pattern for each track.
To use patterns in a Song, either place them in a MIDI track
using the Put to MIDI Track menu command, or copy them
using the Copy to MIDI Track menu command.
You can also use patterns with the RPPR. For more
information, see “Using RPPR (Realtime Pattern
Play/Record)” on page 106.
SEQUENCER mode structure
Songs
A song consists of MIDI tracks 1–16, a master track, audio
tracks 1–16, song parameters such as the song name, Vector,
Arpeggiator, Drum, effects, and RPPR settings, and 100 user
patterns.
A maximum of 200 songs can be loaded into the
NAUTILUS memory at once. Thousands can be stored on
the internal disk, or on USB storage media.
MIDI tracks 1–16 and audio tracks 1–16 each consist of
setup parameters located at the start location, and musical
data within the track. The master track consists of tempo and
time signature data.
For more information, see “Setup parameters & Musical
data” on page 441 of the PG.
Song recording and editing
Song recording is performed on tracks. You can record
MIDI tracks in either of two ways; real-time recording or
step recording. For real-time recording you can choose one
of six recording modes.
Audio tracks can be recorded in real-time, or created by
adding WAVE files.
You can edit MIDI tracks by using Event Edit operations to
modify the recorded data or insert new data, and by using
Track Edit operations such as Create Control Data, which
inserts pitch bend, aftertouch, or control change data.
Sequencer patterns and Drum Track patterns
Preset patterns are directly available for use as Drum Track
patterns.
User patterns can also be used with the Drum Track, but they
must first be converted into user Drum Track patterns (via
the Convert to Drum Track Pattern menu command on
Pattern/RPPR).
When you convert a user pattern, it will be stored in internal
memory, and will not disappear even when you turn off the
power.
71
Page 78

Creating songs (SEQUENCER mode)
AUDIO OUTPUT
L/MONO, R
AUDIO OUTPUT
INDIVIDUAL 1, 2, 3, 4
Insert Eect 1...12
Master Eect 1, 2
Total Eect 1, 2
X-Y Control
Arpeggiator
Drum Track/Step Seq
Audio Input
Sampling
Tone Adjust
Controllers
Master Track
Resampling (L/R 2ch Mix)
Tempo and time signature data
Song
Audio recording function
This is a conceptual diagram of SEQUENCER mode including the hard disk recording function.
(Routing)
MIDI Routing 1,2
Audio Routing 1,2
Track
Insert Eects
Master Eects
Individual Outputs
(FX Ctrl BUS)
(REC BUS)
Audio Track 01..16
Setting
parameters
Performance
data
Setting
parameters
Performance
data
Setting
parameters
Performance
data
Setting
parameters
Performance
data
Setting
parameters
Performance
data
Automation events
Automation events
Automation events
Automation events
Automation events
Audio events
Region
Audio events
Audio events
Audio events
Audio events
Region
Region
Region Region
Region
MIDI Track 01..16
Setting
parameters
Performance
data
Setting
parameters
Performance
data
Setting
parameters
Performance
data
Setting
parameters
Performance
data
Setting
parameters
Performance
data
Internal disk
Sampling memory
(RAM)
WAVE (Stereo)
WAVE (Mono)
Sample
Sample
SEQUENCER mode page structure
Page Explanation
• Song playback/recording
• Easy editing using the RT control knobs,
and Tone Adjust
• Edit mix parameters such as volume, pan,
Play/Mute, and Solo On/Off
Mixer
EQ/X-Y/Controller
Track Parameters
MIDI Filter/Zone
Track Edit • Track editing
•Set up ARP/DRUM
• Select programs for MIDI tracks
• Choose the recording mode
• Make settings for sampling, resampling,
and audio
• EQ adjustments for each track
• Function assignments for the SW1 and
SW2 buttons and RT control knobs 1–6
• Vector Synthesis settings
• Parameter settings for each track (MIDI
channel, OSC selection, pitch settings,
etc.)
• MIDI receive/transmit filter settings for
each track
• Keyboard zone and velocity zone settings
for each track
Page Explanation
• Pattern recording and editing
Pattern/RPPR
• RPPR settings
• Convert User patterns to User Drum Track
patterns
IFX
MFX/TFX
• Insert effect selection, settings, send level
to master effects, output routing
• Master effect and total effect selection
and settings
For details on how to access each mode and page, see “Basic
operations” on page 14.
You can sample from within SEQUENCER mode—
including resampling the Song itself. For more information,
see “Sampling in PROGRAM and COMBINATION modes”
on page 145.
You can also mix in live audio inputs, and process them
through effects. For more information, see “Using effects
with the audio inputs” on page 229.
Set Lists
Songs can also be selected in Set Lists, along with Programs
and Combinations. For more information, see “Set Lists” on
page 113.
72
Page 79

Playing Songs
Solo
Mute/Rec
Status
MIDI Channel
Program Select
Category
Track 1
Track 2
Popup
Track Select
Song Select
Meter Tempo
Pan
Volume
LOCATE button
SEQUENCER REC button SEQUENCER START/STOP button
REW button FF button
Playback
Playing Songs Playback
In order to play back a Song in the sequencer, you must first
either load the Song from disk, send the Song to the
NAUTILUS via MIDI SysEx, or record a new Song.
Let’s start by loading and playing the demo song data.
1. Follow the instructions for loading and playing the
demo songs under “Playing the demo songs” on
page 11 of the QSG.
Now, let’s experiment with the different controls.
2. Press the SEQUENCER START/STOP button.
Pressing this once starts playback; pressing it again stops
playback. Pressing it a third time resumes playback from
where it stopped.
3. Press the LOCATE button to return to the start of the
Song.
The locate point defaults to the start of the Song. You can
change this as desired; see “LOCATE settings” on
page 74.
4. Press the SEQUENCER REW or FF button to rewind
or fast-forward.
You can use the SEQUENCER REW and FF buttons
during playback or while paused. They are disabled
during recording, and while the Song is stopped.
If you like, you can adjust the rewind and fast-forward
speeds using the FF/REW Speed page menu command.
5. To set the tempo, press the TAP button at the desired
interval.
73
Page 80

Creating songs (SEQUENCER mode)
Operations that use the QUICK ACCESS
button
Press the QUICK ACCESS button while holding down the
EXIT button to start and stop the sequencer, put the
sequencer in REC mode and so on.
EXIT button + A button: SEQUENCER/STOP button
EXIT button + B button: SEQUENCER REC button
EXIT button + C button: SEQUENCER LOCATE button
EXIT button + D button: SEQUENCER REW button
EXIT button + E button: SEQUENCER FF button
EXIT button + F button: SEQUENCER PAUSE button
Mute and Solo
Mute lets you silence any of the MIDI tracks 1–16, audio
tracks 1–16, or any of the audio inputs (analog 1, 2, USB 1,
2). Solo lets you hear any of these tracks or inputs by itself.
These functions can be used in various ways. For example,
you can listen only to the rhythm section of the previouslyrecorded tracks while you record new tracks. Let’s try out
the Mute and Solo functions.
1. Use “Song Select” to select the song that you want to
play back.
2. Press the SEQUENCER START/STOP button.
3. Press track 1 Mute/Rec button.
The Mute/Rec button will turn on, and the playback of
track 1 will no longer be heard. In this way, the “mute”
function allows you to silence a specified track until the
track is un-muted.
To cancel muting, press Mute/Rec button once again to
turn off.
Exclusive Solo
Normally, Solo works in “Exclusive Solo off” mode, in
which you can solo more than one track at a time (as in the
example above). In contrast, “Exclusive Solo on” mode
allows only one track to be soloed at a time, making it easy
to switch between soloed tracks.
Use the “Exclusive Solo” page menu command to specify
how the Solo function will operate.
Exclusive Solo off: You will be able to solo more than one
track at a time. The status of a track will change each time
you press its Solo button.
Exclusive Solo on: When you press a Solo button, only that
track will be soloed.
The SOLO setting is not stored when you save the song.
LOCATE settings
You can press the LOCATE button to move to the registered
location. Initially, this will move to 001:01.000.
To change the registered location, use the Set Location page
menu command.
When you select a song, the “LOCATE” setting is
automatically initialized to 001:01.000.
For more information, see “Set Location (for Locate Key)”
on page 523 of the PG.
4. Press track 1 Solo button.
The Solo button will turn on, and this time, only track 1
will be heard. This is known as “soloing” the track.
If both Mute and Solo are used, the Solo function will be
given priority.
Press track 2 Solo button.
You will hear the playback of tracks 1 and 2.
Note: Solo (on) applies to all tracks, including MIDI
tracks 1–16, audio tracks 1-16, and all audio inputs
(analog and USB). If, as in this example, you’ve turned
Solo on for only MIDI tracks 1 and 2, you will not hear
MIDI tracks 3–16, audio tracks 1–16, or any of the audio
inputs.
5. To switch Solo off, press the Solo button once again.
Press the Solo buttons for both MIDI tracks 1 and 2.
The display will change, and the playback of track 1 will
be muted.
74
Page 81

Loop playback
Loop Start
Measure
Track Play
Loop
Play Intro
Loop End
Measure
When recording or playing back a song, you can individually
loop the MIDI tracks that are playing.
In the Home– MIDI Track Loop page, check Track Play
Loop for the MIDI tracks you want to loop, and use Loop
Start Measure and Loop End Measure to specify the
starting and ending measure of the region that will play back
as a loop.
If Play Intro is checked (enabled), the measures preceding
the loop will be played back as an introduction before the
loop begins.
If you play back from the first measure with the settings
shown in the screenshot below, the specified region of
measures will repeat as follows. Note that Play Intro is
enabled for Track 1, but disabled for Track 2.
Measure12345678910111213
Track 1 1 2 3 4 5 6 7 8 5 6 7 8 5
Track 2 9109109109109109109
Playing Songs Playback
If Play Intro is disabled (un-checked) for Track 1, the
specified region of measures will repeat as follows.
Measure12345678910111213
Track 1 5 6 7 8 5 6 7 8 5 6 7 8 5
Track 2 9 10 9 10 9 10 9 10 9 10 9 10 9
75
Page 82

Creating songs (SEQUENCER mode)
MIDI recording
• You can record up to 400,000 events (e.g., notes), up to
200 songs, and up to 999 measures in each song.
• The maximum timing resolution is 1/480 parts per
quarter-note.
• There are sixteen tracks for MIDI performance data, and
a master track which controls the time signature and
tempo.
Preparations for recording
Before you begin recording, make sure that the GLOBAL
mode memory protect setting is turned off. For more
information, see “Memory protect” on page 208.
Selecting a Song
Before we can begin this example, we need to select an
empty song where we can record.
1. Press the MODE button to select SEQUENCER
mode.
2. Go to the Home– Mixer page, etc.
3. Press the Song Select Popup button.
The Song selection popup will appear.
4. Choose a new, empty Song from the list, and press the
OK button.
• You can perform and record using ARP and the Drum
Track.
• You can perform and record using RPPR (Realtime
Pattern Play/Recording).
• There are 718 built-in preset patterns ideal for drum
tracks, and in addition you can create up to 100 user
patterns for each song. These patterns can be used as
performance data for a song, or with the RPPR function.
Tip: Set Song Length
By default, new songs are 64 measures long. If you’d like to
record more than 64 measures, go to the Track Edit page,
and use the Set Song Length command in the page menu.
For more information, see “Set Song Length” on page 538 of
the PG.
Track settings
Since we’re going to record a new song in this example, we
will start by explaining how to assign a program to each
MIDI track, and make basic settings such as volume.
For details on audio tracks, refer to “Audio recording” on
page 91.
1. Assign a program to each MIDI track.
Use “Program Select” (Home– Mixer page) to assign a
program to each MIDI track.
You can copy various settings from Programs or
Combinations, including effects, Arpeggiator settings,
Tone Adjust, and so on.
When assigning a program, you can use “Track Select” to
select the track for which you are making assignments,
and try playing the sound.
2. Set the pan and volume of each MIDI track.
Pan sets the pan of each track, and Vol u me sets the
volume of each track.
3. Specify the tone generator that will be played by each
MIDI track.
Mixer: Use the Track Status button on the Mixer:Status
Play/MuteSet page to set whether the sounds that play on
each track will be played by the NAUTILUS or by an
external device.
Normally when using the NAUTILUS as a 16-timbre
sound module, you will select INT or Both.
Statu s INT: During playback, the NAUTILUS’ internal
tone generator will play the MIDI data recorded on that
track. When you operate the NAUTILUS’ keyboard or
controllers, you will be playing and controlling the track
selected by “Track Select.” MIDI data will not be
transmitted to an external device.
Statu s EXT, EX2, Both: During playback, the MIDI data
recorded on that track will be transmitted from MIDI
OUT to play an external sound module. When you
operate the NAUTILUS’ keyboard or controllers, MIDI
data will be transmitted to play and control the external
sound module selected by “Track Select.” (The MIDI
channel of the external tone generator must be set to
match the MIDI Channel of NAUTILUS tracks that are
set to EXT, EX2 or Both.)
If Status is set to Both, both the external tone generator
and internal tone generator will be sounded and
controlled.
4. Specify the MIDI channel for each track.
In the Track Parameters– MIDI page Status. MIDI
Channel specifies the MIDI channel for each track.
76
Page 83

MIDI recording Preparations for recording
In general, you should set MIDI Channel to different
channels 1–16 for each track. Tracks that are sent to the
same MIDI channel will sound simultaneously when
either is recorded or played.
5. Adjust the effect settings.
Make settings for each effect in IFX and MFX/TFX
pages.
For more information, see “Using effects in
Combinations and Songs” on page 225, “SEQUENCER
> IFX” on page 507 of the PG, and “SEQUENCER >
MFX/TFX” on page 518 of the PG.
6. Set the tempo and time signature.
To set the tempo, you can press the TAP button at the
desired interval. Alternatively, you can select
“ (Tempo)” in the Home– Mixer page (or similar page),
and use the VALUE controllers to set the tempo. Set
“Tempo Mode” to Manual.
Next you will set the time signature. In this example,
we’ll explain how to set the time signature using the
“Meter” field. Normally, you specify the time signature
before recording the first track, and then begin recording.
a) Press the SEQUENCER REC button, and set “Meter”
to **/**.
b) Press **/** to highlight it, and use the VALUE
controllers to set the time signature.
c) Press the SEQUENCER START/STOP button to begin
recording. When the pre-count has ended and Locate
reaches 001:01:000, press the SEQUENCER
START/STOP button to stop recording. The time
signature you specified has been recorded on the Master
track.
If you press the SEQUENCER START/STOP button
during the pre-count, the time signature won’t be
recorded.
7. Set the REC Resolution as desired.
When you record MIDI in real-time, this parameter
controls timing correction, also known as “quantization.”
This also applies when recording audio automation data.
This only affects newly recorded MIDI; it does not
change any previously recorded tracks.
For example, let’s suppose that you recorded some eighth
notes but your timing was not quite perfect, as shown in
part 1 of the illustration below. If “REC Resolution” were
set to when you recorded, the timing would
automatically be corrected as shown in part 2 of the
illustration. If “REC Resolution” is set to Hi, the notes
will be recorded with the timing at which you play them.
Saving your song parameter settings
All of the above settings can be saved as a Template Song. If
you frequently use the same settings, this can be a real timesaver. For more information, see “Template Songs,” below.
8. Make other settings as necessary.
Make settings for Arpeggiator (ARP), MIDI filtering
(MIDI Filter/Zone), etc.
When you are finished making these settings, the basic setup
is complete. You can now record as described under
“Recording procedure” on page 95
77
Page 84

Creating songs (SEQUENCER mode)
Template Songs
The preset data consisting of 18 template songs on the
NAUTILUS (P00–P17) is designed to let you quickly get
started creating your songs, featuring sets of sounds and
effects that match each style of music. Aside from the
presets, you can also create original template songs that
contain the settings and sounds you frequently use.
Further, when you load a template song, you can copy one or
more drum patterns into the tracks.
Note: Each template song includes data on programs, track
parameter settings like volume and pan, and settings such as
effects, ARP, drum tracks and tempo. Template songs do not
include MIDI note data, patterns or audio data.
Template Songs store pretty much everything in the Song
except for the MIDI and audio data itself. This includes
Program selections, track parameters, effects and Scene
settings, and the Song’s name and tempo.
The factory preset Template Songs let you get up and
running quickly with matched sets of sounds and effects for
various styles of music. You can also create your own
Template Songs with your favorite sounds and setups.
Note that Template Songs do not include the MIDI data for
song tracks and patterns, audio data, or settings that govern
how the musical data is played back, including Meter,
Metronome, PLAY/MUTE, and Track Play Loop
(including Start/End measure).
While loading a Template Song, you can also optionally load
one or more Drum Track patterns.
1. In the SEQUENCER > Home– Mixer page, press the
page menu button and select the Load Template Song
command.
A dialog box will appear.
If Copy Pattern to MIDI Track too? was checked in
step 3, the Copy Pattern To MIDI Track dialog box will
appear.
This is the same dialog box as the one that appears for the
Copy To MIDI Track menu command.
I
n the Pattern field, select a pattern to copy.
5.
6. In the To MIDI Track field, select the track to use for
the Drum Track pattern.
7. In the Measure field, set the measure on which you’d
like the pattern to start.
Note: In each of the eighteen preset Template Songs,
track 1 is always assigned to a Drum Program. (In some
cases, other tracks may also have Drum Programs.)
Following the names for each of the 1,271 preset patterns,
the musical style and the name of the most suitable Drum
Programs are partially displayed. (Refer to the VNL for a
complete list of Drum Programs.)
By loading a drum track and the corresponding preset
pattern, you can instantly set up a Drum Track to match
the Template Song.
8. To load the Drum pattern, press the OK button.
After the pattern is loaded, the Measure will count up
automatically. You can then copy another pattern if
desired. For instance, you can use different patterns one
after the other to build up a song, with different patterns
for verse, chorus, and bridge.
After you’ve finished adding patterns, press the EXIT
button, and you’re done!
2. In the From field, choose the Template Song you want
to load.
3. Check the “Copy Pattern to MIDI Track too?” checkbox.
When this box is checked, a dialog box for copying a
pattern will automatically appear after Load Template
Song is complete.
If this is not checked, only the selected Template Song
will be loaded.
4. Press the OK button to load the template song, or
press the Cancel button to exit without making
changes.
When you press OK, the Template Song’s settings will be
copied into the current Song.
Saving your own Template Songs
You can also save your own Template Songs:
1. Set up a Song to your taste, including Programs,
effects, Arpeggiator settings, the Song name, and so
on.
2. In the SEQUENCER > Home– Mixer page, press the
page menu button and select the Save Template Song
command.
3. In the To field, select one of the 16 user Template
Song locations,U00…15.
4. Press OK to save the Template Song.
For more information, see “Save Template Song” on
page 523 of the PG
78
Page 85

Recording MIDI in real-time
Location
Track Select
MIDI recording Recording MIDI in real-time
When you’ve finished with “Preparations for recording,” as
described above, you can start recording!
Real-time recording lets you record your performance on the
NAUTILUS, including the notes that you play, joystick and
knob movements, and so on. This is in contrast to step
recording, which is described in a later section.
The default is to record onto a single track at a time. As an
alternative, multitrack recording allows you to
simultaneously record multiple channels of data onto
multiple tracks. This is handy for use when recording RPPR,
ARP, or the Drum Track, or for recording the output of an
external sequencer in a single pass.
Recording setup
In Home– Recording Setup page, select the realtime
recording method you want to use.
Overwrite
With this method, the musical data previously recorded on a
track is overwritten by the newly recorded data. When you
perform overwrite recording on a previously-recorded track,
its musical data will be deleted and replaced by the newly
recorded data.
Normally you will use this method to record, and then
modify the results by using other types of realtime recording
or MIDI event editing.
1. Use “Track Select” to select the track that you want to
record.
2. Set the Recording Setup to Overwrite.
3. In “Location,” specify the location at which you wish
to begin recording.
4. Press the SEQUENCER REC button, and then press
the SEQUENCER START/STOP button.
If the Metronome Setup is still set to the default settings,
the metronome will sound for a two-measure pre-count,
and then recording will begin.
Play the keyboard and move controllers such as the
joystick to record your performance.
5. When you finish playing, press the SEQUENCER
START/STOP button.
Recording will end, and the location will return to the
point at which you begin recording.
79
Page 86

Creating songs (SEQUENCER mode)
Overdub
With this method, the newly recorded musical data is added
to the existing data.
When you perform overdub recording on a previouslyrecorded track, the newly recorded data will be added to the
previously-recorded data.
It is best to select this mode if you will be recording
additional control data, recording a drum pattern, or
recording the tempo in the master track. With this mode,
data can be added without erasing the existing performance
data.
1. Use “Track Select” to select the track that you want to
record.
2. Set the Recording Setup to Overdub.
6. When you finish recording, press the SEQUENCER
START/STOP button.
Recording will end (playback will continue).
Note: Instead of pressing the SEQUENCER REC button
in steps 5 and 6, you can use a foot switch connected to
the ASSIGNABLE SWITCH jack.
Set the GLOBAL > Controllers/Scales page “Foot Switch
Assign” to Song Punch In/Out. For more information, see
“Setting up the Assignable Switch and Pedal” on
page 175.
7. Press the SEQUENCER START/STOP button.
Playback will stop, and you will return to the location that
you specified in step 3.
Auto punch-in
First you must specify the area that will be re-recorded. Then
recording will occur automatically at the specified area.
With this method, the musical data previously on the track is
overwritten by the newly recorded data.
1. Use “Track Select” to select the track that you want to
record.
2. Set the Recording Setup to Auto Punch In.
3. For the rest of the procedure, refer to steps 3–5 of
“Overwrite.”
Manual punch-in
While the song is playing, you can press the SEQUENCER
REC button or a connected pedal switch at the desired
location to start or stop recording. With this method, the
musical data previously on the track is overwritten by the
newly recorded data.
1. Use “Track Select” to select the track that you want to
record.
2. Set the Recording Setup to Manual Punch In.
3. In “Location,” specify a location several measures
earlier than the point at which you wish to begin
recording.
4. Press the SEQUENCER START/STOP button.
Playback will begin.
5. At the point at which you wish to begin recording,
press the SEQUENCER START/STOP button.
Recording will begin. Play the keyboard and operate
controllers such as the joystick to record your
performance.
3. In “M (Auto Punch In Start Measure), “M (Auto
Punch In End Measure)” specify the area that you
wish to record.
For example if you specify M005–M008, recording will
occur only from measure 5 to measure 8.
4. In “Location,” specify a location several measures
earlier than the point at which you wish to begin
recording.
5. Press the SEQUENCER REC button, and then press
the SEQUENCER START/STOP button.
Playback will begin.
When you reach the starting location you specified in step
3, recording will begin. Play the keyboard and operate
controllers such as the joystick to record your
performance. When you reach the ending location you
specified in step 3, recording will end. (Playback will
continue.)
6. Press the SEQUENCER START/STOP button.
Playback will stop, and you will return to the location you
specified in step 4.
80
Page 87

MIDI recording Recording MIDI in real-time
Loop All Tracks
This method lets you continue recording as you add musical
data.
The specified region can be recorded repeatedly. This is
ideal when recording drum phrases, etc.
1. Use “Track Select” to select the track that you want to
record.
2. Set the Recording Setup to Loop All Tracks.
If Multi REC is checked, it will not be possible to select
Loop All Tracks.
3. In “M (Loop Start Measure), “M (Loop End
Measure)” specify the area that you wish to record.
For example if you specify M004–M008, recording will
occur repeatedly (as a loop) from measure 4 to measure 8.
4. In “Location,” specify a location several measures
earlier than the point at which you wish to begin
recording.
5. Press the SEQUENCER REC button, and then press
the SEQUENCER START/STOP button.
Playback will begin. When you reach the starting location
you specified in step 3, recording will begin. Play the
keyboard and operate controllers such as the joystick to
record your performance.
When you reach the ending location you specified in step
3, you will return to the starting location, and continue
recording.
The musical data that is loop-recorded will be added to
the previously-recorded data.
6. You can also erase specific data even while you
continue loop recording.
If you press the SEQUENCER REC button during loop
recording, all musical will be removed from the currently
selected track as long as you continue pressing the button.
By checking the “Remove Data” check box you can erase
only the specified data. During loop recording, press the
note that you wish to delete, and only the data of that note
number will be deleted from the keyboard as long as you
continue pressing that note.
Similarly, bender data will be deleted as long as you tilt
the joystick in the X (horizontal) direction.
When you are once again ready to record musical data,
uncheck the “Remove Data” check box.
7. Press the SEQUENCER START/STOP button.
Playback will end, and you will return to the recording
start location that you specified in step 4.
If Loop All Tracks is selected, normal playback will be
looped as well.
Multi (multitrack recording)
Multitrack recording allows you to simultaneously record
onto multiple tracks, each with a different channel.
1. In the upper right of the LCD screen, check “Multi
REC.”
2. Make the desired Recording Setup settings.
You can record using Overwrite, Overdub, Manual Punch
In, or Auto Punch In.
3. Use “Location” to specify the measure at which
recording will begin.
4. For the track you want to record, press Mute/REC to
make it indicate Rec.
5. Press the SEQUENCER REC button, and then press
the SEQUENCER START/STOP button.
With the default settings for Metronome Setup, the
metronome will sound for a two-measure pre-count, and
then recording will begin. Now you can perform on the
keyboard and controllers, and use the ARP or RPPR
functions if desired.
6. Press the SEQUENCER START/STOP button.
Playback will stop, and you will return to the location
specified in step 4.
81
Page 88

Creating songs (SEQUENCER mode)
Bass drum: C3
Snare: E3
Hi hat: F#3
An example of realtime recording
In this example, we’ll assign a drum program to MIDI Track
01 and create the following one-measure drum phrase.
1. Create a new song, and specify a drum program for
MIDI Track 01. Use “Track Select” to select MIDI
Track 01, and verify that you hear a drum program.
2. Go to the Home– Recording Setup page. In Recording
Setup, specify “Loop All Tracks” and set it to M001M001.
For more information, see “Loop All Tracks” on page 81.
With this setting, measure 1 will be recorded repeatedly.
The newly recorded data will be added at each pass.
3. Set “REC Resolution” to .
4. Press the SEQUENCER REC button, and then the
SEQUENCER START/STOP button.
The metronome will sound a two-measure count-down,
and then recording will begin.
5. As shown in the musical example printed above, start
by playing the C3 note of the keyboard to record the
bass drum for one measure.
6. Next, play the E3 note of the keyboard to record the
snare for one measure, and then the F#3 note to
record the hi-hat.
7. Press the SEQUENCER START/STOP button to stop
recording.
8. Play back the result, and listen to the drum
performance you recorded.
Press the SEQUENCER START/STOP button. When
you’ve finished listening, press the SEQUENCER
START/STOP button once again to stop playback.
9. If you’re not satisfied with the result, execute the
Compare command to return to the state prior to
recording, and then re-record from step 4.
Note: When you’re finished recording, change the
Recording Setup back to the normally-used Overwrite
(Home– Recording Setup page).
In addition, access the Home– MIDI Track Loop page,
check “Track Play Loop” for MIDI Track 01, and set the
“Loop Start Measure” and “Loop End Measure” to 001.
When you play back, MIDI track 01 will repeatedly play
the first measure.
82
Page 89

MIDI step recording
MIDI recording MIDI step recording
Step recording is the recording method in which you specify
the duration and strength of each note, and use the keyboard
to specify the pitch of each MIDI note. You can use the Rest
button and Tie button of the dialog box to input rests and
ties.
Step recording is useful when you want to create
mechanically precise beats, or when you need to record a
phrase that would be difficult to play by hand “in realtime,”
or when you find it difficult to play extremely complicated
or rapid passages.
An example of step recording
In this example, we’ll assign a bass program to MIDI Track
02 and step-record the following two-measure bass phrase.
1. Specify a bass program for MIDI Track 02. Use
“Track Select” to select MIDI Track 02, and verify
that you hear a bass program.
2. Go to the Track Edit– Track Edit page.
3. Set “From Measure” to 001.
With this setting, step recording will begin from measure
1.
4. Press the page menu button, and press page menu
command “MIDI Step Recording.”
A dialog box will appear.
5. In “Step Time,” use “Select” to specify the basic
timing value at which you will input notes and rests.
Input the first C3 note as (a dotted eighth note).
Use the radio button at the left to select .
You can choose from the range of (a whole note)– (a
32nd note).
Input a dotted note by selecting “.” with the radio buttons
at right.
You can specify “3” to enter a triplet. If you want to use
the unmodified length of the note that’s selected at the
left, choose “-”.
“Note Duration” indicates the length that the note itself
will sound. Smaller values will produce a staccato note,
and larger values will produce a legato note. For this
example, leave this setting unchanged.
“Note Velocity” is the velocity (playing strength), and
larger values will produce a louder volume. Set this to
Key.
If you select Key for this parameter, the velocity with
which you actually play the keyboard will be input.
6. On the keyboard, press and then release the first C3
note that you want to input.
The data you input will appear in the LCD screen as
numerical values. In the upper right, Measure 001 Beat
Tick 01.000 will change to Measure 001 Beat Tick
01.360. The next note you input will be placed at this
location.
7. Input the remaining notes as described in steps 5 and
6. (You’ve already input the first C3 note.)
In addition to the methods described in steps 5 and 6, you
can also use the following input methods.
• To input a rest, press the Rest button. This will input a
rest of the “Step Time” value.
• To modify the length of a note, you can modify the “Step
time” value before you input the note. However if you
want to extend the length (tie) of the note, press the Tie
button. At this time, the previously-input note will be
extended by the “Step time” length.
• To delete a note or rest that you input, press the Step
Back button. The previously-input note will be deleted.
pre
• To input a chord, simultaneously
desired chord. Even if you do not press them
simultaneously, notes that are pressed before you fully
remove your hand from all keys on the keyboard will be
input at the same location.
Step
Note
C3 . C3 key 001 / 01.000
G3 - G3 key 001 / 01.360
C4 - C4 key 001 / 02.240
C4 - C4 key 001 / 03.120
D3 - D3 key 001 / 03.240
Eb3 - Eb3 key 001 / 04.000
E3 - E3 key 001 / 04.240
F3 - F3 key 002 / 01.000
C3 - C3 key 002 / 01.360
Time:
Select
Step
Time:
. 3 -
- Rest button 001 / 02.000
- Rest button 001 / 03.000
- Rest button 002 / 01.120
ss the notes of the
Key,
Button
Measure/
Beat Tick
83
Page 90

Creating songs (SEQUENCER mode)
Step
Note
Time:
Select
F2 - F2 key 002 / 02.240
Tie - Tie button 002 / 03.000
F2 - F2 key 002 / 03.240
A2 - A2 key 002 / 04.000
A3 - A3 key 002 / 04.240
Step
Time:
. 3 -
- Rest button 002 / 02.000
- Rest button 002 / 03.360
- Rest button 002 / 04.360
Key,
Button
Measure/
Beat Tick
8. When you are finished recording, press the Done
button.
Press the SEQUENCER START/STOP button to play
back.
Go to the Home– MIDI Track Loop page, check Track
Play Loop for MIDI Track 02, set Loop Start Measure
to 001, and Loop End Measure to 002. MIDI track 02
will play measures 1–2 repeatedly.
9. If you’re not satisfie d with the result, use the Compare
command in the page menu commands to return to
the state prior to recording, and then re-record from
step 4.
When you begin step recording, all data in the MIDI track
that follows the measure where you began recording will
be erased. You need to be aware of this if you begin step
recording from a measure mid-way through the song.
If you want to copy data into a measure that already
contains data, perform step recording in an empty MIDI
track, and use the Move Measure or Copy Measure
menu commands. For more information, see “Copy
Measure” on page 543 of the PG, and “Move Measure”
on page 544 of the PG.
If you want to edit or add to the recorded data, you can
use the MIDI Event Edit function. For more
information, see “Event Edit” on page 551 of the PG.
84
Page 91

MIDI recording Recording the sound of a Combination or Program
Recording the sound of a Combination or Program
Here’s how you can easily copy the settings of a
Combination or Program, and then record using that sound.
Setup in SEQUENCER mode
(Copy From Combination and Copy From
Program)
In SEQUENCER mode, you can use the “Copy From
Combi” and “Copy From Program” page menu commands
to set up a Song based on a Combination or Program. In this
example, we’ll explain how to set up a song based on a
combination.
Note: Make sure that the global MIDI channel (GLOBAL >
MIDI– MIDI page, MIDI Channel) is set to 01.
1. Select a new, empty song.
2. Select the page menu command “Copy From Combi.”
A dialog box will appear.
Select the program or combination that you want to copy
(i.e., the copy source).
We will copy the effect settings of the combination as
well, so check the IFXs-All, MFXs and TFXs check
boxes.
Check Multi REC Standby. The Stat us will be
automatically set to REC for the MIDI tracks needed to
record that combination.
Press the OK button to execute the copy.
Notice that when you execute this command, the
Play/Rec/Mute setting of each track will be set
automatically. The Multi REC check box will be
checked.
3. Begin recording.
Press the LOCATE button to set the location to
001:01.000.
Press the SEQUENCER REC button, and then press the
SEQUENCER START/STOP button.
Note: If you play the keyboard during the pre-count
before recording, ARP and the Drum Track will start
playing the moment recording begins.
4. Record your performance.
5. When you are finished performing, press the
SEQUENCER START/STOP button.
If you made a mistake or want to re-record, you can use
the Compare function to re-record as many times as you
want.
85
Page 92
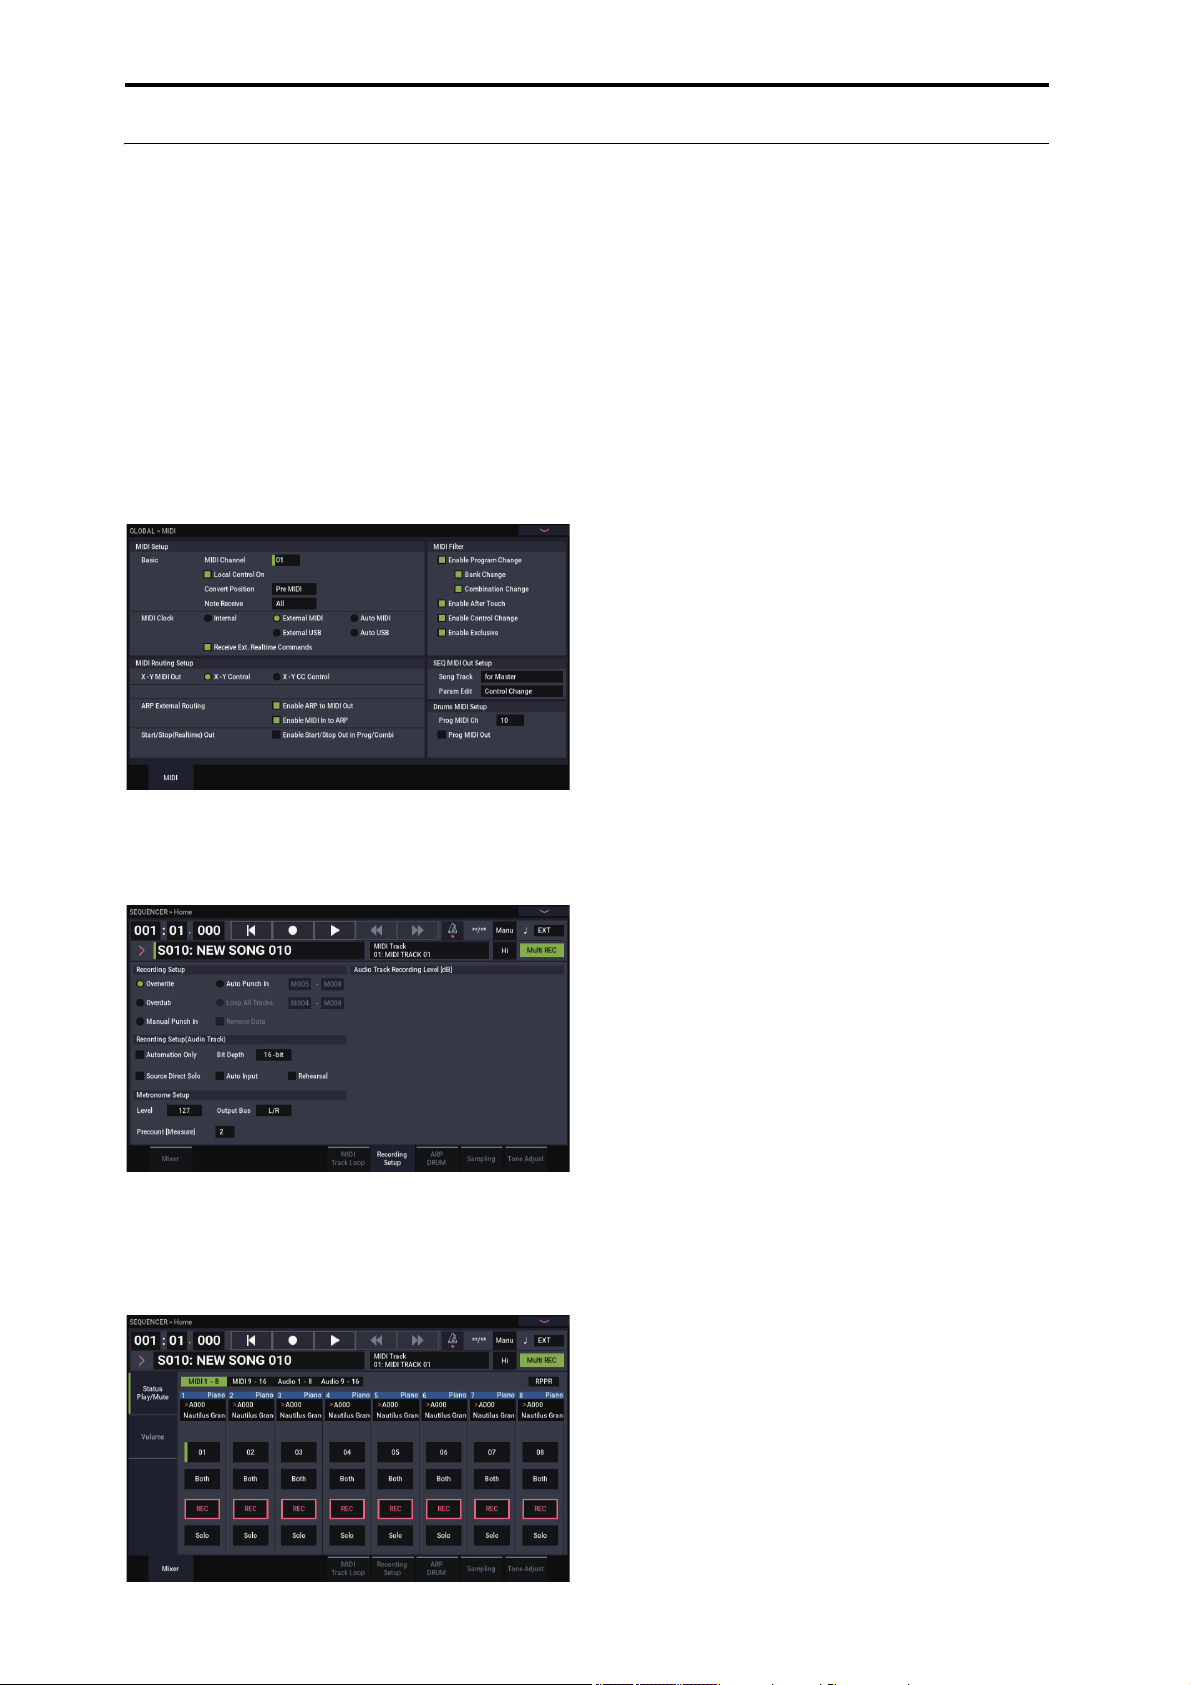
Creating songs (SEQUENCER mode)
Recording multiple MIDI tracks from an external sequencer
1. Make sure that the MIDI OUT of your external
sequencer is connected to the MIDI IN of the
NAUTILUS.
If it is not connected, turn off the power, make the
connection, and then turn the power on.
For more information, see “MIDI applications” on
page 929 of the PG.
2. In the GLOBAL > MIDI– MIDI page, set MIDI Clock
to External MIDI. With this setting, the NAUTILUS
will synchronize to MIDI clock messages from your
external sequencer.
Make sure that Receive Ext. Realtime Commands is
checked.
3. Create a new song in SEQUENCER mode, and in the
SEQUENCER > Home– Recording Setup page, check
the Multi REC check box. Set Recording Setup to
Overwrite.
5. In the SEQUENCER > Track Parameters– MIDI
page, use MIDI Channel to specify the MIDI channel
of each track.
Set the MIDI channel of each NAUTILUS track to match
the MIDI channel of each external sequencer track. Data
of the matching channel will be recorded on each
NAUTILUS track.
Make sure that Status is set to INT or Both.
6. Press the LOCATE button to set the location to
001:01.000.
7. Press the SEQUENCER REC button to enter recordstandby mode.
8. Start your external sequencer.
The NAUTILUS’ sequencer will automatically begin
recording when it receives the MIDI Start message
transmitted by your external sequencer.
9. When playback has ended, stop your external
sequencer.
The NAUTILUS’ sequencer will automatically stop
recording when it receives the MIDI Stop message
transmitted by the external sequencer. You can also stop
recording by pressing the SEQUENCER START/STOP
button of the NAUTILUS.
After this, you can play back the newly recorded
sequence:
10.In the GLOBAL > MIDI page, set MIDI Clock to
Internal.
11.Set “Tempo Mode” to Auto.
12.Press the SEQUENCER START/STOP button to play
back.
Note: If the correct sounds are not selected when you
start playing back, you may be able to solve the problem
by using the page menu command “MIDI Event Edit”
(Track Edit) to re-specify the Program Change data.
4. Press Mute/Rec button on the SEQUENCER >
Home– Mixer page to select “REC” for the tracks you
want to record.
For the tracks you don’t want to record, turn Mute On or
Off (Play mode).
86
Page 93

Recording System Exclusive events
Exclusive messages received from an external MIDI device
or the parameter changes produced when you edit a MIDI
track parameter, audio track parameter or effect parameter
can be realtime-recorded on any MIDI track.
During playback, the exclusive messages you recorded will
control the track parameters and effect parameters of the
song, and can be sent to external MIDI devices.
Note: You can use the page menu command “Put Effect Setting to Track” to insert an exclusive event containing the
parameter settings for an insert effect, master effect or total
effect into the desired location of a track, so that these settings will automatically switch during playback.
GM, XG, and GS exclusive messages can be recorded on
a track, but the NAUTILUS’s tone generator will not
respond to these messages.
Recording internal parameter changes
You can use SysEx for automation of internal NAUTILUS
effects and Program parameters.
As an example, let’s record a short phrase on track 1, add an
insert effect, and then record parameter changes for that
effect on an unused track.
Note: In order to record system exclusive messages, make
sure that the GLOBAL > MIDI– MIDI setting “Enable
Exclusive” is checked.
MIDI recording Recording System Exclusive events
• Select MIDI Track 09 in “Track Select.” Then press the
SEQUENCER REC button and then the SEQUENCER
START/STOP button, and begin recording.
• At the appropriate time while recording, adjust the
parameter(s) that you want to realtime-record.
Select another effect for IFX1 in the IFX– Insert FX
page, and edit the effect parameter values, or use the
Home– Tone Adjust page Tone Adjust controls to edit the
sound in realtime.
Note: For details on the effects parameters that you can
record in real-time, please see “System Exclusive events
supported in Sequencer mode” on page 557 of the PG.
3. Stop recording.
Note: Exclusive messages are always recorded on the
current track selected by “Track Select.” In this example,
they are recorded on MIDI track 9.
Note: In the MIDI event edit screen you can view the
recorded exclusive events and their location. Exclusive
events are displayed as “EXCL”.
To view these events, go to the Track Edit– Track Edit
page, and select the page menu command “MIDI Event
Edit.” Then in the Set Event Filters dialog box, check
Exclusive and press the OK button.
Event displayLocation
1. Select the desired program for MIDI track 1, and
route it to IFX1. Then record a phrase of about
sixteen measures.
• In the Home– Mixer page, use “Program Select” to select
the desired program for MIDI Track 01.
• In the IFX– MIDI Routing1 page, route the MIDI Track
01 Bus Select (IFX/Indiv. Out Assign) to IFX1. Then in
the IFX– Insert FX page, select the desired effect for
IFX1.
• Select MIDI Track 01 in “Track Select.” Then press the
SEQUENCER REC button and then the SEQUENCER
START/STOP button, and record a phrase of about
sixteen measures.
2. Select MIDI Track 09 in “Track Select,” and record
parameter changes as desired.
Note: For this example, select an empty track. If you
want to record onto a MIDI track that already contains
data, set the Home– Recording Setup page Recording
Setup to “Overdub,” as described on page 80.
Exclusive events cannot be changed to a different type of
event. Nor can other events be changed into exclusive
events.
4. If you go to the page (e.g., Insert Effect) that shows the
parameters you adjusted in realtime, you can watch
the recorded changes be reproduced while the song
plays back.
87
Page 94

Creating songs (SEQUENCER mode)
Exclusive messages that can be recorded in realtime
The following exclusive messages can be recorded in realtime:
• Exclusive messages received from an external MIDI
device
• Parameter changes in SEQUENCER mode (see “System
Exclusive events supported in Sequencer mode” on
page 557 of the PG)
• Master Volume universal exclusive messages assigned to
the foot pedal or a knob
88
Page 95

Recording patterns
Pattern Select
MIDI recording Recording patterns
Recording and editing patterns
You can record patterns in either of two ways; realtime
recording or step recording. However, pattern realtime
recording differs from song realtime recording in that you
can use only Loop type recording.
You can edit patterns by using Event Edit operations to
modify the recorded data or insert new data. You can also
use the Get From MIDI Track page menu command to
convert a desired region of performance data from a MIDI
track into a pattern. Conversely, you can use the Put to
MIDI Track or Copy to MIDI Track page menu
commands to place or copy the performance data from a
pattern into a MIDI track.
You can also use your patterns with the Drum Track, via the
Convert to Drum Track Pattern menu command on
Pattern/RPPR.
Recording patterns in real-time
Here’s how you can use realtime recording to create a
pattern. User patterns can be accessed by the RPPR function
in the same way as preset patterns, and can be copied to or
placed in a song. Playback data from a track can also be
copied to a pattern.
When realtime-recording a pattern, a pattern of the specified
number of measures will playback repeatedly, allowing you
to continue adding musical data to it.
1. Create a new song, and as described in “Preparations
for recording” on page 76, set the track to the
program that will be used by the pattern.
2. Go to the Pattern/RPPR– Pattern Edit page (See the
diagram below).
5. Select the page menu command “Pattern Parameter”.
A dialog box will appear.
6. Set the number of measures in the pattern to a
“Length” of 04 (four measures), and set “Meter” to a
time signature of 4/4. Press the OK button.
7. As necessary, set “REC Resolution” to apply realtime
quantization.
8. Begin realtime recording.
You can record in the same way as you did when
recording tracks with Loop All Tracks. (See “Loop All
Tracks” on page 81.)
Press the SEQUENCER REC button, and then press the
SEQUENCER START/STOP button.
After the pre-count, pattern recording will begin. Play the
keyboard and operate the joystick and other controllers to
record your performance.
When you reach the end of the pattern, the sequencer will
return to the beginning of the pattern and continue
recording. If you continue recording, the newly recorded
data will be added to the previously-recorded data.
9. If you want to delete specific data while you continue
pattern recording, you can press the SEQUENCER
REC button or check the “Remove Data” check box.
For details refer to step 6 of “Loop All Tracks” on
page 81.
10.Press the SEQUENCER START/STOP button to stop
recording.
If you made a mistake or decide to re-record, press the
SEQUENCER START/STOP button to stop recording,
and press the “Compare” command in the page menu to
execute.
3. Use “Track Select” to select the track that you will use
to record the pattern.
The pattern will sound with the program and other
settings of the selected track.
4. Set “Pattern (Pattern Bank)” to User, and set “Pattern
Select” to U00.
User patterns U00–U99 can be created for each song.
89
Page 96

Creating songs (SEQUENCER mode)
Control data in pattern recording
To record control data in a pattern, you should restore the
control data to its normal value within the pattern. If you fail
to restore the normal value, unnecessary control data may
remain in a “stuck” position when you place the pattern in a
song or use the RPPR function to play the pattern. However,
the following control data will be automatically reset to the
following values when the song or RPPR function finishes
playing the pattern, or when playback is halted.
Controller Reset value
Modulation 1 (CC#01) 00 (zero)
Modulation 2 (CC#02) 00 (zero)
Expression (CC#11) 127 (max)
Damper switch (CC#64) 00 (zero)
Sostenuto switch (CC#66) 00 (zero)
Soft switch (CC#67) 00 (zero)
EG sustain level (CC#70) 64 (center)
Resonance level (CC#71) 64 (center)
EG release time (CC#72) 64 (center)
EG attack time (CC#73) 64 (center)
Low pass filter cutoff (CC#74) 64 (center)
EG decay time (CC#75) 64 (center)
LFO1 speed (CC#76) 64 (center)
LFO1 depth (pitch) (CC#77) 64 (center)
LFO1 delay (CC#78) 64 (center)
Filter EG intensity (CC#79) 64 (center)
SW1 modulation (CC#80) 00 (zero)
SW2 modulation (CC#81) 00 (zero)
Pitch bender 00 (zero)
Using ARP for pattern recording
If ARP is set to operate for the track that is selected for
“Track Select,” and record the performance of ARP into the
pattern.
Other ways to record
Multi-track recording with ARP and the
Drum Track
You can record multi-track performances generated by ARP
and/or the Drum Track. For more information, see
“Arpeggiator settings in SEQUENCER mode” on page 166
Multi-track recording with RPPR
You can record multi-track performances generated by
RPPR. For more information, see “Using RPPR (Realtime
Pattern Play/Record)” on page 106.
90
Page 97

Audio recording
Audio Track 01
SONG00
Setting
parameters
Region
Automation Events
Volume, Pan, Send, EQ
Audio events
Start, Volume, Region No.
Region00 Region01
0000: Guitar1
0001: Guitar2
0002: Voice1
Song No.: Song00
Track No.: Track01
Allow Tempo: On
Tempo: 120
Start: 000
End: 95999
Anchor Point: 0
Wave Name: GUITAR1.WAV
Setting
parameters
Performance
data
Performance
data
Automation Events
Volume, Pan, Send, EQ
Audio events
Start, Volume, Region No.
NEWFILE.SNG NEW SONG Tracks
PATTERN 00
Regions TRK01_00
TRK01_01
TRK02_00
NEWFILE_A SONG000 ATRACK01
GUITAR1.WAV
VOICE1.WAV
GUITAR2.WAV
Region02
Audio Track 02
ATRACK02
Audio recording overview
Audio recording Audio recording overview
• There are sixteen audio tracks. They allow 16- or 24-bit
linear PCM recording with a maximum time of
80 minutes.
• Automation data (volume, pan, EQ, send 1/2) can be
recorded for each track.
• Up to sixteen tracks can be played back simultaneously,
and up to four tracks can be recorded simultaneously.
• The Stereo Pair function lets you assign two tracks as a
pair for recording, control, and editing.
• You can choose from a broad range of internal buses as
the recording source; Audio Input 1–2, USB 1–2, REC
Bus 1–4, the main L/R outputs, or individual outputs 1–4
(yes, you can directly record from the outputs, all in the
digital domain). You can also route the signal very
flexibly, for example by inserting effects into external
audio sources and recording the result.
• When you record, an audio event and region data are
created and assigned to the track. The region data contains
a link to the WAVE file (audio data) that’s recorded on
the internal drive. You can edit in a variety of ways, for
example by changing the location of the audio event, or
by editing/replacing the region data or WAVE file.
• Auto or manual punch-in/out are provided.
• The Rehearsal function lets you practice a punch-in/out
without actually recording.
• You can use the mixer to adjust the pan and volume etc.
of the audio tracks, and record these operations as
automation events so that the pan and volume changes
will be reproduced during playback.
When recording audio tracks, the MIDI Clock must be
set to Internal. For more information, see “MIDI Clock
(MIDI Clock Source)” on page 653 of the PG.
Audio events and regions in an audio
track
When you record on an audio track, the actual audio data is
recorded directly on the internal drive as a WAVE file. At
this time, a “region” is also created; this contains
information specifying what portion of that WAVE file is to
be actually played back. In addition, an “audio event” which
assigns that region is created; this specifies the location in
the song at which the audio will play.
When playback reaches a point in the song where an audio
event is located, the WAVE file on the internal drive will be
played as specified by the audio event and the region. In
other words, the audio will not play if either the audio event,
the region, or the WAVE file are missing.
Please note that audio events and regions can be deleted
by audio event editing or region editing, and can also be
easily lost if you turn off the power before saving to the
internal drive. If only the WAVE file is left on the internal
drive, this will occupy internal drive capacity for no
purpose; we recommend that you execute “Delete
Unused WAV Files” to free up any such wasted space.
91
Page 98

Creating songs (SEQUENCER mode)
How audio data is stored on the internal
drive
When you save Songs to internal drive, they’re stored in an
.SNG file. This .SNG file contains all of the data from
SEQUENCER mode, including all of the Songs in memory,
except for the related audio files.
When you save an .SNG file, its related audio files are stored
in a separate directory. This directory is created
automatically, within the same directory as the .SNG file.
(It’s also created if you load a pre-existing .SNG file which
doesn’t have a matching audio directory.) The directory’s
name consists of the .SNG file name followed by “_A” (for
“Audio”).
For instance, if the .SNG file is named WAMOZART.SNG,
its audio directory will be named WAMOZART_A.
This main directory contains sub-directories for each song,
named SONG000, SONG001, etc. These in turn contain subdirectories for each audio track, named ATRACK01,
ATRACK02, and so on. Within each of the track subdirectories, each individual audio take is stored as a WAVE
file.
Move or re-name audio and .SNG files together
If you move or re-name an existing .SNG file, make sure to
move or re-name its corresponding audio directory as well.
The main audio directory must be in the same folder as the
.SNG file, and must be named as described above.
Temporary audio files
If you’re recording a new song, and haven’t yet saved it as
an .SNG file, the audio files are stored in a temporary
location on disk. The directory structure is the same as
described above, except that the main audio directory is
named TEMP.
Once you save the song(s) to an .SNG file, these directories
and audio files will be copied to the new “_A” folder
automatically. On the other hand, if for some reason you
don’t or can’t save before turning off the power, you’ll be
given the chance to restore these audio files the next time
that you start up the instrument, as described below.
Recovering temporary audio files
If there are temporary audio files from the previous session,
you’ll see the following dialog the next time you start up the
NAUTILUS:
/TEMP folder detected.
This folder may contain unsaved WAVE files.
Do you want to restore the /TEMP folder, or delete it
from the disk?
[Restore] [Delete]
If you don’t intend to use the WAVE files, we recommend
that you delete them so they don’t waste space on the
internal drive. To delete them, press the Delete button.
If you want to save these files, press the Restore button to
keep them.
Note that while the audio files can be recovered this way, the
rest of the sequencer data cannot be restored.
92
Page 99

Audio recording Audio input settings and recording source selection
Audio input settings and recording source selection
On the Audio Input tab page of the Home-Sample page, you
can select the audio source to record, and operate the
play/mute, solo, pan and volume controls when recording.
Use Global Setting
You can configure the audio inputs separately for each Song,
if desired. Alternatively, you can use the Global setting, as
made on the GLOBAL > Basic Setup– Audio page.
If this is left unchecked, the Audio Input (Input 1, 2 and USB
1, 2) settings that are configured on the SEQUENCER >
Home– Sampling:Audio Input page will be enabled.
Audio Input settings
Just as in PROGRAM and COMBINATION modes,
SEQUENCER mode includes a mixer for the audio inputs,
including analog, and USB. You can use this to mix and
process the inputs prior to recording, if you like. For
instance, you can mix several inputs together and send them
to the same REC bus, or process an input through effects and
then record the result.
As an alternative, you can ignore the mixer settings and just
record directly from the inputs.
Input 1 & 2 are the analog audio inputs from the INPUT 1
& 2 jacks. Turn the Audio In button on to enable the INPUT
1/2 jacks.
Press the Setup button of Audio In to display the Analog
Input Setup dialog box. Switch “Input Select” to “Mic” or
“Line” according to the device that is connected, and adjust
the Analog Input Gain.
For more information, see “Analog Audio Inputs” on page 5.
USB 1 & 2 are the left and right channels of the USB audio
input. For more information, see “USB” on page 5.
Bus Select
This specifies the output bus for each audio signal.
Off: The external audio input signal will not be sent to any
bus. However, you can still record the external audio signal
directly by using the Home– Mixer page Audio Track REC
Source setting to choose an external input (Audio Input 1/2,
USB 1/2) for recording.
L/R: The external audio input signal will be sent to the L/R
bus. Choose this when you want other signals such the
NAUTILUS’ internal tone generator to be recorded along
with an external audio source. Set REC Source to L/R.
IFX1…12: The external audio input signal will be sent to
the IFX1–12 bus. Choose this when you want to apply an
insert effect while recording. Set REC Source to match the
post-IFX Bus Select setting.
1…4: The external audio input signal will be sent in mono to
the selected individual output.
1/2 and 3/4: The external audio input signal will be sent via
Pan in stereo to Individual 1/2 or 3 /4. Set REC Source to
the corresponding INDIV. setting.
Be aware that if you change Bus Select from Off to L/R
or IFX, the volume level from AUDIO OUT L/MONO
and R jacks or from the headphone jack may increase
abruptly. Please use caution.
FX Ctrl Bus
This sends the external audio input signal to the FX Control
bus (stereo two-channel (FX Ctrl1, 2)). For more
information, see “FX Control Buses” on page 735 of the PG.
REC Bus
This sends the external audio input signal to the REC buses
(four mono channels: 1, 2, 3, 4).
The REC buses are dedicated internal recording buses that
you can use for recording or sampling audio tracks.
Recording becomes possible if you choose a REC bus as the
“Source Bus.” For example, you can use the REC buses if
you want to record only an audio input source that is being
played along with the song being output from the L/R bus
(i.e., record the input source, but not the song playback). You
can also mix several audio inputs to the REC buses, or mix
the direct signal from audio inputs to REC buses along with
post-IFX sound and record the result.
Off: The signal will not be output to the REC buses.
Normally you will leave this Off.
1, 2, 3, 4: The external audio input signal will be sent to the
specified REC bus. The Pan setting is ignored, and the
signal is sent in monaural.
1/2, 3/4: The external audio signal will be output to the REC
buses in stereo. According to the Pan setting, it will be sent
in stereo to buses 1 and 2, or 3 and 4.
Send1, Send2
These specify the level at which the external audio input
signal will be sent to the master effects.
Send1 sends the signal to master effect 1.
Send2 sends the signal to master effect 2.
If Bus Select is set to IFX1–12, the send levels to the master
effects are specified by the Send1 and Send2 settings that
follow IFX1–12.
Mute On/Off
Mutes the external audio signal that is being inputted.
Solo On/Off
Solos the external audio signal that is being inputted.
Sound will be output only from channels whose Solo is On.
Other channels will be muted. Solo operation includes both
MIDI tracks and audio tracks.
93
Page 100

Creating songs (SEQUENCER mode)
Track: REC (Mono)
Track: REC (Mono)
Stereo
Level Pan
Insert
Eects
CLIP !
L/MONORAUDIO OUTPUT
HEADPHONES
Insert
Eects
L/R
BUS
REC
1/2
REC
3/4
Indiv.
1/2
Sequencer Playback
Keyboard
Level Pan
Insert
Eects
Audio Input 1
Audio Input 2
REC Source =
Audio Input 1, 2, 1/2
[x] Source Direct Solo
Total
Eects
Master
Eects
Recording
Monitor
BUS = L/R or IFX1-12
3/4
See the signal flowchart on the
page 449 of the PG for other
REC sources.
Pan
This specifies the panning of each external audio input
signal. If you are inputting a stereo audio source, you will
normally pan the inputs to L000 and R127 respectively.
Level
This controls the level of the external audio signal. The
default is 127.
Note: The analog audio signals from Audio Inputs 1 & 2 are
converted into digital form by an A/D converter. The meter
to the left of the Level fader shows the signal level immediately after conversion, and before the Level control. Level
sets the volume of the signal immediately after the meter.
If the sound is distorted even though the Level setting is very
low, see “Tips for eliminating distortion when using the
analog inputs” on page 97.
Avoiding extraneous noise
If cables are connected to any of the audio inputs (analog
or USB), any noise carried by the cables will enter into
the NAUTILUS mixer structure. This may include hiss,
hum, and other audio noise.
To avoid noise from unused audio inputs, either:
• Set the input’s Level to 0
or
• Set all of the bus assignments to Off, including Bus
Select (IFX/Indiv. Out Assign), REC Bus, and FX
Control Bus
If no audio cables are connected to the analog audio
inputs, the input signals are forced to zero, preventing any
additional noise.
Audio Track Mixer
You can specify the audio source to record from, and change
the Play/Mute status, Solo status, pan, and volume for
playback.
REC Source
This selects the so urce that will be recorded on the track. The
signal of the bus line you specify here will be recorded.
If you set the Track S elect field to Audio Track, you will be
able to monitor the REC Source of that track.
The options will differ slightly depending on whether or not
Stereo Pair is enabled.
Audio Input 1, 2, 1/2, or USB 1, 2, 1/2: Choose these to
directly record the audio input from the analog, or USB
inputs. The inputs will be recorded directly without passing
through the L/R bus, REC buses, or Individual buses. None
of the Audio Input settings will affect the recorded signal;
this includes Bus (IFX/Indiv), Pan, Level, Solo, and
Play/Mute. See the diagram “REC Source = Audio Input 1,
2, 1/2.”
If Stereo Pair is on and Audio Input 1/2 is selected, Audio
Input 1 will be input to the odd-numbered track, and Audio
Input 2 will be input to the even-numbered track. Similarly,
USB 1/2 will be input to the odd-numbered and evennumbered tracks respectively.
L, R, L/R: The L/R bus after passing through TFX 1 and 2
will be recorded. Choose this if you want to record an
external audio signal being sent to the L/R bus, or the sound
being produced by the NAUTILUS (and sent to the L/R bus)
in response to sequencer playback, keyboard playing, or
MIDI input.
If Stereo Pair is on, L is sent to odd-numbered tracks, and R
is sent to even-numbered tracks.
94
 Loading...