

Page 1

OWNER’S MANUAL
MANUEL D’UTILISATION
BEDIENUNGSANLEITUNG
Page 2

Precautions
Location
Using the unit in the following locations can result in a malfunction.
• In direct sunlight
• Locations of extreme temperature or humidity
• Excessively dusty or dirty locations
• Locations of excessive vibration
• Close to magnetic fields
Power supply
Please connect the designated AC adapter to an AC outlet of the correct voltage. Do not connect it
to an AC outlet of voltage other than that for which your unit is intended.
Interference with other electrical devices
Radios and televisions placed nearby may experience reception interference. Operate this unit at a
suitable distance from radios and televisions.
Handling
To avoid breakage, do not apply excessive force to the switches or controls.
Care
If the exterior becomes dirty, wipe it with a clean, dry cloth. Do not use liquid cleaners such as
benzene or thinner, or cleaning compounds or flammable polishes.
Keep this manual
After reading this manual, please keep it for later reference.
Keeping foreign matter out of your equipment
Never set any container with liquid in it near this equipment. If liquid gets into the equipment, it
could cause a breakdown, fire, or electrical shock.
Be careful not to let metal objects get into the equipment. If something does slip into the
equipment, unplug the AC adapter from the wall outlet. Then contact your nearest Korg dealer or
the store where the equipment was purchased.
THE FCC REGULATION WARNING (for U.S.A.)
This equipment has been tested and found to comply with the limits for a Class B digital device, pursuant to Part 15 of the FCC
Rules. These limits are designed to provide reasonable protection against harmful interference in a residential installation. This
equipment generates, uses, and can radiate radio frequency energy and, if not installed and used in accordance with the
instructions, may cause harmful interference to radio communications. However, there is no guarantee that interference will
not occur in a particular installation. If this equipment does cause harmful interference to radio or television reception, which
can be determined by turning the equipment off and on, the user is encouraged to try to correct the interference by one or more
of the following measures:
• Reorient or relocate the receiving antenna.
• Increase the separation between the equipment and receiver.
• Connect the equipment into an outlet on a circuit different from that to which the receiver is connected.
• Consult the dealer or an experienced radio/TV technician for help.
Unauthorized changes or modification to this system can void the user’s authority to operate this equipment.
CE mark for European Harmonized Standards
CE mark which is attached to our company’s products of AC mains operated apparatus until December 31, 1996 means it
conforms to EMC Directive (89/336/EEC) and CE mark Directive (93/68/EEC).
And, CE mark which is attached after January 1, 1997 means it conforms to EMC Directive (89/336/EEC), CE mark Directive
(93/68/EEC) and Low Voltage Directive (73/23/EEC).
Also, CE mark which is attached to our company’s products of Battery operated apparatus means it conforms to EMC Directive
(89/336/EEC) and CE mark Directive (93/68/EEC).
Page 3

Introduction
Thank you for purchasing the KAOSS PAD Entrancer
audio/video processor.
To ensure trouble-free enjoyment, please read this
manual carefully and use the product as directed.
Main features
Use the X-Y touch-pad to freely control audio and video
effects in a single performance.
By rubbing your finger across the touch-pad or
tapping it, you can simultaneously control different
effect parameters in the horizontal and vertical
directions, allowing you to manipulate images and/or
audio processing in realtime.
One hundred video effect programs and combinations
dramatically transform the images
The KAOSS PAD Entrancer provides one hundred
ready-to-use video effect programs, letting you apply
dramatic effects to any type of image. These effects
cover a wide range, from basic effects such as fade,
wipe, color modification, freeze, flip left/right, invert
top/down, rotate, and expand/shrink, through
sophisticated effects such as split-screen, inverted
image components, sandstorm, monochrome
compositing, delay, strobe, emboss, and even
shrinking while spinning! You can use the knobs to
easily select effect programs, and register eight of your
favorites to the program memory buttons.
One hundred audio effect programs for DJ mixes and
sound design
The KAOSS PAD Entrancer provides one hundred
audio effects that include filters, spatial-effects such as
delay and reverb, and modulation effects such as
flanger, phaser, and pan. Numerous analog synth
sounds and ambient sounds are also built-in, making
the KAOSS PAD Entrancer an ideal tool not only for
the VJ but also for DJ/remix/music production work.
Pad Motion function and Mute/Freeze function for
realtime operation
The Pad Motion function lets you capture a favorite or
complex movement on the touch-pad, which can then
be played back instantly to control images and sound.
The Mute/Freeze function lets you freeze the image
that is being output.
Easy connection to video equipment or other VJ devices
The KAOSS PAD Entrancer provides a full range of
inputs and outputs for connection to your VJ setup or
any other situation. MIDI connectors allow the KAOSS
PAD Entrancer to be used with external keyboards,
samplers, sequencers or effect devices as a controller
for sounds or effects. By using the KAOSS PAD
Entrancer with external equipment you can enjoy a
nearly infinite range of possibilities for controlling
images and sounds.
“Light” adds an exciting dimension to your live
performances
The pad color changes dramatically depending on the
position of your finger on the pad and on the type of
effect selected. These colorful lighting effects will add
a dramatic element to your performance.
Compact size that fits into any setup
With a compact size, and a highly functional design,
the KAOSS PAD Entrancer occupies minimal space
and will easily fit into any setup.
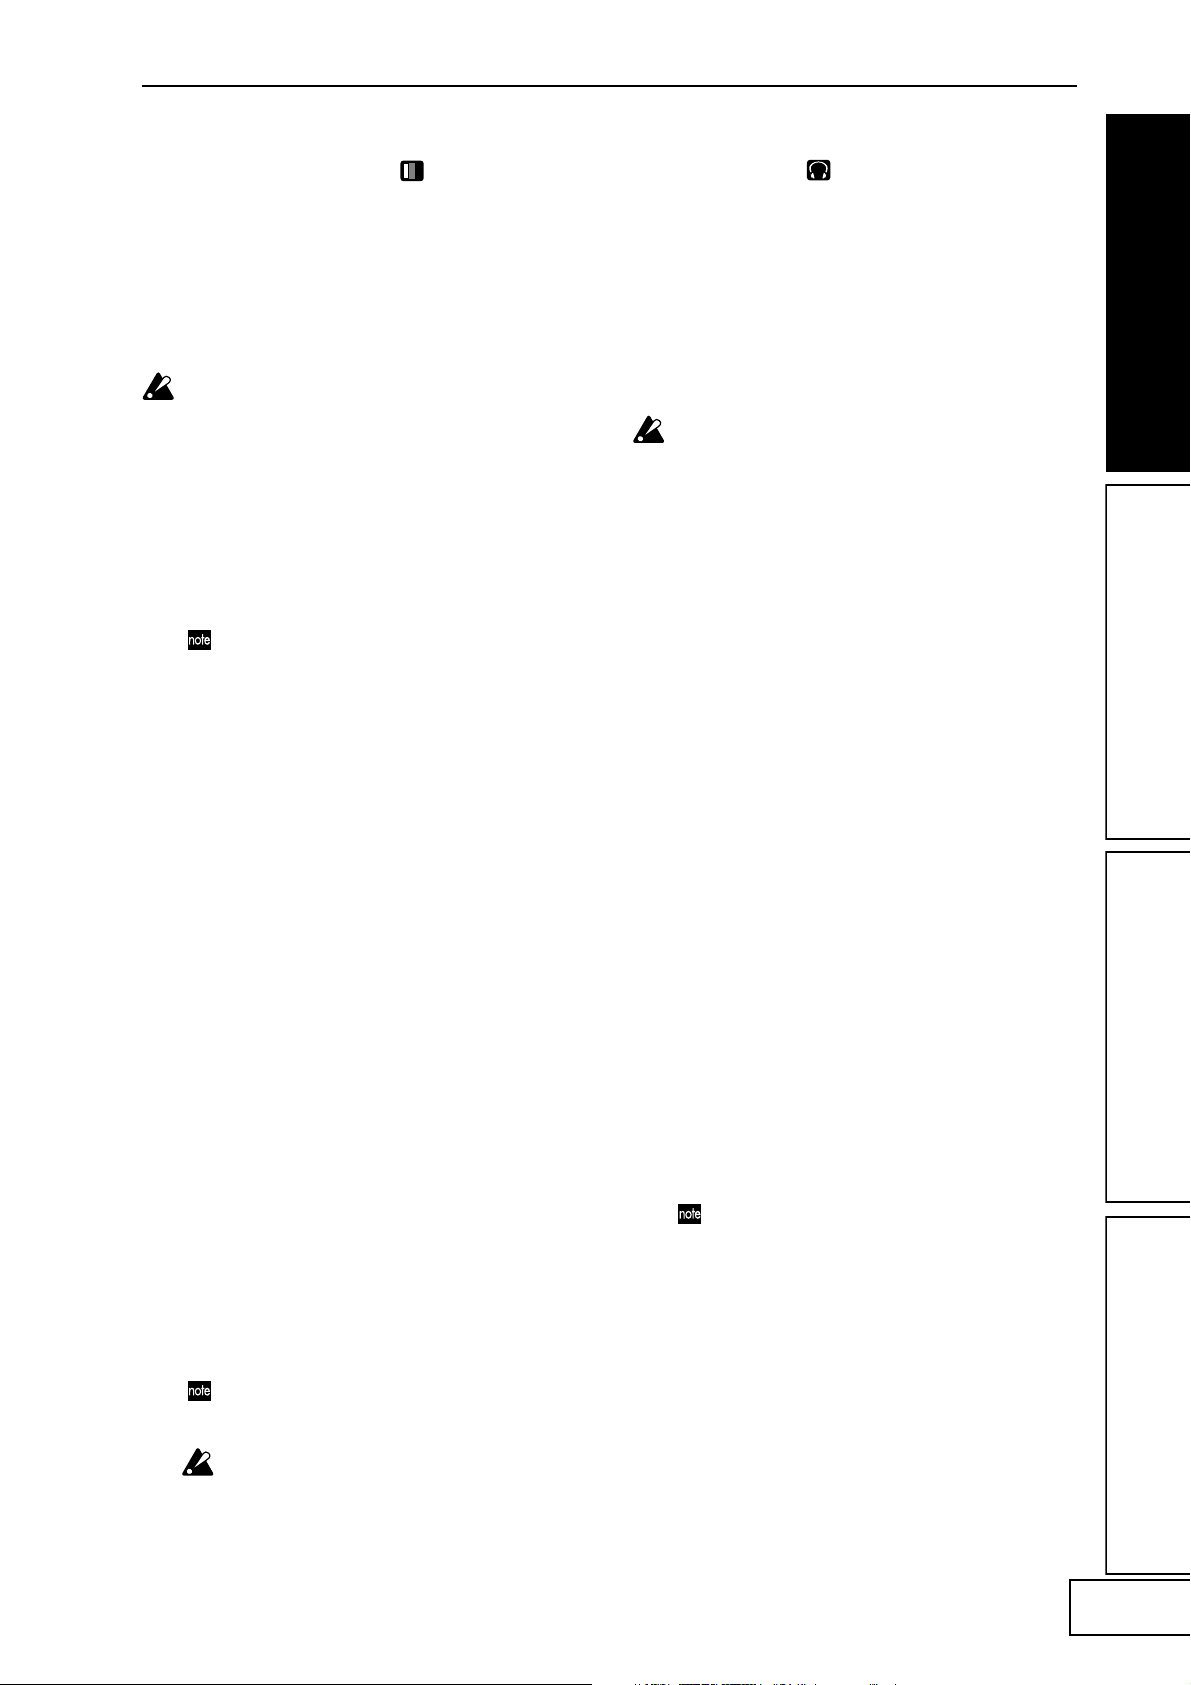
How to read this manual
Indicates a caution or warning.
Indicates a useful hint.
☞p.??
Indicates a reference page.
Indicates material relating to video effects.
Indicates material relating to audio effects.
BPM effect functionality with a variety of BPM detection
Twenty BPM effects can be synchronized to the BPM
to control delay time or the LFO speed of pan, phaser,
or flanger effects. You can set the BPM manually, use
the Auto BPM to automatically detect the beat of an
audio input source, use the Tap Tempo function to set
by BPM by tapping the Tap key, or detect BPM from
incoming MIDI Clock messages.
Ten types of Sample/Play effect let you sample motion
video, still images, and audio
You can directly sample and play back the output
image or an input phrase (a six-second motion video
sample, plus a still image and six-second phrase for
each of the two sample keys)
A note about using this video device
Some people subjected to stimulation by intense
light or rapidly flashing images may experience
symptoms of temporary muscle spasms or loss of
consciousness. If you experience any such
symptoms, stop using this device immediately
and seek medical attention.
In particular when using this device in a public
place or other location where there are large
numbers of people, you must take into account
people other than the operator, and avoid
creating and displaying continuous successions
of images that might produce this type of intense
stimulation.
Korg Corporation accepts no responsibility for
any health problem or personal or property
damage that may occur to the operator or
observers from use of this device in violation of
this warning.
1
Page 4
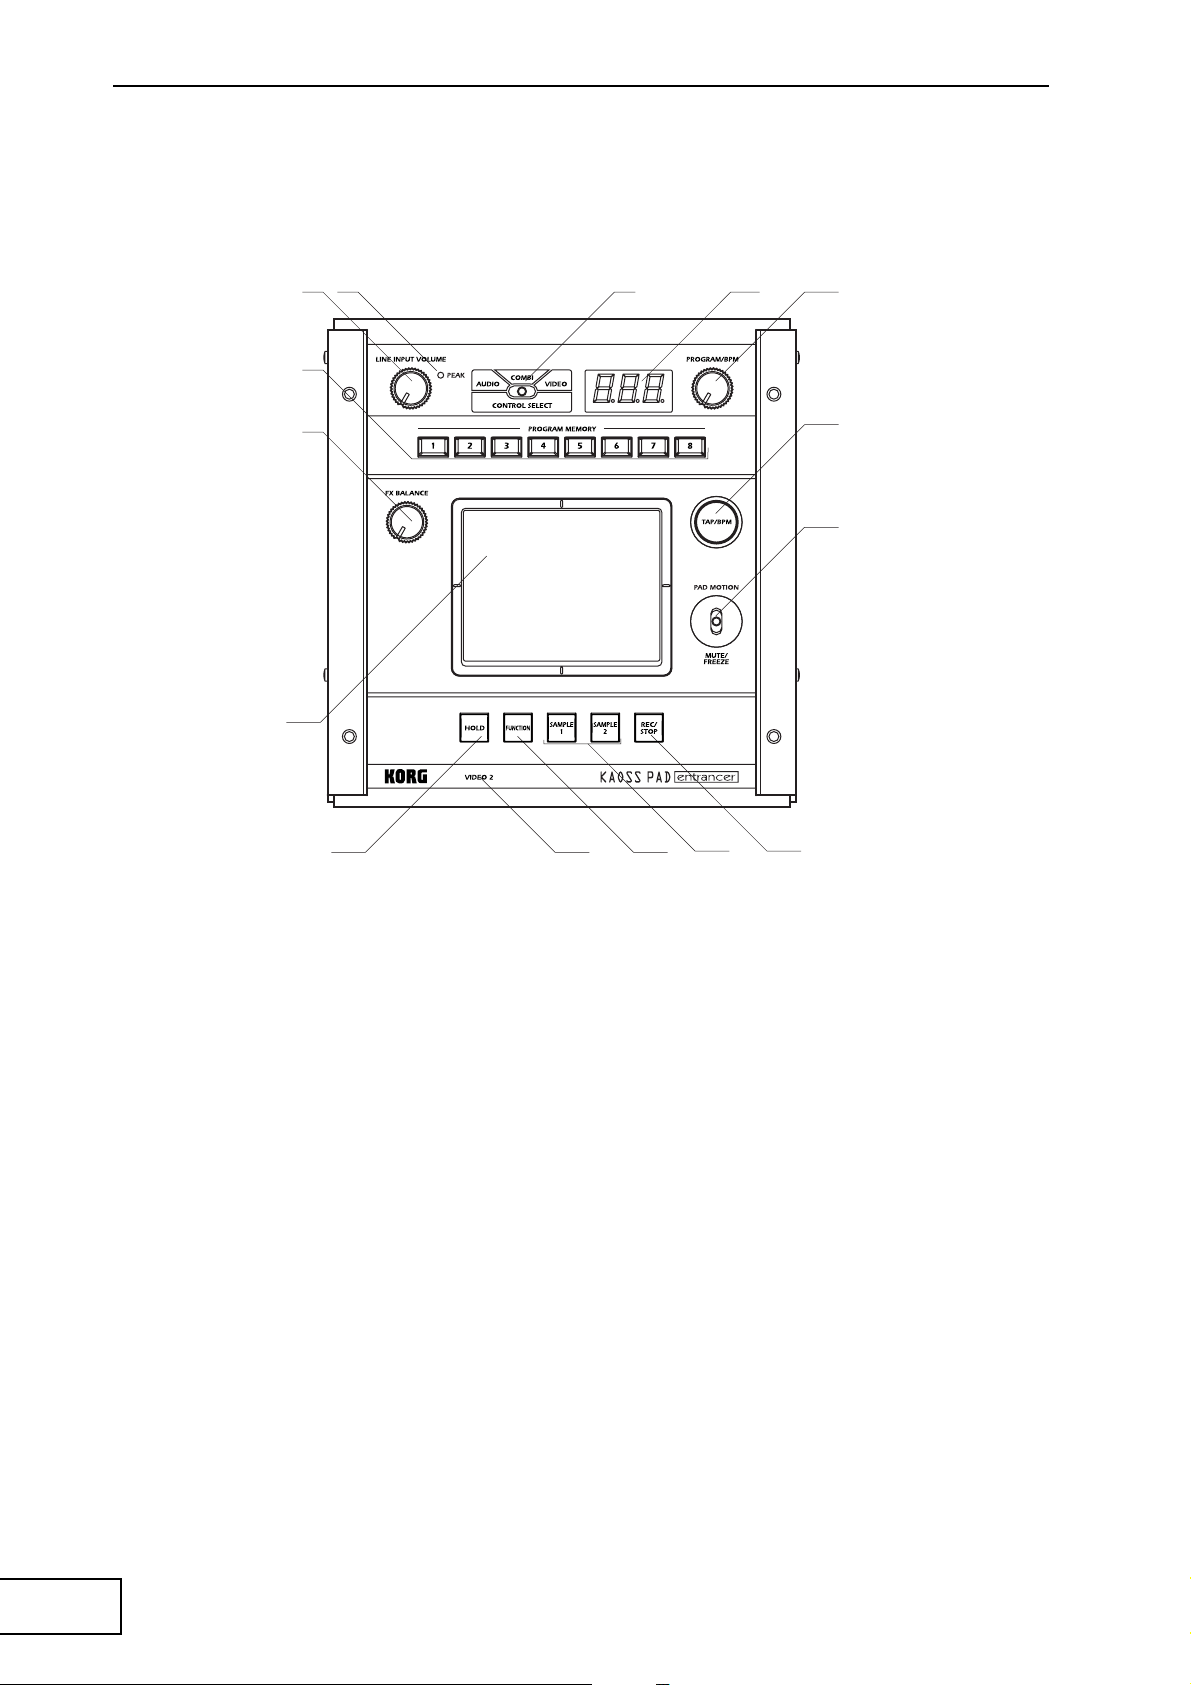
Parts and their function
Top panel
3 2 1
7
4
9
5
6
8
10
1211 15
1413
1.[CONTROL SELECT] switch
2.[PEAK] indicator
3.[LINE INPUT VOLUME] knob
4.[FX BALANCE] knob
5.[PROGRAM/BPM] display
6.[PROGRAM/BPM] knob
7.[PROGRAM MEMORY 1–8] keys
8.[TAP/BPM] key
9.Touch-pad
Care of the touch-pad
Never apply excessive force to the touch-pad or place
heavy objects on it. Rough handling may crack or
break the touch-pad. Rubbing or scraping the surface
of the touch-pad with a sharp object will scratch it;
you must operate it only with your fingers. To clean
the touch-pad, wipe it gently with a soft dry cloth. Do
not use organic solvents such as thinner, since this may
cause deformation.
10. [PAD MOTION / MUTE/FREEZE] lever
11. [HOLD] key
12. [FUNCTION] key
13. [SAMPLE 1], [SAMPLE 2] keys
14. [REC/STOP] key
15. [VIDEO 2] indicator
2
Page 5
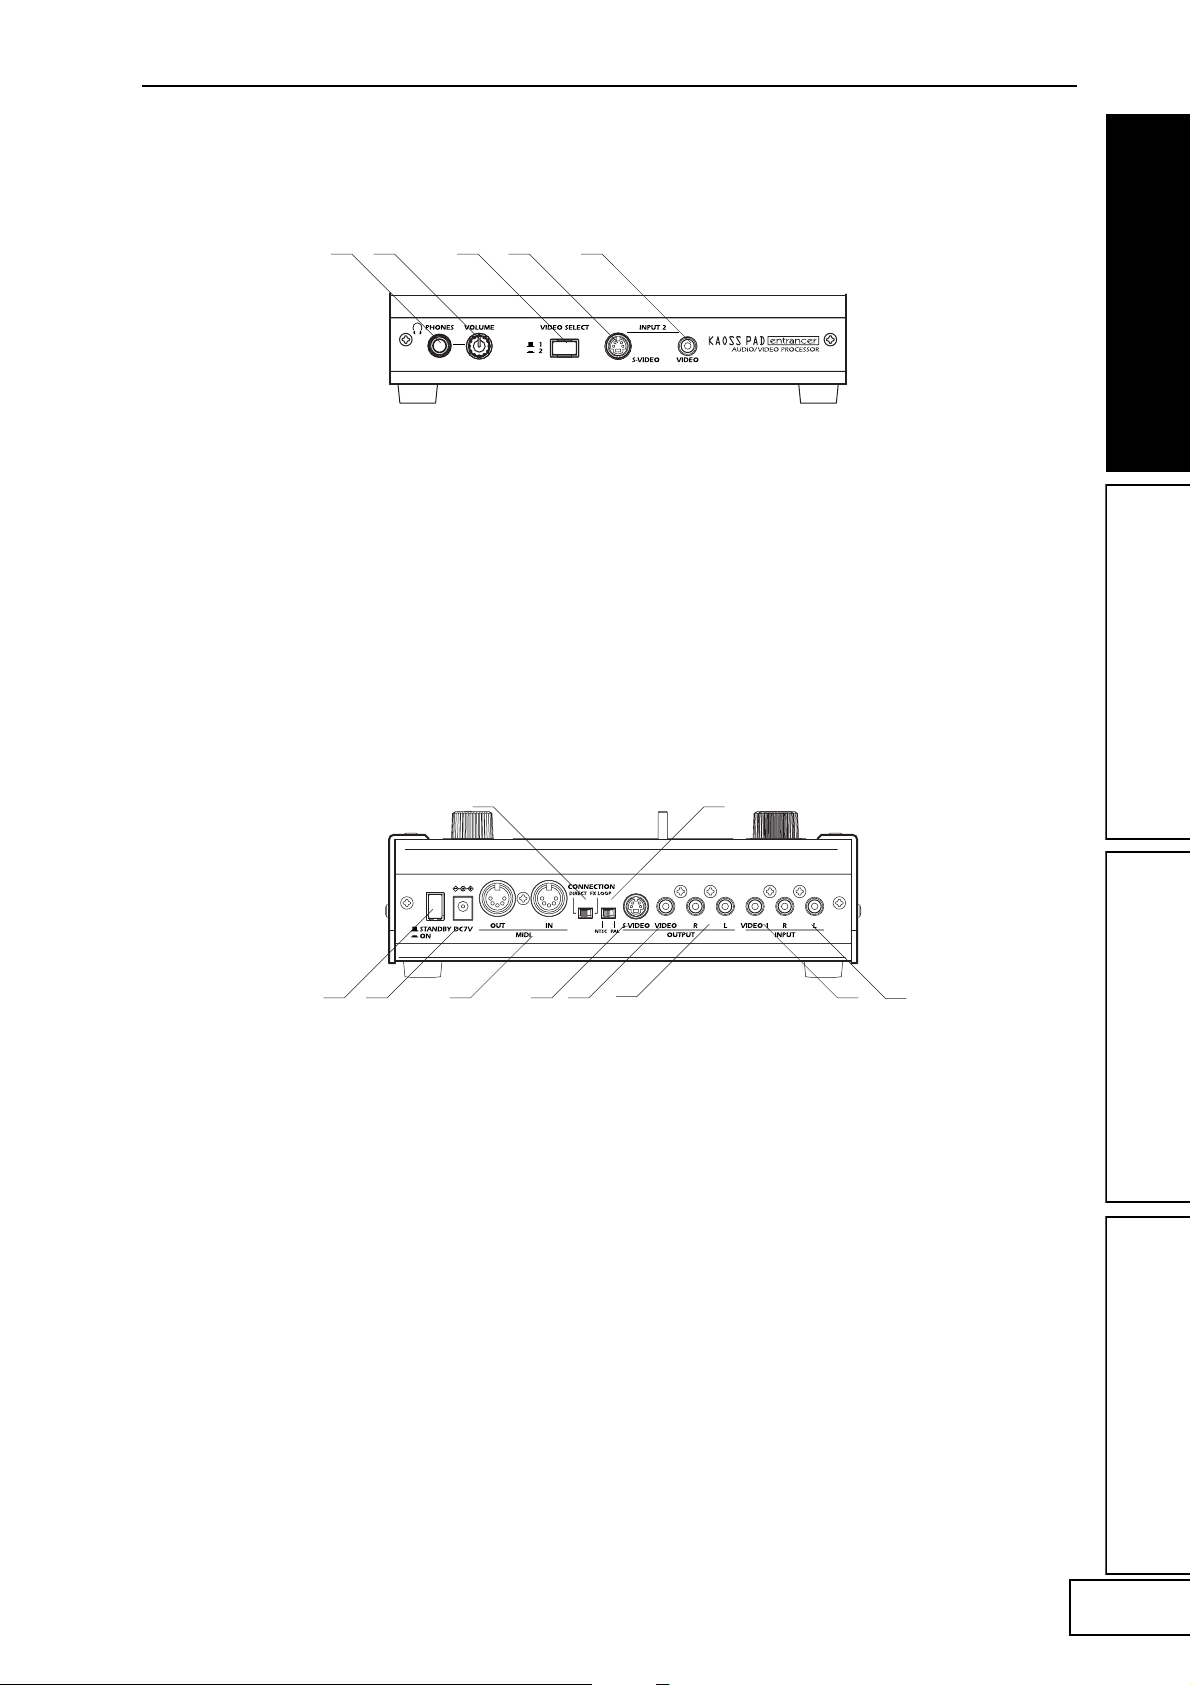
Front panel
1 2 3 4 5
1.[PHONES] output jack
2.[PHONES VOLUME] knob
3.[VIDEO SELECT] switch
Rear panel
1 2 3
1.Power switch
2.Power connector
3.[MIDI IN], [MIDI OUT] connectors
4.[CONNECTION] switch
5.[NTSC/PAL] switch
4. [INPUT 2] S-video jack
5. [INPUT 2] video jack
45
6 7
8
6. [OUTPUT] S-video jack
7. [OUTPUT] video jack
8. [OUTPUT] audio jacks
9. [INPUT] video jack
10. [INPUT] audio jacks
9
10
3
Page 6
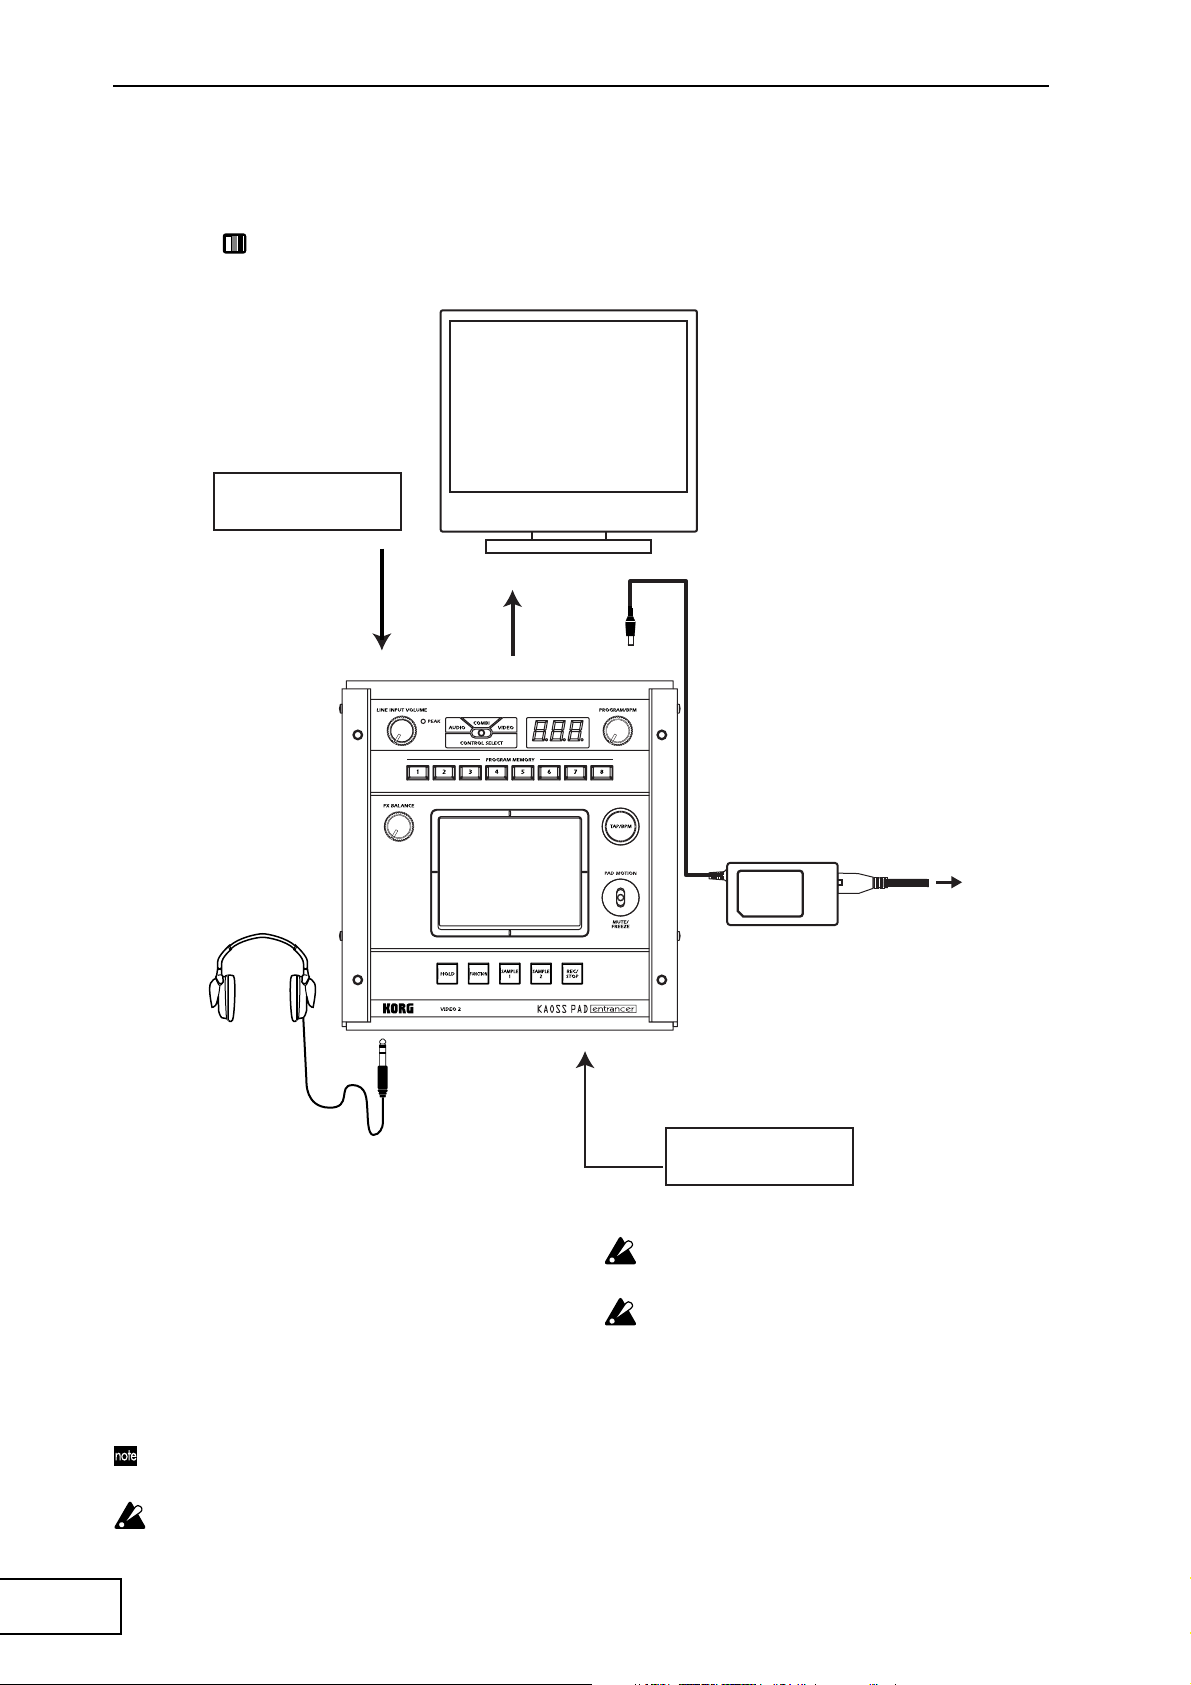
Connections
Video
DVD Player
VIDEO MONITOR
INPUT VIDEO
OUTPUT VIDEO
INPUT 2 VIDEO
DC7V
AC
AC ADAPTER
Video camera
About video signals
The KAOSS PAD Entrancer can be used with either
NTSC or PAL video formats. Set the [NTSC/PAL]
switch to the appropriate format setting for the video
materials you will be using. The KAOSS PAD
Entrancer will not operate correctly if the incorrect
video signal format is selected. The KAOSS PAD
Entrancer will not operate correctly with non-interlaced
signals.
“NTSC” is the standard format used within the
USA, Canada and Japan.
You must turn off the power before you change the
setting of the [NTSC/PAL] switch.
4
The KAOSS PAD Entrancer will not operate if a
copy-protected video signal is input.
Striped noise may appear in the image depending on
the performance and characteristics of the device
connected to the S-video input jack.
Page 7
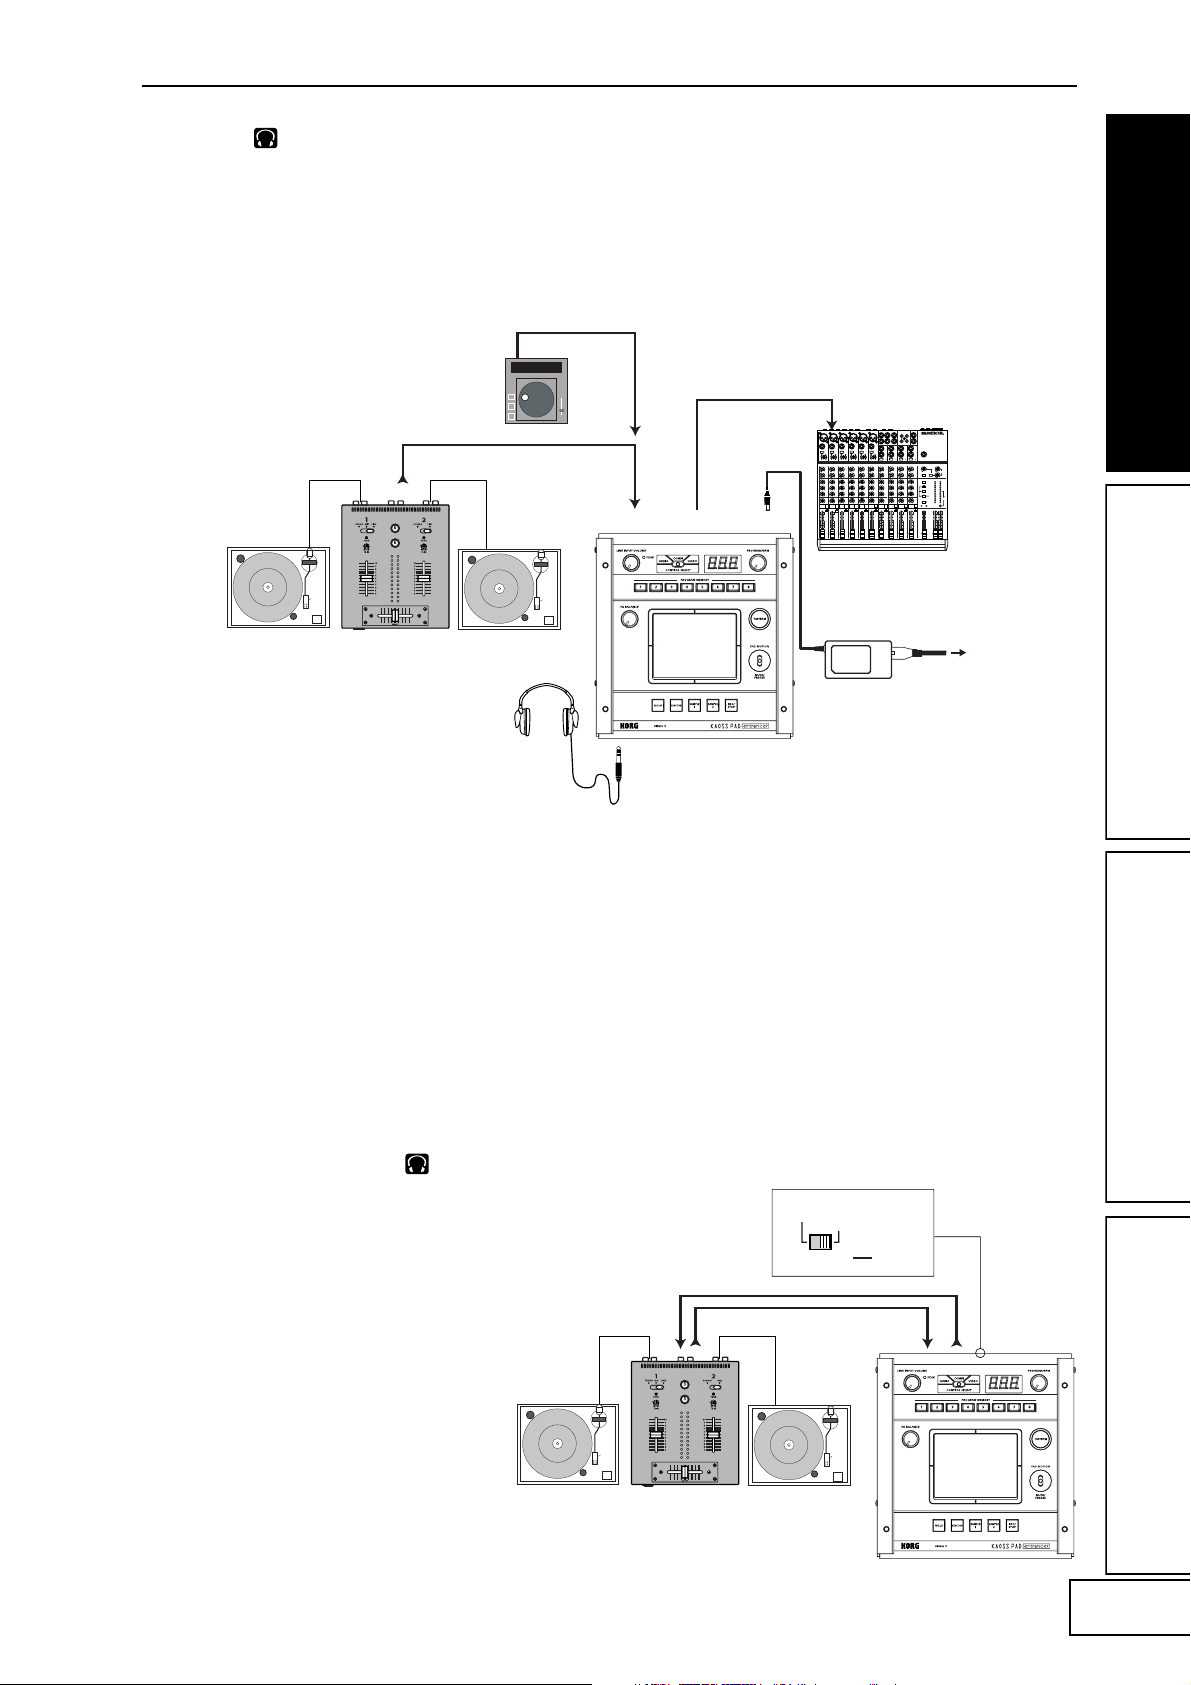
Audio
Here’s an example of connections for applying effects
to the audio input from devices connected to the KAOSS
PAD Entrancer’s input jacks, and sending the
processed sound from the output jacks.
CD PLAYER
LINE OUT
MIC1
BAL
BAL
OR
OR
UNBAL
UNBAL
UNBAL
LINE IN 3
LINE IN 2
LINE IN 1
LOW CUT
LOW CUT
LOW CUT
75Hz
75Hz
75Hz
18dB/OCT
18dB/OCT
18dB/OCT
B
d
V
B
B
d
d
V
V
0
0
0
1
1
1
-
-
-
A
G
A
G
A
G
I
I
I
N
C
N
N
C
C
I
I
I
M
M
M
U
U
U
10
10
10
60
60
60
+10dB
-40dB
+10dB
+10dB
-40dB
-40dB
TRIM
TRIM
TRIM
U
U
U
AUX
AUX
AUX
1
1
MON/
MON/
MON/
EFX
EFX
+15
+15
+15
U
U
U
2
2
EFX
EFX
+15
+15
+15
U
U
U
EQ
EQ
HI
HI
12kHz
12kHz
12kHz
-15
-15
+15
+15
-15
+15
U
U
U
MID
MID
2.5kHz
2.5kHz
2.5kHz
-12
-12
-12
+12
+12
+12
U
U
U
LOW
LOW
LOW
80Hz
80Hz
80Hz
+15
+15
+15
-15
-15
-15
PAN
PAN
PAN
L
L
L
R
R
R
1
3
2
MUTE
MUTE
MUTE
ALT 3–4
ALT 3–4
ALT 3–4
dB
dB
dB
10
10
10
SOLO
SOLO
SOLO
5
5
5
U
U
U
5
5
5
10
10
OUTPUT L/RINPUT L/R
DC7V
10
20
20
20
30
30
30
40
40
40
50
50
50
60
60
60
OUTPUT
INPUT
L
1
1
MICRO SERIES 1402-VLZ
L
14-CHANNEL MIC/LINE MIXER
2
R
2
R
BAL/UNBAL
ALL BAL/UNBAL
LEFT(1/MONO)
RIGHT
BAL
BAL
BAL
BAL
MONO
MONO
MONO
MONO
OR
OR
OR
OR
UNBAL
UNBAL
UNBAL
L
L
L
L
LINE IN 4
LINE IN 6
LINE IN 5
BAL
BAL
BAL
BAL
LOW CUT
OR
OR
LOW CUT
OR
OR
LOW CUT
75Hz
75Hz
75Hz
UNBAL
UNBAL
UNBAL
UNBAL
18dB/OCT
18dB/OCT
18dB/OCT
B
d
V
0
B
d
B
V
d
V
0
0
1
1
-
1
-
-
R
R
R
R
A
G
A
I
G
A
G
N
C
I
I
N
I
N
C
C
I
I
M
M
M
U
U
U
LEVEL
LEVEL
LEVEL
LEVEL
+4
+4
+4
+4
10
60
10
+10dB
-40dB
+10dB
TRIM
TRIM
U
U
AUX
1
1
MON/
EFX
EFX
+15
+15
U
U
2
2
EFX
EFX
+15
+15
U
U
EQ
EQ
HI
HI
12kHz
-15
+15
-15
+15
U
U
MID
MID
2.5kHz
-12
-12
+12
+12
U
U
LOW
80Hz
+15
+15
-15
-15
PAN
L
L
R
R
4
5
MUTE
MUTE
ALT 3–4
ALT 3–4
dB
dB
10
10
SOLO
5
5
U
U
5
5
10
10
20
20
30
30
40
40
50
50
60
60
PHONES
10
60
60
-10
-10
-10
-10
+10dB
-40dB
-40dB
LINE IN 7-8
LINE IN 13-14
LINE IN 9-10
LINE IN 11-12
TRIM
U
AUX
AUX
1
1
MON/
MON/
EFX
EFX
+15
U
2
2
EFX
EFX
+15
U
EQ
EQ
HI
HI
12kHz
12kHz
-15
+15
U
MID
MID
2.5kHz
2.5kHz
-12
+12
U
LOW
LOW
80Hz
80Hz
+15
-15
PAN
PAN
L
R
6
MUTE
ALT 3–4
dB
10
SOLO
SOLO
5
U
5
10
20
30
40
50
60
U
U
U
U
U
U
AUX
AUX
AUX
AUX
1
1
1
1
MON/
MON/
MON/
MON/
EFX
EFX
EFX
EFX
1
+20
+10
+15
+15
+15
+15
NORMALLED
U
U
U
U
U
AUX 1 MASTER
2
PRE
2
2
2
2
POST
EFX
EFX
EFX
EFX
AUX
EFX TO
AUX 1
+20
MONITOR
+15
+15
SELECT
+15
+15
U
-15
+15
U
-12
+12
U
+15
-15
L
R
7–8
MUTE
ALT 3–4
dB
10
5
U
5
10
20
30
40
50
60
RETURNS
U
U
U
SOURCE
EQ
EQ
EQ
EQ
LEFT RIGHT
HI
HI
HI
HI
MAIN
CLIP+28
12kHz
12kHz
12kHz
12kHz
MIX
+10
-15
+15
-15
+15
-15
+15
+7
U
U
U
ALT
+4
3-4
MID
MID
MID
MID
2.5kHz
2.5kHz
2.5kHz
2.5kHz
+2
-12
-12
+12
-12
+12
+12
0
TAPE
U
U
U
-2
LOW
LOW
LOW
LOW
80Hz
80Hz
80Hz
80Hz
-4
+15
+15
-15
+15
-15
-15
-7
ASSIGN
PAN
PAN
PAN
PAN
-10
TO MAIN MIX
-20
NORMAL(AFL)
-30
LEVEL SET(PFL)
L
R
L
L
R
R
0dB=0dBu
SOLO
MODE
9–10
13–14
11–12
MUTE
MUTE
MUTE
POWER
RUDE SOLO LIGHT
PHANTOM
ALT 3–4
ALT 3–4
ALT 3–4
CONTROL
/ PHONES
MAIN MIX
ROOM
dB
dB
dB
dB
dB
10
10
10
10
10
SOLO
SOLO
SOLO
SOLO
5
5
5
5
5
U
U
U
U
U
5
5
5
5
5
10
10
10
10
10
20
20
20
20
20
30
30
30
30
30
40
40
40
40
40
50
50
50
50
50
60
60
60
60
60
MAIN OUTS
TAPE
TAPE
STEREO AUX RETURNS
AUX SEND
MIC4
MIC6
MIC3
MIC5
MIC2
MIXER, DJ MIXER
TURNTABLE
TURNTABLEDJ MIXER
DJ mixer connections
Connect the effect send jack of your DJ mixer etc. to the
KAOSS PAD Entrancer’s [INPUT] audio jack, and
connect the KAOSS PAD Entrancer’s [OUTPUT] audio
jacks to the effect return jacks of your mixer. This lets you
use the KAOSS PAD Entrancer as an external effect
processor.
When connecting the KAOSS PAD Entrancer to the effect
send/return jacks of your mixer
If you set the KAOSS PAD Entrancer’s
[CONNECTION] switch to FX LOOP, the output of
the KAOSS PAD Entrancer’s [OUTPUT] audio jacks
will not include the sound that is input to the KAOSS
PAD Entrancer; only the effect sound will be output.
To adjust the effect depth and volume, use the KAOSS
PAD Entrancer’s [FX BALANCE] knob and the controls
of your mixer.
RETURN
SEND
AC ADAPTER
DIRECT
FX LOOP
CONNECTION LINE OUT
INPUT L/R
AC
OUTPUT L/R
TURNTABLE
TURNTABLEDJ MIXER
5
Page 8

Operation
1. Turning on the power
1. Connect your equipment as described in the
connection examples, and plug the AC
adaptor into an AC outlet.
2. Press the [STANDBY] switch to turn on the
power. The [PROGRAM/BPM] display will
light.
An image will appear on the connected TV
monitor.
To turn off the power
Press the [STANDBY] switch once again.
2. Checking the video input
1. Output a video signal from a connected device.
2. Use the [VIDEO SELECT] switch to select the
input jack that is receiving the video signal
you want to process.
1: The effect will apply to video input 1.
2: The effect will apply to video input 2 (or
S-video input 2). The [VIDEO 2] indicator
will light.
If no signal is being input to video input 2,
the [VIDEO 2] indicator will blink.
S-video input 2 takes priority for video input
2.
3. Adjusting the volume
1. Output audio from a connected device.
2. Adjust the audio input level.
Use the [LINE INPUT VOLUME] knob to
adjust the input level so that the peak
indicator does not light red.
If you are using headphones
Use the [PHONES VOLUME] knob to adjust
the volume.
4. Selecting a program
1. Use the [CONTROL SELECT] switch to select
the signal (video, audio) that you want to
process with the effect.
Use the left position to apply effects to the
audio, or the right position to apply effects to
the video. If you select COMBI (center
position), effects will be applied to both
audio and video.
Refer to “Creating a COMBI program”
2. The [PROGRAM/BPM] display shows the
number of the currently selected program.
Use the [PROGRAM/BPM] knob to select a
program (00–99).
3. Use the [FX BALANCE] knob to adjust the
effect depth.
Turning this knob to the far left will lessen
the effect; turning it to the far right will
produce the maximum effect.
The result will depend on the effect you
select.
If this knob is set to the far left, no effect will
be applied to the sound (“dry”); if the knob
is set to the far right, the maximum effect
will be applied (“wet”).
If you want to use the [FX BALANCE] knob
to adjust the effect depth, set the
[CONNECTION] switch to DIRECT.
About the [PROGRAM/BPM] display
This shows the number of the currently
selected program, the specified BPM, and the
position of the point at which you touch the
touch-pad.
When you touch the touch-pad: The position
you touched (1.1–9.9; 5.5 is center) is
displayed.
Vertical position (1–9)
Horizontal position (1–9)
When you switch programs: The display shows
the program number (00–99). In Combination
mode, this may indicate (--) for some settings
when you use the program memory keys to
recall a program.
When you set the BPM: When you use the
[TAP/BPM] key to set the BPM, the display
shows the BPM value. In Auto BPM mode,
three dots will light.
In Pattern Select mode: The display shows the
number of the currently selected pattern.
In MIDI Edit mode: The display shows
information such as the MIDI channel or
control number.
5. Using the touch-pad
1. Rub your finger over the touch-pad or tap
(lightly strike) it to control the effect (sound).
Affix the included protective sheet to the pad
to help protect it.
2. If you turn on the [HOLD] key, the effect
(sound) for the position immediately before
you removed your finger from the touch pad
will be maintained.
6
Page 9

6. Mute/Freeze function
By moving the [PAD MOTION / MUTE/
FREEZE] lever to the MUTE/FREEZE
position (toward yourself) you can perform
the following operations.
The current video image will freeze.
The currently-input signal, sampling sound, or
synth/drum sound will be cut. This lets you
output only the effect sound (e.g., delay or reverb).
Transformer
By using the [PAD MOTION / MUTE/
FREEZE] lever to rapidly switch MUTE on/
off, you can create a rhythm from a sustained
input sound; this is the “transformer”
technique often used by DJs.
7. Pad motion
You can capture a series of finger movements performed
on the touch-pad, and replay that motion by moving the
[PAD MOTION / MUTE/FREEZE] lever to PAD
MOTION.
[HOLD] key on/off operations are not recorded in a
Pad Motion. If you turn the [HOLD] key on and
replay a Pad Motion, the effect will be held at the
point where pad motion playback stopped.
Recording
When you move the [PAD MOTION /
MUTE/FREEZE] lever to PAD MOTION and
touch the pad, recording will begin.
Since taking your finger off the touch-pad is
also recorded as an operation, you can record
operations such as tapping (lightly striking
the pad several times). Recording will end
when you return the [PAD MOTION /
MUTE/FREEZE] lever, or when the
maximum recording time (approximately six
seconds) has been reached.
Playback
After recording, move the [PAD MOTION /
MUTE/FREEZE] lever to PAD MOTION to
play back the recorded motion.
While the [PAD MOTION / MUTE/FREEZE]
lever is in the PAD MOTION position, the
recorded movement will be played back
repeatedly as a loop.
However if you touch the touch-pad during
playback, recording will begin.
If you change programs, the pad motion that
was recorded in the selected program will be
recalled.
Erase
To erase the recorded motion, hold down the
[FUNCTION] key and move the [PAD
MOTION / MUTE/FREEZE] lever to PAD
MOTION.
8. Setting the BPM
If you have set the BPM, you can select an effect
program from the “BPM FX” or “BPM PTN” group
and apply an effect that is synchronized to the BPM.
For details on the relevant effect parameters, refer to
the Effect Program List (☞ separate sheet).
What is BPM?
BPM (Beats Per Minute) indicates the tempo
of a song in terms of the number of beats
(quarter notes) per minute. A higher BPM
means a faster tempo.
To set the BPM
If you already know the BPM value, press the
[TAP/BPM] key and use the [PROGRAM/
BPM] knob to specify the value. If you do not
set the BPM value within five seconds, normal
operation will resume. You can also press the
[FUNCTION] key to return to normal
operation.
The range for BPM is 40–300.
Tap Tempo function
If you don’t know the BPM, set the tempo by
pressing the [TAP/BPM] key two or more
times at the beat of the song; the BPM will
appear in the [PROGRAM/BPM] display.
Auto BPM function
If you press and hold the [TAP/BPM] key for
several seconds, three dots will appear in the
[PROGRAM/BPM] display, and the BPM of
the input audio will be detected
automatically.
If the BPM cannot be detected, the
[PROGRAM/BPM] display will blink.
Press the [TAP/BPM] key once again to exit
automatic detection.
The detectable BPM range is 80–160.
MIDI Sync function
You can set the BPM to MIDI clock messages
from an external MIDI device. Connect the
[MIDI OUT] connector of the external MIDI
device (e.g., a sequencer) that is sending
MIDI clock messages to the [MIDI IN]
connector of the KAOSS PAD Entrancer.
In order to make the KAOSS PAD Entrancer
synchronize to sequence data, you will either
need to insert a “Touch Pad On” message at
the beginning of each measure in your
sequence data, or touch the KAOSS PAD
Entrancer’s touch-pad at the beginning of the
phrase to start the phrase pattern.
If you want the KAOSS PAD Entrancer to
receive MIDI Clock and Touch Pad On
messages, go to MIDI Edit mode (☞p.11) and
make settings in “MIDI message
transmission/reception settings” (☞ p.12) so
that these messages will be received.
This function does not synchronize the KAOSS
PAD Entrancer’s rhythm pattern programs to
the sequence data.
If the KAOSS PAD Entrancer is synchronized to
timing clock messages being received from an
external MIDI device, the Touch Tempo and
Auto BPM functions will not be available.
7
Page 10

9. Storing settings to the
10. Creating a COMBI program
[PROGRAM MEMORY] keys
You can store your favorite settings to the [PROGRAM
MEMORY 1–8] keys, and instantly recall those settings
when desired.
Settings that can be stored
• Effect program
• [HOLD] key on/off status and position
(coordinates)
• [FX BALANCE] knob setting
• For the “BPM FX” group, the specified BPM
value
• For the “SAMPLE/PLAY” group, the
[SAMPLE 1] and [SAMPLE 2] keys used
• Pad motion
Audio effect programs 60 and 90–99 do not store
the state of the [HOLD] key.
Storing
1. Use the [PROGRAM/BPM] knob to select the
effect program you want to assign.
If you want to store the state of the [HOLD]
key, select the program, then turn the
[HOLD] key on and touch the touch-pad to
specify the position. Also make any other
settings that you want to store.
2. While holding down the [FUNCTION] key,
hold down the [PROGRAM MEMORY 1–8]
key that you want to assign for
approximately two seconds; the settings will
be stored.
When the settings have been stored, the
[PROGRAM/BPM] display will stop
blinking.
If you hold the [PAD MOTION / MUTE/
FREEZE] lever at PAD MOTION while storing
the settings, the pad motion will not be stored.
Recalling
1. Press one of the [PROGRAM MEMORY 1–8]
keys to recall the program and settings that
were stored in that key. If you hold the [PAD
MOTION / MUTE/FREEZE] lever at PAD
MOTION while recalling the settings, the
pad motion will not be recalled.
About COMBI
By setting the [CONTROL SELECT] switch to
[COMBI] and operating the touch-pad, you can
simultaneously control video effects and audio effects.
To store a COMBI
1. Set the [CONTROL SELECT] switch to
[AUDIO], and select a program.
2. Set the [CONTROL SELECT] switch to
[VIDEO], and select a program.
3. Set the [CONTROL SELECT] switch to
[COMBI], and while you hold down the
[FUNCTION] key, hold down the desired
[PROGRAM MEMORY] key for
approximately two seconds to store the
settings.
11. Sampling and playing a still
image
By moving the [PAD MOTION / MUTE/FREEZE] lever
to MUTE/FREEZE you can freeze the video that is being
output, store the still image in the [SAMPLE 1] or
[SAMPLE 2] key, and then use the touch-pad to control
the still image (for example by expanding or inverting it).
You can store one still image in each of the two keys.
The sampled images will be lost when you turn off
the power. It is not possible to save the sampled
images.
Sampling
1. Set the [PAD MOTION / MUTE/FREEZE]
lever to MUTE/FREEZE.
The monitor image will freeze.
2. Press either the [SAMPLE 1] or [SAMPLE 2]
key.
The still image shown in the monitor will be
stored to the key you press.
Playback
1. When you press the [SAMPLE 1] or
[SAMPLE 2] key, the sampled still image will
be selected as the input source.
While playing back the still image, you can
operate the touch-pad to apply an effect to
the still image.
Press the [SAMPLE 1] or [SAMPLE 2] key
once again to cancel the still image playback.
Some effects may not produce any result.
8
If you have selected a program from other than
the “SAMPLE/PLAY” group, you cannot play
back the still image except while recording.
Page 11
12. Sampling and playing
13. Sampling and playing a
motion video
You can sample a motion video clip and play it back
while using an effect program and the touch-pad to
control the video clip (for example by expanding or
inverting it).
If you have selected a program from the SAMPLE/
PLAY group, you can use the touch-pad to control the
playback speed of the video, or even reverse the
playback.
The sampled video will be lost when you turn off the
power. It is not possible to save the sampled video.
Sampling
1. Select program 94–99 from the “SAMPLE/
PLAY” group.
2. When you press the [REC/STOP] key, the
[REC/STOP] key will light and recording
will begin. Recording will end when you
press the key again or when the memory
capacity has been reached.
If you select an effect clip pattern (40–59) in
pattern display mode, you will be able to
record a pattern. Turn on the [SAMPLE 1] or
[SAMPLE 2] key to record the still image that
you sampled.
Playback
The playback method will depend on the effect
program you have selected.
For a program in the “SAMPLE/PLAY” group
1. Select a program in the “SAMPLE/PLAY”
group.
2. When you touch the touch-pad, the video
clip will play back according to the position
of your finger on the touch-pad.
For a program not in the “SAMPLE/PLAY” group
1. Select a program not in the “SAMPLE/
PLAY” group.
2. With the [SAMPLE 1] and [SAMPLE 2] keys
turned off, hold down the [REC/STOP] key
and touch the touch-pad; the sampled video
clip will playback at normal speed. If you
hold down the [REC/STOP] key and press
the [HOLD] key, the [REC/STOP] key will be
held, allowing you to play back the video
clip simply by touching the touch-pad. Hold
will be cancelled when you press the [REC/
STOP] key once again.
When you hold down the [REC/STOP] key
and press the [HOLD] key, playback will be
held. When you press the [REC/STOP] key
once again, the hold will be cancelled.
Pattern display will be cancelled if you play
back a motion video sample while a pattern
is displayed.
You cannot display a pattern during sample
playback.
phrase
If you have recorded a phrase from the input into the
[SAMPLE 1] and [SAMPLE 2] keys, you can select a
program from the “SAMPLE/PLAY” group (90–99)
and use the touch-pad to control the playback speed or
reverse playback.
If you have selected a program from other than the
“SAMPLE/PLAY” group, pressing the [SAMPLE 1] or
[SAMPLE 2] key will play back the phrase that was
recorded on each key. You can record approximately
six seconds of monaural sound in each key.
The recorded phrase will be lost when you turn off
the power. It is not possible to save the recorded
phrase.
Recording
1. Press the [REC/STOP] key. The [REC/STOP]
key LED will blink, and you will be in
record-ready mode.
2. Press either the [SAMPLE 1] or [SAMPLE 2]
key that you want to use for recording. The
playback audio will not be heard at this time.
3. Press the [REC/STOP] key; the [REC/STOP]
key LED will light and recording will begin.
Recording will end when you press the
[REC/STOP] key once again.
Recording will end automatically if you
record up to the maximum recording time.
If you select a program not in the “SAMPLE/
PLAY” group, you can operate the touch-pad
while you record; the sound processed by the
effect will be recorded.
Auto-rec (AUTO REC)
You can make recording start automatically
when audio is input to the [INPUT] audio
jacks.
1. In step 2 of recording, hold down the
[SAMPLE 1] or [SAMPLE 2] key you want to
use, and press the [REC/STOP] key; the
[REC/STOP] key and [SAMPLE 1] [SAMPLE
2] key LEDs will blink simultaneously, and
you will be in record-ready mode.
2. When you input an audio signal, recording will
begin automatically. Recording will end when
you press the [REC/STOP] key once again.
If the lever is set to “COMBI,” and you have
selected a program from the “SAMPLE/PLAY”
group as the video effect, you can record the
video simultaneously with the audio.
9
Page 12

Playback
The playback method will depend on the effect
program you have selected.
For a program in the “SAMPLE/PLAY” group
1. Select a program of the “SAMPLE/PLAY”
group (90–99).
2. Press the [SAMPLE 1] or [SAMPLE 2] key
that you want to play back. You will not hear
the playback at this time.
3. When you touch the touch-pad, playback will
occur according to the position you touch.
The way in which the phrase plays back will
depend on the program. (☞separate sheet
“Effect Program List)
4. Use the [FX BALANCE] knob to adjust the
volume of the playback.
If the [FX BALANCE] knob is in the center
position, the playback sound and the input
sound will be output in a 1:1 proportion.
Setting the knob to the maximum position
will output only the sample sound when
playing; the input sound will not be heard.
For a program not in the “SAMPLE/PLAY” group
1. Select a program not in the “SAMPLE/
PLAY” group.
2. When you press the [SAMPLE 1] or
[SAMPLE 2] key, recorded phrase will play
back at normal speed. If you continue
holding down the key, the playback will
loop.
To adjust the volume, hold down the
[SAMPLE 1] or [SAMPLE 2] key and turn the
[FX BALANCE] knob.
By operating the touch-pad during playback,
you can apply effects to the playback sound.
If you hold down the [SAMPLE 1] or
[SAMPLE 2] key and press the [HOLD] key,
the playback will be held. Hold will be
cancelled when you press the [SAMPLE 1] or
[SAMPLE 2] key once again.
14. Displaying the audio
waveform or a composite
pattern
You can display the waveform of the audio input
signal or audio output signal. In addition, patterns
built into the KAOSS PAD Entrancer can be used
instead of the video input as material for modification.
Pattern Display mode
Hold down the [FUNCTION] key and press
the [SAMPLE 1] key to enter Pattern Display
mode; the [PROGRAM/BPM] display will
blink indicate either Pattern Display mode or
the pattern select number.
If you display a pattern while playing back a
motion video sample, playback will stop.
When you play back the sample once again,
pattern display mode will be cancelled and
the sample will play back.
Exiting Pattern Display mode
To return to normal operation, either touch
the touch-pad, press the [FUNCTION] key,
or simply do not operate the KAOSS PAD
Entrancer for ten seconds.
Displaying a pattern
From Pattern Display mode, press one of the
[PROGRAM MEMORY 1–8] keys to recall the
pattern that is pre-selected for that key.
You can press the [SAMPLE 1] key to turn
the last-selected pattern on/off.
To cancel the display
To cancel the display, press the selected
[PROGRAM MEMORY 1–8] key once again.
The display will also be cancelled if you
switch programs during normal operation.
The display will be not cancelled if you hold
down the [FUNCTION] key and turn the
program knob to change programs.
Effect clip patterns (40–59) will appear when
you operate the touch pad.
Switching patterns
In Pattern Display mode, you can hold down
one of the [PROGRAM MEMORY 1–8] keys
and turn the [PROGRAM/BPM] knob to
switch the pattern that is assigned to that
key. If that key is selected, you can simply
turn the [PROGRAM/BPM] knob to switch
patterns.
Storing the modified settings
In Pattern Display mode, press and hold the
[REC/STOP] key for one second or longer to
store the modified settings. The settings of
MIDI Edit mode will also be stored at this
time. If you turn off the power without
storing, the settings will revert to their
previous state.
To stop the pattern display from being turned off when
you change programs
Hold down the HOLD key while you turn on
the power. (The HOLD key will light for a
short time.)
To cancel
Turn off the power, and then turn it on in the
normal way.
Pattern types
00–39: Impose patterns
These layer a superimposed pattern (such as
the waveform of the input signal, or touch
pad position information) onto the image.
You cannot apply an effect to the imposed
pattern or sample it.
40–59: Effect clip patterns
These patterns display color patterns or
image data. You can use these as effect
materials.
If you have selected a program from other
than the “SAMPLE/PLAY” group, you
cannot display these except while recording.
10
Page 13
MIDI functions
Using MIDI
What is MIDI?
MIDI (Musical Instrument Digital Interface) is a
world-wide standard for exchanging a wide variety of
performance-related data between electronic musical
instruments, effect processors, sequencers, etc. and
computers.
MIDI connections
Use commercially available MIDI cables to send or
receive MIDI messages. Connect the KAOSS PAD
Entrancer’s MIDI connectors to the MIDI connectors of
the external MIDI device to/from which you want to
send/receive data.
MIDI IN connector: Receives MIDI messages from
another MIDI device. Connect this to the MIDI OUT
connector of the external device.
MIDI OUT connector: Transmits messages from the
KAOSS PAD Entrancer. Connect this to the MIDI IN
connector of the external device.
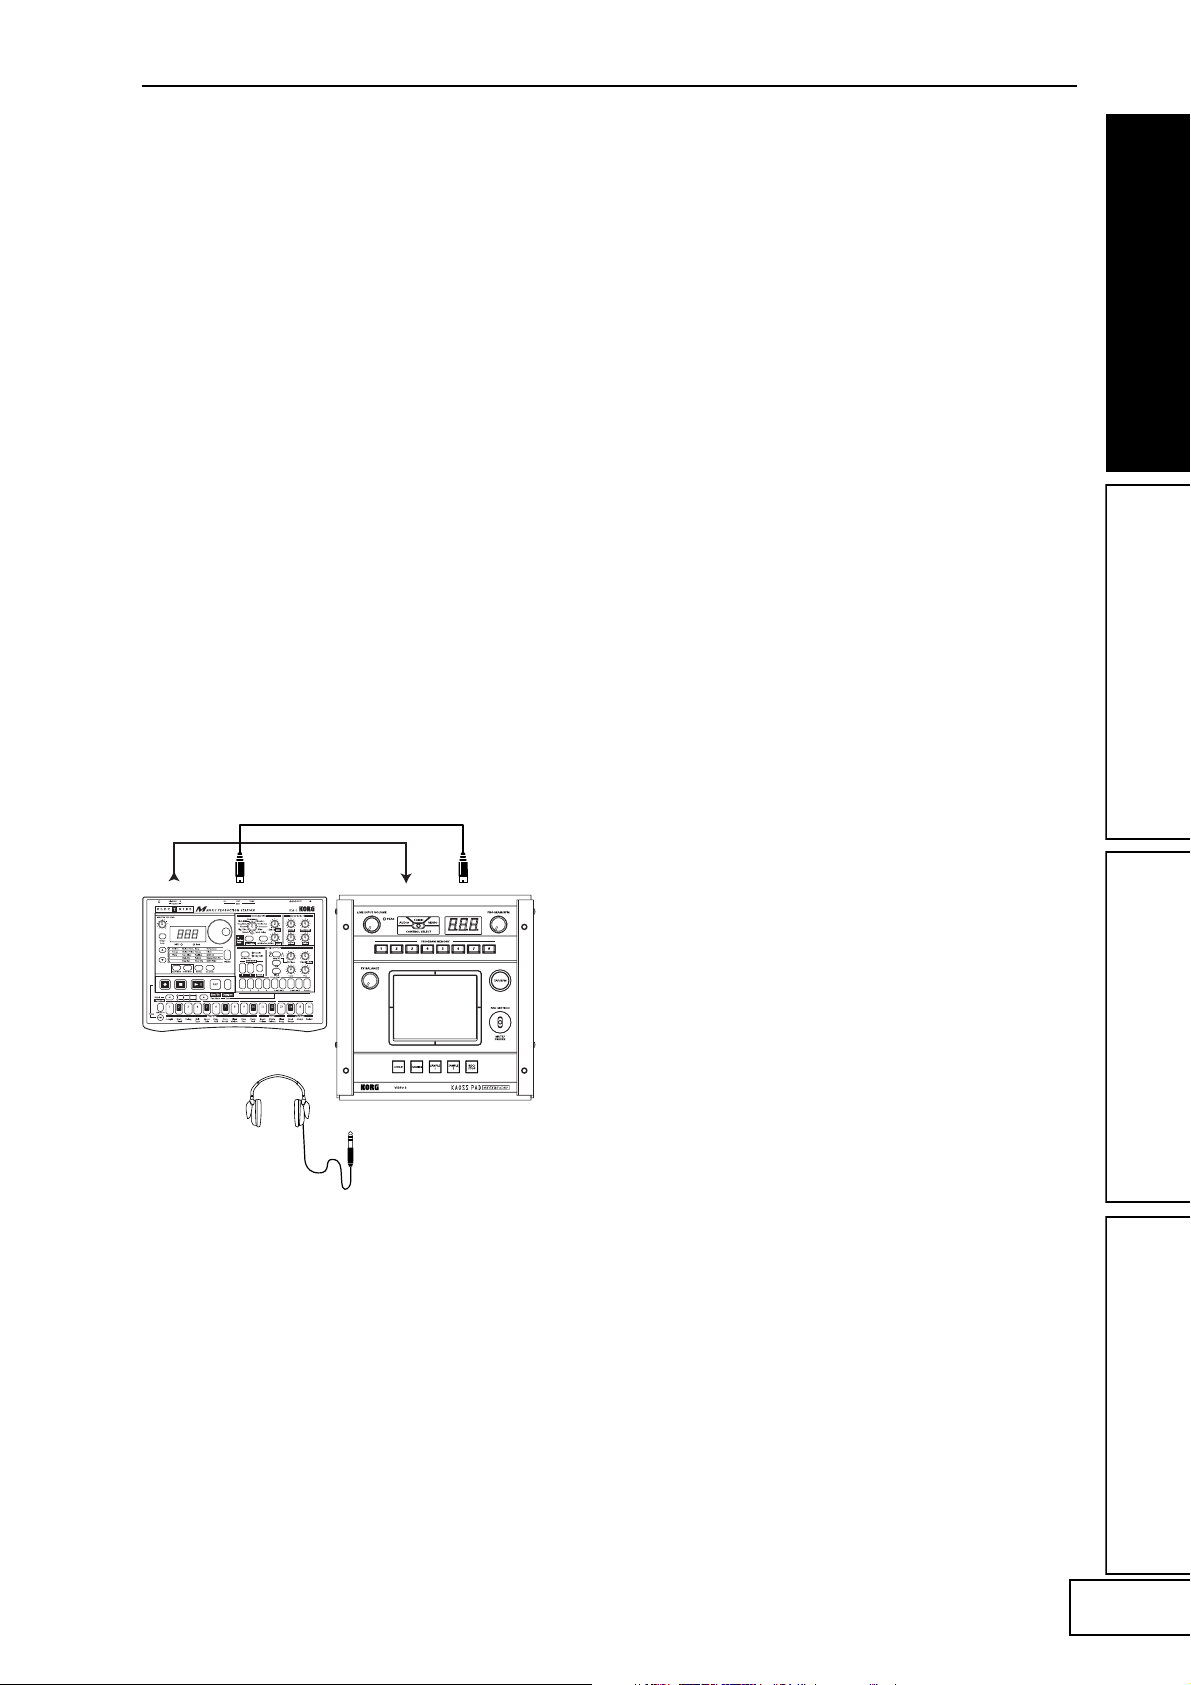
Connection example
Here is an example of connecting the KAOSS PAD
Entrancer with another MIDI device so that it will play
back along with sequence data.
In addition to using the KAOSS PAD Entrancer as an
effect processor, you can use it as a realtime controller
that can transmit MIDI messages to control a
synthesizer or other external MIDI device.
If the KAOSS PAD Entrancer is connected to a MIDI
sequencer, the MIDI messages transmitted when you
operate the touch-pad can be recorded on the MIDI
sequencer and then played back to reproduce all of
your touch-pad operations.
About the MIDI implementation chart
The owner’s manual of each MIDI device contains a
“MIDI implementation chart.” This chart is designed
to show what type of MIDI messages this particular
device is able to transmit and receive. When using two
MIDI devices together, compare the implementation
charts of the two devices to verify that they can
communicate with each other.
* Detailed MIDI specifications are listed in the MIDI
Implementation.
MIDI Edit mode
On the KAOSS PAD Entrancer, use the MIDI Edit
mode to access the MIDI-related settings.
Hold down the [FUNCTION] key and press the
[SAMPLE 2] key to enter MIDI Edit mode. The MIDI
channel will blink in the [PROGRAM/BPM] display.
KORG EM-1
Setting the MIDI channel
In MIDI Edit mode, the [PROGRAM/BPM] display
LINE IN MIDI INMIDI OUTOUTPUT
shows the MIDI channel. In this state you can use the
[PROGRAM/BPM] knob to change the MIDI channel.
About MIDI channels
MIDI uses sixteen “channels” (1–16) to independently
send data along a single cable to more than one MIDI
device.
If the transmitting device is set to MIDI channel “1,”
the MIDI messages will not be received unless the
receiving device is also set to MIDI channel “1“.
11
Page 14
MIDI message transmission/
reception settings
The transmission and reception of each type of MIDI
message can be switched on/off by pressing the key
assigned to that type of MIDI message. Transmission/
reception is enabled if the corresponding key is lit, and
disabled if the key is dark. (see the “Transmitted and
received messages” table below)
Some parameters are only transmitted, and others
are only received.
Changing the MIDI control numbers
In MIDI Edit mode, you can hold down one of the
[PROGRAM MEMORY 3–8] keys and turn the
[PROGRAM/BPM] knob to change the control
number setting assigned to that key.
Although you are free to assign (duplicate) an alreadyassigned control number, you cannot simultaneously
enable transmission/reception of the same control
number.
The MIDI messages transmitted and received by
the KAOSS PAD Entrancer can be selected from a
range of CC#1–CC#31, CC#64–CC#95, and Pitch
Bend.
Storing the edited settings
In MIDI Edit mode, press and hold the [REC/STOP]
key for one second or more; the edited MIDI settings
will be stored. The pattern select mode setting will
also be stored at this time. If you turn off the power
without storing the settings, the KAOSS PAD
Entrancer will revert to the previous settings.
To exit MIDI Edit mode
To return to normal operation, you can either touch
the touch-pad, press the [FUNCTION] key, or wait for
ten seconds without performing any operation.
About the stored settings
The contents of “PROGRAM MEMORY” and the
control number settings you make in MIDI Edit mode
can be transmitted as exclusive messages and saved on
an external MIDI device.
For details on the exclusive messages that can be
transmitted, refer to the separate MIDI
Implementation.
Transmitted and received messages
With the factory settings, the KAOSS PAD Entrancer will transmit and receive the following MIDI messages.
Operation transmitted MIDI message transmitted Key that switches transmission on/off
Touch-pad X axis Effect control 1 (CC#12) *1, *2 PROGRAM MEMORY 4
Touch-pad Y axis Modulation depth 1 (CC#1) Y=5–9 PROGRAM MEMORY 1
Modulation depth 2 (CC#2) Y=5–1 PROGRAM MEMORY 2
Effect control 2 (CC#13) *1, *2 PROGRAM MEMORY 5
Touch-pad X+Y axis Effect depth 3 (CC#93) *1 PROGRAM MEMORY 3
Touch-pad on/off Effect depth 2 (CC#92) *1, *2 PROGRAM MEMORY 6
FX BALANCE Effect depth 4 (CC#94) *1, *2 PROGRAM MEMORY 7
MUTE Effect depth 5 (CC#95) *1, *2 PROGRAM MEMORY 8
Program change Program change (0–99) *2 HOLD
Pad motion output Each touch-pad message SAMPLE 2
Operation received MIDI message received Key that switches reception on/off
Touch-pad X axis Effect control 1 (CC#12) *1, *2 PROGRAM MEMORY 4
Touch-pad Y axis Effect control 2 (CC#13) *1, *2 PROGRAM MEMORY 5
Touch-pad on/off Effect depth 2 (CC#92) *1, *2 PROGRAM MEMORY 6
FX BALANCE Effect depth 4 (CC#94) *1, *2 PROGRAM MEMORY 7
MUTE Effect depth 5 (CC#95) *1, *2 PROGRAM MEMORY 8
Program change Program change (0–99) *2 HOLD
BPM Timing Clock SAMPLE 1
*1: You can select the MIDI message that will be transmitted/received from a range of CC#1–CC#31, CC#64–
CC#95, and Pitch Bend. ( ) indicates the factory setting.
*2: On/off and CC# settings will be the same for transmission and reception.
Control changes for touch-pad Y-axis (Y=5–9, Y=5–1) and touch-pad X+Y axis can be transmitted but not
received. This means that when recording control changes onto a sequencer, you must use MIDI Edit
mode to turn [PROGRAM MEMORY 1–3] off so that unnecessary MIDI messages are not transmitted.
You cannot duplicate the settings of control numbers that have already been assigned.
12
Page 15

FAQ
Q1: A video effect is not applied when I touch the
pad
A: Check the following points.
1) Is the control lever in the correct position?
>> The video effect is applied only when the
control lever is in the COMBI or VIDEO
mode.
2) Try adjusting the FX BALANCE knob.
>> The FX BALANCE knob adjusts the video
only if the control lever is set to VIDEO.
3) Is the PAL/NTSC switch in the correct
position?
>> You must turn off the power before changing
the position of this switch.
Q2: I can't sample a still image successfully.
A: In order to sample a still image, the control
lever must be in VIDEO mode.
>> Set the control lever to VIDEO mode. Then
use the MUTE/FREEZE lever to freeze the
image and press the SAMPLE (1 or 2) button
to sample the image.
Q3: In COMBI mode, the VIDEO effect applies
only to still images.
A: If a still image is being played back, the
video effect will apply to the still image.
>> To stop playback of the still image,
temporarily set the control lever to VIDEO,
and then press the SAMPLE button to stop
the still image playback.
About demo mode
Entering demo mode
Set the control lever to COMBI and hold
down the FUNCTION key while you turn on
the power. (The FUNCTION key will light
momentarily.)
Using demo mode
When the control lever is set to COMBI and
you do not perform any operation for five
seconds, the demo will start. (Pad motions
will be automatically executed as the demo
mode advances through the COMBI
programs.) Only the COMBIs will be
demoed. Sampling programs (94–99) will be
skipped.
Pausing demo mode
The KAOSS PAD Entrancer will pause the
demo mode when you perform any
operation, and will re-enter the demo mode
if no further operation has been performed
for five seconds.
Exiting demo mode
Turn off the power, and then turn it on again
in the usual way.
Q4: In COMBI mode, turning the FX BALANCE
knob does not change the video effect.
A: In COMBI mode, the FX BALANCE knob
applies only to the audio effect.
Q5: I want to store video effect and graphic
pattern playback together in memory.
A: You can't store an effect program and graphic
pattern playback together in the PROGRAM
MEMORY 1–8 keys.
Q6: The graphic pattern disappears when I
change the video effect.
A: Graphic pattern playback will stop when you
re-select the effect program.
>> If you want to display the pattern again, you
must re-enter graphic pattern mode.
If you want to apply a video effect to the
pattern, first select the desired video effect,
and then enter graphic pattern mode and
select the pattern.
Q7: Can I mix the two video inputs VIDEO 1 and
VIDEO 2?
A: The KAOSS Pad KAOSS PAD Entrancer does
not have input mixing capability.
>> The video effect program applies to the input
you select; either VIDEO 1 or VIDEO 2.
However, you can operate the input select
switch to obtain a result similar to mixing a
sampled video clip or still image.
13
Page 16

Specifications
Number of effect programs: 100 (video), 100 (audio), 100 (combination)
Inputs: Video input jack 1 / RCA (phono style) jack
Video input jack 2 / RCA jack or S-video jack (S-video jack takes priority)
(The video input switch selects either video input jack 1 or 2)
Line input jacks / stereo RCA jacks
Outputs: Video output jack / RCA jack
S-video output jack / S-jack
Line output jacks /stereo RCA jacks
Headphone jack / stereo 1/4" phone jack
Audio sampling frequency: 44.1 kHz
Audio AD/DA: 20-bit linear
MIDI: IN/OUT
Power supply: DC7V (dedicated AC adaptor)
Included items: AC adaptor, touch pad protector sheet
Dimensions: 240 (W) × 247 (D) × 83 (H) mm
Weight: 2.0 kg
* Appearance and specifications are subject to change without notice.
14
Page 17

15
Page 18

Précautions
Emplacement
L’utilisation de cet instrument dans les endroits suivants peut en entraîner le mauvais
fonctionnement.
• En plein soleil
• Endroits très chauds ou très humides
• Endroits sales ou fort poussiéreux
• Endroits soumis à de fortes vibrations
•A proximité de champs magnétiques
Alimentation
Branchez l’adaptateur secteur fourni à une prise secteur de tension appropriée. Evitez de brancher
l’adaptateur à une prise de courant dont la tension ne correspond pas à celle pour laquelle
l’appareil est conçu.
Interférences avec d’autres appareils électriques
Les postes de radio et de télévision situés à proximité peuvent par conséquent souffrir
d’interférences à la réception. Veuillez dès lors faire fonctionner cet appareil à une distance
raisonnable de postes de radio et de télévision.
Maniement
Pour éviter de les endommager, manipulez les commandes et les boutons de cet instrument avec soin.
Entretien
Lorsque l’instrument se salit, nettoyez-le avec un chiffon propre et sec. Ne vous servez pas d’agents
de nettoyage liquides tels que du benzène ou du diluant, voire des produits inflammables.
Conservez ce manuel
Après avoir lu ce manuel, veuillez le conserver soigneusement pour toute référence ultérieure.
Evitez toute intrusion d’objets ou de liquide
Ne placez jamais de récipient contenant du liquide près de l’instrument. Si le liquide se renverse ou
coule, il risque de provoquer des dommages, un court-circuit ou une électrocution.
Veillez à ne pas laisser tomber des objets métalliques dans le boîtier (trombones, par ex.). Si cela se
produit, débranchez l’alimentation de la prise de courant et contactez votre revendeur korg le plus
proche ou la surface où vous avez acheté l’instrument.
Marque CE pour les normes européennes harmonisées
La marque CE apposée sur tous les produits de notre firme fonctionnant sur secteur jusqu’au 31 décembre 1996 signifie que ces
appareils répondent à la Directive EMC (89/336/CEE) et à la Directive concernant la marque CE (93/68/CEE).
La marque CE apposée après le 1 janvier 1997 signifie que ces appareils sont conformes à la Directive EMC (89/336/CEE), à la
Directive concernant la marque CE (93/68/CEE) ainsi qu’à la Directive Basse Tension (73/23/CEE).
La marque CE apposée sur tous les produits de notre firme fonctionnant sur piles signifie que ces appareils répondent à la
Directive EMC (89/336/CEE) et à la Directive concernant la marque CE (93/68/CEE).
Page 19

Introduction
Nous vous remercions d’avoir choisi le processeur
audio/vidéo KAOSS PAD Entrancer.
Pour assurer un fonctionnement sans problème,
veuillez lire attentivement ce manuel et utiliser le
produit de la manière indiquée.
Principales
caractéristiques
Utilisez le pavé tactile X-Y pour contrôler en toute liberté
les effets audio et vidéo au cours d’une performance.
En déplaçant votre doigt sur le pad ou en tapotant
dessus, vous pouvez contrôler simultanément
différents paramètres d’effets dans le sens horizontal
et vertical, et manipuler ainsi le traitement des images
et/ou du son en temps réel.
Cent programmes d’effets vidéo et combinaisons d’effets
pour transformer de façon surprenante les images
Le KAOSS PAD Entrancer met à votre disposition cent
programmes d’effets vidéo prêts à être appliqués à tout
type d’image. Ces effets couvrent un large éventail allant
des effets de base comme le fondu, les effets de volet, la
correction colorimétrique, l’arrêt sur image, le Flip
gauche/droite, l’inversion haut/bas, la rotation et le
zoom/compression, aux effets sophistiqués comme le
Split-screen, l’inversion des composants d’image, le
Sandstorm, la composition monochrome, le Delay, le
Strobe, l’Emboss et même la compression durant le
Spinning ! Vous pouvez utiliser les boutons pour
sélectionner facilement les programmes d’effets, et
enregistrer huit de vos programmes favoris sous les
touches de mémoire de programme.
Cent programmes d’effets audio pour le mixage DJ et le
traitement du son
Le KAOSS PAD Entrancer offre cent effets audio qui
incluent des filtres, des effets de type spatial comme le
Delay et le Reverb, et des effets de modulation comme
le Flanger, le Phaser et le Pan. De nombreux sons
analogiques synthétiques et sons ambiants sont aussi
intégrés, faisant du KAOSS PAD Entrancer un outil
idéal non seulement pour le VJ mais aussi pour le
travail de DJ/remix/production musicale.
Fonctionnalité BPM avec modes de détection de BPM variés
Vingt effets BPM peuvent être synchronisés avec le
BPM pour contrôler la durée du Delay ou la vitesse
d’osc. sub. des effets Pan, Phaser ou Planger. Vous
pouvez régler le BPM manuellement, utiliser Auto
BPM pour détecter automatiquement le tempo d’une
source audio, utiliser la fonction Tap Tempo pour
régler le BPM en tapant sur la touche Tap, ou détecter
le BPM à partir des messages MIDI Clock.
Dix types d’effets de sampling/reproduction vous
permettent d’échantillonner clips vidéo, images fixes et sons
Vous pouvez directement échantillonner et reproduire
l’image de sortie ou une phrase entrante (un clip vidéo
de six secondes, plus une image fixe et une phrase de
six secondes pour chacune des deux touches
d’échantillonnage).
Fonction Pad Motion et fonction Mute/Freeze pour un
travail en temps réel
La fonction Pad Motion vous permet de capturer un
mouvement favori ou complexe sur le pavé tactile, qui
pourra ensuite être reproduit pour contrôler l’image et
le son. La fonction Mute/Freeze vous permet de geler
l’image produite.
Raccordement facile pour les appareils vidéo ou autres
appareils pour VJ
Le KAOSS PAD Entrancer offre une gamme complète
d’entrées et de sorties pour raccorder votre
équipement VJ ou dans toute autre situation. Les
prises MIDI autorisent l’utilisation du KAOSS PAD
Entrancer avec des claviers externes, des
échantillonneurs, des séquenceurs ou des dispositifs
d’effets comme un contrôleur pour les sons ou les
effets. En utilisant le KAOSS PAD Entrancer avec des
appareils externes, vous bénéficierez d’un éventail
pratiquement infini de possibilités de contrôle des
images et des sons.
La “lumière” ajoute une dimension excitante à vos
performances live
La couleur du pavé tactile change de façon
surprenante en fonction de la position de votre doigt
sur le pavé tactile et du type d’effet sélectionné. Ces
effets d’éclairage multicolore ajouteront un élément
dramatique à votre performance.
Un format compact pour toutes les configurations
Avec son format compact et sa conception hautement
fonctionnelle, le KAOSS PAD Entrancer occupe un
espace minimal et trouvera sa place dans n’importe
quelle installation ou studio.
Comment lire ce manuel
Indique une précaution à prendre ou un
avertissement.
Indique un conseil pratique.
☞p.??
Indique une page de référence.
Indique des informations concernant les effets vidéo.
Indique des informations concernant les effets audio.
Une remarque à propos de l’utilisation de cet
appareil vidéo
Certaines personnes stimulées par une lumière intense
ou des images changeant rapidement peuvent présenter
des symptômes comme des spasmes temporaires ou une
perte de conscience. Si vous ressentez un de ces
symptômes, arrêtez immédiatement d’utiliser ce
dispositif et consultez un médecin.
En particulier lorsque vous utilisez ce dispositif
dans un lieu public ou tout autre endroit où se
trouvent réunis un grand nombre de personnes,
vous devez prendre en considération les personnes
autres que l’utilisateur de l’appareil et éviter de
créer ou présenter des successions d’images qui
pourraient produire ce type de stimulation intense.
Korg Corporation rejette toute responsabilité pour
tout problème de santé ou dommage personnel ou
matériel quel qu’il soit dont pourraient être victimes
l’utilisateur ou les observateurs, suite à l’utilisation
de ce dispositif en violation du présent avertissement.
1
Page 20

Nomenclature et fonctions
Panneau supérieur
3 2 1
7
4
9
5
6
8
10
1211 15
1413
1.Commutateur [CONTROL SELECT]
2.Indicateur [PEAK]
3.Bouton [LINE INPUT VOLUME]
4.Bouton [FX BALANCE]
5.Écran [PROGRAM/BPM]
6.Bouton [PROGRAM/BPM]
7.Touches [PROGRAM MEMORY 1~8]
8.Touche [TAP/BPM]
9.Pavé tactile
Entretien du pavé tactile
N’appliquez jamais de force excessive sur le pavé
tactile et ne posez pas d’objet lourd à sa surface. Une
utilisation brutale peut provoquer des fissures ou
briser le pavé tactile. Si vous frottez ou grattez la
surface du pavé tactile avec un objet pointu, elle sera
rayée ; utilisez seulement le pavé tactile avec vos
doigts. Pour nettoyer le pavé tactile, essuyez-le
délicatement avec un chiffon doux et sec. N’utilisez
pas de solvants organiques comme du diluant, car
l’appareil pourrait alors être déformé.
10. Manette [PAD MOTION / MUTE/FREEZE]
11.Touche [HOLD]
12. Touche [FUNCTION]
13. Touches [SAMPLE 1], [SAMPLE 2]
14. Touche [REC/STOP]
15. Indicateur [VIDEO 2]
2
Page 21

Panneau avant
1 2 3 4 5
1.Sortie [PHONES]
2.Bouton [PHONES VOLUME]
3.Commutateur [VIDEO SELECT]
Panneau arrière
1 2 3
1.Commutateur de mise sous/hors tension
2.Prise d’alimentation
3.Prises [MIDI IN], [MIDI OUT]
4.Commutateur [CONNECTION]
5.Commutateur [NTSC/PAL]
4. Entrée S-vidéo [INPUT 2]
5. Entrée vidéo [INPUT 2]
45
6 7
8
6. Sortie S-vidéo [OUTPUT]
7. Sortie vidéo [OUTPUT]
8. Sorties audio [OUTPUT]
9. Entrée vidéo [INPUT]
10. Entrées audio [INPUT]
9
10
3
Page 22

Raccordements
Vidéo
Lecteur DVD
VIDEO MONITOR
INPUT VIDEO
OUTPUT VIDEO
INPUT 2 VIDEO
DC7V
AC
AC ADAPTER
Caméra vidéo
A propos des signaux vidéo
Le KAOSS PAD Entrancer peut être utilisé dans le
format vidéo NTSC ou PAL au choix. Réglez le
commutateur [NTSC/PAL] sur le format approprié
correspondant aux appareils vidéo que vous utiliserez.
Le KAOSS PAD Entrancer ne fonctionnera pas
correctement si le format de signal vidéo incorrect est
sélectionné. Le KAOSS PAD Entrancer ne fonctionnera
pas correctement avec des signaux non-entrelacés.
Vous devez mettre l’appareil hors tension avant de
changer le réglage du commutateur [NTSC/PAL].
4
Le KAOSS PAD Entrancer ne fonctionnera pas si
un signal vidéo anti-piratage est reçu.
Des rayures peuvent apparaître dans l’image en
fonction des performances et des caractéristiques de
l’appareil raccordé à l’entrée S-vidéo.
Page 23

Audio
Voici un exemple de raccordements pour appliquer les
effets au signal audio entrant des appareils branchés
sur les entrées du KAOSS PAD, et transmettre le son
traité vers les sorties.
CD PLAYER
LINE OUT
MIC1
BAL
BAL
OR
OR
UNBAL
UNBAL
UNBAL
LINE IN 3
LINE IN 2
LINE IN 1
LOW CUT
LOW CUT
LOW CUT
75Hz
75Hz
75Hz
18dB/OCT
18dB/OCT
18dB/OCT
B
d
V
B
B
d
d
V
V
0
0
0
1
1
1
-
-
-
A
G
A
G
A
G
I
I
I
N
C
N
N
C
C
I
I
I
M
M
M
U
U
U
10
10
10
60
60
60
+10dB
-40dB
+10dB
+10dB
-40dB
-40dB
TRIM
TRIM
TRIM
U
U
U
AUX
AUX
AUX
1
1
MON/
MON/
MON/
EFX
EFX
+15
+15
+15
U
U
U
2
2
EFX
EFX
+15
+15
+15
U
U
U
EQ
EQ
HI
HI
12kHz
12kHz
12kHz
-15
-15
+15
+15
-15
+15
U
U
U
MID
MID
2.5kHz
2.5kHz
2.5kHz
-12
-12
-12
+12
+12
+12
U
U
U
LOW
LOW
LOW
80Hz
80Hz
80Hz
+15
+15
+15
-15
-15
-15
PAN
PAN
PAN
L
L
L
R
R
R
1
3
2
MUTE
MUTE
MUTE
ALT 3–4
ALT 3–4
ALT 3–4
dB
dB
dB
10
10
10
SOLO
SOLO
SOLO
5
5
5
U
U
U
5
5
5
10
10
OUTPUT L/RINPUT L/R
DC7V
10
20
20
20
30
30
30
40
40
40
50
50
50
60
60
60
OUTPUT
INPUT
L
1
1
MICRO SERIES 1402-VLZ
L
14-CHANNEL MIC/LINE MIXER
2
R
2
R
BAL/UNBAL
ALL BAL/UNBAL
LEFT(1/MONO)
RIGHT
BAL
BAL
BAL
BAL
MONO
MONO
MONO
MONO
OR
OR
OR
OR
UNBAL
UNBAL
UNBAL
L
L
L
L
LINE IN 4
LINE IN 6
LINE IN 5
BAL
BAL
BAL
BAL
LOW CUT
OR
OR
LOW CUT
OR
OR
LOW CUT
75Hz
75Hz
75Hz
UNBAL
UNBAL
UNBAL
UNBAL
18dB/OCT
18dB/OCT
18dB/OCT
B
d
V
0
B
d
B
V
d
V
0
0
1
1
-
1
-
-
R
R
R
R
A
G
A
I
G
A
G
N
C
I
I
N
I
N
C
C
I
I
M
M
M
U
U
U
LEVEL
LEVEL
LEVEL
LEVEL
+4
+4
+4
+4
10
60
10
+10dB
-40dB
+10dB
TRIM
TRIM
U
U
AUX
1
1
MON/
EFX
EFX
+15
+15
U
U
2
2
EFX
EFX
+15
+15
U
U
EQ
EQ
HI
HI
12kHz
-15
+15
-15
+15
U
U
MID
MID
2.5kHz
-12
-12
+12
+12
U
U
LOW
80Hz
+15
+15
-15
-15
PAN
L
L
R
R
4
5
MUTE
MUTE
ALT 3–4
ALT 3–4
dB
dB
10
10
SOLO
5
5
U
U
5
5
10
10
20
20
30
30
40
40
50
50
60
60
PHONES
10
60
60
-10
-10
-10
-10
+10dB
-40dB
-40dB
LINE IN 7-8
LINE IN 13-14
LINE IN 9-10
LINE IN 11-12
TRIM
U
AUX
AUX
1
1
MON/
MON/
EFX
EFX
+15
U
2
2
EFX
EFX
+15
U
EQ
EQ
HI
HI
12kHz
12kHz
-15
+15
U
MID
MID
2.5kHz
2.5kHz
-12
+12
U
LOW
LOW
80Hz
80Hz
+15
-15
PAN
PAN
L
R
6
MUTE
ALT 3–4
dB
10
SOLO
SOLO
5
U
5
10
20
30
40
50
60
U
U
U
U
U
U
AUX
AUX
AUX
AUX
1
1
1
1
MON/
MON/
MON/
MON/
EFX
EFX
EFX
EFX
1
+20
+10
+15
+15
+15
+15
NORMALLED
U
U
U
U
U
AUX 1 MASTER
2
PRE
2
2
2
2
POST
EFX
EFX
EFX
EFX
AUX
EFX TO
AUX 1
+20
MONITOR
+15
+15
SELECT
+15
+15
U
-15
+15
U
-12
+12
U
+15
-15
L
R
7–8
MUTE
ALT 3–4
dB
10
5
U
5
10
20
30
40
50
60
RETURNS
U
U
U
SOURCE
EQ
EQ
EQ
EQ
LEFT RIGHT
HI
HI
HI
HI
MAIN
CLIP+28
12kHz
12kHz
12kHz
12kHz
MIX
+10
-15
+15
-15
+15
-15
+15
+7
U
U
U
ALT
+4
3-4
MID
MID
MID
MID
2.5kHz
2.5kHz
2.5kHz
2.5kHz
+2
-12
-12
+12
-12
+12
+12
0
TAPE
U
U
U
-2
LOW
LOW
LOW
LOW
80Hz
80Hz
80Hz
80Hz
-4
+15
+15
-15
+15
-15
-15
-7
ASSIGN
PAN
PAN
PAN
PAN
-10
TO MAIN MIX
-20
NORMAL(AFL)
-30
LEVEL SET(PFL)
L
R
L
L
R
R
0dB=0dBu
SOLO
MODE
9–10
13–14
11–12
MUTE
MUTE
MUTE
POWER
RUDE SOLO LIGHT
PHANTOM
ALT 3–4
ALT 3–4
ALT 3–4
CONTROL
/ PHONES
MAIN MIX
ROOM
dB
dB
dB
dB
dB
10
10
10
10
10
SOLO
SOLO
SOLO
SOLO
5
5
5
5
5
U
U
U
U
U
5
5
5
5
5
10
10
10
10
10
20
20
20
20
20
30
30
30
30
30
40
40
40
40
40
50
50
50
50
50
60
60
60
60
60
MAIN OUTS
TAPE
TAPE
STEREO AUX RETURNS
AUX SEND
MIC4
MIC6
MIC3
MIC5
MIC2
MIXER, DJ MIXER
TURNTABLE
TURNTABLEDJ MIXER
Raccordements d’un mixer DJ
Raccordez la prise de sortie d’effet de votre mixer DJ,
etc., à l’entrée audio [INPUT] du KAOSS PAD
Entrancer, et raccordez les sorties audio [OUTPUT] du
KAOSS PAD Entrancer aux prises de retour d’effet de
votre mixer. Vous pourrez ainsi utiliser le KAOSS PAD
Entrancer comme un processeur d’effets externe.
Lorsque le KAOSS PAD Entrancer est raccordé aux
prises de sortie/retour d’effet de votre mixer
Si le commutateur [CONNECTION] du KAOSS PAD
Entrancer est réglé sur FX LOOP, le signal des sorties
audio [OUTPUT] du KAOSS PAD Entrancer ne
contiendra pas le son entrant ; seul l’effet sonore sera
fourni.
Pour régler la profondeur et le volume de l’effet,
utilisez le bouton [FX BALANCE] du KAOSS PAD
Entrancer et les commandes de votre mixer.
RETURN
SEND
AC ADAPTER
DIRECT
FX LOOP
CONNECTION LINE OUT
INPUT L/R
AC
OUTPUT L/R
TURNTABLE
TURNTABLEDJ MIXER
5
Page 24

Fonctionnement
1. Mise sous tension
1. Raccordez votre matériel comme décrit dans
les exemples de raccordement et branchez
l’adaptateur secteur sur une prise secteur.
2. Appuyez sur le commutateur [STANDBY]
pour mettre l’appareil sous tension. L’écran
[PROGRAM/BPM] s’allumera.
Une image apparaîtra sur le moniteur TV
raccordé.
Pour mettre l’appareil hors tension
Appuyez de nouveau sur le commutateur
[STANDBY].
2. Vérification de l’entrée
vidéo
1. Produisez un signal vidéo avec un appareil
raccordé.
2. Utilisez le commutateur [VIDEO SELECT]
pour sélectionner l’entrée recevant le signal
vidéo que vous souhaitez traiter.
1 : L’effet sera appliqué à l’entrée vidéo 1.
2 : L’effet sera appliqué à l’entrée vidéo 2 (ou
S-vidéo 2). L’indicateur [VIDEO 2]
s’allumera.
Si aucun signal n’est fourni à l’entrée vidéo 2,
l’indicateur [VIDEO 2] clignotera.
L’entrée S-vidéo 2 prend la priorité sur
l’entrée vidéo 2.
3. Réglage du volume
1. Sortie audio d’un appareil raccordé.
2. Réglez le niveau de l’entrée audio.
Utilisez le bouton [LINE INPUT VOLUME]
pour régler le niveau du signal entrant de
telle sorte que l’indicateur de crête ne
s’allume pas en rouge.
Pour l’écoute au casque
Utilisez le bouton [PHONES VOLUME] pour
régler le volume.
4. Sélection d’un programme
1. Utilisez le commutateur [CONTROL
SELECT] pour sélectionner le signal (vidéo,
audio) que vous souhaitez traiter avec l’effet.
Utilisez la position gauche pour appliquer les
effets au signal audio, ou la position droite
pour appliquer les effets au signal vidéo. Si
vous sélectionnez COMBI (position
centrale), les effets seront appliqués en même
temps aux signaux audio et vidéo.
Reportez-vous à “Création d’un programme
COMBI”.
2. L’écran [PROGRAM/BPM] indique le numéro
du programme actuellement sélectionné .
Utilisez le bouton [PROGRAM/BPM] pour
sélectionner un programme (00~99).
3. Utilisez le bouton [FX BALANCE] pour
régler la profondeur de l’effet.
Tournez ce bouton vers la gauche pour
limiter l’effet ; tournez-le vers la droite pour
renforcer l’effet.
Le résultat dépendra de l’effet sélectionné.
Si ce bouton est tourné complètement à
gauche, aucun effet ne sera appliqué au son ;
Si le bouton est tourné complètement à
droite, l’effet maximum sera appliqué.
Si vous souhaitez utiliser le bouton [FX
BALANCE] pour régler la profondeur de
l’effet, réglez le commutateur
[CONNECTION] sur DIRECT.
A propos de l’écran [PROGRAM/BPM]
Cet écran affiche le numéro du programme
actuellement sélectionné, le BPM spécifié, et les
coordonnées du point du pavé tactile touché.
Lorsque vous touchez le pavé tactile : Les
coordonnées du point touché (1.1~9.9; 5.5
représente le centre) sont affichées.
Position verticale (1~9)
Position horizontale (1~9)
Quand vous changez de programme: L’écran
affiche le numéro de programme (00~99).
Dans le mode Combination, (--) peut être
affiché pour certains réglages lorsque vous
utilisez les touches de mémoire de
programme pour rappeler un programme.
Quand vous réglez le BPM: Lorsque vous
utilisez la touche [TAP/BPM] pour régler le
BPM, l’écran affiche la valeur du BPM. En
mode Auto BPM, trois points s’allument.
En mode Pattern Select: L’écran affiche le
numéro du motif actuellement sélectionné.
En mode MIDI Edit: L’écran affiche des
informations comme le canal MIDI ou le
numéro de contrôleur.
5. Utilisation du pavé tactile
1. Effleurez le pavé tactile ou tapotez légèrement
dessus pour contrôler l’effet (son).
Appliquez la feuille de protection fournie
pour le protéger.
2. Si vous appuyez sur la touche [HOLD],
l’effet (son) fourni dans la position précédant
immédiatement le retrait de votre doigt du
pavé tactile sera maintenu.
6. Fonction Mute/Freeze
En déplaçant la manette [PAD MOTION/
MUTE/FREEZE] vers la position MUTE /
FREEZE (vers vous) vous pourrez effectuer
les opérations suivantes.
L’image vidéo actuelle sera gelée.
Le signal entrant, le son échantillonné, ou le
son synth/drum sera coupé. Cela vous
permettra de fournir seulement le son traité
par un effet (p. ex., Delay ou Reverb).
6
Page 25

Transformer
En utilisant la manette [PAD MOTION /
MUTE/FREEZE] Pour activer/désactiver
rapidement MUTE, vous pouvez créer un
rythme à partir d’un son entrant sustain ;
c’est ce qu’on appelle la technique “transformer”
qui est souvent utilisée par les DJ.
7. Pad Motion
Vous pouvez capturer une série de mouvements des
doigts sur le pavé tactile, et reproduire ces
mouvements en déplaçant la manette [PAD MOTION
/ MUTE/FREEZE] vers PAD MOTION.
Les opérations d’activation/désactivation de la touche
[HOLD] ne sont pas enregistrées avec la fonction
Pad Motion. Si vous activez [HOLD] et reproduisez
un mouvement de Pad Motion, l’effet sera arrêté au
point où la reproduction des mouvements sur le pavé
tactile (Pad Motion) a été arrêtée.
Enregistrement
Quand vous déplacez la manette [PAD
MOTION / MUTE/FREEZE] vers PAD
MOTION et touchez le pavé tactile,
l’enregistrement commence.
Chaque fois que vous soulevez le doigt du
pavé tactile, ce mouvement est enregistré
comme une opération. Par conséquent, vous
pouvez enregistrer des opérations comme le
“tapping” (un tapotement répété sur le pavé
tactile). L’enregistrement s’arrêtera quand
vous ramènerez la manette [PAD MOTION /
MUTE/FREEZE] sur sa position d’origine
ou quand le temps maximal d’enregistrement
(environ six secondes) aura été atteint.
Reproduction
Après l’enregistrement, déplacez la manette
[PAD MOTION / MUTE/FREEZE] vers PA D
MOTION pour reproduire le mouvement
enregistré.
Aussi longtemps que la manette [PAD MOTION
/ MUTE/FREEZE] se trouve dans la position
PAD MOTION, le mouvement enregistré sera
reproduit continuellement en boucle.
Néanmoins, si vous touchez le pavé tactile
pendant la reproduction, l’enregistrement
commencera.
Si vous changez de programme, le
mouvement du pavé tactile qui avait été
enregistré dans le programme sélectionné
sera rappelé.
Effacement
Pour effacer le mouvement enregistré, réglez
la manette [PAD MOTION / MUTE/FREEZE]
sur la position PAD MOTION tout en
maintenant la touche [FUNCTION] enfoncée.
8. Réglage du BPM
Si vous avez réglé le BPM, vous pourrez sélectionner
un programme d’effets à partir du groupe “BPM FX”
ou “BPM PTN” et appliquer un effet qui sera
synchronisé avec le BPM. Pour les détails sur les
paramètres des effets concernés, reportez-vous à la
liste Programmes d’effets (☞ feuille séparée).
Qu’est-ce que le BPM ?
Le BPM (Beats Per Minute) indique le tempo
d’un morceau en termes de nombre de notes
de battement (croches) par minute. Un BPM
plus élevé correspond à un tempo plus rapide.
Pour régler le BPM
Si vous connaissez déjà la valeur du BPM,
appuyez sur la touche [TAP/BPM] et utilisez
le bouton [PROGRAM/BPM] pour spécifier
la valeur. Si vous ne réglez pas la valeur du
BPM dans les cinq secondes, le
fonctionnement normal reprendra. Vous
pouvez aussi appuyer sur la touche
[FUNCTION] pour revenir en mode de
fonctionnement normal.
La plage de réglages du BPM est 40~300.
Fonction Tap Tempo
Si vous ne connaissez pas le BPM, réglez le
tempo en appuyant deux fois ou plus sur la
touche [TAP/BPM] au rythme du morceau ; le
BPM sera affiché dans l’écran [PROGRAM/
BPM].
Fonction Auto BPM
Si vous appuyez sur la touche [TAP/BPM] et la
maintenez enfoncée pendant plusieurs
secondes, trois points apparaîtront dans l’écran
[PROGRAM/BPM], et le BPM du signal audio
entrant sera détecté automatiquement.
Si le BPM ne peut pas être détecté, l’affichage
de l’écran [PROGRAM/BPM] clignotera.
Appuyez de nouveau sur la touche [TAP/
BPM] pour quitter le mode de détection
automatique.
La plage de BPM détectable est 80~160.
Fonction MIDI Sync
Vous pouvez régler le BPM sur les messages
MIDI Clock d’un appareil MIDI externe.
Raccordez la prise [MIDI OUT] de l’appareil
MIDI externe (p. ex., un séquenceur) qui
envoie les messages MIDI Clock à la prise
[MIDI IN] du KAOSS PAD Entrancer.
Afin que le KAOSS PAD Entrancer puisse se
synchroniser avec les données de séquence, il
vous faudra insérer un message “Touch Pad
On” au début de chaque mesure de vos
données de séquence, ou toucher le pavé
tactile du KAOSS PAD Entrancer au début de
la phrase pour lancer le motif de phrase.
Si vous souhaitez que le KAOSS PAD
Entrancer reçoive les messages MIDI Clock et
Touch Pad On, passez en mode MIDI Edit
(☞ p.11) et effectuez les réglages de
“Réglages de transmission/réception des
messages MIDI” (☞ p.12) de telle sorte que
ces messages soient reçus.
Cette fonction ne synchronise pas les
programmes de motifs rythmiques du KAOSS
PAD Entrancer avec les données de séquence.
Si le KAOSS PAD Entrancer est synchronisé
avec les signaux d’horloge reçus d’un appareil
MIDI externe, les fonctions Touch Tempo et
Auto BPM ne seront pas disponibles.
7
Page 26

9. Enregistrement des réglages
sous les touches
[PROGRAM MEMORY]
Vous pouvez enregistrer vos réglages favoris sous les
touches [PROGRAM MEMORY 1~8] et rappeler
instantanément ces réglages quand vous le souhaitez.
Réglages pouvant être enregistrés
• Programme d’effets
• Statut activé/désactivé de la touche [HOLD] et
position (coordonnées)
• Réglage du bouton [FX BALANCE]
• Pour le groupe “BPM FX”, la valeur de BPM
spécifiée
• Pour le groupe “SAMPLE/PLAY”, les touches
[SAMPLE 1] et [SAMPLE 2] utilisées
• Mouvements du pavé tactile
Les programmes d’effets audio 60 et 90~99 ne
conservent pas le statut de la touche [HOLD].
Enregistrement
1. Utilisez le bouton [PROGRAM/BPM] pour
sélectionner le programme d’effets que vous
souhaitez assigner à une touche.
Si vous souhaitez enregistrer le statut de la
touche [HOLD], sélectionnez le programme,
puis activez la touche [HOLD] et touchez le
pavé tactile pour spécifier la position.
Effectuez aussi tous les autres réglages que
vous souhaitez conserver.
2. Tout en maintenant la touche [FUNCTION]
enfoncée, appuyez sur la touche [PROGRAM
MEMORY 1~8] sous laquelle vous souhaitez
effectuer l’enregistrement pendant environ
deux secondes. Les réglages seront
enregistrés.
Quand les réglages ont été enregistrés,
l’affichage de l’écran [PROGRAM/BPM]
s’arrête de clignoter.
Si vous maintenez la manette [PAD MOTION /
MUTE/FREEZE] sur la position PAD
MOTION pendant l’enregistrement des
réglages, les mouvements du pavé tactile ne
seront pas enregistrés.
Rappel
1. Appuyez sur une des touches [PROGRAM
MEMORY 1~8] pour rappeler le programme
et les réglages enregistrés sous cette touche.
Si vous maintenez la manette [PAD
MOTION/ MUTE/FREEZE] sur la position
PAD MOTION pendant l’enregistrement des
réglages, les mouvements du pavé tactile ne
seront pas rappelés.
Pour enregistrer un COMBI
1. Réglez le commutateur [CONTROL SELECT]
sur [AUDIO] et sélectionnez un programme.
2. Réglez le commutateur [CONTROL SELECT]
sur [VIDEO] et sélectionnez un programme.
3. Réglez le commutateur [CONTROL SELECT]
sur [COMBI] et tout en maintenant la touche
[FUNCTION] enfoncée, appuyez sur la
touche [PROGRAM MEMORY] souhaitée
pendant environ deux secondes pour
enregistrer les réglages.
11.
En déplaçant la manette [PAD MOTION / MUTE/
FREEZE] sur MUTE/FREEZE, vous pouvez geler le
signal vidéo produit, enregistrer l’image fixe sous la
touche [SAMPLE 1] ou [SAMPLE 2], puis utiliser le
pavé tactile pour contrôler l’image fixe (en
l’agrandissant ou en l’inversant par exemple).
Vous pouvez enregistrer une image fixe sous chacune
des deux touches.
Échantillonnage
Reproduction
12.
Échantillonnage et reproduction
d’une image fixe
Les images échantillonnées sont perdues lorsque
vous mettez l’appareil hors tension. Il n’est pas
possible de sauvegarder les images échantillonnées.
1. Réglez la manette [PAD MOTION / MUTE/
FREEZE] sur MUTE/FREEZE.
L’image du moniteur sera gelée.
2. Appuyez sur une des touches [SAMPLE 1]
ou [SAMPLE 2] au choix.
L’image fixe affichée par le moniteur sera
enregistrée sous la touche sur laquelle vous
avez appuyé.
1. Si vous appuyez sur la touche [SAMPLE 1]
ou [SAMPLE 2], l’image fixe échantillonnée
sera sélectionnée comme source.
Vous pouvez utiliser le pavé tactile tout en
reproduisant l’image fixe pour appliquer un
effet à cette image.
Appuyez de nouveau sur la touche
[SAMPLE 1] ou [SAMPLE 2] pour annuler la
reproduction de l’image fixe.
Certains effets pourront ne pas produire de
résultat.
Si vous avez sélectionné un programme en
dehors du groupe “SAMPLE/PLAY”, vous ne
pourrez pas reproduire l’image fixe, sauf
pendant l’enregistrement.
Échantillonnage et reproduction
10. Création d’un programme
COMBI
A propos de COMBI
En réglant le commutateur [CONTROL SELECT] sur
[COMBI] et en utilisant le pavé tactile, vous pouvez
contrôler simultanément les effets vidéo et les effets audio.
8
d’un clip vidéo
Vous pouvez échantillonner un clip vidéo et le
reproduire tout en utilisant un programme d’effets et
le pavé tactile pour le contrôler (en l’agrandissant ou
en l’inversant par exemple).
Si vous avez sélectionné un programme du groupe
SAMPLE/PLAY, vous pourrez utiliser le pavé tactile
pour contrôler la vitesse de reproduction de la vidéo,
ou même inverser son sens de reproduction.
Page 27

La vidéo échantillonnée est perdue quand vous
mettez l’appareil hors tension. Il n’est pas possible de
sauvegarder une vidéo échantillonnée.
Échantillonnage
1. Sélectionnez un des programmes 94-99 du
groupe “SAMPLE/PLAY”.
2. Quand vous appuyez sur la touche [REC/
STOP], elle s’allume et l’enregistrement
commence. L’enregistrement s’arrêtera
lorsque vous appuierez de nouveau sur la
touche ou lorsque la mémoire sera saturée.
Si vous sélectionnez un motif d’effet de clip
(40~59) en mode d’affichage de motif, vous
pourrez enregistrer un motif. Activez la
touche [SAMPLE 1] ou [SAMPLE 2] pour
enregistrer l’image fixe que vous souhaitez
échantillonner.
Reproduction
La méthode de reproduction dépend du programme
d’effets sélectionné.
Pour un programme du groupe “SAMPLE/PLAY”
1. Sélectionnez un programme dans le groupe
“SAMPLE/PLAY”
2. Quand vous touchez le pavé tactile, le clip
vidéo est reproduit en fonction de la position
de votre doigt sur le pavé tactile.
Pour un programme en dehors du groupe
“SAMPLE/PLAY”
1. Sélectionnez un programme en dehors du
groupe “SAMPLE/PLAY”.
2. Les touches [SAMPLE 1] et [SAMPLE 2]
étant désactivées, touchez le pavé tactile en
maintenant la touche [REC/STOP] enfoncée
et le clip vidéo échantillonné sera reproduit à
vitesse normale. Si vous appuyez sur la
touche [HOLD] en maintenant la touche
[REC/STOP] enfoncée, cette dernière restera
enclenchée, vous permettant ainsi de
reproduire le clip vidéo en touchant
simplement le pavé tactile. La touche [REC/
STOP] sera libérée si vous appuyez de
nouveau dessus.
Quand vous maintenez la touche [REC/
STOP] enfoncée et appuyez sur la touche
[HOLD], la reproduction est bloquée. Quand
vous appuyez de nouveau sur la touche
[REC/STOP], le blocage est annulé.
L’affichage du motif sera annulé si vous
reproduisez un échantillon vidéo pendant
l’affichage d’un motif.
Vous ne pouvez pas afficher un motif pendant
la reproduction d’un échantillon.
13. Échantillonnage et
reproduction d’une phrase
Si vous avez enregistré une phrase du son entrant sous
les touches [SAMPLE 1] et [SAMPLE 2], vous pourrez
sélectionner un programme du groupe “SAMPLE/
PLAY” (90~99) et utiliser le pavé tactile pour contrôler la
vitesse de reproduction ou la reproduction en sens inverse.
Si vous avez sélectionné un programme en dehors du
groupe “SAMPLE/PLAY”, une pression sur la touche
[SAMPLE 1] ou [SAMPLE 2] reproduira la phrase
enregistrée sous chaque touche. Vous pouvez
enregistrer environ six secondes de son
monophonique sous chaque touche.
La phrase enregistrée est perdue lorsque vous mettez
l’appareil hors tension. Il n’est pas possible de
sauvegarder la phrase enregistrée.
Enregistrement
1. Appuyez sur la touche [REC/STOP]. La LED
de la touche [REC/STOP] clignotera et
l’appareil passera en mode d’attente
d’enregistrement.
2. Appuyez sur la touche [SAMPLE 1] ou
[SAMPLE 2] que vous souhaitez utiliser pour
l’enregistrement. Vous n’entendrez pas à ce
moment le son reproduit.
3. Appuyez sur la touche [REC/STOP]. La LED de
la touche [REC/STOP] s’allumera et
l’enregistrement commencera.
L’enregistrement s’arrêtera si vous appuyez
de nouveau sur la touche [REC/STOP].
L’enregistrement s’arrêtera automatiquement
si la durée d’enregistrement maximale est
dépassée.
Si vous sélectionnez un programme en
dehors du groupe “SAMPLE/PLAY”, vous
pourrez utiliser le pavé tactile pendant
l’enregistrement et le son produit par l’effet
sera enregistré.
Enregistrement automatique (AUTO REC)
Vous pouvez lancer automatiquement
l’enregistrement quand le son est reçu via les
entrées audio [INPUT].
1. A l’étape 2 du processus d’enregistrement,
maintenez la touche [SAMPLE 1] ou
[SAMPLE 2] que vous souhaitez utiliser
enfoncée et appuyez sur la touche [REC/
STOP]. Les LED des touches [REC/STOP] et
[SAMPLE 1] ou [SAMPLE 2] clignoteront
simultanément, et l’appareil passera en mode
d’attente d’enregistrement.
2. Quand un signal audio est reçu,
l’enregistrement commence automatiquement.
L’enregistrement s’arrêtera si vous appuyez de
nouveau sur la touche [REC/STOP].
Si la manette est réglée sur “COMBI” et que
vous avez sélectionné un programme du
groupe “SAMPLE/PLAY” comme effet
vidéo, vous pourrez enregistrer
simultanément la vidéo et le son.
Reproduction
La méthode de reproduction dépend du programme
d’effets sélectionné.
Pour un programme du groupe “SAMPLE/PLAY”
1. Sélectionnez un programme dans le groupe
“SAMPLE/PLAY” (90~99).
2. Appuyez sur la touche [SAMPLE 1] ou
[SAMPLE 2] que vous souhaitez utiliser pour
la reproduction. Vous n’entendrez pas à ce
moment le son reproduit.
3. Quand vous touchez le pavé tactile, la
reproduction s’effectue en fonction de la
position de votre doigt sur le pavé tactile.
La façon dont la phrase sera reproduite
dépendra du programme. (☞feuille séparée
“Liste des programmes d’effets”)
9
Page 28

4. Utilisez le bouton [FX BALANCE] pour
régler le volume de reproduction.
Si le bouton [FX BALANCE] est dans la
position centrale, le son reproduit et le son
entrant seront fournis dans un rapport 1:1.
Avec le bouton à sa position extrême, seul le
son échantillonné sera reproduit; le son
entrant sera inaudible.
Pour un programme en dehors du groupe
“SAMPLE/PLAY”
1. Sélectionnez un programme en dehors du
groupe “SAMPLE/PLAY”.
2. Si vous appuyez sur la touche [SAMPLE 1] ou
[SAMPLE 2], la phrase enregistrée sera
reproduite à la vitesse normale. Si vous
maintenez la touche enfoncée, la reproduction
se fera en boucle.
Pour régler le volume, tournez le bouton [FX
BALANCE] en maintenant la touche
[SAMPLE 1] ou [SAMPLE 2] enfoncée.
En utilisant le pavé tactile pendant la
reproduction, vous pouvez appliquer les
effets au son reproduit.
Si vous appuyez sur la touche [HOLD] en
maintenant la touche [SAMPLE 1] ou
[SAMPLE 2] enfoncée, la lecture sera bloquée.
Si vous appuyez de nouveau sur la touche
[SAMPLE 1] ou [SAMPLE 2], le blocage sera
annulé.
14. Affichage de l’onde de
forme audio ou d’un motif
composite
Vous pouvez afficher l’onde de forme du signal audio
entrant ou du signal audio sortant. De plus, les motifs
intégrés au KAOSS PAD Entrancer peuvent être utilisés
au lieu de l’entrée vidéo comme matériau pour les
modifications.
Mode Pattern Display
En maintenant la touche [FONCTION]
enfoncée, appuyez sur la touche [SAMPLE 1]
pour entrer en mode Pattern Display ;
l’affichage de l’écran [PROGRAM/BPM]
clignotera pour indiquer le mode d’affichage
du motif ou le numéro du motif sélectionné
Si vous affichez un motif pendant la
reproduction d’un échantillon video, la
reproduction s’arrêtera. Si vous reproduisez
de nouveau l’échantillon, le mode d’affichage
de motif sera annulé et l’échantillon sera
reproduit.
Pour quitter le mode Pattern Display
Pour revenir en mode de fonctionnement
normal, touchez le pavé tactile ou appuyez
sur la touche [FUNCTION], ou bien encore
laissez le KAOSS PAD Entrancer inactif
pendant dix secondes.
Affichage d’un motif
En mode Pattern Display, appuyez sur une
des touches [PROGRAM MEMORY 1~8] pour
rappeler le motif présélectionné pour cette
touche.
Vous pouvez appuyer sur la touche
[SAMPLE 1] pour activer/désactiver le
dernier motif sélectionné.
Pour annuler l’affichage
Pour annuler l’affichage, appuyez de
nouveau sur la touche [PROGRAM
MEMORY 1~8] sélectionnée.
L’affichage sera aussi annulé si vous changez
de programme pendant le fonctionnement
normal.
L’affichage ne sera pas annulé si vous
tournez le bouton de sélection de programme
en maintenant la touche [FUNCTION]
enfoncée pour changer de programme.
Les motifs de clips d’effets (40~59) apparaîtront
si vous utilisez le pavé tactile.
Changement de motif
En mode Pattern Display, vous pouvez
tourner le bouton [PROGRAM/BPM] en
maintenant une des touches [PROGRAM
MEMORY 1~8] enfoncée pour changer le
motif assigné à cette touche. Si cette touche
est sélectionnée, vous pourrez simplement
tourner le bouton [PROGRAM/BPM] pour
passer d’un motif à l’autre.
Enregistrement des réglages modifiés
En mode Pattern Display, appuyez sur la
touche [REC/STOP] et maintenez-la
enfoncée pendant une seconde ou plus pour
enregistrer les réglages modifiés. Les
réglages du mode MIDI Edit seront
enregistrés en même temps. Si vous mettez
l’appareil hors tension sans avoir enregistré
les modifications, les réglages reviendront à
leur état précédant.
Pour éviter que l’affichage du motif soit désactivé
quand vous changez de programme
Mettez l’appareil sous tension en maintenant
la touche HOLD enfoncée. (La touche HOLD
s’allumera momentanément.)
Pour annuler
Mettez l’appareil hors tension, puis de
nouveau sous tension de la façon habituelle.
Types de motifs
00~39 : Motifs superposés
Cette fonction permet de superposer un
motif (comme l’onde de forme du signal
entrant, ou des informations sur des
positions de pavé tactile) à l’image.
Vous ne pouvez pas appliquer un effet au
motif superposé ni échantillonner ce dernier.
40~59 : Motifs de clips d’effets
Cette fonction permet d’afficher des motifs
de couleur ou des données d’image. Vous
pouvez les utiliser comme matériaux pour
les effets.
Si vous avez sélectionné un programme en
dehors du groupe “SAMPLE/PLAY”, vous
ne pourrez pas afficher ces motifs, sauf
pendant l’enregistrement.
10
Page 29
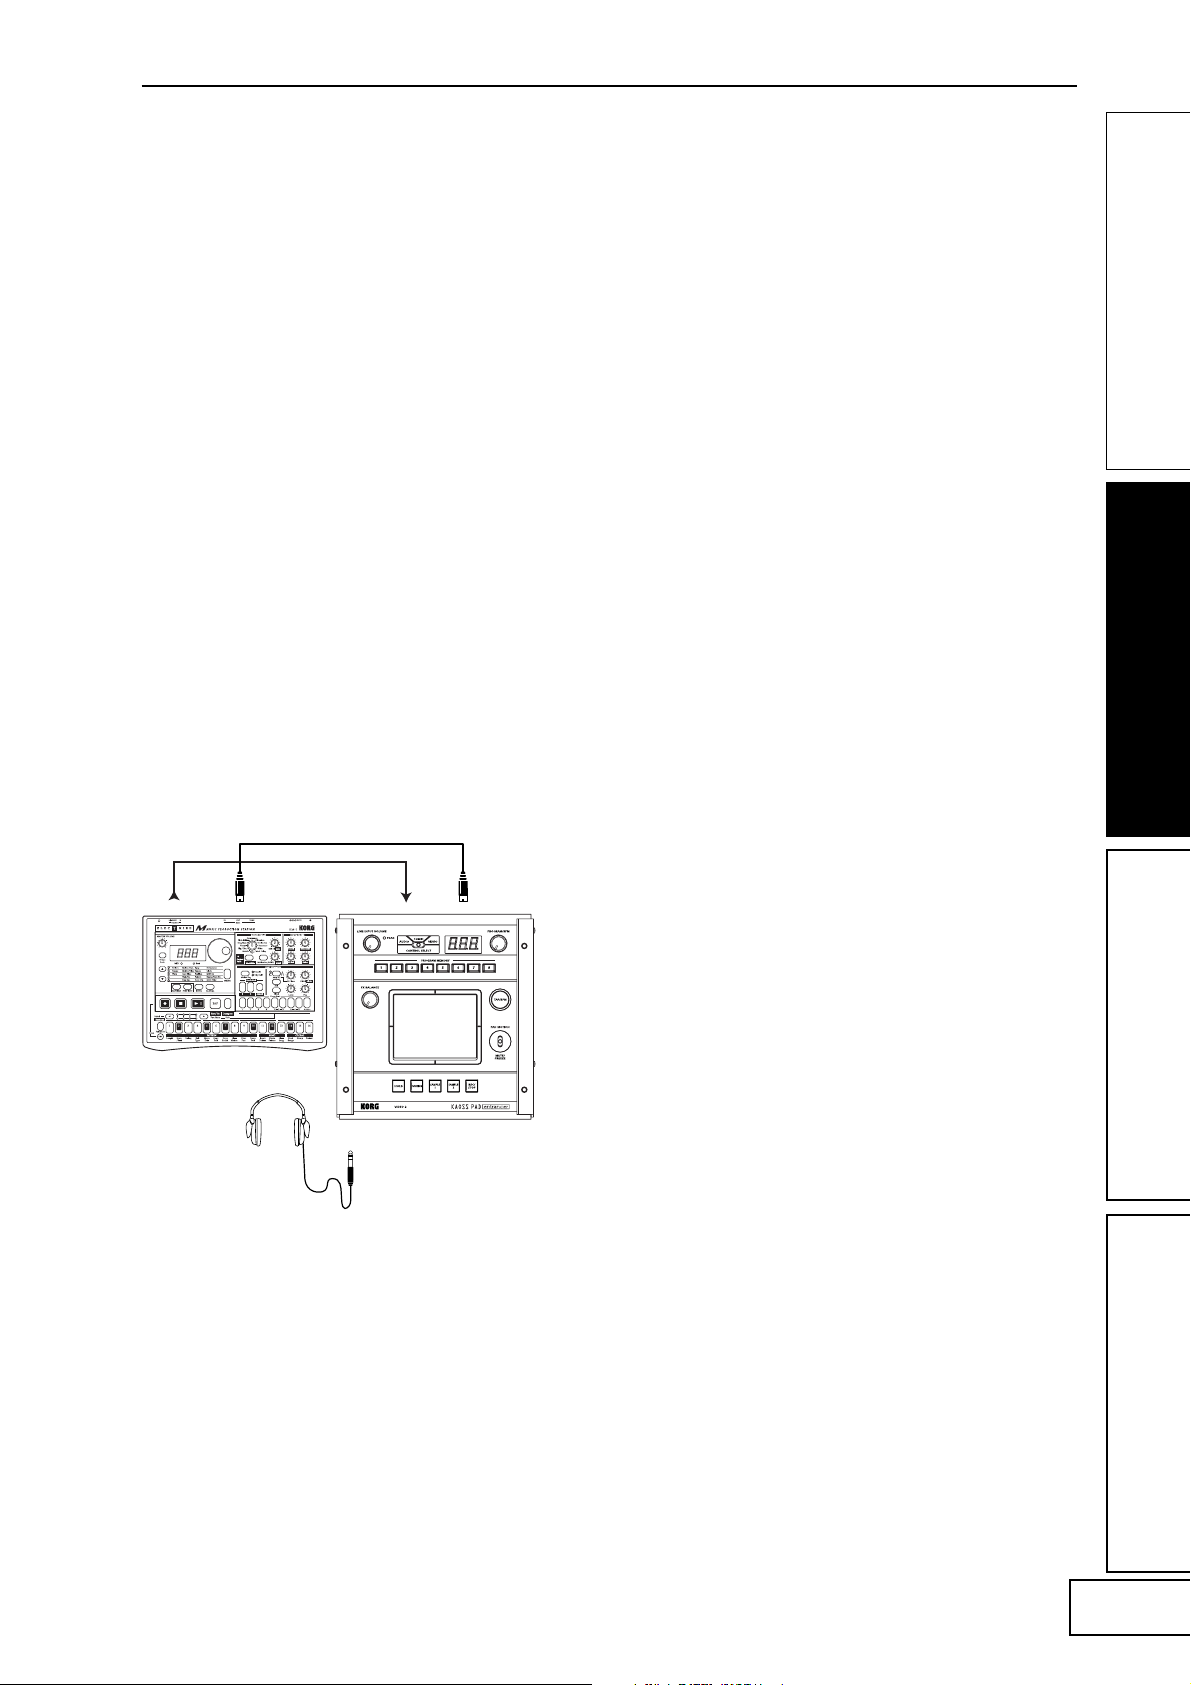
Fonctions MIDI
Utilisation de MIDI
Qu’est-ce que MIDI ?
MIDI (Musical Instrument Digital Interface) est une
norme internationale pour l’échange d’une large
gamme de données entre des instruments de musique
électroniques, des processeurs d’effet, des
séquenceurs, entre autres, et des ordinateurs.
Raccordements MIDI
Utilisez des câbles MIDI disponibles dans le commerce
pour envoyer ou recevoir des messages MIDI.
Raccordez les prises MIDI du KAOSS PAD Entrancer
aux prises MIDI de l’appareil MIDI externe vers
lequel/duquel vous souhaitez envoyer/recevoir les
données.
Prise MIDI IN: Reçoit les messages MIDI d’un autre
appareil MIDI. Raccordez-la à la prise MIDI OUT de
l’appareil externe.
Prise MIDI OUT: Transmet les messages du KAOSS
PAD Entrancer. Raccordez-la à la prise MIDI IN de
l’appareil externe.
Exemple de raccordements
Dans l’exemple suivant, le KAOSS PAD Entrancer est
raccordé à autre appareil MIDI de telle façon qu’il
reproduise le son en même temps que les données de
séquence.
Vous pouvez non seulement utiliser le KAOSS PAD
Entrancer comme processeur d’effets, mais aussi
comme contrôleur en temps réel pouvant
transmettre des messages MIDI de contrôle à un
synthétiseur ou à un autre appareil MIDI externe.
Si le KAOSS PAD Entrancer est raccordé à un
séquenceur MIDI, les messages MIDI transmis lorsque
vous utilisez le pavé tactile pourront être enregistrés
sur le séquenceur MIDI, puis rappelés pour reproduire
toutes les opérations de votre pavé tactile.
A propos de la table d’implémentation MIDI
Le mode d’emploi de chaque appareil MIDI contient
une “Table d’implémentation MIDI”. Cette table vous
indique quels types de signaux MIDI cet appareil est
capable de transmettre et de recevoir. Quand vous
utilisez deux appareils MIDI ensemble, comparez leurs
tables d’implémentation respectives pour vérifier
qu’ils peuvent communiquer l’un avec l’autre.
* Des spécifications MIDI détaillées sont décrites dans
l’implémentation MIDI.
Mode MIDI Edit
Sur le KAOSS PAD Entrancer, utilisez le mode MIDI
Edit pour accéder aux réglages relatifs à MIDI.
En maintenant la touche [FUNCTION] enfoncée,
appuyez sur la touche [SAMPLE 2] pour entrer dans le
mode MIDI Edit. Le canal MIDI clignotera dans l’écran
[PROGRAM/BPM].
KORG EM-1
Réglage du canal MIDI
LINE IN MIDI INMIDI OUTOUTPUT
En mode MIDI Edit, l’écran [PROGRAM/BPM]
indique le canal MIDI. Vous pouvez alors utiliser le
bouton [PROGRAM /BPM] bouton pour changer le
canal MIDI.
A propos des canaux MIDI
MIDI utilise seize “canaux” (1~16) pour envoyer
indépendamment des données sur un simple câble à
plusieurs appareils MIDI .
Si l’appareil transmetteur est réglé sur le canal “1”
MIDI, les messages MIDI ne seront pas reçus à moins
que l’appareil récepteur ne soit lui aussi réglé sur le
canal “1” MIDI.
11
Page 30
Réglages de transmission/
réception des messages MIDI
La transmission et la réception de chaque type de
message MIDI peut être activée/désactivée en
appuyant sur la touche assignée à ce type of message
MIDI. La transmission/réception est activée si la
touche correspondante est allumée, et désactivée si la
touche est éteinte. (Voir le tableau “Signaux transmis
et reçus” ci-dessous)
Certains paramètres sont seulement transmis, et
d’autres seulement reçus.
Changement des numéros de contrôle MIDI
En mode MIDI Edit, vous pouvez tourner le bouton
[PROGRAM/BPM] en maintenant une des touches
[PROGRAM MEMORY 3~8] enfoncée pour changer le
réglage du numéro de contrôleur assigné à cette
touche.
Bien que vous soyez libre d’assigner (dupliquer) un
numéro de contrôleur déjà assigné à cette touche, vous
ne pourrez pas activer simultanément la transmission/
réception d’un même numéro de contrôleur.
Les signaux MIDI transmis et reçus par le KAOSS
PAD Entrancer peuvent être sélectionnés à
l’intérieur des plages CC#1~CC#31,
CC#64~CC#95, et Pitch Bend.
Enregistrement des réglages modifiés
En mode MIDI Edit, appuyez sur la touche [REC/
STOP] et maintenez-la enfoncée pendant une seconde
ou plus ; les réglages de MIDI modifiés seront
enregistrés. Le réglage du mode de sélection de motif
sera enregistré en même temps. Si vous mettez
l’appareil hors tension sans enregistrer les réglages, le
KAOSS PAD Entrancer reviendra aux réglages
précédents.
Pour quitter le mode MIDI Edit
Pour revenir en mode de fonctionnement normal, vous
pouvez au choix toucher le pavé tactile, appuyer sur la
touche [FUNCTION], ou attendre dix secondes sans
effectuer aucune opération.
A propos des réglages
enregistrés
Le contenu de “PROGRAM MEMORY” et les réglages
du numéro de contrôleur effectués en mode MIDI Edit
peuvent être transmis comme messages exclusifs et
enregistrés sur un appareil MIDI externe.
Pour les détails sur les signaux exclusifs pouvant être
transmis, reportez-vous à l’implémentation MIDI
séparée.
Signaux transmis et reçus
Avec les réglages d’usine, le KAOSS PAD Entrancer transmettra et recevra les signaux MIDI suivants.
Opération transmise Message MIDI transmis Touche activant/désactivant la transmission
Axe X du pavé tactile Contrôle de l’effet 1 (CC#12) *1, *2 PROGRAM MEMORY 4
Axe Y du pavé tactile Profondeur de la modulation 1 (CC#1) Y=5~9 PROGRAM MEMORY 1
Profondeur de la modulation 2 (CC#2) Y=5~1 PROGRAM MEMORY 2
Contrôle de l’effet 2 (CC#13) *1, *2 PROGRAM MEMORY 5
Axe X+Y du pavé tactile Profondeur de l’effet 3 (CC#93) *1 PROGRAM MEMORY 3
Pavé tactile activé/désactivé Profondeur de l’effet 2 (CC#92) *1, *2 PROGRAM MEMORY 6
FX BALANCE Profondeur de l’effet 4 (CC#94) *1, *2 PROGRAM MEMORY 7
MUTE Profondeur de l’effet 5 (CC#95) *1, *2 PROGRAM MEMORY 8
Changement de programme Changement de programme (0~99) *2 HOLD
Sortie du mouvement du pavé tactile
Opération reçue Message MIDI reçu Touche activant/désactivant la réception
Axe X du pavé tactile Contrôle de l’effet 1 (CC#12) *1, *2 PROGRAM MEMORY 4
Axe Y du pavé tactile Contrôle de l’effet 2 (CC#13) *1, *2 PROGRAM MEMORY 5
Pavé tactile activé/désactivé Profondeur de l’effet 2 (CC#92) *1, *2 PROGRAM MEMORY 6
FX BALANCE Profondeur de l’effet 4 (CC#94) *1, *2 PROGRAM MEMORY 7
MUTE Profondeur de l’effet 5 (CC#95) *1, *2 PROGRAM MEMORY 8
Changement de programme Changement de programme (0~99) *2 HOLD
BPM Timing Clock SAMPLE 1
*1: Vous pouvez sélectionner le message MIDI qui sera transmis/reçu dans les plages CC#1~CC#31,
CC#64~CC#95, et Pitch Bend. ( ) Indique le réglage d’usine.
*2: Les réglages d’activation/désactivation et CC# seront les mêmes pour la transmission et la réception.
Les changements de contrôle pour l’axe Y (Y=5~9, Y=5~1) et l’axe X+Y du pavé tactile peuvent être
transmis mais pas reçus. Cela veut dire que lorsque les commandes d’enregistrement changent sur un
séquenceur, vous devez utiliser le mode MIDI Edit pour désactiver [PROGRAM MEMORY 1~3] afin que
des messages MIDI inutiles ne soient pas transmis.
Vous ne pouvez pas dupliquer les réglages des numéros de contrôle déjà assignés.
Chaque message du pavé tactile SAMPLE 2
12
Page 31

FAQ
Q1: Un effet vidéo n’est pas appliqué quand je
touche le pavé tactile
A: Vérifiez les points suivants.
1) La manette de contrôle est-elle dans la
position correcte ?
>> L’effet vidéo est appliqué seulement quand la
manette de contrôle est réglée sur le mode
COMBI ou VIDEO.
2) Essayez de régler le bouton FX BALANCE.
>> Le bouton FX BALANCE règle la vidéo
seulement si la manette de contrôle est réglée
sur VIDEO.
3) Le commutateur PAL/NTSC est-il dans la
position correcte ?
>> Vous devez mettre l’appareil hors tension
avant de changer la position de ce
commutateur.
Q2: Je n’arrive pas à échantillonner une image
fixe.
A: Pour échantillonner une image fixe, la manette
de contrôle doit être réglée sur le mode VIDEO.
>> Réglez la manette de contrôle sur le mode
VIDEO. Puis, utilisez la manette MUTE/
FREEZE pour geler l’image et appuyez sur la
touche SAMPLE (1 ou 2) pour échantillonner
l’image.
Q3: En mode COMBI, l’effet VIDEO s’applique
seulement aux images fixes.
A: Si une image fixe est reproduite, l’effet vidéo
sera appliqué à l’image fixe.
>> Pour arrêter la reproduction de l’image fixe,
réglez provisoirement la manette de contrôle
sur VIDEO, puis appuyez sur la touche
SAMPLE pour arrêter la reproduction de
l’image fixe.
Q4: En mode COMBI, tourner le bouton FX
BALANCE ne change pas l’effet vidéo.
A: En mode COMBI, le bouton FX BALANCE
est fonctionnel seulement pour l’effet audio.
Q7: Est-ce que je peux mixer les deux entrées
vidéo VIDEO 1 et VIDEO 2 ?
A: Le KAOSS Pad KAOSS PAD Entrancer n’a
pas de fonction de mixage d’entrées.
>> Le programme d’effets vidéo s’applique
seulement à l’entrée vidéo sélectionnée, VIDEO
1 ou VIDEO 2.
Vous pouvez néanmoins utiliser le
commutateur de sélection d’entrée pour
obtenir un résultat similaire au mixage d’un
vidéo clip ou d’une image fixe échantillonnés.
A propos du mode de démonstration
Pour entrer en mode de démonstration
Réglez la manette de contrôle sur COMBI et
mettez l’appareil sous tension tout en
maintenant la touche FUNCTION enfoncée.
(La touche FUNCTION s’allumera
provisoirement.)
Utilisation du mode de démonstration
Si la manette de contrôle est réglée sur COMBI
et que vous n’effectuez aucune opération
pendant cinq secondes, la démonstration
commencera. (Des mouvements de pavé tactile
seront automatiquement exécutés tandis que le
mode de démonstration parcourra les
programmes COMBI.) Seul les programmes
COMBI seront reproduits. Les programmes
d’échantillonnage (94~99) seront contournés.
Interruption du mode de démonstration
Le KAOSS PAD Entrancer interrompra la
démonstration si vous effectuez une opération
quelconque, et repassera en mode de
démonstration si aucune autre opération n’a
été effectuée dans les cinq secondes.
Pour quitter le mode de démonstration
Mettez l’appareil hors tension, puis remettezle sous tension de la manière habituelle.
Q5: Je voudrais enregistrer ensemble l’effet vidéo
et la reproduction de l’effet graphique dans
la mémoire.
A: Vous ne pouvez pas enregistrer à la fois un
programme d’effets et la reproduction d’un
motif graphique sous une des touches
PROGRAM MEMORY 1~8.
Q6: Le motif graphique disparaît quand je
modifie l’effet vidéo.
A: La reproduction du motif graphique
s’arrêtera si vous re-sélectionnez le
programme d’effets.
>> Si vous souhaitez afficher de nouveau le
motif, vous devez revenir en mode de motif
graphique.
Si vous souhaitez appliquer un effet vidéo au
motif, commencez par sélectionner l’effet
vidéo souhaité, puis passez en mode de
motif graphique et sélectionnez le motif.
13
Page 32

Spécifications
Nombre de programmes d’effets: 100 (vidéo), 100 (audio), 100 (combinaison)
Entrées: Prise d’entrée vidéo 1 / Prise RCA (type phono)
Prise d’entrée vidéo 2 / Prise RCA ou S-vidéo (la prise S-vidéo prend la priorité)
(Le commutateur d’entrée vidéo permet de sélectionner l’entrée vidéo 1 ou 2)
Prises d’entrée ligne / Prises RCA stéréo
Sorties: Prise de sortie vidéo / Prise RCA
Prise de sortie S-vidéo / Prise S-vidéo
Prises de sortie ligne / Prises RCA stéréo
Prise de casque / Jack stéréo 1/4"
Fréquence d’échantillonnage: 44.1 kHz
Conversion A/N et N/A: 20 bit linéaire
MIDI: IN/OUT
Alimentation: CC 7V (adaptateur secteur dédié)
Accessoires inclus: adaptateur secteur, feuille de protection pour le pavé tactile
Dimensions: 240 (W) × 247 (D) × 83 (H) mm
Poids: 2,0 kg
* L’apparence et les spécifications sont sujettes à modifications sans avis préalable.
14
Page 33

15
Page 34

Vorsichtsmaßnahmen
Aufstellungsort
Vermeiden Sie das Aufstellen des Geräts an Orten, an denen
• es direkter Sonneneinstrahlung ausgesetzt ist;
• hohe Feuchtigkeit oder Extremtemperaturen auftreten können;
• Staub oder Schmutz in großen Mengen vorhanden sind;
• das Gerät Erschütterungen ausgesetzt sein kann.
• in der Nähe eines Magnetfeldes.
Stromversorgung
Schließen Sie das beiliegende Netzteil nur an eine geeignete Steckdose an. Verbinden Sie es niemals
mit einer Steckdose einer anderen Spannung.
Störeinflüsse auf andere Elektrogeräte
Dieser kann bei in der Nähe aufgestellten Rund-funkempfängern oder Fernsehgeräten
Empfangsstörungen hervorrufen. Betreiben Sie solche Geräte nur in einem geeigneten Abstand von
diesem Erzeugnis.
Bedienung
Vermeiden Sie bei der Bedienung von Schaltern und Reglern unangemessenen Kraftaufwand.
Reinigung
Bei auftretender Verschmutzung können Sie das Gehäuse mit einem trockenen, sauberen Tuch
abwischen. Verwenden Sie keinerlei Flüssigreiniger wie beispielsweise Reinigungsbenzin,
Ve r dünnungs- oder Spülmittel. Verwenden Sie niemals brennbare Reiniger.
Bedienungsanleitung
Bewahren Sie diese Bedienungsanleitung gut auf, falls Sie sie später noch einmal benötigen.
Flüssigkeiten und Fremdkörper
Stellen Sie niemals Behältnisse mit Flüssigkeiten in der Nähe des Geräts auf. Wenn Flüssigkeit in das
Gerät gelangt, können Beschädigung des Geräts, Feuer oder ein elek-trischer Schlag die Folge sein.
Beachten Sie, daß keinerlei Fremdkörper in das Gerät gelangen. Sollte ein Fremdkörper in das
Gerät gelangt sein, so trennen Sie es sofort vom Netz. Wenden Sie sich dann an Ihren KORGFachhändler.
Das CE-Zeichen für die Europäische Gemeinschaft
Vor dem 31.12.1996 vergebene CE-Zeichen auf unseren netzgespeisten Geräten zeigen an, daß diese Geräte gemäß der
EMC-Richtlinie (89/336/EWG) und der CE-Richtlinie (93/68/EWG) der EU arbeiten.
Nach dem 01.01.1997 vergebene CE-Zeichen auf unseren netzgespeisten Geräten zeigen an, daß diese Geräte gemäß der
EMC-Richtlinie (89/336/EWG), der CE-Richtlinie (93/68/EWG) und der Niederspannungsstromrichtlinie (73/23/
EWG) der EU arbeiten.
Die CE-Zeichen auf unseren batteriegespeisten Geräten zeigen an, daß diese Geräte gemäß der EMC-Richtlinie (89/336/EWG)
und der CE-Richtlinie (93/68/EWG) der EU arbeiten.
Page 35
Einführung
Vielen Dank, dass Sie sich für den AV-Effektprozessor
KAOSS PAD Entrancer entschieden haben.
Um den störungsfreien Betrieb sicherzustellen, lesen
Sie sich das Handbuch sorgfältig durch, und
verwenden Sie das Produkt wie vorgesehen.
Hauptfunktionen
Über das X-Y-Touch-Pad können Audio- und
Video-Effekte bequem simultan gesteuert werden.
Durch Fingerbewegungen oder Tippbewegungen auf
den Sensorflächen können Sie über das Touch-Pad
gleichzeitig verschiedene Effektparameter in horizontaler
und vertikaler Richtung steuern. Dadurch können
sowohl Bild- als auch Audiosignale in Echtzeit
verarbeitet werden.
Mit 100 verschiedenen Videoprogrammen und
Programmkombinationen eröffnen sich Ihnen bei der
Bildverarbeitung nahezu unbegrenzte Möglichkeiten.
Der KAOSS PAD Entrancer bietet über 100 direkt
verfügbare Video-Effektprogramme zur Verarbeitung
beliebiger Bildtypen. Die Bandbreite umfasst einfache
Effekte wie Ausblenden, Wischen, Farbänderungen,
Einfrieren, Kippen (links/rechts), Invertieren, Drehen
und Vergrößerung/Verkleinerung bis hin zu
komplexen Effekten wie geteilten Anzeigen,
vertauschte Bildkomponenten, Sandsturm-Effekte,
Monochrom-Bildaufbau, Verzögerungen, Stroboskopund Reliefdarstellungen und sogar die Minimierung
bei 360°-Drehungen! Über die Knöpfe können Sie
bequem auf die Effektprogramme zugreifen. Ihre
bevorzugten Effekte (bis zu 8) können Sie mit den
Programmspeichertasten aufrufen.
100 Audio-Effektprogramme für DJ-Mixes und
Klangdesign
Der KAOSS PAD Entrancer verfügt über 100
Klangeffekte, darunter Filter, räumliche Effekte wie
Verzögerungen und Nachhall sowie
Modulationseffekte wie Flanger, Phaser und Pan. Mit
den zahlreichen zusätzlich verfügbaren analogen
Synthesizer- und Umgebungsgeräuschen stellt der
KAOSS PAD Entrancer das ideale Werkzeug nicht nur
für die Videobearbeitung, sondern auch für die DJ/
Remix/Musik-Produktion dar.
BPM-Effektfunktion mit verschiedenen TaktzahlErkennungsfunktionen
Zwanzig BPM-Effekte können mit der Taktzahl
synchronisiert werden, um die Verzögerungszeit oder
die LFO-Geschwindigkeit für Pan-, Phaser- oder
Flanger-Effekte zu steuern. Sie können die Taktzahl
manuell einstellen, mit der Auto BPM-Funktion die
Taktzahl einer Audioquelle automatisch ermitteln, mit
der Tap Tempo-Funktion die Taktzahl über die TapTaste steuern oder die Taktzahl aus eingehenden MIDI
Clock-Meldungen abrufen.
Mit zehn unterschiedlichen Typen von Sample/
Wiedergabe-Effekten können Sie Ihrer Kreativität beim
Sampling von Videoclips, Standbildern und Audiodaten
freien Lauf lassen.
Sie können das Ausgabebild oder Eingangs-Sätze (ein 6Sekunden-Filmsample, ein Standbild und ein 6-SekundenSatz für jede der beiden Sample-Tasten) direkt sampeln.
Pad Motion-Funktion und Mute/Freeze-Funktion für den
Echtzeitbetrieb
Mit der Pad Motion-Funktion können Sie bevorzugte
oder komplexe Bewegungen auf dem Touch-Pad
erfassen und diese sofort wiedergeben, um die Bilder
und den Klang zu steuern. Mit der Mute/FreezeFunktion können Sie das aktuell ausgegebene Bild
einfrieren.
Einfache Verbindung mit Videogeräten oder sonstigem
VJ-Zubehör
Der KAOSS PAD Entrancer bietet die komplette
Bandbreite an Ein- und Ausgängen zur Verbindung
mit Ihrer VJ-Einrichtung oder weiteren Komponenten.
Über MIDI-Anschlüsse kann der KAOSS PAD
Entrancer für externe Keyboards, Sampler, Sequenzer
oder Effektgeräte als Steuergerät für Klang und Effekte
verwendet werden. Durch die Kompatibilität mit
zahlreichen anderen Geräten bietet Ihnen der KAOSS
PAD Entrancer eine nahezu unbegrenzte Anzahl von
Möglichkeiten zur Steuerung von Bildern und Klang.
Die Lichtvariationen bereichern Ihre Live-Auftritte um
eine weitere Dimension.
Die Farbe des Pads verändert sich je nach der Position
Ihres Fingers auf den Sensorelementen und dem
ausgewählten Effekttyp. Diese Farbvariationen fließen
als zusätzliches dramaturgisches Element in Ihre
Performance ein.
Flexible Verwendung durch kompakte Abmessungen
Durch die kompakte und funktionelle Formgebung
benötigt der KAOSS PAD Entrancer wenig Platz und
kann so flexibel in die verschiedensten Arrangements
integriert werden.
Hinweise zur Verwendung
des Handbuchs
Kennzeichnet eine Vorsichtsmaßnahme oder
einen Warnhinweis.
Anm.
☞S.??
Hinweise zur Verwendung des Geräts
Bei einigen Personen können Reize durch intensives
Licht oder rasch wechselnde Bilder Symptome wie
vorübergehende Krämpfen oder
Bewusstseinsverlust hervorrufen. Wenn Sie an sich
derartige Symptome feststellen, unterbrechen Sie
sofort die Arbeit mit dem Gerät und suchen Sie
einen Arzt auf.
Insbesondere bei Verwendung des Geräts auf
öffentlichen Plätzen oder vor großem Publikum ist
auch auf andere Personen zu achten. Sequenzen
von rasch wechselnden Bildern bzw. intensiven
Lichtreizen sind in diesem Fall zu vermeiden.
Korg Corporation schließt jegliche Haftung für
gesundheitliche oder Sachschäden beim Bediener
oder anderen Personen, die aus der Nichtbeachtung
dieses Warnhinweises entstehen, aus.
Kennzeichnet nützliche Informationen.
Verweist auf eine andere Seite.
Kennzeichnet Angaben, die sich auf Video-
Effekte beziehen.
Kennzeichnet Angaben, die sich auf Audio-
Effekte beziehen.
1
Page 36

Teile und Funktionen
Oberseite
3 2 1
7
4
9
5
6
8
10
1211 15
1413
1.[CONTROL SELECT]-Schalter (Steuerungsauswahl)
2.[PEAK]-Anzeige (Spitzenanzeige)
3.[LINE INPUT VOLUME]-Knopf
(Line-Eingangslautstärke)
4.[FX BALANCE]-Knopf (FX-Balance)
5.[PROGRAM/BPM]-Display
6.[PROGRAM/BPM]-Knopf
7.Tasten [PROGRAM MEMORY 1~8]
(Programmspeicher)
8.[TAP/BPM]-Taste (Tipp-/Taktzahltaste)
9.Touch-Pad
Umgang mit dem Touch-Pad
Setzen Sie das Touch-Pad keinen starken Belastungen aus
und stellen Sie keine schweren Gegenstände darauf ab.
Andernfalls kann das Touch-Pad beschädigt oder
unbrauchbar werden. Das Touch-Pad darf nur mit dem
Finger bedient werden. Wenn Sie scharfe oder spitze
Gegenstände verwenden, zerkratzen Sie die Oberfläche.
Verwenden Sie zur Reinigung des Touch-Pads ein
trockenes, weiches Tuch. Verwenden Sie keine
organischen Lösungsmittel wie Terpentin, da dadurch
Verformungen entstehen können.
10. [PAD MOTION / MUTE/FREEZE]-Hebel
(Pad-Bewegung/Stumm/Frieren)
11. [HOLD]-Taste (Halten)
12. [FUNCTION]-Taste
13. [SAMPLE 1]-, [SAMPLE 2]-Taste
14. [REC/STOP]-Taste (Aufnahme/Wiedergabe)
15. [VIDEO 2]-Anzeige
2
Page 37
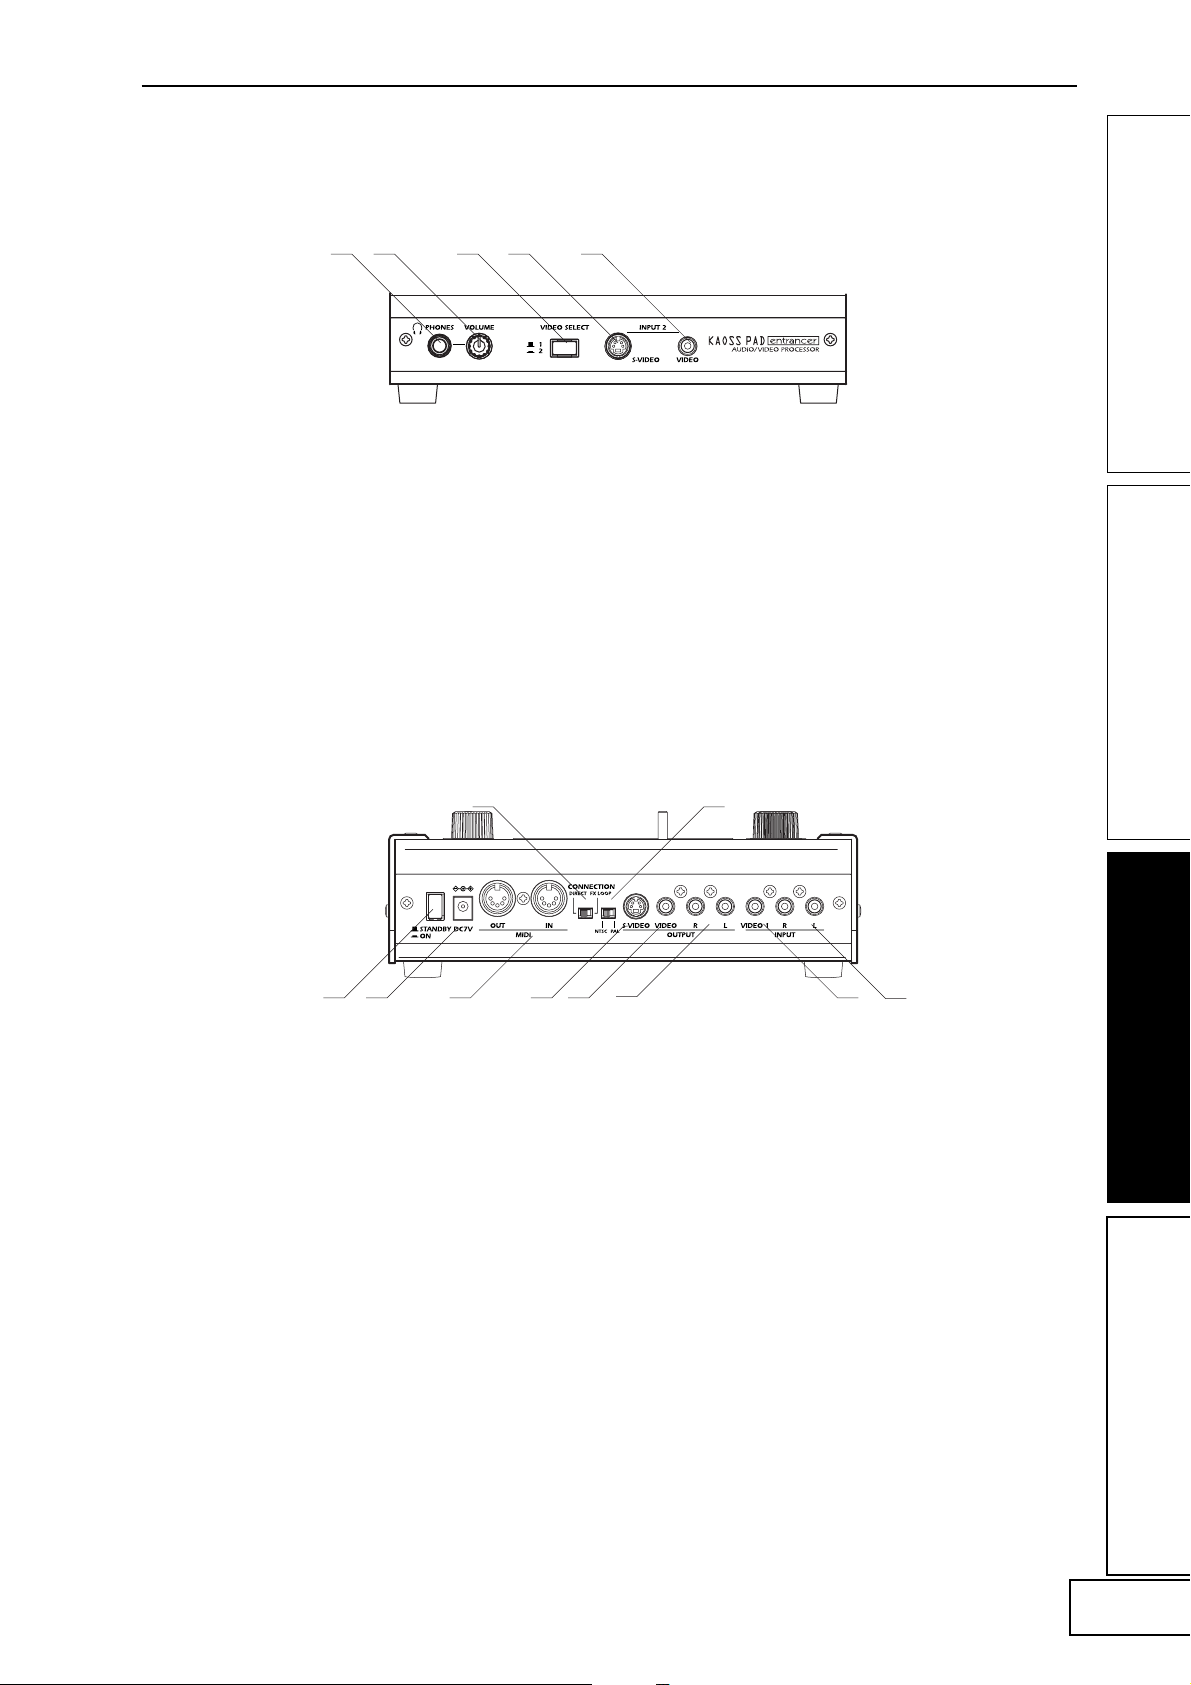
Vorderseite
1 2 3 4 5
1.[PHONES]-Ausgang
2.[PHONES VOLUME]-Knopf (Kopfhörer-Lautstärke)
3.[VIDEO SELECT]-Schalter (Videoauswahl)
Rückseite
45
1 2 3
1.Netzschalter
2.Netzanschluss
3.[MIDI IN]-, [MIDI OUT]-Anschluss
4.[CONNECTION]-Schalter (Verbindung)
5.[NTSC/PAL]-Schalter
6 7
4. [INPUT 2] S-Video-Eingang
5. [INPUT 2] Video-Eingang
8
6. [OUTPUT] S-Video-Ausgang
7. [OUTPUT] Video-Ausgang
8. [OUTPUT] Audio-Ausgänge
9. [INPUT] Video-Eingang
10. [INPUT] Audio-Eingänge
9
10
3
Page 38

Anschlüsse
Video
DVD-Player
VIDEO MONITOR
INPUT VIDEO
OUTPUT VIDEO
INPUT 2 VIDEO
DC7V
AC
AC ADAPTER
Videokamera
Informationen zu Videosignalen
Der KAOSS PAD Entrancer unterstützt die VideoFormate NTSC und PAL. Wählen Sie mit dem [NTSC/
PAL]-Schalter das für Ihr Videomaterial geeignete
Format. Wenn Sie nicht das richtige VideoEmpfangsformat einstellen, arbeite der KAOSS PAD
Entrancer nicht ordnungsgemäß. Der KAOSS PAD
Entrancer unterstützt keine Non-Interlaced-Signale.
„NTSC“ ist das Standardformat in den USA,
Anm.
Kanada und Japan.
Bevor Sie den [NTSC/PAL]-Schalter umstellen,
müssen Sie das Gerät ausschalten.
4
Kopiergeschützte Videosignale können mit dem
KAOSS PAD Entrancer nicht wiedergegeben
werden.
Je nach der Leistung bzw. den technischen Daten des
mit dem S-Video-Eingang verbundenen Geräts kann
es bei der Bildwiedergabe zu Streifen auf dem
Bildschirm kommen.
Page 39

Audio
Das Beispiel zeigt, wie auf die Signale von Audiogeräten,
die mit den Audio-Eingängen des KAOSS PAD
Entrancers verbunden sind, Effekte angewendet werden
und der verarbeitete Ton an die Ausgänge gegeben wird.
CD PLAYER
LINE OUT
MIC1
BAL
BAL
OR
OR
UNBAL
UNBAL
UNBAL
LINE IN 3
LINE IN 2
LINE IN 1
LOW CUT
LOW CUT
LOW CUT
75Hz
75Hz
75Hz
18dB/OCT
18dB/OCT
18dB/OCT
B
d
V
B
B
d
d
V
V
0
0
0
1
1
1
-
-
-
A
G
A
G
A
G
I
I
I
N
C
N
N
C
C
I
I
I
M
M
M
U
U
U
10
10
10
60
60
60
+10dB
-40dB
+10dB
+10dB
-40dB
-40dB
TRIM
TRIM
TRIM
U
U
U
AUX
AUX
AUX
1
1
MON/
MON/
MON/
EFX
EFX
+15
+15
+15
U
U
U
2
2
EFX
EFX
+15
+15
+15
U
U
U
EQ
EQ
HI
HI
12kHz
12kHz
12kHz
-15
-15
+15
+15
-15
+15
U
U
U
MID
MID
2.5kHz
2.5kHz
2.5kHz
-12
-12
-12
+12
+12
+12
U
U
U
LOW
LOW
LOW
80Hz
80Hz
80Hz
+15
+15
+15
-15
-15
-15
PAN
PAN
PAN
L
L
L
R
R
R
1
3
2
MUTE
MUTE
MUTE
ALT 3–4
ALT 3–4
ALT 3–4
dB
dB
dB
10
10
10
SOLO
SOLO
SOLO
5
5
5
U
U
U
5
5
5
10
10
OUTPUT L/RINPUT L/R
DC7V
10
20
20
20
30
30
30
40
40
40
50
50
50
60
60
60
OUTPUT
INPUT
L
1
1
MICRO SERIES 1402-VLZ
L
14-CHANNEL MIC/LINE MIXER
2
R
2
R
BAL/UNBAL
ALL BAL/UNBAL
LEFT(1/MONO)
RIGHT
BAL
BAL
BAL
BAL
MONO
MONO
MONO
MONO
OR
OR
OR
OR
UNBAL
UNBAL
UNBAL
L
L
L
L
LINE IN 4
LINE IN 6
LINE IN 5
BAL
BAL
BAL
BAL
LOW CUT
OR
OR
LOW CUT
OR
OR
LOW CUT
75Hz
75Hz
75Hz
UNBAL
UNBAL
UNBAL
UNBAL
18dB/OCT
18dB/OCT
18dB/OCT
B
d
V
0
B
d
B
V
d
V
0
0
1
1
-
1
-
-
R
R
R
R
A
G
A
I
G
A
G
N
C
I
I
N
I
N
C
C
I
I
M
M
M
U
U
U
LEVEL
LEVEL
LEVEL
LEVEL
+4
+4
+4
+4
10
60
10
+10dB
-40dB
+10dB
TRIM
TRIM
U
U
AUX
1
1
MON/
EFX
EFX
+15
+15
U
U
2
2
EFX
EFX
+15
+15
U
U
EQ
EQ
HI
HI
12kHz
-15
+15
-15
+15
U
U
MID
MID
2.5kHz
-12
-12
+12
+12
U
U
LOW
80Hz
+15
+15
-15
-15
PAN
L
L
R
R
4
5
MUTE
MUTE
ALT 3–4
ALT 3–4
dB
dB
10
10
SOLO
5
5
U
U
5
5
10
10
20
20
30
30
40
40
50
50
60
60
PHONES
10
60
60
-10
-10
-10
-10
+10dB
-40dB
-40dB
LINE IN 7-8
LINE IN 13-14
LINE IN 9-10
LINE IN 11-12
TRIM
U
AUX
AUX
1
1
MON/
MON/
EFX
EFX
+15
U
2
2
EFX
EFX
+15
U
EQ
EQ
HI
HI
12kHz
12kHz
-15
+15
U
MID
MID
2.5kHz
2.5kHz
-12
+12
U
LOW
LOW
80Hz
80Hz
+15
-15
PAN
PAN
L
R
6
MUTE
ALT 3–4
dB
10
SOLO
SOLO
5
U
5
10
20
30
40
50
60
U
U
U
U
U
U
AUX
AUX
AUX
AUX
1
1
1
1
MON/
MON/
MON/
MON/
EFX
EFX
EFX
EFX
1
+20
+10
+15
+15
+15
+15
NORMALLED
U
U
U
U
U
AUX 1 MASTER
2
PRE
2
2
2
2
POST
EFX
EFX
EFX
EFX
AUX
EFX TO
AUX 1
+20
MONITOR
+15
+15
SELECT
+15
+15
U
-15
+15
U
-12
+12
U
+15
-15
L
R
7–8
MUTE
ALT 3–4
dB
10
5
U
5
10
20
30
40
50
60
RETURNS
U
U
U
SOURCE
EQ
EQ
EQ
EQ
LEFT RIGHT
HI
HI
HI
HI
MAIN
CLIP+28
12kHz
12kHz
12kHz
12kHz
MIX
+10
-15
+15
-15
+15
-15
+15
+7
U
U
U
ALT
+4
3-4
MID
MID
MID
MID
2.5kHz
2.5kHz
2.5kHz
2.5kHz
+2
-12
-12
+12
-12
+12
+12
0
TAPE
U
U
U
-2
LOW
LOW
LOW
LOW
80Hz
80Hz
80Hz
80Hz
-4
+15
+15
-15
+15
-15
-15
-7
ASSIGN
PAN
PAN
PAN
PAN
-10
TO MAIN MIX
-20
NORMAL(AFL)
-30
LEVEL SET(PFL)
L
R
L
L
R
R
0dB=0dBu
SOLO
MODE
9–10
13–14
11–12
MUTE
MUTE
MUTE
POWER
RUDE SOLO LIGHT
PHANTOM
ALT 3–4
ALT 3–4
ALT 3–4
CONTROL
/ PHONES
MAIN MIX
ROOM
dB
dB
dB
dB
dB
10
10
10
10
10
SOLO
SOLO
SOLO
SOLO
5
5
5
5
5
U
U
U
U
U
5
5
5
5
5
10
10
10
10
10
20
20
20
20
20
30
30
30
30
30
40
40
40
40
40
50
50
50
50
50
60
60
60
60
60
MAIN OUTS
TAPE
TAPE
STEREO AUX RETURNS
AUX SEND
MIC4
MIC6
MIC3
MIC5
MIC2
MIXER, DJ MIXER
TURNTABLE
TURNTABLEDJ MIXER
DJ-Mischpult-Anschlüsse
Verbinden Sie den Effektausgang Ihres DJ-Mischpults
oder entsprechenden Geräts mit dem Audio-Eingang
des KAOSS PAD Entrancers [INPUT], und schließen
Sie wiederum die Audio-Ausgänge des KAOSS PAD
Entrancers [OUTPUT] an die Effekt-Eingänge des
Mischpults bzw. entsprechenden Geräts an. In dieser
Konfiguration können Sie den KAOSS PAD Entrancer
als externen Effektprozessor einsetzen.
Verbinden des KAOSS PAD Entrancer mit den Effekt-Ein/Ausgängen des Mischpults
Wenn Sie den [CONNECTION]-Schalter des KAOSS
PAD Entrancers auf FX LOOP setzen, wird über die
[OUTPUT]-Audio-Ausgänge des Geräts nicht das
Signal ausgegeben, dass der KAOSS PAD Entrancer
empfängt, sondern ausschließlich der Effektton.
Um die Klangtiefe und die Lautstärke anzupassen,
verwenden Sie den [FX BALANCE]-Knopf des KAOSS
PAD Entrancers sowie die Steuerungen Ihres
Mischpultes.
RETURN
SEND
AC ADAPTER
DIRECT
FX LOOP
CONNECTION LINE OUT
INPUT L/R
AC
OUTPUT L/R
TURNTABLE
TURNTABLEDJ MIXER
5
Page 40

Betrieb
1. Einschalten des Geräts
1. Verbinden Sie Ihre Geräte wie in den
Anschlussbeispielen dargestellt, und verbinden
Sie das Netzteil mit einer Wandsteckdose.
2. Drücken Sie die [STANDBY]-Taste, um das
Gerät einzuschalten. Das [PROGRAM/
BPM]-Display wird beleuchtet.
Auf dem angeschlossenen TV-Bildschirm
wird ein Bild angezeigt.
Ausschalten des Geräts
Drücken Sie erneut die [STANDBY]-Taste.
2. Prüfen des Video-Eingangs
1. Aktivieren Sie die Video-Wiedergabe über
eines der angeschlossenen Geräte.
2. Wählen Sie mit dem [VIDEO SELECT]Schalter den Eingang aus, über den das zu
verarbeitende Videosignal empfangen wird.
1: Der Effekt wird auf den Video-Eingang 1
angewendet.
2: Der Effekt wird auf den Video-Eingang 2
(oder S-Video-Eingang 2) angewendet. Die
[VIDEO 2]-Anzeige leuchtet auf.
Wenn der Video-Eingang 2 kein Signal
empfängt, beginnt die [VIDEO 2]-Anzeige zu
blinken.
S-Video-Eingang 2 ist relativ zu Video-
Anm.
Eingang 2 prioritär geschaltet.
3. Anpassen der Lautstärke
1. Aktivieren Sie die Audio-Wiedergabe über
eines der angeschlossenen Geräte.
2. Passen Sie die Audio-Eingangslautstärke an.
Passen Sie mit dem [LINE INPUT VOLUME]
die Eingangslautstärke an, sodass der
Spitzenanzeiger sich nicht im roten Bereich
befindet.
Verwenden von Kopfhörern
Passen Sie mit dem [PHONES VOLUME]Knopf die Kopfhörer-Lautstärke an.
4. Auswählen von Programmen
1. Wählen Sie mit dem [CONTROL SELECT]Schalter das Signal (Video, Audio), auf das Sie
den Effekt anwenden möchten.
Wenn Sie den Schalter nach links drehen,
werden die Effekte auf den aktiven AudioEingang angewendet. Um die Effekte auf den
aktiven Video-Eingang anzuwenden, drehen
Sie den Schalter nach rechts. Wenn Sie die
Einstellung COMBI (Mittlere Stellung) wählen,
werden die Effekte sowohl auf den Audio- als
auch auf den Video-Eingang angewendet.
Weitere Informationen finden Sie im
Anm.
Abschnitt „Erstellen von COMBIProgrammen“
2. Das [PROGRAM/BPM]-Display zeigt die
aktuell ausgewählte Programmnummer an.
Wählen Sie mit dem [PROGRAM/BPM]Knopf ein Programm (00 ~ 99) aus.
3. Passen Sie mit dem [FX BALANCE]-Knopf
die Effekttiefe an.
Je mehr Sie diesen Knopf nach links drehen,
desto mehr lässt der Effekt nach. Durch
Drehen nach rechts steigern Sie den Effekt.
Das Ergebnis hängt vom ausgewählten Effekt ab.
Wenn Sie den Knopf vollständig nach links
drehen, wird der Effekt gar nicht auf den Ton
angewendet („Trocken“); wenn Sie den Knopf
vollständig nach rechts drehen, wird der Effekt
maximal auf das Signal angewendet („Nass+++“).
Wenn Sie die Effekttiefe über den [FX
BALANCE]-Knopf anpassen möchten,
drehen Sie den [CONNECTION]-Schalter in
die Stellung DIRECT.
Informationen zum [PROGRAM/BPM]-Display
Auf diesem Display werden die aktuell
ausgewählte Programmnummer, der
festgelegte Beat und die aktuelle Position Ihres
Fingers auf dem Touch-Pad angezeigt.
Wenn Sie mit dem Finger das Touch-Pad
berühren: Die gewählte Position (1,1~9,9;
wobei 5,5 den Mittelpunkt darstellt) wird
angezeigt.
Vertikale Position (1~9)
Horizontale Position (1~9)
Beim Programmwechsel: Auf dem Display wird
die Programmnummer (00 ~ 99) angezeigt.
Im Kombinationsmodus zeigt das Display
möglicherweise bei einigen Einstellungen (--)
an, wenn Sie Programme über die
Programmspeichertasten aufrufen.
Beim Festlegen der Taktzahl: Wenn Sie die
Taktzahl mithilfe der [TAP/BPM]-Taste
festlegen, zeigt das Display den BPM-Wert an.
Im Auto BPM-Modus werden drei Punkte
angezeigt.
Im Pattern Select-Modus: Das Display zeigt die
Anzahl der aktuell ausgewählten Strukturen
an.
Im MIDI Edit-Modus: Auf dem Display werden
Informationen wie die MIDI-Kanalnummer
oder die Steuerungsnummer angezeigt.
5. Verwenden des Touch-Pads
1. Führen Sie Ihren Finger über das Touch-Pad
oder tippen Sie leicht darauf, um den Effekt
(Klang) zu steuern.
Bringen Sie die mitgelieferte Schutzfolie an,
Anm.
um das Pad vor Beschädigungen zu schützen.
2. Wenn Sie die [HOLD]-Taste aktivieren, bleibt
die letzte Effekteinstellung (Ton) erhalten,
wenn Sie den Finger vom Pad nehmen.
6. Mute/Freeze-Funktion
Indem Sie den [PAD MOTION / MUTE/
FREEZE]-Hebel in die Stellung MUTE/
FREEZE (in Richtung des Bedieners), können
Sie folgende Vorgänge ausführen:
Das aktuelle Videobild einfrieren.
Das aktuelle Eingangs-Signal bzw. der
aktuelle Sampling- oder Synth/Drum-Ton
wird deaktiviert. Dadurch wird nur der
Effektton ausgegeben (z.B. Verzögerung oder
Nachhall).
6
Page 41

Transformer
Indem Sie mit dem [PAD MOTION / MUTE/
FREEZE]-Hebel die MUTE-Funktion ein- und
ausschalten, können Sie einen „unterdrückten“
Klang erzeugen; dabei handelt es sich um die
von DJs häufig verwendete „Transformer“Technik.
7. Pad Motion (Pad-Bewegung)
Sie können Abfolgen von Fingerbewegungen auf dem
Touch-Pad erfassen und diese anschließend
wiedergeben. Setzen Sie dazu den [PAD MOTION /
MUTE/FREEZE]-Hebel in die Stellung PAD MOTION.
Das aktivieren bzw. deaktivieren der [HOLD]-Taste
wird in Pad Motions nicht erfasst. Wenn Sie die
[HOLD]-Taste aktivieren und eine Pad Motion
wiedergeben, wird der zum Ende der Aufzeichnung
aktive Effekt übernommen.
Aufzeichnung
Um die Aufzeichnung zu beginnen, bringen
Sie den [PAD MOTION / MUTE/FREEZE]Hebel in die Stellung PAD MOTION, und
berühren Sie das Pad.
Da das Lösen des Fingers vom Touch-Pad
ebenfalls als Ereignis erfasst wird, können
Sie auch Tipp-Vorgänge (mehrmaliges
leichtes Tippen auf das Pad) aufzeichnen. Die
Aufnahme endet, wenn Sie den [PAD
MOTION / MUTE/FREEZE]-Hebel
zurücksetzen oder die maximale
Aufnahmezeit (ca. 6 Sekunden) erreicht ist.
Wiedergabe
Bringen Sie den [PAD MOTION / MUTE/
FREEZE]-Hebel nach Abschluss der
Aufzeichnung in die Stellung PAD MOTION,
um die aufgezeichnete Bewegung
wiederzugeben.
Solange der [PAD MOTION / MUTE/
FREEZE]-Hebel sich in der Stellung PAD
MOTION befindet, wird die aufgezeichnete
Bewegung als Schleife wiederholt.
Wenn Sie jedoch während der Wiedergabe
das Touch-Pad berühren, beginnt eine neue
Aufzeichnung.
Beim Programmwechsel wird die im
ausgewählten Programm zuletzt
aufgezeichnete Bewegung wiedergegeben.
Löschen
Um die aufgezeichnete Bewegung zu
löschen, halten Sie die [FUNCTION]-Taste
gedrückt, und bringen Sie den [PAD
MOTION / MUTE/FREEZE]-Hebel in die
Stellung PAD MOTION.
8. Festlegen der Taktzahl (BPM)
Wenn Sie die Taktzahl festgelegt haben, können Sie ein
Effektprogramm aus der Gruppe „BPM FX“ oder „BPM
PTN“ auswählen dieses mit der Taktzahl
synchronisieren. Detaillierte Informationen zu den
entsprechenden Effektparametern finden Sie in der
beiliegenden Effektprogrammliste (☞ separates
Dokument).
Was bedeutet BPM?
Die Taktzahl (BPM, Beats per Minute) drückt
das Tempo eines Stücks als Anzahl der Takte
(Viertelnoten) pro Minute aus. Je mehr BPM,
desto schneller das Tempo.
So legen Sie die Taktzahl fest
Wenn Sie einen bestimmten BPM-Wert
verwenden möchten, drücken Sie die [TAP/
BPM]-Taste, und geben Sie mit dem
[PROGRAM/BPM]-Knopf den gewünschten
Wert ein. Wenn innerhalb von 5 Sekunden
keine Eingabe erfolgt, kehrt das Gerät zum
Normalbetrieb zurück. Sie können auch die
[FUNCTION]-Taste drücken, um zum
Normalbetrieb zurückzukehren.
Anm.
Sie können Werte von bis 40 ~ 300 BPM wählen.
Tap Tempo-Funktion
Wenn Sie die Taktzahl eines Stücks nicht
kennen, drücken Sie die [TAP/BPM]-Taste
zweimal oder öfter im Takt der Musik; die
Taktzahl wird daraufhin auf dem
[PROGRAM/BPM]-Display angezeigt.
Auto BPM-Funktion
Wenn Sie die [TAP/BPM]-Taste drücken und
mehrere Sekunden lang gedrückt halten,
werden auf dem [PROGRAM/BPM]-Display
drei Punkte angezeigt, und die Taktzahl des
Audio-Eingangssignal wird automatisch
ermittelt.
Wenn die Taktzahl nicht erkannt werden
kann, beginnt das [PROGRAM/BPM]Display zu blinken.
Drücken Sie die [TAP/BPM]-Taste erneut,
um die automatische Erkennung zu beenden.
Anm.
Der Erkennungsbereich beträgt 80 ~ 160
BPM.
MIDI Sync-Funktion
Sie können die Taktzahl über MIDI ClockMeldungen von einem externen MIDI-Gerät
synchronisieren. Verbinden Sie den [MIDI
OUT]-Anschluss des externen MIDI-Geräts
(z.B. Sequenzer), das die MIDI ClockMeldungen versendet, mit dem [MIDI IN]Eingang des KAOSS PAD Entrancers.
Damit der KAOSS PAD Entrancer mit den
Sequenzdaten synchronisiert wird, müssen
Sie entweder jedem Wert in Ihren
Sequenzdaten eine „Touch Pad On“Meldung voranstellen, oder zu Beginn des
Satzes das Touch-Pad des KAOSS PAD
Entrancers berühren, um die Satzstruktur zu
aktivieren.
Anm.
Wenn Sie mit dem KAOSS PAD Entrancer
MIDI Clock- und „Touch Pad On“-Meldungen
empfangen möchten, wechseln Sie in den
MIDI Edit-Modus (☞ S.11), und nehmen Sie
die erforderlichen Einstellungen wie unter
„Einstellung für die Übertragung/den
Empfang von MIDI-Meldungen“ (☞ S.12)
beschrieben vor.
Durch diese Funktion werden die RhythmusStrukturprogramme des KAOSS PAD
Entrancers nicht mit den Sequenzdaten
synchronisiert.
Wenn der KAOSS PAD Entrancer mit
Zeittakt-Meldungen eines externen MIDIGeräts synchronisiert wird, sind die
Funktionen Touch Tempo und Auto BPM
nicht verfügbar.
7
Page 42

9. Speichern von Einstellungen
für die [PROGRAM
MEMORY]-Tasten
Sie können die Tasten [PROGRAM MEMORY 1 ~ 8]
mit Ihren bevorzugten Einstellungen belegen, sodass
diese bei Bedarf jederzeit abgerufen werden können.
3. Bringen Sie den [CONTROL SELECT]Schalter in die Stellung [COMBI], und halten
Sie bei gedrückter [FUNCTION]-Taste die
gewünschte [PROGRAM MEMORY]-Taste für
mindestens 2 Sekunden gedrückt, um die
Einstellungen zu speichern.
11. Sampling und Wiedergabe
Folgende Einstellungen können gespeichert werden:
• Effektprogramm
• Ein-/Aus-Status der [HOLD]-Taste und Position
(Koordinaten)
• Einstellung des [FX BALANCE]-Knopfes
• Die für die Gruppe „BPM FX“ festgelegte
Taktzahl (BPM)
• Für die Gruppe „SAMPLE/PLAY“, die verwendete
Sample-Taste ([SAMPLE 1] oder [SAMPLE 2]).
• Pad Motion (Pad-Bewegung)
Die Audio-Effektprogramme 60 und 90 ~ 99
können bei gedrückter [HOLD]-Taste nicht
gespeichert werden.
Speichern
1. Wählen Sie mit dem [PROGRAM/BPM]-
Knopf das zu speichernde Effektprogramm.
Um den Status der [HOLD]-Taste zu speichern,
wählen Sie zunächst das Programm aus,
drücken Sie anschließend die [HOLD]-Taste,
und berühren Sie das Touch-Pad (zur Angabe
der Position). Nehmen Sie anschließend die
weiteren zu speichernden Einstellungen vor.
2. Halten Sie bei gedrückter [FUNCTION]-Taste
die zu belegende [PROGRAM MEMORY ]Taste [1~8] für mindestens 2 Sekunden
gedrückt, um die Einstellungen zu speichern.
Wenn der Speichervorgang für die jeweiligen
Einstellungen abgeschlossen ist, hört das
[PROGRAM/BPM]-Display auf zu blinken.
Wenn Sie den [PAD MOTION / MUTE/
FREEZE]-Hebel beim Speichern der Einstellungen
in der Stellung PAD MOTION halten, wird die
Pad-Bewegung nicht gespeichert.
Abrufen
1. Drücken Sie eine der Tasten [PROGRAM
MEMORY 1~8], um das dafür gespeicherte
Programm und die entsprechenden Einstellungen
abzurufen. Wenn Sie den [PAD MOTION /
MUTE/FREEZE]-Hebel beim Abrufen der
Einstellungen in der Stellung PAD MOTION
halten, wird die Pad-Bewegung nicht
abgerufen.
von Standbildern
Indem Sie den [PAD MOTION / MUTE/FREEZE]Hebel in die Stellung MUTE/FREEZE bringen, können
Sie das aktuell ausgegebene Videosignal einfrieren,
das Standbild der Taste [SAMPLE 1] oder [SAMPLE 2]
zuweisen und über das Touch-Pad das Standbild
steuern (zum Beispiel um es zu vergrößern oder
umzudrehen).
Sie können für beide Tasten jeweils ein Standbild
speichern.
Die gesampelten Bilder gehen beim Ausschalten des
Geräts verloren. Gesampelte Bilder können nicht
gespeichert werden.
Sampling
1. Bringen Sie den [PAD MOTION / MUTE/
FREEZE]-Hebel in die Stellung MUTE/
FREEZE.
Das Monitorbild friert ein.
2. Drücken Sie wahlweise die [SAMPLE 1]oder die [SAMPLE 2]-Taste.
Das auf dem Monitor angezeigt Bild wird
gespeichert und der gedrückten Taste
zugewiesen.
Wiedergabe
1. Wenn Sie die [SAMPLE 1]- oder die
[SAMPLE 2]-Taste drücken, wird das
gesampelte Standbild als Eingangsquelle
ausgewählt.
Während der Wiedergabe des Standbildes
können Sie über das Touch-Pad einen Effekt
auf das Bild anwenden.
Drücken Sie erneut die [SAMPLE 1]- oder
[SAMPLE 2]-Taste, um die Wiedergabe des
Standbildes zu beenden.
Einige Effekte führen möglicherweise zu
keinem Ergebnis.
Wenn Sie ein Programm ausgewählt haben,
das nicht Bestandteil der Gruppe „SAMPLE/
PLAY„ ist, können Sie das Standbild nicht
wiedergeben (außer bei Aufnahmen).
10. Erstellen von COMBIProgrammen
Informationen zur COMBI-Funktion
Wenn Sie den [CONTROL SELECT]-Schalter in die
Stellung [COMBI] bringen, können Sie mit dem TouchPad gleichzeitig Audio- und Video-Effekte steuern.
So speichern Sie eine COMBI
1. Bringen Sie den [CONTROL SELECT]Schalter in die Stellung [AUDIO], und
wählen Sie ein Programm aus.
2. Bringen Sie den [CONTROL SELECT]Schalter in die Stellung [VIDEO], und
wählen Sie ein Programm aus.
8
12. Sampling und Wiedergabe
von Videoclips
Sie können Videoclips aufzeichnen und anschließend
bei der Wiedergabe ein Effektprogramm aktivieren
sowie die Clips mit dem Touch-Pad bearbeiten (z.B.
indem Sie das Bild vergrößern oder es umdrehen).
Wenn Sie ein Programm aus der Gruppe SAMPLE/
PLAY ausgewählt haben, können Sie über das TouchPad die Wiedergabegeschwindigkeit des Clips steuern
und ihn sogar rückwärts abspielen.
Der gesampelte Videoclip geht beim Ausschalten des
Geräts verloren. Gesampelte Videos können nicht
gespeichert werden.
Page 43

Sampling
1. Wählen Sie aus der Gruppe „SAMPLE/
PLAY“ ein Programm von 94 ~ 99.
2. Wenn Sie die [REC/STOP]-Taste drücken,
leuchtet die LED der Taste auf, und die
Aufzeichnung beginnt. Die Aufzeichnung
endet, wenn Sie die Taste erneut betätigen
oder die maximale Speicherkapazität erreicht
ist.
Wenn Sie im Pattern Display-Modus eine
Anm.
Effekt-Clipstruktur (40 ~ 59) auswählen,
können Sie eine Struktur aufzeichnen. Drücken
Sie die [SAMPLE 1]- oder die [SAMPLE 2]Taste, um das gesampelte Standbild
aufzuzeichnen.
Wiedergabe
Das Wiedergabeverfahren richtet sich nach dem
ausgewählten Effektprogramm.
Für Programme aus der Gruppe „SAMPLE/PLAY”
1. Wählen Sie ein Programm aus der Gruppe
„SAMPLE/PLAY“.
2. Wenn Sie das Touch-Pad berühren, wird der
Videoclip gemäß der Position Ihres Fingers
auf dem Touch-Pad wiedergegeben.
Für Programme, die nicht der Gruppe „SAMPLE/
PLAY“ angehören
1. Wählen Sie ein Programm, das nicht der
Gruppe „SAMPLE/PLAY“ angehört.
2. Halten Sie bei deaktivierter [SAMPLE 1]und [SAMPLE 2]-Taste die [REC/STOP]Taste gedrückt, und berühren Sie das TouchPad; der gesampelte Videoclip wird mit
normaler Geschwindigkeit wiedergegeben.
Wenn Sie bei gedrückter [REC/STOP]-Taste
die [HOLD]-Taste betätigen, wird die
Aktivierung der [REC/STOP]-Taste
beibehalten, sodass Sie den Videoclip durch
einfaches Berühren des Touch-Pads
wiedergeben können. Die Funktion wird
wieder deaktiviert, wenn Sie erneut die
[REC/STOP]-Taste drücken.
Wenn Sie bei gedrückter [REC/STOP]-Taste
die [HOLD]-Taste betätigen, bleibt die
Wiedergabe aktiviert. Die Funktion wird
wieder deaktiviert, wenn Sie erneut die
[REC/STOP]-Taste drücken.
Der Pattern Display-Modus wird deaktiviert,
Anm.
sobald Sie ein Videoclip-Sample
wiedergeben, während eine Struktur
angezeigt wird.
Während der Wiedergabe von Samples können
keine Strukturen angezeigt werden.
13. Sampling und Wiedergabe
von Sätzen (Phrasen)
Wenn Sie einen Satz aus den Daten der [SAMPLE 1]oder [SAMPLE 2]-Taste erstellt haben, können Sie in
der Gruppe „SAMPLE/PLAY“ (90 ~ 99) ein Programm
auswählen und über das Touch-Pad die
Wiedergabegeschwindigkeit und -richtung steuern.
Wenn Sie ein Programm gewählt haben, das nicht der
Gruppe „SAMPLE/PLAY“, angehört, wird beim
Drücken der [SAMPLE 1]- oder [SAMPLE 2]-Taste den
jeweilig gespeicherten Satz wiedergegeben. Sie können
für die Tasten jeweils einen 6-Sekunden-Satz aufzeichnen.
Die aufgezeichneten Sätze gehen beim Ausschalten
des Geräts verloren. Die aufgezeichneten Sätze
können nicht gespeichert werden.
Aufzeichnung
1. Drücken Sie die [REC/STOP]-Taste. Die LED
der [REC/STOP]-Taste beginnt zu blinken;
das Gerät ist für die Aufnahme bereit.
2. Drücken Sie entweder die [SAMPLE 1]-Taste
oder die [SAMPLE 2]-Taste (je nachdem,
welcher Taste Sie die Aufzeichnung
zuweisen möchten). Die Audio-Wiedergabe
ist dabei nicht zu hören.
3. Wenn Sie die [REC/STOP]-Taste drücken,
leuchtet die LED der Taste auf, und die
Aufnahme beginnt. Die Aufzeichnung wird
beendet, wenn Sie erneut die [REC/STOP]Taste drücken.
Die Aufzeichnung endet automatisch, wenn
die maximale Aufnahmezeit erreicht ist.
Wenn Sie ein Programm wählen, das nicht
der Gruppe „SAMPLE/PLAY“ angehört,
können Sie während der Aufnahme das
Touch-Pad bedienen, um den mit dem Effekt
erzeugten Ton aufzuzeichnen.
Automatische Aufzeichnung (AUTO REC)
Sie können das Gerät so einstellen, dass die
Aufzeichnung automatisch gestartet wird,
sobald über die [INPUT]-Audio-Eingänge
ein Eingangssignal erkannt wird.
1. Halten Sie bei Schritt 2 des
Aufnahmeverfahrens die [SAMPLE 1]-Taste
oder die [SAMPLE 2]-Taste gedrückt, und
betätigen Sie die [REC/STOP]-Taste; die
LEDs der [REC/STOP]-Taste und der
[SAMPLE 1]- bzw. [SAMPLE 2]-Taste
beginnen daraufhin im gleichen Rhythmus
zu blinken, und das Gerät ist
aufnahmebereit.
2. Wenn ein Audio-Eingangssignal erkannt
wird, beginnt die Aufzeichnung automatisch.
Die Aufzeichnung wird beendet, wenn Sie
erneut die [REC/STOP]-Taste drücken.
Wenn der Hebel sich in der Stellung „COMBI“
Anm.
befindet und Sie als Video-Effekt ein
Programm aus der Gruppe „SAMPLE/PLAY“
ausgewählt haben, können Sie das Audiosignal
und das Videosignal gleichzeitig aufzeichnen.
Wiedergabe
Das Wiedergabeverfahren richtet sich nach dem
ausgewählten Effektprogramm.
Für Programme aus der Gruppe „SAMPLE/PLAY”
1. Wählen Sie ein Programm aus der Gruppe
„SAMPLE/PLAY“ (90 ~ 99).
2. Drücken Sie die [SAMPLE 1]- oder die
[SAMPLE 2]-Taste (je nachdem, welche
Aufzeichnung Sie wiedergeben möchten). Zu
diesem Zeitpunkt ist die Wiedergabe nicht zu
hören.
3. Wenn Sie das Touch-Pad berühren, erfolgt
die Wiedergabe gemäß der Position der
Berührung.
Die Art der Wiedergabe hängt vom
gewählten Programm ab. (☞ separates
Dokument „Effektprogrammliste“)
9
Page 44

4. Passen Sie mit dem [FX BALANCE]-Knopf
die Lautstärke der Wiedergabe an.
Wenn sich der [FX BALANCE]-Knopf in der
mittleren Stellung befindet, werden der
Eingangston und der Ausgangston im
Ve rhältnis 1:1 wiedergegeben. Wenn Sie den
Knopf ganz nach rechts drehen, wird bei der
Wiedergabe ausschließlich der Sample-Ton
ausgegeben; der Eingangston ist in diesem Fall
nicht zu hören.
Für Programme, die nicht der Gruppe „SAMPLE/
PLAY“ angehören
1. Wählen Sie ein Programm, das nicht der
Gruppe „SAMPLE/PLAY“ angehört.
2. Wenn Sie die [SAMPLE 1]- oder die
[SAMPLE 2]-Taste drücken, wird der
aufgezeichnete Satz mit normaler
Geschwindigkeit wiedergegeben. Wenn Sie die
Taste gedrückt halten, wird die Wiedergabe
als Schleife wiederholt.
Um die Lautstärke anzupassen, halten Sie
die [SAMPLE 1]- bzw. die [SAMPLE 2]-Taste
gedrückt, und drehen Sie den [FX
BALANCE]-Knopf.
Über das Touch-Pad können Sie bei der
Wiedergabe Effekte auf den
wiedergegebenen Ton anwenden.
Wenn Sie bei gedrückter [SAMPLE 1]- bzw.
[SAMPLE 2]-Taste die [HOLD]-Taste betätigen,
bleibt die Wiedergabe aktiviert. Die Funktion
wird wieder deaktiviert, wenn Sie erneut die
[SAMPLE 1]- bzw. die [SAMPLE 2]-Taste
drücken.
14. Anzeigen von AudioWellenformen oder
kombinierten Strukturen
Sie können die Wellenform des Audio-Eingangssignals
oder des Audio-Ausgangssignals anzeigen. Zusätzlich
können Strukturen, die mit dem KAOSS PAD
Entrancer erstellt wurden, anstelle des VideoEingangssignals als Grundlage für Modifikationen
verwendet werden.
Pattern Display-Modus
Drücken Sie die [FUNCTION]-Taste, und
halten Sie sie gedrückt, und betätigen Sie die
[SAMPLE 1]-Taste, um in den Pattern
Display-Modus zu wechseln. Das
[PROGRAM/BPM]-Display beginnt
daraufhin zu blinken und zeigt entweder
„Pattern Display-Modus“ oder die
Auswahlnummer der Struktur an.
Wenn Sie Strukturen während der
Anm.
Wiedergabe von Videoclip-Samples
anzeigen, wird die Wiedergabe gestoppt.
Wenn Sie das Sample nochmals abspielen,
wird der Pattern Display-Modus beendet,
und das Sample wird wiedergeben.
Beenden des Pattern Display-Modus
Um zum Normalbetrieb zurückzukehren,
berühren Sie wahlweise das Touch-Pad,
drücken Sie die [FUNCTION]-Taste oder
nehmen Sie einfach für ca. 10 Sekunden
keine Eingabe am KAOSS PAD Entrancer
vor.
Anzeigen von Strukturen
Wählen Sie im Pattern Display-Modus eine
der Tasten [PROGRAM MEMORY 1 ~ 8], um
die für die entsprechende Taste
programmierte Struktur abzurufen.
Mit der [SAMPLE 1]-Taste können Sie die
zuletzt ausgewählte Struktur aktivieren bzw.
deaktivieren.
So beenden Sie den Anzeigemodus
Um den Anzeigemodus zu beenden, drücken
Sie erneut die zuvor gewählte [PROGRAM
MEMORY ]-Taste [1 ~ 8].
Der Anzeigemodus wird auch beendet, wenn
Sie im Normalbetrieb das Programm wechseln.
Der Anzeigemodus bleibt aktiv, wenn Sie
Anm.
beim Drehen des Programmknopfes die
[FUNCTION]-Taste gedrückt halten.
Die Effekt-Clip-Strukturen (40 ~ 59) werden
Anm.
angezeigt, wenn Sie das Touch-Pad berühren.
Aktivieren von Strukturen
Im Pattern Display-Modus können Sie die
einer Taste zugewiesene Struktur aktivieren,
indem Sie eine der Tasten [PROGRAM
MEMORY 1 ~ 8] drücken und niederhalten,
während Sie den [PROGRAM/BPM]-Knopf
drehen. Wenn die Taste aktiviert ist, können
Sie durch einfaches Drehen des
[PROGRAM/BPM]-Knopfes zwischen den
gespeicherten Strukturen wechseln.
Speichern der bearbeiteten Einstellungen
Um veränderte Einstellungen zu speichern,
drücken Sie im Pattern Display-Modus die
[REC/STOP]-Taste, und halten Sie sie für
mindestens eine Sekunde gedrückt. Die
Einstellungen für den MIDI Edit-Modus
werden durch diesen Vorgang ebenfalls
gespeichert. Wenn Sie das Gerät ausschalten,
ohne die bearbeiteten Einstellungen zu
speichern, gehen alle Änderungen verloren.
So deaktivieren Sie das automatische Beenden des
Pattern Display-Modus beim Wechseln von Programmen
Halten Sie die beim Einschalten des Geräts
die HOLD-Taste gedrückt. (Die HOLD-Taste
leuchtet daraufhin vorübergehend auf.)
Zurücksetzen
Schalten Sie das Gerät aus und dann wie
gewohnt ein.
Struktur-Typen
00~39: Strukturen im Vordergrund
Dabei werden Strukturen (wie beispielsweise
die Wellenform des Eingangssignals oder die
Touch-Pad-Koordinaten) im Vordergrund
über das Bild gelegt.
Die Vordergrund-Strukturen können nicht
mit Effekten bearbeitet oder gesampelt
werden.
40~59: Effekt-Clip-Strukturen
Diese Strukturen enthalten Farbmuster oder
Bilddaten. Sie können sie für Effekte
verwenden.
Wenn Sie ein Programm ausgewählt haben,
das nicht Bestandteil der Gruppe „SAMPLE/
PLAY“ ist, können die Strukturen nicht
angezeigt werden (außer bei Aufnahmen).
10
Page 45

MIDI-Funktionen
Verwenden von MIDI-
Was bedeutet MIDI?
MIDI (Musical Instrument Digital Interface, Digitale
Schnittstelle für Musikinstrumente) ist ein weltweit
verbreiteter Standard für die Übertragung von
leistungsbezogenen Daten von elektronischen
Musikinstrumenten, Effektprozessoren, Sequenzern,
etc. an Computer.
MIDI-Anschlüsse
Verwenden Sie zur Übertragung von MIDIMeldungen handelsübliche MIDI-Kabel. Verbinden sie
die MIDI-Anschlüsse des KAOSS PAD Entrancers mit
den MIDI-Anschlüssen des externen MIDI-Geräts, von
dem bzw. an das die MIDI-Daten übertragen werden
sollen.
MIDI IN-Anschluss: Empfängt MIDI-Meldungen von
einem anderen MIDI-Gerät. Verbinden Sie diesen
Anschluss mit dem MIDI OUT-Anschluss des externen
Geräts.
MIDI OUT-Anschluss: Überträgt Meldungen vom
KAOSS PAD Entrancer. Verbinden Sie diesen
Anschluss mit dem MIDI IN-Anschluss des externen
Geräts.
Verbindungsbeispiel
Das Beispiel zeigt, wie der KAOSS PAD Entrancer mit
einem anderen MIDI-Gerät verbunden wird, sodass
Sequenzdaten wiedergegeben werden können.
Funktionen
Außer als Effektgerät können Sie KAOSS PAD
Entrancer auch als Echtzeit-Steuergerät verwenden.
Die Steuerung des Synthesizers oder eines anderen
externen MIDI-Geräts erfolgt dabei über MIDIMeldungen.
Wenn der KAOSS PAD Entrancer mit einem MIDISequencer verbunden ist, können die bei Verwendung
des Touch-Pads versendeten MIDI-Meldungen auf
dem MIDI-Sequenzer aufgezeichnet werden und
anschließend wiedergegeben werden, um alle TouchPad-Ereignisse zu wiederholen.
Informationen zur MIDI-Implementierungstabelle
Im Benutzerhandbuch von MIDI-Geräten ist stets eine
„MIDI-Implementierungstabelle enthalten.“ Diese
Tabelle zeigt, welchen Typ MIDI-Meldungen das Gerät
empfangen und übertragen kann. Wenn Sie zwei
MIDI-Geräte miteinander verbinden, können Sie
anhand der Implementierungstabellen überprüfen, ob
die Geräte miteinander kommunizieren können.
* Detaillierte MIDI-Spezifikationen finden Sie in der
MIDI-Implementierung.
MIDI Edit-Modus
Auf dem KAOSS PAD Entrancer erfolgt der Zugriff
auf die MIDI-Einstellungen im MIDI Edit-Modus.
Betätigen Sie bei gedrückter [FUNCTION]-Taste die
[SAMPLE 2]-Taste, um zum MIDI Edit-Modus zu
wechseln. Daraufhin beginnt der MIDI-Kanal auf dem
[PROGRAM/BPM]-Display zu blinken.
KORG EM-1
Einstellen des MIDI-Kanals
LINE IN MIDI INMIDI OUTOUTPUT
Im MIDI Edit-Modus zeigt das [PROGRAM/BPM]Display den MIDI-Kanal an. Wenn dies der Fall ist,
können Sie mit dem [PROGRAM/BPM]-Knopf den
MIDI-Kanal wechseln.
Informationen zu MIDI-Kanälen
MIDI verwendet 16 „Kanäle“ (1 ~ 16), um
verschiedene Daten über ein einzelnes Kabel an
mehrere MIDI-Geräte zu senden.
Wenn das Gerät, das die Daten versendet, auf MIDIKanal „1“ gesetzt ist, werden die MIDI-Meldungen
nicht empfangen, sofern das empfangende Gerät nicht
ebenfalls auf MIDI-Kanal „1“ gesetzt ist.
11
Page 46

Einstellungen für die
Übertragung/den Empfang von
MIDI-Meldungen
Um die Übertragung- und Empfangsfunktion für
MIDI-Meldungen zu aktivieren bzw. zu deaktivieren,
drücken Sie die Taste, die dem jeweiligen Typ MIDIMeldungen zugewiesen ist. Übertragung und
Empfang sind aktiviert, wenn die entsprechende Taste
leuchtet (andernfalls ist die Funktion deaktiviert).
(siehe weiter unten in der Tabelle „Übertragbare und
empfangbare Meldungen“)
Einige Parameter können ausschließlich übertragen
werden, andere ausschließlich empfangen werden.
Anpassen der MIDI-Steuerungsnummern
Um im MIDI Edit-Modus die einer Taste zugewiesene
Steuerungsnummer zu ändern, drehen Sie bei
gedrückter [PROGRAM MEMORY]-Taste [3 ~ 8] den
[PROGRAM/BPM]-Knopf.
Sie können zwar bereits vergebene
Steuerungsnummern erneut zuweisen, jedoch
gleichzeitig die Übertragung/den Empfang für zwei
identische Steuernummern aktivieren.
Die vom KAOSS PAD Entrancer zu übertragenden
und zu empfangenden MIDI-Meldungen können in
den Bereichen von CC#1 ~ CC#31, CC#64 ~
CC#95 und Pitch Bend ausgewählt werden.
Speichern der bearbeiteten Einstellungen
Betätigen Sie im MIDI Edit-Modus die [REC/STOP]Taste, und halten Sie sie für mindestens eine Sekunde
gedrückt. Daraufhin werden die bearbeiteten MIDIEinstellungen gespeichert. Die Einstellungen für den
Pattern Select-Modus werden durch diesen Vorgang
ebenfalls gespeichert. Wenn Sie das Gerät ausschalten,
ohne die Änderungen zu speichern, wird der KAOSS
PAD Entrancer auf die vorherigen Einstellungen
zurückgesetzt.
Beenden des MIDI Edit-Modus
Um zum Normalbetrieb zurückzukehren, berühren Sie
wahlweise das Touch-Pad, drücken Sie die
[FUNCTION]-Taste oder nehmen Sie einfach für ca. 10
Sekunden keine Eingabe am KAOSS PAD Entrancer
vor.
Informationen zu den
gespeicherten Einstellungen
Der Inhalt des Programmspeichers (PROGRAM
MEMORY) und die im MIDI Edit-Modus festgelegten
Einstellungen für die Steuerungsnummern können als
exklusive Meldungen an ein externes MIDI-Gerät
übertragen werden.
Weitere Informationen zur Übertragung von
exklusiven Meldungen finden Sie im separaten
Dokument „MIDI-Implementierung“.
Übertragbare und empfangbare Meldungen
Mit den Standardeinstellungen empfängt bzw. überträgt der KAOSS PAD Entrancer folgende MIDI-Meldungen.
Übertragener Vorgang Übertragene MIDI-Meldung Taste zum Aktivieren/Deaktivieren der Übertragung
Touch-pad X-Achse Effektsteuerung 1 (CC#12) *1, *2 PROGRAM MEMORY 4
Touch-pad Y-Achse Modulationstiefe 1 (CC#1) Y=5~9 PROGRAM MEMORY 1
Modulationstiefe 2 (CC#2) Y=5~1 PROGRAM MEMORY 2
Effektsteuerung 2 (CC#13) *1, *2 PROGRAM MEMORY 5
Touch-pad X+Y-Achse Effektsteuerung 3 (CC#93) *1 PROGRAM MEMORY 3
Touch-pad Ein/Aus Effektsteuerung 2 (CC#92) *1, *2 PROGRAM MEMORY 6
FX BALANCE Effektsteuerung 4 (CC#94) *1, *2 PROGRAM MEMORY 7
MUTE Effektsteuerung 5 (CC#95) *1, *2 PROGRAM MEMORY 8
Programmwechsel Programmwechsel (0~99) *2 HOLD
Pad Motion-Ausgabe Jede Touch-Pad-Meldung SAMPLE 2
Empfangener Vorgang Empfangene MIDI-Meldung Taste zum Aktivieren/Deaktivieren des Empfangs
Touch-pad X-Achse Effektsteuerung 1 (CC#12) *1, *2 PROGRAM MEMORY 4
Touch-pad Y-Achse Effektsteuerung 2 (CC#13) *1, *2 PROGRAM MEMORY 5
Touch-pad Ein/Aus Effektsteuerung 2 (CC#92) *1, *2 PROGRAM MEMORY 6
FX BALANCE Effektsteuerung 4 (CC#94) *1, *2 PROGRAM MEMORY 7
MUTE Effektsteuerung 5 (CC#95) *1, *2 PROGRAM MEMORY 8
Programmwechsel Programmwechsel (0~99) *2 HOLD
BPM Timing Clock SAMPLE 1
*1: Die zu übertragenden und zu empfangenden MIDI-Meldungen können in den Bereichen von CC#1 ~
CC#31, CC#64 ~ CC#95 und Pitch Bend ausgewählt werden. ( ) kennzeichnet die Standardeinstellung.
*2: Die Ein/Aus- und die CC#-Einstellungen sind für die Übertragung und den Empfang jeweils identisch.
Änderungen der Steuerungen für die Touch-Pad Y-Achse (Y=5 ~ 9, Y=5 ~ 1) und die Touch-Pad X+YAchse können weder übertragen noch empfangen werden. Wenn Sie also Steuerungsänderungen auf
einem Sequenzer aufzeichnen möchten, müssen Sie im MIDI Edit-Modus die Tasten [PROGRAM
MEMORY 1 ~ 3] deaktivieren, damit keine überflüssigen MIDI-Meldungen übertragen werden.
Die Einstellungen von bereits zugewiesenen Steuerungsnummern können nicht doppelt übertragen oder
empfangen werden.
12
Page 47

Häufig gestellte
Fragen (FAQ)
Q1: Beim Berühren des Pads wird der
gewünschte Video-Effekt nicht ausgeführt
A: Prüfen Sie folgende Punkte:
1) Befindet sich der Steuerungshebel in der
richtigen Stellung?
>> Video-Effekte werden nur ausgeführt, wenn
der Hebel in der Stellung COMBI VIDEO
befindet.
2) Ändern Sie die Einstellung des FX
BALANCE-Knopfes.
>> Mit dem FX BALANCE-Knopf kann die
Videowiedergabe nur angepasst werden,
wenn der Steuerungshebel sich in der
Stellung VIDEO befindet.
3) Befindet sich der PAL/NTSC-Schalter in der
richtigen Stellung?
>> Schalten Sie das Gerät aus, bevor Sie die
Einstellung des Schalters ändern.
Q2: Ein Bild kann nicht erfolgreich gesampelt
werden.
A: Standbilder können nur gesampelt werden,
wenn der Hebel sich in der Stellung VIDEO
befindet.
>> Bringen Sie den Hebel in die Stellung
VIDEO. Frieren Sie das Bild anschließend mit
dem MUTE/FREEZE-Hebel ein, und
drücken Sie die SAMPLE-Taste (1 oder 2),
um das Bild zu sampeln.
Q3: Im COMBI-Modus wird der Video-Effekt nur
auf Standbilder angewendet.
A: Wenn ein Standbild wiedergegeben wird,
wird der Video-Effekt nur auf das Standbild
angewendet.
>> Um die Wiedergabe des Standbildes zu
stoppen, bringen Sie den Hebel kurz in die
Stellung VIDEO, und drücken Sie zuvor
verwendete SAMPLE-Taste.
Q4: Im COMBI-Modus lässt sich der Video-Effekt
mit dem FX BALANCE-Knopf nicht ändern.
A: Im COMBI-Modus kann mit dem FX
BALANCE-Knopf nur der Audio-Effekt
angepasst werden.
Q5: Wie kann die Wiedergabe eines Video-Effekts
gemeinsam mit einer Grafik-Struktur
gespeichert werden?
A: Effektprogramme und Grafiken können
grundsätzlich nicht gemeinsam den Tasten
PROGRAM MEMORY 1~8 zugewiesen
werden.
Q6: Die Grafikstruktur verschwindet, wenn der
Video-Effekt geändert wird.
A: Wenn Sie das Effekt-Programm wählen, endet
die Wiedergabe der Grafik-Struktur
automatisch.
>> Um die Grafik-Struktur wieder anzuzeigen,
müssen Sie wieder in den Graphic PatternModus wechseln.
Wenn Sie einen Video-Effekt auf die Struktur
anwenden möchten, wählen Sie zunächst
den gewünschten Video-Effekt, wechseln Sie
anschließend zum Graphic Pattern-Modus,
und wählen Sie die gewünschte Struktur aus.
Q7: Können die beiden Eingänge VIDEO 1 und
VIDEO 2 abgemischt werden?
A: Der KAOSS Pad KAOSS PAD Entrancer
unterstützt kein Abmischen von
Eingangssignalen.
>> Das Video-Effektprogramm wird nur auf den
aktiven Eingang angewendet (VIDEO 1 oder
VIDEO 2).
Sie können den Input Select-Schalter jedoch
so einsetzen, dass Sie ein mit dem
Abmischen eines gesampelten Videoclips
oder Standbildes vergleichbares Ergebnis
erzielen.
Informationen zum Demo-Modus
Aufrufen des Demo-Modus
Bringen Sie den Steuerungshebel in die
Stellung COMBI, und schalten Sie bei
gedrückter FUNCTION-Taste das Gerät ein.
(Daraufhin leuchtet die LED der FUNCTIONTaste vorübergehend auf.)
Ver wenden des Demo-Modus
Wenn der Steuerungshebel sich in der Stellung
COMBI befindet und Sie fünf Sekunden lang
nichts unternehmen, beginnt die Vorführung
automatisch. (Pad-Bewegungen werden
automatisch ausgeführt, während der DemoModus die COMBI-Programme wiedergibt.) Es
werden nur die COMBI-Programme
vorgeführt. Die Sampling-Programme (94 ~ 99)
werden übersprungen.
Anhalten des Demo-Modus
Der KAOSS PAD Entrancer unterbricht den
Demo-Modus, wenn Sie eine Eingabe
vornehmen. Danach wird der Demo-Modus
fortgesetzt, wenn innerhalb von 5 Sekunden
keine weitere Eingabe erfolgt.
Beenden des Demo-Modus
Schalten Sie das Gerät aus, und schalten Sie
es anschließend wie gewohnt wieder ein.
13
Page 48

Spezifikationen
Anzahl von Effektprogrammen: 100 (Video), 100 (Audio), 100 (Kombination)
Eingänge: Video-Eingang 1 / RCA (Phono)-Eingang
Video-Eingang 2 / RCA-Eingang oder S-Video-Eingang (S-Video-Eingang prioritär)
(Der Video Input-Schalter aktiviert entweder den Video-Eingang 1 oder 2)
Cinch-Eingänge (Line) / Stereo-RCA-Eingänge
Ausgänge: Video-Ausgang / RCA-Ausgang
S-Video-Ausgang / S-Ausgang
Cinch-Ausgänge (Line) / Stereo-RCA-Ausgänge
Kopfhörerausgang / Stereo 1/4"-Telefonausgang
Audio-Abtastrate: 44,1 KHz
Audio-AD/DA: 20-Bit linear
MIDI: IN/OUT
Stromversorgung: 7 V Gleichstrom (spezifisches Netzteil)
Lieferumfang: Netzteil, Schutzfolie für Touch-Pad
Abmessungen: 240 (B) × 247 (T) × 83 (H) mm
Gewicht: 2,0 kg
* Die Abmessungen und die Spezifikationen können ohne vorherige Ankündigung geändert werden.
14
Page 49
15
Page 50

KPE1 MIDI IMPLEMENTATION
1.TRANSMITTED DATA
1-1 CHANNEL MESSAGES [H]:Hex, [D]:Decimal
+--------+---------+-------+-----------------------------+-----+
| Status | Second | Third | Description | ENA |
| [H] | [H] [D] | [H] | | |
+--------+---------+-------+-----------------------------+-----+
| Bn | cc | dd | Control Change | C |
| | | | | |
| Cn | pp | -- | Program Change | P |
| | | | | |
| En | bb | bb | Pitch Bender | C |
+--------+---------+-------+-----------------------------+-----+
C : Transmit when Control Change Enable
P : Transmit when Program Change Enable
n : MIDI Channel Number (0 ~ 15)
cc : Control Number (1 ~ 31, 64 ~ 95)
dd : Control Data (0 ~ 127)
pp : Program Number (0 ~ 99)
bb : Pitch Bender Data (0 ~ 16383)
1-2 UNIVERSAL SYSTEM EXCLUSIVE MESSAGES (DEVICE INQUIRY REPLY)
+---------+-----------------------------------------------+
| Byte[H] | Description |
+---------+-----------------------------------------------+
| F0 | Exclusive Status |
| 7E | Non Realtime Message |
| 0c | MIDI Channel ( Device ID ) |
| 06 | Inquiry Message |
| 02 | Identity reply |
| 42 | KORG ID ( Manufacturers ID ) |
| 6F | KPE1 ID ( Family ID (LSB)) |
| 00 | ( Family ID (MSB)) |
| 00 | ( Member ID (LSB)) |
| 00 | ( Member ID (MSB)) |
| xx | ROM No. 1~ ( Minor Ver. (LSB)) |
| 00 | ( Minor Ver. (MSB)) |
| xx | Soft Version ( Major Ver. (LSB)) |
| 00 | ( Major Ver. (MSB)) |
| F7 | End of Exclusive |
+---------+-----------------------------------------------+
This message is transmitted whenever a INQUIRY MESSAGE REQUEST
is received.
1-3 STRUCTURE OF SYSTEM EXCLUSIVE MESSAGES
(KPE1 and KP2 System Exclusive)
+- -+ -+
| 1st Byte = 1111 0000 (F0) : Exclusive Status | |
| 2nd Byte = 0100 0010 (42) : KORG ID |Ex.Header |
| 3rd Byte = 0011 nnnn (3n) : Format ID n:MIDI Channel | |
| 4th Byte = 0110 xxxx (6x) : KPE1(x:=F) or KP2(x:=7) ID | |
| 5th Byte = 0fff ffff (ff) : Function Code -+ |
| 6th Byte = 0ddd dddd (dd) : Data |
| : : : |
| LastByte = 1111 0111 (F7) : End of Exclusive |
+- -+ -+
1-4 SYSTEM EXCLUSIVE MESSAGES FUNCTION CODE LIST (TRANSMIT)
+-------------+-----------------------------------+---+---+
| Function ID | | R | E |
| [Hex] | | | |
+-------------+-----------------------------------+---+---+
| 49 | CURRENT MAP DATA DUMP | o | |
| 4D | MAP DATA DUMP | o | |
| 51 | GLOBAL DATA DUMP | o | |
| 50 | ALL DATA DUMP | o | |
| 26 | DATA FORMAT ERROR | | o |
| 23 | DATA LOAD COMPLETED | | o |
| 24 | DATA LOAD ERROR | | o |
| 21 | WRITE COMPLETED | | o |
| 22 | WRITE ERROR | | o |
+-------------+-----------------------------------+---+---+
Transmitted when
R : Request message is received
E : Exclusive message is received
2.RECOGNIZED RECEIVE DATA
2-1 CHANNEL MESSAGES
+--------+---------+-------+-------------------------------+---+
| Status | Second | Third | Description |ENA|
| [Hex] | [H] [D] | [H] | | |
+--------+---------+-------+-------------------------------+---+
| Bn | cc | dd | Control Change | C |
| Bn | 79(121) | 00 | Reset All Controllers | A |
| | | | | |
| Cn | pp | -- | Program Change | P |
| | | | | |
| En | bb | bb | Pitch Bender | C |
+--------+---------+-------+-------------------------------+---+
n : MIDI Channel Number (0 ~ 15)
cc : Control Number (1 ~ 31, 64 ~ 95)
dd : Control Data (0 ~ 127)
pp : Program Number (0 ~ 99)
bb : Pitch Bender Data (0 ~ 16383)
ENA = P : Enabled when MIDI Program Change Enable
C : Enabled when MIDI Control Change Enable
A : Always Enabled
2-2 UNIVERSAL SYSTEM EXCLUSIVE MESSAGES (DEVICE INQUIRY REQUEST)
+---------+-----------------------------------------------+
| Byte[H] | Description |
+---------+-----------------------------------------------+
| F0 | Exclusive Status |
| 7E | Non Realtime Message |
| nn | MIDI Channel |
| 06 | Inquiry Message |
| 01 | Inquiry Request |
| F7 | End of Exclusive |
+---------+-----------------------------------------------+
When receive this message and transmits Inquiry Reply Message.
nn = 00 ~ 0F : Receive if same Channel
7F : Receive any Channel
2-3 SYSTEM EXCLUSIVE MESSAGES FUNCTION CODE LIST (RECEIVE)
+-------------+-------------------------------------------+
| Function ID | Function |
| [Hex] | |
+-------------+-------------------------------------------+
| 19 | CURRENT MAP DATA DUMP REQUEST |
| 1D | MAP DATA DUMP REQUEST |
| 0E | GLOBAL DATA DUMP REQUEST |
| 0F | ALL DATA DUMP REQUEST |
| 11 | MAP WRITE REQUEST |
| 49 | CURRENT MAP DATA DUMP |
| 4D | MAP DATA DUMP |
| 51 | GLOBAL DATA DUMP |
| 50 | ALL DATA DUMP |
+-------------+-------------------------------------------+
3.MIDI EXCLUSIVE FORMAT (R:Receive, T:Transmit)
(1) CURRENT MAP DATA DUMP REQUEST R
+----------------+--------------------------------------------------+
| Byte | Description |
+----------------+--------------------------------------------------+
| F0,42,3c,6x | EXCLUSIVE HEADER KPE1(x:=F) or KP2(x:=7) |
| 0001 1001 (19) | CURRENT MAP DATA DUMP REQUEST 19H |
| 1111 0111 (F7) | EOX |
+----------------+--------------------------------------------------+
When this message is received, the CURRENT MAP DATA DUMP
(Function:49h) message will be transmitted by the same ID
(KPE1:6Fh or KP2:67h).
(2) MAP DATA DUMP REQUEST R
+----------------+--------------------------------------------------+
| Byte | Description |
+----------------+--------------------------------------------------+
| F0,42,3c,6x | EXCLUSIVE HEADER KPE1(x:=F) or KP2(x:=7) |
| 0001 1101 (1D) | MAP DATA DUMP REQUEST 1DH |
| 1111 0111 (F7) | EOX |
+----------------+--------------------------------------------------+
When this message is received, the MAP DATA DUMP(Function:4Dh)
message will be transmitted by the same ID(KPE1:6Fh or KP2:67h).
(3) GLOBAL DATA DUMP REQUEST R
+----------------+--------------------------------------------------+
| Byte | Description |
+----------------+--------------------------------------------------+
| F0,42,3c,6x | EXCLUSIVE HEADER KPE1(x:=F) or KP2(x:=7) |
| 0000 1111 (0E) | GLOBAL DATA DUMP REQUEST 0EH |
| 1111 0111 (F7) | EOX |
+----------------+--------------------------------------------------+
When this message is received, the GLOBAL DATA DUMP(Function:51h)
message will be transmitted by the same ID(KPE1:6Fh or KP2:67h).
Page 51

(4) ALL DATA DUMP REQUEST R
+----------------+--------------------------------------------------+
| Byte | Description |
+----------------+--------------------------------------------------+
| F0,42,3c,6x | EXCLUSIVE HEADER KPE1(x:=F) or KP2(x:=7) |
| 0000 1111 (0F) | ALL DATA DUMP REQUEST 0FH |
| 1111 0111 (F7) | EOX |
+----------------+--------------------------------------------------+
When this message is received, the ALL DATA DUMP(Function:50h)
message will be transmitted by the same ID(KPE1:6Fh or KP2:67h).
(5) MAP WRITE REQUEST R
+----------------+--------------------------------------------------+
| Byte | Description |
+----------------+--------------------------------------------------+
| F0,42,3c,6x | EXCLUSIVE HEADER KPE1(x:=F) or KP2(x:=7) |
| 0001 0001 (11) | MAP WRITE REQUEST 11H |
| 000m mmmm (mm) | Destination Map Number [NOTE 1]|
| 1111 0111 (F7) | EOX |
+----------------+--------------------------------------------------+
When this message is received, a WRITE COMPLETED(Function:21h) message
or a WRITE ERROR(Function:22h) message will be transmitted by the same
ID(KPE1:6Fh or KP2:67h).
(6) CURRENT MAP DATA DUMP R/T
+----------------+--------------------------------------------------+
| Byte | Description |
+----------------+--------------------------------------------------+
| F0,42,3c,6x | EXCLUSIVE HEADER KPE1(x:=F) or KP2(x:=7) |
| 0100 1100 (49) | CURRENT MAP DATA DUMP 49H |
| 0ddd dddd (dd) | Data [NOTE 2][TABLE 1]|
| : | : |
| 1111 0111 (F7) | EOX |
+----------------+--------------------------------------------------+
When this message is received, a DATA LOAD COMPLETED(Function:23h)
message or a DATA LOAD ERROR(Function:24h) message will be transmitted
by the same ID(KPE1:6Fh or KP2:67h).
This message is transmitted by the same ID(KPE1:6Fh or KP2:67h)
whenever a CURRENT MAP DATA DUMP REQUEST(Function:19h) is received.
(7) MAP DATA DUMP R/T
+----------------+--------------------------------------------------+
| Byte | Description |
+----------------+--------------------------------------------------+
| F0,42,3c,6x | EXCLUSIVE HEADER KPE1(x:=F) or KP2(x:=7) |
| 0100 1100 (4D) | MAP DATA DUMP 4DH |
| 0ddd dddd (dd) | Data [NOTE 3][TABLE 1]|
| : | : |
| 1111 0111 (F7) | EOX |
+----------------+--------------------------------------------------+
When this message is received, a DATA LOAD COMPLETED(Function:23h)
message or a DATA LOAD ERROR(Function:24h) message will be transmitted
by the same ID(KPE1:6Fh or KP2:67h).
This message is transmitted by the same ID(KPE1:6Fh or KP2:67h)
whenever a MAP DATA DUMP REQUEST(Function:1Dh) is received.
(8) GLOBAL DATA DUMP R/T
+----------------+--------------------------------------------------+
| Byte | Description |
+----------------+--------------------------------------------------+
| F0,42,3c,6x | EXCLUSIVE HEADER KPE1(x:=F) or KP2(x:=7) |
| 0101 0001 (51) | GLOBAL DATA DUMP 51H |
| 0ddd dddd (dd) | Data [NOTE 4][TABLE 2]|
| : | : |
| 1111 0111 (F7) | EOX |
+----------------+--------------------------------------------------+
When this message is received, a DATA LOAD COMPLETED(Function:23h)
message or a DATA LOAD ERROR(Function:24h) message will be transmitted
by the same ID(KPE1:6Fh or KP2:67h).
This message is transmitted by the same ID(KPE1:6Fh or KP2:67h)
whenever a GLOBAL DATA DUMP REQUEST(Function:0Eh) is received.
(9) ALL DATA DUMP R/T
+----------------+--------------------------------------------------+
| Byte | Description |
+----------------+--------------------------------------------------+
| F0,42,3c,6x | EXCLUSIVE HEADER KPE1(x:=F) or KP2(x:=7) |
| 0101 0000 (50) | ALL DATA DUMP 50H |
| 0ddd dddd (dd) | Data [NOTE 5][TABLE 1][TABLE 2]|
| : | : |
| 1111 0111 (F7) | EOX |
+----------------+--------------------------------------------------+
When this message is received, a DATA LOAD COMPLETED(Function:23h)
message or a DATA LOAD ERROR(Function:24h) message will be
transmitted
by the same ID(KPE1:6Fh or KP2:67h).
This message is transmitted by the same ID(KPE1:6Fh or KP2:67h)
whenever a ALL DATA DUMP REQUEST(Function:0Fh) is received.
(10) DATA FORMAT ERROR T
+----------------+--------------------------------------------------+
| Byte | Description |
+----------------+--------------------------------------------------+
| F0,42,3c,6x | EXCLUSIVE HEADER KPE1(x:=F) or KP2(x:=7) |
| 0010 0110 (26) | DATA FORMAT ERROR 26H |
| 1111 0111 (F7) | EOX |
+----------------+--------------------------------------------------+
Transmits this message by the same ID(KPE1:6Fh or KP2:67h) when
there is an error in MIDI in message.
(11) DATA LOAD COMPLETED T
+----------------+--------------------------------------------------+
| Byte | Description |
+----------------+--------------------------------------------------+
| F0,42,3c,6x | EXCLUSIVE HEADER KPE1(x:=F) or KP2(x:=7) |
| 0010 0011 (23) | DATA LOAD COMPLETED 23H |
| 1111 0111 (F7) | EOX |
+----------------+--------------------------------------------------+
Transmits this message by the same ID(KPE1:6Fh or KP2:67h) when
DATA LOAD, PROCESSING have been completed.
(13) DATA LOAD ERROR T
+----------------+--------------------------------------------------+
| Byte | Description |
+----------------+--------------------------------------------------+
| F0,42,3c,6x | EXCLUSIVE HEADER KPE1(x:=F) or KP2(x:=7) |
| 0010 0100 (24) | DATA LOAD ERROR 24H |
| 1111 0111 (F7) | EOX |
+----------------+--------------------------------------------------+
Transmits this message by the same ID(KPE1:6Fh or KP2:67h) when
DATA LOAD, PROCESSING have not been completed.
(14) WRITE COMPLETED T
+----------------+--------------------------------------------------+
| Byte | Description |
+----------------+--------------------------------------------------+
| F0,42,3c,6x | EXCLUSIVE HEADER KPE1(x:=F) or KP2(x:=7) |
| 0010 0001 (21) | WRITE COMPLETED 21H |
| 1111 0111 (F7) | EOX |
+----------------+--------------------------------------------------+
Transmits this message by the same ID(KPE1:6Fh or KP2:67h) when
DATA WRITE by MIDI has been completed.
(15) WRITE ERROR T
+----------------+--------------------------------------------------+
| Byte | Description |
+----------------+--------------------------------------------------+
| F0,42,3c,6x | EXCLUSIVE HEADER KPE1(x:=F) or KP2(x:=7) |
| 0010 0010 (22) | WRITE ERROR 22H |
| 1111 0111 (F7) | EOX |
+----------------+--------------------------------------------------+
Transmits this message by the same ID(KPE1:6Fh or KP2:67h) when
DATA WRITE by MIDI has not been completed.
Dump Data Format
n = 0, 1, ...
DATA ( 1set = 8bit x 7byte )
b7 ~ b0 b7 ~ b0 b7 ~~ b0 b7 ~ b0
+-+-+-+-+-+-+-+-+ +-+-+-+-+-+-+-+-+ +-+-+-~~-+-+-+ +-+-+-+-+-+-+-+-+
| | | | | | | | | | | | | | | | | | | | | | | | | | | | | | | | |
+-+-+-+-+-+-+-+-+ +-+-+-+-+-+-+-+-+ +-+-+-~~-+-+-+ +-+-+-+-+-+-+-+-+
7n+0 7n+1 7n+2 ~~ 7n+5 7n+6
MIDI DATA ( 1set = 7bit x 8Byte )
b7b7b7b7b7b7b7 b6 ~ b0 b6 ~~ b0 b6 ~ b0
+-+-+-+-+-+-+-+-+ +-+-+-+-+-+-+-+-+ +-+-+-~~-+-+-+ +-+-+-+-+-+-+-+-+
|0| | | | | | | | |0| | | | | | | | |0| | | | | |0| | | | | | | |
+-+-+-+-+-+-+-+-+ +-+-+-+-+-+-+-+-+ +-+-+-~~-+-+-+ +-+-+-+-+-+-+-+-+
7n+6,5,4,3,2,1,0 7n+0 7n+1 ~~ 7n+5 7n+6
NOTE 1 : Destination Map Number
a) When header is KPE1 ID.
mm = 0000 0000(00) ~ 0001 0111(17)
b) When header is KP2 ID.
mm = 0000 0000(00) ~ 0000 0111(07)
NOTE 2 : CURRENT MAP DATA DUMP FORMAT
a) When header is KPE1 ID.
[Map Data A (12byte)], (See TABLE 1-a)
[Map Data B (12byte)], (See TABLE 1-b)
[Map Data P (1058byte)] (See TABLE 1-d)
1082byte = 7 * 154 + 4 --> 8 * 154 + (4 + 1) = 1237byte
b) When header is KP2 ID.
Page 52

[Map Data (12byte)] (See TABLE 1-a)
12byte = 7 * 1 + 5 --> 8 * 1 + (5 + 1) = 14byte
NOTE 3 : MAP DATA DUMP FORMAT
a) When header is KPE1 ID.
[Map. A 1(12byte)], ... ,[Map. A 8(12byte)] (See TABLE 1-a)
[Map. C 1(24byte)], ... ,[Map. C 8(24byte)] (See TABLE 1-c)
[Map. B 1(12byte)], ... ,[Map. B 8(12byte)] (See TABLE 1-b)
[Map. P 1(1058byte), ... ,[Map. P 24(1058byte)] (See TABLE 1-d)
25776byte = 7 * 3682 + 2 --> 8 * 3682 + (2 + 1) = 29459byte
b) When header is KP2 ID.
[Map.1 (12byte)], ... ,[Map.8 (12byte)] (See TABLE 1-a)
96byte = 7 * 13 + 5 --> 8 * 13 + (5 + 1) = 110byte
NOTE 4 : GLOBAL DATA DUMP FORMAT
a) When header is KPE1 ID.
[Global Data (18byte)] (See TABLE 2-a)
18byte = 7 * 2 + 4 --> 8 * 2 + (4 + 1) = 21byte
b) When header is KP2 ID.
[Global Data (10byte)] (See TABLE 2-b)
10byte = 7 * 1 + 3 --> 8 * 1 + (3 + 1) = 12byte
NOTE 5 : ALL DATA DUMP FORMAT
a) When header is KPE1 ID.
[Global Data (18byte)] (See TABLE 2-a)
[Map. A 1(12byte)], ... ,[Map. A 8(12byte)] (See TABLE 1-a)
[Map. C 1(24byte)], ... ,[Map. C 8(24byte)] (See TABLE 1-c)
[Map. B 1(12byte)], ... ,[Map. B 8(12byte)] (See TABLE 1-b)
[Map. P 1(1058byte), ... ,[Map. P 24(1058byte)] (See TABLE 1-d)
25794byte = 7 * 3684 + 6 --> 8 * 3684 + (6 + 1) = 29479byte
b) When header is KP2 ID.
[Global Data (10byte)], (See TABLE 2-b)
[Map.1 (12byte)], ... ,[Map.8 (12byte)] (See TABLE 1-a)
106byte = 7 * 15 + 1 --> 8 * 15 + (1 + 1) = 122byte
TABLE 1-a :
+0 AUDIO FX PROGRAM NUMBER (0~99)
+1 bit0 SAMPLE BANK NUMBER (0/1)
bit1~6 (RESERVED)
bit7 HOLD OFF/ON (0=OFF, 1=ON)
+2 FX DEPTH
+3 HOLD X
+4 HOLD Y
+5 HOLD X2
+6 HOLD Y2
+7 HOLD X3
+8 HOLD Y3
+9 (RESERVED)
+10~11 BPM
TABLE 1-b :
+0 VIDEO FX PROGRAM NUMBER (0~99)
+1 bit0 SAMPLE 1 OFF/ON (0=OFF, 1=ON)
bit1 SAMPLE 2 OFF/ON (0=OFF, 1=ON)
bit2~6 (RESERVED)
bit7 HOLD OFF/ON (0=OFF, 1=ON)
+2 FX DEPTH
+3 HOLD X
+4 HOLD Y
+5 HOLD X2
+6 HOLD Y2
+7 HOLD X3
+8 HOLD Y3
+9 (RESERVED)
+10~11 BPM
TABLE 1-c :
+0 AUDIO FX PROGRAM NUMBER (0~99)
+1 bit0 AUDIO FX SAMPLE BANK NUMBER (0/1)
bit1~6 (RESERVED)
bit7 AUDIO FX HOLD OFF/ON (0=OFF, 1=ON)
+2 AUDIO FX DEPTH
+3 AUDIO FX HOLD X
+4 AUDIO FX HOLD Y
+5 AUDIO FX HOLD X2
+6 AUDIO FX HOLD Y2
+7 AUDIO FX HOLD X3
+8 AUDIO FX HOLD Y3
+9 bit0~6 COMBI PROGRAM NUMBER (0~99)
bit7 COMBI PROGRAM VALID (0=VALID, 1=NO VALID)
+10~11 BPM
+12 VIDEO FX PROGRAM NUMBER (0~99)
+13 bit0 VIDEO FX SAMPLE 1 OFF/ON (0=OFF, 1=ON)
bit1 VIDEO FX SAMPLE 2 OFF/ON (0=OFF, 1=ON)
bit2~6 (RESERVED)
bit7 VIDEO FX HOLD OFF/ON (0=OFF, 1=ON)
+14 VIDEO FX DEPTH
+15 VIDEO FX HOLD X
+16 VIDEO FX HOLD Y
+17 VIDEO FX HOLD X2
+18 VIDEO FX HOLD Y2
+19 VIDEO FX HOLD X3
+20 VIDEO FX HOLD Y3
+21 bit0~6 FX DEPTH
bit7 HOLD OFF/ON (0=OFF, 1=ON)
+22~23 BPM
TABLE 1-d :
+0 VALID DATA COUNT HIGH WORD
+1 VALID DATA COUNT LOW WORD
DATA COUNT 0~264
+2~1055 PAD MOTION DATA#
PAD MOTION DATA#
+0 bit0~6 X VALUE HIGH WORD
bit7 TOUCH ON/OFF (0=ON, 1=OFF)
+1 X VALUE LOW WORD
X VALUE 0~1023 (valid:167~891)
+2 Y VALUE HIGH WORD
+3 Y VALUE LOW WORD
Y VALUE 0~1023 (valid:218~846)
TABLE 2-a :
+0 (RESERVED)
+1 bit7 MIDI PROGRAM CHANGE ENA/DIS (0=DIS, 1=ENA)
bit6~2 (RESERVED)
bit1 MIDI PAD MOTION ENA/DIS (0=DIS, 1=ENA)
bit0 MIDI CLOCK ENA/DIS (0=DIS, 1=ENA)
+2 bit7 MIDI MUTE ENA/DIS (0=ENA, 1=DIS)
bit6 MIDI FX DEPTH ENA/DIS (0=ENA, 1=DIS)
bit5 MIDI TOUCH PAD ON/OFF ENA/DIS (0=ENA, 1=DIS)
bit4 MIDI TOUCH PAD Y ENA/DIS (0=ENA, 1=DIS)
bit3 MIDI TOUCH PAD X ENA/DIS (0=ENA, 1=DIS)
bit2 MIDI TOUCH PAD X+Y ENA/DIS (0=ENA, 1=DIS)
bit1 MIDI TOUCH PAD -Y ENA/DIS (0=ENA, 1=DIS)
bit0 MIDI TOUCH PAD +Y ENA/DIS (0=ENA, 1=DIS)
+3 (RESERVED)
+4 MIDI TOUCH PAD X+Y CTRL#
+5 MIDI TOUCH PAD X CTRL#
+6 MIDI TOUCH PAD Y CTRL#
+7 MIDI TOUCH PAD ON/OFF CTRL#
+8 MIDI FX DEPTH CTRL#
+9 MIDI MUTE CTRL#
+10 MAP KEY 1 PATTERN NUMBER (0~59)
+11 MAP KEY 2 PATTERN NUMBER (0~59)
+12 MAP KEY 3 PATTERN NUMBER (0~59)
+13 MAP KEY 4 PATTERN NUMBER (0~59)
+14 MAP KEY 5 PATTERN NUMBER (0~59)
+15 MAP KEY 6 PATTERN NUMBER (0~59)
+16 MAP KEY 7 PATTERN NUMBER (0~59)
+17 MAP KEY 8 PATTERN NUMBER (0~59)
TABLE 2-b :
+0 (RESERVED)
+1 bit7 MIDI PROGRAM CHANGE ENA/DIS (0=DIS, 1=ENA)
bit6~1 (RESERVED)
bit0 MIDI CLOCK ENA/DIS (0=DIS, 1=ENA)
+2 bit7 MIDI MUTE ENA/DIS (0=ENA, 1=DIS)
bit6 MIDI FX DEPTH ENA/DIS (0=ENA, 1=DIS)
bit5 MIDI TOUCH PAD ON/OFF ENA/DIS (0=ENA, 1=DIS)
bit4 MIDI TOUCH PAD Y ENA/DIS (0=ENA, 1=DIS)
bit3 MIDI TOUCH PAD X ENA/DIS (0=ENA, 1=DIS)
bit2 MIDI TOUCH PAD X+Y ENA/DIS (0=ENA, 1=DIS)
bit1 MIDI TOUCH PAD -Y ENA/DIS (0=ENA, 1=DIS)
bit0 MIDI TOUCH PAD +Y ENA/DIS (0=ENA, 1=DIS)
+3 (RESERVED)
+4 MIDI TOUCH PAD X+Y CTRL#
+5 MIDI TOUCH PAD X CTRL#
+6 MIDI TOUCH PAD Y CTRL#
+7 MIDI TOUCH PAD ON/OFF CTRL#
+8 MIDI FX DEPTH CTRL#
+9 MIDI MUTE CTRL#
CTRL#
1~31,64~95 : CTRL# 1~31,64~95
96 : PITCH BEND
Page 53

[AUDIO/VIDEO PROCESSOR]
KOSS PAD entrancer
Function Transmitted Recognized Remarks
MIDI Implementation Chart
2003.7.7
Basic
Channel:
Mode
Note
Number:
Velocity:
Aftertouch:
Pitch Bend
Control
Change
Default
Changed
Default
Messages
Altered
True Voice
Note On
Note Off
Key’s
Channel
1– 31, 64–95
121
1–16 1–16
1–16
**************
Memorized
1–16
3
As control source
As control source
Reset All Controllers
Program
Change:
System Exclusive
System
Common:
System
Real Time:
Aux
Messages:
Remarks
Transmitted/received when control numbers or pitch bend are selected,
and are enabled.
Transmitted/received when program changes are enabled.
Received when timing clock is enabled.
Mode 1: OMNI ON, POLY Mode 2: OMNI ON, MONO : Yes
Mode 3: OMNI OFF, POLY Mode 4: OMNI OFF, MONO : No
Consult your local Korg distributor for more information on MIDI Implementation.
Veuillez vous adresser à votre revendeur Korg pour une copie de l’équipement MIDI.
Weitere Informationen über die MIDI IMPLEMENTATION erhalten Sie bei Ihrem Korg-Vertrieb.
Variable Range
Song Position
Song Select
Tune Request
Clock
Commands
Local On/Off
All Notes Off
Active Sensing
System Reset
0–99
**************
0–99
0–99
Page 54

IMPORTANT NOTICE TO CONSUMERS
This product has been manufactured according to strict specifications and voltage requirements that
are applicable in the country in which it is intended that this product should be used. If you have
purchased this product via the internet, through mail order, and/or via a telephone sale, you must
verify that this product is intended to be used in the country in which you reside.
WARNING: Use of this product in any country other than that for which it is intended could be
dangerous and could invalidate the manufacturer's or distr ibutor's warranty.
Please also retain your receipt as proof of purchase otherwise your product may be disqualified from
the manufacturer's or distributor's warranty.
REMARQUE IMPORTANTE POUR LES CLIENTS
Ce produit a été fabriqué suivant des spécifications sévères et des besoins en tension applicables
dans le pays où ce produit doit être utilisé. Si vous avez acheté ce produit via l’internet, par vente par
correspondance ou/et vente par téléphone, vous devez vérifier que ce produit est bien utilisable
dans le pays où vous résidez.
ATTENTION: L’utilisation de ce produit dans un pays autre que celui pour lequel il a été conçu peut
être dangereuse et annulera la garantie du fabricant ou du distributeur. Conservez bien votre
récépissé qui est la preuve de votre achat, faute de quoi votre produit ne risque de ne plus être
couvert par la garantie du fabricant ou du distributeur.
2003 KORG INC.
WICHTIGER HINWEIS FÜR KUNDEN
Dieses Produkt wurde unter strenger Beachtung von Spezifikationen und Spannungsanforderungen
hergestellt, die im Bestimmungsland gelten. Wenn Sie dieses Produkt über das Internet, per
Postversand und/oder mit telefonischer Bestellung gekauft haben, müssen Sie bestätigen, dass
dieses Produkt für Ihr Wohngebiet ausgelegt ist.
WARNUNG: Verwendung dieses Produkts in einem anderen Land als dem, für das es bestimmt ist,
verwendet wird, kann gefährlich sein und die Garantie des Herstellers oder Importeurs hinfällig
lassen werden. Bitte bewahren Sie diese Quittung als Kaufbeleg auf, da andernfalls das Produkt von
der Garantie des Herstellers oder Importeurs ausgeschlossen werden kann.
15-12, Shimotakaido 1-chome, Suginami-ku, Tokyo, Japan
1508 CTH
Printed in Japan
 Loading...