


magicolor® 2480 MF
Warranty Exchange
Guide
1760588-001A

Trademarks
KONICA MINOLTA and the KONICA MINOLTA logo are trademarks or registered
trademarks of KONICA MINOLTA HOLDINGS, INC.
magicolor is a trademark or registered trademark of KONICA MINOLTA PRINTING
SOLUTIONS U.S.A., INC. All other trademarks are the property of their respective
owners.
Copyright Notice
Copyright © 2006 KONICA MINOLTA PRINTING SOLUTIONS U.S.A., INC., One
Magnum Pass, Mobile, AL 36618, USA. All Rights Reserved. This document may not
be copied, in whole or part, nor transferred to any other media or language, without
written permission of KONICA MINOLTA BUSINESS TECHNOLOGIES, INC.
Manual Notice
KONICA MINOLTA BUSINESS TECHNOLOGIES, INC. reserves the right to make
changes to this manual and to the equipment described herein without notice.
Considerable effort has been made to ensure that this manual is free of inaccuracies
and omissions. However, KONICA MINOLTA BUSINESS TECHNOLOGIES, INC.
makes no warranty of any kind including, but not limited to, any implied warranties of
merchantability and fitness for a particular purpose with regard to this manual.
KONICA MINOLTA BUSINESS TECHNOLOGIES, INC. assumes no responsibility for,
or liability for, errors contained in this manual or for incidental, special, or
consequential damages arising out of the furnishing of this manual, or the use of this
manual in operating the equipment, or in connection with the performance of the
equipment when so operated.
Introduction
Thank you for contacting a technical support representative to obtain
information about returning your magicolor 2480 MF for warranty exchange.
Follow these instructions very carefully.
If you need additional assistance, refer to the General Information Guide
(included with the original all-in-one) or printer.konicaminolta.com
wide sources of service and support.
Attention
Failure to follow these instructions could result in voiding your
warranty.
Exchange Procedure
Each of these steps is explained in detail in this guide.
1 Unpack the exchange all-in-one. See page 2.
2 Prepare the original all-in-one (remove the media tray,
close the output tray, and then remove the Quick Guide
holder and, if applicable, keypad overlays).
3 Move the consumables (toner cartridges, drum
cartridge, and transfer belt unit).
4 Finishing setting up the exchange all-in-one (install the
media tray and Quick Guide holder, extend the output
tray, install the keypad overlays if applicable, and connect the USB cable).
5 Repack the original all-in-one, and then call the shipper
for pickup.
for world-
See page 6.
See page 9.
See page 18.
See page 21.
Introduction
1
Unpack the Exchange All-in-One
Attention
Use caution when unpacking the exchange all-in-one, so the packaging
(including the tape) can be used to repack the all-in-one to be returned.
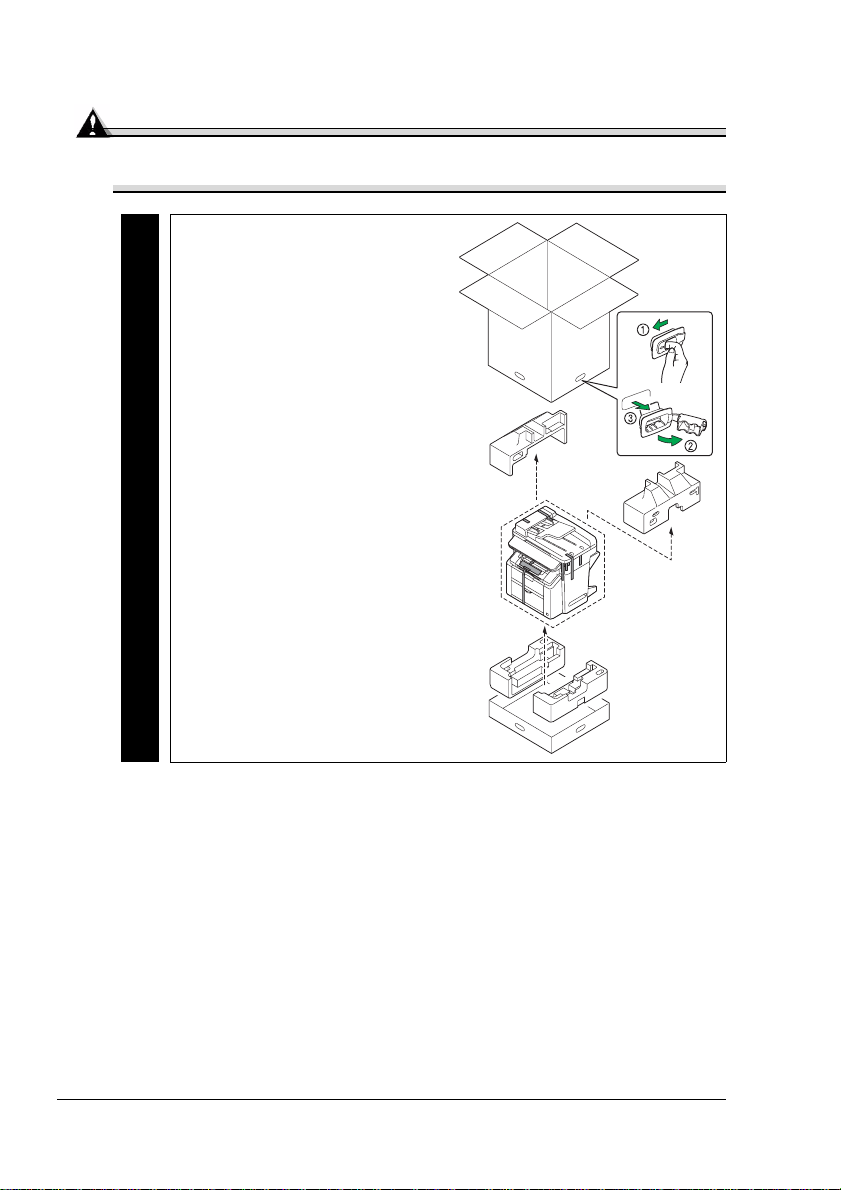
1 Unpack the exchange
all-in-one.
Exchange
Unpack the Exchange All-in-One2
2 Remove the tape and packing materials from the exchange
all-in-one.
A B
Exchange
C
Unpack the Exchange All-in-One
3
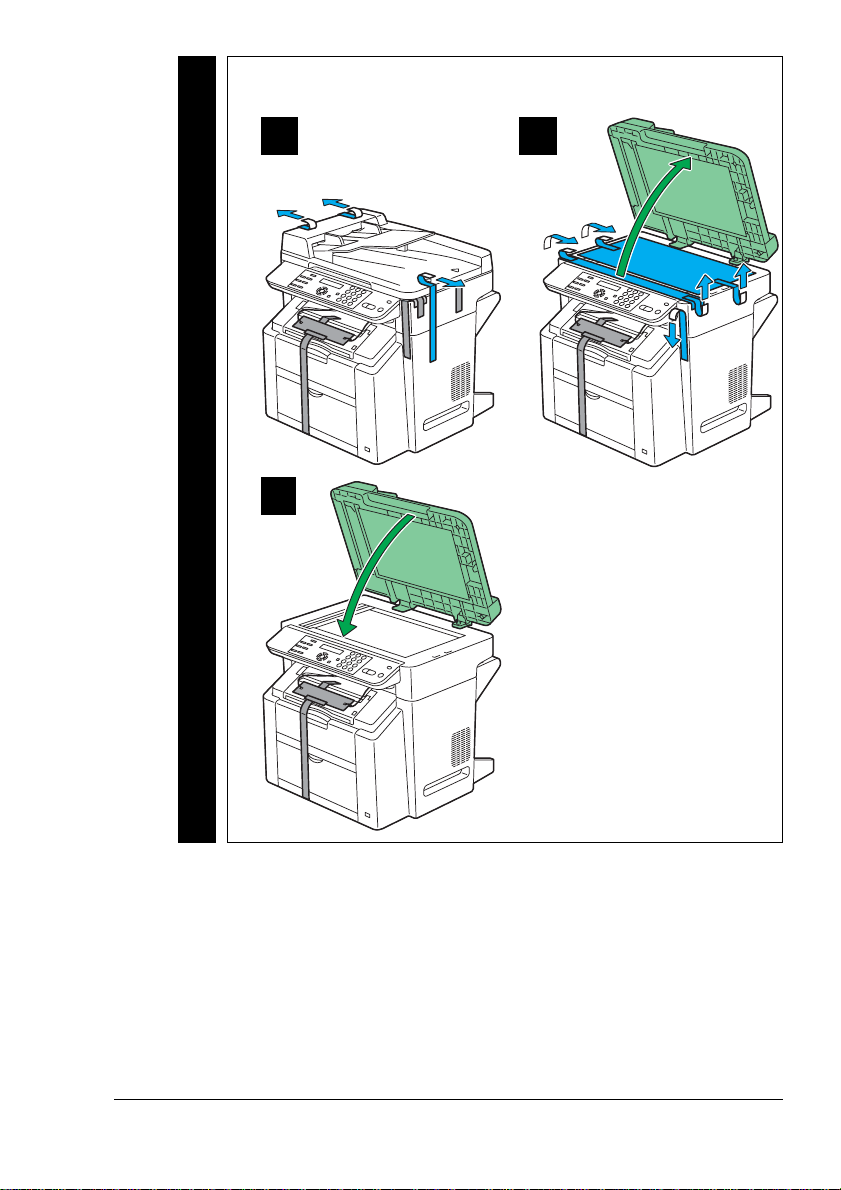
3 Unlock the scanner on the exchange all-in-one.
A B
c
Exchange
Unpack the Exchange All-in-One4
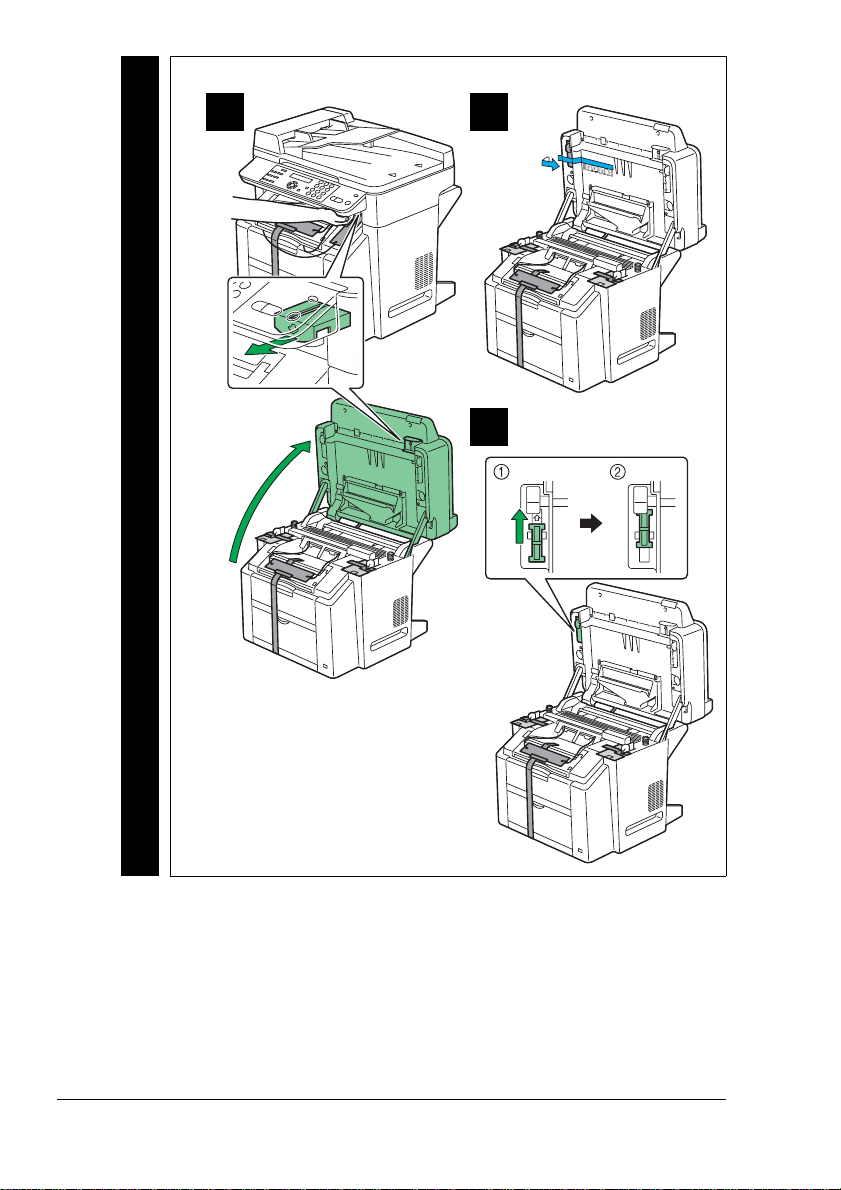
4 With the scanner unit still open, remove the fuser separators and
remaining packing materials from the exchange all-in-one.
A
C
Exchange
B
D
E
Unpack the Exchange All-in-One
F
5

5 Remove the packing materials from the exchange all-in-one’s
media tray.
A B
Exchange
Prepare the Original All-in-One
1 Remove the media from the original all-in-one, and then remove
the media tray.
A B
Original
C D
Prepare the Original All-in-One6

2 Close the original all-in-one’s
output tray.
Original
3 Turn off the original
all-in-one.
Original
Prepare the Original All-in-One
7

4 Disconnect the USB cable and power cord from the original
all-in-one.
A B
Original
5 Remove the Quick Guide and
holder from the original
all-in-one.
Original
6 If you’ve installed French,
Spanish, or Portuguese keypad overlays on the original
all-in-one, remove them now.
Original
Prepare the Original All-in-One8

Move the Consumables
Toner Cartridges
1 Access the original all-in-one’s toner carousel.
A B
Original
C
2 If the cyan toner cartridge is already in position to be removed,
skip to step 3.
If it is not, use a small
screwdriver to press
down on the toner
carousel release lever,
and then manually
Original
Move the Consumables
rotate the carousel
toward the front of the
all-in-one until the cyan
toner cartridge is in
position.
9

3 Remove the cyan toner cartridge.
" Do not touch the surface of the
roller.
Original
4 Using a small screwdriver, press down on the toner carousel
release lever, manually rotate the carousel toward the front of the
all-in-one until the black toner cartridge is in position, and then
remove the black toner cartridge.
" Do not touch the surface of the roller.
A B
Original
5 Repeat step 4 two more times to remove first the yellow toner
cartridge and then the magenta toner cartridge.
" Do not touch the surface of the roller.
Original
6 Close the original all-in-one’s front
door.
Original
Move the Consumables10

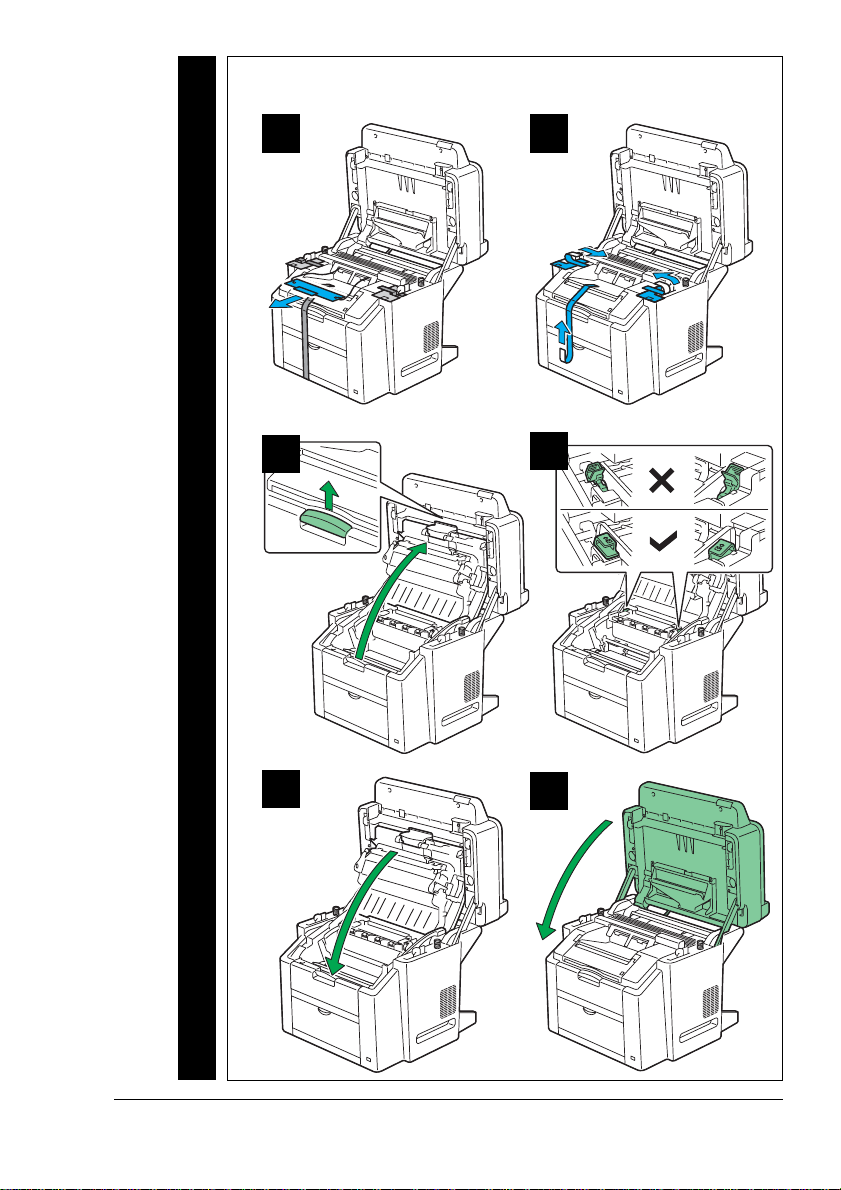
Drum Cartridge
1 With the scanner unit and engine
cover still open, remove the drum
cartridge from the original
all-in-one.
Original
Move the Consumables
11

Transfer Belt Unit
1 With the scanner unit and engine cover still open, remove the
transfer belt unit from the original all-in-one.
A
B
Original
C
Move the Consumables12

2 Close original all-in-one’s engine cover and scanner unit.
A B
Original
3 Open the scanner unit and engine cover on the exchange
all-in-one.
A
Exchange
Move the Consumables
B
13

4 Install the transfer belt unit in the exchange all-in-one.
A
Exchange
B
C
Move the Consumables14

Drum Cartridge
1 With the scanner unit and
engine cover of the
exchange all-in-one still
open, install the drum
cartridge.
Exchange
Toner Cartridges
1 With the scanner unit and engine
cover still open, access the toner carousel in the exchange all-in-one.
Exchange
2 If the toner carousel is already in the “C” (cyan) position, skip to
step 3.
If it is in any other position,
use a small screwdriver to
press down on the toner
carousel release lever, and
then manually rotate the
Exchange
Move the Consumables
carousel toward the front of
the all-in-one into the “C”
position.
C
15

3 Install the cyan toner cartridge.
" Do not touch the surface of the roller.
A B
Exchange
4 Using a small screwdriver, press down on the toner carousel
release lever, manually rotate the carousel toward the front of the
all-in-one into the “K” (black) position, and then install the black
toner cartridge.
" Do not touch the surface of the roller.
A B
Exchange
C
Move the Consumables16

5 Repeat step 4 to install first the yellow (“Y”) toner cartridge and
then the magenta (“M”) toner cartridge.
" Do not touch the surface of the rolle r.
Exchange
6 Close front door, engine cover and scanner unit on the exchange
all-in-one.
Exchange
A
C
B
Move the Consumables
17

Finish Setting Up the Exchange All-in-One
1 Install the media tray you removed from the original all-in-one (on
page 6) on the exchange all-in-one, and fill it with paper.
A B
C D
Exchange
FE
Finish Setting Up the Exchange All-in-One18

2 Attach the Quick Guide and
holder to the exchange
all-in-one.
Exchange
3 Extend the exchange
all-in-one’s output tray.
Exchange
Finish Setting Up the Exchange All-in-One
19

4 If you removed French,
Spanish, or Portuguese keypad overlays from the original
all-in-one (on page 8), install
them on the exchange
all-in-one.
Exchange
5 Plug in and turn on the exchange all-in-one.
A B
Exchange
6 Connect the USB cable to the
exchange all-in-one.
Exchange
Finish Setting Up the Exchange All-in-One20

Repack the Original All-in-One
1 Place the packing materials in the original all-in-one’s media tray.
A B
Original
2 Open the fuser separators on the original all-in-one.
A B
Original
Repack the Original All-in-One
C
21

3 Place the packing materials on the original all-in-one.
A B
Original
C
D
D
Repack the Original All-in-One22

4 Repack the original all-in-one in
the carton in which the
exchange all-in-one was
shipped.
Original
5 Securely tape the top flaps of the shipping carton closed.
Original
6 In the Americas, clearly write the RMA (Return Me rchandise
Authorization) number you received from your customer support
representative on the outside of the carton.
" If the RMA number is not prominently visible on the outside
Original
7 Call the shipper for pickup.
of the return carton, KONICA MINOLTA will not accept
receipt.
" Use the telephone number listed on the shipping label
Original
Repack the Original All-in-One
provided with the exchange all-in-one.
23

 Loading...