

Page 1

Certified AutoCAD Driver
KIP Unattend
Operator Guide
Page 2

KIP Unattend Operator Guide
Contents
KIP Unattend ................................................................................................................................................................. 1
Configuration Menu .................................................................................................................................................... 4
KIP 7.2 File Shredding (Overwriting) ........................................................................................................................ 14
KIP Windows Unattend Configuration ..................................................................................................................... 15
Print Queue ............................................................................................................................................................ 1
KIP Code ................................................................................................................................................................. 1
Requester ............................................................................................................................................................... 1
Job Name/Number .............................................................................................................................................. 2
Description ............................................................................................................................................................. 2
Media ...................................................................................................................................................................... 2
# of Orig. ................................................................................................................................................................ 2
# of Sets .................................................................................................................................................................. 2
Color Codes ........................................................................................................................................................... 3
Set Monitor Paths .................................................................................................................................................. 4
Request Dir Path .................................................................................................................................................... 4
Configure Monitored Directory........................................................................................................................... 5
Monitor Path Selection Arrows ............................................................................................................................ 5
Save ........................................................................................................................................................................ 5
Cancel .................................................................................................................................................................... 5
Miscellaneous Setup ............................................................................................................................................. 5
Units ......................................................................................................................................................................... 6
Media Selection .................................................................................................................................................... 6
Rotation .................................................................................................................................................................. 6
Password ................................................................................................................................................................ 6
Copy Density ......................................................................................................................................................... 6
Feeder Size ............................................................................................................................................................. 6
Feeder Media ........................................................................................................................................................ 7
Separator Media ................................................................................................................................................... 7
Log file Directory ................................................................................................................................................... 7
Print Configs ........................................................................................................................................................... 7
Cold Sleep Settings ........................................................................................................... .................................... 7
Copy mode delay ................................................................................................................................................ 8
Unattended delay ................................................................................................................................................ 8
Default DPI ............................................................................................................................................................. 8
Print Separator Sheet ............................................................................................................................................ 8
Deck Info ................................................................................................................................................................ 8
Save ........................................................................................................................................................................ 8
Cancel .................................................................................................................................................................... 8
Check Your M-files ................................................................................................................................................ 9
Reset Current Job ................................................................................................................................................. 9
Quit Configuration ................................................................................................................................................ 9
Exit Program ......................................................................................................................................................... 10
Manager Mode ................................................................................................................................................... 10
Managing the Current Job ............................................................................................................................... 11
Managing Subsequent Jobs ............................................................................................................................. 12
Printing to the KIP 9000 Sheet Feed .................................................................................................................. 13
Page 3
KIP Unattend Operator Guide
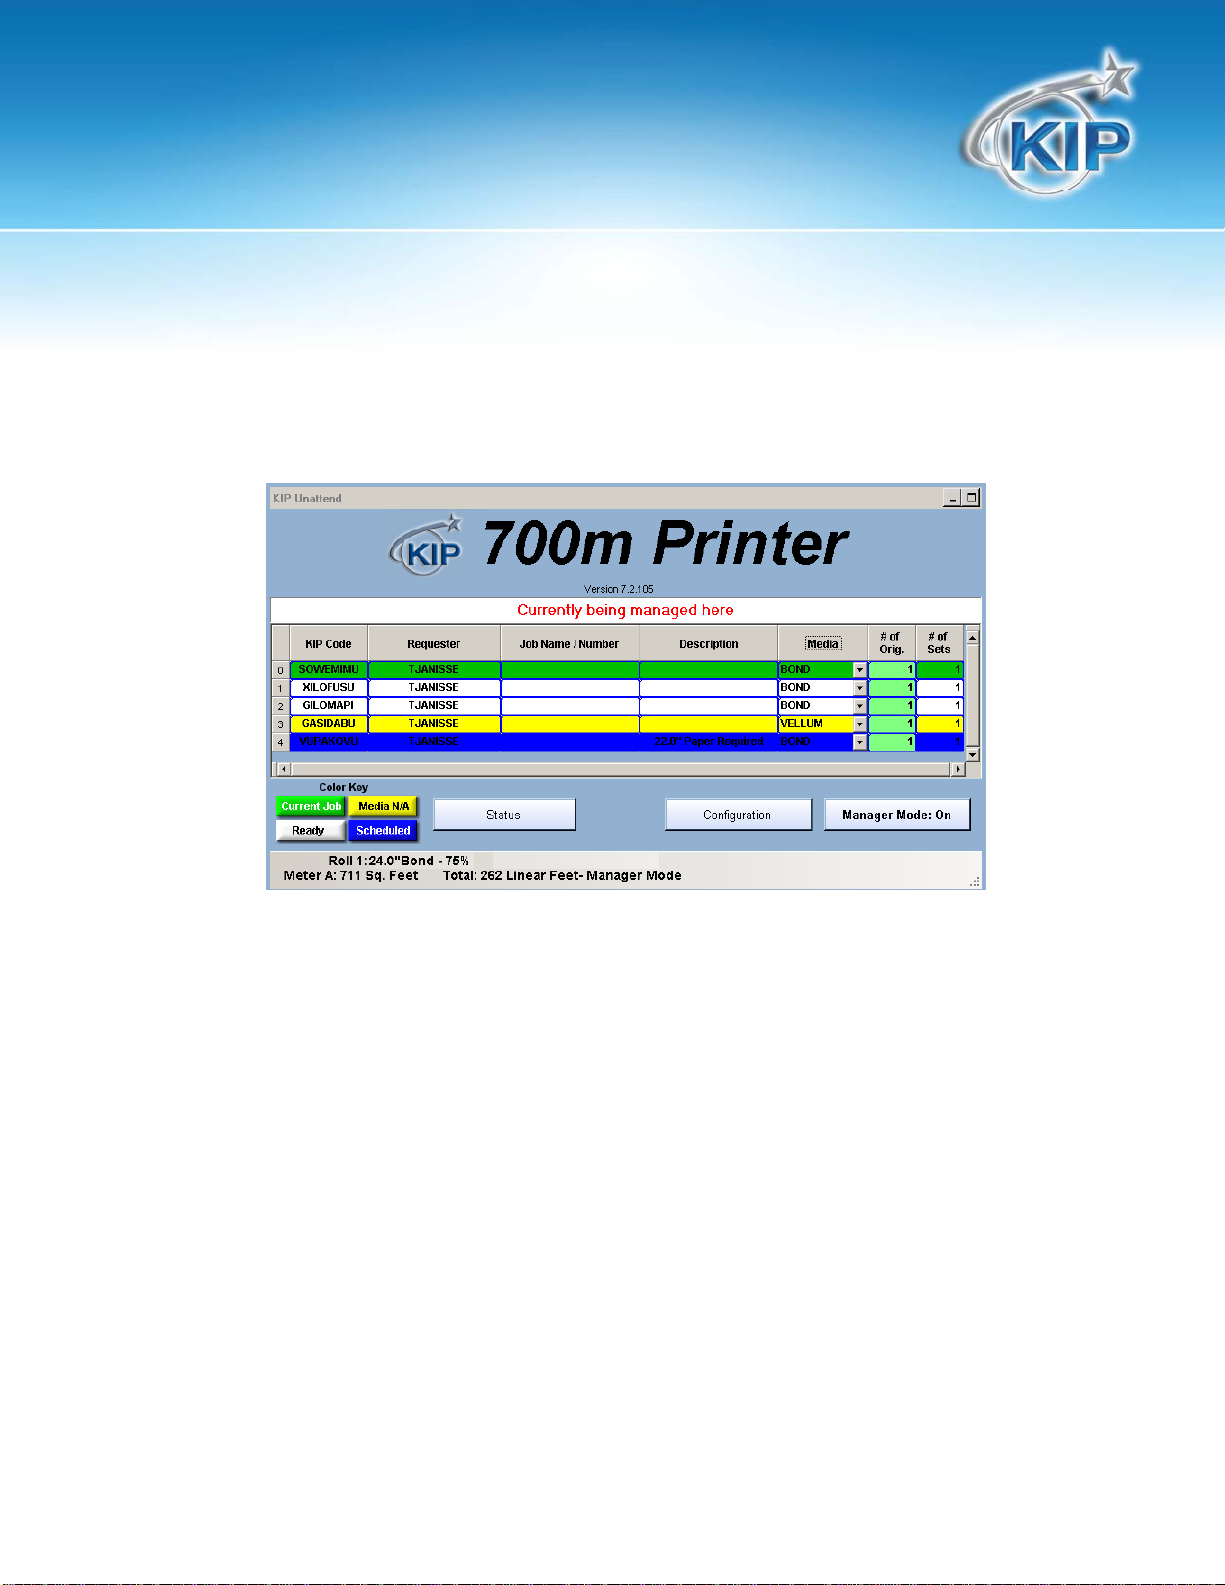
KIP Unattend
The KIP Unattend software is used as the KIP print queue with local print management features. The
model of the KI P Print engine is displayed at the top of the KIP Unattend screen. The print queue of the
requested print jobs or files within the queue is displayed here.
Print Queue
The print queue is divided into columns of information regarding the files in queue. These are:
KIP Code
When files are requested from the KIP Request software, the software helps in identifying the job ticket in
print by generating the KIP code. When files are simply dropped into the monitor path(s) the file name is
displayed in this column.
Requester
User information identifying person or location of the file’s requester. (This information is derive d from the
KIP Request software.)
This information is solely for use of KIP Personnel and KIP Authorized Dealers. No part of this publication may be copied,
reproduced or distributed in any form without express written permission from KIP America, Inc. © 2011 KIP America, Inc.
- 1 -
Page 4

KIP Unattend Operator Guide
Job Name/Number
User information identifying job name/number of the job(s) in print. (This information is derived from the
Request software.)
Description
Additional user information identifying the job(s) in print. (This information is derived from the Request
software.) When files are simply dropped into the monitor path(s) the files path is displayed in this
column. File sent via LPR will show the file name in this field.
Media
This column will show the media type of the job(s) in print. If user(s) have requested a file using the
Request software, the media type requested will be shown.
# of Orig.
This column will show the number of originals of the job(s) in print.
# of Sets
This column will show the number of sets requested of the job(s) in print.
This information is solely for use of KIP Personnel and KIP Authorized Dealers. No part of this publication may be copied,
reproduced or distributed in any form without express written permission from KIP America, Inc. © 2011 KIP America, Inc.
- 2 -
Page 5
KIP Unattend Operator Guide
Color Codes
When jobs are received in the Unattend print queue they will be assigned one of the four different col or
codes, the definition of these four color codes is conveniently displayed in a color key at the bottom left
corner of the KIP Unattend interface.
a) GREEN: This displays the current job being printed.
b) WHITE: This displays a subsequent job in queue, ready for print.
c) YELLOW: This displays the job with a warning that the job requested requires a different media
than what is available in the print engine.
d) BLUE: This displays the job with a wait state: either the controller’s time or time zone setting is not
in synchronization with the computer it was requested from, or the user has requested this job to
be printed at a later time. Jobs that are sent with a specific size (Forced) will show BLUE until the
applicable size media is installed in the printer.
Note: When the # of Originals column shows the number of originals displays green this means that
these files have already been preprocessed and are ready to be printed.
This information is solely for use of KIP Personnel and KIP Authorized Dealers. No part of this publication may be copied,
reproduced or distributed in any form without express written permission from KIP America, Inc. © 2011 KIP America, Inc.
- 3 -
Page 6
KIP Unattend Operator Guide
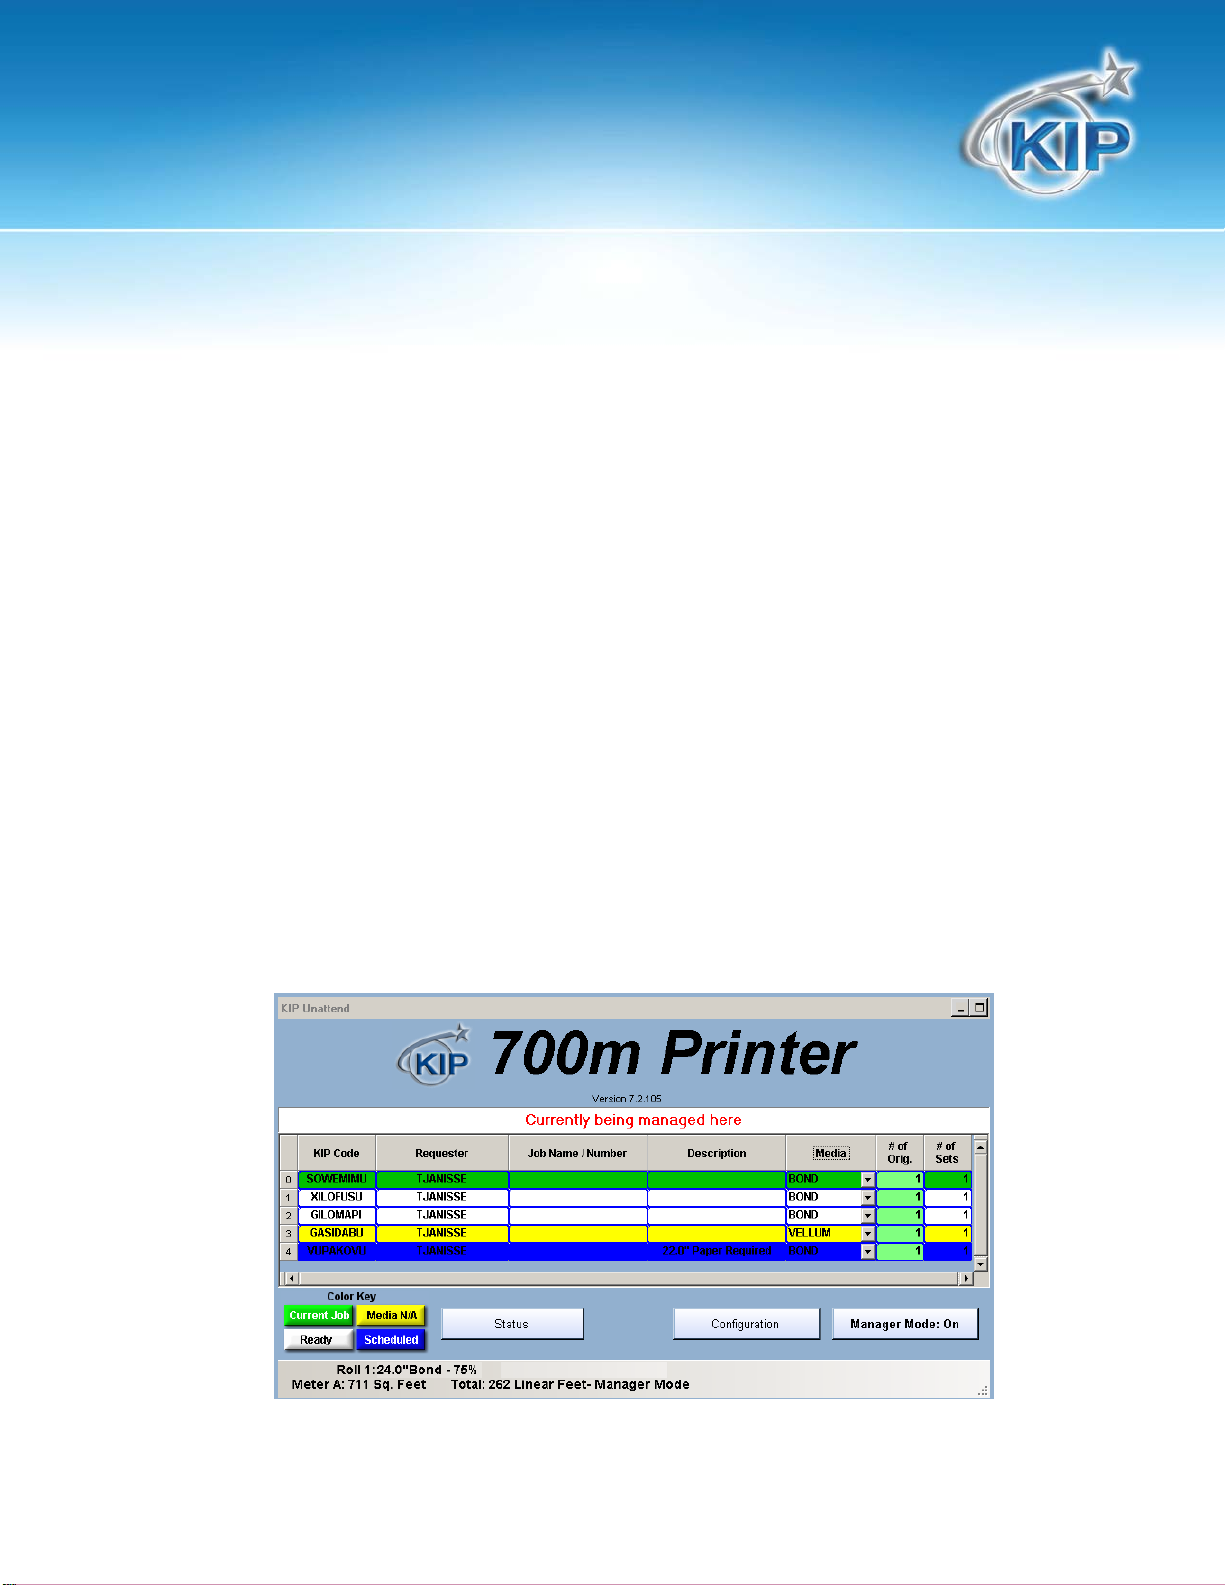
Configuration Menu
The first selection displayed underneath the print queue, the
configuration button will call up a dialog box with six (6) selections,
which are:
Set Monitor Paths
Allows the user to set up to different paths for the KIP Unattend software to monitor for incoming
print jobs.
Request Dir Path
This field contains the path statement KIP Unattend will monitor for print Requests.
‘D:\Monpath1\Request’ is the fir st request path and should not be removed or modified.
This information is solely for use of KIP Personnel and KIP Authorized Dealers. No part of this publication may be copied,
reproduced or distributed in any form without express written permission from KIP America, Inc. © 2011 KIP America, Inc.
- 4 -
Page 7

KIP Unattend Operator Guide
Configure Monitored Directory
Files that are sent to the configured monitored directory
will have the parameters that are defined within the miniRequest as shown to the right. With this, it is possible to
create custom paths that can enlarge / reduce a file,
apply custom pen settings or change the media type. This
is helpful if sending LPR data that has no embedded
information within the printable image.
Monitor Path Selection Arrows
These arrows allow the user to toggle between the monitor paths currently setup on the controller.
Save
Allows the u se r to save monitor pat h s cr e ated in the set monitor path screen.
Cancel
Allows the user to exit the s et monitor path screen and return to the configuration menu.
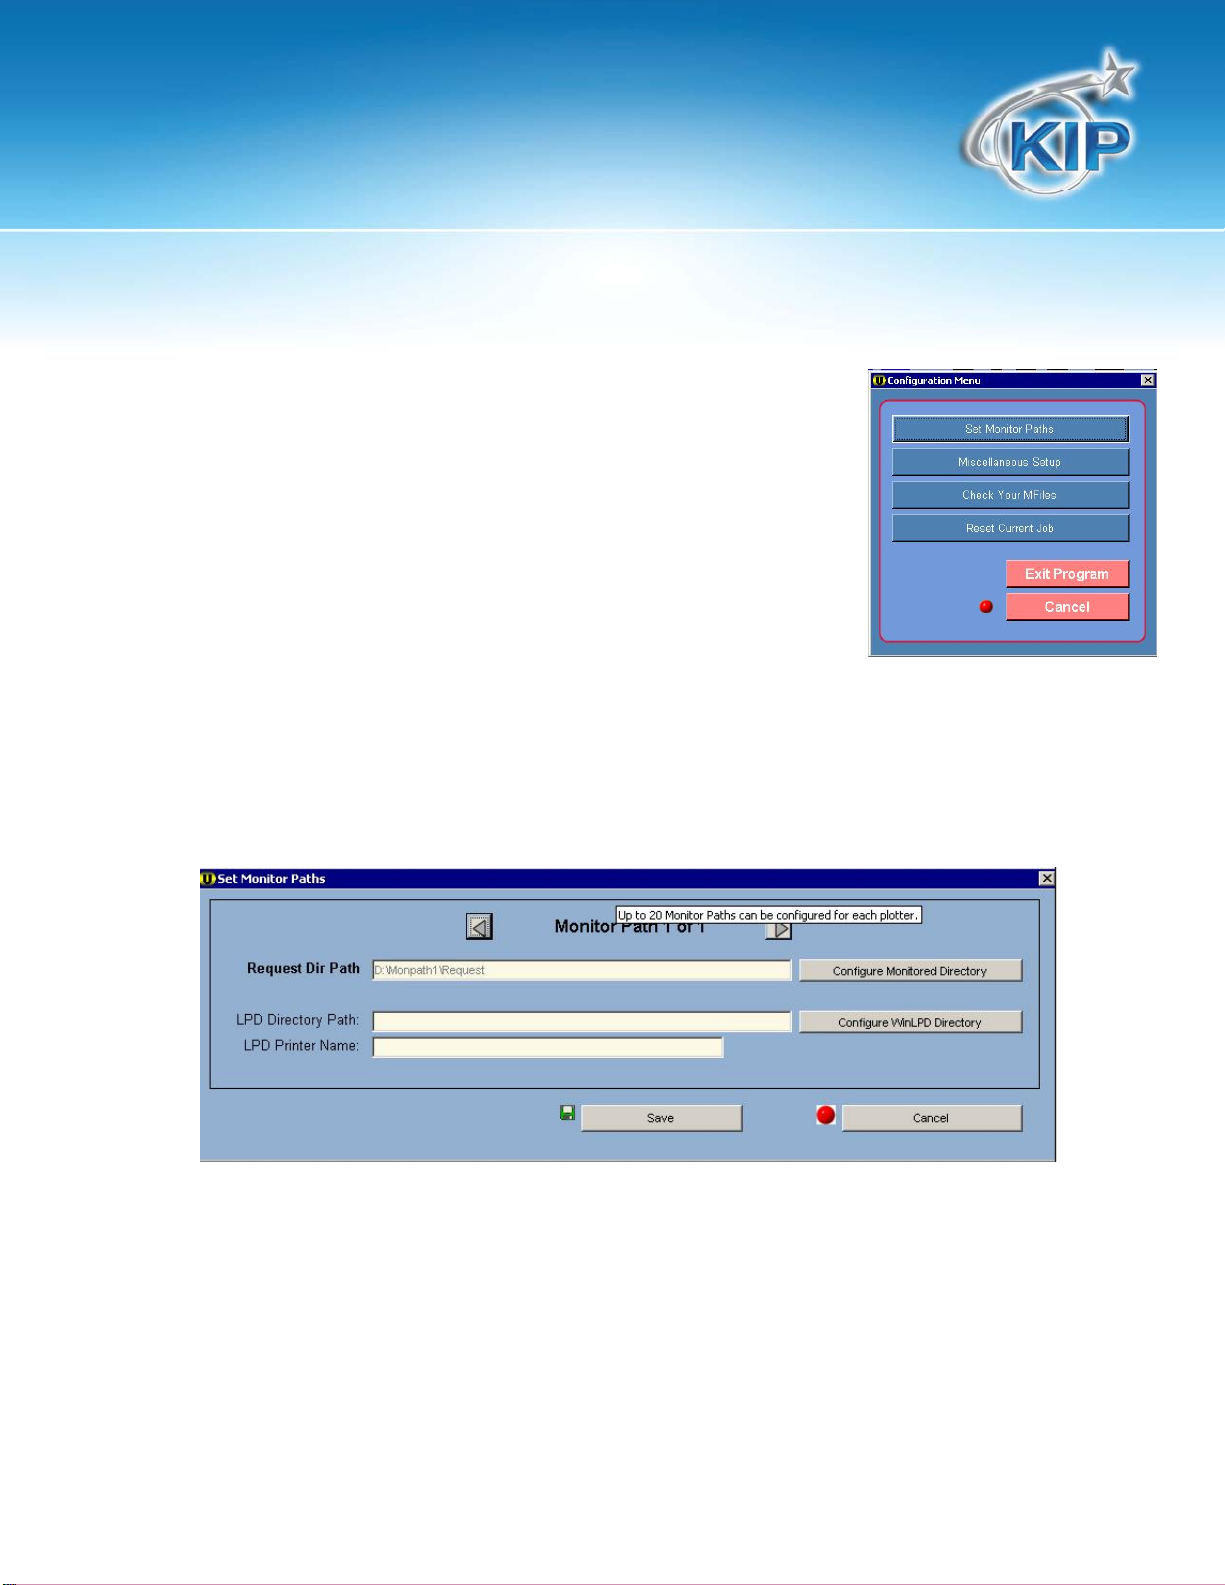
Miscellaneous Setup
Allows the user to set up custom configurations of media defaults, copy density, password protection,
etc. Variables within the miscellaneous configuration include:
This information is solely for use of KIP Personnel and KIP Authorized Dealers. No part of this publication may be copied,
reproduced or distributed in any form without express written permission from KIP America, Inc. © 2011 KIP America, Inc.
- 5 -
Page 8
KIP Unattend Operator Guide
Units
Allows the user to set the controller to read either Eng lish or Metric standards of measurement.
Media Selection
Allows the user to print their documents on the closest size media loaded in the machine, or to the
‘Exact size’ media. If the user has this
option set to exact, the job will not print out
until the correct size media is loaded into
the machine.
Rotation
Rotate for least paper usage will place the
printed image on the smallest roll saving
the most paper.
Rotate for faster printing will rotate the
printed image to allow for least drum
rotation. This may use more paper.
Password
Allows the user to set a password in the Unattend mode, so that no configuration changes can be
made without entering a password. This password is not encrypted.
Copy Density
Allows the u se r to change the amoun t of toner (density) th at is being applied to printed files.
Feeder Size
Specific to the KIP 8000. Users must pre-select the size of the sheets in the sheet feed deck. The
corresponding roll size must not be installed when using the sheet feed.
This information is solely for use of KIP Personnel and KIP Authorized Dealers. No part of this publication may be copied,
reproduced or distributed in any form without express written permission from KIP America, Inc. © 2011 KIP America, Inc.
- 6 -
Page 9
KIP Unattend Operator Guide
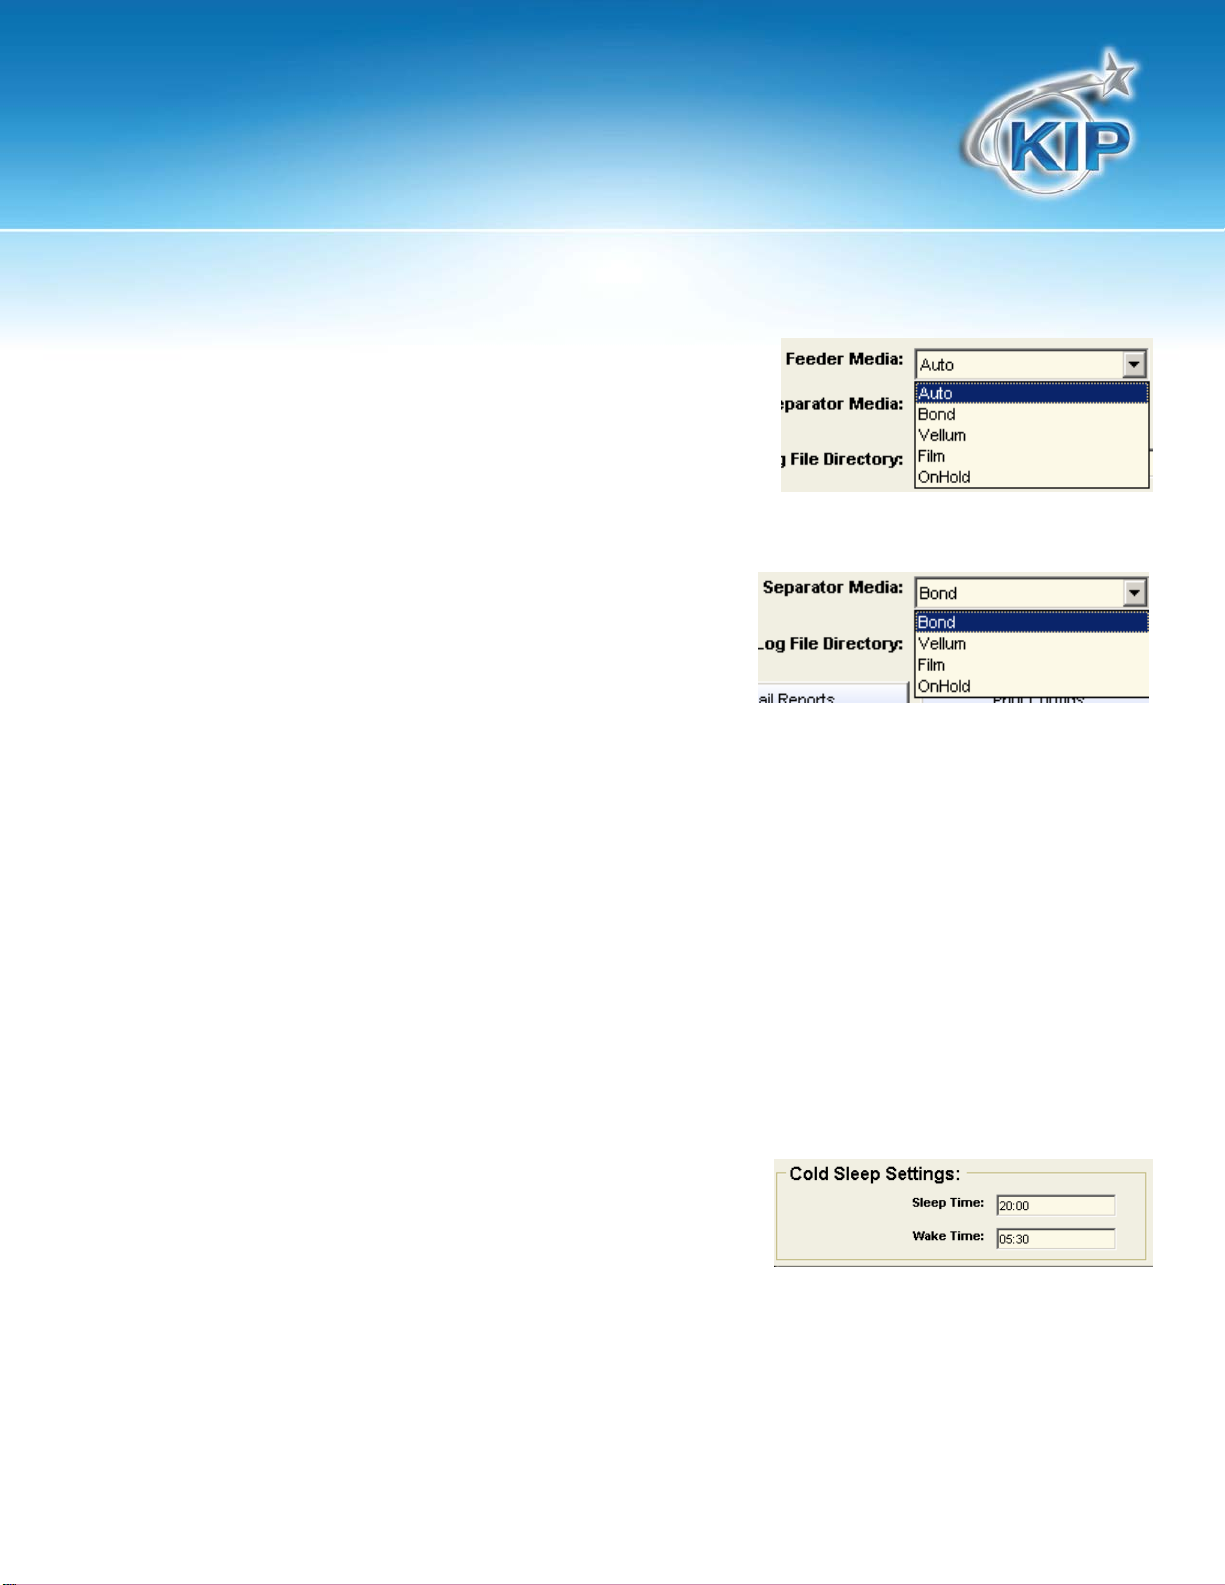
Feeder Media
Type of media (bond, vellum, film, on hold) in the feeder
(Starprint 8000) can be specified here.
Separator Media
Type of media on which the separator sheet should print can
be specified here.
Log file Directory
Allows the user to set a directory in which the Printer status and accounting data should be stored. This
can be input as a UNC path to a server location. Note: The KIP controller must have access to this
location. The default path of c:\monpath1\logdir will continue to receive the print logs.
Print Configs
Allows the user to print all configuration files (.INI files) on the e mbedded controller with the touch of a
button.
Cold Sleep Settings
Sleep time and wake up time are intuitive for power saving.
Users can set up time for sleep when there’s no apparent
printing that’s needed, or can set up time for the printer to
wake up. By default, the printer will start warming back up
anytime a Job / file arrives at a monitored path for printing. It will resume cold sleep 15 minutes later. This
can be set to 24 hour time or 12 hour time. Please check the time zone for proper settings.
This information is solely for use of KIP Personnel and KIP Authorized Dealers. No part of this publication may be copied,
reproduced or distributed in any form without express written permission from KIP America, Inc. © 2011 KIP America, Inc.
- 7 -
Page 10

KIP Unattend Operator Guide
Copy mode delay
Allows the user to adjust the interval (in seconds) the machine will use when interrupting the print queue
for copy mode. It can also be set to zero for infinity and will require a ke y stroke to escape out of Copy
mode. This is not used on HDP printers.
Unattended delay
Allows the user to adjust the time interval (in seconds) in which the KIP Controller will seek the monitor
paths for files to be printed. The default should be set to 2 seconds.
Default DPI
Allows a user to set a conversion DPI if not specified in a submitted file or job ticket.
Print Separator Sheet
Users can choose to print a separator sheet between
each job, or between each set. This feature has been
found to be very useful for users of KIP folding and finishing
systems.
Deck Info
Allows the user to override the media in a specific drawer of the printer, or the print er can be set to
automatically detect the media loaded into a drawer. It is also possible to adjust the winuntd.ini file for
custom paper types, such as BBOND or TRANS. Please see the [PaperTypes] sections of the winuntd.ini
file.
Save
Allows the user to save changes made to the miscellaneous setup.
Cancel
Allows the user to exit the miscellaneous setup screen and return to the configura tion menu.
This information is solely for use of KIP Personnel and KIP Authorized Dealers. No part of this publication may be copied,
reproduced or distributed in any form without express written permission from KIP America, Inc. © 2011 KIP America, Inc.
- 8 -
Page 11
KIP Unattend Operator Guide
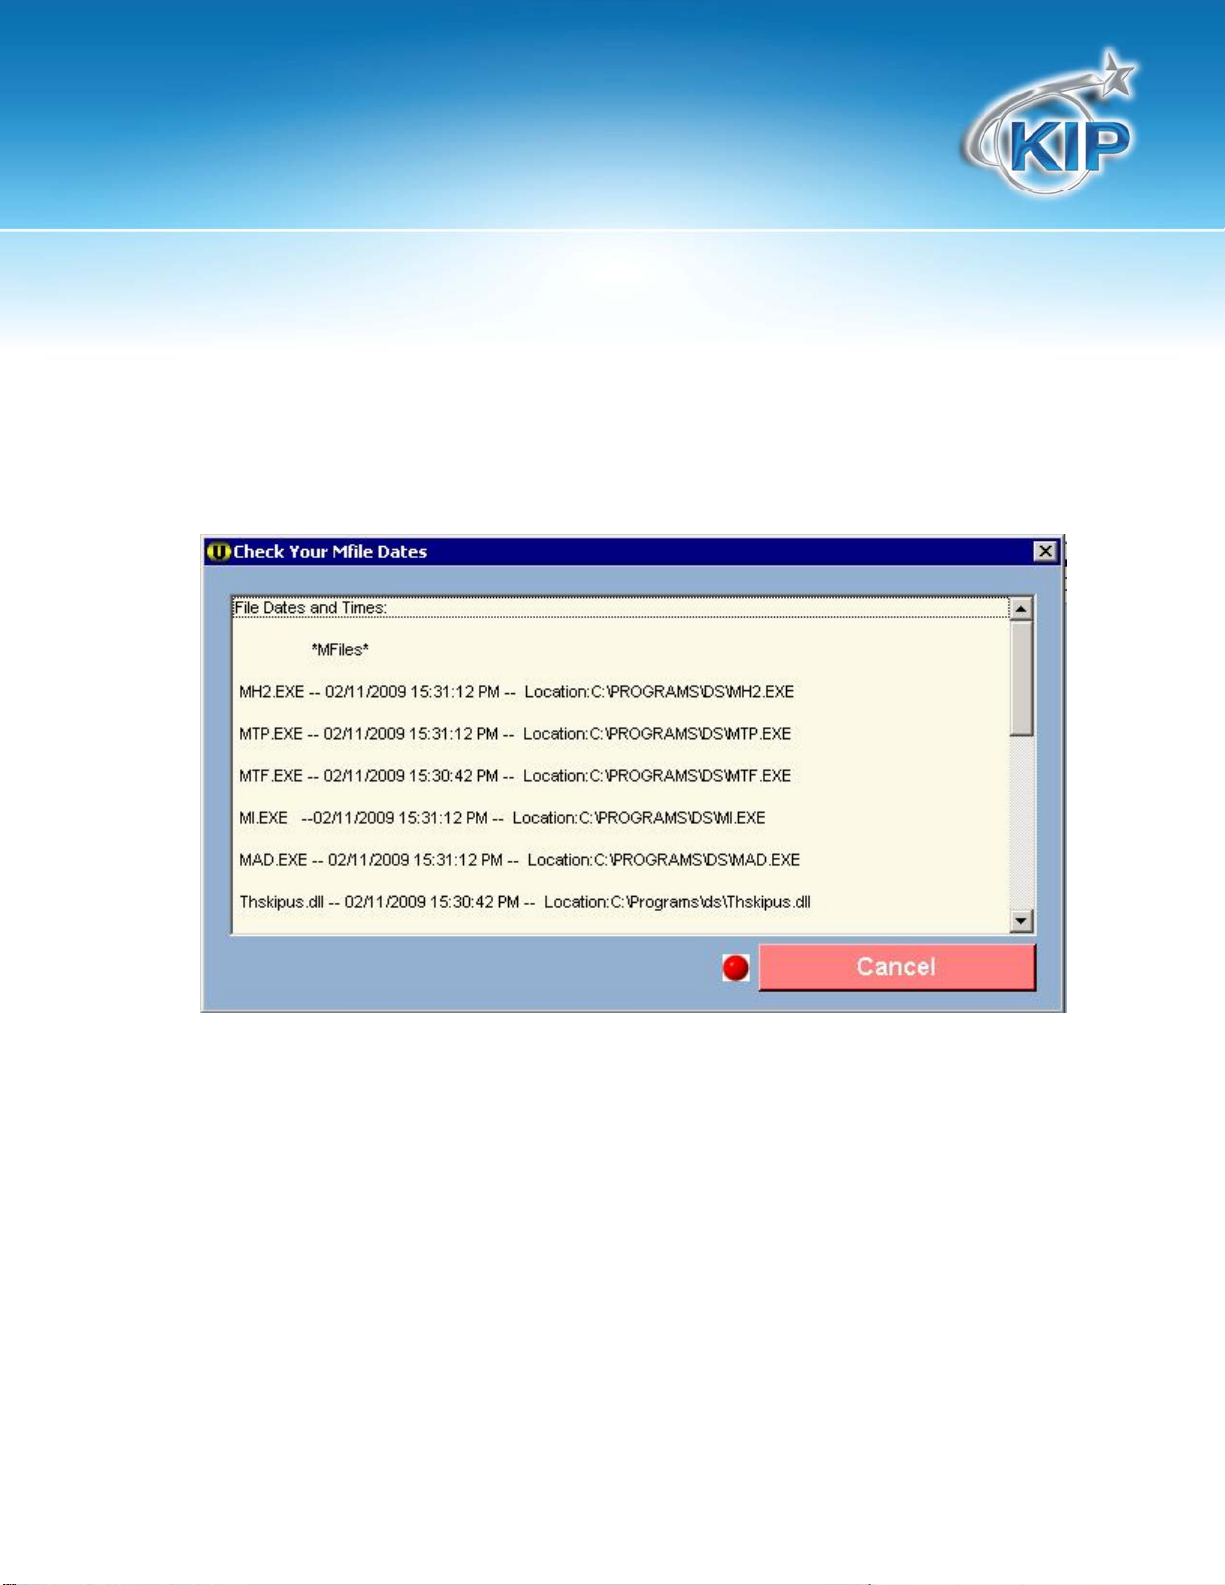
Check Your M-files
The “Check your M-files” button allows a technician to quickly see what conversion files are being used
on the KIP printer. These are the files that are responsible for the conversion of the files sent into a
printable format.
Reset Current Job
Clicking on Reset Current Job will stop any print job that is currently processing on the KIP controller. It
will stop / kill any process (conversion file / M-File) that is running and place the offending print job into a
“problem folder” for later review. This information can then be gathered using the KIP 6.5 Request
software using the Transfer Æ Get Problem Files option. Please see the KIP 6.5 Request documentation
for further information.
Quit Configuration
Allows the user to quit the configuration mode.
This information is solely for use of KIP Personnel and KIP Authorized Dealers. No part of this publication may be copied,
reproduced or distributed in any form without express written permission from KIP America, Inc. © 2011 KIP America, Inc.
- 9 -
Page 12

KIP Unattend Operator Guide
Exit Program
Allows the user to exit Unattend.
Note: Exiting the KIP Unattend will stop all printing. KIP Unattend MUST be opened for printing to occur.
Manager Mode
The Manager Mode button will allow the user the option of manually controlling the print queue.
This information is solely for use of KIP Personnel and KIP Authorized Dealers. No part of this publication may be copied,
reproduced or distributed in any form without express written permission from KIP America, Inc. © 2011 KIP America, Inc.
- 10 -
Page 13

KIP Unattend Operator Guide
Managing the Current Job
By selecting the Manager Mode button, the mouse
cursor will change from an arrow to a crosshair. The
Manager Mode icon will illuminate in Bold and pause all
printing. The operator can manage a print job by
double-clicking the “job count” list along the left side.
The user is given six selections to choose from:
1. Update Copy Count – This will allow the user to update the copy count if more or less copies are
needed.
2. Remove Job- this will allow the user to remove the Job before conversion begins.
3. Pause After Job- this will allow the user to pause Unattend after the current Job in queue is printed.
4. Pause After Set- this will allow the user to pause Unattend after the current set in queue is printed
5. Cancel- this will allow the user to cancel the manager mode.
This information is solely for use of KIP Personnel and KIP Authorized Dealers. No part of this publication may be copied,
reproduced or distributed in any form without express written permission from KIP America, Inc. © 2011 KIP America, Inc.
- 11 -
Page 14

KIP Unattend Operator Guide
Managing Subsequent Jobs
By placing the crosshair over job count on the left side of the screen and double-clicking on subsequent
jobs in the print queue (not job 0 shown in Green) the user is given the ability to manually control the
order, number of sets printed, type of media used and SEND JOB to ANOTHER KIP PRINTER. (For instance,
the job(s) in the queue are printing and you have a job you need printed NOW to another KIP printer.
Double click on the job in the queue you need right away and the Manager Screen will appear with a
number of variables. They are:
1. Remove Job button - this allows the customer to remove the job they have just highlighted from the
print queue
2. Job name - this is the KIP Code information generated by Request. This field is not available for
change.
3. Number of Originals - this is the number of originals requested. This field is not available for change.
4. Format - this is the format information as explained earlier in Section I (The Print Queue) either
“Request”, “Raster” or “Vector”. This field is not available for change.
5. Number of Sets - this is the number of sets requested, this is modifiable in Manager Mode
6. Media - whichever is the type of media requested, this is modifiable in Manager Mode.
This information is solely for use of KIP Personnel and KIP Authorized Dealers. No part of this publication may be copied,
reproduced or distributed in any form without express written permission from KIP America, Inc. © 2011 KIP America, Inc.
- 12 -
Page 15

KIP Unattend Operator Guide
7. Time - this i s the time of the request
8. Requestor - this is Requestor information input in Request
9. Distribution - this is Distribution information input in Request
10. Description - this is Description information input in Request
11. Move Job buttons - these four buttons will allow the customer to move jobs within the queue and
prioritize them. These four buttons are:
• Move to Top - (remember our example? You need a job NOW!). Highlight the job you need by
double clicking it in the queue, click the “Move to Top” button and the job you need will be
moved to the next job in the queue.
• Move Up One - Highlight the job you need by double clicking it in the queue, click the “Move Up
One” button and the job you need will be moved up one position in the queue.
• Move Down One - Highlight the job you need by double clicking it in the queue, click the “Move
Down One” button and the job you need will be moved down one position in the queue.
• Move to Bottom - Highlight the job you need by double clicking it in the queue, click the “Move
to Bottom” button and the job you need will be moved to the bottom position in the queue.
12. Send Job – This allows the user to send jobs from one network configured KIP printer to another
network configured KIP printer. This helps with load sharing in multiunit installations.
By right clicking on a job (current or subsequent) you are offered 5 items to choose from. These are the
same functionality as outlined above. Move job, Schedule, Remove, and Send To. There is also a
selection for changing media. The job list can be modified by clicking and dragging a single job t o any
spot in the list.
Printing to the KIP 9000 Sheet Feed
When Printing to the KIP 9000 sheet feed the tray can hold up to 50 sheets of media (C size or less) for
auto mode pr i nting. If larger than C s i z e me d ia is to be used only one sheet may be loaded at a time.
This information is solely for use of KIP Personnel and KIP Authorized Dealers. No part of this publication may be copied,
reproduced or distributed in any form without express written permission from KIP America, Inc. © 2011 KIP America, Inc.
- 13 -
Page 16

KIP Unattend Operator Guide
KIP 7.2 File Shredding (Overwriting)
KIP 7.2 Software includes the Department of Defense NISPOM specifications to securely delete (overwrite) all
image data after a print, copy or scan job has been completed. KIP7.2 File Shredding (overwriting) processes
and scheduling is configurable using KIP PrintNET.
The KIP PrintNET File Shredding configuration allows administrators or key operators to select one or both of the
following file shredding processes:
1. After each copy, print or scan job, KIP 7.2 software will remove all remnants of file image data.
2. 7.2 Software may also be configured via KIP PrintNET to shred all blank hard disk drive space on a daily,
weekly or monthly basis.
Organizations using file shredding software may wish to use both processes. That is they wish to shred image
data after each print, copy or scan job plus shred blank hard drive space on a daily, weekly or monthly basi s.
The shredding process time can vary depending on the amount of data or empty hard drive space to be
overwritten.
NISPOM (National Industrial Security Program Operating Manual) paragraphs 5-704 and 5-705 set out
requirements for the destruction of classified data that is no longer required. The appropriate file shredding
procedure to be used is based on the classification of sensitivity of the information and the type (size, capacity
and coercivity) of the media.
NISPOM outlines the clearing and sanitizing of data with a matrix. This matrix outlines the method of clearing
and sanitization of hard disk drives (Rigid Disks). In order to comply with NISPOM standards for rigid disks, KIP 7.2
software removes all image data and temporary image data used during the copy, print and scan process.
The KIP three pass file shredding process complies with the NISPOM specification which consists of overwriting all
image data locations with a character, its compliment and a random character. This method ensures that all
image data can no longer be accessed using a data recovery device.
KIP 7.2 File Shredding (Overwriting) Technical Details
Overwriting is a process whereby unclassified data are written to storage locations that previously held sensitive
data. To satisfy the DoD (Department of Defense) clearing requirement, it is sufficient to write any character to
all data locations in question. To purge AIS (Automa ted Information Systems) storage media, the DoD requires
overwriting with a pattern, then its comple ment, and finally with another pattern; e.g., overwrite first with 0011
0101, followed by 1100 1010, then 1001 0111. The number of times an overwrite must be accomplished depends
on the storage media, sometimes on its sensitivity, and sometimes on differing DoD component requirements. In
any case, a purge is not complete until a final overwrite is made using unclassified data.
This information is solely for use of KIP Personnel and KIP Authorized Dealers. No part of this publication may be copied,
reproduced or distributed in any form without express written permission from KIP America, Inc. © 2011 KIP America, Inc.
- 14 -
Page 17

KIP Unattend Operator Guide
KIP Windows Unattend Configuration
WindowsUnattendVersion=7.1.x
The current version of KIP Unattend. The value is automatically entered by the Unattend program.
Primarily used for diagnostic purposes.
Language=1
Current Language being used.
LastLanguage=1
Last Language used.
MachineID=
Machine Serial Number
DealerName=
If Entered in the IPS User Interface this information will show up here also.
DealerNumber=
If Entered in the IPS User Interface this information will show up here also.
MachineType=9900
The defined Printer Model. Choices are listed in the top paragraph. This line is usually modified after a
system re-ghost. An incorrect entry would force Unattend to see incorrect paper roll information, or
none at all.
DisplayPrinterName=9900~9900~4
Allows for customization of the Unattend header displayed on the main screen
Units=METRIC
Defines ENGLISH or METRIC mode.
This information is solely for use of KIP Personnel and KIP Authorized Dealers. No part of this publication may be copied,
reproduced or distributed in any form without express written permission from KIP America, Inc. © 2011 KIP America, Inc.
- 15 -
Page 18

KIP Unattend Operator Guide
Password=
When a password is defined in Unattend, the user must know the password before the program will
allow them into Unattend Manager Mode, or the Configuration menu. Note that the Unattend
password is not encrypted in the winuntd.ini, and offers minimal security.
SCSIScanner=True
Set to Tru e if the printer is attached to a 2050, 2080, 20120, or 2160 SCSI Scanner.
BypassBoard=False
Used With KIP Legacy units.
UnattendedDelay=1
The Interval in which the KIP Queue Vi ew will look for printable files in the designated folder locations.
Used with Unattend 6.5. Unattend 7.1 automatically looks for a job when files are sent to the monitored
locations.
JobReadDelay=30
CopyModeDelay=0
Utilized with KIP Legacy units.
AFolderDelay=0
Folder Delay used for printing smaller (A Size) sheets.
OtherFolderDelay=0
Additional delay for folder
LandscapeFolderDelay=0
Folder Delay used for printing smal ler landscape sheets.
ShutDownDelay=0
SleepWarmDelay=840
Value is a number of seconds. If Unattend does not receive a print within this number of seconds, it
lowers the fuser temperature to a ‘power-save’ state. Value 0 disables Warm Sleep mode.
This information is solely for use of KIP Personnel and KIP Authorized Dealers. No part of this publication may be copied,
reproduced or distributed in any form without express written permission from KIP America, Inc. © 2011 KIP America, Inc.
- 16 -
Page 19

KIP Unattend Operator Guide
SleepColdDelay=5340
Value is a number of seconds. If the engine is in a “Warm Sleep” state, and a print is not received within
this number of seconds, the fuser temperature is lowered even further to room temperature. Value 0
disables Cold Sleep mode.
SleepColdStandBy=False
Puts the KIP IPS into Standby Mode.
ColdStartTime=
The information entered under ‘Windows Unattend – Configuration – Misc settings’ in the screen below is
duplicated in the Winuntd.ini for ColdStartime and ColdStoptime. ColdStartime refers to the time when
the software will s ignal the printer to go into Cold slee p mode. Coldstoptime refers to Wake t ime that
sends the printer to ‘warm up’. Users can normally put the Sleep time at 20:00 (8PM) and Wake time at
06:00 (6AM).
ColdStopTime=
See above
Advanced Sleep=
Feeder5Paper=6
Utilized with the KIP 8000, KIP 9000 & KIP 9900
IdleWait=0
MeterPeriod=
MeterDate=
MeterDay=
MeterTime=
MeterReportDate=12:00:00 AM
This section is used for the Print Reports Setting utilized in KIP PrintNet
This information is solely for use of KIP Personnel and KIP Authorized Dealers. No part of this publication may be copied,
reproduced or distributed in any form without express written permission from KIP America, Inc. © 2011 KIP America, Inc.
- 17 -
Page 20

KIP Unattend Operator Guide
CurrentLogPath=C:\MONPATH1\LOGDIR
Normally selected in Unattend’s CONFIG/MISC menu, this is the defined path that Unattend uses to
write its Log and Roll information. Unattend creates an ASCII-based print log using the naming
convention MonthYear.l og (i.e. Jan03.log). It also writes roll information files (rollinfo.dat) to this location.
This path can be defined to point to another
computer on the network, but the KIP Controller will need rights in order to create and modify files on
another computer.
LogFileName=
Some users prefer their own naming structure instead of the MonthYear.log format that Unattend uses to
write the print log. User can define another filename and extension (i.e. printlog.txt). This file will be
written in the Current Log Path as defined in the CurrentLogPath= line. The new Log File does not create
a new file every month, but appends a single file. Note that the MonthYear.log file is still written in
addition to the custom Log Filename.
TempDir=C:\TU
The Directory location where all conversion of files takes p lace.
LPDSpoolDirectory=
EnhancedWinLPDRead=F
HistoryGB=0
The amount of hard drive space designated for the storing of History Jobs.
MinDoneFileSize=1
MinCutLength=8.5
Allows the technician to set the minimum number of inches for the cut length that will be produced by
the controller when printing. Especially helpful for printing longer Trim Sheets or Error Pages, that may
jam the printer when the curl of the media causes problems. (Suggested MINCUTLENGTH=17)
DefaultMedia=Bond
SepMedia=BOND
LastPen=C:\PROGRAM FILES\KIP\REQUEST\PENS\DEFAULT.PEN
The last pen table used for printing.
This information is solely for use of KIP Personnel and KIP Authorized Dealers. No part of this publication may be copied,
reproduced or distributed in any form without express written permission from KIP America, Inc. © 2011 KIP America, Inc.
- 18 -
Page 21

KIP Unattend Operator Guide
DefaultDPI=0
Rarely changed (0 by default) when set to 0 this tells the KIP to read and use the dpi of the file as it was
sent.
PrinterDPI=600
DPI capability of the KIP Unit.
SwitchSelect=4
TextPos=0
TextSize=.1
ExtraGap=0
AmountCutOff=500
If the original being printed exceeds the Maximum print width this setting will strip pixels off of the sides.
AddHpglCmd=-: 6
Switches may be added to this location to assist with specific printing requirements (contact KIP for
assistance).
AddRasterCmd=
Switches may be added to this location to assist with specific printing requirements (contact KIP for
assistance).
AddPrintCmd=
Switches may be added to this location to assist with specific printing requirements (contact KIP for
assistance).
AddOutputCmd=-j 75
Switches may be added to this location to assist with specific printing requirements (contact KIP for
assistance).
AddCGMCmd=
Switches may be added to this location to assist with specific printing requirements (contact KIP for
assistance).
This information is solely for use of KIP Personnel and KIP Authorized Dealers. No part of this publication may be copied,
reproduced or distributed in any form without express written permission from KIP America, Inc. © 2011 KIP America, Inc.
- 19 -
Page 22

KIP Unattend Operator Guide
AddDWFCmd=-lt 6
Switches may be added to this location to assist with specific printing requirements (contact KIP for
assistance).
AddPSCmd=-dNOTRANSPARANCY
Switches may be added to this location to assist with specific printing requirements (contact KIP for
assistance).
LeadingSpace=0
IgnoreExt=
CopyDensity=2
CyanCopyDensity=0
Utilized with the KIP KC80 Printer.
MagentaCopyDensity=0
Utilized with the KIP KC80 Printer.
YellowCopyDensity=0
Utilized with the KIP KC80 Printer.
MaximumRollSize=36.75
Allows the technician to set the Maximum Roll size the printer will utilize. This can be set a bit larger to
allow off size files to print.
FoldBypass=01
This sets the Folder Bypass to either on (1) or off (0) this is set in KIP PrintNet.
DefaultFileType=V
DefaultJamCopies=2
Value is a number of prints. If a jam occurs, and if Internal Controller=False, Unattend displays a popup
window asking how many copies to reprint. This value is the default number, unless the user changes it. If
Internal Controller=True, the program uses the ReprintJamInches= value to automatically reprint copies.
ReprintJamInches=24
Sets the amount of inches the printer will go back and print after a Jam.
This information is solely for use of KIP Personnel and KIP Authorized Dealers. No part of this publication may be copied,
reproduced or distributed in any form without express written permission from KIP America, Inc. © 2011 KIP America, Inc.
- 20 -
Page 23

KIP Unattend Operator Guide
DelayBetweenSets=0
MaxImageSize=600
Sets the Max imum Print length of the KIP (in inches)
WireCleanTime=12:00
Value is in military time. A Wire Cleaning will be performed every day on the engine at this defined time,
based on the computer clock.
WireCleanAmount=0
Value is a linear feet total. Once FeetSinceWireClean= counts up to this total, a Wire Cleaning will be
performed, in addition to the time established in WireCleanTime=. Automatic wire cleaning is only
available on certain printer models. Other models sh ould have this feature disabled by changing the
value to 0.
FeetSinceWireClean=166.5468
Value is a counter that keeps track of the number of linear feet printed since the last Wire Cleaning.
Once the WireCleanAmount= is reached, a Wire Cleaning will be performed at the time defined in
WireCleanTime=.
RasterMultiplier=1
This value will be multiplied by the –G value in Request Job Tickets or in the
AddHpglCmd= line, whichever applies. It is used to darken the grayscale level of light HP-RTL data.
KipNumberOfRolls=0
KeyCode=
BackupConfigFile=C:\Program Files\KIP\Unattend\WinUntd.Ini-Bak
SCPFilterDir=C:\SCP\Db
JISTolerance=0
Japanese Image Standard, this is a tolerance that will match non-standard sizes and print them to
Japanese Image Standard sizes.
UseKipFinishResponse=True
ExternalJamReprint=False
WaitASCIIJobs=False
IgnoreKeyCardError=True
KipStatDelay=False
AutoTrimPaper=False
This information is solely for use of KIP Personnel and KIP Authorized Dealers. No part of this publication may be copied,
reproduced or distributed in any form without express written permission from KIP America, Inc. © 2011 KIP America, Inc.
- 21 -
Page 24

KIP Unattend Operator Guide
When set to True, Unatte nd will automatically cut a trim sheet from a new roll once it is inserted.
PreloadPaper=True
MultPlotCopies=True
UseRigoliFold=False
When set to True, Unatte nd will attempt communication with a Rigoli Folder.
IgnoreFoldPresets=False
UseKipFold=False
When set to True, Unattend will attempt communication with a KIP Folder.
UseEsteFold=False
When set to True, Unatte nd will attempt communication with a Este Folder.
UseKipFold500=False
When set to True, Unattend assumes a KIP 500 Fan Folder is present. This statement is not dependent
upon UseKipFold (stated above)
InternalController=True
PrintSeparatorSheetJob=False
PrintSeparatorSheetSet=False
FoldSeparatorSheet=True
ScaleSeparatorSheet=True
ReverseMultipageRaster=False
PrintLocalSeparator=False
When set to True, and if PrintSeparaterSheet=True, the Separator Sheet will print to the KIP Controller’s
default Windows printer instead of the KIP Printer engine.
NewInterface=False
DontEmailErrors=False
CalcompParams=True
ForceTextOn=False
TextOn=False
DontPrintMultipleRaster=False
KeepMultipleSets=True
HardwareConnect=False
Rarely altered. Only set to False if Unattend is being used in Demo mode, or diagnostic mode.
This information is solely for use of KIP Personnel and KIP Authorized Dealers. No part of this publication may be copied,
reproduced or distributed in any form without express written permission from KIP America, Inc. © 2011 KIP America, Inc.
- 22 -
Page 25

KIP Unattend Operator Guide
MCC8BoardTest=False
IgnoreTime=True
When set to False, Unattend sorts jobs by the times created within the Job Ticket. But since these Job
Tickets are created on the user workstations and copied to the KIP Controller, this can lead to jobs being
scheduled for moments or hours later, if the workstation clocks (and workstation Time Zones) are not
synchronized with the KIP Controller. When set to True, IgnoreTime= simply prints the jobs in the order
they were received by Unattend, ignoring any perceived ‘scheduled’ times.
ReprintMultiple=True
KipCopier=False
MultiPagePDF=True
ReverseCGM=False
RedPrinter=False
StampInRed=False
HeaderInRed=False
PowerScriptInstalled=True
Used to define a method of PDF file conversion. In previous versions of KIP, more than one PDF
conversion option was available, and this legacy setting was used to enable PowerScript. In KIP 5,
Powerscript is the only available conversion option. This setting should be set to True even if the
Powerscript Hardware Key has not been attached.
LPDDisplay=True
ViewOutput=True
Used in troubleshooting. If HardwareConnect=False, then Unattend is running in demo mode.
ViewOutput= determines whether a job sent to Unattend ‘prints to screen’, or simply disappears from
the queue.
QuickView=True
Determines if quickview will be used to display output, else ultraview
OutputPaperSquareFootage=True
Will use paper dimensions when set to true to calculate print logging information. Will use image
dimension to calculate print logging information when set to False
This information is solely for use of KIP Personnel and KIP Authorized Dealers. No part of this publication may be copied,
reproduced or distributed in any form without express written permission from KIP America, Inc. © 2011 KIP America, Inc.
- 23 -
Page 26

KIP Unattend Operator Guide
PreconvertSets=False
Must be set to True for Starprint 1020 printers. Can be set to true for other printers if the controller has
trouble printing at full speed during the first collated set. When set to True, the controller will pre-convert
the complete set of images before any printing takes place. This allows the printer to work at full speed
during the first collated set of printing.
CheckHardwareLockMultiple=False
When set to True will check for KIP Online and/or Powerscript 3 hardware lock multiple times before
rejection.
DontCheckHardwareLock=False
When set to Tru e t h i s wi ll tell the printer not to look for a Hardware lock.
AlwaysUseConfiguredMedia=False
When set to True, will use a configured path setting for Media Type when KIPJL based plot files are
presented to KIP0 via LPR or port copy. When set to False, will use KIPJL based media call.
RotateToSavePaper=False
DontUseCalcompData=False
ReadStatusFile=True
JISStandardCut=False
This will turn on (1) or turn off (0) the use of Japanese Image Standard
RightJustifyFolds=False
AbacusEnabled=True
If Abacus is being used this will be set to True
PrintDriverUnifiedAccounting=False
Turns on the Unified Accounting for the KIP Windows Driver. This can also be turned on through KIP
PrintNet.
WaitForceSize=False
If True will hold a force size job in the queu e when media runs out allowing other jobs to print.
DisableFoldReprints=False
IgnoreHDIBorders=False
Ignores existing borders that are on by defaul from within AutoCAD.
This information is solely for use of KIP Personnel and KIP Authorized Dealers. No part of this publication may be copied,
reproduced or distributed in any form without express written permission from KIP America, Inc. © 2011 KIP America, Inc.
- 24 -
Page 27

KIP Unattend Operator Guide
CardReaderEnabled=False
True enables the use of a card reader; False disable the use of a card reader. Used in Europe.
MultiSheetFeederEnabled=False
Used in conjunction with a feeder drawer on the KIP 700M and 7100 systems.
Embedded=True
MultiThreadPDF=True
Uses the multithread (Dual Core) capabilities of the IPS for processing multi-page pdf files.
ExpandedMagenta=False
Used in conjunction with the KIP KC80
FolderPort=0
Used when connecting a KIP Controller to a Folding Unit. Value is a Com Port (serial port) number.
Correct number will depend on the unique configuration and the number of serial ports on the KIP
Controller. Controllers not connected to a Folding Unit should use a value of 0.
SerialDisplayPort=-1
Used when connecting an internal KIP Controller to an LCD Display Window on KIP 4000 and 5000
models. Value is a Com Port (serial port) number. Correct number will depend on the unique
configuration and the number of serial ports on the KIP Controller. Also, InternalController= must be set
to True, and the Unattend program must be running, for the LCD Display to function. Controllers not
connected to an LCD Display should use a value of -1.
FormTop=1170
FormLeft=6165
FormHeight=11085
FormWidth=14625
FormState=0
ShowColorKey=TRUE
Debug=-1
Used for diagnostic purposes only
PrintExe=C:\PROGRAMS\KIPPRNT.EXE
This information is solely for use of KIP Personnel and KIP Authorized Dealers. No part of this publication may be copied,
reproduced or distributed in any form without express written permission from KIP America, Inc. © 2011 KIP America, Inc.
- 25 -
Page 28

KIP Unattend Operator Guide
StatusExe=C:\PROGRAMS\KIPSTAT.EXE
VectorInExe=C:\PROGRAMS\DS\MH2.EXE
RasterInExe=C:\PROGRAMS\DS\MTF.EXE
TlcPrintExe=C:\PROGRAMS\DS\MTP.EXE
ViewExe=
TiffViewExe=
QuickViewExe=C:\PROGRAM FILES\KIP\REQUEST\QV.EXE
RequestExe=C:\PROGRAM FILES\KIP\REQUEST\WINREQ.EXE
MergeExe=C:\PROGRAMS\DS\MI.EXE
ColorExe=C:\SCP\KC80_COLOR_ENGINE.EXE
AutoRecognizeExe=C:\PROGRAMS\DS\MAD.EXE
PowerScriptExe=C:\PROGRAMS\DS\PSCRIPT.EXE
NestImageExe=C:\PROGRAMS\MPACK.EXE
KipPortExe=C:\PROGRAMS\KAWPDFT.EXE
DWFExe=C:\PROGRAMS\DS\DWFCONVERT.EXE
BlankPrint=C:\PROGRAMS\TRIMSHT.TLC
ExternalCommandLine=
ExternalDirectory=
[PDFDefaults]
UseImageSize=True
PDFImageSizeX=0
PDFImageSizeY=0
ReverseOrder=False
EnhancedColor=False
PSUsePageSize=True
The above lines refer to default handling of PDF/PS documents if presented through KIP0 using Port
based transfer methods. If using the 6.5 KIP Windows Printer driver, PSUsePageSize must be set to True.
[RasterScaling]
RasterThreshold1=0
RasterThreshold2=0
RasterSetting1=
RasterSetting2=
RasterSetting3=
Added Enhancements to full and half Size Printing of Raster Data – designed to improve full and half size
printing of heavy Raster data. The INI settings allow the technician to specify at what “Raster Density”
the KIP software applies a Dither Pattern and Density Setting. This is very similar to applying a Dither
Pattern and Density Setting to RTL data, but this now applies for Raster Data.
Here’s how the features work:
This information is solely for use of KIP Personnel and KIP Authorized Dealers. No part of this publication may be copied,
reproduced or distributed in any form without express written permission from KIP America, Inc. © 2011 KIP America, Inc.
- 26 -
Page 29

KIP Unattend Operator Guide
a. Below RasterThreshold1, it is best to apply a no setting command, (EG:
RasterSetting1=“blank”). Leave blank. Most “line” images fall under 2.8, these don’t need
any further settings.
b. Between RasterThreshold1 and RasterThreshold2; RasterSetting2 will be used.
c. Above RasterThreshold2; RasterSetting3 will be used.
Switches
These five switches must be used i n conjunction with each other .
Z - Photo Mode ON
W 100 - Raster Density, lower numbers will “ li ghten” data.
u 0 - Raster Dither Pattern, values include 0,4,6, or 8. Same as RTL Density values. These two switches must
be used in conjunction with each other and BOTH must be used together.
q 1 – utilizes a “random” dither pattern, better for non-continuous tone images.
W 75 - Raster Density, lower numbers will “lighten” data.
[FoldPresets2.0]
ESizePortraitPreset=6
ESizeLandscapePreset=6
E2SizePortraitPreset=2
E2SizeLandscapePreset=2
E3SizePortraitPreset=2
E3SizeLandscapePreset=2
DSizePortraitPreset=6
DSizeLandscapePreset=6
D2SizePortraitPreset=2
D2SizeLandscapePreset=2
CSizePortraitPreset=2
CSizeLandscapePreset=2
C2SizePortraitPreset=2
C2SizeLandscapePreset=2
C3SizePortraitPreset=2
C3SizeLandscapePreset=2
BSizePortraitPreset=2
BSizeLandscapePreset=2
B2SizePortraitPreset=2
B2SizeLandscapePreset=2
ASizePortraitPreset=2
ASizeLandscapePreset=2
[MetricFoldPresets]
A0SizePortraitPreset=27
This information is solely for use of KIP Personnel and KIP Authorized Dealers. No part of this publication may be copied,
reproduced or distributed in any form without express written permission from KIP America, Inc. © 2011 KIP America, Inc.
- 27 -
Page 30

KIP Unattend Operator Guide
A0SizeLandscapePreset=27
A02SizePortraitPreset=27
A02SizeLandscapePreset=27
A1SizePortraitPreset=28
A1SizeLandscapePreset=28
A12SizePortraitPreset=28
A12SizeLandscapePreset=28
A2SizePortraitPreset=29
A2SizeLandscapePreset=29
A3SizePortraitPreset=30
A3SizeLandscapePreset=30
A4SizePortraitPreset=31
A4SizeLandscapePreset=31
[PaperSettings]
Roll1Paper=Auto
Roll2Paper=Auto
Roll3Paper=Auto
Roll4Paper=Auto
Roll5Paper=Auto
[FolderPaperSettings3.0]
FolderPaperSizeE=36
FolderPaperSizeE2=34
FolderPaperSizeE3=30
FolderPaperSizeD=24
FolderPaperSizeD2=22
FolderPaperSizeC=18
FolderPaperSizeC2=17
FolderPaperSizeC3=15
FolderPaperSizeB=12
FolderPaperSizeB2=11
FolderPaperSizeA=11
FolderPaperSizeDPortrait=24
FolderPaperSizeD2Portrait=22
FolderPaperSizeCPortrait=18
FolderPaperSizeC2Portrait=17
FolderPaperSizeC3Portrait=15
FolderPaperSizeBPortrait=12
FolderPaperSizeB2Portrait=11
FolderRotationSizeEPortrait=0
FolderRotationSizeE2Portrait=0
FolderRotationSizeE3Portrait=0
FolderRotationSizeDPortrait=0
FolderRotationSizeD2Portrait=0
FolderRotationSizeCPortrait=0
FolderRotationSizeC2Portrait=0
FolderRotationSizeC3Portrait=0
This information is solely for use of KIP Personnel and KIP Authorized Dealers. No part of this publication may be copied,
reproduced or distributed in any form without express written permission from KIP America, Inc. © 2011 KIP America, Inc.
- 28 -
Page 31

KIP Unattend Operator Guide
FolderRotationSizeBPortrait=0
FolderRotationSizeB2Portrait=0
FolderRotationSizeAPortrait=0
FolderRotationSizeELandscape=3
FolderRotationSizeE2Landscape=3
FolderRotationSizeE3Landscape=3
FolderRotationSizeDLandscape=3
FolderRotationSizeD2Landscape=3
FolderRotationSizeCLandscape=3
FolderRotationSizeC2Landscape=3
FolderRotationSizeC3Landscape=3
FolderRotationSizeBLandscape=3
FolderRotationSizeB2Landscape=3
FolderRotationSizeALandscape=3
ESizeWidthMax=1500
ESizeWidthMin=47.5
ESizeLengthMax=36.5
ESizeLengthMin=35.5
E2SizeWidthMax=1500
E2SizeWidthMin=43.5
E2SizeLengthMax=34.5
E2SizeLengthMin=32.5
E3SizeWidthMax=1500
E3SizeWidthMin=41
E3SizeLengthMax=30.5
E3SizeLengthMin=29.5
DSizeWidthMax=1500
DSizeWidthMin=35.5
DSizeLengthMax=24.5
DSizeLengthMin=23.5
D2SizeWidthMax=1500
D2SizeWidthMin=33.5
D2SizeLengthMax=22.5
D2SizeLengthMin=21.5
CSizeWidthMax=1500
CSizeWidthMin=23.5
CSizeLengthMax=18.5
CSizeLengthMin=17.5
C2SizeWidthMax=1500
C2SizeWidthMin=21.5
C2SizeLengthMax=17.5
C2SizeLengthMin=16.5
C3SizeWidthMax=1500
C3SizeWidthMin=20.5
C3SizeLengthMax=15.5
C3SizeLengthMin=14.5
BSizeWidthMax=1500
BSizeWidthMin=17.5
This information is solely for use of KIP Personnel and KIP Authorized Dealers. No part of this publication may be copied,
reproduced or distributed in any form without express written permission from KIP America, Inc. © 2011 KIP America, Inc.
- 29 -
Page 32

KIP Unattend Operator Guide
BSizeLengthMax=12.5
BSizeLengthMin=11.5
B2SizeWidthMax=1500
B2SizeWidthMin=16.5
B2SizeLengthMax=11.5
B2SizeLengthMin=10.5
ASizeWidthMax=1500
ASizeWidthMin=10.5
ASizeLengthMax=9.5
ASizeLengthMin=7.5
[MetricFolderPaperSettings]
FolderPaperSizeA0=841
FolderPaperSizeA02=0
FolderPaperSizeA1=594
FolderPaperSizeA12=0
FolderPaperSizeA2=420
FolderPaperSizeA3=297
FolderRotationSizeA0Portrait=0
FolderRotationSizeA02Portrait=0
FolderRotationSizeA1Portrait=0
FolderRotationSizeA12Portrait=0
FolderRotationSizeA2Portrait=0
FolderRotationSizeA3Portrait=0
FolderRotationSizeA4Portrait=0
FolderRotationSizeA0Landscape=1
FolderRotationSizeA02Landscape=1
FolderRotationSizeA1Landscape=1
FolderRotationSizeA12Landscape=1
FolderRotationSizeA2Landscape=1
FolderRotationSizeA3Landscape=1
FolderRotationSizeA4Landscape=2
A0SizeWidthMax=6000
A0SizeWidthMin=1170
A0SizeLengthMax=864
A0SizeLengthMin=812
A02SizeWidthMax=0
A02SizeWidthMin=0
A02SizeLengthMax=0
A02SizeLengthMin=0
A1SizeWidthMax=6000
A1SizeWidthMin=812
A1SizeLengthMax=625
A1SizeLengthMin=560
A12SizeWidthMax=0
A12SizeWidthMin=0
A12SizeLengthMax=0
A12SizeLengthMin=0
This information is solely for use of KIP Personnel and KIP Authorized Dealers. No part of this publication may be copied,
reproduced or distributed in any form without express written permission from KIP America, Inc. © 2011 KIP America, Inc.
- 30 -
Page 33

KIP Unattend Operator Guide
A2SizeWidthMax=6000
A2SizeWidthMin=550
A2SizeLengthMax=440
A2SizeLengthMin=400
A3SizeWidthMax=6000
A3SizeWidthMin=400
A3SizeLengthMax=320
A3SizeLengthMin=270
A4SizeWidthMax=6000
A4SizeWidthMin=270
A4SizeLengthMax=220
A4SizeLengthMin=200
[MonitorPaths]
RasterMonitorPath1=
VectorMonitorPath1=
RequestMonitorPath1=C:\Monpath1\Request
[WinLpd]
WinLpdMonitorPath1=
WinLpdName1=
[PriorityPaths]
PriorityRequestPath=C:\MonPath1\PRequest
This defined path is used only for jobs coming from KIP Scan’s or KIP CopyMaker’s “Concurrent Print”
mode. When “Concurrent Print” is enabled, the Scan program places a file called prequest.kip in the
root of the Monpath1 folder. When Unattend sees t h is file, it pauses the normal print queue, and displays
the message “Priority Plots – Idle.” “Concurrent Print” then sends jobs via this defined folder. Unattend
gives priority to these jobs, and remains in this mode until “Concurrent Print” is disabled in the Scan
/CopyMaker program.
[CopyDensityValues]
Dark=12
MediumDark=10
Medium=8
MediumLight=6
Light=5
Printer strobe-timing values. Numbers vary per printer model. Smaller numbers lay down less toner. If
these values are set too high, Unattend will appear to convert the file, but then it will disappear from the
queue. For HDP models (2000, 6000, 7000, 8000), this value cannot exceed 48. For KIP 3000 models, these
This information is solely for use of KIP Personnel and KIP Authorized Dealers. No part of this publication may be copied,
reproduced or distributed in any form without express written permission from KIP America, Inc. © 2011 KIP America, Inc.
- 31 -
Page 34

KIP Unattend Operator Guide
values cannot exceed 13. These values are usually matched to the Copy Density Values in the backup
data mode of the print engine.
[RedCopyDensityValues]
Dark=19
MediumDark=14
Medium=11
MediumLight=9
Light=7
[CyanCopyDensityValues]
Dark=12
MediumDark=10
Medium=8
MediumLight=6
Light=5
[MagentaCopyDensityValues]
Dark=12
MediumDark=10
Medium=8
MediumLight=6
Light=5
[YellowCopyDensityValues]
Dark=12
MediumDark=10
Medium=8
MediumLight=6
Light=5
[PaperTypes]
Paper0=Bond
Paper1=Vellum
Paper2=Film
Paper3=OnHold
List of available paper types. This section should match the [PaperTypes] section in the winreq.ini. Once
configured, the user can force Unattend to use the custom typ e in Unattend’s C ONFIG/MISC/ROLL INFO
pulldown section. This feature is used to override the paper-type signals coming from the print engine
drawer selections. Custom types may be manually added following this format: Papern=(6 characters or
less) i.e. Paper3=BluBnd
This information is solely for use of KIP Personnel and KIP Authorized Dealers. No part of this publication may be copied,
reproduced or distributed in any form without express written permission from KIP America, Inc. © 2011 KIP America, Inc.
- 32 -
Page 35

KIP Unattend Operator Guide
It is also possible to set the same values for the KIP 6.5 Request software so that a user can select the
same paper types from within the Request user interface. Please see [PaperType] in c:\program
files\kip\request\winreq.ini to make the same setting changes.
[OpaquePens]
[ConvertTypes]
Type1=ASCII TXT A
Type2=INI INI A
Type3=OUT OUT A
Type4=LOG LOG A
This information is solely for use of KIP Personnel and KIP Authorized Dealers. No part of this publication may be copied,
reproduced or distributed in any form without express written permission from KIP America, Inc. © 2011 KIP America, Inc.
- 33 -
 Loading...