

Page 1

KIP PrintNET
KIP PrintNET
User Guide
Page 2

KIP PrintNET
Introduction
KIP PrintNET is a full featured web based viewing, printing and print management app that utilizes standard web
browsers to print to KIP systems via a c orporate intranet or over the internet. KIP web-based printing delivers
powerful online job creation, preflight controls, and system administration features for high volume online print
users.
- Print full job sets from anywhere with unlimited number of files
- “Flash” based file uploading ensures 100% browser compatibility
- Integrated viewing displays accurate photos, graphics and fine lines
- Apply printing preferences on a per-file basis or to a complete print job
- Individual, departmental and project specific accounting information
- Fast file processing for maximum productivity
Page 3

KIP PrintNET
Contents
Supported Web Browsers .............................................................................................................................................. 1
Internet Explor e 6. x – 8.x Settings ................................................................................................................................ 1
Installing KIP PrintNET - Flash Upload .......................................................................................................................... 2
Main Screen .................................................................................................................................................................... 4
Key Functions .................................................................................................................................................................. 6
User Login ................................................................................................................................................................... 6
Administration ........................................................................................................................................................... 6
Printer Configuration ................................................................................................................................................ 6
IPS Mailbox Management ...................................................................................................................................... 6
Printer Queue Management .................................................................................................................................. 7
Historical Queue ....................................................................................................................................................... 7
Information/Help ...................................................................................................................................................... 7
Creating a Print Set for Submittal ................................................................................................................................. 8
New Job ..................................................................................................................................................................... 8
Add Files ..................................................................................................................................................................... 8
Image Viewing – Monochrome Systems ................................................................................................................... 9
Image Viewing - KIP Color Systems.......................................................................................................................... 10
Select specific pages from Multipage Files (.PDF/.DWF) ...................................................................................... 11
Job Defaults ................................................................................................................................................................... 12
Printing Properties ......................................................................................................................................................... 13
Individual Parameters ................................................................................................................................................. 14
Job Management ........................................................................................................................................................ 15
Recall Last Job ........................................................................................................................................................15
Save Job ..................................................................................................................................................................15
Load Job ..................................................................................................................................................................15
HPGL / HP-RTL Pen Settings and Image Adjustment .............................................................................................. 16
Modify Pens .............................................................................................................................................................16
Use Colors .................................................................................................................................................................16
Force Pens................................................................................................................................................................17
Line Width Compensation ....................................................................................................................................17
Page 4

KIP PrintNET
Vector Line Dither Pattern ....................................................................................................................................17
HP-RTL Photo Mode ................................................................................................................................................17
HP-RTL Photo Mode Dither ....................................................................................................................................17
HP-RTL Raster Density .............................................................................................................................................17
Clip to Image Size ...................................................................................................................................................17
Line Merge ...............................................................................................................................................................18
Use Round End Capping ......................................................................................................................................18
Border .......................................................................................................................................................................18
KIP Fold Parameter Selection ..................................................................................................................................... 18
Digital Image Stamp Selection .................................................................................................................................. 18
Modify Stamp ..........................................................................................................................................................19
Stamp Schemes ......................................................................................................................................................19
Stamp Schemes - KIP Color Systems ........................................................................................................................ 20
Font Color.................................................................................................................................................................20
Stamp Settings ........................................................................................................................................................21
Units ...........................................................................................................................................................................21
Text ............................................................................................................................................................................21
Graphic (Monochrome Printers Only) ................................................................................................................21
Merge Type – Monochrome Systems ....................................................................................................................... 22
Screening – Monochrome Systems .....................................................................................................................22
Modify Output Size ....................................................................................................................................................... 22
Force Size .................................................................................................................................................................22
Enlarge / Reduce ......................................................................................................................................................... 23
Job Accounting – Unified Accounting ..................................................................................................................... 24
Requester .................................................................................................................................................................24
Description ...............................................................................................................................................................24
Distribution ...............................................................................................................................................................24
Submit ............................................................................................................................................................................. 25
Multiple KIP Printers ...................................................................................................................................................... 25
Job Accounting – Unified Accounting .................................................................................................................... 26
Unified Accounting ................................................................................................................................................26
Users/Requesters .....................................................................................................................................................26
Job Number .............................................................................................................................................................26
Description ...............................................................................................................................................................27
Page 5

KIP PrintNET
Prompt Setup for Accounting Data ....................................................................................................................27
KIP Printers ...................................................................................................................................................................... 27
Email Settings ................................................................................................................................................................ 28
SMTP Configurat i on ................................................................................................................................................28
Job Ticket E-mail .......................................................................................................................................................... 28
Printer Status Message ................................................................................................................................................. 29
Monthly Meter Report .................................................................................................................................................. 29
Service Interval ............................................................................................................................................................. 30
Printer Configuration .................................................................................................................................................... 31
Basic Configuration ................................................................................................................................................31
Wire Cleaning ..........................................................................................................................................................32
Advanced Configuration .....................................................................................................................................32
Upload Fonts............................................................................................................................................................34
Folder Configuration ..............................................................................................................................................34
IPS Mailboxes ................................................................................................................................................................ 36
IPS Mailboxes ...........................................................................................................................................................36
Select All ...................................................................................................................................................................37
Unselect All ..............................................................................................................................................................37
Add Files to Current Job ........................................................................................................................................37
Download ................................................................................................................................................................37
Download As .ZIP ....................................................................................................................................................37
Empty Mailbox ........................................................................................................................................................37
Add a Mailbox ........................................................................................................................................................37
Adding SMB Mailboxes ..........................................................................................................................................38
Adding FTP Mailbox Location ..............................................................................................................................38
Delete a mailbox ....................................................................................................................................................39
Printer Queue Management ...................................................................................................................................... 39
Edit Job .....................................................................................................................................................................40
Color Options – KIP Color Systems ............................................................................................................................ 41
Image Quality .........................................................................................................................................................42
Grey Composing ....................................................................................................................................................42
Dithering Mode .......................................................................................................................................................42
Black Trapping ........................................................................................................................................................42
Color Trapping ........................................................................................................................................................43
Page 6

KIP PrintNET
Enable Color Management .................................................................................................................................43
Enable Color Filtering .............................................................................................................................................43
Enable Fine Line Control .......................................................................................................................................44
Enhance Black Text ................................................................................................................................................44
Setup of Custom Filters ................................................................................................................................................ 45
Submitting Color Files for Printing .............................................................................................................................. 46
Historical Queue ........................................................................................................................................................... 47
Edit Job .....................................................................................................................................................................47
Information / Help ........................................................................................................................................................ 48
Page 7

KIP PrintNET
Supported Web Browsers
On Microsoft W indows platform - Internet Explorer 6.0-8.x, Mozilla Firefox 2.0-3.x, Goog le C hro me ,
Apple Safari, & Opera.
Linux/UNIX/MAC OSX –Mozilla Firefox 2.0-3.x, Apple Safari, Opera
Note: for all uploads there is a 2 gig maximum upload per session.
Internet Explore 6.x – 8.x Settings
To enhance PrintNET performance in Internet Explorer, it is necessary to adjust internet options using the
procedure below:
1. Close Internet Explorer
2. Click on Start and browse to Control Panel within Windows
3. Find Internet Options and double-click to open
4. On the General tab, find Settings within the ‘Browsing History’ dialog
5. Enable ‘Every time I visit the webpage’
6. Click ‘OK’, click ‘OK’
This information is solely for use of KIP Personnel and KIP Authorized Dealers. No part of this publication may be copied,
reproduced or distributed in an y for m without express written permission from KIP America, Inc. 2011 K IP Amer ica, Inc.
- 1 -
Page 8
KIP PrintNET
Installing KIP PrintNET - Flash Upload
NOTE: All KIP systems are preloaded with a version of KIP PrintNET. This update includes the “Flash” based up
loader to enhance the user experience. You will use the current version of PrintNET to load the update to the
system.
Installing the KIP PrintNET - Flash Upload is as simple as “pushing” the update package to the KIP printer (IPS).
Your KIP system should be installed, powered on and connected to your LAN with an IPS address pre-assigned.
1. Download the KIP PrintNET Flash Upload from the KIP App Store.
2. Extract the upload from the .zip file to your local drive ( the ZIP file includes the User Guide and the
update )
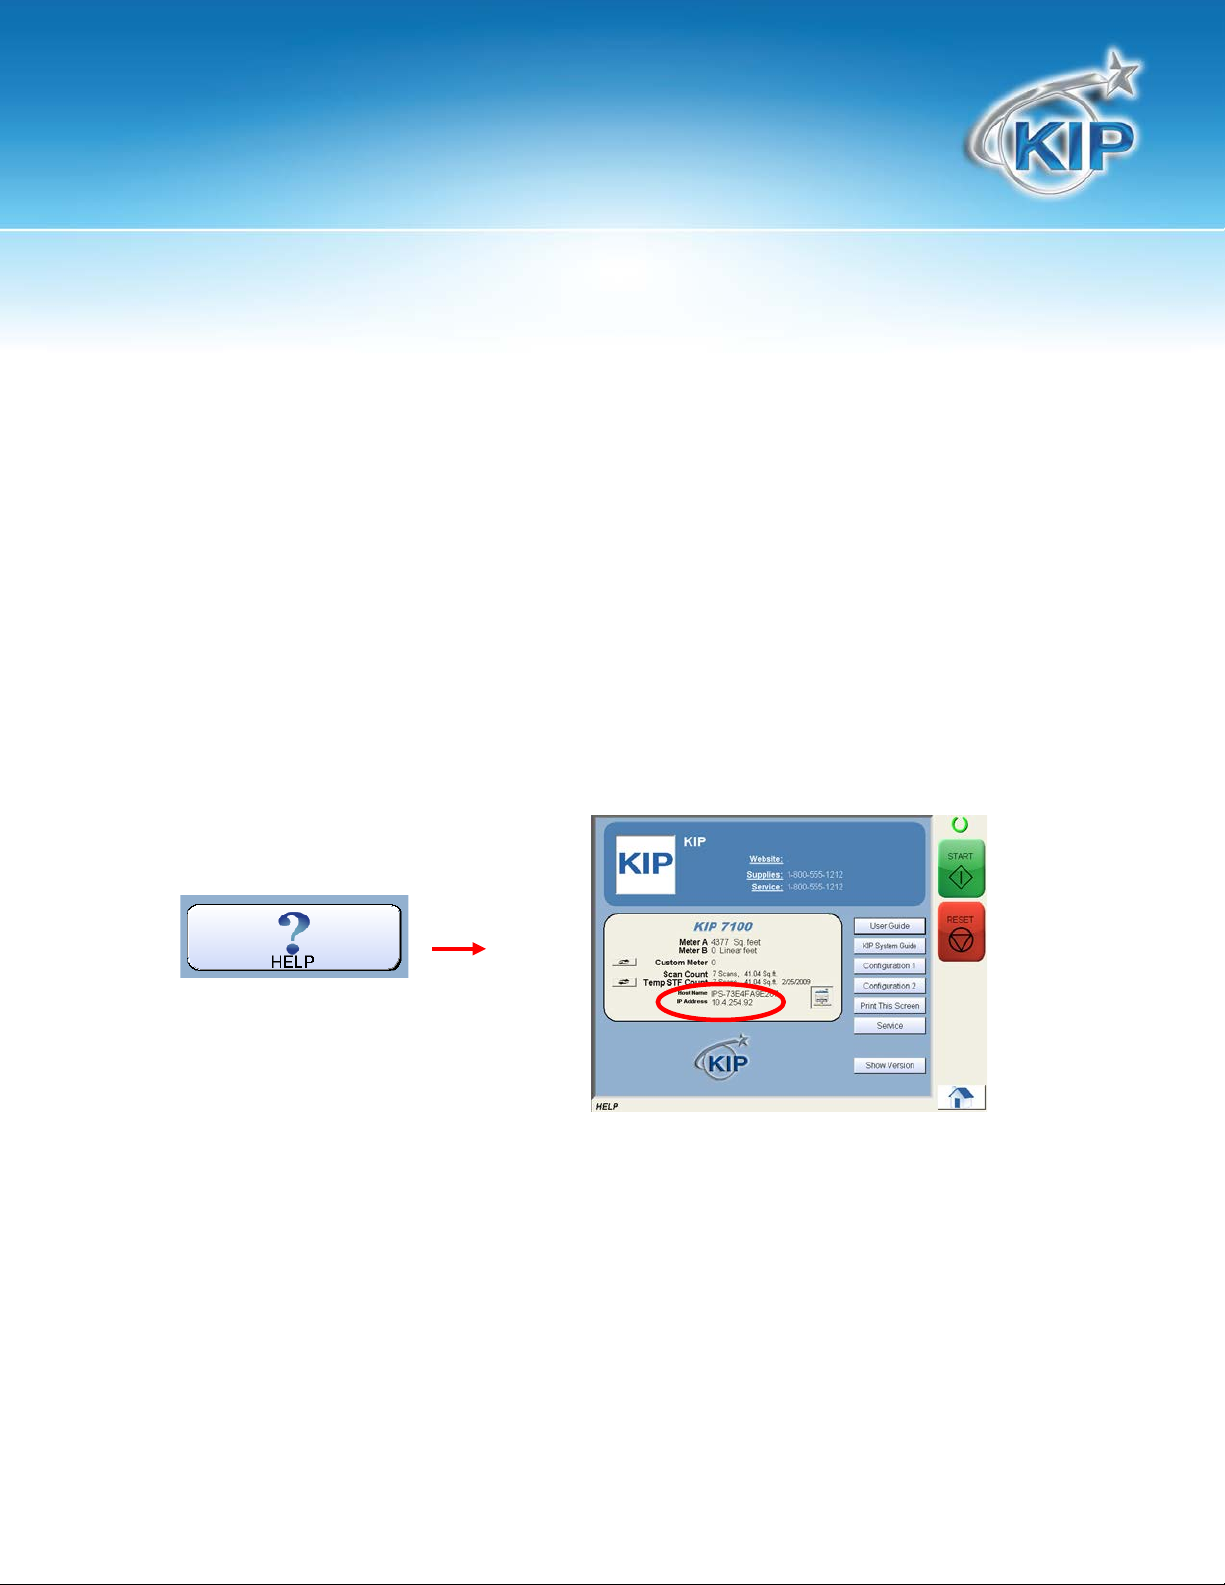
3. Locate the IP address of the KIP system by selecting the “?” button on the main screen on the KIP’s
system touch panel.
This information is solely for use of KIP Personnel and KIP Authorized Dealers. No part of this publication may be copied,
reproduced or distributed in an y for m without express written permission from KIP America, Inc. 2011 K IP Amer ica, Inc.
- 2 -
Page 9
KIP PrintNET
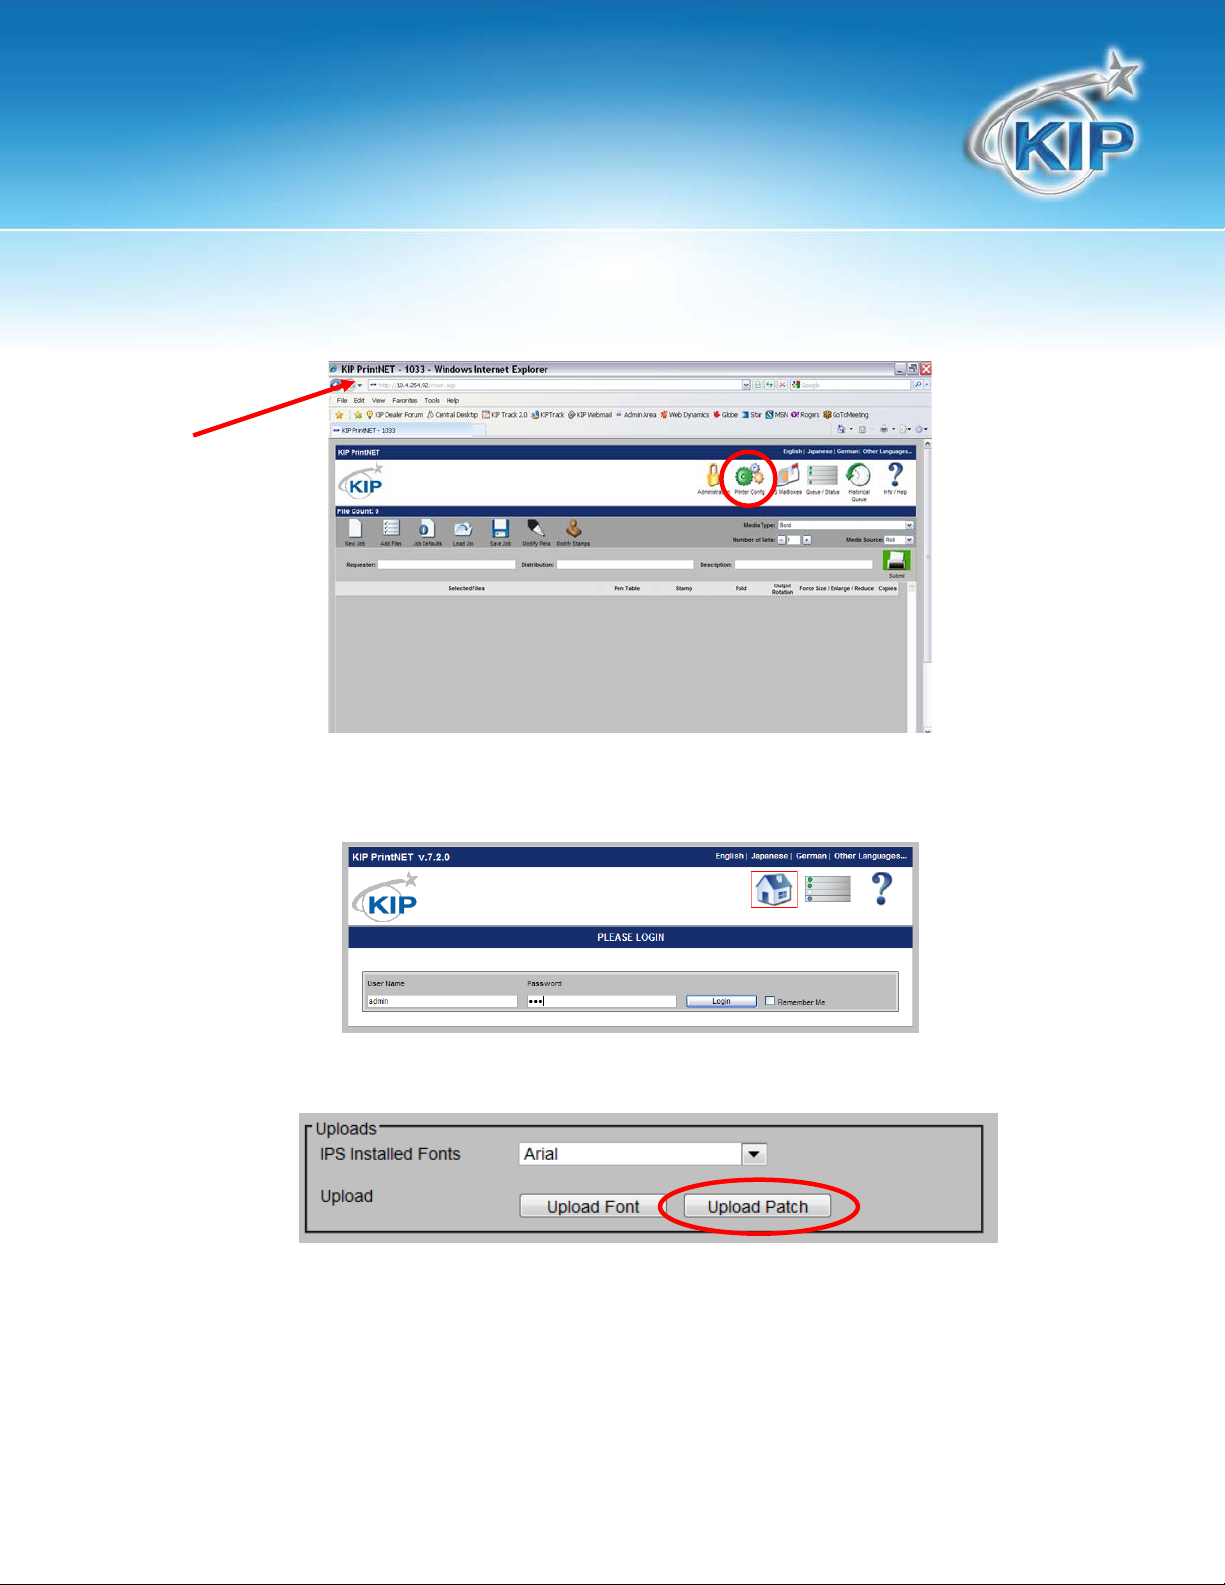
4. KIP models are web browser enabled. From your web browser on your desktop, simply enter the IP
address of the KIP printer to launch KIP PrintNET. And then click on the “Printer Config” page.
5. Enter the “admin” user name and password. (contact your local administrator for credentials for the KIP
system or reference the system’s user guide)
6. Scroll down the web page until “Upload” is located. Click on “Upload Patch”
7. Browse for the file that was extracted in step #2.
8. Select “Save”. This will transfer the Web App software to the KIP system.
9. At the printer the touch screen will display a message “Please wait Updating IPS” and the system will
restart. (this can take up to ten minutes)
10. Once the KIP printer has restarted, KIP Web App is ready for final configuration as noted in the following
pages.
This information is solely for use of KIP Personnel and KIP Authorized Dealers. No part of this publication may be copied,
reproduced or distributed in an y for m without express written permission from KIP America, Inc. 2011 K IP Amer ica, Inc.
- 3 -
Page 10

KIP PrintNET
Main Screen
Note: When connected to a KIP Color System the Color Options selection will appear.
This information is solely for use of KIP Personnel and KIP Authorized Dealers. No part of this publication may be copied,
reproduced or distributed in an y for m without express written permission from KIP America, Inc. 2011 K IP Amer ica, Inc.
- 4 -
Page 11

KIP PrintNET
NO. NAME FUNCTION
1 Administration Administrator Functions (when logged on as Admin)
2 Printer Configuration Printer Configuration Settings
3 IPS Mailboxes IPS Mailbox Management / Image Download
4 Printer Queue Management To manage the printer job queue
Note Color Options
5 Job History Recall Printed Jobs from historical queue (if enabled)
6 Information / Help Operator Guides / IPS Client Software Downloads
7 New Job Create a New Print Job
8 Add Files Add Files From Local PC or Network Resource
9 Job Defaults Configure Job Default Parameters
10 Load Job Load Saved Print Job With All Printing Parameters
11 Save Job Save Current Print Job with All Printing Parameters
12 HPGL Pen Table Settings Manage HPGL Pen Table Settings
13 Stamp Settings Create / Modify Digital Image Stamps
14 Recall Last Job Recall Previously Printed Job / Resubmit Print Job
15 F orc e Si ze Se t t i ng s Select or create a force size setting
16 Media Type Select Output Media Type
17 Number of Sets Set the Output Print Job Number of Sets
18 Job Setup Grid Display Print Job Images and Print Job Settings
19 Requester Username Recorded in Unified Accounting Print Log (if enabled)
20 Job Number
21 Description Description Recorded in Unified Accounting Print Log (if enabled)
22 Submit Print Dispatches Print Job to Selected Printer
When connected to a KIP Color system allows the management
of the color option.
Job Number Recorded in Unified Accounting Print Log (if
enabled)
Note: When connected to a KIP Color System the Color Options selection will appear.
This information is solely for use of KIP Personnel and KIP Authorized Dealers. No part of this publication may be copied,
reproduced or distributed in an y for m without express written permission from KIP America, Inc. 2011 K IP Amer ica, Inc.
- 5 -
Page 12
KIP PrintNET
Key Functions
User Login
The Log in screen will appear if a user tries to open or do something that requires an Administrator.
Administration
Both the user name and password for Administrative access to KIP PrintNET must be defined within KIP
Request software using Prompt Setup operations for the Requester field. Requester prompt must be
configured as “Required” from the pull down list.
The default user name for accessing the Administrative account is: admin
The default password for accessing the Administrative account is: kip
Printer Configuration
NOTE: Undesired output might occur if settings are changed.
This section is for configuring the printer. After making necessary changes click on submit. Changes will
be sent to the printer and after 20 seconds the new settings will be applied.
IPS Mailbox Management
The IPS Mailboxes feature will allow a user to download files that have already been scanned into a
Mailbox in the IPS. The user will be able to see all current Mailboxes, and select files that are present in
that Mailbox for download. The desired files may also be downloaded to a .ZIP file for easy portability.
Administrative users may create, modify, and delete IPS mailboxes, SMB mailboxes and FTP mailboxes
This information is solely for use of KIP Personnel and KIP Authorized Dealers. No part of this publication may be copied,
reproduced or distributed in an y for m without express written permission from KIP America, Inc. 2011 K IP Amer ica, Inc.
- 6 -
Page 13

KIP PrintNET
Printer Queue Management
This Feature allows the administrative user, to manage jobs that have arrived in the queue.
Historical Queue
The Historical Queue displays a list of jobs that have been printed in the past. Parameters f or Historical
Queue are defined in PrintNET Configuration.
Information/Help
The Info/Help will take a user to the page where User Manuals can be downloaded and printed if
necessary. Within the Info/Help section users may also download the current versions of software
associated with the KIP Printer.
This information is solely for use of KIP Personnel and KIP Authorized Dealers. No part of this publication may be copied,
reproduced or distributed in an y for m without express written permission from KIP America, Inc. 2011 K IP Amer ica, Inc.
- 7 -
Page 14

KIP PrintNET
Creating a Print Set for Submittal
Creating a print set for submittal is simple and fast.
1. Simply type in the IP address of the KIP IPS (this may be found on the help menu of the IPS touch
screen.
2. Log in with user credentials.
3. Add files to the set by browsing the local PC or network resource
4. Click printer icon to submit a print
New Job
Begins a new Print Job
Add Files
Users may add fil es to the job by selecting the Add
Files button. This will allow a user to browse available
locations on the local PC, network or removable
media for files to print.
Note: File upload limitation of 2GB per upload
session. If more than 2GB of image data is to be
uploaded, simply select the ‘add files’ button to
add more images. Non-Windows Internet Explorer
web browsers are limited to single file selections and
uploads of 10 images.
This information is solely for use of KIP Personnel and KIP Authorized Dealers. No part of this publication may be copied,
reproduced or distributed in an y for m without express written permission from KIP America, Inc. 2011 K IP Amer ica, Inc.
- 8 -
Page 15
KIP PrintNET
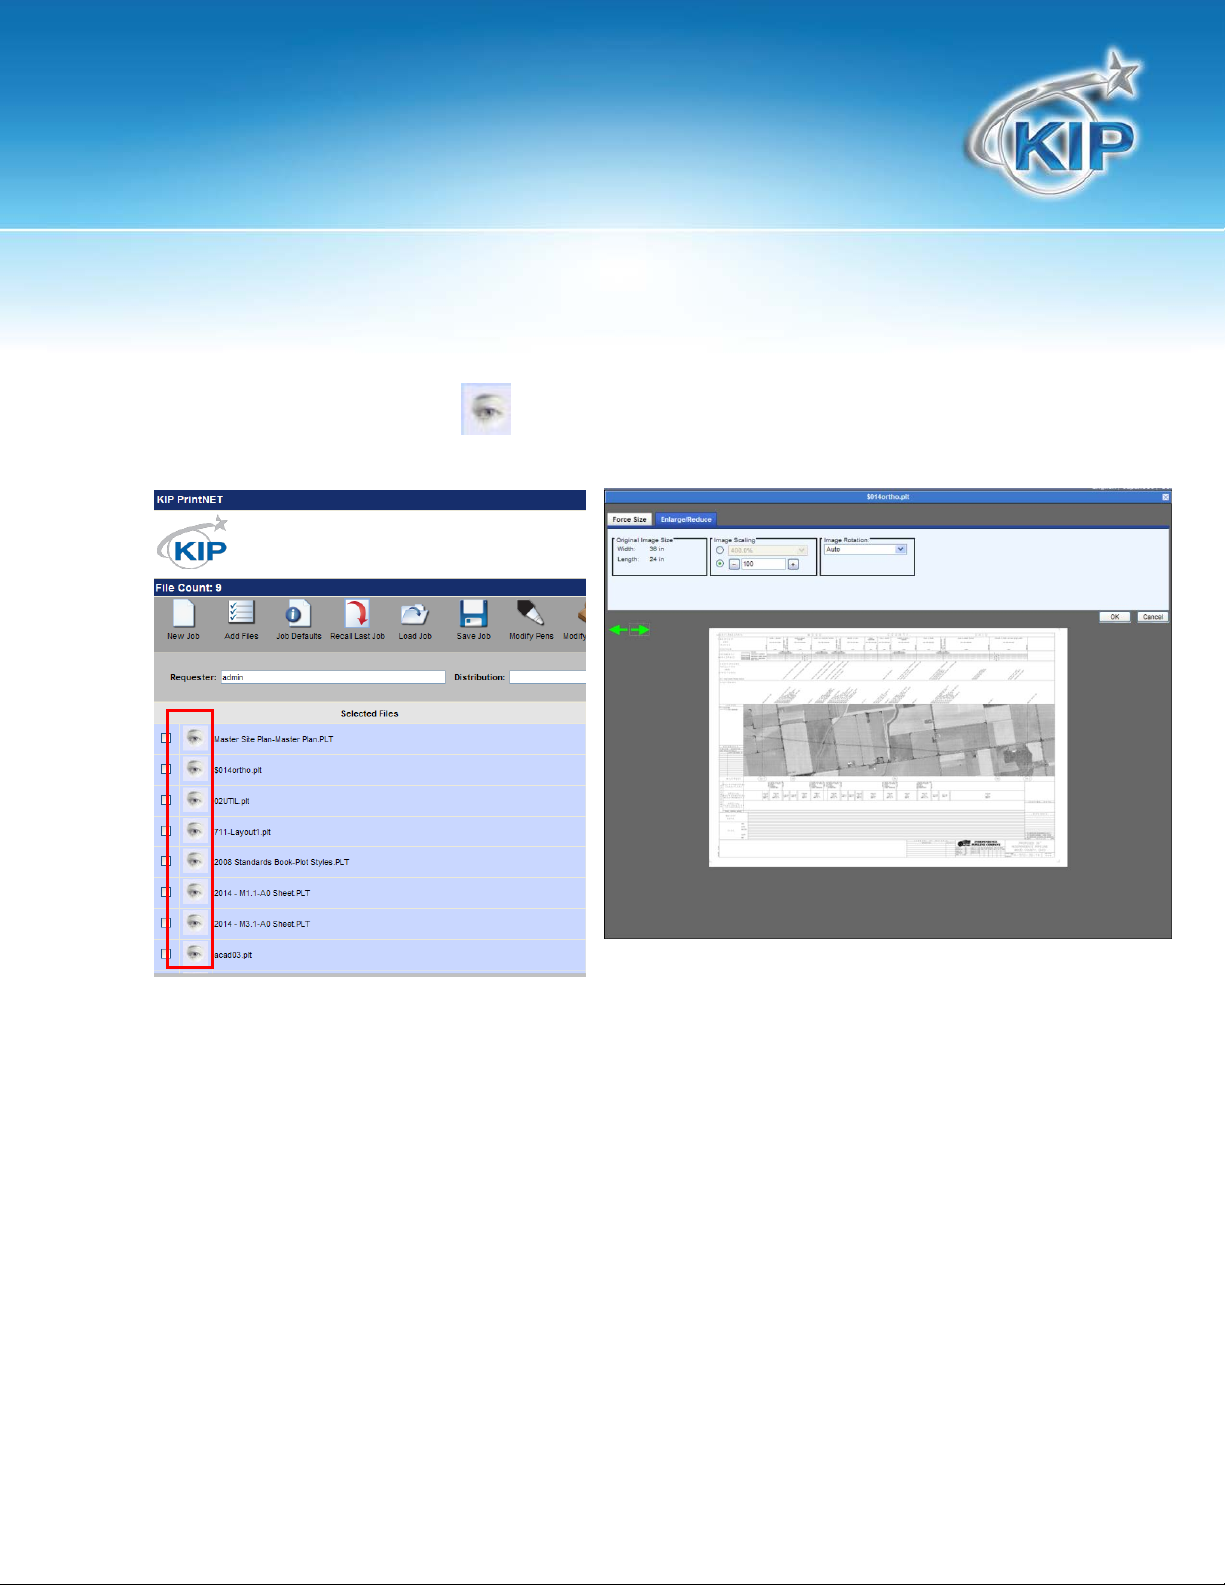
Image Viewing – Monochrome Systems
Once files have been uploaded, a user can view the selected files prior to printing. This process is done
by clicking on the view icon next to the file name. Using the green arrows will allow for the
viewing of the files in the current job
This information is solely for use of KIP Personnel and KIP Authorized Dealers. No part of this publication may be copied,
reproduced or distributed in an y for m without express written permission from KIP America, Inc. 2011 K IP Amer ica, Inc.
- 9 -
Page 16

KIP PrintNET
Image Viewing - KIP Color Systems
Once files have been uploaded, a user can view the
selected files prior to printing. This process is done by
clicking on the view icon next to the file name.
Once a file has been selected it will appear in the
viewer. Users can now scroll through all of the files in
the job by clicking the Left/Right arrows in the
upper left corner of the viewing window.
This information is solely for use of KIP Personnel and KIP Authorized Dealers. No part of this publication may be copied,
reproduced or distributed in an y for m without express written permission from KIP America, Inc. 2011 K IP Amer ica, Inc.
- 10 -
Page 17
KIP PrintNET
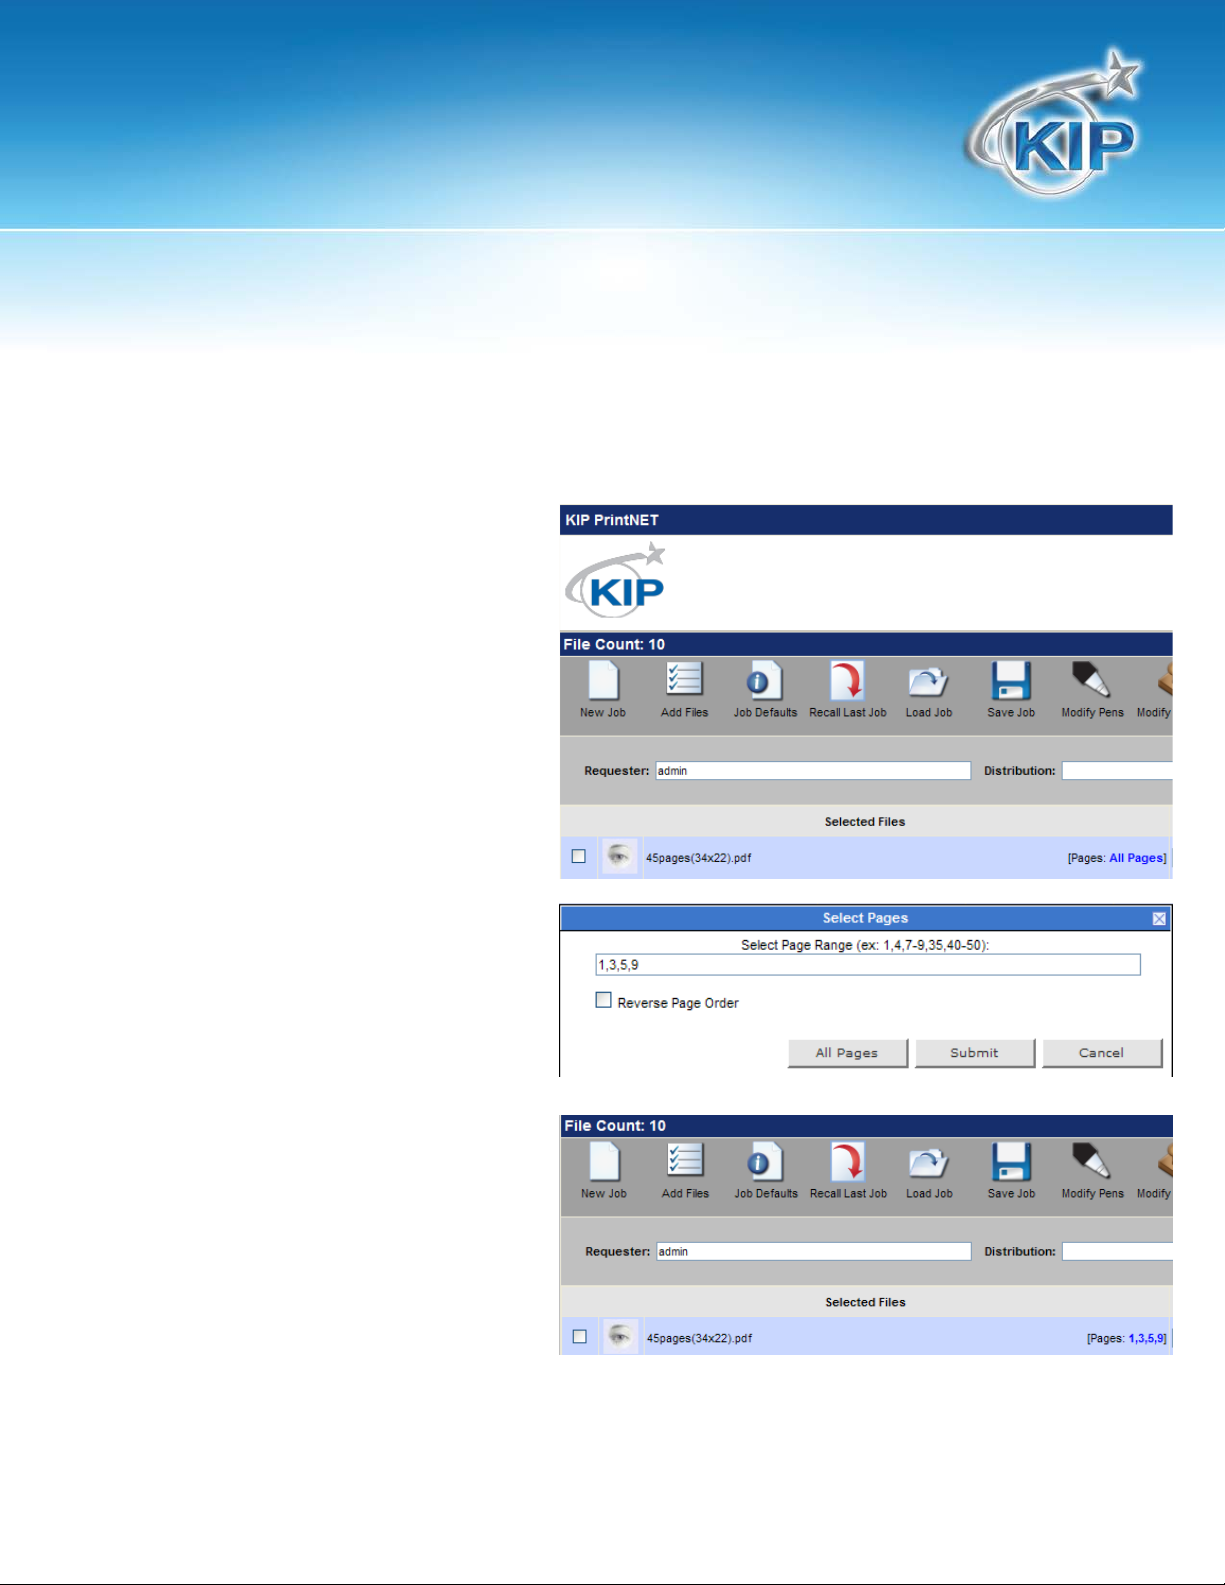
Select specific pages from Multipage Files (.PDF/.DWF)
KIP PrintNET allows for the selection of a specific page or page range from multipage .pdf & .dwf files.
User has the ability to print all pages or
specific pages in a multipage PDF or
DWF file. Multipage files are auto
detected.
User can select the desired page
number to be printed. If desired select
the Reverse Page Order check box.
Selected pages are displayed next to
the file name in the list.
This information is solely for use of KIP Personnel and KIP Authorized Dealers. No part of this publication may be copied,
reproduced or distributed in an y for m without express written permission from KIP America, Inc. 2011 K IP Amer ica, Inc.
- 11 -
Page 18

KIP PrintNET
Job Defaults
Job Defaults allows for setting print job parameters as files are selected and added to the print job set.
These preferences become the “default” for that print submission and can be edited individually. It is
also possible to change printing preferences for files that are added to the print job set at a later time.
This information is solely for use of KIP Personnel and KIP Authorized Dealers. No part of this publication may be copied,
reproduced or distributed in an y for m without express written permission from KIP America, Inc. 2011 K IP Amer ica, Inc.
- 12 -
Page 19

KIP PrintNET
Printing Properties
If multiple files are selected to be printed, a user can make changes to a specific file or to multiple files
within a job set. This is done by selecting the file (or files) desired right click and selecting properties. User
is able to make changes regarding the Pen Table, Stamps, Fold, Output Rotation and Force Size settings.
These changes will then be applied to those files in that job.
This information is solely for use of KIP Personnel and KIP Authorized Dealers. No part of this publication may be copied,
reproduced or distributed in an y for m without express written permission from KIP America, Inc. 2011 K IP Amer ica, Inc.
- 13 -
Page 20

KIP PrintNET
Individual Parameters
Individual Parameters allows the user to the ability to create a custom job with complete control over
the preferences of each file to be printed. Users have the ability to change the Pen Table, Stamp, Fold
Parameters, Output Rotation, Force Size/Enlarge reduce settings and Number of copies for each file
selected in the print job independent of any setting on other files.
This information is solely for use of KIP Personnel and KIP Authorized Dealers. No part of this publication may be copied,
reproduced or distributed in an y for m without express written permission from KIP America, Inc. 2011 K IP Amer ica, Inc.
- 14 -
Page 21

KIP PrintNET
Job Management
Recall Last Job
Select to recall the last submitted job. This function preserves all printing parameters. Icon appears after
job submittal.
Save Job
When logged on as a standard user, select this option to save the current print job along with the
printing parameters. If logged on as an administrator, the administrator may view all jobs saved by
each user. Standard users may only view jobs saved within their login session.
Load Job
When logged on as a standard user, select this option to load a saved print job with printing parameters
retained. If logged on as an administrator, the administrator may view all jobs saved by each user and
may load any print job. Standard users may only view jobs saved within their login session.
This information is solely for use of KIP Personnel and KIP Authorized Dealers. No part of this publication may be copied,
reproduced or distributed in an y for m without express written permission from KIP America, Inc. 2011 K IP Amer ica, Inc.
- 15 -
Page 22

KIP PrintNET
HPGL / HP-RTL Pen Settings and Image Adjustment
Pen type and styles can be created and applied to vector or hybrid (HP-RTL)
files. They can include pen widths, raster density. These can be selected from
the Pen Table drop down list.
Modify Pens
This feature will allow a user the ability to Modify or Create new Pen tables to. Modification of settings for
vector plot files, pen table and screening information can be changed. Plot File Setup also allows
borders, modification of halftone settings, dither patterns and more. The following is a list of the all the
controls:
Use Colors
This applies an HPGL file’s native pen width information, and half toning information. Unless changes are
being made to a customer’s file “Use Colors” is the default setting. When “Use Colors” is active the
“Force Pens” area is inactive.
This information is solely for use of KIP Personnel and KIP Authorized Dealers. No part of this publication may be copied,
reproduced or distributed in an y for m without express written permission from KIP America, Inc. 2011 K IP Amer ica, Inc.
- 16 -
Page 23

KIP PrintNET
Force Pens
Allows editing pen widths and screening by pen number (with a range of Pen 0 to Pen 255.) of an HPGL
/ HP-RTL file. This forces the settings in the KIP Pen Table to override the pen information originally
embedded in the file.
Line Width Compensation
This allows addition and subtraction of pixels from the overall width of all vector lines.
Vector Line Dither Pattern
Users have 2 choices of vector line dither patterns. This will alter the appearance of vector grayscale in
different ways.
HP-RTL Photo Mode
When a raster image has been embedded within a plot file, Raster Photo Mode should be used. Raster
Photo Mode can be applied to all drawings, whether they contain raster images or not.
HP-RTL Photo Mode Dither
Users have 3 choices of raster dither output patterns. There is no ‘correct’ setting. Set a ccor din g to use r
preference.
HP-RTL Raster Density
This slide bar will modify the density level of the embedded raster image. The scale range is from 0-200.
The higher the number on the scale, the darker the image will be. A density level can also be keyed into
the text field.
Clip to Image Size
This crops the file data to the start of image data. Apply when the file designer has saved the entire
drawing area as part of the file. If an error “File Too Large to Print,” occurs, clipping to Image Size is often
the solution.
This information is solely for use of KIP Personnel and KIP Authorized Dealers. No part of this publication may be copied,
reproduced or distributed in an y for m without express written permission from KIP America, Inc. 2011 K IP Amer ica, Inc.
- 17 -
Page 24

KIP PrintNET
Line Merge
This enables the user to merge lines of different shades. When not applied the layers within the plot file
determine how lines merge on each other.
Use Round End Capping
This will set end capping on lines in vector files to round ends instead of what has been specified in the
plot file’s Line Attribute command.
Border
This allows a border to be used in the file. A maximum border of five inches can be applied to each
edge.
KIP Fold Parameter Selection
Fold settings can be created and applied directly to the job when a KIP Folder is
present.
Digital Image Stamp Selection
Users can create and apply an available stamp scheme to printed documents.
This information is solely for use of KIP Personnel and KIP Authorized Dealers. No part of this publication may be copied,
reproduced or distributed in an y for m without express written permission from KIP America, Inc. 2011 K IP Amer ica, Inc.
- 18 -
Page 25

KIP PrintNET
Modify Stamp
This feature will allow a user the ability to Modify or Create new Stamp, Watermark or Overlay to be
used in the software. These stamps can be either Text, Graphics or both can be used.
Stamp Schemes
Custom Stamp settings are saved as schemes which can be used at different times or edited when
necessary. Stamps may b e selected from the list of available stamps or “New Stamp” can be used to
create a new stamp.
All Stamps must be saved prior to their use.
This information is solely for use of KIP Personnel and KIP Authorized Dealers. No part of this publication may be copied,
reproduced or distributed in an y for m without express written permission from KIP America, Inc. 2011 K IP Amer ica, Inc.
- 19 -
Page 26

KIP PrintNET
Stamp Schemes - KIP Color Systems
Font Color
From within the Stamp screen users have the ability to choose a Font Color for the stamp being
created. Font Color can be select from:
• Black
• Cyan
• Magenta
• Yellow
• Red
• Green
• Blue
This information is solely for use of KIP Personnel and KIP Authorized Dealers. No part of this publication may be copied,
reproduced or distributed in an y for m without express written permission from KIP America, Inc. 2011 K IP Amer ica, Inc.
- 20 -
Page 27

KIP PrintNET
Stamp Settings
This Window will show the placement of the current stamp settings or
where the stamp being created will be placed. There are 9 locations
to choose from. Depending on the selected location the value
window may be utilized for more precise placement of the stamp. If
the value button is active a value up to 18” may be entered.
Units
Allows for the choice between English or Metric
Text
By selecting the Use Text check box the user has the
ability to create a text based stamp with the desired
information. Text Rotation allows the user to rotate
(counter clockwise) the text portion of their stamp in 45°
increments. “Font” will allow the user to select from
available fonts.
Graphic (Monochrome Printers Only)
By selecting the Use Graphic check box the user has the
ability to Upload an image that can be used to create a
Graphic based stamp. Graphic Rotation allows the user
to rotate (counter clockwise) the graphic portion of their
stamp in 45° increments. Graphic Placem ent determines
the placement of the graphic in relation to the applied
text. This is ignored if text is not applied. Graphic Gap
applies a separation of up to 5” between the Text and
Graphic stamps
This information is solely for use of KIP Personnel and KIP Authorized Dealers. No part of this publication may be copied,
reproduced or distributed in an y for m without express written permission from KIP America, Inc. 2011 K IP Amer ica, Inc.
- 21 -
Page 28

KIP PrintNET
Merge Type – Monochrome Systems
Opaque: This option displays the stamp on top of the
image. The background of the stamp is white and will
obscure some image.
Transparent: This option overlays the stamp on top of the image. The background of the stamp is
transparent.
Invert: This option displays the stamp on top of the image. Colors are inverted where the data intersects.
Screening – Monochrome Syst ems
This allows the user to define the screen level (shading) of
the stamp using pre-set screening percentages.
Modify Output Size
Force Size
This feature will allow a user the ability to
Modify or Create new Force Sizes to be
used in the software. All setting can be
saved as a scheme for later use.
Scheme: Save customized settings for use
at a later date
Units: Units to use for setting up Force Size
parameters.
Margins: Add margins to one or more sides for image placement within the canvas. Uncheck
Automatic Placement to freely drag the image within the virtual canvas.
Image Scaling: Select from preset scaling percentages, scale to fit or type in a custom percentage
This information is solely for use of KIP Personnel and KIP Authorized Dealers. No part of this publication may be copied,
reproduced or distributed in an y for m without express written permission from KIP America, Inc. 2011 K IP Amer ica, Inc.
- 22 -
Page 29

KIP PrintNET
Other: Ignore Settings if Image is Smaller Than Paper will, if checked, ignore enlargement / reduction
settings if a set contains an image that is smaller than other images. Used when a transmittal sheet is
inserted into the set and should not be scaled.
Paper Size: Configure output paper size. Width selection will force the job to print on the selected roll
size.
Original Image Size: Displays the image size of the digital file
Image Rotation: Rotate images from 0-270 degrees
When setting up the desired scheme is complete, choose the Save As
prompt the user for a scheme name. Select Submit and this new scheme will be added to the list of
available schemes to choose from on the main menu. Selecting “OK” will use the settings temporarily for
the selected file. This will NOT save as a new scheme.
Enlarge / Reduce
Image Size: Displays the image size of the digital
file
Image Scaling: Select from preset scaling
button and it will
percentages, scale to fit or type in a custom
scaling percentage.
Image Rotation: Rotate images from 0-270
degrees.
This information is solely for use of KIP Personnel and KIP Authorized Dealers. No part of this publication may be copied,
reproduced or distributed in an y for m without express written permission from KIP America, Inc. 2011 K IP Amer ica, Inc.
- 23 -
Page 30

KIP PrintNET
Job Accounting – Unified Accounting
Requester
Requester - This is a field which can be used for accounting. Information entered is applied to the KIP
Job and Print Logs.
Description
Description - This is a field which can be used for accounting. Information entered is applied to the KIP
Job and Print Logs. This field is tied to ALL Reports!
Distribution
Distribution - This is a field which can be used for accounting. Information entered is applied to the KIP
Job and Print Logs.
This information is solely for use of KIP Personnel and KIP Authorized Dealers. No part of this publication may be copied,
reproduced or distributed in an y for m without express written permission from KIP America, Inc. 2011 K IP Amer ica, Inc.
- 24 -
Page 31

KIP PrintNET
Submit
This button will send the selected print files and job information to the host PC for
printing.
Multiple KIP Printers
If multiple printers are available and have been added (See KIP Printer in Administration section) a
menu will pop up allowing the user to choose from the available printers to dispatch the job.
This can be useful if KIP Printers are in different
locations on the same network for load sharing.
Example:
• 20 sets needed
• Set # of sets to 10
• Dispatch job to two (2) printers
Administration
This information is solely for use of KIP Personnel and KIP Authorized Dealers. No part of this publication may be copied,
reproduced or distributed in an y for m without express written permission from KIP America, Inc. 2011 K IP Amer ica, Inc.
- 25 -
Page 32

KIP PrintNET
Job Accounting – Unified Accounting
Unified Accounting
Administrative user may turn on/off the use of Unified Accounting for Request Client software and the
KIP Windows driver.
Users/Requesters
Used to create new users with and passwords
Job Number
Used to create new Job Numbe r s and associated passwords.
This information is solely for use of KIP Personnel and KIP Authorized Dealers. No part of this publication may be copied,
reproduced or distributed in an y for m without express written permission from KIP America, Inc. 2011 K IP Amer ica, Inc.
- 26 -
Page 33

KIP PrintNET
Description
Used to create new Descriptions and associated passwords.
Note: If it is necessary to add many Requesters, Job Numbers and Descriptions at one time there is a
utility on the Software and Operation Guide CD called Unified Accounting Tool. Please reference the
CD for this.
Prompt Setup for Accounting Data
To turn on/off specific settings that a User must follow in order submit a print job.
KIP Printers
Set up the ability to send print jobs to multiple KIP Printers on the local network. Create New Printers, ed i t
existing printers and delete printers.
This information is solely for use of KIP Personnel and KIP Authorized Dealers. No part of this publication may be copied,
reproduced or distributed in an y for m without express written permission from KIP America, Inc. 2011 K IP Amer ica, Inc.
- 27 -
Page 34

KIP PrintNET
Email Settings
SMTP Configuration
This section must be filled out in order for E-mail notifications to be sent. SMTP and Server information
must be supplied by the customer/network administrator.
Job Ticket E-mail
Once the SMTP information is setup and confirmed this section can be filled out as to what notification
will be sent to the user about the job submitted. By right clicking in the open white body area, a menu
with available macros will appear.
This information is solely for use of KIP Personnel and KIP Authorized Dealers. No part of this publication may be copied,
reproduced or distributed in an y for m without express written permission from KIP America, Inc. 2011 K IP Amer ica, Inc.
- 28 -
Page 35

KIP PrintNET
Printer Status Message
Once the SMTP information is setup and confirmed this section can be filled out as to what notification
will be sent to the desired people regarding status or instances that may occur on the KIP Printer Such as
Printer Out of Toner, Printer Out of Paper and Printer Jams. By right clicking in the open white area a
menu with available macros will appear.
Monthly Meter Report
Once the SMTP information is setup and confirmed this section can be filled out as to what Information
should be sent out and to whom it should be sent. This can be done on a Weekly or Monthly basis and
the desired time can be determined depending on what option is chosen. By right clicking in the open
white area a menu with available macros will appear.
This information is solely for use of KIP Personnel and KIP Authorized Dealers. No part of this publication may be copied,
reproduced or distributed in an y for m without express written permission from KIP America, Inc. 2011 K IP Amer ica, Inc.
- 29 -
Page 36

KIP PrintNET
Service Interval
KIP Service Providers may configure the Service Interval to be automatically notified when the KIP Printer
is due for scheduled maintenance. Up to 10 destination email addresses (Semi colon separat ed) may
be entered for notification at the specified interval.
This information is solely for use of KIP Personnel and KIP Authorized Dealers. No part of this publication may be copied,
reproduced or distributed in an y for m without express written permission from KIP America, Inc. 2011 K IP Amer ica, Inc.
- 30 -
Page 37

KIP PrintNET
Printer Configuration
Basic Configuration
Basic Configuration enables administrators, key operators and service personnel to configure
parameters for the KIP printer.
Printer Name: Type a descriptive name for the KIP device. Useful if more than one of the same KIP
printer exists in the facility.
Copy Density Value: Configures the density of the printer toner output from Dark to Light. Density
settings may be set from the IPS touch screen in the Configuration menu.
Output Rotation: Rotate for faster printing ensures that the printed output is sent to the widest roll
available (long edge first). Rotate for Least Paper Usage calculates the percentage of paper to be
used and will output to the roll with the least amount of paper waste.
Historical Queue: Configure the amount of physical hard drive space is to be allocated to store jobs
that have been printed. Values are from 0-25 GB. Users may recall previously printed jobs using KIP
PrintNET, KIP Request and the KIP Touch Screen interface (if enabled).
Reprint: Configure the behavior of the IPS if a jam occurs. Reprint Jam (in or mm) calculates the number
of images to reprint based on the value set. (e.g. If 48 inches is set and a user is printing 36x48 sheets,
the printer would reprint 1 image based on this setting). Reprint Jam Copies will automatically reprint a
specified number of images. Jam Reprint Prompt when enabled, prompts the user at the touch screen
the number of copies to reprint.
Print Setting: Configure behavior of paper selection handling. Closest prints the output image to the
closest fitting roll. Image may be rotated automatically to fit. Center prints the output image to the
This information is solely for use of KIP Personnel and KIP Authorized Dealers. No part of this publication may be copied,
reproduced or distributed in an y for m without express written permission from KIP America, Inc. 2011 K IP Amer ica, Inc.
- 31 -
Page 38

KIP PrintNET
closest fitting roll, but centers the image to the roll. Exact requires the exact roll installed for the output
width.
Wire Cleaning
Amount of output in linear meters between wire cleaning intervals.
Advanced Configuration
In the Advanced section of the Printer Configuration screen Administrators can further manipulate the
Internal IPS settings. With the settings available in this section Specific Deck info can be set, specific
Media can be set and miscellaneous other settings regarding the way printed files will come out.
Print Separator Sheets: Configure job or set separator sheets to be printed. Separator sheets contain
information regarding current print job such as Job Number, Requester, Images printed (file names),
output total (sq. ft / sq. m.).
Deck Info: Override the installed media per roll deck. Auto is defaulted and will display to the user the
selected media from the IPS touch screen.
Monochrome PDF Proces sing: Select output dither mode based on image type (line, line/photo, mixed,
etc). Min Feature Size ensures that the finest detail can be output to the KIP printer.
This information is solely for use of KIP Personnel and KIP Authorized Dealers. No part of this publication may be copied,
reproduced or distributed in an y for m without express written permission from KIP America, Inc. 2011 K IP Amer ica, Inc.
- 32 -
Page 39

KIP PrintNET
Other:
• Min Cut Length – instructs the printer to cut paper at no less than this length (in or mm)
• Max Image Length – instructs the printer to cut paper to no more than this length (ft or m)
• Image Width Removal (pixels) – Image width tolerance adjustment used for documents that
may be over 36”x36”. (e.g . image data is 36.5” x 36.5”, this is too large to print to the KIP. Value
set to 600 (600 pixels = 1 inch) would “ignore” any image data past 36”).
• Lead Edge Void (pixels) – amount of “white space” to add to the printed output. (600 pixels = 1
inch)
• Delay Between Sets (seconds) – Amount of time to pause the print queue between sets.
• JIS Tolerance (in) – Images sent to the IPS without a KIP Job Ticket (FTP/LPR) will be printed to
exact JIS sizes.
• Ignore Job Tim e – Unchecked verifies the time specified in the job ticket prior to printing. Used to
schedule print jobs for a later date/time.
• Hold Paper After Print – When Selected the printer will hold the paper in the ready position for 13
seconds.
• Preload Paper – When selected this will load the paper to the ready position for the next print.
• Ignore HDI Borders – When selected this will ignore borders that may be in by default within the
HDI (AC) driver.
• Enable Abacus – If available when selected this will enable the use of Abacus software.
Monochrome HPGL Processing:
• HPGL Min Line weight – Minimum line thickness that may be printed. If line specified is thinner
than configured setting, line thickness will be increased.
• HPGL Min Grayscale – Minimum shade of gray that may be printed. If fill area shade is less than
specified configured setting, shading will be “darkened”.
Uploads:
• IPS Installed Fonts – Displays fonts that are currently installed on the IPS.
This information is solely for use of KIP Personnel and KIP Authorized Dealers. No part of this publication may be copied,
reproduced or distributed in an y for m without express written permission from KIP America, Inc. 2011 K IP Amer ica, Inc.
- 33 -
Page 40

KIP PrintNET
• Upload Fonts – Select fonts to be uploaded and installed to the local KIP IPS. Installed Fonts
display the current list of fonts that are installed at the IPS. To add fonts, select the Upload Font
button and browse the local workstation or server PC for .ttf (True Type Fonts). Select Open to
install the fonts at the IPS. No further action is necessary at the IPS.
• Upload Patch – Upload patches and software upgraded without installing additional software.
Custom Media Types: Configure additional media types. Enter descriptive names for media to be
selected from KIP IPS Client Applications.
Monochrome DWF Processing:
• Gamma – Controls gamma of output image. Negative numbers are lighter image output.
• DWF Min Lineweight – Minimum line thickness in pixels. If an image has a line that is thinner than
the specified lineweight, the thickness will be increased.
• Clip to Image Size – When enabled, ignores the paper space of the image and will print the
image space.
Upload Fonts
Fonts are an integral part of any file or stamp. With PrintNET 7.2, it is possible to upload fonts from a
networked PC directly to the IPS. These fonts will be installed automatically by the IPS software.
Installed Fonts display the current list of fonts that are installed at the IPS. To add fonts, select the Upload
Font button and browse the local workstation or server PC for .ttf (True Type Fonts). Select Open to
install the fonts at the IPS. No further action is necessary at the IPS.
Folder Configuration
If a folder is available the folder configuration settings will allow an Administrator to set up desired folder
packets. Note: This is should only be done by a technician trained on folder setup.
This information is solely for use of KIP Personnel and KIP Authorized Dealers. No part of this publication may be copied,
reproduced or distributed in an y for m without express written permission from KIP America, Inc. 2011 K IP Amer ica, Inc.
- 34 -
Page 41

KIP PrintNET
This information is solely for use of KIP Personnel and KIP Authorized Dealers. No part of this publication may be copied,
reproduced or distributed in an y for m without express written permission from KIP America, Inc. 2011 K IP Amer ica, Inc.
- 35 -
Page 42

KIP PrintNET
IPS Mailboxes
IPS Mailboxes
The IPS Mailboxes feature will allow a user to download files that have already been scanned into a
Mailbox in the IPS. The user will be able to see all current Mailboxes, and select files that are present in
that Mailbox for download. The desired files may also be downloaded to a .ZIP file for easy portability.
Administrative users may create, modify, and delete IPS mailboxes, SMB mailboxes and FTP mailboxes
This can be done by Selecting the IPS Mailbox Icon and then selecting the desired mailbox and all or
specific files to download and clicking on the Download Button.
List View Thumbnail View
This information is solely for use of KIP Personnel and KIP Authorized Dealers. No part of this publication may be copied,
reproduced or distributed in an y for m without express written permission from KIP America, Inc. 2011 K IP Amer ica, Inc.
- 36 -
Page 43

KIP PrintNET
Select All
Allows a user to select all files in the current Mailbox.
Unselect All
Allows a user to Unselect all files in the current Mailbox.
Add Files to Current Job
Allows a user to add additional files to a currently selected job to be printed.
Download
Allows a user to download all tagged files to a location of their choice.
Download As .ZIP
Allows a user to download as a .zip file all tagged files to a location of their choice.
Empty Mailbox
This will allow a user to remove all files from the current selected mailbox.
Add a Mailbox
This will allow an Administrator the ability to create a new Mailbox on the IPS without
having to be in front of the IPS itself.
This information is solely for use of KIP Personnel and KIP Authorized Dealers. No part of this publication may be copied,
reproduced or distributed in an y for m without express written permission from KIP America, Inc. 2011 K IP Amer ica, Inc.
- 37 -
Page 44

KIP PrintNET
Adding SMB Mailboxes
Administrators now have the ability to configure SMB scanning destinations directly from KIP PrintNET.
Select “SMB” from the list of available tabs to display configuration parameters
Once an SMB destination is configured, it will be displayed in the list of available destinations on the left
hand side of the screen prefixed by “SMB:”
Please note: Files scanned to SMB & FTP destinations cannot be seen or selected from the PrintNET
interface.
Adding FTP Mailbox Location
Administrators now have the ability to
create FTP scanning destinations
directly from KIP PrintNET.
Select “FTP” from the list of available
tabs to display configuration
parameters.
Once an FTP destination is configured,
it will be displayed in the list of
available destinations on the left hand
side of the screen prefixed by “FTP:”
Please note: Files scanned to SMB &
FTP destinations cannot be seen or
selected from the PrintNET interface.
This information is solely for use of KIP Personnel and KIP Authorized Dealers. No part of this publication may be copied,
reproduced or distributed in an y for m without express written permission from KIP America, Inc. 2011 K IP Amer ica, Inc.
- 38 -
Page 45

KIP PrintNET
Delete a mailbox
This will allow a user the ability to
delete a Mailbox (and all of its contents) on the
IPS without having to be in front of the IPS itself.
Printer Queue Management
The Printer Queue can be managed by an Administrator and allows the administrator to see where jobs
are in the queue. An Administrator also has the ability to manipulate the queue (ex. Change the
position of a job in the Queue, Delete a job in the Queue and Edit a job in the Queue).
This information is solely for use of KIP Personnel and KIP Authorized Dealers. No part of this publication may be copied,
reproduced or distributed in an y for m without express written permission from KIP America, Inc. 2011 K IP Amer ica, Inc.
- 39 -
Page 46

KIP PrintNET
Edit Job
From within the Printer Queue the selected job can be reprinted as is or edited by “Right Clicking” on
the desired job and selecting “Edit Job Ticket” and then selecting the desired available option.
This information is solely for use of KIP Personnel and KIP Authorized Dealers. No part of this publication may be copied,
reproduced or distributed in an y for m without express written permission from KIP America, Inc. 2011 K IP Amer ica, Inc.
- 40 -
Page 47

KIP PrintNET
Color Options – KIP Color Systems
The Color Options screen will allow an Administrator/User to modify the values that control the selection
buttons for printing. These include:
• CAD – Line is used for image data that consists primarily of lines such as CAD files.
• CAD – GIS is used for image data that consists of mixed line and photographic image data or
CAD renderings.
• Graphics – Line is used on graphic image data where there is an emphasis on solid fill areas such
as a pie chart or bar graph.
• Graphics – Photo is used on graphic image data where there is an emphasis on photos
• Scan-To-File – this is used for any scanned documents.
• Custom – Allows the Administrator/User to set up multiple custom filters defined by the customer.
Note: Settings/changes made here will become the default settings for the color option buttons
used in other KIP Programs.
This information is solely for use of KIP Personnel and KIP Authorized Dealers. No part of this publication may be copied,
reproduced or distributed in an y for m without express written permission from KIP America, Inc. 2011 K IP Amer ica, Inc.
- 41 -
Page 48

KIP PrintNET
Image Quality
Image Quality allows the Administrator to select from the various
selections and choose the best output for the file being printed.
Grey Composing
Grey Composing allows the Administrator to determine how the
color black will be made.
Black – Uses black toner only
CMYK – processed black using CMYK to make the color black
Dithering Mode
Dithering Mode allows the Administrator to set the desired dithering
method for the type of files being printed.
Clustered Lines – Ordered Line Pattern
Clustered Circles – Ordered Circle Pattern
Rainbow – Stochastic Pattern
Black Trapping
In general, trapping is the overlapping of colors to prevent
mis-registration and the resulting gaps of paper showing
through (The image bellow is exaggerated to show the misregistration). Black Trapping off Black Trapping On
This information is solely for use of KIP Personnel and KIP Authorized Dealers. No part of this publication may be copied,
reproduced or distributed in an y for m without express written permission from KIP America, Inc. 2011 K IP Amer ica, Inc.
- 42 -
Page 49

KIP PrintNET
Color Trapping
When one color totally surrounds another, they must have
either a choke or spread relationship. The examples below
illustrate applications of choking and spreading. Notice that
when a dominant color is surrounded by a submissive color,
the dominant color chokes the submissive color (it draws the
submissive color underneath its edges). Conversely, when a
submissive color is surrounded by a dominant color, it spreads into
the dominant color (bottom example, below).
Enable Color Management
This feature is predominantly used for Graphical printing.
Note: when printing a color line drawing, Color Management
is generally not used.
Enable Color Filtering
Allows the user to apply image quality filters that will affect and
modify the ICC profile that has been set. These filters are
created within the KIP RIP software (see the KIP RIP manual for
further information).
This information is solely for use of KIP Personnel and KIP Authorized Dealers. No part of this publication may be copied,
reproduced or distributed in an y for m without express written permission from KIP America, Inc. 2011 K IP Amer ica, Inc.
- 43 -
Page 50

KIP PrintNET
Enable Fine Line Control
Enable Line Enhancement for CAD images that contain fine line image detail. When used on Graphic
images, this feature can smooth text and long or curved edges. When enabled, grayscale lines will be
dithered with Rainbow Standard while image fill areas retain clustered dither patterns. The amount of
dithering depends on Sensitivity for Edge Detection and Edge Thickness. Sensitivity for Edge Detection
controls the amount of Rainbow Standard dithering from 0 to 100%. At 100%, the image data will use
Rainbow Standard as the dithering pattern. At 0%, Cluster dithering will occur on the entire image data.
Dithering begins from the outside edges of the line inwards and is controlled by Edge Thickness. This is a
setting from 0.0 in to .039 inches or roughly 3 pixels on each edge of the line. Suggested settings:
Intensity 88, Edge Threshold 1.
Enhance Black Text
The option to turn on or off “Enhance Black Text”
gives the user the ability to enhance otherwise
light or faded text. When the option is on, CMYK
text and graphics defined as black (C=M=Y=0,
K=100) are printed with black toner only, at the
maximum toner density of the print device.
Note: this is only for CMYK image data, RGB will not be affected.
This information is solely for use of KIP Personnel and KIP Authorized Dealers. No part of this publication may be copied,
reproduced or distributed in an y for m without express written permission from KIP America, Inc. 2011 K IP Amer ica, Inc.
- 44 -
Page 51

KIP PrintNET
Setup of Custom Filters
Administrators logged into KIP PrintNET have the ability to Manipulate or Create filters that will be used
by the other KIP Software Applications. The five default filters are: Cad (Line), CAD/GIS (Photo), Graphics
(Line), Graphics (Photo), and Scan-To-File. These five filter names will remain constant however the
administrator has the ability to manipulate their settings to best match the needs of the customer.
To Modify default filters follow these steps:
1. Select Filter (will highlight red)
2. Make the appropriate changes to the settings
3. Select Save (will highlight green)
4. Custom filter settings have now been saved
The sixth filter is a custom filter and can be configured to best match the specific needs of the customer.
There is an unlimited amount of custom filters that can be made by the
administrator.
To create custom filters follow these steps:
1. Select custom Filter (will highlight red)
2. Create a New Preset Name
3. Make the appropriate changes to the settings
4. Select Save (will highlight green)
5. Custom filter settings have now been saved and available in the drop down
list from within KIP Request, KIP PrintNET, KIP Windows Driver and KIP AutoCAD
driver..
This information is solely for use of KIP Personnel and KIP Authorized Dealers. No part of this publication may be copied,
reproduced or distributed in an y for m without express written permission from KIP America, Inc. 2011 K IP Amer ica, Inc.
- 45 -
Page 52

KIP PrintNET
Submitting Color Files for Printing
This button will send the selected print files and job
information to the host PC for printing.
In order to submit color files to the KC 80 each file has
to have color printing options associated with it prior
to submitting. If no color printing options are selected
the user will be prompted to do so.
The following window will appear
and allow the user to select the
color printing options and apply
then to the specific file or to set
to the remaining files in the job.
Once the desired filter has been set the job can be submitted. If
multiple printers have been set up the follow box will appear so that
the user can send the job to the correct printer.
This information is solely for use of KIP Personnel and KIP Authorized Dealers. No part of this publication may be copied,
reproduced or distributed in an y for m without express written permission from KIP America, Inc. 2011 K IP Amer ica, Inc.
- 46 -
Page 53

KIP PrintNET
Historical Queue
The Historical Queue size is set up under Basic Configuration and can be set from 0 Gb – Off to 25 GB –
Max size. Once set, the Historical Queue will keep track of all submitted jobs and allow them to be
called up again from within the Historical Queue and printed again as is or edited.
Edit Job
From within the Historical Queue the selected job can be
reprinted as is or edited by “Right Clicking” on the desired job
and selecting “Edit Job Ticket”
This will bring up the following window that will allow
the user to edit the Number of Copies desired and
also to change the Media selection if necessary.
This information is solely for use of KIP Personnel and KIP Authorized Dealers. No part of this publication may be copied,
reproduced or distributed in an y for m without express written permission from KIP America, Inc. 2011 K IP Amer ica, Inc.
- 47 -
Page 54

KIP PrintNET
Information / Help
The Info/Help will take a user to the page where User Manuals can be downloaded and printed if
necessary. Within the Info/Help section users may also download the current versions of software
associated with the KIP Printer.
This information is solely for use of KIP Personnel and KIP Authorized Dealers. No part of this publication may be copied,
reproduced or distributed in an y for m without express written permission from KIP America, Inc. 2011 K IP Amer ica, Inc.
- 48 -
 Loading...