

Page 1
Digital Image
Scanner
User’s Guide
Version "A" A.0
Carefully read this USER'S GUIDE before use. Keep this USER'S GUIDE for future reference.
Page 2
Thank you for purchasing the KIP 600A Monochrome / Color Wide Format Document Scanner.
This USER'S GUIDE contains functional and operational explanations for KIP 600A.
Please read this USER'S GUIDE carefully before using KIP 600A.
Please keep this USER'S GUIDE for future reference.
This device complies with part 15 of the FCC Rules. Operation is subject to the following two
conditions:
(1) This device may not cause harmful interference.
(2) This device must accept any interference received, including interference that may cause
undesired operation.
.
.
.
.
.
Do not install the Machine around other electric equipment or precision instruments.
This may be affected by electrical noise or vibration during operation.
If the Machine is installed near other electric equipment, such as TV or radio, interference to
said equipment, such as noise or flickering may occur.
Use a separate power line and install the Machine as far as possible from said equipment.
As an ENERGY STAR ® Partner, Katsuragawa Electric Co., Ltd. has determined
that this product meets the
The International
promotes energy saving through the penetration of energy efficient computers and other office
equipment. The program backs the development and dissemination of products with functions that
effectively reduce energy consumption. It is an open system in which business proprietors can
participate voluntarily. The targeted products are office equipment such as computers, monitors,
printers, facsimiles, copiers, scanners, and multifunction devices. Their standards and logos are
uniform among participating nations.
The symbol shown indicates that this product conforms to Directive
2002/96/EC of the European Parliament and the council of 27
January 2003 on waste electrical and electronic equipment (WEEE)
and does not apply to countries outside of EU.
ENERGY STAR ® Office Equipment Program is an international program that
ENERGY STAR ® guidelines for energy efficiency.
NOTE
KIP 600A should be connected with a supported KIP printer through a USB cable for any
operation. KIP 600A does not operate as a single unit.
(1)
Page 3
Safety Warnings
The following warnings are very important in order to safely use this machine.
These notes are important in preventing danger to the operator or operation of the product.
The following symbols are found throughout the USER’S GUIDE and have the following meaning:
WARNING
This WARNING mark means that there is a possibility of death or serious
injury if you ignore or do not follow the said instruction.
CAUTION
This CAUTION mark means that there is a possibility of injury or physical
damage if you ignore or do not follow the said instruction.
When marked with this symbol, “DO NOT ATTEMPT”
When marked with this symbol, “pay close attention to”
(2)
Page 4
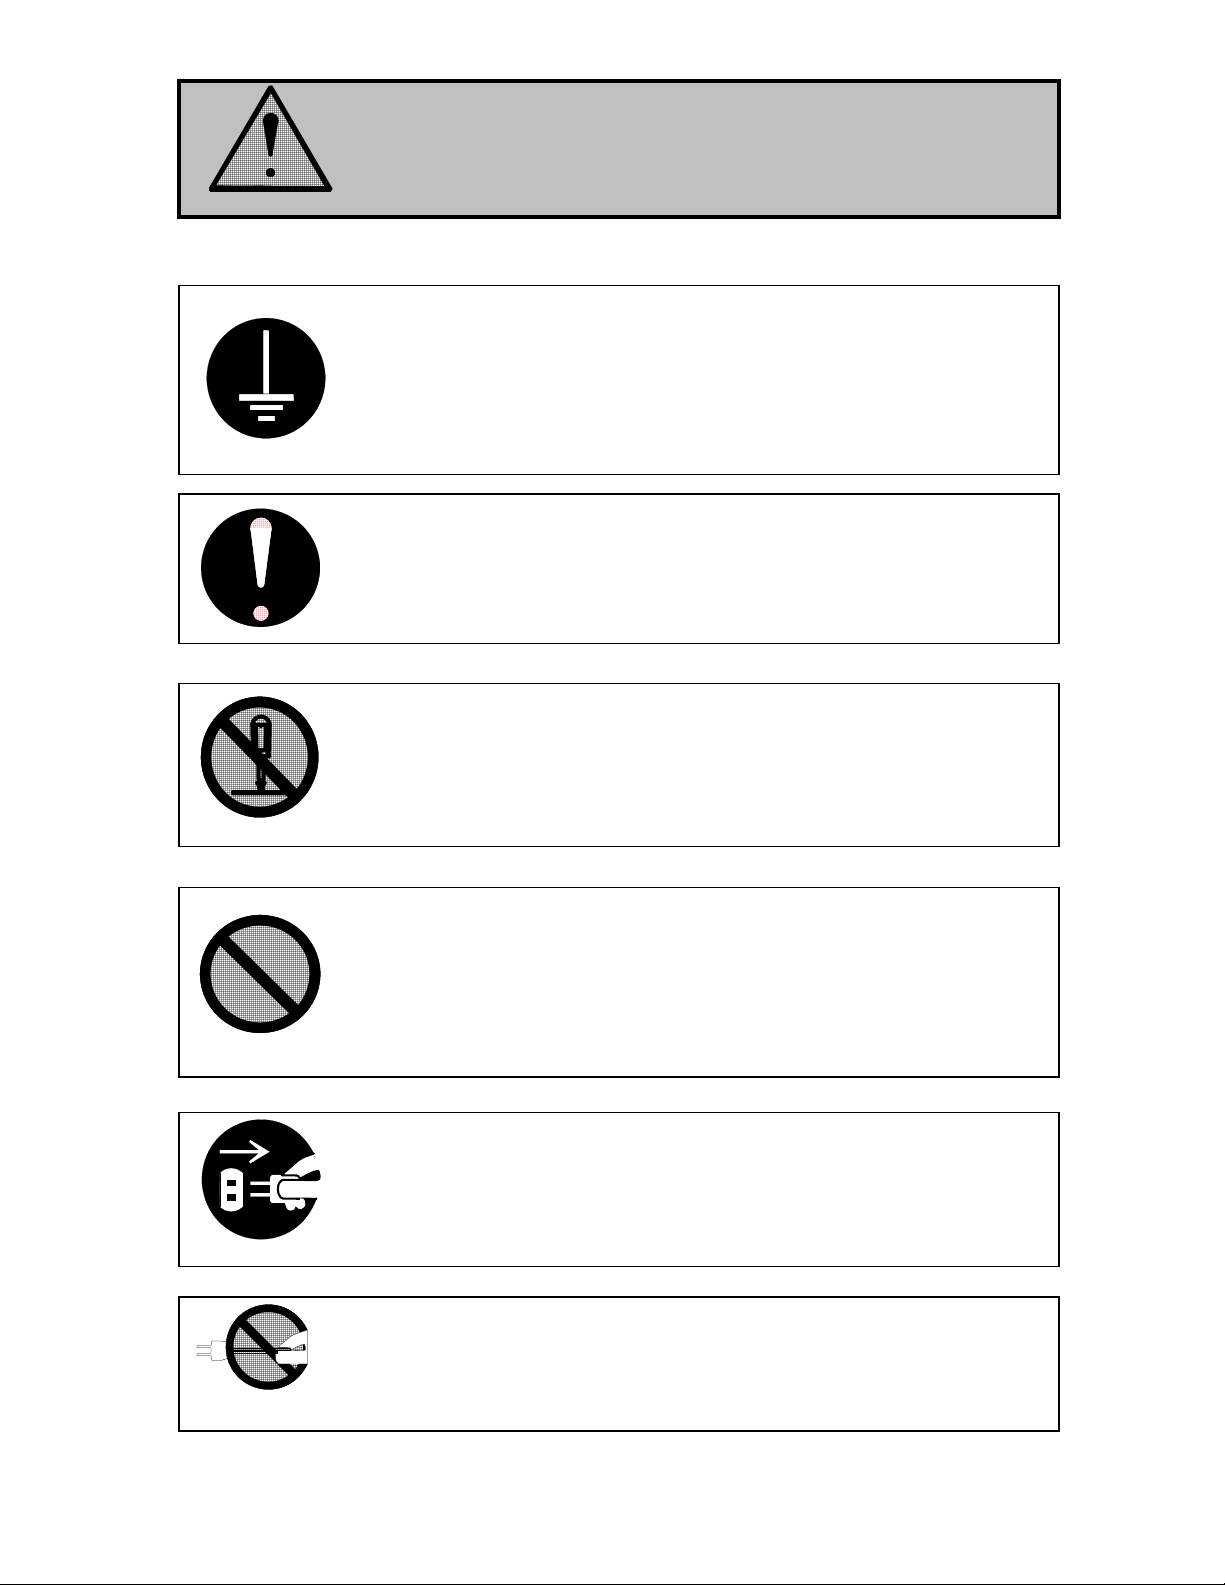
WARNING
Ground the machine with a correct ground source or you may be
electrically shocked.
1. The power source should be as follows:
100-120VAC/200-240VAC, 50/60Hz, 1A or higher
2. Use a circuit with a dedicated breaker.
3. Install the machine as close to the wall outlet as possible.
4. If you want to move the machine, contact your service personnel.
1. Do not remove the screw and do not open the cover if not said to do so
in this User’s Manual. If you ignore this warning, you may be burnt or
receive an electrical shock due to a hot part or electrically charged part
inside.
2. Do not disassemble or tamper with the machine.
It may result in a fire or an electrical shock.
1. Do not plug in the machine into a multi-wire connector in which some
other equipment is plugged into.
It may cause a fire due to outlet overheating.
2. Do not damage the power cord by stepping on or placing heavy objects
on it.
If the power cord is damaged, it may cause a fire or you may receive an
electrical shock. REPLACE THE CORD IF DAMAGED!
1. Do not put a flower vase, a flowerpot or any water-filled objects on the
machine.
Spilt water could cause a fire or an electrical shock.
2. If the machine generates an unusual smell or noise, turn it off and
unplug it from the wall electrical outlet immediately.
Be sure to catch the plug when you unplug the machine.
Otherwise, you may damage the power cord and may result in a fire or an
electrical shock.
(3)
Page 5
CAUTION
Do not install the machine in a humidified room or a dusty room.
Also, do not install the machine on an unstable floor as injuries may occur.
Be careful not to catch a finger in the Top Cover.
1. Unplug the machine before you move it.
The power cord may damage and it may result in a fire or an electrical
shock.
2. If you do not use the machine for a long duration (holidays, company
shutdown) turn off and unplug the printer from the outlet for safety.
(4)
Page 6

TABLE OF CONTENTS
Part 1 Basic Functions
Part 2 Copy - Monochrome
Part 3 Copy - Color
Part 4 Scan - Monochrome
Part 5 Scan - Color
Part 6 Help / Configuration Screen
(5)
Page 7

Part 1
Basic Functions
page
Chapter 1 Before Use 1- 2
1. 1 Installation Requirements 1- 2
1. 2 Originals Prohibited from Duplication 1- 3
1. 3 Features 1- 4
1. 4 Specifications 1- 5
1. 5 Appearance 1- 6
1. 5. 1 Front View 1- 6
1. 5. 2 Rear View 1- 7
1. 5. 3 Operation Panel 1- 8
1. 6 Specifications for Scan Originals 1- 9
1. 7 Options 1-12
Chapter 2 Basic Operation 1-13
2. 1 Turning on KIP 600A 1-13
2. 2 Turning off KIP 600A 1-15
2. 3 Positioning Original 1-16
2. 4 Canceling the Current Scan 1-20
2. 5 Canceling Power Saving Mode 1-21
2. 6 Removing Original Tray 1-22
Chapter 3 Troubleshooting 1-23
3. 1 Original Misfeed 1-23
3. 2 ERROR LED 1-25
3. 2. 1 ERROR LED Lights 1-25
3. 2. 2 ERROR LED Blinks 1-25
3. 3 Original Not Carried 1-25
3. 4 Other errors 1-26
3. 4. 1 Top Cover Open 1-26
3. 4. 2 Toner Low 1-26
3. 4. 3 Roll Empty 1-27
3. 4. 4 Color Printer Configuration 1-27
3. 5 Uneven Density
Chapter 4 Maintenance 1-28
4. 1 Cleaning 1-28
4. 1. 1 Scan Glass, Feed Roller and Guide Plate 1-28
4. 1. 2 Sensors 1-31
5. 0 Utility Software
5. 1 Installation
5. 1. 1 Installing USB Driver
5. 1. 2 Installing Utility Software
5. 2 Starting Utility Software
5. 3 Displaying Scanner Information
5. 4 Scanner Adjustment
Part 1 Basic Functions 1-1
Page 8

Chapter 1 Before Use
1. 1 Installation Requirements
The following conditions have to be satisfied when installing KIP 600A Scanner.
1. Satisfy the following input power condition.
Voltage 100-240VAC
Current 1A or higher
Frequency 50 / 60Hz.
KIP 600A can be supplied with any voltage within 100 to 240VAC. If the voltage is within this
range, please connect to the outlet simply. (No setting has to be changed.)
2. Make sure to connect the power plug to the outlet that is provided with the Ground Terminal.
3. To completely disconnect the machine from the power source, draw the power plug from the
outlet.
The outlet must be easily accessible near the equipment.
4. The temperature must be within the range from 10 to 32 degrees centigrade, and the humidity
must be 20 to 80% RH.
5. Prevent the machine away from water, fire, dust or direct sunlight.
If it is impossible to avoid the direct sunlight, please pull the curtain to intercept the sunlight.
6. The floor must be enough strong to withstand machine’s weight (About 57lbs or 26kg).
7. Keep enough space around the machine as follows.
(The following values are the least requirements. Please keep a wider space if possible.)
[Rear]
KIP 600A
12” or wider
[Front]
12” or wider
12” or wider
8” or wider
Part 1 Basic Functions 1-2
Page 9
1. 2 Originals Prohibited to Copy
It is not necessarily allowed to copy every kind of original.
You may be punished by the law if only you possess the copy of some kind of original.
We recommend you to consider enough before you copy such original.
[Originals prohibited from copying by the law]
1. It is not allowed to copy Currency (Bill, Money, Bank Note, etc.); Government issued
Negotiable Instruments (National Bonds, Security, Local Debt Bonds, etc.).
2. It is not allowed to copy Foreign Currency or Foreign Negotiable Instruments.
3. It is not allowed to copy unused postal stamps or government postcards without permission
to make replica from Government,
4. It is not allowed to copy Government issued revenue stamps, certificate stamps which are
prescribed by Liquor Tax Act or the Commodity Tax Act.
[Special items to be cared]
1. It is warned by the government to copy private issued securities (stock certificate, draft,
check, goods ticket, etc.), commutation ticket or book of tickets, excluding that some specific
company copies such originals as many as it requires for its own business.
2. We recommend you not to copy freely such originals as government issued passport, public
or private issued licenses, automobile inspection certification, Ids and tickets like pass or
meal.
Reference Law Prohibited items to copy
Regulations to control fake currency and
Bond.
Control Law against Forged & faked
Foreign Currency, Bill, Bank Note and Bond
Forged postal stamps control law Unused postal stamps or government postcards
Forged revenue stamps control law Government issued revenue stamps, and
Currency similarity securities Control Law Private issued securities (stock, draft, check,
[Originals protected by the copyright]
It is prohibited to copy such originals as book, music, paintings, printed copy, maps, drawings,
movie and pictures which are protected by the copyright, except for personnel or family use or
similar purpose.
Currency (Bill, Money, Bank Note, etc.),
Government issued Negotiable Instruments
(National Bonds, Security, Local Debt Bonds,
etc.)
Foreign Currency or Foreign Negotiable
Instruments
certificate stamps prescribed by Liquor Tax Act
or Commodity Tax Act
goods ticket, etc.), commutation or book tickets
Part 1 Basic Functions 1-3
Page 10

1. 3 Features
KIP 600A has the following features.
Wide format image scanner
KIP 600A is available for various sized originals.
11 – 36” (257 - 914mm) in width
8.5” – 75 feet (210mm – 25,000mm) in length.
High speed scanning
KIP 600A provides quick scan operation (65mm/s in monochrome / grayscale, 22mm/s in color on
600 dpi).
High resolution scanner head
KIP 600A’s 600dpi CIS enables clear and high quality color / monochrome images.
Space-saving
KIP 600A is a small footprint component to fit on most of your preferred space.
Energy-saving
KIP 600A has Power Saving Mode for reduced power consumption.
Copier Features
• Easy Touch screen control panel
• Collated Sets copying
• Real-time image preview
• Recall/reprint previous jobs
• 600 x 600DPI copy quality
• Integrated Accounting and Reports for all copying, network printing, scanning
• Network ready copier
• Simple Operator assistance for every day tasks (toner replacement procedure)
• Image stamping
• Information center displays all support information, meter readings, and serial number.
• Color copy to third party colour wide format inkjet devices (Optional)
Scan-to-File Features (Optional)
• Scan directly to PDF, TIF Group 4, Cals Group 4
• Scan to file to FTP, LAN location or personal inbox on the KIP 5000
• Selected resolution – up to 600 DPI optical
• Automatic original size recognition
• Retrieve scanned image files with KIP Request
• Scan to color (Optional)
Part 1 Basic Functions 1-4
Page 11
1. 4 Specifications
Model KIP 600A
Scanning method Sheet through type
Reading sensor Contact Image Sensor
(for A4 size x 5 pieces in staggered arrangement)
Light source LED (R/G/B)
Setting Face up
Starting point of scan Center
Original width 11 - 36” / 257 - 914mm
Original thickness 0.05 - 1.6mm
Margin 3.5 to 4.5mm from leading / trailing edge
Color mode Monochrome : Binary
Grayscale : 4 bit / 8 bit
Color : 24 bit
Scanning speed
(on 600 dpi)
Resolution 600dpi
Interface USB 2.0 (Maximum: 5VDC)
Input power Voltage: 100 - 240VAC
Monochrome : 65mm/s
Grayscale : 65mm/s
Color : 22mm/s
Current: 1A (at 100V)
Frequency: 50/60Hz
NOTE
KIP 600A accepts the inlet voltages of 100 to 240VAC
without additional voltage transformation.
Power consumption 60W maximum
Environmental conditions 10-32 degrees centigrade, 20-80%RH (Non condensing)
Acoustic noise 60 db or less (during 65mm/s scan operation)
Outer dimension 1,097mm (Width) x 408mm (Depth) x 170mm (Height)
or 43” (Width) x 16” (Depth) x 7” (Height)
Weight Approximately 26kg (57.4 lbs)
NOTE
These specifications are subject to change without notice.
Part 1 Basic Functions 1-5
Page 12
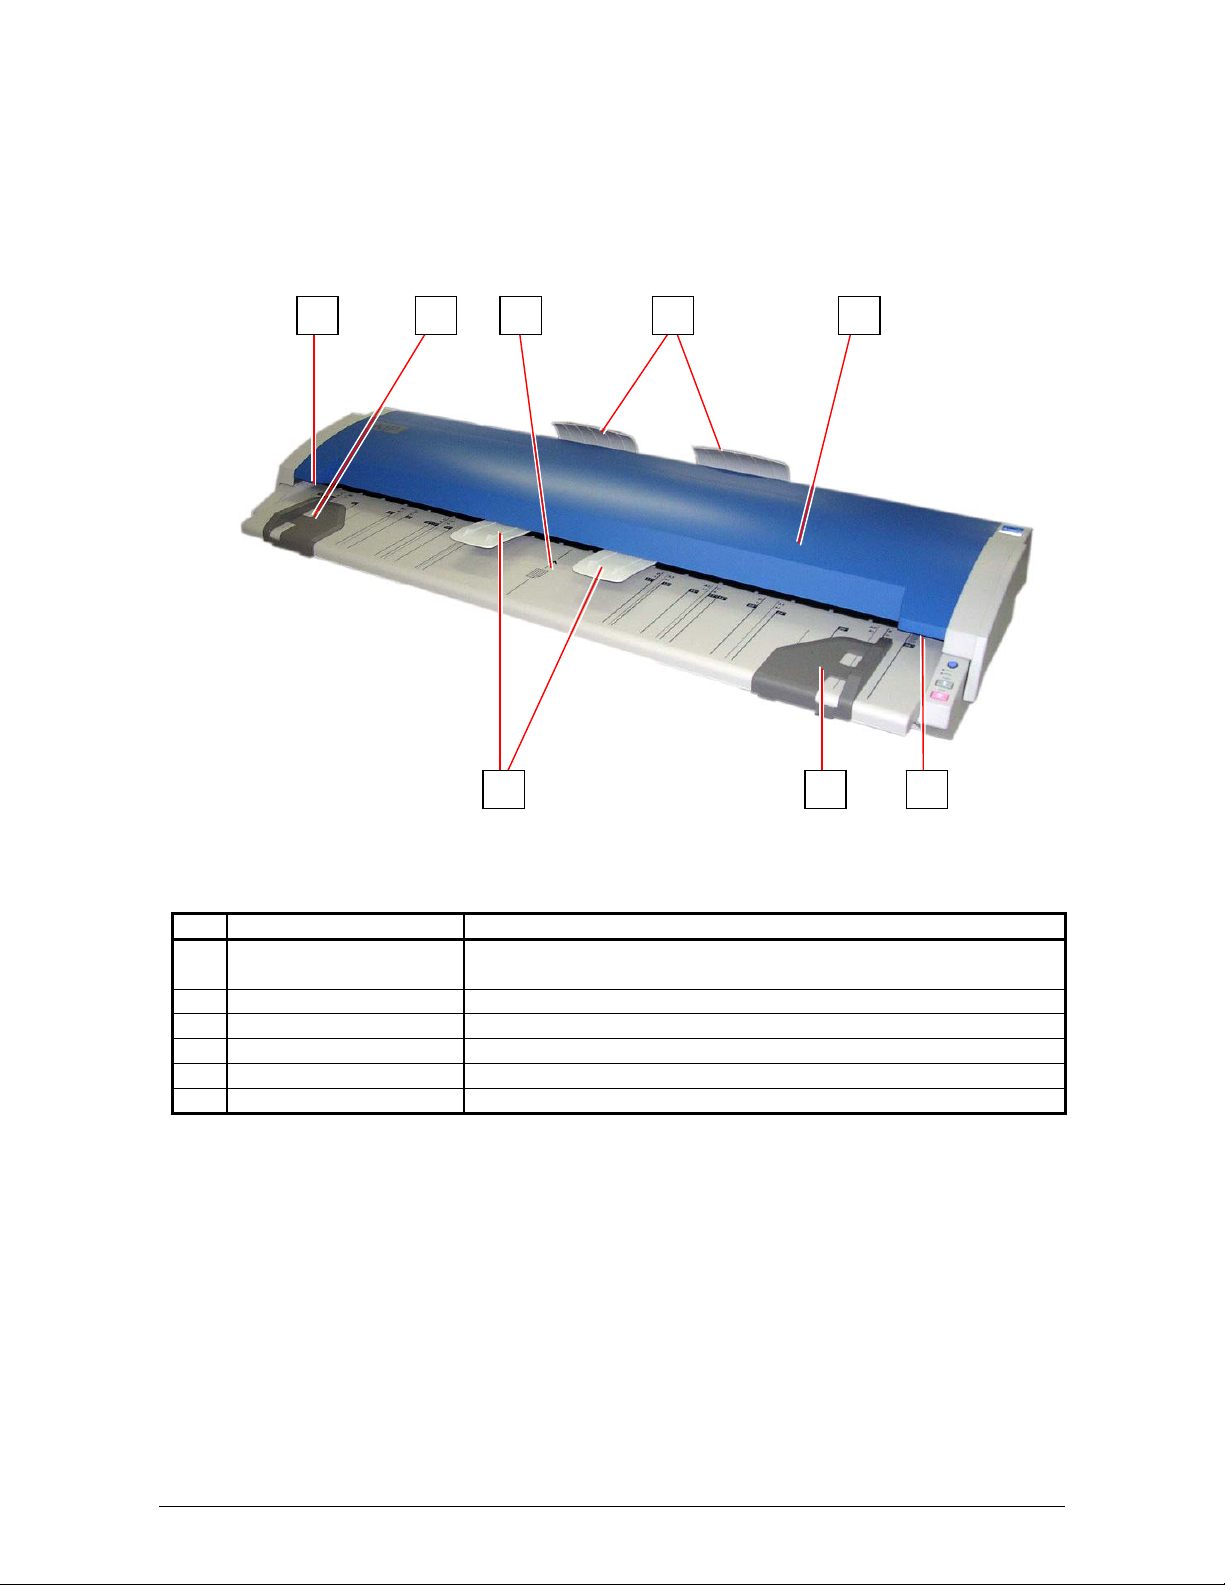
1. 5 Appearance
1. 5. 1 Front View
4
15 23
4
56
No. Part Name Function
1 Top Cover Scan originals.
Opened when cleaning or misfeed.
2 Original Tray Receives an ejected original.
3 Original Table Used to place an original.
4 Original Guide Guides an original to the scanner straight.
5 Lever Locks Top Cover.
6 Eject Guide Prevents an ejected original from misfeed.
Part 1 Basic Functions 1-6
Page 13
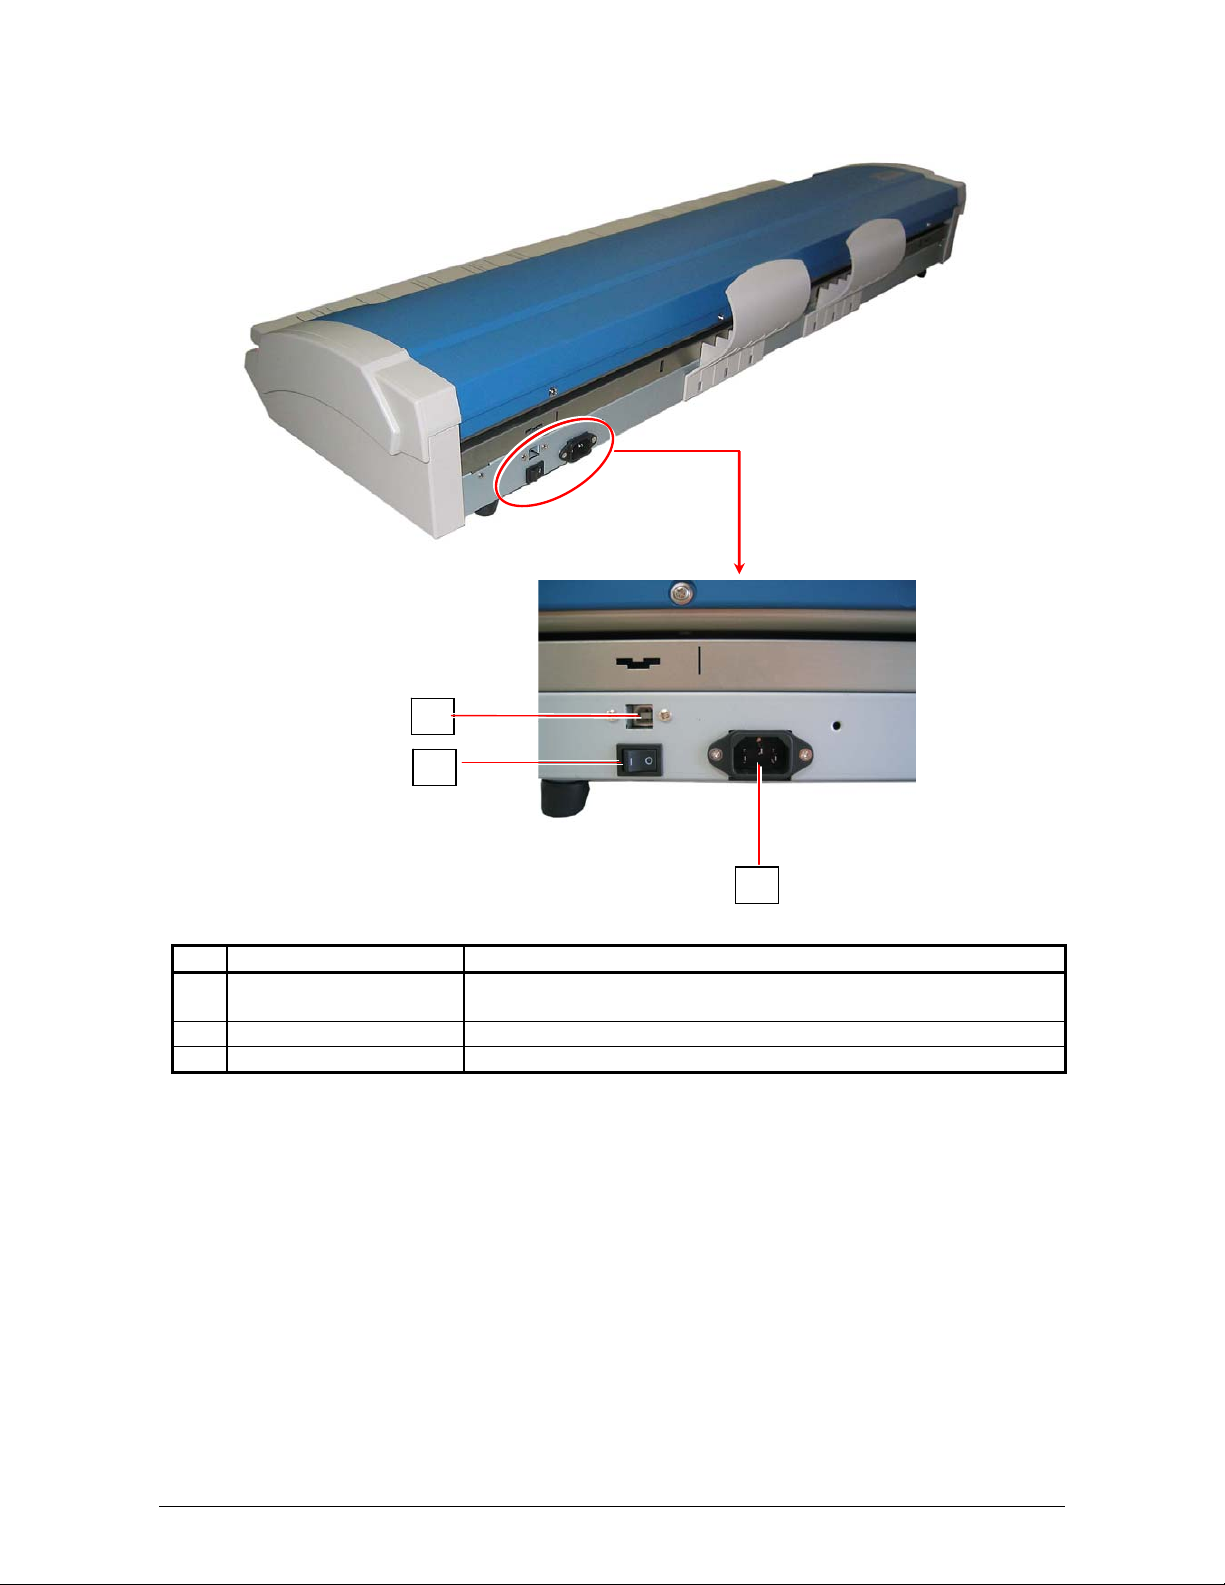
1. 5. 2 Rear view
1
2
3
No. Part Name Function
1 USB Terminal Connects to the printer through a USB cable.
(Maximum: 5VDC)
2 Main Power Switch Turns KIP 600A on / off.
3 AC Inlet Connects the power cord.
Part 1 Basic Functions 1-7
Page 14
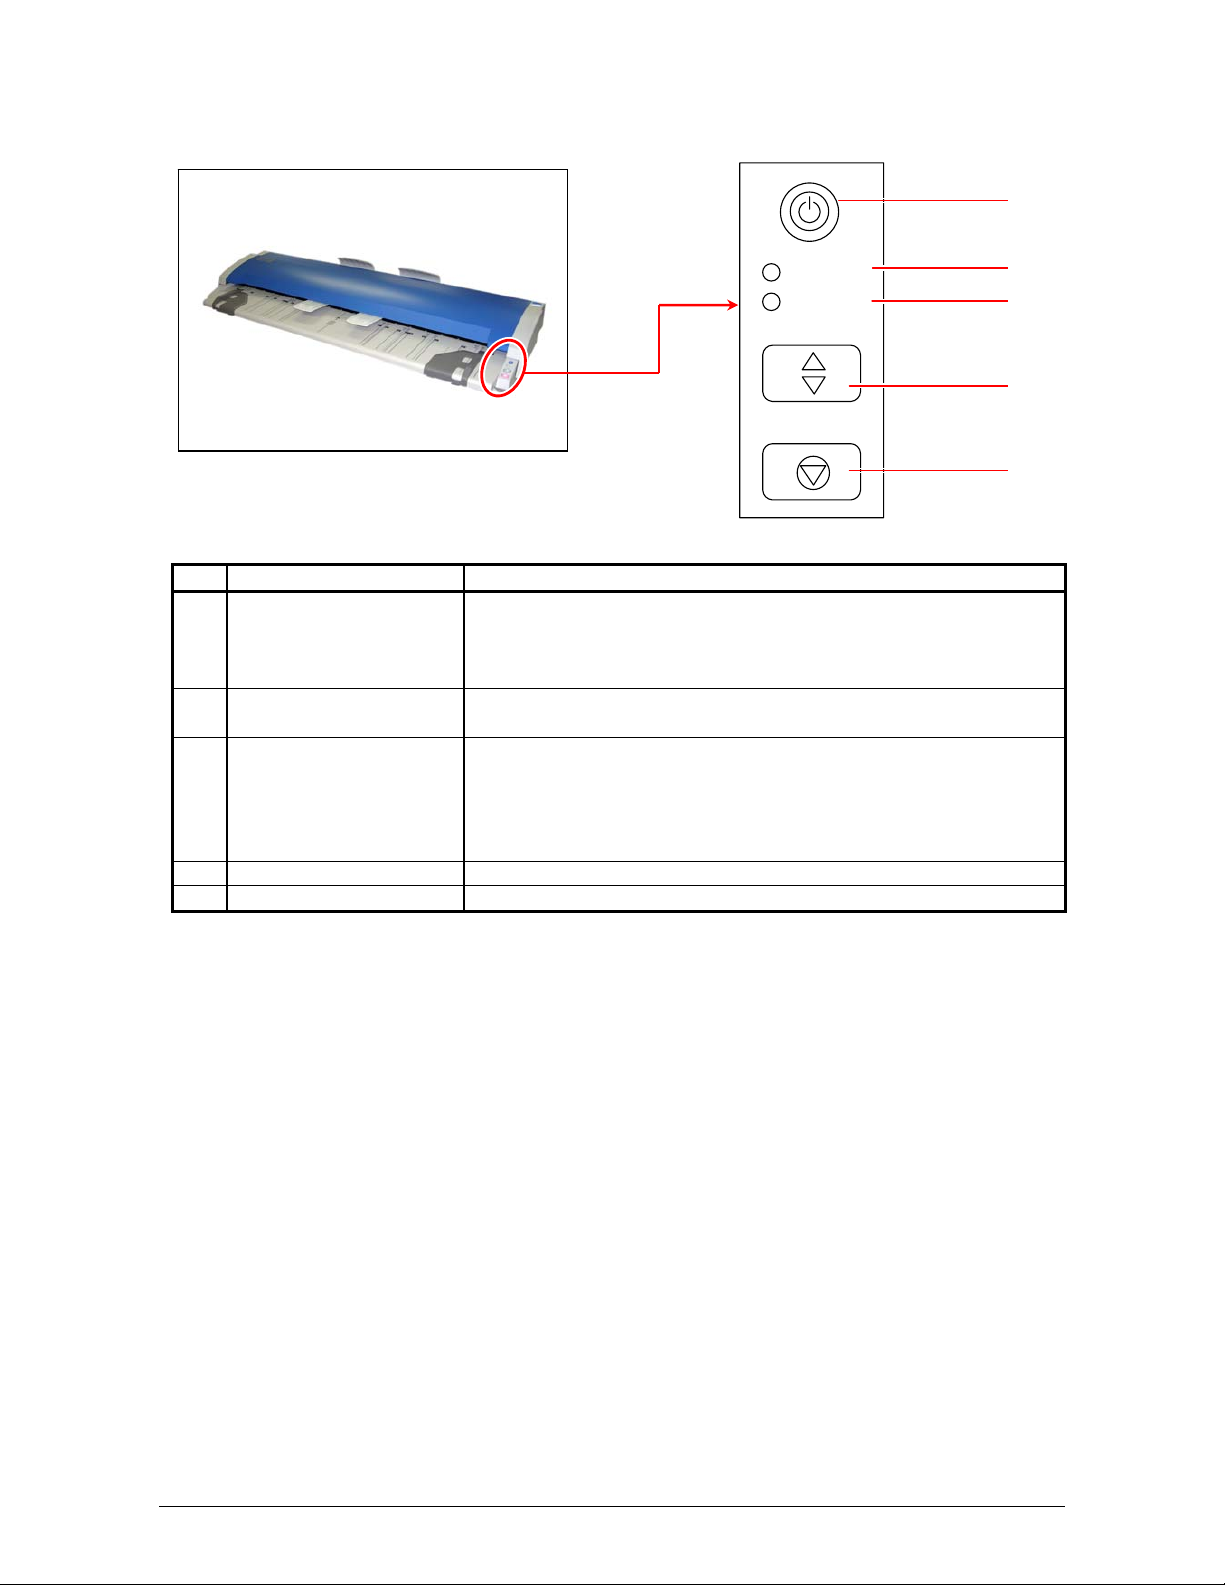
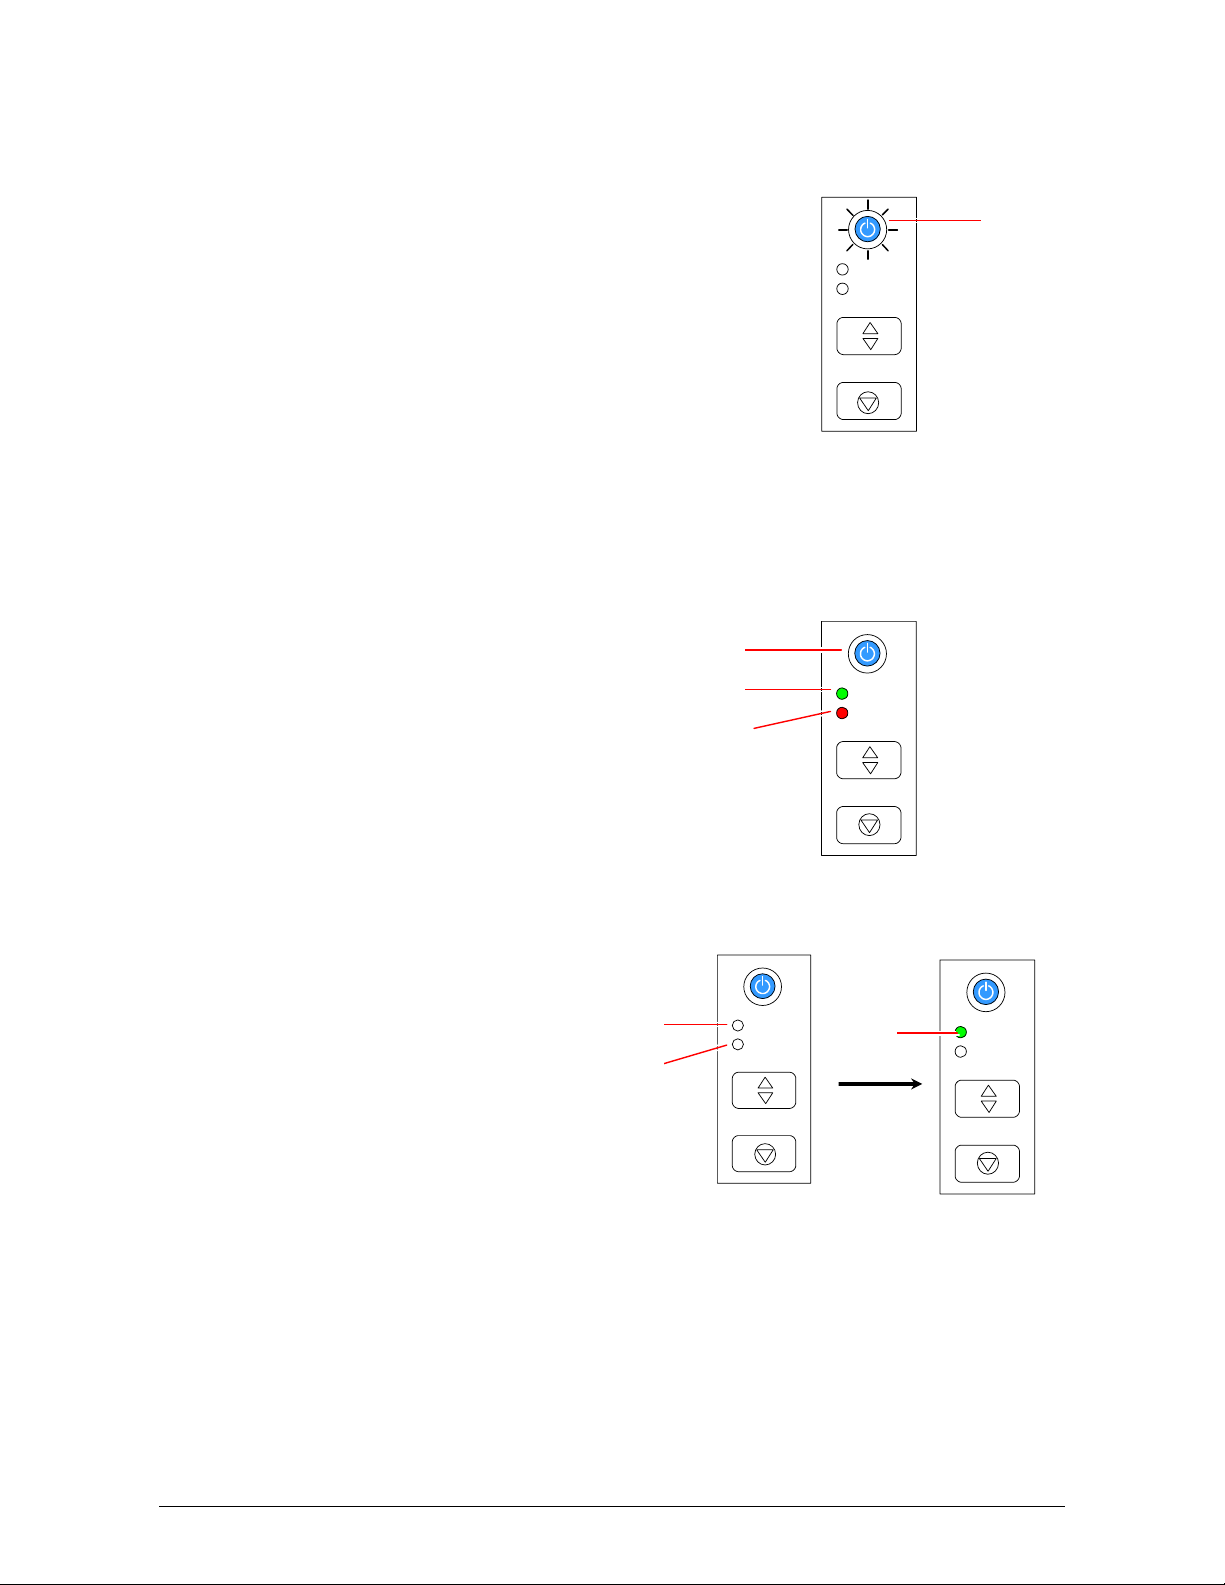
1. 5. 3 Operation Panel
1
READY
ERROR
EJECT
STOP
No. Part Name Function
1 Power Button Turns KIP 600A on / off.
Lighting: turned on
Not lighting: turned off
Blinking: Power Saving Mode
2 READY LED Lighting: ready to scan
Not lighting: ready to start scanning the placed original
3 ERROR LED Lighting: some significant errors may occur
Blinking:
x an original is left on the KIP 600’s startup
x the STOP key is pressed during scan
x an original is misfed
4 EJECT Key Ejects the original.
5 STOP Key Stops the original during scan.
2
3
4
5
Part 1 Basic Functions 1-8
Page 15

1. 6 Specifications for Scan Originals
Scan originals must satisfy the following specifications.
(Both the image quality and original feeding are guaranteed.)
Thickness 0.05 - 0.65mm
Width 11 - 36” / 257-914mm
Length 8.5” – 75 Ft / 210 -25,000mm
Reference
A thicker original than 0.65mm (Max. 1.6mm) is available to scan.
However we will not guaranteed the image quality or original feeding for such originals.
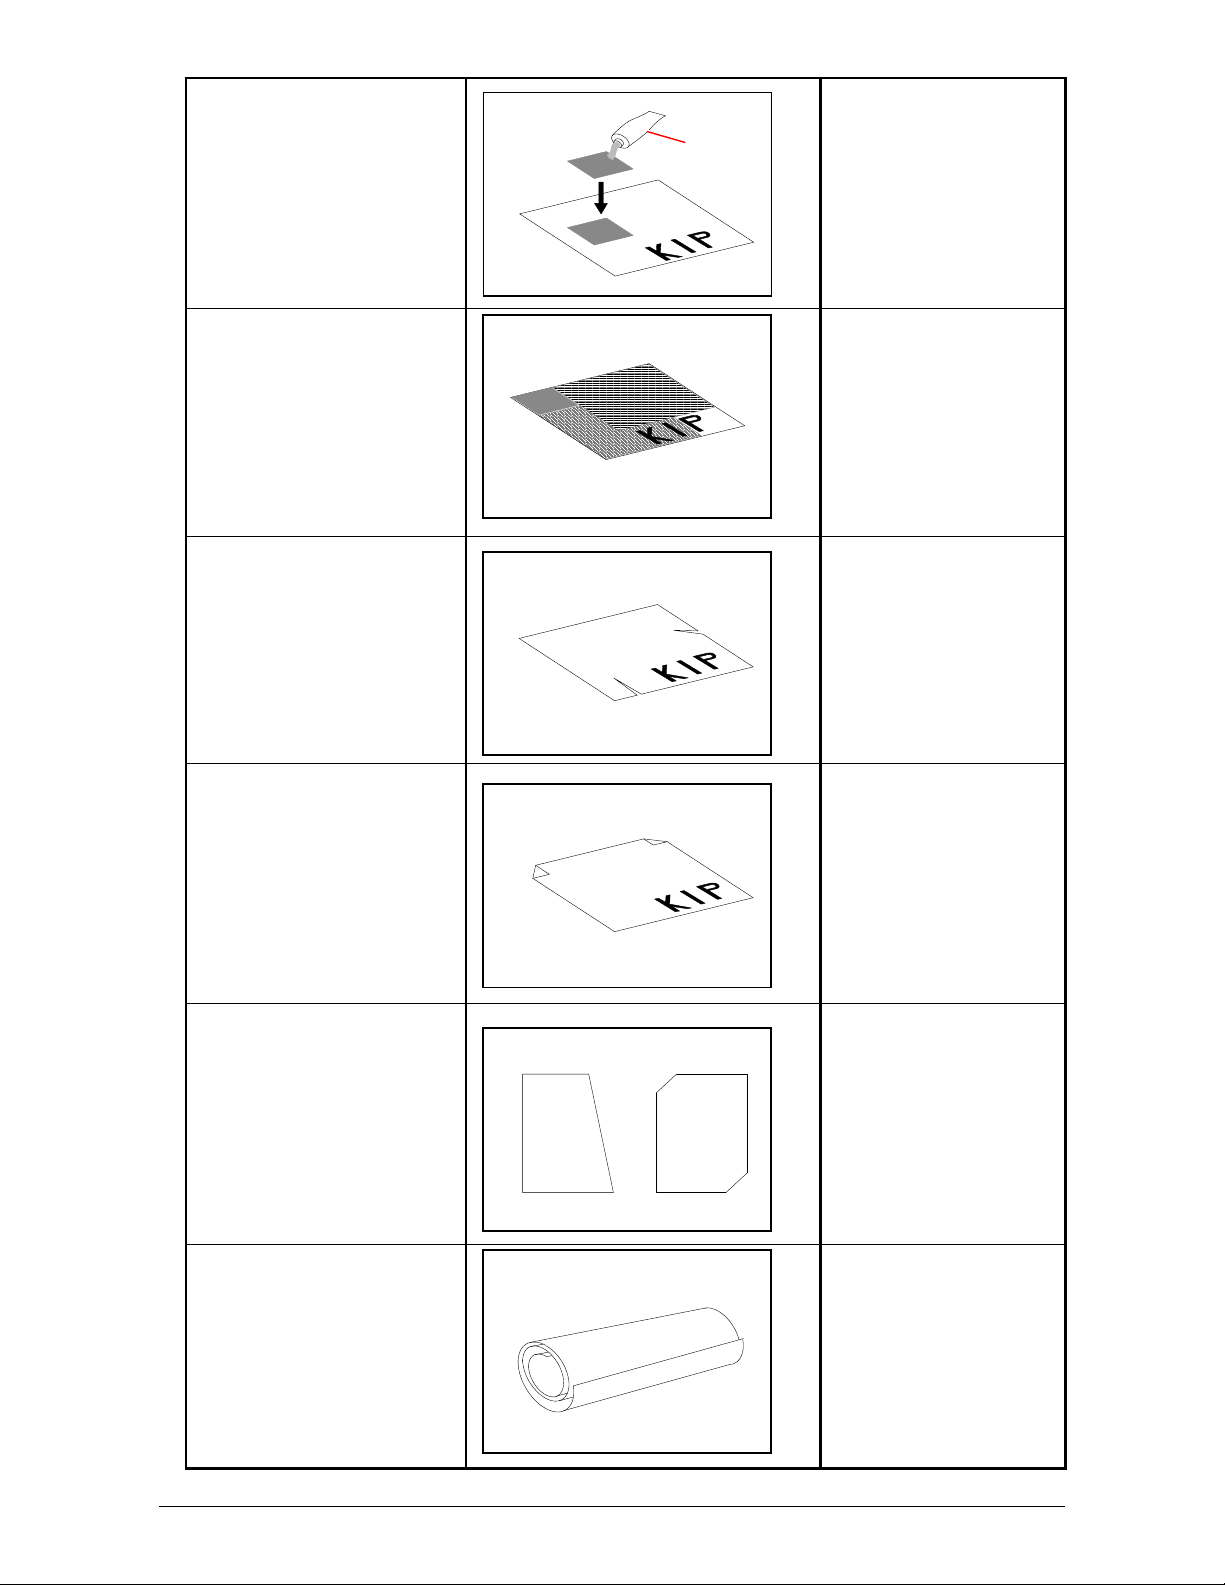
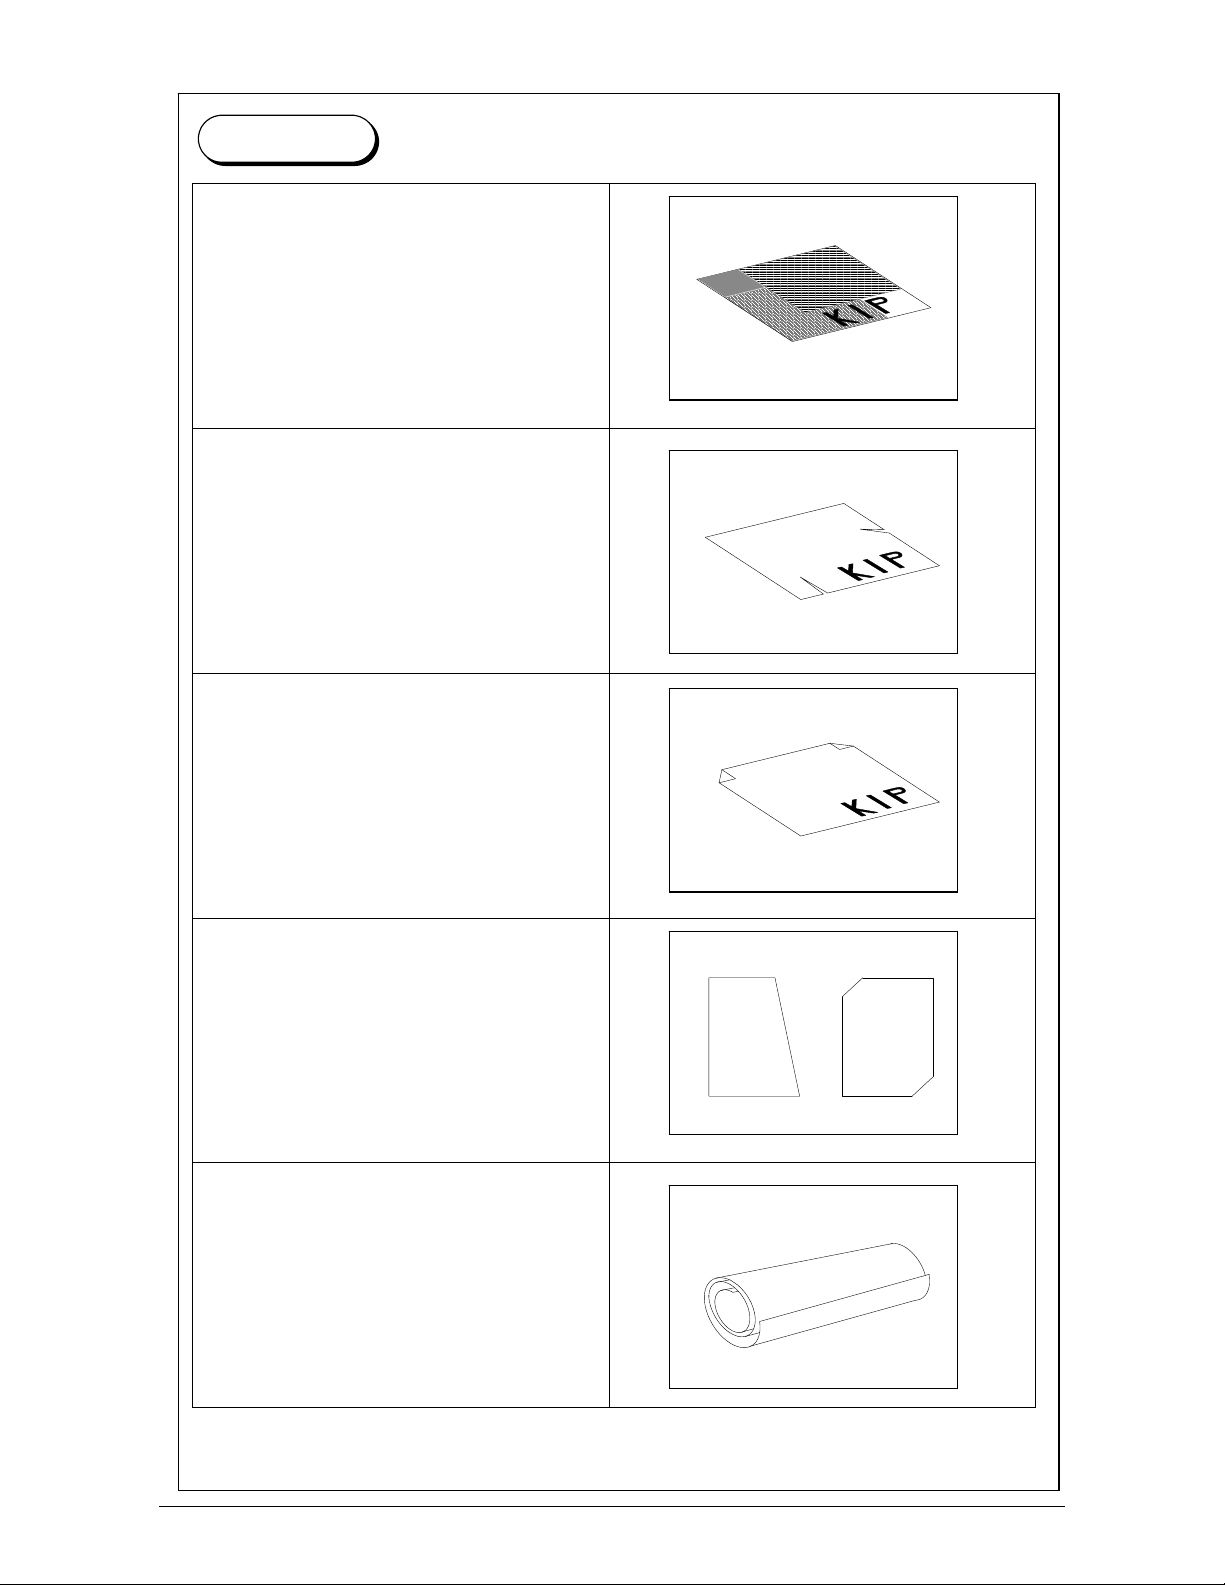
Do not scan the following kinds of originals. The original or the scanner may damage.
Wet (wet ink)
Metal or fabric material
Clipped or stapled
Wet
Metal Fabric
KIP KIP
Clipped Stapled
KIP KIP
Part 1 Basic Functions 1-9
Page 16
Pasted With a carrier sheet, it is
possible to scan.
Paste
Patched With a carrier sheet, it is
possible to scan.
Torn With a carrier sheet, it is
possible to scan.
Folded
(especially at leading edge)
Not square With a carrier sheet, it is
With a carrier sheet, it is
possible to scan.
possible to scan.
KIP KIP
Excessively curled
(a diameter of 50 mm or
less)
With a carrier sheet, it is
possible to scan.
Part 1 Basic Functions 1-10
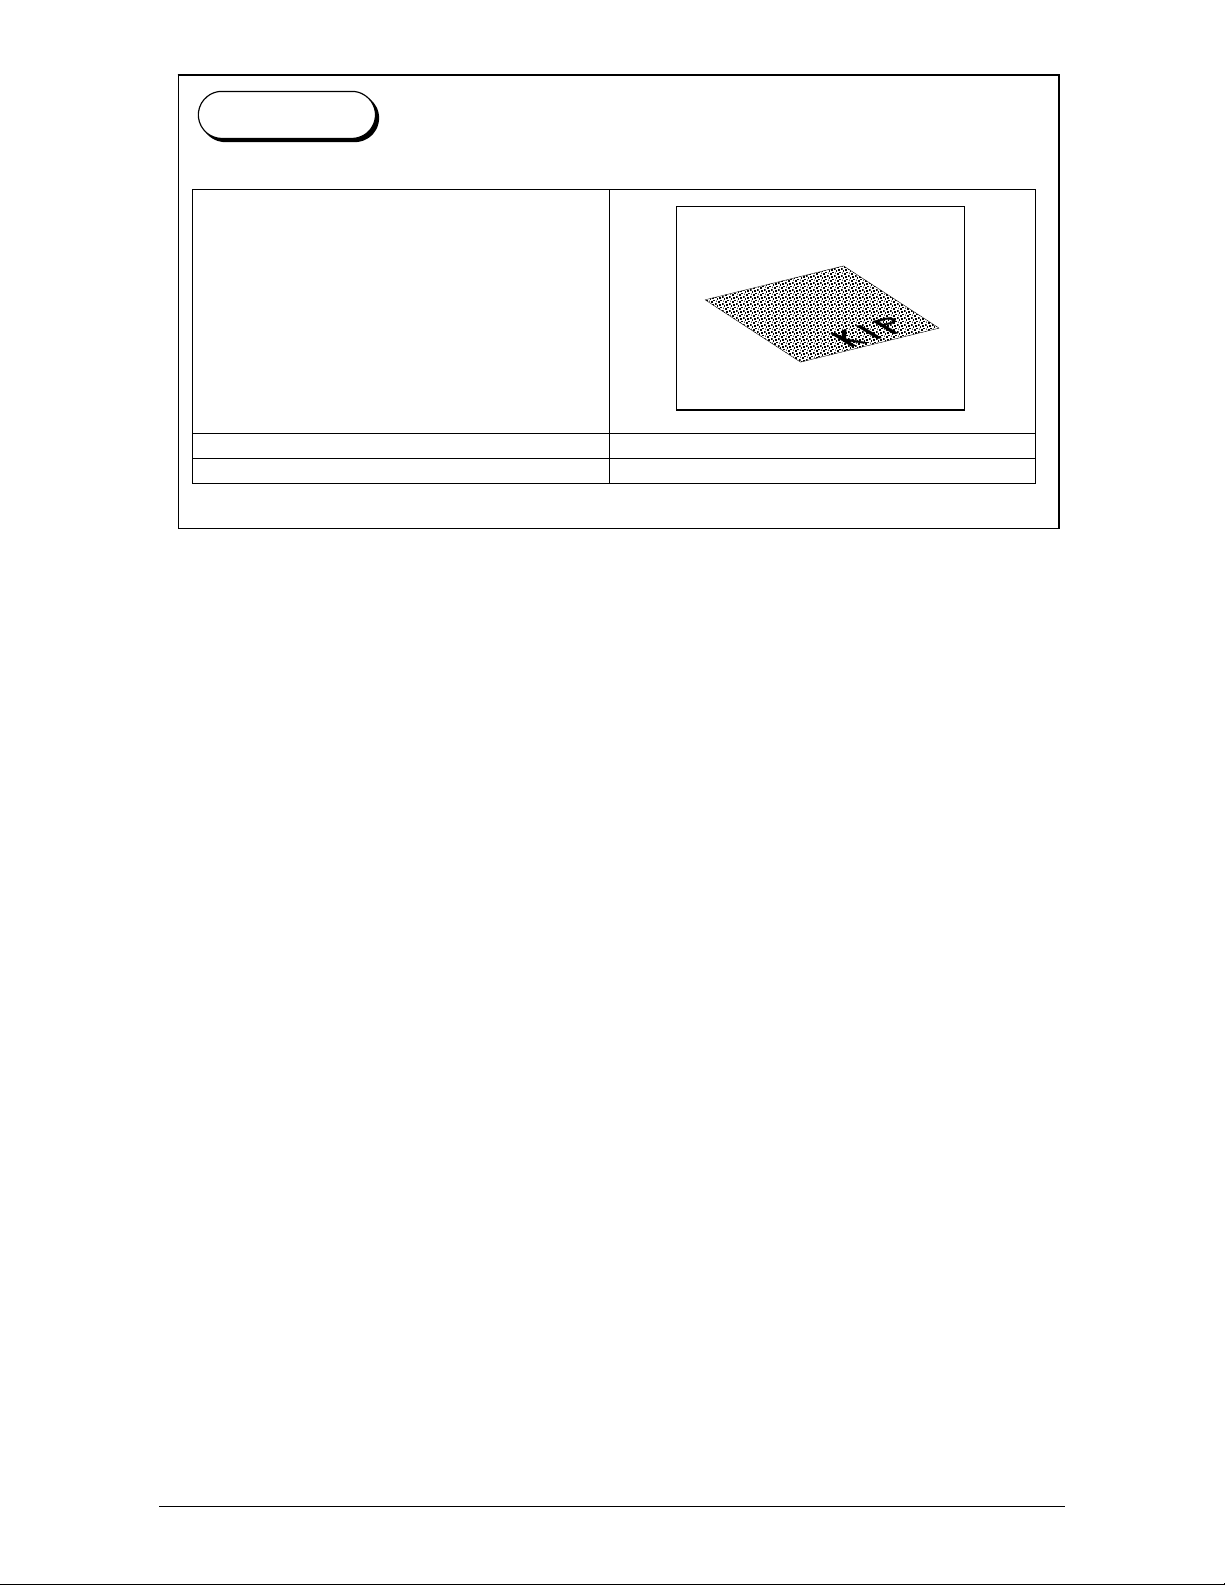
Page 17
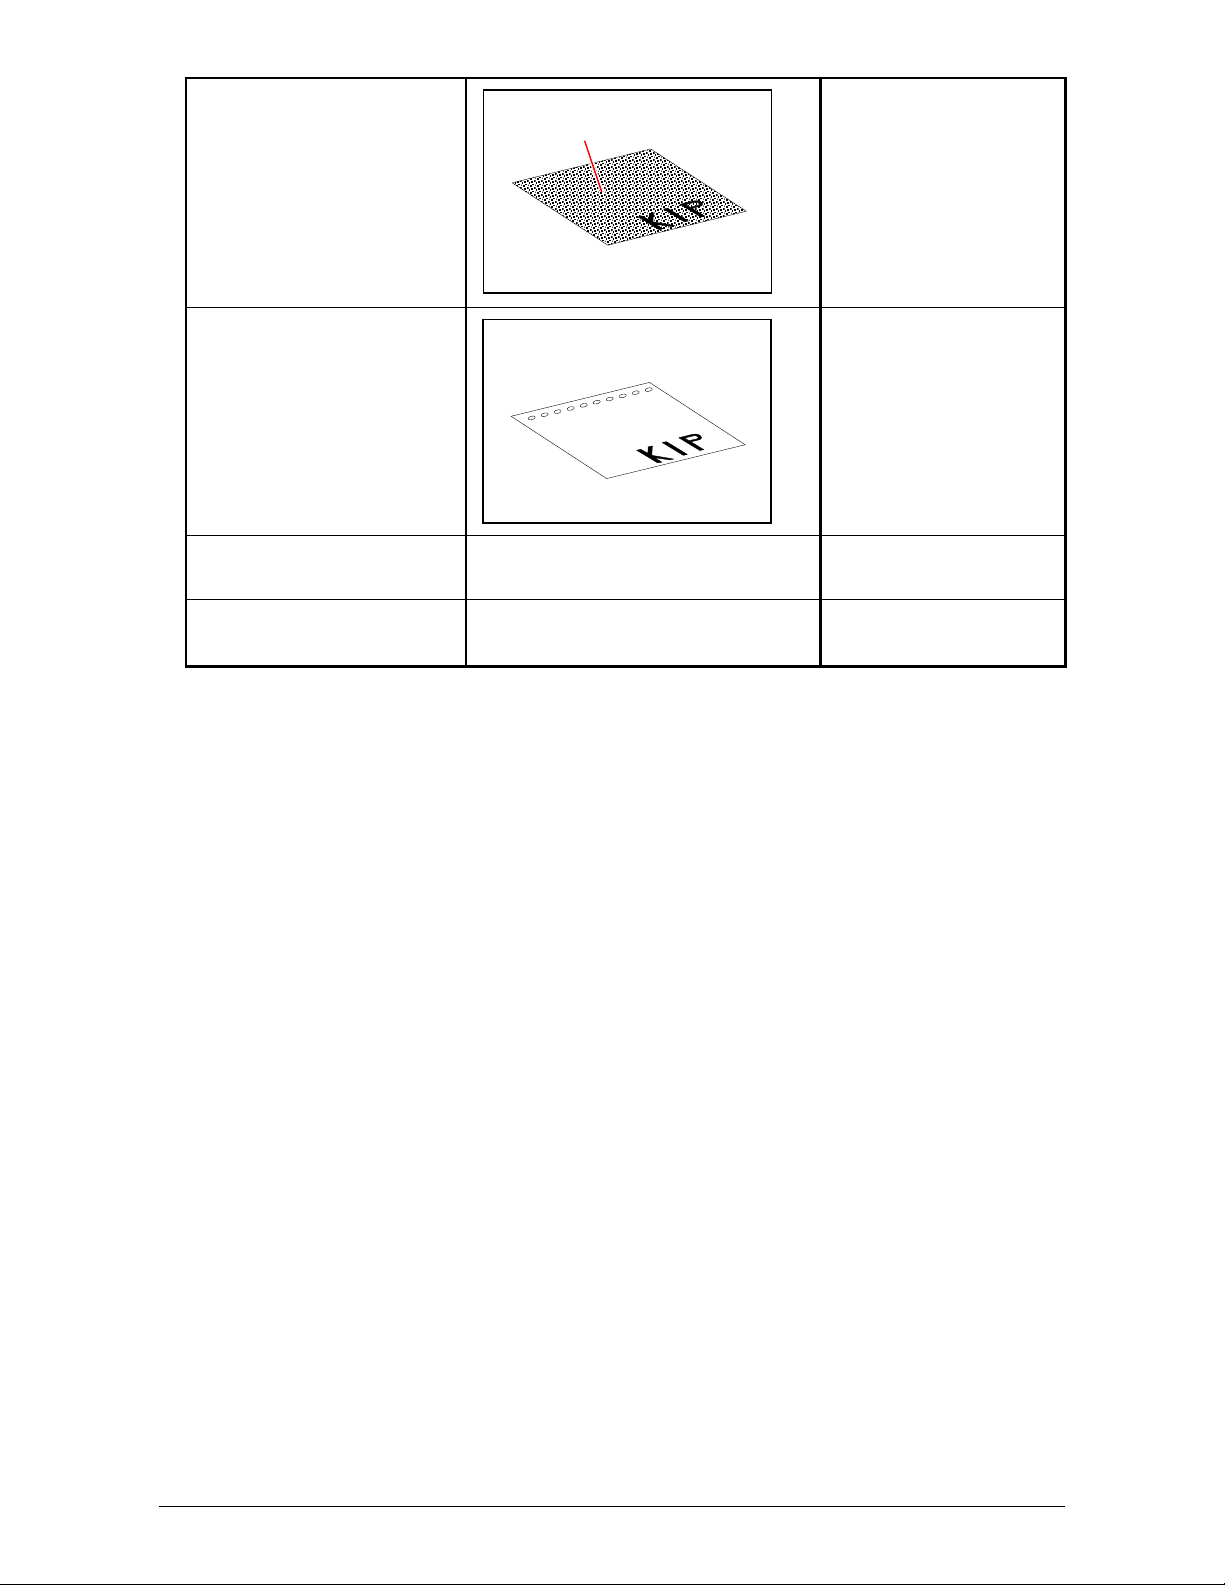
Rough surface
(Carbon paper for example)
Punched With a carrier sheet, it is
Extremely thin and soft With a carrier sheet, it is
Transparent With a carrier sheet, it is
With a carrier sheet, it is
Rough surface
possible to scan.
possible to scan.
possible to scan.
possible to scan.
Part 1 Basic Functions 1-11
Page 18

1. 7 Options
Please contact your Authorized Reseller for the following options available for the KIP System:
1) Scan Monochrome
Adds the functions of scan to file in monochrome to local drives or FTP sites in a variety of file
formats.
2) Color Copy / Color Scanning
Adds the advanced functions of color copy to third party device (with a simple closed loop
calibration) and color scan to file.
3) PDF / PS Printing
Allows direct PDF and Postscript file format printing from various applications including
Request (See KIP printer’s manual.)
4) Print Tray - Slant Stacker KIP 200
To accommodate a larger quantity of prints than the standard rear print tray a rearward
stacking system is available (See KIP printer’s manual.).
5) Print Tray - KIP 300 Vertical Stacker
This device separates A, B and C sizes from D and E documents. It can hold up to 250
documents (See KIP printer’s manual.).
(for KIP Printer)
6) Print Tray - KIP 1200
This device is a horizontal stacker that holds in excess of 500 documents of various sizes (See
KIP printer’s manual.).
7) Folding (KIPFold)
For fan and crossfold functions as a copier, or network printer (See KIP printer’s manual.).
All options and accessories are subject to change without notice. Please contact your local
Authorized Reseller for details on current available options.
Part 1 Basic Functions 1-12
Page 19
Chapter 2 Basic Operation
2. 1 Turning on KIP 600A
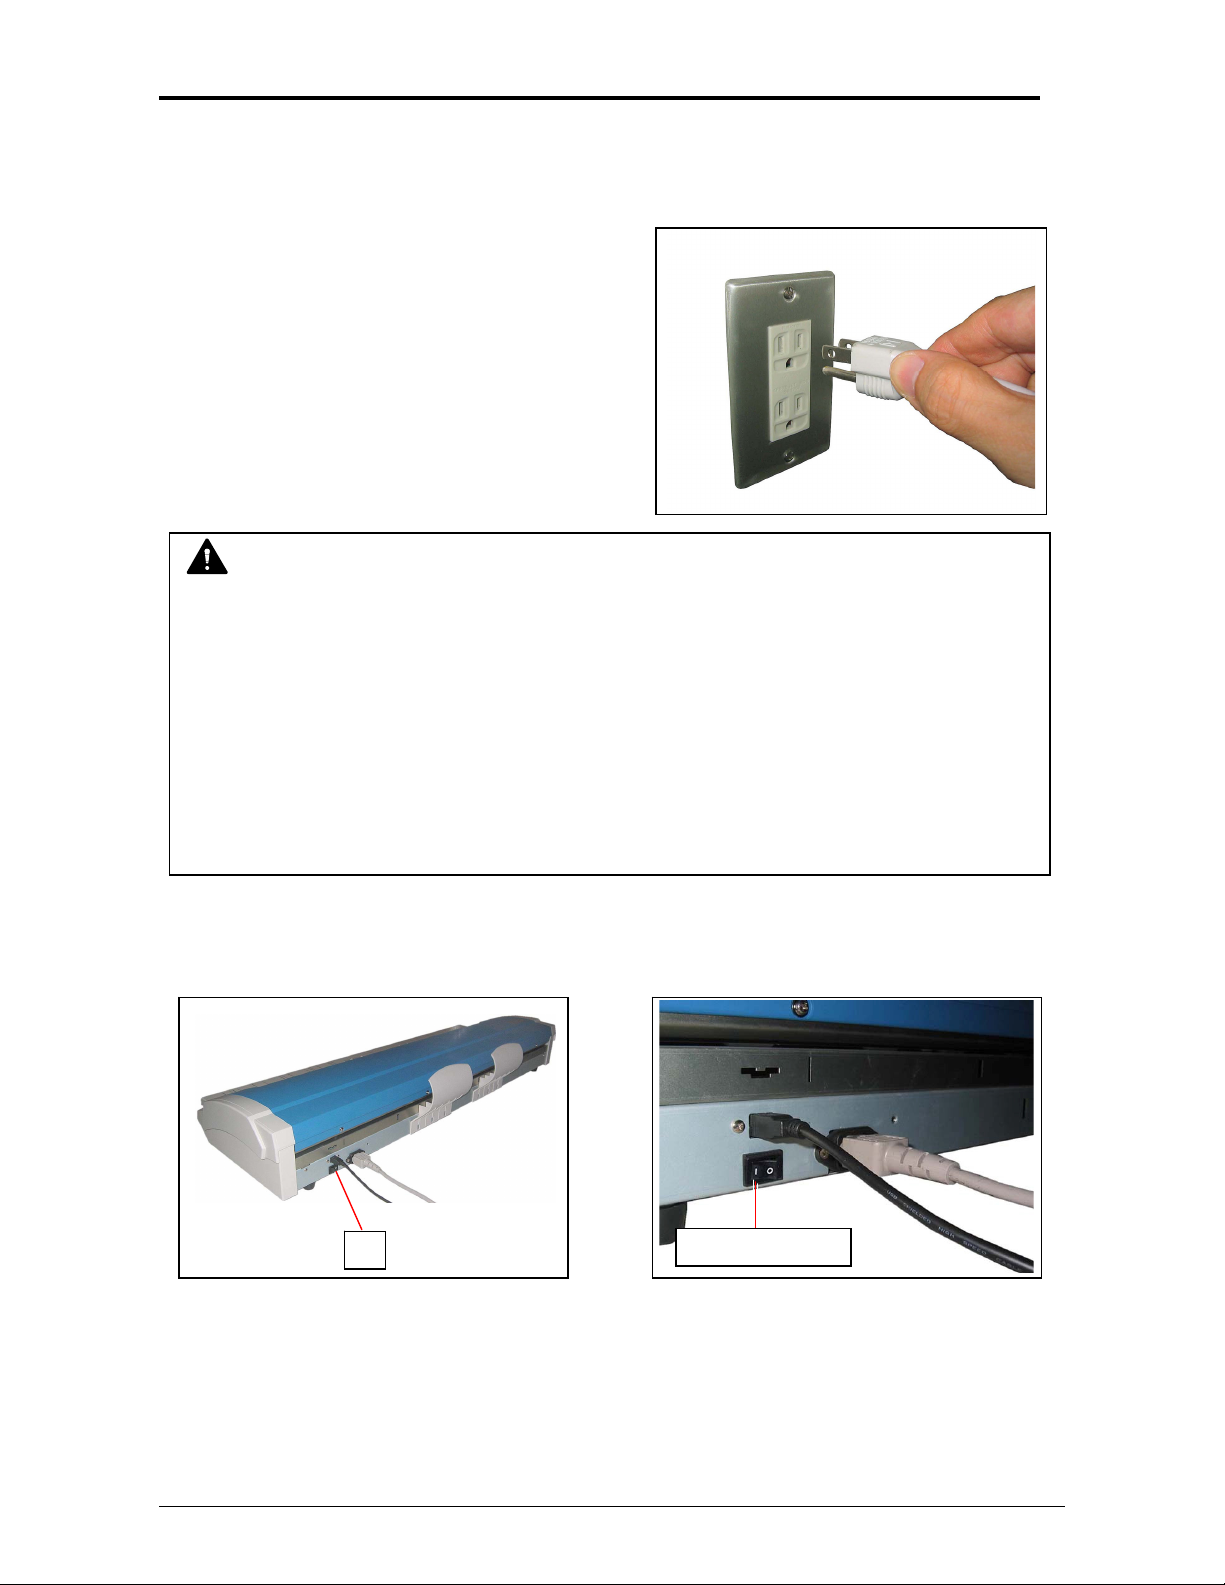
1. Plug the power cord to a dedicated outlet.
WARNING
• Do not handle the power plug with a wet hand. It may result in receiving an electrical
shock.
• Be sure to ground the machine.
• Use a dedicated outlet for KIP 600A. Many loads on a single outlet may cause
overheating and result in a fire.
• The outlet must satisfy the following conditions;
100-120VAC/200-240VAC, 50/60Hz, 1A or higher
2. Press “I” side of the Power Switch (1) on the rear.
1
Press this side
Part 1 Basic Functions 1-13
Page 20
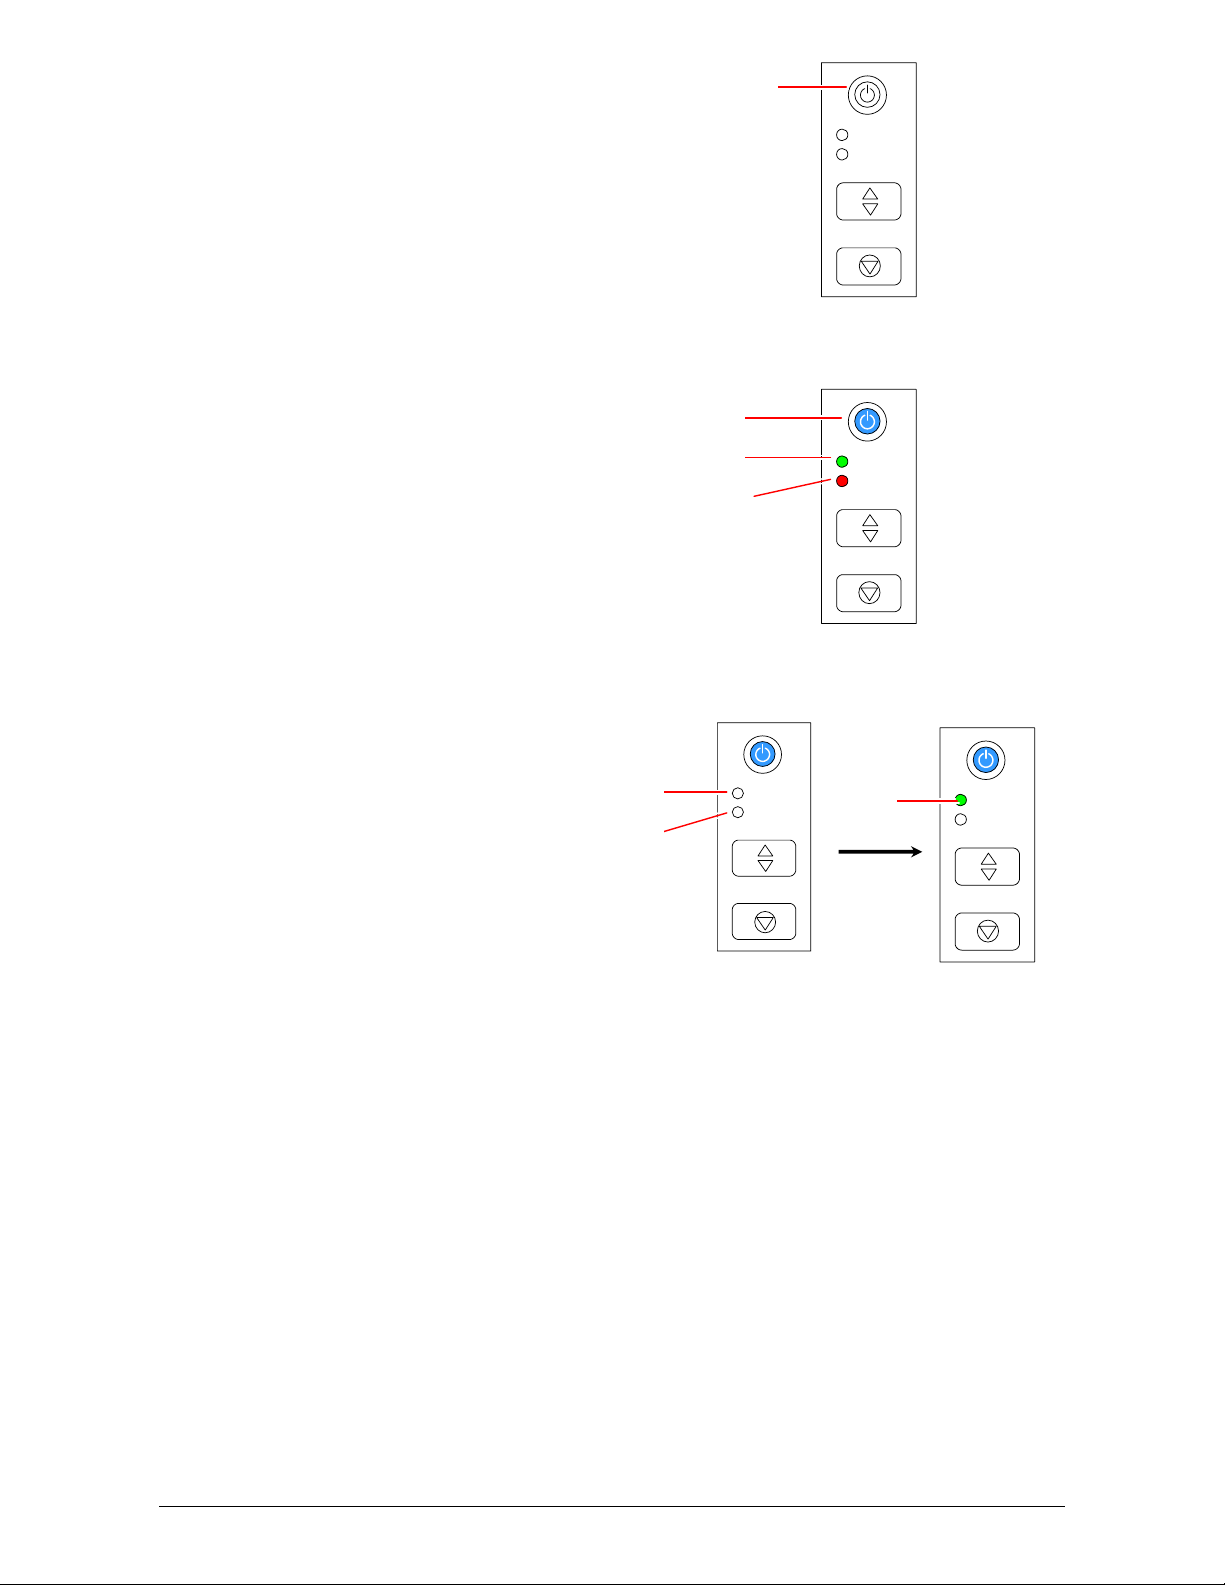
3. Press the Power Button (2).
2
READY
ERROR
EJECT
STOP
4. The Power Button (2), READY LED (3) and ERROR LED (4) light for 10 seconds.
2
3
4
READY
ERROR
EJECT
STOP
5. READY LED (3) and ERROR LED (4) go off and READY LED (3) will light again soon.
KIP 600A is ready with READY LED (3) on.
3
4
READY
ERROR
EJECT
3
STOP
READY
ERROR
EJECT
STOP
Part 1 Basic Functions 1-14
Page 21
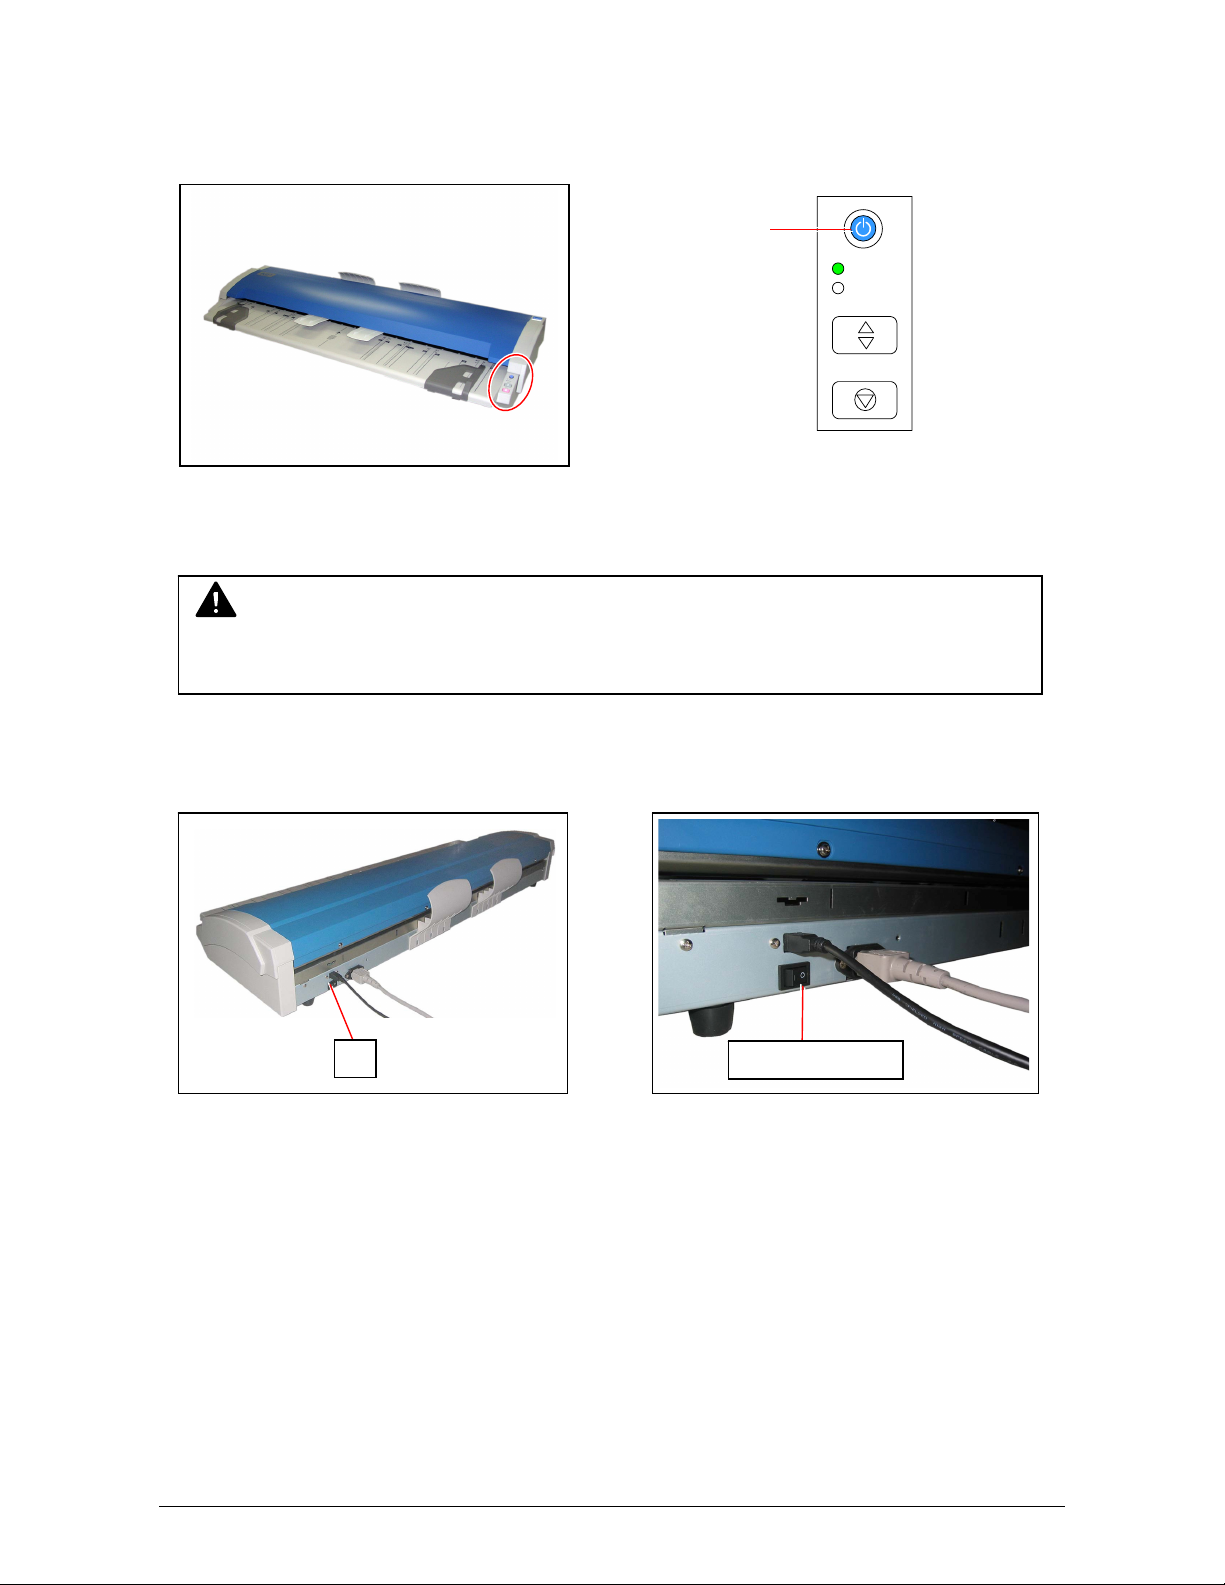
2. 2 Turning off KIP 600A
1. Press the Power Button (1).
2. The Power Button (1) goes off when KIP 600A is turned off.
NOTE
Wait at least 5 seconds for turning on KIP 600A again.
3. When KIP 600A is not to be used for an extended period of time, press “O” side of the Power
Switch (2) on the rear.
2
1
READY
ERROR
EJECT
STOP
Press this side
Part 1 Basic Functions 1-15
Page 22
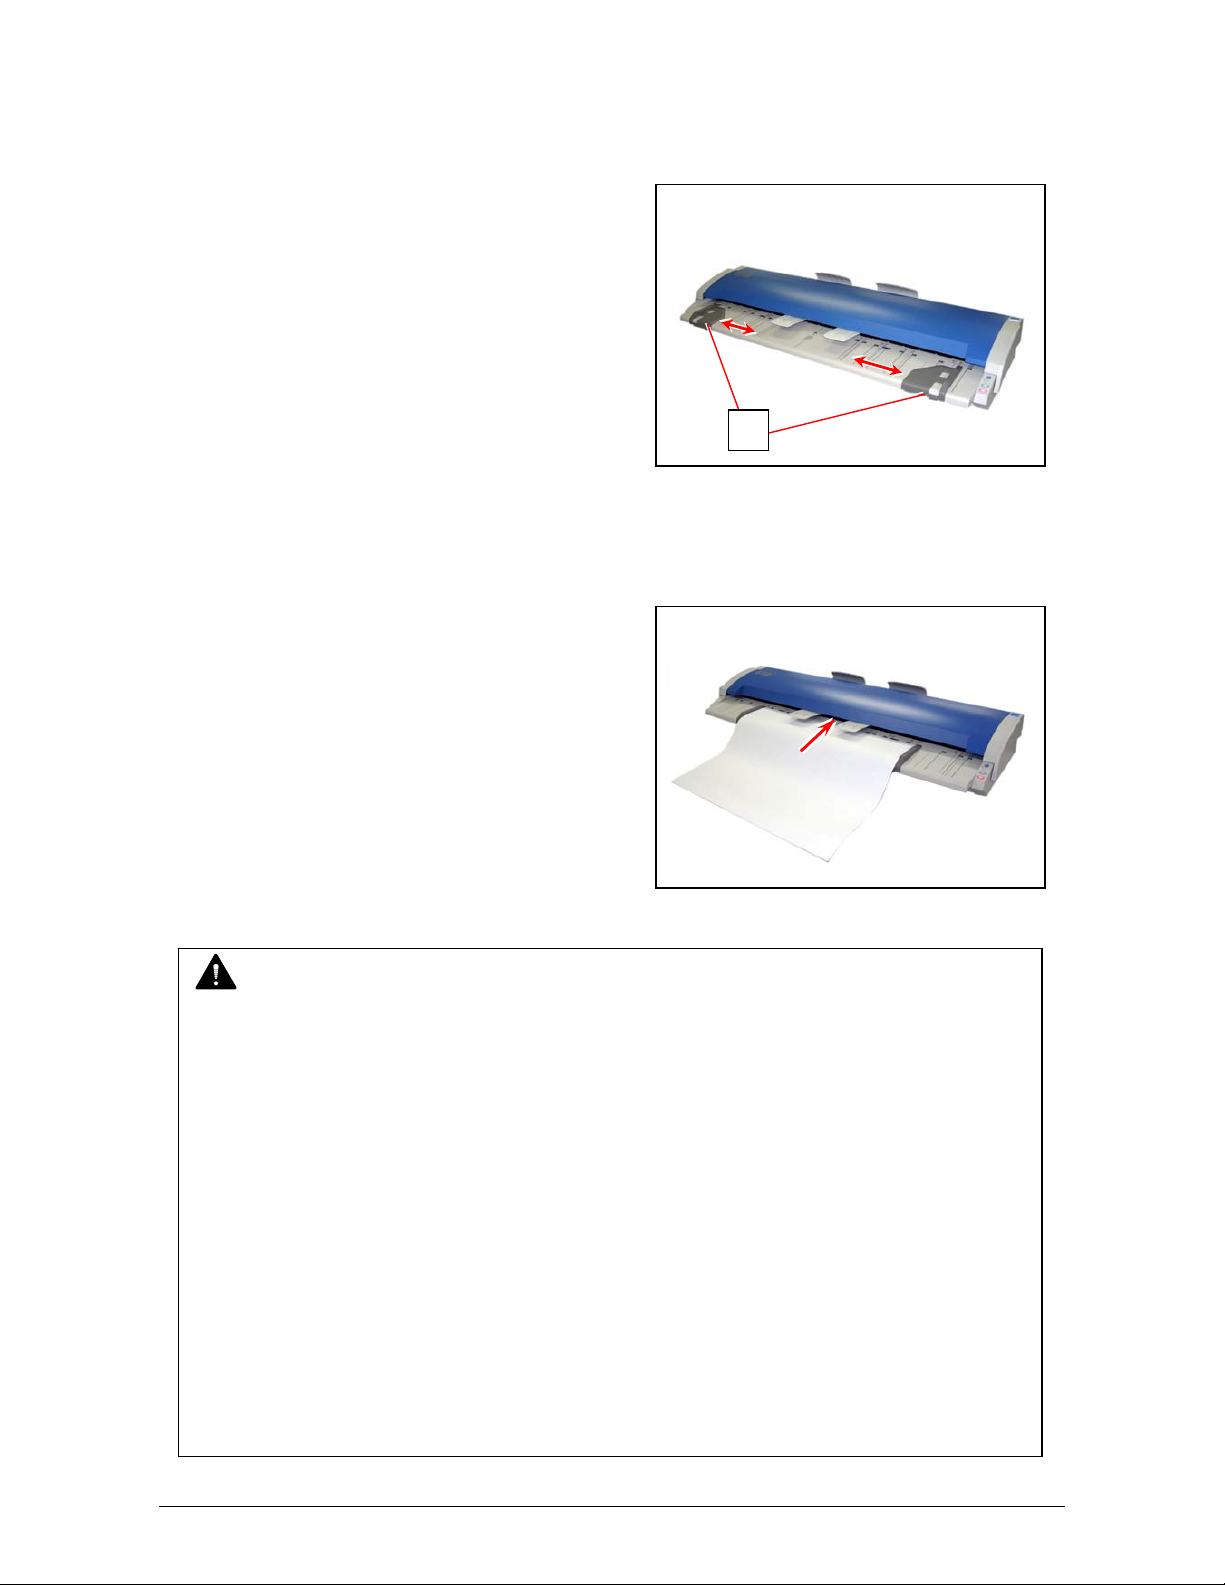
2. 3 Positioning Original
1. Slide Original Guides (1) to align them to the original width.
2. Place an original facing up on Original Table.
Insert the leading edge to Top Cover along with Original Guides.
1
NOTE
x Align an original to Original Guides to avoid skewing.
x Position an original in the center of Original Table. Not doing so may result in skewing.
x Do not place any objects except originals on Original Table. The scanner may catch
such objects and result in damage.
x When scanning originals as follows, removing Original Trays is recommended.
Original Trays may damage such object.
x Original in a carrier sheet
x Tough original (cannot be transported along with Original Tray)
Æ See [2. 6 Removing Original Tray].
x If the scanner does not carry an original,
x Wipe Sensors and remove dust on them. Æ See [4. 1. 2 Sensors].
x Check USB connection.
Part 1 Basic Functions 1-16
Page 23
3. READY LED (2) goes off. KIP 600A starts scanning.
(See later sections for copy / scan operation.)
2
READY
ERROR
EJECT
STOP
Reference
Use a carrier sheet (option) for the following kinds of originals.
(Such original with a carrier sheet is not guaranteed to be carried properly.)
NOTE
Handle a carrier sheet carefully. A damaged one may cause a poor scan image.
When scanning an original in a carrier sheet, remove Original Tray.
Otherwise, the original may damage.
For more detail, see [2. 6 Removing Original Tray].
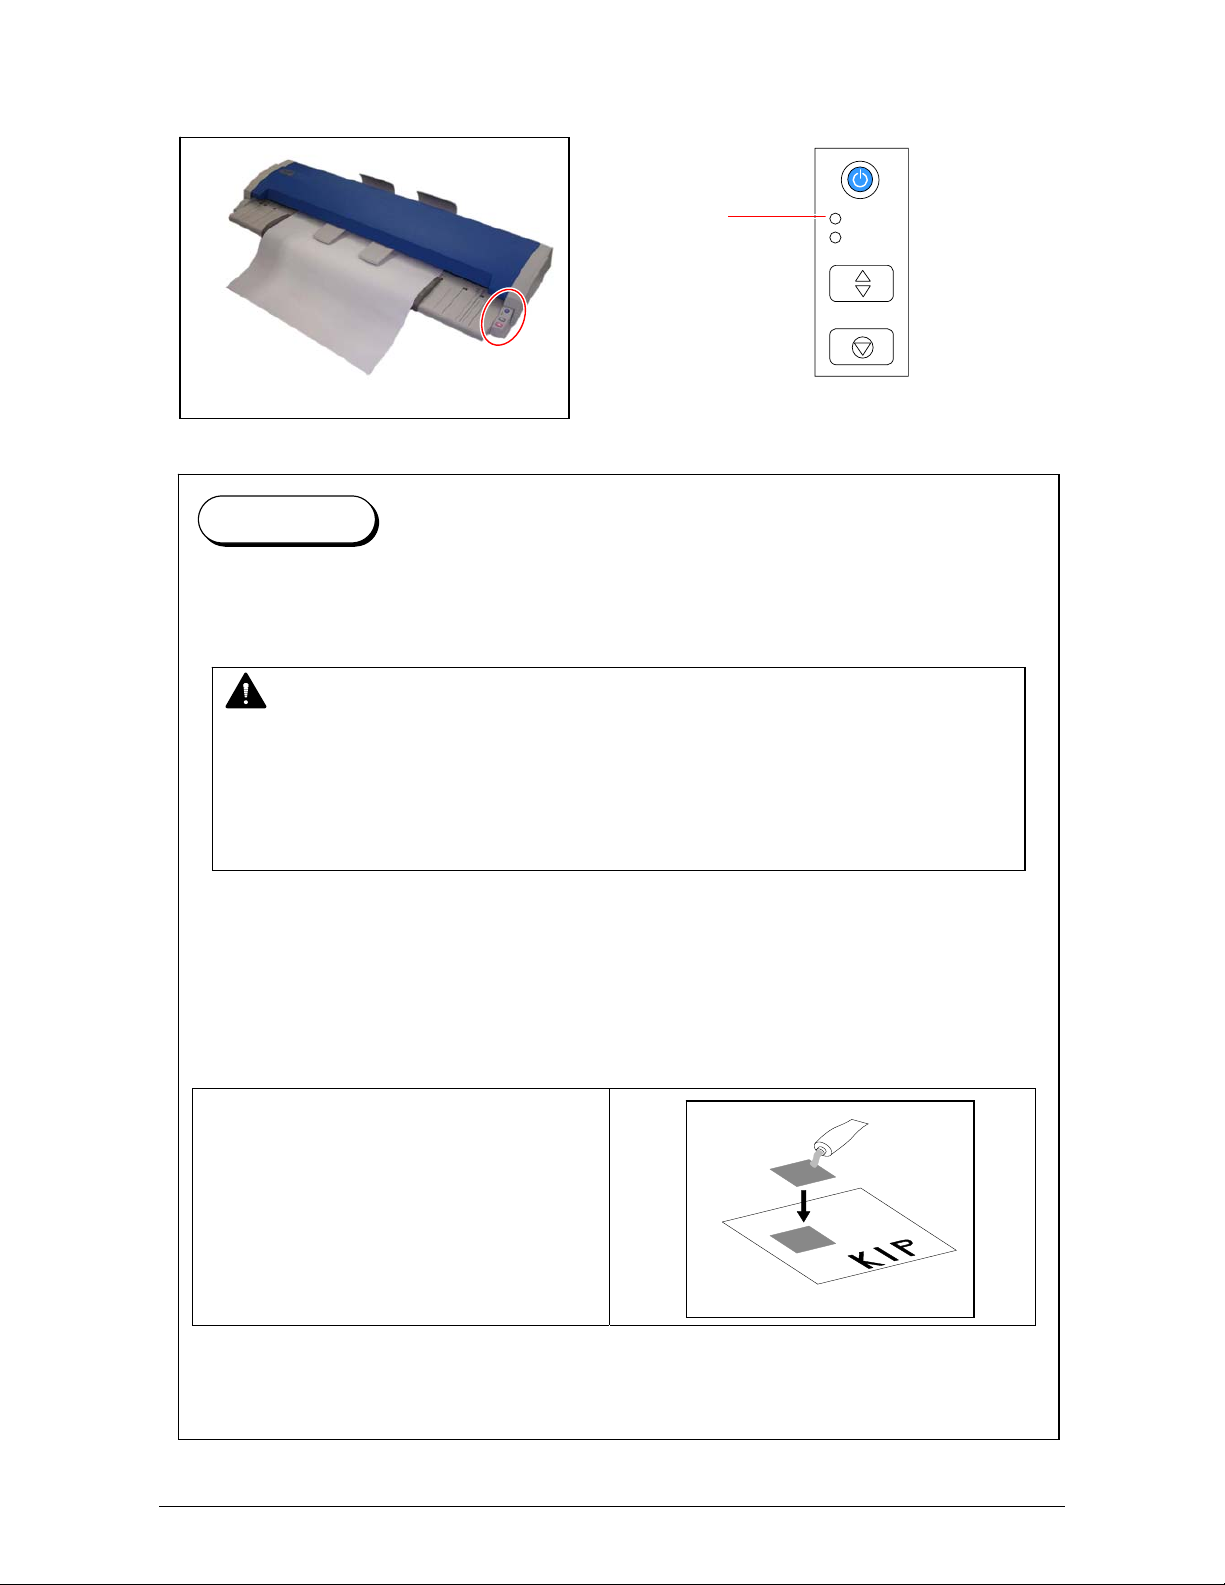
[How to use a carrier sheet]
Put an original into a carrier sheet, place the original so that its face can be seen through
the transparent film.
Then, insert the carrier sheet as in normal operation.
For the following kinds of original, using the carrier sheet is recommended.
Pasted
Part 1 Basic Functions 1-17
Page 24
Reference
Patched
Torn
Folded (especially at leading edge)
Not square
Extremely curled
(Less than 50mm in diameter)
(Continued)
KIP KIP
Part 1 Basic Functions 1-18
Page 25
Reference
Rough surface
Extremely thin and soft
Transparent
Part 1 Basic Functions 1-19
Page 26
2. 4 Canceling the Current Scan
1. Press the STOP key (1) during the scan. ERROR LED (2) blinks and the original stops.
The STOP button on the KIP printer’s UI is available as well (in that case the original may be
ejected automatically).
1
2. If the original stops, lift up the Top Cover (3) and remove the original by hand.
See [3.1 Original Misfeed] on the page 1-23.
3
READY
ERROR
EJECT
STOP
2
READY
ERROR
EJECT
STOP
3
Part 1 Basic Functions 1-20
Page 27
2. 5 Canceling Power Saving Mode
KIP 600A will enter Power Saving Mode if left inactive for 13 minutes.
The Power Button (1) blinks during Power Saving Mode.
READY
ERROR
EJECT
STOP
To cancel Power Saving Mode,
• Press any of the Power / EJECT / STOP keys.
• Or insert an original.
When cancelled, the Power Button (1), READY LED (2) and ERROR LED (3) light for 10 seconds.
1
2
3
READY
ERROR
EJECT
STOP
The READY LED (2) and ERROR LED (3) go off and READY LED (2) will light again soon.
KIP 600A is ready with READY LED (2) on.
2
3
READY
ERROR
EJECT
2
STOP
1
READY
ERROR
EJECT
STOP
Part 1 Basic Functions 1-21
Page 28
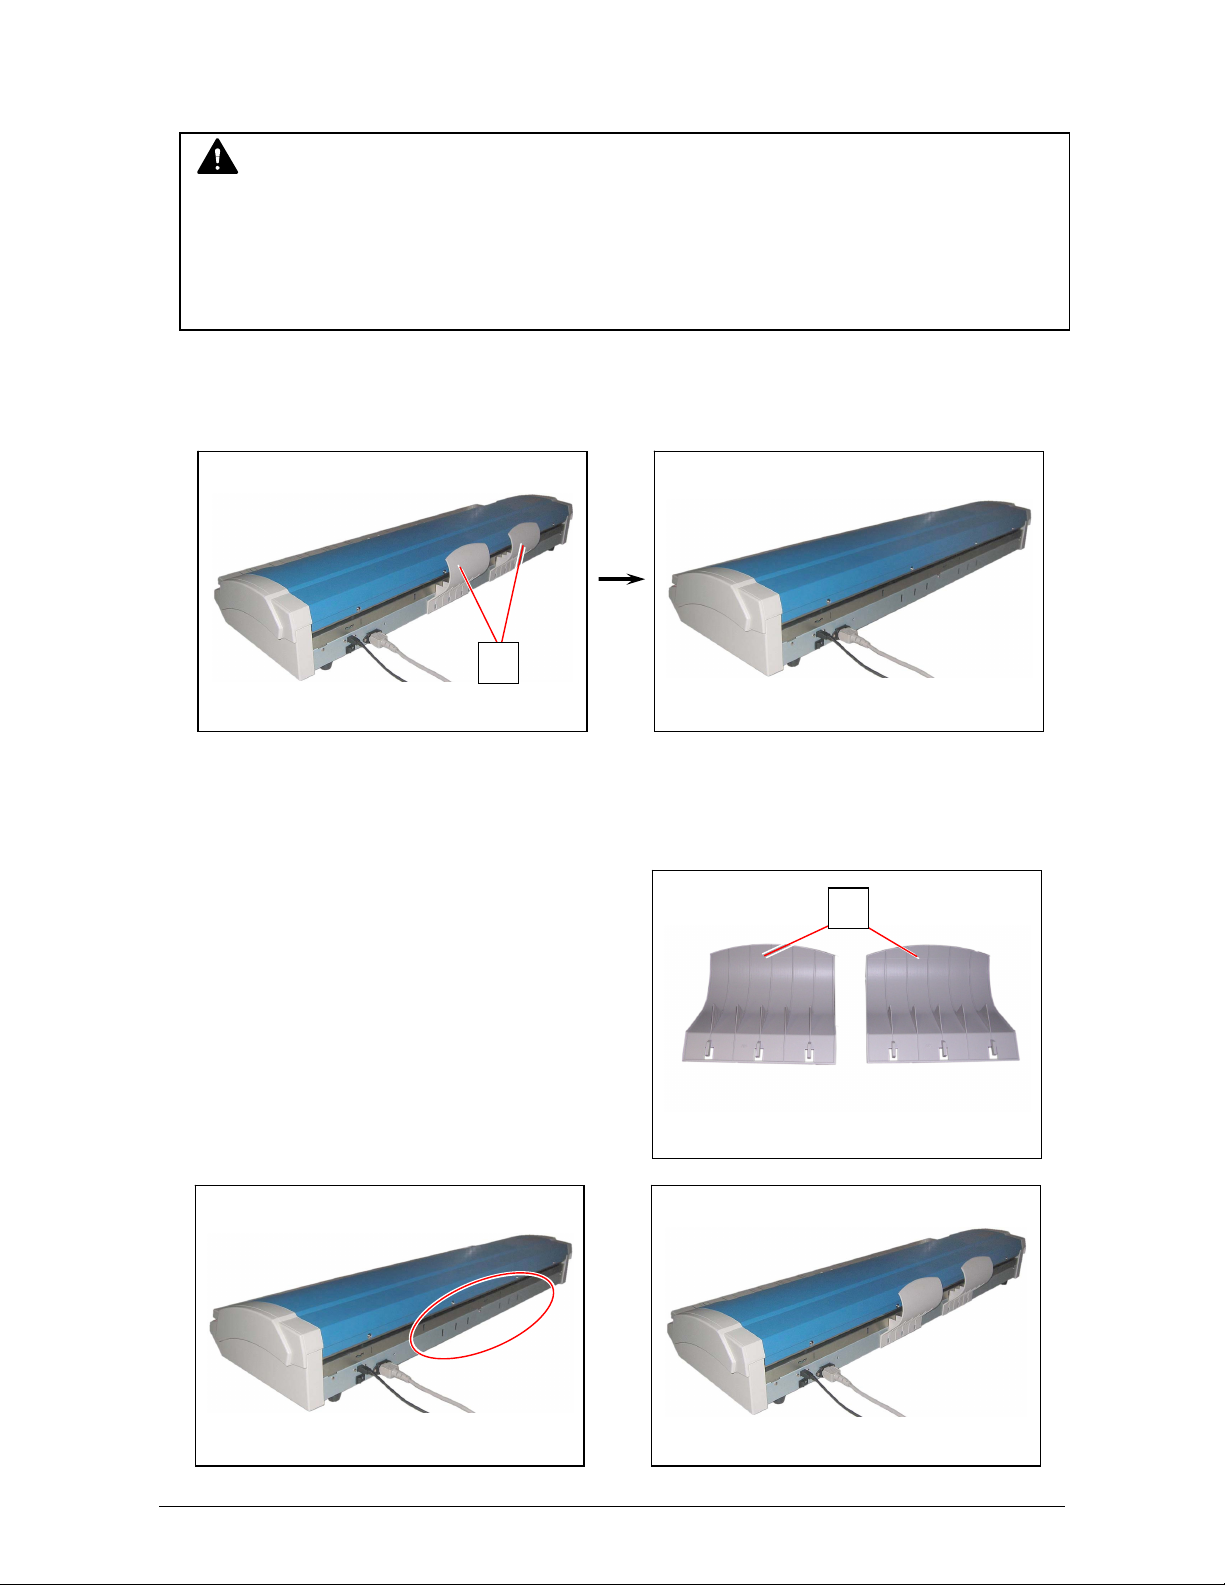
2. 6 Removing Original Tray
NOTE
When scanning originals as follows, removing Original Tray is recommended.
Original Trays may damage such object.
[Removing]
1. Remove Original Trays (1).
[Reinstalling]
1. Attach Original Trays (1) to the notches on the rear.
• Original in a carrier sheet
• Tough original (cannot be transported along with Original Tray)
1
1
Part 1 Basic Functions 1-22
Page 29
Chapter 3 Troubleshooting
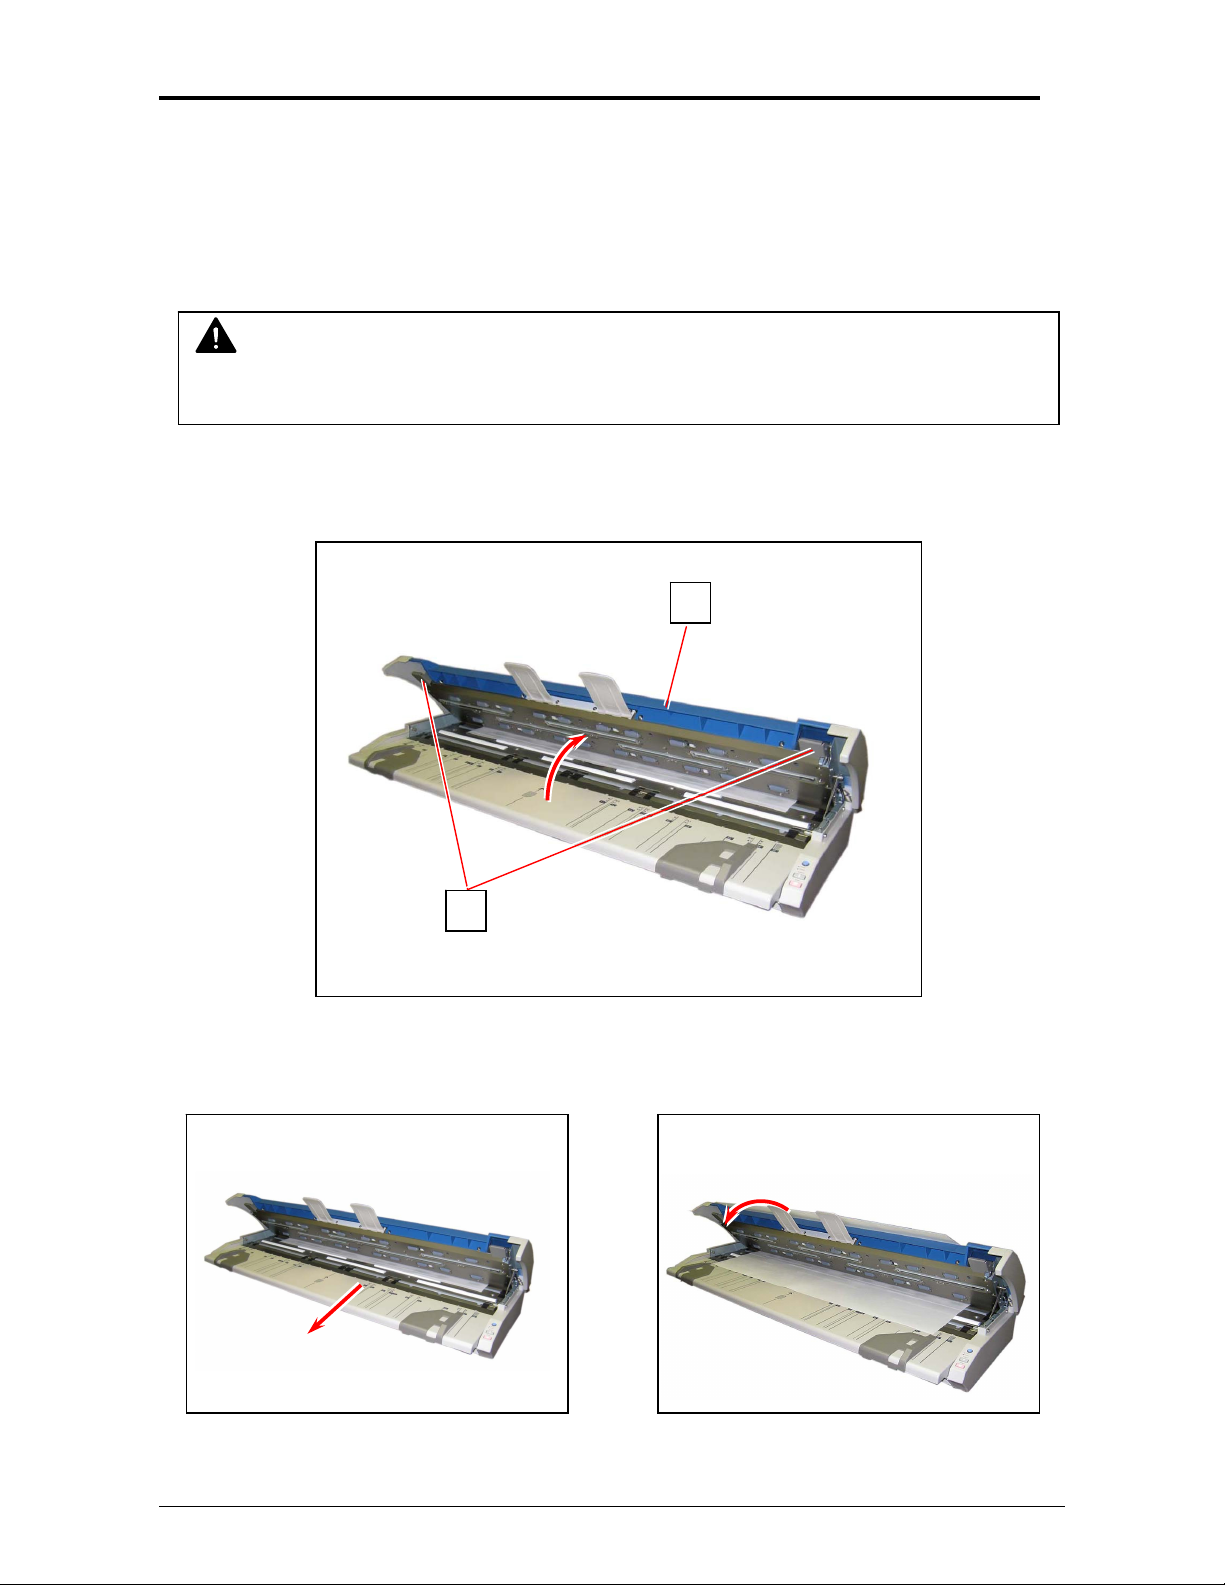
3. 1 Original Misfeed
If the Scanner carries an original incorrectly, the original should be removed by hand.
CAUTION
Be careful not to catch a finger in Top Cover.
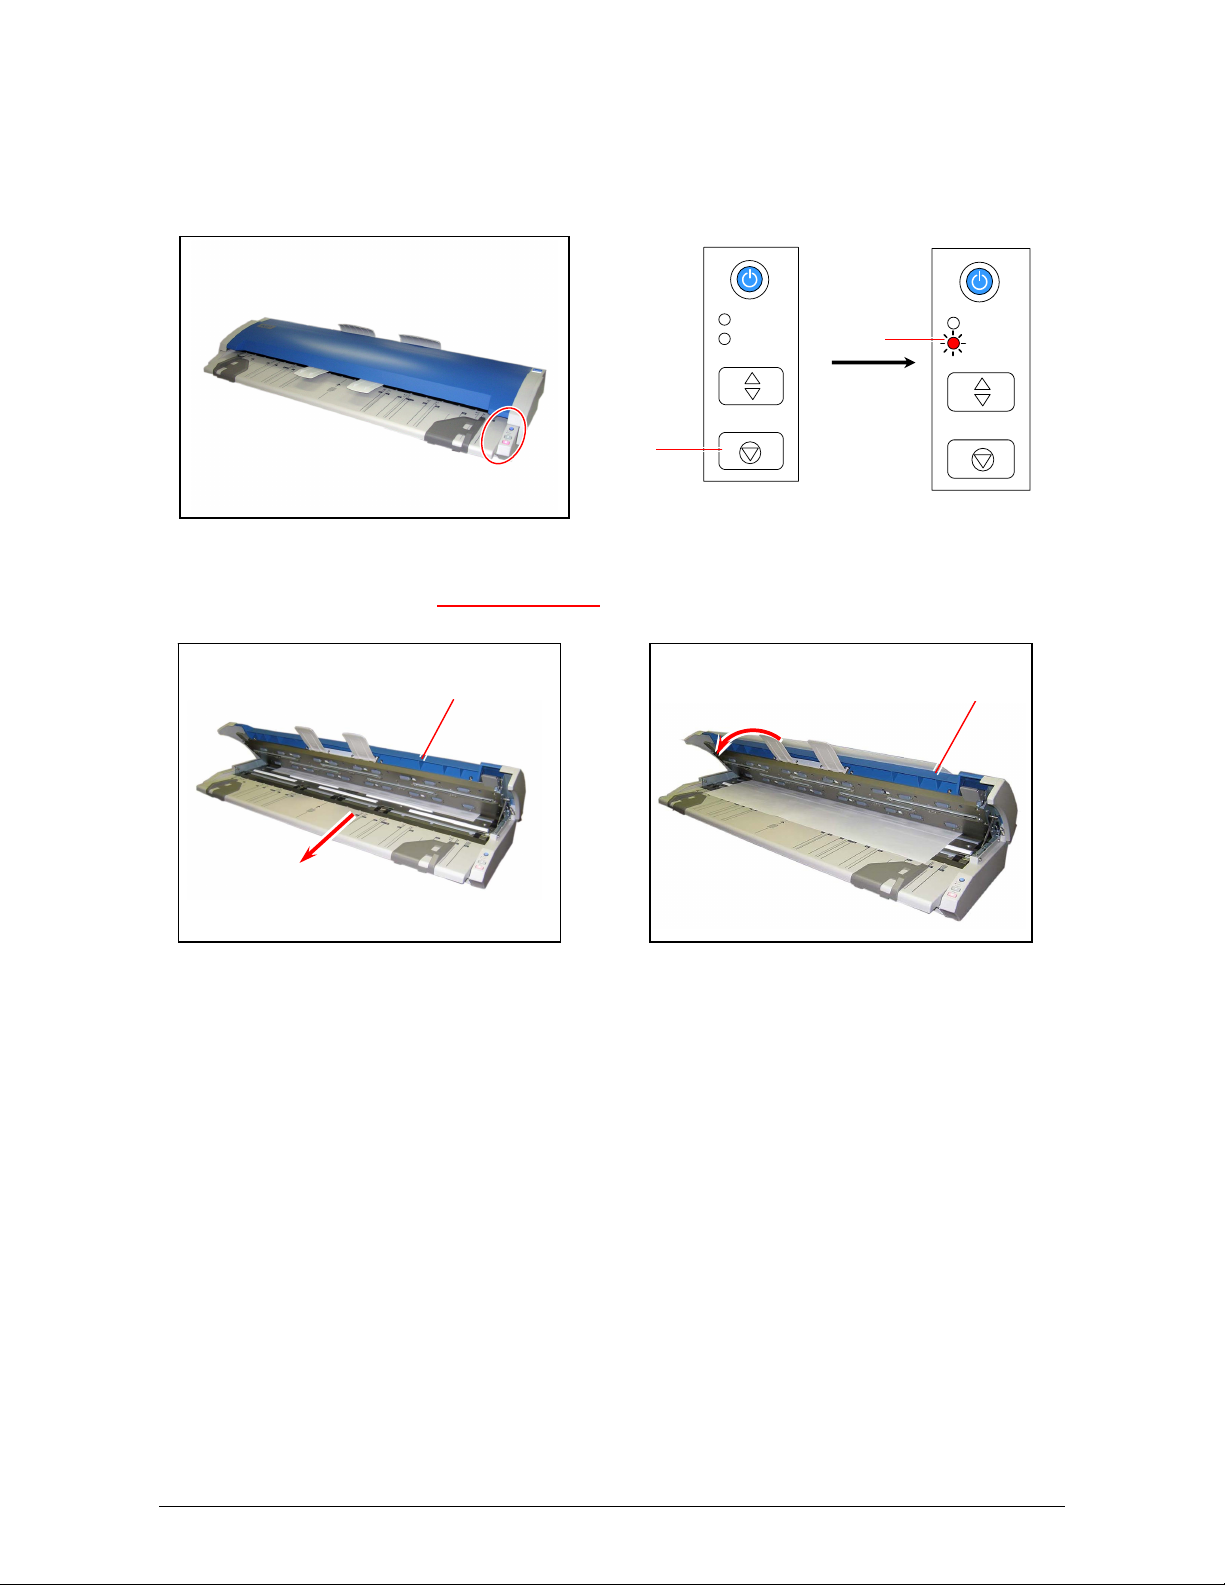
1. Pull Levers (1) upward to lift up Top Cover (2).
Lift until it locks in the open position.
2. Carefully pull the original from the front and remove it.
If cannot, pull it from the rear.
2
1
Part 1 Basic Functions 1-23
Page 30
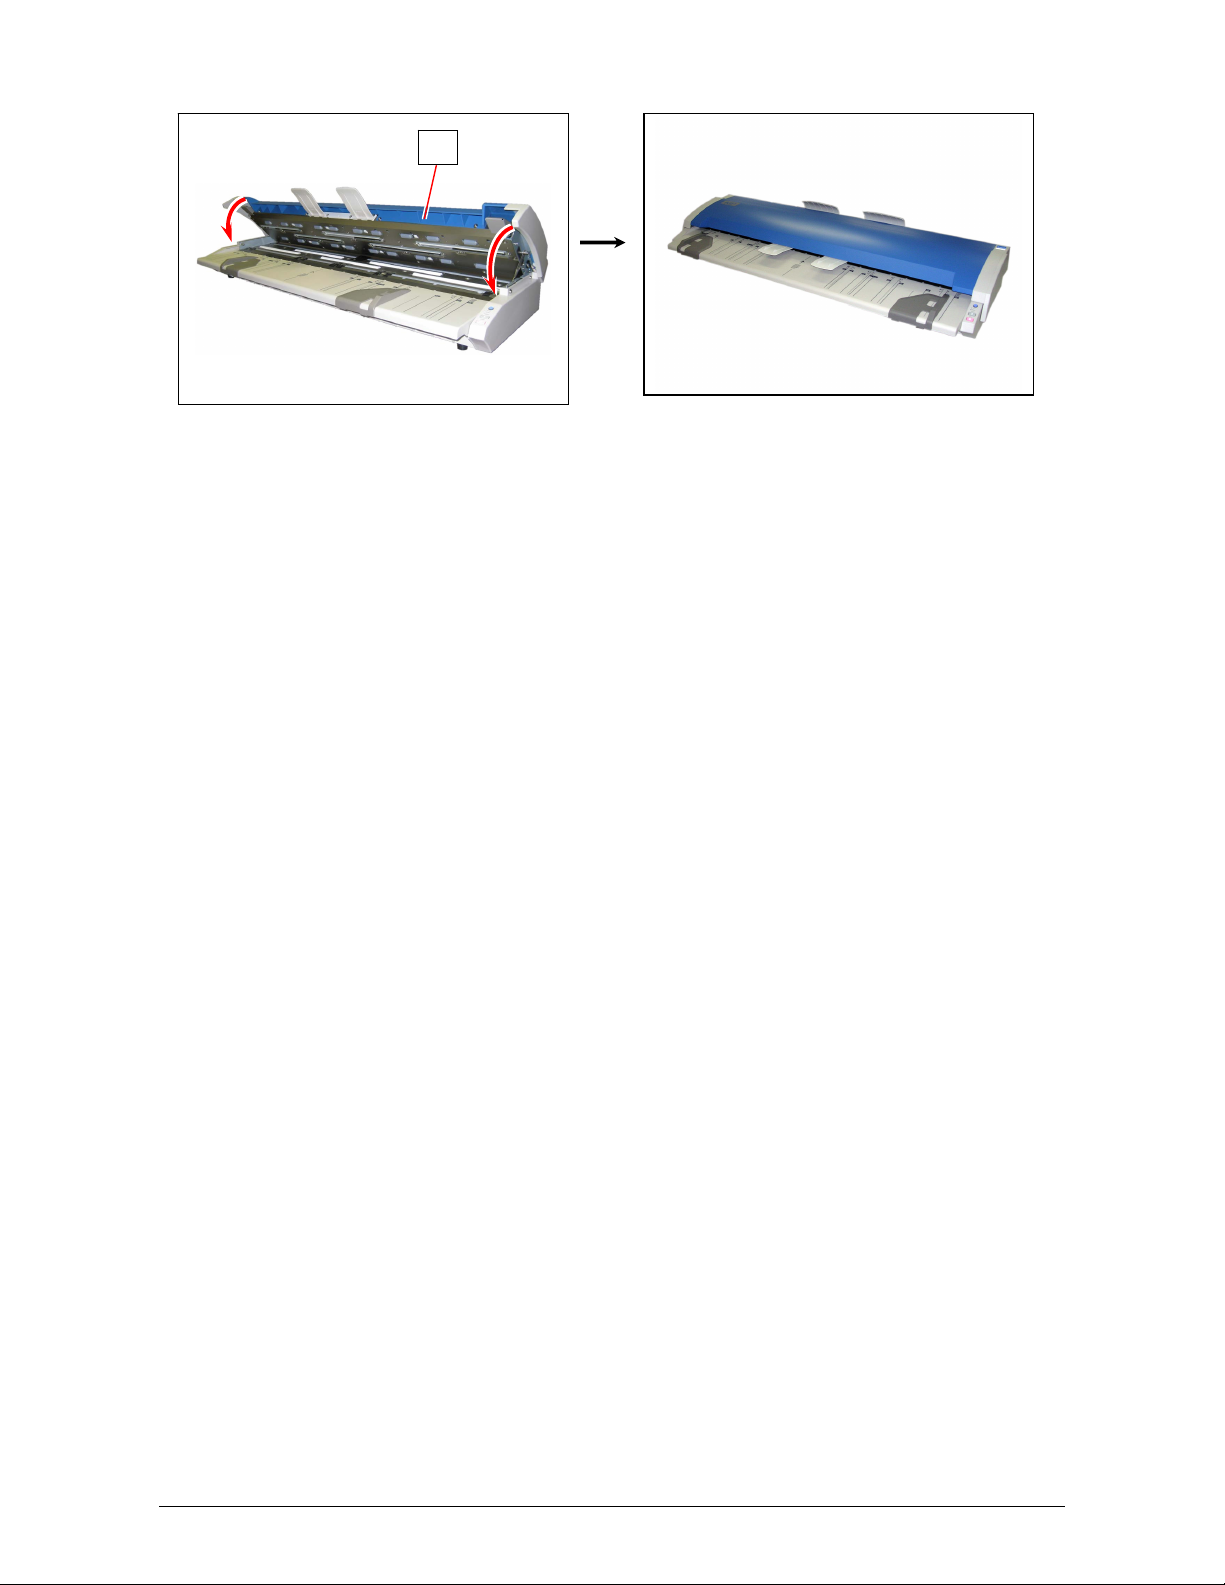
3. Press down Top Cover (2) gently.
2
Part 1 Basic Functions 1-24
Page 31

3. 2 ERROR LED
READY
ERROR
EJECT
STOP
3. 2. 1 ERROR LED lights
If ERROR LED lights in red, some significant errors may occur on the machine.
Contact your service personnel. Any disassembly or replacement should not be attempted by
the customer.
3. 2. 2 ERROR LED blinks
ERROR LED blinks in the following situation;
• An original is left on the KIP 600A’s startup.
• An original is misfed.
Æ See [3. 1 Original Misfeed] on the page 1-23.
• The STOP key is pressed during scan.
Æ See [2. 4 Canceling the Current Scan] on the page 1-20 and
[3. 1 Original Misfeed] on the page 1-23.
ERROR
(lighting)
ERROR
(blinking)
3. 3 Original Not Carried
If KIP 600A does not start carrying an original,
• Wipe Sensors and remove dust on them.
Æ See [4. 1. 2 Sensors] on the page 1-31.
• Check USB connection.
Part 1 Basic Functions 1-25
Page 32

3. 4 Other Errors
The following screens will appear on the KIP printer’s UI if some other errors occur.
The screens may differ from the actual ones depending on the KIP printer model.
3. 4. 1 Top Cover Open
If the scanner lid is open, the UI Screen will display the following:
Press down Top Cover to close firmly.
3. 4. 2 Replacing Toner Cartridge
The UI Screen will display the Toner Low Error by lighting the Toner Low Indicator.
Replace the Toner Cartridge with the new cartridge using the procedure in the Printer User
Guide or as noted on the Touch Screen help.
Part 1 Basic Functions 1-26
Page 33

3. 4. 3 Replacing Roll Media
The UI Screen will display the Roll Empty Error. Install a new roll media using the directions in the
Printer’s User Guide or by following the help on the Touch Screen.
3. 4. 4 Color Printer Configuration
If the below dialog appears on the UI Screen, KIP 600A requires Color Printer Configuration.
Remove the original and press OK.
Calibrate KIP 600A to your third party printer before the first color mode operation.
See on Part 6 [Chapter 6 Color Printer Configuration].
3. 5 Unevenly Colored Image
If a scan image is unevenly colored, the KIP 600 needs Scanner Adjustment.
Utility Software for Scanner Adjustment improves uneven images.
See [Chapter 5 Utility Software] on page 5-1 for installing and operating Utility Software.
Part 1 Basic Functions 1-27
Page 34

Chapter 4 Maintenance
4. 1 Cleaning
4. 1. 1 Scan Glass, Feed Roller and Guide Plate
If Scan Glasses, Feed Rollers or Guide Plates get dusty, it may result in a poor scan image.
Perform cleaning once a week (or as needed).
CAUTION
Be careful not to catch a finger in Top Cover.
1. Press the Power Button to turn off KIP 600A (1).
2. Pull Levers (2) upward to lift up Top Cover (3).
Lift until it locks in the open position.
2
1
READY
ERROR
EJECT
STOP
READY
ERROR
EJECT
STOP
3
Part 1 Basic Functions 1-28
Page 35

3. Gently wipe Scan Glasses (4) and Feed Rollers (5) with a soft cloth.
Equal mixture of water and neutral detergent can be used.
4
5
NOTE
Do not use organic solvent, glass cleaner or antistatic spray for cleaning.
4. Wipe Scan Glasses (4) and Feed Rollers (5) with a dry cloth.
5. Wipe Upper Guide Plate (6) and Lower Guide Plate (7) with a dry cloth.
6
7
Part 1 Basic Functions 1-29
Page 36

6. Press down Top Cover (3) gently.
3
Part 1 Basic Functions 1-30
Page 37

4. 1. 2 Sensor
If Sensors are dirty, the original may be detected incorrectly.
Perform cleaning once a week (or as needed).
CAUTION
Be careful not to catch a finger in the Top Cover.
1. Press the Power Button to turn off KIP 600A (1).
2. Pull Levers (2) upward to lift up Top Cover (3).
Lift until it locks in the open position.
2
1
READY
ERROR
EJECT
STOP
3
READY
ERROR
EJECT
STOP
Part 1 Basic Functions 1-31
Page 38

3. Gently wipe Sensors (4) with a dry cotton bud.
4
4
NOTE
Do not use water, organic solvent, glass cleaner or antistatic spray for cleaning.
4. Press down Top Cover (3) gently.
3
Part 1 Basic Functions 1-32
Page 39

Section 2
Copy Mode - Monochrome
1. 0 Copy Mode - Monochrome.................................................................................................. 3
1.1 Main Screen - General ...................................................................................................... 3
1.2 Simple Copying ................................................................................................................. 4
1.2.1 Select Copy Mode ......................................................................................................... 4
1.2.2 Select Size Mode .......................................................................................................... 4
1.2.3 Select Original Image Type ........................................................................................... 5
1.2.4 Copy Count ................................................................................................................... 5
1.2.5 Media............................................................................................................................. 6
1.2.6 Length ........................................................................................................................... 6
1.2.7 Size ............................................................................................................................... 7
1.2.8 Insert Original ................................................................................................................ 7
2. 0 Operation Details ................................................................................................................. 8
2.1 Main Screen ...................................................................................................................... 8
2.2 Original.............................................................................................................................. 8
2.2.1 Original Size Mode ........................................................................................................ 8
2.2.2 Original Type ................................................................................................................. 9
2.3 Quality ............................................................................................................................... 9
2.3.1 Automatic ...................................................................................................................... 9
2.3.2 Threshold .................................................................................................................... 10
2.3.3 Density ........................................................................................................................ 10
2.3.4 Sharpness ................................................................................................................... 10
2.3.5 Dither........................................................................................................................... 10
2.4 Copy Count ..................................................................................................................... 11
2.4.1 Arrows - Count Increase / Decrease .......................................................................... 11
2.4.2 Number Pad - Count Increase / Decrease .................................................................. 11
2.4.3 Set Copy...................................................................................................................... 11
2.4.4 Clear............................................................................................................................ 12
2.4.5 Concurrent Print .......................................................................................................... 13
2.5 Advanced Settings ......................................................................................................... 14
2.5.1 Mirror ........................................................................................................................... 14
2.5.2 Invert ........................................................................................................................... 14
2.5.3 COPY Quality Settings ................................................................................................ 14
2.5.4 Fold ............................................................................................................................. 15
2.5.5 Stamp .......................................................................................................................... 16
2.5.6 Leading Edge Adjustment ........................................................................................... 17
2.5.7 Trailing Edge Adjustment ............................................................................................ 18
2.6 Width ............................................................................................................................... 18
2.6.1 Auto ............................................................................................................................. 19
2.6.2 Manual Roll Selection.................................................................................................. 19
2.6.3 Enabling Cutsheet ....................................................................................................... 20
2.6.4 Cut Sheet .................................................................................................................... 20
2.6.5 Copying to Multiple Cutsheets..................................................................................... 21
2.6.6 Media Remaining ........................................................................................................ 21
2.6.7 Installing Roll Media .................................................................................................... 22
2.7 Length ............................................................................................................................. 23
2.7.1 Auto ............................................................................................................................. 23
2.7.2 Standard...................................................................................................................... 23
2.8 Size – Zoom .................................................................................................................... 25
Section 2 Copy Mode - Monochrome 2-1
Page 40

Preset Percentages ..................................................................................................... 26
2.8.1
2.8.2 Percentage Key Pad ................................................................................................... 26
2.8.3 Page Size Zoom .......................................................................................................... 27
2.8.4 Auto Zoom ................................................................................................................... 28
2.8.5 Clear............................................................................................................................ 28
2.9 Start................................................................................................................................. 28
2.10 View Last........................................................................................................................ 28
2.11 Recall Job ...................................................................................................................... 28
2.12 Stop / Reset ....................................................................................................................29
2.13 Interrupt.......................................................................................................................... 29
2.14 Rescan ........................................................................................................................... 29
2.15 Log Off ........................................................................................................................... 29
Section 2 Copy Mode - Monochrome 2-2
Page 41

1. 0 Copy Mode - Monochrome
1.1 Main Screen - General
3
2
No. Name Function
1 Mode Selects the “Mode” of the system. (Copy Mode for this
2 Media Displays Media type and quantity installed. Includes Cut
3 Original Type User Selects the type of original to copy. Also select
4 Quality Select Auto or Manual Image adjustments
5 Copy Count Select the quantity of prints and sets designation.
6 Advanced Settings Invert , mirror, stamps, folds, and edge adjustments
7 Reset Clears the image buffer and resets the system to default
8 View Last The last scan / job can be viewed
9 Recall Job Images can be recalled from the last job for reprint.
10 Interrupt Pauses the network print jobs to print any copy jobs
11 Zoom Manual and automatic zoom ratios set.
12 Log Off Displayed if Accounting enabled to Log off current user
13 Length Sets the length of the copy
1
4
13
screen shown)
Sheet Functions and Media Selection
Eng/Arch Modes here. (Color Copy is selected here if
enabled)
preformed / displayed in this button (sub screen)
settings.
Please note that a time limit may be set to recall or this
feature may be disabled by the administrator to prevent
any unauthorized copies.
5
6
7
8
9
10
11
12
Section 2 Copy Mode - Monochrome 2-3
Page 42

1.2 Simple Copying
To copy, please follow these basic steps. The following chapters have details on
adjustments and parameters that the user can change to modify the copies as
required.
1.2.1 Select Copy Mode
On the lower region of the Operator Panel, select “COPY”.
1.2.2 Select Size Mode
Select whether the document is an engineering or architectural size document. This
will allow the automatic width detection to function.
Engineering widths = 34, 22, 17, 11, and 8.5 inches
Architecture widths = 36, 30, 24, 18, 12, and 9 inches
Section 2 Copy Mode - Monochrome 2-4
Page 43

1.2.3 Select Original Image Type
Set the original image type you will copy. The selections are:
Line - used for simple line documents
Line / Photo - used for a combination of lines & photos documents
Grayscale - used for a combination of lines & areas of shade (CAD)
originals
Photo - used for photographic originals
This will allow automatic image quality adjustments for the scan.
1.2.4 Copy Count
Press the arrow buttons to scroll through the number of copies required or press
on the actual number to set the quantity with the number pad.
Section 2 Copy Mode - Monochrome 2-5
Page 44

1.2.5 Media
Selects automatic (for best possible fit) or manual roll selection.
or
1.2.6 Length
Select Auto for automatic cut length (to the length of the original) or Standard Cut
for a manual length. (A number pad will request the desired length to be entered)
Section 2 Copy Mode - Monochrome 2-6
Page 45

1.2.7 Size
Select
a) AutoZoom to automatically zoom to the width of paper or
b) press the arrow keys to scroll through presets ratios or
c) press on the Zoom number to enter a ratio on the key pad
1.2.8 Insert Original
Using the guides on the feed table, center the original face up and push forward
until the KIP 600 accepts it.
The KIP 600 will automatically commence to copy. While this occurs the image will
be displayed on the Operator Panel for your reference.
Section 2 Copy Mode - Monochrome 2-7
Page 46

2. 0 Operation Details
2.1 Main Screen
The main Copy screen is selected with the Copy Button.
This screen contains all user functions for copying. The following pages details the
functions and settings of each button and sub screens that can be used to adjust the
copy mode parameters to achieve the required result.
2.2 Original
This region allows the setting of the Size Mode (Engineering or Architectural) and the
original image type.
2.2.1 Original Size Mode
This button is used to select the Size Mode of Engineering or Architectural.
This will allow the automatic width detection system to determine the image width
when an original is placed in the KIP 600.
Engineering widths = 34, 22, 17, 11, and 8.5 inches
Architectural widths = 36, 30, 24, 18, 12, and 9 inches
Section 2 Copy Mode - Monochrome 2-8
Page 47

2.2.2 Original Type
Select one of the four different predetermined original types. The selections are:
a) Line - used for simple line documents
b) Line / Photo - used for a combination of lines & photos documents
c) Grayscale - used for a combination of lines & areas of shade (CAD)
originals
d) Photo - used for photographic originals
Press the desired original setting from one of the four diagrams. This will allow
automatic image quality adjustments for the next scan. Please note that the
selection will be highlighted with a “black circle” and the icon will become white, as
in the above example “Grayscale”.
2.3 Quality
This region is used to change the image quality settings from the automatic setting.
2.3.1 Automatic
For most copies, “Auto” should be selected. This will allow the copier to
automatically determine the best image settings without any user intervention
(please also note “Original” in 2.2)
Section 2 Copy Mode - Monochrome 2-9
Page 48

2.3.2 Threshold
To override the “Automatic” settings, “Threshold” can be
adjusted. Deselect “Auto” to enable “Threshold”.
Pressing the arrows manually adjusts the threshold. This
will suppress or enhance the lines and images from the
original.
2.3.3 Density
To override the “Automatic” settings, “Density” can be
adjusted. Deselect “Auto” to enable “Density”.
Pressing the arrows manually adjusts the background
density. This will suppress or enhance the background from
the original.
2.3.4 Sharpness
To override the “Automatic” settings, “Sharpness” can be
adjusted. Deselect “Auto” to enable “Sharpness”.
Pressing the arrows manually adjusts the line sharpness to
remove rough lines or when photos are copied to allow for
smoother graduations.
2.3.5 Dither
To override the “Automatic” settings, “Dither” can be
adjusted. Deselect “Auto” to enable “Dither”.
By pressing the dither button,
a) None
b) Fine
c) Medium or
d) Course
This will change how the dots are arranged to create the
final image of the copy. For fine lines a “Course” dither
pattern may be desired. For Photos “None” may be desired.
Section 2 Copy Mode - Monochrome 2-10
Page 49

2.4 Copy Count
In this region the number of copies, and set copy / collation can be set.
2.4.1 Arrows - Count Increase / Decrease
Use the arrows to increase or decrease the total numbers of copies desired by one
with each press of the button.
In this example the arrow was pressed seven times to reach “8 copies”.
2.4.2 Number Pad - Count Increase / Decrease
Press the “number of copies” value (which is a button) to set the desired number of
copies using a number pad. This will allow the quick entry of larger numbers.
a) Press the numbers for the quantity desired.
(up to 999)
b) Select “Enter”.
c) If an entry error was made press “C” to start
again.
d) If you wish to close the screen without
changing the quantity press “Cancel”.
2.4.3 Set Copy
a) To enable collated sets or copy sets to be printed select the Set Copy button.
b) As originals are scanned, the total number in the set is displayed.
Section 2 Copy Mode - Monochrome 2-11
Page 50

c) Copying will not commence until the set is closed. To close a set, press the start
button. The set with the total number of copies will be printed.
An example of Set Copy:
3 originals with 3 sets or copies
2.4.4 Clear
Press the clear button to reset the quantity to “1”.
1 2 3
.
Originals
Copies
Section 2 Copy Mode - Monochrome 2-12
Page 51

2.4.5 Concurrent Print
Set Copy/Concurrent Print will allow a user to receive a check print with each scanned
image while creating a temporary set copy for multiple copies.
While in the COPY menu, touch the Set Copy button in order to access Set
Copy/Concurrent Print.
1. Touch the Set Copy button to access the Set Copy/Concurrent Print feature.
This will require 3 total presses of the Set Copy button on the touch screen
2. Set Copy/Concurrent Print will begin the set creation process.
3. Please insert the first original and
begin the scanning process
4. The first original will copy begin to print immediately (if there are no network print
jobs currently processing)
5. Each subsequent copy will receive a check print until the entire set has been
scanned
6. Press the Start button to begin the set copy printing process
Note: If a user has selected 5 sets for concurrent print, only 4 will be printed once the
Start button has been pressed. The first set of the 5 has already been printed with the
check print of each scanned original.
Section 2 Copy Mode - Monochrome 2-13
Page 52

2.5 Advanced Settings
The Advanced Setting button contains the
additional parameters on a sub screen:
a) Mirror
b) Invert
c) Fold (if optional device connected)
d) Stamp (Water Mark)
e) Lead Edge Adjustment
f) Trail Edge Adjustment
When any of the adjustments / selections is selected, the selections will now be
displayed on the main Copy screen
2.5.1 Mirror
Select this button to “mirror” a scan. This can be utilized on
originals that may have the actual image on the reverse side such
as older “sepia” or “film” documents.
2.5.2 Invert
Select this button to change a region of white to black and visa
versa of a scanned document. This is normally used for “negative”
documents or “blue prints”.
2.5.3 COPY Quality Settings
On the KIP IPS COPY screen, it is possible to select varying copy quality settings
in addition to Original type settings.
Change Copy Quality Settings
a) Touch the COPY button on the IPS touch screen
b) Touch the Advanced button to select advanced copy features
c) Select the desired Print Quality.
Section 2 Copy Mode - Monochrome 2-14
Page 53

• Draft mode will decrease the scanner DPI while increasing scanning speed
• Quality mode will increase the scanner DPI while decreasing scanning speed
Note: Quality is the default value
2.5.4 Fold
Select “Fold” to display the fold sub screen. This will allow the selection of a “Fold
Pattern” to be applied to the copy.
a) Use the Arrow buttons to scroll through
the available folds and select a desired
fold from the list.
b) The fold selected will be displayed in the button.
c) Select OK.
NOTE
The list of “Folds” is loaded into Copy Mode by the system administrator or key operator.
They can not be altered or modified in any manner on the UI.
Please contact these persons for any additional stamps that may be required.
Please see “KIP Request” for these functions. An optional KIP Folder must be purchased
to enable these functions.
Section 2 Copy Mode - Monochrome 2-15
Page 54

2.5.5 Stamp
Select “Stamp” to display another sub screen. This will allow the selection of a
“Stamp” or “Water Mark” to be placed on the scanned image. It will be imbedded into
the image.
a) Use the Arrow buttons to scroll through
the available stamps and select the
desired stamp from the list.
b) The Stamp button will now display the stamp selected.
c) Select OK.
NOTE
The list of “Stamps” is loaded into Copy Mode by the system administrator or key
operator. They can not be altered or modified in any manner on the KIP printer’s
UI.
Please contact these persons for any additional stamps that may be required.
Please see “KIP Request” for these functions.
Section 2 Copy Mode - Monochrome 2-16
Page 55

2.5.6 Leading Edge Adjustment
The leading edge of a copy can be altered. ( +/- 4” )
a) additional void area can be placed on the lead edge of a scan or
b) image can be removed (such as a binding strip or a file hanger)
Leading Edge + Leading Edge -
KIP
Image
Scanner
Original
KIP
Image
Scanner
Copy
Added margin
To adjust the Leading Edge, use the arrows to denote the quantity you wish to add
or remove.
Touch the value displayed area to reset the quantity.
Scanner
Original
Deleted image
KIP
Image
ScannerImage
Copy
Section 2 Copy Mode - Monochrome 2-17
Page 56

2.5.7 Trailing Edge Adjustment
The trailing edge of each copy can be altered. ( +/- 4” )
c) Additional void area can be placed on the bottom of a copy or
d) Image can be removed (such as a binding strip or a file hanger)
Scanner
Trail edge + Trail Edge -
KIP
Image
Original
To adjust the Trailing Edge, use the arrows to denote the quantity you wish to add
or remove.
Touch the value displayed area to reset the quantity.
Make any of the required adjustments / selections and press “OK” to accept. The
selections will now be displayed on the main Scan screen.
KIP
Image
Scanner
Copy
Added trailing margin
KIP
Image
Scanner
Original
Deleted trailing image
KIP
Image
Copy
2.6 Width
This region allows automatic or manual roll selection, roll size display, cut sheet media,
the roll amount remaining and to set the installed media type and width.
Section 2 Copy Mode - Monochrome 2-18
Page 57

2.6.1 Auto
This default setting allows the copier to automatically select the best media roll
width to print the image onto. It selects the roll noting the amount of image area to
prevent surplus media consumption. (applies to the option - two or more roll model)
Example:
22” original
36” and 24” bond media installed
Original is 22” wide
36” installed 24” Installed
excess non-imaged media has the best image to media fit
therefore this roll will be used
2.6.2 Manual Roll Selection
To select a roll deck, press the roll deck desired. Note that the roll information is
displayed in the roll deck button.
Section 2 Copy Mode - Monochrome 2-19
Page 58

2.6.3 Enabling Cutsheet
Some KIP printers are equipped with a cut sheet feeder that can be enabled in the
configuration menu of the UI.
This can be accomplished by following these steps
1. Select the (?) button in the bottom left corner of the user
interface.
2. Select the Configuration button from the Info/Help screen.
3. Using the Left/Right arrows located at the bottom of the
page
scroll to page four (4).
4. Change the Enable Cut Sheet button to “Yes”.
2.6.4 Cut Sheet
To copy onto a cut sheet of media:
a) Select the CUT SHEET button on the main screen.
b) Select the Output Size of the actual cut sheet paper that will be inserted into
the Cut Sheet feeder.
Section 2 Copy Mode - Monochrome 2-20
Page 59

Select desired settings from the main copy screen. Feed your original (s) into the
KIP 600.
c) Prepare Cut Sheet Feeder on your printer and WAIT until prompted by the UI.
d) Insert the media into the Cut Sheet Feeder.
Note:
Only one cut sheet may be fed at a time and this function will time out after 3
minutes if no paper is inserted.
Note:
DO NOT insert the cut sheet media into the feeder while printing from a roll deck,
as this may cause the printer to jam.
2.6.5 Media Remaining
The installed roll information is displayed in the button of the particular roll deck.
Beside each deck is a volume of media that currently is left on the roll of media.
Indicators will display full, ¾, ½, ¼ or empty.
Section 2 Copy Mode - Monochrome 2-21
Page 60

2.6.7 Installing Roll Media
When media is replaced or installed, a screen will automatically appear. This
screen allows the setting of the media type and width. Please see the KIP Printer’s
manual for the procedures to replace a roll of media.
a) If no changes are required, press cancel
b) If changes are required from the currently settings displayed, select the correct
media type and size for each deck and press OK.
This screen shows 36” bond for
deck one and 18” Vellum for Roll 2 deck.
Media types settings noted above can be changed at any time by pressing the
Media button on the main Copy Screen.
Section 2 Copy Mode - Monochrome 2-22
Page 61

2.7 Length
Two methods determine the length of the copy in the KIP printer. These two methods
are Auto (may also be known as Synchro Cut or Automatic Cut) and Standard Cut.
2.7.1 Auto
This mode allows the media length to be determined by the
original length. This also takes into consideration any
enlargements or reductions that are applied to an image as
well, to prevent excess media without image.
NOTE
Auto Length works in conjunction with Auto Roll
noted in 2.6.1.
2.7.2 Standard
This mode allows the media length to be determined by a standard length or a
length set manually by the user with a number pad.
a) Select Standard Cut. A sub screen will appear. When Standard is used, the roll
must also be selected.
- If Auto Roll is selected in the Media region the following screen will appear,
prompting the media to be selected. Select the roll.
Section 2 Copy Mode - Monochrome 2-23
Page 62

- If a roll is already selected in Media, then the following screen appears now
only requesting the length.
b) Once the roll is determined (if so required) the length can now be set.
- Standard Length
- Auto Length
- Custom Length
c) Standard Length – use an industry
standard length. Select the length and
press Enter.
d) Auto Length – uses the length of the
original to determine the copy length.
Select and press Enter.
Section 2 Copy Mode - Monochrome 2-24
Page 63

e) Custom Length – set the custom length
in the key pad and press enter
f) The cut length will now be displayed in the main Copy screen in the Standard Cut
button.
2.8 Size – Zoom
Image size / Zoom can be altered in this region on the UI. This includes automatic
zooming, predetermined percentages, or ratio calculations to page size, and simply
percentage increments.
Section 2 Copy Mode - Monochrome 2-25
Page 64

2.8.1 Preset Percentages
The KIP printer has several predetermined industry standard zoom percentages
used for quick access. These can be access with the arrow buttons.
The pre-programmed percentages are:
50 - 66.7 - 70.7 - 100 - 141 - 150 - 200
2.8.2 Percentage Key Pad
To enter a percentage directly into the UI,
a) Press on the Percentage value displayed (the number is a button).
b) This will show a keypad to enter the value. (Please note that the button
Manual on the side is a default.)
c) Press the desired zoom value and press enter.
Section 2 Copy Mode - Monochrome 2-26
Page 65

2.8.3 Page Size Zoom
To enter a zoom percentage based on pages sizes into the UI:
a) Press on the Percentage value displayed (the number is a button).
This will show a keypad to enter the value.
b) Select Standard button.
c) Select the original page size by pressing onto the
original page size button.
d) Please note either Engineering or Architectural
mode can be utilized by pressing on the button
below the original page size.
e) Select the desired Copy page size. Again please
note either Engineering or Architectural mode can
be utilized.
f) Press Enter to confirm your selections or Cancel to restart.
Section 2 Copy Mode - Monochrome 2-27
Page 66

2.8.4 Auto Zoom
Press the Auto Zoom bottom to enable this function. Auto Zoom features works in
conjunction with the roll selected to scale the image to the selected roll width.
a) If a roll is selected in the Media region the
zoom from the original will automatically fit the
width of the selected roll.
b) If a roll is not selected (Auto is currently
selected), roll selection is requested prior to
the function of Auto Zoom. If cut sheet is
used then it will use the values set in the Cut
Sheet button in Media.
2.8.5 Clear
To reset the percentage value to default, press the
“C” button.
2.9 Start
The copier is always set to “Auto Start”. That is when an originally is
inserted into the KIP 600, it will start without other user intervention.
The start button is used when a job is recalled. The start button will “start”
the job if depressed after ‘Recall”. (The name will change to “Re-print”)
2.10 View Last
The last documented scanned to be copied be viewed.
2.11 Recall Job
The last set or single copy can be recalled to be resized or to switch
media type. After a job is recalled, make the required changes and then
press “Start”.
Section 2 Copy Mode - Monochrome 2-28
Page 67

2.12 Stop / Reset
This button has two functions.
1) Press the Stop button to stop the current scan. The original
will be ejected automatically. If not, open Top Cover to
remove the original.
2) Press the Reset button to restore the “default settings” in
Copy Mode. Some of the default settings are determined in
the Information / Help Screen of the UI. (see Copy Mode
Configurations chapter)
2.13 Interrupt
Network printing can be interrupted between collated sets of
documents. Press the Interrupt button to pause the queue and
allow a more urgent file to be copied. For example if a file is
needed right away and there is a job in the queue that has 20
sheets and 10 sets are being printed this can be interrupted
when one of the sets finishes printing. After the urgent file is
printed the sets will continue to print.
2.14 Rescan
This button only appears when “Set Copy” mode in enabled. It
allows a user to rescan an original in a set as required. This
may be due to skew or incorrect image quality settings of the
previous scan.
2.15 Log Off
This button only appears when “Accounting” functions are
enabled. This allows the current user to cease all KIP printer
functions after the user has preformed the required copies.
(after the code was entered to enable Coping)
Please note that the KIP printer will also automatically logoff
from the current user after 180 seconds of no copy function
activities by a user.
Section 2 Copy Mode - Monochrome 2-29
Page 68

Section 3
Copy Mode - Color
1.0 Copy Mode – Color ............................................................................................................3- 2
Main Screen - General.........................................................................................................3- 2
1.1
1.2 Simple Copying....................................................................................................................3- 3
1.2.1 Select Copy Mode ............................................................................................................3- 3
1.2.2 Select Size Mode .............................................................................................................3- 3
1.2.3 Select Original Image Type .............................................................................................. 3- 4
1.2.4 Print Quality......................................................................................................................3- 4
1.2.5 Copy Count ......................................................................................................................3- 5
1.2.6 Original Size .....................................................................................................................3- 5
1.2.7 Size ..................................................................................................................................3- 6
1.2.8 Insert Original ...................................................................................................................3- 6
2.0
Operation Details ...............................................................................................................3- 7
Main Screen.........................................................................................................................3- 7
2.1
2.2 Original.................................................................................................................................3- 7
2.2.1 Original Size Mode ...........................................................................................................3- 7
2.2.2 Original Type ....................................................................................................................3- 8
2.3 Print Quality .........................................................................................................................3- 8
2.3.1 Line / Graphic Mode .........................................................................................................3- 8
2.3.2 Draft / Normal / High Quaility ...........................................................................................3- 8
2.4 Copy Count ..........................................................................................................................3- 9
2.4.1 Arrows - Count Increase / Decrease ...............................................................................3- 9
2.4.2 Number Pad - Count Increase / Decrease .......................................................................3- 9
2.4.3 Set Copy ..........................................................................................................................3-10
2.4.4 Clear.................................................................................................................................3-10
2.5 Advanced Settings ...............................................................................................................3-10
2.5.1 Mirror ................................................................................................................................3-10
2.5.2 Invert ................................................................................................................................3-10
2.5.3 Leading Edge Adjustment ................................................................................................3-11
2.5.4 Trailing Edge Adjustment .................................................................................................3-12
2.6 Original Size......................................................................................................................... 3-13
2.6.1 Auto ..................................................................................................................................3-13
2.6.2 Manual .............................................................................................................................3-13
2.6.3 Custom. ............................................................................................................................3-14
2.6.4 Rotation ............................................................................................................................3-15
2.7 Size – Zoom.........................................................................................................................3-15
2.7.1 Preset Percentages..........................................................................................................3-15
2.7.2. Percentage Key Pad ....................................................................................................3-16
2.7.3. Page Size Zoom...........................................................................................................3-16
2.7.4. Clear.............................................................................................................................3-17
2.8. Start .....................................................................................................................................3-18
2.9. View Last ............................................................................................................................3-18
2.10. Recall Job ...........................................................................................................................3-18
2.11. Stop / Reset .........................................................................................................................3-18
2.12. Interrupt...............................................................................................................................3-18
2.13. Rescan ................................................................................................................................3-18
2.14. Log Off ................................................................................................................................3-18
Section 3 Copy Mode – Color 3-1
Page 69

1. 0 Copy Mode - Color
1.1 Main Screen - General
1
2
No. Name Function
1 Mode Select Color Mode from Mono Mode
2 Original Size Select the size of the original in length and rotation
3 Original Type User Selects the type of original to copy. Also select
Eng/Arch Modes here.
4 Print Quality Select the calibrated Quality (must be calibrated prior to
use)
5 Copy Count Select the quantity of prints and sets designation.
6 Advanced Settings Invert , mirror, stamps, folds, and edge adjustments
preformed / displayed in this button (sub screen)
7 Reset Clears the image buffer and resets the system to default
settings.
8 View Last The last scan / job can be viewed
9 Recall Job Images can be recalled from the last job for reprint.
Please note that a time limit may be set to recall or this
feature may be disabled by the administrator to prevent
any unauthorized copies.
10 Interrupt Pauses the network print jobs to print any copy jobs
11 Zoom Manual and automatic zoom ratios set.
12 Log Off Displayed if Accounting enabled to Log off current user
4 3
5
6
7
8
9
10
11
12
Section 3 Copy Mode – Color 3-2
Page 70

1.2 Simple Copying
To copy, please follow these basic steps. The following chapters have details on adjustments
and parameters that the user can change to modify the copies as required.
Please note that a third party color printer, supported by KIP, must first be calibrated in
the “?” screen under the “Color Config” button. Please see the “?” Section.
1.2.1 Select Copy Mode
On the lower region of the Operator Panel select “COPY” and then press the Color button if
not already selected.
1.2.2 Select Size Mode
Select whether the document is an engineering or architectural size document. This will
allow the automatic width detection to function.
Engineering widths = 34, 22, 17, 11, and 8.5 inches
Architecture widths = 36, 30, 24, 18, 12, and 9 inches
Section 3 Copy Mode – Color 3-3
Page 71

1.2.3 Select Original Image Type
Set the original image type you will copy. The selections are:
Line - used for simple color line documents
Line / Photo - used for a combination of lines & photos color documents
Photo - used for color photographic originals
This will allow automatic image quality adjustments for the scan.
1.2.4 Print Quality
The model of third party color printer will determine on the available Print Quality. Select
“Graphics” or “Line Art” mode and then select “Draft, Normal or High Quality” mode for the
printer.
Please note that each Print Quality mode must be calibrated prior to its use. Please see
Color Calibration in the “?” screen for greater details.
Section 3 Copy Mode – Color 3-4
Page 72

1.2.5 Copy Count
Press the arrow buttons to scroll through the number of copies required or press on the
actual number to set the quantity with the number pad.
1.2.6 Original Size
This selects automatic (for best possible fit) or manual page size selection.
or
Section 3 Copy Mode – Color 3-5
Page 73

1.2.7 Size
Select
a) AutoZoom to automatically zoom to the width of paper or
b) Press the arrow keys to scroll through presets ratios or
c) Press on the Zoom number to enter a ratio on the key pad
1.2.8 Insert Original
Using the guides on the feed table, center the original face up and push forward until the
KIP 600 accepts it.
The KIP 600 will automatically commence to copy. While this occurs the image will be
displayed on the Operator Panel for your reference.
Section 3 Copy Mode – Color 3-6
Page 74

2. 0 Operation Details
2.1 Main Screen
The main Copy Color screen is selected with the Copy Button in the lower bar, then use the
Mono / Color button in the upper left corner to select Color Mode.
The following pages detail the functions and settings of each button and sub screen that can
be used to adjust the color copy mode.
2.2 Original
This region allows the setting of the Size Mode (Engineering or Architectural) and the original
image type.
2.2.1 Original Size Mode
This button is used to select the Size Mode of Engineering or Architectural.
This will allow the automatic width detection system to determine the image width when an
original is placed in the KIP 600.
Engineering widths = 34, 22, 17, 11, and 8.5 inches
Architectural widths = 36, 30, 24, 18, 12, and 9 inches
Section 3 Copy Mode – Color 3-7
Page 75

2.2.2 Original Type
Select one of the three different predetermined original types. The selections are:
a) Line - used for simple color line documents
b) Line / Photo - used for a combination of color lines & photos
c) Photo - used for color photographic originals
Press the desired original setting from one of the three diagrams. This will allow automatic
image quality adjustments for the scan. Please note that the selection will be highlighted
with a “black circle” and the icon will become white, as in the above example “Line/Photo”.
2.3 Print Quality
This region is used to change the image quality settings on the third party printer.
2.3.1 Line / Graphic Mode
The device you will copy to will determine the best setting. Each Quality mode has three
sub modes. Each mode must be calibrated prior to use. Please see Color Calibration in the
“?” screen.
2.3.2 Draft / Normal / High Quaility
This controls the settings of the printer and which mode of image
quality will be used on the printer. Please see third party printer guide
for details.
Section 3 Copy Mode – Color 3-8
Page 76

2.4 Copy Count
In this region the number of copies, and set copy / collation can be set.
2.4.1 Arrows - Count Increase / Decrease
Use the arrows to increase or decrease the total numbers of copies desired by one with
each press of the button.
In this example the arrow was press five times to reach “6 copies”.
2.4.2 Number Pad - Count Increase / Decrease
Press the “number of copies” value (which is a button) to set the desired number of copies
using a number pad. This will allow the quick entry of larger numbers.
a) Press the numbers for the quantity desired.
(up to 999)
b) Select “Enter”.
c) If an entry error was made press “C” to
start again.
d) If you wish to close the screen without
changing the quantity press “Cancel”.
Section 3 Copy Mode – Color 3-9
Page 77

2.4.3 Set Copy
Has no function in Color Copy Mode.
2.4.4 Clear
Press the “eraser” button to reset the quantity to “1”.
2.5 Advanced Settings
The Advanced Setting button contains the additional
parameters on a sub screen:
a) Mirror
b) Invert
c) Lead Edge Adjustment
d) Trail Edge Adjustment
When any of the adjustments / selections is selected, the
selections will now be displayed on the main Copy
screen.
2.5.1 Mirror
Select this button to “mirror” a scan. This can be utilized on originals that
have the actual image on the reverse side such as older “sepia” or “film”
documents.
2.5.2 Invert
Select this button to change a region of white to black and visa versa of a
scanned document. This is normally used for “negative” documents or
“blue prints”.
Section 3 Copy Mode – Color 3-10
Page 78

2.5.3 Leading Edge Adjustment
The leading edge of a copy can be altered. ( +/- 4” )
a) additional void area can be placed on the lead edge of a scan or
b) image can be removed (such as a binding strip or a file hanger)
Leading Edge
KIP
Image
Scanner
KIP
Image
Original
Scanner
Scan
Added margin
To adjust the Leading Edge, use the arrows to denote the quantity you wish to add or
remove.
Touch the value displayed area to reset the quantity.
Original
Deleted image
Leading Edge -
KIP
Scanner
Image
ScannerImage
Scan
Section 3 Copy Mode – Color 3-11
Page 79

2.5.4 Trailing Edge Adjustment
The trailing edge of each copy can be altered. ( +/- 4” )
a) Additional void area can be placed on the bottom of a copy or
b) Image can be removed (such as a binding strip or a file hanger)
Scanner
Trail edge + Trail Edge -
KIP
Image
Original
To adjust the Trailing Edge, use the arrows to denote the quantity you wish to add or
remove.
Touch the value displayed area to reset the quantity.
Make any of the required adjustments / selections and press “OK” to accept. The selections
will now be displayed on the main Scan screen.
KIP
Image
Scanner
Copy
Added trailing margin
KIP
Imag e
Scanner
Original
Deleted trailing image
KIP
Image
Copy
Section 3 Copy Mode – Color 3-12
Page 80

2.6 Original Size
This region allows automatic or manual roll detection of the original.
2.6.1 Auto
This default setting allows the KIP 600 to automatically detect the width and length of the
original. Please note the correct “Original Size Mode” in 2.2.1 must be select prior to the
copy.
2.6.2 Manual
To select an original size manually, select Manual and a sub screen displays all current
standard page sizes.
Section 3 Copy Mode – Color 3-13
Page 81

2.6.3 Custom
This mode allows the original width and length to be determined by the number pad.
a) Set the width of the scan. Note that these are only Standard Sizes.
b) Set a Standard Length or Custom Length – set the Custom length in the key pad
and press enter.
Standard Length Custom Length
c) The cut length will now be displayed in the Manual button. In this example 18” width and a
custom length of 25.8”.
Section 3 Copy Mode – Color 3-14
Page 82

2.6.4 Rotation
Select the rotation to save copy media. This function may be void dependent on the third
party printer ability in media width and auto rotate function programmed in the printer.
Example:
D Size copy may waste less media if printed 36” wide (if the printer so supports this size
and is installed in the printer) rather than 24” wide. If the user wishes to scan the document
24” and then select a 270 degree or 90 degree rotation to print 36” width rather than 24”
this can save media.
Rotation available:
2.7 Size – Zoom
Image size / Zoom can be altered in this region of the KIP operator panel. This includes
automatic zooming, predetermined percentages, or ratio calculations to page size, and simple
percentage increments.
2.7.1 Preset Percentages
The KIP has several predetermined industry standard zoom percentages used for quick
access. These can be access with the arrow buttons.
The pre-programmed percentages are:
50 - 66.7 - 70.7 - 100 - 141 - 150 - 200
Section 3 Copy Mode – Color 3-15
Page 83

2.7.2. Percentage Key Pad
To enter a percentage directly:
a) Press on the Percentage value displayed (the number is a button).
b) This will show a keypad to enter the value (please note that the button Manual on the
side is a default).
c) Press the desired zoom value and press enter.
2.7.3. Page Size Zoom
To enter a zoom percentage based on pages sizes into the UI:
a) Press on the Percentage value displayed (the number is a button). This will show a
keypad to enter the value.
Section 3 Copy Mode – Color 3-16
Page 84

b) Select Standard button.
c) Select the original page size by pressing onto the
original page size button.
d) Please note either Engineering or Architectural mode
can be utilized by pressing on the button below the
original page size.
e) Select the desired Copy page size. Again please note
either Engineering or Architectural mode can be
utilized.
f) Press Enter to confirm your selections or Cancel to
restart.
2.7.4. Clear
To reset the percentage value to default, press the “erase” button.
Section 3 Copy Mode – Color 3-17
Page 85

2.8. Start
The copier is always set to “Auto Start”. That is when an original is
inserted into the KIP 600, it will start without user intervention.
The start button is used when a job is recalled. The start button will “start”
the job if depressed after ‘Recall” (the name will change to “Re-print”).
2.9. View Last
The last documented scanned to be copied be viewed.
2.10. Recall Job
No function in Color Copy Mode.
2.11. Stop / Reset
This button has two functions.
1) Press the Stop button to stop the current scan. The original will be
ejected automatically. If not, open Top Cover to remove the original.
2) Press the Reset button to restore the “default settings” in Copy
Mode. Some of the default settings are determined in the
Information / Help Screen of the UI. (see Copy Mode
Configurations chapter)
2.12. Interrupt
No function in Color Copy Mode.
2.13. Rescan
No Function in Color Copy Mode.
2.14. Log Off
This button only appears when “Accounting” functions are enabled. This
allows the current user to cease all KIP functions after the user has
preformed the required copies (after the code was entered to enable
Coping).
Please note that the KIP printer will also automatically log off the current user after 180
seconds of no copy function activities by a user.
Section 3 Copy Mode – Color 3-18
Page 86

Section 4
Scan Mode - Monochrome
1.0 Scan Mode - Monochrome .............................................................................................. 4- 2
1.1 Main Screen ................................................................................................................. 4- 2
1.2 Simple Scanning ..........................................................................................................4- 3
1.2.1 Select Scan Mode .................................................................................................... 4- 3
1.2.2 Select Size Mode ..................................................................................................... 4- 3
1.2.3 Select Original Image Type ...................................................................................... 4- 4
1.2.4 Select Format ........................................................................................................... 4- 5
1.2.5 Select Mailbox .......................................................................................................... 4- 6
1.2.6 Insert Original ........................................................................................................... 4- 6
1.2.7 Retrieve the File .......................................................................................................4- 6
2.0 Operation Details ............................................................................................................. 4- 7
2.1 Main Screen ................................................................................................................. 4- 7
2.2 Original......................................................................................................................... 4- 7
2.2.1 Original Size Mode ................................................................................................... 4- 7
2.2.2 Original Type ............................................................................................................ 4- 8
2.3 Original Size................................................................................................................. 4- 8
2.3.1 Automatic Size ......................................................................................................... 4- 8
2.3.2 Manual Size.............................................................................................................. 4- 9
2.3.3 Hard Drive Space Monitor ........................................................................................ 4-10
2.3.4 Rotation .................................................................................................................... 4-11
2.4 Quality .......................................................................................................................... 4-11
2.4.1 Automatic ................................................................................................................. 4-11
2.4.2 Threshold ................................................................................................................. 4-11
2.4.3 Density ..................................................................................................................... 4-12
2.4.4 Sharpness ................................................................................................................4-12
2.4.5 Dither........................................................................................................................ 4-12
2.5 DPI ............................................................................................................................... 4-12
2.6 Format..........................................................................................................................4-13
2.7 Advanced Settings .......................................................................................................4-14
2.7.1 Mirror ........................................................................................................................ 4-14
2.7.2 Invert ........................................................................................................................ 4-14
2.7.3 Stamp ....................................................................................................................... 4-15
2.7.4 Leading Edge Adjustment ........................................................................................ 4-16
2.7.5 Trailing Edge Adjustment ......................................................................................... 4-17
2.8 Mailbox.........................................................................................................................4-18
2.8.2 Creating a New Mailbox ........................................................................................... 4-18
2.8.3 SMB Setup ............................................................................................................... 4-19
2.8.3.1 Share Setup – Workstation/Server .......................................................................... 4-19
2.8.3.2 Network Location (SMB/CIFS) – IPS Setup ............................................................ 4-20
2.8.3.3 Scan to File – Image Naming .................................................................................. 4-23
2.8.3.4 Create a Mailbox with Naming Convention ............................................................. 4-23
2.8.3.5 FTP Site................................................................................................................... 4-24
2.8.4 Removing a Mailbox ................................................................................................. 4-26
2.9 Start.............................................................................................................................. 4-27
2.10 Reset / Stop ................................................................................................................. 4-27
2.11 Re-Scan ....................................................................................................................... 4-27
2.12 View Last...................................................................................................................... 4-27
2.13 Log Off .........................................................................................................................4-27
Section 4 Scan Mode - Monochrome 4-1
Page 87

1. 0 Scan Mode - Monochrome
1.1 Main Screen
3
2
4 6
5
7
8
9
10
11
No. Name Function
1 Mode Selects the “Mode” of the system. (Scan Mode for
2 Original Size Use automatic settings or manually set width, length
3 Original Type User Selects the type of original to scan. Also select
4 Quality Select Auto or Manual image adjustments
5 DPI Scroll through final image resolution. (DPI)
6 Format Scroll through formats the scanned file will be saved
7 Advanced Settings Invert, mirror, stamps, and edge adjustments
8 Reset / Stop Resets the system to default settings. Stops a scan
9 Mailbox Select where the image will be stored after the scan
10 View Last View the last scanned image
11 Rescan Rescans the last image (replaces)
1
this screen shown)
and rotation of the images.
either Eng/Arch Mode here.
to.
preformed / displayed in this button (sub screen)
in process
(KIP printer, FTP, LAN PC etc).
Section 4 Scan Mode - Monochrome 4-2
Page 88

1.2 Simple Scanning
To scan to file, please follow these basic steps.
The following chapters have details on adjustments and parameters that the user can
change to modify the scans.
1.2.1 Select Scan Mode
On the lower region of the UI, select “SCAN”.
1.2.2 Select Size Mode
Select whether the document is an engineering or architectural size document. This will
allow the automatic width detection to function.
Engineering widths = 34, 22, 17, 11, and 8.5 inches
Architecture widths = 36, 30, 24, 18, 12, and 9 inches
Section 4 Scan Mode - Monochrome 4-3
Page 89

1.2.3 Select Original Image Type
Set the Original Image type you will scan. The selections are:
Line - used for simple line documents
Line / Photo - used for a combination of lines & photos documents
Grayscale - used for a combination of lines & areas of shade (CAD) originals
Photo - used for photographic originals
This will allow automatic image quality adjustments for the scan.
Section 4 Scan Mode - Monochrome 4-4
Page 90

1.2.4 Select Format
Press the button to scroll through the file formats available.
TIF-G4 - tif format Group 4 level compressed
TLC - KIP format compressed
CAL-G4 - Cals Group 4 level
PDF - PDF Level 3
DWF - Design Web Format (AutoCAD)
Multipage TIF-G4 - Tif format Group 4 level compressed
Multipage PDF - PDF Level 3
Multipage DWF - Design Web Format (AutoCAD)
Select the type you require which will save the file in this format.
Section 4 Scan Mode - Monochrome 4-5
Page 91

1.2.5 Select Mailbox
Select the location to where the file will be saved. Use the “Page Arrows” to view other
choices currently available.
NOTE
The Mailboxes are predetermined by the system administrator or key operator.
Please contact these persons for any additional locations that you may require. The
“Mailbox” button will allow for additional location entries.
1.2.6 Insert Original
Using the guides on the feed table, center the original face up and push forward until the
KIP 600 accepts it.
The KIP 600 will automatically commence to scan. While this occurs the image will be
displayed on the Operator Panel for your reference.
1.2.7 Retrieve the File
Depending on the “Mailbox” you may now access your scan from a PC connected to the
LAN. This includes:
a) from a FTP site (using Microsoft Windows Internet Explorer or other FTP
software)
b) from the “KIP IPS Mailbox” utilizing “KIP Request” to access the document.
c) from SMB location
Please see the User Guides of these applications for details on their function.
Section 4 Scan Mode - Monochrome 4-6
Page 92

2. 0 Operation Details
2.1 Main Screen
The main SCAN screen is selected with the Scan Button.
This screen contains all user functions for scanning to file. The following pages detail the
functions and settings of each button and sub screen that can be used to adjust the scan
parameters to achieve the required result.
2.2 Original
This region allows the setting of the Size Mode (Engineering or Architectural) and the
Original Document type.
2.2.1 Original Size Mode
This button is used to select the Size Mode of Engineering or Architectural and Original
Image type.
This will allow the automatic width detection system to determine the image width when an
original is placed in the KIP 600.
(Eng) Engineering widths = 34, 22, 17, 11, and 8.5 inches
(Arch) Architecture widths = 36, 30, 24, 18, 12, and 9 inches
Section 4 Scan Mode - Monochrome 4-7
Page 93

2.2.2 Original Type
Select one of the four different predetermined original types. The selections are:
a) Line - used for simple line documents
b) Line / Photo - used for a combination of lines & photos documents
c) Grayscale - used for a combination of lines & areas of shade (CAD)
originals
d) Photo - used for photographic originals
Press the desired original setting from one of the four diagrams. This will allow automatic
image quality adjustments for the next scan. Please note that the selection will be
highlighted with a “black” circle and the icon will become white, as in the above example
“Grayscale”.
2.3 Original Size
This region is used to select the image size of the original being scanned.
2.3.1 Automatic Size
For most scans, “Automatic” should be selected. This will allow the KIP 600 to
automatically determine the width and length of the scan without any user intervention.
(Please also note “Original Size Mode” in 2.2)
Section 4 Scan Mode - Monochrome 4-8
Page 94

2.3.2 Manual Size
To select an original size manually, select Manual and a sub screen displays all current
standard page sizes.
a)
Select a desired size of the sheet.
b) Or use “Custom” to select a width.
c) Set a standard size width.
Section 4 Scan Mode - Monochrome 4-9
Page 95

d) Select a standard size length or
e) Select a custom length with the key pad.
f) Press “Reset” to begin again,
“Enter” to accept the settings or Cancel” to
cancel “Manual” image size.
g) The main Scan screen will now
display the custom or manual size
settings for the next image.
2.3.3 Hard Drive Space Monitor
Located on the main screen of the KIP printer Scan mode, the Disk Use
monitor provides a real-time display of remaining disk space on the KIP
printer’s hard drive. The monitor shows both the used space and the space
available for image storage on the drive.
Section 4 Scan Mode - Monochrome 4-10
Page 96

2.3.4 Rotation
The file can be saved rotated, from the actual feed direction. This can be used to reduce
the scan time on certain orientation of originals, when they are archived.
Press the “Rotation” button to select either one of four settings:
2.4 Quality
This region is used to change the image quality settings from the
automatic setting.
2.4.1 Automatic
For most scans, “Auto” should be selected. This will allow the KIP
600 to automatically determine the best image settings without any
user intervention. (Please also note “Original” in 2.2)
2.4.2 Threshold
To override the “Automatic” settings, “Threshold” can be adjusted.
Deselect “Auto” to enable “Threshold”.
Pressing the arrows manually adjusts the threshold. This will
suppress or enhance the lines and images from the original.
Section 4 Scan Mode - Monochrome 4-11
Page 97

2.4.3 Density
To override the “Automatic” settings, “Density” can be adjusted.
Deselect “Auto” to enable “Density”.
Pressing the arrows manually adjusts the background density. This
will suppress or enhance the background from the original.
2.4.4 Sharpness
To override the “Automatic” settings, “Sharpness” can be adjusted.
Deselect “Auto” to enable “Sharpness”.
Pressing the arrows manually adjusts the line sharpness to remove
rough lines or when photos are scanned to allow for smoother
graduations.
2.4.5 Dither
To override the “Automatic” settings, “Dither” can be adjusted.
Deselect “Auto” to enable “Dither”.
By pressing the dither button,
a) None
b) Fine
c) Medium or
d) Course
This will change how the dots are arranged to create the final image
of the scan. For fine lines a “Course” dither pattern may be desired.
For Photos “None” may be desired.
2.5 DPI
Scroll through the DPI button to select the required scan resolution.
Choices are 200, 300, 400 or 600 DPI.
300 400
Section 4 Scan Mode - Monochrome 4-12
Page 98

2.6 Format
Press the “Format” button to toggle through the file formats available.
TIF-G4 - tif format Group 4 level compressed
TLC - KIP format compressed
CAL-G4 - Cals Group 4 level
PDF - PDF Level 3
DWF - Design Web Format (AutoCAD)
Multipage TIF-G4 - Tif format Group 4 level compressed
Multipage PDF - PDF Level 3
Multipage DWF - Design Web Format (AutoCAD)
Select the file type required to save the image into this format.
TLC Cals
For a Multipage scan, select the desired Multipage format. Start button will prompt for next
original.
When finished scanning, select the Close File button to finalize the multipage file.
Section 4 Scan Mode - Monochrome 4-13
Page 99

2.7 Advanced Settings
The Advanced Setting button contains the additional parameters on a sub screen:
a) Invert
b) Mirror
c) Stamp (Water Mark)
d) Lead Edge Adjustment
e) Trail Edge Adjustment
Make any required adjustments / selections and press “OK” to accept. The selections will
now be displayed on the main Scan screen.
2.7.1 Mirror
Select this button to “mirror” a scan. This can be utilized on originals that
have the actual image on the reverse side such as older “sepia” or “film”
documents.
2.7.2 Invert
Select this button to change a region of white to black and visa versa of a
scanned document. This is normally used for “negative” documents or
“blue prints”.
Section 4 Scan Mode - Monochrome 4-14
Page 100

2.7.3 Stamp
Select “Stamp” to display another sub screen. This will allow the selection of a “Stamp” or
“Water Mark” to be placed on the scanned image. It will be embedded digitally into the
image.
a) Use the Arrow buttons to scroll
through the available stamps and
then select the stamp from the list.
b) The Stamp button will now display the stamp
selected.
NOTE
The list of “Stamps” is loaded into Scan Mode by the system administrator or key
operator. They can not be altered or modified in any manner on the KIP printer’s
UI.
Please contact these persons for any additional stamps that may be required.
Please see “KIP Request” for these functions.
Section 4 Scan Mode - Monochrome 4-15
 Loading...