

Page 1

DiMAGE T
DiMAGE T
ransfer for
ransfer for
MAXXUM 7D / DYNAX 7D
MAXXUM 7D / DYNAX 7D
Page 2

- 2 -
BEFORE YOU BEGIN
Before installing the DiMAGE Transfer software, the camera firmware may need to be updated. Read
this manual and the data-transfer section in the camera manual. The examples in this manual assume
the camera is connected to the computer with a USB cable as described in the camera manual.
This instruction manual does not provide instruction in the basic operation of the personal computers,
or the basic operation of Windows operating systems; refer to the manuals supplied with the computer.
Every precaution has been taken to ensure the accuracy of this material. Contact Konica Minolta if
you have any questions. Konica Minolta is not responsible for any loss or damage caused by the use
of this software.
This instruction manual may not be copied either in part or in its entirety without the prior permission
of Konica Minolta.
TABLE OF CONTENTS
System requirements ...........................................................................................................................3
About DiMAGE Viewer / DiMAGE Master............................................................................................3
Camera firmware update......................................................................................................................4
Cameras requiring update ..............................................................................................................4
Software Update License Agreement .............................................................................................5
Preparing the CompactFlash card ..................................................................................................6
Updating the camera firmware........................................................................................................7
Installation ............................................................................................................................................8
Uninstalling DiMAGE transfer........................................................................................................11
Starting up the software .....................................................................................................................12
Quit................................................................................................................................................14
Taking pictures ...................................................................................................................................14
Preview window .................................................................................................................................17
Updating the file list.......................................................................................................................19
Viewing images with DiMAGE software.............................................................................................20
Preferences ........................................................................................................................................22
Preferences window......................................................................................................................22
File destination ..............................................................................................................................22
File name ......................................................................................................................................23
Konica Minolta is a trademark of Konica Minolta Holdings, Inc. DiMAGE is a trademark of Konica Minolta
Photo Imaging, Inc. Microsoft and Windows are registered trademarks in the United States and other countries of Microsoft Corporation. The official name of Windows is Microsoft Windows Operating System.
Pentium is a registered trademark of Intel Corporation. All other brand and product names are trademarks or
registered trademarks of their respective owners.
Page 3

- 3 -
For the camera to be connected, the computer must be equipped with a USB port as a standard interface.
The computer and the operating system must be guaranteed by their manufacturers to support USB
interface.
SYSTEM REQUIREMENTS
IBM PC/AT compatible computers
600MHz Intel Pentium III processor or higher and
must meet the operating system requirements.
Windows®XP (Home / Professional)
Windows
®
2000 Professional
128MB RAM or the memory required by the operating system, whichever is greater.
200MB or more of available hard-disk space after installation
ATrue Color (24 bit) or greater monitor
with a minimum resolution of 1024 X 768 (XGA).
ABOUT DIMAGE VIEWER / DIMAGE MASTER
DiMAGE Viewer or DiMAGE Master can be launched from DiMAGE Transfer. DiMAGE Viewer is
installed from the DiMAGE Viewer CD-ROM supplied with the camera. Many editing and imageprocessing functions are available. DiMAGE Master is an optional software that has improved
editing and processing tools compared with DiMAGE Viewer.
To display image files taken with Maxxum/Dynax 7D, DiMAGE Master or DiMAGE Viewer (version
2.3.7 or later) must be installed. See the DiMAGE Viewer or DiMAGE Master manual for details.
Page 4
- 4 -
CAMERA FIRMWARE UPDATE
CAMERAS REQUIRING UPDATING
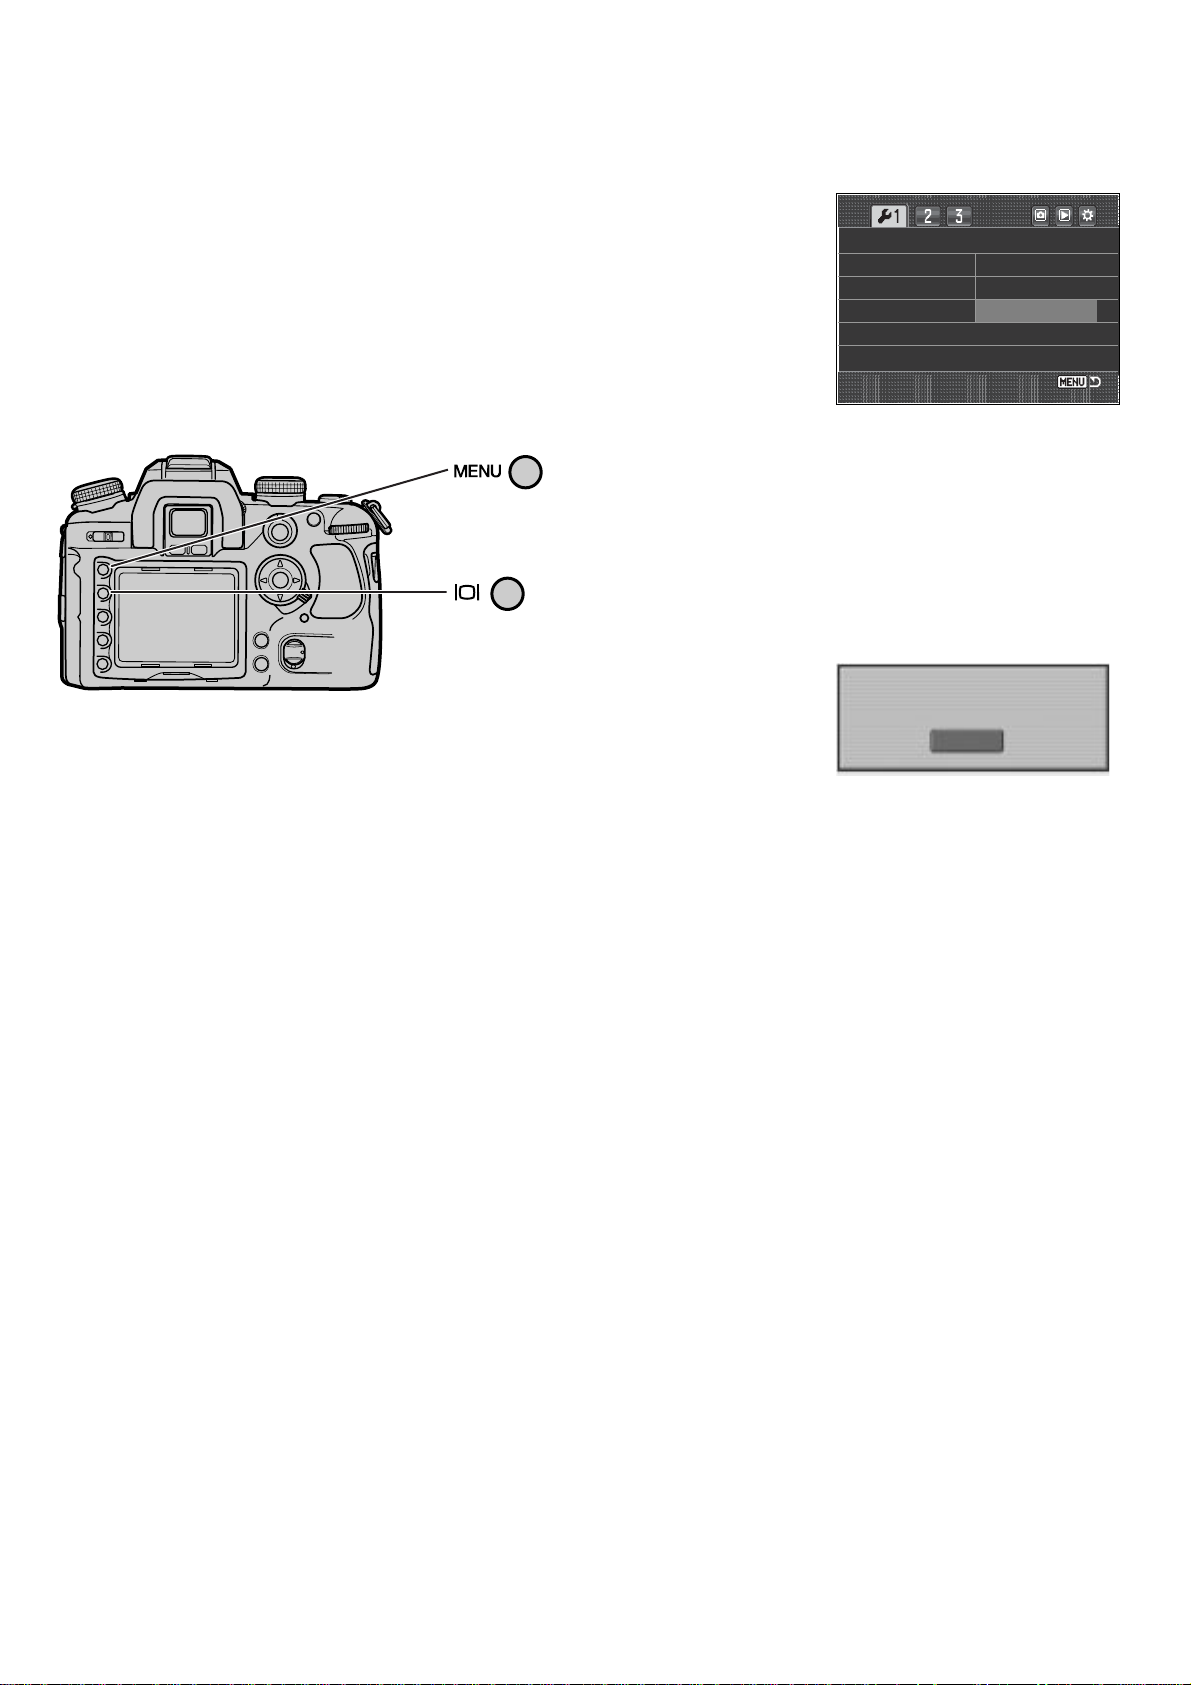
If RemoteStorage in the transfer-mode option of the setup menu
(A) is not displayed, the camera must be updated.
LCDbrightness
Transfer mode Data storage
Video output PTP
Audio signals RemoteStorage
Language
Date/Time set
To check the Maxxum/Dynax 7D firmware version,
press the menu button, and then press the display
button.
The version is displayed under the camera name
(B). The version number is followed by “e” or “u” to
denote the product region. Press the central button
of the controller to close the screen.
(A)
MAXXUM 7D
MAXXUM 7D
Ver. 1.00 e
OK
(B)
If the camera has the 1.10 or later version, do not
update the firmware.
To update the camera firmware, a CompactFlash
card and a personal computer are necessary.
Page 5

- 5 -
SOFTWARE UPDATE LICENSE AGREEMENT
GRANT OF LICENSE
Konica Minolta Photo Imaging U.S.A., Inc. ("Konica Minolta") grants you a license to use one or more copies of the Software specifically for the purpose of copying the Firmware into a Camera in order to update the Camera, subject to the license restrictions set
forth below.
You may copy the Software as necessary to update one or more Cameras that you own, as long as the Software is used only with a
Konica Minolta camera product. You may also make one backup copy of the Software.
You may not distribute the Software to others, whether or not such others may own Cameras.
COPYRIGHT
The software is owned by Konica Minolta and its Licensors and protected by copyright laws and international treaties. You may not
copy the software other than as expressly provided in this license. You may not reverse engineer, decompile, or disassemble the
Software.
TERM
This license is effective until terminated. You may terminate it at any time by destroying the Software together with all copies in any
form. It will also terminate if you fail to comply with any term or condition of this Agreement. You agree upon such termination to
destroy the Software together with all copies in any form.
LIMITED WARRANTY
If you use the Software during the original warranty period of your Camera, as evidenced by a copy of your purchase receipt for your
Camera, Konica Minolta will warrant that the Software performs substantially in accordance with the accompanying written materials
for the remainder of the original warranty period of your Camera. If you load and use the Software after the original warranty period of
your Camera has expired, then you accept the Software "AS IS" without any express warranty.
Konica Minolta does not warrant that the functions contained in the Software will meet your requirements or that operation of the
Software will be interrupted or error free. You assume responsibility for operation of the Software to achieve your intended results,
and for the installation, use, and results obtained from the Software.
Subject to any applicable legislation which prohibits the following exclusions, KONICA MINOLTA MAKES NO OTHER WARRANTIES
OF ANY KIND, EITHER EXPRESS OR IMPLIED, INCLUDING THE IMPLIED WARRANTIES OF MERCHANTABILITY AND FITNESS
FOR A PARTICULAR PURPOSE. Some states and countries, including England and Australia, do not allow the exclusion of implied
warranties, or have legislation that imposes certain statutory warranties that cannot be excluded, so the above exclusion may not
apply to you. This warranty gives you specific legal rights and you may also have other rights.
LIMITATIONS OF REMEDIES
Subject to any applicable legislation which prohibits the following limitations, Konica Minolta's entire liability and your exclusive remedy shall be the replacement of the Software not meeting Konica Minolta's "Limited Warranty", provided that you notify Konica Minolta
or your dealer within the original warranty period of your Camera and have a copy of your purchase receipt for your Camera. This
remedy is not available if failure of the Software is the result of misuse, abuse, or a failure to follow the operating instructions in the
accompanying written materials, or if you load and use the Software after the original warranty period of your Camera has expired.
IN NO EVENT WILL KONICA MINOLTA OR ITS SUPPLIERS, LICENSORS OR DEALERS BE LIABLE TO YOU FOR ANY INCIDENTAL OR CONSEQUENTIAL DAMAGES, INCLUDING ANY LOST PROFITS, LOST SAVINGS, OR OTHER DAMAGES ARISING OUT
OF THE USE OR INABILITY TO USE THE SOFTWARE EVEN IF ADVISED OF THE POSSIBILITY OF SUCH DAMAGES. Some
states and countries, including England and Australia, do not allow the limitation or exclusion of liability for incidental or consequential
damages, or have legislation which restricts the limitation or exclusion of liability, so the above limitation may not apply to you.
GENERAL
If the Software was obtained in the United States, this Agreement is governed by the laws of the State of New York without regard to
its conflicts of laws rules. If obtained outside the United States, this Agreement is governed by the laws of the country in which it was
obtained.
U.S. GOVERNMENT RESTRICTED RIGHTS
The Software and documentation are provided with RESTRICTED RIGHTS. Use, duplication, or disclosure by the Government is
subject to restrictions as set forth in subdivision (b)(3)(ii) of The Rights in Technical Data and Computer Software clause 201.574-
4000. Contractor / manufacturer is Konica Minolta Photo Imaging U.S.A., Inc. 725 Darlington Avenue, Mahwah, NJ 07430
EUROPEAN UNION PROVISIONS
If this Software is used within a country of the European Union, nothing in this Agreement shall be construed as restricting any rights
available under the European Community Software Directive (91/250/EEC).
Page 6
- 6 -
The required files downloaded from the web site must be copied to a CompactFlash (CF) card in the
camera. Before updating the camera firmware, read the data-transfer section of the camera
instruction manual to connect the camera to a computer.
• Prepare a 16MB or larger CF card by formatting it with the camera.
• Do not use a microdrive to update the camera firmware.
• Using the USB cable, connect the camera with a CF card inside to your computer. If the camera is
not compatible with the computer system, a CF card reader connected to your computer can be
used instead.
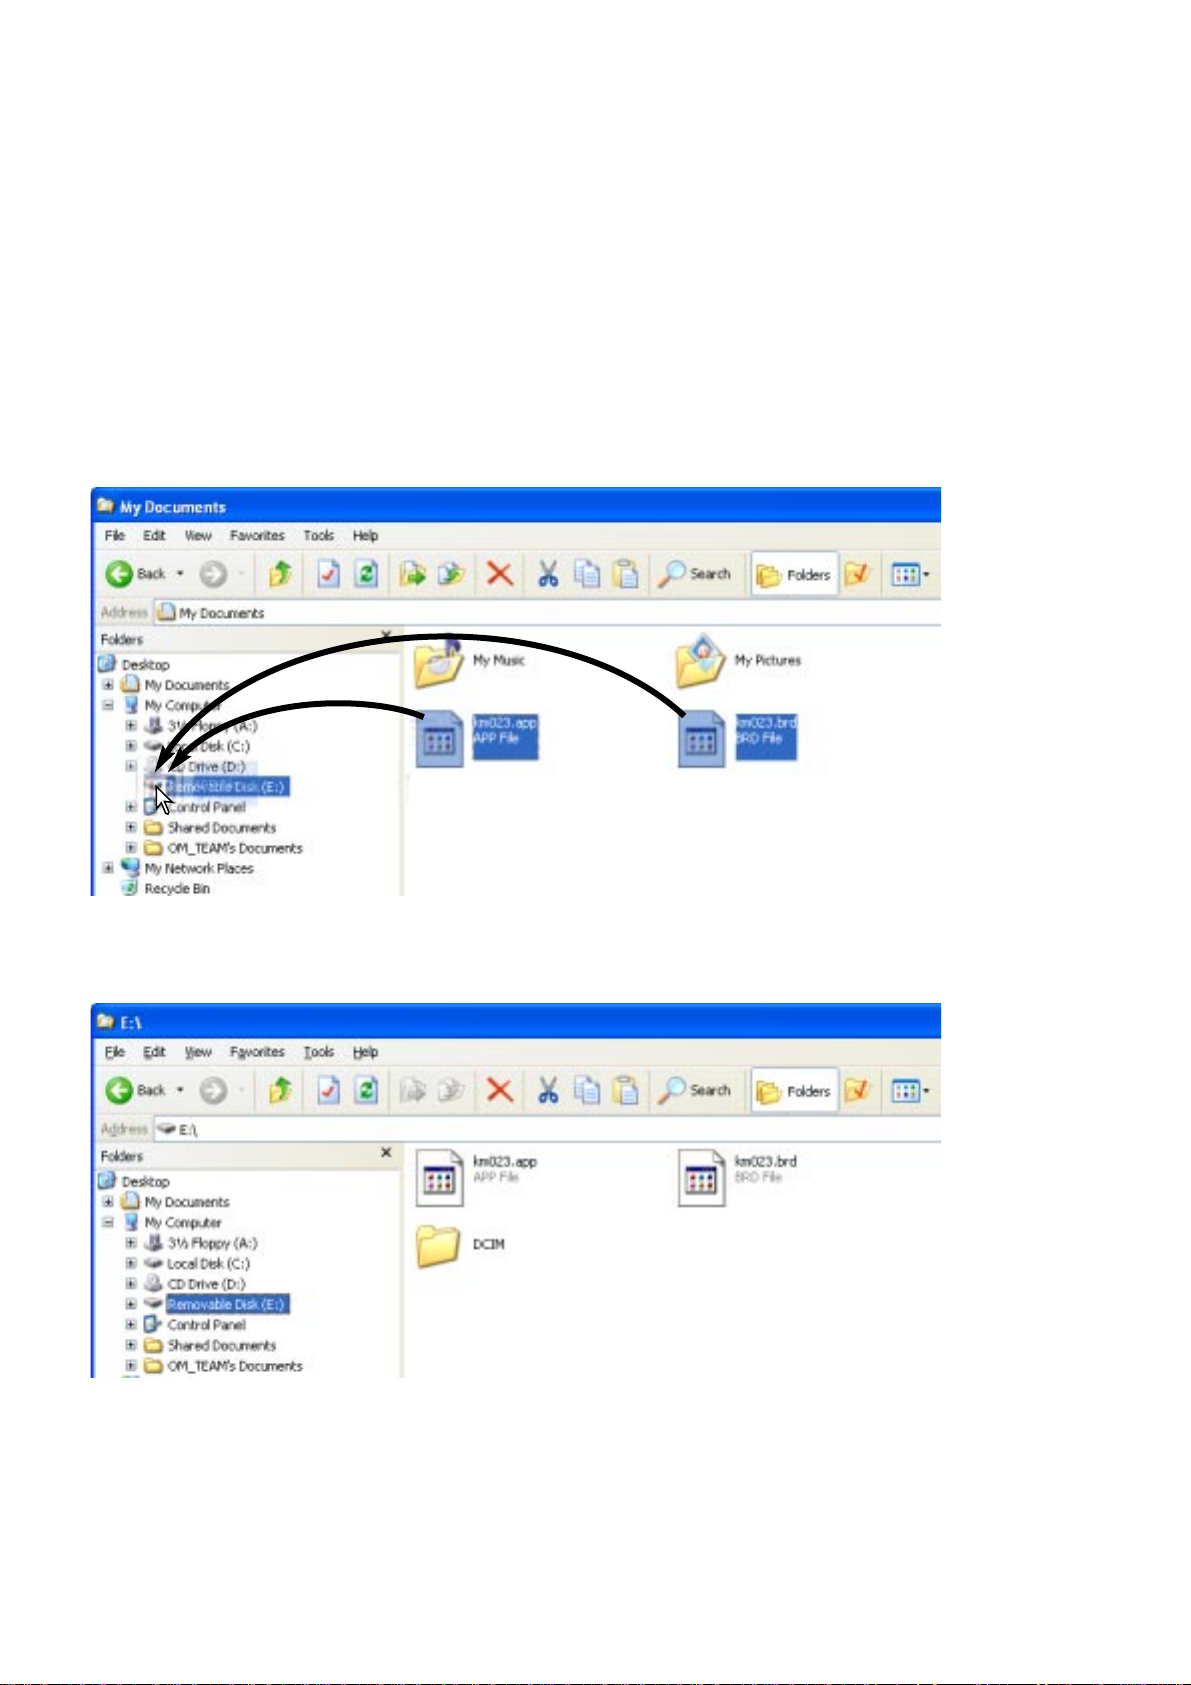
1. Double click the downloaded file “7dv110.exe” to decompress it. The update files named
“km023.app” and “km023.brd” are created.
2. Copy the update files onto the CF card. The files should not be copied into a folder such
as the DCIM folder.
PREPARING THE
COMPACT
FLASH CARD
4. Disconnect the camera from the computer or remove the CF card from the drive.
3. Confirm that the the update files have been copied to the CompactFlash card using the
computer.
Page 7
- 7 -
When performing the software update, use a set of fully charged batteries or the AC adapter (sold
separately). When using the AC adapter, be sure not to inadvertently disconnect the camera during
the software updating procedure, otherwise the camera may be permanently damaged. The camera
memory and settings are all reset when the update software is installed.
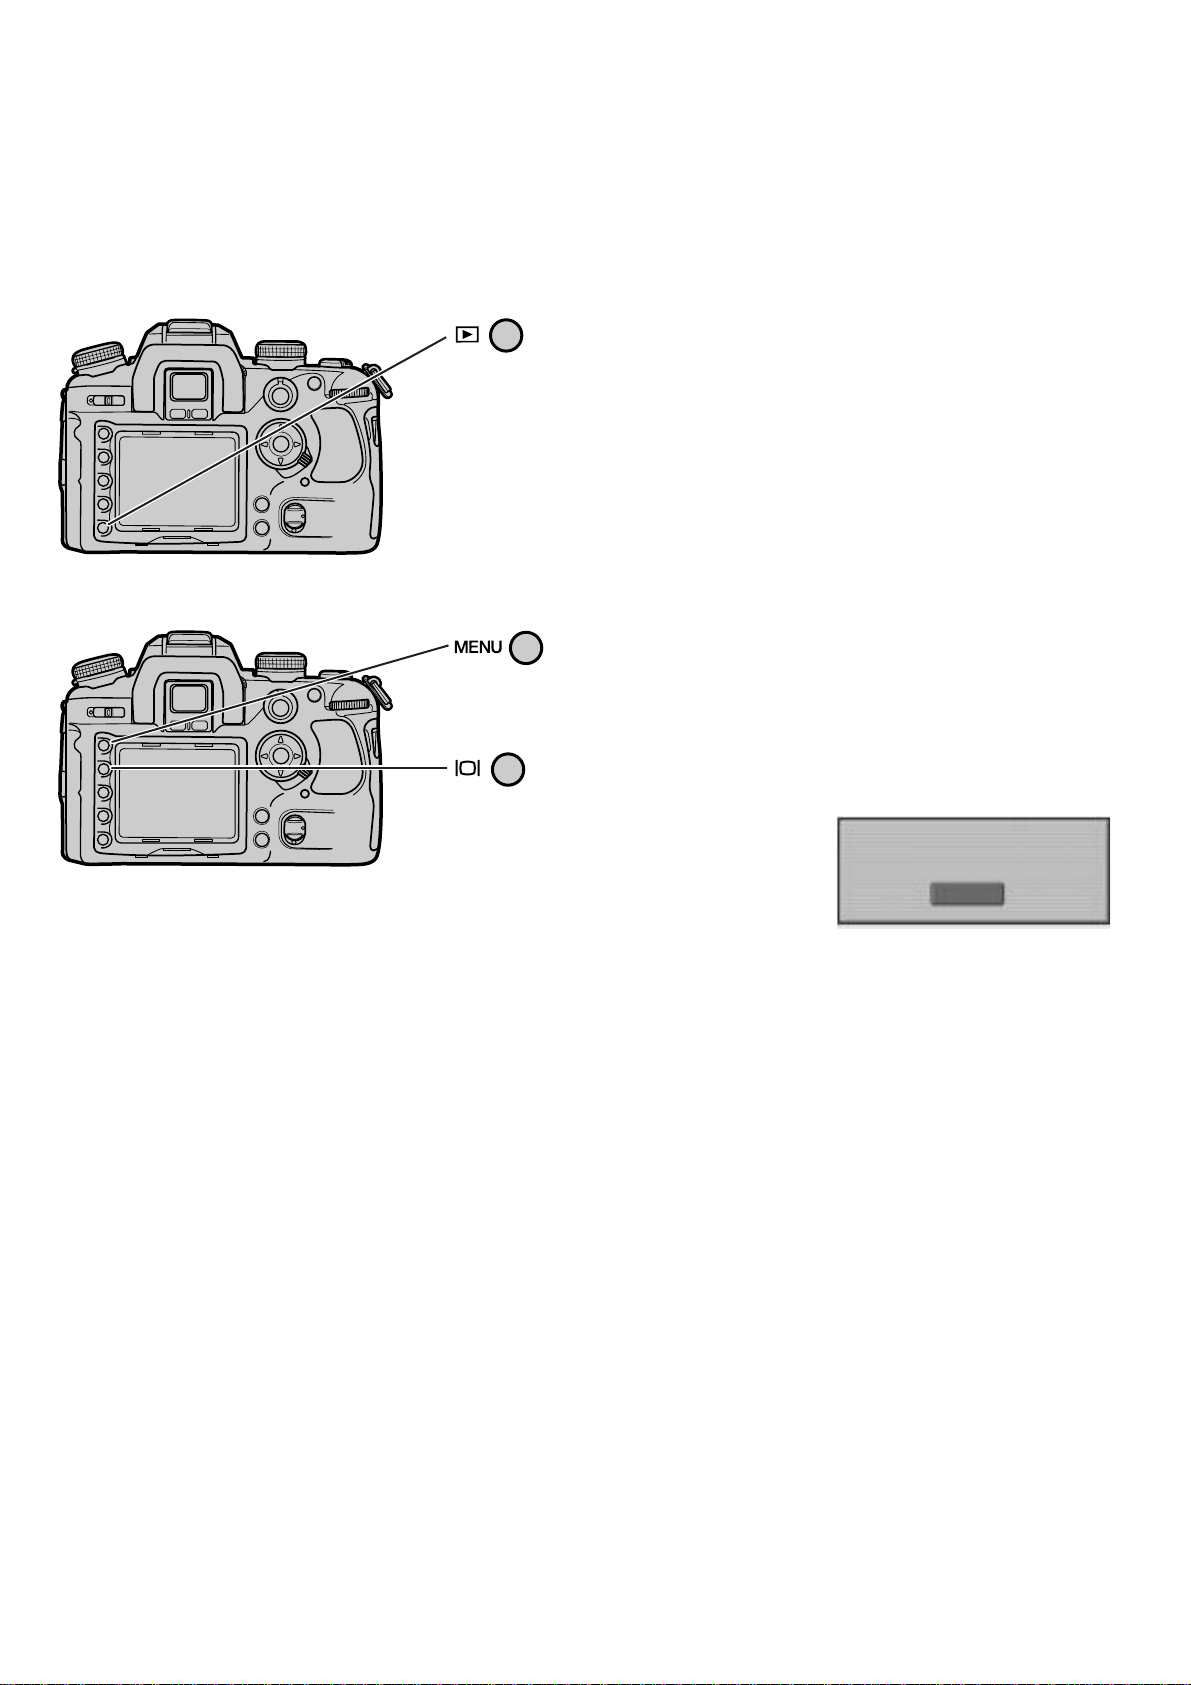
1. With the camera off, insert the prepared CF
card.
2. Turn the camera on, and press the playback
button (C).
3. When the update confirmation screen
appears, select “Yes” and press the central
button of the controller to begin the firmware
update. This process should take about two
minutes.
4. When the complete message appears, turn
the camera off and remove the CF card.
5. Turn the camera on and press the menu
button (D).
6. Press the display button. Confirm that ver.
1.10 is displayed. The version number is
followed by “e” or “u” denoting the product
region (E).
UPDATING THE
CAMERA
FIRMWARE
MAXXUM 7D
MAXXUM 7D
Ver. 1.10e
OK
(E)
(C)
(D)
Updating Notes:
• After updating, delete the update files from the CF card; format the card or remove the files using
a computer. If the files remain on the card, the update procedure may repeat.
• If the update was not performed correctly, or an error occurred during the update procedure, an
error message appears. Turn the camera off and remove the batteries or disconnect the AC
adapter. Repeat the procedure from step 1.
• If any other software version number is displayed or the camera does not work properly, repeat the
installation procedure.
• This software update can only be used for versions ending with the letter "u" or "e.” The update
will not work with software ending in any other letter.
7. Press the central button of the controller to
close the screen.
8. Reset the camera using the recording-mode
reset function. See page 64 in the camera
manual.
Page 8
- 8 -
INSTALLATION
RAM-stationed programs such as anti-virus or installation-monitoring software may cause the
installer to fail. Remove or disable these programs before installing DiMAGE Transfer. Reinstall or
enable the software when the installation is complete.
In the example below, the hard disk is drive C. The letters designating the drives vary between
computers. The software should be installed with the Administrator privilege.
1. Double click the downloaded file “dtv100e.exe” to decompress it. The installation
file named “DiMAGE Transfer Installer.exe” is created. If you download two
separate files, “dtv100e1.exe” and “dtv100e2.zip”, save them in the same folder
and double click the “dtv100e1.exe” file; the installation file is created.
2. Double click the “DiMAGE Transfer installer.exe” file to begin installation.
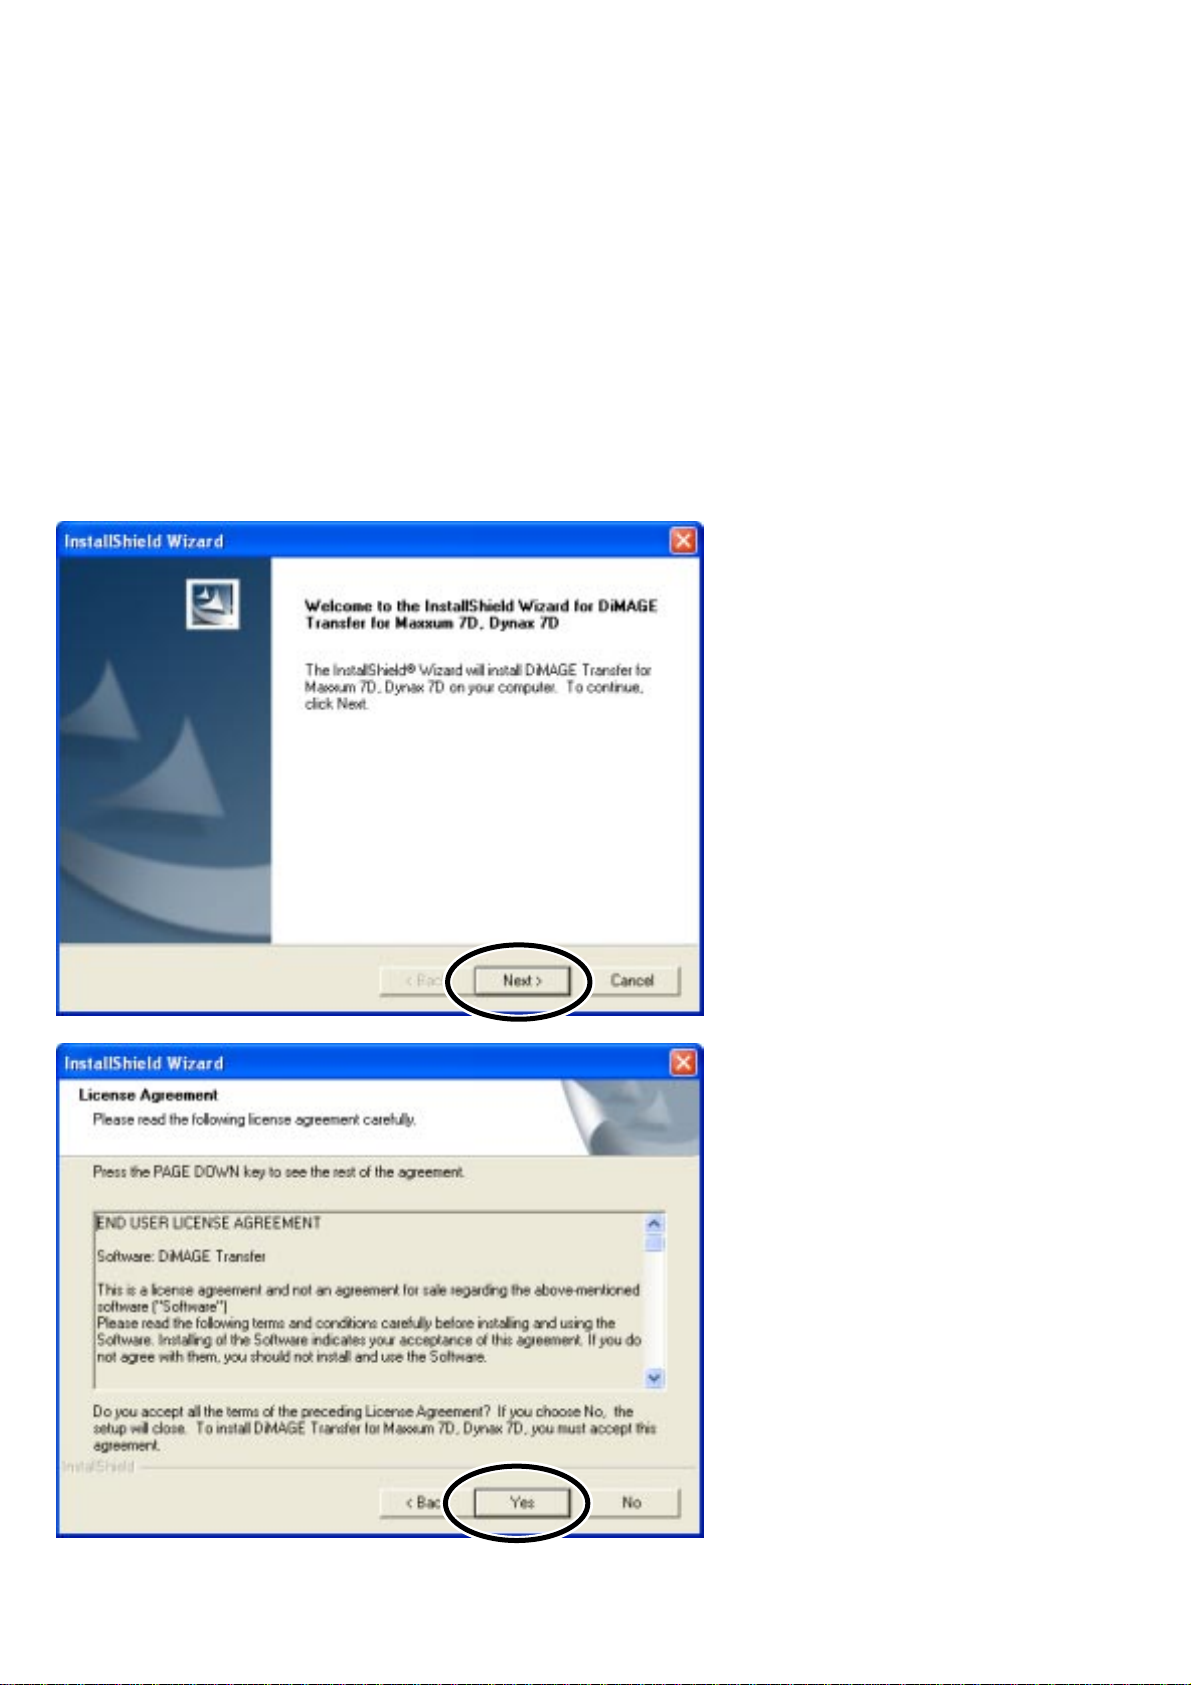
3. The welcome window opens.
Click “Next >” to continue.
4. The license agreement
appears. If you accept the
agreement, click “Yes” to
continue the installation
routine.
Read the entire license
agreement carefully before
continuing. If you do not
agree to the terms, click “No”
to exit the installation
program.
Page 9

- 9 -
5. To install the software in the
default location (C:\Program
Files\DiMAGE Transfer for
Maxxum 7D, Dynax 7D), click
“N
ext >.”
To install the software in a
different location, click the
Br
owse button to display the
folder selection window.
Specify the directory in which
to install the software.
6. The name of the default
program folder is displayed.
To install the software icons
in this folder, click “N
ext >.”
Installation begins.
To install the software icons
in another folder, select one of
the folders listed in the
existing-folders box below.
Click “N
ext >” to begin
installation.
7. When the software installation
has been completed, a
message is displayed. Click
“Finish.”
(Continued on next page.)
Page 10

- 10 -
8. The message shown at left is
displayed. Click “OK” to
continue.
9. The welcome window opens.
Click “Next >” to continue.
10. The license agreement
appears. If you accept the
agreement, click “Y
es.”
Installation of the USB driver
begins.
Read the entire license
agreement carefully before
continuing. If you do not
agree to the terms, click “N
o”
to exit the installation
program.
Page 11

- 11 -
11. When the USB driver
installation has been
completed, a message is
displayed. Click “Finish.”
UNINSTALLING
DIMAGE TRANSFER
Windows®XP:
1. Quit the software.
2. Select Start > Control Panel > Add or Remove Programs.
3. Select DiMAGE Transfer for Maxxum 7D, Dynax 7D.
4. Click Change/Remove.
Windows
®
2000 Professional:
1. Quit the software.
2. Select Start > Settings > Control Panel > Add/Remove Applications.
3. Select DiMAGE Transfer for Maxxum 7D, Dynax 7D.
4. Click Change/Remove.
Page 12

- 12 -
STARTING UP THE SOFTWARE
1. Start up the computer. The computer must be
on before connecting the camera.
2. Turn the camera on and select
“RemoteStorage” from the transfer-mode
option in section 1 of the setup menu (A). See
camera’s manual for details.
3. Open the AV out / USB port cover on the
camera (B-1). Attach the smaller plug of the
USB cable to the camera (B-2). The plug
should be firmly attached.
4. Attach the other end of the USB cable to the
computer’s USB port. The plug should be
firmly attached. Only one camera can be
connected to the computer. The camera
should be connected directly to the
computer’s USB port. Attaching the camera to
a USB hub may prevent proper operation. A
memory card is not necessary.
Windows-logo-testing message
(Windows
®
XP) or Digital-signature-not-found
message (Windows
®
2000 Professional) may
appear when the camera is connected for
the first time. Click “Continue anyway” to
continue.
LCDbrightness
Transfer mode Data storage
Video output PTP
Audio signals RemoteStorage
Language
Date/Time set
(A)
(B-1) (B-2)
When “Completing the Found New
Hardware Wizard” screen appears, click
“Finish.”
Page 13

- 13 -
5. Open DiMAGE Transfer.
Windows®XP:
Choose Start > All Programs > DiMAGE Transfer for Maxxum 7D, Dynax 7D > DiMAGE Transfer for
Maxxum 7D, Dynax 7D
Windows
®
2000 Professional:
Choose Start > Programs > DiMAGE Transfer for Maxxum 7D, Dynax 7D > DiMAGE Transfer for
Maxxum 7D, Dynax 7D
The main window opens.
When connected, the remaining frames and the harddisk space is displayed at the lower right corner of the
camera LCD monitor.
Page 14

- 14 -
QUIT
1. Turn the camera off. The main window changes as
shown. Confirm that the remaining frames counter
displays a dash and the preferences button is active.
Always turn the camera off before
quitting DiMAGE Transfer or opening
the preference window.
• Fast user switching may prevent DiMAGE Transfer from operating properly.
• System standby will not work until DiMAGE Transfer is closed.
• If the low-battery warning appears on the camera, DiMAGE Transfer cannot be used. The
computer and the camera are disconnect automatically after transferring the data.
• Use of the AC Adapter (sold separately) is recommended for extended use.
NOTES
2. Click the quit button in the lower right corner of the
main window.
TAKING PICTURES
1. Click “Preview” in the main window. The
preview window opens to the left of the main
window. The last image taken is displayed in
the window.
Page 15

- 15 -
2. Press the shutter-release button on the camera to take the picture. The image
taken is displayed in the preview window and saved in the My Picture folder at the
same time.
(Continued on next page.)
• Pictures are saved in the My Picture folder with the default setting. This folder can be changed.
See page 22.
Preview window
Page 16

- 16 -
3. Pictures can be continued to be taken.
• All of the recording mode camera setting such as exposure mode, drive mode, focus mode, and
the recording menu settings are made with the camera body only. DiMAGE Transfer can not
control the camera settings.
• While connecting the camera to the computer with the DiMAGE Transfer, the playback button on
the camera is disabled. During the instant playback period, image can not be deleted or enlarged.
• While connecting the camera to the computer with the DiMAGE Transfer, the setup menu options
listed below can not be used.
Transfer mode
File number memory
Folder name
Select folder
New folder
Clean CCD
Reset default
• If the low-battery warning appears on the camera, DiMAGE Transfer cannot be used. The
computer and the camera are disconnect automatically after transferring the data.
• Use of the AC Adapter (sold separately) is recommended for extended use.
NOTES
When taking pictures in the RAW image-quality mode, images taken are displayed in
the preview window at a low resolution of 640 X 480 pixels. To display a finer preview
image, use the RAW & JPEG image-quality option or launch the DiMAGE Viewer /
DiMAGE Master software from this software to view the RAW image files. See page 20
for details.
Page 17

- 17 -
PREVIEW WINDOW
Fit-to-window button
Full-screen display button
Magnifying tool button
Rotate buttons
Show first image Histogram button
Close button
Grab tool button Show last image
Full-screen display button
To display the image in the entire monitor area. Press the keyboard escape key to cancel the display.
Fit-to-window button
To resize the image automatically to fit the display area. The
magnifying and grab tool cannot be used with the fit-to-window
function.
Magnifying tool button
Click on the image to enlarge. To reduce, hold down the keyboard shift key and click on the image. When the image has
reached the magnification limit, the plus or minus sign in the
magnifier icon disappears.
Grab tool button
When an image is larger than the display area, the grab tool can
be used to scroll the image. Click and drag on the image to
scroll.
Rotate 90 degrees to left button Click to rotate the image 90° counterclockwise.
Rotate 90 degrees to right button Click to rotate the image 90° clockwise.
Display horizontally Click to display the image horizontally.
Show first image
To display the first image saved in the destination folder
1
.
Keyboard shortcut: Home key.
Show previous image
To display the previous image saved in the destination folder
from the current image
1
. Keyboard shortcut: right cursor key.
Show next image
To display the next image saved in the destination folder from
the current image
1
. Keyboard shortcut: left cursor key.
Show last image
To display the last image saved in the destination folder1.
Keyboard shortcut: End key.
Show next image
Show previous image
Display horizontally
(Continued on next page.)
1.The image displayed is based on the date the image was last modified. Processing images and
saving them in the destination folder can alter the order the images are displayed.
Page 18

- 18 -
Fit-to-window button
Full-screen display button
Magnifying tool button
Rotate buttons
Show first image Histogram button
Close button
Grab tool button Show last image
Show next image
Show previous image
Display horizontally
Histogram button
To show the histogram of the image displayed in the preview
window.
Close button To close the preview window.
Click histogram button to show the histogram of the
image displayed in the preview window.
Page 19

- 19 -
No. of remaining frames
STATUS
BAR
Magnification
Image quality
File name
Image number of the image currently displayed
Total number of images saved in the destination folder
Image size
UPDATING THE FILE LIST
When image data is saved with DiMAGE Viewer, DiMAGE
Master, or Windows Explorer when using DiMAGE Transfer,
press the F5 key on the keyboard to update the file list so
images are displayed correctly in the preview window.
Page 20

- 20 -
The DiMAGE Viewer or DiMAGE Master can be launched from DiMAGE Transfer. DiMAGE Viewer
is supplied with every Konica Minolta camera. Many editing and image-processing functions are
available. DiMAGE Master is an optional software that has improved editing and processing tools
compared with DiMAGE Viewer. DiMAGE Viewer version 2.3.7 or later is required to view images
taken by a Maxxum/Dynax 7D.
VIEWING IMAGES WITH DIMAGE SOFTWARE
1. Click “DiMAGE Viewer” in the main window; the DiMAGE Viewer or DiMAGE Master
is launched automatically and the image thumbnails saved in the destination folder
are shown. If both the DiMAGE Viewer and DiMAGE Master are installed, DiMAGE
Master is launched.
Page 21

- 21 -
2. Press the shutter-release button on the camera to take pictures. Images taken are
added automatically to the DiMAGE Viewer or DiMAGE Master thumbnail display.
Images taken are added automatically to the thumbnail
display.
Page 22

- 22 -
PREFERENCES
PREFERENCES WINDOW
1. Turn the camera off. The main window changes
as shown. Confirm that the remaining frames
counter displays a dash and the preferences
button is active.
2. Click the preferences button in the main window.
The preferences window opens.
FILE DESTINATION
Images are saved in the My Picture folder. This can be
changed.
1. Click “View...” next to the file destination
option to open the folder tree.
Page 23

- 23 -
2. Select the folder to save the images. Click
“OK” to complete the operation. The folder
name can be changed using the keyboard’s F2
key. A new folder can also be created in this
window.
FILE
NAME
A file name consists of up to 16 alphanumeric characters,
followed by a five-digit serial number. The file name for
for captured images can be specified. The serial number
is attached automatically and cannot be changed.
Use alphanumeric characters which are appropriate in file
names in Windows operating systems. Invalid character
cannot be used.
If the serial number exceeds 99999, additional pictures
cannot be saved in the destination folder. A new folder
must be selected or made, or the file name changed.
Click “OK” to close the preferences window and
applies all changes.
Click “Cancel” to close the preferences window
without saving changes.
Click “Version” to display the splash screen showing
the version number of this software.
Page 24

© 2004 Konica Minolta Photo Imaging, Inc. under the Berne
Convention and the Universal Copyright Convention.
9224-7306-11 X- B502
 Loading...