


This manual does not provide instructions for the basic operation of
personal computers, or the basic operation of Windows
®
or Mac
operating systems.
Please refer to the manual that came with your computer for information
on the above mentioned topics.
• This instruction manual may not be copied either in part or in its entirety without the
prior permission of Minolta Co., Ltd.
© 1999 Minolta Co., Ltd.
• Every precaution has been taken to ensure the accuracy of this material. Please contact
Minolta if you have any questions, find any mistakes or notice missing information.
• Minolta cannot accept responsibility for any loss, damage or other problems caused by
use of this software.
• With the exception of personal, home or equivalent use no part of any book, magazine,
music, or other copyrighted material may be used, copied or revised without the prior
permission of the author or copyright holder,.
• This software has been designed to mitigate the so-called “Year 2000 Problem.”For
information on how Minolta has addressed the “Year 2000 Problem,”please visit our
Website: http://www.minoltaeurope.com
• Digita™, Digita Desktop™ and the Digita logo are licensed or registered trademar ks in
the United States and other countries of FlashPoint Technology, Inc.
®
• Microsoft
and Windows®are registered trademarks in the United States and other
countries of Microsoft Corporation.
• The official name of Windows
• I486 and Pentium
®
are trademarks or registered trademarks of Intel Corporation.
®
is Microsoft®Windows®Operating System.
• Apple, the Apple logo, Macintosh, Power Macintosh, Mac OS and the Mac OS logo are
registered trademarks of Apple Computer, Inc.
• Other company and product names are the trademark or registered trademark of their
respective owners.
1

2
TABLE OF CONTENTS
TABLE OF CONTENTS . . . . . . . . . . . . . . . . . . . . . . . . . . . . . . . . . . . . . . 2
BEFORE YOU BEGIN . . . . . . . . . . . . . . . . . . . . . . . . . . . . . . . . . . . . . . . . 6
User Registration . . . . . . . . . . . . . . . . . . . . . . . . . . . . . . . . . . . . . . . . . 6
Terms used in this manual . . . . . . . . . . . . . . . . . . . . . . . . . . . . . . . . . . 7
SYSTEM REQUIREMENTS . . . . . . . . . . . . . . . . . . . . . . . . . . . . . . . . . . . 8
For Windows
®
. . . . . . . . . . . . . . . . . . . . . . . . . . . . . . . . . . . . . . . . . . . . 8
For Macintosh . . . . . . . . . . . . . . . . . . . . . . . . . . . . . . . . . . . . . . . . . . . . 10
INTRODUCTION
INSTALLING THE SOFTWARE . . . . . . . . . . . . . . . . . . . . . . . . . . . . . . . . . 14
For Windows®95/98/NT . . . . . . . . . . . . . . . . . . . . . . . . . . . . . . . . . . . . 14
Installing the Twain-Driver (Windows®) . . . . . . . . . . . . . . . . . . . . . . . . 17
For Macintosh . . . . . . . . . . . . . . . . . . . . . . . . . . . . . . . . . . . . . . . . . . . . 18
CONNECTING THE CAMERA TO YOUR PC . . . . . . . . . . . . . . . . . . . . . . . 24
SCSI ID Setup . . . . . . . . . . . . . . . . . . . . . . . . . . . . . . . . . . . . . . . . . . . . 24
Terminator power supply setup . . . . . . . . . . . . . . . . . . . . . . . . . . . . . . 26
The SCSI connector cable . . . . . . . . . . . . . . . . . . . . . . . . . . . . . . . . . . 28
For PC/AT compatible computers . . . . . . . . . . . . . . . . . . . . . . . . . . . . . 28
For Apple Macintosh computers . . . . . . . . . . . . . . . . . . . . . . . . . . . . . . 29
Connection to the computer . . . . . . . . . . . . . . . . . . . . . . . . . . . . . . . . 30
Insertion of the CF card . . . . . . . . . . . . . . . . . . . . . . . . . . . . . . . . . . . . 31
BASIC OPERATIONS . . . . . . . . . . . . . . . . . . . . . . . . . . . . . . . . . . . . . . . . 32
Basic operation (Viewer Panel, Image Panel) . . . . . . . . . . . . . . . . . . . 32
Basic operation (Camera Panel) . . . . . . . . . . . . . . . . . . . . . . . . . . . . . 34
OPENING THE SOFTWARE . . . . . . . . . . . . . . . . . . . . . . . . . . . . . . . . . . . 36
For Windows®95/98/NT . . . . . . . . . . . . . . . . . . . . . . . . . . . . . . . . . . . . 37
For Macintosh . . . . . . . . . . . . . . . . . . . . . . . . . . . . . . . . . . . . . . . . . . . . 38

TABLE OF CONTENTS
USING THE SOFTWARE
USING THE TWAIN.DRIVER (WINDOWS)
Saving images to the hard drive . . . . . . . . . . . . . . . . . . . . . . . . . . . . .42
Deleting images from the CF-Card . . . . . . . . . . . . . . . . . . . . . . . . . . . .43
Quitting the Twain-Driver . . . . . . . . . . . . . . . . . . . . . . . . . . . . . . . . . . .43
USING THE VIEWER PANEL . . . . . . . . . . . . . . . . . . . . . . . . . . . . . . . . . .44
At the Viewer Panel . . . . . . . . . . . . . . . . . . . . . . . . . . . . . . . . . . . . . . . .44
Displaying camera Images . . . . . . . . . . . . . . . . . . . . . . . . . . . . . . . . . .45
Displaying Hard disk Images . . . . . . . . . . . . . . . . . . . . . . . . . . . . . . . .48
Find . . . . . . . . . . . . . . . . . . . . . . . . . . . . . . . . . . . . . . . . . . . . . . . . . . . .50
Copying files from the camera . . . . . . . . . . . . . . . . . . . . . . . . . . . . . . .52
For Windows
For Macintosh . . . . . . . . . . . . . . . . . . . . . . . . . . . . . . . . . . . . . . . . . . . .53
Viewing image file properties . . . . . . . . . . . . . . . . . . . . . . . . . . . . . . . .55
Printing albums . . . . . . . . . . . . . . . . . . . . . . . . . . . . . . . . . . . . . . . . . .56
Deleting images from the CF card . . . . . . . . . . . . . . . . . . . . . . . . . . . .57
For Windows®95/98/NT . . . . . . . . . . . . . . . . . . . . . . . . . . . . . . . . . . . .57
For Macintosh . . . . . . . . . . . . . . . . . . . . . . . . . . . . . . . . . . . . . . . . . . . .58
Creating a new folder . . . . . . . . . . . . . . . . . . . . . . . . . . . . . . . . . . . . . .60
For Windows®95/98/NT . . . . . . . . . . . . . . . . . . . . . . . . . . . . . . . . . . . .60
For Macintosh . . . . . . . . . . . . . . . . . . . . . . . . . . . . . . . . . . . . . . . . . . . .61
Changing the Image Display . . . . . . . . . . . . . . . . . . . . . . . . . . . . . . . .62
For Windows®95/98/NT . . . . . . . . . . . . . . . . . . . . . . . . . . . . . . . . . . . .62
For Macintosh . . . . . . . . . . . . . . . . . . . . . . . . . . . . . . . . . . . . . . . . . . . .62
Sorting images in the Viewer Panel . . . . . . . . . . . . . . . . . . . . . . . . . . .64
For Windows®95/98/NT . . . . . . . . . . . . . . . . . . . . . . . . . . . . . . . . . . . .64
For Macintosh . . . . . . . . . . . . . . . . . . . . . . . . . . . . . . . . . . . . . . . . . . . .64
Using Quick View . . . . . . . . . . . . . . . . . . . . . . . . . . . . . . . . . . . . . . . . .66
Changing file names . . . . . . . . . . . . . . . . . . . . . . . . . . . . . . . . . . . . . . .68
Adding audio data to an image (Macintosh only) . . . . . . . . . . . . . . . .69
Drag and Drop operation . . . . . . . . . . . . . . . . . . . . . . . . . . . . . . . . . . .72
®
95/98/NT . . . . . . . . . . . . . . . . . . . . . . . . . . . . . . . . . . . .52
3

4
TABLE OF CONTENTS
USING THE IMAGE PANEL . . . . . . . . . . . . . . . . . . . . . . . . . . . . . . . . . . . 74
What you can do at the Image Panel . . . . . . . . . . . . . . . . . . . . . . . . . . 74
Displaying camera images . . . . . . . . . . . . . . . . . . . . . . . . . . . . . . . . . . 75
Displaying hard disk images . . . . . . . . . . . . . . . . . . . . . . . . . . . . . . . . 78
Zoom in/Zoom out . . . . . . . . . . . . . . . . . . . . . . . . . . . . . . . . . . . . . . . . 79
Resizing documents . . . . . . . . . . . . . . . . . . . . . . . . . . . . . . . . . . . . . . . 80
Cropping the image . . . . . . . . . . . . . . . . . . . . . . . . . . . . . . . . . . . . . . . 82
Scrolling the image . . . . . . . . . . . . . . . . . . . . . . . . . . . . . . . . . . . . . . . . 83
Adjusting Brightness and Contrast . . . . . . . . . . . . . . . . . . . . . . . . . . . 84
Adjusting Colour Balance . . . . . . . . . . . . . . . . . . . . . . . . . . . . . . . . . . 85
Using the Quick Correction function . . . . . . . . . . . . . . . . . . . . . . . . . . 86
Lighten/Darken . . . . . . . . . . . . . . . . . . . . . . . . . . . . . . . . . . . . . . . . . . . 86
Sharpen/Soften . . . . . . . . . . . . . . . . . . . . . . . . . . . . . . . . . . . . . . . . . . 87
Flipping an image (horizontally or vertically) . . . . . . . . . . . . . . . . . . . 88
Rotating an image . . . . . . . . . . . . . . . . . . . . . . . . . . . . . . . . . . . . . . . . 90
Superimposing text . . . . . . . . . . . . . . . . . . . . . . . . . . . . . . . . . . . . . . . 92
Resizing the image . . . . . . . . . . . . . . . . . . . . . . . . . . . . . . . . . . . . . . . . 94
Digita Desktop image filters and plug-in filters . . . . . . . . . . . . . . . . . . 95
Printing images . . . . . . . . . . . . . . . . . . . . . . . . . . . . . . . . . . . . . . . . . . 96
Saving an image . . . . . . . . . . . . . . . . . . . . . . . . . . . . . . . . . . . . . . . . . . 98
Image file formats . . . . . . . . . . . . . . . . . . . . . . . . . . . . . . . . . . . . . . . . . 98
Saving images . . . . . . . . . . . . . . . . . . . . . . . . . . . . . . . . . . . . . . . . . . . 100
USING THE CAMERA PANEL . . . . . . . . . . . . . . . . . . . . . . . . . . . . . . . . . 102
WHAT YOU CAN DO FROM THE CAMERA PANEL . . . . . . . . . . . . . . . . . 102
Camera Panel . . . . . . . . . . . . . . . . . . . . . . . . . . . . . . . . . . . . . . . . . . . . 103
To open the Camera Panel . . . . . . . . . . . . . . . . . . . . . . . . . . . . . . . . . . 104
When the Camera Panel does not open . . . . . . . . . . . . . . . . . . . . . . . 105
Displaying camra images . . . . . . . . . . . . . . . . . . . . . . . . . . . . . . . . . . . 106
Remote photography . . . . . . . . . . . . . . . . . . . . . . . . . . . . . . . . . . . . . . 107
CAMERA SETTINGS . . . . . . . . . . . . . . . . . . . . . . . . . . . . . . . . . . . . . . . . 110
Formatting the CF card . . . . . . . . . . . . . . . . . . . . . . . . . . . . . . . . . . . . . 110
Synchronizing the internal clock with your PC clock . . . . . . . . . . . . . . . 112
INTERVAL PHOTOGRAPHY . . . . . . . . . . . . . . . . . . . . . . . . . . . . . . . . . . . 114

5
TABLE OF CONTENTS
SLIDESHOWS . . . . . . . . . . . . . . . . . . . . . . . . . . . . . . . . . . . . . . . . . . . . . 118
What is a slideshow? . . . . . . . . . . . . . . . . . . . . . . . . . . . . . . . . . . . . . . 118
To open the Slideshow window . . . . . . . . . . . . . . . . . . . . . . . . . . . . . . 119
Appending image files to a slideshow . . . . . . . . . . . . . . . . . . . . . . . . . 120
Appending individual image files . . . . . . . . . . . . . . . . . . . . . . . . . . . . . . 120
Append all the image files in a folder . . . . . . . . . . . . . . . . . . . . . . . . . . 122
Changing the display of files in the slideshow window . . . . . . . . . . . 124
For Windows®95/98/NT . . . . . . . . . . . . . . . . . . . . . . . . . . . . . . . . . . . . 124
For Macintosh . . . . . . . . . . . . . . . . . . . . . . . . . . . . . . . . . . . . . . . . . . . . 124
Changing the Order of Slides . . . . . . . . . . . . . . . . . . . . . . . . . . . . . . . . 126
Updating slides (Windows®only) . . . . . . . . . . . . . . . . . . . . . . . . . . . . 126
Removing slides . . . . . . . . . . . . . . . . . . . . . . . . . . . . . . . . . . . . . . . . . . 127
Adding audio to a slide . . . . . . . . . . . . . . . . . . . . . . . . . . . . . . . . . . . . 128
Adding background music . . . . . . . . . . . . . . . . . . . . . . . . . . . . . . . . . . 130
Slideshow Preferences . . . . . . . . . . . . . . . . . . . . . . . . . . . . . . . . . . . . . 132
Presenting a slideshow . . . . . . . . . . . . . . . . . . . . . . . . . . . . . . . . . . . . 134
Saving a slideshow . . . . . . . . . . . . . . . . . . . . . . . . . . . . . . . . . . . . . . . . 135
Saving the slideshow as an AVI file . . . . . . . . . . . . . . . . . . . . . . . . . . . 136
Saving the slideshow as a QuickTime movie file. . . . . . . . . . . . . . . . . 136
VERIFYING THE DIGITA DESKTOP VERSION . . . . . . . . . . . . . . . . . . . . . 140
For Windows®95/98/NT . . . . . . . . . . . . . . . . . . . . . . . . . . . . . . . . . . . . 140
For Macintosh . . . . . . . . . . . . . . . . . . . . . . . . . . . . . . . . . . . . . . . . . . . . 143
USER TECHNICAL SUPPORT . . . . . . . . . . . . . . . . . . . . . . . . . . . . . . . . . 145

6
BEFORE Y OU BEGIN
Please register this software before you begin using it.Complete the enclosed
user registration card.
Persons who register their software are recognized as official users, and receive
technical support as well as software upgrade and other new product information.
• Please be aware that you will not receive any notification of registration from Minolta.
• The information contained on your user registration card is used exclusively by Minolta
for customer service and product development.The information you provide will remain
confidential.
USER REGISTRATION
7
BEFORE Y OU BEGIN
• This manual assumes the use of a two-button, right-handed mouse for Windows®.The
terms ‘click’and ‘double-click’refer to a single or double click of the left mouse button.
The term ‘drag’refers to the action of holding down the left mouse button while moving
the mouse.
• If you are using Macintosh OS, the term ‘Command Key’refers to the key located next
to the Space Bar.
• Command names shown in this manual which are common both to the Windows
®
and
Macintosh systems do not indicate any of the shortcut keys found in Windows
®
command names.
Example No.1:The File command appears as “File” on Windows
®
and “File” on
Macintosh menus, but in this manual it is shown as merely as “File.”
Example No.2:The Save command appears as “Save”on Windows
®
and “Save” on
Macintosh menus, but in this manual it is shown merely as “Save.”
TERMS USED IN THIS MANUAL
• This manual assumes that your computer’s operating system (Windows®95/98/NT or
Mac OS) as well as other necessary software such as device drivers have been
installed, and are operating properly.
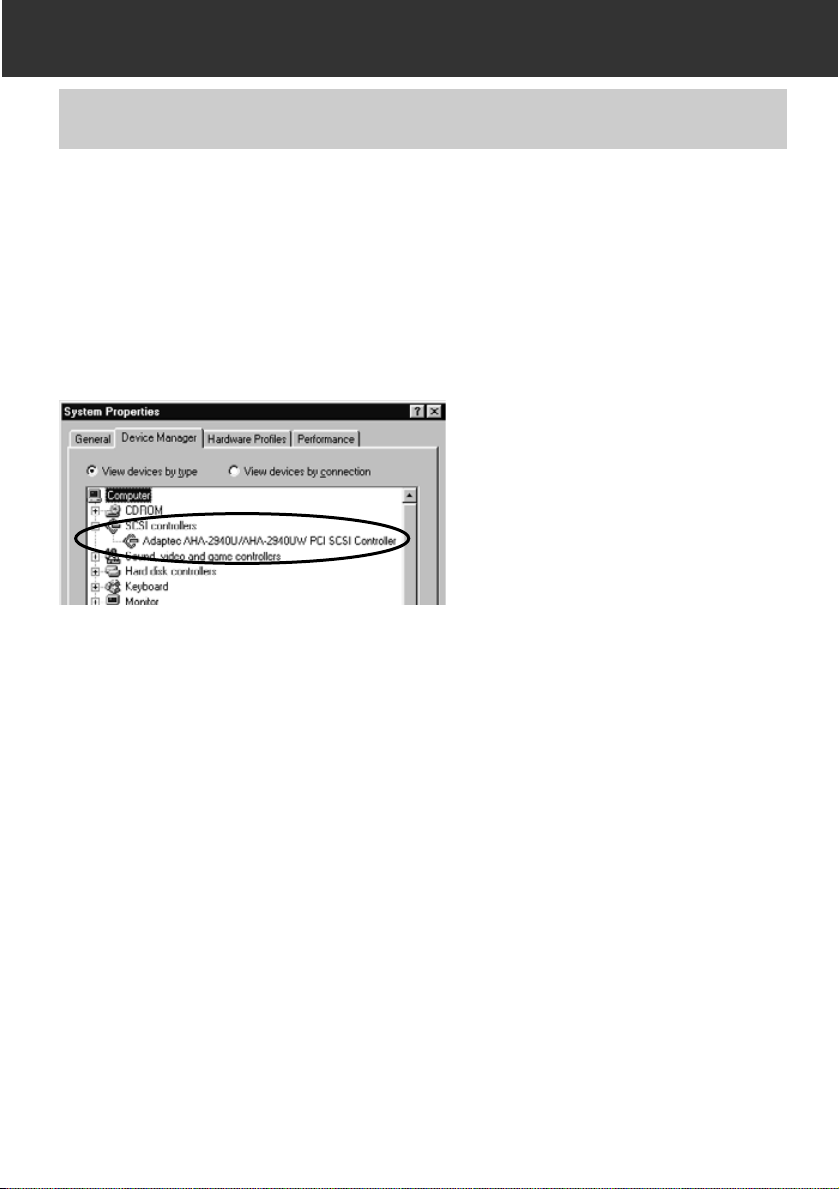
• If you are using a Windows
®
OS, click the Start button, point to Settings, and click
Control Panel.Double-click the System icon, then click the Device Manager tab.Verify
that the name of your SCSI host adapter is displayed in the tree shown under the SCSI
Controller icon.

8
SYSTEM REQUIREMENTS
The system requirements for the operation of this software are as shown below:
IBM PC/AT COMPATIBLE COMPUTERS
CPU
OS
Intel Pentium 90 MHz or higher
1
Adaptec:
AVA-1505AE
AHA-1510B
AHA-1520B
AHA-1540CP
AHA-8945
AVA-2902E
AVA-2904E
AHA-2910B
AHA-2920C
AHA-2930C
AHA-2930U
AHA-2930U2
AHA-2940
AHA-2940U
AHA-2940AU
AHA-2940UW
AHA-2940U2W
RAM
HARD DISK SPACE
MONITOR
CD-ROM DRIVE
RECOMMENDED
SCSI HOST
ADAPTERS
APPLICATIONS
COMP A TIBLE WITH
THE OPERATION OF
TWAIN DRIVERS
Windows®95 (including OSR2)/98/NT4.0
2
32 MB or more of free hard disk memory for use as workspace
VGA (640 x 480 dots) or higher/High Colour (16-bit)
Required for installation only
Adobe Photoshop
Ver. 3.0.5/4.0.1/5.0.1/5.0.2
A minimum of 32 MB of RAM
1
Not including computers built from kits, shop-brands or other computers for which
components have been selected and assembled individually.
2
Windows®NT users should manually set their virtual memory page-file size to a
minimum of 100 MB. Users who run several programs concurrently could find that their
computer requires more. For details on how to adjust your memory settings, please refer
to your NT manual or help files.
FOR WINDOWS
®

9
SYSTEM REQUIREMENTS
NOTE:
The setup program for this software will install the file Winaspi.dll ver.4.57 on your computer’s system
(Windows
®
95 only). It is possible, however, that the installation of software for other SCSI devices
automatically reinstalls an older version that is not compatible with the Dimâge RD 3000 software.In the
event that your Dimâge RD 3000 software no longer operates properly after the installation of software
for some other SCSI device, please reinstall the Dimâge RD 3000 software.
Minolta does not guarantee the performance of this software when used with a SCSI host adapter not
included in the list shown to the left. Minolta’s guarantee is limited to the assurance that the Dimâge RD
3000 will operate properly in combination with any of the SCSI host adapters included in the list shown
to the left. It does not include any assurances regarding the SCSI host adapter itself nor problems
caused by the SCSI host adapter.Minolta cannot guarantee nor provide customer support for the
operation of the SCSI host adapter with your computer.

10
SYSTEM REQUIREMENTS
The system requirements for the operation of this software are as shown below:
FOR MACINTOSH
APPLE MACINTOSH SERIES COMPUTERS
CPU
OS
Power PC (Power Macintosh or Power Macintosh G3)
Excludes Mac OS compatibles.
Standard Internal SCSI host adapter
Units which have an expansion board inserted into the PCI bus or
NuBus to effect a connection are not compatible.
RAM
HARD DISK SPACE
MONITOR
CD-ROM DRIVE
RECOMMENDED
SCSI HOST
ADAPTERS
APPLICATIONS
COMP A TIBLE WITH
THE OPERATION OF
THE ADOBE
PHOTOSHOP
PLUG IN
Mac OS 7.6 to Mac OS 8.5.1. QuickTime ver. 2.5 or later is required.
QuickTime ver.3.0 or later is required to operate the slideshow function.
32 MB or more of free hard disk memory for use as workspace
13” (640 x 480 dots) or higher/32000 Colours
Required for installation only
Adobe Photoshop
Ver. 4.0.1/5.0.1/5.0.2
16 MB or more of free memory

11
SYSTEM REQUIREMENTS
NOTE:
Minolta does not guarantee the performance of this software when used with a SCSI host adapter not
included in the list shown to the left. Minolta’s guarantee is limited to the assurance that the Dimâge RD
3000 will operate properly in combination with any of the SCSI host adapters included in the list shown
to the left. It does not include any assurances regarding the SCSI host adapter itself nor problems
caused by the SCSI host adapter.Minolta cannot guarantee nor provide customer support for the
operation of the SCSI host adapter with your computer.

12

13
INTRODUCTION
14
INST ALLING THE SOFTW ARE
Use the following procedure to install Dimâge RD 3000 software on your
computer.
FOR WINDOWS®95/98/NT
The following explanation refers to the hard disk drive as drive C and the CDROM drive as drive D.
Be sure that the Dimâge RD 3000 is not connected to your computer when you
install the software.
Turn the computer on to star t up Windows
®
.
1
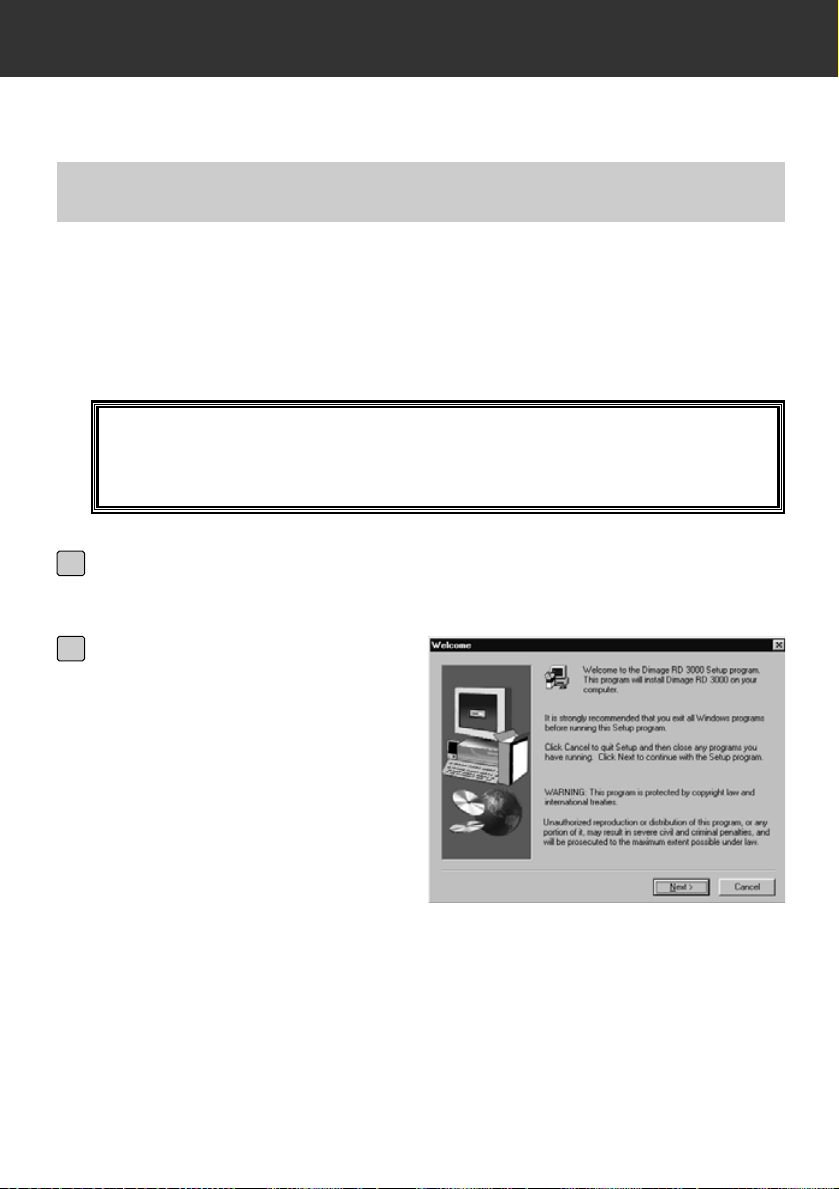
Insert the Dimâge RD 3000 CDROM in your computer’s disk
drive.
• The Dimâge RD 3000 setup
program opens.
2
BE SURE THAT THE DIMÂGE RD 3000 IS NOT CONNECTED TO
YOUR COMPUTER WHEN YOU INSTALL THE SOFTWARE.
15
INST ALLING THE SOFTW ARE
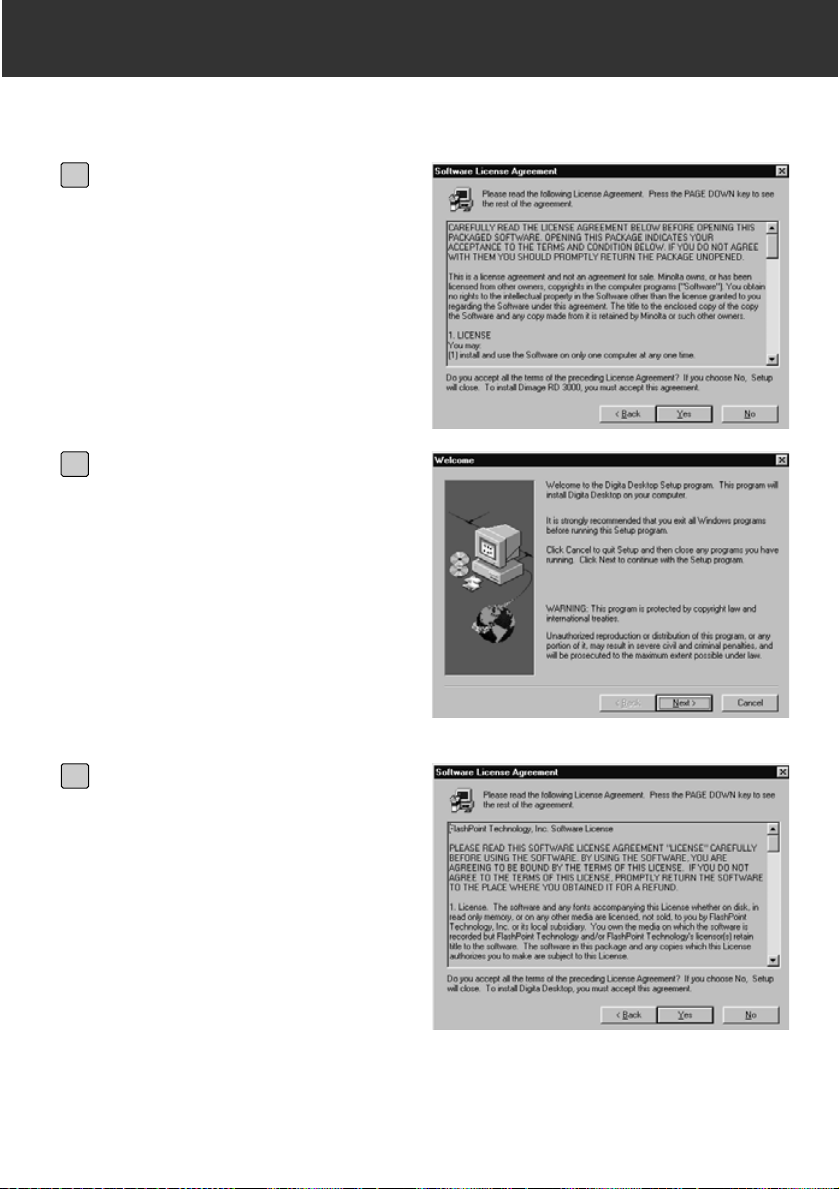
Click the Next button.
• The Product License Agreement
opens. Please read the entire
agreement carefully before
continuing the installation.
• If you cannot agree to the terms of
the Product License Agreement,
click the No button to exit the
Setup program.
3
Click the Yes button.
• The files are copied to hard disk.
• Once the necessary files have all
been copied, the Digita Desktop
setup program closes
automatically.
4
Click the Next button.
• The Product License Agreement
opens. Please read the entire
agreement carefully before
continuing the installation.
• If you cannot agree to the terms of
the Product License Agreement,
click the No button to exit the
Setup program.
5
16
INST ALLING THE SOFTW ARE
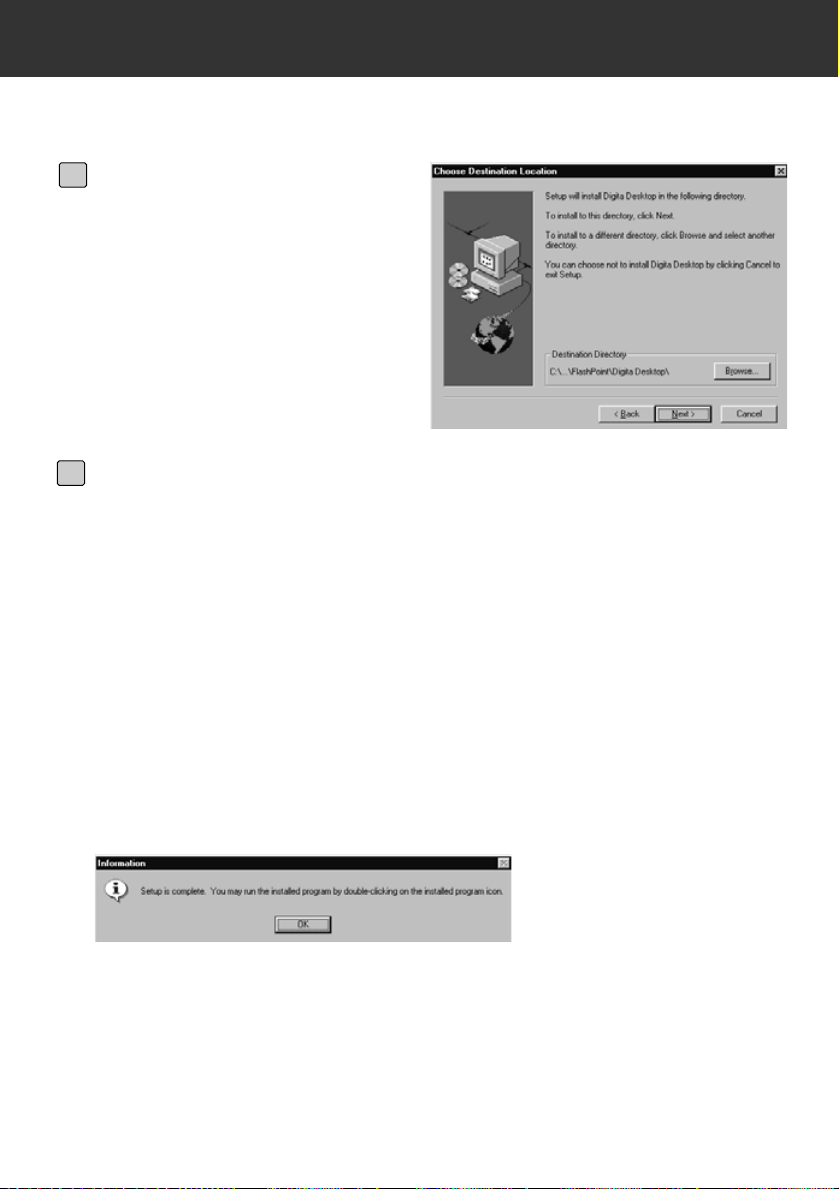
Click the Yes button.
• The installation destination folder is
displayed.If you wish to install the
software in a different folder, click
the Browse button.
6
Click the Next button.
• The program files are copied to your computer’s hard disk. Before exiting the Setup
program, you will be asked if you wish to view the Readme file.
• The Readme file contains important information not found in this manual. Be sure to
click the Yes button, and read the contents of this file carefully.
• After clicking the Yes button, the Readme.txt file is opened in Notepad. At the same
time the Exit Program dialog box opens.
• Click the OK button in the dialog box to finish the installation process, and after
viewing the Readme file, close Notepad.
7

17
INST ALLING THE SOFTW ARE
• It is assumed that the CD-ROM drive is drive D.
INSTALLING THE TWAIN DRIVER (WINDOWS)
Turn the computer on to star t up Windows
®
.
1
While pressing the Shift key, insert the Dimâge RD3000 CD-ROM into
the CD-ROM drive.
• This operation bypasses the auto-play function of CD-ROM.
2
Click on “Star t” and click on “Run”.
3
Type D:\English\Twain\Setup.exe in the Open drop-down list, then click
on “OK”.
• Setup program will begin.
4
Click on “Next >”, then follow the directions on the screen.
5
BE SURE THAT THE DIMÂGE RD3000 IS NOT CONNECTED TO
YOUR COMPUTER WHEN YOU INSTALL THE TWAIN DRIVER.
18
INST ALLING THE SOFTW ARE
Before you begin
Virus protection tools and control panel documentation can be the cause of
problems during installation.These programs should be removed from your
system or temporarily disabled during installation.
The installation program does not operate properly on Japanese systems
using Japanese-language versions of QuickTime. Either remove the
Japanese-language version, and install the English-language version of
QuickTime before using the installation program, or manually drag into the
installation folder the files shown in the Where to Find the Files section on
page 21.
▼
FOR MACINTOSH
Be sure that the Dimâge RD 3000 is not connected to your computer when you
install the software.
Turn on the Macintosh.
1
Once the desktop opens, inser t the Dimâge RD 3000 CD-ROM in your
computer’s disk drive.
2
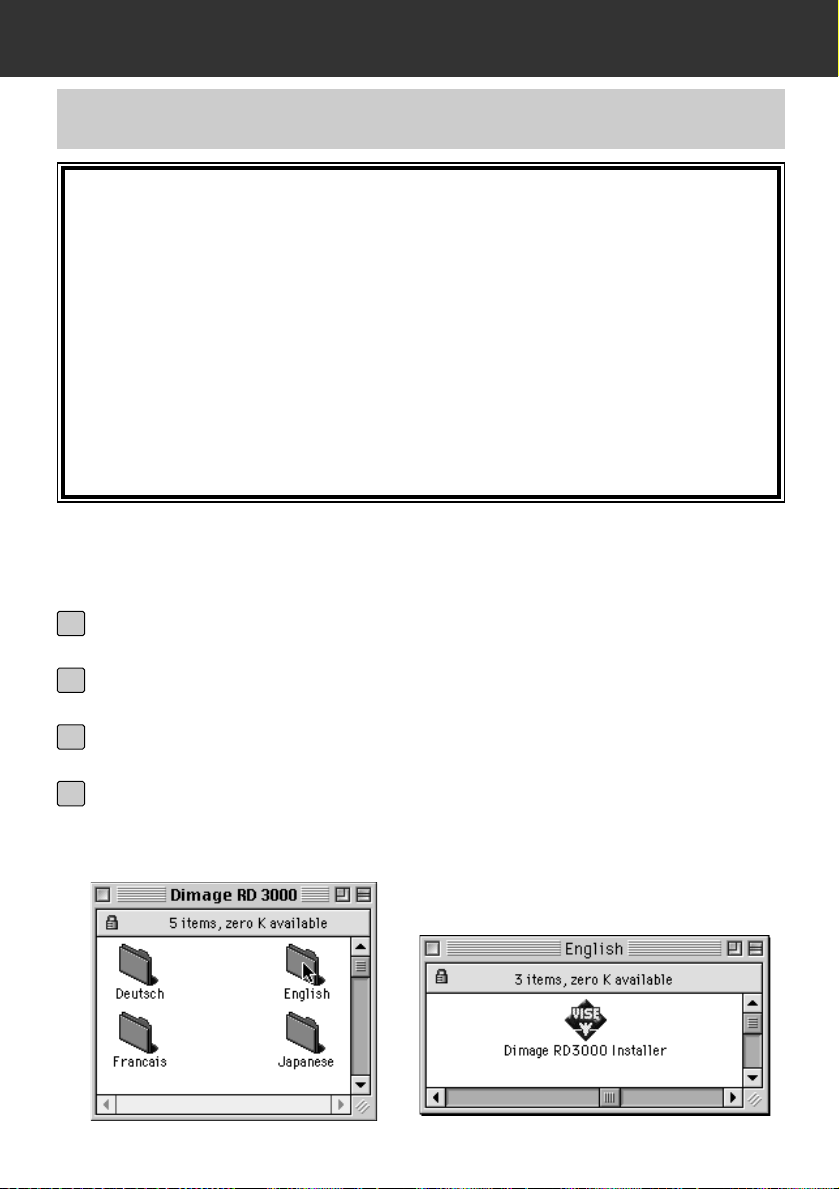
Once the CD-ROM is mounted, double-click the icon.
3
Double-click the ENGLISH icon.
• The Dimâge RD 3000 Installer icon is displayed.
4
19
INST ALLING THE SOFTW ARE
Double-click the Dimâge RD 3000 Installer icon.
• The Software License Agreement is displayed. Please read the entire agreement
carefully before continuing the installation.
• Click the Save button to save the contents of the Software License Agreement as a
text file.Click the Print button to print out the contents of the Software License
Agreement.
• If you cannot agree to the terms of the Software License Agreement, click the
Decline button to exit the installer.
5
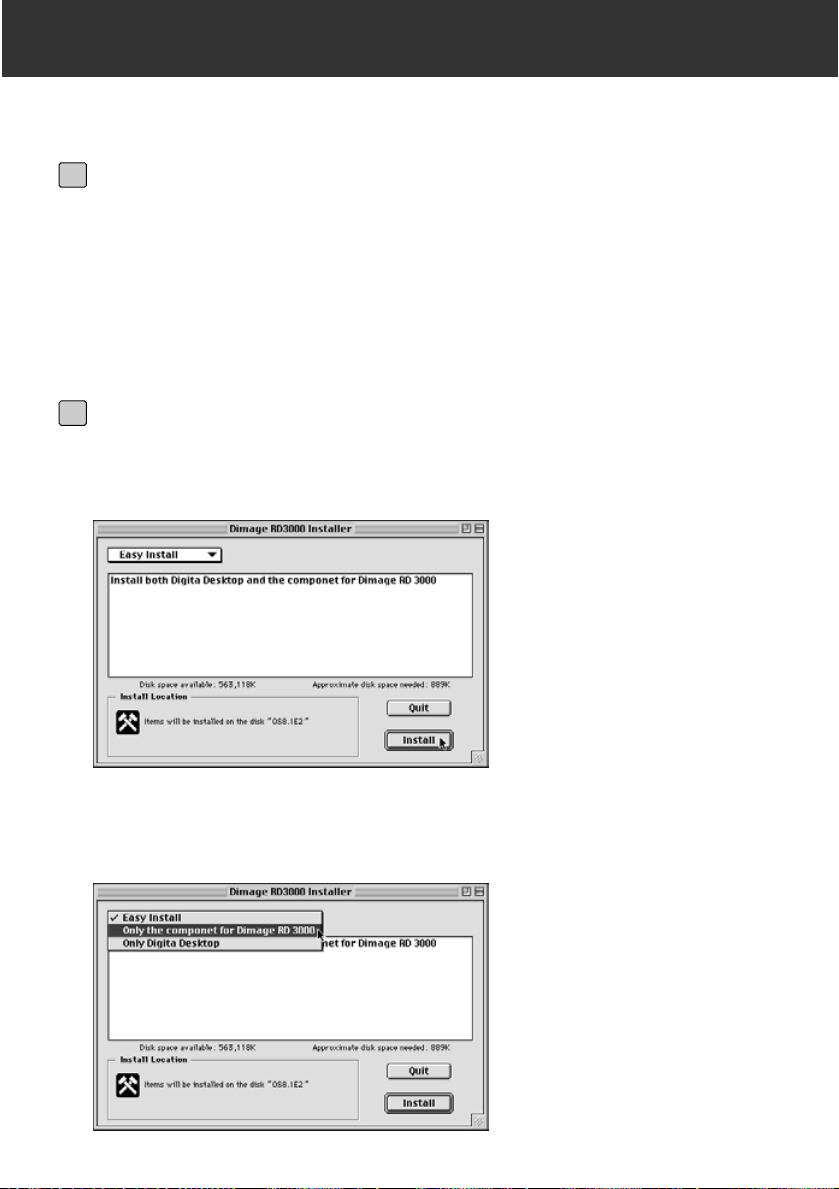
Click the Agree button.
• The Easy Install window opens.
• If you are installing the software for the first time, leave the Easy Install settings as
they are, and proceed to the next step.
• If you wish to install only the Dimâge RD 3000 components or only the Digita
Desktop components, from the pop up menu select Dimâge RD 3000 Components
Only or Digita Desktop Components Only and proceed to the next step.
6
20
INST ALLING THE SOFTW ARE
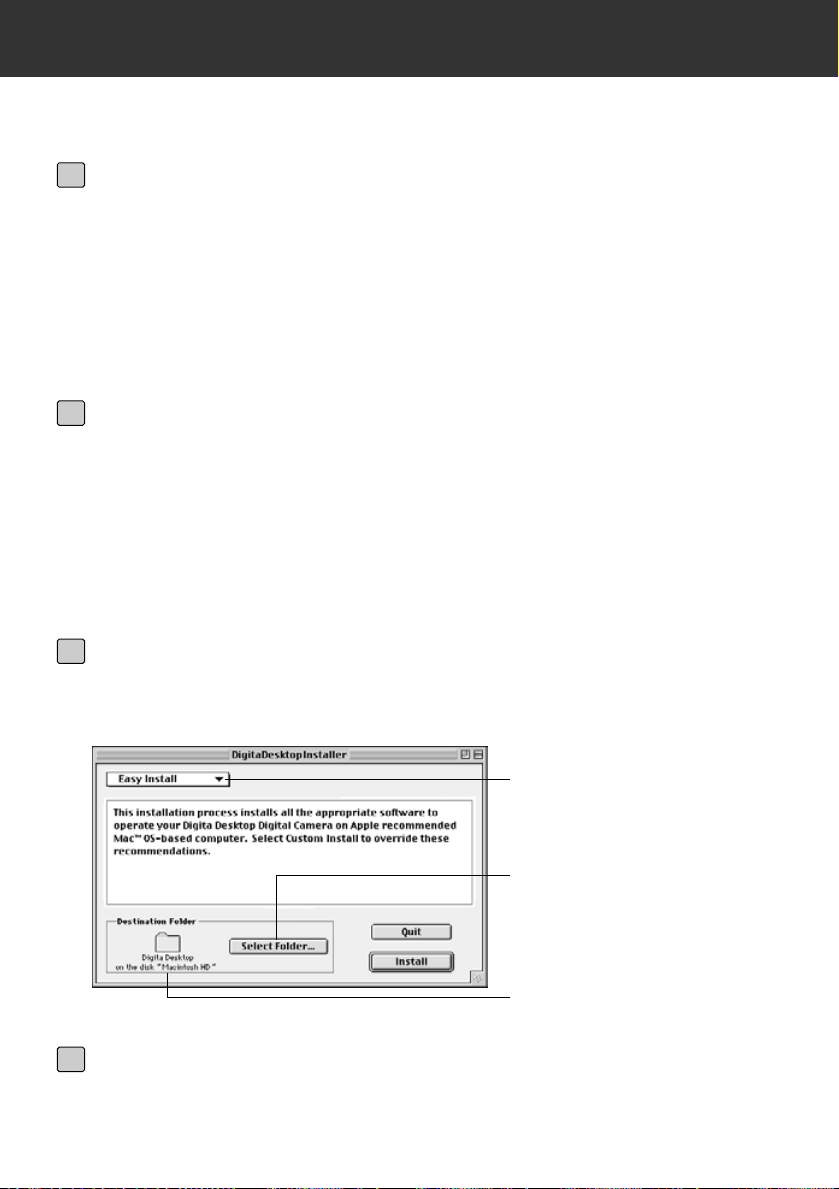
Select the installation type.
Click to select an existing folder
or create a new folder in which
the software is to be installed.
Drive and folder in which the
software is to be installed.
Click the Install button.
• The software installation begins. Follow the instructions that appear on the screen.
• Once the software installation is complete, the Digita Desktop installer opens
automatically.
• If on the previous page, "Only the component for Dimâge RD 3000" was selected
from the pop-up menu, skip steps 8 through 10 shown below and proceed directly
to step 11.
7
Click the Continue button.
• The Software License Agreement is displayed. Please read the entire agreement
carefully before continuing the installation.
• Click the Save button to save the contents of the Software License Agreement as a
text file.Click the Print button to print out the contents of the Software License
Agreement.
• If you cannot agree to the terms of the Software License Agreement, click the
Disagree button to exit the installer.
8
Click the Agree button.
• The Easy Install window opens.The drive and folder in which the software is to be
installed is displayed at the bottom left of the window.
9
Confirm the current selection, select a different folder or create a new
folder.
10
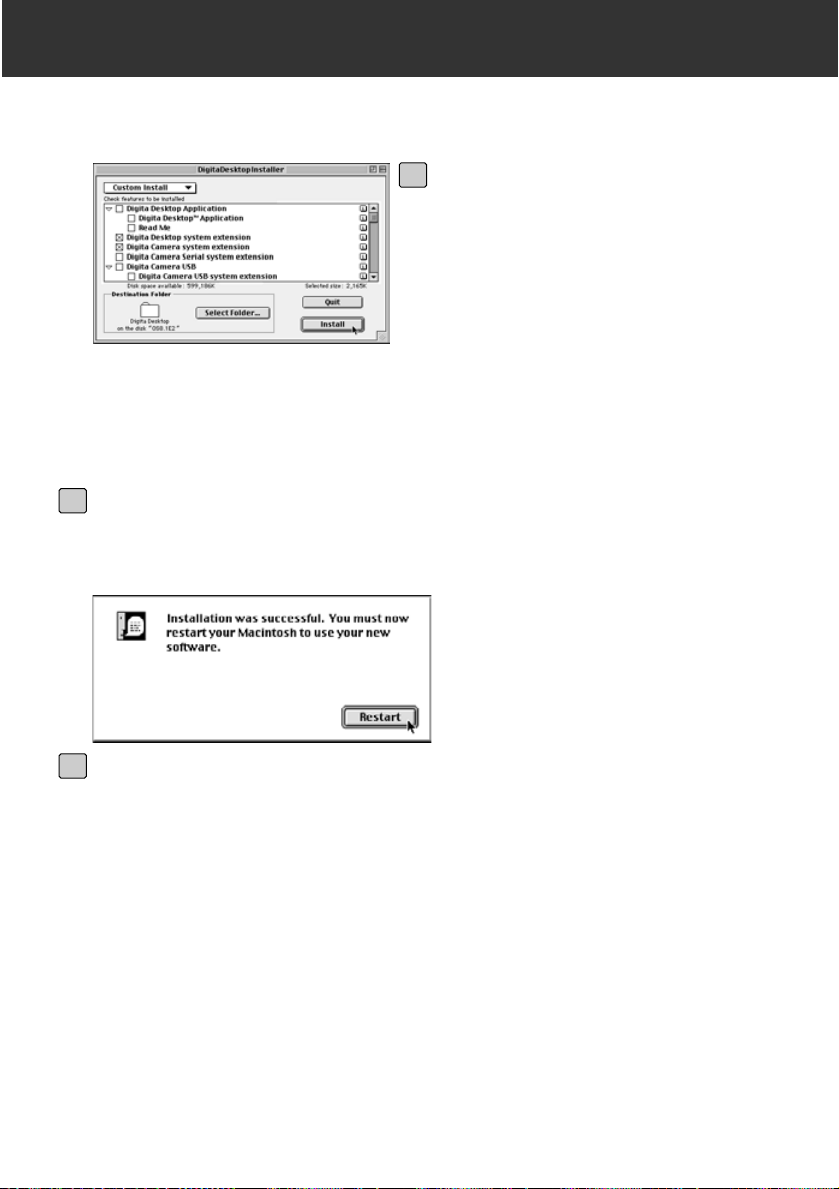
21
INST ALLING THE SOFTW ARE
• Click the Check Box to the left of the files you wish to install. An “x” will appear
inside the Check Box of the files you select.Click the Left Arrow to change it to a
Down Arrow, and open a list of files. Each file can be selected individually.
• Click the i to the right of a file to view file information.
Click the Install button.
• The installer begins. Follow the instructions that appear on the screen.
• Once the installation is complete, the Restart window opens.
12
Select an Installation Type using the
pop-up menu in the upper left of the
window.
• Selecting Custom Install opens the
window shown to the left.
11
Click the Restart button.
Where to Find the Files
If you choose Simple Installation, all the files shown below are copied into
the file folder. If you choose Custom Installation, only the files you select (by
placing an “X” in the check box) are copied into the file folder.
• User-selected destination folder
Digita Desktop (application)
Goodies (folder)
• Extension
Digita Desktop (extension)
Digita Camera (extension)
Minolta Dimâge RD 3000 (extension)
13

22
INST ALLING THE SOFTW ARE
INST ALLING THE SOFTW ARE
Installing the Adobe Photoshop plug-in module
The installation of this plug-in module in the specified location will enable you to
open the Digita Desktop directly from Adobe Photoshop.This plug-in module is
not installed automatically. To install the module, first install the Dimâge RD 3000
and Digita Desktop, then follow the instructions shown below.
Users who do not use Adobe Photoshop do not need to install this module.
Close Adobe Photoshop, if open.
1
Open the Adobe Photoshop folder.
2
Open the Plug-ins folder located in the Adobe Photoshop folder.
3
Open the Goodies folder located in the Digita Desktop folder.
4
Drag the Digita Desktop Acquire located in the Goodies folder to the
Import/Export folder of the Plug-ins folder.
5
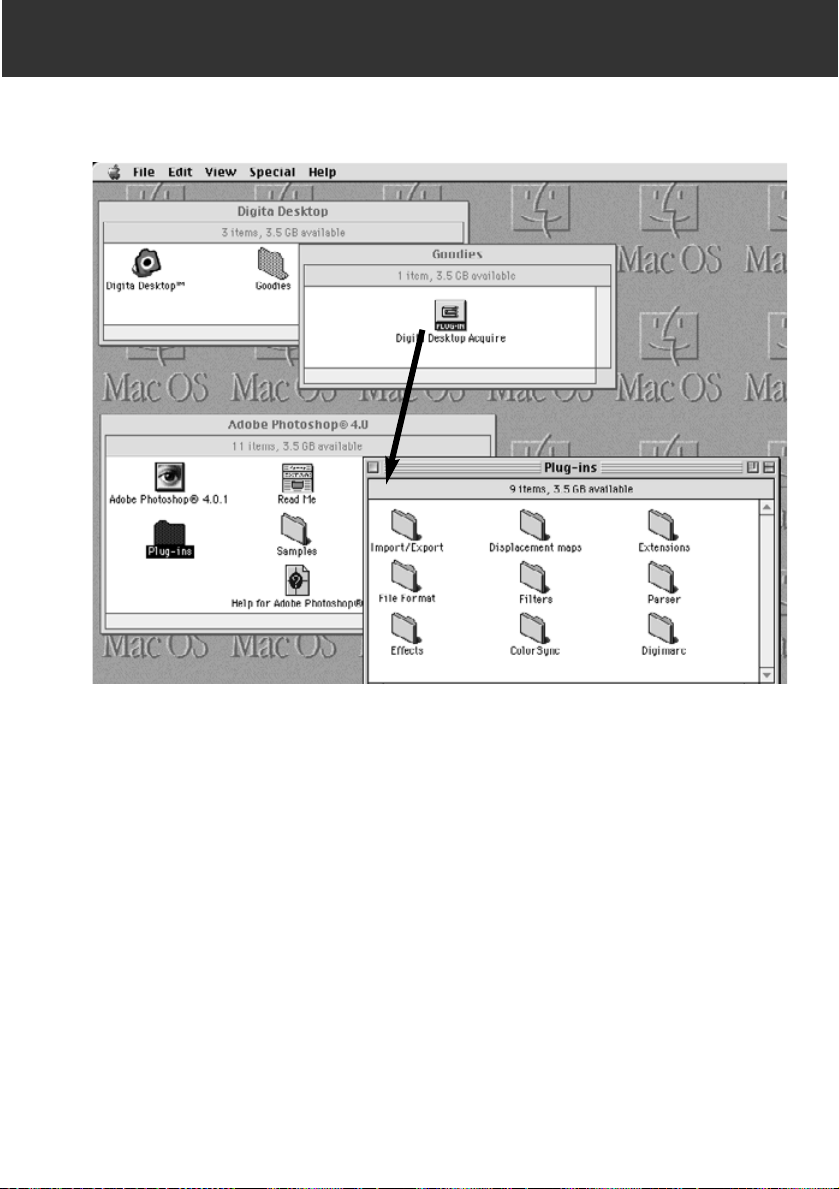
23
INST ALLING THE SOFTW ARE
Drag the Digita Desktop Acquire located in the Goodies folder to the
Import/Expor t folder of the Plug-ins folder.

24
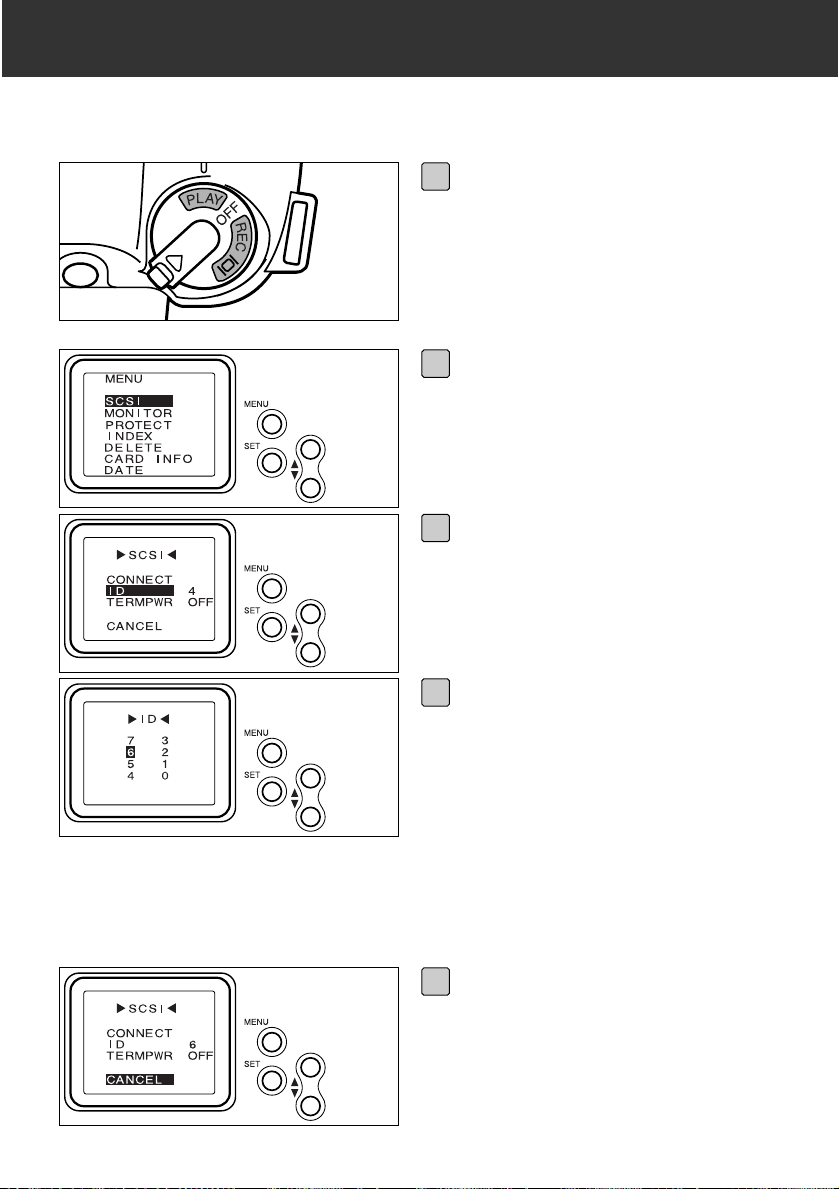
CONNECTING THE CAMERA TO Y OUR PC
Each SCSI device that is connected to your computer must be assigned its own
SCSI ID number from 0 to 7 so that the computer can identify it correctly.
Depending upon the computer, there are some SCSI ID Nos.which are pre-allocated, and cannot be given to any other device. Please refer to the table below.
1
Some Macintosh models have IDE hard disk drives.On these models, ID No. 0 is
not pre-allocated.
2
Some Macintosh models have both an internal and external SCSI bus.On these
models ID No.3 of the external SCSI bus is not pre-allocated.
The Dimâge RD 3000 has been preset to SCSI ID No.4 at the factory. If SCSI
ID No.4 is available for use on your computer, you need not change any settings
before installing and using it.
If SCSI ID No.4 is already in use on your computer, it will be necessary to allocate an unused ID No.to the Dimâge RD 3000.
SCSI ID SETUP
PC/AT COMPATIBLE
APPLE MACINTOSH
PRE-ALLOCATED SCSI ID NO.
No.7 - SCSI host adapter
No.0 - Hard disk drive
1
No.3 - CD-ROM drive
2
No.7 - The Macintosh computer
25
CONNECTING THE CAMERA TO Y OUR PC
Push either the or button to
move the cursor to the ID you
wish to allocate, and push the
SET button.
• The selected SCSI ID No.is allocated
to the Dimâge RD 3000, and the SCSI
Menu reopens.
• This setting remains stored in the
camera’s memory even after the
power is turned off.
▼▲
4
Push either the or button to
move the cursor to CANCEL, and
push the SET button; or push the
MENU button twice.
▼▲
5
Turn the Dimâg e RD 3000 Main
Switch/Mode Selector dial to
PLAY, and push the MENU button
located on the back of the unit.
• The Top Menu opens on the LCD
screen.
1
Push either the or button to
move the cursor to SCSI, and
push the SET button.
• The SCSI menu opens.
▼▲
2
Push either the or button to
move the cursor to ID, and push
the SET button.
• The ID No.list opens.
▼▲
3

26
CONNECTING THE CAMERA TO Y OUR PC
For PC/AT compatible computers
Check the user manual of your SCSI host adapter to determine whether or not
the SCSI host adapter you are using is one that supplies power to the terminator.If it is, you do not need to perform the terminator power supply setup.
Users of SCSI host adapters that do not supply power to the terminator need to
perform the terminator power supply setup in order to supply the terminator with
power from the Dimâge RD 3000.
For Macintosh computers
Users of desktop and mini-tower Power Macintosh or Power Macintosh G3
model computers do not need to perform the terminator power supply setup.
Users of PowerBook and PowerBook G3 computers with Power PC CPUs need
to perform the terminator power supply setup in order to supply the terminator
with power from the Dimâge RD 3000.
The Dimâge RD 3000 is equipped with only one SCSI connector, which means
that it can only be used as the final device on a SCSI chain. Since the final
device on a SCSI chain requires a device called a terminator, the Dimâge RD
3000 comes with a built-in terminator.
The terminator requires a power source.
TERMINATOR POWER SUPPLY SETUP
Turn the Dimâg e RD 3000 Main
Switch/Mode Selector dial to
PLAY, and push the MENU button
located on the back of the unit.
• The Top Menu opens on the LCD
screen.
1
Push either the or button to
move the cursor to SCSI, and
push the SET button.
• The SCSI menu opens.
▼▲
2
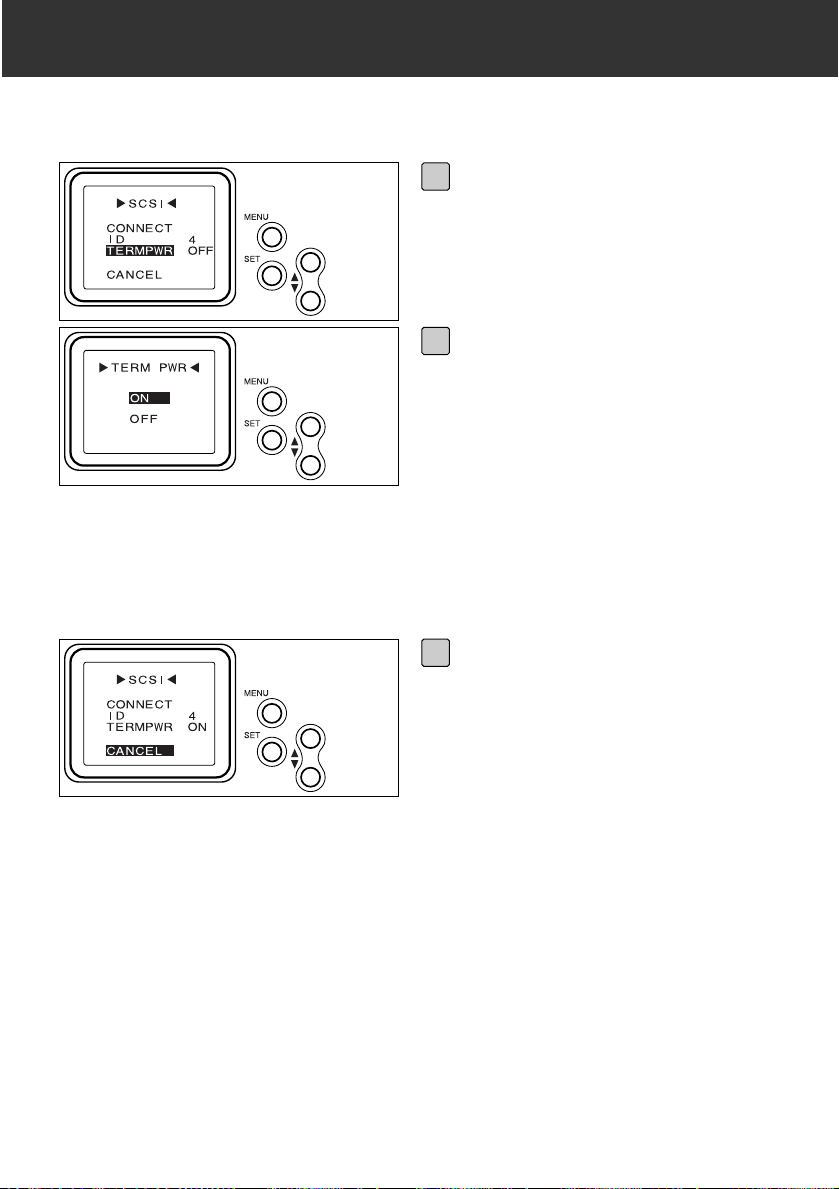
27
CONNECTING THE CAMERA TO Y OUR PC
Push either the or button to
move the cursor to ON, and push
the SET button.
• The settings are revised to supply
power from the Dimâge RD 3000 to
the terminator, and the SCSI menu
reopens.
• This setting remains stored in the
camera’s memory even after the
power is turned off.
▼▲
4
Push either the or button to
move the cursor to CANCEL, and
push the SET button; or push the
MENU button twice.
▼▲
5
Push either the or button to
move the cursor to TERMPWR,
and push the SET button.
• The TERM PWR menu opens.
▼▲
3
28
CONNECTING THE CAMERA TO Y OUR PC
For host adapters with 50-pin
Wide SCSI connectors:
Use the SCSI connector cable
included with your Dimâge RD 3000.
For host adapters with other
connector types:
Use a cable on which one end has a
connector that matches your host
adapter and the other end has a male
50-pin Wide SCSI connector.
For SCSI devices with 50-pin
Wide SCSI connectors:
Use the SCSI connector cable
included with your Dimâge RD 3000.
For SCSI devices with other
connector types:
Use a cable on which one end has a
connector that matches the current
terminator and the other end has a
male 50-pin Wide SCSI connector.
THE SCSI CONNECTOR CABLE
FOR PC/AT COMPATIBLE COMPUTERS
When the Dimâge RD 3000 is your only SCSI device:
When the Dimâge RD 3000 is the final device on a SCSI chain:
29
CONNECTING THE CAMERA TO Y OUR PC
For desktop and mini-tower
Power Macintosh and Power
Macintosh G3 computers:
Use the SCSI connector cable
included with your Dimâge RD 3000
together with a Macintosh adapter.Note
that the Macintosh adapter connects to
the Macintosh SCSI host adapter.
For PowerBook and PowerBook
G3 computers with a PowerPC
CPU:
Use a cable on which one end has a
connector that matches the PowerBook
SCSI host adapter (HDI-30) and the
other end has a male 50-pin Wide
SCSI connector.
For SCSI devices with 50-pin
Wide SCSI connectors:
Use the SCSI connector cable
included with your Dimâge RD 3000.
For SCSI devices with other
connector types:
Use a cable on which one end has a
connector that matches the current
terminator and the other end has a male
50-pin Wide SCSI connector.
FOR APPLE MACINTOSH COMPUTERS
When the Dimâge RD 3000 is your only SCSI device:
When the Dimâge RD 3000 is the final device on a SCSI chain:
30
CONNECTING THE CAMERA TO Y OUR PC
WHEN THE DIMÂGE RD 3000 IS
YOUR ONLY SCSI DEVICE:
WHEN THE DIMÂGE RD 3000 IS THE
FINAL DEVICE ON A SCSI CHAIN:
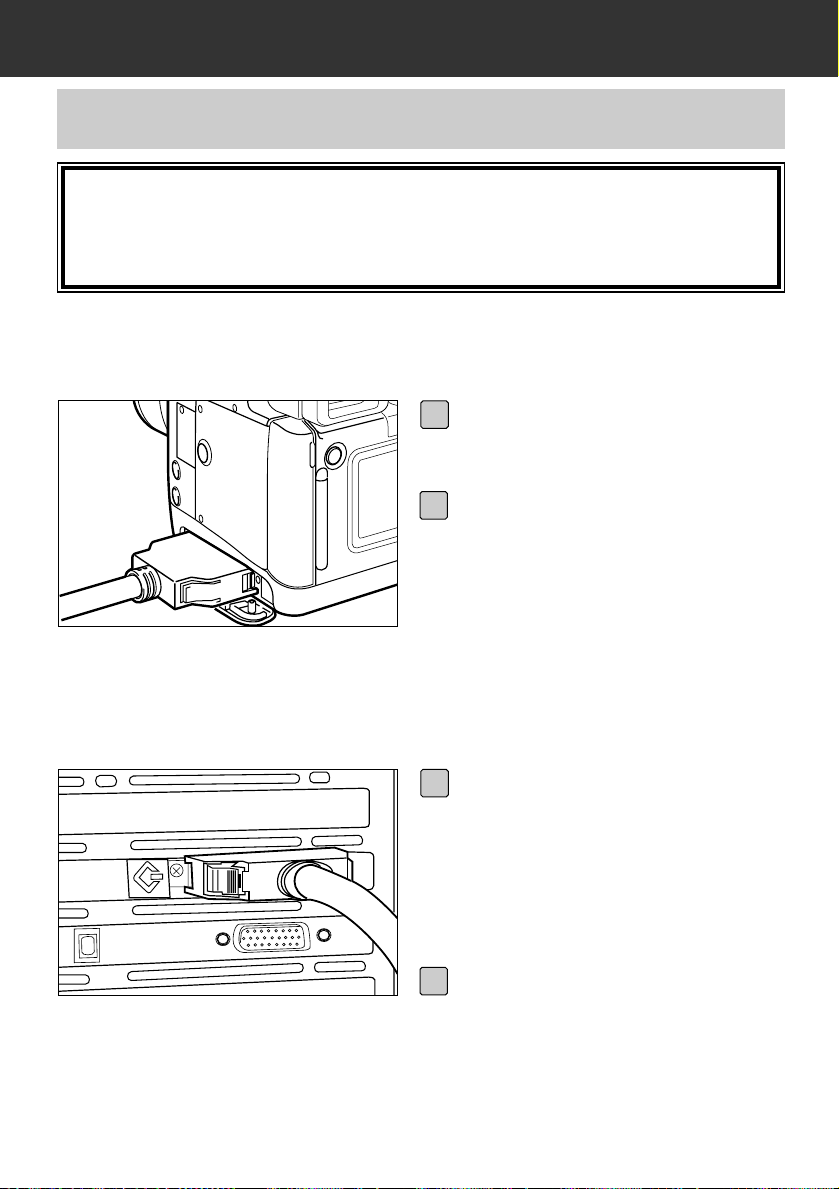
Before connecting the Dimâge RD 3000 to your computer, be sure to tur n off
both the computer and the Dimâge RD 3000. Connecting the Dimâge RD
3000 to the computer while the power is on could result in damage to both
devices.
• To turn off the Dimâge RD 3000, tur n the Main Switch/Mode Selector dial to Off.
CONNECTION TO THE COMPUTER
Remove or render inactive the
present terminator, and attach
the open end of the connector
cable to the SCSI connector that
had been used for the terminator.
3
Open the Dimâge RD 3000 connector cover.
1
Attach the 50-pin Wide SCSI
cable connector to the Dimâge
RD 3000 SCSI connector, and
press firmly until the connector
clicks into place.
2
Attach the open end of the connector cable to the SCSI host
adapter.
3
 Loading...