Page 1

INSTRUCTION MANUAL
Page 2
www.konicaminoltasupport.com
Konica Minolta Product Support Site, featuring
access to a searchable Knowledgebase, Software
and Hardware FAQs (Frequently Asked Questions),
Software, Driver and Firmware Downloads,
Telephone Support Information.
Page 3
1
Master Notes
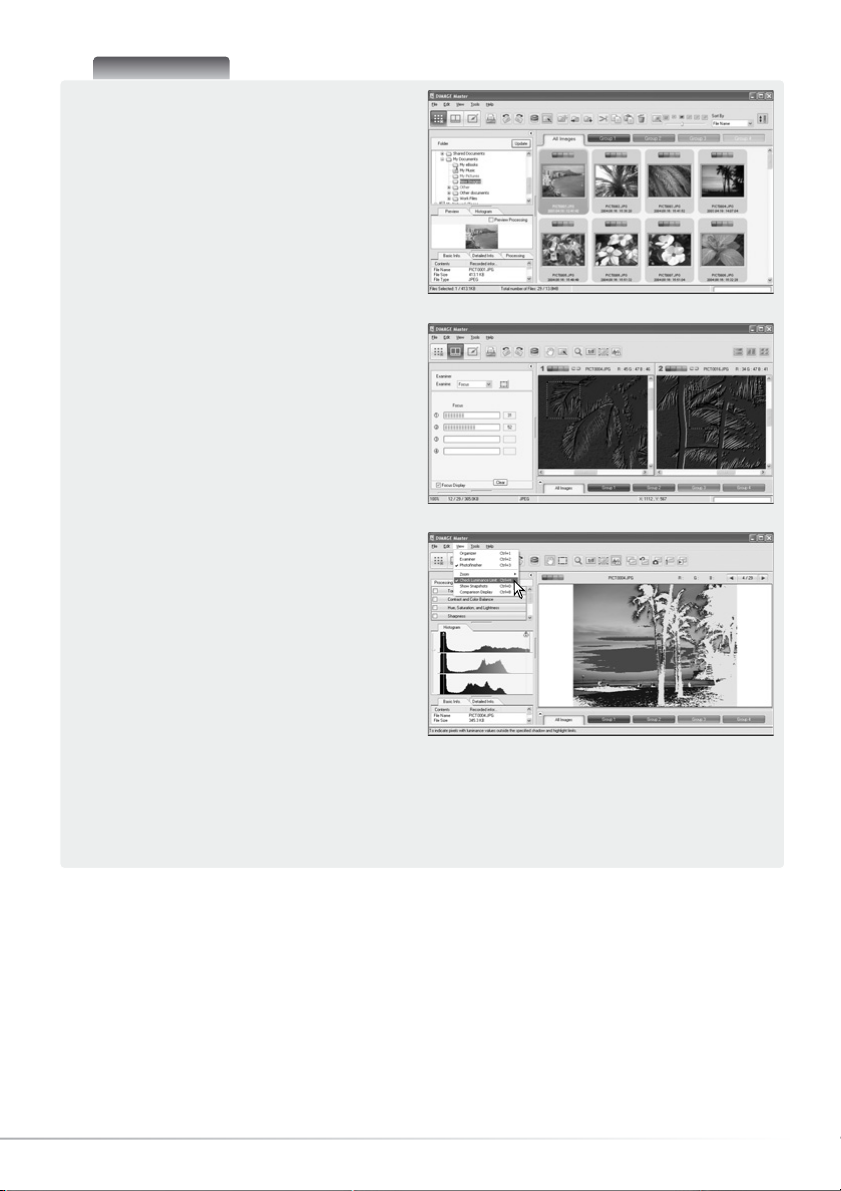
The full version of DiMAGE Master gives you all
the tools to organize, examine, and process
your images. The Organizer window allows you
to sort images quickly into four user-defined
classifications. Outtakes can easily be hidden
from view without the need to delete or remove
them from the folder.
Is it difficult to decide which image is the best?
The Examiner window allows you to compare
up to four images for differences between
color, exposure, white balance, and focus by
sampling areas in each image.
The Photofinisher window has many features
to process large numbers of images quickly.
Jobs can be created for specific adjustments
and applied to other images as well as used
for batch processing. Processing can be
simply cut and pasted from one picture to
another.
A luminance limit can be specified on the
histogram and displayed on an image to show
the pixels which are approaching the black and
white levels. The focus checker enlarges the
image so sharpness can be determined. These
tools are available in the Organizer, Examiner,
and Photofinisher.
Organizer
Focus Examiner
Photofinisher: Luminance Limit Display
For more on the other features in DiMAGE Master, visit us on the web at:
North America: http://kmpi.konicaminolta.us/
Europe: http://www.konicaminoltasupport.com
This instruction manual does not provide instruction in the basic operation of the personal
computers or the basic operation of Windows or Macintosh operating systems; refer to the manuals
supplied with the computer.
The examples in this manual use Windows XP software. The appearance of the screens may differ
from the examples when using Macintosh or other Windows operating systems.
Every precaution has been taken to ensure the accuracy of this material. Contact Konica Minolta if
you have any questions. Konica Minolta is not responsible for any loss or damage caused by the
use of this software. This instruction manual may not be copied either in part or in its entirety
without the prior permission of Konica Minolta.
Page 4

2 TABLE OF CONTENTS
TABLE OF CONTENTS
1.0 Getting started .................................................................................................................................3
1.1 Before installing the software.......................................................................................3
1.2 Installing the software - Windows ................................................................................4
1.3 Opening the software - Windows.................................................................................5
1.4 Installing the software - Macintosh ..............................................................................6
1.5 Opening the software - Macintosh...............................................................................7
2.0 Importing and editing images ..........................................................................................................8
2.1 Organizer window.........................................................................................................8
2.2 Adjusting the window ...................................................................................................9
2.3 Loading image files ......................................................................................................9
2.4 Preview and information tabs.......................................................................................9
2.5 Thumbnail size............................................................................................................10
2.6 Sorting image files......................................................................................................10
2.7 Selecting thumbnails ..................................................................................................11
2.8 Selecting Favorites .....................................................................................................12
2.9 Copying Favorites.......................................................................................................13
2.10 Downloading camera files ..........................................................................................14
2.11 Creating folders ..........................................................................................................14
2.12 Copy & move files to another folder ..........................................................................15
2.13 Cut, copy, paste, and delete - Windows....................................................................16
2.14 Cut, copy, paste, and delete - Macintosh..................................................................16
2.15 Renaming single files..................................................................................................17
2.16 Renaming multiple files ..............................................................................................17
3.0 Basic image processing.................................................................................................................18
3.1 Photofinisher window .................................................................................................18
3.2 Image display tools ....................................................................................................19
3.3 Rotate images ............................................................................................................20
3.4 RGB display................................................................................................................20
3.5 Tone processing .........................................................................................................21
3.6 Contrast & color balance............................................................................................22
3.6.1 Variation palette..........................................................................................................22
3.7 An introduction to color..............................................................................................23
3.8 Hue, saturation, and lightness....................................................................................24
3.8.1 Variation palette..........................................................................................................25
3.9 Comparison display....................................................................................................26
3.10 Undoing image processing.........................................................................................26
3.11 Flip ..............................................................................................................................26
3.12 Resize .........................................................................................................................27
3.13 Save ............................................................................................................................28
3.14 Save as .......................................................................................................................28
4.0 Printing ....................................................................................................................................29
4.1 Print - single ...............................................................................................................30
4.1.1 Print - multiple ............................................................................................................32
5.0 Preferences....................................................................................................................................34
5.1 Basic-information preferences ...................................................................................34
5.2 Application preferences..............................................................................................35
6.0 Advanced Organizer ......................................................................................................................37
6.1 Save image information..............................................................................................37
6.2 Print index...................................................................................................................38
6.3 Batch processing........................................................................................................40
6.4 Edit user note .............................................................................................................41
6.5 Slide show ..................................................................................................................42
Page 5

3
1.0 GETTING STARTED
This section cover DiMAGE Master Lite installation. Confirm the system requirements in the camera
manual before installing the software.
Refer to the data-transfer section in the camera manual on how to connect the camera to a
computer using a USB cable. The examples in this manual assume the camera is connected to the
computer with a USB cable as described in the camera manual.
RAM-stationed programs such as anti-virus or installation-monitoring software may cause
the installer to fail. Remove or disable these programs before installing DiMAGE Master Lite.
1.1 BEFORE INSTALLING THE SOFTWARE
7.0 Advanced Photofinisher.................................................................................................................43
7.1 Processing tools.........................................................................................................43
7.2 Tone curve and histogram..........................................................................................44
7.3 Tone-curve processing guide .....................................................................................46
7.4 Histogram processing guide ......................................................................................48
7.5 White, black, and gray-point processing ...................................................................49
7.5.1 White and black-point values.....................................................................................50
7.6 White balance (RAW only) ..........................................................................................50
7.7 Sharpness...................................................................................................................51
7.8 Filter effects................................................................................................................51
7.9 Color space selection (RAW only)..............................................................................52
7.10 Imprint data ................................................................................................................53
7.11 Area marquee .............................................................................................................54
7.12 Snapshot ....................................................................................................................55
7.12.1 Print snapshots...........................................................................................................56
8.0 Color preferences ..........................................................................................................................58
8.1 Using monitor ICC profiles .........................................................................................58
8.2 Using printer ICC profiles...........................................................................................58
9.0 Appendix ....................................................................................................................................60
9.1 Uninstalling the DiMAGE Master Lite.........................................................................60
9.2 ICC profile locations...................................................................................................60
Become a member of Konica Minolta Photo World ...........................................................................61
Page 6
4 SECTION 1: GETTING STARTED
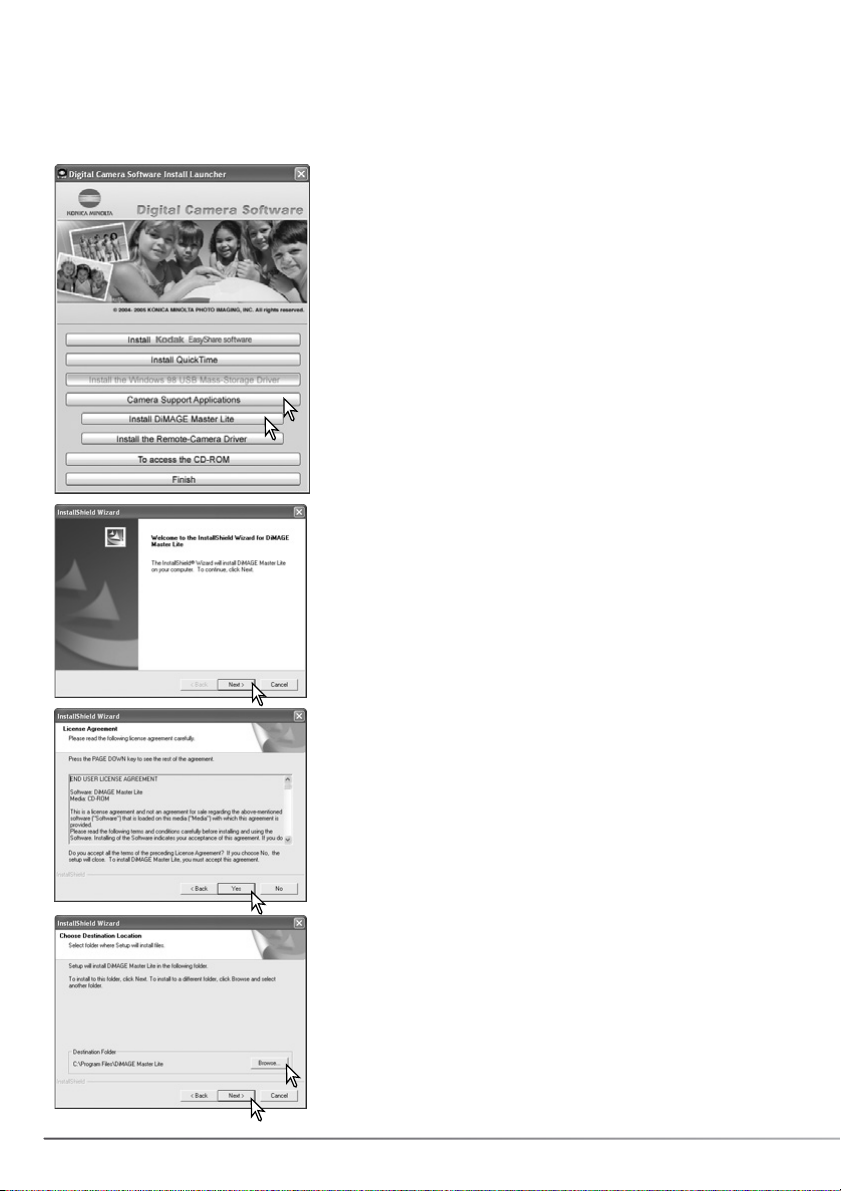
To install the software in the default location - C:\Program
Files\DiMAGE Master Lite, click “Next >.” To install the software
in a different location, click browse button to display the folder
selection window. Specify the directory in which to install the
software.
1.2 INSTALLING THE SOFTWARE - WINDOWS
In the example below, the hard disk drive is drive C. The letters designating the drives vary between
computers. When using Windows 2000 or XP, the software should be installed with the Administrator
privilege.
Turn on the computer to start Windows. Insert the Digital
Camera Software CD-ROM into the CD-ROM drive. The
launcher window opens automatically.
Click the “Camera Support Applications” button to display the
installer buttons. Click the “Install DiMAGE Master Lite” button
to begin installation.
The welcome window opens. Click “Next>” to continue.
The license agreement appears. If you accept the agreement,
click “Yes” to continue the installation routine.
Read the entire license agreement carefully before continuing.
If you do not agree to the terms, click “No” to exit the
installation program.
Page 7
5
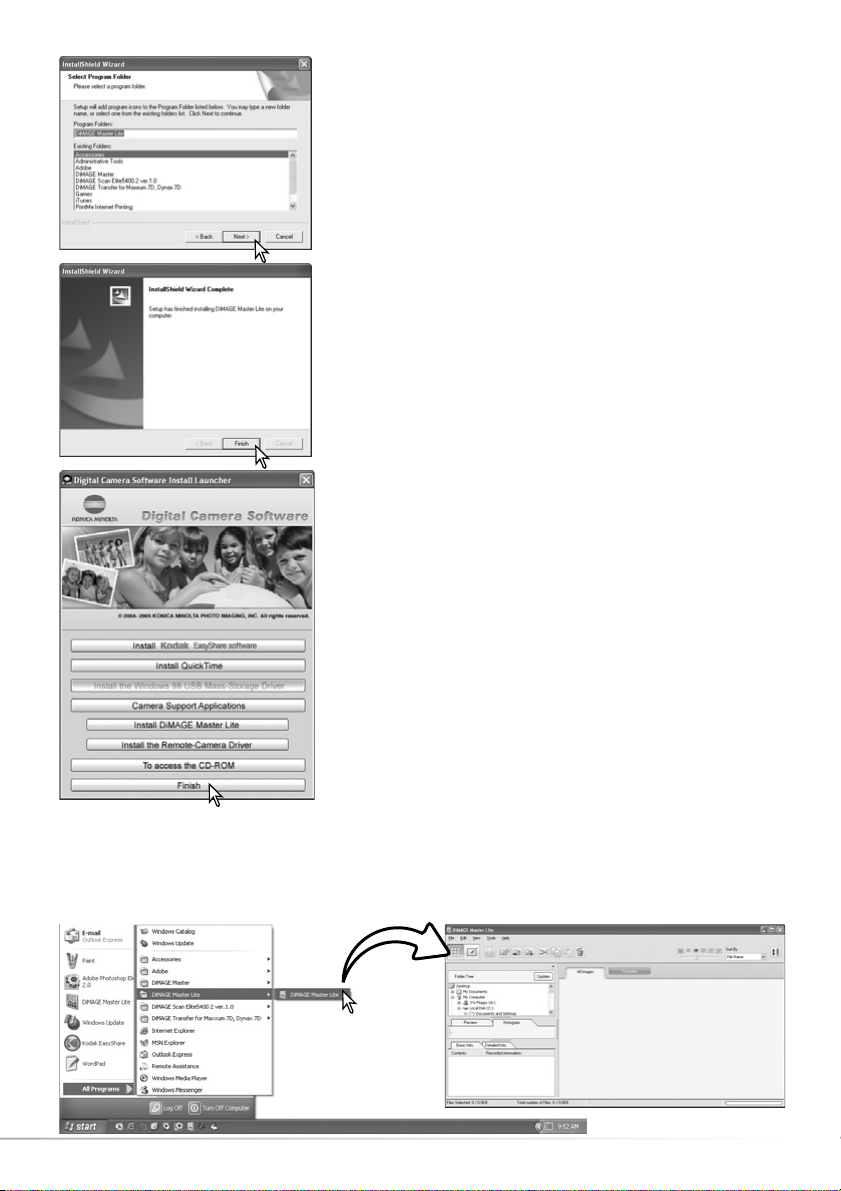
The name of the default program folder is displayed. To install
the software icons in this folder, click “Next>.” Installation
begins.
To install the software icons in another folder, select one of the
folders listed in the existing-folders box below. Click “Next>” to
begin installation.
When the software installation is completed, a message is
displayed. Click “Finish.”
1.3 OPENING THE SOFTWARE - WINDOWS
Click the finish button to close the launcher window.
Select DiMAGE Master Lite from the DiMAGE Master Lite folder in the program option of the start
menu. The application starts up and the Organizer window is displayed.
Page 8
6 SECTION 1: GETTING STARTED
The license agreement appears. If you accept the agreement, click
“Yes” to continue the installation routine.
Read the entire license agreement carefully before continuing. If
you do not agree to the terms, click “No” to exit the installation
program.
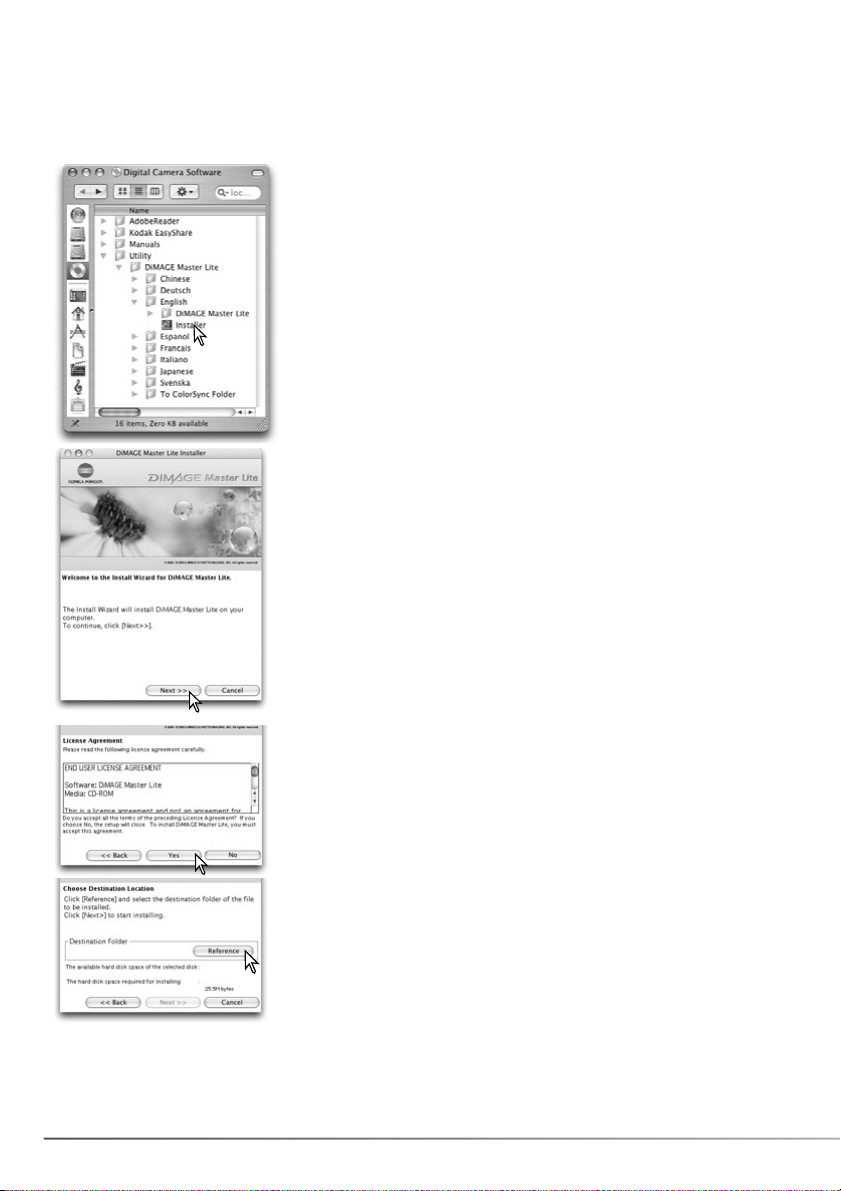
Turn on the computer to start the operating system. When the desktop appears, insert the Digital
Camera Software CD-ROM into the CD-ROM drive. The CD-ROM icon appears on the desktop;
double click the CD-ROM icon to open it.
1.4 INSTALLING THE SOFTWARE - MACINTOSH
The location for the DiMAGE Master Lite files must be specified.
Click the reference button.
When the installation screen appears click “Next >>” to begin the
setup.
Open the utility folder, the DiMAGE Master Lite folder, and then
open the appropriate language folder.
Double-click on the installer icon to start the installation program.
Page 9
7
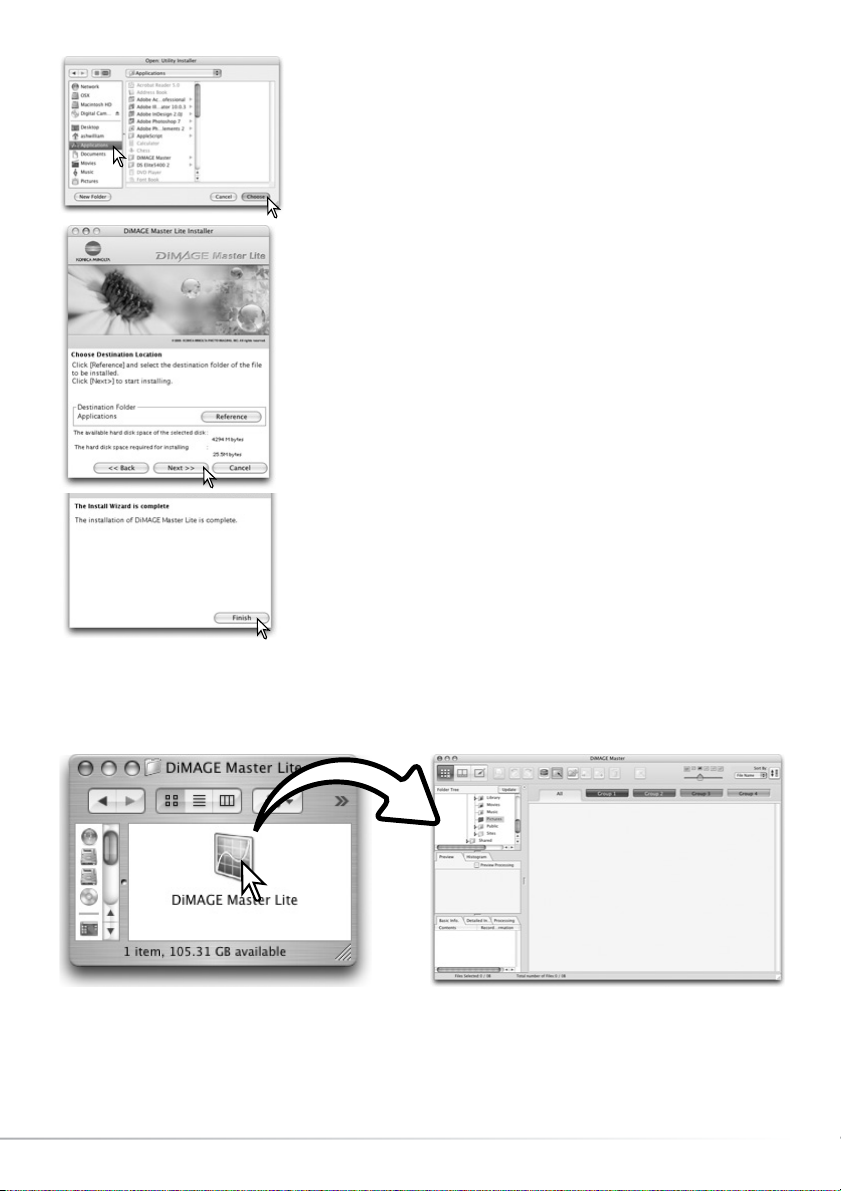
Confirm the installation location on the installer screen. Click “Next
>>” to install DiMAGE Master Lite.
A window appears when the software has been installed. Click
“Finish” to exit the installer.
Using the folder-selection dialog box, select the location where the
software should be installed. Click “Choose.”
1.5 OPENING THE SOFTWARE - MACINTOSH
Open the DiMAGE Master Lite folder. Double-click the DiMAGE Master Lite icon to start up the
application. The Organizer window is displayed.
Page 10
8 SECTION 2: IMPORTING AND EDITING IMAGES
2.1 ORGANIZER WINDOW
2.0 IMPORTING AND EDITING IMAGES
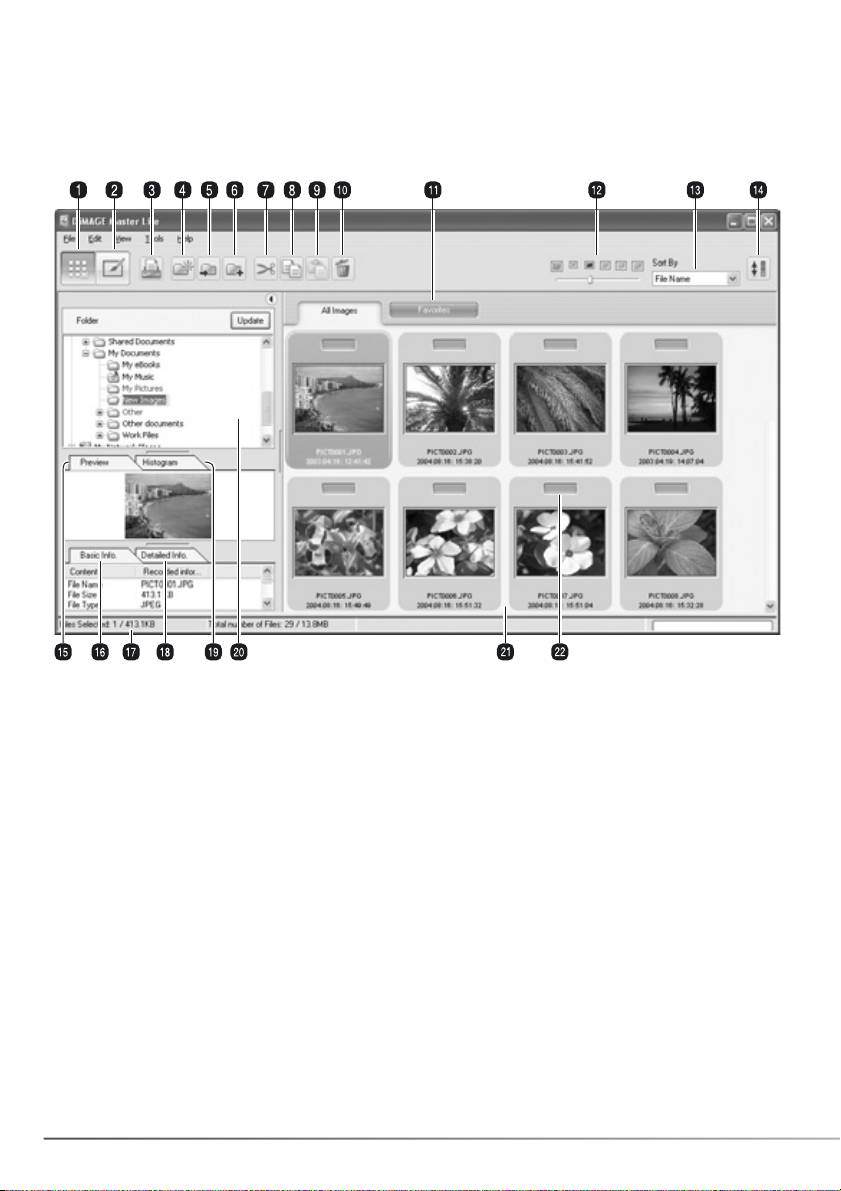
The section covers the basic operation of the Organizer. The Organizer allows files to be viewed and
sorted. For advanced Organizer functions, see section 6.0.
1. Organizer button
2. Photofinisher button (p. 18)
4. New folder button (p. 14)
10. Delete button (p. 16)
9. Paste button (p. 16)
7. Cut button (p. 16)
8. Copy button (p. 16)
14. Reverse-order button (p. 10)
13. Sort-by menu (p. 10)
12. Thumbnail size (p. 10)
15. Preview tab (p. 9)
20. Folder tree (p. 9)
21. Thumbnail display
11. Favorites tabs (p. 12) 22. Favorites selector (p. 12)
5. Move-to-folder button (p. 15)
6. Copy-to-folder button (p. 15)
16. Basic-information tab (p. 9)
18. Detailed-information tab (p. 9)
19. Histogram tab (p. 9)
17. Status bar
The Organizer and Photofinisher buttons switch between the main software functions. The status bar
gives information on operation.
3. Print button (p. 29)
Page 11
9
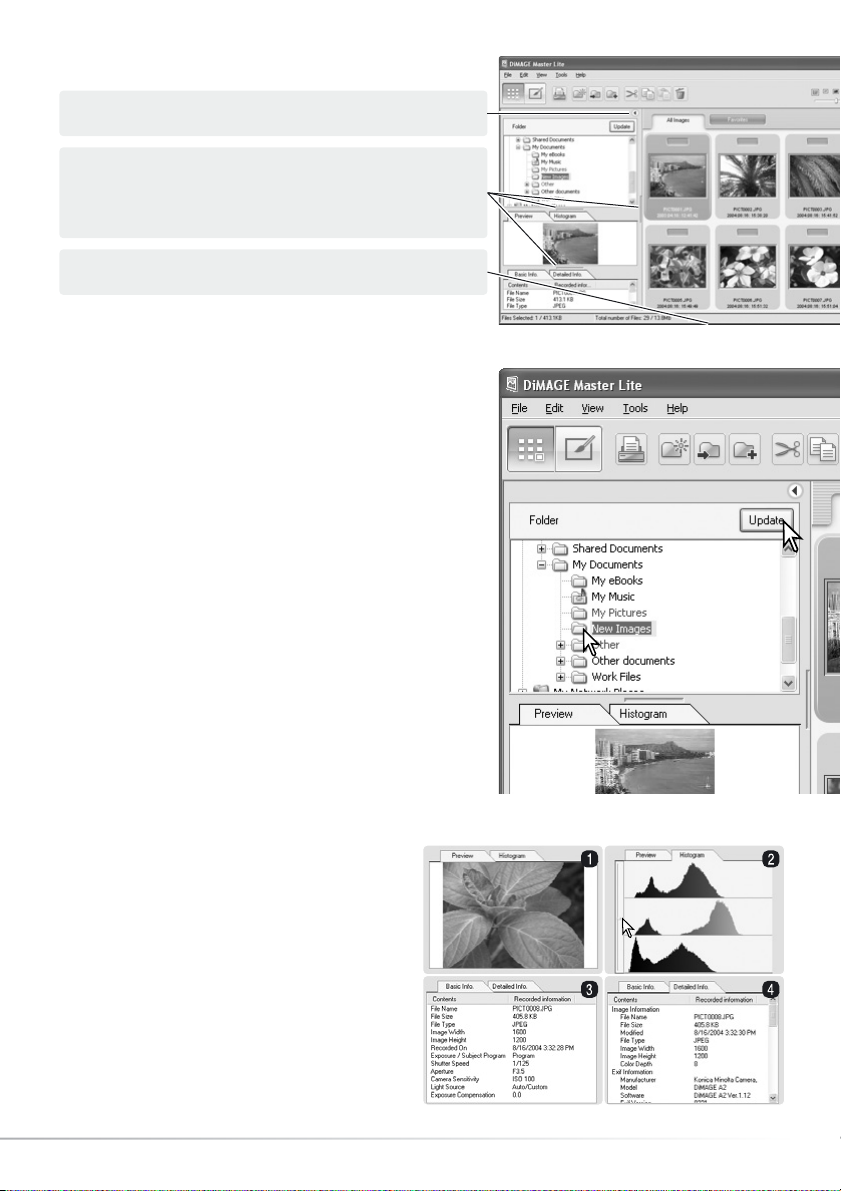
Images can be loaded directly from a digital camera or
from folders located in the computer. Simply use the folder
tree to select the file containing the images. For
information on the camera’s folder organization and
connecting the camera to the computer, refer to the
camera’s instruction manual.
Click on the positive (+) nodes to display the contents of a
folder. Click on a negative (–) node to hide the folder
contents. The names of folders containing image and audio
files are blue.
Click on the image folder to load the images. All stillimage, audio, and movie files in the folder are loaded in the
thumbnail display.
If any changes are made to the folder tree, for example, the
camera is disconnected from the computer, the tree can be
updated. Click the update button or select the updatefolder-tree option from the view menu.
2.3 LOADING IMAGE FILES
2.4 PREVIEW AND INFORMATION TABS
2.2 ADJUSTING THE WINDOW
The pane can be opened and closed by clicking the
hide/show button.
The window can be resized by clicking and dragging on
the frame.
The spacing between the folder tree, preview,
histogram, and information displays can be changed by
clicking and dragging the points between the displays.
The tabs under the folder tree provide
information on a selected image. Simply click
on the tab to view it.
The preview tab (1) shows the selected image.
The histogram (2) displays the pixel distribution
of each color channel; use the slider to change
the histogram scale. The basic-information tab
(3) gives recording and file information; the
display can be edited in the preferences
window, see section 5.1. The detailedinformation tab (4) shows all file and image
information.
Page 12
10 SECTION 2: IMPORTING AND EDITING IMAGES
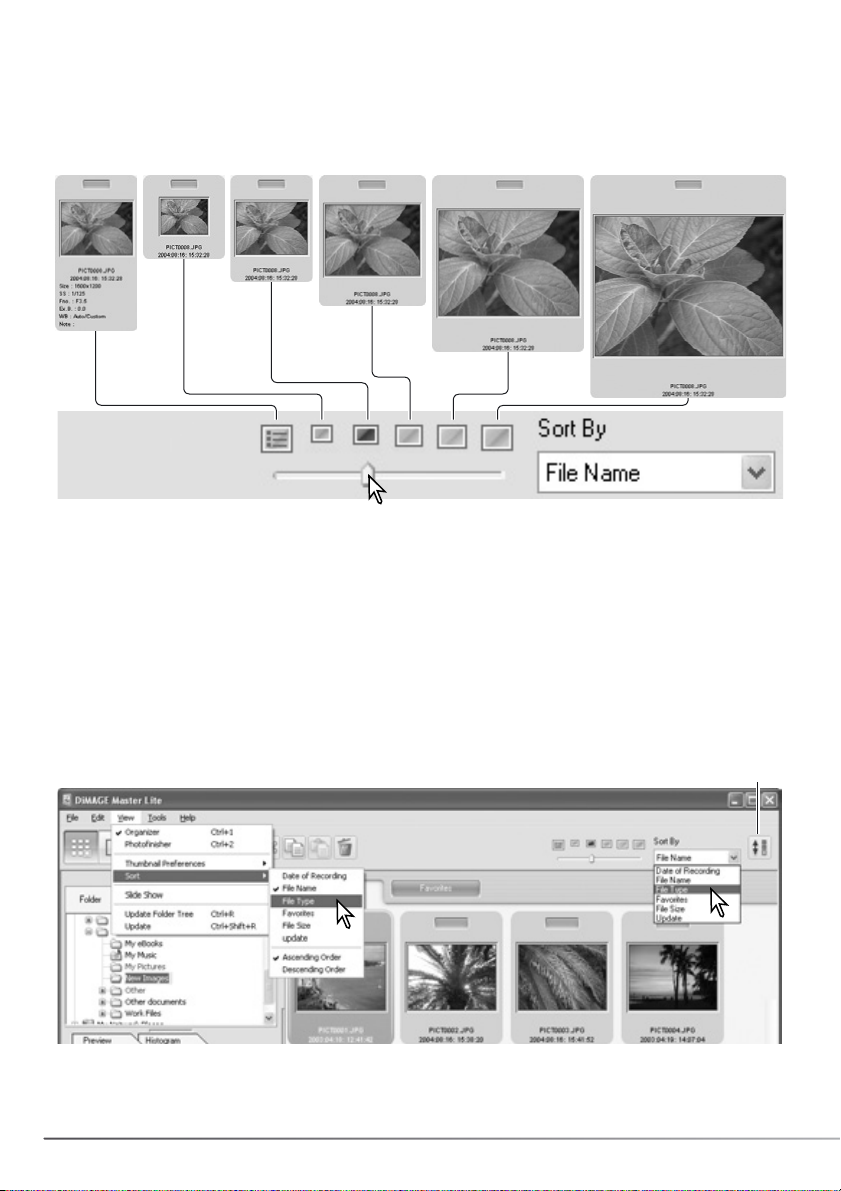
2.5 THUMBNAIL SIZE
The thumbnail size can be changed. Six sizes are available.
320x320
240x240160x160120x12080x80
120x120
with data
To change the size, use the thumbnail size slider on the tool bar or highlight the thumbnail
preferences option on the view menu to display the size options. On the menu, highlight and click
the desired thumbnail size; the thumbnail display changes accordingly.
To edit or add a user note in the data display see section 6.4.
2.6 SORTING IMAGE FILES
Image files can be sorted by date and time of recording, file name, file type, favorites, file size, or
update in ascending or descending order. To sort the displayed images, use the sort-by drop-down
menu on the tool bar or the sort option on the view menu. Simply highlight the sorting category with
the mouse.
The sort menu can also be used to change the display between ascending and descending order.
The reverse-order button on the tool bar also changes the display order.
Reverse-order button
Page 13
11
Master Notes
Some Konica Minolta cameras can record movie
and audio files. Audio recordings, voice memos,
and audio captions are indicated by an audio
indicator. Movies use a .mov or .avi extension.
QuickTime must be installed in the computer to
view a thumbnail image of a movie file. See
section 5.2 on how to set up DiMAGE Master Lite
to open these files.
Movie
Voice memo or audio caption
Audio recording
2.7 SELECTING THUMBNAILS
Click on the thumbnail borders or file icon to select a single image or use the keyboard cursor keys.
To select multiple images, click and drag over the thumbnails or press and hold the control key
(Windows) or command key (Macintosh) and click on each image; the selected frames become
dark. To deselect an image, click on the thumbnail or icon a second time while holding the control
key (Windows) or command key (Macintosh). To select consecutive images, press and hold the shift
key and then click on the first and last image of the series.
To select all files, select the select-all option in the edit menu or press the control key (Windows) or
command key (Macintosh) and “A” key at the same time.
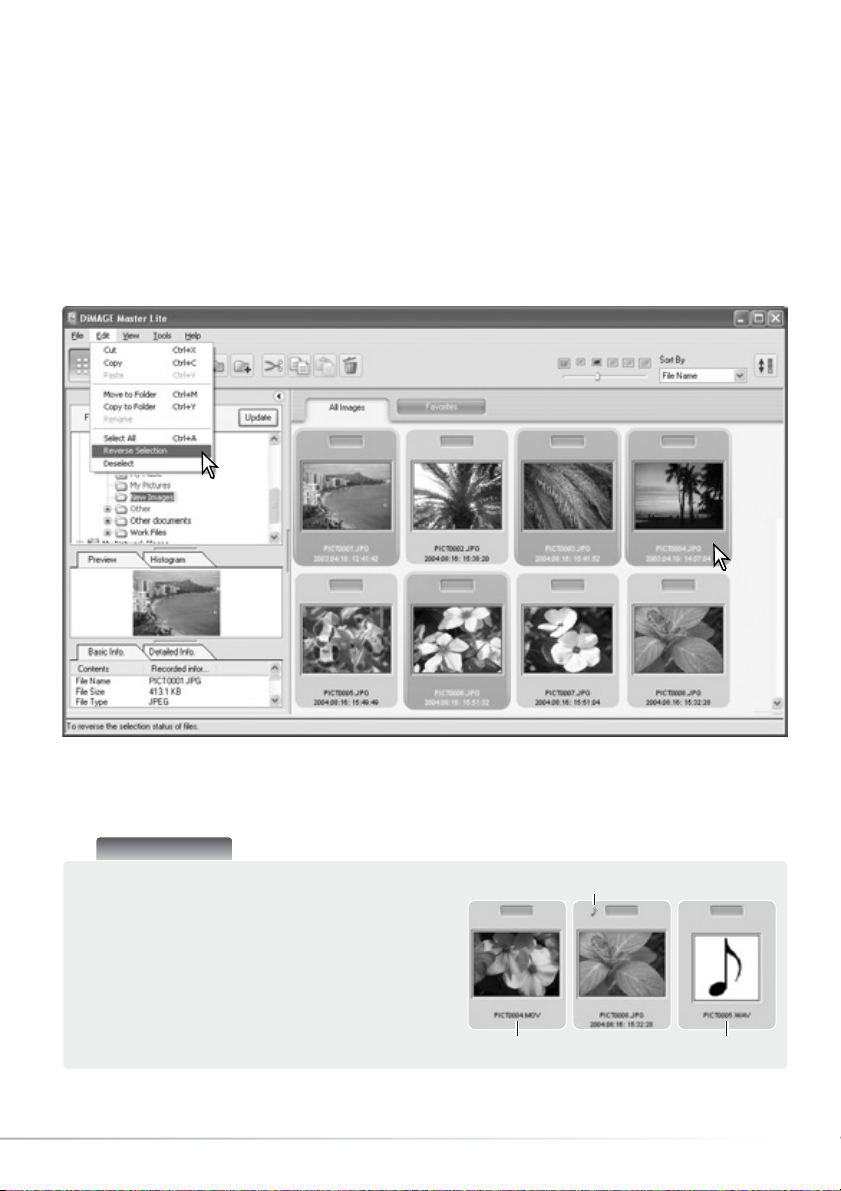
The reverse-selection option in the edit menu deselects all selected images and selects all
unselected images. To deselect the images, select the deselect option in the edit menu or click on
the white background in the index display.
Page 14
12 SECTION 2: IMPORTING AND EDITING IMAGES
2.8 SELECTING FAVORITES
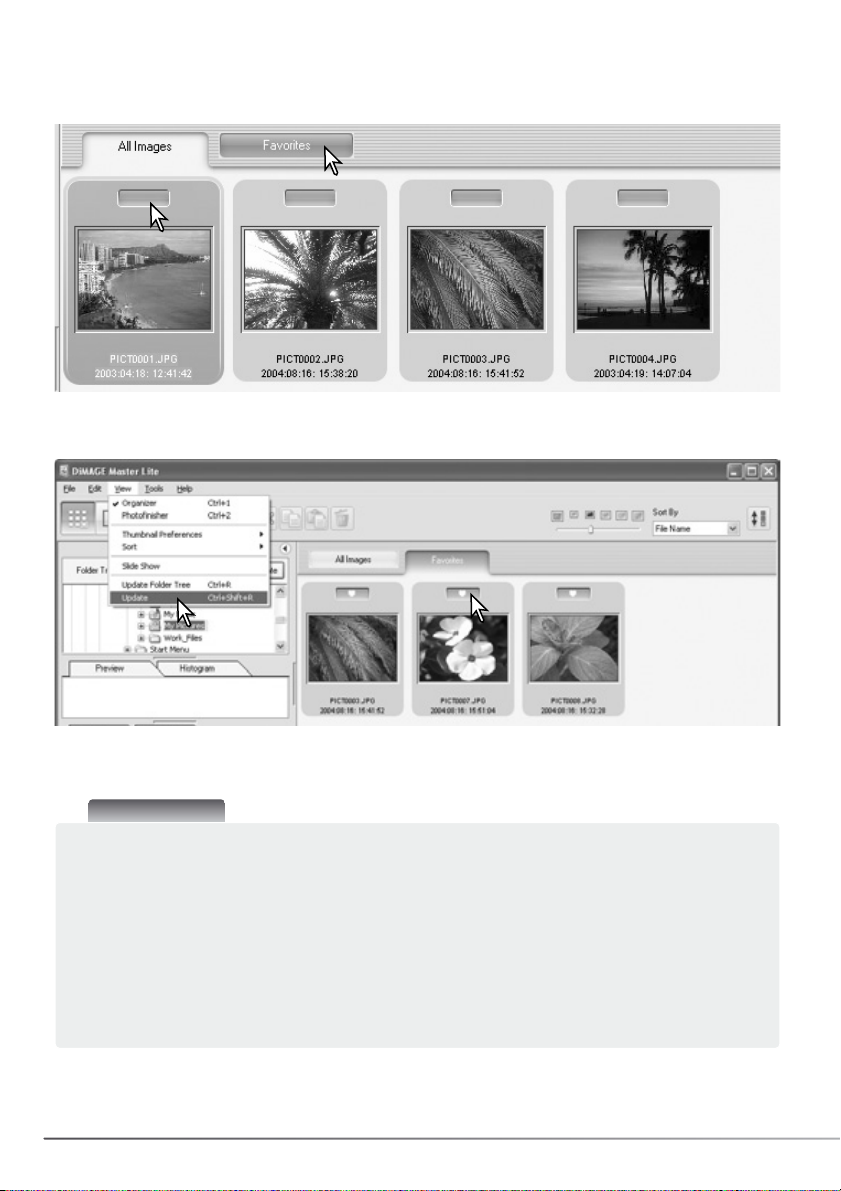
Image files can be classified as a favorite.
Simply click the favorites selector at the top of the thumbnail to add the image to the group. Click
the favorites tab to view the group.
To remove an image from the favorites group, click the favorites selector again to remove the heart.
Select the update option from the view menu to update the thumbnail display.
Master Notes
Files can be added to favorites by clicking on the thumbnail image and dropping it onto the
favorites tab. Dropping it onto the all-images tab removes it from favorites.
The full version of DiMAGE Master uses a more sophisticated method of classifying images. Four
tabs, which can be named and color coded by the user, are used to organize image data. The
groups can be copied to different folders. For more on DiMAGE Master, visit us on the web at:
North America: http://kmpi.konicaminolta.us/
Europe: http://www.konicaminoltasupport.com
Page 15
13
2.9 COPYING FAVORITES
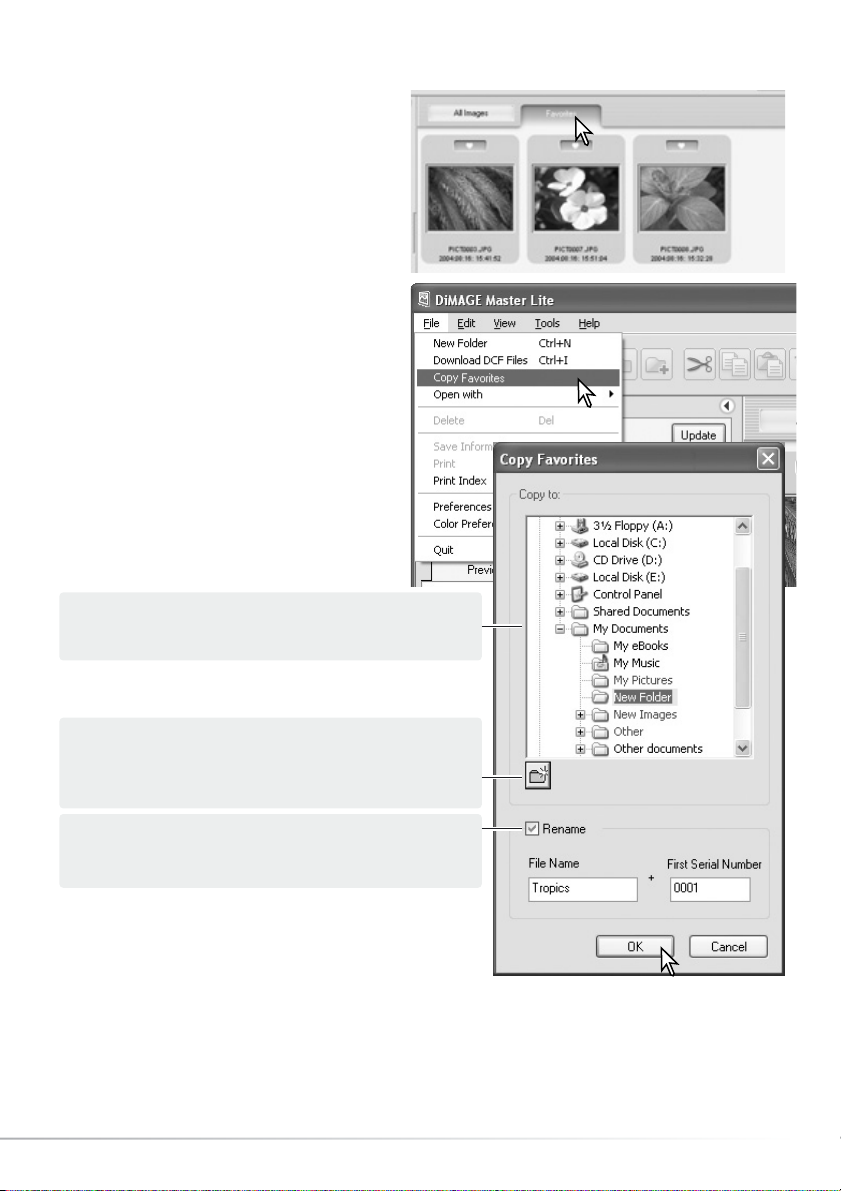
A copy of the images in favorites can be
made. Click the favorites tab to display the
group.
Select the copy favorites option from the file
menu.
Click the OK button to copy the group to the designated
folder. If an image has an attached audio or thumbnail
file, those files are also copied.
In the copy-favorites window, select the destination
folder in the folder tree.
A new folder can be created in this window. Click on
the location for the new folder and click the new-folder
button; a folder appears on the folder tree. The folder
can be renamed.
To rename the files, click the rename check box. Enter
the new file name and the first serial number of the
group.
Page 16
14 SECTION 2: IMPORTING AND EDITING IMAGES
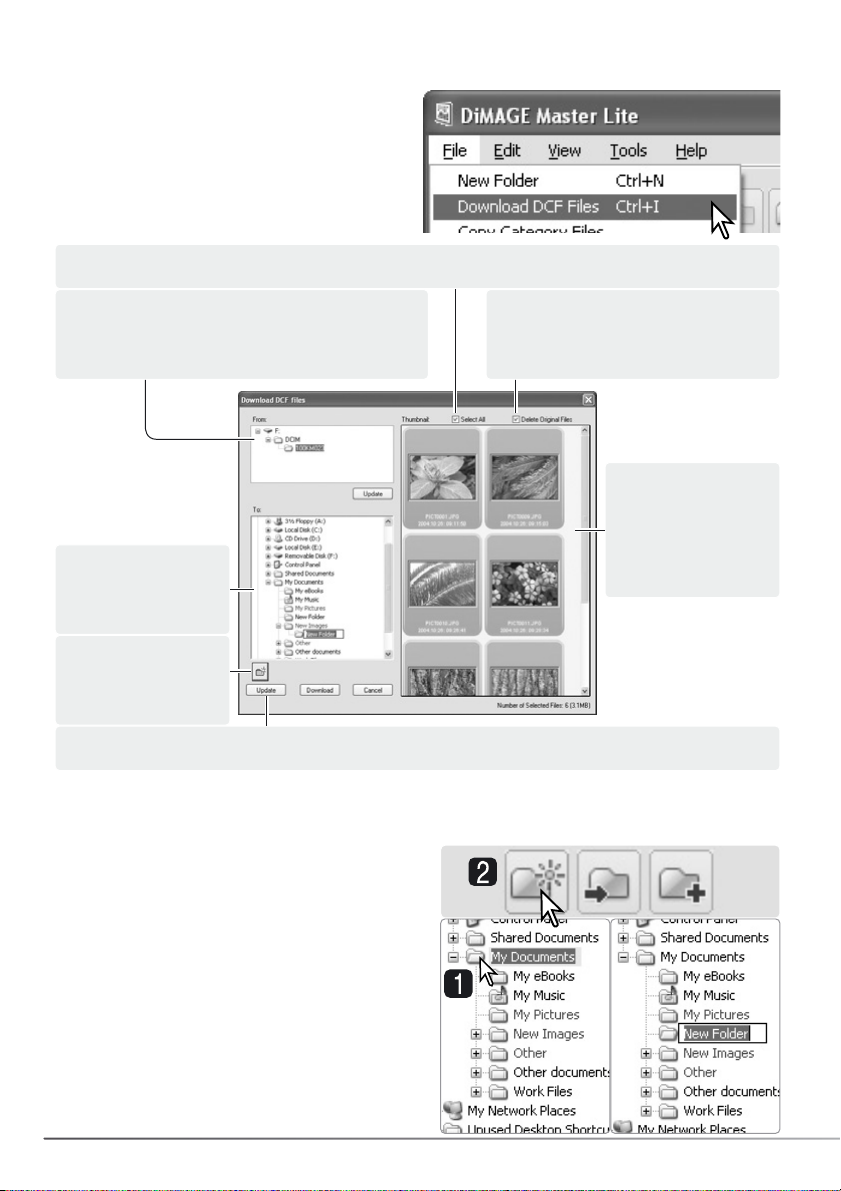
2.10 DOWNLOADING CAMERA FILES
Camera files can be downloaded directly to the
computer hard drive. Connect a camera to the
computer using a USB cable and select the
Download-DCF-files option from the file menu.
The download dialog box opens. This options
also downloads images from a card reader.
Select the file location on the camera’s memory
card. If the camera is changed, use the update
button to update the folder tree.
Select the file
destination in the
computer.
Click the delete-original-files check
box to erase the downloaded files
from the camera.
Use the index
display to select
specific files to
download. See
section 2.7 on how
to select files.
Click the select-all check box to copy all images to the computer.
The new folder
button adds a folder
to the folder tree.
The update button updates the computer’s folder tree.
Confirm the settings and then click the download button to complete the operation. The cancel
button closes the window without downloading any images.
New folders can be created to store images. Click
on the desired location for the new folder. In this
example the new folder is placed in the My
Documents folder (1).
Click on the new-folder button (2) on the tool bar
or select the new-folder option from the file menu.
The new folder is created in the specified location.
The folder name can be changed with the
keyboard.
2.11 CREATING FOLDERS
Page 17
15
2.12 COPY & MOVE FILES TO ANOTHER FOLDER
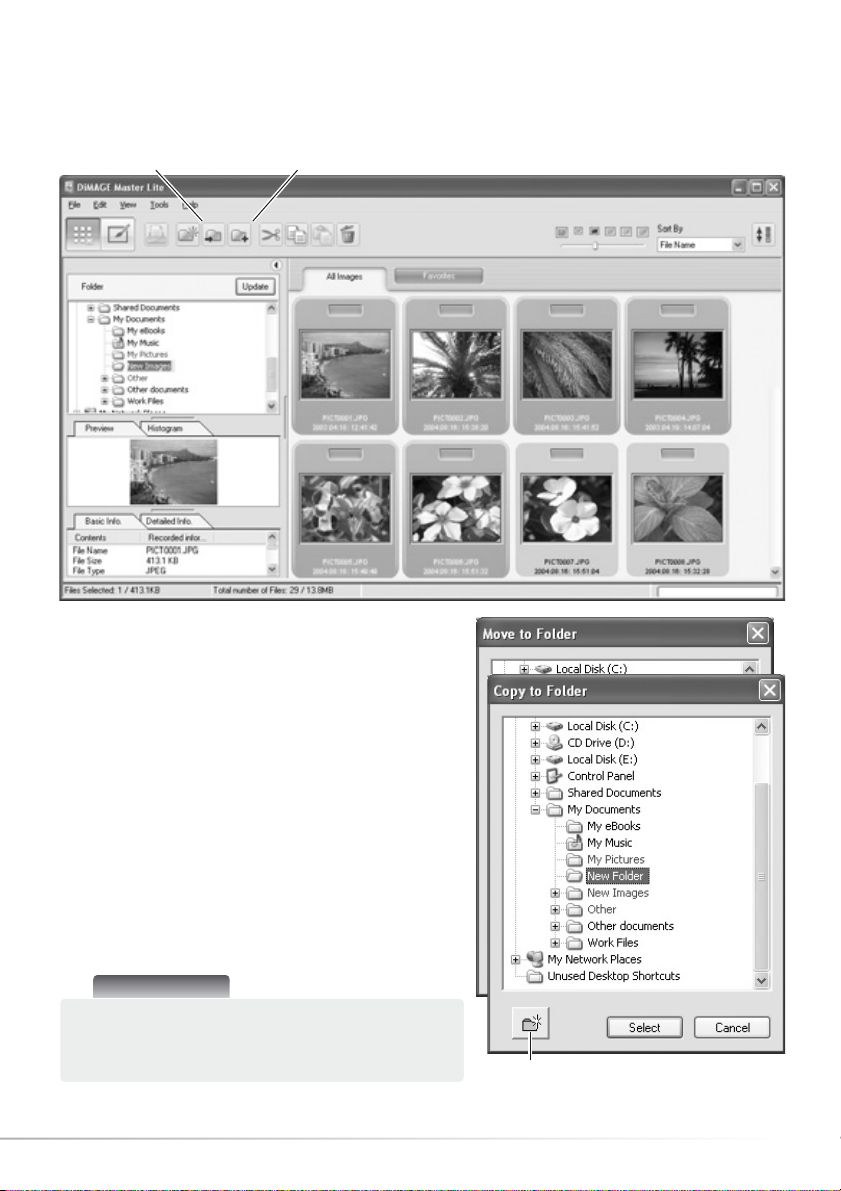
Multiple files can be copied or moved from one folder to another. Click on the thumbnail borders to
select the images. To select images, see section 2.7.
After selecting the files, click on the move-to-folder
button or copy-to-folder button on the tool bar or
select the corresponding option from the edit menu.
The select-destination window opens.
In the select-destination window, click on the
destination folder. Click the select button to move or
copy the specified images to the designated folder. If
an image has an attached audio, or thumbnail file,
those files are also copied.
A new folder can be created in the select-destination
window. Click on the location for the new folder and
click the new-folder button; a folder appears in the
folder tree in the window. The folder can be renamed.
Copy-to-folder buttonMove-to-folder button
New folder button
Master Notes
Files can also be copied by clicking on the
thumbnail and dragging it to a folder in the folder
tree.
Page 18

16 SECTION 2: IMPORTING AND EDITING IMAGES
2.13 CUT, COPY, PASTE, AND DELETE - WINDOWS
The cut, copy, and paste functions are
located in the edit menu. They can be
used for editing file and folder names, but
they cannot be used to cut, copy, or paste
files and folders.
The delete button on the tool bar or
pressing the command and delete button
on the keyboard erases files and folders.
When a delete command is given, a
confirmation screen appears. Clicking the
yes button executes the command and
deletes the data, clicking the no button
cancels the delete command.
2.14 CUT, COPY, PASTE, AND DELETE - MACINTOSH
The tool bar and edit menu can be used to cut, copy, and paste folders and files. The delete button
and delete option on the file menu erases files. These functions affect any audio or thumbnail files
attached to an image. The delete key on the keyboard also deletes folders and images.
Select the folder or images to be moved. Click the cut or copy button. The display does not change
when a cut is made until the paste has been completed. Click on the new location for the folder or
images. Click the paste button to complete the operation.
When a delete command is given, a confirmation screen appears. Clicking the yes button executes
the command and deletes the data, clicking the no button cancels the delete command.
Delete buttonPaste buttonCut button Copy button
Delete button
Master Notes
Images locked with the camera have the lock indicator displayed on the
top left corner of the thumbnail. To unlock the image in Windows, right
click on the file icon in the hard drive and select the properties option;
uncheck the read-only attributes. In Macintosh, highlight the file icon in
the hard drive and press command + i; uncheck the lock option in the
dialog box.
Page 19
17
2.15 RENAMING SINGLE FILES
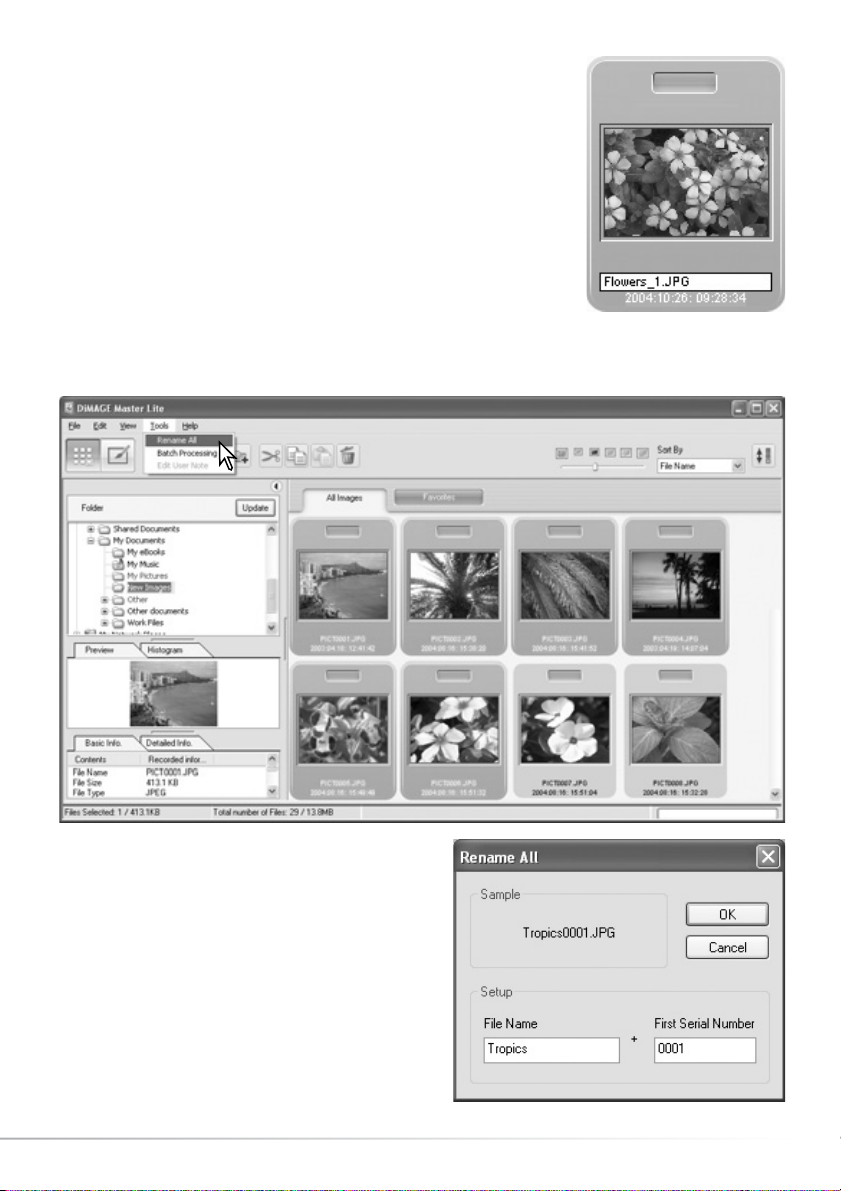
Single files can be renamed in the thumbnail and details displays.
When rewriting file names, always include the original file extension.
Select the image. Click on the file name to activate the cursor. Use the
keyboard to change the file name.
2.16 RENAMING MULTIPLE FILES
Multiple files can be renamed. See section 2.7 on how to select files.
After selecting the images to be renamed, select the
rename-all option in the tool menu. The rename-all
window opens.
In the rename-all window, enter the new file name
and the first serial number. The first file name in the
series is displayed in the sample area.
Click the OK button to change the file names of the
selected images.
Page 20
18 SECTION 3: BASIC IMAGE PROCESSING
3.1 PHOTOFINISHER WINDOW
3.0 BASIC IMAGE PROCESSING
The section covers the basic operation of the Photofinisher. Images can be processed to improve
them. For advanced Photofinisher functions, see section 7.0.
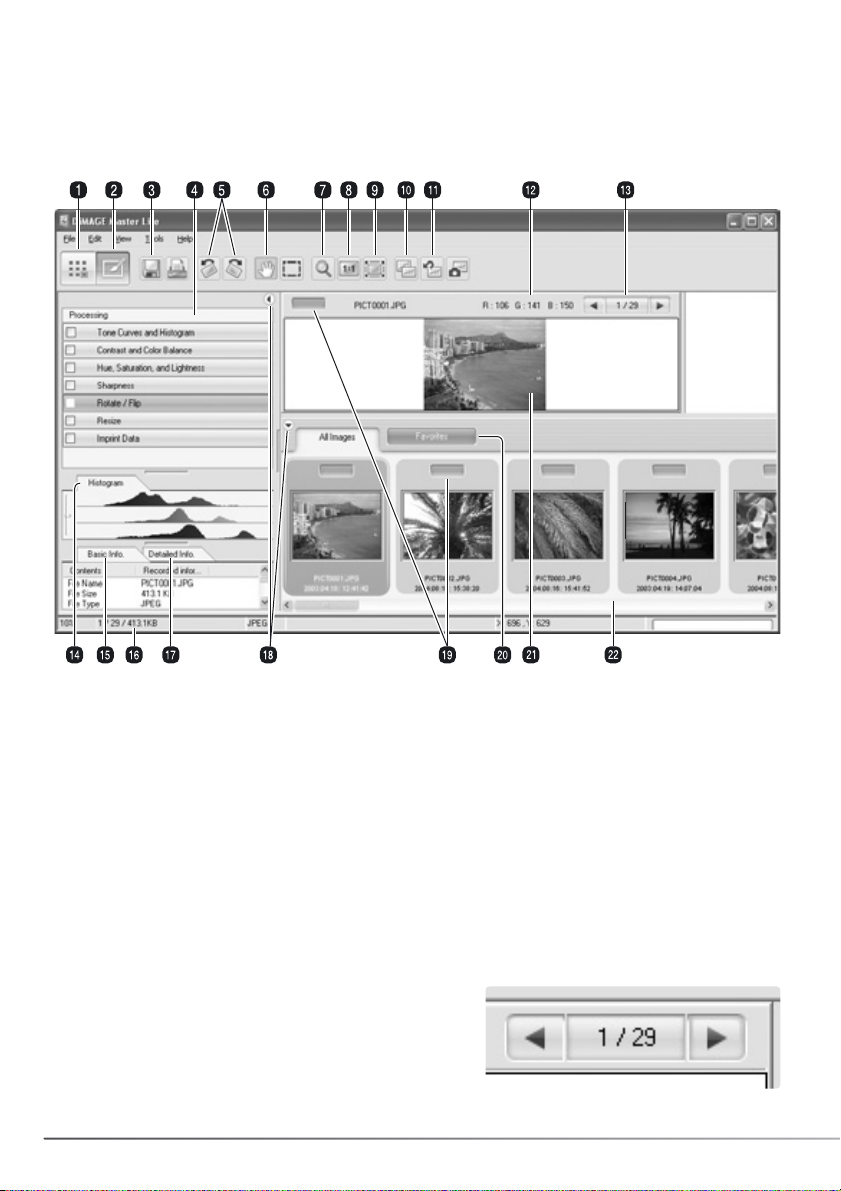
1. Organizer button (p. 8)
3. Save button (p. 28)
2. Photofinisher button
6. Grab tool (p. 19)
4. Photofinisher tool pane
5. Rotate buttons (p. 20)
12. RGB display (p. 20)
11. Undo-all button (p. 26)
9. Fit-to-window button (p. 19)
10. Comparison display button (p. 26)
16. Status bar
15. Basic-information tab (p. 9)
14. Histogram tab (p. 9)
17. Detailed-information tab (p. 9)
13. Frame selector
7. Magnification tool (p. 19)
8. Actual-size button (p. 19)
18. Hide/Show pane button (p. 9)
22. Thumbnail display
21. Preview display
19. Favorites selector (p. 12)
The Organizer and Photofinisher buttons switch between the main software functions. The status bar
gives information on operation.
20. Favorites tab (p. 12)
The frame selector shows the number of the displayed
image as well as the total number of images in the folder.
Clicking the arrows displays the previous or next image.
Page 21

19
3.2 IMAGE DISPLAY TOOLS
Grab - When an image is larger than the
display area, the grab tool can scroll the
image. Click the grab-tool button to select the
tool; the cursor changes. Click and drag on the
image to scroll.
Fit to Window - click an image to select it and then the fit-to-window button, which
resizes the image automatically to fit the display area.
The tool bar contains tools to enlarge and scroll displayed images. Simply click on the appropriate
button to active the tool.
Actual size - click an image to select it and then the actual-size button, which shows the
image based on its pixel dimensions.
Magnification tool - the display image can be
enlarged or reduced. Click the magnificationtool button to select the tool; the cursor
changes. Click on the image to enlarge. To
reduce, hold down the alt (Windows) or option
key (Macintosh) and click on the image. When
the image has reached the magnification limit,
the plus or minus sign in the magnifier icon
disappears.
Enlarge Reduce
The zoom option on the view menu controls the size of
the display image. As well as the magnification tool’s
enlarge and reduce functions, fit-to-window, and actualsize functions, the menu can display the image at preset
magnifications.
Master Notes
Tools can be selected using the keyboard. Press and hold the space bar to activate the grab
tool. Press and hold the control key (Windows) or command key (Macintosh) to activate the
magnification tool to enlarge an image. Press and hold the alt. key (Windows) or option key
(Macintosh) to activate the magnification tool to reduce image size.
Page 22

20 SECTION 2: IMPORTING AND EDITING IMAGES
3.4 RGB DISPLAY
The RGB (red, green, blue) values for any point on the image can be displayed. Simply place the
cursor on the image to display the information.
3.3 ROTATE IMAGES
The orientation of the displayed
image can be changed with the
rotate buttons on the tool bar or
with the tools menu. Any changes
to image orientation is applied to
the selected thumbnail image(s).
The rotate buttons rotate the
thumbnail in 90° increments each
time the buttons are clicked.
Page 23

21
3.5 TONE PROCESSING
Automatic tone-curve processing can be applied to an
image. Click the image thumbnail to display it in the
preview area.
Click the tone-curves and histogram button to open the
dialog box.
Select the appropriate processing from the toneprocessing list box. The affect is visible in the preview
image.
The selected processing is reflected on the tone curve.
The curve can be adjusted further by clicking and
dragging on the nodes. see section 7.2 for more on tone
curves.
To cancel the tone processing, select the none option
from the list box or click the reset button.
Click the close button to close the window. If a change
is made, an indicator is shown on the tone-curves and
histogram button. See Master notes on page 25.
Master Notes
The auto-setting button makes automatic tone-curve
and histogram adjustments to the image.
Adjustments to contrast and color are made. Simply
click the button to see the results. Click the reset
button to cancel the processing.
Reset button
Close button
Page 24

22 SECTION 3: EXAMINING IMAGES
3.6 CONTRAST & COLOR BALANCE
Contrast and color corrections can be applied to an
image. Click the image thumbnail to display it in the
preview area.
Click the contrast and color balance button to open the
dialog box.
Click and drag on the sliders or enter a value in the text
boxes to make adjustments: changes are applied to the
preview image. For more on color, see section 3.7.
To cancel the changes click the reset button. Click the
close button to close the window. If a change is made,
an indicator is shown on the contrast and color balance
button. See Master notes on page 25.
Click the variation button to open the variation palette,
see below.
The variation palette allows an image to be corrected by
comparing it to other slightly corrected images
surrounding it. This is an easy method to correct images
for individuals who are inexperienced in image
processing.
Click the variation button to display the palette.
3.6.1 VARIATION PALETTE
Click the arrow next to the variation list box to select the
image quality to be corrected: color balance or contrast.
Each variation palette shows the current image in the
center with corrected samples displayed around it.
Click the best image among the frames. The selected
image becomes the new center surrounded by a set of
new images; the change is applied to the preview
image. This procedure can be repeated until the desired
correction is obtained. Click the reset button to cancel
all changes.
Click and drag the bottom right palette corner to resize.
Sample images change accordingly.
Reset button
Close button
Variation button
Page 25

23
3.7 AN INTRODUCTION TO COLOR
RED
GREEN
BLUE
CYAN
MAGENTA
YELLOW
Click the close button to close the palette and apply
any changes.
The difference between the samples can be changed. Drag the correction-step slider, or enter a
value into the text box to set the degree of correction between the samples. The initial setting is
10.
Checking the display-limit check box indicates with
the complementary color when any of the image
values exceed 0 (black limit) or 255 (white limit). For
example, if the yellow
channel exceeds those
values, the area is
displayed in blue.
In photography, red, green, and blue are the
primary colors. The secondary colors, cyan,
magenta, and yellow, are made from
combining the primary colors: cyan = blue +
green, magenta = blue + red, and yellow = red
+ green. The primary and secondary colors
are grouped in complementary pairs: red and
cyan, green and magenta, and blue and
yellow.
Knowing the complementary colors is very
important in color balancing. If the image has
a specific color cast, either subtracting the
color or adding its complementary color
creates a natural looking image. For example,
if the image is too red, decrease the amount
of red; if the image is too yellow, increase the
amount of blue.
Adding or subtracting equal parts of red,
green, and blue has no affect on the color balance. However, it can change the overall image
brightness and contrast. Usually, no more than two color channels are needed to color balance an
image.
Color balancing is a skill that develops with practice. While the human eye is extremely sensitive in
making comparative judgements, it is a poor tool when making absolute measurements of color.
Initially, it can be very difficult to distinguish between blue and cyan, and red and magenta.
However, adjusting the wrong color channel never improves an image; subtracting blue from an
image that is too cyan creates a green cast.
Page 26

24 SECTION 3: EXAMINING IMAGES
3.8 HUE, SATURATION, & LIGHTNESS
Hue, saturation, and lightness corrections can be applied
to an image. Click the image thumbnail to display it in
the preview area.
Click the hue, saturation, and lightness button to open
the dialog box.
Click and drag on the sliders or enter a value in the text
boxes to make corrections: changes are applied to the
preview image. The hue slider rotates the colors in the
image through the color space; the maximum position to
the right (180°) is the same as the maximum position to
the left (–180°).
Two color spaces are displayed at the bottom of the
dialog box. The top bar indicates the color space of the
original image. The bottom bar displays the relative
changes to the color space.
To cancel the changes click the reset button. Click the
close button to close the window. If a change is made,
an indicator is shown on the hue, saturation, and
lightness button.
Click the variation button to open the variation palette,
see the next section.
Reset button
Close button
Variation button
The hue, saturation and lightness
controls adjust the image in
reference to the HSL color
model. Hue refers to each
separate color in the model.
Saturation is how vivid each
colors is. Lightness describes
how bright or dark a color is in
the color space.
Saturation
Lightness
Hue
When changing hue, each color is assigned a new hue depending on the degree of rotation through
the color space. In the example, the original image was rotated 180° through the color space.
Page 27

25
The variation palette allows an image to be corrected by
comparing it to other slightly corrected images
surrounding it. This is an easy method to correct images
for individuals who are inexperienced in image
processing.
Click the variation button in the hue, saturation, and
lightness dialog box to display the palette.
Click the best image among the frames. The selected
image becomes the new center surrounded by a set of
new images; the change is applied to the preview
image. This procedure can be repeated until the desired
correction is obtained.
3.8.1 VARIATION PALETTE
Click the close button to close the palette and apply
any changes.
The difference between the samples can be changed. Drag the correction-step slider, or enter a
value into the text box to set the degree of correction between the samples. The initial setting is
10.
Checking the display-limit check box indicates with
the complementary color when any of the image
values exceed 0 (black limit) or 255 (white limit). For
example, if the yellow
channel exceeds those
values, the area is
displayed in blue.
Click to cancel all changes.
Master Notes
If any image-processing tool is used, an indicator is
shown on the corresponding tool button. The check
box allows the processing to be canceled or
applied; the change is reflected in the preview
image.
Click and drag to resize palette.
Page 28

26 SECTION 3: EXAMINING IMAGES
3.10 UNDOING IMAGE PROCESSING
3.9 COMPARISON DISPLAY
Click the comparison display button to divide the preview display area in two. The original
image data is on the left and the processed data is on the right. To display the processed
image only, click the button again.
Original data Processed data
Changes made with the display tools (p. 19) on one image is applied to the other. Using the fit-towindow button automatically resizes both images to fit the display area.
Click the reset-all button to cancel all image processing applied to the displayed image.
3.11 FLIP
Select the appropriate flip option
from the tools menu to flip the
displayed image. The vertical option
flips the image left to right. The
horizontal option flips the image top
to bottom.
Page 29

27
3.12 RESIZE
An image can be resized. Click the image thumbnail to
display it in the preview area.
Click the resize button to open the dialog box.
Enter the new width or height in the text boxes. Pixel
dimensions must fall in the range of 90 to 3,500 pixels.
The image can also be resized by a percentage of the
original dimensions using the magnification field. Only
one value needs to be entered, the other values adjust
automatically to keep the image proportions unchanged.
Click the close button to set the new dimensions. The
image is resized when it is saved or printed. The reset
button cancels any changes.
If a change is made, it is shown with an indicator on the
resize button. See Master notes on page 25.
Reset button
Close button
Master Notes
Multiple files can be resized at one time using the
batch-processing option in the tools menu in the
Organizer. See section 6.3 for more information.
Page 30

28 SECTION 3: EXAMINING IMAGES
3.13 SAVE
To save an image after applying processing, click the
save button or select the save option from the file menu.
The save command overwrites the original data. A
confirmation screen appears before an images is saved.
Click the yes button to save the file.
Save erases and replaces the original file data.
To protect this data, use the save-as command
to rename the file, see below.
3.14 SAVE AS
Click the save button to save the image.
To save an image file under a new name or in a new file
format, select the save-as option from the file menu. The
operating system’s save-as dialog box opens.
If JPEG is selected, the compression rate must be fixed
using the slide bar in the option box. The higher the
compression rate, the smaller the file size, and the lower
the image quality.
If RAW data is saved as a TIFF file, the color depth must
be specified between 8-bit per channel and 16-bit per
channel.
The save-as dialog box varies with the operating system.
Refer to the operating system’s help section for more
information. The following should be specified:
Specify the location to save the file.
Enter the file name.
Specify the file format of the image from the list box.
The file does not need to be saved in the original file
format.
Embed color profile if appropriate. Unchecking the
box deletes any embedded profile. Not available with
all file formats.
Page 31

29
4.0 PRINTING
The section covers the basic printing operation. Single or multiple images can be printed. The
appearance of screens can vary with operating system and printer.
Simply click the print button to open the print dialog box. The print button is located in the Organizer
and Photofinisher. The print dialog box can also be opened from the file menu.
Master Notes
The date and time of recording, file name, and
user note can be imprinted into the image
data. See section 7.10 for more information.
An area within an image can be selected for
printing. See section 7.11 for more information.
An index print of the images in a folder or in
favorites can be made in the Organizer. See
section 6.2.
Page 32

30 SECTION 4: BASIC IMAGE PROCESSING
4.1 PRINT - SINGLE
Select the image(s) to be printed and click the print button (p. 29). Use the print dialog box to set up
the print parameters.
Select the single-image or multiple-image option from the list
box depending on if a single image or multiple images are to be
printed on each page. For information on multiple-image setup,
see section 4.1.1.
Page / total number of pages - click the left/right buttons to
show the next or previous page.
To access the dialog box for the printer. This screen varies
with the operating system and printer. Refer to the operating
system’s help and the printer instruction manual.
Page 33

31
Click the print button to begin printing. The operating
system’s print dialog box opens before the document is
sent to the printer; this screen varies with the operating
system and printer. Refer to the operating system’s help
and the printer instruction manual.
Select the appropriate options from the print dialog box. Click the print button to start printing or the
cancel button to close the window.
Click the check box to add information to the
printout. Click the Info. setup button to select the
information printed.
On the information-print-setup screen, click the
appropriate check boxes. To make a user note, see
section 6.4. Click the add-text check box and enter
a comment in the text field below it. Click “OK” to
complete the setup. Fonts can be selected and
changed; click the font-setup or font-color buttons
to open the appropriate dialog box.
The size-to-page option sets print parameters
automatically. The image can be bled to the long or the
short side of the page; the print preview reflects the setting.
Uncheck the size-to-page option to set print size manually.
The fields are linked so a change in one value is reflected in
the others. The units for width and height can be changed.
To see the affect on the preview image, click the apply
button. Auto rotate can be turned on and off, see below.
Auto rotate orients the image to the page dimensions
automatically; the print preview reflects the setting.
For information on the font-setup and font-color dialog
boxes, see Master notes on page 33.
Page 34

32 SECTION 4: BASIC IMAGE PROCESSING
4.1.1 PRINT - MULTIPLE
Select the image(s) to be printed and click the print button (p. 29). Use the print dialog box to set up
the print parameters.
Select the single-image or multiple-image option from the list
box depending on if a single image or multiple images are to be
printed on each page. For information on single-image setup,
see section 4.1.
Page / total number of pages - click the left/right buttons to
show the next or previous page.
To access the dialog box for the printer. This screen varies
with the operating system and printer. Refer to the operating
system’s help and the printer instruction manual.
Page 35

33
Master Notes
The font, font style, and point size can be specified with the font
setup dialog box; click the button to open the box. The sample area
reflects the settings. The script can be selected from the list box at
the bottom. The fonts and scripts available vary with the computer
system.
Click the print button to begin printing. The operating
system’s print dialog box opens before the document is
sent to the printer; this screen varies with the operating
system and printer. Refer to the operating system’s help
and the printer instruction manual.
Select the appropriate options from the print dialog box. Click the print button to start printing or the
cancel button to close the window.
Click the check box to add information to the
printout. Click the Info. setup button to select the
information printed.
On the information-print-setup screen, click the
appropriate check boxes. To make a user note, see
section 6.4. Click the add-text check box and enter
a comment in the text field below it. Click “OK” to
complete the setup. Fonts can be selected and
changed; click the font-setup or font-color buttons
to open the appropriate dialog box.
Select the page layout from the layout list box; the setting
is reflected in the print preview.
Auto rotate orients the images to best fit the page
automatically; the print preview reflects the setting.
To open the font-setup and font-color dialog boxes, see Master notes below.
The text color can be specified with the font-color dialog box; click
the button to open the box. This dialog box varies between
operating systems. Refer to the operating system help for more
information.
Page 36

34 SECTION 5: PREFERENCES
5.0 PREFERENCES
The preferences dialog box can customize the
DiMAGE Master Lite operation. The preferences
dialog box can be opened from the Organizer
and Photofinisher. Select the option from the file
menu (Windows) or DiMAGE Master Lite menu
(Macintosh).
5.1 BASIC INFORMATION PREFERENCES
The information shown in the basic information
tab in the Organizer and Photofinisher can be
edited in the preferences dialog box. The
preferences dialog box is opened from the file
menu (Windows) or DiMAGE Master Lite menu
(Macintosh).
Click on an information heading to highlight it,
then click the hide or show button to move it
between the lists. The hide-all and show-all
buttons move all headings from one list to
another.
For more on the basic information tab, see
section 2.4.
Master Notes
When using a Macintosh operating system, the
DiMAGE Master Lite menu opens the
preferences and color preferences dialog
boxes. The menu can also be used for opening
other applications with the services option as
well as hiding the DiMAGE Master Lite or other
windows.
Page 37

35
5.2 APPLICATION PREFERENCES
Files can be opened in other applications directly
from the Organizer or Photofinisher. The
preferences dialog box is opened from the file
menu (Windows) or DiMAGE Master Lite menu
(Macintosh).
To create a link to another image-processing
application, click the load button.
In the operating system’s open dialog box, locate
the application, select it, and click the open
button to complete the operation. The application
is displayed in the preferences dialog box.
Links to multiple applications can be made.
To open a single or multiple images in the linked
application from the Organizer or Photofinisher,
select the images from the thumbnail display and
then select the application from the open-with
option in the file menu.
To delete a link, highlight the application in the
preferences dialog box, and click the delete
button.
Page 38

36 SECTION 5: PREFERENCES
Some Konica Minolta cameras can record movie
and audio files. Audio recordings, voice memos,
and audio captions are indicated by an audio
indicator. Movies use a .mov or .avi extension.
QuickTime must be installed in the computer to
view a thumbnail image of a movie file. The
application to open these files must be specified
in preferences.
Movie
Voice memo or audio caption
Audio recording
Click a view button to locate the corresponding
movie or audio application.
In the operating system’s open dialog box, locate
the application, select it, and click the open
button to complete the operation.
The application is displayed in the preferences
dialog box. Repeat the process to replace the
current application.
To playback a movie or audio file, simply double
click on the thumbnail. To play back an attached
audio file, single click on the indicator next to the
favorites selector. The selected application opens
automatically.
Page 39

37
6.0 ADVANCED ORGANIZER
The section covers advanced Organizer operation. See section 3 for information on the basic tools
and functions.
6.1 SAVE IMAGE INFORMATION
Information on images can be saved. This data
can be viewed in a spreadsheet application such
as Microsoft Excel.
Select the images whose information is to be
recorded and then select the save-information
option from the file menu.
Select the type of information to be included by
clicking on the check boxes next to the item in
the select-information pane.
Click the appropriate radio button to specify the
format of the compiled data.
Click the save button to continue.
In the operating system’s save-as dialog box,
specify the location and name of the file. Click
the save button to complete the operation.
The document can be opened in a spreadsheet
application the supports .CSV format files. Check
the application’s manual.
Page 40

38 SECTION 6: ADVANCED ORGANIZER
6.2 PRINT INDEX
Index prints or images in a folder or in favorites can be
made in the Organizer.
Select the folder or the favorites tab and then select the
print-index option from the file menu in the Organizer
window. The print-index dialog box opens.
Date and time of recording
Print preview displays the images as well as the print
options for title, page number, file name, and date of
recording.
Title for each page.
Page number
File name
Page / total number of pages - click the left/right buttons to show the next or previous index
page.
Page 41

39
Select the number of images per page from the list box. If the folder contains a large number of
images, the preview display may take some time to show the new layout.
To print the index. The operating system’s print dialog box opens before the
document is sent to the printer; this screen varies with the operating system
and printer.
Select the appropriate options from the index-print dialog box. Click the print button to start printing
or the cancel button to close the window.
To access the dialog box for the
printer. This screen varies with the
operating system and printer.
To select the text format on the index.
For more on this dialog box, see
Master notes on page 33.
To select the color of the text printed on
the index. This dialog box varies with the
operating system, see Master notes on
page 33.
To select the information printed on the index.
Changes are reflected in the preview. Use the text
box to enter the title.
Select the appropriate option to justify the printing to
the long or short dimension of the printed page.
Page 42

40 SECTION 6: ADVANCED ORGANIZER
6.3 BATCH PROCESSING
Images can be rotated. Click the rotateclockwise check box to activate the radio
buttons. Each image in the batch will be rotated
by the specified degree.
Images can be resized. Click the resize check
box to activate the fields. Enter the new width or
height in the text boxes between 90 and 3,500.
The image can also be resized by a percentage
of the original dimensions using the
magnification field. Only one value needs to be
entered, the other values adjust automatically to
keep the image proportions unchanged.
Click the start button to begin processing. The
select-folder dialog box opens.
Multiple images can be rotated and resized at
one time and multiple RAW images can be
converted to JPEG or TIFF files based on
camera settings used during capture. Select the
images to be processed and then select the
batch-processing option from the tools menu.
Select the destination folder from the folder tree.
A new folder can be created with the new-folder
button. Specify the file type from the list box.
Select any available option below it. The
compression rate for JPEG files can be set and
RAW images can be saved as 8-bit or 16-bit TIFF
files.
Click the change-file-name check box to make a
new file name with serial number. Enter the name
and number in the text boxes.
Click the OK button to begin batch processing.
An ICC profile is embedded in the image.
Unchecking the box removes any embedded
profiles.
New-folder button
Master Notes
When resizing images in a batch, the pixel dimensions displayed are based on the first image in
the batch. Any images with a different aspect ratio or orientation are resized to the width
dimension; the height dimension changes to compensate for the proportions. To process image
to approximately the same file size, the images in the batch should all have a horizontal or
vertical orientation.
Page 43

41
Master Notes
During a save operation, if a folder contains files with the same name as the ones being saved,
the confirm operation dialog box opens. Three operations are available:
Overwrite - the old file is replaced with the
new one erasing the original data.
Skip - the file is not saved and the batch
processing continues. The file can be
processed later.
Add serial number - the file serial number is
extended with an extra digit to prevent
overwriting the original file.
The apply check box repeats the selected operation if another file in the batch has a conflicting
file name.
Click the OK button to continue. The cancel button stops the batch processing at that point.
6.4 EDIT USER NOTE
A user note can be added to an image. This note
can be seen on the information thumbnail
display (p. 10), in the information tabs (p. 9), and
printed with an image (p. 30, 32). Exif 2.1 or later
format images can have a user note.
Select the image(s). Choose the edit-user-note
option from the tools menu to open the edit
window. Enter the note and click the OK button
to complete the operation.
Page 44

42 SECTION 6: ADVANCED ORGANIZER
6.5 SLIDE SHOW
The images in the all-images or favorites tab can
be displayed automatically in the order specified
by the sort-by list box.
Click the appropriate tab. Select the slide-show
option from the view menu.
Close button
Classification selector
File name
Reverse to previous image
Forward to next image
Pause / Play
Quit
Play once / Repeat
The slide-show controller can pause, start,
forward, reverse, repeat, and quit the slide show.
When the slide show is paused, the duration
each image is displayed can be specified; the
duration does not include loading time, which
depends on file size.
The favorites selector is active. Images can be
added to or remove from favorites as they are
displayed. For more on favorites, see section 2.8.
To hide the controller, right click (Windows) or
press the control key and click (Macintosh) on
the image and select the option. Press the
escape key on the keyboard to exit the slide
show.
Master Notes
Some commands and functions can be accessed with
the mouse. Right click (Windows) or press the control
key and click (Macintosh) on the thumbnail to display
the options. The menu varies between the Organizer
and Photofinisher as well as operating systems.
Page 45

43
7.0 ADVANCED PHOTOFINISHER
The section covers advanced photofinisher operation including RAW
processing. See section 4 for information on the basic tools and
functions.
7.1 PROCESSING TOOLS
The processing tools available depends if the file type is RAW data or
not. The thumbnails of RAW files are marked with an indicator. Simply
click the tool buttons to open the palette. Rotate is located on the tool
bar, see section 3.3. Flip is located on the tool menu.
Tone curve and histogram (exposure compensation - RAW only), p. 21, 44
White balance (RAW only), p. 50
Sharpness, p. 51
Hue, saturation, and lightness, p. 24
Filter effects (RAW only), p. 51
Color space selection (RAW only), p. 52
Contrast and color balance, p. 22
Imprint data, p. 53
Resize, p. 27
Rotate / Flip, p. 20, 26
Processing
Master Notes
The full version of DiMAGE Master has dust-removal processing for digital SLRs. This processing
uses a reference image to eliminate the affect of dust on the CCD from the captured image.
Page 46

44 SECTION 7: ADVANCED PHOTOFINISHER
Exposure compensation is only available with RAW
images.
7.2 TONE CURVE AND HISTOGRAM
Reset button
Auto-setting button, see section 3.5.
Output shadow and highlight text boxes
Output shadow and highlight sliders
Input shadow, gamma, and highlight sliders
Input shadow, gamma, and highlight text boxes
Histogram
Apply button
White, gray, and black-point buttons
Tone curve
Smooth curve button
Freehand curve button
Channel list box
Color-histogram button
Exposure compensation slider and text box
Close button
Tone-processing list box, see section 3.5.
Master Notes
When processing a RAW image with the
tone curve and histogram palette, exposure
compensation can be adjusted. Use the
slider or enter an Ev value in the text box.
Page 47

45
Place the mouse pointer over the tone curve.
Click and drag the curve.
Each time the tone curve is clicked, a new node
is attached. The nodes can be moved by
clicking and dragging. The input and output
levels of the node are displayed as it is moved.
The input level (horizontal axis) refers to the
original image, and the output level (vertical axis)
refers to the new value in the adjusted image.
Any corrections made on the tone curve are
immediately applied to the displayed image. By
placing the mouse pointer on the image, the
gray or color level of that point is indicated on
the tone curve by a white circle.
Click the arrow next to the channel list box to
select the channel. To make adjustments to the
color balance of the image, select the
appropriate color channel. To adjust the contrast
or brightness of the image without affecting the
color, select the RGB channel.
To draw a tone curve, click the freehand-curve
button. The mouse pointer changes to the pencil
tool when placed in the tone-curve box.
Click and drag the pointer to draw a new curve.
Extreme image manipulations are possible with
the freehand curve tool.
To smooth a rough freehand curve, click the
smooth-curve button. Nodes are automatically
placed on the curve and can be adjusted with
the mouse.
With extreme freehand curves, the smooth curve
button may significantly change the shape of the
curve. The reset button cancels all corrections in
all channels.
Page 48

46 SECTION 7: ADVANCED PHOTOFINISHER
The histogram indicates the distribution of pixels
with specific brightness and color values in the
displayed image. Using the histogram can
maximize the output of the image data. Changes
made with the histogram are also displayed on
the tone curve.
The highlight level, shadow level, and gamma
can be set manually with the sliders under the
histogram. These levels are displayed
numerically to the right of the sliders and can be
changed with the keyboard.
Gamma defines the mid-tones of the image. The
input highlight slider sets the white level. All
pixels to the right of the slider are set to 255 and
any image detail they may contain is lost. The
input shadow slider sets the black level. All
pixels to the left of the slider are set to 0 and
any image detail they may contain is lost.
The black and white output levels can be
adjusted. By moving the output highlight and
shadow sliders, the contrast of the image can be
reduced.
Click the color-histogram button to view the red,
green, and blue histograms. Click the button
again to hide the display.
Input shadow slider
Input gamma slider
Input highlight slider
Output shadow slider
Output highlight slider
The tone curve is a graphic representation of the brightness and
color levels of the image. The bottom axis is the 256 levels of the
original image (input data) from black to white. The vertical axis is
the corrected image (output data) with the same scale from top
to bottom.
The bottom left portion of the graph represents the dark colors
and shadow areas of the image. The middle section represents
the mid-tones: skin, grass, blue sky. The top right section is the
highlights: clouds, lights. Changing the tone curve can affect the
brightness, contrast, and color of the image.
7.3 TONE-CURVE PROCESSING GUIDE
Input
Output
Highlights
Mid-tones
Shadows
Page 49

47
By selecting individual color channels on the tone
curve, adjustments to the overall color of an
image can be made. This can be used to eliminate
unnatural color casts or add warmth to an image.
If the image is too red, green, or blue, simply drag
the corresponding color-channel curve down until
the color appears natural. If the color cast is
predominantly one of the secondary colors, cyan,
magenta, or yellow, move the curve of the
complementary color up. For example, if the
image is too yellow, move the blue curve up. For
more on color, see section 3.7.
Correcting color
Changing brightness
This is a simple technique to make an image
brighter.
With the RGB channel selected, place the
smooth-curve cursor on the center of the curve.
Click and drag the curve up. Look at the displayed
image to judge the result. The adjustment can be
very small and still have a significant impact on
the image. Moving the tone curve down makes
the image darker.
The contrast of an image can be changed. The
45° line on the tone-curve graph represents the
original contrast of the image. Making the angle of
the tone curve greater than 45° increases the
contrast. Making the angle less than 45° reduces
contrast.
With the RGB channel selected, click on the tone
curve near the top and bottom to add two nodes.
Slightly move the top node up and the bottom
node down. This increases the angle of the
central portion of the tone curve and increase the
contrast of the image without making an overall
change in image brightness.
Increasing contrast
Page 50

48 SECTION 7: ADVANCED PHOTOFINISHER
This guide shows simple corrections that can be
made with a histogram. Unlike the tone curve,
the histogram provides information on a specific
image. This can used to evaluate the image and
make adjustments accordingly.
The pixel distribution in the histogram shows the
entire tonal range of the image is not used.
There is an absence pixels in the highlights.
By moving the highlight slider to the left to set
the white level to where the pixel distribution
begins, image contrast is improved.
The gamma slider can be used to change the relative distribution of the tones in the image. By
moving the gamma slider to the left toward the shadows, the image becomes lighter. By moving the
gamma slider in the opposite direction, the image becomes darker.
7.4 HISTOGRAM PROCESSING GUIDE
Page 51

49
On the tone-curve / histogram palette,
corrections can be made by specifying a white,
black, and gray point within the image. When a
dropper tool is placed over the image, the RGB
display and tone curve show the value of that
point. All changes are immediately reflected in
the displayed image.
Click and hold the apply button to show the
change on the histogram. To change the white
and black point value, see the following section.
Click the reset button to cancel the processing.
7.5 WHITE, BLACK, & GRAY-POINT PROCESSING
Click the white-point button; the mouse pointer
changes to the white dropper tool.
With the dropper tool, click on the brightest
neutral area of the image to define it as the white
point. The values of the image are adjusted
based on the selected point. The default level for
the white point is 255 for each RGB channel.
Click the black-point button.
With the dropper tool, click on the darkest
neutral area of the image to define it as the black
point. The values of the image are adjusted
based on the selected point. The default level for
the black point is 0 for each RGB channel.
Click the gray-point button. The gray point
controls the color of the image.
With the dropper tool, click a neutral area of the
image to be defined as the gray point. The area
used to calibrate the gray point must be neutral.
The brightness level of the area is not important,
but if the area has a definite color, the color is
not balanced correctly.
Sampled point
RGB display
Page 52

50 SECTION 7: ADVANCED PHOTOFINISHER
The white and black-point values are set to 255 and 0 for each RGB level. Changing these values
allow the calibration of an image with no true white or black. This is an advanced image-processing
tool.
7.5.1 WHITE AND BLACK-POINT VALUES
Double-click on either the white-point or blackpoint button to activate the point-value-setting
dialog box.
Input the new white-point or black-point values.
Click the OK button.
With the point-value-setting dialog box open, the
mouse pointer can be used to measure the color
of any point on the displayed image.
Calibrate the image following the steps in
section 7.5: white, black, and gray point
processing.
7.6 WHITE BALANCE (RAW ONLY)
White balance controls the overall color of the
image. Adjust white balance before using the
filter-effects palette so that image color can be
judged accurately.
The list box automatically applies the camera
white-balance setting used when the image was
captured or balances it to a specific light source.
The Auto Precision Analysis option automatically
adjusts white balance.
Master Notes
The full version of DiMAGE Master allows white balance to be calibrated with color temperature
and CC index data collected with a color meter or using sampled neutral areas directly from the
RAW image.
Page 53

51
7.7 SHARPNESS
Basic sharpness processing can be applied to an
image. Move the contrast slider among the soft,
normal, and hard positions to change the degree of
sharpness. Move the slider to the left most position in
order to not apply any sharpness processing.
The affect of sharpness can be seen in the sample
image. Click and drag on the sample to scroll it. Click
the image-display-area-preview check box to see the
affect in the Photofinisher display.
7.8 FILTER EFFECTS (RAW ONLY)
Filter effects specifies if the RAW image is to be
color or black and white. The overall color of the
image can be adjusted.
There are two sets of color slider: LB (Light
Balancing) filter and CC (Color Compensating)
filter controls. The LB filter scale is calibrated in
mired. The CC filter sliders are for red/cyan,
green/magenta, and blue/yellow adjustments.
CC refers to optical density. 30CC has an optical
density of 0.3 or 1.0Ev.
Click the check box at the bottom of the palette
to convert the RAW data to black and white.
Master Notes
The full version of DiMAGE Master allows sharpening with an unsharp mask for all image data as
well as spatial frequency filtering for RAW images.
Master Notes
The full version of DiMAGE Master can create
toned black and white images as well as
apply contrast filters to the black and white
RAW data.
Page 54

52 SECTION 7: ADVANCED PHOTOFINISHER
7.9 COLOR SPACE SELECTION (RAW ONLY)
Color space selection specifies the target color
space for the RAW image when it is saved.
Select the color space from the list box.
Ten standard color spaces are available. The
camera-settings option employs the color space
defined by the camera’s color mode; see the
camera’s instruction manual.
To use a specific profile, select the use-ICCprofile option from the list box; the operating
system’s open dialog box opens. Locate and
open the profile; the profile name is displayed in
the color-space-selection dialog box.
Master Notes
sRGB - multi-media and internet standard.
Adobe RGB - graphic arts standard.
PRO Photo RGB - a Kodak standard.
Apple RGB - Apple display standard.
CIE RGB - specialized color space.
ColorMatch RGB - prepress standard.
NTSC - Japanese television standard.
PAL/SECAM - European television standard.
SMPTE-C - U.S. television standard.
Wide-gamut RGB - specialized color space.
Page 55

53
The date and time of recording, file name, and
user note can be imprinted into the image. To
add a user note to an image, see section 6.4.
Select the information to be imprinted by
checking the appropriate boxes.
Click the appropriate position button to select
the corner to imprint the data. If the within-areamarquee check box is selected, the data
appears inside the area marquee in the position
selected. For more about the area marquee, see
section 7.11.
The font-setup and font-color button allow the
attributes of the imprinted text to be specified.
See the Master notes on page 33 for more
information.
The relative size of the imprinted data varies with
image size. To cancel the imprinting function,
click the reset button.
When the file is saved, the data is embedded
into the image. Always rename the file to protect
the original image data. RAW data cannot be
saved as 16-bit TIFF files.
7.10 IMPRINT DATA
Page 56

54 SECTION 7: ADVANCED PHOTOFINISHER
7.11 AREA MARQUEE
When the print-selected-area option is chosen, the print dialog box opens.
The selected area is seen in the preview display. See section 4 on how to
make print settings.
When the save-selected-area option is chosen, the save-as dialog box
opens. Enter the file name for the selected area, choose the file format,
specify the location to which to save the file, and save the image, see
section 3.14.
An area of an image can be selected and saved as a separate image file or printed. The marquee
can also be used to specify the area used for data imprinting (p. 53). Click on the area-marquee
button on the tool bar or select the area marquee from the cursor option of the tools menu.
Area-marquee button
Click and drag over the area of the image to be selected. The areamarquee tool creates a rectangle with a dashed border. The marquee can
be moved by placing the cursor within the area and clicking and dragging.
It can be resized by clicking and dragging on the borders.
Select the save-selected-area option or the print-selected-area option from
the file menu.
Master Notes
The copy-selected-area option on the edit menu, copies the data in the
area marquee to the clipboard so it can be pasted in another
application.
Page 57

55
7.12 SNAPSHOT
Image corrections can be stored temporarily as a thumbnail next to the displayed image. To open
the snapshot display area, select the show-snapshots option from the view menu. Simply click the
snapshot button on the tool bar or select the snapshot option from the tools menu to create a
thumbnail with the current image processing.
To return to previous image-processing settings,
click on the corresponding snapshot. The
processing is applied to the displayed image. Up
to 10 snapshots can be made depending on the
computer memory available.
To delete a snapshot, click on the thumbnail and
select the delete-thumbnail option from the tool
menu or press the keyboard delete key.
Snapshots can be printed, see the following
section.
Snapshot display areaSnapshot button
Page 58

56 SECTION 7: ADVANCED PHOTOFINISHER
7.12.1 PRINT SNAPSHOTS
The current snapshots can be printed. Select the print-snapshots option
from the file menu to open the print-snapshots dialog box.
Select the layout of the images per page from
the list box.
The snapshot pane shows the current
snapshots. Uncheck the check boxes to
remove them from the printing job.
Page 59

57
Print preview displays the images as well as
the print options for file name and snapshot
number.
Snapshot number.
File name. Selected with options.
Page / total number of pages - click the left/right buttons to show the next or previous page.
To print the snapshots. The
operating system’s print dialog
box opens before the
document is sent to the printer;
this screen varies with the
operating system and printer.
Select the appropriate options from the print-snapshots dialog box. Click the print button to start
printing or the cancel button to close the window.
To access the dialog box for
the printer. This screen varies
with the operating system and
printer.
To select the information printed with the
snapshots. Changes are reflected in the
preview.
Page 60

58 SECTION 8: COLOR PREFERENCES
Specific monitor and printer ICC profiles can be used with DiMAGE
Master Lite. Select the color-preferences option from the file menu
(Windows) or DiMAGE Master Lite menu (Macintosh) to open the dialog
box.
In the color-preferences dialog box, click the printerICC-profile-name check box. Click on the load button
to display the open window.
8.0 COLOR PREFERENCES
8.1 USING MONITOR ICC PROFILES
8.2 USING PRINTER ICC PROFILES
Locate the ICC profile for the specific device. CMY or
CMYK printer profiles cannot be used with DiMAGE
Master Lite. Click the open button to complete the
operation.
The computer system’s monitor ICC profiles can be
used with DiMAGE Master Lite. Select the colorpreferences option from the file menu to open the
dialog box. In the dialog box, click the monitor-ICCprofile-name check box.
If the monitor ICC profile field is gray, the monitor
profile has not been specified with the operating
system. Refer to your operating system’s manual or
help on how to install monitor ICC profiles. For locations for specific profiles, see section 9.2.
Generic monitor profiles are supplied with DiMAGE Master Lite: Std_Monitor.icc for average
monitors, sRGB_Monitor.icc for Windows sRGB monitors, and Apple_RGB_Monitor.icc for Apple
monitors. See Master notes below for the profile location.
When loaded correctly, the profile name is displayed.
The profile can be temporarily disabled by clicking on
the printer-ICC-profile-name check box.
Page 61

59
sRGB_Printer.icc
Std_ColorLBP.icc
Std_DyeSublimation.icc
Std_InkJet.icc
Std_SilverHalide.icc
For printers which use sRGB color space.
For color laser printers.
For dye-sublimation printers.
For inkjet printers.
For silver-halide dye-transfer printers.
Generic printer profiles are supplied with DiMAGE Master Lite. See Master notes below for the
profile location.
The following printer profiles are for use with Konica Minolta Inkjet Paper Professional Inkjet Photo
Glossy Paper (North and Latin America) or Konica Minolta Inkjet Paper QP Professional Photo Paper
Glossy (all other regions):
CA_i960_QP_SBG1.icc
CA_960i_QP_SBG1.icc
CA_990i_QP_SBG1.icc
CA_9900i_QP_SBG1.icc
For Canon i960 model printers.
For Canon 960i model printers.
For Canon 990i model printers.
For Canon 9900i / 9950i model printers.
EP_4000PX_QP_SBG1.icc
CA_i990_QP_SBG1.icc
CA_i9900_QP_SBG1.icc
EP_2100_QP_SBG1.icc
For Epson PM-4000PX model printers.
For Canon i990 model printers.
For Canon i9900 / i9950 model printers.
For Epson Stylus Photo 2100 / 2200 model printers.
HP_5850_QP_SBG1.icc
EP_G800_QP_SBG1.icc
EP_G900_QP_SBG1.icc
EP_R800_QP_SBG1.icc
For HP Deskjet 5850 model printers.
For Epson PM-G800 model printers.
For Epson PX-G900 model printers.
For Epson Stylus Photo R800 model printers.
The following settings need to be made in the printer setup dialog box, which can be accessed
from the print dialog box:
For Canon models: set media type to “Photo paper pro,” color adjustment to “manual,” and print
type to “none.”
For Epson models: in the advanced options, set paper & quality option to “premium glossy photo
paper,” color management to “ICM,” and ICC/ICM profiles to “off.”
For HP models: set paper type to “hp premium plus photo paper, glossy,” print quality to “Best,”
and hp digital photography contrast enhancement and digital flash to “off.”
For more information or ICC profiles for other printers, visit us at:
http://konicaminolta.com/products/consumer/inkjet
Master Notes
The Konica Minolta monitor profile and printer profile folders containing the supplied ICC profiles
are in the following locations:
Windows XP: [Windows] > [System32] > [Spool] > [Drivers] > [Color] > [KonicaMinolta]
Windows 2000: [WINNT] > [System32] > [Spool] > [Drivers] > [Color] > [KonicaMinolta]
Windows 98, 98SE, Me: [Windows] > [System] > [Color] > [KonicaMinolta]
Mac OS X: [Library] > [ColorSync] > [Profiles] > [KonicaMinolta]
CA_iP7100_QP_SB1.icc
CA_iP8600_QP_SB1.icc
For Canon iP7100 model printers.
For Canon iP8600 model printers.
EP_G5000_QP_SBG1.icc For Epson PX-G5000 model printers.
EP_G820_QP_SBG1.icc For Epson PM-G820 model printers.
EP_G920_QP_SBG1.icc For Epson PX-G920 model printers.
Page 62

60 SECTION 9: APPENDIX
9.0 APPENDIX
Library ColorSync Profiles KonicaMinolta
Windows
Uninstall DiMAGE Master Lite using the add/remove programs or add/remove applications (XP)
routine in the control panel. Afterwards, place the KonicaMinolta folder in the trash and empty it to
complete the operation.
In Windows 2000 Professional and XP, the folder is located in:
[Documents and Settings] > [Logon user] > [Application Data] > [KonicaMinolta].
In Windows 98, 98SE, and Me, the folder is located in:
[Windows] > [Application Data] > [KonicaMinolta].
Macintosh
As well as the DiMAGE Master Lite application folder, the following files and folders should also be
deleted:
Users
Logon name Library Preferences
Delete
9.1 UNINSTALLING DIMAGE MASTER LITE
DiMAGE Master Lite
com.konicaminolta.dimagemasterlite.plist
9.2 ICC PROFILE LOCATIONS
ICC profiles can be found in the following locations:
Windows XP: [Windows] > [System32] > [Spool] > [Drivers] > [Color]
Windows 2000: [WINNT] > [System32] > [Spool] > [Drivers] > [Color]
Windows 98, 98SE, Me: [Windows] > [System] > [Color]
Mac OS X: [Library] > [ColorSync] > [Profiles]
ICC profiles for a specific monitors or printers are available from the manufacturer. These may be
downloaded from the manufacturer’s web site. See the instruction manual of the specific device on
how to install the ICC profile.
Konica Minolta is a trademark of Konica Minolta Holdings, Inc. DiMAGE is a trademark of Konica
Minolta Photo Imaging, Inc. Microsoft and Windows are registered trademarks in the United States
and other countries of Microsoft Corporation. The official name of Windows is Microsoft Windows
Operating System. Pentium is a registered trademark of Intel Corporation. Apple, Macintosh, Power
Macintosh, and Mac OS are registered trademarks of Apple Computer, Inc. All other brand and
product names are trademarks or registered trademarks of their respective owners.
Page 63

Become a member of Konica Minolta Photo World today, free of
charge, and enter the fascinating world of Konica Minolta photography.
The ultimate gateway to knowledge for photo-fans:
www.KonicaMinoltaPhotoworld.com
Register now, save 29.99 EUR, get DiMAGE Messenger for free!
Picture: Konica Minolta Photoworld Member Professor Claes Magnusson/Sweden
Page 64

62
© 2005 Konica Minolta Photo Imaging, Inc.
Under the Berne Convention and Universal Copyright Convention.
9224-7319-11/12984
Printed in Japan
Konica Minolta Customer Support:
www.konicaminoltasupport.com
Konica Minolta Photo World:
www.konicaminoltaphotoworld.com
Become a member of the Konica Minolta Photo World today.
It is free for registered customers of Konica Minolta.
Register now, save 29.99 EUR, get DiMAGE Messenger for free!
 Loading...