

Kohler K-98740 Installation And Care Manual
Installation and Care Guide
Overhead Rain Panel
K-98740
Français, page ″Français-1″
Español, página ″Español-1″
1207715-2-B
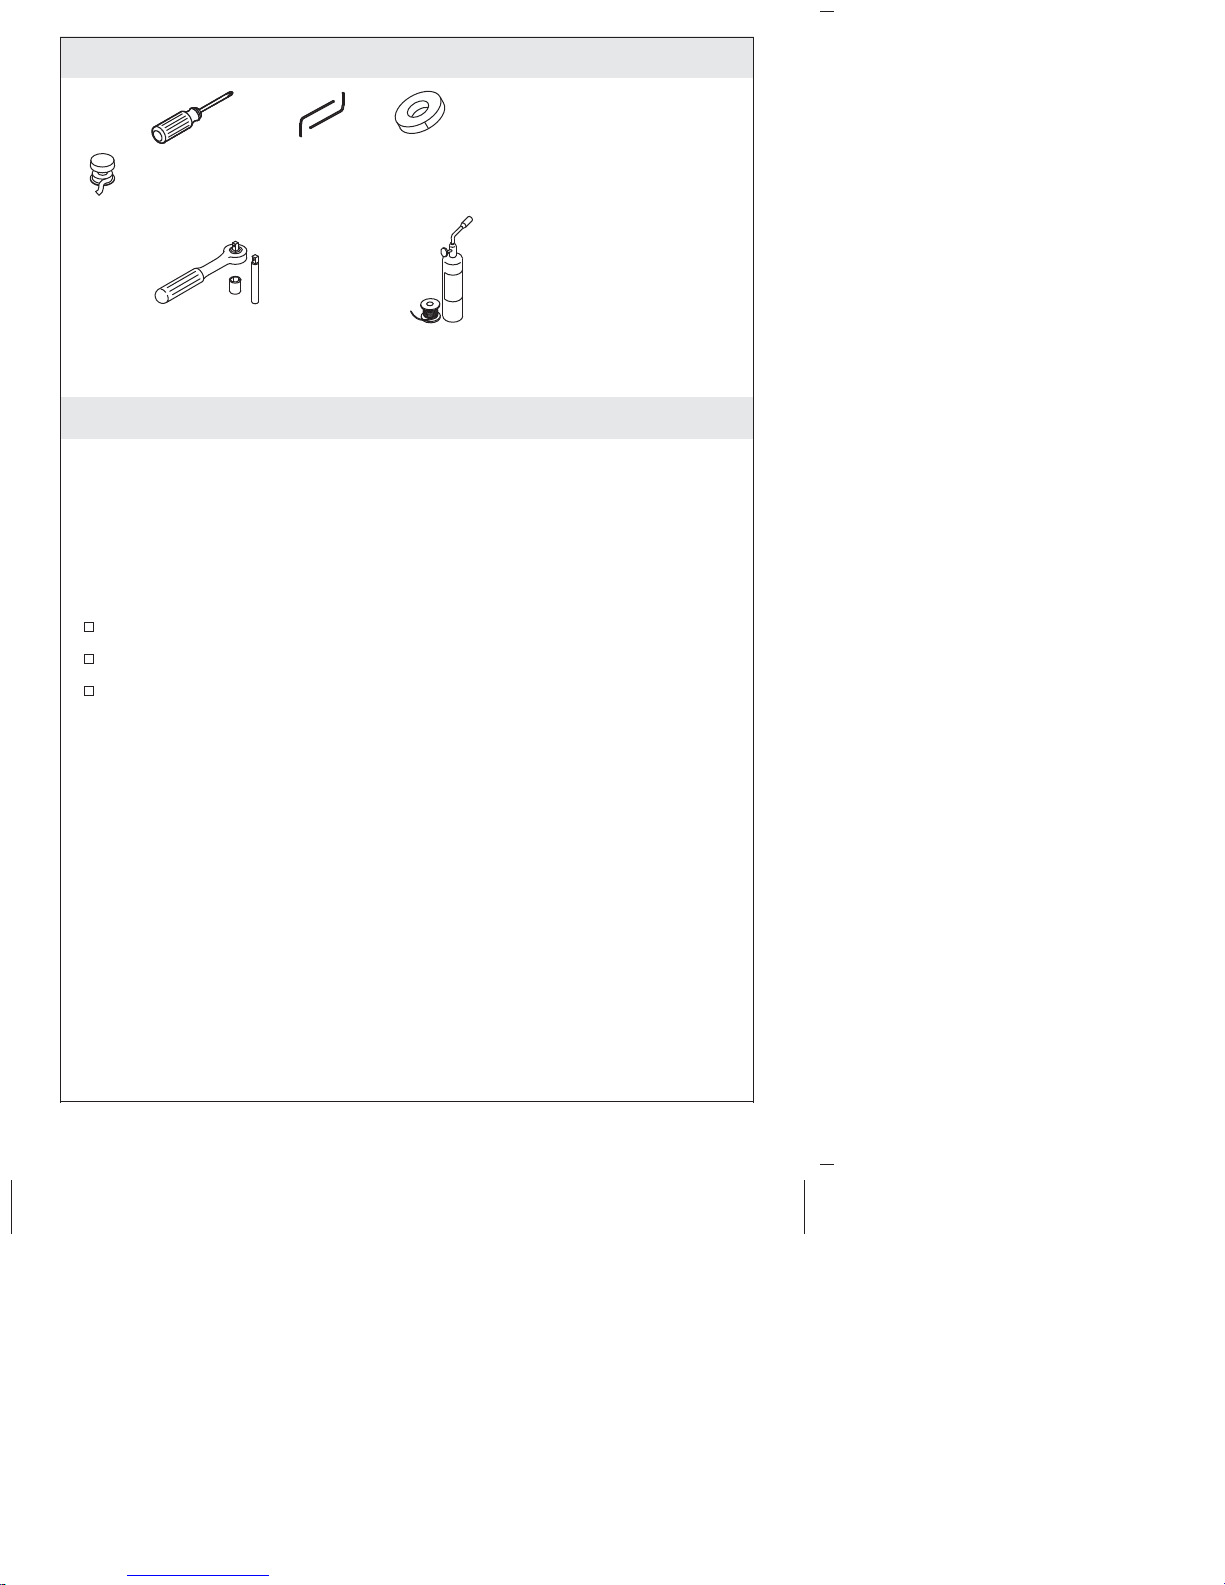
Tools
Phillips
Screwdriver
Sealant
Tape
5/64" & 5/32"
Hex Wrenches
Masking
Tape
Plus:
Note: All nipples and fittings
are 1/2" NPT
• Close or 1-1/2" nipple
• Female fittings
• 1/2" copper tubing
• 2x2's and 2x4's
• Conventional woodworking
tools and materials
Socket Wrench with 11 mm or
7/16" Socket and Extension
Soldering Supplies
Important Information
NOTICE: Choose an automatic compensating valve with the
appropriate minimum flow rate to assure your valve will provide
safety at the lowest flow rates.
•
For a showerhead rated at 2.5 gal/min (9.5 l/min) maximum, use
with an automatic compensating valve rated at 2.0 gal/min (7.6
l/min) or less.
Observe all local plumbing and building codes.
Inspect the supply piping for damage. Replace as necessary.
For service parts information, visit your product page at
www.kohler.com/serviceparts.
1207715-2-B 2 Kohler Co.
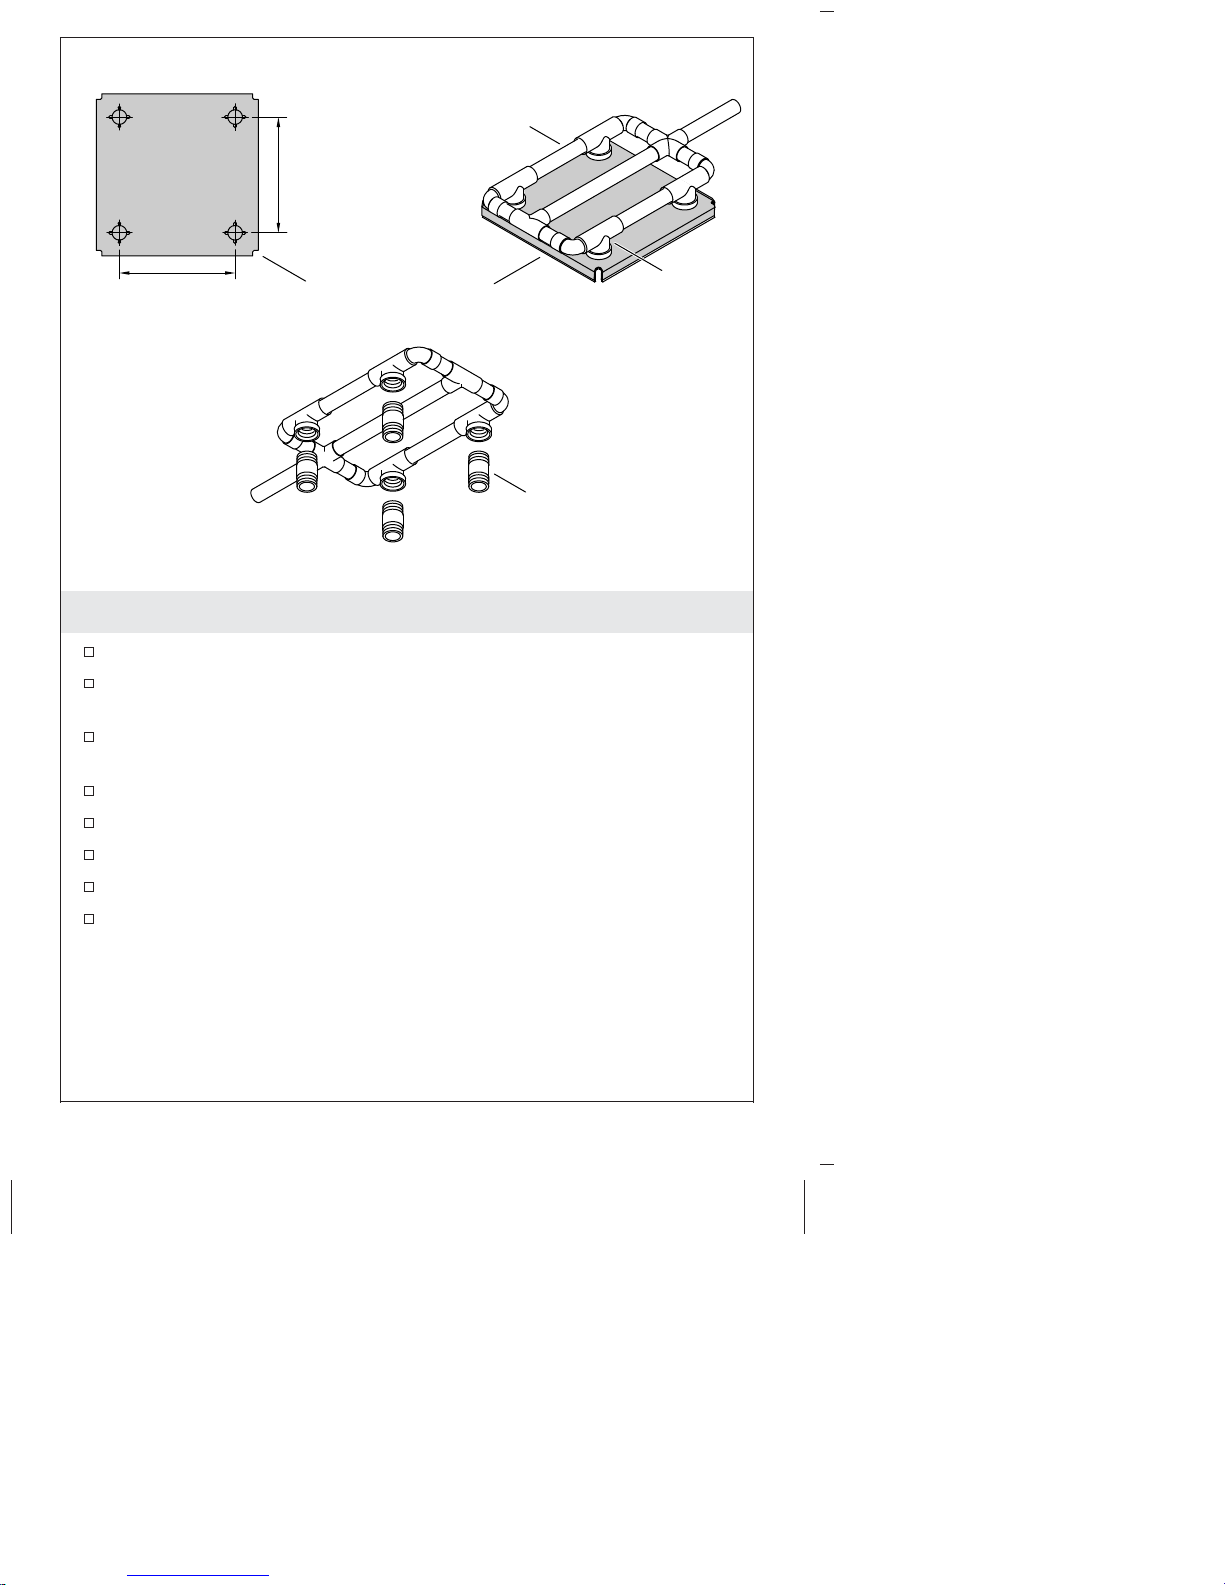
5"
(127 mm)
Pressure
Balancing Loop
5" (127 mm)
Soldering Template
1/2" NPT Nipple
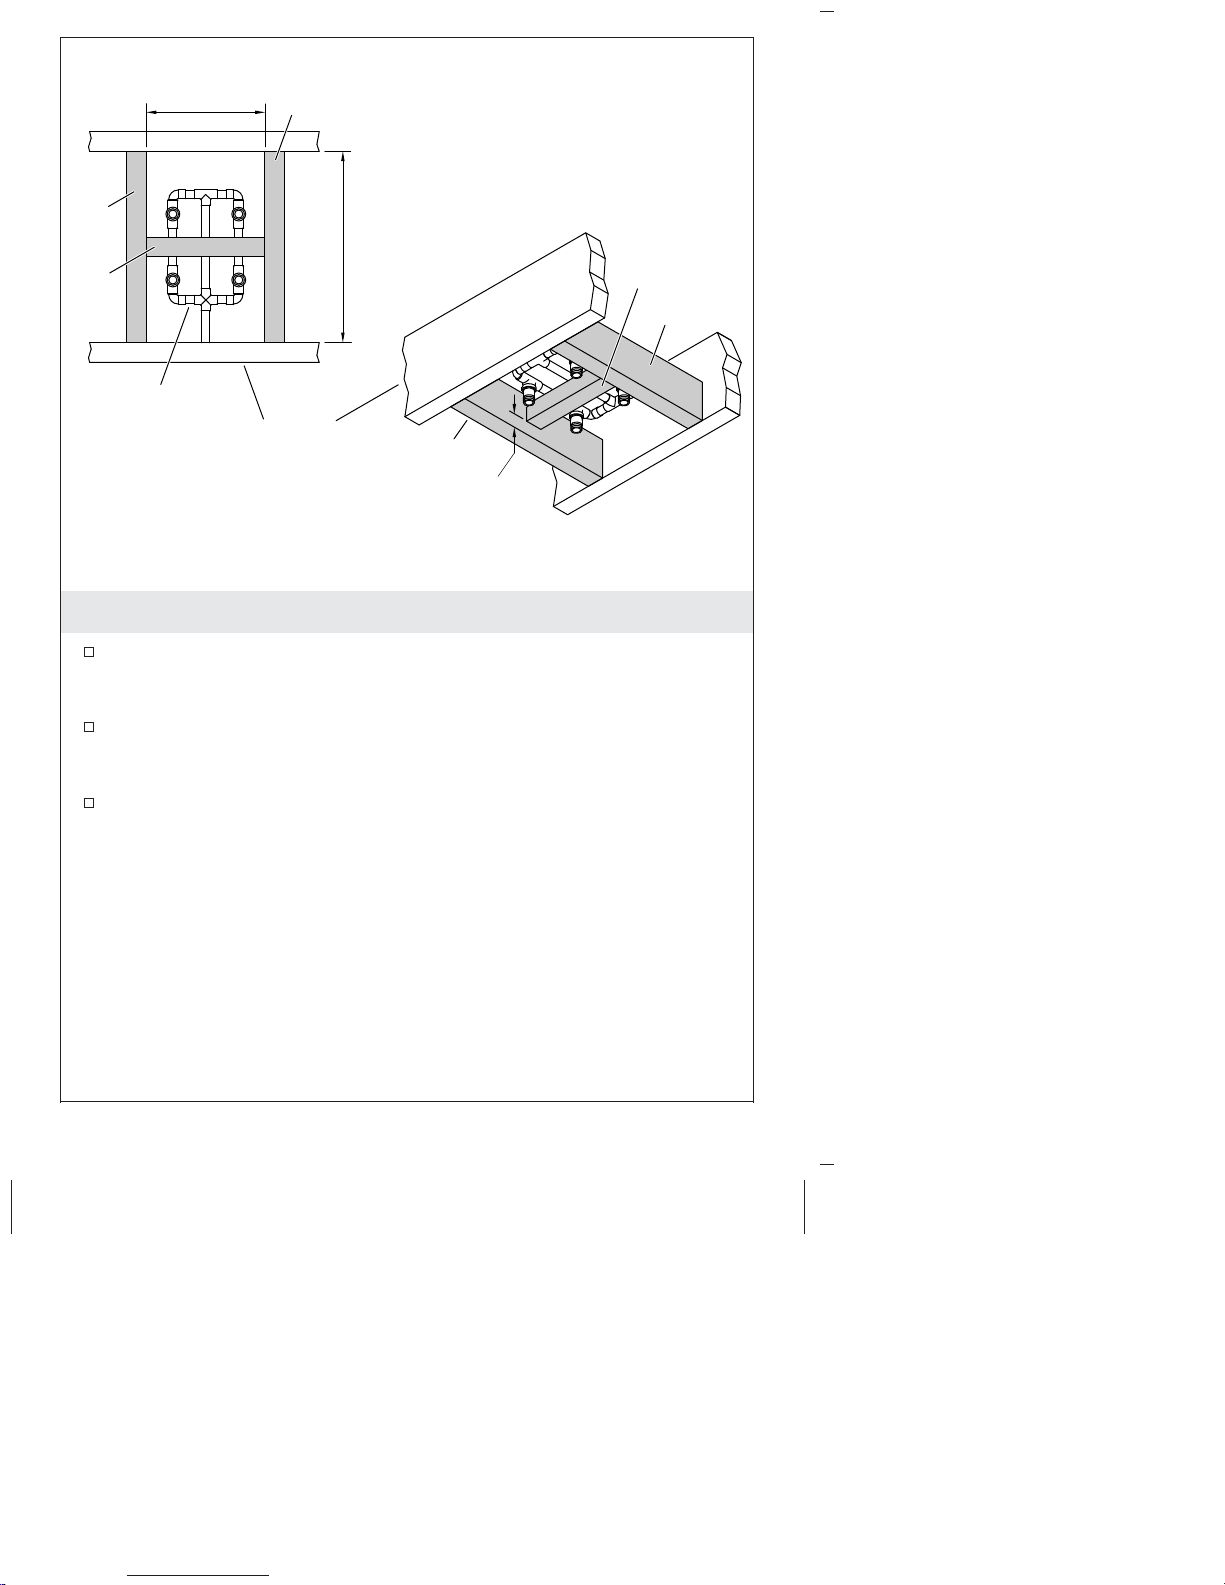
1. Install the Supply Piping – Single Supply
Route the water supply lines.
Use the provided soldering template to construct a pressure
balancing loop.
Position tees in the loop over each of the four raised locations on
the template.
Solder the assembly while it is attached to the template.
Remove the pressure balancing loop from the template.
Connect the pressure balancing loop to the water supply.
Do not strap the pipes.
Temporarily install a nipple to each tee. Do not use any sealant.
Tee
Kohler Co. 3 1207715-2-B
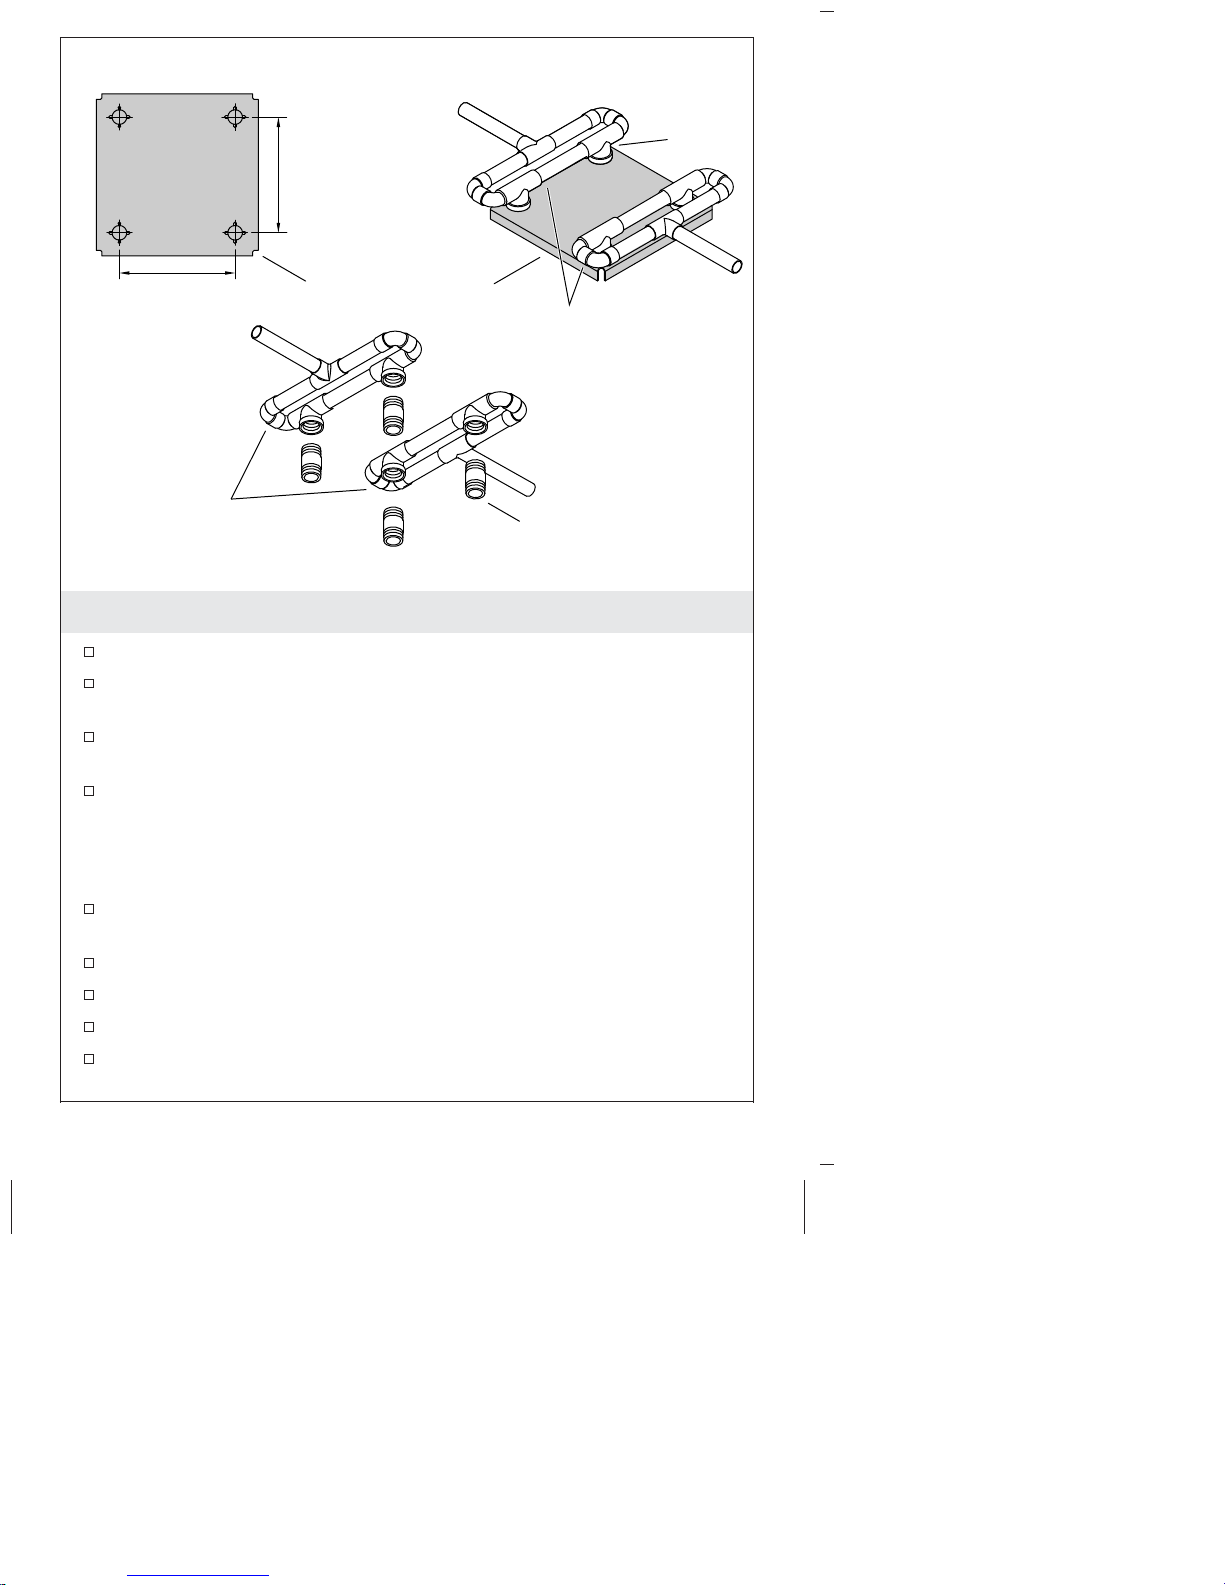
5"
(127 mm)
Tee
5" (127 mm)
Soldering Template
Rigidly connect
the loops to each
other while on the
template.
Pressure
Balancing
Loops
1/2" NPT Nipple
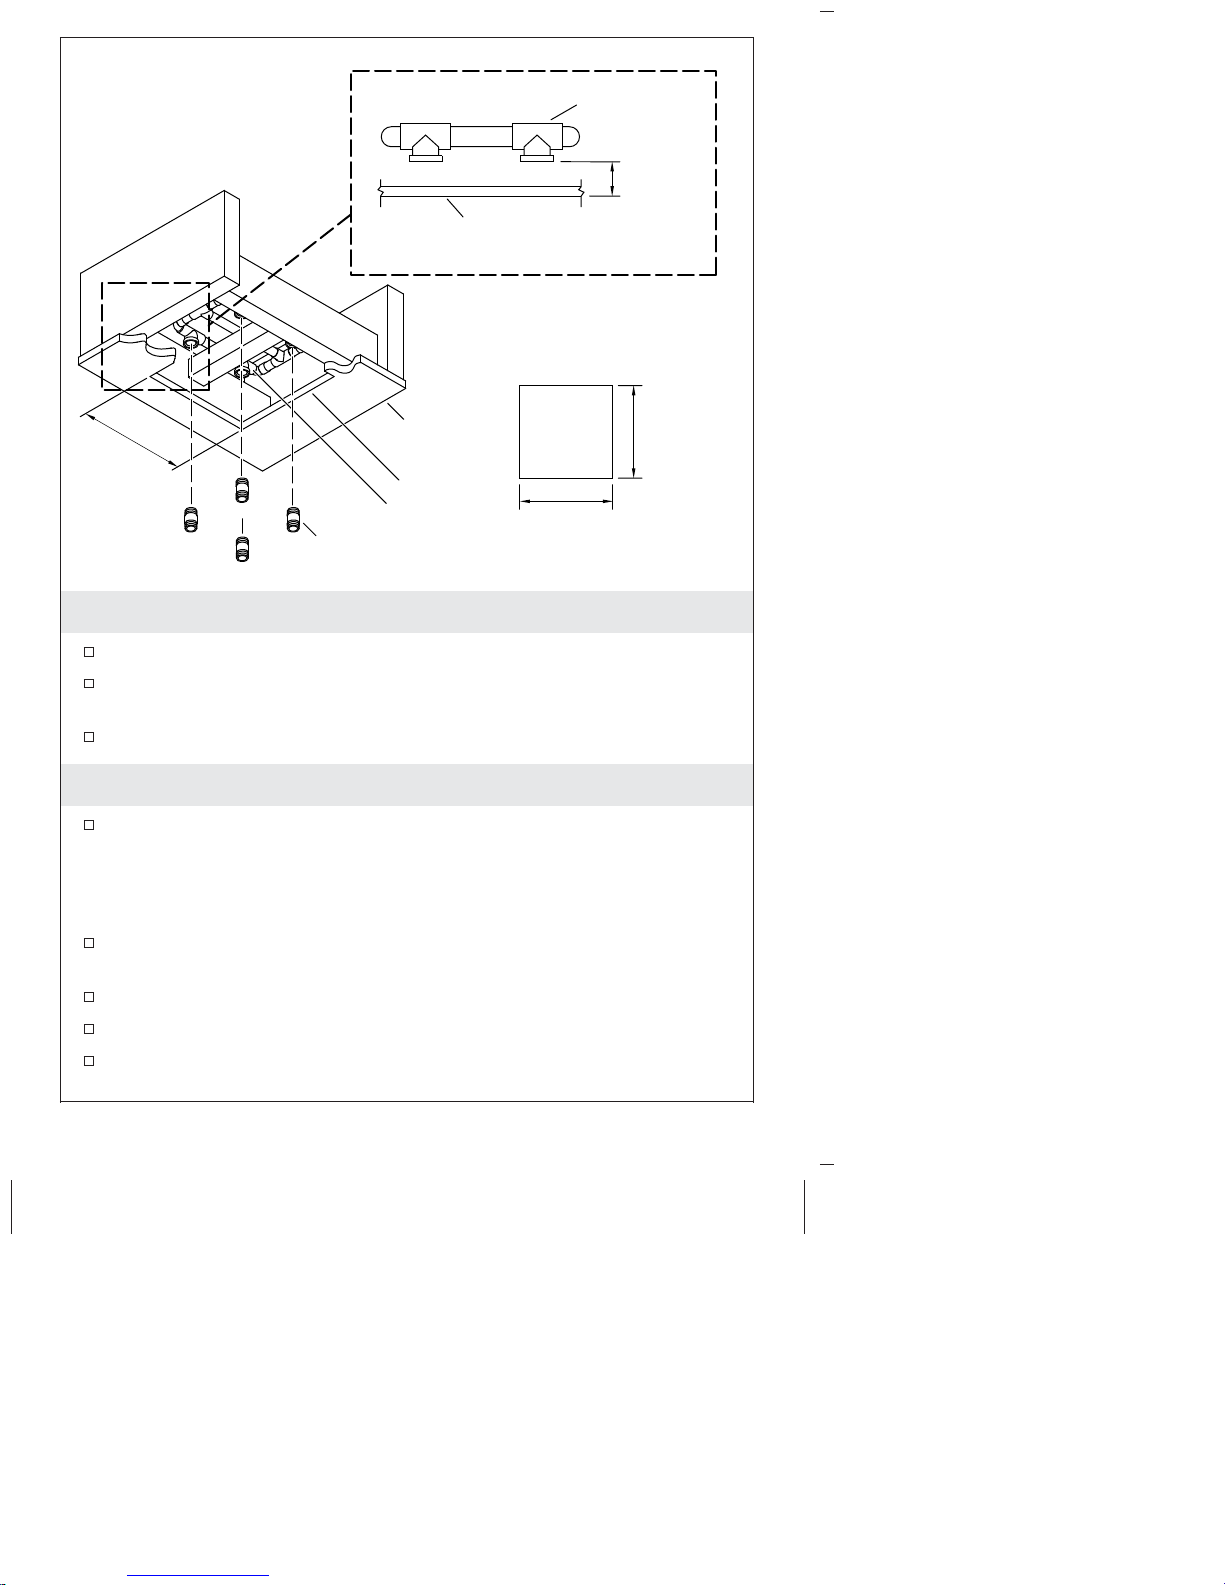
2. Install the Supply Piping – Multiple Supplies
Route the water supply lines.
Use the provided soldering template to construct the pressure
balancing loops.
Position tees in the loops over each of the four raised locations on
the template.
Solder the assembly while it is attached to the template.
IMPORTANT! To ensure proper alignment of the tees with the
product, the two pressure balancing loops must be rigidly connected
to each other while on the soldering template.
While still on the soldering template, rigidly connect the two
pressure balancing loops to each other.
Remove the pressure balancing loop assembly from the template.
Connect the pressure balancing loops to the water supplies.
Do not strap the pipes.
Temporarily install a nipple to each tee. Do not use any sealant.
1207715-2-B 4 Kohler Co.
9" (229 mm)
2x4
2x4
14-1/2"
(368 mm)
Typical
2x2
Pressure
Balancing
Loop
Ceiling
Joist
2x4
1-3/16"
(30 mm)
3. Install the Support Framing
Construct the support framing as illustrated. The 2x2 should be
offset 1-3/16″ (30 mm) from the bottom edge of the 2x4s to
support the pressure balancing loop at the proper depth.
Install the support framing under the pressure balancing loop(s).
The bottom of the 2x4s should be flush with the bottom of the
ceiling joists.
Do not strap the pipes.
2x2
2x4
Kohler Co. 5 1207715-2-B
Tee
Finished Ceiling
Cutout
9"
(229 mm) 9-1/4"
(235 mm)
Nipple
Finished
Ceiling
Cutout
Tee
9" (229 mm) 9-1/4" (235 mm)
4. Install the Finished Ceiling
Install the water-resistant wall board.
Cut out a 9″ (229 mm) to 9-1/4″ (235 mm) square at the desired
installation location.
Install the finished wall material.
2-1/4"
(57 mm)
Min
9"
(229 mm) 9-1/4"
(235 mm)
5. Install the Pipe Nipple
Remove the nipples.
NOTE: The minimum distance between the face of the tees/elbows
and the surface of the finished ceiling should be 2-1/4″ (57 mm).
The measurement for typical installations is 2-3/4″ (70 mm).
Measure the distance from the face of the tees/elbows to the
surface of the finished ceiling. Make any adjustments as needed.
If your measurement is 2-1/4″ (57 mm): Use close pipe nipples.
If your measurement is 2-3/4″ (70 mm): Use 1-1/2″ pipe nipples.
Thread the nipple into the tee/elbow and hand tighten.
1207715-2-B 6 Kohler Co.
Install the Pipe Nipple (cont.)
Measure the distance from the end of the nipples to the surface of
the finished ceiling. Verify that the distance is at least 1-1/2″ (38
mm) and no more than 1-3/4″ (44 mm).
Remove the nipples.
Apply thread sealant to the threads of the nipples.
Reinstall the nipples to the tees/elbows.
Run water through the system to flush out any dirt or debris.
Kohler Co. 7 1207715-2-B

Leak Shield
Escutcheon
Adapter
Socket Wrench
With Bit
Extension
Waterway
Screw
6. Install the Waterway
Insert the escutcheon into the opening.
If any of the leak shields makes contact with an elbow: Enlarge
the hole in the back of the leak shield to 1-1/4″ (32 mm).
Thread the adapter onto the nipple using the provided 11 mm bit,
11 mm or 7/16″ socket, extension and socket wrench. Use
masking tape to hold the bit in place, as the bit could fall off and
cause damage.
IMPORTANT! The escutcheon should sit loosely at this point. If it
is tight against the wall, use a longer pipe nipple.
Align the groove in the waterway with the double ribs on the
leak shield.
Press the waterway into place over the adapter. Secure the
waterway to the adapter with the screw provided.
Verify that the escutcheon does not turn or shift.
IMPORTANT! If the escutcheon is still loose after this step, use a
shorter pipe nipple.
1207715-2-B 8 Kohler Co.

Install the Waterway (cont.)
Repeat for the remaining waterways.
Kohler Co. 9 1207715-2-B

Escutcheon
Waterway
Ribs
Groove
Sprayhead
Hex Screws
Nozzle Membrane
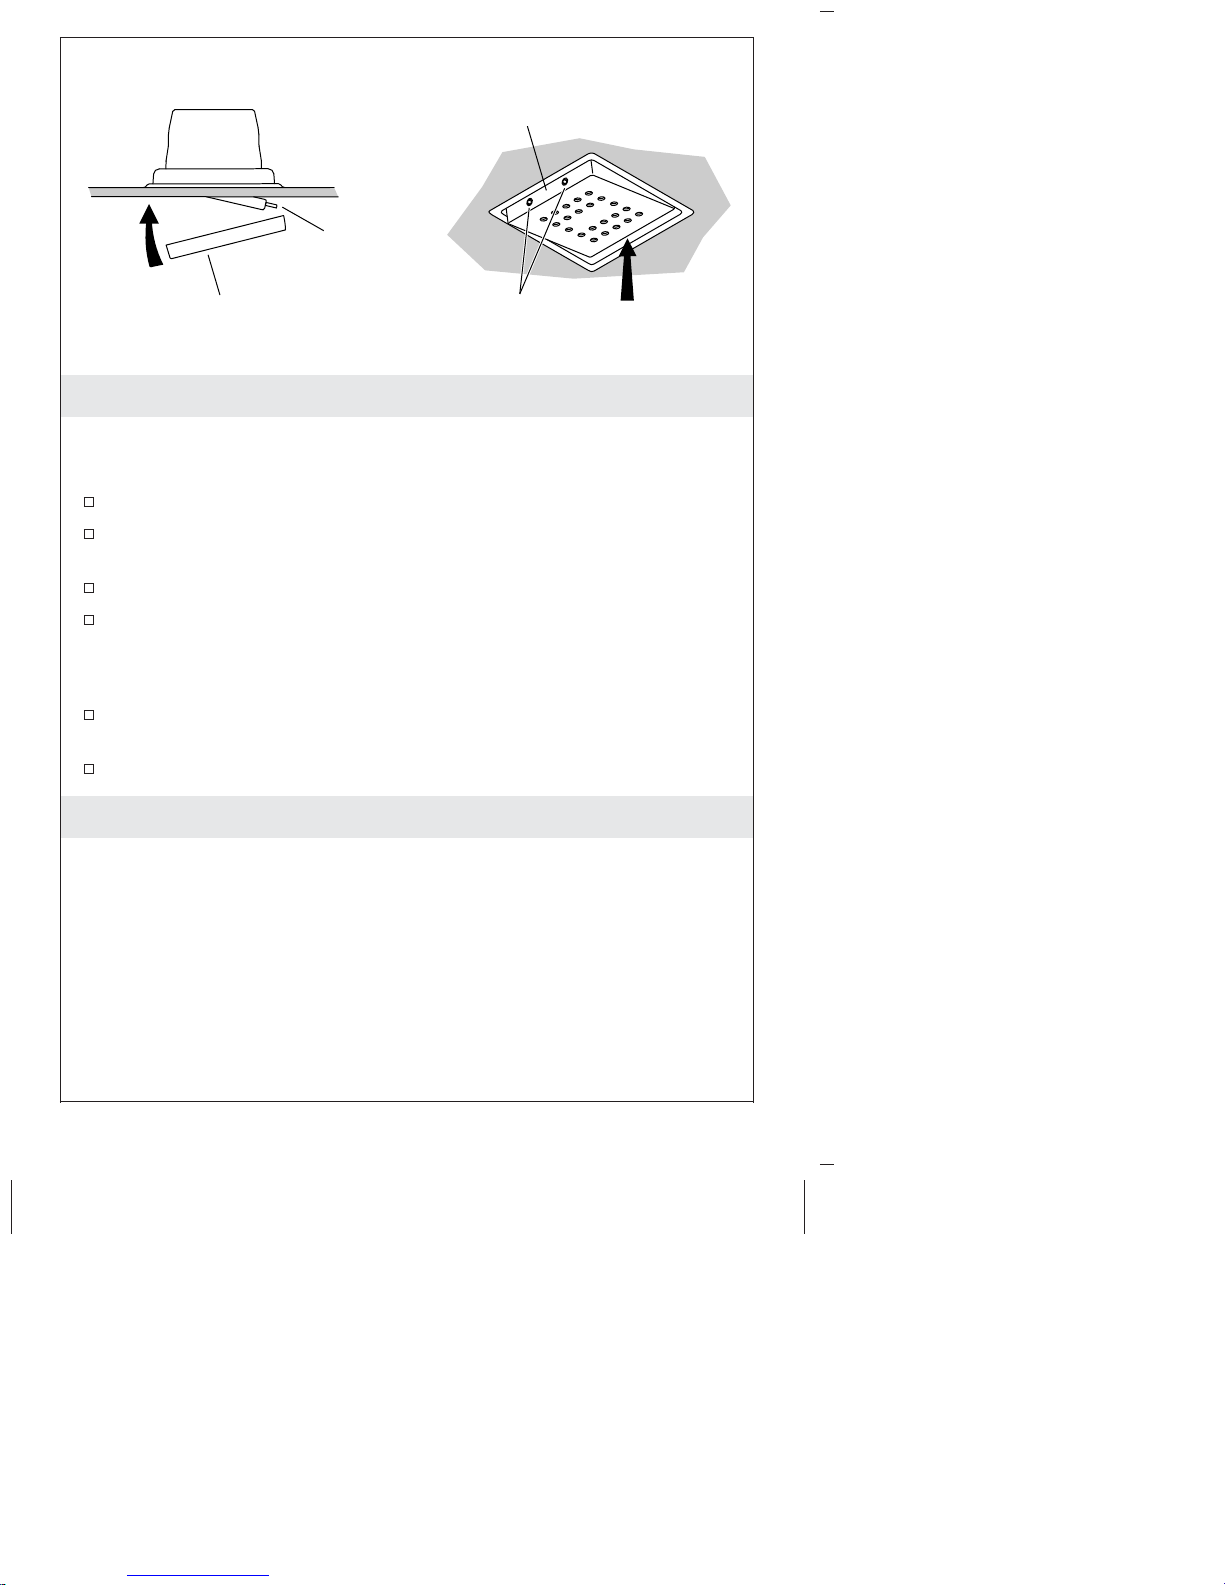
7. Install the Sprayhead
Using a 5/32″ hex wrench, secure the sprayhead to the waterway
with the two hex screws. Do not overtighten.
Verify that the sprayhead sits squarely within the escutcheon and
tilts freely up and down.
Place the nozzle membrane over the sprayhead, aligning the long
edge of the membrane with the ribs.
NOTE: For optimum performance, ensure that the membrane is
applied evenly.
Applying pressure evenly, press the membrane seal into the
sprayhead groove.
1207715-2-B 10 Kohler Co.
Ribs
Sprayface
Sprayface
Setscrews
8. Install the Sprayface
NOTE: For product with brushed finishes, align the brush pattern
of the sprayfaces with the direction of the brushed pattern of the
escutcheon.
Tilt the sprayhead to expose the ribs.
Position the grooves of the sprayface over the ribs, then rotate the
loose end of the sprayface up as illustrated.
Press the sprayface into place to cover the sprayhead.
Tilt the sprayhead assembly to expose the setscrew holes.
IMPORTANT! To avoid product damage, the setscrews must not
protrude beyond the sprayface.
Using a 5/64″ hex wrench, turn the setscrews counterclockwise
until they are flush with the sprayface.
Repeat for the remaining sprayfaces.
Warranty
KOHLER®Faucet Lifetime Limited Warranty
Kohler Co. warrants its Faucets* manufactured after January 1, 1997, to
be leak and drip free during normal residential use for as long as the
original consumer purchaser owns his or her home. If the Faucet
should leak or drip during normal use, Kohler Co. will, free of charge,
mail to the purchaser the cartridge necessary to put the Faucet in good
working condition. This warranty applies only to Kohler Faucets
installed in the United States of America, Canada or Mexico (″North
America″).
Kohler Co. also warrants all other aspects of the faucet or accessories
Kohler Co. 11 1207715-2-B

Warranty (cont.)
(″Faucet″)*, (except gold, non-Vibrant
, non-chrome finishes) to be free
®
of defects in material and workmanship during normal residential use
for as long as the original consumer purchaser owns his or her home.
This warranty applies only to Kohler Faucets installed in North
America. If a defect is found in normal residential use, Kohler Co. will,
at its election, repair, provide a replacement part or product, or make
appropriate adjustment. Damage to a product caused by accident,
misuse, or abuse is not covered by this warranty. Improper care and
cleaning will void the warranty**. Proof of purchase (original sales
receipt) must be provided to Kohler Co. with all warranty claims.
Kohler Co. is not responsible for labor charges, installation, or other
incidental or consequential costs. In no event shall the liability of
Kohler Co. exceed the purchase price of the Faucet.
If the Faucet is used commercially or is installed outside of North
America, or if the finish is gold, non-Vibrant or a painted or powder
coated color finish, Kohler Co. warrants the Faucet to be free from
defects in material and workmanship for one (1) year from the date the
product is installed, under Kohler Co.’s standard one-year limited
warranty.
If you believe that you have a warranty claim, contact Kohler Co.,
either through your Dealer, Plumbing Contractor, Home Center or
E-tailer, or by writing Kohler Co., Attn.: Customer Care Center, 444
Highland Drive, Kohler, WI 53044, USA. Please be sure to provide all
pertinent information regarding your claim, including a complete
description of the problem, the product, model number, color, finish,
the date the product was purchased and from whom the product was
purchased. Also include your original invoice. For other information,
or to obtain the name and address of the service and repair facility
nearest you, call 1-800-4-KOHLER (1-800-456-4537) from within the
USA and Canada, and 001-800-456-4537 from within Mexico, or visit
www.kohler.com within the USA, www.ca.kohler.com from within
Canada, or www.mx.kohler.com in Mexico.
KOHLER CO. AND/OR SELLER ARE PROVIDING THESE
WARRANTIES IN LIEU OF ALL OTHER WARRANTIES,
EXPRESSED OR IMPLIED, INCLUDING BUT NOT LIMITED TO
THE IMPLIED WARRANTIES OF MERCHANTABILITY AND
FITNESS FOR A PARTICULAR PURPOSE. KOHLER CO. AND/OR
SELLER DISCLAIM ALL LIABILITY FOR SPECIAL, INCIDENTAL
OR CONSEQUENTIAL DAMAGES. Some states/provinces do not
allow limitations of how long an implied warranty lasts or the
exclusion or limitation of such damages, so these limitations and
exclusions may not apply to you. This warranty gives the consumer
specific legal rights. You may also have other rights that vary from
1207715-2-B 12 Kohler Co.

Warranty (cont.)
state/province to state/province.
This is Kohler Co.’s exclusive written warranty.
*Trend
components; WaterHaven
faucets, MasterShower®tower, BodySpa systems and
®
tower, systems and components; Tripoint
®
®
faucets, Polished Gold, non-Vibrant and painted or powder coated
finishes, fittings; all items within the ″Fixture Related″ section of the
Kohler Faucets Price Book, drains, Duostrainer
soap/lotion dispensers, Moxie
TM Wireless Speaker; and faucets used in
sink strainers,
®
commercial settings, and outside North America, are covered by
Kohler Co.’s one-year limited warranty.
**Never use cleaners containing abrasive cleansers, ammonia, bleach,
acids, waxes, alcohol, solvents or other products not recommended for
chrome. This will void the warranty.
Warranty
For Mexico
KOHLER CO.
It is recommended that at the time of purchase, you verify that all
accessories and components are complete in this package.
This Kohler product is warranted to be free of defects in material and
workmanship for one (1) year from the date of purchase as shown on
the invoice or receipt.
1. Kohler Co. will only service its commercialized products through its
authorized distributors.
2. To obtain warranty service, please present the invoice and
corresponding warranty.
3. Through its authorized distributors, Kohler Co. promises to repair
the defective product or provide a new replacement or an equivalent
model (in those cases that the model has been discontinued) when the
product is beyond repair, without any charge to the consumer.
4. The time of repair will not exceed six (6) weeks commencing on the
date the product is received.
5. It is recommended that the consumer save the invoice or receipt as
additional protection, as it may substitute the warranty in the case that
there is a discrepancy in the validity of the warranty.
EXCEPTIONS AND RESTRICTIONS
The Warranty will not be valid in the following cases:
Kohler Co. 13 1207715-2-B

Warranty (cont.)
1. When the product is not operated in accordance with the
instructions concerning use and operation set forth in the owner’s
manual or installation instructions, and when the recommendations
and warnings included are not observed.
2. When the product has been modified or dismantled partially or
totally; or has been used in a negligent fashion and as a consequence
has suffered damages attributable to the consumer, individual, or
hardware not authorized by Kohler Co.
3. This warranty does not cover the damages as a result of disaster
such as fire or acts of God, including flooding, earthquake, or electric
storms, etc. To obtain a list of distributors in your area where you can
exercise your rights under this warranty, please call 001-800-456-4537.
KOHLER CO., KOHLER, WI 53044 U.S.A.
IMPORTER:
INTERNACIONAL DE CERÁMICA, S.A.B. DE C.V.
AV. CARLOS PACHECO NO. 7200
CHIHUAHUA, CHIH., MEXICO C.P. 31060
TEL: 52 (14) 29-11-11
1207715-2-B 14 Kohler Co.
 Loading...