

Kohler K-97631, K-97630 Installation And Care Manual
Installation and Care Guide
Locker
Français, page ″Français-1″
Español, página ″Español-1″
1248926-2-C
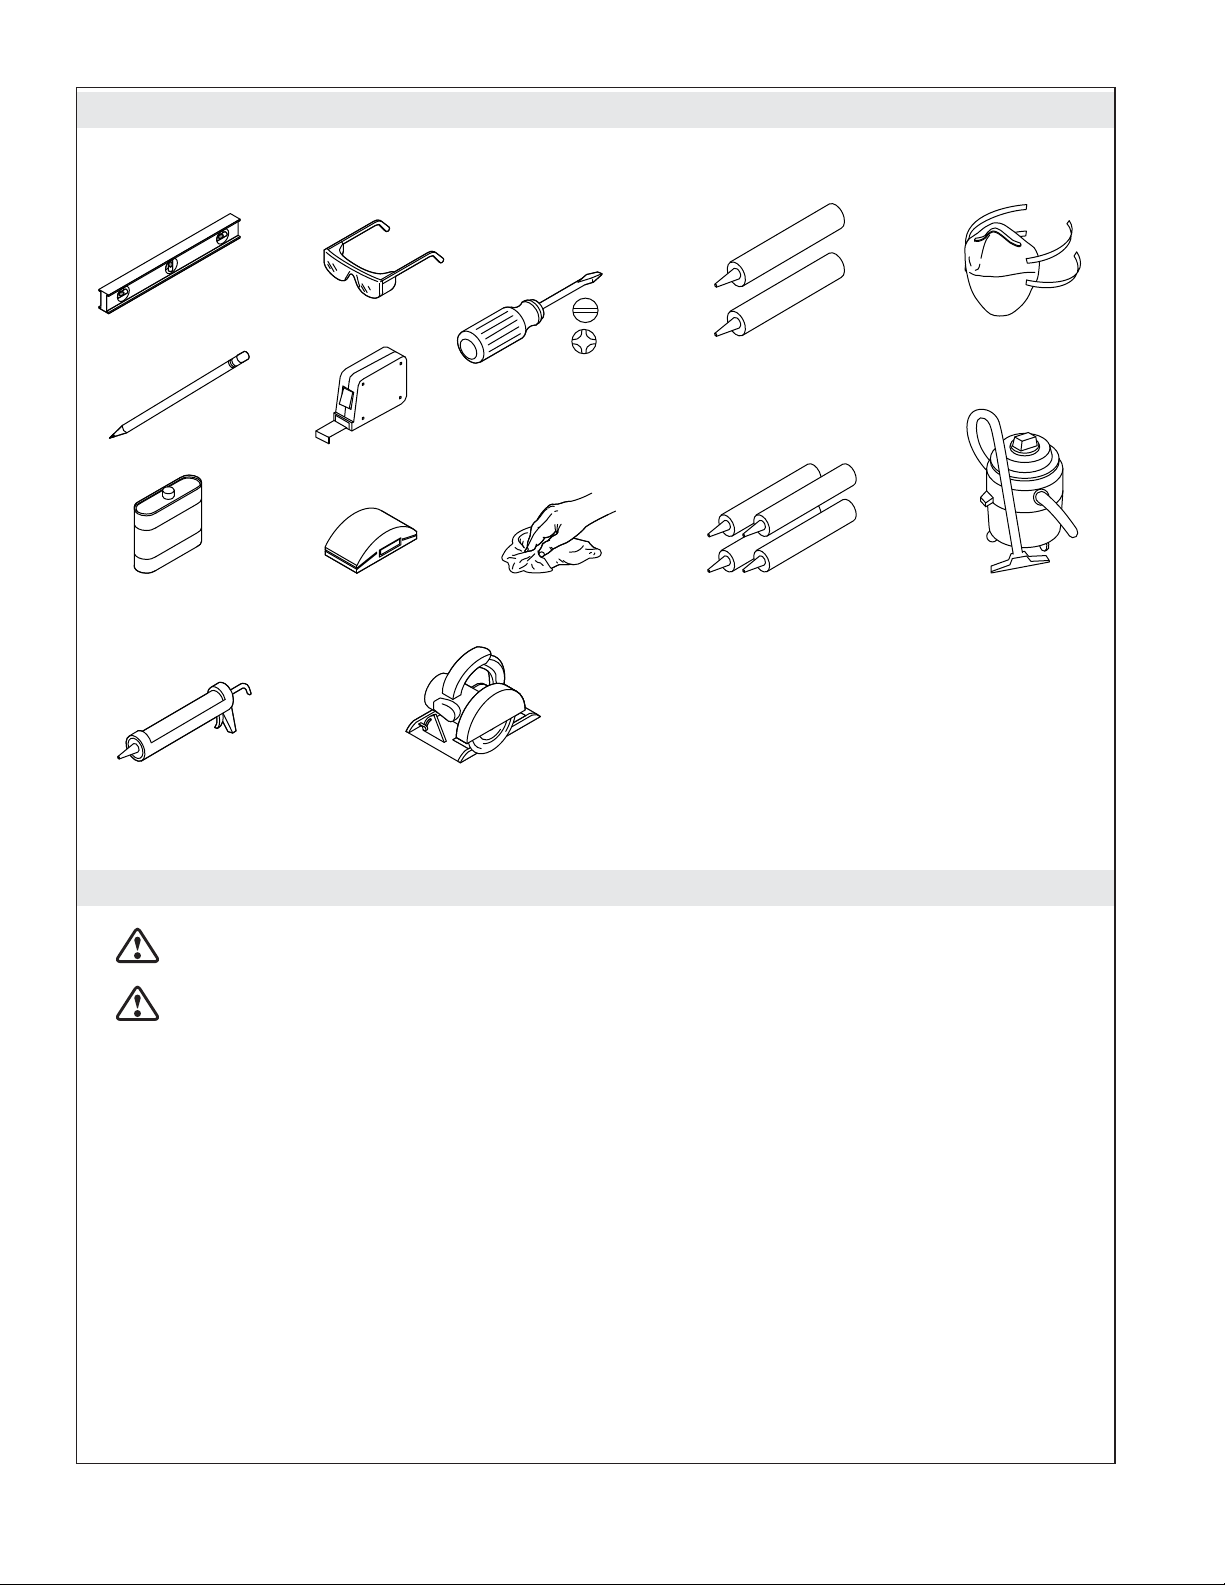
Tools and Materials
1-2 Tubes Color Matched
100% Silicone Sealant
Breathing
Protection
Denatured Alcohol Rags
Caulk Gun Circular Saw with 7-1/4"
Sanding Block
Fine-Toothed Blade
4+ Tubes UrethaneBased Construction Adhesive
Plus:
• Standard Woodworking Tools
• 2x4 Lumber (to create bracing)
• Sawhorses
• Drop Cloth
• Soap and Water
Before You Begin
WARNING: Risk of serious injury. When cutting the locker unit, take appropriate safety measures
including the use of breathing protection.
CAUTION: Risk of serious injury. Always wear safety glasses while cutting and drilling.
IMPORTANT! Dust will be generated when cutting the locker unit. Cut the locker outside or in a
well-ventilated area.
IMPORTANT! Leave this manual for the end user.
Read these instructions before installing this product:
Shop Vacuum
•
Only trim the locker unit to height. Do not trim the sides.
•
Make sure that the existing rough walls are within 3/8″ (10 mm) of plumb.
•
Brace the locker unit using 2x4s around the entire unit.
•
Use color-matched 100% silicone sealant around the locker unit.
•
Cover the shower base with a drop cloth or other protective material to avoid damage.
•
Follow the construction adhesive and 100% silicone sealant instructions for application and curing
time.
•
Inspect the locker unit for damage before installation.
•
You can use a router to cut the locker unit. Note that the router bit will dull quickly.
1248926-2-C 2 Kohler Co.
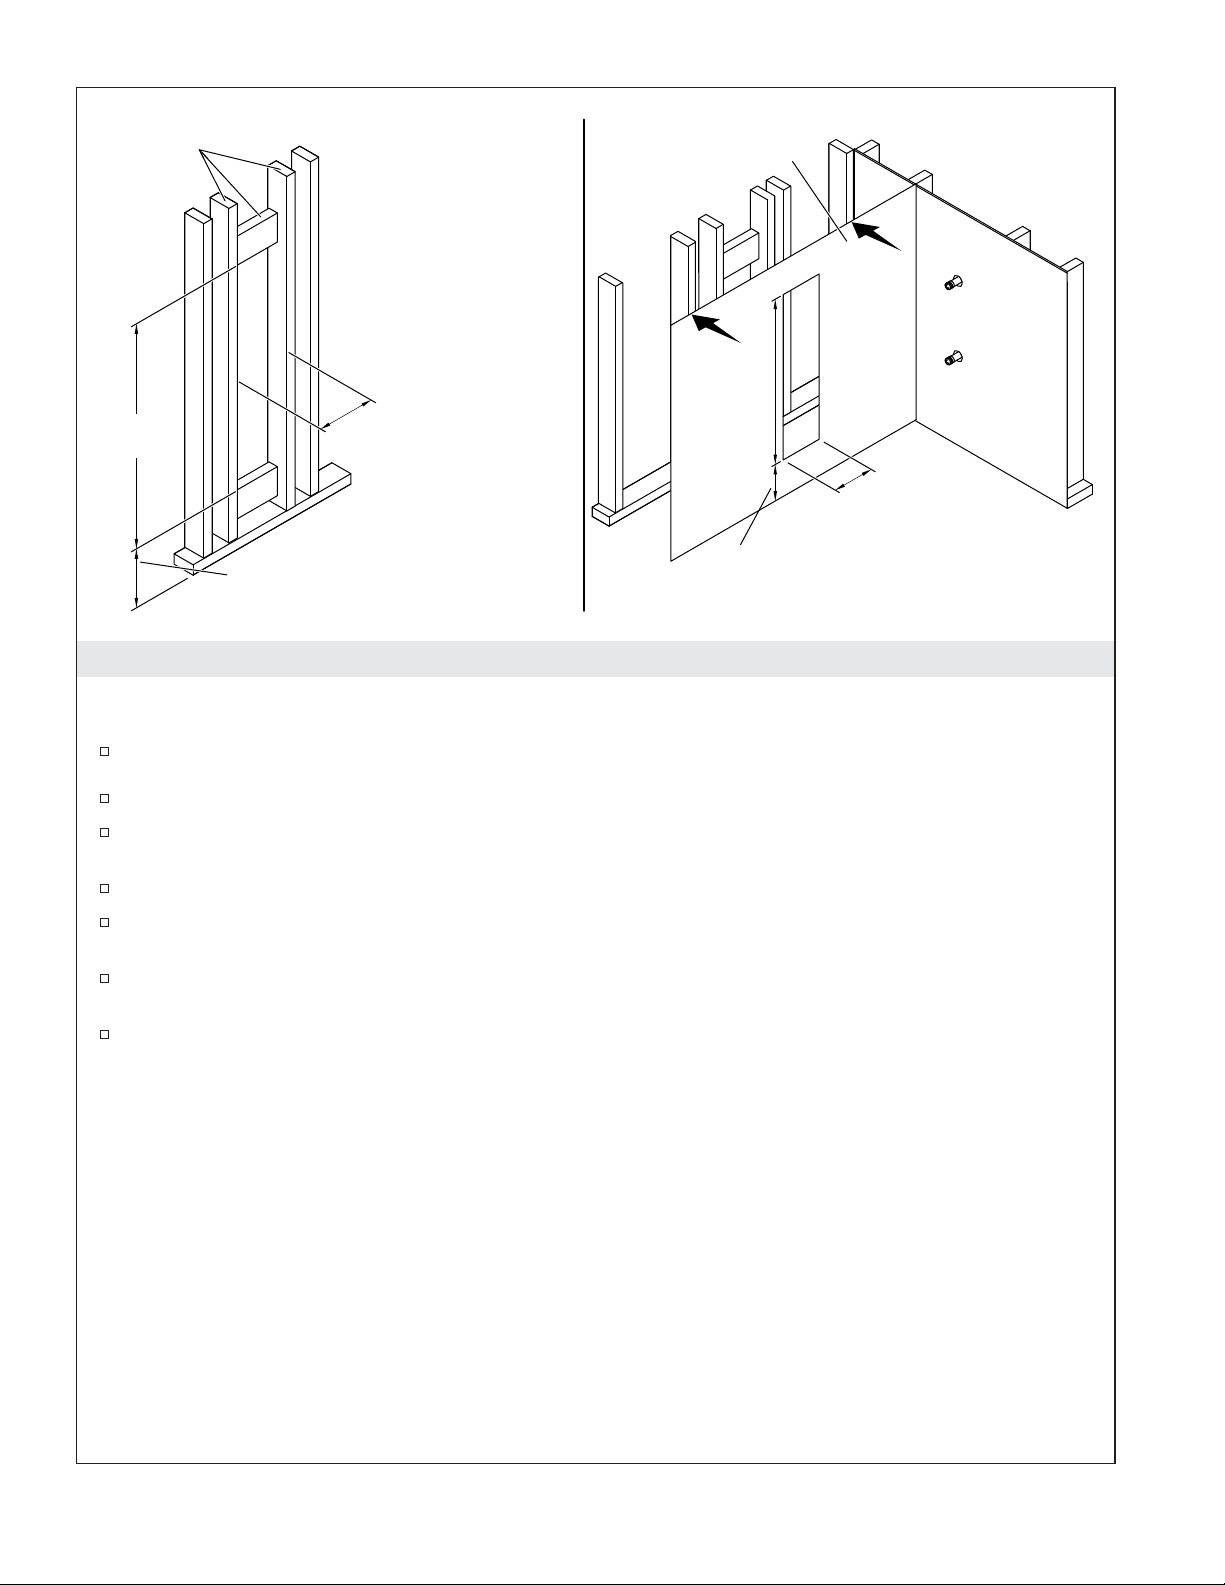
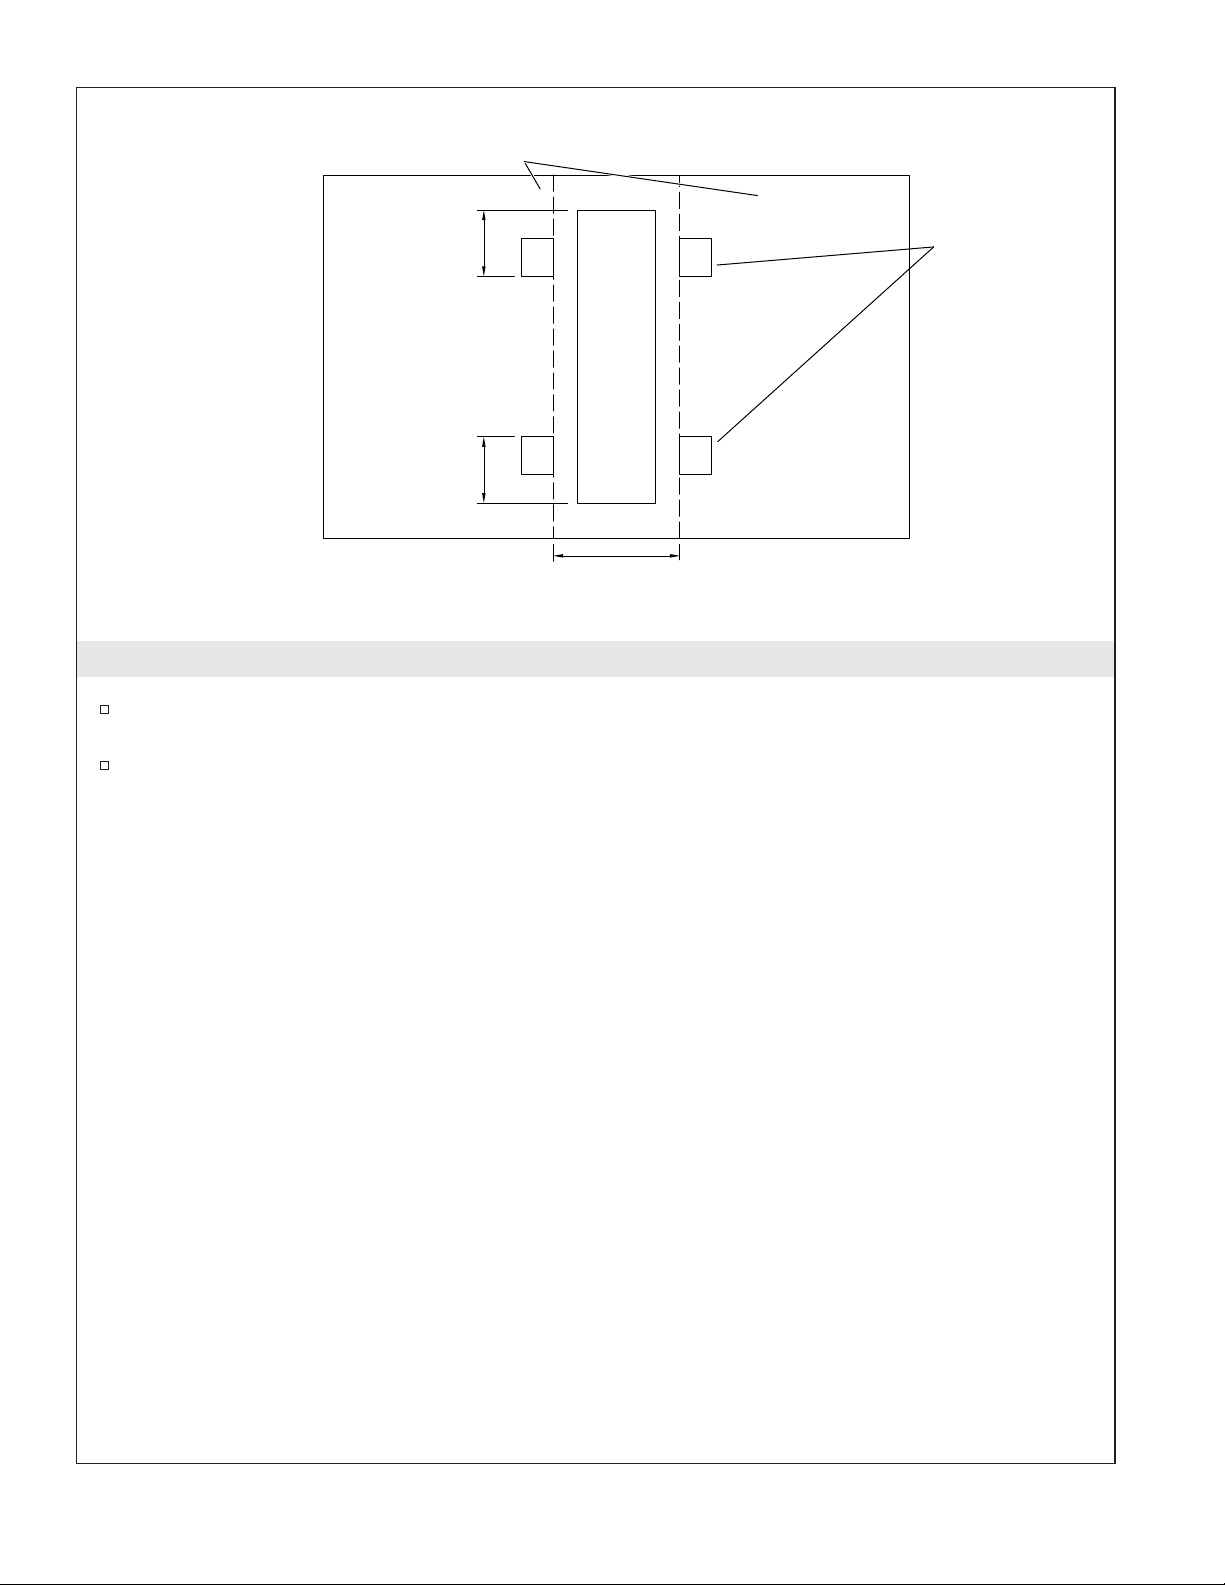
2x4 Bracing
65"
(1651 mm)
K-97630: 9" (229 mm)
K-97631: 14-1/2" (368 mm)
11" (279 mm) Min
15" (381 mm) Max
Wallboard
Backing
65"
(1651 mm)
11" (279 mm) Min
15" (381 mm) Max
1. Prepare the Site
IMPORTANT! Use water-resistant wallboard backing material for this installation.
K-97630: 9" (229 mm)
K-97631: 14-1/2" (368 mm)
Install rough plumbing for the bath and shower components.
Make sure that the studs are plumb within 3/8″ (10 mm). Shim as needed.
The locker unit ledge is designed for use as a footrest. Kohler Co. recommends a footrest height of
12″ (305 mm) to 16″ (406 mm), measured from the shower floor to the locker room ledge.
Determine the height of the enclosure and the locker unit.
Refer to the dimensions in the illustration above, and install 2x4 bracing where you will install the
locker unit.
To determine the height of the bottom bracing, subtract 1″ (25 mm) from the desired height of the
footrest.
Install wallboard backing material over the locker unit opening with the same dimensions as the 2x4
bracing cutout.
Kohler Co. 3 1248926-2-C
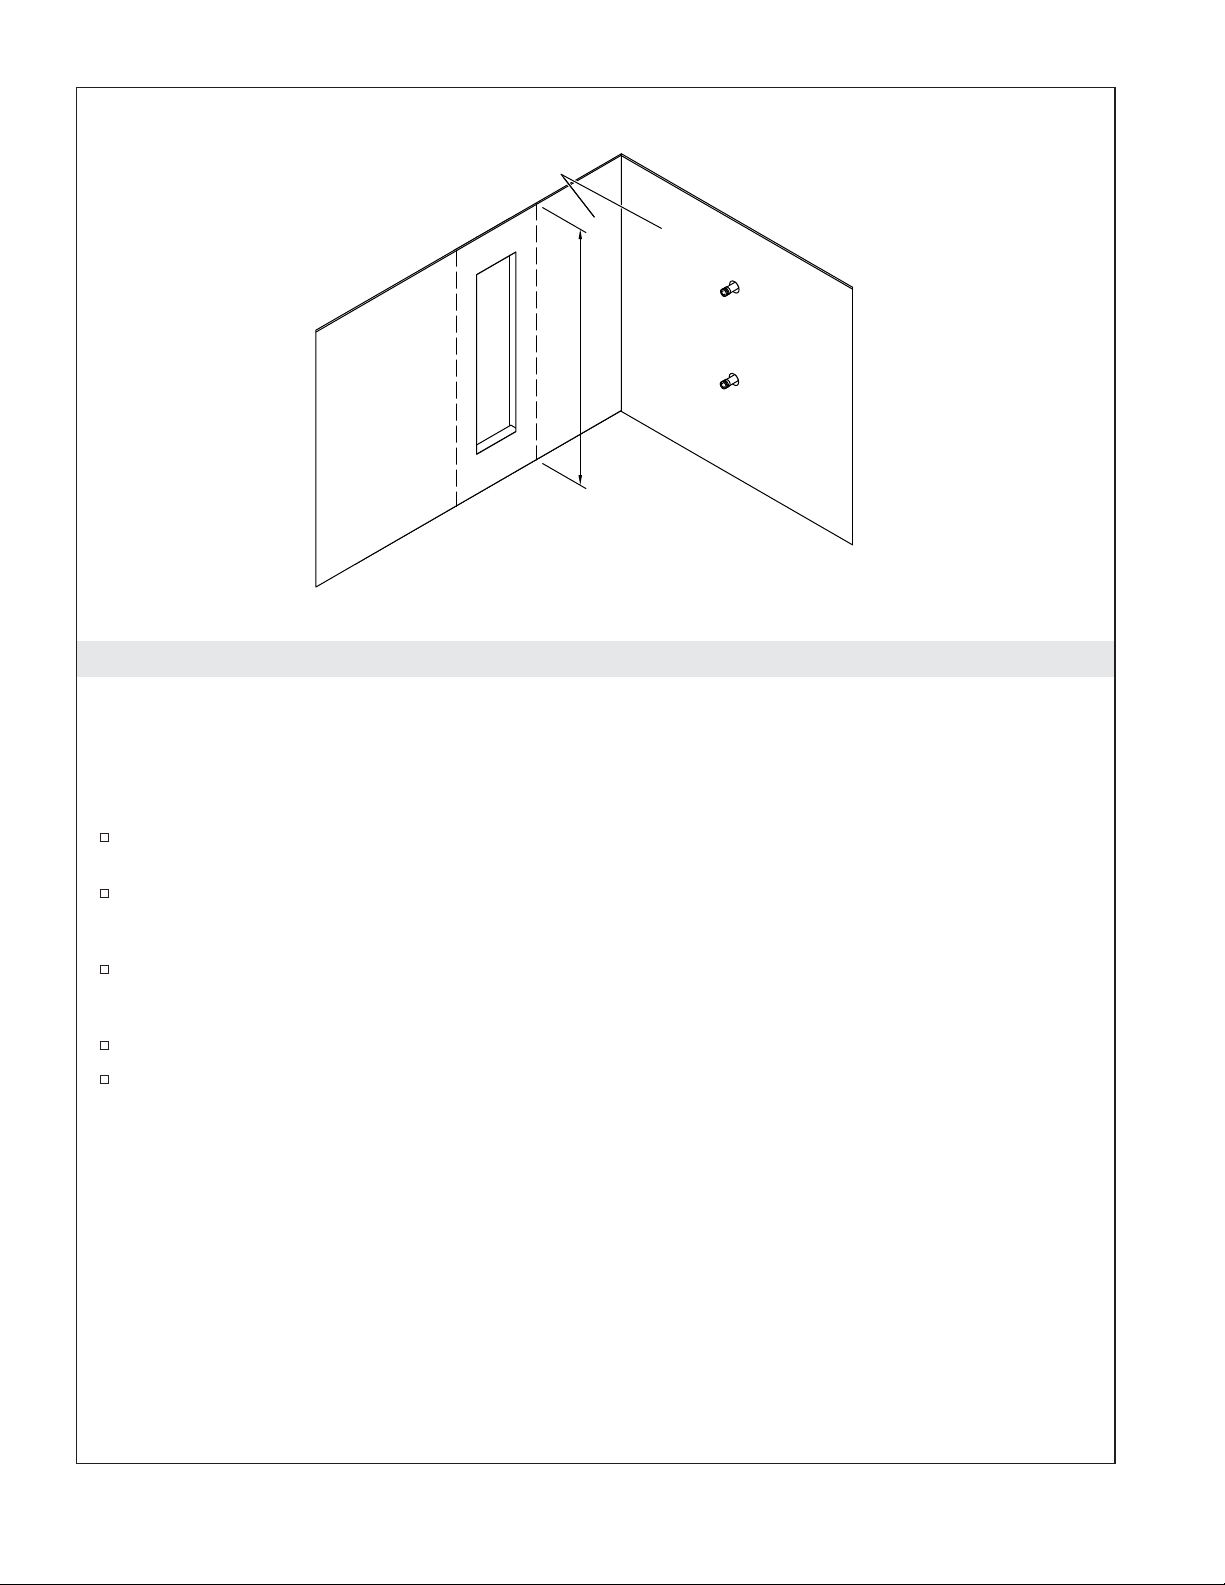
Wallboard
Backing
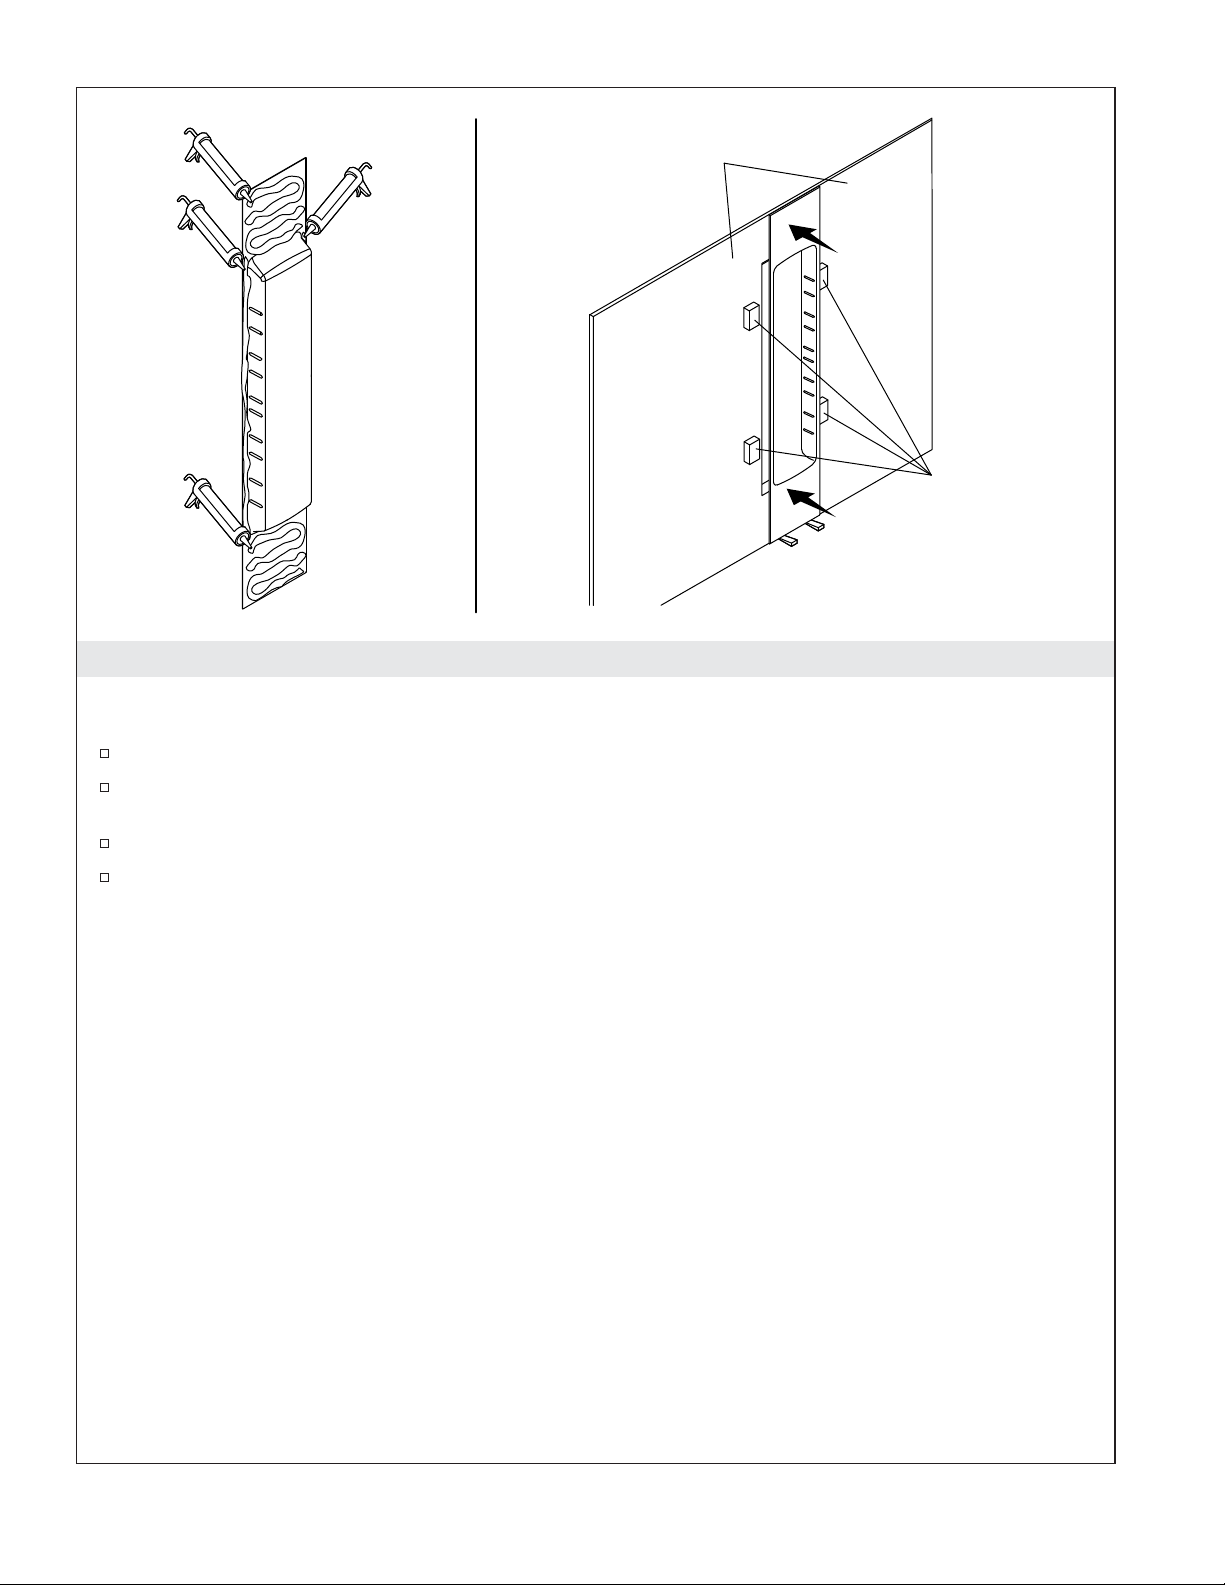
2. Measure and Trim the Locker
IMPORTANT! Use a circular saw and a fine-toothed blade to trim the locker unit.
IMPORTANT! Do not cut the sides of the locker unit. Only trim the top or bottom to fit your wall length.
IMPORTANT! Install the locker unit with the shelf grooves angled upward. The shelves will not stay in
place if you install the locker unit upside down.
Measure the vertical installation area and determine how much of the locker top and bottom you
need to trim.
Mark the cut-lines on the back side of the locker unit.
NOTE: Remove any protective film from the locker unit surface before cutting.
Cut the locker unit along the marked lines.
IMPORTANT! It is critical that the locker unit is clean to create a strong adhesive bond.
Remove excess material and sand any rough edges using a sanding block.
Clean the back of the locker unit with denatured alcohol.
1248926-2-C 4 Kohler Co.
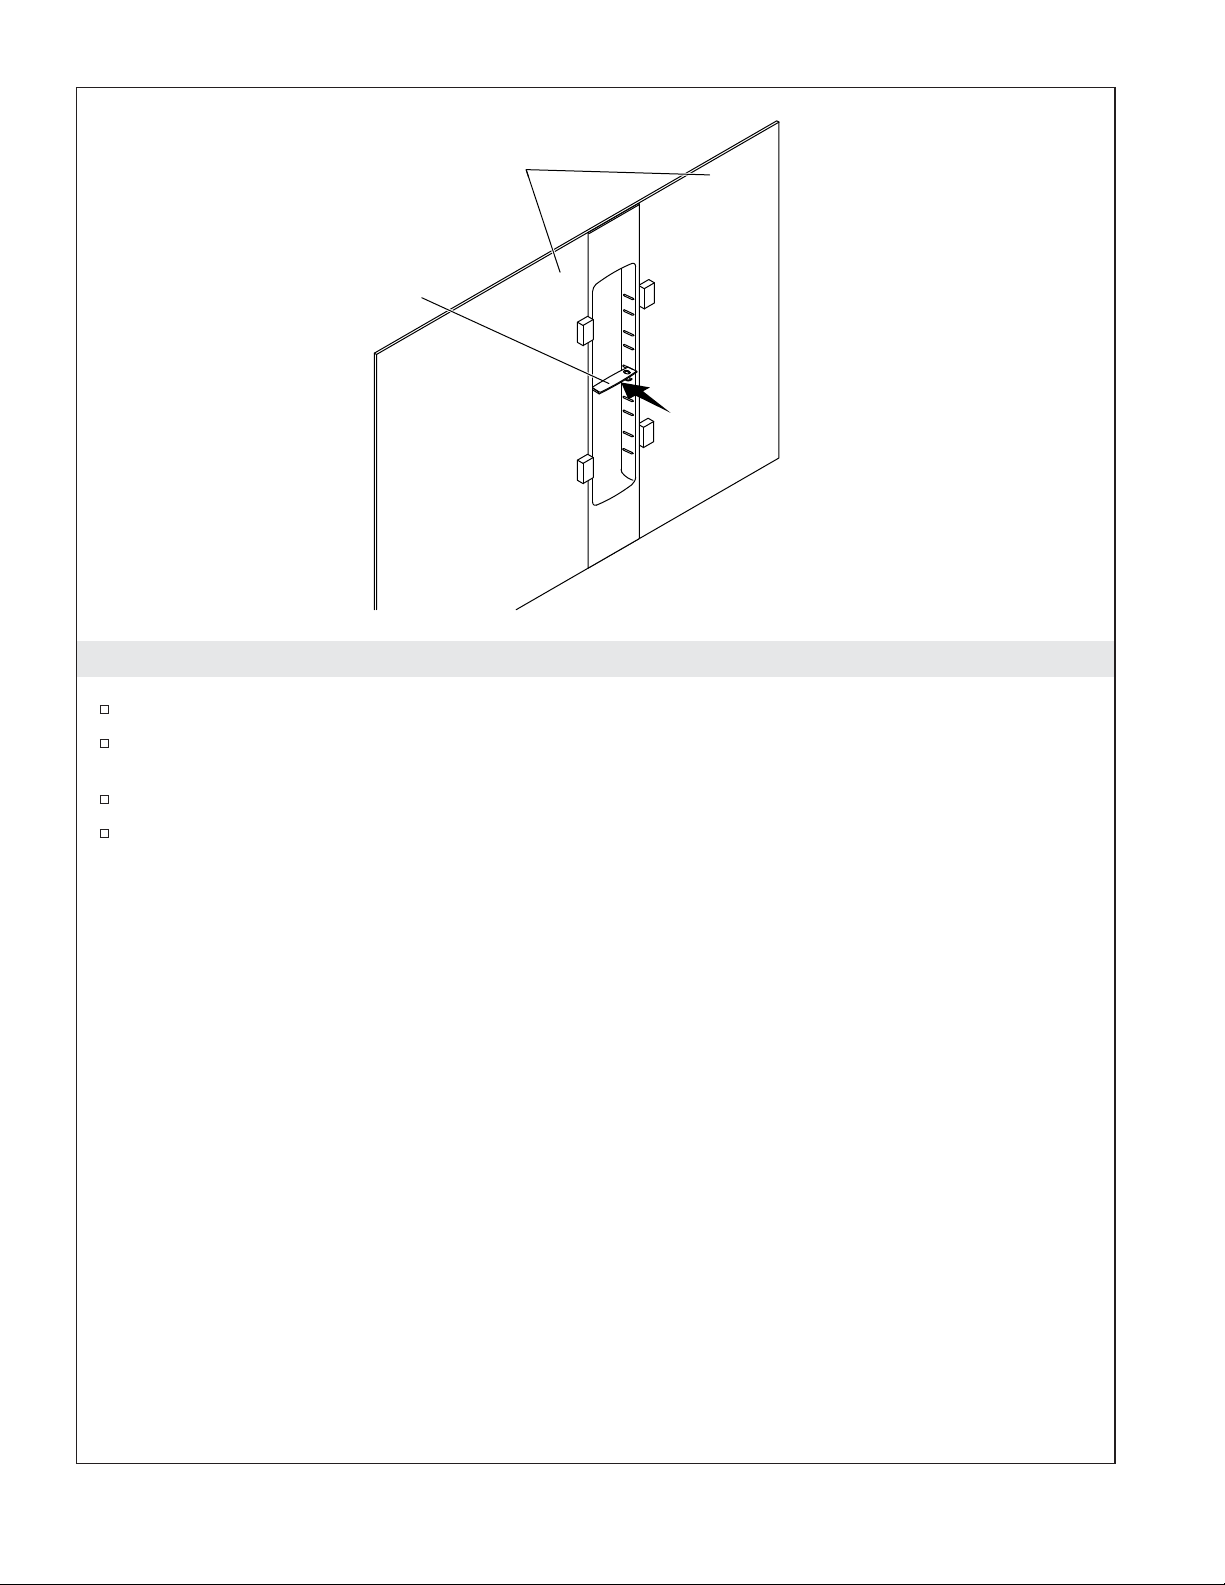
Wallboard
Backing
24"
(610 mm)
24"
(610 mm)
10-7/8" (276 mm) = 9" Locker
16-13/16" (427 mm) = 14" Locker
3. Install Blocking
Secure four blocks of 2x4 lumber (not provided) to the rough wall according to the dimensions
shown above.
Leave the wood blocking in place until instructed.
2x4 Blocking
Kohler Co. 5 1248926-2-C
Wallboard
Backing
2x4 Blocking
4. Install the Locker Unit
IMPORTANT! Install the locker unit with the shelf grooves angled upward. The shelves will not stay in
place if you install the locker unit upside down.
TIP: Urethane-based adhesive will provide the best adhesion with this product.
Generously apply bath and shower construction adhesive to the back of the locker unit on the top,
bottom, and sides.
Position the locker unit into place at a slight angle.
Push the locker unit against the rough wall between the wood bracing. Press firmly and evenly
across the entire locker unit.
1248926-2-C 6 Kohler Co.
Wallboard
Backing
Shelf
5. Check the Fit
Check that the shelf fits securely in the set of grooves toward the middle of the locker unit.
If the fit of the shelf is loose, move the wood blocking inward 1/16″ (2 mm) and check again.
Continue until the shelf fits securely.
Remove the shelf.
Leave the wood blocking in place until instructed.
Kohler Co. 7 1248926-2-C
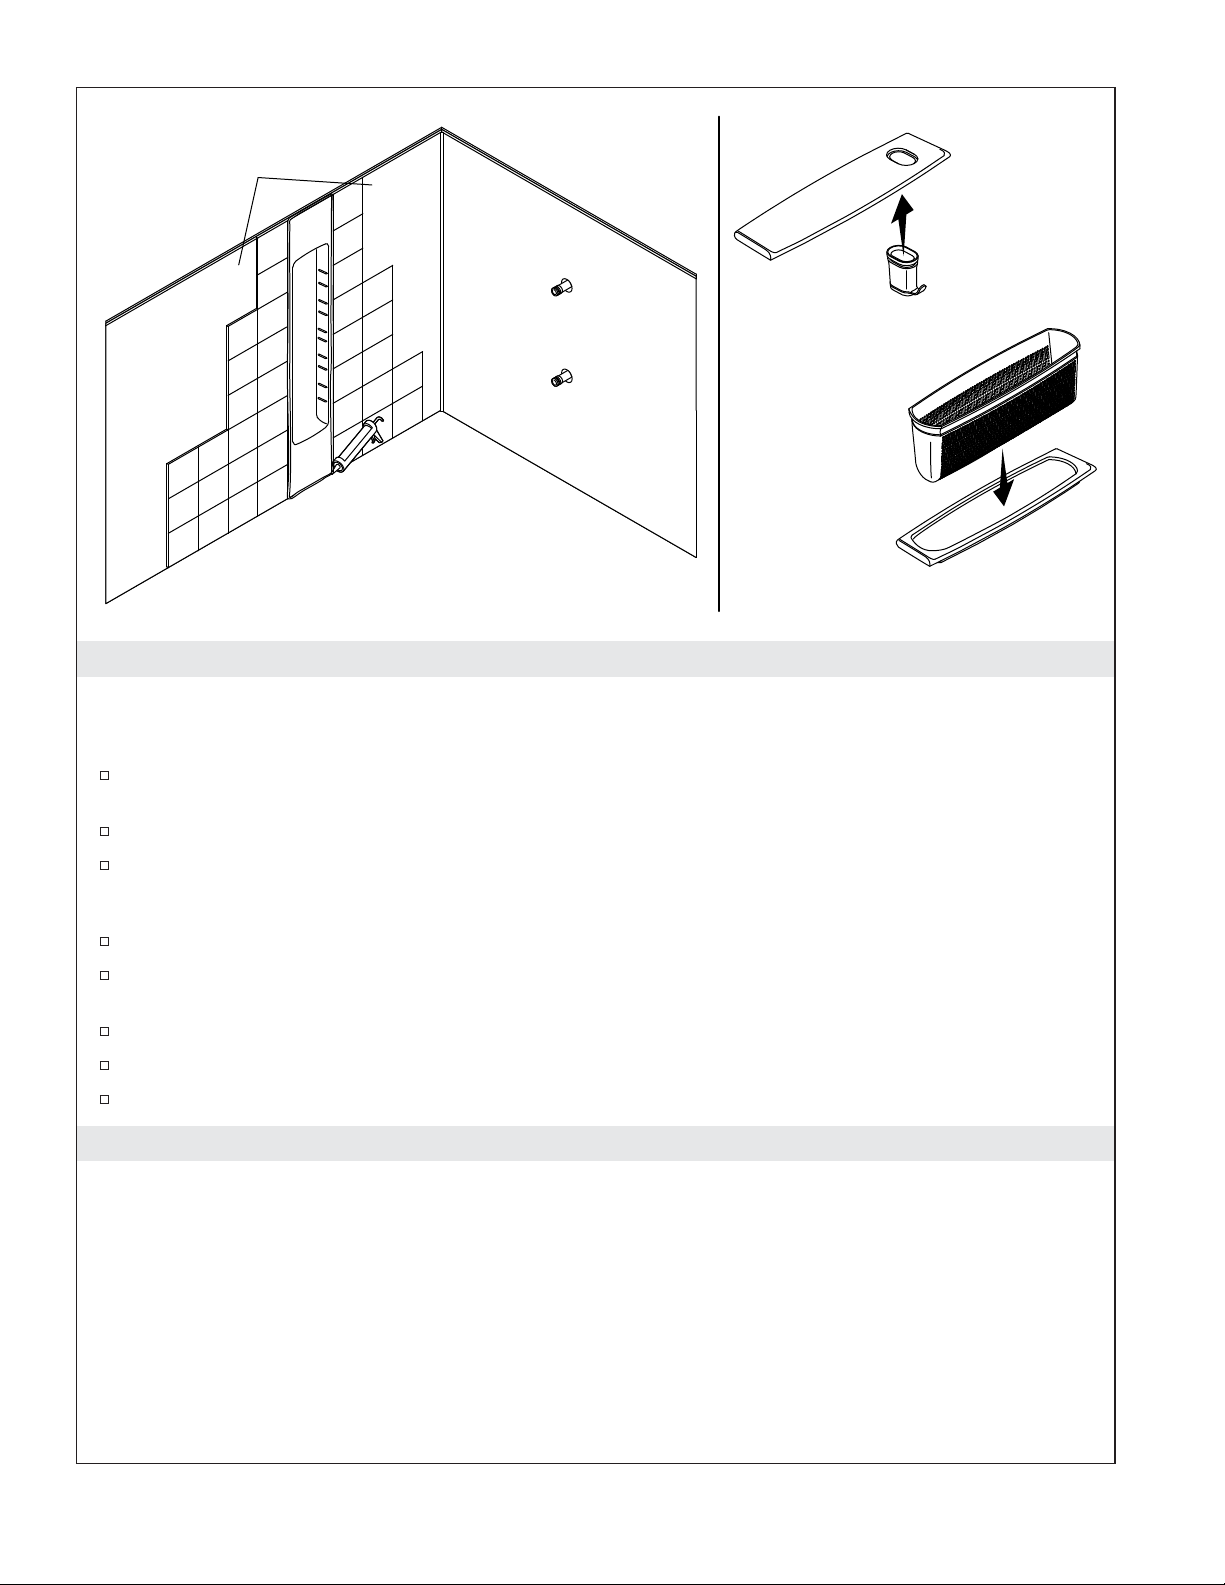
Finished Wall
6. Complete the Installation
IMPORTANT! To ensure a successful installation, allow the construction adhesive to cure 24 to 48 hours
before installing the finished wall material. Do not remove the 2x4 bracing until the construction adhesive
has fully cured.
Remove the 2x4 bracing from the rough wall once the construction adhesive on the locker unit has
fully cured.
Install the finished wall material up to the edges of the locker unit.
Apply color-matched 100% silicone sealant around the entire locker unit.
NOTE: Wait 24 hours before using the shower unit.
Prepare the shelves with accessories.
TIP: When preparing the two shelves, use soap and water to guide the hook and basket into the
shelves with ease.
Press the hook into the shelf as shown above.
Press the basket into the shelf as shown above.
Install the shelves into the locker unit.
Care and Cleaning
For best results, keep the following in mind when caring for your KOHLER product:
•
Always test your cleaning solution on an inconspicuous area before applying to the entire surface.
Avoid using aerosol products.
•
Wipe surfaces clean and rinse completely with water immediately after applying cleaner. Rinse and
dry any overspray that lands on nearby surfaces.
•
Do not allow cleaners to soak on surfaces.
•
Use a soft, dampened sponge or cloth. Never use an abrasive material such as a brush or scouring
pad to clean surfaces.
•
The ideal cleaning technique is to rinse thoroughly and blot dry any water from the surface after
each use.
1248926-2-C 8 Kohler Co.
Care and Cleaning (cont.)
For detailed cleaning information and products to consider, visit kohler.com/clean. To order Care & Cleaning
information, call 1-800-456-4537.
Warranty
KOHLER®Limited Warranty – ChoreographTM Walls and Accessories
Kohler Co. warrants all ChoreographTM products (including ChoreographTM accessories) to be free of defects
in material and workmanship during normal residential use for ten (10) years from the date of sale. If a
Choreograph
America, Canada or Mexico, Kohler Co. warrants the Choreograph
defects in material and workmanship during normal use for three (3) years from the date of sale.
TM product or accessory is used commercially or is installed outside of the United States of
TM product or accessory to be free of
If Kohler Co.’s inspection of your Choreograph
TM product or accessory discloses a defect in material or
workmanship within the applicable period of coverage stated above, Kohler Co. will, at its election, repair,
replace or make appropriate adjustment. Kohler Co. is not responsible for labor charges, installation, or other
incidental or consequential costs. In no event shall the liability of Kohler Co. exceed the purchase price of the
Choreograph
TM product or accessory. Damages due to improper handling, installation or maintenance are not
considered manufacturing defects and are not covered by this warranty. This warranty is valid for the
original, consumer purchaser only. Proof of purchase (original sales receipt) must be provided to Kohler Co.
with all warranty claims.
To obtain warranty service, contact Kohler Co., either through your plumbing contractor, home center,
wholesaler, dealer, or E-tailer, or by calling or writing Kohler Co., Attn.: Customer Care Center, 444 Highland
Drive, Kohler, Wisconsin 53044, 1-800-4KOHLER (1-800-456-4537) from within the USA and Canada, and
001-800-456-4537 from within Mexico, or visit www.kohler.com within the USA, www.ca.kohler.com from
within Canada, or www.mx.kohler.com in Mexico.
TO THE EXTENT PERMITTED BY LAW, ALL IMPLIED WARRANTIES INCLUDING THOSE OF
MERCHANTABILITY AND FITNESS FOR A PARTICULAR PURPOSE ARE HEREBY DISCLAIMED.
KOHLER CO. AND SELLER HEREBY DISCLAIM ANY LIABILITY FOR SPECIAL, INCIDENTAL, OR
CONSEQUENTIAL DAMAGES. Some states/provinces do not allow limitations on how long an implied
warranty lasts, or the exclusion or limitation of special, incidental or consequential damages, so these
limitations and exclusions may not apply to you. This warranty gives you specific legal rights. You may have
other rights which vary from state/province to state/province.
This is the exclusive written warranty for Kohler Co.
Kohler Co. 9 1248926-2-C
 Loading...