

Kohler K-1737-K1, K-5549-K1, K-1838-K1, K-5548-K1 Installation And Care Manual

Installation and Care Guide
Steam Adapter Kit / Steam Head for DTV+
K-1737-K1, K-1838-K1,
K-5548-K1, K-5549-K1
Français, page ″Français-1″
Español, página ″Español-1″
1235393-2-C
IMPORTANT INSTRUCTIONS
IMPORTANT SAFETY INFORMATION
WARNING: When using this unit, basic precautions should
always be followed:
DANGER: Risk of electrocution. Disconnect the electricity
to the working area at the main breaker panel before
performing these installation steps.
WARNING: Risk of personal injury. If you become
uncomfortable while taking a steam bath, you should turn off
the unit. Cool off with the shower, open the door, or exit the
unit.
WARNING: Risk of allergic reaction. Before adding any
oils, aromatic therapies, or skin care products to the
aromatherapy well, make sure they will not cause an allergic
reaction to the user.
WARNING: Risk of personal injury. This steam bath may
not be suitable for use if you are pregnant, have a heart
condition, have high blood pressure, have circulatory
problems, are under the influence of alcohol, are taking drugs
or are under the care of a physician. A steam bath can put
undue stress on the body, as does any hot bath, shower, or
sauna.
WARNING: Risk of personal injury. DO NOT consume
alcoholic beverages or take medications/drugs prior to or
when using the steam bath. Alcohol and drugs affect mental
judgement, greatly increase the risk of hyperthermia, and
inhibit bodily functions such as heartbeat and respiration,
resulting in potentially dangerous effects.
WARNING: Risk of injury to children. Do not allow
children to use this unit unless they are closely supervised at
all times. The steam generator is not designed to be used by
children.
WARNING: Risk of scalding. Do not touch the steam head
during operation. The steam head is hot during operation.
WARNING: Risk of personal injury or property damage.
Avoid coming in contact with the water tank and/or steam
discharge line while the steam generator is operating or
1235393-2-C 2 Kohler Co.

IMPORTANT INSTRUCTIONS (cont.)
shortly after shutdown. Wear eye protection and protective
clothing when servicing the steam generator. The steam
generator operates at high temperatures.
NOTICE: Use this unit only for its intended use as specified in this
manual. DO NOT use attachments not recommended by Kohler Co.
NOTICE: Follow all plumbing, electrical, and building codes.
_________________________________________________________________
Operation with DTV+
To connect the steam adapter to the DTV+ system, the K-99695
system controller is required.
The provided data cable is used to connect the steam adapter to
the system controller.
Refer to the ″DTV+ System Layout″ section in this guide.
Before Operating the System For the First Time:
Download and install the latest software for connected components.
This may take an hour or more to complete based on system
configuration and internet connection speed. Do not disconnect the
power from any component during software download and
installation.
Tools and Materials
Socket Wrench
with 1" Socket
Drill w/ 3/8", 7/16", &
2-1/2" Hole Bit
(match bit to wall material)
Kohler Co. 3 1235393-2-C
Sealant
Tape
Silicone
Sealant
Pipe Nipples
Temperature
Sensor
Temperature
Sensor
5"
(127 mm)
Steam
Head
6"
(152 mm)
Shower
5"
(127 mm)
Steam
Head
6"
(152 mm)
Bath
4-1/2"
(114 mm)
Min
6"
(152 mm)
From Floor
Threshold
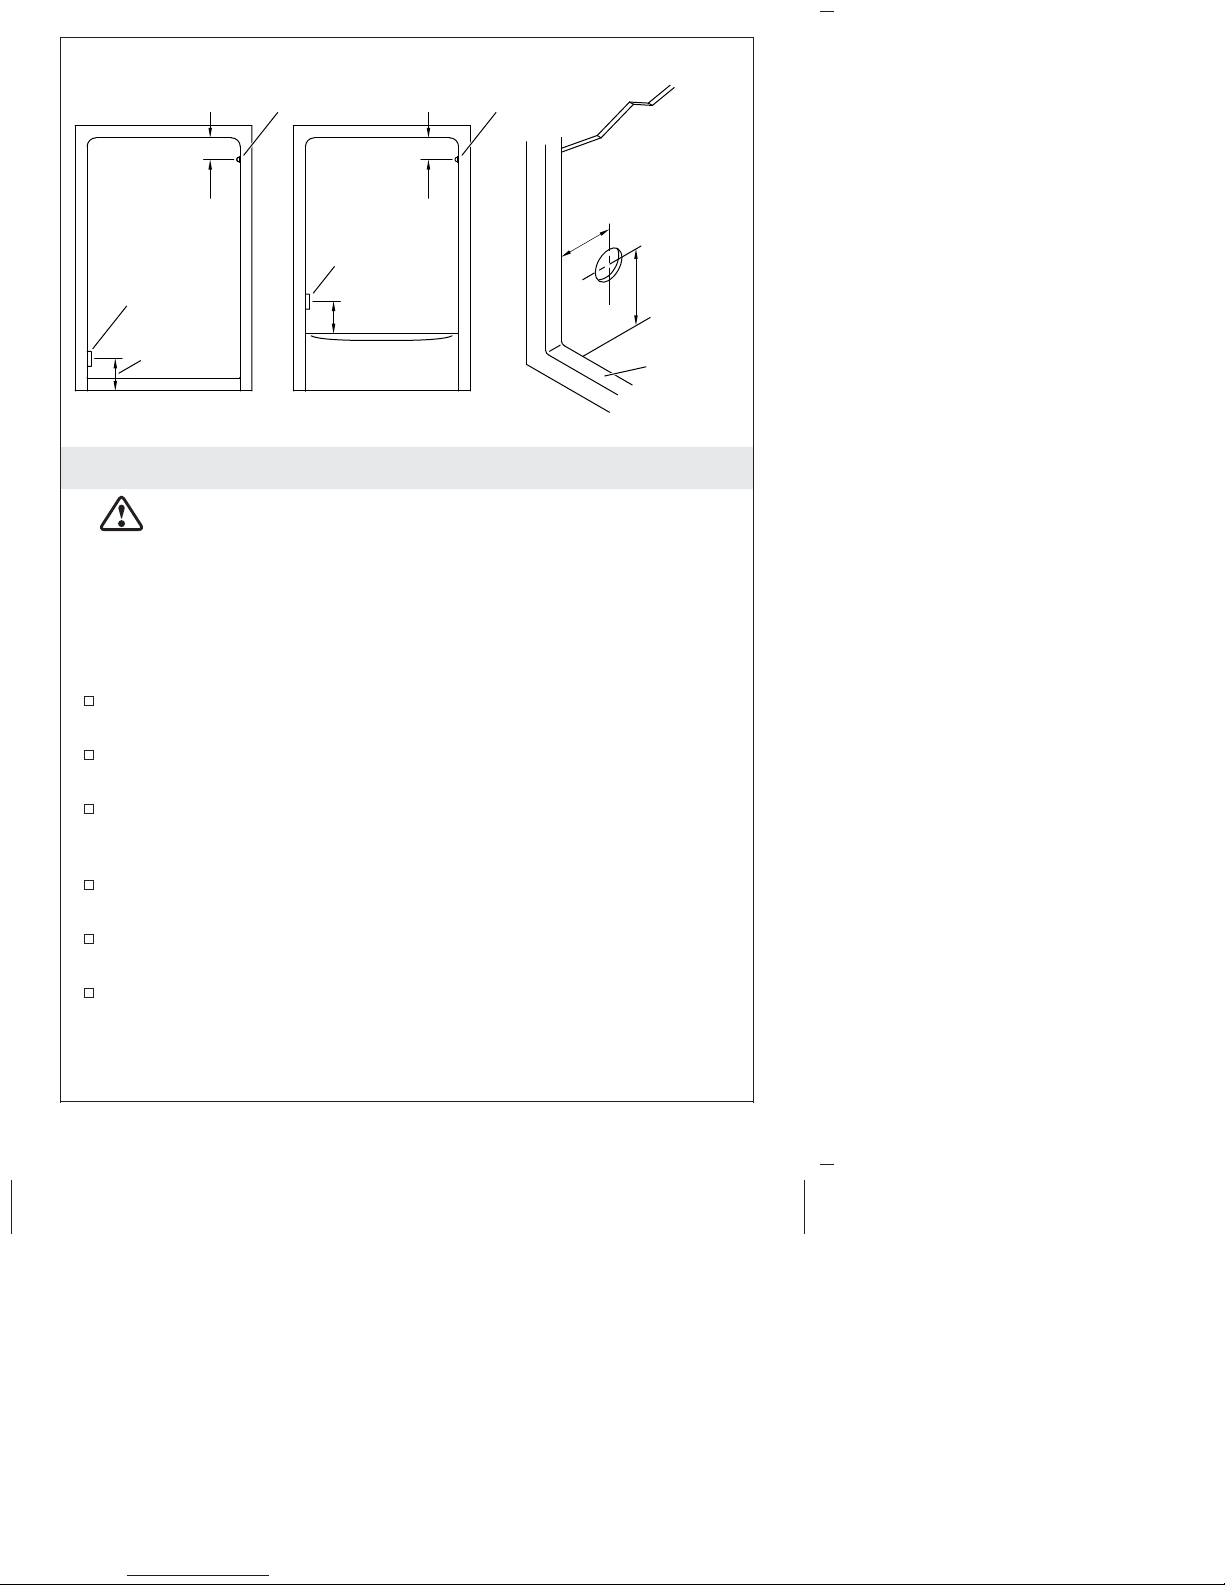
Before You Begin
WARNING: Risk of personal injury. A user interface must
be located within the steam enclosure to allow temperature
regulation and control of the steam flow.
NOTICE: Do not locate the user interface on the same wall as the
steam head(s).
NOTICE: The temperature sensor must be located on the wall
opposite the steam head(s).
If possible install the steam generator(s) and K-99695 system
controller before beginning this installation.
Locate the steam head 6″ (152 mm) above the floor and 4-1/2″
(114 mm) from the inside of the threshold.
If two steam heads are used, there must be at least 12-1/2″ (318
mm) between the center of each hole. The steam heads do not
need to be located in the same area.
Locate the steam head(s) as far away as possible from any shower
seating area.
Locate the temperature sensor on the wall 5″ (127 mm) down
from the ceiling.
Make sure there is adequate clearance between the steam lines
and any surrounding surfaces, or apply appropriate insulation to
the steam lines.
1235393-2-C 4 Kohler Co.
AC
Power
Router
Interface
(Up to Three)
25' (7.6 m) Data Cable
Controller
Component
Cable
Connections
Digital
Valve(s)
Temperature
Sensor
Steam
Head
Steam
Adapter
Steam
Generator
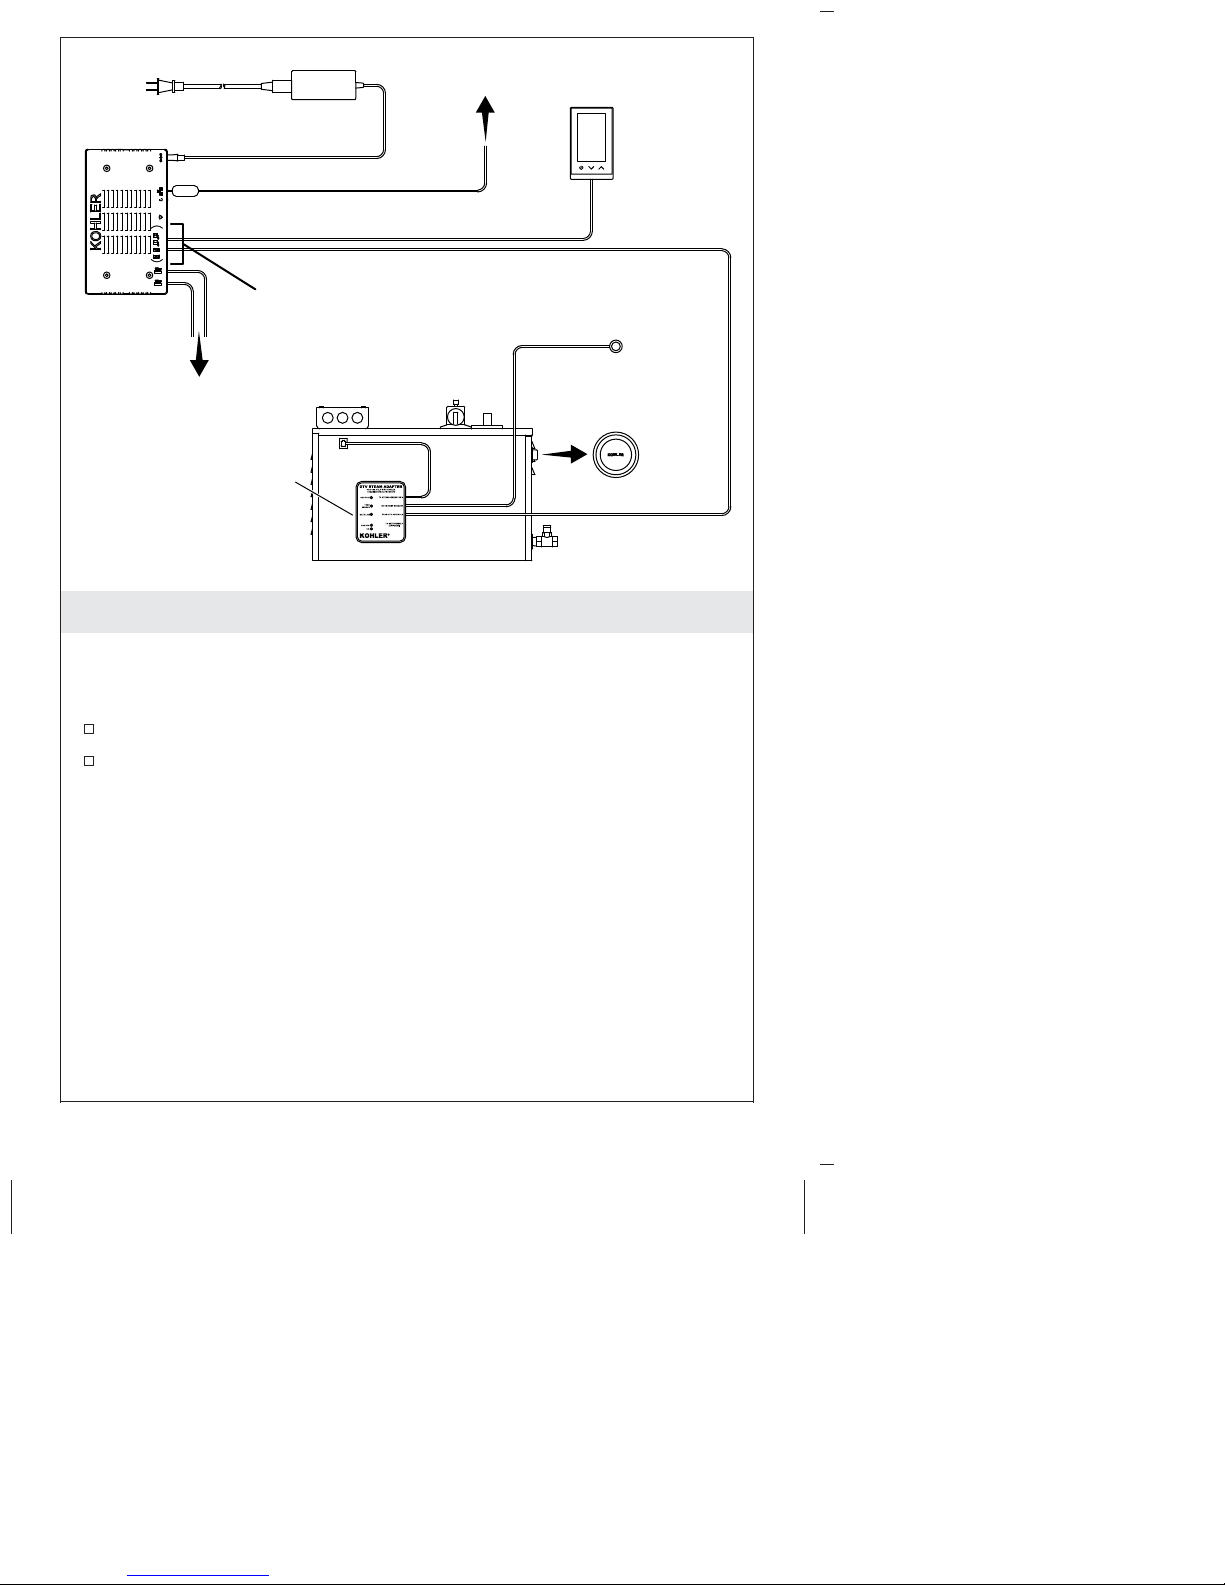
1. DTV+ System Layout
The K-99695 system controller powers the interface(s) and controls the
steam generator and other system components.
Determine the locations of all required components.
A 25’ (7.6 m) data cable is provided to connect the steam adapter
to the controller. If the steam generator is not within 25’ (7.6 m) of
the controller, add a telephone-style extension cable.
Before Operating the System For the First Time:
Download and install the latest software for connected components.
This may take an hour or more to complete based on system
configuration and internet connection speed. Do not disconnect the
power from any component during software download and
installation.
Kohler Co. 5 1235393-2-C
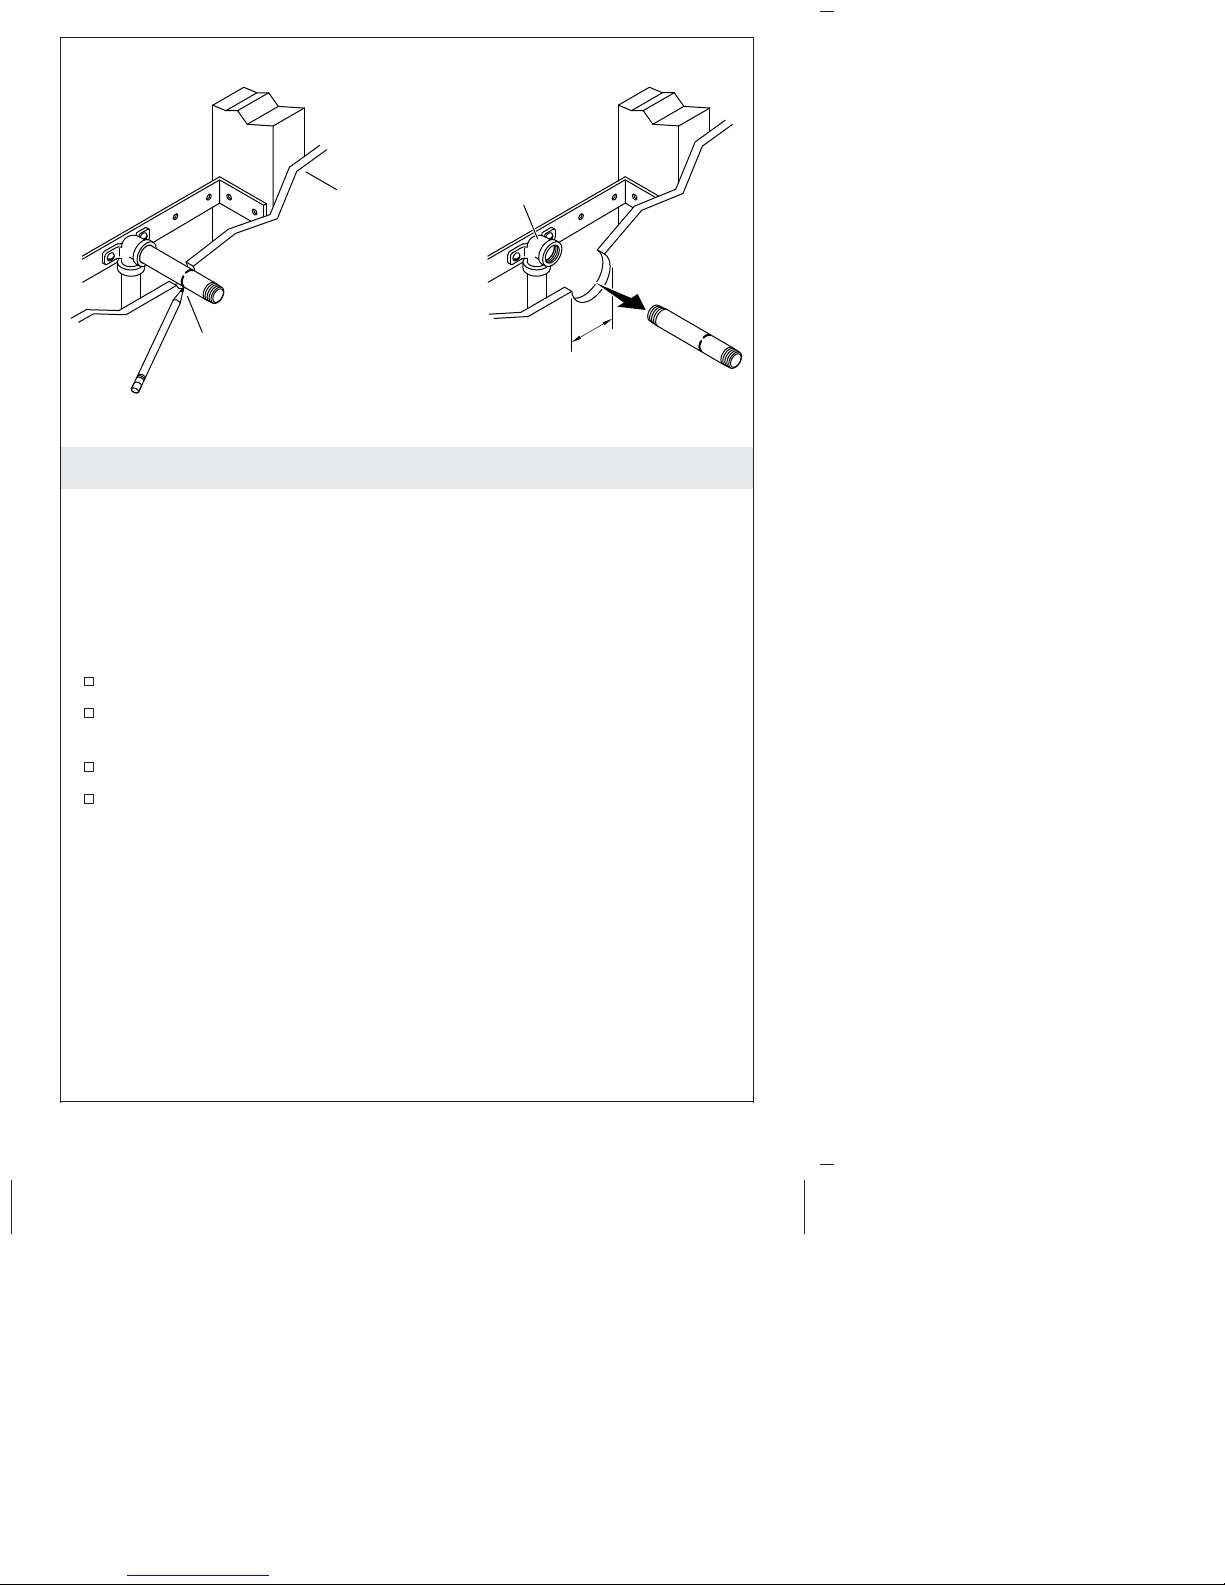
Finished
Wall
1/2" NPT
Elbow
Mark the temporary nipple
at the finished wall.
2-1/2"
(64 mm)
2. Prepare the Site
NOTE: This section continues the installation described in the
steam generator installation instructions. Refer to the steam
generator installation instructions for more information, if needed.
NOTE: If two steam heads are used, there must be at least 12-1/2″
(318 mm) between the center of each hole. The steam heads do not
need to be located on the same wall. Two steam heads can be
mounted on different walls to improve steam distribution.
Install the finished wall.
Drill or cut a 2-1/2″ (64 mm) hole centered around the elbow in
the wall.
Mark the temporary pipe nipple at the finished wall surface.
Remove the temporary pipe nipple from the elbow.
1235393-2-C 6 Kohler Co.
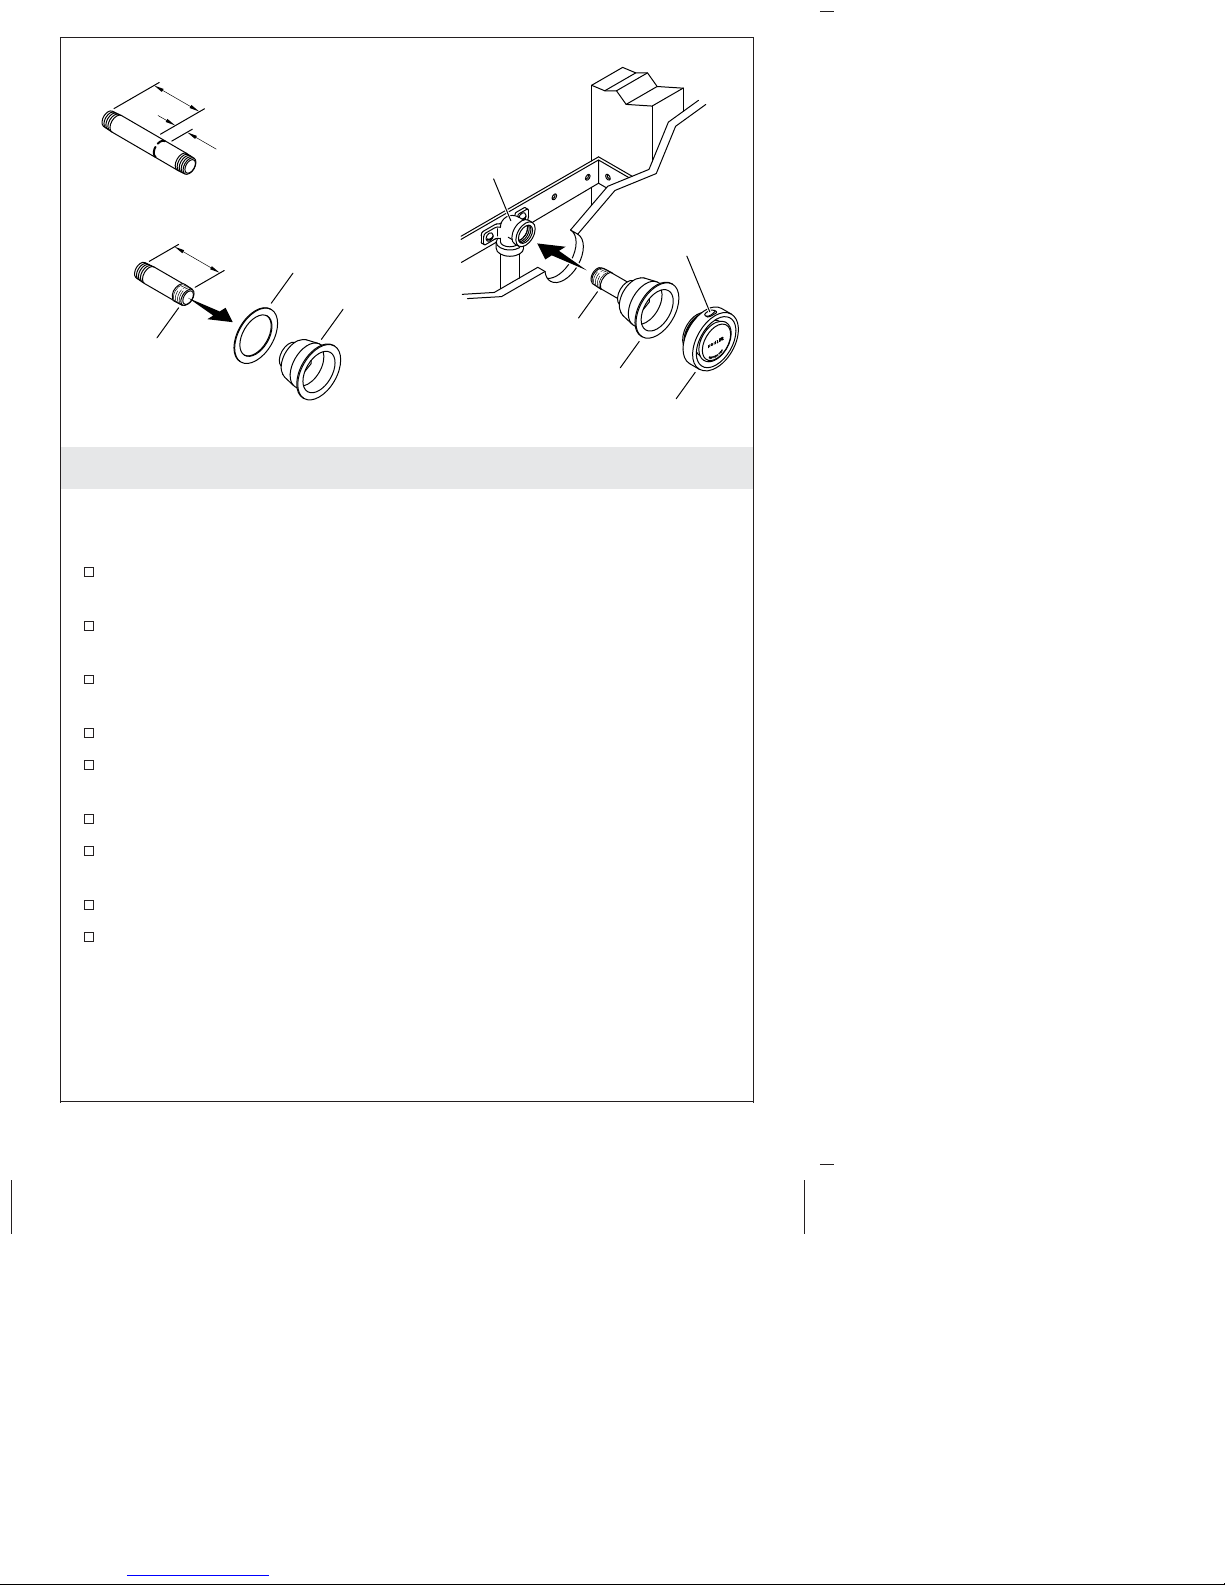
X
Subtract 1-1/4"
(32 mm) from the
Elbow
marked length.
X
Gasket
Housing
Apply thread
Apply
thread
sealant.
sealant.
Flange
Steam Head
3. Install the Steam Head(s)
NOTICE: Do not obstruct the steam head with shut-off valves,
plugs, or caps.
Subtract 1-1/4″ (32 mm) from the marked length on the
temporary nipple to determine the appropriate nipple size.
Choose a nipple length within 1/8″ (3 mm) of the appropriate
size.
Apply thread sealant to one end of the nipple and thread into the
housing until hand-tight.
Apply thread sealant to the other end of the nipple.
Position the gasket onto the housing so it will sit between the
finished wall and the housing flange.
Usea1″ socket to thread the housing into the elbow.
Make sure the gasket is compressed to achieve a good seal
around the housing.
If needed, use an appropriate sealant to achieve a watertight seal.
Press the steam head into the housing with the well positioned at
the top.
Well
Kohler Co. 7 1235393-2-C
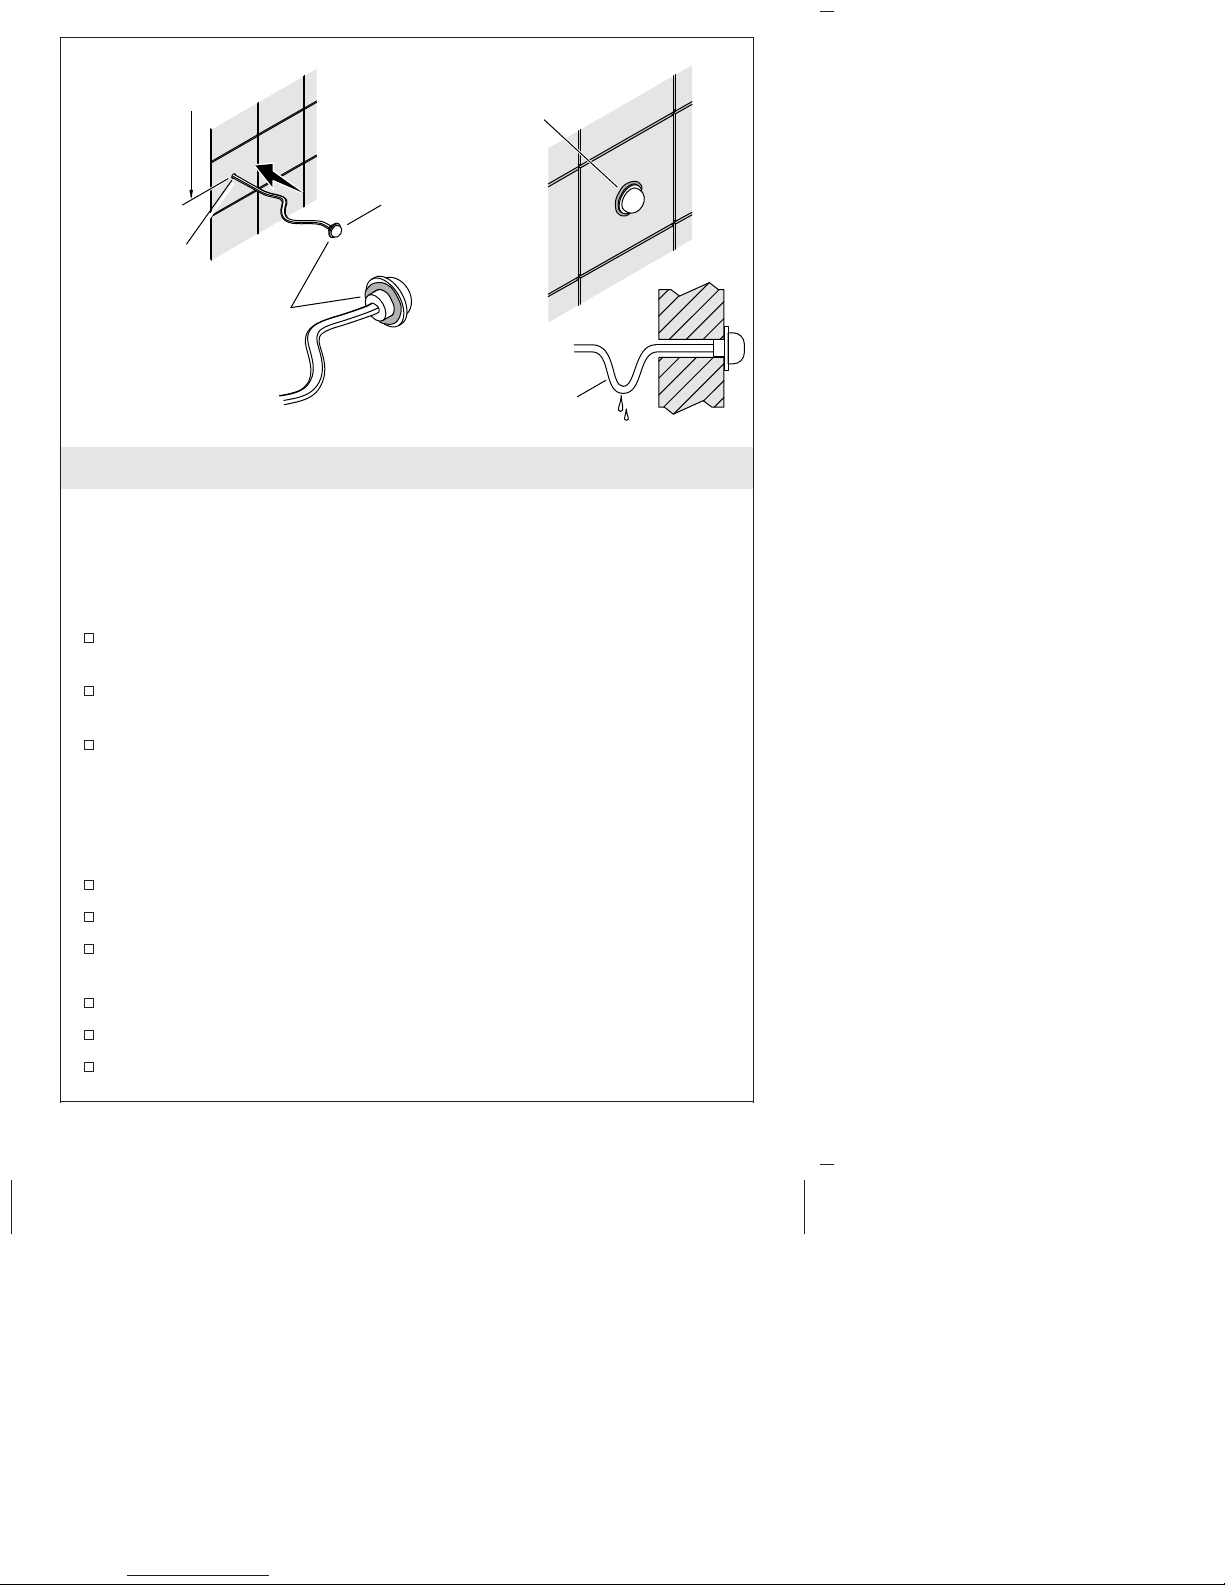
Apply silicone
5" (127 mm)
From Ceiling
Sensor
Drilled Hole
sealant.
Apply silicone
sealant.
Back View
Drip Loop
4. Install the Temperature Sensor
IMPORTANT! Do not locate the temperature sensor directly above
the steam head. Locate the temperature sensor on the wall opposite
the steam head.
IMPORTANT! Make a drip loop in the temperature sensor wire to
prevent moisture from following the wire to the steam generator.
Make sure the power is turned off at the main breaker panel
before proceeding.
Locate the temperature sensor on the wall 5″ (127 mm) down
from the ceiling, on the wall opposite the steam head.
Drill a 3/8″ (K-1737-K1, K-1838-K1) or 7/16″ (K-5548-K1,
K-5549-K1) hole at the selected location.
IMPORTANT! Do not pinch, nail, wedge, or use undue force when
handling the sensor wire. Any damage may result in temperature
sensor failure.
Insert the temperature sensor wire through the drilled hole.
Route the wire behind the wall to the steam generator location.
Apply a small bead of silicone sealant to the back of the sensor
housing. Do not let any sealant contact the sensor probe.
Press the sensor firmly onto the wall.
Temporarily secure the sensor in place with tape.
Allow the silicone sealant to cure before use.
1235393-2-C 8 Kohler Co.

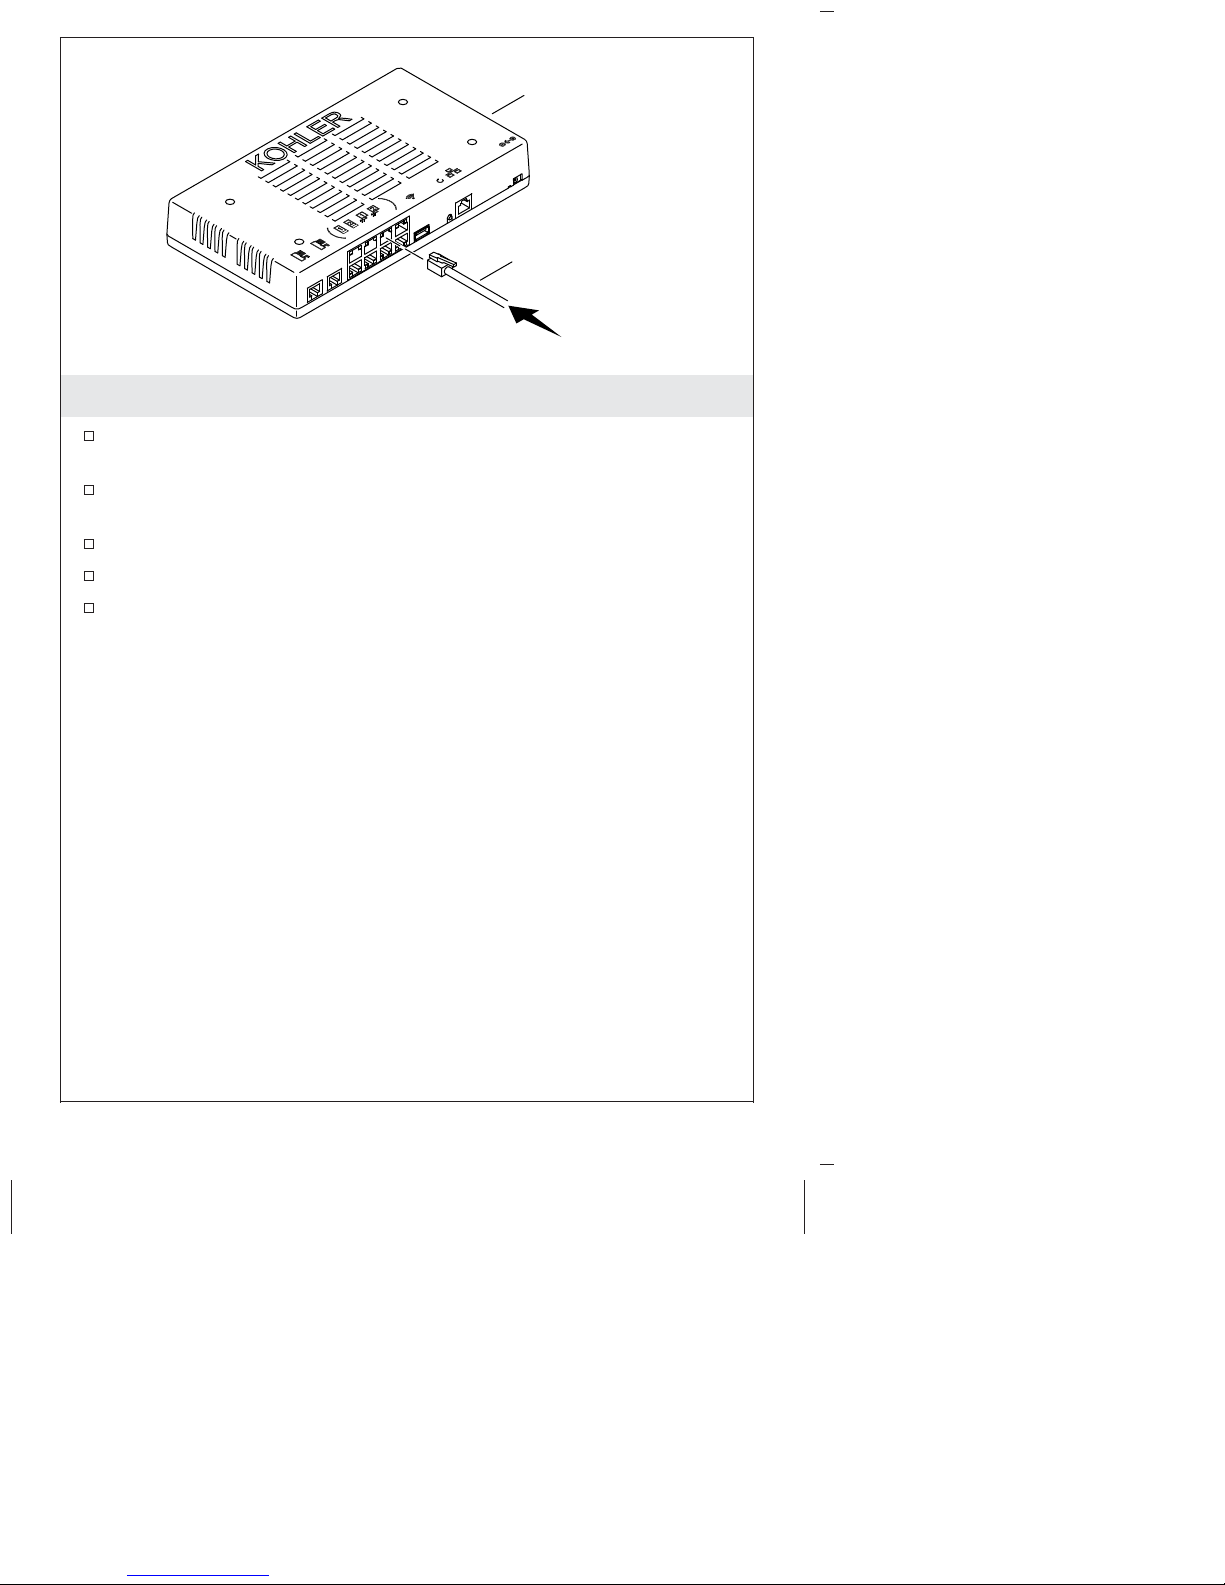
Install the Temperature Sensor (cont.)
Loop the cable through the ferrite on the adapter end of the cable,
and snap the ferrite closed. Use the cable tie provided to encircle
and lightly secure the looped cable and ferrite.
Kohler Co. 9 1235393-2-C
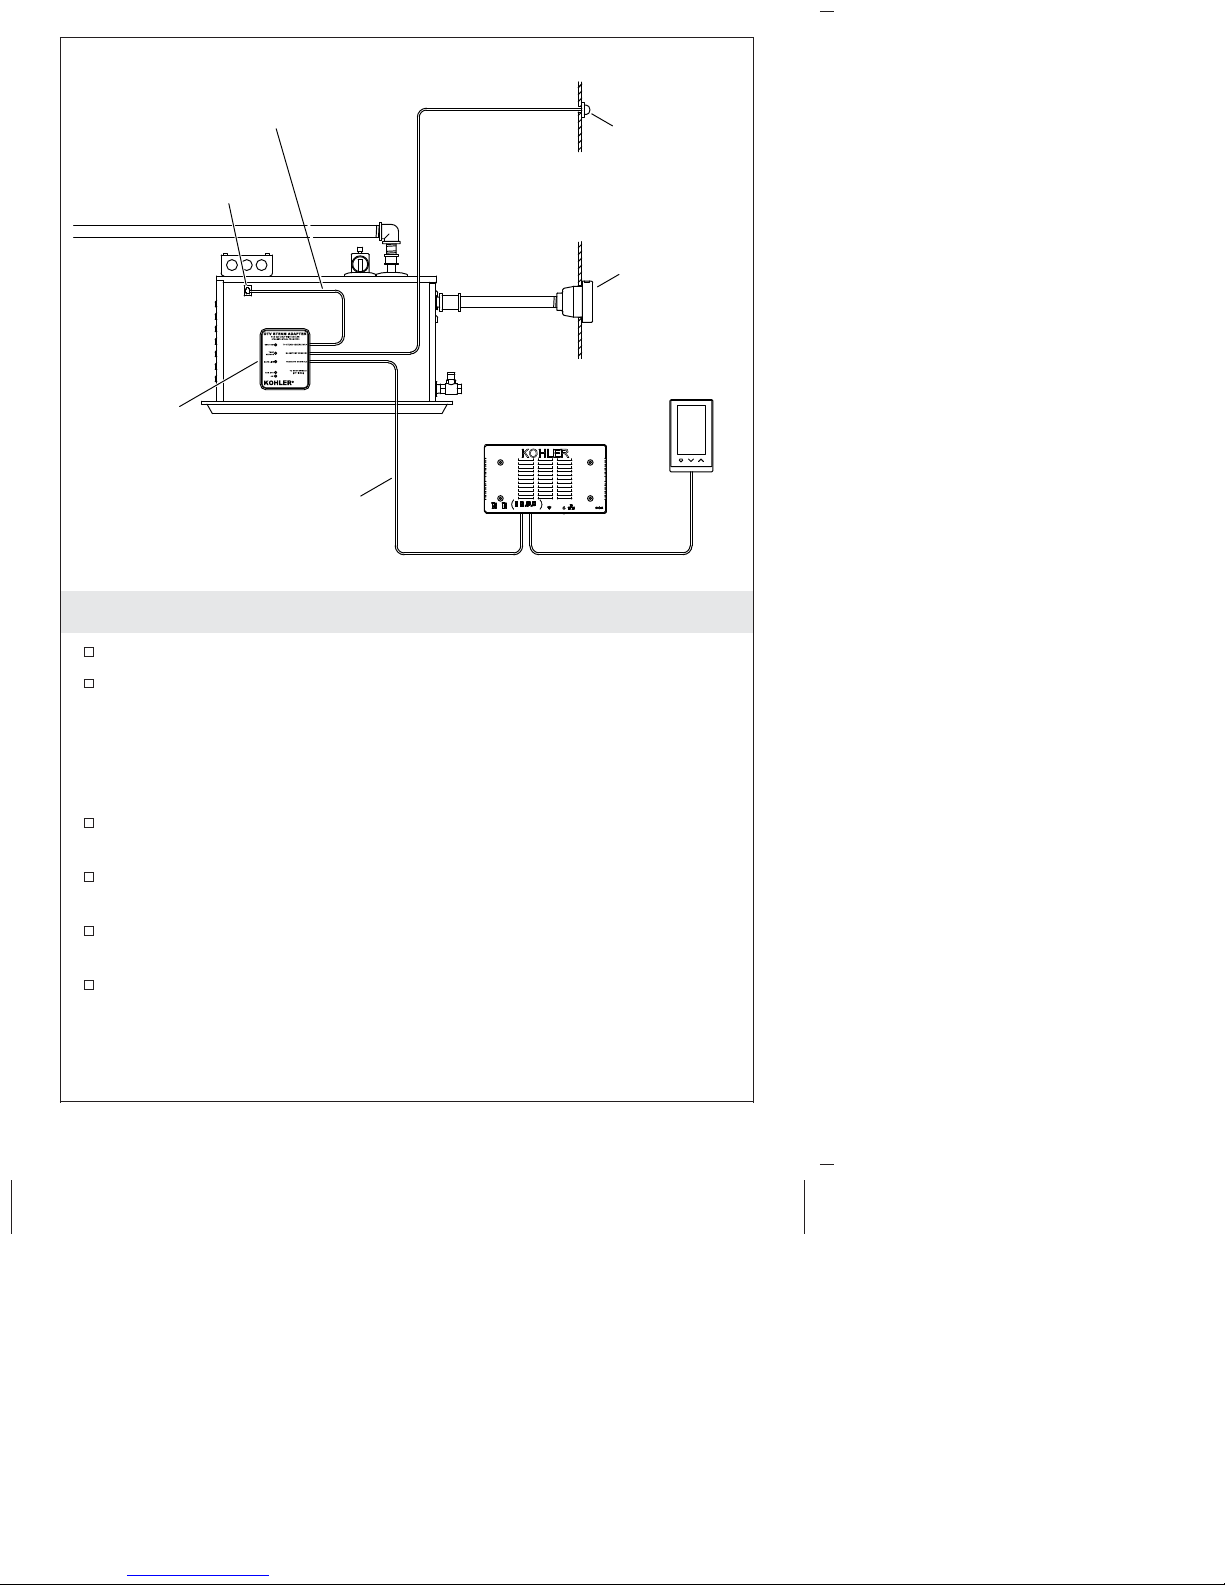
10" (254 mm) Silver
or 16" (406 mm) White
Crossover Cable
Control Cable
Input (Location
Varies By Model)
Steam
Adapter
Controller
25' (7.6 m)
Data Cable
5. Install the Adapter – Single Steam Head
Remove the adhesive backing from the steam adapter.
Mount the adapter firmly to the side of the steam generator.
Temperature
Sensor
Steam
Head
Interface
NOTICE: Do not pinch, nail, wedge, or use undue force when
handling the silver crossover cable. Any damage may result in
adapter failure. If the adapter is not installed immediately, protect
the cable ends with tape or other shielding material.
Connect the 10″ (254 mm) silver or 16″ (406 mm) white crossover
cable to the steam adapter and the steam generator.
Connect the temperature sensor wire to the corresponding port
on the steam adapter.
Connect the data cable to the steam adapter and route the cable
to the controller installation location.
Install the terminator into the ″Optional″ port on the steam
adapter.
1235393-2-C 10 Kohler Co.
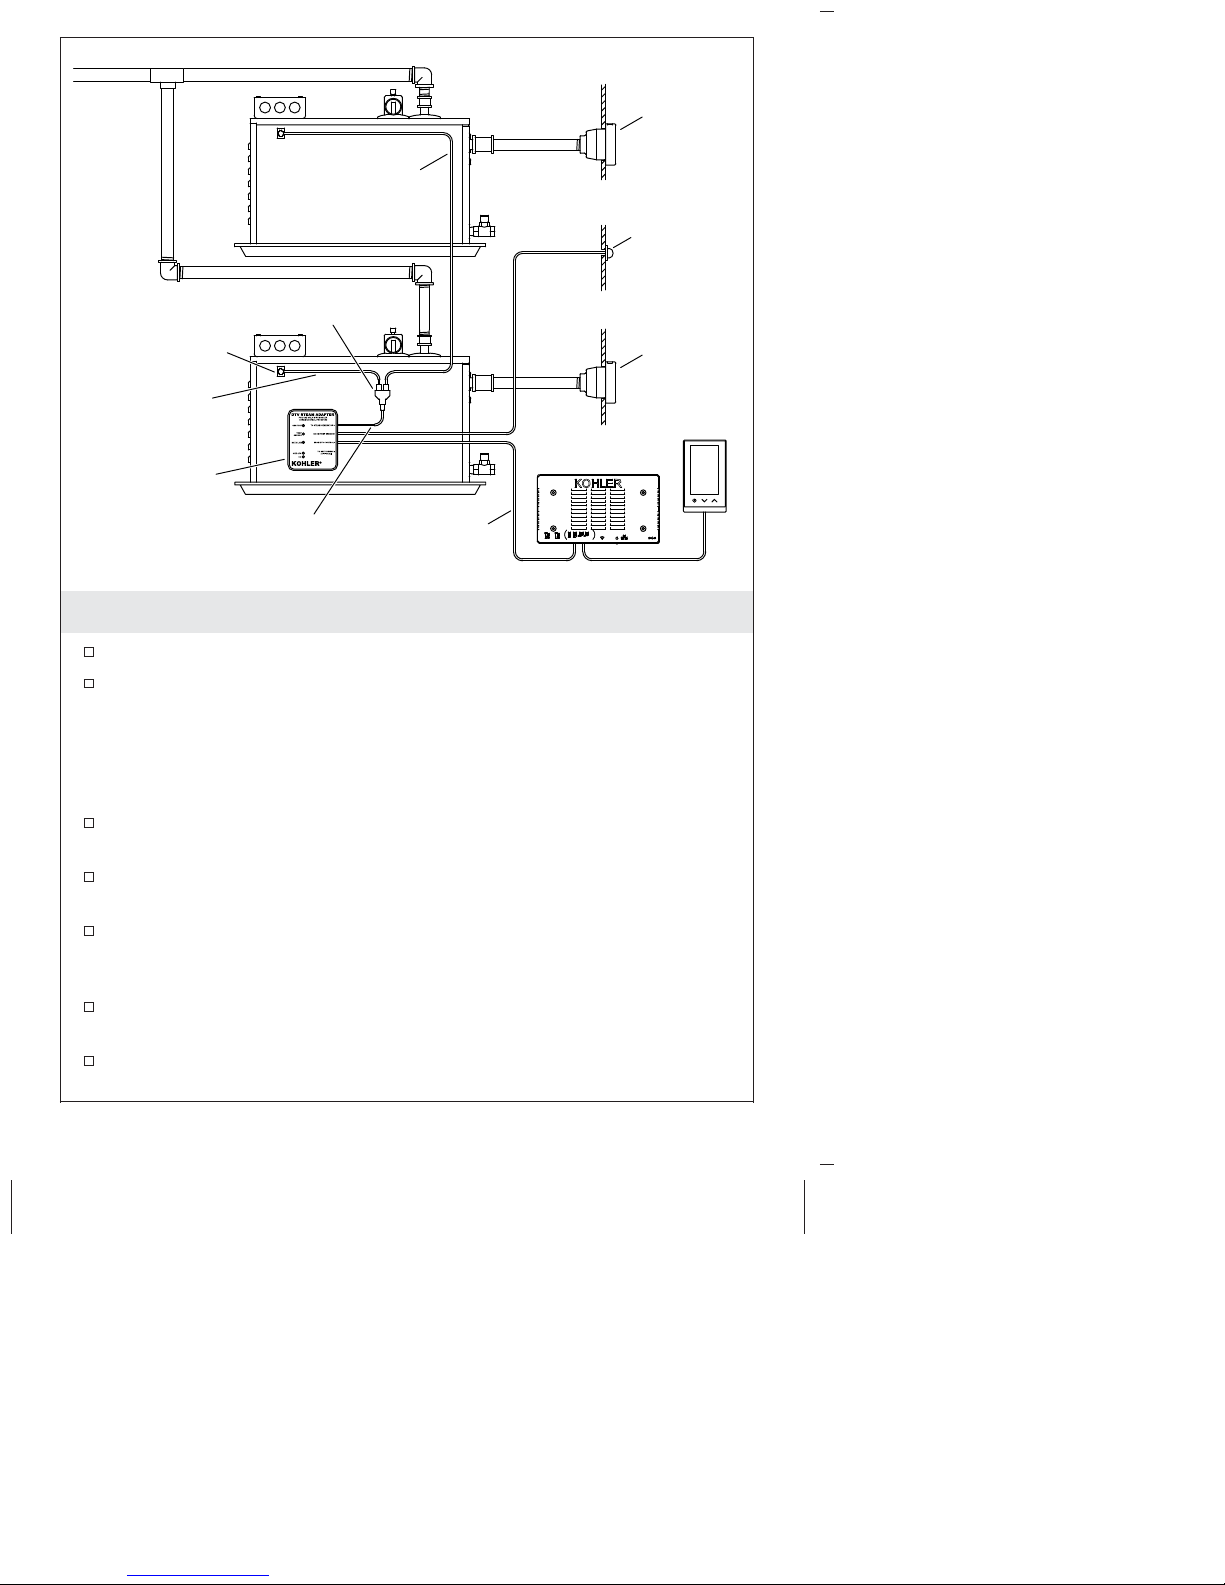
72" (1829 mm)
or 78" (1981 mm)
Black StraightThrough Cable
Steam
Head
Temperature
Sensor
Control Cable
Input (Location
3-Way Straight
Coupler
Varies By Model)
10" (254 mm)
Black StraightThrough Cable
Controller
Steam Adapter
10" (254 mm) Silver or 16"
(406 mm) White Crossover Cable
25' (7.6 m)
Data Cable
6. Install the Adapter – Dual Steam Head
Remove the adhesive backing from the steam adapter.
Mount the adapter firmly to the side of the steam generator.
NOTICE: Do not pinch, nail, wedge, or use undue force when
handling the white crossover cable. Any damage may result in
adapter failure. If the adapter is not installed immediately, protect
the cable ends with tape or other shielding material.
Connect the 10″ (254 mm) silver or 16″ (406 mm) white crossover
cable to the steam adapter and the inlet side of the 3-way coupler.
Connect the 10″ (254 mm) black straight-through cable to the
output side of the 3-way coupler and the first generator.
Connect the 72″ (1829 mm) or 78″ (1981 mm) black
straight-through cable to the output side of the 3-way coupler
and the second generator.
Connect the temperature sensor wire to the corresponding port
on the steam adapter.
Connect the data cable to the steam adapter and route the cable
to the controller installation location.
Steam
Head
Interface
Kohler Co. 11 1235393-2-C

Install the Adapter – Dual Steam Head (cont.)
Install the terminator into the ″Optional″ port on the steam
adapter.
1235393-2-C 12 Kohler Co.
Controller
Data Cable
From Steam
Adapter
7. Complete the Installation
If not already installed, install the K-99695 system controller
according to the instructions packed with the product.
Connect the data cable into one of the eight grouped component
ports on the controller.
Turn on the water supply.
Restore the power at the main breaker panel.
For information on system setup and operation, refer to the guide
on the controller product page at www.us.kohler.com.
Before Operating the System For the First Time:
Download and install the latest software for connected components.
This may take an hour or more to complete based on system
configuration and internet connection speed. Do not disconnect the
power from any component during software download and
installation.
Kohler Co. 13 1235393-2-C
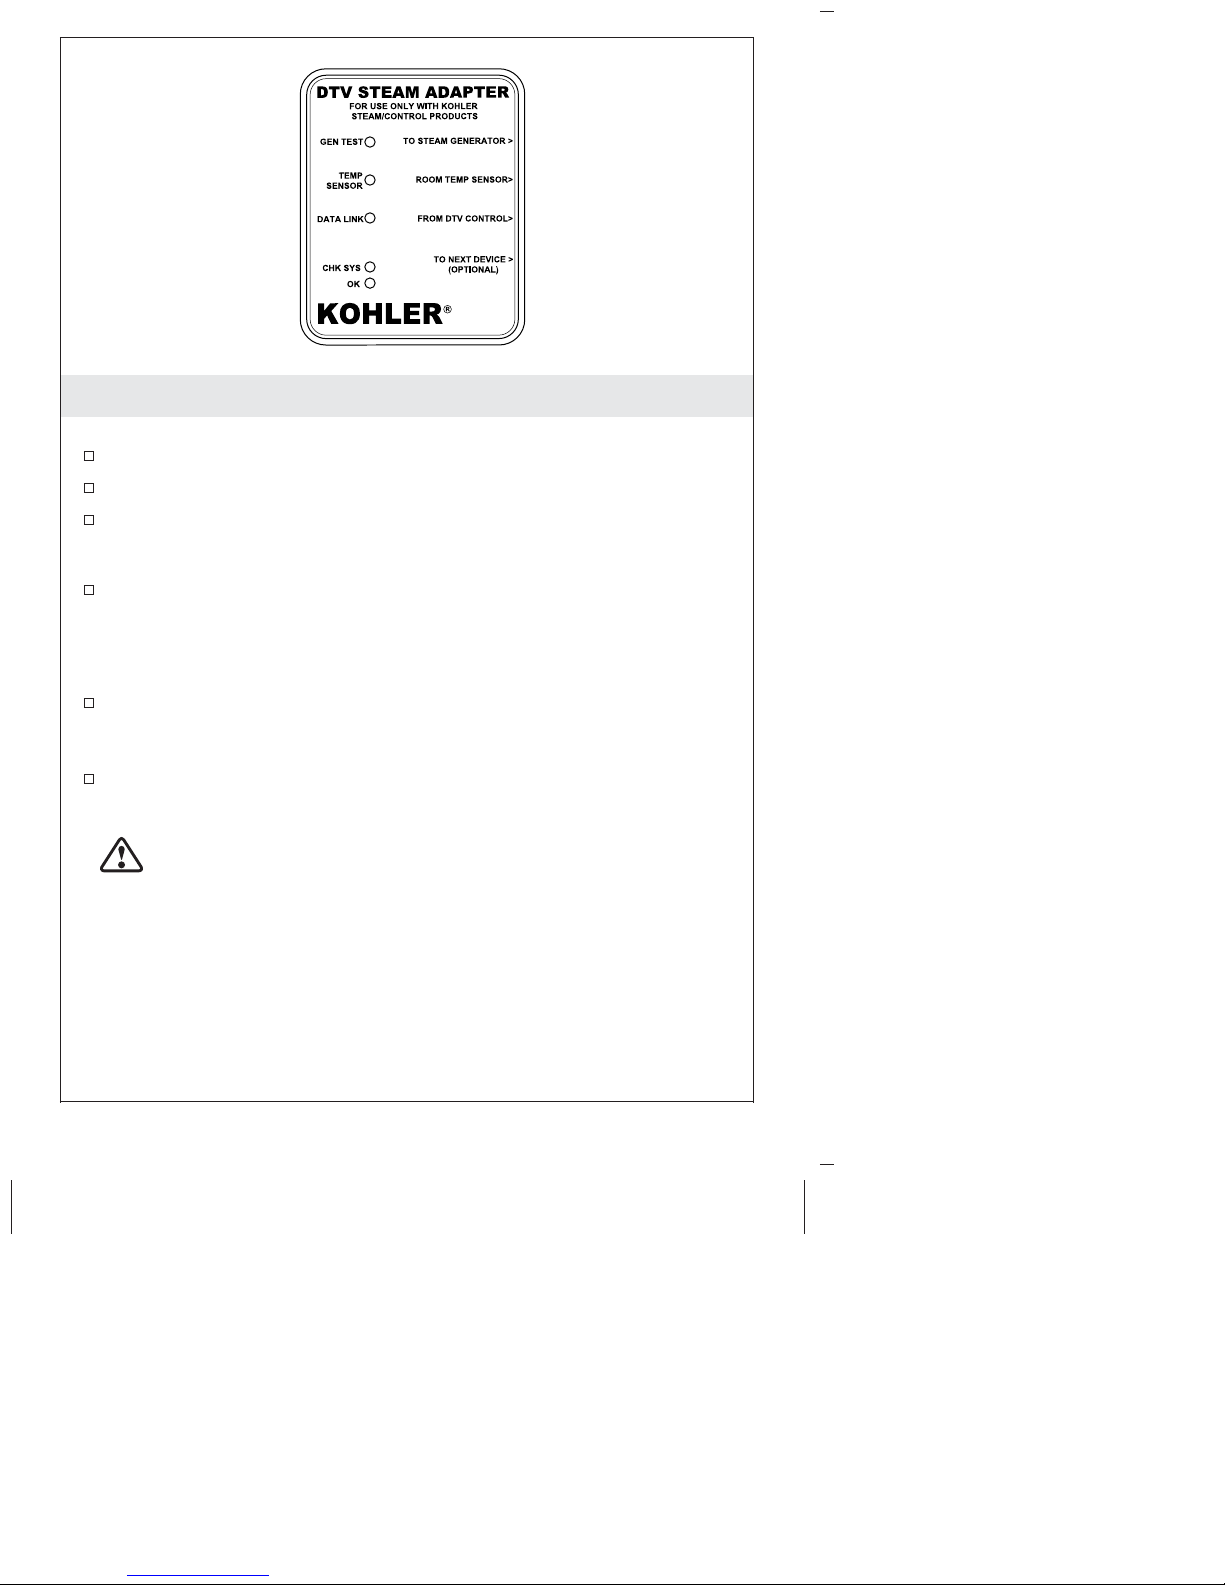
Operation
Status LED Lights
″GEN TEST″ = steam generator connection/function.
″TEMP SENSOR″ = temperature sensor connection/function.
″DATA LINK″ = data cable connection/function.
Normal Operation
Each of the main LEDs (″GEN TEST,″″TEMP SENSOR,″ and
″DATA LINK″) blinks green once every second (1 second ON, 1
second OFF).
Abnormal Operation
One or more of the main LED status lights (″GEN TEST,″″TEMP
SENSOR,″ and ″DATA LINK″) is OFF, ON flashing red, ON solid
green, or ON solid red.
Refer to the ″Troubleshooting″ section for more information.
Power Clean Function
NOTICE: Users will be automatically reminded to use power clean
after 600 minutes of steam generator use. The steam generator may
be run three more times before the power clean function must be
run. Failure to initiate power clean after the third reminder will
result in the system locking. Power clean must then be run to
resume steam operation.
NOTE: When the power clean function is activated, water will
discharge from the steam head.
1235393-2-C 14 Kohler Co.
WARNING: Risk of personal injury. Stay out of the
showering area when the power clean function is activated.

Care and Cleaning
For best results, keep the following in mind when caring for your
KOHLER product:
•
Always test your cleaning solution on an inconspicuous area
before applying to the entire surface.
•
Wipe surfaces clean and rinse completely with water immediately
after applying cleaner. Rinse and dry any overspray that lands on
nearby surfaces.
•
Do not allow cleaners to soak on surfaces.
•
Use a soft, dampened sponge or cloth. Never use an abrasive
material such as a brush or scouring pad to clean surfaces.
For detailed cleaning information and products to consider, visit
www.kohler.com/clean. To order Care & Cleaning information, call
1-800-456-4537.
Troubleshooting
NOTE: For DTV+ system troubleshooting, refer to the guide on
the K-99695 controller product page at www.us.kohler.com.
NOTE: For service parts information, visit your product page at
www.kohler.com/serviceparts.
This troubleshooting guide is for general aid only. For service and
installation issues and concerns, call 1-800-4KOHLER.
Symptoms Probable Causes Recommended Action
1. Error 0140 is
displayed.
Kohler Co. 15 1235393-2-C
A. Tank water level is
too low (green
status light on
steam generator is
on).
B. Tank temperature
limit has been
exceeded (green
status light on
steam generator is
off).
A. Inspect the water
inlet screen and clean
if necessary. Ensure
the water supply
valve is on and that
water is being
supplied to the steam
generator.
B. Call the Customer
Care Center using
the information
provided on the back
page of this manual.

Troubleshooting (cont.)
Symptoms Probable Causes Recommended Action
2. Error 0120 is
displayed.
C. Internal steam
generator
components are
not functioning
properly.
A. The temperature in
the steam room
has exceeded the
maximum
allowable level.
C. Call the Customer
Care Center using
the information
provided on the back
page of this manual.
A1. Reset power to the
steam generator and
ventilate the steam
room to remove
excess heat.
A2. Relocate the
temperature sensor
away from the steam
head or other heat
source.
A3. Call the Customer
Care Center using
the information
provided on the back
page of this manual.
3. Error 0104 is
displayed.
A. Temperature sensor
not connected.
B. Temperature sensor
is damaged.
A. Connect the
temperature sensor.
B. Call the Customer
Care Center using
the information
provided on the back
page of this manual.
4. Error 0408 is
displayed.
A. A communication
error has occurred.
A. Perform a system
reset on the user
interface.
5. Lights on the
adapter are off.
A. Inadequate power
is supplied to the
steam generator
(green status light
on steam generator
is off).
A. Provide proper
power to the steam
generator. If
necessary, use the
provided test kit to
ensure the steam
generator is working
properly.
B. The user interface
is not receiving
power from the
steam generator
B. Use the provided test
kit and instructions
to identify the source
of the problem.
(green status light
on the steam
generator is on).
1235393-2-C 16 Kohler Co.

Troubleshooting (cont.)
Symptoms Probable Causes Recommended Action
6. ″GEN TEST″
light is
blinking red.
C. The user interface
is damaged (green
status light on the
steam generator is
on).
A. An error has
occurred with the
steam generator.
C. Call the Customer
Care Center using
the information
provided on the back
page of this manual.
A. Check the error code
on the user interface.
See the
corresponding error
code in this
document.
7. ″TEMP
SENSOR″ light
is blinking red.
A. The temperature
sensor is not
connected.
B. The temperature
sensor is damaged.
A. Connect the
temperature sensor.
B. Call the Customer
Care Center using
the information
provided on the back
page of this manual.
8. ″DATA LINK″
light is
blinking red.
A. A connection to the
controller has not
yet been
A. Wait for the
connection to be
made.
established.
B. A connection to the
controller cannot
be established.
B. Remove and reattach
the cable that
connects the adapter
to the controller.
Inspect the cable for
damage and replace
if necessary.
C. An error has
occurred.
C1. Check the error code
on the user interface.
See the
corresponding error
code in this
document.
C2. Reset power to the
steam generator and
controller.
C3. Perform a system
reset on the user
interface.
Kohler Co. 17 1235393-2-C

Troubleshooting (cont.)
Symptoms Probable Causes Recommended Action
9. Steam menu
disappears
after requesting
steam.
A. Cables between the
steam generator(s)
and adapter are
installed
incorrectly.
A1. Reinstall the black
and/or white cable(s)
between the steam
generator(s) and
adapter according to
the instructions in
the installation
guide.
A2. Call the Customer
Care Center using
the information
provided on the back
page of this manual.
10. Display does
not show
steam function.
A. Inadequate power
is supplied to the
steam generator
(green status light
on steam generator
is off).
A1. Provide proper
power to the steam
generator. Use the
provided test kit, if
necessary, to ensure
the steam generator
is working properly.
A2. Call the Customer
Care Center using
the information
provided on the back
page of this manual.
B. The adaptor is
damaged (green
status light on
steam generator is
B1. Use the provided test
kit and instructions
to identify the source
of the problem.
on).
B2. Call the Customer
Care Center using
the information
provided on the back
page of this manual.
11. Water from
steam head.
A. Normal operation. A1. A small amount of
water discharged
from the steam head
just before, during,
and just after steam
use is normal.
1235393-2-C 18 Kohler Co.

Troubleshooting (cont.)
Symptoms Probable Causes Recommended Action
A2. Water discharge from
the steam head
during the Power
Clean cycle is
normal.
B. Water supply lines
are connected
incorrectly.
B. Review the steam
generator installation
guide and reinstall
the lines at the
proper locations.
C. Internal steam
generator
components are
not functioning
properly.
C1. Turn off water
supply to the steam
generator. If possible,
drain the tank.
Slowly open the
water supply valve
to refill the steam
generator.
C2. Call the Customer
Care Center using
the information
provided on the back
page of this manual.
12. No steam after
5 minutes of
activating the
steam.
A. An error has
occurred.
A. Check the user
interface for error
messages. If an error
message appears, see
the appropriate error
message
troubleshooting.
B. The temperature
setpoint has
already been
reached.
B. Confirm the
temperature setpoint
is greater than the
current steam room
temperature. Increase
the temperature
setpoint if desired.
C. Inadequate power
is supplied to the
steam generator
(green status light
on steam generator
is off).
C1. Provide proper
power to the steam
generator. If
necessary use the
provided test kit to
ensure the steam
generator is working
properly.
Kohler Co. 19 1235393-2-C

Troubleshooting (cont.)
Symptoms Probable Causes Recommended Action
C2. Call the Customer
Care Center using
the information
provided on the back
page of this manual.
D. Cables between the
steam generator(s)
and adapter are
installed
incorrectly.
E. Steam line or
steam head is
blocked.
F. Steam generator is
damaged.
13. Steam stopped. A. An error has
occurred.
B. The session time
limit was met or
the temperature
setpoint was met.
D. Reinstall the black
and/or white cable(s)
between the steam
generator(s) and
adapter according to
the instructions in
the installation
guide.
E. Check the steam
head and steam line
for blockages. Repair
as necessary.
F1. Use the provided test
kit to check steam
generator function.
F2. Call the Customer
Care Center using
the information
provided on the back
page of this manual.
A. Check the user
interface for error
messages. If an error
message appears, see
the appropriate error
message
troubleshooting.
B. Restart the session
timer or increase the
temperature setpoint
to restart steam.
Warranty
KOHLER Steam Generator
THREE-YEAR LIMITED WARRANTY
Kohler steam generator units manufactured after September 15, 2001,
are warranted to the original consumer purchaser to be free of
1235393-2-C 20 Kohler Co.

Warranty (cont.)
manufacturing defects in material and workmanship during normal
residential usage for three (3) years from the date of installation. This
warranty only applies to KOHLER steam generator units installed in
the United States of America, Canada or Mexico (″North America″).
If a defect is found in normal residential usage, Kohler Co. will, at its
election, repair or replace the unit, or make appropriate adjustment.
Damage caused by accident, misuse or abuse is not covered by this
warranty. Proof of purchase (original sales receipt) must be provided to
Kohler Co. with all warranty claims. Kohler Co. is not responsible for
labor charges, removal charges, installation, or other consequential
costs. In no event shall the liability of Kohler Co. exceed the purchase
price of the unit.
If this unit is used commercially or installed outside of North America,
Kohler Co. warrants the unit to be free from defects in material and
workmanship for one (1) year from the date of installation with all
other terms of this warranty applying except duration.
To obtain warranty service contact Kohler Co., either through your
Dealer, Plumbing Contractor, Home Center or E-tailer or by writing
Kohler Co., Attn: Customer Care Center, 444 Highland Drive, Kohler,
WI 53044, USA, or by calling 1-800-4-KOHLER (1-800-456-4537) from
within the USA and Canada, and 001-800-456-4537 from within Mexico,
or visit www.kohler.com within the USA, www.ca.kohler.com from
within Canada, or www.mx.kohler.com in Mexico.
KOHLER CO. AND/OR SELLER ARE PROVIDING THESE
WARRANTIES IN LIEU OF ALL OTHER WARRANTIES,
EXPRESSED OR IMPLIED, INCLUDING BUT NOT LIMITED TO
THE IMPLIED WARRANTIES OF MERCHANTABILITY AND
FITNESS FOR A PARTICULAR PURPOSE. KOHLER CO. AND/OR
SELLER DISCLAIM ANY LIABILITY FOR SPECIAL, INCIDENTAL
OR CONSEQUENTIAL DAMAGES. Some states/provinces do not
allow limitations on how long an implied warranty lasts, or the
exclusion or limitation of special, incidental or consequential
damages, so these limitations and exclusions may not apply to you.
This warranty gives you specific legal rights. You may also have
other rights, which vary from state/providence to state/providence.
This is Kohler Co.’s exclusive written warranty.
Kohler Co. 21 1235393-2-C
Guide d’installation et d’entretien
Kit d’adaptateur de vapeur / Collecteur de
vapeur pour DTV+
INSTRUCTIONS IMPORTANTES
INFORMATIONS IMPORTANTES SUR
LA SÉCURITÉ
AVERTISSEMENT: Lors de l’utilisation de cette unité, les
précautions de base doivent toujours être suivies:
DANGER: Risque d’électrocution. Déconnecter
l’alimentation électrique pour la zone de travail au niveau du
disjoncteur principal avant d’exécuter ces étapes
d’installation.
AVERTISSEMENT: Risque de blessures. Si l’on commence à
ressentir une gêne pendant que l’on prend le bain à vapeur,
arrêter l’unité. Se refroidir avec la douche, ouvrir la porte, ou
sortir de l’unité.
AVERTISSEMENT: Risque de réaction allergique. Avant
d’ajouter des huiles, des traitements aromathérapiques ou des
produits de soins de la peau au puits d’aromathérapie,
s’assurer qu’ils ne causeront pas de réaction allergique pour
l’utilisateur.
AVERTISSEMENT: Risque de blessures. Ce bain à vapeur
peut ne pas être approprié pour être utilisé par les femmes
enceintes, les personnes qui ont des problèmes de cœur, une
hypertension artérielle ou des problèmes de circulation, ou
des personnes qui sont sous l’influence d’alcool, qui prennent
des drogues, ou qui sont suivies par un médecin. Un bain à
vapeur peut soumettre le corps à un stress exagéré, comme le
font les bains chauds, les douches, ou les saunas.
AVERTISSEMENT: Risque de blessures. NE PAS
consommer de boissons alcoolisées et ne pas prendre de
médicaments ou de drogues avant ou pendant l’utilisation du
bain à vapeur. L’alcool et les drogues affectent le jugement
mental, augmentent le risque d’hyperthermie de manière
significative, et inhibent les fonctions corporelles, comme le
Kohler Co. Français-1 1235393-2-C
 Loading...