

Page 1
KODAK PALMPIX Camera for the
P A LM m500 Handheld Series
User’s Guide
http://www.kodak.com/go/palmpix
Page 2

Eastman Kodak Company
343 State Street
Rochester, New York 14650
© Eastman Kodak Company, 2001
Kodak is a trademark of Eastman Kodak Company.
HOTSYNC and PALMCONNECT are registered trademarks and PALM, the PALM
logo and PALMPIX are trademarks of PALM, Inc.
PALMPIX is used under license by Eastman Kodak Company.
P/N 6B5476
Page 3

Table of Contents
1 Introduction ...........................................................................1
PALMPIX Features......................................................................1
Camera Overview.........................................................................2
2 KODAK PALMPIX Camera Software ............................ 5
On the KODAK PALMPIX Camera CD .................................. 5
Before You Begin.............. ...................................................6
PALM HOTSYNC Tech nology........................... .................6
Installing the Software............................. ...............................7
Customizing the HOTSYNC Transfer Settings................9
Changing the Transfer Settings on a PC....................10
Changing the Transfer Settings
on a MACINTOSH Computer....................................... .....11
3 Using Your PALMPIX Camera .......................................13
Connecting the Camera.......................... ................................13
Releasing the Camera.............................................................14
Starting the PALMPIX Image Capture Software.......... .14
Using Your Camera............. .....................................................15
Focusing the Camera............... ...............................................17
Taking Pictures.......................... ...............................................18
Taking Close-Up Pictures.......................................................19
Photographing a Business Card................................ .........20
Photographing a Full Page ....................................... .............21
i
Page 4

4 Working With Your Pictures .............................................1
Selecting and Viewin g Pictures.................................... ...........1
Renaming Pictures.....................................................................2
Deleting Pictures ............ ...........................................................2
Transferring Pictures To Your Computer ..........................3
Specifying the Pictures to Tran sfer.......... ..........................4
Beaming Pictures to Another Handheld............................. 5
Converting Images on Your Handheld.................................6
Storing Pictures on Your Handheld........... .........................6
5 Working With an Expansion Card ..................................7
Storing Pictures on an Expansion Card.............................8
Viewing Pictures on a Card.....................................................9
Using a Computer to Access Pictures on the Card......10
Converting PPX Pictures on a PC..................................10
Converting PPX Pictures on a
MACINTOSH Computer.......................................................11
Accessing JPEG Card Images with
Your Computer.... ........................................ ........................12
Transferring Imag es from Computer to Card............12
6 Getting Help .....................................................................13
Software Help................................................................... ........13
Kodak Online Services..................................................... ........13
Kodak Fax Support.................. ................................................13
Telephone Customer Support................. ...................... ........14
Before You Call....................................................................14
ii
Page 5

Telephone Numbers.. ...........................................................14
7 Appendix ..............................................................................17
PALMPIX Camera Specifications................ .........................17
PALMPIX Camera Tip s................................................... .........19
Camera Safety and Maintenance.......................................19
Warranty...................................................................................20
Limited Warranty..............................................................20
Limited Warranty Coverage...........................................20
Limitations..........................................................................20
Your Rights............. ........................................ ......................21
Outside the United States.... ...................... ...................21
Regulatory Informat ion........................... ...............................22
FCC Compliance and Advisory........................................22
Canadian DOC Statem ent......................... .................... 2 3
VCCI Class B ITE................................................................ 23
iii
Page 6

Page 7

Chapter 1
1 Introduction
Congratulations on purchasing the KODAK PALMPIX Camera (PALMPIX
Camera) for the PALM m500 Handheld Series, the camera that turns your
PALM Handhe ld in to a digi ta l ca mera . Install the software from the KODAK
PALM P I X Camera CD be fore you begin using yo ur c amera.
PALMPIX Features
With the PALMPIX Camera you can:
m Take great looking pictures in three different resolutions:
800 x 600 (SVGA), 640 x 480 (VGA) or 320 x 240 (1/4 VGA).
m Get close to your subject with a 2x digital zoom.
m Focus the camera manually for use in Macro (close-up), Portrait
(mid-range), Landscape (infinity), Business card, and Page settings
m Transfer pictures by PALM HOTSYNC Technology for instant editing,
e-mailing, printing, and placement into documents.
m Transfer pictures to an expansion (MMC/SD) card for storage and use on
other computers.
m Save pictures to a PC in JPEG (.JPG) or Bitmap (.BMP) format; to a
MACINTOSH Computer in JPEG or PICT format.
m Convert 640 x 480 and 320 x 240 pictures to JPEG format on the PALM
expansion card.
m Beam pictures to other PALM Handheld users.
1
Page 8
Chapter 1
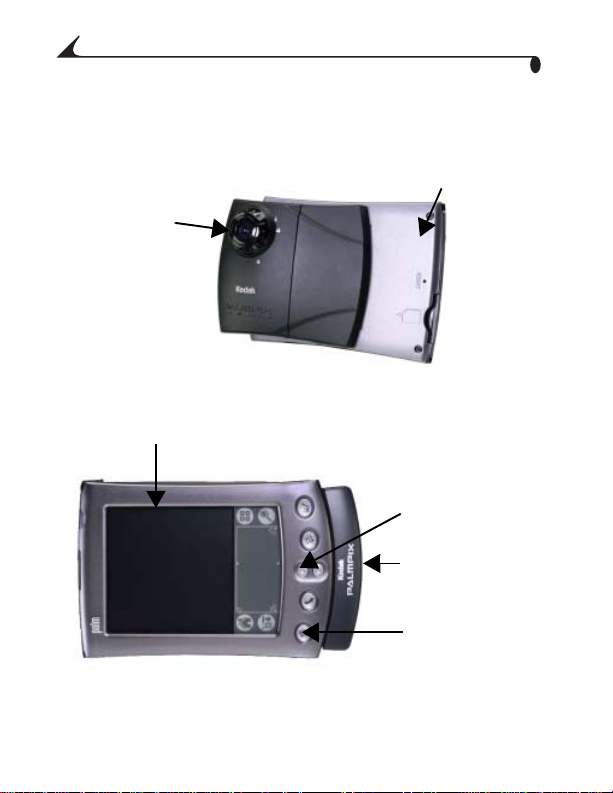
Camera Overview
Camera Installed on Handheld
Camera lens
Camera Viewfinder
(Handheld display)
Back of
handheld
Zoom
Camera back
Shutter button
(Date Book)
2
Page 9
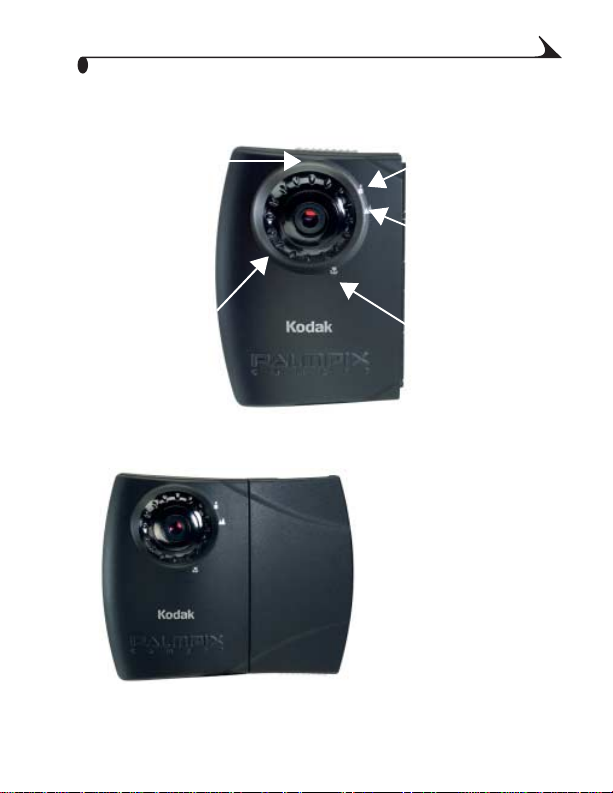
Camera Front View
Chapter 1
Page mode - use
to photograph a
full page
(approximately
19 inches,
48 cm)
Business card
mode - use to
photograph
business cards(approximately
6 inches,
15 cm)
Portrait - use for
mid-range shots
(2 to 12 feet,
.6 to 3.6 m)
Landscape - use for
full-range shots
(8 feet, 2.4 m or
greater)
Macro - use for
close-ups (4 inches,
10 cm)
Open position - ready
to be connected to
the PALM Handheld
3
Page 10
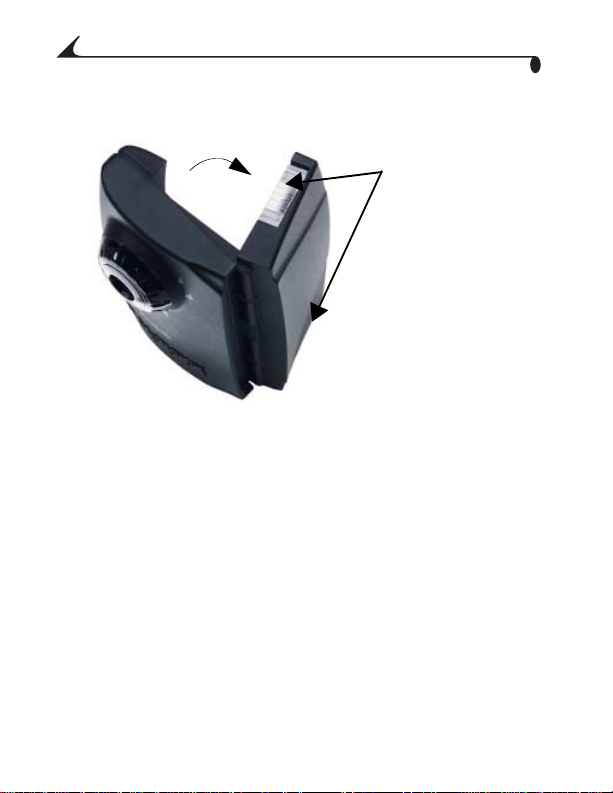
Camera Top View
Chapter 1
Latches - use to secure
the camera to the
handheld
4
Page 11

Chapter 2
2 KODAK PALMPIX Camera
Software
On the KODAK PALMPIX Camera CD
The following applications are included on the PALMPIX Camera CD, supplied
with your camera. You must install the KODAK PALMPIX Image Capture
Application and PALMPIX Conduit before you can capture images and transfer
them from your PALM Handheld to the computer.
m PALMPIX Image Capture Applicati on—runs on the PALM m500
Handheld Series and controls the camera and picture transfer functions.
m PALMPIX Conduit—is added to the PALM HOTSYNC Manager and lets
you transfer pictures from the PALM Handheld to the computer using
HOTSYNC Technology.
m PALMPIX Demo—runs on your computer to show you the major features
and functions of the camera system.
m PALMPIX Image Conversion Application—is installed and runs on
your computer. The Image Conversion Application enables you to convert
PPX images stored on the expansion card into JPEG, BMP, or PICT format
so that you can view them on your computer and share them with people
who don’t have PALM Handhelds.
NOTE: The PPX image format was created to keep PALMPIX image sizes as
small as possible for storage on a memory card while maintaining the
highest image quality.
5
Page 12

Chapter 2
Before You Begin
Before you install the KODAK PALMPIX Software, make sure you have installed
the PALM Desktop softwa r e that was provided wi th your PALM Handheld, and
that you can perform a HOTSYNC operation with the PALM Handheld to your
computer. You cannot install the KODAK PALMPIX Software unless the PALM
Desktop software is installed first.
PALM HOTSYNC Technology
The PALMPIX Conduit uses PALM HOTSYNC Technology to transfer pictures
from the PALM Handheld to your computer. HOTSYNC Software is the program
that enables you to synchronize the data on the PALM Handheld with the data
on the computer.
For more information, refer to the guides that came with the PALM Handheld.
6
Page 13
Chapter 2
Installing the Software
1 On your computer, exit all software programs.
2 Place the KODAK PALMPIX Camera CD into the CD-ROM drive.
If the CD does not start automatically:
On a PC—from the Start menu, select Run. In the text box, enter the
CD drive letter:\setup.exe. For example, d:\setup.exe.
On a MACINTOSH COMPUTER—cl ick the PALMPIX desktop icon and
open Installer.
3 Select your language (if asked), then follow the on-screen instructions to
install the software.
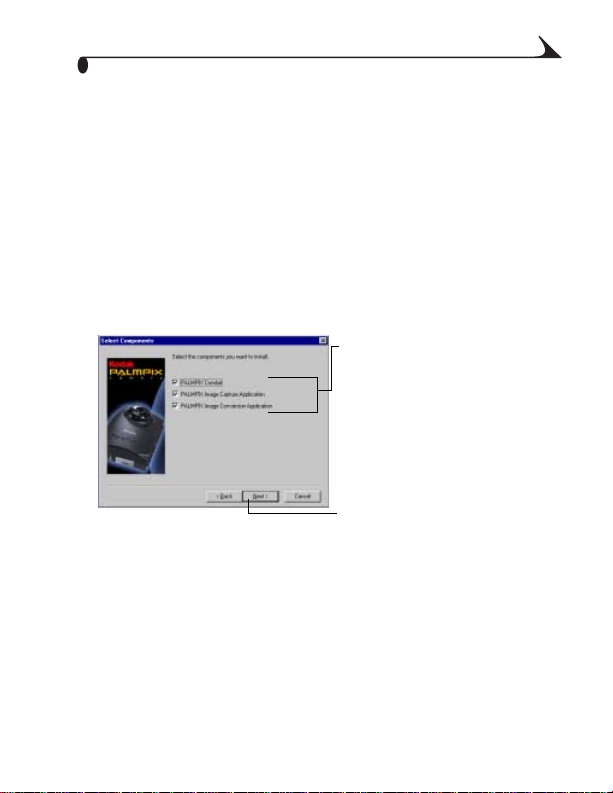
On a PC:
Select the programs to install.
Click Next
7
Page 14
Chapter 2
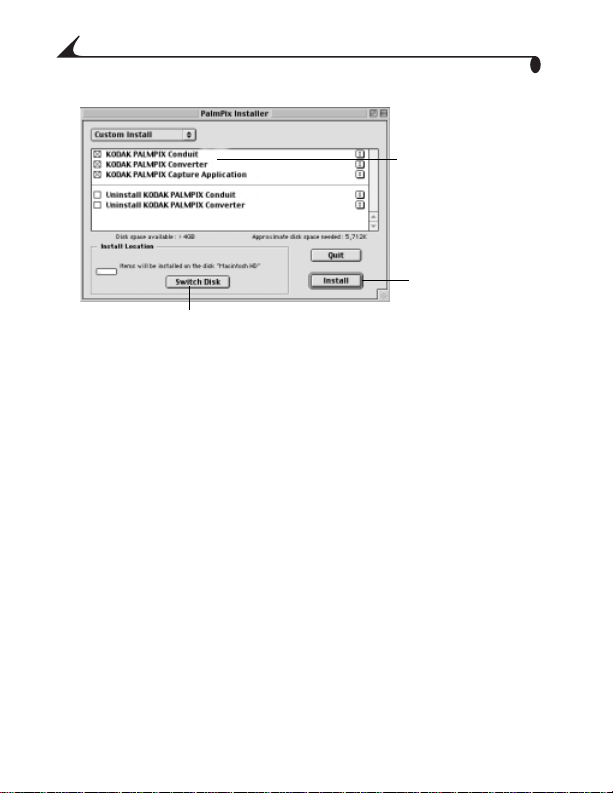
On a MACINTOSH Computer:
Select the programs
to install.
Click Install.
Click Switch Disk to select a custom installation directory.
4 Select your PALM Handheld user name (if asked) when prompted.
NOTE: If multiple PALM Handheld users share your computer, install the
KODAK PALMPIX Software separately for each user, selecting the
appropriate user name when prompted.
5 After the software is installed on the computer, perform a HOTSYNC
operation to transfer the PALMPIX Software onto the PALM Handheld.
NOTE: If you have difficulty installing the PALMPIX Image Capture Application
on your PALM Handheld, refer to the guides that came with your PALM
Handheld for instructions on i nstalling applications manually.
8
Page 15

Chapter 2
Customizing the HOTSYNC Transfer Settings
From your computer, you can change the following settings that determine how
and where your pictures are saved on your computer:
Setting Options System Default
HOTSYNC action Handheld overwrites
After HOTSYNC
operation
Save Pictures As PC: JPEG, BMP JPEG
Save Pictures Here On a PC:
desktop
Do nothing
Delete pictures off PDA
Open picture folder
MACINTOSH Computer:
JPEG, PICT
C:\KODAK Pictures\
PalmPix\username
C:\Palm\username\
PalmPix
User-specified director y
On a MACINTOSH
computer:
KODAK Picture Folder
Palm User Directory
User-specified
Handheld overwrites
desktop
Not checked
Checked
JPEG
On a PC:
hard drive letter\Kodak
Pictures\PalmPix\user name
On a MACINTOSH
Computer:
HD:Kodak
Pictures:PalmPix:username
9
Page 16
Chapter 2
Changing the Transfer Settings on a PC
1 On your computer desktop, right-click the HOTSYNC Manager icon ,
located in the System Tray on the WINDOWS desktop. Select Custom to
display the Conduit’s Custom Window.
NOTE: For information about the Cond uit windows, refer to the guides that
came with the PALM Handheld.
2 Select KODAK PALMPIX, then click Change.
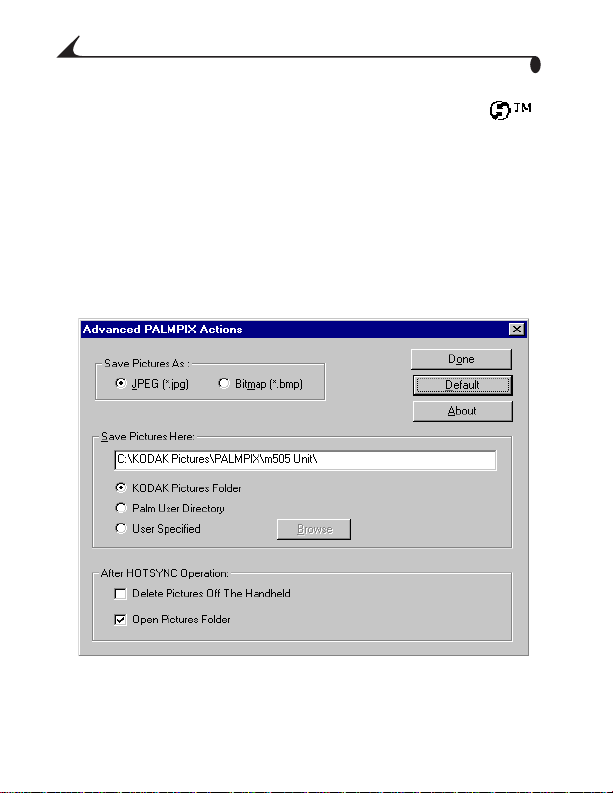
3 On the Change HotSync Action window, select the desired image transfer
option. Click Advanced.
4 In the Advanced PalmPix Actions window, select the options you want, then
click Done.
10
Page 17
Chapter 2
Changing the Transfer Settings on a MACINTOSH Computer
1 From the Finder Menu bar, select the PALM Icon.
NOTE: For information about the Cond uit windows, refer to the guides that
came with the PALM Handheld.
2 Select HotSync (with your user name), then Conduit Settings.
3 Select KODAK PALMPIX Camera. Click Change Settings.
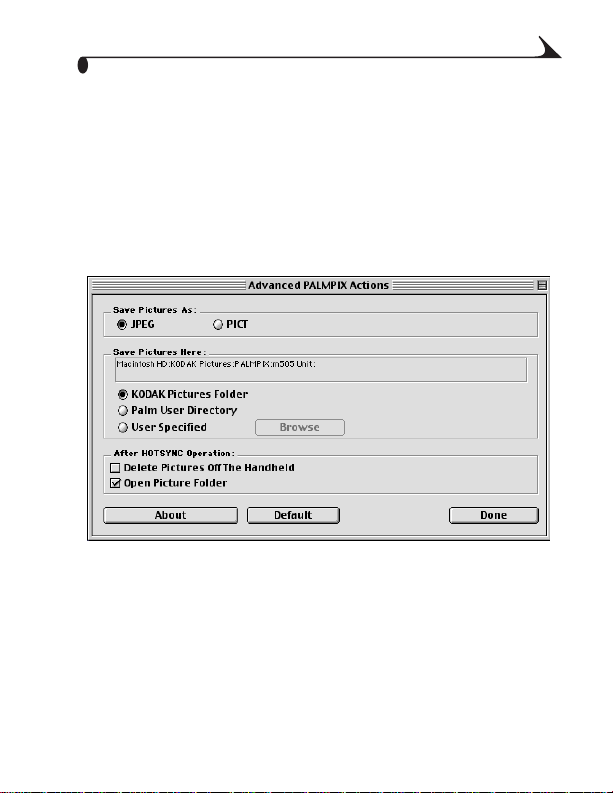
4 Click Advanced. In the Advanced PalmPix Actions window, select the
options you want, then click Done.
11
Page 18

Page 19

Chapter 3
3 Using Your PALMPIX Camera
When you connect the KODAK PALMPIX Camera to your PALM Handheld and
start the PALMPIX Image Capture Application:
m the PALM Handheld Date Book button becomes the Preview/Shutter
button
m the PALM Handheld Scroll-up button becomes the Zoom toggle button
m the PALM Handheld screen becomes the viewfinder
Connecting the Camera
For the camera to work, it must be connected to a PALM m500 Handheld series
that has the PALMPIX Image Capture Application installed. When the camera is
connected, the lens faces away from the back of the PALM Handheld.
1 Flip open the camera.
2 Fit the connector end of the camera over the
PALM Handheld connector and press to seat
the connectors.
3 Push the camera latches forward and fit the
camera tabs into the indents in the PALM
Handheld.
13
Page 20

Chapter 3
Releasing the Camera
1
2
CAUTION:
Do not remove the camera during a picture transfer. Doing
so may cause you to lose picture data or information.
1 Slide the camera latches forward to release
the camera tabs from the detents in the
PALM Handheld.
2 Rotate the camera cover away from the
handheld until it disconnects.
IMPORTANT : Make sur e you r otate the
camera away from the
handheld to release it. Do
not pull the camera
directly away from the
connector .
Starting the PALMPIX Image Capture Software
1 Connect the camera and turn on the PALM Handheld.
2 Tap the Applications button , and tap the PALMPIX Icon to display
the Image List screen.
3 To exit t h e PALMPIX Softw are, tap the Applications button.
14
Page 21

Chapter 3
Using Your Camera
NOTE: The PALMPIX Camera is powered by the PALM Handheld and does not
require batteries.
A. Select a picture resolution—tap the
icon before you take a picture:
320 x 240 resolution—use when you
will view your pictures online, or
when you need extra space for
picture-taking. Each picture takes
about 30K of available PALM
Handheld memory.
640 x 480 resolution—use when you
will print or e-mail your pictures.
Each picture takes about 100K of
available PALM Handheld memory.
800 x 600 resolution—use when you
B CA
will print your pictures. Each pict ure
takes about 160K of available PALM
Handheld memory.
B. Set the self-timer—tap the icon to
turn the self-timer on . Creates a
ten-second delay after you press the Shutter
button.
C. Check pict u res r ema in ing—the
Frame Counter displays approximate ly how
many additional pictur es can be st ored on
the PALM Handheld, based on the
resolution you select.
15
Page 22

Chapter 3
D
E
F
D. Set the lens focus position—rotate
the focus ring to the correct position. See
Focusing the Camera, page 17.
E. Use the zoom —press the up Zoom
button (Scroll-up button) to magnify the
picture up to 2x (2x is displayed on the
screen). Press the Zoom button up again to
zoom back to 1x.
Zoom is available in 800 x 600 and
640 x 480 resolutions. If you press the
Zoom button while in 320 x 240 resolution,
the camera automatically resets the
resolution to 640 x 480.
F. Take a picture—press the Preview/
Shutter button (Date Book bu tton) once to
preview the image on the screen, then press
it again to take the picture. The LCD screen
is your viewfinder. Tap the screen to cancel
Preview.
G. Work with your pictures—tap a file
name to view, rename, or delete the pict ure.
See Selecting and Viewing Pictures, page 1.
16
Page 23

Chapter 3
Focusing the Camera
To focus the camera, turn the lens to any of the predefined focus positions.
Three focus positions are denoted by icons—Macro, Portrait and Landscape.
Two focus modes are marked by indentations.
Page focus mode
Business Card
focus mode
Icon Position/
Mode
Portrait
(Mid-range)
Landscape
(Infinity)
Macro
(Close-up)
Page Use when taking a picture of an 8.5 x 11 inch or A4 size
Business
Card
Distance
Use for subjects that are 2 to 12 feet (.6 to 3.6 m) away.
Use for subjects that are over 8 feet (2.4 m) away.
Use when your subject is approximately 4 inches
(10 cm) away. See Taking Close-Up Pictures, page 19.
paper. See Photographing a Full Page, page 21.
Use when taking a picture of a business card. See
Photographing a Business Card, page 20.
17
Page 24

Chapter 3
Taking Pictures
When the PALMPIX Software is running on the PALM Handheld, the Date Book
button becomes the camera Preview/Shutter button.
1 Connect the camera to the PALM Handheld,
then tap the Applications
button .
2 Tap the PALMPIX Icon.
3 Press the Preview/Shutter (Date Book)
button once to display a live preview of your
subject on the screen.
NOTE: T o cance l th e Previe w mod e , simp ly tap
the PALM screen.
Shutter button
m Holding the PALM Handheld horizontally with the buttons to the right,
produces a typical print format.
m If the self-timer is activated, the PALM Handheld beeps for ten seconds,
then beeps faster just before the picture is taken.
m A progress bar appears at the bottom of the screen as the picture is
transferred from the camera to the PALM Handheld. To cancel the transfer,
tap the trash can icon.
m When the picture is transferred to the PALM Handheld, it appears in the
Image List with a numerical image name. See Selecting and Viewing
Pictures, page 1.
4 Focus the camera by turning the lens.
5 Hold the PALM Handheld steady and press
the Preview/Shutter button a second time to
take the picture.
18
CAUTION:
Do not remove the camera during a picture transfer. Doing
so may cause you to lose picture data or information.
Page 25

Chapter 3
Taking Close-Up Pictures
For the sharpest close-up pictures, position your camera 4 inches (10 cm)
away from the subject. To make sure that you’re exactly 4inches (10 cm)
away, use your PALM Stylus.
1 Connect the camera to the PALM Handheld,
then tap the Applications button.
2 Tap the PALMPIX icon.
3 Set the focus to the Macro setting.
4 Place the tip of the stylus in the indentation
at the bottom of the camera awa y from the
lens.
5 Rest the other end of the stylus on a surface
next to your subject.
6 Press the Preview/Shutter (Date Book)
button once to display a live preview of your
subject on the screen.
7 Hol d t he PALM Handheld steady and press
the Preview/Shutter (Date Book) button
again to take the picture.
IMPORTANT: Keep the display screen
parallel to the subject.
19
Page 26

Chapter 3
Photographing a Business Card
Keep track of all those business cards you received by photographing them and
storing them on your PALM Handheld.
Follow these steps for a sharp picture of a business card (2 x 3.5 inches,
5x9cm).
Business
Card
Focus
Mode
1 Set the lens to the business card focus
mode. (From the Portrait position, tu rn the
lens counterclockwise to the second click.)
2 Click the Preview/Shutter (Date Book)
button once to turn on the Preview mode.
3 Posi tion t he camera so that the business
card image fills the viewer with a slight
space to the left and right.
NOTE: When the business card image fills the
viewfinder, the camera is about 6 inches
(15 cm) from the subject.
4 Keep the vi ew find er p arall el to t he bu siness
card and press the Preview/Shutter (Date
Book) button again to take the picture.
20
Page 27

Chapter 3
Photographing a Full Page
Capture a full page of information by using the Page mode. (For 8.5 x 11 inch
or A4 paper.)
Page focus
mode
1 Set the lens to the Page focus mode. (From
the Portrait position, turn the lens
counterclockwise to the first click.)
2 Click the Preview/Shutter (Date Book)
button once to turn on the Preview mode.
3 Posi tion t he camera so that the horizontal
page image fills the viewer with a slight
space to the left and right.
NOTE: When the page image fills the viewfinder,
the camera is about 19 inches (28 cm)
from the subject.
4 Keep the view finder parallel to the page and
press the Preview/Shutter (Date Book)
button again to take the picture.
21
Page 28

Page 29

Chapter 4
4 Working With Your Pictures
Selecting and Viewing Pictures
When you start the PALMPIX Image Capture Application, the Image List
appears. The Image List contains all the pictures that are stored on the
handheld. For each picture, the name plus the date and time the picture was
taken appear.
To select one or more pictures, tap the
box in front of the name.
A check appears in the box.
Tap the box again to remove the check and
deselect the picture.
To select all the pictures, tap
®Select all. To deselect all the
pictures, tap ®Deselect all.
To navigate through the pictures, tap
the Scroll butt o n up or down.
To view a picture, tap the name of the
picture you want to view.
The picture appears in Image View with
the name, the date and time the picture
was taken, and the picture resolution.
NOTE: Pictures beamed from non-color to col or handhelds appear as
grayscale images on the color handheld.
1
Page 30

Chapter 4
Renaming Pictures
1 With the picture displayed, tap Details.
2 In the Details window, rename the file.
You can also categorize, delete, and mark
the file as private. For more information,
refer to the guides that came with the PALM
Handheld.
3 Tap OK on the Details window. Tap Done on
the Image View window to return to the
Image List.
Deleting Pictures
To delete one or more pictures—With the image list displayed, select each
file to delete, then tap Menu ®Record®Delete Image. When
prompted, tap Yes to delete the pictures.
To delete the picture you are viewing—With the picture displayed, tap
Menu ®Delete Selected. Or with the picture displayed, tap Details
®Delete.
2
Page 31

Chapter 4
Transferring Pictures To Your Computer
The PALMPIX Image Capture Application uses PALM HOTSYNC Technology to
transfer pictures from the PALM Handheld to your computer.
1 Exit the PALMPIX Image Capture Application
and disconnect the camera from the PALM
Handheld.
2 Set the PALM Handheld in the HOTSYNC
cradle.
3 Press the HOTSYNC Manager button on the
cradle.
All pictures in the Upload List are
transferred to your computer. (See
Specifying the Pictures to Transfer,
page 4.)
HOTSYNC bu tton
NOTE: To transfer pictures from your handheld to the MMC/SD card, see
Storing Pictures on an Expansion Card, page 8.
Pictures are saved in the default Save folder
or in the folder you specified when
customizing the HOTSYNC transfer settings.
(See Customizing the HOTSYNC Transfer
Settings, page9.)
3
Page 32

Chapter 4
Specifying the Pictures to Transfer
Only pictures included in the Upload List are transferred to the computer.
When you take a picture, it is added automatically to the Upload List.
You can add or remove pictures from the Upload List before you transfer them.
1 With the Image List displayed, tap Menu
® Options ®Select Image Uploads.
The Image Uploads screen appears.
NOTE: Images that are marked as Private do not
appear in the Upload list. To transfer
Private images, remove the Private check
box in the Detail screen for that image.
2 To add a picture to the Upload List, highlight
it in the Image List and tap the single arrow
button to add it to the Upload List.
Continue to add as many pictures to the
Upload List as you want.
To add all the pictures, tap the double
arrow button.
3 To remove a picture from the Upload List,
highlight it a nd tap Remove.
Continue to remove as many pictures from
the Upload List as you want.
To remove all the pic tur es , tap Rem ove Al l.
4 Tap Done to return to the main Image List
screen.
4
Page 33

Chapter 4
Beaming Pictures to Another Handheld
You can beam your pictures to another PALM Handheld via the IR port. The
receiving handheld must have KODAK PALMPIX Software installed, and must be
at its home screen when receiving.
You can beam only one picture at a time.
Before you begin, m a ke s u r e that Beam is set to On in the PALM Preferences
(Prefs) menu.
To beam a picture from the Image List—With the Image List displayed,
tap ®Record®Beam Select ed.
To beam the displayed picture—With the picture displayed, tap the check
box for the picture you want to beam, then tap ®Beam Image.
For more information about beaming pictures, refer to the guides that came
with the PALM Handheld.
NOTE: If the receiving handheld does not have KODAK PALMPIX Software
installed, you can beam the application as well. You need two files for
the application to run—palmpix.prc and palmpixLib.prc. Refer to the
guides that came with the PALM Handheld for information on beaming
applications.
5
Page 34

Chapter 4
Converting Images on Your Handheld
If the picture was taken at good (320 x 240) or better resolution (640 x 480)
and an expansion card is available, you can convert PALMPIX images to JPEG
on your handheld.
1 With the image displayed, tap Details.
If the Convert option is not available, the
image is not the correct resolution for
conversion.
2 Tap Convert.
The picture is converted and stored on the
expansion card in the Pictures Folder.
3 Tap OK on the Details screen. Tap Done on
the Image View screen to return to the main
Image List screen.
NOTE: The conversion process can take up to
1.5 minutes.
Storing Pictures on Your Handheld
Pictures are saved—pictures store d on your PALM Handheld are saved
when you turn off the handheld.
Pictures are not saved
m If the PALM Handheld loses power (batteries are exhausted) for an
extended period of time, it may lose data, includi ng your pictures. For
more information, refer to the guides that came with the PALM Handheld.
m If you delete the KODAK PALMPIX Image Capture Software from the PALM
Handheld, the pictures are also deleted.
6
Page 35

Chapter 5
5 Working With an Expansion
Card
To free up space on your PALM Handheld, you can store pictures on an
expansion card by copying or moving them from the handheld. Also, when you
convert PALMPIX images on the handheld to JPEG format, the converted images
are written to the expansion card.
The PALM Handheld expansion slot accepts Secure Digital (SD) and
MultiMedia Card (MMC) expansion cards. Pictures on these cards can be
archived, transferred via card reader to a computer, moved back to the
handheld, and shared with others.
NOTE: For instructions on inserting and removing expansion cards, refer to the
PALM user manual.
You can work with the pictures on the MMC/SD card that are in PPX format
(those listed in the PalmPix Images Directory) much as you work with pictures
on the handheld (those listed in the Image List).
That is, when you are viewing the pictures in the PalmPix Images Directory:
m you select and deselect them the same way
m you delete them the same way
m you beam them to another handheld the same way
m you can move and copy the pictures. Note that when you do so, your
pictures are moved and copied from the card back to the PALM Handheld.
IMPORTANT: Even though it is possible to copy the PALMPIX
Image Capture application to t he exp ansion card,
do not attempt to run the application from the card.
7
Page 36

Chapter 5
Storing Pictures on an Expansion Card
Pictures moved or copied using the following procedure are stored in PPX
format on the card. You will store most pictures this way.
1 Insert the MMC/SD card into the PALM
Handheld. See the back of the handheld for
how to insert the card correctly.
2 From the Image List tap the image’s
checkbox to select the image.
3 Tap ®Record®Copy Selected or
Move Selected.
NOTE: Moving deletes the image from the PALM
memory but copying does not.
A graphic appears to show that each
picture is being copied or moved.
8
Page 37

Chapter 5
Viewing Pictures on a Card
1 With the Image List displayed, tap
®Options ®Expansion Card.
The Directory window appears.
2 Tap Pa lmpix o r JPEG . Tap OK to view the list.
The card list of PPX or JPEG pictures
appears. Unlike the Image List, it
contains all the PPX or JPEG pictures
stored on the card, displaying the name,
date and time when the image was copied
or moved.
3 Tap the up or down scroll buttons to
navigate through the list.
4 Tap the name of the picture that you want to
view.
9
Page 38

Chapter 5
Using a Computer to Access Pictures on the Card
If you have an MMC/SD card reader, you can view, transfer or convert pictures
that are stored on the memory card on your computer.
You must install the KODAK PALMPIX Image Conversion Application on your
computer before you can view the pictures. You then use the Image Conversion
Application to convert your pictures to a viewable format (JPEG, BMP, or
PICT).
Converting PPX Pictures on a PC
1 With the MMC/SD card reader connected to your PC, insert the card into
the card reader slot.
2 On the PC, launch the Image Conversion Application.
The main screen appears.
3 Select the pictur es to con ver t and view, then select the desired format
(JPEG or BMP).
10
Page 39

Chapter 5
In the right pane, select the folder in which to store the pictures.
4
5 Click the right arrow button to start the conversion.
Messages appear during conversion.
6 Click OK when the Completed Successfully message appears.
Converting PPX Pictures on a MACINTOSH Computer
1 With the MMC/SC card reader connected to your computer, insert the
expansion card into the card reader slot.
2 On the MACINTOSH Computer, launch the Image Conversion Application.
The PalmPix Converter window appears.
3 In the left pane, navigate to and open the PALMPIX folder on the memory
card.
4 Select the pictures to convert and view, then select the desired format
(JPEG or PICT).
5 In the right pane, select the folder in which to store the pictures.
The name of the selected folder appears above the right pane.
11
Page 40

Chapter 5
If desired, check the Open folder after conversion.
6
7 Click Convert to start the conversion.
Messages appear during conversion.
8 Click OK when the Completed Successfully message appears.
Accessing JPEG Card Images with Your Computer
When the MMC/SD card is inserted into the card reader, your computer views
the card as it would any other storage device. So if there are JPEG images on
the MMC/SD card, you can move, copy, delete, or open them from your
computer as you would any other file.
Transferring Images from Computer to Card
With the card reader attached to your computer, you can copy or move JPEG
images from your computer onto the card.
NOTE: JPEG images created on digital devices other than the PALMPIX camera
might not be viewable on the handheld.
12
Page 41

6 Getting Help
If you need help with your KODAK PALMPIX Camera, it is available from a
number of resources:
m Software applica tion online help
m Product informati on by fax
m Place of purchase
Software Help
Help with any software application packaged with your camera can be obtained
from the online help provided with the application.
Kodak Online Services
m World Wide Web http://www.kodak.com
(click Service and Support)
Kodak Fax Support
m World Wide Web
m Technical support
m U.S. and Canada
m Europe
m U.K.
1-800-508-1531
44-0-131-458-6962
44-0-131-458-6962
13
Page 42

Chapter 6
Telephone Customer Support
If you have questions concerning the operatio n of KODAK software or the
camera, you may speak directly to a customer support representative.
Before You Call
Before you call to speak to a customer suppo rt re presentative, please hav e the
camera connected to your computer , be at your computer , and have the
following information available:
Operating system__________________________________________
Processor speed (MHz)_____________________________________
Computer model _________________ _________________________
Amount of memory (MB)_______________ ________________ _____
Exact error message you received______________________________
Version of installation CD_______________________________ _____
Camera serial numbe r _______________ ________________ _______
PALM Handheld Model______________________________________
PALM Handheld OS Version___________________________________
Telephone Numbers
m U.S.—call toll fre e, 1- 800-235-6325, between the hours of 9:00 a.m. and
8:00 p.m. (Eastern Standard Time) Monday through Friday.
m Canada—call toll free, 1-800-465-6325, be tween the hours of 9:00 a.m.
and 8:00 p.m. (Eastern Standard Time) Monday through Friday.
m Europe—call the Koda k Digital Imaging Support Centre toll free numbe r
associated with your location, or the U.K. toll line,
44-0-131-458-6714, between the hours of 09.00 and 17.00 (GMT/CET)
Monday through Friday.
14
Page 43

Chapter 6
m Outside the U.S.—calls are charged at National Rate.
If the number for your location is not listed, please check the following
URL for the most current number.
http://www.kodak.de/include/internaltion.shtml
Africa 44-1895-457000
Australia 1300-130-674
Austria/Osterreich 0179 567 357
Belgium/Belgique 02 713 14 45
Brazil 0-800-15-0000
Canada 1-800-465-6325
Caribbean Islands 78-7-757-5500
China 86 21 63500888 1577
Chile 56-2-697-2000
Denmark/Danmark 3 848 71 30
Ireland/Eire 01 407 3054
Finland/Suomi 0800 1 17056
France 01 55 1740 77
Germany/Deutschland 069 5007 0035
Greece 0080044125605
Hong Kong 852-2564-9777
Italy/Italia 02 696 33452
Japan 81-3-5488-2390
Korea 82-2-708-5600
Netherlands/Nederland 020 346 9372
Norway/Norge 23 16 21 33
15
Page 44

Chapter 6
Portugal 021 415 4125
Spain/Espana 91 749 76 53
Sweden/Sverige 08 587 704 21
Switzerland/Schweiz/Suisse 01 838 53 51
UK 0870 2430270
International Toll Line +44 131 4586714
International Toll Fax Number +44 131 4586962
16
Page 45

Chapter 7
7 Appendix
PALMPIX Camera Specifications
Camera Specifications
Imager SVGA, 800 x 600 CMOS image sensor,
VGA resolution Best 800 x 600=480,000 pixels
Better 640 x 480=307,200 pixel s
Good 320 x 240=76, 800 pixels
Image quality
settings
Color 24-bit, millions of colors
Picture file format
(via Conduit)
Lens,
fixed focus
Shutter speed 1/15-1/500 seconds
Exposure Automatic; auto white balance
Best 800 x 600
Better 640 x 480
Good 320 x 240
Aperture F/2.8
Zoom 2X digital zoom (in Good/Better
Focal Length 0.31 in. (7.88 mm)
Focus Range 4 in. (0.1 m) to infinity
user selectable to 640 x 480 (VGA) or
320 x 240 (1/4 VGA)
JPEG, BMP (on a PC)
JPEG, PICT (on a MACINTOSH
Computer)
resolution)
17
Page 46

Chapter 7
Camera Specifications
ISO 100
Self-timer 10 seconds
Power Powered by Handheld, no battery
Automatic shut down Handheld off, camera off
Interface Universal connection to the PALM
Picture storage
(at 640 x 480)
Picture storage
(at 800 x 600)
PALMPIX application storage PALMPIX Software uses 185 K of PALM
Picture transfer HOTSYNC cable or dock
Dimensions
(w x d x h)
Dimensions
(w x d x h)
Weight 0.12 lb. (54 g)
Operating temperature 32 to 104° F (0 to 40° C)
Certifications FCC Class B, ICES-003 Class B, CE, VCCI,
Warranty One year
Open 3.5 in. x 0.9 in. x 2.9i n.
Closed 2.1 in. x 0.9 in. x 2.9 in.
required; 200 images per full Handheld
battery charge
m500,
IrDA between handhelds
Stores one picture for every 100 K of
available PALM Handheld memory
Stores one picture for every 160 K of
available PALM Handheld memory
Handheld memory
(90 mm x 23 mm x 74 mm)
(54 mm x 23 mm x 74 mm)
C-Tick
18
Page 47

Chapter 7
PALMPIX Camera Tips
m To keep your PALM Handheld updated with the most current KODAK
PALMPIX Software, visit us on the Web at www.kodak.com/go/palmpix
m Improve your pictures by adjusting the available light or by changing the
light source. This is especially true under older fluorescent lighting.
m If pictures appear too dark when viewing on a computer, increase the
available light source when taking pictures.
m Adjust the PALM Handheld contrast level for better picture viewing on the
liquid crystal display (LCD). Refer to the guide that came with your
handheld for details.
m Extreme temperatures can affect the PALM Handheld display. Hot
temperatures can darken the LCD and cold temperatures can lighten it.
This does not affect the image you capture, only the display. Refer to the
guide that came with your PALM Handheld for details on adjusting the
display.
m Camera resolution remains at the last setting until you change it.
m Lens focus position remains at the last setting until you change it.
m Fold the camera closed whenever it is not attached to the PALM Handheld.
Camera Safety and Maintenance
m To keep from damaging your camera, avoid exposing it to moisture and
extreme temperatures.
m Never disassemble or touch the inside of the camera.
m Clean the outside of the camera by wiping with a clean, dry cloth. Never use
harsh or abrasive cleaners or organic solvents on the camera or any of its
parts.
m Wipe the lens gently with a soft, lint-free cloth or an untreated lens-
cleaning tissue.
m Do not allow any chemicals, such as suntan lotion, to come into contact
with the surface of the camera.
19
Page 48

Chapter 7
Warranty
Limited Warranty
Kodak warrants the KODAK Digital and Applied Imaging Division digital
cameras and accessories (excluding batteries) to be free from malfunctions
and defects in both materials and workmanship for one year fro m the date of
purchase.
Retain the original dated sales receipt. Proof of the date of purchase will be
required with any request for warranty repair.
Limited Warranty Coverage
THIS LIMITED WARRANTY WILL BE HONORED ONLY WITHIN THE
GEOGRAPHICAL LOCATION THAT KODAK DIGITAL CAMERAS AND
ACCESSORIES WERE PURCHASED.
Kodak will REPAIR or REPLACE KODAK digital cameras and accessories if they
fail to function properly during the warrant y peri od, subject to any conditions
and/or limitations stated herein. Such repair service will include all labor as
well as any necessary adjustments and/or replacement parts. Such repair or
replacement is the sole remedy under this warranty.
If replacement parts are used in making repairs, these parts may be
remanufactured, or may contain remanufactured materials. If it is necessary to
replace the entire product, it may be replaced with a remanufactured product.
Limitations
Request for Warranty service will not be accepted without proof of dat e of
purchase, such as a copy of the original dated KODAK digital camera or
accessory sales receipt. (Always keep the original for your records.)
This warranty does not apply to the battery(s) used in digital cameras or
accessories . This warranty does not cover circumstances beyond Kodak’s
control, nor problems caused by failure to follow the operating instructions in
the KODAK digital cameras and accessories User’s Guides.
20
Page 49

Chapter 7
THIS WARRANTY DOES NOT APPLY WHEN FAILURE IS DUE TO SHIPPING
DAMAGE, ACCIDENT, AL TERA TION, MODIFICATION, UNAUTHORIZED SERVICE,
MISUSE, ABUSE, USE WITH INCOMPATIBLE ACCESSORIES OR ATTACHMENTS,
FAILURE TO FOLLOW KODAK’S OPERATION, MAINTENENCE OR REPACKING
INSTRUCTIONS, FAILURE TO USE ITEMS SUPPLIED BY KODAK (SUCH AS
ADAPTERS AND CABLES), OR CLAIMS MADE AFTER THE DURATION OF THIS
WARRANTY.
Kodak makes no other express or implied warranty for this product. In the
event that the exclusion of any implied warranty is ineffective under the law, the
duration of the implied warranty will be one year from the purchase date.
The option of replacement is Kodak ’s only obligation. Kodak will not be
responsible for any special, consequential or incidental damages resulting
from the sale, purchase, or use of this product, regardless of the cause.
Liability for any special, consequentia l or incidental damages (including but
not limited to loss of revenue or profit, down time costs, loss of the use of the
equipment, cost of substitute equipment, facilities or services, or claims of
your customers for such damages resulting from the purchase, use or failure
of the product), regardless of cause or for breach of any written or implied
warranty is expressly disclaimed and excluded herefrom.
Your Rights
Some states or jurisdictions do not allow exclusion or limitation of incidental
or consequential damages, so the above limitation or exclusion may not apply
to you. Some states or jurisdictions do not allow limitations on how long an
implied warranty lasts, so the above limitation may not apply to you.
This warranty gives you specific rights, and you may have other rights which
vary from state to state or by jurisdiction.
Outside the United States
In countries other than the United States, the terms and conditions of this
warranty may be different. Unless specific Kodak warranty is communicated to
the purchaser in writing by a Kodak company, no warranty or liability exists
beyond any minimum requirements imposed by law, even though defect,
damage, or loss may be by negligence or other act.
21
Page 50

Chapter 7
Regulatory Information
FCC Compliance and Adv isory
This device complies with Part 15 of the FCC Rules. Operation is subject to the
following two conditions: 1) this device may not cause harmful interference,
and 2) this device must accept any interference received, including
interference that may cause undesired operation.
This equipment has been tested and found to comply with the limits for a Class
B digital device, pursuant to Part 15 of the FCC Rules. These limits are designed
to provide reasonable protection against harmful interference in a residential
installation.
This equipment generates, uses, and can radiate radio frequency energy and, if
not installed or used in accordance with the instructions, may cause harmful
interference to radio communications. However, there is no guarantee that
interference will not occur in a particular installation.
If this equipment does cause harmful interference to radio or television
reception, which can be determined by turning the equipment off and on, the
user is encouraged to try to correct the interference by one or more of the
following measures: 1) reorient or relocate the receiving antenna; 2) increase
the separation between the equipment and the receiver; 3) connect the
equipment to an outlet on a circuit different from that to which the receiver is
connected; 4) consult the dealer or an experienced radio/TV technician for
additional suggestions.
Any changes or modifications not expressly approved by the party responsible
for compliance could void the user’s authority to operate the equipment.
Where shielded interface cables have been provided with the product or
specified additional components or accessories elsewhere defined to be used
with the installation of the product, they must be used in order to ensure
compliance with FCC regulation.
FOR HOME OR OFFICE USE. Tested to comply with FCC standard.
22
Page 51

Chapter 7
Canadian DOC Stateme nt
DOC Class B Compliance—This digital apparatus does not exceed the Class
B limits for radio noise emissions from digital apparatus set out in the radio
interference regulations of the Canadian Department of Communications.
Obervation des normes-Class B—Le présent appareil numérique n’émet
pas de bruits radioélectriques dépassant les limites applicables aux appareils
numériques de la Classe B prescrites dans les règlements sur le brouillage
redioélectrique édictés par le Ministère des Communications du Canada.
VCCI Class B ITE
This is a Class B product based on the standard of the Voluntary Control
Council for Interference from Information Technology Equipment (VCCI ). I f
this is used near a radio or television receiver iin a domestic environment, it
may cause radio interference. Install and use the equipment according to the
instruction manual.
23
Page 52

Page 53

Index
B
beaming pictures 5
BMP images
converting to 10
business cards 20
C
camera
connecting 13
disconnecting 14
features 1
focus 17
front view 2
inserted on handheld 2
resolution 15
taking picture 18
timer 15
top view 3
using 15
zoom 16
card reader 10
close-up pictures 19
compliance
Canadian 23
FCC 22
Japanese 23
connecting camera 13
converting pictures 5
on handheld 6
on Machintosh 11
on PC 10
customer support numbers 14
customize HOTSYNC operation 9
D
deleting pictures 2
disconnecting camera 14
E
expansion card reader 10
expansion cards
adding pictures from
computer 12
MultiMedia 7
reading JPEG imag es 12
Secure Digital 7
storing pictures 8
viewing pictures 9
F
fax numbers, support 13
FCC compliance 22
25
Page 54

Chapter
features 1
focusing 17
H
help
online service 13
telephone support 14
HOTSYNC technology
customizing 9
description 6
transferring wi th 3
I
Image Capture software
description 5
starting 14
Image Conversion Application
description 5
installing software 7
J
JPEG images
accessing with computer 12
converting to from computer
10
converting to from handheld
6
K
KODAK software
getting help 1 3
M
macro setting 19
MultiMedia C ar d 7
P
PALMPIX conduit 5
photographing
a page 21
business cards 20
PICT images
converting to 11
pictures
adding to upload list 4
beaming 5
converting on Machintosh 11
converting on PC 10
deleting 2
renaming 2
resolution 15
selecting and viewing 1
storing on card 8
storing on handheld 6
taking 18
taking close-ups 19
transferring 3
26
Page 55

Chapter
transferring from computer
to card 12
viewing on card 9
PPX image
description 5
R
regulatory information 22
Canadian 23
Japanese 23
renaming pictures 2
resolution 15
S
Secure Digital card 7
selecting pictures 1
self-timer 15
service and support
fax numbers 13
Kodak web site 13
telephone numbers 14
software 5
getting help 13
installing 7
stating Image Capture 14
storing pictures
on card 8
on handheld 6
T
taking pictures 15, 18
telephone support 14
timer 15
transferring pictur es 3
beaming 5
from computer to car d 12
PALMPIX conduit 5
upload list 4
U
upload list 4
W
web site, Kodak 13
Z
zoom 16
27
Page 56

 Loading...