

Page 1

Table of Contents
1 Introduction. . . . . . . . . . . . . . . . . . . . . . . . . . . . . . . . . . . . . .1
2 About the Software. . . . . . . . . . . . . . . . . . . . . . . . . . . . . . 2
Installing the Software . . . . . . . . . . . . . . . . . . . . . . . . . . . . . . 3
Changing Your Picture Format Settings. . . . . . . . . . . . . . . . .4
3 Preparing the Camera . . . . . . . . . . . . . . . . . . . . . . . . . . . . 6
Installing the Battery . . . . . . . . . . . . . . . . . . . . . . . . . . . . . . . 6
Checking the Battery. . . . . . . . . . . . . . . . . . . . . . . . . . . . . . . . 6
Connecting the Camera. . . . . . . . . . . . . . . . . . . . . . . . . . . . . . .7
4 Using Your PALMPIX Camera . . . . . . . . . . . . . . . . . . . . . . . 8
Starting the PALMPIX Software . . . . . . . . . . . . . . . . . . . . . . 8
Using Your Camera. . . . . . . . . . . . . . . . . . . . . . . . . . . . . . . . . . 9
Getting PALMPIX Help on the Handheld . . . . . . . . . . . . . . . .10
5 Taking Pictures . . . . . . . . . . . . . . . . . . . . . . . . . . . . . . . . . . 11
6 Working With Your Pictures . . . . . . . . . . . . . . . . . . . . . . .12
Viewing Pictures . . . . . . . . . . . . . . . . . . . . . . . . . . . . . . . . . . . .12
Renaming Pictures. . . . . . . . . . . . . . . . . . . . . . . . . . . . . . . . . . 12
Deleting Pictures . . . . . . . . . . . . . . . . . . . . . . . . . . . . . . . . . . .13
i
Page 2

Transferring Pictures to Your Computer. . . . . . . . . . . . . . . .13
Specifying the Pictures to Transfer. . . . . . . . . . . . . . . . . . . . 14
Beaming Pictures to Another Handheld. . . . . . . . . . . . . . . . 15
Storing Pictures on Your Handheld. . . . . . . . . . . . . . . . . . . . 15
7 General Tips, Maintenance, and Safety. . . . . . . . . . . . . 16
PALMPIX Camera Tips . . . . . . . . . . . . . . . . . . . . . . . . . . . . . . .16
Camera Safety and Maintenance. . . . . . . . . . . . . . . . . . . . . .16
Using Your Battery . . . . . . . . . . . . . . . . . . . . . . . . . . . . . . . . . 17
PALMPIX Camera Specifications . . . . . . . . . . . . . . . . . . . . . .18
8 Customer Support. . . . . . . . . . . . . . . . . . . . . . . . . . . . . . 20
World Wide Web . . . . . . . . . . . . . . . . . . . . . . . . . . . . . . . . . . . 20
Telephone Customer Support. . . . . . . . . . . . . . . . . . . . . . . . 20
9 Warranty and Regulatory . . . . . . . . . . . . . . . . . . . . . . . . 22
Warranty . . . . . . . . . . . . . . . . . . . . . . . . . . . . . . . . . . . . . . . . . 22
Regulatory Information. . . . . . . . . . . . . . . . . . . . . . . . . . . . . 24
Index . . . . . . . . . . . . . . . . . . . . . . . . . . . . . . . . . . . . . . . . . . . 27
ii
Page 3

Introduction
1 Introduction
Congratulations on purchasing the KODAK PALMPIX Camera for the PALM m100
Handheld (PALMPIX Camera), the camera that turns your PALM m100 Handheld
into a digital camera.
With the PALMPIX Camera you can:
m Take great looking pictures in two different resolutions:
640 x 480 (VGA)or 320 x 240 (1/4 VGA).
m Get close to your subject with a 2x digital zoom.
m Transfer pictures by PALM HOTSYNC Technology for instant editing,
printing, and placement into documents.
m Save pictures to a PC in JPEG (.JPG) or Bitmap (.BMP) format; to a
Macintosh in JPEG or PICT format.
m E-mail pictures in minutes to business associates, friends, and family
anywhere in the world.
m Beam pictures to other PALM handheld users.
1
Page 4

About the Software
2 About the Software
The following applications are included on the KODAK PALMPIX Camera CD,
supplied with your camera. You must install KODAK PALMPIX Software (PALMPIX
Palm Application and PALMPIX Conduit) before you can transfer images from
your PALM handheld to the computer.
m KODAK PALMPIX Palm Application—runs on the PALM m100 Handheld
and controls the camera and picture transfer functions.
m KODAK PALMPIX Conduit—is added to the PALM HOTSYNC Manager and
lets you transfer pictures from the PALM handheld to the computer using
HOTSYNC Technology.
m ARCSOFT PHOTOIMPRESSION 2000 Software—installs and runs on
your computer. Lets you edit and enhance your pictures, add special effects,
add text and borders, create calendars and invitations, and much more.
Before You Begin
Before you install the KODAK PALMPIX Software, make sure you have installed the
PALM Desktop software that was provided with your PALM handheld, and that you
can perform a HOTSYNC operation with the PALM handheld to your computer.
You cannot install the KODAK PALMPIX Software unless the PALM Desktop
software is installed first.
PALM HO TSY NC Tech no log y
PALMPIX uses PALM HOTSYNC Technology to transfer pictures from the PALM
handheld to your computer. HOTSYNC is the software that enables you to
synchronize the data on the PALM handheld with the data on the computer.
For more information, refer to the guides that came with the PALM handheld.
2
Page 5

About the Software
Installing the Software
1 Exit all software programs.
2 Place the KODAK PALMPIX Camera CD into the CD-ROM drive.
If the CD does not start automatically:
On a PC—from the Start menu, select Run. In the text box, enter the
CD drive letter:\setup.exe. For example, d:\setup.exe.
On a Macintosh—click the PALMPIX desktop icon and open Installer.
3 Select your language, then follow the on-screen instructions to install the
software.
On a PC:
Make sure both PalmPix Conduit
and PalmPix Palm Application
are checked.
Click Browse to change the
Destination folder (Default is
C:\Palm\your user name\
PalmPix\)
Click Next
On a Macintosh:
Check Easy Install.
3
Click Install.
Page 6

About the Software
4 Select your PALM handheld user name when prompted.
Note: If multiple PALM handheld users share your computer, install the KODAK
PALMPIX Software separately for each user, selecting the appropriate user
name when prompted.
5 After the software is installed on the computer, perform a HOTSYNC operation
to transfer the PALMPIX Software onto the PALM handheld.
If you have difficulty installing the PALMPIX Palm Application Software on
your PALM handheld, refer to the guides that came with your PALM handheld
for instructions on installing applications manually.
Changing Your Picture Format Settings
You can change the following settings that determine how and where your
pictures are saved on your computer:
Setting Options Preset System Default
Picture file format JPEG, BMP, PICT JPEG
Delete pictures after
transfer?
Location where
pictures are saved
on your computer
To change the settings on a PC:
1 On your computer desktop, right-click the HOTSYNC Manager icon ,
then select Custom.
2 Select KODAK PalmPix Camera, with your user name. Then click Change to
display the Change HotSync Action window.
Note: For information about this window, refer to the guides that came with
the PALM handheld.
Yes, No No
You can designate
a location
On a PC or a Macintosh:
hard drive name\Palm\
your user name\PalmPix\
4
Page 7
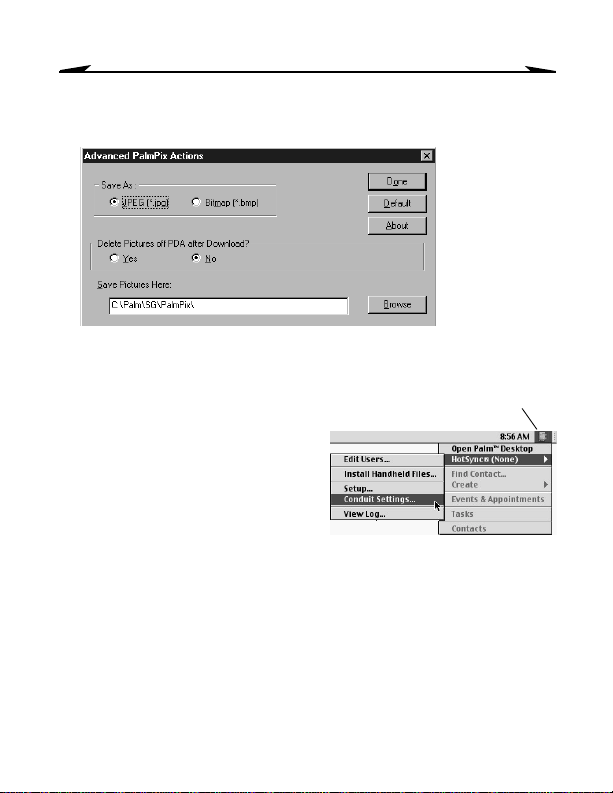
About the Software
3 Click Advanced. In the Advanced PalmPix Actions window, select the options
you want, then click Done.
To change the settings on a Macintosh:
1 From the Finder Menu bar, select the
PALM icon.
2 Select HotSync (with your user name),
then Conduit Settings.
3 Select KODAK PalmPix Camera, then
click Change Settings.
4 Click Advanced. In the Advanced
PalmPix Actions window, select the
options you want, then click Done.
PALM icon
5
Page 8
Preparing the Camera
3 Preparing the Camera
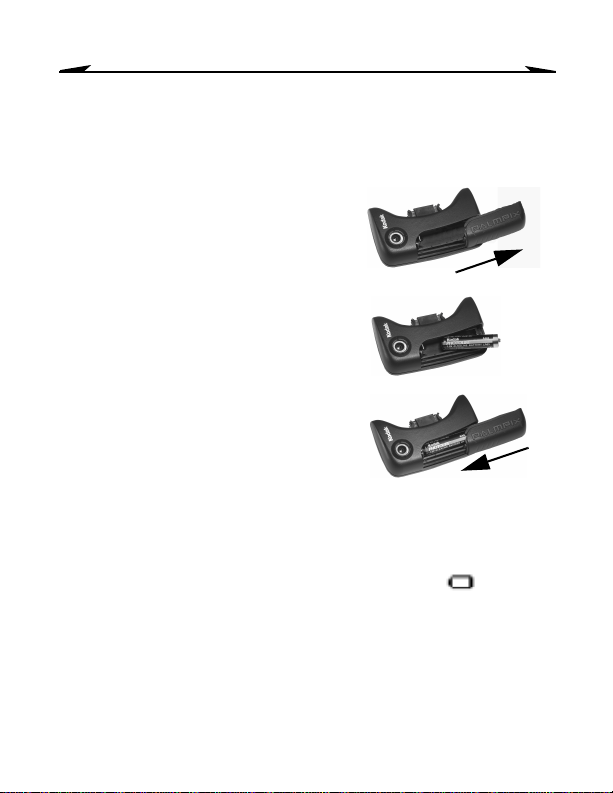
Installing the Battery
1 Remove the battery door by sliding it to
the right.
2 Insert the AAA battery into the
chamber as shown.
3 Replace the battery door, sliding it
closed until it clicks into place.
Note: The camera battery supplies
power to the camera when it is
connected to the PALM handheld, with
the PALMPIX Software running.
The PALM handheld batteries do not
supply power to the camera.
Checking the Battery
You can capture up to 200 pictures on one camera battery.
When you preview a picture (page 11), a battery status symbol appears on
the PALM handheld if the camera battery is nearly exhausted and needs to be
replaced.
No symbol appears if the battery can adequately power the camera.
6
Page 9
Preparing the Camera
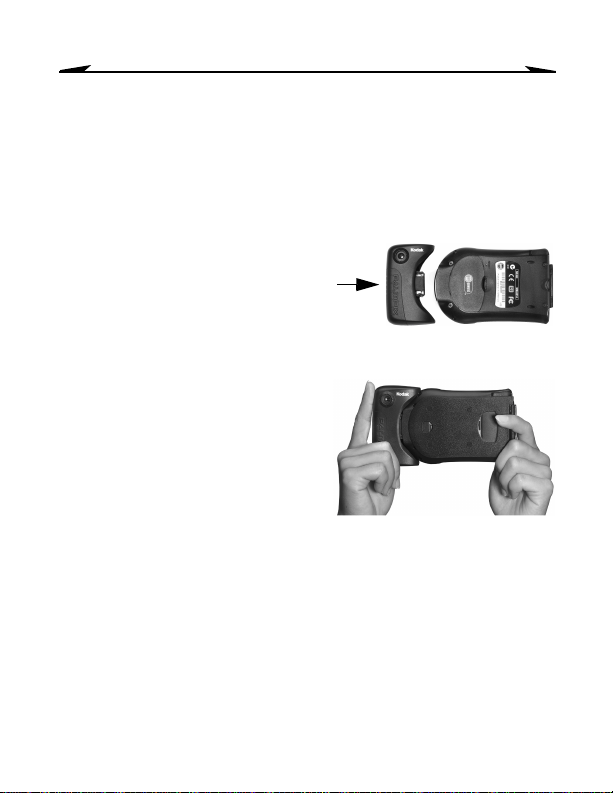
Connecting the Camera
For the camera to work, it must be connected to a PALM m100 Handheld that has
the PALMPIX Software installed.
When the camera is connected, the lens faces the back of the PALM handheld.
1 Align the PALM handheld connector
and the camera connector.
2 Push the camera and PALM handheld
together until they lock in place.
3 To remove the camera, pull it away
from the PALM handheld.
CAUTION: Do not remove the camera during a picture transfer (page 11).
Doing so may cause you to lose picture data or information.
7
Page 10

Using Your PALMPIX Camera
4 Using Your PALMPIX Camera
When you connect the KODAK PALMPIX Camera to your PALM handheld and start
the PALMPIX Software:
m the PALM handheld Date Book button becomes the Preview/Shutter
button
m the PALM handheld Scroll button becomes the Zoom button
m the PALM handheld screen becomes the viewfinder
Starting the PALMPIX Software
1 Connect the camera and turn on the PALM handheld.
2 Tap the Applications button , then tap the PALMPIX icon to display
the Image List screen.
3 To exit the PALMPIX Software, tap the Applications button.
8
Page 11

Using Your PALMPIX Camera
Using Your Camera
A. Work with your pictures—tap a file name
to view, rename, or delete the picture. See
page 12 for how.
B. Set the self-timer—tap the icon to turn
the self-timer on . Creates a ten-second
delay after you press the Shutter button.
C. Select a picture resolution—tap the icon
before you take a picture:
320 x 240 resolution—use when you
will view your pictures online, or when
you need extra space for picturetaking. Each picture takes about 30K of
available PALM handheld memory.
640 x 480 resolution—use when you
will print or e-mail your pictures. Each
picture takes about 100K of available
PALM handheld memory.
D. Check pictures remaining—the Frame Counter displays approximately
how many additional pictures can be stored on the PALM handheld, based on
the resolution you select.
E. Take a picture—press the Preview/Shutter button (Date Book button) once
to preview the image on the screen, then press it again to take the picture. The
LCD screen is your viewfinder.
F. Use the zoom—press the up Zoom button (Scroll button) to magnify the
picture up to 2x (2x is displayed on the screen). Press up again to zoom back
to 1x.
Zoom is available in 640 x 480 resolution only. If you press the Zoom button
A
B
C
D
FE
9
Page 12

Using Your PALMPIX Camera
while in 320 x 240 resolution, the camera automatically resets the resolution
to 640 x 480.
Getting PALMPIX Help on the Handheld
You can get help using your PALMPIX Camera and Software even if you don’t have
your User Guide or camera with you.
1 With PALMPIX Software running on your PALM handheld, tap Menu , then
Options→About PalmPix.
2 Tap the icon in the upper right corner of the screen and scroll through
3 To return to the Image List screen, tap Done, then OK.
i
the topics with the arrows.
10
Page 13

Taking Pictures
5 Taking Pictures
When PALMPIX Software is running on the PALM handheld, the Date Book button
becomes the camera Preview/Shutter button.
1 Connect the camera to the PALM handheld, then tap the Applications
button .
2 Tap the PALMPIX icon .
3 Press the Preview/Shutter (Date
Book) button once to display a live
preview of your subject on the screen.
To cancel the preview, tap the screen.
4 Press the Preview/Shutter button a
second time to take the picture.
m If the Self-Timer is activated, the
PALM handheld beeps for ten
seconds, then beeps faster just
before the picture is taken.
m A progress bar appears at the bottom of the screen as the picture is
transferred from the camera to the PALM handheld. To cancel the
transfer, tap the trash can icon.
m When the picture is transferred to the PALM handheld, it appears in the
Image List. See “Viewing Pictures” on page 12.
CAUTION: Do not remove the camera from the PALM handheld during a
picture transfer. Doing so may cause you to lose picture data or
information.
11
Page 14

Working With Your Pictures
6 Working With Your Pictures
Viewing Pictures
1 With PALMPIX Software running, tap the file name
to view the picture.
The picture appears in Image View with the file
name, the date and time the picture was taken,
and the picture resolution.
2 Press the Scroll button to navigate through the
pictures.
Note: Pictures beamed between non-color and color
handhelds appear as grayscale images on the
color handheld.
Renaming Pictures
1 With the picture displayed, tap Details.
2 In the Details window, select the image name and
rename the file.
You can also categorize, delete, and mark the file
as private. For more information, refer to the
guides that came with the PALM handheld.
3 Tap OK, then tap Done to return to the Image List.
12
Page 15

Working With Your Pictures
Deleting Pictures
To delete a selected picture—tap the file name
to be deleted, then tap Menu →Record→
Delete Image.
To delete all pictures—tap Menu →
Options→ Delete All.
Note: You cannot access Options→Delete All
when a picture is displayed.
Transferring Pictures to Your Computer
PALMPIX uses PALM HOTSYNC Technology (page 2) to transfer pictures from the
PALM handheld to your computer.
1 Exit the PALMPIX Software and disconnect the
camera from the PALM handheld.
2 Connect the HOTSYNC cable from the PALM
handheld to the computer.
3 Press the HOTSYNC Manager button on the
cable.
All pictures in the Upload List (page 14) are
transferred to your computer.
On a PC, pictures are saved in the following
folder:
C:\Palm\your user name\PalmPix
On a Macintosh, pictures are saved in the following folder:
hard drive name\Palm\your user name\PalmPix
If you wish, you can change the destination folder and its location (page 4).
HOTSYNC Manager
button
to
computer
13
Page 16

Working With Your Pictures
Specifying the Pictures to Transfer
Only pictures included in the Upload List are transferred to the computer. Each
picture is added automatically to the Upload List when you take it.
You can add or remove pictures from the Upload List before you transfer them.
1 With PALMPIX Software running, tap Menu
, then Options→Select Image Uploads.
Note: You cannot access Options→Select Image
Uploads when a picture is displayed.
2 In the Image Uploads screen, highlight the file
name in the Image List and tap the single
arrow button to add the picture to the Upload
List.
You can add as many pictures to the Upload
List as you want.
To add all the pictures to the Upload List at
once, tap the double arrow button.
3 To remove pictures from the Upload List, highlight the file name and tap
Remove.
To remove all the pictures, tap Remove All.
14
Page 17

Working With Your Pictures
Beaming Pictures to Another Handheld
You can beam your pictures to another PALM handheld via the IR port. The
receiving handheld must have an IR port, have KODAK PALMPIX Software
installed, and be at its home screen when you beam the pictures.
1 In the PALM Preferences (Prefs) menu, make sure Beam is set to On.
2 With PALMPIX Software running, select the picture in the Image List.
3 Tap Menu , then Record→Beam Image.
For more information about beaming pictures, refer to the guides that came
with the PALM handheld.
If the receiving handheld does not have KODAK PALMPIX Software installed,
you can beam the application as well. Refer to the guides that came with the
PALM handheld.
Storing Pictures on Your Handheld
Pictures are saved
m Pictures stored on your PALM handheld are saved when you turn off the
handheld.
Pictures are not saved
m If the PALM handheld loses power (batteries are exhausted) for an extended
period of time, it may lose data, including your pictures. For more
information, refer to the guides that came with the PALM handheld.
m If you delete the KODAK PALMPIX Software from the PALM handheld, the
pictures are also deleted.
15
Page 18

General Tips, Maintenance, and Safety
7 General Tips, Maintenance,
and Safety
PALMPI X Camera Tips
m To keep your PALM handheld updated with the most current KODAK PALMPIX
Software, visit us on the Web at www.kodak.com/go/palmpix.
m Improve your pictures by adjusting the available light or by changing the light
source. This is especially true under older fluorescent lighting.
m If pictures appear too dark when viewing on a computer, increase the
available light source when taking pictures.
m Adjust the PALM handheld contrast level for better picture viewing on the
liquid crystal display (LCD). Refer to the guide that came with your handheld
for details.
m Extreme temperatures can affect the PALM handheld display. Hot
temperatures can darken the LCD and cold temperatures can lighten it. This
does not affect the image you capture, only the display. Refer to the guide that
came with your PALM handheld for details on adjusting the display.
m Camera resolution remains at the last setting until you change it.
Camera Safety and Maintenance
m To keep from damaging your camera, avoid exposing it to moisture and
extreme temperatures.
m Never disassemble or touch the inside of the camera.
m Clean the outside of the camera by wiping with a clean, dry cloth. Never use
harsh or abrasive cleaners or organic solvents on the camera or any of its
parts.
16
Page 19

General Tips, Maintenance, and Safety
m Wipe the lens gently with a soft, lint-free cloth or an untreated lens-cleaning
tissue.
m Do not allow any chemicals, such as suntan lotion, to come into contact with
the surface of the camera.
Using Your Battery
m Keep all batteries away from children.
m Kodak recommends KODAK PHOTOLIFE Alkaline Batteries (AAA), or KODAK
Ni-MH Rechargeable Batteries (AAA).
m Remove the battery when the camera is stored for extended periods of time.
m Always follow your battery manufacturer’s directions fully. Do not attempt to
disassemble, short circuit, or subject the battery to high temperature or fire.
m If you choose to use alkaline batteries in your camera, you will obtain better
performance from “photo-flash grade” alkaline batteries, such as KODAK
PHOTOLIFE Alkaline Batteries. These types of batteries last more than twice as
long in digital cameras as ordinary alkaline batteries. Alkaline batteries are
not rechargeable, do not attempt to recharge them in a charger.
m When disposing of batteries, follow the manufacturer’s instructions and all
federal, state, and local regulations. Kodak suggests customers take advantage
of any community battery recycling programs that may exist in your area.
Contact your local waste remover or recycler for details.
m In the unlikely event that battery fluid leaks onto your skin, immediately wash
the contaminated skin with soap and plenty of water. Contact your local health
care provider or, in the U.S., contact Kodak Health, Safety and Environment
Information at 1-716-722-5151.
17
Page 20

General Tips, Maintenance, and Safety
m In the unlikely event that battery fluid leaks inside the camera, U.S. customers
can contact the Kodak Information Center (KIC) at 1-800-242-2424.
Customers outside the U.S. can contact their local Kodak Customer Service
representative.
PALMPIX Camera Specifications
Imager VGA, 640 x 480 CMOS image sensor,
VGA resolution High 640 x 480=307,200 pixels
Low 320 x 240=76,800 pixels
Image quality
settings
Color 24-bit, millions of colors
Picture file format
(when transferred to the computer
only, individual picture files do not
exist on the PALM handheld)
Lens,
fixed focus
Shutter speed 1/15-1/500 seconds
Exposure Automatic; auto white balance
Better 640 x 480
Good 320 x 240
Aperture F/2.0
Zoom 2X digital zoom (in high resolution)
Focal Length 0.24 in. (6.1 mm)
Focus Range 36 in. (0.9 m) to infinity
user selectable to 320 x 240 (1/4 VGA)
JPEG, BMP (on a PC)
JPEG, PICT (on a Macintosh)
18
Page 21

General Tips, Maintenance, and Safety
Self-timer 10 seconds
Power
(200 images per battery)
Interface Serial connection to the PALM m100,
Picture storage
(at 640 x 480)
PALMPIX application storage PALMPIX Software uses 62 K of PALM
Picture transfer HOTSYNC cable or dock
Dimensions (w x d x h) 1.9 in. x 0.9 in. x 3.3 in.
Weight 0.1 lb. (45 g) without batteries
Operating temperature 32 to 104° F (0 to 40° C)
Certifications FCC Class B, ICES-003 Class B, CE, VCCI,
Warranty One year
1 AAA-size, 1.5-volt alkaline (included)
or 1 AAA-size, 1.2-volt Ni-MH
rechargeable
IrDA between handhelds
Stores one picture for every 100 K of
available PALM handheld memory
handheld memory
(48 mm x 23 mm x 83 mm)
C-Tick
19
Page 22

Customer Support
8 Customer Support
World Wide Web
Contact us on the World Wide Web at www.kodak.com/go/palmpix.
Telephone Customer Support
If you have questions concerning the operation of KODAK software or the camera,
you may speak directly to a customer support representative.
Before You Call
Before you call to speak to a customer support representative, please have the
camera and PALM handheld available. If you are having problems transferring
pictures to your computer, have your PALM handheld and HOTSYNC cable and the
following information available:
Operating system ____________________________________________
Processor speed (MHz) _______________________________________
PC or Macintosh model _______________________________________
Amount of memory (MB) ______________________________________
Exact error message you received ________________________________
Version of installation CD ______________________________________
Camera serial number ________________________________________
Telephone Numbers
m U.S.—call toll free, 1-800-235-6325, between the hours of 9:00 a.m. and
8:00 p.m. (Eastern Standard Time) Monday through Friday.
20
Page 23

Customer Support
m Canada—call toll free, 1-800-465-6325, between the hours of 9:00 a.m. and
8:00 p.m. (Eastern Standard Time) Monday through Friday.
m Europe—call the Kodak Digital Imaging Support Centre toll number
associated with your location, or the U.K. toll line, 44-0-131-458-6714,
between the hours of 09.00 and 17.00 (GMT/CET) Monday through Friday.
m Outside the U.S., Canada, and Europe—calls are charged at National
Rate.
Austria/Osterreich 0179 567 357
Belgium/Belgique 02 713 14 45
Denmark/Danmark 3 848 71 30
Ireland/Eire 01 407 3054
Finland/Suomi 0800 1 17056
France 01 55 1740 77
Germany/Deutschland 069 5007 0035
Greece 0080044125605
Italy/Italia 02 696 33452
Netherlands/Nederland 020 346 9372
Norway/Norge 23 16 21 33
Portugal 021 415 4125
Spain/Espana 91 749 76 53
Sweden/Sverige 08 587 704 21
Switzerland/Schweiz/Suisse 01 838 53 51
UK 0870 2430270
International Toll Line +44 131 4586714
International Toll Fax Number +44 131 4586962
21
Page 24

Warranty and Regulatory
9 Warranty and Regulatory
Warranty
Limited Warranty
Kodak warrants the KODAK PALMPIX Camera for the PALM m100 Handheld
(excluding batteries) to be free from malfunctions and defects in both materials
and workmanship for one year from the date of purchase. Retain the original
dated sales receipt. Proof of the date of purchase will be required with any
request for warranty repair.
Limited Warranty Coverage
THIS LIMITED WARRANTY WILL BE HONORED ONLY WITHIN THE
GEOGRAPHICAL LOCATION THAT THE KODAK PALMPIX Camera for the PALM
m100 Handheld WAS PURCHASED.
Kodak will REPLACE the KODAK PALMPIX Camera for the PALM m100 Handheld if
it fails to function properly during the warranty period, subject to any conditions
and/or limitations stated herein. Such replacement is the sole remedy under this
warranty. If it is necessary to replace the entire product, it may be replaced with a
remanufactured product.
Limitations
Request for Warranty service will not be accepted without proof of date of
purchase, such as a copy of the original dated KODAK PALMPIX Camera for the
PALM m100 Handheld sales receipt. (Always keep the original for your records.)
This warranty doesn’t apply to the batteries used in this camera. This warranty
does not cover circumstances beyond Kodak’s control, nor problems caused by
failure to follow the operating instructions in the KODAK PALMPIX Camera for the
PALM m100 Handheld User’s Guide.
22
Page 25

Warranty and Regulatory
THIS WARRANTY DOES NOT APPLY WHEN FAILURE IS DUE TO SHIPPING
DAMAGE, ACCIDENT, ALTERATION, MODIFICATION, UNAUTHORIZED SERVICE,
MISUSE, ABUSE, USE WITH INCOMPATIBLE ACCESSORIES OR ATTACHMENTS,
FAILURE TO FOLLOW KODAK’S OPERATION, MAINTENENCE OR REPACKING
INSTRUCTIONS, FAILURE TO USE ITEMS SUPPLIED BY KODAK (SUCH AS
ADAPTERS AND CABLES), OR CLAIMS MADE AFTER THE DURATION OF THIS
WARRANTY.
Kodak makes no other express or implied warranty for this product. In the event
that the exclusion of any implied warranty is ineffective under the law, the
duration of the implied warranty will be one year from the purchase date. The
option of replacement is Kodak’s only obligation. Kodak will not be responsible
for any special, consequential or incidental damages resulting from the sale,
purchase, or use of this product, regardless of the cause. Liability for any special,
consequential or incidental damages (including but not limited to loss of revenue
or profit, downtime costs, loss of the use of the equipment, cost of substitute
equipment, facilities or services, or claims of your customers for such damages
resulting from the purchase, use or failure of the product), regardless of cause or
for breach of any written or implied warranty is expressly disclaimed and
excluded herefrom.
Your Rights
Some states or jurisdictions do not allow exclusion or limitation of incidental or
consequential damages, so the above limitation or exclusion may not apply to you.
Some states or jurisdictions do not allow limitations on how long an implied
warranty lasts, so the above limitation may not apply to you. This warranty gives
you specific rights, and you may have other rights, which vary, from state to state
or by jurisdiction.
Outside the United States
In countries other than the United States, the terms and conditions of this
warranty may be different. Unless specific Kodak warranty is communicated to the
purchaser in writing by a Kodak company, no warranty or liability exists beyond
23
Page 26

Warranty and Regulatory
any minimum requirements imposed by law, even though defect, damage, or loss
may be by negligence or other act.
How to Obtain Service
Visit us on the Internet at http://www.kodak.com.
When returning a camera for repair, pack the camera in its original packaging
materials. A problem report should also be enclosed with the equipment. If the
original packaging has been discarded or is not available, packaging will be at the
owner’s expense.
Unless a specific Kodak warranty is communicated to the purchaser in writing by
a Kodak company, no other warranty or liability exists beyond the information
contained above, even though defect, damage or loss may be caused by
negligence or other act.
To obtain warranty repair service contact your local Kodak representative.
Regulatory Information
FCC Compliance and Advisory
This device complies with Part 15 of the FCC Rules. Operation is subject to the
following two conditions: 1) this device may not cause harmful interference, and
2) this device must accept any interference received, including interference that
may cause undesired operation.
This equipment has been tested and found to comply with the limits for a Class B
digital device, pursuant to Part 15 of the FCC Rules. These limits are designed to
provide reasonable protection against harmful interference in a residential
installation.
This equipment generates, uses, and can radiate radio frequency energy and, if
not installed or used in accordance with the instructions, may cause harmful
interference to radio communications. However, there is no guarantee that
interference will not occur in a particular installation.
24
Page 27

Warranty and Regulatory
If this equipment does cause harmful interference to radio or television reception,
which can be determined by turning the equipment off and on, the user is
encouraged to try to correct the interference by one or more of the following
measures: 1) reorient or relocate the receiving antenna; 2) increase the
separation between the equipment and the receiver; 3) connect the equipment to
an outlet on a circuit different from that to which the receiver is connected; 4)
consult the dealer or an experienced radio/TV technician for additional
suggestions.
Any changes or modifications not expressly approved by the party responsible for
compliance could void the user’s authority to operate the equipment. Where
shielded interface cables have been provided with the product or specified
additional components or accessories elsewhere defined to be used with the
installation of the product, they must be used in order to ensure compliance with
FCC regulation.
FOR HOME OR OFFICE USE. Tested to comply with FCC standard.
Canadian DOC Statement
DOC Class B Compliance—This digital apparatus does not exceed the Class B
limits for radio noise emissions from digital apparatus set out in the radio
interference regulations of the Canadian Department of Communications.
Obervation des normes-Class B—Le présent appareil numérique n’émet pas
de bruits radioélectriques dépassant les limites applicables aux appareils
numériques de la Classe B prescrites dans les règlements sur le brouillage
redioélectrique édictés par le Ministère des Communications du Canada.
25
Page 28

Page 29

Index
Index
B
battery
capacity 6
checking 6
guidelines 17
installing 6
safety 17
tips 17
beaming pictures 15
button
date book 9
preview/shutter 9
scroll 9
zoom 9
C
camera
connecting to handheld 7
maintenance 16
preparing 6
safety 16
specifications 18
taking pictures 11
tips 16
using handheld as 8
changing picture formats 4
close software 8
color specification 18
computer, transferring pictures 13
connect camera to handheld 7
customer support 20
customizing picture formats 4
D
date book button 9
deleting pictures 13
Details screen 12
E
exit software 8
exposure 18
F
file formats
changing 4
specifications 18
file names 9
frame counter 9
27
Page 30

Index
G
guidelines, battery 17
H
help
getting support 20
online 10
HOTSYNC Technology 13
I
Image List 9
Image View screen 12
installing
battery 6
camera to handheld 7
software 3
L
lens, specifications 18
loading
battery 6
software 3
M
maintenance, camera 16
O
online help 10
P
PALMPIX Software
about 2
installing 3
pictures
beaming to another handheld
15
deleting 13
renaming 12
resolution 9
storing on handheld 15
taking 11
transferring to computer 13
viewing 12
power specifications 19
preview/shutter button 9
R
regulatory information 24
renaming pictures 12
resolution 1, 9, 18
S
safety 16
self-timer 9
service 24
shutter button 9
shutter speed 18
28
Page 31

Index
software
about 2
changing picture formats 4
installing 3
using 8
specifications, camera 18
storing pictures on handheld 15
support, telephone numbers 20
T
taking pictures 11
temperature, operating 19
tips
battery guidelines 17
taking pictures 16
using PALMPIX 16
transferring pictures
adding to upload list 14
HOTSYNC 13
to another handheld 15
to computer 13
U
upload list 14
V
viewfinder
use lcd as 9
viewing pictures 12
W
warranty 22
world wide web 20
Z
zoom feature 9
29
 Loading...