

Page 1

Introduction
Congratulations on purchasing the KODAK PalmPix Camera, the
camera that takes pictures using a PALM III, IIIe, IIIx, IIIc and VII
CONNECTED ORGANIZERS (Palm), and IBM WORKPAD and
TRGpro personal data assistants (PDAs). With the camera you can:
n Take great looking pictures in two different resolutions. Select
a 640 x 480 picture resolution for printing and e-mail; select a
320 x 240 picture resolution for viewing online, or when you
need extra space for picture-taking.
n Get close to the subject with a 2X digital zoom.
n Transfer pictures by HotSync Technology for instant editing,
printing, and placement into documents.
n Save pictures to a laptop or desktop computer as a JPEG (JPG)
or Bitmap (BMP) format.
n E-mail pictures in minutes to business associates, friends, and
family anywhere in the world.
n Beam pictures to other Palm users. For details, refer to the
guides that came with the Palm.
Introduction 1
Page 2

About the Software
Four applications are included on the Kodak CD supplied with
the camera.
n KODAK PalmPix Software—runs on the Palm and controls
the camera and picture transfer functions.
n KODAK PalmPix Conduit Software—provides the capability
to perform a HotSync operation for transferring pictures from
the Palm to the computer.
n Presto! Mr. Photo (NewSoft, Inc.)—lets you edit, enhance,
e-mail, print, and organize pictures. For help, refer to the
online manual or the NewSoft, Inc. Website at
www.newsoftinc.com.
n Image Carousel (Rhode Island Soft Systems, Inc.)—lets you
create scrolling screen savers and wallpapers for the computer.
For help, refer to the online help or the Rhode Island Soft
Systems, Inc. website at www.risoftsystems.com.
Loading the Software
1. Exit all software programs.
2. Place the CD into the CD-ROM drive.
3. Follow the on-screen instructions to install the software.
4. After the software is loaded on the computer, perform a HotSync
operation to transfer the PalmPix software onto the Palm.
2 About the Software
Page 3

Customizing the Transfer Conduit
The KODAK PalmPix Conduit default settings are set when you install
the software, but can be changed using the Advanced window of the
HotSync Manager. You can:
n Save pictures in a JPEG (default) or BMP format.
n Specify folders for transferring and saving pictures. A default
folder with the same name as your Palm user name, and a
subfolder named PalmPix are automatically created in
the Palm data directory on the {C:} drive.
n Select options for deleting pictures from the Palm after transfer.
The default is No.
1. Right click the HotSync Manager icon, then select Custom.
2. Select PalmPix, then click Change to display the Change HotSync
Action window.
Note: For information about this window, refer to the guides that
came with the Palm.
3. Click Advanced to display the Advanced window. Select the
options you want, then click Done.
About the Software 3
Page 4
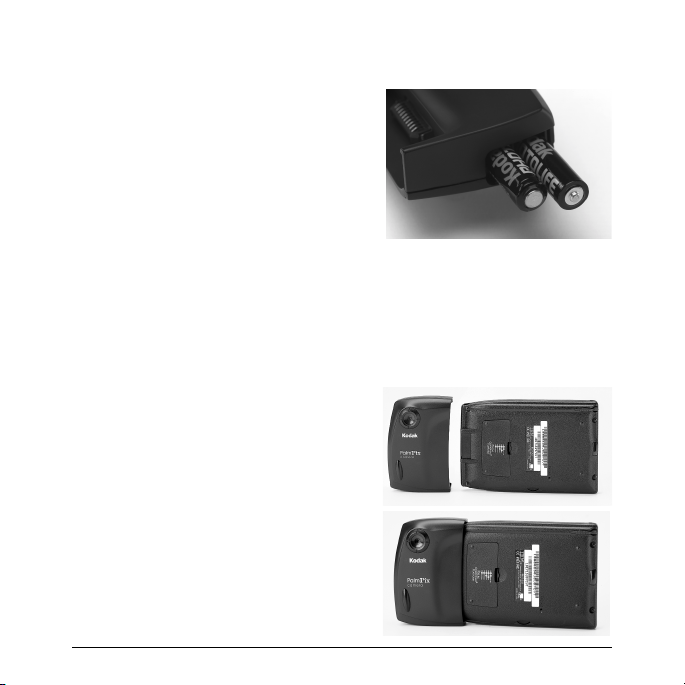
Preparing the Camera
Loading Batteries
1. Open the battery door (not shown).
2. Insert two AAA batteries into the
chamber as shown.
3. Close the battery door.
Checking Batteries
A battery status symbol appears on the Palm when previewing a
picture (page 6). A black battery symbol means batteries are charged;
a partially black symbol means batteries are weak; and a blinking
symbol indicates batteries are exhausted and need to be replaced.
Connecting the Camera
When connected, the camera lens
faces the back of the Palm.
1. Align the Palm connector and the
camera connector.
2. Push the camera and Palm together
until they lock in place.
To remove the camera, pull it away
from the Palm.
4 Preparing the Camera
Page 5
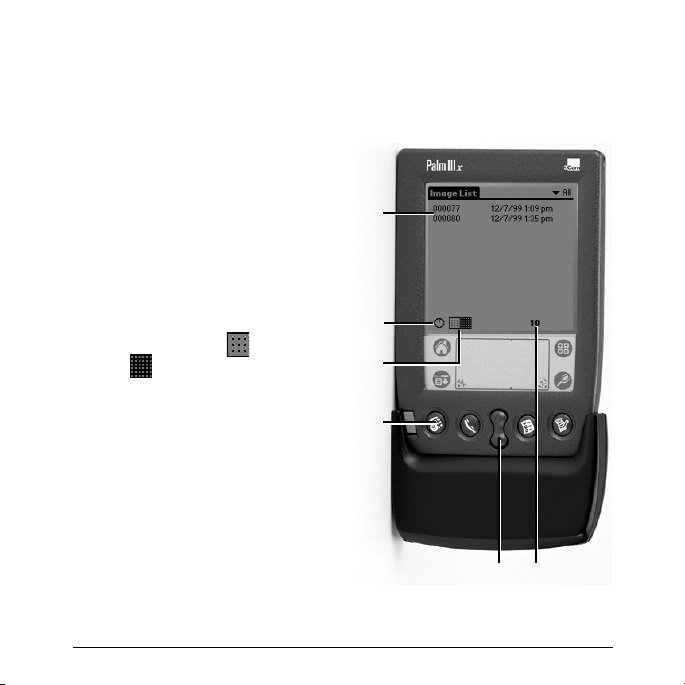
Using the PalmPix Software
With the camera connected, turn on the Palm, tap the Applications
button, then tap the PalmPix icon to display the main PalmPix
window.
A. Picture File Name—name
given to pictures stored on the
Palm. Pictures can be renamed,
deleted, and categorized using
the Details window (page 7).
B. Self-Timer—tap the icon to
create a ten-second delay.
C. Resolution—tap the icon to
select 320 x 240 or 640 x
480 picture resolution.
D. Preview/Shutter Button—
press the Date Book button
once to preview the image, then
press it again to take the picture.
E. Zoom Button—press the Scroll
button up to zoom in, or down
to zoom out on the image.
Zoom is available only in
640 x 480 resolution.
F. Frame Counter—displays the number of pictures that can be
stored on the Palm.
Using the PalmPix Software 5
A
B
C
D
E
F
Page 6
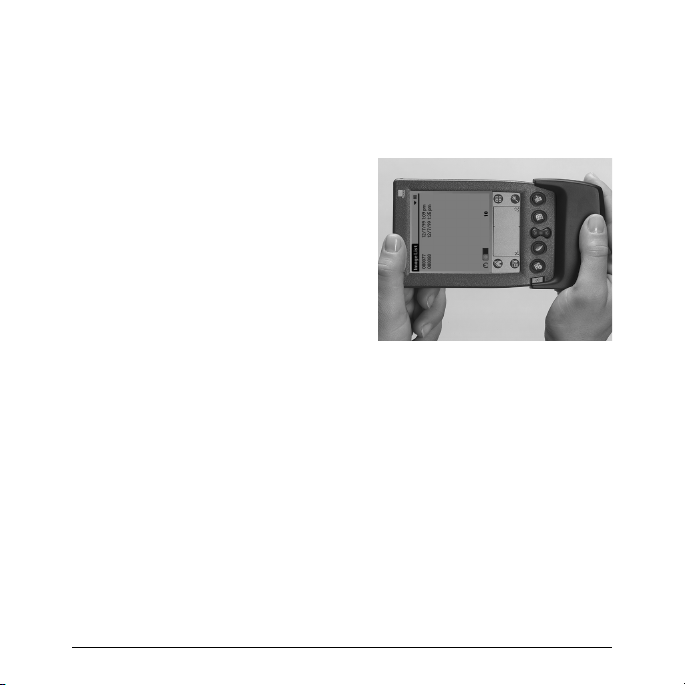
Taking Pictures
With the camera connected to the Palm, picture-taking is controlled
by the PalmPix Software. When PalmPix is activated, the Date Book
button becomes the camera Preview/Shutter button.
1. Press the Date Book button once to
view the subject.
The Palm screen displays a live
preview. To cancel the preview,
tap the screen.
Note: Because of image processing
time, color PDAs preview the
image in grayscale.
2. Press the Date Book button a second time to take the picture.
Note: If the Self-Timer is activated, the Palm beeps for ten
seconds, then beeps faster just before the picture is taken.
A progress bar appears below the picture displaying the transfer
status of the picture to the Palm. To cancel the transfer, tap the
trash can icon.
6 Taking Pictures
Page 7

Viewing, Renaming, and Deleting Pictures
Viewing Pictures
Tap the file name to view the picture. The
picture appears with the file name, and the
date and time when the picture was taken.
Press the Scroll button to navigate through
the pictures.
Note: Pictures beamed between non-color
and color PDAs appear as grayscale images on
the color PDA.
Renaming Pictures
With the picture displayed, tap Details to
display the Details window and rename the
file. In the Details window, you can
categorize, delete, and mark the file as private.
For more information, refer to the guides that
came with the Palm.
Deleting Pictures
To delete a selected picture—tap the file
name to be deleted, then tap Menu->Record->
Delete Image.
To delete all pictures—tap Menu->Options->
Delete All.
Note: You cannot access Options->Delete All
when a picture is displayed.
Viewing, Renaming, and Deleting Pictures 7
Page 8

Transferring Pictures to a Computer
1. Tap Menu->Options->Select Image
Uploads.
Note: You cannot access Options->Select
Image Uploads when a picture is
displayed.
2. Highlight the file name and tap the single
arrow button to add the picture, or tap the
double arrow button to add all the pictures
to be transferred to the Upload List.
To remove pictures from the Upload List,
highlight the file name and tap Remove, or
tap Remove All to remove all the pictures.
3. Place the Palm in the cradle, then press the
HotSync Manager button to transfer the
images from the Palm to the PalmPix folder
on your computer.
8 Transferring Pictures to a Computer
Page 9

General Maintenance, Safety, and Tips
n To keep from damaging your camera, avoid exposing it to
moisture and extreme temperatures.
n Clean the outside of the camera by wiping with a clean, dry
cloth. Never use harsh or abrasive cleaners or organic solvents
on the camera or any of its parts.
n Do not allow any chemicals, such as suntan lotion to come into
contact with the surface of the camera.
n Never disassemble or touch the inside of the camera.
n Wipe the lens gently with a soft, lint-free cloth or an untreated
lens-cleaning tissue.
n If pictures appear too dark when viewing on a computer,
increase the available light source when taking pictures.
Using Your Batteries
n Kodak recommends KODAK PHOTOLIFE AAA Alkaline
Batteries, or KODAK AAA Ni-MH Rechargeable Batteries.
n Remove the batteries when the camera is stored for extended
periods of time.
n Always follow your battery manufacturer’s directions fully. Do
not attempt to disassemble, short circuit, or subject the battery
to high temperature or fire.
General Maintenance, Safety, and Tips 9
Page 10

n Replace all batteries of a set at the same time. New batteries
should not be mixed with used ones. Do not mix rechargeable
and nonrechargeable batteries. Do not mix alkaline or Ni-MH
types of batteries. Do not mix different grades or brands of
batteries. Failure to observe this precaution may result in some
batteries in a set being driven beyond their normal exhaust
point and increase their possibility of leakage.
n If you elect to use alkaline batteries in your camera, you will
obtain better performance from “photo-flash grade” alkaline
batteries, such as KODAK PHOTOLIFE alkaline batteries.
These types of batteries last more than twice as long in digital
cameras as ordinary alkaline batteries. Alkaline batteries are
not rechargeable, do not attempt to recharge them in a charger.
n When using the camera, we recommend limiting continuous
Preview or Review to less than 10-minutes per session.
n When disposing of batteries, follow the manufacturer’s
instructions and all federal, state, and local regulations. Kodak
suggests customers take advantage of any community battery
recycling programs that may exist in your area. Contact your
local waste remover or recycler for details.
10 General Maintenance, Safety, and Tips
Page 11

Specifications
VGA Resolution High 640 x 480=307,200 pixels
Low 320 x 240=76,800 pixels
Color 24-bit, millions of colors
Picture File Format BMP, JPEG
Lens Aperture F/2.0
Zoom 2X digital zoom
Focal Length 6.1 mm
Focus
Distance
Shutter Speed 1/15-1/500 seconds
Power 2 AAA-size, 1.5-volt alkaline, or
Dimensions (w x d x h) 2.2 x 1.1 x 3.3 in.
Weigh t 0.1 lb. (45 g) without batteries
Operating Temperature 40 to 104° F (4.4 to 40° C)
Design and specifications are subject to change without notice.
36 in. (0.9 m) to infinity
2 AAA-size, 1.2-volt Ni-MH
rechargeable
(55.9 x 28.0 x 83.8 mm)
Specifications 11
Page 12

Customer Support
n Web —www.kodak.com/go/palmpix.
n U.S. and Canada—call toll free, 1-888-375-6325, between 9:00
a.m. and 8:00 p.m. (Eastern Standard Time) Monday through
Friday.
n Europe—call toll free the number associated with your
location, or the U.K. toll line, 44-0-131-458-6714, between
09.00 and 17.00 (GMT/CET) Monday through Friday.
n Outside the U.S., Canada, and Europe—call the number on
the following pages that is associated with your location.
Country Help Number Fax
Argentina 54-1-808-300 54-1-808-3328
Australia 1-800-674-831 61-3-9353-2092
Austria 0179-567-357 44-0-131-458-6962
Belgium 02-713-14-45 44-0-131-458-6962
Brazil 0-800-15-0000 55-12-331-8571
Caribbean 78-7-757-5500 78-7-757-8760
Chile 56-2-697-2000 56-2-697-0310
China–Shanghai 8621-64720888 8621-64726582
China–Beijing 8610-63471155 8610-63475641
Colombia 57-1-629-0266 57-1-629-0673
Denmark 3-848-71-30 44-0-131-458-6962
12 Customer Support
Page 13

Country Help Number Fax
Dominican Republic 809-563-1252 809-563-1264
Egypt 20-2-394-2205 20-2-393-1119
Eire 01-407-3054 44-0-131-458-6962
France 01-55-1740-77 44-0-131-458-6962
Finland 0800-117056 44-0-131-458-6962
Germany 069-5007-0035 44-0-131-458-6962
Greece 00800-44125605 44-0-131-458-6962
Hong Kong 852-2564-9777 852-2564-9753
Hungary 36-1-269-71-17 36-1-269-71-13
India 91-22-617-5823 91-22-617-6004
Ireland 1-800-409391 44-0-131-458-6962
Italy 02-696-334-52 44-0-131-458-6962
Japan 81-3-5488-2390 81-3-5488-4512
Korea 82-2-708-5400 82-2-708-5500
Latin America 1-305-267-4700 1-305-267-4780
Lebanon 961-1-883822 961-1-881726
Malaysia 60-3-757-2722 60-3-755-5919
Mexico 52-5-449-4300 52-5-449-4400
Middle East 971-4-444-910 971-4-447-059
Netherlands 020-346-9372 44-0-131-458-6962
New Zealand 0800-500-135 64-9-302-8637
Norway 23-16-21-33 44-0-131-458-6962
Customer Support 13
Page 14

Country Help Number Fax
Panama 52-3-678-6200 52-3-678-6210
Peru 51-1-224-8610 51-1-224-8605
Philippines 63-2-810-0331 63-2-816-6718
Portugal 351-1-4149-500 351-14194-321
Russia 7-095-929-9166 7-095-929-9170
Singapore 65-470-9875 65-479-8397
South Africa 27-11-804-2852 27-11-804-5013
Spain 91-749-76-53 44-0-131-458-6962
Sweden 08-587-704-21 44-0-131-458-6962
Switzerland 01-838-53-51 44-0-131-458-6962
Taiwan 886-2-893-8210 886-2-895-1069
Thailand 66-2-271-3040 66-2-279-5073
Turkey 90-216-342-3332 90-216-343-6743
U.K. 0870-2430270 44-0-131-458-6962
Uruguay 59-2-92-0473 59-2-92-1796
Venezuela 58-2-903-1111 58-2-943-2081
14 Customer Support
Page 15

Full One Year Warranty
Kodak warrants this product against any defects that are due to faulty
workmanship or material for a one-year period after the original date of
purchase. During that one-year period, Kodak will replace this product
without charge if defective in material or workmanship. To obtain warranty
service, please contact Kodak support at the telephone numbers provided in
your user’s manual. Proof of date of purchase is required to obtain service
under the warranty. You may return the product registration card, within 30
days of purchase, to place proof of the date of purchase on file. Failure to
return the card will not affect your rights under this warranty.
THIS WARRANTY DOES NOT APPLY WHEN FAILURE IS DUE TO SHIPPING
DAMAGE, ACCIDENT, ALTERATION, MODIFICATION, UNAUTHORIZED
SERVICE, MISUSE, ABUSE, USE WITH INCOMPATIBLE ACCESSORIES OR
ATTACHMENTS, FAILURE TO FOLLOW KODAK’S OPERATION,
MAINTENANCE OR REPACKING INSTRUCTIONS, OR FAILURE TO USE
ITEMS SUPPLIED BY KODAK (SUCH AS ADAPTERS AND CABLES).
Liability for any special, consequential or incidental damages, (including but
not limited to loss of revenue or profit, downtime costs, loss of use of the
equipment, cost of substitute equipment, facilities or services, or claims of
your customers for such damages resulting from the purchase, use or failure
of the product), regardless of cause or for breach of any written or implied
warranty is expressly disclaimed and excluded here from.
Some localities do not allow limitations on how long an implied warranty
lasts, nor the exclusion or limitation of incidental or consequential damages,
so the above limitation or exclusion may not apply to you. This warranty gives
you specific legal rights, you may also have other rights.
Full One Year Warranty 15
Page 16

Warranty Repair Coverage
This warranty will be honored within the geographical location that the
product was purchased.
If the equipment does not function properly during the warranty period due
to defects in either materials or workmanship, Kodak will, at its option, either
repair or replace the equipment without charge, subject to the conditions and
limitations stated herein. Such repair service will include all labor as well as
any necessary adjustments and/or replacement parts.
If replacement parts are used in making repairs, these parts may be
remanufactured, or may contain remanufactured materials. If it is necessary to
replace the entire system, it may be replaced with a remanufactured system.
Kodak will also provide telephone assistance during the warranty period.
How to Obtain Service
Visit us on the Internet at http://www.kodak.com.
When returning a camera for repair, pack the camera in its original packaging
materials. A problem report should also be enclosed with the equipment. If
the original packaging has been discarded or is not available, packaging will
be at the owner’s expense.
Unless a specific Kodak warranty is communicated to the purchaser in writing
by a Kodak company, no other warranty or liability exists beyond the
information contained above, even though defect, damage or loss may be
caused by negligence or other act.
To obtain warranty repair service contact your local Kodak representative.
16 Full One Year Warranty
Page 17

Regulatory Information
FCC Compliance and Advisory
This device complies with Part 15 of the FCC Rules. Operation is
subject to the following two conditions: 1) this device may not cause
harmful interference, and 2) this device must accept any interference
received, including interference that may cause undesired operation.
This equipment has been tested and found to comply with the limits
for a Class B digital device, pursuant to Part 15 of the FCC Rules.
These limits are designed to provide reasonable protection against
harmful interference in a residential installation.
This equipment generates, uses, and can radiate radio frequency
energy and, if not installed or used in accordance with the
instructions, may cause harmful interference to radio
communications. However, there is no guarantee that interference
will not occur in a particular installation.
If this equipment does cause harmful interference to radio or
television reception, which can be determined by turning the
equipment off and on, the user is encouraged to try to correct the
interference by one or more of the following measures: 1) reorient or
relocate the receiving antenna; 2) increase the separation between
the equipment and the receiver; 3) connect the equipment to an
outlet on a circuit different from that to which the receiver is
connected; 4) consult the dealer or an experienced radio/TV
technician for additional suggestions.
Regulatory Information 17
Page 18

Any changes or modifications not expressly approved by the party
responsible for compliance could void the user’s authority to operate
the equipment. Where shielded interface cables have been provided
with the product or specified additional components or accessories
elsewhere defined to be used with the installation of the product,
they must be used in order to ensure compliance with FCC
regulation.
FOR HOME OR OFFICE USE. Tested to comply with FCC
standard.
Canadian DOC Statement
DOC Class B Compliance—This digital apparatus does not exceed
the Class B limits for radio noise emissions from digital apparatus set
out in the radio interference regulations of the Canadian Department
of Communications.
Obervation des normes-Class B—Le présent appareil numérique
n’émet pas de bruits radioélectriques dépassant les limites applicables
aux appareils numériques de la Classe B prescrites dans les
règlements sur le brouillage redioélectrique édictés par le Ministère
des Communications du Canada.
18 Regulatory Information
 Loading...