

Page 1
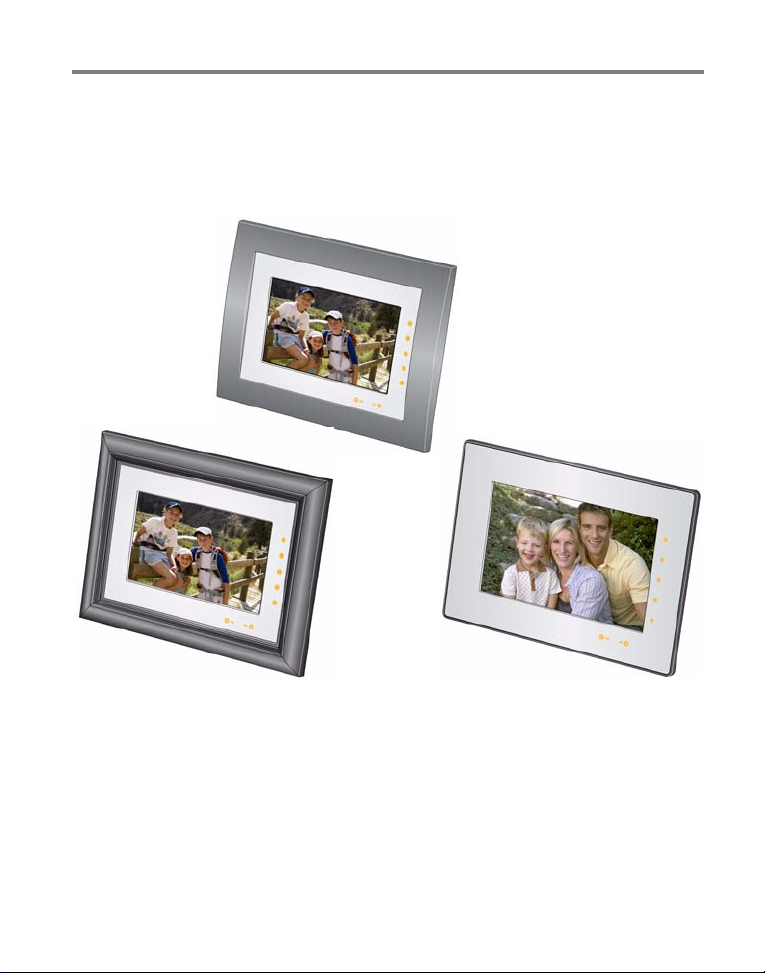
KODAK EASYSHARE Digital Frames
Extended user guide
P730/P730m/P736
www.kodak.com
For help with your digital frame, www.kodak.com/go/digitalframesupport
Page 2

Eastman Kodak Company
Rochester, New York 14650
© Eastman Kodak Company, 2009
All screen images are simulated.
Kodak, EasyShare, and Perfect Touch are trademarks of Eastman Kodak Company.
P/N 4H6539_en
Page 3
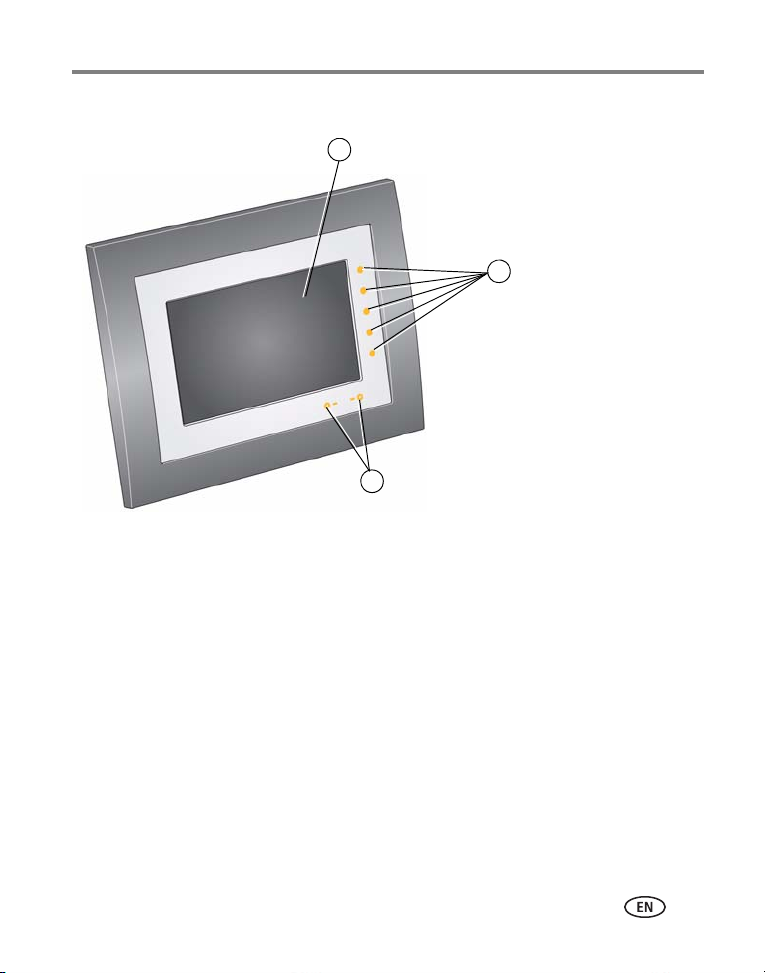
Front View
2
1
3
Quick Touch Border:
1 LCD screen
2 Side touch lights—tap only
3 Bottom touch lights—slide between or tap arrows
Product features
NOTE: When your hand is within 1 - 3 inches (2.5 - 7.6 cm) of the borders, the lights turn on and indicate
where to touch. Tap a light on the right border to see the screen icons.
To use the Quick Touch Border
www.kodak.com/go/support
, see page 4.
i
Page 4
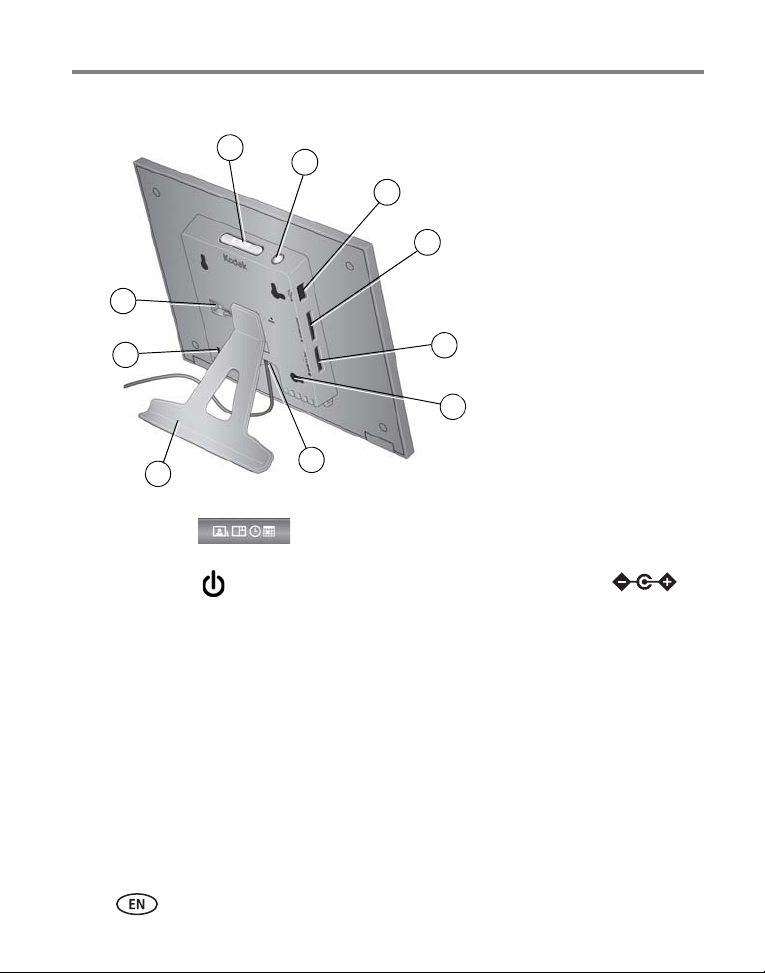
Back/side View
1
2
4
3
5
6
7
8
9
10
1 Mode button 6 Wall mounting holes (3) - P730, P730m
only
2 Power button 7 DC In 5V power connector
3 USB connector 8 Frame stand (see page 1)
4 Memory card slot - SD/MMC/xD/MS 9 Security lock slot
5 Memory card slot - MS/MS Pro Duo 10 Stand attachment slot
ii www.kodak.com/go/support
Page 5

Table of contents 1
1 Getting started ......................................................................................1
Setting up your frame....................................................................................1
Navigating using the Quick Touch Border ......................................................4
Setting your language ...................................................................................6
Setting the clock, energy saver, and timer......................................................6
Inserting a memory card................................................................................8
Connecting a USB device...............................................................................9
2 Viewing pictures ..................................................................................10
Enjoying your pictures immediately! ............................................................10
Viewing your pictures..................................................................................11
Changing viewing modes ............................................................................12
Viewing pictures in collage mode ................................................................13
Viewing thumbnails ....................................................................................15
Viewing a single picture ..............................................................................16
Saving a default play location......................................................................16
3 Doing more with your frame ...............................................................17
Accessing menu options..............................................................................17
Selecting multiple pictures...........................................................................19
Copying on your frame................................................................................20
Rotating pictures.........................................................................................21
Deleting pictures.........................................................................................21
Creating and playing a multimedia slide show .............................................22
4 Changing settings and more ...............................................................25
Changing frame settings .............................................................................25
Settings menus ...........................................................................................25
Changing the display picture order ..............................................................28
Upgrading your firmware (recommended)....................................................29
Changing your frame orientation.................................................................29
Hanging your frame on the wall (P730/P730m only) ....................................31
www.kodak.com/go/support iii
Page 6

Table of contents
Maintaining your frame...............................................................................31
Learning more about your frame..................................................................31
5 Troubleshooting and support ..............................................................32
Picture frame problems ...............................................................................32
Screen messages.........................................................................................34
6 Appendix .............................................................................................36
Digital frame specifications..........................................................................36
Important safety instructions .......................................................................38
Upgrading your software and firmware........................................................38
Additional care and maintenance ................................................................39
Limited warranty .........................................................................................39
Regulatory compliance and advisory............................................................41
iv www.kodak.com/go/support
Page 7
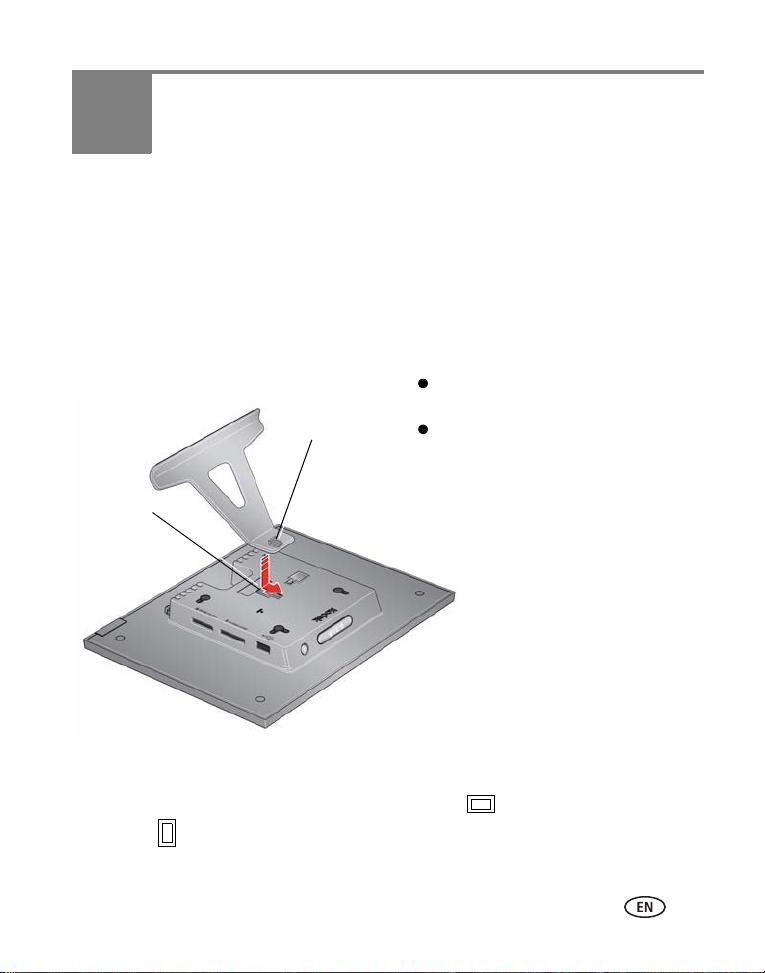
1 Getting started
Snap the stand into the slot in the back
of the frame.
Make sure the tab is secure in the slot.
Slot
Ta b
Welcome to your KODAK EASYSHARE Digital Frame. Viewing and sharing your
pictures couldn’t be simpler!
Setting up your frame
Attaching the stand
Your frame displays pictures in landscape orientation . To change to portrait
orientation , see page 29.
www.kodak.com/go/support 1
Page 8
Getting started
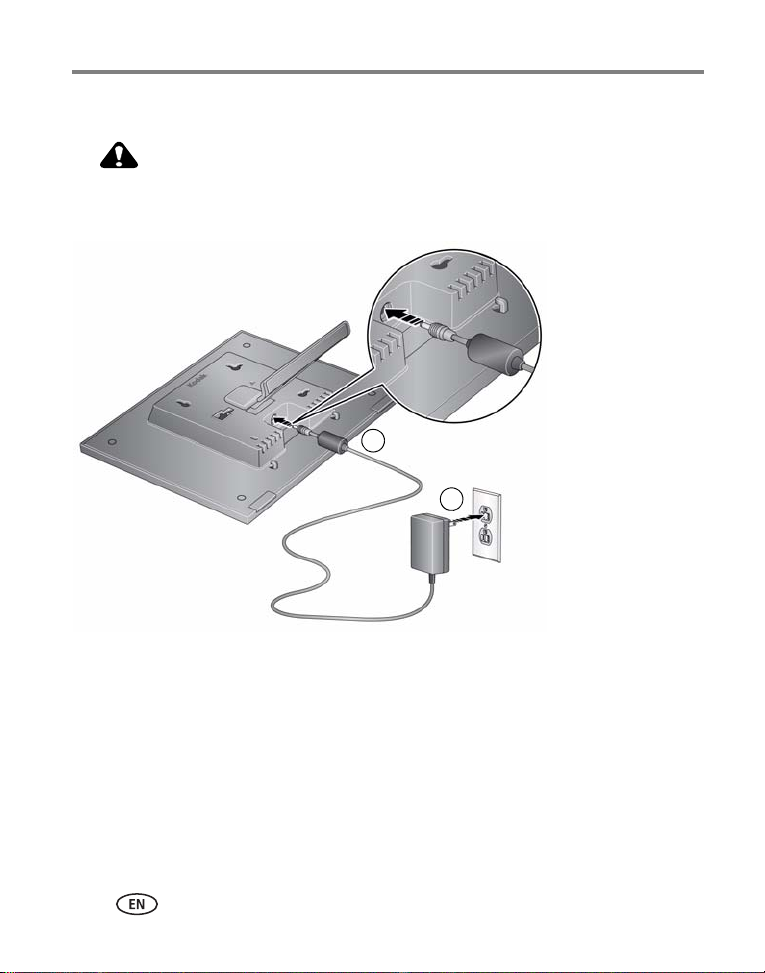
CAUTION:
Your power cable may look different from
the one pictured. Use the plug that
accommodates your type of power outlet.
1
2
Attaching the power cable
Do not use this power cable with other devices, including digital
cameras.
2 www.kodak.com/go/support
Page 9
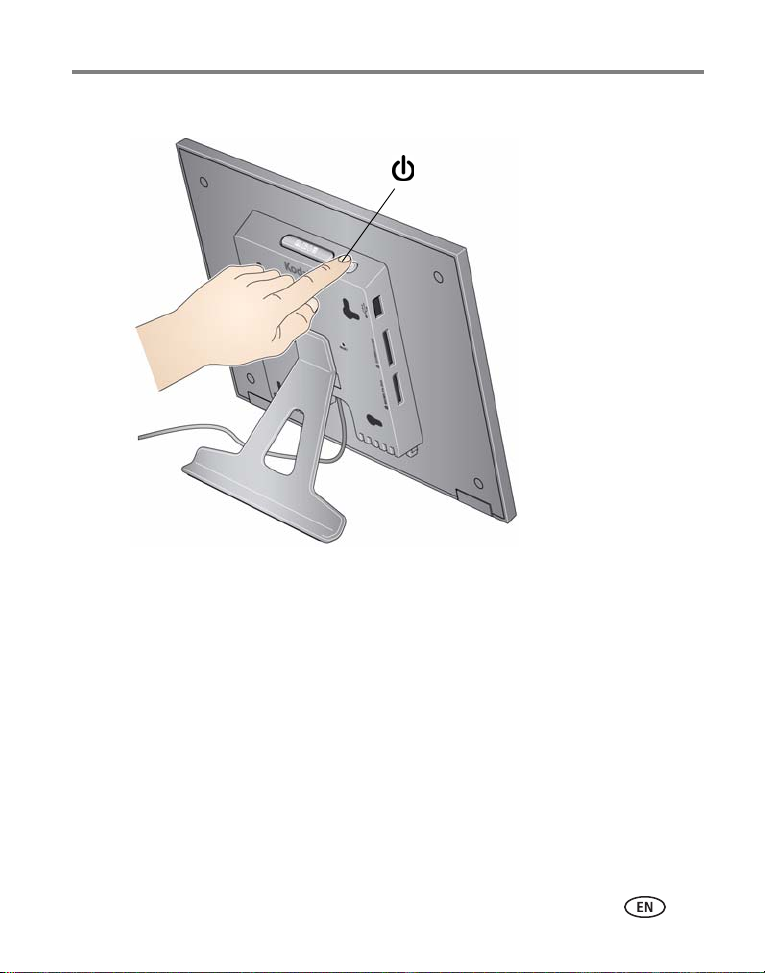
Turning your frame on and off
Power button - press and hold (for about
2 seconds), then release
With the power cable still plugged in,
your frame retains information (like the
time) if you turn it off.
Getting started
www.kodak.com/go/support
3
Page 10
Getting started
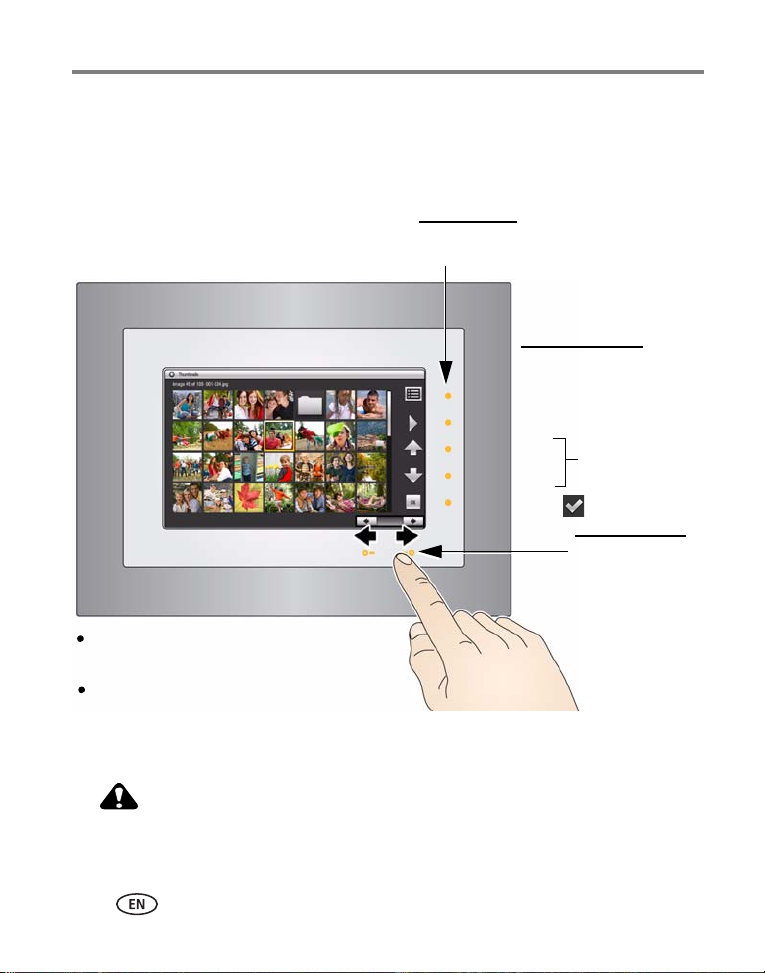
CAUTION:
Right border
Tap
lights
Tap, or press and
hold arrow lights,
or slide between
them to go forward
or backwards
Menu
Play
Up
Down
OK or
Move through the
menus and
thumbnail rows
Bottom
Right border icons
Tap a light on the right border to see the icons.
Tap OK to hide them.
Hover within
1 - 3 inches (2.5 - 7.6 cm)
of any
border to turn on the lights.
Navigating using the Quick Touch Border
IMPORTANT:
4 www.kodak.com/go/support
The display screen is not touch-sensitive. Do not touch it. Instead, tap the
lights on the right and bottom borders.
Only use your finger on the borders. Borders do not react to sharp
or metal objects—and they may damage the border or screen.
Page 11
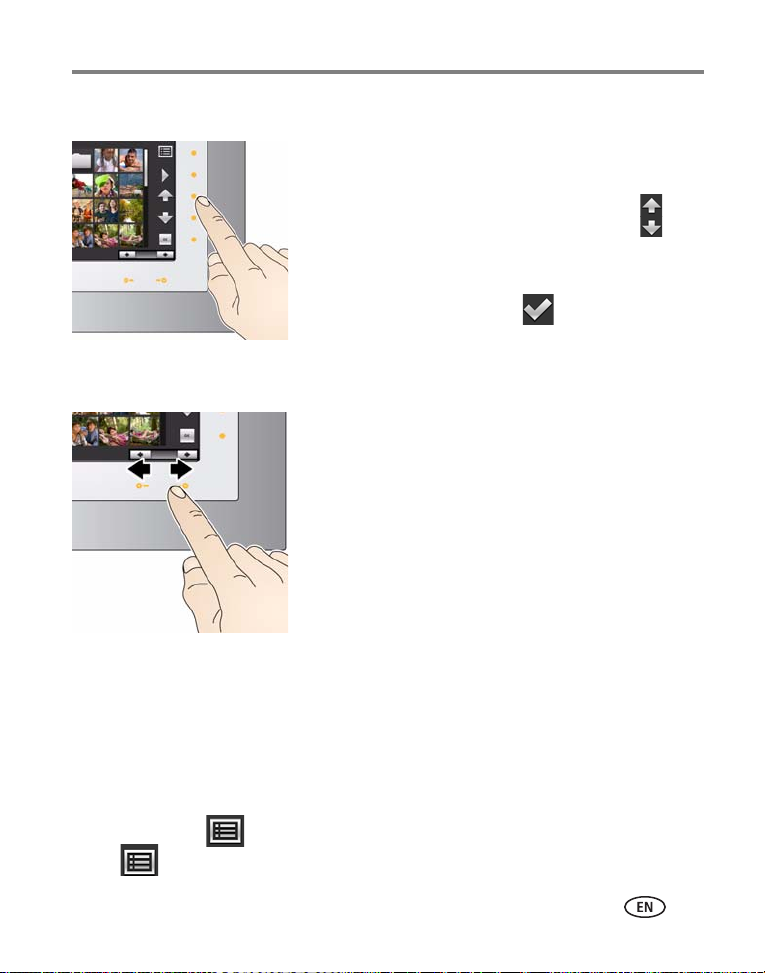
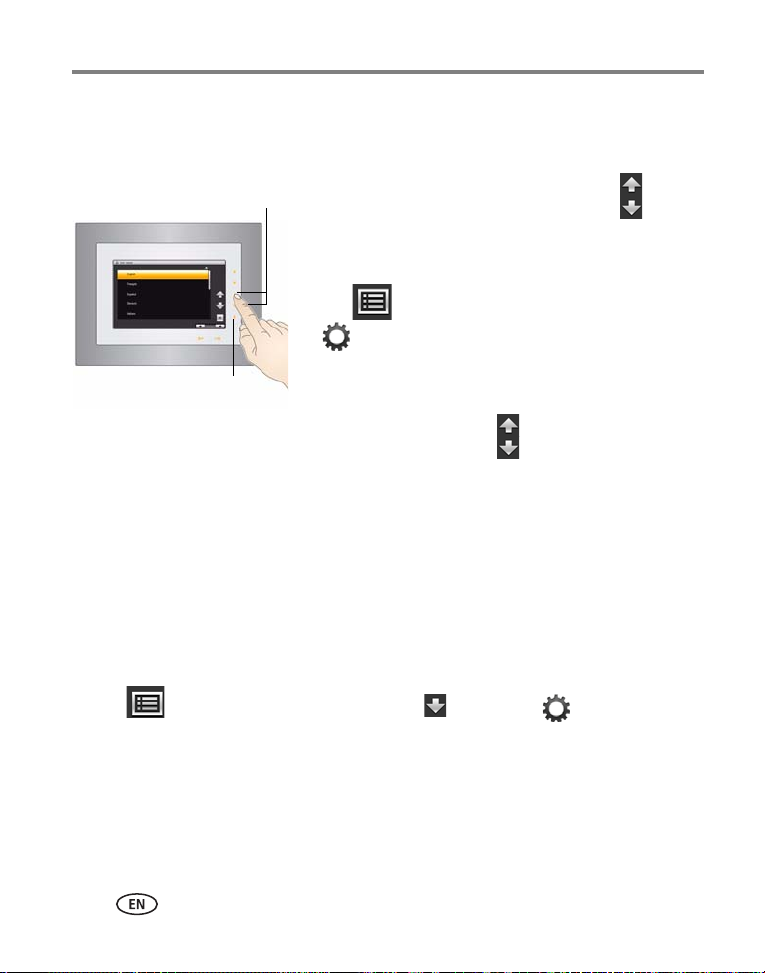
Tapping on the right border
■ Tap the light next to an icon to select it. Icons
change color when they are selected.
■ Tap the lights next to the up/down arrows to
move up or down through menus or rows of
thumbnails.
■ Tap the light next to OK or (see page 19) to
select the highlighted item.
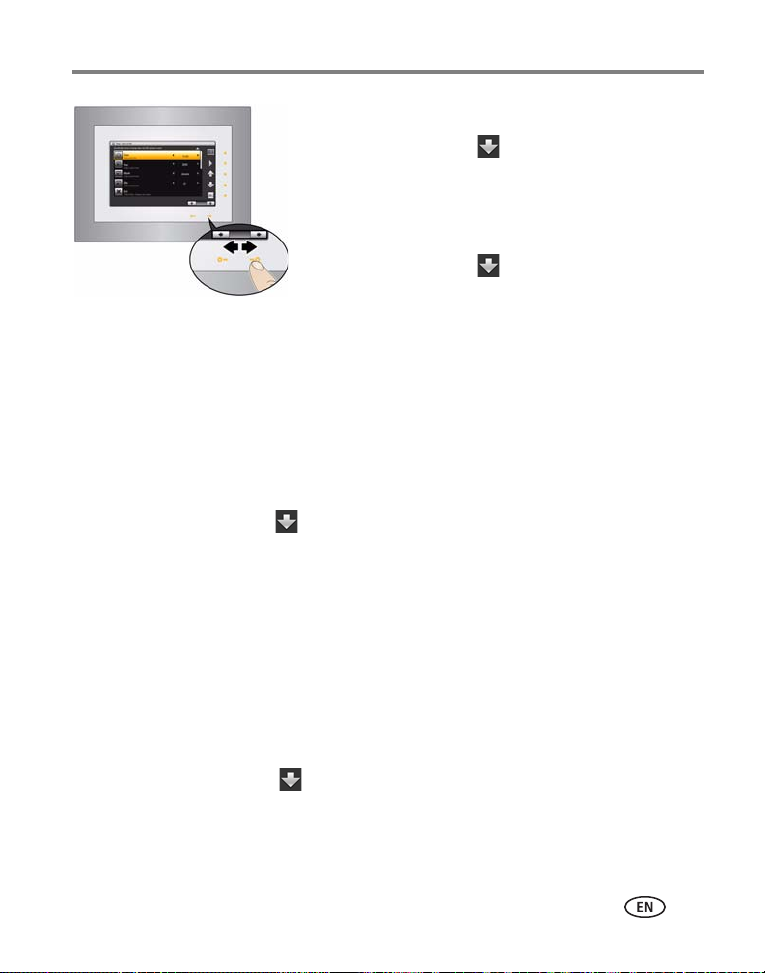
Tapping and sliding on the bottom border
■ Tap the left/right arrow lights to change the values
for your settings (see Changing frame settings,
page 25), or to move the highlight one picture,
menu, or item at a time.
■ Slide between the arrow lights to scroll through
pictures: like turning the pages of a book, slide left
← to go forward; slide right → to go back.
■ For faster scrolling through large numbers of
thumbnail pictures, press and hold an arrow light (3
seconds).
Getting started
What ’tap’ and ’slide’ mean in this guide
Only the lights on the right and bottom Quick Touch Border are touch-sensitive. The
screen and other borders are not.
In this manual, ’tap’ or ’slide’ means tap or slide on the light next to or under an icon
or button. It does not mean ’tap the icon on the screen’.
For example: ’Tap (Menu)’ means ’Tap the light on the Quick Touch Border next
to the (Menu) icon’.
www.kodak.com/go/support
5
Page 12
Getting started
Tap a rrows
OK
Setting your language
The language screen appears the first time you turn on your frame.
■ Tap the light next to an up/down arrow to
highlight your language, then tap the OK light.
To change the language at a later time:
■ Tap (Menu). Tap the down arrow to highlight
(Settings); tap the down arrow to highlight
Language, then tap OK.
The language screen appears.
■ Tap an up/down arrow to highlight your
language, then tap OK.
To use the Quick Touch Border, see page 4.
Setting the clock, energy saver, and timer
If this is the first time you turned on your frame, the Time/On Off screen appears
automatically after you select your language. Follow steps 3, 4, and 7 below.
To change or set the clock, date, energy saver, and automatic timer later, follow all the
steps below.
1 Tap (Menu), then tap the down arrow to highlight (Settings). Tap
OK.
2 Tap the down arrow to highlight Time/On Off, then tap OK.
6 www.kodak.com/go/support
Page 13
Getting started
Press and hold to move quickly
through the time and date
settings.
Slide between the arrow lights.
3 Set the clock.
Tap the down arrow to highlight Clock, then
slide or tap between the left/right arrow lights to
select the current time (based on a 24-hour clock).
4 Set the date.
Tap the down arrow to highlight
Year/Month/Day, then slide or tap between the
left/right arrow lights to select the current date
(three separate settings).
5 Set Energy saver.
Energy saver automatically turns off the frame after 16 hours of play. You can
change the time to 8 hours or disable the feature.
■ Tap the down arrow to highlight Energy saver, then slide or tap between
the left/right arrow lights to select 8 or 16 (default) hours. To disable Energy
saver, select 24 hours.
NOTE: Energy saver is disabled when you set the automatic On/Off Timer.
Energy saver is available on frames with firmware dated September 2009 or later. To check your
frame’s firmware version and date, see page 27, Settings, About this frame.
6 Set your automatic on and off times.
Specify the times you want your frame to automatically turn on and off.
NOTE: Make sure the on time is earlier than the off time.
a Tap the down arrow to highlight On/Off Timer, then tap OK to change the
option to Enabled.
b Tap the down arrow to highlight Turn Frame On At, then slide or tap between
the left/right arrow lights to select the On time (based on a 24-hour clock).
www.kodak.com/go/support
7
Page 14
Getting started
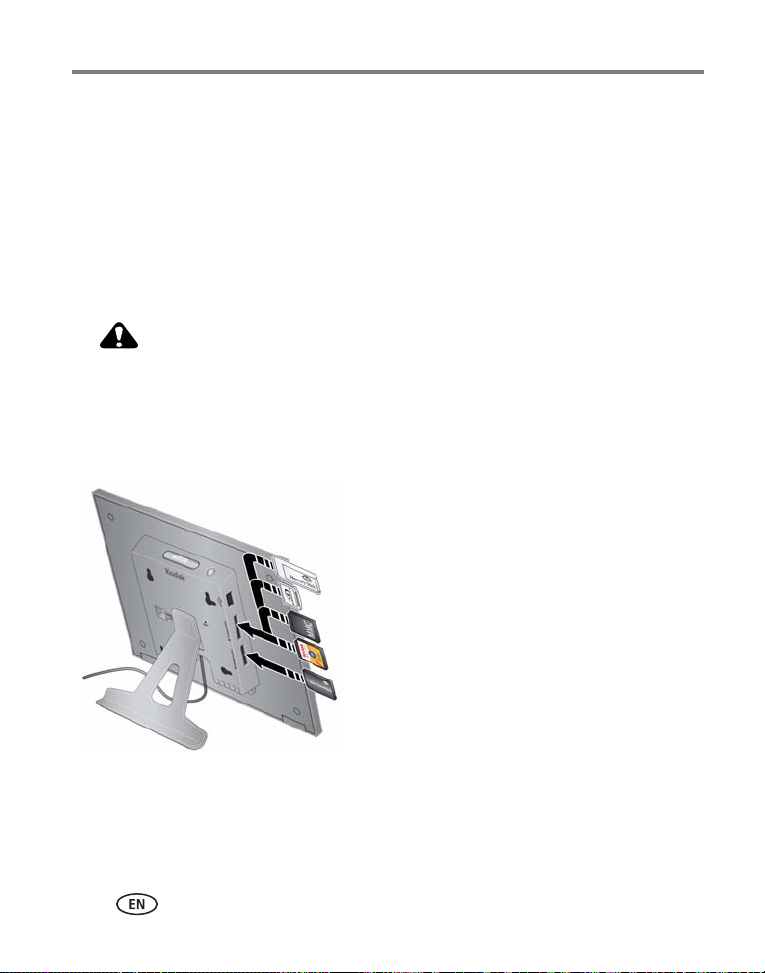
CAUTION:
MMC (MULTIMEDIA Card)
xD
SD (SECURE DIGITAL)
MS/MS Pro Duo (MEMORY STICK)
MS (MEMORY STICK)
Top card slot:
Bottom card slot:
c Tap the down arrow to highlight Turn Frame Off At, then slide or tap between
the left/right arrow lights to select the Off time (based on a 24-hour clock).
7 Tap OK to save your selections.
If your frame loses power (for more than 12 hours), the clock time returns to the
factory setting and the automatic on/off times, if set, are disabled. To reset the clock
and re-enable your on/off times, see Resetting the clock after losing power, page 33.
Inserting a memory card
Do not insert an MS Pro Duo card in the top slot. It could get
stuck and damage the card or your frame.
■ To insert a card, push it firmly into the slot until it clicks and stops
■ To remove a card, pull it out of the slot.
8 www.kodak.com/go/support
Page 15

Connecting a USB device
Supported USB devices include a flash drive,
card reader, hard drive, etc.
USB devices and cables are sold separately.
Getting started
www.kodak.com/go/support
9
Page 16
2 Viewing pictures
View pictures from your frame’s internal memory or any connected picture source
(memory card, USB device).
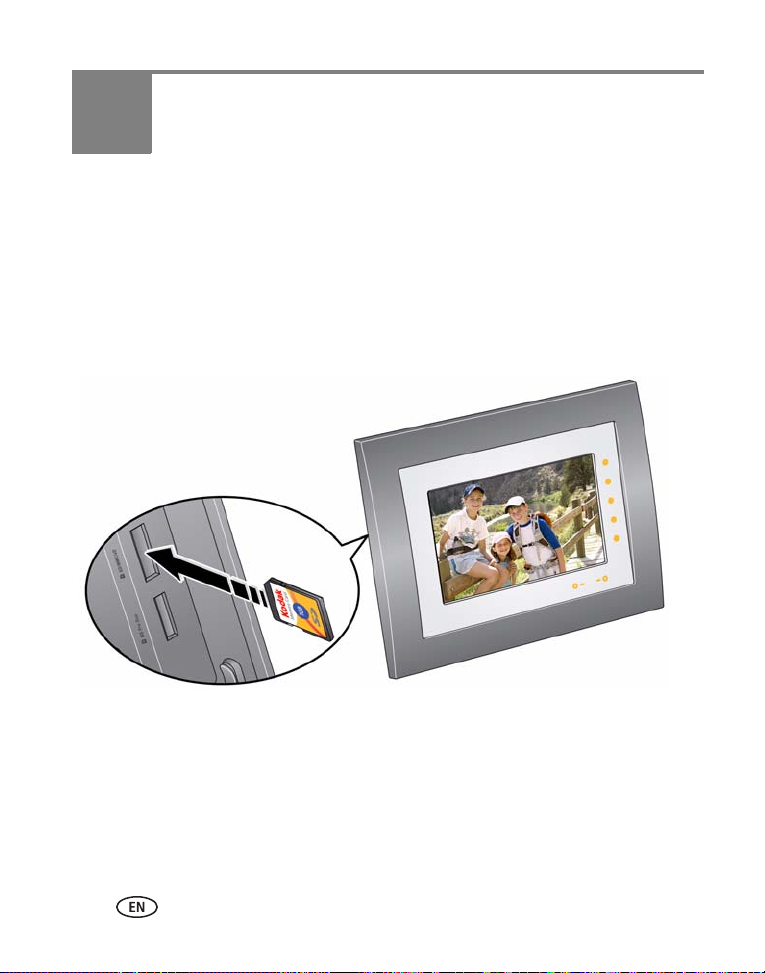
Enjoying your pictures immediately!
To view your pictures or play a slide show, insert a memory card or other USB
device (see page 8). Your pictures play automatically.
NOTE: Your frame may have pre-loaded pictures, which start playing if you do not insert a memory card or
USB device with your own pictures.
You cannot delete the pre-loaded pictures.
10 www.kodak.com/go/support
Page 17

Viewing pictures
Tap arrows
OK
Viewing your pictures
View your pictures from the frame’s internal memory or any connected picture source.
1 Tap (Menu), then tap (Pictures).
All connected sources and internal memory are listed.
2 Tap an up/down arrow to highlight a picture
source, then:
■ Tap (Play) to start a slide show of the
pictures in the highlighted source.
■ Or, tap OK to view thumbnails of the pictures in
the highlighted source.
Picture sources:
Default play location—appears when you save a picture source as your automatic
go-to location (see page 16).
Internal memory—the frame’s 512 MB internal memory. Copy your pictures into
internal memory from a memory card or other device.
Memory card—appears when you insert a card (page 8). The label and icon indicate
the type of card.
USB drive—appears when you insert a USB flash or other type drive (page 9).
Playback information
■ Picture display order:
www.kodak.com/go/support
- When Shuffle is On (the default setting, see page 26), pictures play in random
order.
- When Shuffle is Off, pictures play according to your Display Picture Order By
setting (see page 27).
11
Page 18

Viewing pictures
Mode button
Collage (4 or 6 pictures)
Clock/picture
Calendar/picture
Single picture
■ You can change the slide duration (how long each picture stays on the screen) and
transition style between pictures. See Changing frame settings, page 25.
■ Pictures play continuously until you: tap a right border light to pause play, turn off
the frame, or change viewing modes. Play resumes automatically after 15 seconds
or when you tap (Play).
Changing viewing modes
Press the Mode button to access the four slide show viewing modes on your frame:
Pictures, Collage, Clock/picture, and Calendar/picture.
NOTE: If your pictures are cropped, change the frame setting to Fit (see page 27).
Each time you press the Mode button, the frame advances to the next mode.
Viewing modes
Pictures (default)—the pictures in your current picture source play one at a time (see
page 11).
Collage—multiple pictures from your current picture source are arranged on the
screen, then continue to change according to your playback settings (page 11).
12 www.kodak.com/go/support
Page 19

Viewing pictures
Mode button
Four-picture collage
Six-picture collage (P736 only)
Clock—a clock with the current time is displayed on one side of the screen, while the
pictures in your current picture source play on the other. See Setting the clock, energy
saver, and timer, page 6.
Calendar—a calendar with today’s date highlighted is displayed on one side of the
screen, while the pictures in your current picture source play on the other. See Setting
the clock, energy saver, and timer, page 6.
Viewing pictures in collage mode
View a revolving four-picture (or six-picture, P736) slide show. Press the Mode button
to play your pictures in collage mode .
■ Tap a right/left arrow to highlight a different picture in the collage.
■ Tap the right or bottom border to pause play and highlight the current picture.
www.kodak.com/go/support
13
Page 20

Viewing pictures
■ While play is paused, tap OK to display the highlighted picture in full screen, single
view.
■ While play is paused, tap (Menu) to access the main menu options (see
page 17).
■ Tap (Play) to resume collage play.
NOTE: Multimedia slide shows do not play in collage mode.
14 www.kodak.com/go/support
Page 21

Viewing pictures
Thumbnails
screen
Viewing thumbnails
There are two ways to view your pictures as thumbnails:
First, from the picture source list:
1 Tap a light on the right border to see the icons, then tap (Menu).
2 Tap (Pictures).
3 Tap an up/down arrow to select a picture source (see page 11), then tap OK.
Pictures are displayed as thumbnails.
Second, while pictures are playing or from a single view:
1 Tap a light on the right border to see the icons, then tap (Menu).
2 Tap (Thumbnails).
Pictures are displayed as thumbnails.
Tips when viewing thumbnails:
■ To move to the previous or next row, tap the up/down arrows on the right Quick
Touch Border.
■ To move through the thumbnails, tap the arrows or slide your finger left/right
along the bottom slider. To move even faster through the thumbnails, touch and
hold until the slide control changes (about 3 seconds), then slide.
■ To play a folder of images, highlight the folder then tap (Play).
■ To play a slide show, highlight the slide show thumbnail and tap (Play).
www.kodak.com/go/support
15
Page 22

Viewing pictures
Viewing a single picture
■ To view a single, full-screen picture, highlight it in
thumbnails view (see page 15), then tap OK.
■ Or, when a slide show is playing, tap a Quick Touch
Border (right or bottom). The slide show is paused
and the picture in view is displayed. Tap OK to hide
the icons.
Saving a default play location
Save the picture source where you usually store your favorite pictures (internal
memory, memory card, USB drive, etc.) as your default go-to location.
1 While viewing a slide show, tap a Quick Touch Border.
The slide show is paused and the screen icons (with their lights) appear.
2 Tap (Menu), then (Settings).
3 Tap an up/down arrow to highlight Default Play Location.
4 Tap an up/down arrow to highlight an option:
■ Yes—to confirm .
■ No—to exit the menu.
■ Clear my Default Play Location—to delete reference to the currently
designated picture source.
The next time you turn on your frame, it will automatically start playing from the same
source you were in when you entered the Settings Menu.
The Default Play Location icon appears in the Pictures list as a picture source (see
page 11).
16 www.kodak.com/go/support
Page 23

3 Doing more with your frame
Tap a rrows
OK
Accessing menu options
Use the Menu button to view and work with your pictures, and change your frame
settings (see page 25).
NOTE: As your hand approaches the frame, lights turn on indicating where to touch on the Quick Touch
Border. Tap the right border to see the screen icons.
1 Tap (Menu).
2 Tap an up/down arrow to highlight a menu
option, then tap OK.
IMPORTANT:
NOTE: Menu options are displayed for one minute after selecting
Understanding menu options
You may need to keep tapping the
up/down arrows to see a complete list of
available options.
them.
Tap OK after highlighting
an option
Pictures View all available picture sources. Start here to play your
Slide shows
View your slide show list.
Thumbnails View all pictures in your current picture source as thumbnails
www.kodak.com/go/support 17
Description
pictures (see page 11).
View and play all available multimedia slide shows (see
page 22).
(see page 15).
Page 24

Doing more with your frame
Tap OK after highlighting
an option
Multi-select
Available from the Thumbnails
menu only.
Select or Deselect All
Available from the
Multi-select/Thumbnails menu
only.
Copy See Copying on your frame, page 20.
Rotate See Rotating pictures, page 21.
Delete See Deleting pictures, page 21.
Settings Customize how you use your frame and how you view your
Exit Close the Menu and return to the previous screen.
Description
Select multiple pictures to copy, rotate, delete, or play (see
page 19).
Select or deselect everything in your current picture source (see
page 19).
pictures. See Chapter 4, Changing settings and more.
18 www.kodak.com/go/support
Page 25

Doing more with your frame
Arrow lights
Selecting multiple pictures
Use the multi-select feature to copy, delete, or rotate multiple pictures at once. Or
select just the pictures you want to play in a slide show.
1 While viewing pictures or thumbnails, tap
(Menu), then tap Multi-Select.
2 To find and highlight a picture, tap the arrow lights
or slide between them, then tap (Select).
A check mark appears on the selected picture.
3 Continue selecting pictures.
■ Tap the up/down arrows to move to the
previous or next row.
■ To remove a check mark, tap (Unselect)
while the picture is highlighted.
■ To select all pictures at once, tap (Menu),
then tap Select All.
■ To deselect all pictures at once, tap
(Menu), then tap Deselect All.
www.kodak.com/go/support
19
Page 26

Doing more with your frame
CAUTION:
Copying on your frame
Copy pictures from your current viewing location to other connected devices (see
page 8). For example, copy pictures from a memory card* into your frame’s internal
memory.
*HINT: Share the digital pictures from your camera or computer—take the memory card out of your camera
or computer, then insert it in your frame for easy copying to internal memory. Then share your pictures with
with friends and family, anywhere!
Removing a card or disconnecting a device while copying may
damage your card, pictures, or device.
1 Highlight a picture in thumbnails view (see page 15) or display it in single view
(see page 16).
To select multiple pictures, see page 19.
2 Tap (Menu).
3 Tap the down arrow to highlight Copy , then tap OK
4 Tap an up/down arrow to highlight the copy-to destination, then tap OK.
The picture is copied.
5 Tap OK to dismiss the screen.
Notes on copying to internal memory
When you copy pictures into the frame’s internal memory, the copies are
automatically resized to a lower resolution (smaller size). Full resolution is
unnecessary for viewing and quickly fills up the internal memory.
To copy pictures at full resolution, turn off the automatic resizing feature in the
Settings
20 www.kodak.com/go/support
→ Automatic resizing menu (see Settings menus, page 25).
Page 27

Doing more with your frame
CAUTION:
Rotating pictures
1 Highlight a picture in thumbnails view (see page 15) or display it in single view
(see page 16).
To select multiple pictures, see page 19.
2 Tap (Menu).
3 Tap the down arrow to highlight Rotate , then tap OK
4 Tap an up/down arrow to highlight the direction and degree of rotation, then
tap OK.
Highlight Exit and tap OK to return to the picture without rotating it.
Deleting pictures
Removing a card or disconnecting a device while deleting may
damage your card, pictures, or device.
1 Highlight a picture in thumbnails view (see page 15) or display it in single view
(see page 16).
To select multiple pictures, see page 19.
2 Tap (Menu).
3 Tap the down arrow to highlight Delete , then tap OK
4 Tap Yes to confirm.
5 Tap OK to delete the picture and return to the menu.
To change your mind, highlight No, then tap OK to return to the menu.
www.kodak.com/go/support
21
Page 28

Doing more with your frame
Creating and playing a multimedia slide show
Use KODAK EASYSHARE Digital Display Software to create a multimedia slide show
on your computer (WINDOWS OS only); then, copy the slide show to your frame.
Before you proceed, make sure you download and install the software.
Download EASYSHARE Digital Display Software
Download and install the latest version of KODAK EASYSHARE Digital Display
Software—www.kodak.com/go/digitalframedownloads.
1 Select Software in the product type drop-down menu.
2 Select Digital Display Software in the software package drop-down menu, then
click Go.
3 Select your operating system, then follow the screen directions to download and
install KODAK EASYSHARE Digital Display Software.
The software icon appears on your desktop when the installation is complete.
4 Double-click to open EASYSHARE Digital Display Software (if it doesn’t open
automatically).
When prompted, take a few minutes to electronically register your frame and software
for exclusive tips and offers. To register later, visit www.kodak.com/go/register.
Creating a multimedia slide show
1 Double-click the KODAK EASYSHARE Digital Display Software icon on your
desktop to open the software .
22 www.kodak.com/go/support
Page 29

Doing more with your frame
2
3
4
6
5
2 Click the Slide Show Editor tab.
3 In Picture & Videos, click the folder or location that
contains the picture files you want to add to the
slide show.
4 In the Viewer pane, select the pictures, then drag
and drop them to the Slide Show Editor.
Drag pictures in the Editor to change the order.
5 Click Save.
6 For more details on creating multimedia slide
shows, click Help.
Copying a multimedia slide show to your frame
On your computer, use Digital Display Software to copy your multimedia slide shows
to a memory card or USB flash; then, copy the slide shows to your frame. Here’s how:
1 In the navigation pane under Slide Shows, click a multimedia slide show.
2 Drag the slide show to a connected card or USB drive in the Drag & Drop Zone.
For more details on copying from Digital Display Software to a connected device,
click the Help button in the software.
3 Insert the card or USB drive into your frame. To copy the slide show to your frame,
follow the directions in Copying on your frame, page 20.
Playing a multimedia slide show on your frame
1 Tap (Menu), then tap Slide Shows.
2 Tap an up/down arrow to highlight a slide show icon, then tap (Play).
The slide show begins playing.
To play a multimedia slide show on your frame, see Viewing your pictures, page 11.
www.kodak.com/go/support
23
Page 30

Doing more with your frame
NOTE: To maintain the multimedia slide show’s order during playback on the frame, see Changing the
display picture order, page 28 and select Filename, A - Z.
NOTE: A slide show plays continuously until you: tap a right border light to pause play, turn off the frame,
or change viewing modes (page 12). Play resumes automatically after 15 seconds or when you tap
(Play).
24 www.kodak.com/go/support
Page 31

4 Changing settings and more
Changing frame settings
The options in the Settings menu let you customize and configure your frame.
IMPORTANT:
1 Tap (Menu), then tap (Settings).
2 Tap an up/down arrow to highlight a setting.
3 Follow the on-screen instructions. Use the left/right arrows on the bottom Quick
Touch Border to select an option, then tap OK to save your selections.
4 Tap (Play) to return to playback from the current image. Tap (Menu) to
return to the top level menu.
Settings menus
Setting Options
Upgrade firmware
This setting is only available if
the upgrade file (.img) is
present on the frame (memory
card, flash drive, internal
memory, etc.).
Duration Specify how long each picture is displayed from 3 seconds to
You may need to keep tapping the up/down arrows to see a complete list of
available options.
Upgrade firmware—load the latest version of firmware on
your frame (page 29).
Exit—return to the Home screen.
1 hour. The default is 5 seconds.
NOTE: When Transition is set to Zoom and Pan, the Duration is
always 10 seconds.
www.kodak.com/go/support 25
Page 32

Changing settings and more
Setting Options
Transition Specify the transition style between pictures during playback.
See screen for options. The default is Random.
Default Play Location
Save the current picture source
as your default go-to location.
Shuffle On (default)—pictures play in random order.
Slide show starting point
Specify where playback starts
when Display Picture Order By
setting is Oldest to newest.
Brightness 1 (darkest) to 10 (brightest).
Frame Orientation
Change this setting if you turn
your frame to display it in a
different orientation.
Automatic resizing
This setting applies when you
copy pictures into the frame’s
internal memory. Copies are
automatically resized to a
lower resolution (smaller size).
Yes—confirm the current picture source as your default go-to
location.
No—exit the menu
Clear my Default Play Location—delete reference to the
currently designated picture source.
See Saving a default play location, page 16.
Off—play pictures by the current Display Picture Order By
setting (see page 27).
Most recent week (default)—start playback with the last
week of pictures.
Oldest pictures—start playback with the oldest picture
available.
This setting only applies when Display Picture Order By setting
is Oldest to newest (see page 27).
Landscape (default)
Portrait
See Changing your frame orientation, page 29.
On (default)—copy pictures to internal memory at a lower
resolution (smaller size).
Off—copy pictures to internal memory at full resolution.
See page 20. Full resolution is unnecessary for viewing and
quickly fills up the frame’s memory.
26 www.kodak.com/go/support
Page 33

Changing settings and more
Setting Options
Fit or Fill
Choose the picture scale for
your screen.
KODAK PERFECT TOUCH
Technology
Automatically enhance your
pictures to look their best on
your frame.
Display Picture Order By
Specify the order in which to
play your pictures—by date or
file name.
NOTE: If Shuffle is On (see
Fit—show the entire picture. Black borders may appear
around the image.
Fill (default)—the picture fills the entire screen; some of the
picture may be cut off (cropped).
On—automatically enhance your pictures.
Off (default)—display pictures without corrections.
Oldest to newest (default)—start play with the oldest file
date.
Newest to oldest—start play with the most recent file date.
A - Z—start play alphabetically from A to Z.
Z - A—start play alphabetically by filename from Z to A.
page 26), pictures play in
random order, regardless
of this setting.
Time/On Off
See Setting the clock, energy
saver, and timer, page 6.
Clock—set the current time.
Year—set the current year.
Month—set the current month.
Day—set the current day of the month.
Energy saver*—set automatic shut-down to save energy.
On/Off Timer—set automatic on and off times.
* Energy saver is available on frames with firmware dated September
2009 or later. See About this frame, below.
Language Choose your language (page 6).
About this frame Check your frame model, serial number, and firmware version.
Exit Return to the top menu with no actions performed or saved.
www.kodak.com/go/support
27
Page 34

Changing settings and more
Changing the display picture order
The pictures on your frame are arranged and played by date, starting with the oldest.
You can change the display order by date or alphabetically by file name.
To change the display order:
1 Tap a light on the right border to see the icons.
2 Tap (Menu), then (Settings).
3 Tap (Down arrows) to highlight Display picture order by, then tap OK.
4 Highlight a display order:
-Oldest to newest (default)
-Newest to oldest
-A to Z
-Z to A
5 Tap OK.
NOTE: If Shuffle is On (see page 26), pictures play in random order, regardless of this setting.
28 www.kodak.com/go/support
Page 35

Changing settings and more
Landscape
Portrait
Upgrading your firmware (recommended)
Firmware is the software that runs on your frame. To check for the latest version, visit
www.kodak.com/go/digitalframedownloads.
Download the firmware to your computer, then upgrade your frame:
1 On your computer, go to www.kodak.com/go/digitalframedownloads.
2 Follow the screen directions to download the frame firmware to your computer.
3 Copy the IMG file to the root directory (not in a folder or subfolder) of a memory
card or USB flash drive, then insert into the frame. See page 20 for copying files.
4 Tap (Menu), then tap (Settings).
5 Highlight Firmware Upgrade, then tap OK to begin the upgrade.
IMPORTANT:
When the upgrade is complete, your frame automatically restarts. If it doesn’t, wait 10
minutes, then press the power button on the frame to Off, then back to On.
Do not turn off the frame or remove the memory card or USB flash drive
during the upgrade or damage to the internal memory may occur.
Changing your frame orientation
Your frame is set up to display pictures in landscape orientation . You can turn the
frame on its side to change the orientation to portrait . But, you must also change
the orientation setting to portrait (page 30).
www.kodak.com/go/support
29
Page 36

Changing settings and more
Remove the stand, turn it 90° , and
replace as shown.
Make sure the tab is secure in the slot.
Slot
Tab
Change the stand position
Change the frame orientation setting
1 Tap (Menu), then tap (Settings).
2 Tap the down arrow to highlight Frame orientation, then tap OK.
3 Tap the down arrow to highlight Portrait, then tap OK.
4 Tap (Menu) to return to the main menu, or tap (Play) to play your
pictures.
30 www.kodak.com/go/support
Page 37

Changing settings and more
Hanging your frame on the wall (P730/P730m only)
To hang your frame on the wall, remove the stand, then use wall-anchoring hardware
(not included) to securely mount the frame to the wall.
See Back/side View, page ii for the location of the mounting holes.
Maintaining your frame
IMPORTANT:
Gently wipe the frame and screen with a clean, dry, lint-free cloth. For fingerprints on
the frame, apply light pressure.
Always disconnect the power before cleaning. Do not use water, cleaning
solutions, or other adhesives on the frame or any of its parts.
Learning more about your frame
www.kodak.com/go/digitalframe Learn more about your frame
www.kodak.com/go/digitalframesupport Interactive troubleshooting and repairs
Interactive tutorials
Frequently asked questions
Downloads
Product registration
www.kodak.com/go/support
31
Page 38

5 Troubleshooting and support
For step-by-step product support, visit www.kodak.com/go/digitalframesupport and
select Step-by-Step Solutions & Repair.
Picture frame problems
If... Try one or more of the following
Frame does not
turn on.
Nothing happens when
a memory card or USB
device is connected.
Touch border doesn’t
work.
■ Make sure the power cable that was included with your frame is
connected securely (see page 2).
■ Unplug the power cable for 5 seconds, then reconnect the cable.
Press and hold the power button (for about 2 seconds), then
release.
■ Insert a certified SD/MMC/MS/xD Card, with images, into the
upper designated card slot, then push to seat it (see page 8).
■ Insert a certified MS Duo/Duo Pro Card, with images, into the
lower designated card slot, then push to seat it (see page 8).
NOTE: Do not insert an MS Pro or MS Pro Duo card in the top slot. It could get stuck
and damage the card or your frame.
■ Make sure the USB cable that was included with your USB device is
connected securely (see page 9).
■ Make sure the file format of your pictures is supported. (See
page 36).
NOTE: Pictures may take a longer time to display when: the picture/video files are
large; when using a large capacity memory card or other connected device.
■ Use your finger to make your selections on the touch-sensitive
borders (see page 4). Lights on the border show you where to
touch.
IMPORTANT:
■ Unplug the power cable for 5 seconds, then reconnect the cable.
Press and hold the power button (for about 2 seconds), then
release.
Do not slide on the right border (tap only).
32 www.kodak.com/go/support
Page 39

Troubleshooting and support
If... Try one or more of the following
Frame freezes up or
doesn’t work properly.
You set automatic
on/off but the frame
doesn’t turn on and off
at the specified times.
Cannot copy pictures
from one device to
another even though
the copy destination is
not full.
■ Unplug the power cable for 5 seconds, then reconnect the cable.
Press and hold the power button (for about 2 seconds), then
release.
■ Reset the frame. Press the Mode and Power buttons (see page ii)
at the same time, then tap Yes to reset the frame. (Resetting your
frame does not erase your saved files.)
■ Make sure you Enabled the on/off setting after you set the times,
then press OK (not Back). See page 6.
■ If your frame loses power, the clock returns to the factory setting
and auto on/off times are disabled. See Resetting the clock after
losing power, page 33.
Storage devices that have FAT (File Allocation Table) 16 formatting can
only store up to 512 files in the top level folder (root directory). To make
sure all your pictures copy properly, format the copy destination to
FAT32 before copying to it:
Caution: Formatting deletes all pictures and videos, including
protected files.
1 Connect the device to your computer.
2 Open My Computer and locate the device.
3 Right-click on it and choose Format.
4 From the File system drop-down menu, choose FAT32 then click
Start.
Resetting the clock after losing power
If you turn off the power on the frame or otherwise lose power for half a day or more,
the clock time returns to the factory setting and the automatic on/off times, if set, are
disabled.
■ When you turn the frame back on, the set time screen appears on the frame.
■ Slide to set the hour. Tap the left/right arrows to highlight the previous or next
setting (hour and minutes), then slide to adjust the setting.
www.kodak.com/go/support
33
Page 40

Troubleshooting and support
■ Tap OK.
The Home screen appears. The time is reset and the automatic on/off times (if set) are
re-enabled. It is not necessary to reset the on/off times.
NOTE: If you exit the set time screen without setting the time, you can manually reset the clock and
re-enable the automatic on/off times (see page 6). It is not necessary to reset the on/off times.
Screen messages
Screen message Try one or more of the following
File is bad.
(usually preceded by the file
name:
xxx_xxxx.JPG file is bad
Create file failed. The device (memory card, USB drive, etc.) you are trying to
Write failed. Select another
location.
Unable to create file. Device write
protected or full.
Disk full.
The frame is unable to display the picture. Make sure the
file format of your pictures is supported. (See page 36).
)
copy to is protected.
■ See your device documentation to remove write
protection.
■ Insert or connect a different device.
The frame was unable to copy the picture.
■ Insert a different card or device (page 8).
The frame was unable to copy the picture.
■ Insert a different card or device (page 8).
■ Remove write protection, unlock card.
■ Delete pictures from card.
34 www.kodak.com/go/support
Page 41

Troubleshooting and support
Screen message Try one or more of the following
Error attempting to open file or
directory.
Error duplicate filename.
Error occurred while closing a file.
Error invalid filename.
Error reading from file.
Error writing from file.
Error writing a file.
Error writing to a file.
File Copy Failed!
Internal error.
Parameter is invalid.
Unknown error.
■ Turn off the frame, then turn it back on. Press and
hold the power button (for about 2 seconds), then
release. If the problem persists, contact customer
support help, at
www.kodak.com/go/digitalframesupport.
www.kodak.com/go/support
35
Page 42

6 Appendix
Digital frame specifications
For more specifications, visit www.kodak.com/go/digitalframesupport.
KODAK EASYSHARE P730/P730m/P736 Digital Frames
Color display
Size (approximate) 17.8 cm (7 in.) diagonal digital LCD, 800 x 480 pixels, 15:9
aspect ratio (P736 - 4:3)
15.4 x 9.2 cm (6.1 x 3.6 in.) viewable area
Internal storage capacity
512 MB
Power (5 Volt AC Adapter)
United
States/Canada
United
States/Canada
EAMER
Asia Pacific
Communication with computer
Not supported
P730m Manufacturer, Model #: Malata, MPA-05015A,
EIAJ class 2 DC plug
Input: 100 - 240V AC 50/60 Hz
Output: 5 Volt DC, 1.5 amp,
P730 Manufacturer, Model #: Leader, MU12-G050200-A1,
EIAJ class 2 DC plug, straight
Input: 100 - 240V AC 50/60 Hz
Output: 5 Volt DC, 2.0 amp,
P730
Manufacturer, Model #: Phihong, PSAA10R-050,
EIAJ class 2 DC plug (P730 - straight; P736 - right angle)
P736
Input: 100 - 240V AC 50/60 Hz
Output: 5 Volt DC, 2.0 amp,
36 www.kodak.com/go/support
Page 43

Appendix
KODAK EASYSHARE P730/P730m/P736 Digital Frames
Wi-Fi wireless network compatibility
Not supported
Other features
PICTBRIDGE enabled
printing
Picture formats JPEG, JPG, EXIF 2.2
Video formats Not supported.
Music formats Not supported.
Memory cards Top card slot: SD (SECURE DIGITAL); MMC (MULTIMEDIA Card);
Security lock
(not included)
Temperature Operating: 32 to 104
Size
(approximate)
Weight
(approximate)
with stand and
AC power
adapter
Not supported
MS (MEMORY STICK), XD
Bottom card slot: MS (MEMORY STICK)/Pro Duo
Kensington
° F (0 to 40° C)
Storage: -4 to 140
P730/
196 x 256 x 39 mm (7.7 x 10.1 x 1.5 in.)
P730m
P736 150 x 215 x 30 mm (5.9 x 8.5 x 1.2 in.)
P730 669 grams (23.6 ozs.)
P730m 714 grams (25.2 ozs.)
P736 537 grams (18.9 ozs.)
° F (-20 to 60° C)
www.kodak.com/go/support
37
Page 44

Appendix
CAUTION:
Important safety instructions
Do not disassemble this product; there are no user-serviceable
parts inside. Refer servicing to qualified service personnel. Do not
expose this product to liquid, moisture, or extreme temperatures.
The use of controls, adjustments, or procedures other than those
specified herein may result in exposure to shock and/or electrical
or mechanical hazards. If the LCD screen breaks, do not touch the
glass or liquid. Contact Kodak customer support.
■ The use of an accessory that is not recommended by Kodak may cause fire, electric
shock, or injury. For approved accessories, visit www.kodak/go/accessories.
■ Use only the AC power adapter specified for your frame (see page 36).
Use of other AC adapters may damage the frame and void your warranties.
■ Use only a USB-certified computer equipped with a current-limiting motherboard.
Contact your computer manufacturer if you have questions.
■ When displayed, the frame rests at a 68 - 76 degree angle.
■ Do not place frame near open flame sources such as lighted candles or heaters.
■ Excessive sound pressure from earphones and headphones may cause hearing
loss.
Upgrading your software and firmware
Upgrade to the latest versions of the KODAK EASYSHARE Software and the frame
firmware at www.kodak.com/go/digitalframedownloads. See page 29 for upgrading
firmware.
38 www.kodak.com/go/support
Page 45

Appendix
Additional care and maintenance
■ To clean the frame or screen, use a soft lint-free cloth dampened with lens
cleaning solution or a water-based cleaning solution. Use light pressure.
■ Do not allow chemicals, such as suntan lotion, to contact painted surfaces.
■ Service agreements are available in some countries. Contact a dealer of Kodak
products for more information.
■ For digital frame disposal or recycling information, contact your local authorities. In
the US, visit the Electronics Industry Alliance Web site at www.eiae.org or visit
www.kodak.com/go/digitalframesupport.
Limited warranty
Kodak warrants Kodak consumer electronic products and accessories (“Products”),
excluding batteries, to be free from malfunctions and defects in both materials and
workmanship for one year from the date of purchase. Retain the original dated sales
receipt. Proof of the date of purchase will be required with any request for warranty
repair.
Limited warranty coverage
Warranty service is only available from within the country where the Products were
originally purchased. You may be required to ship Products, at your expense, to the
authorized service facility for the country where the Products were purchased. Kodak
will repair or replace Products if they fail to function properly during the warranty
period, subject to any conditions and/or limitations stated herein. Warranty service
will include all labor as well as any necessary adjustments and/or replacement parts. If
Kodak is unable to repair or replace a Product, Kodak will, at its option, refund the
purchase price paid for the Product provided the Product has been returned to Kodak
along with proof of the purchase price paid. Repair, replacement, or refund of the
purchase price are the sole remedies under the warranty. If replacement parts are
used in making repairs, those parts may be remanufactured, or may contain
remanufactured materials. If it is necessary to replace the entire Product, it may be
www.kodak.com/go/support
39
Page 46

Appendix
replaced with a remanufactured Product. Remanufactured Products, parts and
materials are warranted for the remaining warranty term of the original Product, or 90
days after the date of repair or replacement, whichever is longer.
Limitations
This warranty does not cover circumstances beyond Kodak's control. This warranty
does not apply when failure is due to shipping damage, accident, alteration,
modification, unauthorized service, misuse, abuse, use with incompatible accessories
or attachments (such as third party ink or ink tanks), failure to follow Kodak's
operation, maintenance or repacking instructions, failure to use items supplied by
Kodak (such as adapters and cables), or claims made after the duration of this
warranty. Kodak makes no other express or implied warranty for this product, and
disclaims the implied warranties of merchantability and fitness for a particular
purpose. In the event that the exclusion of any implied warranty is ineffective under
the law, the duration of the implied warranty will be one year from the purchase date
or such longer period as required by law. The option of repair, replacement, or refund
is Kodak's only obligation. Kodak will not be responsible for any special,
consequential or incidental damages resulting from the sale, purchase, or use of this
product regardless of the cause. Liability for any special, consequential or incidental
damages (including but not limited to loss of revenue or profit, downtime costs, loss
of the use of the equipment, cost of substitute equipment, facilities or services, or
claims of your customers for such damages resulting from the purchase, use, or failure
of the Product), regardless of cause or for breach of any written or implied warranty is
expressly disclaimed.
Your rights
Some states or jurisdictions do not allow exclusion or limitation of incidental or
consequential damages, so the above limitation or exclusion may not apply to you.
Some states or jurisdictions do not allow limitations on how long an implied warranty
lasts, so the above limitation may not apply to you. This warranty gives you specific
rights, and you may have other rights which vary from state to state or by jurisdiction.
40 www.kodak.com/go/support
Page 47

Appendix
Outside the United States and Canada
In countries other than the United States and Canada, the terms and conditions of
this warranty may be different. Unless a specific Kodak warranty is communicated to
the purchaser in writing by a Kodak company, no warranty or liability exists beyond
any minimum requirements imposed by law, even though defect, damage, or loss may
be by negligence or other act.
Regulatory compliance and advisory
FCC compliance and advisory
FCC and Industry Canada
This device complies with Part 15 of the FCC Rules. Operation is subject to the
following two conditions: (1) this device may not cause harmful interference, and (2)
this device must accept any interference received, including interference that may
cause undesired operation.
Canadian DOC statement
This Class B digital apparatus complies with Canadian ICES-003.
Cet appareil numérique de la classe B est conforme à la norme NMB-003 du Canada.
CE
Hereby, Eastman Kodak Company declares that this Kodak product is in compliance
with the essential requirements and other relevant provisions of Directive 1999/5/EC.
www.kodak.com/go/support
41
Page 48

Appendix
N137
Eastman Kodak Company
Rochester, NY 14650
Australian C-Tick
Waste Electrical and Electronic Equipment labeling
EU: It is the final user’s responsibility to discard this equipment into an
approved, segregated collection scheme to enable its suitable
treatment/disposal and to improve human/environmental protection. For
more information, see your retailer, local authority, or
www.kodak.com/go/recycle.
Weight with AC adapter and stand: P730 - 669 g
P730m - 714 g
P736 - 537 g
Russian GOST-R
ENERGY STAR Product
ENERGY STAR® qualified product.
42 www.kodak.com/go/support
Page 49

Appendix
China RoHS
Licensing
Supply of this product does not convey a license nor imply any right to distribute
content created with this product in revenue-generating broadcast systems (terrestrial,
satellite, cable and/or other distribution channels), streaming applications (via Internet,
intranets and/or other networks), other content distribution systems (pay-audio or
audio-on-demand applications and the like) or on physical media (compact discs,
digital versatile discs, semiconductor chips, hard drives, memory cards and the like). An
independent license for such use is required. For details, please visit
http://mp3licensing.com.
www.kodak.com/go/support
43
Page 50

Index 1
A
about, frame, 27
AC adapter, 36
appendix, 36
automatic on/off, 27
B
border, touch, 4
C
cable
power, connecting, 2
cables
USB, connecting, 9
changing picture locations, 11
cleaning, 31
cleaning frame, 39
clock and date, setting, 27
clock, date, and timer, setting, 33
copying
to frame’s internal memory, 20
D
date
sort pictures by, 28
deleting pictures, 21
display order, changing, 28
disposal, recycling, 39
E
EASYSHARE Digital Display Software
create slide show, 22
error messages, 34
F
filename, sort by, 28
firmware
checking version, 27
upgrading, 25, 29, 38
flash drive, connecting, 9
frame
URLs, 31
frame screen, cleaning, 31
frame, picture
checking model, firmware, serial
number, 27
disposal, 39
resetting, 33
setup, 1
specifications, 36
troubleshooting, 32
turn on/off, 3
G
go-to location
saving, 16
H
hanging your frame, 31
help
frame, 32
troubleshooting and support, 32
home
viewing picture sources, 11
44 www.kodak.com/go/support
Page 51

Index
I
internal memory
capacity, 36
L
landscape, set orientation, 29
language, 27
language, setting, 6
M
memory card types, 37
memory cards
inserting, 8
Menu
Copy, 18
Delete, 18
Deselect All, 18
Exit, 18
Multi-select, 18
Pictures, 17
Rotate, 18
Select All, 18
Settings, 18
Slide shows, 17
Thumbnails, 17
Menu options, 17
Mode
button, ii
mounting your frame, 31
multimedia slide show, 22
O
on/off, setting auto, 27
orientation setting, 29
P
pictures
copying to internal memory, 20
deleting, 21
location, viewing, 11
rotating, 21
selecting more than one, 19
sort by date or filename, 28
thumbnails, 15
viewing locally, 10
viewing single, 16
portrait, set orientation, 29
power
button, ii, 3
connecting, 2
specifications, 36
Q
Quick Touch Border, i
quick touch border, 4
R
recycling, disposal, 39
regulatory compliance, 41
reset frame, 33
rotating
pictures, 21
S
safety information, 38
screen
cleaning, 39
error messages, 34
selecting
menus and pictures, 4
www.kodak.com/go/support 45
Page 52

Index
multiple pictures, 19
serial number, checking, 27
setting
auto on/off, 27
clock after losing power, 33
language, 6
time, 27
setting your language, 27
Settings
About, 27
Automatic resizing, 26
Brightness, 26
Clock and Date, 27
Default play location, 26
Display picture order by, 27
Duration, 25
Exit, 27
Fit or Fill, 27
Frame orientation, 26
KODAK PERFECT TOUCH
technology, 27
Language, 27
Shuffle, 26
Slide show starting point, 26
Tra ns ition, 2 6
Upgrade firmware, 25
setup
picture frame, 1
size, 37
slide show
create with pictures and music, 22
playing, 10
sort order, 28
slide show location
saving, 16
software
upgrading, 38
sort, 28
source, picture location, 11
specifications, frame, 36
storage capacity, internal memory, 36
T
thumb drive. See flash drive.
thumbnails, 15
time, setting, 27
timer, 27
troubleshooting
error messages, 34
frame, 32
turn on frame, 3
U
upgrading
firmware, 25
software and firmware, 38
USB
device, connecting, 9
V
viewing
picture sources, 11
pictures, locally, 10
single picture, 16
thumbnails, 15
W
warranty, 39
weight, 37
46 www.kodak.com/go/support
 Loading...