

Page 1
P461
Personal Photo Scanner
Scanneur de photos personnelles
Persönlicher Foto-Scanner
User Guide
Guide de l’utilisateur
Bedienungsanleitung
Page 2

Table of Contents
Read This First ... .... .............................................................. ..... ..... ...................................................... 3
Important Safety Precautions ..................................................... ..... .... ............................................. 3
Introduction .......................................................................................................................................... 4
Scanner Overview ................................................................................................................................ 4
Scanner Indicator Lights ..................................................................................................................... 5
Suitable and Unsuitable Original Types ............................................................................................ 6
Supported Memory Cards ................................................................................ ..... ..... .... ..... ................ 7
Orientation of the Original and Scanned Picture .............................................................................. 8
Operating the Scanner......................................................................................................................... 8
Preparation and Initial Setup ............................................................................................................ 8
Scanning a Photo ............................................................................................................................. 9
Scanning 35mm Negatives and Slides ........................................................................................... 10
Feeding Filmstrips .......................................................................................................................... 11
Scanning Mounted Slides ............................................................................................................... 12
Automatic Image Cropping ................... ..... .... .............................................................. ..... ..... ......... 12
Connect Scanner to a Computer ...................................................................................................... 13
System Requirements .................................................................................................................... 13
Scanned Picture Naming Convention ............................................................................................. 14
Safely Disconnect the Scanner from Computer ............................................................................. 14
Scan PC Software for KODAK Personal Photo Scanners .............................................................. 15
Install Scan PC Software .......................................................................... ..... ..... .... ..... ................... 15
Using the Scan PC Software ................................... ..... ..... .... ..... .................................................... 16
Uninstall the Scan PC Software ..................................................................................................... 16
KODAK EASYSHARE Software for PC ............................................................................................ 16
System Requirements .................................................................................................................... 16
Install KODAK EASYSHARE Software .......................................................................................... 17
Launch KODAK EASYSHARE Software ........................................................................................ 17
Uninstall the KODAK EASYSHARE Software ................................................................................ 18
Scanner Maintenance ........................................................................................................................ 18
Calibrate the Scanner ........................................................................................................................ 19
Notes on Battery Usage................................................... ......... .......... ......... .......... ......... ................... 20
Storing the Scanner .......................................... ..... ..... ..... ..... ............................................................. 20
Technical Specifications ................................................................................................................... 21
Frequently Asked Questions ............................................................................................................ 21
Upgrading Software and Firmware .................................................................................................. 22
Limited Warranty ................................................................................................................................ 22
FCC Statement ............................................................................................................................... 23
Waste Electrical and Electronic Equipment/Battery disposal ......................................................... 23
04.Kodak P461_UG_v1.2_E-FR-SP_2010-09-21
2 Customer Support: http://www.pandigital.net/kodaksupport
Page 3
Read This First
Please read the following important safety instructions carefully before using the KODAK Personal Photo Scanner. Failure to
observe these instructions may result in personal injuries or damages to the scanner.
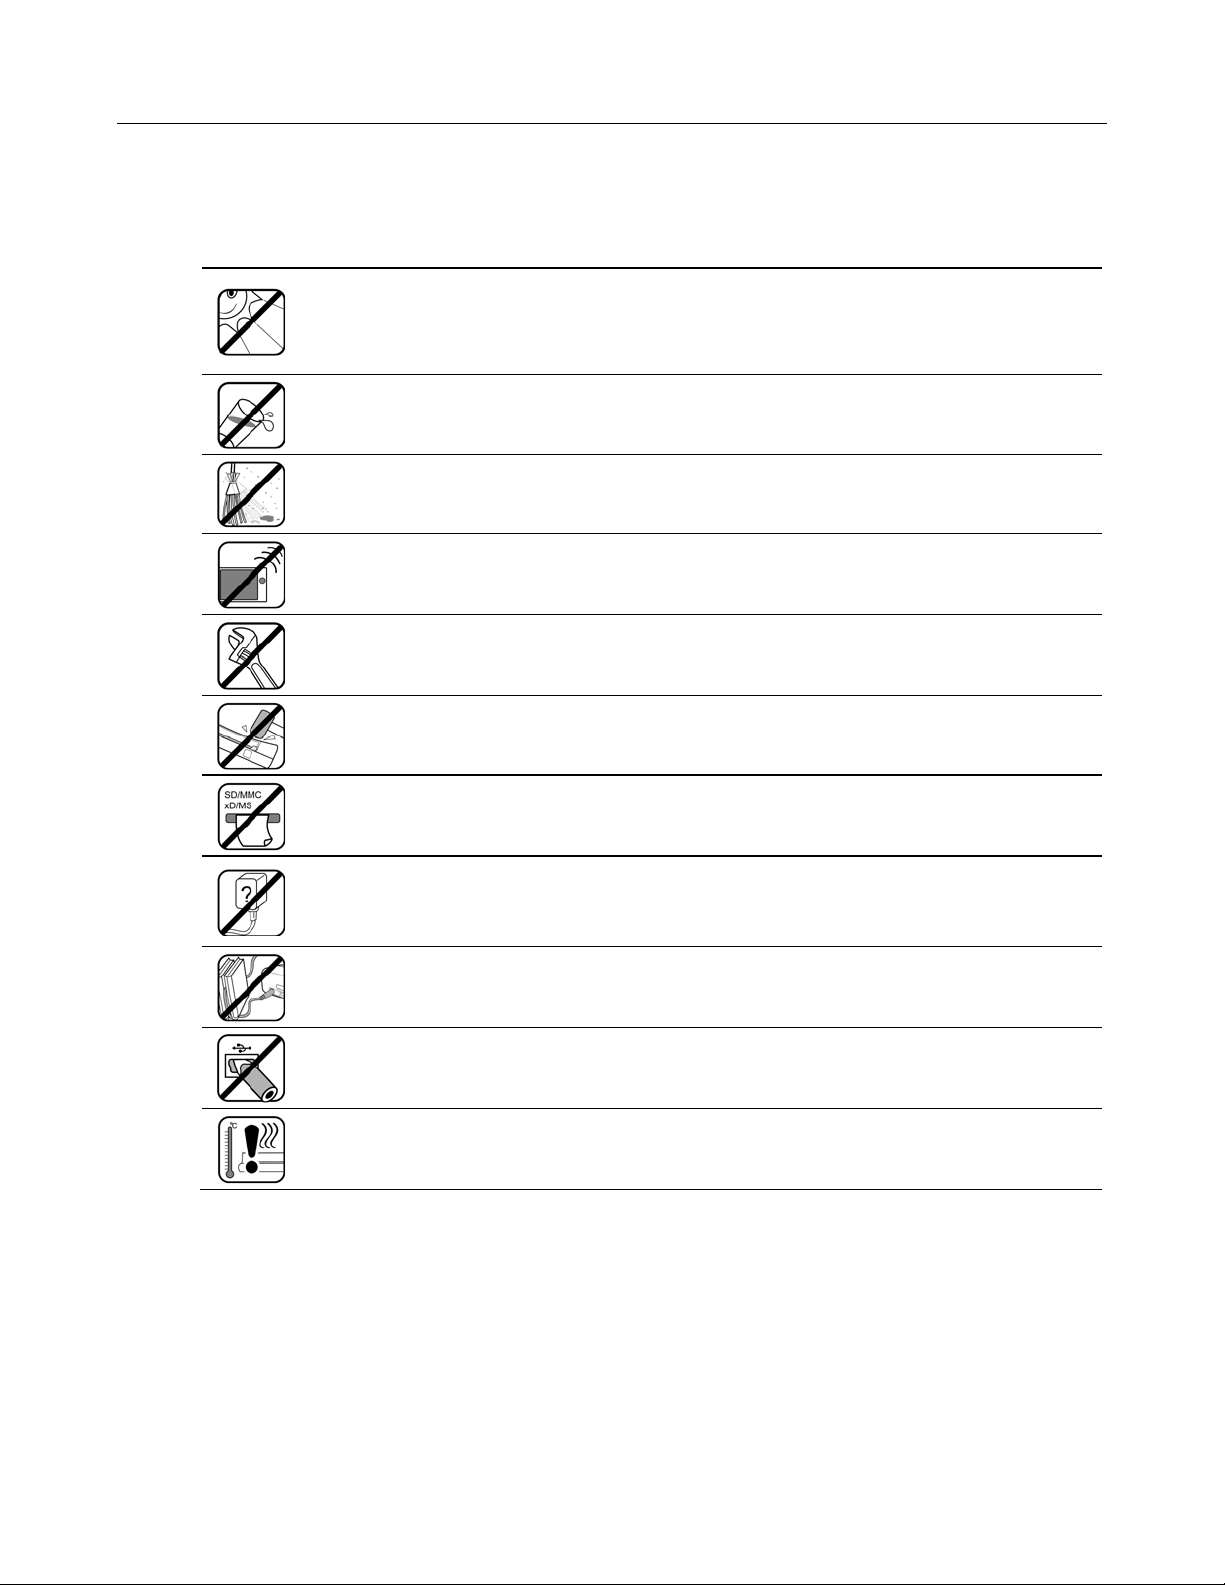
Important Safety Precautions
Always follow these basic safety precautions when using your scanner. This reduces the risk of fire, electric shock, and injury.
Do not place this device under direct sunlight or near heat sources, such as in a closed car under sunlight
or near a stove. The outer casing of this device may become deformed and the sophisticated sensors
inside may become damaged due to excessive heat.
Do not use this device near water, in the rain or allow any liquid to get inside this product. Water and
moisture may cause short-circuit to the electronic components and lead to malfunctions.
Do not use this device in dusty environments. Dust grains may cover this device and scratch the original.
Do not scan originals that are contaminated by dusts or other particles.
Do not use this device near strong electromagnetic sources, such as a microwave oven or television. The
electromagnetic interference may cause this device to malfunction.
Do not attempt to disassemble or modify this device. There are no user serviceable parts inside this
scanner, and unauthorized modifications will void your warranty.
What’s in the Box
Check the package for the following items. If there are any items missing or damaged, please contact your place of
purchase immediately.
Do not drop or apply shock/vibration to this device. Strong impacts may damage the components inside.
Do not insert objects other than compatible memory cards into the memory card slots of this scanner. The
metal contacts inside the slots can easily become damaged by foreign objects.
Do not use an unknown power adapter other than the one supplied with this scanner. Connecting this
scanner to an unknown power adapter is very dangerous and may lead to fire or explosion.
Some adapter models may include switchable prongs. When necessary to use alternate prongs, use only
the prongs included with the scanner.
Do not cut, bend, modify, place heavy objects, or step on the cable of the power adapter. Otherwise the
external insulation may be damaged and result in short-circuit or fire.
The power socket and USB port on this scanner are designed solely for connecting to the supplied power
adapter and optional USB cable. Do not insert any other objects into these sockets.
If there are strange odors or heat emitting from this device or any signs of malfunction, disconnect this
scanner from the power immediately and contact your dealer for inspection or service.
Personal Photo Scanner
AC Power Adapter (varies by region)
USB Cable
KODAK MICROSD Mobile Memory Card and Adapter
35mm Filmstrip Guide Adapter
35mm Slide Holder
Calibration Card
Roller Cleaning Sheet
Photo and Transparency Sensor Cleaning Swab
Scan PC Software (on MICROSD Card)
KODAK EASYSHARE Software (on MICROSD Card)
Quick Start Guide and User Guide
Customer Support: http://www.pandigital.net/kodaksupport 3
Page 4
Introduction
Now you can scan your printed photos, negative films, and slides, and store them on your memory card. No computer is
necessary. Simply insert a memory card into the scanner, and power it on. When the unit is ready, feed your printed photo,
negative filmstrip, or slide into the scanner and your pictures are stored in the memory card. It’s as easy as that.
If you want to transfer your photos directly into your PC, it’s just as easy via a USB cable and our Scan PC Software (page 15).
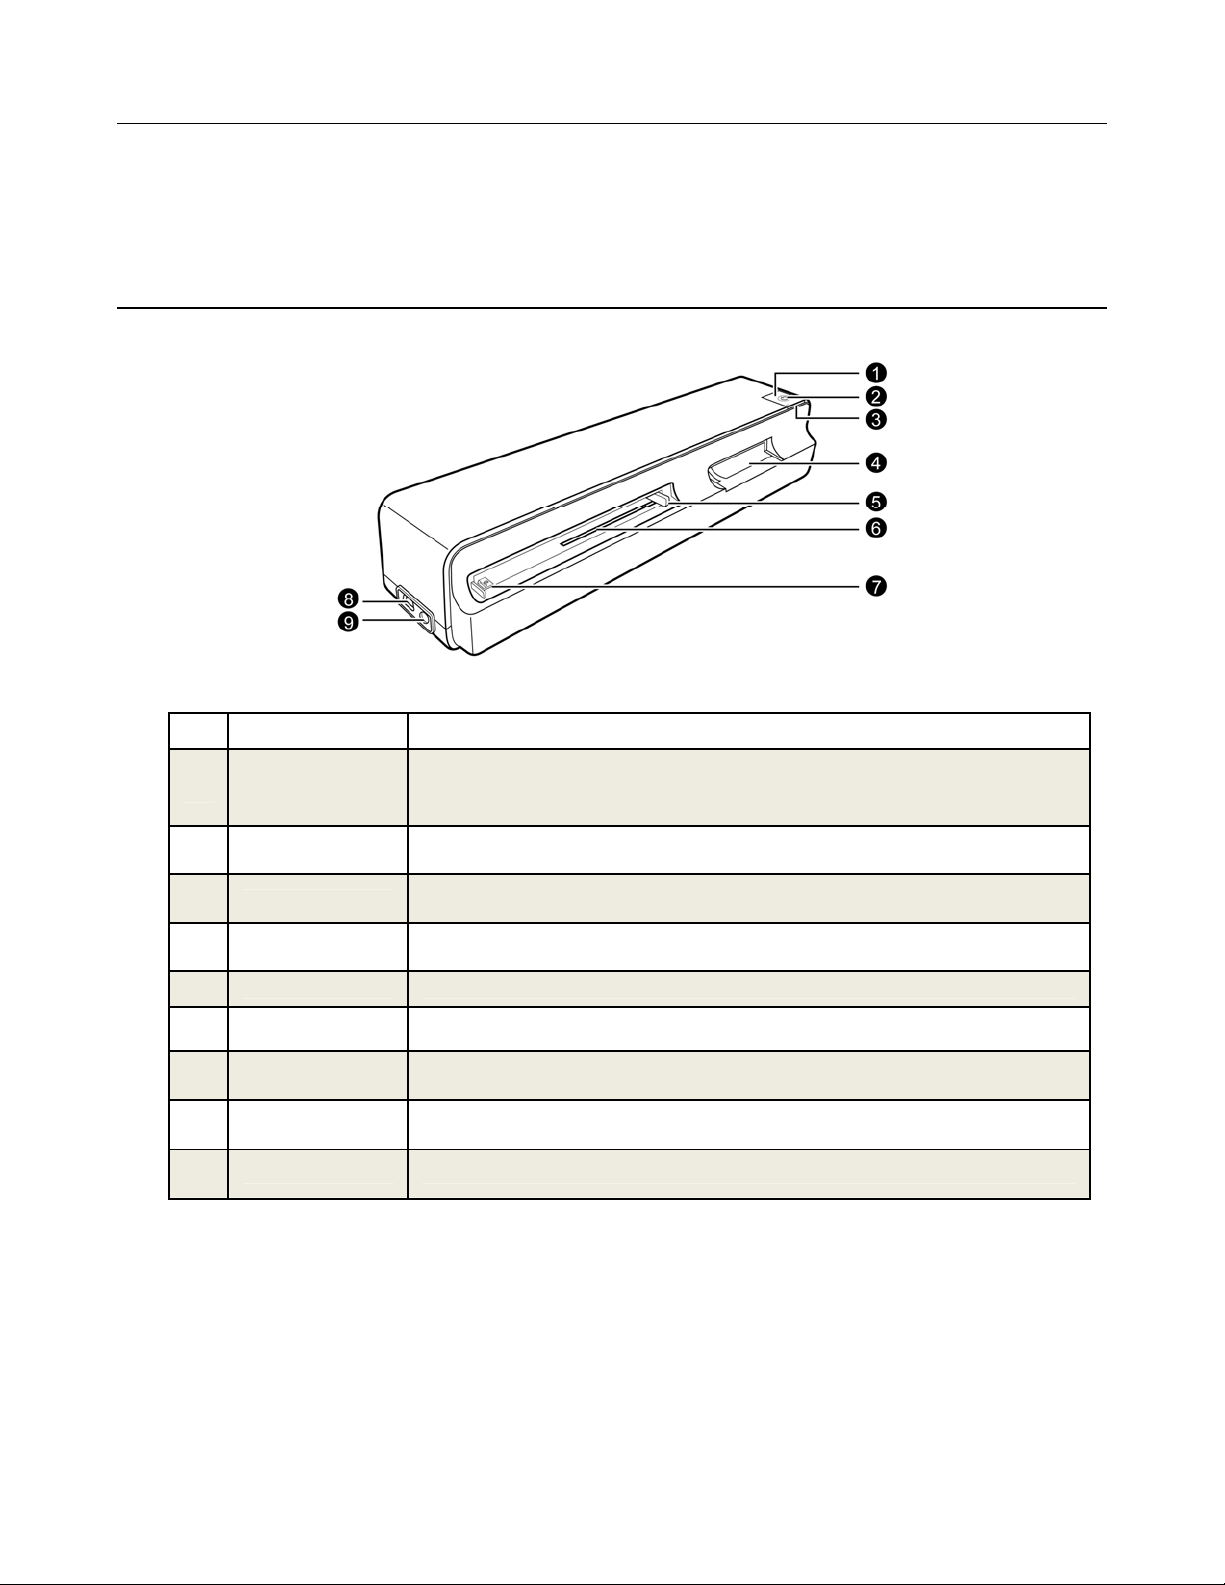
Scanner Overview
Front View
No. Name Function/ Description
Press once to turn on in 600dpi mode (default); press again for 300dpi mode.
Power Button
Power Indic ator Indicates the power status of the scanner. (Refer to “Indicator Lights” on page 5.)
Status/Card Indicator
Transparency feed
slot
Paper guide lever Slide the guide to adjust for smaller originals to ensure the proper alignment.
Photo Feed Slot For scanning non-transparent originals like photos and business cards.
Orientation guide Indicates the correct position and orientation of the original for proper scanning.
Power connector For connecting to the 35mm supplied power adapter.
Mini USB connector For connecting to a computer via a USB cable.
Press and hold for 1 second to turn off.
If an original jams in the feeding slot ( and ), press to back it out of the scanner in
photo/slide scanning mode, and feed forward in filmstrip scanning mode.
Indicates the operating status of the scanner and memory card. (Refer to “Indica to r Li g hts”
on page 5.)
For scanning transparencies like 35mm filmstrips and 35mm slides – requires 35mm
filmstrip guide adapter or 35mm slide holder
4 Customer Support: http://www.pandigital.net/kodaksupport
Page 5
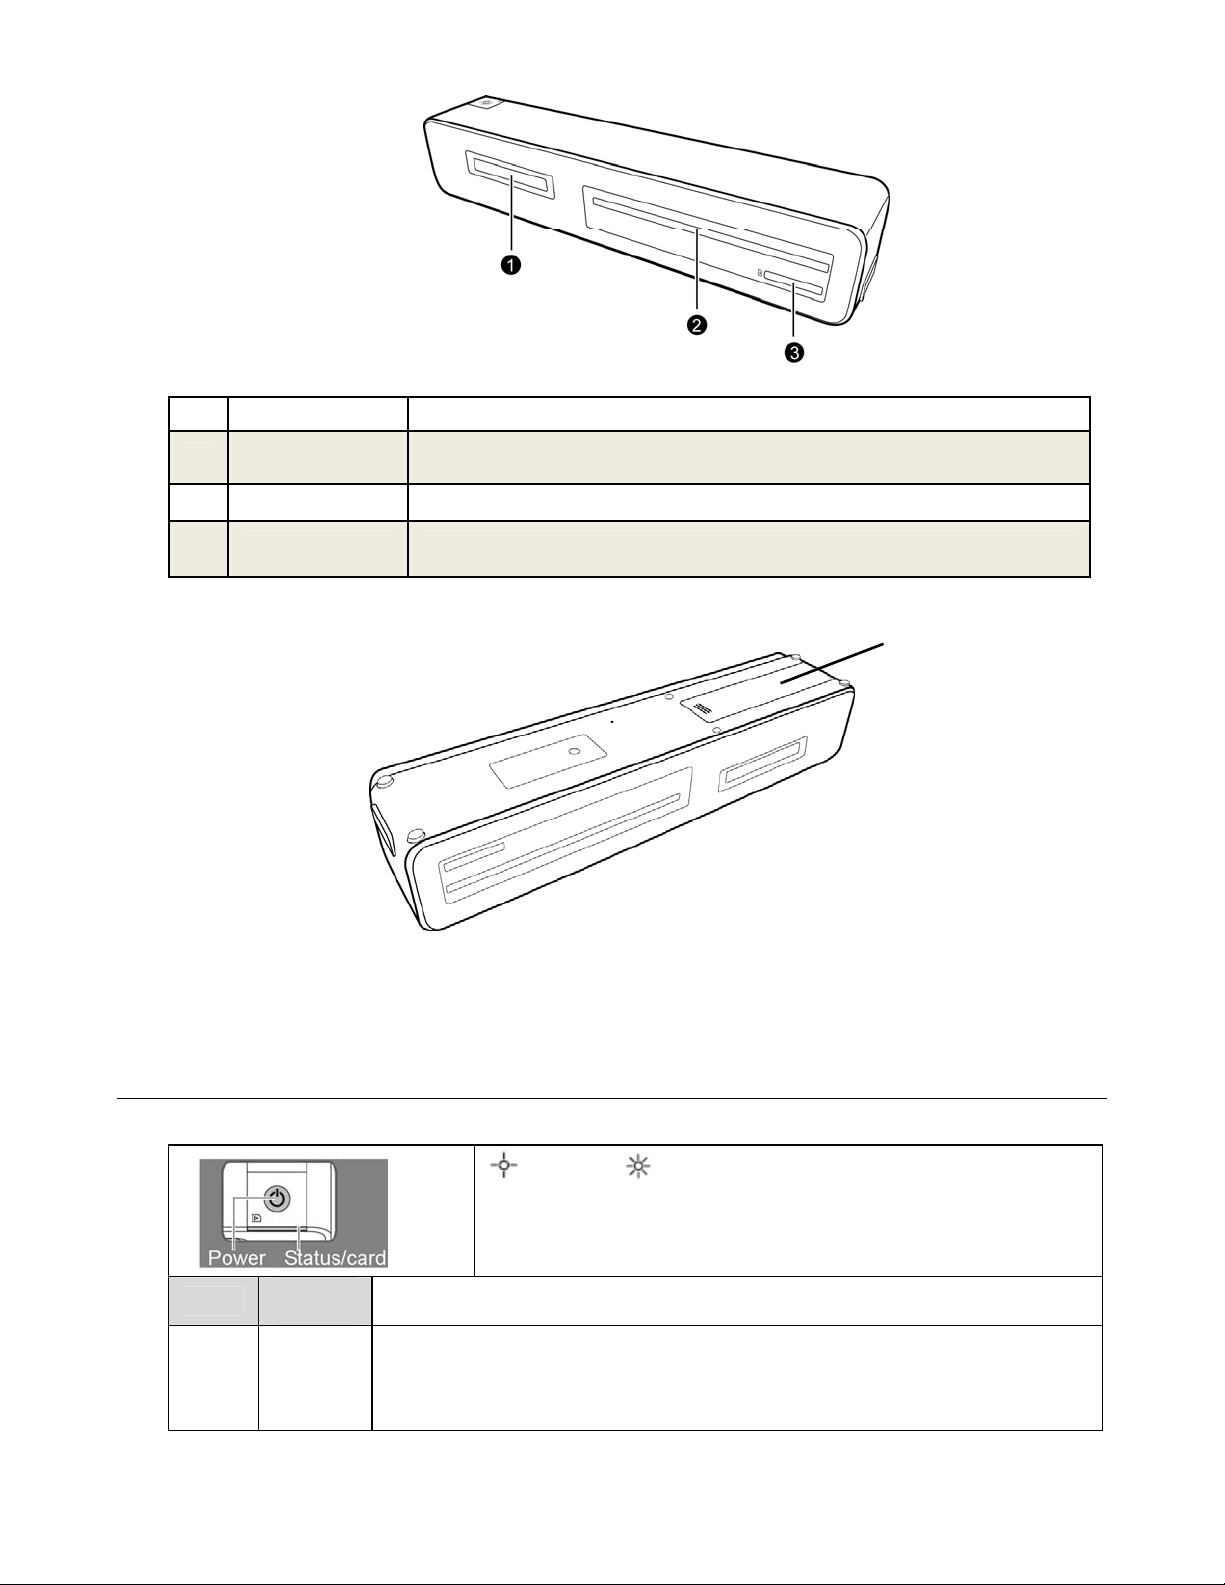
Rear View
No. Name Function/ Description
Transparency output
slot
Photo output slot The scanned non-transparent original (like photos or business cards) exit from this slot.
SD/xD/MMC/
MS Card slot
Bottom View
Recommend using NiMH rechargeable type batteries. We do not recommend or support alkaline batteries. For
acceptable battery life, and to make sure your scanner operates dependably, use recommended batteries. There is
no battery charging function in the scanner.
Scanner Indicator Lights
The scanned transparency (like filmstrips or mounted slides) exits from this slot.
Accepts the following types of memory cards: SD, xD, MMC and MS. Also accepts
MICROSD Cards with an SD adapter. (Refer to "Supported Memory Cards" on page 7.)
Battery Compartment
For installing four AAA
(UM-4) batteries.
(Batteries not included)
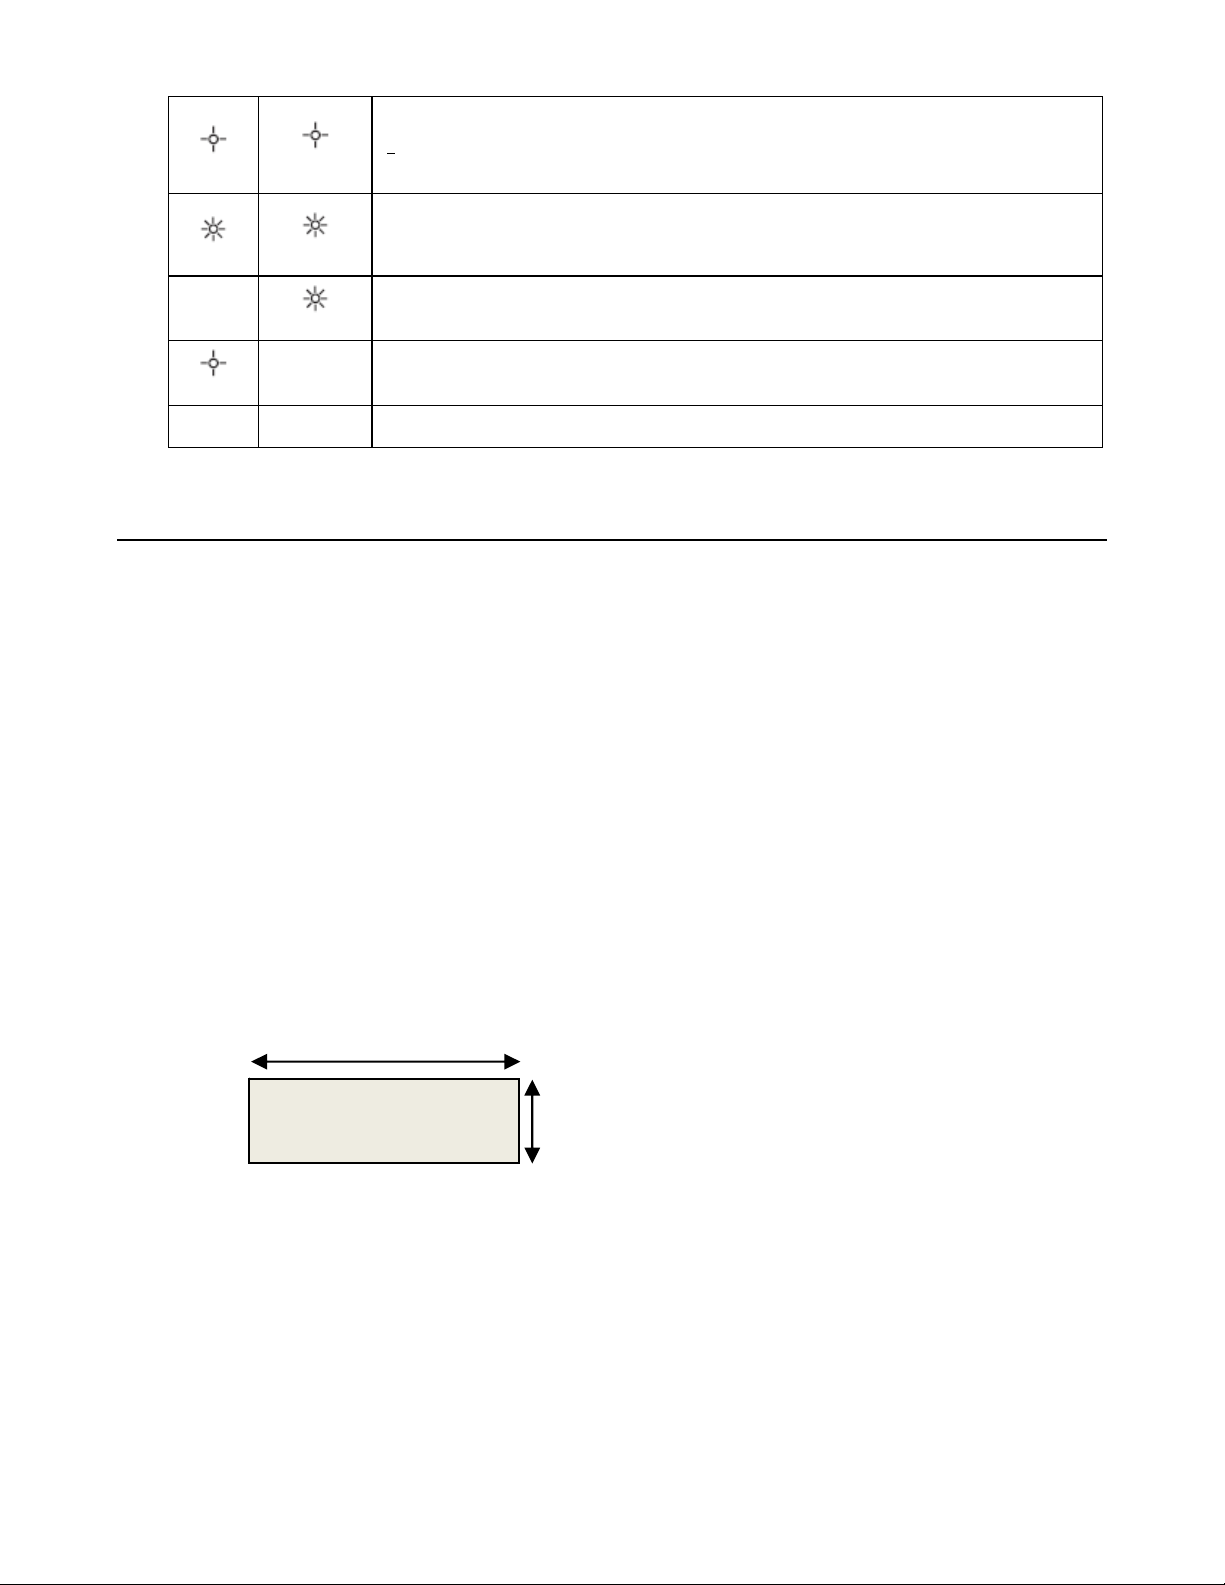
Listed below are the indicator light patterns and the functions they represent:
Blinking slowly Blinking rapidly
Steadily onOff
Power
Status
/Card
(orange)
(green)
The scanning resolution setting is indicated by color of Status/Card light
600dpi (default) – The scanner is ready for use in 600dpi mode (default).
300dpi – After scanner is ready in 600dpi mode, press the power button again for 300dpi mode.
Customer Support: http://www.pandigital.net/kodaksupport 5
Page 6
(green)
(green)
(color)
(color)
(color)
Initializing system and memory card. Please wait until the initialization process is complete
before using the scanner.
Busy scanning and storing picture files. Please wait until the process is complete before
scanning another original.
Paper jam. Press the Power button. The scanner backs out the original so you can remove the
jammed original from the feed slot in photo/slide scanning mode, and transparency output slot in
filmstrip scanning mode.
Calibration error. Please contact your nearest service center for help.
No memory card, card full (free space below 10MB), card error, memory card locked, or the file
system is not supported. Remove files from the card to free up space, unlock the card if it is
locked, or try another card.
(green)
(color)
The battery power is low.
The scanner is turned off.
Suitable and Unsuitable Original Types
Suitable
The scanner is designed to obtain the best scanning results with the following types of originals (without using a plastic
sheath):
3.5” x 5” and 4” x 6” photos (max size 4.1” x 12”)
Business cards (max 1.0mm thick)
35mm negatives (1-6 frame unmounted with 35mm filmstrip guide)
35mm mounted slides (with 35mm Slide Holder)
Unsuitable
Do not use the following types of originals for scanning. Otherwise the scanner may malfunction or cause the original to
jam in the slot.
Originals thicker than 1.0mm
Originals with either side shorter than 55mm
Originals with lots of black or dark colors
Originals with dark colors surrounding the edges
Printed pictures (pictures on newspapers, magazines, etc.)
Soft and thin materials (thin paper, cloth, etc.)
Over-exposed films/slides
To avoid auto-detection failure, remove any over-exposed filmstrip from the beginning of the filmstrip before feeding.
Over-sized film (i.e., 24x36mm) or professional High Exposure ISO 800+ film may cause the device to malfunction.
Originals that exceed the following acceptable size:
Length: 12 inches (304.8mm)
Width 4.1 inches (105mm)
6 Customer Support: http://www.pandigital.net/kodaksupport
Page 7

35mm negative/monochrome filmstrips are unsuitable with any of the following conditions:
1. Ends of the filmstrip are taped. Remove the tape and clean any residue of glue before scanning.
2. Ends of the filmstrip have not been cut straight across. Cut the ends straight across before
scanning.
3. Ends of the filmstrip are folded. Cut the folded portions before scanning.
4. Ends of the filmstrip are tapered. Cut the ends straight across before scanning.
5. Some perforations on the filmstrip are torn or missing. This may affect the scanner’s auto
Supported Memory Cards
MS (Memory Stick)
MS Pro
MS Pro Duo (adapter required)
MS Duo
MMC (Multi Media Card)
RS-MMC (adapter required)
feeding mechanism. Gently push the filmstrip into the filmstrip guide adapter when necessary.
xD (extreme Digital, H-type and M-type)
SD (Secure Digital)
SDHC
MINISD (adapter required)
MICROSD/T-Flash (adapter required)
MICROSD Card (SD adapter required)
Customer Support: http://www.pandigital.net/kodaksupport 7
Page 8
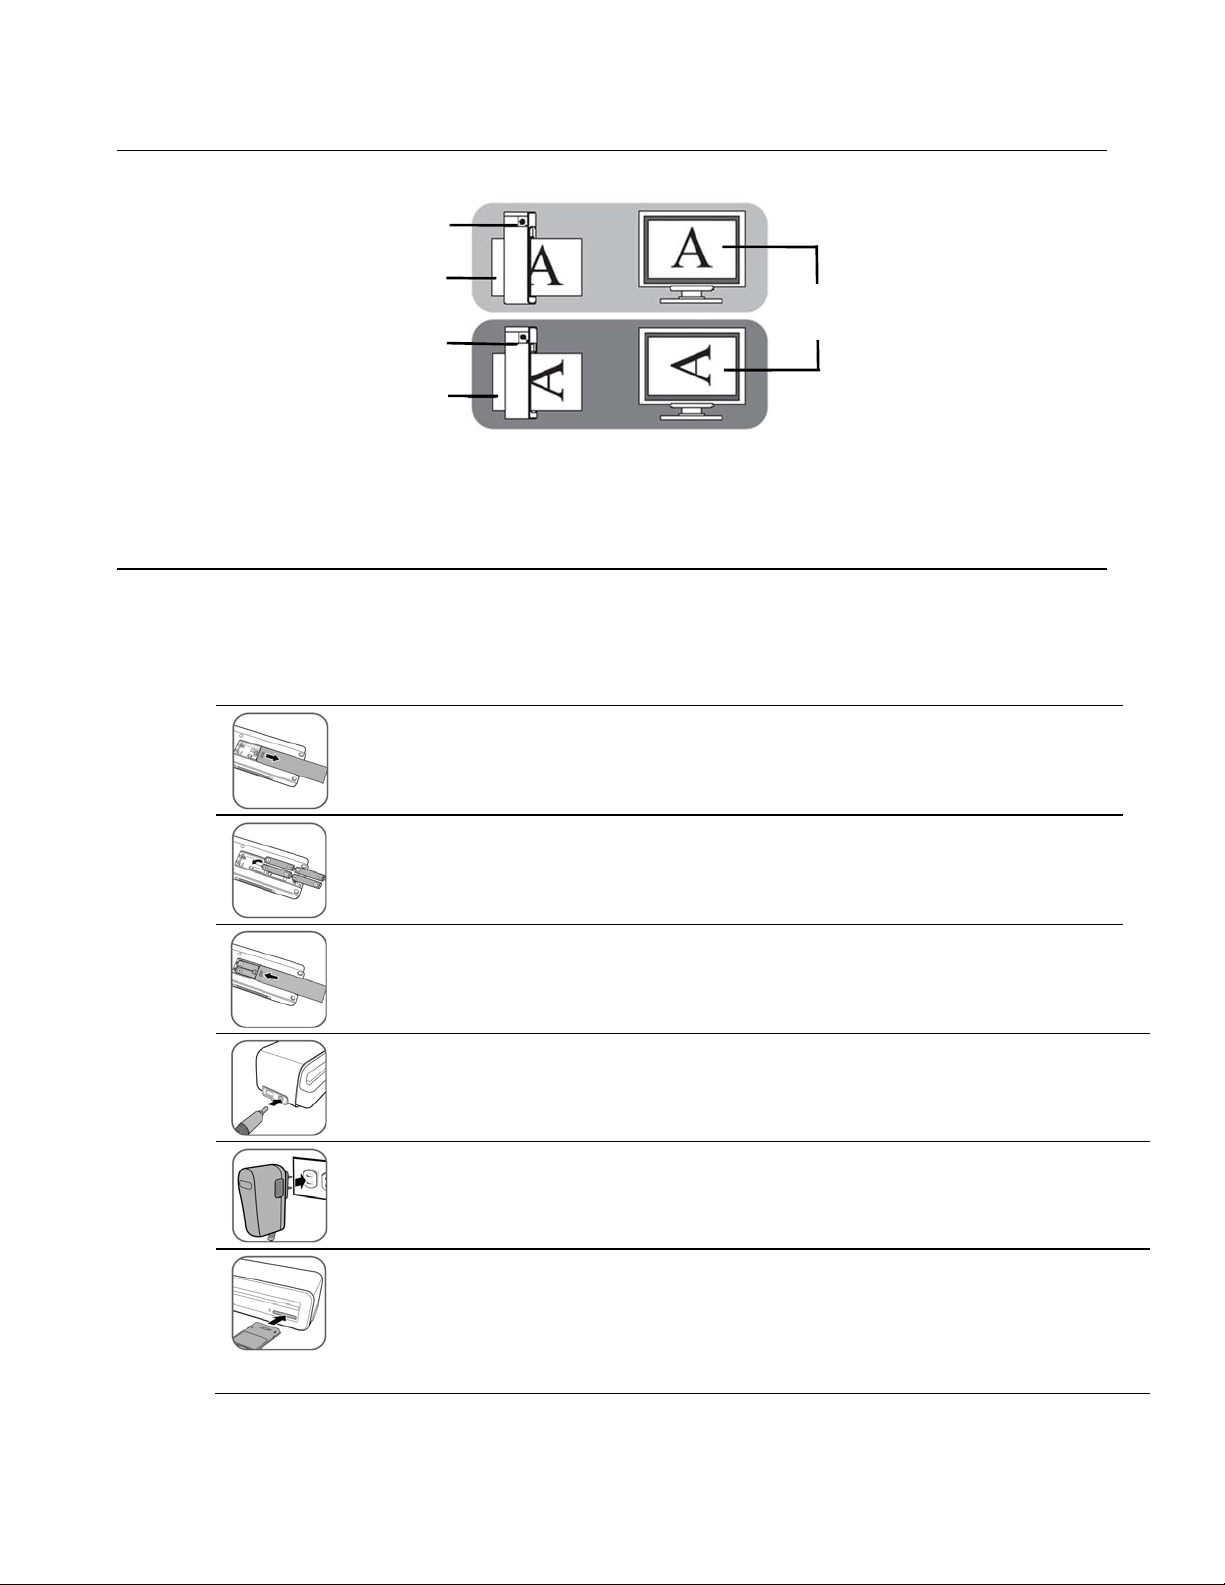
Orientation of the Original and Scanned Picture
r
r
It’s easy to see how scanned pictures appear on your computer. Note: You can rotate pictures on your computer.
Scanne
Original
Scanned image when
displayed on-screen
Scanne
Original
Scanning the same original in different orientations may produce scanned pictures that look slightly different in color tones and
brightness. This is not a malfun ction.
Operating the Scanner
Preparation and Initial Setup
The scanner can run on battery power or an external power supply.
When both power sources are available, the scanner only consumes power from the external power supply.
Recommended Ni-MH type rechargeable batteries. (There is no battery charging function in the scanner.)
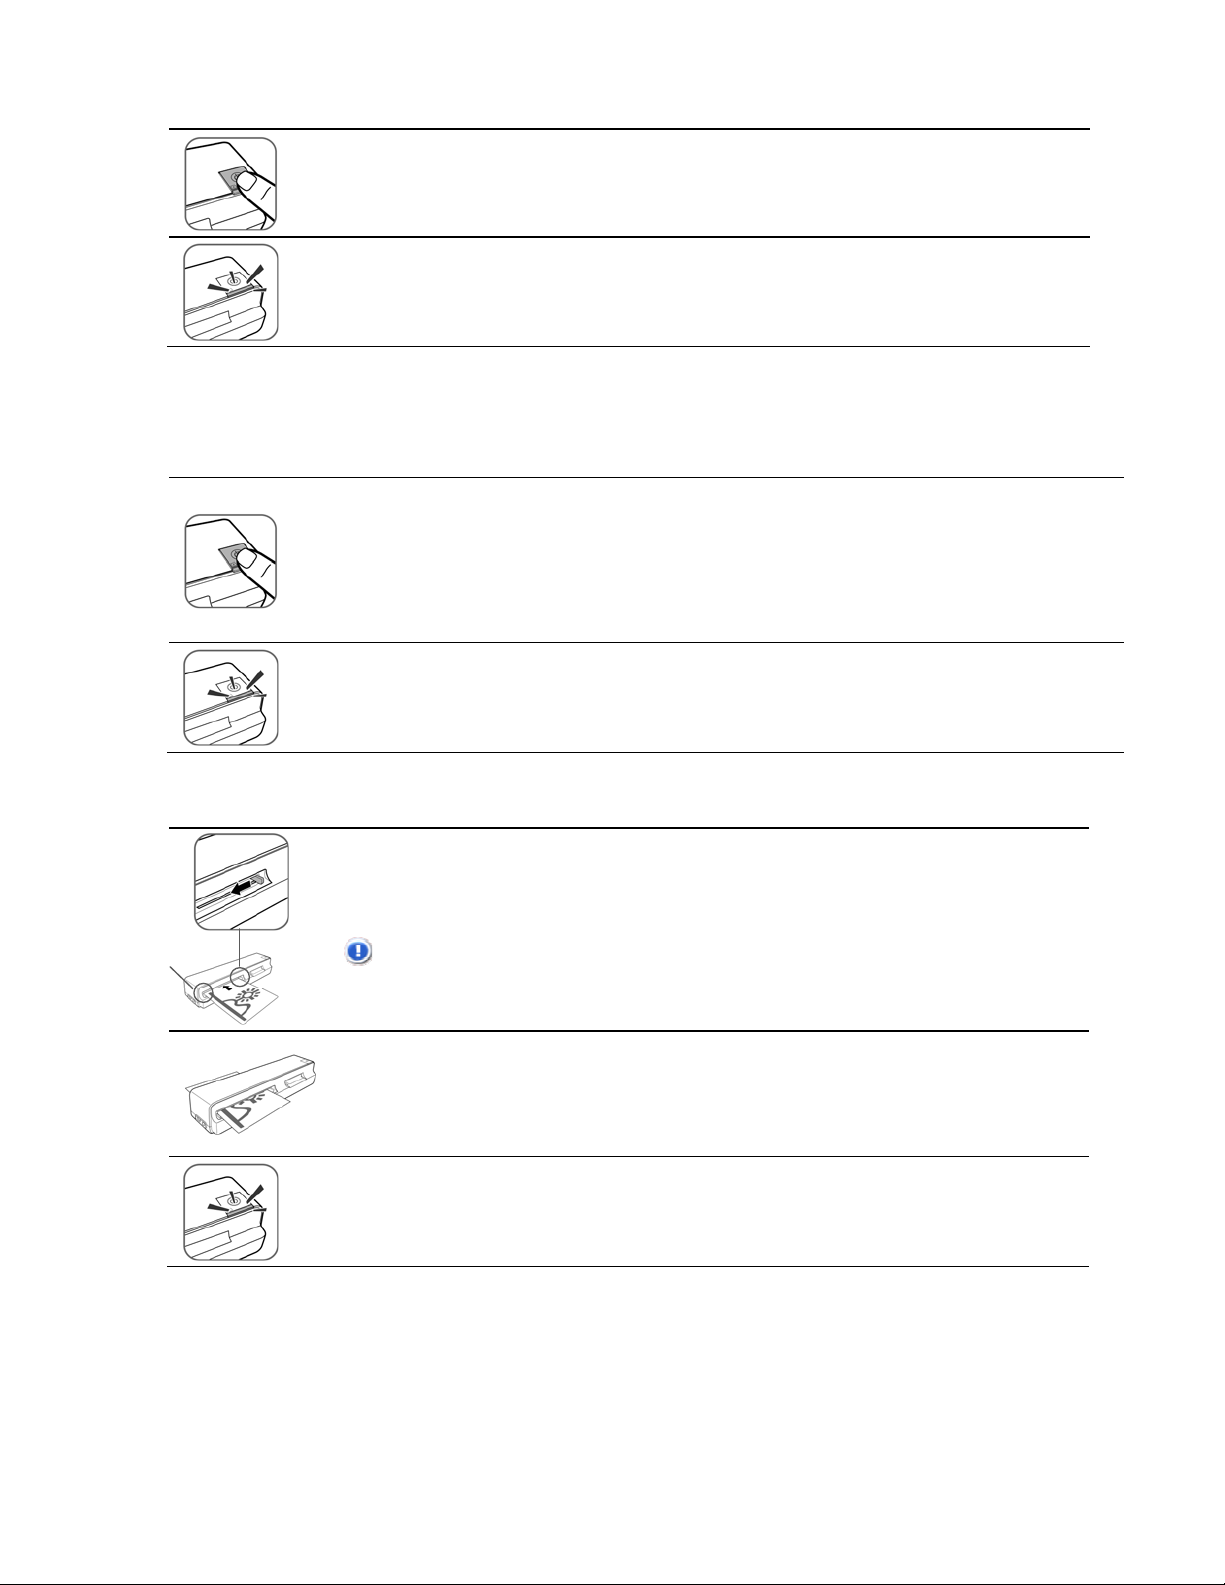
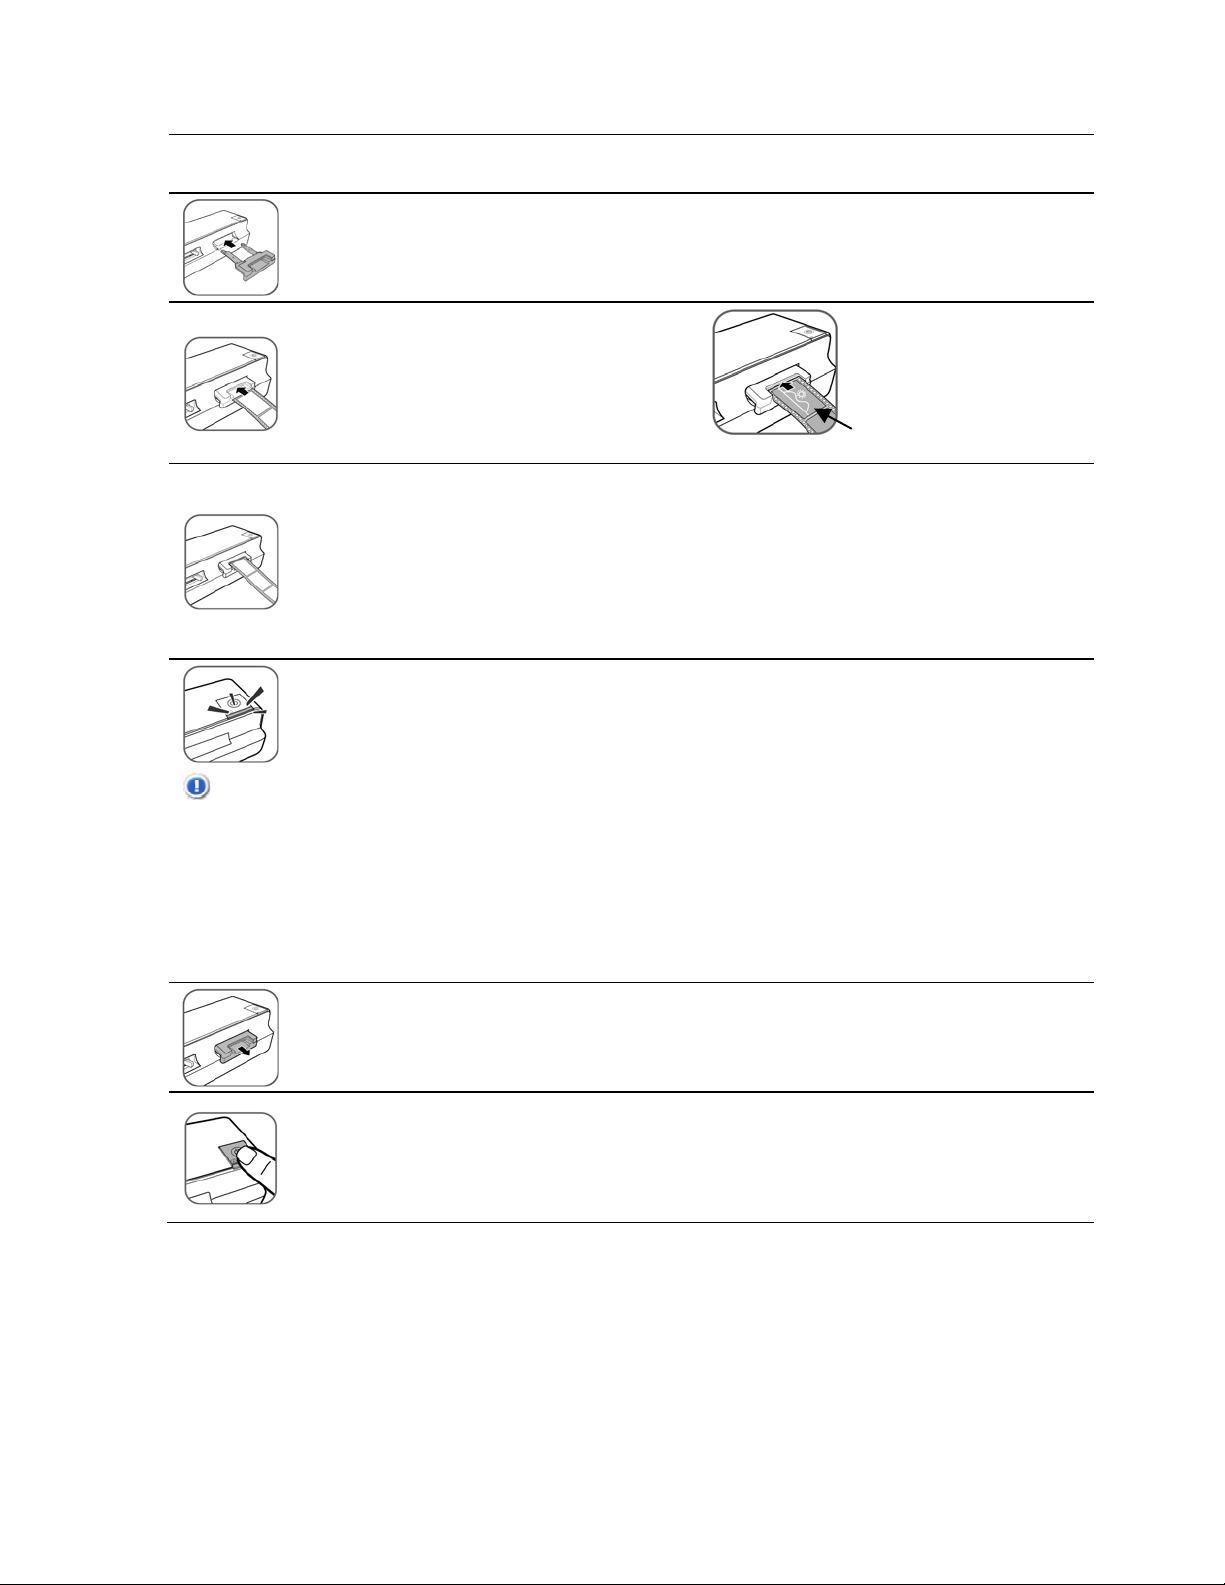
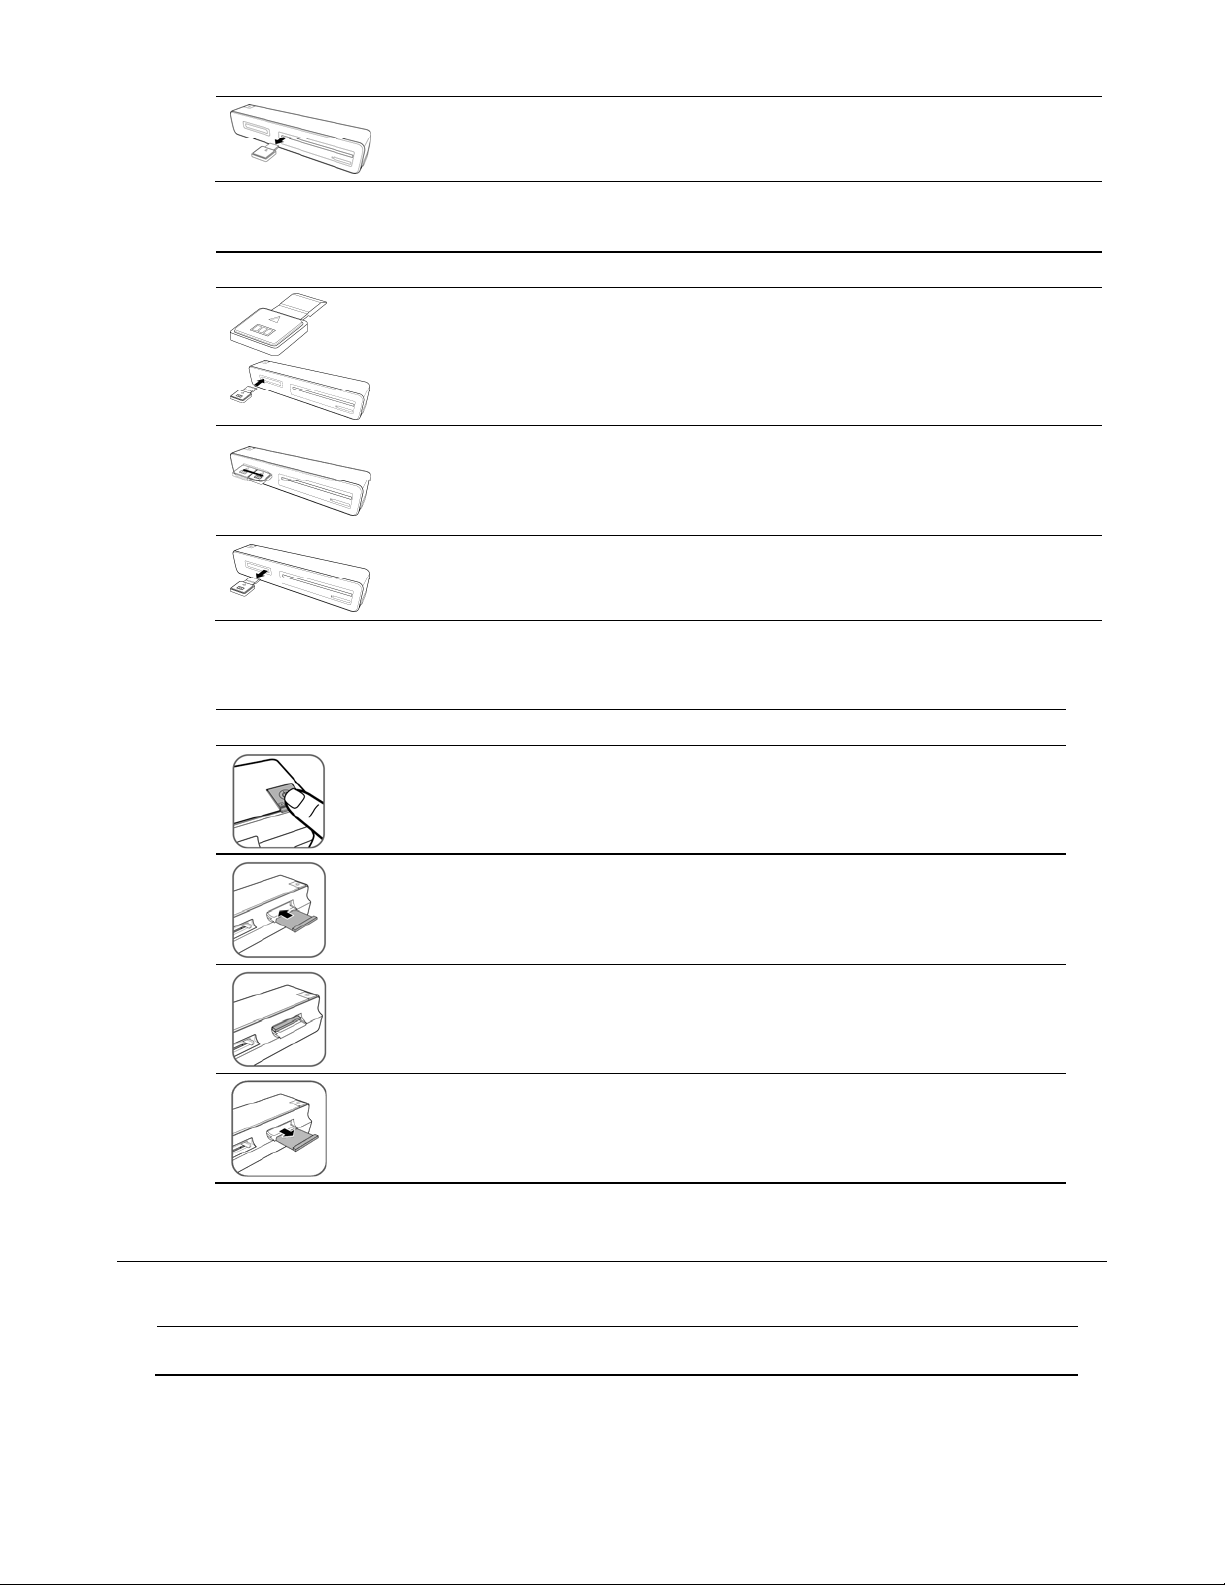
1. Turn the scanner over and slide open the battery compartment cover.
2. Install four AAA (UM-4) batteries. Make sure the batteries are correctly installed according to the
markings in the battery compartment.
3. Replace the battery compartment cover.
4. Connect the plug on the power adapter to the power connector on the scanner.
5. Plug the power adapter into a power outlet.
The type of power plug and socket illustrated may differ from that of your region.
6. Insert the KODAK MICROSD Mobile Memory Card into the SD adapter (included) or an unlocked (writable)
memory card into the memory card slot.
Always insert a memory card before scanning.
Make sure the memory card is unlocked (writable)
8 Customer Support: http://www.pandigital.net/kodaksupport
The scanner only accepts memory cards in FAT or FAT32 file system. NTFS and other file systems are
not supported.
Page 9
Turning on the Scanner
t
1. Press the
information, refer to “Indicator Lights” on page 5.)
2. Wait until the power indicator stops blinking and then turns off. The Status/Card indicator stays on steady,
indicating that the scanner is ready.
Do not insert an original into the feed slot when the power indicator is blinking. Otherwise the original will
not be scanned.
Setting the Scanning Resolution
The scanning resolution is measured in dpi (dots per inch). The higher the dpi, the more details on the original are captured
by the scanner and produce a higher quality scanned image. However, a higher dpi also results in a larger image size and
occupies more space on the memory card.
1. To change the scanning resolution, press and release the Power button. The scanning resolution changes by
each press of the button, and the color of the Status/Card indicator changes according to the resolution
selected:
The scanning resolution for transparencies is fixed as 1200dpi and cannot be changed.
2. Wait until the power indicator stops blinking and then turns off. The Status/Card indicator stays on steady,
indicating that the scanner is ready.
Do not insert an original into the feed slot when the power indicator is blinking. Otherwise the original will
Scanning a Photo
align lef
1. With the photo facing upward and in correct orientation, place one edge of the photo on the scanner
Power button. The power indicator and Status/Card lights blink. (For more indicator lights
Orange: 600dpi (fine mode, default)
Green: 300dpi (normal mode)
not be scanned.
and adjust the guide lever so that the photo aligns against the left side of the feed slot.
CAUTION: Do not scan glossy photos in humid environments (humidity higher than 70% RH).
Otherwise the surface of the photo will become sticky and may cause the scanner to jam.
2. Insert the original level and flat into the feed slot.
The original is fed through the slot and scanned automatically; the Power and Status/Card indicator
lights blink while scanning.
To prevent poor image quality, reserve adequate space behind the scanner for the photo to
complete the scan feeds.
When scanning is completed, the Power and Status/Card indicator lights blink while the scanner stores
the photo on the memory card.
Wait until the indicator lights stop blinking before inserting and scanning the next photo.
Customer Support: http://www.pandigital.net/kodaksupport 9
Page 10
A
A
CAUTION: Insert only one photo at a time, and insert the next photo only when the previous one is done. Otherwise
the scanner may malfunction.
Always place the scanner on a flat surface for scanning. Do not hold the scanner while scanning.
Do not remove the memory card or disconnect the power supply or batteries while the indicators are blinking.
Do not remove the batteries during while scanning.
This scanner only produces JPEG (.jpg) file formats. The date/ time attribute is not added.
Please do not insert the filmstrip guide adapter or slide holder in the Transparency feed slot while scanning a photo.
For more information on how this scanner stores the scanned picture files on the memory card, refer to “Orientation”
on page 8.
If the memory card is nearly full (less than 10MB remaining), the Status/Card indicator blinks (refer to “Indicator
Lights” on page 5). Use another card or transfer pictures to your computer.
To turn off the scanner, press and hold the power button for one second. The power indicator blinks and then
goes off.
Now you can safely disconnect the power and remove the memory card from the scanner.
The scanner automatically turns off if it’s left idle for 5 minutes. (If it’s connected to a computer, the scanner
does not automatically turn off.)
Scanning 35mm Negatives and Slides
This scanner only supports the scanning of 35mm negative/monochrome 6-frame unmounted filmstrips and 35mm slides
commonly available from your local photo studios.
Filmstrips in certain conditions are not suitable for scanning. Refer to Suitable and Unsuitable Original Types on
page 6.
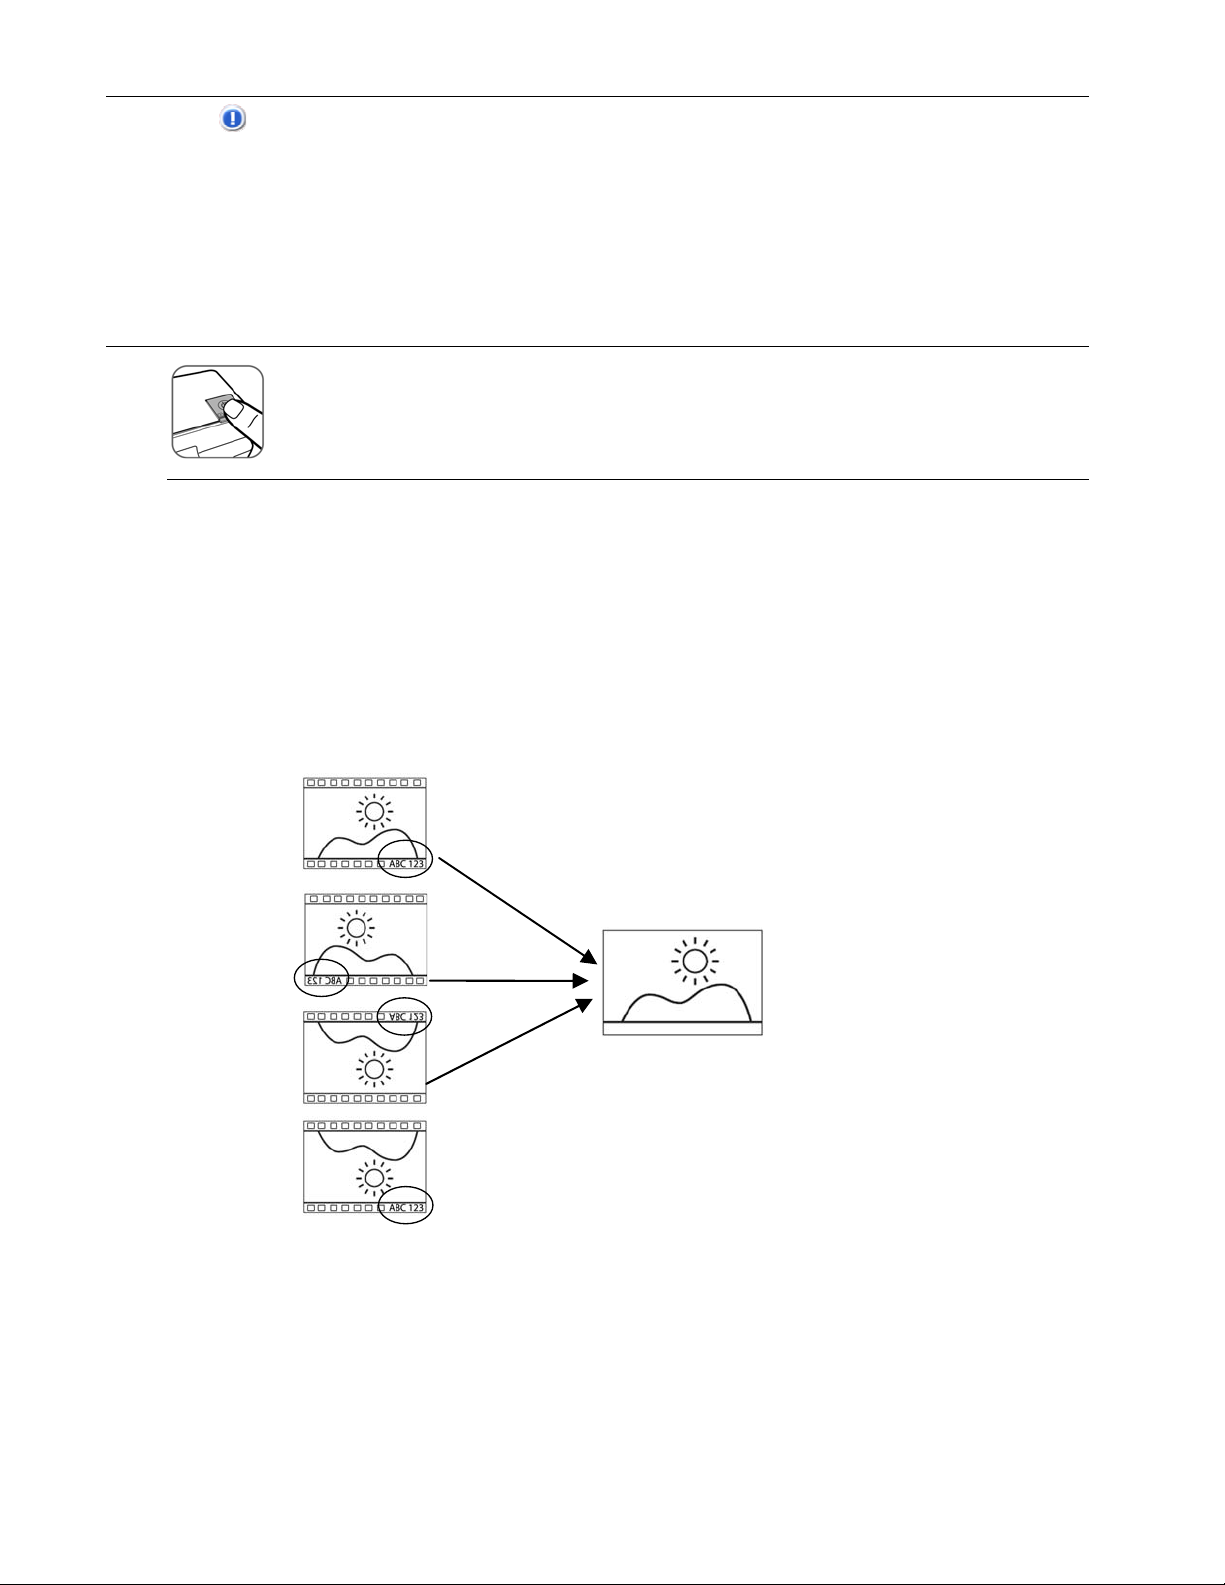
Auto Image Mirror/Flip
The scanner can detect the orientation of a filmstrip when the printed numbers on the edge of the filmstrip are in the
same orientation as the picture.
If you feed the filmstrip with the image mirrored or upside-down, the scanner automatically adjusts the scanned
image during the scan.
The following orientations would result in the same scanned image:
No rotation required
For example, the bottom image (above) is upside-down but the numbers are right-side up. If fed in this
orientation, the picture would not be rotated, resulting in the scanned picture remaining upside-down.
The current recognition capability has difficulty to distinguish the direction of the numbers “3”, “6”, “8” and
“9”. If the number’s position is near the edge of the filmstrip, it can easily be worn-out or damaged. When
the number on the edge can’t be detected in the expected position, or meet the required condition above,
the Auto Mirror/Flip function is disabled.
uto mirrored
uto flipped
If the numbers and image are not in the same orientation, or if numbers are damaged,
the auto mirror/flip function will not rotate the image.
Final scanned image
10 Customer Support: http://www.pandigital.net/kodaksupport
Page 11
Feeding Filmstrips
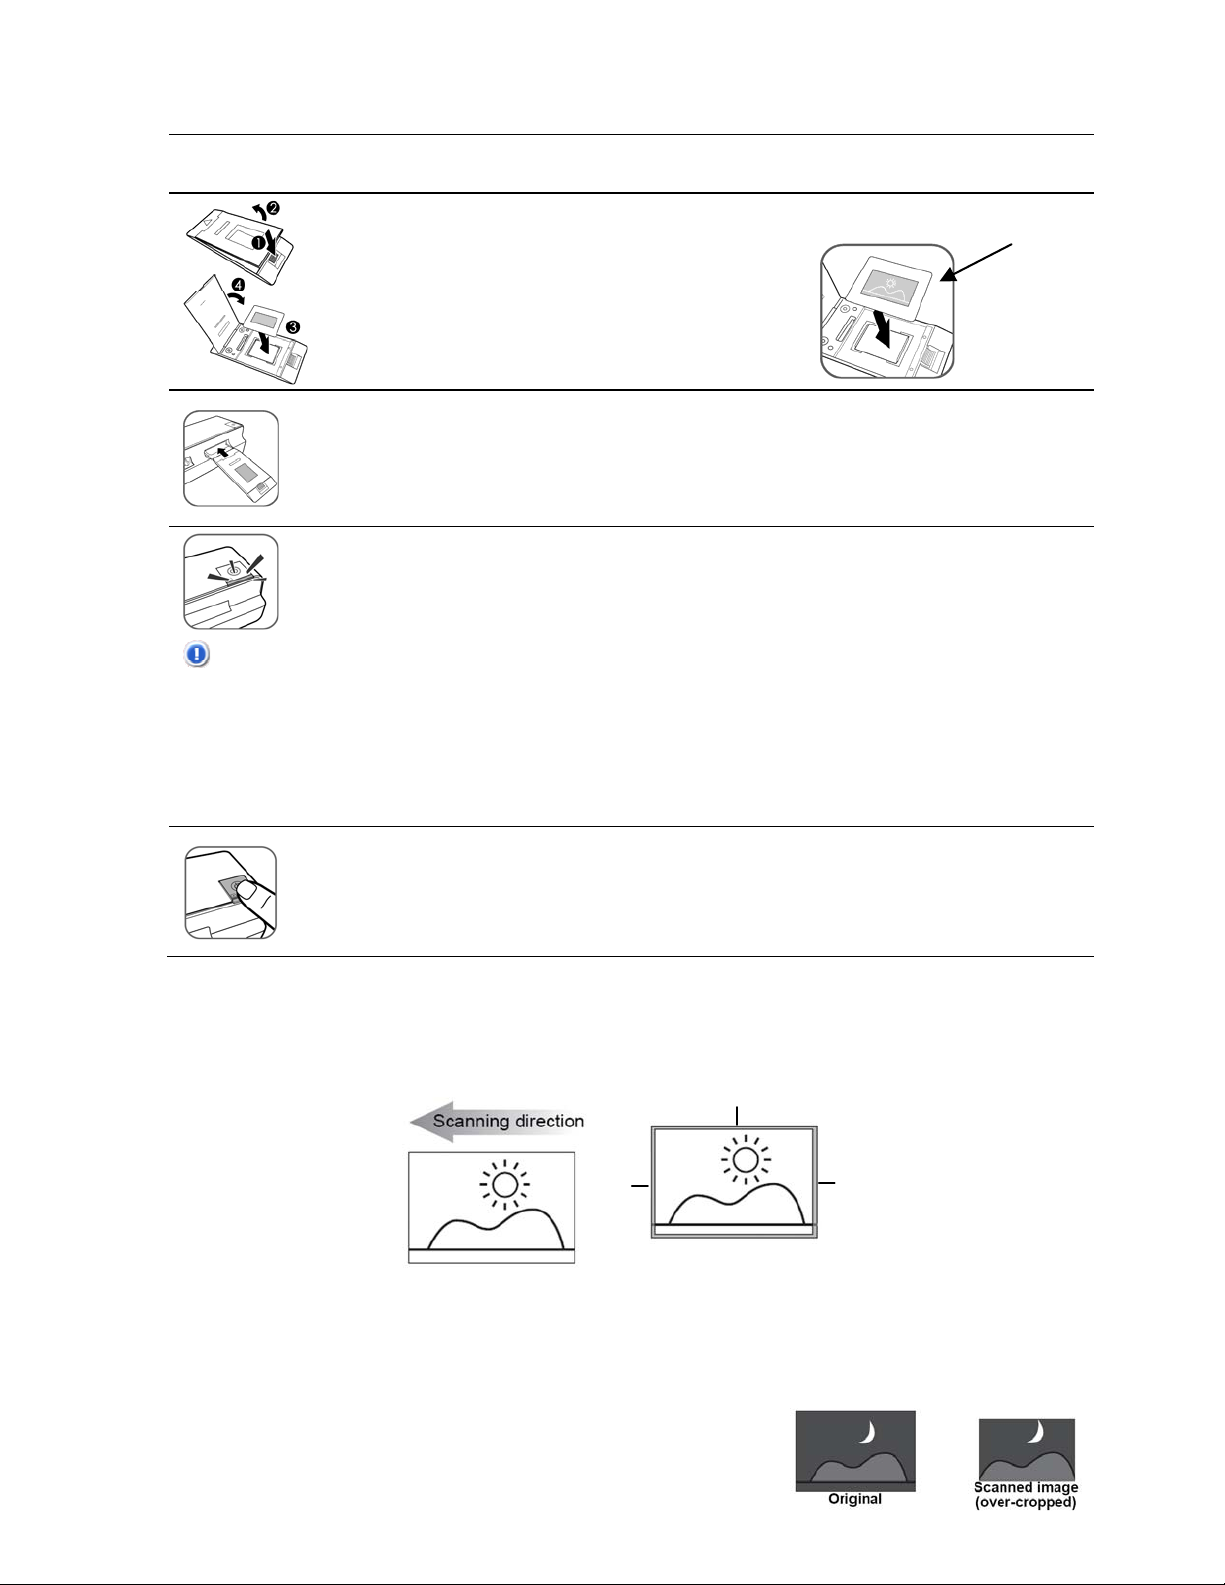
1. Make sure that the transparency feed slot is clear of any original and there is enough space behind the scanner for the
filmstrip to completely feed through the unit.
2. Insert the filmstrip guide adapter all the way into the feed slot until it snaps into place, as shown. Be
careful not to bend the metal parts of the filmstrip guide adapter when inserting.
3. Wait until indicator lights are in the “Ready to use” status before proceeding.
4. Insert the filmstrip into the filmstrip guide
adapter.
of the filmstrip or slide
5. The original is fed into the slot and scanned automatically.
Common filmstrip length is up to 6 negatives. To prevent poor image quality, reserve adequate space
behind the scanner for the filmstrip to complete the scan feeds.
While scanning a filmstrip, the scanner automatically recognizes the filmstrip type, (monochrome, or
negative) and determines the best suitable scan and color enhancement settings for scanning.
The scanner scans filmstrips at a higher resolution; therefore the scanning speed is slower than that of
photo scanning. This is not a malfunction.
If the filmstrip is pulled out from the scanner while scanning, the scanning process remains for a few
seconds and then stops. This is not a mailfunction.
When scanning is completed, the Power and Status/Card indicator lights blink while the scanner stores the
photo on the memory card.
6. Wait until the indicator lights stop blinking before inserting and scanning the next original.
Pay attention to the direction
CAUTION: Insert only one original at a time, and insert the next original only when the previous one is done. Otherwise
Do not remove the memory card or disconnect the power supply or batteries while the indicators are blinking.
This scanner produces JPEG (.jpg) file formats. The date/ time attribute are not added.
Please do not insert a photo into the Photo feed slot while scanning filmstrips or slides.
If the memory card is nearly full (less than 10 MB remaining), the Status/Card indicator blinks (refer to “Indicator Lights” on
page 5). Use another card or transfer pictures to your computer.
Please remove slide from slide holder when finished scanning.
the scanner may malfunction.
To remove the filmstrip guide adapter after all originals are scanned, gently pull it out from the transparency
feed slot.
To turn off the scanner, press and hold the power button for one second. The power indicator blinks and
then goes off.
Now you can safely disconnect the power and remove the memory card from the scanner.
The scanner automatically turns off if it’s left idle for 5 minutes. (If it’s connected to a computer, the
scanner does not automatically turn off.)
Customer Support: http://www.pandigital.net/kodaksupport 11
Page 12
Scanning Mounted Slides
1. Make sure that the transparency feed slot is clear of any original and there is enough space behind the scanner for the slide
holder to completely feed through the unit.
Pay attention to the direction of the mounted slide
2. Open the slide holder, place the mounted
slide in the holder as shown, and then close
the holder.
3. Insert the slide holder level into the transparency feed slot. The original is fed into the slot and
scanned automatically.
The scanner scans transparencies at a higher resolution; therefore the scanning speed is slower
than that of photo scanning. This is not a malfunction.
When scanning is completed, the Power and Status/Card indicator lights blink while the scanner stores
the photo on the memory card.
Wait until the indicator lights stop blinking before inserting and scanning the next original.
CAUTION: Insert only one original at a time, and insert the next original only when the previous one is done. Otherwise
the scanner may malfunction.
Do not remove the memory card or disconnect the power supply or batteries while the indicators are blinking.
Please do not insert a photo into the Photo feed slot while scanning a slide.
Please remove the slide from the slide holder when scanning is done.
This scanner produces JPEG (.jpg) file formats. The date/ time attribute are not added.
If the memory card is nearly full (less than 10 MB remaining), the Status/Card indicator blinks (refer to “Indicator Lights” on
page 5). Use another card or transfer pictures to your computer.
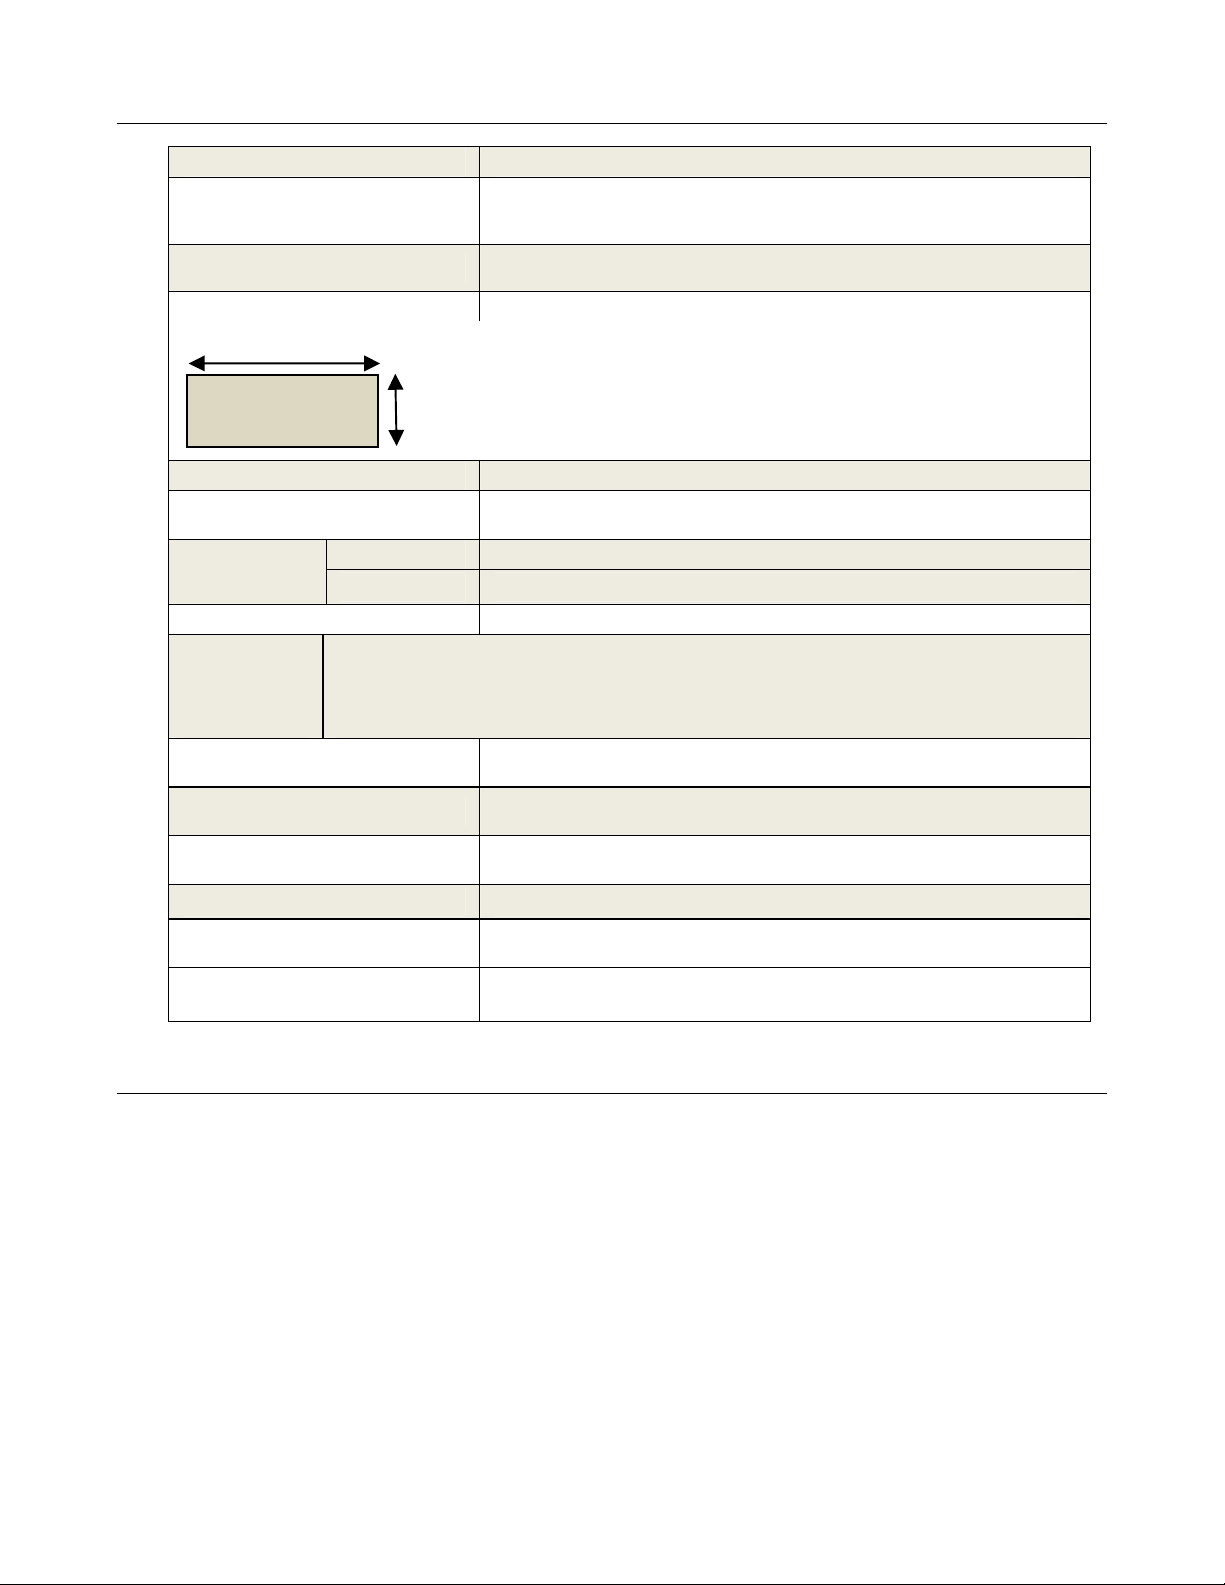
Automatic Image Cropping
The scanner has a built-in cropping function that detects and crops dark edges of an original during the scan process (see
following illustration).
To turn off the scanner, press and hold the power button for one second. The power indicator blinks
and then goes off.
Now you can safely disconnect the power and remove the memory card from the scanner.
The scanner automatically turns off if it’s left idle for 5 minutes. (If it’s connected to a computer, the
scanner does not automatically turn off.)
Cropping size (as measured on the original)
1.5mm
Max.
Max. 1.5mm
Max.
1.5mm
Use the plastic sheath when scanning originals that are sized or shaped other than the standard 3.5”x5” or 4”x6”.
Depending on the shape, you may want to perform additional manual cropping on the scanned image, using your own
photo editing software, to achieve your desired final image.
When scanning darker originals (for example, a photo of the night sky),
over-cropping may occur. Please insert the original in a different direction
(orientation) and try again.
12 Customer Support: http://www.pandigital.net/kodaksupport
Original
Max. 1.5mm
Scanned image
Page 13
When scanning over-exposed, older or lighter color (faded) filmstrip originals, an irregular auto-
cropping may occur. Cut the filmstrip into individual films and rescan them.
Connect Scanner to a Computer
By connecting the scanner to a computer, you can access the scanned pictures on the memory card directly, or use the scanner
as a memory card reader, so that you can freely copy, paste or delete files to and from the memory card using the computer.
System Requirements
Operating system: WINDOWS XP, WINDOWS VISTA, WINDOWS 7 or later versions (32 bit)
Macintosh: MAC OS 10.5, 10.6, or later versions
USB Port Supported: USB 1.1 or 2.0 port
1. Connect the plug on the power adapter cord to the power connector on the scanner.
2. Plug the power adapter into an electrical outlet.
The type of power plug and socket illustrated may differ from that of your region.
3. Insert an unlocked (writable) SD memory card into the memory card slot.
Memory card is required. The scanned picture files are stored on an inserted memory card, and
then you can access the scanned pictures with WINDOWS EXPLORER or VISTA Photo Import
Wizard.
4. Connect the mini end of the USB cable (included with scanner) to the Mini USB connector on the
scanner.
5. Turn on your PC, and then connect the large end of the USB cable to a USB port on your computer.
6. Press the Power button; the power indicator light blinks. (For more information, refer to “Indicator
Lights” on page 5.)
CAUTION: Do not remove the memory card while th e computer is accessing the files on it.
The scanner is recognized by the computer as a removable disk. Now you are ready to view or edit the files on the
memory card.
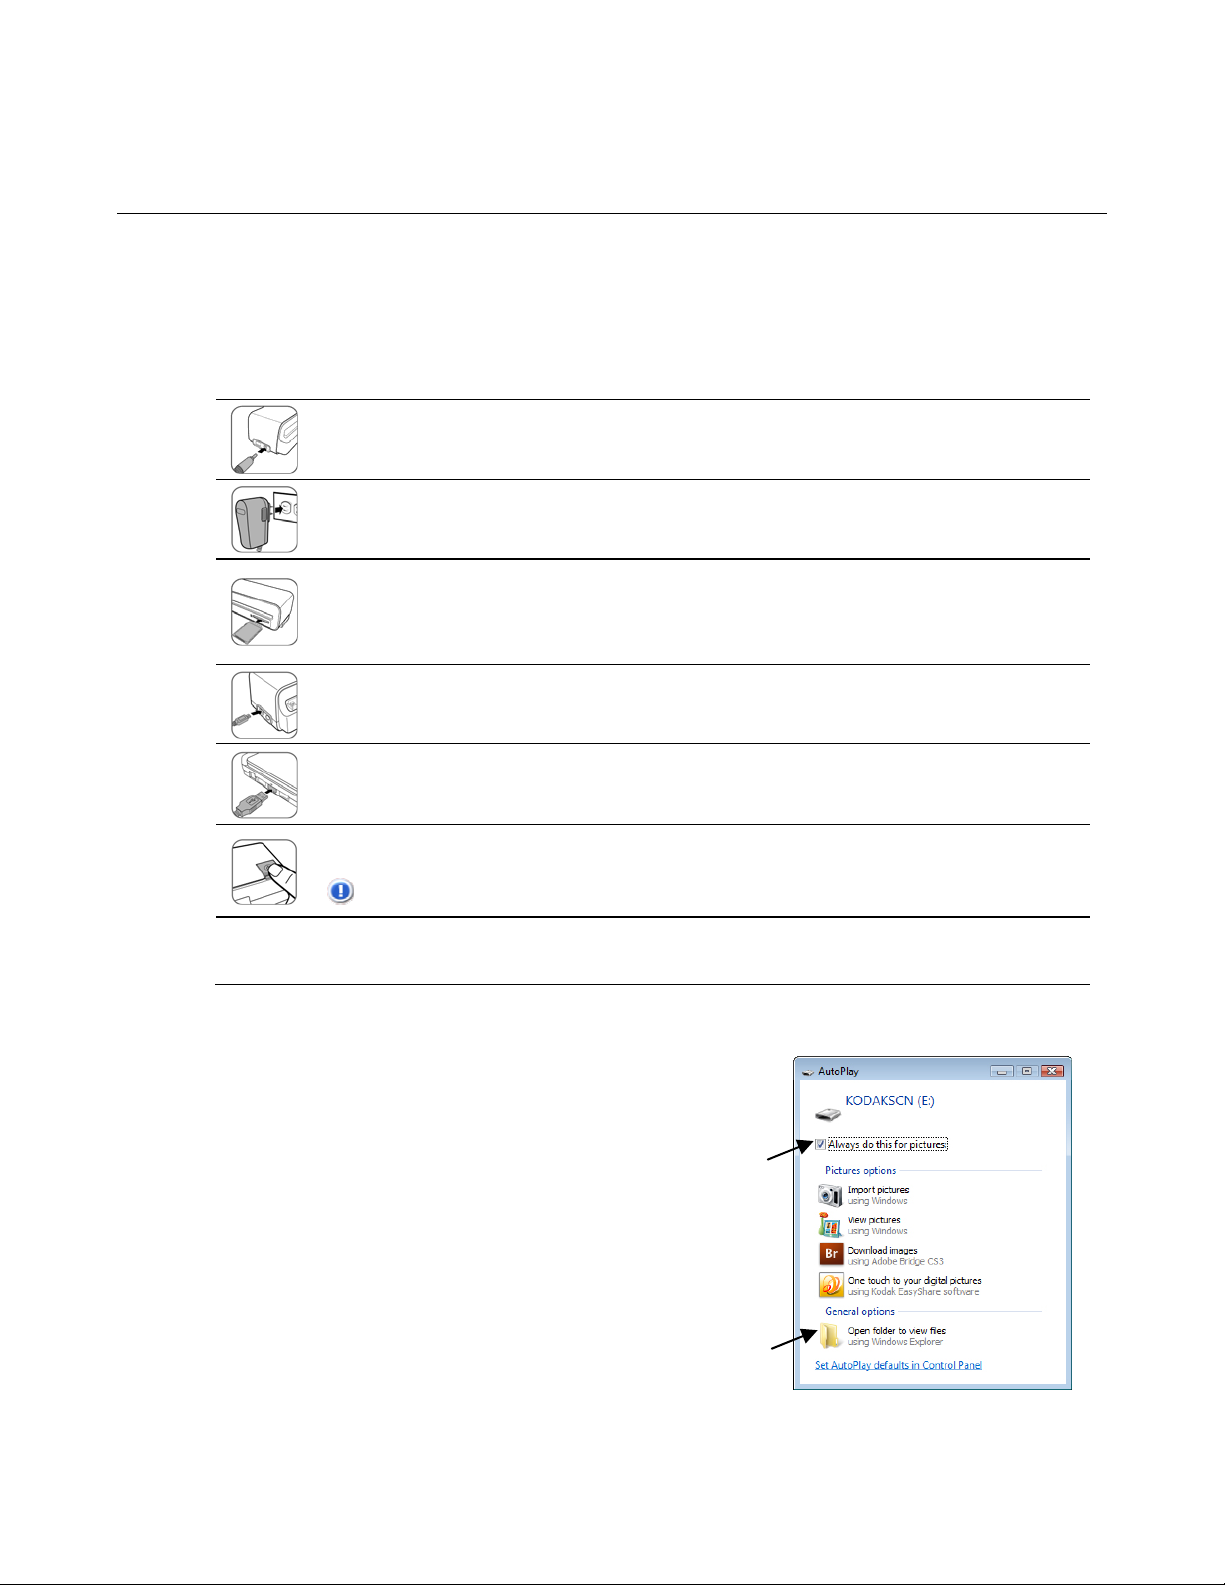
For WINDOWS VISTA Users
When the PC recognizes the scanner, with an inserted memory card, an
“Auto Play” pop-up window appears.
To view photos on the PC while scanning, change WINDOWS EXPLORER
setting as follows:
1. Check the
2. Select
3. When the scanner connects with the PC, an additional drive is listed in the
EXPLORER window. If you are using the KODAK SD memory card, the
drive is titled
If you are using your own memory card, the drive is titled
Disk [drive letter]
assigned to your memory card.
Do not select “Take no Action” or “Set AutoPlay to defaults in Control
Panel”.
Always do this for pictures checkbox.
Open folder to view files option.
KODAKSCN [drive letter].
Removable
or the personalized title you may have previously
Customer Support: http://www.pandigital.net/kodaksupport 13
Page 14
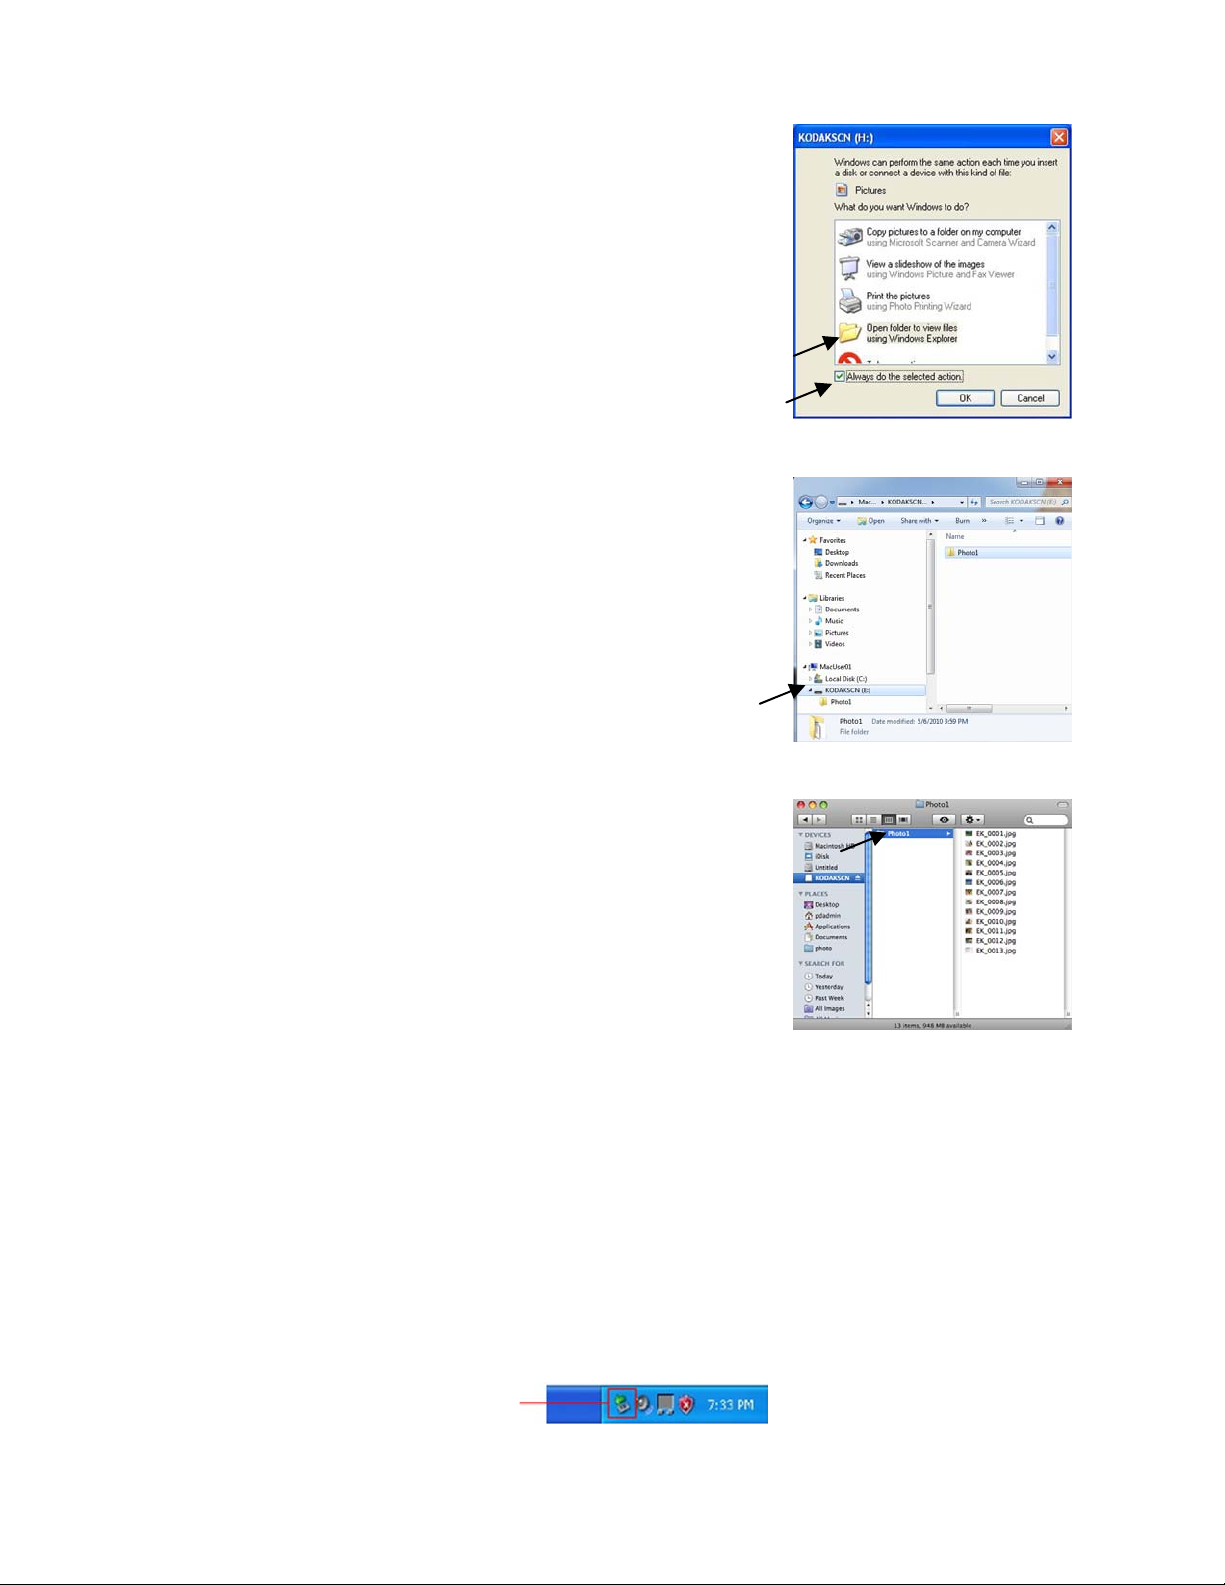
For WINDOWS XP Users
When the PC recognizes the scanner with an inserted memory card, a popup window appears.
To view photos on the PC while scanning, change WINDOWS EXPLORER
setting as follows:
1. Select
2. Select the “
Open folder to view files using WINDOWS EXPLORER.
Always do the selected action” checkbox, and then click
OK.
3. When the scanner connects with the PC, an additional drive is listed in the
EXPLORER window. If you are using the KODAK SD memory card, the
drive is titled
If you are using your own memory card, the drive is titled
Disk [drive letter]
assigned to your memory card.
KODAKSCN [drive letter].
Removable
or the personalized title you may have previously
For WINDOWS 7 Users
When the PC recognizes the scanner with an inserted memory card, a
WINDOWS EXPLORER opens.
1. Select
2. Open
KODAKSCN drive in EXPLORER window.
PHOTO1 folder to view your scanned photos.
For MAC Users
When the computer recognizes the scanner with an inserted memory card,
the volume icon appears on the desktop; double-click it to open a Finder
window.
1. Double-click the
2. Open
PHOTO1 folder to view your scanned photos.
KODAKSCN volume icon on the desktop.
Scanned Picture Naming Convention
After your first scan, a folder titled PHOTO1 is added to the memory card file structure.
The scanned pictures are saved in the
followed by a 4- digit sequential number in the order the pictures are stored. For example,
If the file name reaches
subsequent new files, and so on.
There can be up to 9 folders (
indicator light blinks.
You can now view or edit the files on the memory card using your own photo editing software.
EK_9999.jpg in the PHOTO1 folder, a new folder titled PHOTO2 is automatically created to store
PHOTO1..9, EK_0001... EK_9999) on a memory card. If exceeded, the Status/Card
PHOTO1 folder. Each scanned picture is given a file name with the prefix EK_
Safely Disconnect the Scanner from Computer
For Windows Users
1. On the WINDOWS System Tray, click the hardware removal icon as indicated below.
Hardware Removal Icon
EK_0001.jpg, EK_0002.jpg.
14 Customer Support: http://www.pandigital.net/kodaksupport
Page 15
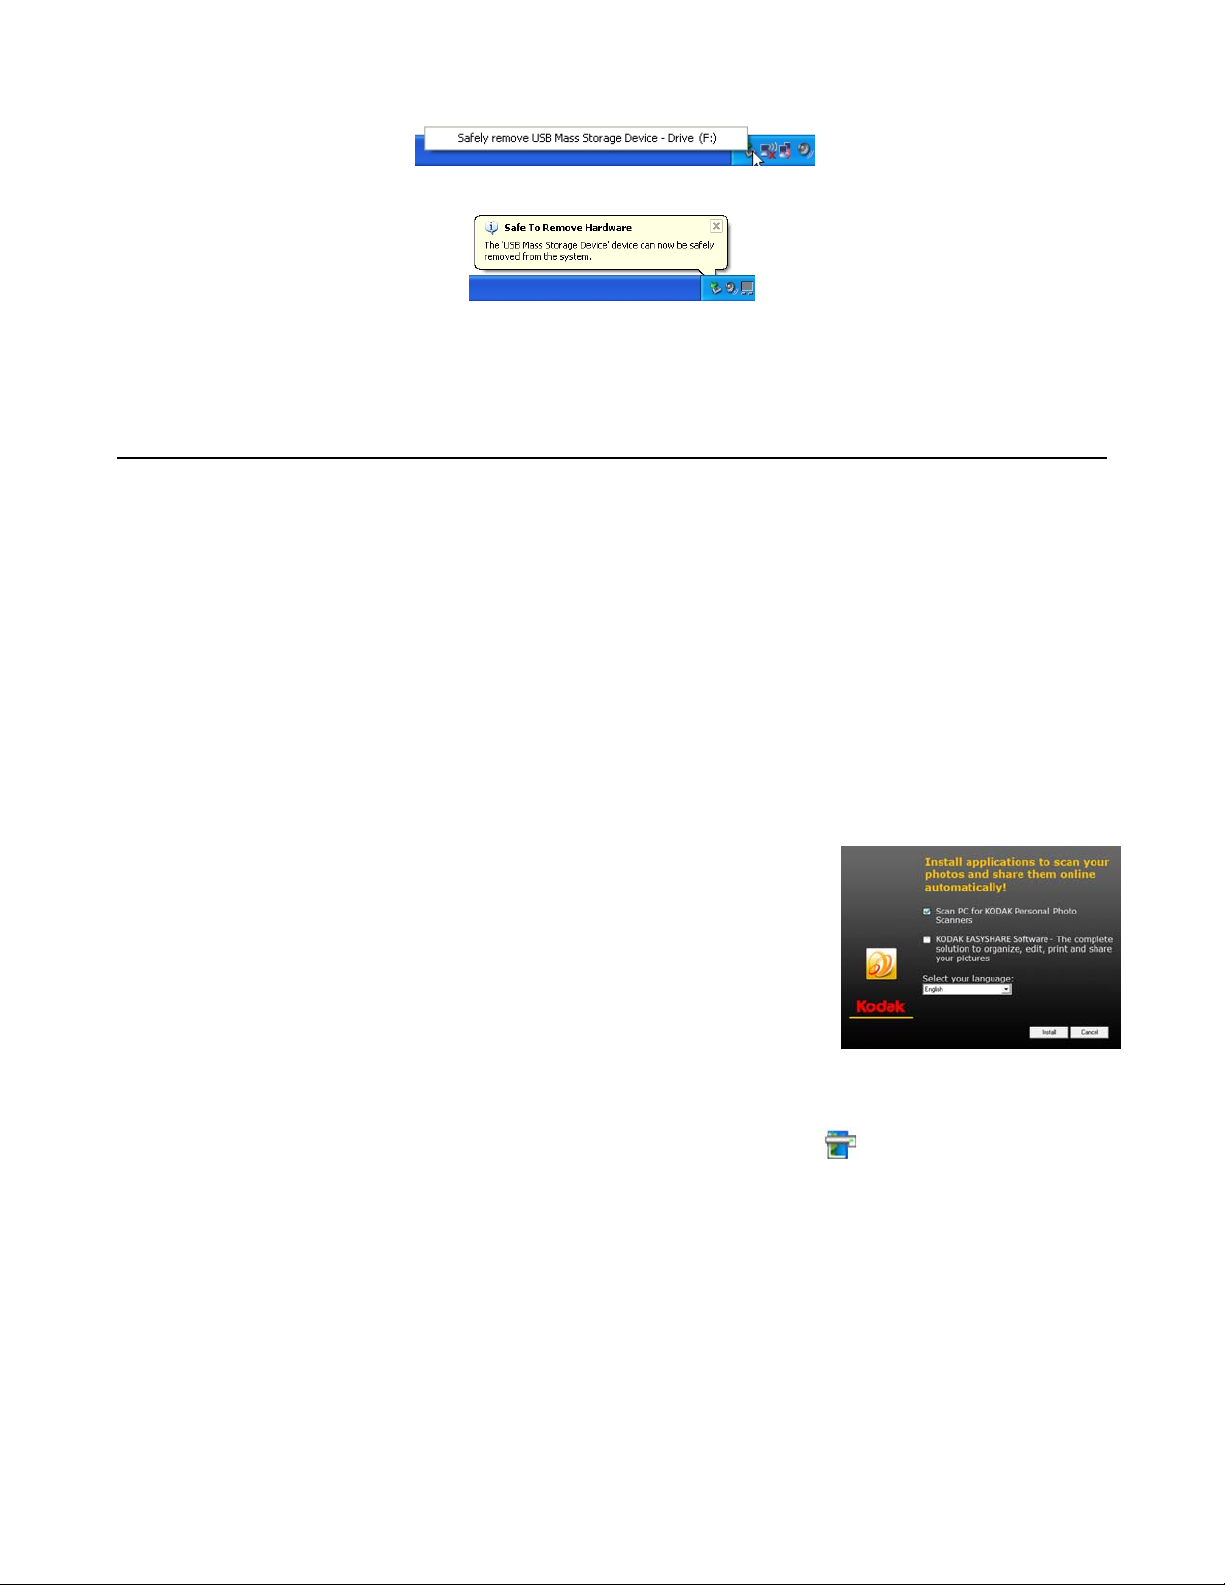
2. Click the ‘Safely remove USB mass Storage device’ message with the corresponding Drive.
3. When the ‘Safe to Remove Hardware’ message appears, you can safely remove the scanner’s USB cable.
For MAC users
On the desktop, right-click on the KODAKSCN volume, then select Eject “KODAKSCN”.
Scan PC Software for KODAK Personal Photo Scanners
With the Scan PC Software for KODAK Personal Photo Scanners (Scan PC Software), you can easily scan photos and save the
scanned pictures directly to the connected PC.
System Requirements
Operating system: WINDOWS, XP SP2 or later, VISTA, WINDOWS 7 - 32-Bit
The Scan PC Software is not supported on the MAC OS
INTEL PENTIUM IV processor
1.2 GHz processor speed
512 MB RAM minimum
10MB free hard disk space for Scan PC Software for KODAK Personal Photo Scanners
200MB free hard disk space for KODAK EASYSHARE Software
NOTE: APPLE QUICKTIME Player is required for some software features. Visit APPLE to download the latest version of
the QUICKTIME Player.
Install Scan PC Software
1. Connect the scanner to your PC (see page 13), using the KODAK MICROSD
Mobile Memory Card
2. Open a Windows Explorer window.
3. Select
KODAKSCAN>KODAK>Software>KODAK_Scan_PC_Software_Setup_Vxxxx
4. Double-click the
5. In the Install Wizard window, click
6. Click
7. In the Ready to Install window, click
8. After the software is installed, click
Next to install in default location, or select desired location and then click
Next.
ScanPC_KODAK_Scanner_Setup_Vxxxx.exe file.
Next.
Install.
Finish
Once installed, the
If you want to close the
select Exit.
Scan PC Software runs automatically upon PC startup, and the icon stays on the system tray.
Scan PC for KODAK Personal Photo Scanners software temporarily, right-click on the icon and
Customer Support: http://www.pandigital.net/kodaksupport 15
Page 16
Using the Scan PC Software
CAUTION: To maximize memory usage, close all other applications programs before scanning multi-image filmstrips.
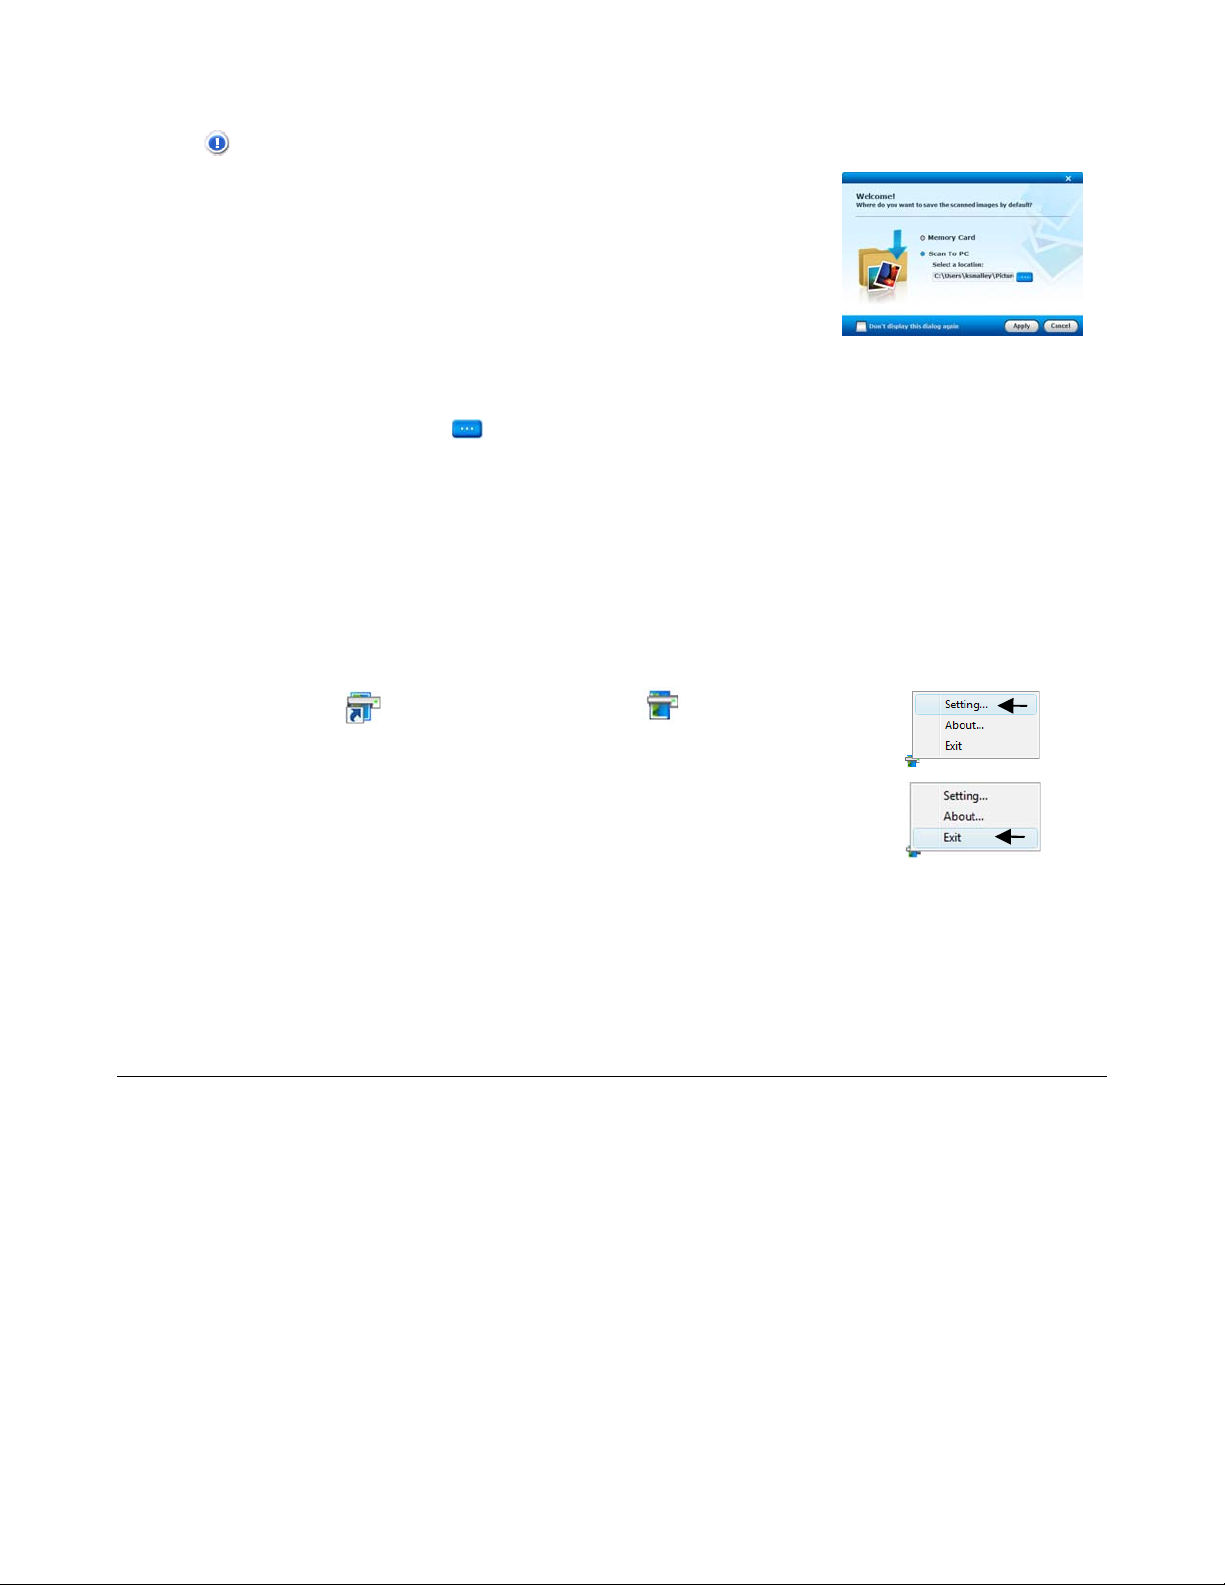
1. When the scanner is connected via USB cable to the PC, the Status/Card
light blinks. The
2. Specify the location where you want the scanned pictures to be saved:
~ Memory Card
~ Scan to PC
3. Click
Apply; the window closes.
After your first scan, a folder titled PHOTO1 is added to the file structure as follows:
~ Memory Card: \PHOTO1
~ Scan to PC: WINDOWS 2000 and XP: C:\Documents and Settings\(your username)\My Documents\My Pictures\PHOTO1
4. Scan your original as instructed begin ning on page 9.
5. The scanned picture is saved to the location you selected in step 2 above.
Each scanned picture is given a file name with the prefix
pictures are stored. For example,
If the file name reaches
store subsequent new files, and so on.
Note: There can be up to 9 folders (
Status/Card indicator light blinks.
Scan PC Software window appears.
WINDOWS VISTA or WINDOWS 7: C:\Users\(your username) \Pictures\PHOTO1
You can click the
Launch Scan PC Software Manually
button to select a different location if desired.
EK_ followed by a 4- digit sequential number in the order the
EK_0001.jpg, EK_0002.jpg.
EK_9999.jpg in the PHOTO1 folder, a new folder titled PHOTO2 is automatically created to
PHOTO1..9, EK_0001... EK_9999) on a memory card. If exceeded, the
Double-click the
and select
If you want to close the Scan PC Software temporarily, right-click on the icon and
select
icon on the Desktop, or right-click the icon in the system tray
Setting.
Exit.
Uninstall the Scan PC Software
1. From the PC Start menu, select All Programs > Scan PC Software > Uninstall.
2. Follow the uninstall wizard to uninstall the software.
3. Restart your PC when prompted to do so.
If you choose to restart later, be aware that the
Scan PC Software uninstall is not completed until you restart the PC.
KODAK EASYSHARE Software for PC
After using Scan PC Software for KODAK Personal Photo Scanners to scan and store your pictures on your PC, if desired, you
can use KODAK EASYSHARE Software to organize, edit, print, and share your pictures online.
System Requirements
Operating system: WINDOWS XP, WINDOWS VISTA, WINDOWS 7
Intel Pentium IV processor
1.2GHZ or better processor speed
512MB RAM
200MB f r ee h ard disk space
16 Customer Support: http://www.pandigital.net/kodaksupport
Page 17
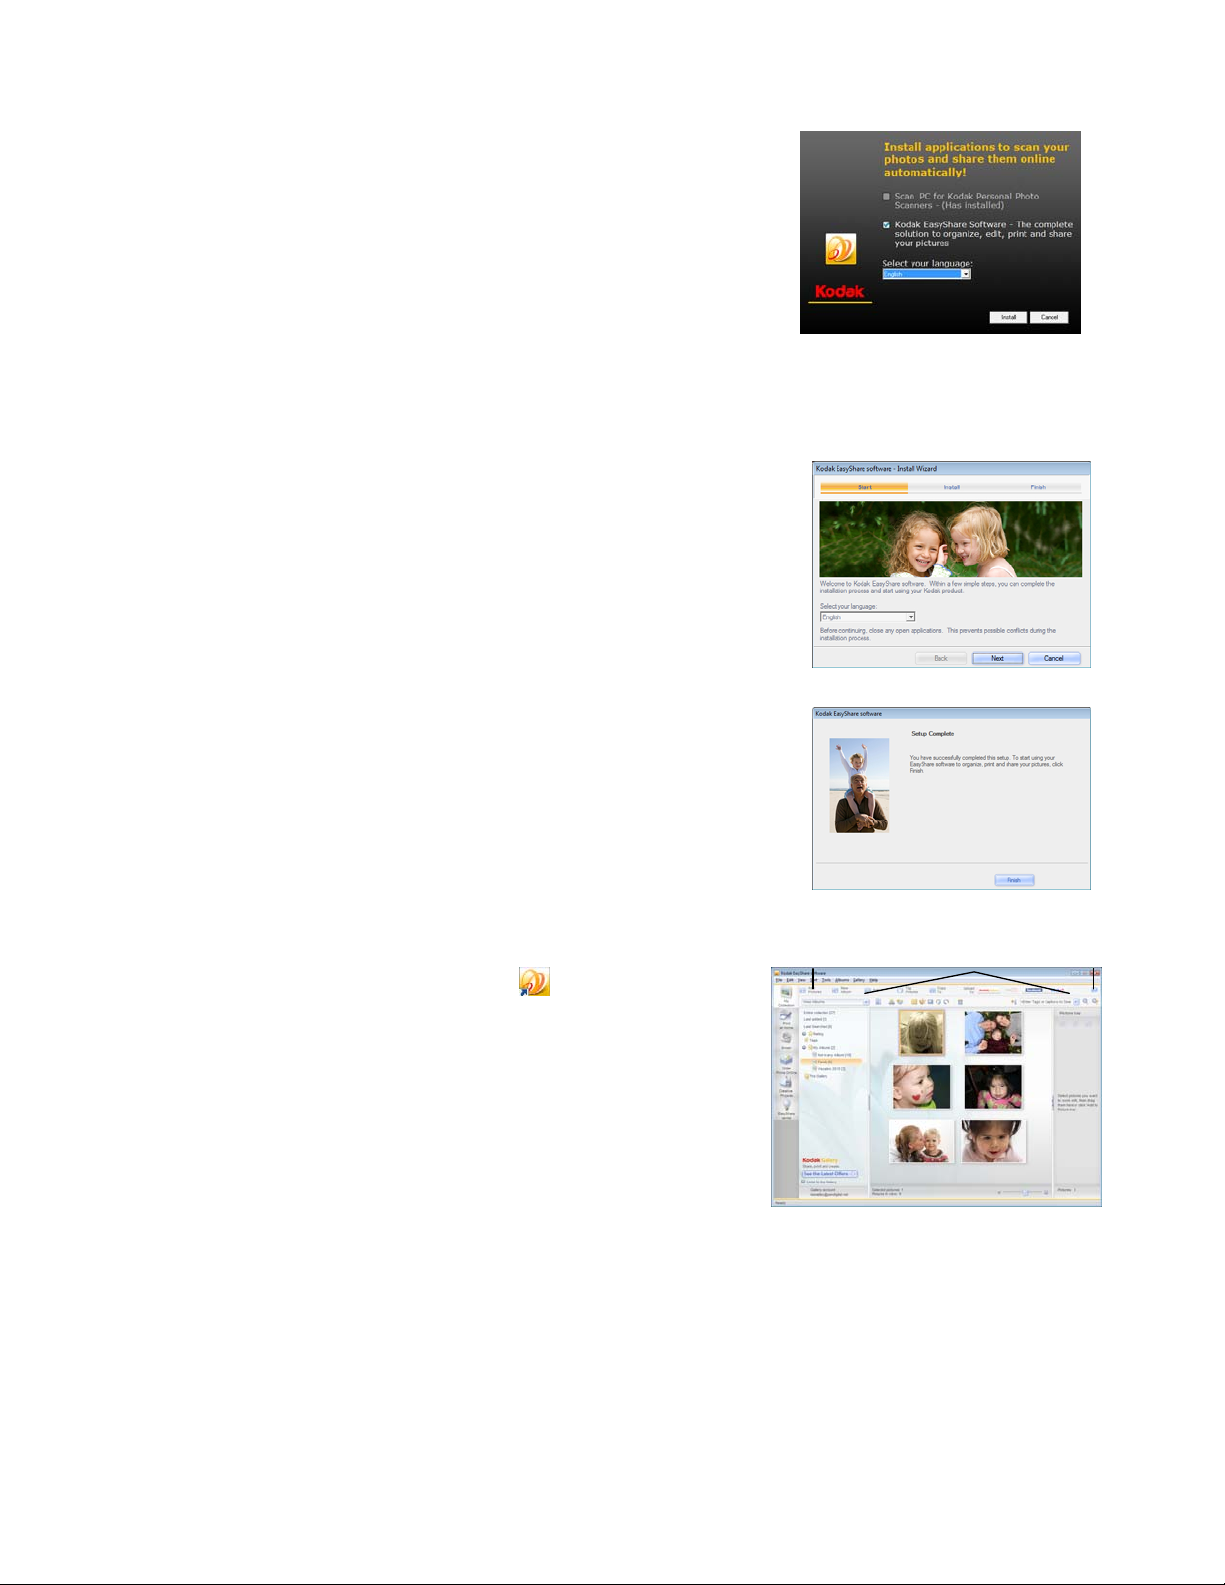
Install KODAK EASYSHARE Software
1. Insert the KODAK MICROSD Mobile Memory Card into the SD adapter,
and then into the scanner.
2. Connect the scanner to your PC (see instructions beginning on page 13).
3. Open a Windows Explorer window.
4. Select
5. Double-click the
6. Follow the prompts to install and register your software.
7. After the software is installed, click
KODAKSCAN>KODAK>
Software>KODAK_Scan_PC_Software_Setup_Vxxxx
Setup.exe file.
>KodakEasyShare.
Finish.
Launch KODAK EASYSHARE Software
1. Double-click the KODAK EASYSHARE
or select
2. Click
Kodak EASYSHARE software from the Start>Programs list.
Add Pictures.
shortcut on your desktop
Customer Support: http://www.pandigital.net/kodaksupport 17
Page 18
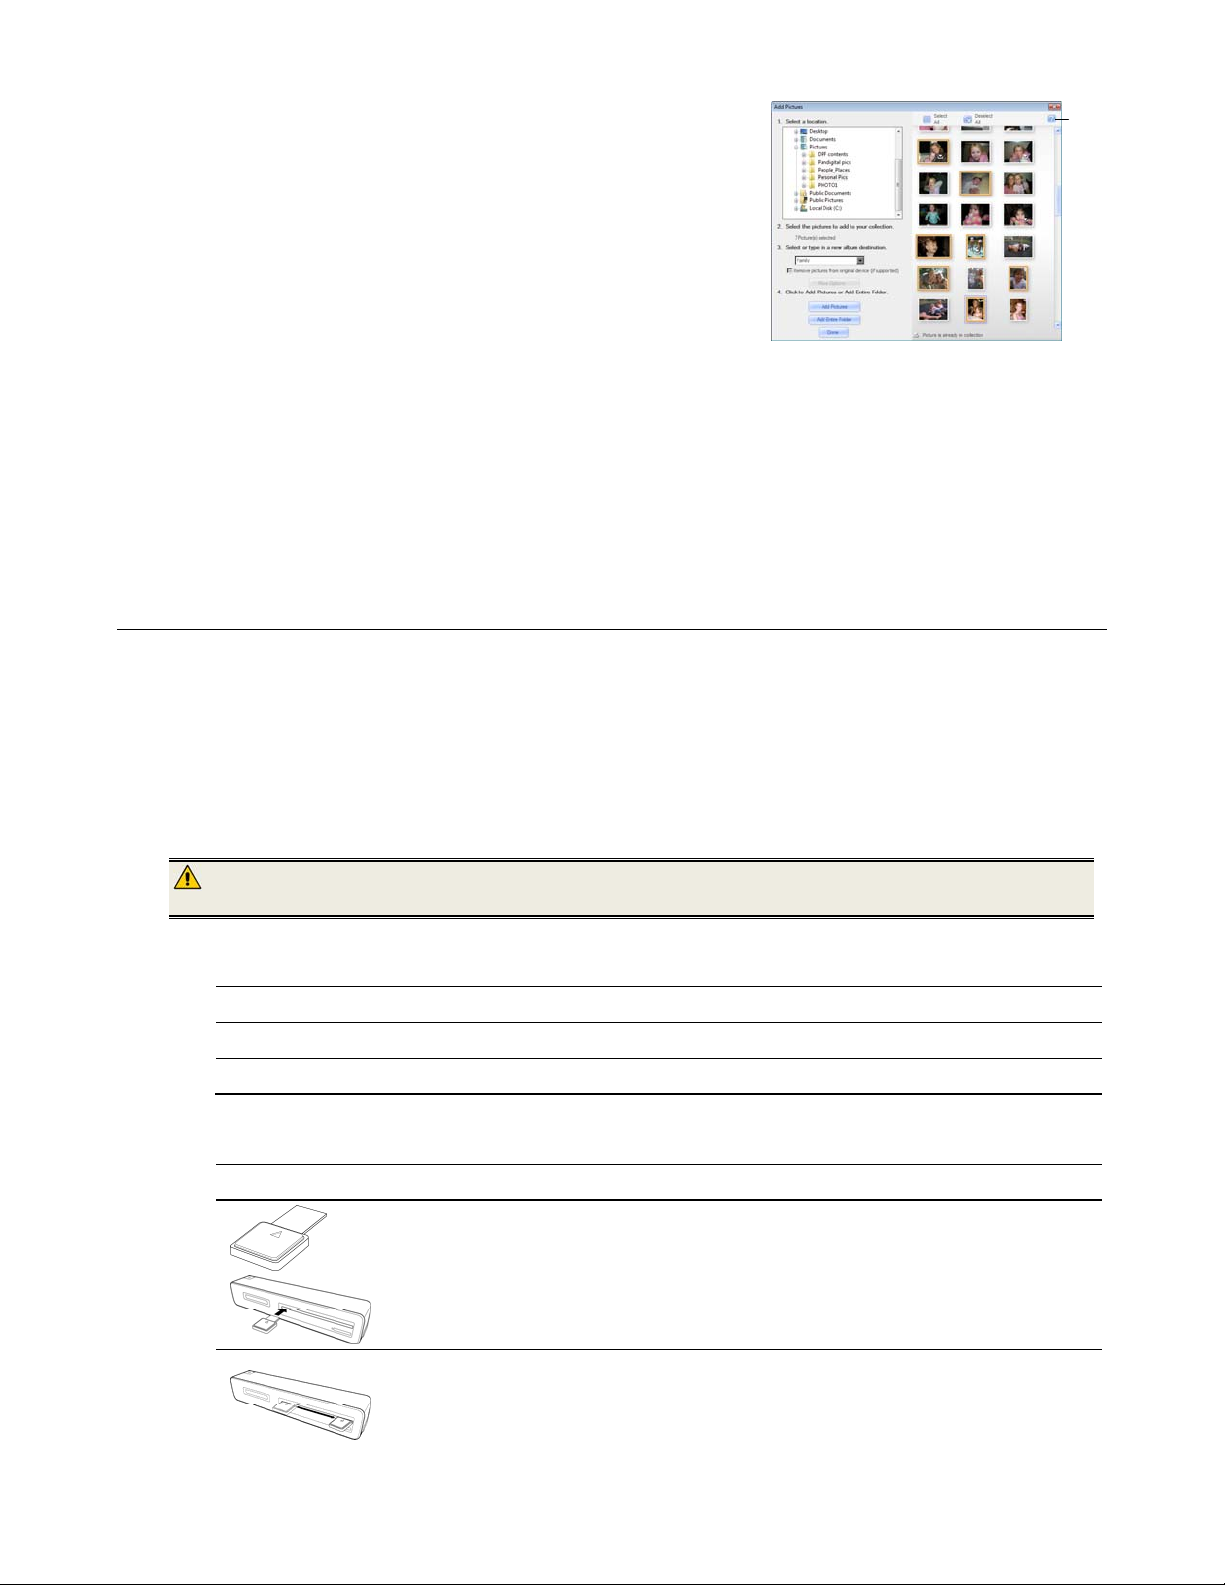
3. Select the PHOTO1 folder containing the scanned pictures (as
designated during the Scan PC usage, pg. 16).
4. Select the desired pictures to add to an Album.
5. Enter a new Album destination name.
6. Click
7. Using the top row of options in the EASYSHARE window, pictures that
8. Use the
Add Pictures, and then Done.
you’ve copied into Albums can be edited and enhanced, copied to
other locations, and uploaded directly into your FACEBOOK or
FLICKR accounts for quick and easy sharing.
Help for complete usage instr u ctions on all featu res.
Uninstall the KODAK EASYSHARE Software
1. Open WINDOWS Control Panel.
2. WINDOWS VISTA: Select
WINDOWS 7: Select
WINDOWS XP: Select
3. Select
4. Follow the prompts to complete.
Kodak EASYSHARE Software, and then click Uninstall.
Programs>Uninstall a Program
Programs and Features
Add or Remove a Program
Scanner Maintenance
Cleaning the Scanner
In order to maintain the scanned image quality and prevent dust accumulation, it is recommended that you clean the
scanner (outer casing, image sensor and roller inside the scanner) approximately every 50-100 scans.
Clean the scanner also if:
vertical lines or stripes appear on the scanned picture
photos or filmstr i p will not feed
Use only the recommended and supplied tools to clean the scanner.
WARNING: Do not use any solvents or corrosive liquid (i.e., alcohol, kerosene, etc.) to clean any part of the scanner.
Otherwise the plastic material will be permanently damaged.
Clean the Outer Casing
1. Use a suitable dust blower to blow off the dust on the scanner.
2. Use a slightly dampened cloth to wipe off any smears on the surface of the scanner.
3. Wipe the scanner with a dry and clean lint-free cloth.
Clean the Photo Image Sensor
1. Clean the scanner’s outer casing first.
2. With the scanner turned off and disconnected from the power supply, insert the photo image
sensor cleaning swab into one end of the photo output slot.
Make sure there is no visible dust on the swab before inserting it into the output slot.
3. Gently slide the swab back and forth from one end of the slot to the other, five or six times
consecutively.
Do not apply too much force on the swab.
18 Customer Support: http://www.pandigital.net/kodaksupport
Page 19
4. Remove the swab from the slot and store it in a safe place, protected from dust.
Clean the Transparency Image Sensor
1. Clean the scanner’s outer casing first.
Clean the Roller
1. Clean the scanner’s outer casing first.
2. With the scanner turned off and disconnected from the power supply, insert the photo image
sensor cleaning swab into one end of the transparency output slot.
Make sure there is no visible dust on the swab before inserting it into the output slot.
3. Gently slide the swab back and forth from one end of the slot to the other, five or six times
consecutively.
Do not apply too much force on the swab.
4. Remove the swab from the slot and store it in a safe place, protected from dust.
2. With the scanner turned off, press and hold the Power button for 5 seconds. The scanner
enters into the cleaning mode. The Power and Status/Card indicators are on.
3. Insert the supplied roller cleaning sheet into the transparency feed slot as shown.
Note the direction of the white sponge on the sheet when inserting.
Make sure that there is no visible dust on the sheet before inserting it into the feed slot.
Calibrate the Scanner
If the scanned picture looks fuzzy or there are strange stripes on it, the scanner may need calibrating in order for the sensor to
resume its original precision.
Follow the instructions beginning on page 18 to clean the roller and the image sensor, and then follow the instruction in “Initial
Setup” on page 8 to prepare the scanner for scanning.
The cleaning sheet is brought into the feed slot automatically, and the cleaning process begins.
During the cleaning process, the Power and Status/Card indicator lights blink slowly and
simultaneously.
When the cleaning process is completed, the cleaning sheet is ejected from the feed slot, and the
power indicator lights go off.
4. Remove the cleaning sheet. Store it in a safe place and protect it from dust.
Customer Support: http://www.pandigital.net/kodaksupport 19
Page 20

Insert the calibration card into the photo feed slot as shown.
The scanner scans the pattern on the calibration card and performs calibration to the sensor inside
automatically.
Make sure that the calibration card is inserted in the correct direction. Otherwise the calibration
won’t work.
Notes on Battery Usage
We recommend using rechargeable Ni-MH type batteries for optimal number of scans. Rechargeable battery life in 600dpi
averages 100+ scans per charge. Actual battery life may vary based on usage.
We do not recommend or support alkaline batteries. For acceptable battery life, and to make sure your scanner operates
dependably, use recommended batteries.
Note that there is no battery charging function in the scanner.
Always ensure that the batteries are installed with the positive and negative terminals in the correct direction as shown in the
battery compartment.
Different types of batteries have different characteristics. Do not mix different types.
Do not mix old and new batteries. Mixing old and new batteries shorten battery life or causes chemical leaks from the old
batteries.
Chemicals which leak from batteries may cause skin irritation. If any chemical matter seeps out of the batteries, wipe it up
immediately using a dry cloth, and replace the batteries as soon as possible.
When the scanner indicates “battery low” in “ready for use” status, replace batteries before beginning a scan to avoid the
scanner from stopping during the scan.
Storing the Scanner
If the scanner will not be used for a prolonged period of time, follow the instructions below to store the scanner for future use.
1. Disconnect the scanner from power supply.
2. Place the scanner and power adapter in a box or bag to keep them from accumulating dust.
3. Place it in a cool and dry place, inaccessible to small children.
4. To avoid warping the top housing, do not place heavy objects on top of the scanner.
5. After long-term storage, it is recommended that you clean and calibrate the scanner before use.
20 Customer Support: http://www.pandigital.net/kodaksupport
Page 21
Technical Specifications
Specification KODAK P461 Personal Photo Scanner
Media Type
Common Document Size 3.5”x5”, 4”x6” and 4x11”
Actual Feed Slot Size up to 4.1” x 12”
Length: 12 inches (304.8mm)
Output file formats JPEG with compression (4:2:2)
Resolution (fixed)
Interfaces
USB Mass Storage Supported WINDOWS 2000 / XP / VISTA / WINDOWS 7
Power
Batteries
Photo feeding
Transparency feeding
Dimensions
Net weight 0.75 lbs (455g)
Operating Temperature
Operating Humidity
Storage Temperature
Storage Humidity
Memory Cards Refer to Supported Memory Cards (pg 7)
USB Mini USB port compatible USB 2.0
Input 100-240V AC, 50/60 Hz, Output 5V, 1A
Takes four AAA (UM-4) batteries (not included). Recommend rechargeable batteries for optimal
number of scans. Rechargeable battery life in 600dpi averages 100+ scans per charge. Actual battery
life may vary based on usage.
Width 4.1 inches (105mm)
Frequently Asked Questions
Photo: Up to 4.1 x 12” (Common use: 3.5x5” and 4x6” photo)
Filmstrip: 35 mm Color / B&W Negative filmstrip
Slide: 35 mm Color / B&W Mounted Slide
Photo: 600x600 dpi (default) and 300x300 dpi
Filmstrip: 1200 x 1200 dpi
Sheet-fed type (single-pass)
Twin roller design
Filmstrip fed with Filmstrip Guide Adapter
Mounted Slides fed with Slide Holder
2.25” (L) x 10.5” (W) x 2” (H)
61.7 mm (L) x 269.3mm (W) x 52 (H) mm
15ºC ~ 35ºC (59oF~95oF);
20% RH ~ 70% RH
-20ºC ~ 60ºC (59oF~95oF);
10% RH ~ 90% RH
Q: What would cause strange lines on the scanned picture or unclear?
A: Check the following:
Are there scratches on the original, or is the original clean? Remove any stains or dust from the original before scanning.
Has the scanner been used for a long period of time without cleaning and calibration? Follow the instructions for "Cleaning
the scanner" on page 18 and “Calibrating the scanner" on page 19, and then try again.
Q: Why isn’t the scanned filmstrip image rotating properly?
The current “auxiliary” OCR capability has difficulty distinguishing the direction of some numbers, (i.e.,“6”, “9”). If the number’s
A:
position is near the edge of the filmstrip, it can easily be worn out or damaged, and then it can’t be detected in the expected
position, or meet the required conditions causing the Auto Mirror/Flip function to be disabled
indicator on the filmstrip guide adapter to re-scan the filmstrip.
Q: How do I clear an original that is stuck halfway in the feed slot?
A: Press the Power button; the scanner ejects the original so you can remove the jammed original from the feed slot in
photo/slide scanning, and Transparency output slot in filmstrip scanning.
Customer Support: http://www.pandigital.net/kodaksupport 21
(see page 10).
Please follow the
Page 22

Q: What would cause the status indicator to blink rapidly and not scan?
A: Check the following:
Is the memory card inserted properly into the memory card slot? Re-insert the card and try again.
Is the memory card locked (set to write-protect)? Unlock the card.
Is the memory card full? The indicator blinks when the free space on the memory card is below 1MB. Use another card if
necessary.
Make sure the memory cards are in FAT or FAT32 file formats only, not NTFS or any other file format. Reformat the
memory card if necessary to use it with the scanner.
Did you insert the next original before the scanning process of the previous one was completed? Power the scanner off
and back on and try again. Make sure that you scan the next original only after the scanning process of the previous one
has completed.
Does the length of the original exceed the maximum acceptable size? Refer to "Suitable and Unsuitable Original Types"
on page 6 for more information.
Q: Should the scanner feel warm to the touch?
A: It is no rmal for the scanner to emit a small a mount of heat (around 30-45
strange odors coming from the scanner or the scanner feels hot to the touch, disconnect the scanner immediately from the
power supply or the PC. (Refer to safety precaution – use only included power adapter; page 3.)
Q: What would cause the scanner to shut down in the middle of a scan?
A: Check the following:
If powered by battery, please remove and replace batteries, and then re-start the scanner.
If powered by the power supply, please disconnect the power supply, re-connect, and then re-start the scanner.
If the original is stuck in the feed slot, press the Power button and the scanner ejects the original.
Q: Why do I get only 10-20 scans when powering by battery?
A: We recommend using
100+ scans per charge. Actual battery life may vary based on usage. We do not recommend and do not support alkaline
batteries.
rechargeable
batteries for optimal number of scans. Rechargeable battery life in 600dpi averages
o
C) after prolonged use. However, if there are
For any other questions not answered here, please contact Customer Support at 1-800-715-5354.
Upgrading Software and Firmware
We occasionally update firmware (the software that runs on the scanner). Download the latest versions:
www.pandigital.net/kodaksupport.
Limited Warranty
The limited warranty set forth below is given by Pandigital with respect to Pandigital brand electronics products purchased and
used in the United States of America. Pandigital warrants this product against defects in material or workmanship as follows:
LABOR: For a period of one (1) year from the date of purchase, if this product is found to be defective, Pandigital will repair or
replace the product, at its option, at no charge. After this one (1) year, labor charges will be charged on a case by case basis.
PARTS: For a period of one (1) year from the date of purchase, if this product is found to be defective, Pandigital will supply at no
cost, new or rebuilt replacement parts, at its option, at no charge. Af ter this one (1) year period, parts will be charged for on a case
by case basis. Modifications not approved by the party responsible for compliance could void user’s authority to operate the
equipment.
This warranty does not cover: (1) customer instruction, installation or setup; (2) cosmetic damage or damage due to accident,
misuse, abuse or negligence; (3) commercial use of the product; (4) modification of any part of the product; (5) damage due to
improper operation, improper maintenance, or connection to an improper power supply; (6) loss of data, regardless of value or
format, that may result through proper and/or improper use of the product; (7) damage due to an attempted repair of the product
by anyone other than a facility authorized by Pandigital to service the product; (8) consumables (such as fuses and batteries). This
warranty is valid only in the United States.
The product must be accompanied by a copy of the original retail purchase receipt. If no proof of purchase is attached, the
warranty will not be honored and repair costs will be charged. This warranty is only valid with written documentation detailing the
complaint attached to the outside or inside of the carton. This warranty is invalid if the factory applied serial number has been
altered and or removed from the product. This warranty does not provide protection for the loss of data, regardless of format.
Pandigital reserves the right to modify and design this product without prior notice, written or otherwise.
To obtain warranty service, you must deliver the product freight prepaid in either its original packaging or packaging affording an
equal degree of protection, plus proof of purchase.
Repair or replacement as provided under this warranty is the exclusive remedy of the consumer. Pandigital, its parent company,
affiliates or subsidiaries, shall not be liable for any incidental or consequential damages for breach of any expressed or implied
warranty on this product. Except to the extent prohibited by applicable law, any implied warranty of merchantability or fitness for a
particular purpose on this product is limited in duration to the duration of this warranty.
Some states do not allow the exclusion or limitation of incidental or consequential damages, or allow limitation on how long an
implied warranty lasts, so the above limitations or exclusions may not apply. This warranty gives you specific legal rights, and you
may have other rights, which vary from state to state.
22 Customer Support: http://www.pandigital.net/kodaksupport
Page 23

All content included on the Pandigital website as well as Pandigital products, including pre-loaded demonstration images, digital
media, digital cookbooks, text, graphics, logos, designs, photographs, button icons, images, audio/video clips, digital downloads,
data compilations, and software, is the property of Pandigital or its suppliers and is protected by United States and international
copyright laws or other intellectual property laws and treaties. Said content shall not be reproduced or used without express written
permission from Pandigital and its suppliers respectively.
Use of this product constitutes acceptance of these terms and conditions of warranty.
Technical support telephone number: 1-800-715-5354.
FCC Statement
FCC Part 15 Information
This equipment has been tested and found to comply with the limits for a Class B digital device, pursuant to Part 15 of the
Federal Communication Commission (FCC) Rules. These limits are designed to provide reasonable protection against
harmful int e rference in a res idential installation.
This equipment generates, uses, and can radiate radio frequency energy and if not installed and used in accordance with
the instructions, may cause harmful interference to radio communications. However, there is no guarantee that interference
will not occur in a particular installation.
If this equipment does cause harmful interference to radio or television reception, which can be determined by turning the
equipment off and on, the user is encouraged to try to correct the interference by one or more of the following measures:
Reorient or relocate the receiving antenna.
Increase the separation between the equipment and receiver.
Connect the equipment to an outlet on a circuit different from that to which the receiver is connected.
Consult the dealer or an experienced radio/TV technician for help.
Waste Electrical and Electronic Equipment/Battery disposal
In Europe: For human/environmental protection, it is your responsibility to dispose of this equipment and batteries at a
collection facility established for this purpose (separate from municipal waste.) For more information, contact your
retailer, collection facility, or appropriate local authorities; or go to www.kodak.com/go/recycle. Product weight: 130 g
(4.6 oz) including card and battery.
Pandigital Copyright 2010.
Kodak and Kodak trade dress are trademarks of Kodak used under license.
EasyShare is a trademark of Kodak.
Customer Support: http://www.pandigital.net/kodaksupport 23
Page 24

Français
Page 25

Table des matières
Veuillez d’abord lire ces instructions ........................................................................................ 3
Précautions importantes de sécurité ..................................................................................... 3
Introduction .................................................................................................................................. 4
Vue générale du Scanneur .......................................................................................................... 4
Indicateur lumineux du scanneur ............................................................................................... 6
Types de Documents originaux adaptés et inadaptés ............................................................. 6
Cartes mémoire supportées ............................................................................. .......... .......... ...... 7
Orientation de la photo originale et de l’image scannée ....................................................... .. 8
Utilisation du Scanneur .............................................................. .... ..... ..... ................................... 8
La préparation et Installation Initiale ...................................................................................... 8
Installation des Piles ........................ ..... .............................................................. ..... ..... . 8
Scanner une photo ..................................................... ..... ..... ..... .... ..... ..... .............................. 9
Scruter 35 mm Négatifs et Glisse ........................................................................................ 10
Insertion des films fixes ............................................................. .......................................... 11
Diapositives encadrées de scannage .................................................................................. 12
Recadrage automatique d’image ......................................................................................... 12
Connecter le Scanneur à un PC ............................................................................................... 13
Configuration nécessaire ..................................................................................................... 13
Protocole de dénomination des photos scannées ............................................................... 15
Pour déconnecter de façon sûre le scanneur du PC ........................................................... 15
Logiciel Scan PC pour le Scanneur de photos personnelles KODAK .................................. 15
Pour installer le logiciel Scan PC ................................................... ..... ..... ..... .... ..... .............. 16
Pour utiliser le logiciel Scan PC ........................................................................................... 16
Désinstaller le logiciel Scan PC ............... ..... ..... ..... .... ..... ..... .... ........................................... 16
Logiciel KODAK EASYSHARE pour PC ................................................................................... 17
Système requis .................................................................................................................... 17
Pour installer Logiciel KODAK EASYSHARE ...................................................................... 17
Launch Logiciel KODAK EASYSHARE ............................................................................... 17
Désinstaller le logiciel KODAK EASYSHARE ....................... .... ..... ...................................... 18
Entretien du scanneur ............................................................................................................... 18
Comment calibrer le scanneur ................................................................................................. 20
Utilisation de Piles ...................... ..... ..... .............................................................. .... ..... .............. 20
Ranger le Scanneur ................................................................................................................... 20
Spécifications techniques ......................................................................................................... 20
Questions fréquentes ... .... ..... ..... .............................................................. ................................. 21
Mise à jour du Logiciel et du Micrologiciel .............................................................................. 22
Limite de la garantie .................................................................................................................. 22
Déclaration FCC .................................................................................................... ..... ..... .... 22
Gaspiller disposition Electrique d'Equipement/Pile et Electronique ..................................... 23
2 Assistance aux utilisateurs : http://www.pandigital.net/kodaksupport
Page 26

Veuillez d’abord lire ces instructions
Veuillez lire attentivement ces importantes instructions de sécurité avant d’utiliser le Scanneur de photos personnelles KODAK. Si
vous ne suivez pas ces instructions, vous risquez de souffrir des lésions personnelles ou d’endommager le scanneur.
Précautions importantes de sécurité
Respectez toujours ces précautions élémentaires de sécurité lorsque vous utilisez votre Scanneur. Ceci contribuera à
réduire les risques d’incendie, d’électrocution et de blessures
N’exposez pas cet appareil à la lumière directe du soleil et ne le mettez pas à proximité des sources de
chaleur, notamment dans un véhicule fermé et exposé au soleil ou à proximité d’un four. Le boîtier externe
de cet appareil peut être déformé et les capteurs perfectionnés qui se trouvent à l’intérieur peuvent être
endommagés en raison d’une chaleur excessive
Ne pas utilisez cet appareil près d’une source d ‘eau ou sous la pluie et ne laissez aucun liquide y
pénétrer. L’eau et l’humidité peuvent provoquer des courts-circuits dans les composants électroniques et
aboutir à des dysfonctionnements
Ne pas utilisez cet appareil dans un environnement poussiéreux. Les particules de poussières risquent de
se déposer sur l’appareil et d’abîmer le document original. Ne scannez pas les documents originaux
contaminés par des poussière s ou d’autres particules.
N’utilisez pas cet appareil à proximité des sources électromagnétiques puissantes, telles qu’un four à
micro-ondes ou une télévision. Les interférences électromagnétiques peuvent causer le
dysfonctionnement de cet appareil.
Ne tentez pas de démonter ou de modifier cet appareil. Il n’existe aucune pièce de rechange à l’intérieur
de ce Scanneur et des modifications non-autorisées annuleront votre garantie.
Contenu de l’emballage
Assurez-vous que les éléments suivants soient bien présents dans l’emballage. Si vous constatez qu’un objet est
manquant ou endommagé, veuillez immédiatement contacter votre revendeur
Scanneur de pho t os personnelles
Adaptateur de courant AC (différent selon les régions)
Câble USB
KODAK la Carte mémoire et l'Adaptateur Mobiles
MICROSD
Adaptateur pour négatif 35mm
35 mm Glisser Support
Ne laissez pas tomber cet appareil et ne le soumettez pas à des chocs/vibrations. Les chocs violents
peuvent endommager les composantes internes
N’insérez aucun objet dans les lecteurs de cartes de ce Scanneur, excepté les cartes mémoires
compatibles. Les bornes de contact métallique se trouvant à l’intérieur des fentes peuvent être facilement
endommagées par des corps étrangers
N’utilisez pas d’adaptateurs secteurs autres que celui fourni avec ce Scanneur. Il est très dangereux de
brancher ce Scanneur à un adaptateur secteur inconnu, ceci peut provoquer un incendie ou une
explosion.
Certains modèles d’adaptateur comprennent des broches commutables. Lorsqu’il s’avère nécessaire
d’utiliser des broches alternatives, utilisez uniquement les broches fournies avec le Scanneur.
Ne coupez, ne tordez, ne modifiez, ne placez pas des objets lourds ou ne piétinez pas le câble de
l'adaptateur d’alimentation. Sinon, vous risquez d’endommager le revêtement isolant externe et de
provoquer un court-circuit ou un incendie.
La prise d’alimentation et le port USB de ce Scanneur ne sont destinés qu’à être branchés exclusivement
à l’adaptateur secteur et le câble USB optionnel. N’insérer aucun autre objet dans ces prises
Si l’appareil dégage des odeurs étranges ou de la chaleur, ou tout autre signe de dysfonctionnement,
débranchez immédiatement le Scanneur et contactez votre revendeur pour le faire examiner ou répare
Carte de calibrage
Feuille de nettoyage du rouleau
Ecouvillon de nettoyage de capteurs de transparence et d’image
Scanner le logiciel PC (sur carte MICROSD)
Logiciel KODAK EASYSHARE (sur carte MICROSD)
Guide de démarrage rapide et Guide d’utilisateur
Assistance aux utilisateurs : http://www.pandigit a l.net/kodaksupport 3
Page 27

Introduction
Maintenant vous pouvez scanner vos photos imprimées, film fixes négatifs et Diapositives, et les sauvegarder dans votre carte
mémoire. Vous n’avez pas besoin d’un ordinateur. Insérer simplement une carte mémoire dans le scanneur et allumez-le. Lorsque
l’unité est prête, insérer votre photo imprimée, film fixe négatif ou diapositive dans le scanneur et vos images seront sauvegardées
sur la carte mémoire. Aussi simple que cela.
Si vous voulez transférer vos photos directement à votre PC, c’est tout aussi simple au moyen d’un câble USB et de notre logiciel
Scan PC (page 15).
Vue générale du Scanneur
Vue de face
No. Nom Fonction/ Description
Appuyer une fois pour mettre en marche sur mode 600ppp(par défaut) ; appuyer à nouveau
pour le mode 300 ppp.
Touche de Mise en
Marche
Appuyer et maintenir pendant 1secondes pour éteindre.
Si une image originale est bloquée dans la fente d’insertion ( et ), appuyer pour le
retirer du scanneur en mode de scannage photo/diapositive et faite circuler vers l’avant en
mode scannage de film fixe.
Indicateur de marche Indique l’état de marche du sc a nn eu r. (Voir “Indicateurs lumineux” page 5)
Indicateur d’état/de
carte
Fente d’insertion de
transparence
Niveau de guide de
feuille
Fente d’insertion de
photo
Guide d’orientation Indique la position correcte et l’orientation de la photo originale pour un scannage adéquat.
Connecteur de
courant
Mini connecteur USB Pour connecter à un ordinateur au moyen d’un câble USB
Indique l’état de fonctionnement du scanneur et de la carte mémoire. (Voir “Indicateurs
lumineux” page 5)
Pour scruter des transparences aiment 35 mm les films pour projection fixe et 35 mm les
chutes – exige 35 mm l'adaptateur de guide de film pour projection fixe ou 35 mm le portechute.
Faites glisser le guide pour ajuster aux dimensions des petites images originales afin
d’assurer un alignement convenable.
Pour le scannage d es images non transp arentes comme les ph o t os et les cartes d’affaires.
Pour connecter l’adaptateur de courant électrique
4 Assistance aux utilisateurs : http://www.pandigital.net/kodaksupport
Page 28

Vue arrière
No. Nom Fonction/ Description
Fente de sortie de
transparence
Fente de sortie de
photo
Fente pour cartes
SD/xD/MMC/MS
La transparence scannée (comme les films fixes ou les diapositives encadrées) sort de cette
fente.
L’original non transparent scanné (comme les photos et les cartes d’affaire) sort de cette
fente.
Accepte les types de cartes mémoire suivantes : SD, xD, MMC et MS. Accepte aussi les
cartes MICROSD avec un adaptateur SD. (Voir "Cartes mémoire supportées" page 7.)
Vue de bas
Compartiment piles
Pour l’installat ion de quatre
piles AAA (UM-4)
(les piles n'ont pas inclus)
Il est recommandé d'utiliser des piles rechargeables du type NiMH. Nous ne supportons pas et nous ne
recommandons pas des piles alcalines. Pour une durée de vie acceptable de vos piles et pour permettre un
fonctionnement assuré de votre scanneur, utilisez les piles recommandées.
Recommander l’utilisation des piles du type rechargeable NI-MH.
Il n’existe aucune fonction de recharge de piles dans le scanneur.
Assistance aux utilisateurs : http://www.pandigit a l.net/kodaksupport 5
Page 29

Indicateur lumineux du scanneur
Ci-dessous figure une liste des modèles d’indicateurs lumineux et des fonctions qu’ils représentent
Clignote lentement
Cl ignote rapidem e nt
Régulièrement allumé
Eteint
Mise en
marche
(vert)
(vert)
Etat
/Carte
(orange)
(vert)
(couleur)
(couleur)
(couleur)
La configuration de la résolution du scannage est indiquée par la couleur de l'indicateur
d’état/carte
600ppp (par défaut) – Le scanneur est prêt pour être utilisé en mode 600ppp (par défaut).
300ppp – Une fois que le scanneur est en mode 600ppp, appuyez à nouveau sur le bouton de
marche pour mettre sur le mode 300ppp.
Système d’initialisation et de carte mémoire. Veuillez attendre que le processus d’initialisation
termine avant d’utiliser le scanneur
Occupé à scanner et à garder des fichiers d’image. Veuillez attendre que le processus termine
avant de scanner une autre photo
Bourrage de feuilles. Appuyer la touche de mise en marche. Le scanneur éjectera le document
original afin que vous puissiez retirer le document original bloqué de la fente d’insertion en mode de
scannage photo/diapositive et la fente de sortie de la transpar ence en mode de scannage du film
fixe.
Erreur de calibrage. Veuillez contacter votre centre de service le plus proche pour assistance.
Aucune carte mémoire, carte pleine (espace libre inférieure à 10Mo), erreur de carte, carte mémoire
verrouillée ou le système fichier n’est pas pris en charge. Supprimer des fichiers de la carte pour
créer de l’espace, déverrouiller la carte si elle est verrouillée ou essayer une autre carte.
(couleurr)
(vert)
Niiveau de pile faible.
Le scanneur est mis en arrêt.
Types de Documents originaux adaptés et inadaptés
Documents originaux adaptés
Le Scanneur est conçu pour obtenir les meilleurs résultats en numérisant les documents originaux de types suivants° (sans
utiliser l’enveloppe protectrice plastique)
Photos 3,5”x5” et 4”x6” (taille max 4,1”x12”)
Cartes de présentation (épaisseur max 1,0mm)
35 mm les négatifs (1-6 cadre non monté avec 35 mm le Guide de Film pour projection fixe)
35mm mounted slides (with 35mm Slide Holder)
Documents originaux inadaptés
N’utilisez pas le Scanneur pour numériser les types de documents suivants, sinon, vous risquez de provoquer un
dysfonctionnement de l'appareil ou un bourrage de la fente d'insertion des documents
Documents originaux de plus d' 1,0 mm d’épaisseur
Documents originaux avec un côté de moins de 55 mm
Documents originaux comportant une grande proportion de noir ou de couleurs sombres
Documents originaux dont les rebords sont de couleur sombre
Images imprimées (images de journaux, magazines, etc.)
Matériaux doux et fins (papier fin, tissus, etc.)
Film fixe/diapositives surexposées. Pour éviter une faille de l’auto-détecteur, retirez les film fixes surexposés du début du
film fixe avant de l’insérer.
6 Assistance aux utilisateurs : http://www.pandigital.net/kodaksupport
Page 30

Documents orig in a ux dont les dimensions dépassent la taille acceptable suivante°
35 mm les films pour projection fixe négatif/monochromes sont peu appropriés avec n'importe lequel des
conditions suivantes:
Longueur : 12 pouces (304.8mm)
Largeur 4,1 pouces (105mm)
1. Les extrémités du film fixe sont scotchées. Enlevez le scotch et nettoyez tout reste de colle
avant de scanner
2. Les extrémités du film fixe n’ont pas été coupées droit. Coupez-les comme il faut avant de
scanner.
3. Les extrémités du film fixe sont pliées. Coupez les bouts pliés avant de scanner
4. Les extrémités du film fixe sont édentées. Coupez-les droit avant de scanner
5. Certaines perforations sur le film fixe sont déchirées ou manquantes. Cela peut affecter le
Cartes mémoire supportées
MS (MemoryStick)
MS Pro
MS Pro Duo (adaptateur requis
MS Duo
MMC (Carte Multimédia).
RS-MMC (adaptateur requis)
mécanisme automatique d’alimentation du scanneur. Pousser soigneusement le film fixe
dans l’adaptateur de guide de film fixe si nécessaire.
xD (extreme Digital, type H et type M)
SD (Secure Digital)
SDHC
MINISD (adaptateur requis)
MICROSD/T-Flash (adaptateur requis)
Carte MICROSD (adaptateur SD requis)
Assistance aux utilisateurs : http://www.pandigit a l.net/kodaksupport 7
Page 31

Orientation de la photo originale et de l’image scannée
r
r
Il est facile de voir comment l’image numérisée apparaîtra sur votre ordinateur. Note: Vous pouvez faire tourner vos images sur
votre ordinateur
Scanneu
Original
Image scannée quand
elle s’affiche sur l’écran
Scanneu
Original
Si vous scannez une même photo en diverses positions, il se peut que l’image numérisée présente des légères différences de
tons de couleur et de luminosité. Il ne s’agit pas d’un mauvais fonctionnement
Utilisation du Scanneur
La préparation et Installation Initiale
Lorsque les deux sources d’alimentation sont disponibles, le scanneur tirera sa source d’alimentation uniquement de la
source d’alimentation externe.
Piles de type rechargeable recommandées Ni-MH. (Il n’existe aucune fonction de recharge de piles dans le scanneur.)
Installation des Piles
1. Tourner le scanneur et ouvrir le couvercle du compartiment piles.
2. Installer quatre piles AAA (UM-4). Assurez-vous que les piles soient correctement installées
conformément aux indications prévues dans le compartiment piles.
3. Refermer le couvercle du compartiment piles.
4. Brancher la fiche sur le câble de l’adaptateur d'alimentation sur le connecteur d’alimentation du
scanneur.
5. Brancher l’adaptateur d’alimentation sur une prise de courant.
Le type de prise de courant et de prise femelle illustrées peut être différent de ceux de votre
8 Assistance aux utilisateurs : http://www.pandigital.net/kodaksupport
région.
Insérer le KODAK Carte Mobile MICROSD dans l'adaptateur de SD (a inclus) ou un ouvert (writable)
la carte mémoire dans l'entaille de carte mémoire.
Toujours insérer une carte mémoire avant le scannage.
Assurer vous que la carte mémoire insérée est déverrouillée (réinscriptible).
Le scanneur n'accepte que les cartes mémoires sous système fichier FAT16 ou FAT32. Le NTSF et
les autres systèmes fichiers ne sont pas pris en charge.
Page 32

Mettre le scanneur en marche
t
1. Appuyez sur le bouton Marche. Les indicateurs lumineux de marche et d’état/carte clignotent. (Pour plus
d’information sur les indicateurs lumineux, voir la partie “Indicateurs lumineux ” page 5.)
2. Attendez que l’indicateur de marche cesse de clignoter et s’arrête. L’indicateur d’état/carte se stabilisera,
pour indiquer que le scanneur est prêt.
N’insér ez pa s d e photo originale dans la fe nte d’alimentation pendant que l’indic ateur de marche
clignote, car la photo ne sera pas scannée
Configuration de la Résolution du Scannage
La résolution du scannage est mesurée en ppp (point par pouce). Au fur et à mesure que le ppp s’accroît, plus de détails
seront capturés sur l’original par le scanneur et produira ainsi une meilleure qualité d’image scannée. Cependant, un ppp
élevé aboutit à une taille d’image plus grande et occ up e plus d’espace sur la carte mémoire.
1. Pour changer la résolution de scannage, appuyer et lâcher la touche de mise en marche. La résolution de
scannage change à chaque appui de la touche et la couleur de l'indicateur d'Etat/Carte changera selon la
résolution sélectionnée :
Orange: 600ppp (mode fin, par défaut)
Vert : 300ppp (mode normal)
La résolution du scannage pour les transparentes est fixées à 1200ppp et ne peut être changée.
2. Veuillez attendre jusqu’à l’arrêt du clignotement de l’indicateur de mise en marche, puis éteindre. L’indicateur
d’Etat/Carte restera constant indiquant que le scanneur est prêt.
Ne pas insérer un original dans la fente d’insertion lorsque l’indicateur de mise en marche clignote ; sinon
l'original ne sera pas scanné.
Scanner une photo
alignemen
à gauche
1. Avec l’image de la photo tournée vers le haut et correctement orientée, placez un bord de la photo
dans le scanneur et ajustez le petit levier guide de telle sorte que la photo soit alignée sur le côté
gauche de la fente d’alimentation
ATTENTION : Ne scannez pas de photos brillantes dans un environnement humide (humidité
supérieure à 70% RH). la surface de la photo deviendra collante et pourrait
provoquer un blocage du scanneur.
2. Insérez la photo tout en l’aplanissant dans la fente d’alimentation
La photo sera insérée à travers la fente et numérisée automatiquement ; les indicateurs lumineux de
marche et d’état/carte clignotent au moment du scannage
Afin d’éviter de diminuer la qualité de l’image, prévoyez un espace suffisant à l’arrière du
scanneur pour que la photo termine d’être scannée complètement
Une fois le scannage terminé, les indicateurs lumineux de marche et d’état/carte clignotent pendant
que le scanneur gar de la photo dans la ca r t e mémoire.
Attendez jusqu’à ce que les indicateurs aient cessé de clignoter pour insérer et scanner la photo
suivante.
Assistance aux utilisateurs : http://www.pandigit a l.net/kodaksupport 9
Page 33

ATTENTION : Insérez seulement une photo à la fois, et insérez la suivante seulement lorsque la photo précédente est
Toujours placer le scanneur sur une surface plane pour scannage. Ne pas tenir le scanneur pendant le scannage.
Ne pas retirer la carte mémoire ou débrancher la source d’alimentation ou les piles pendant que les indicateurs
clignotent.
Ne pas retirer les piles pendant le scannage.
Ce scanneur produit des formats de fichier JPEG (.jpg). La fonction date et heure ne sera pas ajoutée.
Veuillez ne pas insérer l’adaptateur de guide de film fixe ou la pochette à diapositives dans la fente d’insertion de la
transparente pendant le scannage d’une photo.
Pour plus d’information sur la manière dont ce scanneur stocke les fichiers d’images scannées dans la carte mémoire,
reportez-vous à la section “Orientation”.
Si la carte mémoire est presque pleine (moins d‘ 10Mo restant), l’indicateur d’état/carte clignote (voir la section
“Indicateurs Lumineux” page 5). Utilisez une autre carte ou transférez des images à votre ordinateur.
finie, sinon le scanneur pourrait mal fonctionner.
Pour mettre en arrêt le scanneur, appuyer et tenir la touche de mise en marche pendant une seconde.
L’indicateur d’alimentation clignotera puis s’arrêtera.
Présentement vous pouvez débrancher en toute sécurité la source d’alimentation et retirer la carte mémoire du
scanneur.
Le scanneur s’arrêtera automatiquement s’il est inactif pendant 5 minutes. (s’il est connecté à un ordinateur,
le scanneur ne s’arrêtera pas automatiquement.)
Scruter 35 mm Négatifs et Glisse
Ce scanneur ne prend en charge que les films fixes non encadrées 6-cadre négatif/monochrome de 35 mm et les chutes
de 35 mm généralement disponibles dans vos studios photo locaux.
Les films fixes qui présentent des conditions particulières ne sont pas adaptés pour être scannés. Reportez-vous à la
partie Types de photos adéquats et inadéquats.
Image en auto-miroir/auto-inversé
Le scanneur peut détecter l’orientation d’un film fixe quand les nombres imprimés sur le bord du film fixe sont dans le
même sens que l’image
Si vous introduisez le film fixe avec l’image en miroir ou à l’envers, le scanneur ajustera automatiquement l’image
numérisée durant le scannage.
Les orientations suivantes donneront la même image scannée :
Pas de rotation requise
Par exemple, l’image du bas (juste au-dessus) est à l’envers mais les numéros sont bien alignés. Si l’image
est introduite dans ce sens, elle ne sera pas tournée, et en résultat l’image scannée restera à l’envers.
La capacité de reconnaissance en cours manifeste des difficultés de distinction de la direction des chiffres
"3", "6", "8" et "9". Si la position des chiffres est proche de l’extrémité du film fixe, il peut facilement être
usé ou endommagé. Lorsque le chiffre du bout de bande ne peut être détecté dans la position attendue ou
répond aux conditions exigées ci-dessus, la fonction Miroir/Réflexion automatique sera désactivée.
En auto-miroir
En auto-inversé
Si les numéros et l’image ne sont pas dans le même sens ou si les nombres sont abîmés,
la fonction auto-miroir/auto-in versé n’opérera pas la rotation de l’image
Image finale scan née
10 Assistance aux utilisateurs : http://www.pandigital.net/kodaksupport
Page 34

Insertion des films fixes
1. S’assurer que la fente d'insertion de transparente ne contient aucun original et qu’il y a assez d’espace derrière le scanneur
pour le film fixe pour entièrement alimenter l’unité.
2. Insérer l’adaptateur de film fixe dans la fente d’insertion jusqu’à ce qu’il soit fixé en place, comme indiqué
ci-contre. Prenez soin de ne pas tordre les parties métalliques de l’adaptateur du guide de film fixe
pendant l'insertion.
Veuillez attendre jusqu’à ce que les indicateurs lumineux soient en état de "Prêt à utiliser" avant de
continuer.
3. Insérer le film fixe dans l'adaptateur de guide
du film fixe.
film fixe ou de la diapositive
4. Le document original sera inséré dans la fente et scanné automatiquement.
La longueur commune de film pour projection fixe est jusqu'à 6 négatifs. Pour empêcher la qualité de
l'image pauvre, la réserve espace suffisant derrière le dispositif de balayage pour le film pour
projection fixe pour compléter le balayage nourrit.
Pendant le scannage du film fixe, le scanneur reconnait automatiquement le type de film fixe
(monochrome ou négatif) et détermine la meilleure mise en valeur de configuration de couleur et de
scannage pour l’opération.
Le scanneur numérise les films fixes avec une résolution plus haute ; par conséquent la vitesse de
numérisation est plus lente que pour la numérisation d’une photo. Il ne s’agit pas d’un mauvais
fonctionnement
Si le flm fixe est retirée du scanneur pendant le scannage, le processus de scannage continuera
pendant quelques secondes puis s’arrâtra. Ceci n’est pas un dysfonctionnnment.
Prenez soin de la direction du
Lorsque le scannage est terminé, les indicateurs de lumière de Mise en Marche et d'Etat/Carte clignotent
pendant que le scanneur sauvegarde la photo sur la carte mémoire.
Veuillez attendre que les indicateurs lumineux arrêtent de clignoter avant d’insérer ou de scanner le p rochain
original.
ATTENTION : N’insérer qu’un seul original à la fois, et n’insérer le prochain original que lorsque le précédent a été
Ne pas retirer la carte mémoire ou débrancher la source d’alimentation ou les piles lorsque les indicateurs clignotent.
Ce scanneur produit ls fichiers en formats JPEG (jpg). La date/heure ajoutée ne sera pas ajoutée.
Veuillez ne pas insérer une photo dans la fente d'insertion photo pendant le scannage des film fixes ou des diapositives.
Si la carte mémoire est presque pleine (moins de 10Mo restant), l’indicateur Etat/Carte clignote (voir “indicateur
lumineux » à la page 5). Utiliser une autre carte ou transférer les images sur votre ordinateur.
Veuillez retirer la diapositive de la pochette à diapositive lorsque vous avez terminé le scannage.
achevé. Autrement, le scanneur pourrait avoir un dysfonctionnement.
Pour retirer l’adaptateur de guide du film fixe après avoir scannés tous les originaux, tirer le soigneusement
de la fente d’insertion de la transparente.
Pour mettre en arrêt le scanneur, appuyez et maintenez le bouton marche pendant une seconde.
L’indicateur de marche clignotera et s’éteindra.
Vous pouvez maintenant déconnecter le courant électrique en toute sécurité et ôter la carte mémoire du
scanneur
Le scanneur s’arrêtera automatiquement s’il reste inactif pendant 5 minutes. (S’il est connecté à un
ordinateur, le scanneur ne s’arrêtera pas automatiquement.)
Assistance aux utilisateurs : http://www.pandigital.net/kodaksupport 11
Page 35

Diapositives encadrées de scannage
1. Assurer vous que la fente d’insertion de la transparence ne contient aucun document original et qu’il dispose d’assez
d’espace derrière le scanneur pour une pochette à diapositives pour entièrement alimenter l’unité.
Prenez soin de la direction de
2. Ouvrir la pochette à diapositives, placer la
diapositive encadrée à l’intérieur de la
pochette comme indiqué et puis fermer la
pochette.
3. Insérer le niveau de pochette à diapositives dans la fente d’insertion de la transparence. L’original
sera inséré dans la fente et scanné automatiquement.
Le scanneur scanne les transparences à une plus haute résolution, par conséquent, la vitesse du
scannage EST plus lente que celle du scannage de photo. Ceci n’est pas un dysfonctionnement.
Lorsque le scannage est terminé, les indicateurs lumineux de Mise en Marche et d’Etat/Carte clignote
pendant que le scanneur sauvegarde la photo sur la carte mémoire.
Veuillez attendre jusqu’à ce que les indicateurs lumineux arrêtent de clignoter avant d'insérer et scanner
le prochain orig in a l.
la diapositive encadrée
ATTENTION : N’insérer qu’un seul original à la fois et n'insérer le suivant que lorsque le précédent a été achevé.
Ne pas retirer la carte mémoire ou débrancher la source d’alimentation ou les piles pendant que les indicateurs cli gnotent.
Veuillez ne pas insérer une photo dans la fente d’insertion photo pendant que le scannage d’une diapositive.
Veuillez retirer la diapositive de la pochette à diapos it ives lorsque le scannage est terminé.
Ce scanneur produit les fichiers en format JPEG (jpg). Les attributs de date/d’heure ne seront pas ajoutés.
Si la carte mémoire est presque pleine (moins de 10Mo restant) l’indicateur Etat/Carte clignote (voir “Indicateur lumineux”
à la page 5). Utiliser une autre carte ou transférer les images sur votre ordinateur.
Autrement, le scanneur pourrait connaître un dysfonctionnement.
Pour mettre en arrêt le scanneur, appuyer et retenir la touche de mise en marche pendant une
seconde. L’indicateur de mise en marche clignotera puis s’arrêtera.
Présentement, vous pouvez débrancher en toute sécurité l’alimentation et retirer la carte mémoire du
scanneur.
Le scanneur s’arrêtera automatiquement s’il est inactif pendant 5 minutes. (S’il est connecté à un
ordinateur, le scanneur ne s’arrêtera pas automatiquement.)
Recadrage automatique d’image
Le Scanneur dispose d’une fonction intégrée de recadrage qui détecte et coupe les bords sombres d’une image originale
au cours de la numérisation (voir illustration ci-dessus).
Taille de recadrage (telle que mesurée sur l'original)
1,5mm
Max.
Max. 1,5mm
Max.
1,5mm
Utilisez l’enveloppe plastique quand vous scannez des photos originales dont la taille ou la forme est différente de la taille
standard 3.5”x5” ou 4”x6”. Selon la forme, il vous est possible de réaliser d’autres découpages manuels sur l’image
scannée, en utilisant votre propre logiciel d’édition d’image pour obtenir l’image finale souhaitée.
12 Assistance aux utilisateurs : http://www.pandigital.net/kodaksupport
Original
Max. 1,5mm
Image scannée
Page 36

Lorsque vous numérisez les originaux sombres (par exemple, une photo. avec
un ciel de nuit). S'il vous plaît insérer l'original dans une direction différente
(l'orientation) et essaie encore.
En scrutant surexposer, plus vieil ou plus léger la couleur (a palî) les originaux de film
pour projection fixe, un irrégulier auto-recadrant peut arriver. Couper le film pour projection
fixe dans les films et rescan individuels les.
Connecter le Scanneur à un PC
En connectant le Scanneur à un ordinateur, vous pouvez directement accéder aux images sur la carte mémoire, ou bien vous
servir du Scanneur comme d'un lecteur de cartes mémoires et copier, coller ou effacer les fichiers en toute liberté vers ou depuis
la carte mémoire à l’aide de l’ordinateur.
Configuration nécessaire
Système d’exploitation : WINDOWS XP, WINDOWS VISTA, WINDOWS 7 ou plus récent - 32 bit
Macintosh : MAC OS 10 :5, 10:6, ou versions plus récentes
Port USB supporté : port USB 1.1 ou 2.0
1. Branchez la fiche du câble de l’adaptateur secteur sur le branchement de l’alimentation du Scanneur
2. Branchez l’adaptateur secteur sur une prise électrique
Le type de fiche et de prise de courant représentés peuvent différer de ceux disponibles dans votre
Le scanneur sera reconnu par l’ordinateur comme un disque amovible. Vous pouvez maintenant visionner ou éditer vos
fichiers sur la carte mémoire.
région.
3. Insérer une carte mémoire SD déverrouillée (inscriptible) dans la fente de la carte mémoire.
Une carte mémoire est requise. Les fichiers d’images scannées seront stockés dans la carte
mémoire insérée, et vous pourrez y accéder grâce à l’assistant Import Photo de WINDOWS
EXPLORER ou VISTA
4. Connectez le mini connecteur du câble USB (fourni avec le Scanneur) sur le port mini USB du
Scanneur
5. Allumez votre PC puis connectez le grand connecteur du câble USB sur l’un des ports USB de votre
PC.
6. Appuyez sur le bouton Marche ; l’indicateur lumineux de marche clignote. (Pour plus d’information,
reportez-vous à “Indicateurs lumineux“ page 5.)
ATTENTION : Ne retirez pas la carte mémoire lorsque l’ordinateur est en train d’accéder aux fichiers
qui se trouvent de ss us.
Assistance aux utilisateurs : http://www.pandigital.net/kodaksupport 13
Page 37

Pour les utilisateurs de WINDOWS VISTA
Lorsque le PC reconnaît le Scanneur, avec une carte SD insérée, une
fenêtre "Lecture Automatique" apparaît.
Pour visionner les photos sur le PC au cours d e la n um érisation, modifiez les
réglages de Windows Explorer de la façon suivante
1. Cochez la case
2. Sélectionnez l'option
3. Quand le scanneur est connecté au PC, un périphérique additionnel
apparaît dans la liste de la fenêtre EXPLORER. Si vous utilisez la carte
mémoire SD KODAK, le périphérique apparaîtra sous le titre KODAKSCN
Toujours effectuer cette opération pour les images
Ouvrir le répertoire pour voir les fichiers.
[Lettre du disque dur].
Si vous utilisez votre propre carte mémoire, le périphérique apparaîtra sous
le titre Disque amovible [
le titre personnalisé que vous avez pu donner auparavant à votre carte
mémoire.
Ne pas sélectionner “Ne rien faire [Take no Action]” ou “ Configurer auto-
lecture sur les valeurs par défaut dans le panneau de configuration [Set
AutoPlay to defaults in Control Panel]”.
Pour les utilisateurs de WINDOWS XP
Quand le PC reconnaît le scanneur avec une carte SD insérée, une fenêtre
popup s’ouvrira.
Pour visionner des photos sur le PC pendant que vous scannez, changez la
configuration de WINDOWS EXPLORER comme suit :
1. Sélectionnez “Ouvrir un dossier pour voir les fichiers en utilisant WINDOWS
EXPLORER [
EXPLORER]
2. Sélectionnez la boîte “Toujours appliquer l’option sélectionnée [
the selected action]”
3. Quand le scanneur est connecté au PC, un périphérique additionnel
apparaît dans la liste de la fenêtre EXPLORER Si vous utilisez la carte
mémoire SD KODAK, le périphérique apparaîtra sous le titre KODAKSCN
Open folder to view files using WINDOWS
Disque amovible] [Lettre du disque dur] ou
Always do
et cliquez sur OK.
[Lettre du disque dur].
Si vous utilisez votre propre carte mémoire, le périphérique apparaîtra sous
le titre Disque amovible [
titre personnalisé que vous avez pu donner auparavant à votre carte
mémoire
Disque amovible] [Lettre du disque] ou le
Pour les utilisateurs de WINDOWS 7
Quand le PC reconnaît le scanneur avec une carte SD insérée, WINDOWS
EXPLORER s’ouvre.
1. Sélectionnez le disque
2. Ouvrez le dossier
KODAKSCN dans la fenêtre EXPLORER.
PHOTO1 pour voir vos photos scannées.
14 Assistance aux utilisateurs : http://www.pandigital.net/kodaksupport
Page 38

Pour les utilisateurs de MAC
Lorsque l’ordinateur reconnait le scanneur avec une carte mémoire intégrée,
l'icône du volume s'affiche sur le bureau ; double cliquer le pour ouvrir une
fenêtre de Recherche.
1. Double-cliquez sur l’icône
2. Ouvrez le dossier
KODAKSCN du bureau
PHOTO1 pour voir vos photos scannées
Protocole de dénomination des photos scannées
Après le premier scannage, un dossier intitulé PHOTO1 est ajouté á la structure des fichiers de la carte mémoire (voir
exemple ci-dessous).
Les images scannées seront sauvegardées dans le dossier
EK_ suivi d’un nombre en séquence de 4 chiffres, dans l’ordre dans lequel les images sont stockées, par exemple
EK_0001.jpg, EK_0002.jpg
Si le nom de fichie r arr ive jusqu’à
automatiquement pour garder les fichiers suivants et ainsi de suite.
Il peut y avoir jusqu’à 9 dossiers (
l’indicateur lumineux de l’état/carte clignote
Vous pouvez maintenant voir ou éditer les fichiers sur votre carte mémoire en utilisant votre propre logiciel d’édition de
photos
EK_9999.jpg dans le dossier PHOTO1, un nouveau dossier intitulé PHOTO2 sera créé
PHOTO1.9, EK_0001... EK_9999) sur une carte mémoire. Si ce chiffre est dépassé,
Pour déconnecter de façon sûre le scanneur du PC
Pour Utilisateurs Windows
1. Sur la barre du système WINDOWS, cliquez sur l’icône de retrait du périphérique comme indiqué ci -dessous.
Icône de retrait du disque
2. Cliquez sur le message ‘Retirez en toute sécurité le dispositif USB de stockage massif [Safely remove USB mass Storage
device]’ du disqu e correspondant.
3. Quand le message ‘Retrait sûr du périphérique’ apparaît, vous pouvez retirer le câble USB du scanneur en toute sécurité.
PHOTO1. Chaque image scannée reçoit un nom avec le préfixe
Pour Utilisateurs MAC
Sur le bureau, cliquer avec le bouton droit sur le volume de KODAKSCN, alors choisir Ejecter « KODAKSCN ».
Logiciel Scan PC pour le Scanneur de photos personnelles KODAK
Avec le logiciel Scan PC pour les Scanneurs de photos personnelles KODAK (Logiciel Scan PC), vous pouvez facilement
numériser des photos et sauvegarder les photos scannées directement sur le PC connec t é .
Configuration nécessaire
Système d’exploitation : WINDOWS, XP SP2 ou versions plus récente, VISTA, WINDOWS 7 - 32-Bit
(Le logiciel Scan PC n’est pas pris en charge sur l’OS du MAC)
Vitesse du Processeur : INTEL PENTIUM IV. 1.2 GHz
RAM: 512 Mo minimum
10Mo d’espace libre du disque dur pour le logiciel Scan PC pour les Scanneurs de photos personnelles KODAK
200Mo d’espace libre du disque dur pour logiciel KODAK EASYSHARE
REMARQUE : Le lecteur APPLE QUICKTIME est nécessaire pour les options de certains logiciels. Consulter le site APPLE
pour télécharger la plus récente version du lecteur QUICK TIME.
Assistance aux utilisateurs : http://www.pandigital.net/kodaksupport 15
Page 39

Pour installer le logiciel Scan PC
1. Connectez le scanneur à votre PC (voir page 13), en utilisant la KODAK la
Carte mémoire et l'Adaptateur Mobiles MICROSD
(inclus avec le scanneur)
2. Dans la fenêtre d’installation, sélectionnez
Diapositives et Négatifs KODAK
3. Dans la fenêtre d’Assistant d’installation [Install Wizard], cliquez sur Suivant
Suivant].
[
4. Cliquez sur Suivant pour installer sur une localisation du disque par défaut,
ou sélectionnez la localisation désirée puis cliquez sur S uivant [
5. Dans la fenêtre Prêt pour l’installation [Prêt à Installer] cliquez sur
6. Une fois le logiciel installé, cliquez sur Terminer [
, puis cliquez sur Installer.
dans l’adaptateur SD
Scan PC du Scanneur de Photos,
Terminer]
Suivant].
Installer
Une fois installé, le logiciel
sur la barre du système
Si vous souhaitez fermer le Logiciel Scan PC pour le Scanneur de photos personnelles KODAK temporairement, faites
un clic droit sur l’icône et choisissez Quitter.
Scan PC démarre automatiquement dès mise en marche du PC et l’icône reste
Pour utiliser le logiciel Scan PC
ATTENTION : Pour optimiser l’utilisation de la mémoire, fermez tous les autres programmes avant de scanner les film
1. Une fois le Scanneur est connecté au PC avec un câble USB, l’indicateur
lumineux d’Etat/de Carte va se mettre à clignoter. La fenêtre suivante du
Logiciel
2. Indiquez la localisation où vous souhaitez que les images scannées soient
archivées :
~ Carte mémoire
~ Scan to PC
3. Cliquez sur
Après le premier scannage, un dossier intitulé PHOTO1 est ajouté à la structure du fichier comme suit :
~ Carte mémoire: \PHOTO1
~ Scan to PC: WINDOWS 2000 et XP: C:\Documents and Settings\(your username)\My Documents\My Pi ct ures\PHOTO1
4. Numérisez votre document original comme indiqué à partir de la page 9.
5. L’image numérisée sera sauvegardée à l’endroit que vous avez sélectionné à l’étape 2 ci-dessus
Chaque image numérisée se voit attribuer un nom de fichier avec le préfixe
en fonction de l'ordr e dans lequel les image s sont stockées. Par exemple,
Si le nom des fichiers atteint
automatiquement créé pour y stocker les fichiers suivants, et ainsi de suite
Remarque : Il ne peut y avoir jusqu’à 9 répertoire (
delà, l’indicateur lumineux d’Etat/de Carte va se mettre à clignoter
fixes multi-images.
Scan PC va s’afficher.
Appliquer ; et la fenêtre va se refermer
WINDOWS VISTA ou WINDOWS 7: C:\Users\(your username) \Pictures\PHOTO1
Vous pouvez cliquer sur le bouton
Lancer le logiciel Scan PC manuellement
pour sélectionner une localisation différente si nécessaire.
EK_ suivi d’un numéro à 4 quatre chiffres
EK_0001.jpg, EK_0002.jpg
EK_9999.jpg dans le répertoire PHOTO1, un nouveau répertoire nommé PHOTO2 sera
PHOTO1.9, EK_0001... EK_9999) sur une carte mémoire. Au-
Double-cliquez sur l’icône
barre de système et sélectionnez
Si vous souhaitez fermer le
l’icône et choisissez Exit [ Quitter
du Bureau, ou f aites un clic dro i t s ur l’icône de la
Setting [Configuration].
Logiciel Scan PC temporairement, faites un clic droit sur
].
Désinstaller le logiciel Scan PC
1. A partir du menu Démarrage du PC, sélectionner Tous programmes > Logiciel Scan PC > Dési n st aller
2. Suivez les instructions de l’assistant de désinstallation pour désinstaller le logicie
3. Redémarrez votre PC lorsqu’on vous êtes invité à le faire.
Si vous choisissez de redémarrer votre PC plus tard, la désinstallation de Logiciel
tant que le PC n’aura pa s re dé marré
16 Assistance aux utilisateurs : http://www.pandigital.net/kodaksupport
Scan PC ne sera pas terminée
Page 40

Logiciel KODAK EASYSHARE pour PC
Après avoir utilisé le logiciel Logiciel Scan PC pour le Scanneur de photos personnelles KODAK pour scanner et garder vos
images sur votre PC, vous pouvez utiliser le logiciel KODAK EASYSHARE pour organiser, éditer, imprimer et partager vos images
en ligne.
Système requis
Système d’exploitation: WINDOWS XP, WINDOWS VISTA, WINDOWS 7
Intel Pentium IV processeur
1.2GHZ ou meilleure vitesse de processeur
Espace libre de disque dur de 200Mo.
512MB RAM
USB 2.0 compatible
Pour installer Logiciel KODAK EASYSHARE
1. Insérez la KODAK la Carte mémoire et l'Adaptateur Mobiles MICROSD
dans l’adaptateur SD et insérez-le dans le scanneur
2. Connectez le scanneur à votre PC (voir les instructions qui commencent en
page 13) ; la boîte de dialogue Installation apparaît
3. Sélectionnez
KODAK EASYSHARE Software
4. Suivez les instructions sur l’écran et enregistrez votre logiciel.
5. Une fois l’installation du logiciel terminée, cliquez sur
Launch Logiciel KODAK EASYSHARE
1. Double-cliquez sur l’accès direct KODAK EASYSHARE
Bureau ou sélectionnez
Démarrer > Programmes [
2. Cliquez sur Ajouter de images [
Finish [Terminer]
sur votre
KODAK EASYSHARE Software à parti r de la liste
Start>Programs]
Add Pictures].
Assistance aux utilisateurs : http://www.pandigital.net/kodaksupport 17
Page 41

3. Sélectionnez le dossier PHOTO1 qui contien t le s im ages scannées (tel
que vous l’av ez déterminé au cour s de l’utilisatio n du Scan PC, pg. 16)
4. Sélectionnez les images que vous souhaitez pour les inclure dans un
album
5. Saisissez un nouveau nom d’Album de destination
6. Cliquez sur Ajouter des images [
7. En utilisant les options sur la ligne supérieure de la fenêtre Logiciel
KODAK EASYSHARE, les images que vous avez copiées dans les
Albums peuvent être éditées et améliorées, copiées dans d’autres
localisations, et téléchargées directement sur votre compte de
FACEBOOK ou FLICKR pour être facilement et rapidement partagées.
8. Utilisez l’Aide [
options
Help] pour de plus amples instructions sur toutes les
Désinstaller le logiciel KODAK EASYSHARE
1. Ouvrez le Panneau de configuration de WINDOWS
2. WINDOWS VISTA : Sélectionnez Programmes > Désinstaller un programme [
WINDOWS 7 : Sélectionnez Programmes et Options [
WINDOWS XP : Sélectionnez Ajouter ou ôter un programme [
3. Sélectionnez Logiciel EASYSHARE KODAK [
4. Suivez les instructions pour terminer
Entretien du scanneur
Add Pictures], puis sur Fait [Done]
Programs and Features]
Add or Remove a Program]
KODAK EASYSHARE Software], puis cliquez sur Désinstaller [Uninstall].
Programs> Uninstall a Program]
Nettoyage du scanneur
Afin de maintenir la qualité des images scannées et éviter l’accumulation de poussière, il est recommandé de nettoyer le
scanneur (boîtier extérieur, senseur d’image et rouleau interne du scanneur) environ tous les 50 à 100 scannages.
Nettoyez le scanneur également si :
Des lignes verticales ou des rayures apparaissent sur l’image scannée
Les photos ou les film fixes ne s’insèrent pas correctement
Utilisez uniquement les accessoires fournis ou recommandés pour nettoyer le scanneur
AVERTISSEMENT : N’utilisez aucun solvant ou liquide corrosif (ex. alcool, essence, etc.) pour nettoyer des éléments de
Scanneur. Sinon, les éléments en plastique en seraient définitivement endommagés.
Nettoyage du boîtier
1. Utilisez un souffleur à poussière adapté pour hôter la poussière du Scanneur.
2. Utilisez un chiffon légèrement humide pour essuyer toute saleté qui se serait déposée sur le boîtier de Scanneur.
3. Essuyez le Scanneur avec un chiffon non pelucheux, propre et sec
Nettoyer le Capteur d’Image Photo
1. Nettoyez d’abord le boîtier extérieur du scanneur
18 Assistance aux utilisateurs : http://www.pandigital.net/kodaksupport
2. Avec le scanneur mis en arrêt et débranché de la source d’alimentation, insérer l’écouvillon
de nettoyage du capteur d’image photo dans l’une des extrémités de la fente de sortie photo.
Assurer vous qu’il n’ait pas de poussière visible sur l’écouvillon avant de l’insérer dans la
fente de sortie.
Page 42

3. Faire glisser soigneusement l'écouvillon vers l'arrière et l'avant d'une extrémité de la fente à
l'autre, cinq ou six fois de manière consécutive.
Ne pas appliquer trop de force sur l’écouvillon.
4. Retirer l’écouvillon de la fente et garder le dans un lieu sûr, exempt de toute poussière.
Nettoyer le Capteur Image de Transparence
1. Nettoyer d’abord le boîtier extérieur du scanneur.
2. Avec le scanneur mis en arrêt et débranché de la source d'alimentation, insérer l’écouvillon
de nettoyage du capteur d’image photo dans l’une des extrémités de la fente de sortie de la
transparence.
Assurez-vous qu’il n’ait aucune poussière visible sur l’écouvillon avant de l’insérer dans la
fente de sortie.
3. Faire glisser soigneusement vers l’avant et vers l’arrière d’une extrémité de la fente à une
autre, cinq ou six fois de manière consécutive.
Ne pas appliquer trop de force sur l’écouvillon.
4. Retirer l’écouvillon de la fente et garder le en lieu sûr, exempt de toute poussière.
Comment nettoyer le rouleau
1. Nettoyez d’abord le boîtier extérieur du scanneur.
2. Quand le scanneur est éteint, appuyez et maintenez appuyé le bouton de Marche pendant
plus de 5 secondes : le scanneur se mettra sur mode nettoyage. Les indicateurs lumineux
de marche et d’état/carte seront allumés.
3. Insérer la feuille de nettoyage du rouleau fournie dans la fente d’insertion de la transparence
comme indiquée.
Prendre note de la direction de l’éponge blanche sur la feuille lors de l’insertion.
Assurez-vous qu’il n’ait aucune poussière visible sur la feuille avant de l'insérer dans la fente
d'insertion.
La feuille de nettoyage sera introduite automatiquement dans la fente d’alimentation et le
processus de net t oyage commencera.
Pendant ce processus, les indicateurs lumineux de Marche et d’état/carte clignoteront lentement
et simultanément.
Une fois le proc e s sus de nettoyage te r miné, la feuille de ne ttoyage sera é jec tée de l’appareil et
l’indicateur de marche s’éteindra.
4. Retirez la feuille de nettoyage et gardez-la dans un endroit à l’abri de la poussière.
Assistance aux utilisateurs : http://www.pandigital.net/kodaksupport 19
Page 43

Comment calibrer le scanneur
Si les images numérisées sont floues ou ont des bandes bizarres, le Scanneur a besoin d’être calibré afin que le capteur retrouve
sa précision d’origine
Suivez les instructions qui commencent en page 18 pour nettoyer le rouleau et le senseur d’image, puis suivez les instructions
de “Configuration Initiale [Initial Setup]” page 8 pour préparer le scanneur
Insérer la carte de calibrage dans la fente d’insertion photo comme illustré.
Le scanneur scannera le motif sur la carte de calibrage et réalisera automatiquement le calibrage du
senseur interne
Assurez-vous que la carte de calibration soit insérée dans le bons sens, sinon la calibration ne
pourra se faire avec succès.
Utilisation de Piles
1. Recommander l’utilisation des piles de type rechargeable Ni-MH. Remarquer qu’il n’existe aucune fonction de recharge de piles
dans le scanneur .
2. Toujours s’assurer que les piles sont installées avec les terminaux positifs et négatifs insé rés selon la direction appropriée tel
qu’indiqué dans le compartiment pile.
3. Les piles de types différents disposent des caractéristiques différentes. Ne pas mélanger les types différents.
4. Ne pas mélanger les vieilles et les nouvelles piles, puisque cela réduirait la durée de fonctionnement ou causerait la fuite
chimique des vi eilles piles.
5. Les produits chimiques qui coulent des piles peuvent provoquer des irritations corporelles. Si tout produit chimique suinte des
piles, essuyer le immédiatement à l’aide d’un tissu sec et remplacer les piles dès que possible.
6. Lorsque le scanneur indique ‘batterie faible” en état de “Prêt à utiliser”, veuillez remplacer les piles avant de commencer à
scanner afin d'éviter que le scanneur ne s'arrête pendant le scannage.
ATTENTION : Veuillez retirer les piles lorsque vous avez terminé le scannage.
Ranger le Scanneur
Si le Scanneur ne sera utilisé durant une période prolongée, suivez les instructions ci-dessus pour le ranger de façon appropriée.
1. Débranchez l’alimentation du Scanneur
2. Placez le Scanneur et son adaptateur d’alimentation dans une boîte ou un sac pour les protéger de la poussière.
3. Placez-le dans un lieu frais et sec, hors de portée des jeunes enfants
4. Pour éviter la déformation du bloc support, ne placer pas les objets lourds sur le scanneur.
5. Après une période prolongée sans usage, il est recommandé de nettoyer et de calibrer le scanneur avant de le réutiliser.
Spécifications techniques
Spécification Escáner personal de fotos KODAK P461
Type de média
Taille standard de d ocument 3,5”x5”, 4”x6” and 4x11”
Dimension de la fente d’alimentation Jusqu’à 4,1” x 12”
Longueur: 12 pouces (304.8mm)
20 Assistance aux utilisateurs : http://www.pandigital.net/kodaksupport
Largeur 4.1 pouces (105mm)
Photo : Jusqu’à 4,1 x 12” (usage courant : photo 3,5x5” et 4x6”)
Film fixe : Couleur / Film fixe négatif B&W de 35 mm
Diapositive : Couleur / Diapositive encadrée B &W d e 3 5 m m
Page 44

Formats de fichiers de sortie JPEG avec compression (4:2:2)
Résolution (fixe)
Interfaces
Stockage massif USB supporté WINDOWS 2000 / XP / VISTA / WINDOWS 7
Tension
Piles
Alimentation photo
Insertion de transparence
Dimensions
Poids net 0.75 lbs (455g)
Température de fonctionnement
Humidité tolérée
Température de conservation -20ºC ~ 60ºC (59oF~95oF); 10% RH ~ 90% RH
Carte mémoire Se référer à la partie relative aux Cartes mémoire (page 7)
USB Port pour Mini USB, compatible USB 2.0
Entrée 100-240V AC, 50/60 Hz, Sortie 5V, 1A
Contient quatre piles AAA (UM-4, non incluses), Des piles rechargeables du type NiMH sont
recommandées pour un nombre optimal de numérisations. La vie d'un pile rechargeable sous résolution
600dpi permet une moyenne de 100 numérisations ou plus par recharge. La durée de vie réelle d'une
pile peut varier en fonction de l'usage.
Questions fréquentes
Photo : 600x600 ppp (par défaut) et 300x300 ppp
Film fixe : 1200 x 1200 ppp
Type d’alimentation par feuille (un seul passage)
Conception à double rouleau
Film fixe insérée avec un Adaptateur de Guide du Film fixe
Diapositives encadrées insérées à l'aide de pochette à diapositives
2.25” (L) x 10.5” (l) x 2” (H)
61.7 mm (Lo) x 269.3mm (La) x 52 (H) mm
15ºC ~ 35ºC (59oF~95oF);
20% RH ~ 70% RH
Q : Quelle est la cause des lignes étranges sur l'image scannée ou d’une image pas très clair ?
R : Vérifiez les points suivants :
Y a-t-il des rayures sur le document original, le document original est-il propre ? Retirez toutes les taches ou particules de
poussière que se tr o uveraient sur l'or iginal avant de le num ériser
Le Scanneur a-t-il été utilisé durant une période prolongée sans qu'il ne soit nettoyé ni calibré ? Suivez les instructions du
paragraphe "Nettoyer le Scanneur" à la page 18 et du paragraphe "Calibrer le Scanneur " à la page 20, puis essayez à
nouveau.
Q : Pourquoi est-ce que l’image du film fixe scannée ne tourne pas convenablement ?
R : La fonctionnalité “auxiliaire
position du chiffre est près du bord du film fixe, il peut être facilement arraché ou abîmé, et donc il ne peut être détecté dans
la position espérée ni remplir les conditions pour pouvoir être détecté, et provoquer que la fonction Auto-miroir/auto-inversé
soit inhabilitée
Q : Comment sortir un original à moitié bloqué dans une fente d’insertion ?
R : Appuyer la touche Mise en marche, le scanneur éjectera l’original afin que vous puissiez retirer l’original bloqué dans la fente
d’insertion en scannage photo/diapositive et dans la fente de sortie de la transparence en scannage du film fixe.
Q : Quelle est la cause du clignotement rapide de l'indicateur d'état et l’arrêt scannage ?
R : Vérifiez les points suivants :
La carte mémoire est-elle correctement insérée dans l'emplacement prévu à cet effet ? Réinsérez la carte et tentez à
nouveau
La carte SD Card est-elle verrouillée (protégée en écriture) ? Déverrouillez la carte
La carte mémoire est-elle pleine ? Le témoin lumineux clignote lorsque l'espace disponible sur la carte est inférieur à 1Mo.
Utilisez une autre carte si nécessaire
Assurez-vous que la carte mémoire soit formatée en système FAT ou FAT32, le système NTFS et les autres systèmes de
formatage ne sont pas supportés. Reformater la carte mémoire si nécessaire afin de l’utiliser avec le scanneur.
Avez-vous inséré le document original suivant avant que le processus de numérisation du document en cours ne soit
terminé ? Eteignez le Scanneur et rallumez-le, puis réessayez. Faites en sorte de ne numériser un document qu'une fois
que la numérisation du docume n t pré cé den t est term i née .
La longueur du document original est-elle supérieure à la taille maximale autorisée ? Pour plus d'informations, consultez
le paragraphe "Documents originaux adaptés et inadaptés".
Q : Si le Scanneur dégage de la chaleur ?
R : Il est normal que le Scanneur dégage une certaine quantité de chaleur (environ 30-45°C) après une utilisation prolongée,
mais s'il dégage une odeur étrange ou qu'il semble trop chaud au toucher, débranchez-le immédiatement de la prise de
courant ou de l'ordinateur.
(voir page 10) .
actuelle a des difficultés pour distinguer le sens de certains chiffres (par ex., “6”, “9”). Si la
” OCR
Veuillez suivre l’indicateur sur l’adaptateur du film fixe pour scanner à nouveau le film fixe.
Assistance aux utilisateurs : http://www.pandigital.net/kodaksupport 21
Page 45

Q : Quel est la cause de l’arrêt du Scanneur en plein milieu d'une opération de scannage ?
R : Effectuer les vérifications suivantes :
S’il est alimenté par des piles, veuillez retirer et remplacer les piles, puis redémarrer le scanneur.
S’il est alimenté par une source d’alimentation électrique, veuillez débrancher l’alimentation électrique, rebrancher et puis
redémarrer le sc an neur.
Si l’original est bloqué à l’intérieur de la fente d’insertion, appuyer la touche de Mise en Marche et le scanneur éjectera
l’original.
Q: Pourquoi est-ce que j'obtiens seulement 10 à 20 numérisations quand j'utilise la source de courant sur pile?
R: Nous vous recommandons d'utiliser des piles rechargeables pour un nombre optimal de numérisations. La vie d'un pile
rechargeable sous résolution 600dpi permet une moyenne de 100 numérisations ou plus par recharge. La durée de vie réelle
d'une pile peut varier en fonction de l'usage, Nous ne supportons pas et nous ne recommandons pas des piles alcalines.
Mise à jour du Logiciel et du Micrologiciel
Parfois des mises à jour du logiciel sont publiées (le logiciel sur lequel fonctionne le scanneur). Téléchargez les dernières versions
depuis le site : www.pandigital.net/ kodaksupport.
Limite de la garantie
La garantie limitée ci-dessous décrite est accordée par Pandigital pour les produits électroniques de marque Pandigital achetés et
utilisés aux États-Unis. Pandigital garantit ce produit contre les défauts de fabrication ou de main-d’oeuvre comme suit :
MAIN-D’OEUVRE : Pendant une période d’un (1) an à compter de la date d’achat, si ce produit s’avère défectueux, Pandigital réparera
ou remplacera le produit, à sa convenance et gratuitement. Au-delà de la période d’un (1) an, le coût de la main-d’oeuvre sera facturé au
cas par cas.
PIÈCES DÉTACHÉES : Pendant une période d’un (1) an à compter de la date d’achat, si ce produit s’avère défectueux, Pandigital
fournira gratuitement des pièces de rechange neuves ou remises à neuf, à son choix et sans aucuns frais. Au-delà de la période d’un (1 )
an, les pièces seront facturées au cas par cas. Toute modification non approuvée par la partie responsable de la conformité pourra
annuler le droit de l’utilisateur de faire fonctionner l’appareil.
La garantie ne couvre pas: (1) les instructions, l’installation ou la configuration qui incombent au client; (2) les dommages esthétiques ou
les dommages ayant pour origine un accident, une mauvaise utilisation, une manipulation abusive ou la négligence; (3) l’utilisation
commerciale du produit; (4) la modification de l’une des parties du produit; (5) les dommages résultant d’une mauvaise utilisation, d’une
maintenance abusive, ou d’une connexion à une alimentation électrique inadéquate; (6) la perte de données, quelle que soit la valeur ou
le format, qui résulterait d’une utilisation adéquate et/ou inadéquate du produit; (7) les dommages dus à une réparation du produit
effectuée par quiconque autre qu’un service d’entretien agréé par Pandigital; (8) les consommables (tels que les fusibles et les piles). La
garantie n’est applicable qu’aux États-Unis.
Le produit doit être accompagné d’une copie de la preuve d’achat originale. Sans preuve d’achat, la garantie ne sera pas honorée et les
frais de réparation seront facturés. La garantie est valable seulement avec une documentation écrite, exposant en détail le motif de la
plainte et jointe à l’extérieur ou à l’intérieur de la boîte. La garantie est annulée si le numéro de série de l‘usine a été altéré et/ou retiré du
produit. Elle ne protège pas contre la perte de données, quel que soit le format. Pandigital se réserve le droit de modifier et de concevoir
ce produit sans avertissement préalable écrit ou autre.
Pour obtenir le service de la garantie, vous devez amener le prod uit en réglant les frais de transport à l’avance, soit dans son emballage
d’origine ou soit dans un emballage offrant des conditions identiques de protection. Le produit doit également être accompagné de sa
preuve d’achat.
La réparation ou le remplacement, tels que prévus dans la garantie, constitue le seul recours du consommateur. Pandigital, sa société
mère ou ses filiales, ne pourront pas être tenus responsables de tout dommage accessoire ou consécutif et de l’inexécution d’une
garantie expresse ou implicite sur ce produit. Sauf pour les dispositions prohibées par les lois applicables, toute garantie implicite de
qualité marchande ou d’adaptation à un usage particulier relative à ce produit est limitée à la période de garantie.
Certains États n’autorisent pas l’exclusion ni la limitation des dommages access oires ou consécutifs, ou bien ils permettent la limitation
sur la durée de la garantie implicite, de sorte que les limitations ou exclusions énoncées ci-dessus peuvent être nulles. La garantie vous
donne des droits juridiques spécifiques, et vous pouvez aussi disposer d’autres droits, qui varient d’un État à l’autre.
Tout contenu inclus sur le site internet de Pandigital , de même que les produits Pandigital, y compris les images de démonstration
chargées préalablement, le média numérique, les livres de cuisine numériques, textes, graphiques, logos, conceptions, photographies,
icônes boutons, images, clips audio/vidéo, téléchargements numériques, compilations de données et logiciels appartiennent à Pandigital
ou à ses fournisseurs, et tout cela est protégé par les États-Unis et la législation internationale sur la propriété littéraire et intellectuelle,
ou par d’autres lois et traités sur la propriété intellectuelle. Le contenu cité ne pourra pas être reproduit ni utilisé sans la permission
expresse et écrite de Pandigital et de ses fournisseurs respectivement.
L’utilisation de ce produit représente l’acceptation des clauses et conditions de la garantie
Visitez notre site internet http://www.pandigital.net/kodaksupport
pour vérifier le numéro de téléphone du Support Client.
Déclaration FCC
Information sur la Partie 15 de la FCC
Cet équipement a été testé et est considéré comme se soumettant aux limitations applicables pour ce type de dispositif
numérique de Classe B, conformément à la Partie 15 des normes de la Commission Fédérale de Communication (Federal
Communication Commission, FCC). Ces limitations sont conçues pour fournir une protection raisonnable contre les
interférences nuisibles dans une résidence domestique.
22 Assistance aux utilisateurs : http://www.pandigital.net/kodaksupport
Page 46

Cet équipement génère, utilise et peut diffuser des ondes de fréquence radio et s’il n’est pas installé ni utilisé
conformément aux instructions, il peut provoquer des interférences nuisibles aux communications radio. Quoi qu’il en soit, il
n’existe pas de garantie que des interférences ne se produiront pas dans certaines installations.
Si cet équipement produit des interférences nuisibles pour la réception radio ou de télévision, ce qui peut être vérifié en
allumant et en éteignant l’équipement, il est consei l lé à l’utilisateur d’essayer de corriger les interférences en prenant l’une
ou plusieurs des mesures suivantes
Réorientez ou changez l’antenne réceptrice de place
Augmentez la distance entre l’équipement et le récepteur.
Connectez l’équipement à une prise ou à un circuit différent de celui auquel le récepteur est connecté
Consultez votre revendeur ou un technicien radio/TV compétent pour qu’il vous aide.
Gaspiller disposition Electrique d'Equipement/Pile et Electronique
En Europe: Pour la protection humain/écologique, c'est votre responsabilité de liquider cet équipement et ces piles à une
facilité de collection ont établi à cet effet (sépare des ordures ménagères). Pour plus d'informations, contacter votre
détaillant, votre facilité de collection, ou approprier des autorités locales ; ou aller à www.kodak.com/go/recycle.
Poids de produit : 130 g (4,6 once) y compris la carte et la pile.
Pandigital Droits d'auteur 2010.
Kodak et Kodak Trade Dress (Habillage commercial) sont des marques déposées de Kodak utilisées sous licence.
Easyshare est une marque déposée de Kodak.
.
Assistance aux utilisateurs : http://www.pandigital.net/kodaksupport 23
Page 47

Español
Page 48

Índice
Lea esto antes de comenzar ............................................................................................................... 3
Precauciones de seguridad importantes .......................................................................................... 3
Introducción ......................................................................................................................................... 4
Descripción del Escáner ..................................................................................................... ................ 4
Luces indicadoras del Escáner .......................................................................................................... 6
Tipos de originales adecuados y no adecuados .............................................................................. 6
Tarjetas de memoria compatibles ................................................................................. ..... ..... ........... 7
Orientación del original y la imagen escaneada ............................................................................... 8
Uso del Escáner ............................................................................. ..... ..... .... ..... ..... ..... ......................... 8
Preparación y Arreglo Inicial ............................................................................................................. 8
Escaneado de una fotografía ........................................................................................................... 9
Escudriñar 35 Negativos de Mm y Desliza ..................................................................................... 10
Alimentación de tiras de película .................................................................................................... 11
Escaneado de diapositivas montadas ............................................................................................ 12
Recorte automático de imágenes ................................................................................................... 12
Conectar el Escáner al PC................................................................................................................. 13
Requisitos del sistema .................................................................................................................... 13
Convención de nombres de imágenes escaneadas ...................................................................... 15
Desconexión segura del Escáner de la PC .................................................................................... 15
Software Scan PC para Escáneres personales de fotos KODAK ................................... ..... ..... .... 15
Instalar software Scan PC .............................................................................................................. 16
Uso del software Scan PC .............................................................................................................. 16
Desinstalar el software Scan PC .................................................................................................... 16
Software KODAK EASYSHARE para PC .......................................................................................... 17
Requisitos del sistema .................................................................................................................... 17
Instalación de KODAK EASYSHARE Software .............................................................................. 17
Lanzamiento de KODAK EASYSHARE Software ....................................................... ................... 18
Desinstalar el software KODAK EASYSHARE ............................................................................... 18
Mantenimiento del Escáner ....................................... ..... .................................................................. 18
Calibración del Escáner ............................................................................................. .... ..... .............. 20
Uso de baterías .................................................................................................................................. 20
Cómo guardar el Escáner.................................................................................................................. 20
Especificaciones técnicas ................................................................................................................ 21
Preguntas frecuentes ........................................................................................................................ 21
Actualización de software y firmware .............................................................................................. 22
Garantía Limitada ............................................................................................................................... 22
Normativas FCC ..................... .... ..... ..... .............................................................. ..... .... ................... 23
Malgaste disposición Eléctrica y Electrónica de Equipo/Batería ........................................... ..... .... 23
2 Asistencia al cliente: http://www.pandigital.net/kodaksupport
Page 49

Lea esto antes de comenzar
Por favor lea detenidamente las instrucciones importantes antes de usar escáner de fotos, Escáner personal de fotos
KODAK. Si no lo hace, podría sufrir lesiones o dañar el Escáner.
Precauciones de seguridad importantes
Tenga siempre en cuenta estas precauciones básicas de seguridad al utilizar su Escáner. Así disminuirá el riesgo de
incendios, descargas eléctricas y lesiones.
No exponga este dispositivo a la luz directa del sol ni cerca de fuentes de calor, como por ejemplo adentro
de un automóvil cerrado bajo la luz del sol ni cerca de una estufa. A causa del calor excesivo, la carcasa
externa del Escáner podría deformarse y los sofisticados sensores internos podrían dañarse.
No utilice este dispositivo cerca del agua o bajo la lluvia ni permita que se introduzca ningún tipo de
líquido en el interior de este producto. El agua y la humedad podrían producir un cortocircuito en los
componentes electrónicos y ocasionar fallas en el funcionamiento.
No utilice este dispositivo en ambientes donde haya polvillo. Las partículas de polvo podrían cubrir este
dispositivo y rayar la fotografía, diapositiva o negativo original. No escanee originales que estén
contaminados con polvillo u otro tipo de partículas.
No utilice este dispositivo cerca de fuentes electromagnéticas, tales como hornos microondas o
televisores. La interferencia electromagnética podría ocasionar fallas de funcionamiento en este
dispositivo.
No intente desarmar ni realizar modificaciones en este dispositivo. El interior del Escáner no contiene
piezas reparables por el usuario y cualquier modificación no autorizada invalidará su garantía.
Artículos incluidos
Verifique que el paquete incluya los siguientes artículos. Si falta alguno de ellos, o si alguno está dañado, comuníquese
con el vendedor de inmediato.
No permita que este dispositivo se caiga ni que sufra golpes o movimientos bruscos. Los impactos fuertes
podrían dañar los componentes internos del dispositivo.
No inserte objetos en las ranuras para tarjetas de memoria del dispositivo que no sean tarjetas de
memoria compatibles con el Escáner. Los contactos metálicos del interior de las ranuras pueden ser
dañados fácilmente por objetos extraños.
No utilice adaptadores de suministro eléctrico desconocidos que no sean los incluidos con el Escáner. Es
muy peligroso conectar el Escáner a un adaptador de suministro eléctrico desconocido, ya que se podrían
producir incendios o explosiones.
Algunos adaptadores pueden incluir enchufes con interruptor. Cuando necesite usar enchufes con
interruptor, use solamente los que se incluyen con el Escáner.
No corte, doble, modifique ni pise el cable del adaptador de suministro eléctrico ni coloque objetos
pesados sobre el mismo. De lo contrario, se podría dañar el aislamiento externo y producirse
cortocircuitos o incendios.
Tanto el enchufe como el puerto USB del Escáner se encuentran diseñados exclusivamente para la
conexión con el adaptador de suministro eléctrico proporcionado y el cable USB opcional. No introduzca
ningún otro objeto en estas conexiones.
Si detecta olores o calor poco habituales provenientes del dispositivo, o bien si éste presenta señales de
mal funcionamiento, desconecte el Escáner de la fuente de alimentación eléctrica de inmediato y
comuníquese con el distribuidor para que lo revise o lo repare.
Escáner personal de fotos
Adaptador de suministro eléctrico AC (varía por región)
Cable USB
Tarjeta de memoria de Móvil de KODAK MICROSD y
Adaptador
35mm Filmstrip Guide Adapter
35mm Slide Holder
Tarjeta de calibración
Hoja de limpieza de rodillos
Hisopo de limpieza de sensor de transparencias y fotos
Scan PC Software (en tarjeta MICROSD)
KODAK EASYSHARE Software (en tarjeta MICROSD)
Guía de inicio rápido y Guía de usuario
Asistencia al cliente: http:/ /www.pandigital.net/kodaksupport 3
Page 50

Introducción
Ahora puede escanear sus fotos impresas y tiras de película de negativos y almacenarlas en su tarjeta de memoria. No necesita su PC.
Simplemente inserte la tarjeta de memoria en el Escáner y enciéndalo. Cuando la unidad esté preparada, alimente su fotografía impresa
o tiras de película de negativos en el escáner y sus imágenes quedarán almacenadas en la tarjeta de memoria. Es así de simple.
Si desea transferir sus fotos directamente a su PC, es tan simple como conectar un cable USB a nuestro software Scan PC (página 15).
Descripción del Escáner
Vista frontal
N° Nombre Función/ Descripción
Pulse una vez para encender el Escáner en modo de 600 ppp (prefijado). Pulse
nuevamente p ar a e ncender en modo de 3 00 ppp.
Botón de encendido
Indicador de
encendido
Indicador de
estado/tarjeta
Ranura de
alimentación de
transparencia
Palanca de la guía
de papel
Ranura de
alimentación de fot o s
Guía de orientación Indica la posición y orientación correctas del original para su escaneado.
Conector de
suministro eléctrico
Pulse durante 1 segundos para apagarlo.
Si un original se atasca en la ranura de alimentación ( y ), pulse el botón para que
retroceda y salga del escáner en el modo de escaneado de fotos/diapositivas y alimente la
tira de película en el modo de escaneado.
Indica el estado de encendido de l Escáner . (Consulte “Luces indicadoras” en la página 5.)
Indica el estado de operación del Escáner y la tarjeta de memoria. (Consulte “Luces
indicadoras” en la página 5.)
Para escudriñar transparencias como 35 películas de Mm y 35 resbaladas de Mm –
requiere 35 adaptador de guía de película de Mm o a 35 poseedor de resbalada de Mm.
Deslice la guía para ajustarla para originales más pequeños para asegurarse de que la
alineación sea correcta.
Para escanear originales no transparentes como fotos y tarjetas comerciales.
Para conectar al adaptador de suministro eléctrico incluido.
Conector Mini USB Para conectar a un equipo a través de un cable USB.
4 Asistencia al cliente: http://www.pandigital.net/kodaksupport
Page 51

Vista posterior
A
N° Nombre Función/ Descripción
Ranura de salida de
transparencias
La transparencia escaneada (como tiras de películas o diapositivas montadas) sale de esta
ranura.
Vista inferior
Ranura de salidas
de fotos
Ranura SD/xD/MMC/
MS
Se recomienda utilizar baterías NiMH recargables. No recomendamos ni alentamos el uso de baterías alcalinas. Para
un rendimiento aceptable de las baterías y a fin de asegurarse de que su escáner opere óptimamente, utilice las
baterías recomendadas.
Se recomienda usar baterías recargables tipo NI-MH.
No hay función de carga de baterías en el escáner.
El original escaneado no transparente (como fotos o tarjetas comerciales) sale de esta
ranura.
Acepta los siguientes tipos de tarjetas de memoria: SD, xD, MMC y MS. También acepta
tarjetas MICROSD con adaptador SD. (Consulte “Tipos de memorias compatibles” en
página 7).
Compartimiento de baterías
Para instalar cuatro baterías
AA (UM-4)
(baterías no incluido)
Asistencia al cliente: http:/ /www.pandigital.net/kodaksupport 5
Page 52

Luces indicadoras del Escáner
Debajo se muestra la lista de patrones de luces indicadoras y las funciones que representan:
Parpadeo lento
Parpadeo rápido
Encendido
Apagado
Encendi
do
(verde)
(verde)
Estado
/Tarjeta
(naranja)
(verde)
(color)
(color)
(color)
La configuración de resolución del escaneado es indica mediante el color de luz del
Estado/Tarjeta
600 ppp (prefijado) –el Escáner está preparado para su uso en modo de 600 ppp (prefijado).
300 ppp: después de que el Escáner está preparado en modo de 600 ppp, pulse el botón de
encendido nuevamente para pasar al modo de 300 ppp.
Inicializando el sistema y la tarjeta de memoria. Por favor, aguarde hasta que el proceso de
inicialización finalice antes de usar el Escáner.
Escaneando y almacenando los archivos de imágenes. Por favor, aguarde hasta que finalice el
proceso antes de escanear otro original.
Papel atascado. Pulse el botón Encendido. El escáner retirará el original de modo que pueda quitar
el original atascado de la ranura de alimentación en el modo de escaneado de fotos/diapositivas y la
ranura de salida de transparencias en modo de escaneado de tira de película.
Error de calibración. Comuníquese con el centro de servicio más cercano para recibir ayuda.
Sin tarjeta de memoria, tarjeta llena (el espacio libre es menor a 10 MB), error de tarjeta o tarjeta SD
bloqueada o el sistema de archivo no es compatible. Elimine estos archivos de la tarjeta para
obtener espacio libre, desbloquee la tarjeta si está bloqueada o intente con otra tarjeta.
(verde)
(color)
La batería está por agotarse.
El escáner está apagado.
Tipos de originales adecuados y no adecuados
Adecuados
El diseño del Escáner permite obtener los mejores resultados con los siguientes tipos de originales (sin usar una funda
plástica):
Fotos de 3,5 x 5 pulg. y 4 x 6 pulg. (tamaño máximo de 4,1 x 12 pulg.)
Tarjetas comerciales (máx. 1,0 mm de espesor)
35 negativos de Mm (1-6 marco no montado con 35 Guía de Película de Mm)
Diapositivas montadas de 35mm (con Soporte de diapositiva de 35mm)
No adecuados
No utilice ninguno de los siguientes tipos de originales, de lo contrario, el Escáner podría funcionar de forma incorrecta, o
bien el origina l p odría atascarse en la ranura.
Originales de más de 1,0 mm de espesor.
Originales con un lado menor a 55 mm.
Originales con mucho negro o colores oscuros.
Originales con colores oscuros en la zona de los márgenes
Imágenes impresas (fotos en diarios, revistas, etc.)
Materiales suaves y finos (papel fino, tela, etc.)
Tiras de películas/diapositivas sobrexpuestas. Para evitar errores de detección automática, elimine las tiras de película
sobrexpuestas del comienzo de la tira antes de la alimentación.
6 Asistencia al cliente: http://www.pandigital.net/kodaksupport
Page 53

Originales que superen el siguiente tamaño aceptable:
A
35 Mm películas que negativo/monocromos son inapropiadas con cualquiera de las condiciones siguientes:
Longitud: 12 pulg. (304.8 mm)
nchura 4.1 pulg. (105 mm)
1. Los extremos de la tira de película están pegados con cinta. Quite la cinta y limpie los restos de
adhesivo antes del escaneado.
2. Los extremos de la tira de película no están cortados de manera recta. Corte los extremos de
manera recta antes del escaneado.
3. Los extremos de la tira de película están plegados. Corte las partes plegadas antes del
escaneado.
4. Los extremos de la tira de película están pegados con cinta. Corte los extremos de manera recta
antes del escaneado.
5. Algunas perforaciones en la tira de película están rotas o no están. Esto podría afectar el
mecanismo de alimentación automática del Escáner. Empuje suavemente la tira de película en el
adaptador cuando sea necesario.
Tarjetas de memoria compatibles
MS (MemoryStick)
MS Pro
MS Pro Duo (adaptador
requerido)
MS Duo
MMC (Multi Medi a Card)
RS-MMC (adaptador requerido)
xD (extreme Digital, H-type y M-type)
SD (Secure Digital)
SDHC
MINISD (adaptador requerido)
MICROSD/T-Flash (adaptador requerido)
MICROSD Card (adaptador SD requerido)
Asistencia al cliente: http:/ /www.pandigital.net/kodaksupport 7
Page 54

Orientación del original y la imagen escaneada
r
r
Es fácil ver como aparecerán las imágenes escaneadas en su equipo. Nota: Puede rotar las imágenes en su equipo.
Escáne
Original
Escáne
Original
El escaneado del mismo original en distintas orientaciones puede producir imágenes escaneadas cuyos tonos de colores y
brillo lucen ligeramente diferente. Esto no es un defecto en el funcionamiento.
Imagen escaneada cuando se muestra en
pantalla
Uso del Escáner
Preparación y Arreglo Inicial
Cuando ambas fuentes eléctricas están disponibles, el escáner sólo consumirá suministro eléctrico externo.
Se recomienda usar baterías recargables tipo NI-MH. (No hay función de car ga de baterías en el escáner).
1. Gire el escáner y abra la cubierta del compartimiento de baterías.
2. Instale cuatro baterías AAA(UM-4). Asegúrese de que las baterías estén instaladas correctamente de
acuerdo a las marcas en el compartimiento de baterías.
3. Quite la cubierta del compartimiento de baterías.
4. Conecte el cable adaptador de alimentación al conector de alimentación en el escáner.
5. Conecte el adaptador de suministro eléctrico a la salida de suministro eléctrico.
Los tipos de enchufe y tomacorrientes que se muestran pueden diferir de los de su región.
6. Inserte la Tarjeta de Móvil de KODAK MICROSD en el adaptador de SD (incluyó) o un desatrancado
(writable) tarjeta de memoria en la ranura de tarjeta de memoria.
Inserte siempre una tarjeta de memoria antes de escanear.
Asegúrese de que la tarjeta de memoria esté desbloqueada (que se pueda sobreescribir)
El Escáner acepta únicamente tarjetas de memoria con sistemas de archivos FAT16 o FAT32. Los
sistemas de archivo NTFS y otros no son compatibles.
8 Asistencia al cliente: http://www.pandigital.net/kodaksupport
Page 55

Encendido del Escáner
1. Pulse el botón
obtener más información acerca de las luces indicadoras, consulte “Luces indicadoras” en la página 5.)
2. Espere hasta que el indicador de encendido deje de parpadear y después se apague. El indicador de
Estado/Tarjeta seguirá encendido, lo que indica que el Escáner está preparado.
No inser t e u n o r iginal en la ranura de alimentación c ua ndo el indicador de enc e ndido está
parpadeando. El original no se escaneará.
Encendido. Las luces del indicador de encendido y Estado/Tarjeta parpadean. (Para
Configuración de la resolución de escaneo
La resolución de escaneo se mide en ppp (puntos por pulgada). Cuanto más alto es el ppp, más detalles del original se
capturan con el escáner y la imagen producida será de mayor calidad. Sin embargo, un ppp alto producirá una imagen de
mayor tamaño y ocupará más espacio en la tarjeta de memoria.
1. Para cambiar la resolución de escaneado, pulse y suelte el botón de encendido. La resolución de escaneado
cambia cada vez que presiona el botón, y el color del indicador del Estado/Tarjeta también cambiará de
acuerdo a la resolución seleccionada:
Naranja: 600 ppp (modo fino, prefijado)
Verde: 300 ppp (modo normal)
La resolución de escaneado para transparencias se fija en 1200 ppp y no se puede cambiar.
2. Espere hasta que el indicador de encendido deje de parpadear y después se apague. El indicador de
Estado/Tarjeta seguirá encendido, lo que indica que el escáner está preparado.
No inserte un original en la ranura de alimentación cuando el indicador de encendido está parpadeando.
El original no se escaneará.
Escaneado de una fotografía
1. Con la foto hacia arriba y en la orientación correcta, coloque un borde de la foto en el Escáner y ajuste
la palanca de la guía de modo que la foto quede alineada contra el lado izquierdo de la ranura de
alimentación.
PRECAUCIÓN: No escanee fotos brillantes en ambientes húmedos (humedad superior a 70% RH);
Alinear a la
izquierda
la superficie de la foto se volverá pegajosa y podría atascar el Escáner.
2. Inserte el original nivelado y plano en la ranura de alimentación.
El original se alimentará a través de la ranura y se escaneará automáticamente. Las luces indicadoras
de Estado/Tarjeta parpadearán durante el escaneado.
Para evitar una calidad de imagen pobre, reserve suficiente espacio detrás del Escáner para que la
foto complete la alimentación al Escáner.
Cuando finaliza el escaneado, las luces indicadoras de Estado/Tarjeta parpadean mientras el Escáner
almacena la foto en la tarjeta de memoria.
Espere a que las luces indicadoras dejen de parpadear antes de insertar y escanear la siguiente foto.
Asistencia al cliente: http:/ /www.pandigital.net/kodaksupport 9
Page 56

PRECAUCIÓN: Inserte sólo una foto por vez, e inserte la siguiente foto cuando ya se haya escaneado la anterior. De lo
Siempre coloque el escáner en una superficie plana para el escaneado. No sostenga el escáner mientras escanea.
No quite la tarjeta de memoria ni desconecte el suministro eléctrico o baterías cuando las luces indicadoras estén
parpadeando.
No quite las baterías durante el escaneado.
Este Escáner produce archivos de formato JPEG (.jpg). El atributo de fecha/hora no se agregará.
No inserte el adaptador de guía de tiras de película en la ranura de alimentación de transparencias mientras escanea
una foto.
Para obtener más información sobre el modo en que el Escáner almacena los archivos de imágenes escaneadas en la
tarjeta de memoria , co n sulte la “Orientación” en la p ágina Error! Bookmark not defined..
Si la tarjeta de memoria está casi llena (menos de 10 MB restante), el indicador de Estado/Tarjeta parpadea (consulte
“Luces indicadoras” en la página 5). Use otra tarjeta o transfiera las imágenes a su PC.
Para apagar el Escáner, pulse el botón de encendido durante un segundo. El indicador de encendido
contrario, el Escáner no funcionará correctamente.
parpadeará y después se apagará.
Ahora puede desconectar y quitar la tarjeta de memoria de manera segura.
El Escáner se apagará automáticamente si queda inactivo por 5 minutos. (Si está conectado a un equipo, el
Escáner no se apagará automáticamente).
Escudriñar 35 Negativos de Mm y Desliza
Este escáner sólo admite el escaneado de negativos de tiras de película de 6 cuadros negativos/monocromáticos de 35
mm y slides de 35 mm que normalmente están disponibles en los estudios fotográficos de su localidad.
Las tiras de película en ciertas condiciones no son aptas para el escaneado. Consulte Tipos de originales aptos y no
aptos en la página 6.
Invertir/Rotar imagen automáticamente
El Escáner puede detectar la orientación de una tira de película cuando los números impresos en el borde de las
tiras de película es tán en la misma orientación que la imagen.
Si alimenta la tira de película a la imagen invertida o al revés, el Escáner automáticamente ajustará la imagen
escaneada durante el escaneado.
Las siguientes orientaciones generarán la misma imagen escaneada:
No requiere rotación
Por ejemplo, la imagen inferior (arriba) está al revés pero los números están colocados correctamente. Si se
alimenta en esta orientación, la imagen no se rotará y la imagen escaneada quedará al revés.
La capacidad de reconocimiento actual tiene dificultades para distinguir la dirección de los números “3”,
“6”, “8” y “9”. Si la posición de los números está cercana al borde de la tira de película, pueden
desgastarse o dañarse fácilmente. Cuando el número en el borde no se puede detectar en la posición
esperada o cuando no cumple con las condiciones mencionadas, se desactivará la función Invertir/Rotar
automáticamente.
Inversión automática
Rotación automática
Si los núme r o s y la imagen no están en la misma orientación o si los números están
dañados, la función de inversión/rotación automática no rotará la imagen.
Imagen final escaneada
10 Asistencia al cliente: http://www.pandigital.net/kodaksupport
Page 57

Alimentación de tiras de película
1. Asegúrese de que la ranura de alimentación de transparencias esté libre de originales y de que haya suficiente espacio
detrás del escáner para que la tira de película se alimente completamente a través de la unidad.
2. Inserte completamente el adaptador de la guía de la tira de película en la ranura de alimentación hasta
que permanezca firmemente en su posición, como se indica. Tenga cuidado de no doblar las partes
metálicas del adaptador de la guía de la tira de película al insertarlo.
Espere hasta que las luces indicadoras se encuentren en el estado “Preparado para su uso” antes de
continuar.
3. Inserte la tira de película en el adaptador de
guía de tira de película.
4. El original se alimentará en la ranura y se escaneará automáticamente.
La longitud común de la película está hasta 6 negativos. Para prevenir calidad pobre de imagen, la
reserva espacio que adecuado atrás del escáner para la película para completar las comidas de
escáner.
La longitud normal de las tiras de películas es de hasta 6 negativos. Para evitar una calidad de imagen
pobre, reserve suficiente espacio detrás del Escáner para que la tira de película complete la
alimentación al Escáner.
Cuando se escanea una tira de película, el escáner automáticamente reconoce el tipo de tira de película
(monocromo o negativo) y determina el escaneado más apropiado y las opciones de mejora de color
para el escaneado.
El Escáner escanea las tiras de película en una mayor resolución; por lo tanto, la velocidad del
escaneado es más le nta que la del escane ado de fotos. Esto no e s u n d ef e cto en el funcionam iento.
Si la tira de película se extrae del escáner mientras se escanea, el proceso de escaneado continuará
durante algunos segundos y después se detendrá. Esto no es un defecto en el funcionamiento.
dirección de la tira de película
o diapositiva
Preste atención a la
Cuando finaliza el escaneado, las luces indicadoras de Estado/Tarjeta parpadean mientras el Escáner
almacena la foto en la tarjeta de memoria.
Espere a que las luces indicadoras dejen de parpadear antes de insertar y escanear el siguiente original.
PRECAUCIÓN: Inserte sólo un original por vez, e inserte el siguiente original cuando ya se haya escaneado el anterior.
No quite la tarjeta de memoria ni desconecte el suministro eléctrico o baterías cuando las luces indicadoras estén
parpadeando.
Este Escáner produce archivos de formato JPEG (.jpg). El atributo de fecha/hora no se agregará.
Por favor, no inserte una foto en la ranura de alimentación de fotos mientras escanea tiras de películas o diapositivas.
Si la tarjeta de memoria está casi llena (menos de 10 MB restante), el indicador de Estado/Tarjeta parpadea (consulte
“Luces indicadoras” en la página 5). Use otra tarjeta o transfiera las imágenes a su PC.
Por favor, quite la diapositiva del soporte de diapositivas mientras escanea.
De lo contrario, el escáner no funcionará correctamente.
Para quitar el adaptador de guía de tiras de película después de haber escaneado todos los originales,
quítelo suavemente de la ranura de alimentación de transparencias.
Para apagar el Escáner , pulse el botón de encendido durante un segundo. El indicador de encendido
parpadeará y después se apagará.
Ahora puede desconectar y quitar la tarjeta de memoria de manera segura.
El escáner se apagará automáticamente si queda inactivo por 5 minutos. (Si está conectado a un equipo,
el escáner no se apagará automáticamente).
Asistencia al cliente: http://www.pandigital.net/kodaksupport 11
Page 58

Escaneado de diapositivas montadas
1. Asegúrese de que la ranura de alimentación de transparencias esté libre originales y de que haya suficiente espacio detrás
del escáner para que el soporte de diapositivas se alimente completamente a través de la unidad.
Preste atención a la dirección
de la diapositiva montada.
2. Abra el soporte de diapositivas, coloque la
diapositiva montada en el soporte como se
indica y después cierre el soporte.
3. Inserte el nivel de soporte de diapositivas en la ranura de alimentación de transparencias. El original
se alimentará en la ranura y se escaneará automáticamente.
El escáner escanea transparencias en una mayor resolución; por lo tanto, la velocidad del
escaneado es más lenta que la del escaneado de fotos. Esto no es un defecto en el funcionamiento.
Cuando finalice el escaneado, las luces indicadoras de Estado/Tarjeta parpadean mientras el escáner
almacena la foto en la tarjeta de memoria.
Espere a que las luces indicadoras dejen de parpadear antes de insertar y escanear el siguiente original.
PRECAUCIÓN: Inserte sólo un original por vez, e inserte el siguiente original cuando ya se haya escaneado el anterior.
No quite la tarjeta de memoria ni desconecte el suministro eléctrico o baterías cuando las luces indicadoras estén
parpadeando.
Por favor, no inserte una foto en la ranura de alimentación de fotos mientras escanea una diapositiva.
Quite la diapositiva del soporte de diapositivas cuando finaliza el escaneado.
Este escáner produce archivos de formato JPEG (.jpg). El atributo de fecha/hora no se agregará.
Si la tarjeta de memoria está casi llena (menos de 10 MB restantes), el indicador de Estado/Tarjeta parpadea (consulte
“Luces indicadoras” en la página 5). Use otra tarjeta o transfiera las imágenes a su PC.
De lo contrario, el escáner no funcionará correctamente.
Para apagar el escáner, pulse el botón Encendido durante un segundo. El indicador de encendido
parpadeará y después se apagará.
Ahora puede desconectar y quitar la tarjeta de memoria de manera segura.
El escáner se apagará automáticamente si queda inactivo por 5 minutos. (Si está conectado a un
equipo, el escáner no se apagará automáticamente).
Recorte automático de imágenes
El Escáner tiene incorporada una función de recorte que detecta y recorta los bordes oscuros de un original durante el
proceso de escaneo (observe la ilustrac ión que apare ce a cont in ua c ió n).
Tamaño de recorte (según se mide en el original)
Máx. 1.5 mm
Máx.
1.5
Máx.
1.5 mm
Use la funda plástica cuando escanee los originales que tienen medidas diferentes a las medidas estándar 3,5 x 5 pulg. o 4
x 6 pulg. Según la forma, puede realizar recortes manuales adicionales en la imagen escaneada, usando su propio
software de edición de fotografí as, para lograr la imagen final desead a.
12 Asistencia al cliente: http://www.pandigital.net/kodaksupport
Original
Máx. 1.5 mm
Imagen escaneada
Page 59

Cuando se escanean originales más oscuros (por ejemplo, una foto del cielo
nocturno), Inserte por favor la original en una dirección diferente (orientación) y
trate otra vez.
Cuando la visualización radiográfica sobreimpone, color más viejo o más ligero (destiñó)
originales de película, un irregular auto-cortando puede ocurrir. Corte la película en
películas y rescan individuales ellos.
Conectar el Escáner al PC
Al conectar el Escáner a una computadora puede tener acceso a las imágenes escaneadas en la tarjeta de memoria de forma
directa, o bien utilizar el Escáner como lectora de tarjetas de memoria, para poder copiar, pegar o eliminar archivos libremente
desde y hacia la tarjeta de memoria por medio de la computadora.
Requisitos del sistema
Sistema operativo: WINDOWS XP, VISTA, WINDOWS 7 o posterior(32 bits).
Macintosh: Sistema operativo Mac OS 10.5, 10.6 o posterior
Puerto USB compatible: puerto USB 1.1 ó 2.0
1. Conecte el cable del adaptador de suministro eléctrico al conector del Escáner.
2. Conecte el adaptador de suministro eléctrico a un tomacorriente.
El tipo de conector y el enchufe de la ilustración pueden ser distintos en su zona.
3. Inserte una tarjeta de memoria SD desbloqueada (que se pueda escribir) en la ranura de tarjeta de
memoria.
Se necesita la tarjeta de memoria. Los archivos de imagen escaneados se almacenarán en la
tarjeta de memoria introducida y después podrá tener acceso a las imágenes escaneadas
mediante el EXPLORADOR DE WINDOWS o el asistente para importar fotografías de Vista.
4. Conecte el extremo menor del cable USB (incluido con el Escáner) al conector Mini USB del Escáner.
5. Encienda la PC y conecte el extremo mayor del cable USB a un puerto USB de la PC.
6. Pulse el botón Encendido; el indicador de encendido parpadea. (Para obtener más información,
consulte “Luc es indicadoras e n la p ágina 5.)
PRECAUCIÓN: No quite la tarjeta de memoria mientras la computadora está teniendo acceso a los
El Escáner será reconocido por la computadora como un disco removible. Ahora está preparado para ver o editar los
archivos en la tarjeta de memoria.
archivos almacenados en ella.
Asistencia al cliente: http://www.pandigital.net/kodaksupport 13
Page 60

Para usuarios de WINDOWS VISTA
Cuando la PC reconoce el Escáner, con una tarjeta SD introducida, aparece
la ventana emergente “AutoPlay” (Reproducción automática).
Para ver fotografías en la PC mientras escanea, cambie la configuración del
Explorador de Windows de la siguiente manera:
1. Marque la casilla
2. Seleccione la opción
3. Cuando el Escáner se conecte con la PC, aparecerá una unidad adicional
en la ventana del EXP L O RADOR. Si está usand o la t a rjeta de memoria
KODAK SD, la unidad se llamará KODAKSCN [letra de unidad].
Si utiliza su propia tarjeta de memoria la unidad se llamará Disco extraíble
[letra de la unidad] o bien tendrá el nombre personalizado que se le haya
asignado a su tarjeta de memoria anteriormente.
No seleccione “No realizar ninguna acción” ni “Establecer los valores
predeterminados de Reproducción automática en el Panel de control”.
Realizar esto siempre con las fotografías.
Abrir carpeta para ver archivos.
Para usuarios de WINDOWS XP
Cuando la PC reconoce el Escáner con una tarjeta SD introducida, aparece
una ventana emergente.
Para ver fotografías en la PC mientras escanea, cambie la configuración del
EXPLORADOR DE WINDOWS de la siguiente manera:
1. Seleccione la opción Abrir carpeta para ver archivos usando el
EXPLORADOR DE WINDOWS.
2. Seleccione la casilla “Realizar siempre la opción seleccionada" y luego
haga clic en Acepta r.
3. Cuando el Escáner se conecte con la PC, aparecerá una unidad adicional
en la ventana del EXP L O RADOR. Si está usand o la t a rjeta de memoria
KODAK SD, la unidad se llamará KODAKSCN [letra de unidad].
Si utiliza su propia tarjeta de memoria la unidad se llamará Disco extraíble
[letra de la unidad] o bien tendrá el nombre personalizado que se le haya
asignado a su tarjeta de memoria anteriormente.
Para usuarios de WINDOWS 7
Cuando su PC reconoce el Escáner con una tarjeta SD introducida, aparece
el EXPLORADOR DE WINDOWS.
1. Seleccione la unidad
2. Abra la carpeta
KODAKSCN en la ventana del EXPLORADOR.
PHOTO1 para ver sus fotos escaneadas.
Para usuarios MAC
Cuando el equipo reconoce el escáner con una tarjeta SD insertada, el ícono
de volumen aparece en el escritorio. Haga doble clic para abrir una ventana
Finder.
1. Haga doble clic en el ícono
2. Abra la carpeta
14 Asistencia al cliente: http://www.pandigital.net/kodaksupport
PHOTO1 para ver sus fotos escaneadas.
KODAKSCN en el escritorio.
Page 61

Convención de nombres de imágenes escaneadas
Después del primer escaneado, se agrega una carpeta llamada PHOTO1 a la estructura de archivos de la tarjeta de
memoria.
Las imágenes escaneadas se guardan en la carpeta PHOTO1. Cada imagen escaneada recibe un nombre de archivo que
contiene el prefijo EK_ seguido por un número secuencial de 4 dígitos en el orden en el que se guarden las imágenes. Por
ejemplo, EK_0001.jpg, EK_0002.jpg.
Si los nombres de archivos llegan a EK_9999.jpg en la carpeta PHOTO1, se creará automáticamente una nueva carpeta
llamada PHOTO2 para guardar los nuevos archivos en orden secuencial, y así sucesivamente.
En una tarjeta de memoria puede haber hasta 9 carpetas (PHOTO1...9, EK_0001... EK_9999). Si se supera esta cantidad,
la luz indicadora de Estado/Tarjeta comienza a parpadear.
Ahora puede ver o editar los archivos que se encuentran en la tarjeta de memoria con su propio software de edición de
imágenes.
Desconexión segura del Escáner de la PC
Para usuarios Windows
1. En la bandeja del sistema WINDOWS, haga clic en el ícono para quitar hardware como se indica debajo.
Ícono para quitar hardware
2. Haga clic en el mensaje ‘Quitar de manera segura el dispositivo de almacenamiento masivo USB’ con la unidad
correspondiente.
3. Cuando aparece el mensaje ‘Es seguro retirar el hardware’, puede quitar el cable USB del Escáner con seguridad.
Para usuarios MAC
En el escritorio, haga clic con el botón secundario en el volumen de KODAKSCN, entonces selecciona Expulsa
"KODAKSCN".
Software Scan PC para Escáneres personales de fotos KODAK
Con el software Scan PC para Escáneres personales de fotos KODAK (Scan PC), puede escanear fotos fácilmente y guardarlas
directamente al PC conectado.
Requisitos del sistema
Sistema operativo: WINDOWS, XP, SP2 o posterior, VISTA, WINDOWS 7 - 32-Bit
(El software Scan PC no es compatible con el sistema operativo de MAC)
Velocidad del procesador: INTEL PENTIUM IV. 1.2 GHz
RAM: 512 MB mínimo
10 MB de espacio libre de disco duro para Scan PC para Escáneres personales de fotos KODAK.
200MB de espacio libre de disco duro para KODAK EASYSHARE Software
NOTA: El reproductor APPLE QUICKTIME es obligatorio para algunas funciones de software. Visite APPLE para
descargar la última versión del reproductor QUICKTIME.
Asistencia al cliente: http://www.pandigital.net/kodaksupport 15
Page 62

Instalar software Scan PC
1. Conecte el Escáner a su PC (consulte la página 13), usando la tarjeta Memoria
de su dispositivo móvil KODAK MICROSD
Escáner).
2. En la ventana de instalación, seleccione Scan PC para escáneres de fotos,
diapositivas y negativos Kodak, y después haga clic en
3. En la ventana del asistente de instalación, haga clic en
4. Haga clic en
seleccione la ubicación deseada y después haga clic en
5. En la ventana
6. Después de que se instala el software, haga clic en
Siguiente para instalar en una u bicación predeterm inada o
Listo para instalar, haga clic en Instalar.
en el adaptador SD (incluido con el
Instalar.
Siguiente.
Siguiente.
Terminar.
Una vez instalado, el software
bandeja de sist ema.
Si desea cerrar el Software Scan PC para Escáneres personales de fotos KODAK temporalmente, haga clic con el botón
derecho sobre el ícono y seleccione
Scan PC se ejecuta automáticamente al iniciar la PC, y el ícono permanece en la
Salir.
Uso del software Scan PC
PRECAUCIÓN: Para maximizar el uso de memoria, cierre todos los programas de aplicaciones antes de escanear tiras
1. Al conectar el Escáner mediante un cable USB a la PC, se enciende la luz
de Estado/Tarjeta de forma intermitente. Se abrirá la ventana del software
Scan PC
2. Especifique la ubicación donde desea guardar las imágenes escaneadas:
~ Tarjeta de memoria
~ Escanear a PC
3. Haga clic en
Después del primer escaneo, se agrega una carpeta llamada PHOTO1 a la estructura de archivos como a continuación:
~ Tarjeta de memoria: \PHOTO1
~ Escanear a PC: WINDOWS 2000 y XP: C:\Documents and Settings\(su nombre du usuario)\My Documents
\My Pictures\PHOTO1
4. Escanee el original tal como se indica al principio de la página 9.
5. La imagen escaneada se guardará en la ubicación seleccionada en el paso 2.
Cada imagen escaneada recibe un nombre de archivo que contiene el prefijo
de 4 dígitos en el orden en el que se guarden las imágenes. Por ejemplo,
Si los nombres de archivos llegan a EK_9999.jpg en la carpeta PHOTO1, se creará automáticamente una nueva
carpeta llamada
Nota: En una tarjeta de memoria puede haber hasta 9 carpetas (
esta cantidad, la luz indicadora de Estado/Tarjeta comienza a parpadear.
de películas de múltiples imágenes.
.
Aplicar y la ventana se cerrará.
WINDOWS VISTA o WINDOWS 7: C:\Users\(su nombre de usuario) \Pictures\PHOTO1
También puede hacer clic en el botón
para seleccionar otra ubicación si lo prefiere.
EK_ seguido por un número secuencial
EK_0001.jpg, EK_0002.jpg.
PHOTO2 para guardar los nuevos archivos en orden secuencial, y así sucesivamente.
PHOTO1...9, EK_0001... EK_9999). Si se supera
Lanzar manualmente el software Scan PC
Haga doble clic en el icono
icono
Si desea cerrar el software Scan PC temporalmente, haga cl ic c o n e l b otón derecho
sobre el ícono y seleccione Salir.
en la bandeja de sistema y seleccione Configuración.
en el escritorio, o haga clic con el botón derecho en el
Desinstalar el software Scan PC
1. En el menú Inicio, seleccione Todos los programas > Software Scan PC > Desinstalar.
2. Siga las instrucciones del asistente de desinstalación para desinstalar el software.
3. Reinicie la PC cuando el asistente se lo solicite.
16 Asistencia al cliente: http://www.pandigital.net/kodaksupport
Page 63

Si desea reiniciar más tarde, tenga en cuenta que la desinstalación del software Scan PC no se completará hasta
que reinicie el equipo.
Software KODAK EASYSHARE para PC
Después de usar el Software Scan PC para Escáneres personales de fotos KODAK para escanear y almacenar sus imágenes en
su PC, si lo desea, puede usar el software KODAK EASYSHARE para organizar, editar, imprimir y compartir sus imágenes en
línea.
Requisitos del sistema
Sistema operativo: WINDOWS XP, WINDOWS VISTA, WINDOWS 7
Intel Pentium IV procesador
1.2GHZ o mejor velocidad de procesador
200MB libres de esp acio de disco duro
512MB RAM
USB 2,0 compatible
Instalación de KODAK EASYSHARE Software
1. Inserte la tarjeta Tarjeta de memoria de Móvil de KODAK MICROSD en el
adaptador SD y después insértela en el Escáner.
2. Conecte el Escáner a su PC (consulte las instrucciones en la página 13);
se abrirá el cuadro de diálogo de la instalación.
3. Seleccione
Kodak EasyShare Software.
4. Siga los anuncio s p ara instalar y reg ist rar su software.
5. Después de que se instala el software, haga clic en
Terminar.
Asistencia al cliente: http://www.pandigital.net/kodaksupport 17
Page 64

Lanzamiento de KODAK EASYSHARE Software
1. Haga doble clic en el acceso directo KODAK EASYSHARE
su escritorio o seleccione
Inicio>Programas.
2. Haga clic en
Agregar imágenes.
KODAK EASYSHARE Software en la lista
3. Seleccione la carpeta
(según se designe durante el uso de Scan PC, pág. 16).
4. Seleccione las imágenes deseadas para agregar a un álbum.
5. Introduzca el nombre de destino del álbum nuevo.
6. Haga clic en
7. Al usar la fila superior de opciones en la ventana KODAK EASYSHARE
Software, las imágenes que ha copiado en los álbumes se pueden
editar y mejorar, copiar a otras ubicaciones y cargar directamente a
sus cuentas de Facebook o Flickr para compartirlas rápidamente.
8. Use la
funciones.
Agregar imágenes, y después Hecho.
Ayuda para obtener las instrucciones completas de todas las
PHOTO1 que contiene las imágenes escaneadas
en
Desinstalar el software KODAK EASYSHARE
1. Abra el Panel de control de WINDOWS.
2. WINDOWS VISTA: Seleccione
WINDOWS 7: Seleccione
WINDOWS XP: Seleccione
3. Seleccione
4. Siga los anuncios para completar la desinstalación.
Kodak EasyShare Software y después haga clic en Desinstalar.
Programas> Desinstalar un programa
Programas y características
Agregar o quitar un programa
Mantenimiento del Escáner
Limpieza del Escáner
Para mantener la calidad de la imagen escaneada y evitar la acumulación de polvo, se recomienda que limpie el Escáner
(gabinete exterior, sensor de imágenes y rodillo interior del Escáner) aproximadamente cada 50-100 escaneados.
Limpie el Escáner si también:
Aparecen líneas o tiras verticales en la imagen escaneada
No se alimentan fotos o tiras de películas
Utilice sólo las herramientas recomendadas y proporcionadas para la limpieza del Escáner.
ADVERTENCIA: No utilice solventes ni líquidos corrosivos (po r eje mplo: alcohol, kerose ne, etc) para limpiar ninguna parte
del Escáner, de lo contrario el material plástico sufrirá daños permanentes.
Limpieza de la carcasa externa
1. Utilice un removedor de polvo apropiado para quitar el polvo del Escáner.
2. Utilice una tela ligeramente humedecido para retirar cualquier mancha en la superficie del Escáner.
3. Limpie el Escáner con una tela seca, limpia y sin pelusas.
18 Asistencia al cliente: http://www.pandigital.net/kodaksupport
Page 65

Limpieza del sensor de imágenes de fotos
1. Primeramente , l i m pie la carcasa ext e r n a d el Escáner.
2. Con el escáner apagado y desconectado del suministro eléctrico, inserte el hisopo de limpieza
del sensor de imágenes en un extremo de la ranura de salida de fotos.
Asegúrese de que no haya polvo visible en el hisopo antes de introducirlo en la ranura de
salida.
3. Deslice suavemente el hisopo hacia adelante y atrás de un extremo de la ranura al otro, cinco
o seis veces consecutivas.
No aplique demasiada fuerza sobre el hisopo.
4. Quite el hisopo de la ranura y almacénelo en un lugar seguro, protegido del polvo.
Limpieza del sensor de imágenes de transparencias
1. Primero limpie el gabinete externo del escáner.
2. Con el escáner apagado y desconectado del suministro eléctrico, inserte el hisopo de limpieza
del sensor de imágenes de fotos en un extremo de la ranura de salida de fotos.
Asegúrese de que no haya polvo visible en el hisopo antes de insertarlo en la ranura de
alimentación.
Limpie el rodillo
3. Deslice suavemente el hisopo hacia adelante y atrás de un extremo de la ranura al otro, cinco
o seis veces consecutivas.
No aplique demasiada fuerza sobre el hisopo.
4. Quite el hisopo de la ranura y almacénelo en un lugar seguro, protegido del polvo.
1. Primero limpie el gabinete externo del Escáner.
2. Con el Escáner apagado, pulse el botón Encendido por más de 5 segundos. El Escáner
ingresará al modo de limpieza. Los indicadores del Estado/Tarjeta se encenderán.
3. Inserte la hoja de limpieza de rodillos suministrada en la ranura de alimentación de
transparencias como se indica.
Al insertar la hoja, tenga en cuenta la dirección de la esponja blanca.
Asegúrese de que no haya polvo visible en la hoja antes de insertarla en la ranura de
alimentación.
La hoja de limpieza ingresará en la ranura de alimentación automáticamente y el proceso de
limpieza comenzará.
Durante el proceso de limpieza, las luces indicadoras de Estado/Tarjeta parpadearán de manera
lenta y simultánea.
Asistencia al cliente: http://www.pandigital.net/kodaksupport 19
Page 66

Cuando el proceso de limpieza está completo, la hoja de limpieza se eyectará de la ranura de
alimentación y la luz indicadora de encendido se apagará.
4. Elimine la hoja de limpieza. Guárdela en un lugar seguro y protéjalo del polvo.
Calibración del Escáner
Si la imagen escaneada se ve borrosa o aparecen rayas extrañas sobre ella, es posible que deba calibrar el Escáner para que el
sensor continúe teniendo la precisión original.
Siga las instrucciones que comienzan en la página 18 para limpiar el rodillo y el sensor de imagen, y siga las instrucciones
que aparecen en “Configuración inicial” en la página Error! Bookmark not defined. para preparar el Escáner.
Inserte la tarjeta de calibración en la ranura de alimentación de fotos como se indica.
El Escáner escaneará el patrón de la tarjeta de calibración y realizará la calibración del sensor
interno automáticamente.
Asegúrese de que la tarjeta de calibración se haya introducido en la dirección correcta, de lo
contrario la calibración no resultará efectiva.
Uso de baterías
1. Se recomienda usar baterías recargables tipo NI-MH. Tenga en cuenta que no hay función de carga de baterías en el escáner.
2. Siempre asegúrese de que las baterías se instalen con las terminales positivas y negativas en la dirección correcta como se
indica en el compartimiento de las baterías.
3. Los distintos tipos d e baterías tienen dif e r entes características. No mezcle los diferentes tipos.
4. No mezcle baterías usadas y nuevas porque acortará la vida útil de las baterías o causará derrames químicos de las baterías
usadas.
5. Los químicos que emiten las baterías pueden causar irritación de la piel. Si un material químico escapa de las baterías, límpielo
inmediatamente con una paño seco y reemplace las baterías lo más pronto posible.
6. Cuando el escáner indica que la batería “está por agotarse” en el estado “lista para el uso”, reemplace las baterías antes de
comenzar el escaneado para evitar que se detenga durante la operación.
PRECAUCIÓN: Por favor, quite las baterías cuando finalice el escaneado.
Cómo guardar el Escáner
Si el Escáner no va a ser utilizado durante un período prolongado, siga las siguientes instrucciones a fin de guardarlo y utilizarlo
en el futuro.
1. Desconecte el Escáner del suministro eléctrico.
2. Coloque el Escáner y el adaptador de suministro eléctrico en una caja o bolsa para evitar la acumulación de polvo.
3. Colóquelo en un lugar fresco y seco, fuera del alcance de niños pequeños.
4. Para evitar deformar el compartimiento superior, no coloque objetos pesados en la parte superior del escáner.
5. Después de un largo período de almacenamiento, se recomienda que limpie y calibre el Escáner antes de usarlo.
20 Asistencia al cliente: http://www.pandigital.net/kodaksupport
Page 67

Especificaciones técnicas
A
Especificación Escáner de fotos, diapositivas y negativos KODAK P461
Tipo de papel
Tamaño de documento normal 3.5 ”x 5 ”, 4” x 6” y 4 x 11”
Foto: Hasta 4.1 x 12” (Uso común: Fotos 3.5 x 5” y 4 x 6”)
Tira de película: tira de película de negat ivos 35 mm Color / B&W
Diapositiva: Diapositiva montada de 35 mm Color / B&W
Tamaño real de la ranura de
alimentación
Longitud: 12 pulg. (304.8 mm)
Formatos de archive de salida JPEG con compresión (4:2:2)
Resolución (fija)
Tarjetas de
Interfaces
Almacenamiento masivo USB
compatible
Suministro el éctrico
Baterías
Alimentación de foto
Alimentación de transparencias
Dimensiones
Peso neto 0.75 lbs (455 g)
Temperatura de funcionamiento
Humedad de funcionamiento
Temperatura de almacenamiento -20ºC ~ 60ºC (59oF~95oF); 10% RH ~ 90% RH
memoria
USB Puerto Mini USB compatible USB 2.0
Preguntas frecuentes
Hasta 4.1” x 12”
nchura 4.1 pulgadas (105 mm)
Foto: 600 x 600 ppp (predeterminado) y 300 x 300 ppp
Tira de película: 1200 x 1200 ppp
Consulte “Tipos de memorias compatibles” (página 7)
WINDOWS 2000 / XP / VISTA / WINDOWS 7
Entrada 100-240V AC, 50/60 Hz, Salida 5V, 1ª
Utiliza cuatro baterías AAA (UM-4) (no incluídas). Se recomienda el uso de baterías recargables
para una cantidad óptima de escaneos. La duración de baterías recargables utilizando una
resolución de 600dpi promedia más de 100 escaneos por carga. La duración real de la batería
puede variar de pendiendo del uso.
Tipo de hoja alimentada (una sola pasada)
Diseño de rodillo doble
Tira de película alimentada con adaptador de guía de tira de película
Diapositivas montadas con soporte de diapositivas
2.25 pulg. (L) x 10.5 pulg. (A) x 2 pulg. (H)
61.7 mm (L) x 269.3 mm (A) x 52 (H) mm
15ºC ~ 35ºC (59oF~95oF);
20% RH ~ 70% RH
P: ¿Que puede ocasionar la aparición de líneas extrañas en la imagen escaneada o por qué la imagen no es clara?
S: Verifique lo siguiente:
¿El original presenta rayas o es nítido? Quite las manchas o el polvillo del original antes de escanear.
¿El Escáner se ha utilizado durante mucho tiempo sin haberse limpiado o calibrado? Siga las instrucciones de "Limpieza
del Escáner" en la página 18 y “Calibración del Escáner " en la página 20, e inténtelo nuevamente.
P: ¿Por qué la imagen de la tira de película escaneada no rota correctamente?
La capacidad “auxiliar” actual de OCR tiene dificultades para distinguir la dirección de algunos números, (p. ej. “6”, “9”). Si la
S:
posición del núm ero está cerca del borde de la ti ra de película, se puede desg astar o dañar fácilment e y después no se
podrá detectar en la posición esperada, o se encontrarán las condiciones requeridas para que la función automática
Invertir/Rotar esté desactivada
volver a escanear la tira de película.
(consulte p ágina 10 ).
Por favor, siga el indicador en el adaptador de la tira de película para
Asistencia al cliente: http://www.pandigital.net/kodaksupport 21
Page 68

P: ¿Cómo retiro un original que está atascado a medio camino en la ranura de alimentación?
R: Pulse el botón Encendido; el escáner retirará el original de modo que pueda quitar el original atascado de la ranura de
alimentación en el modo de escaneado de fotos/diapositivas y la ranura de salida de transparencias en modo de escaneado
de tira de película.
P: ¿Qué hace que el indicador de estado parpadee rápidamente y no se escanee?
Verifique lo siguiente:
S:
¿La tarjeta de memoria se ha introducido correctamente en la ranura para tarjetas de memoria? Vuelva a introducir la
tarjeta e intén telo nuevamente .
¿Está bloqueada la tarjeta SD (configurada con protección contra escritura)? Desbloquee la tarjeta.
¿Está llena la tarjeta de memoria? El indicador parpadea cuando el espacio libre en la tarjeta de memoria es menor a 1
MB. Utilice otra tarjeta de ser necesario.
Asegúrese de que las tarjetas de memoria estén solamente en formatos de archivo FAT o FAT32, no en NTFS ni ningún
otro formato de archivo. Vuelva a dar formato a la tarjeta de memoria si necesita usarla con el escáner.
¿Introdujo el siguiente original antes de que se completara el proceso de escaneo del anterior? Apague el Escáner,
vuelva a encenderlo e inténtelo nuevamente. Asegúrese de escanear el siguiente original cuando se haya completado el
proceso de esca neo del anterior.
¿Supera el largo del original el tamaño máximo aceptable? Consulte "Tipos de originales adecuados y no adecuados" en
la página 6 para obtener más información.
P: ¿El escáner debe estar caliente si se lo toca?
S: Es normal que el Escáner emita una pequeña cantidad de calor (alrededor de 30 a 45 ºC) después del uso prolongado. No
obstante, si siente olores extraños provenientes del Escáner, o bien, si el Es cáne r se s ien te cal ien te, de sco nect e el Escá ner
del suministro eléctrico o de la computadora de inmediato.
P: ¿Qué hace que el escáner se apague en el medio de un escaneado?
R: Compruebe l o siguiente:
Si el suministro es por baterías, por favor, quite y reemplace las baterías y después inicie nuevamente el escáner.
Si el suministro eléctrico es externo, desconecte el suministro eléctrico, conéctelo nuevamente y reinicie el escáner.
Si el original se atascó en la ranura de alimentación, pulse el botón de encendido y el escáner eyectará el original.
P: ¿Por qué obtengo únicamente 10 a 20 escaneos cuando utilizo baterías como fuente de energía?
R: Re comendamos utilizar baterías recargables para una cantidad óptima de escaneos. La duración de baterías recargables
utilizando una r esolución de 600 dpi promedia má s de 100 escaneos por c arga. La duración rea l de la batería p uede variar
dependiendo del uso. No recomendamos ni alentamos el uso de baterías alcalinas.
Actualización de software y firmware
En ocasiones actualizamos el firmware (el software que ejecuta el Escáner). Descargue las versiones más recientes:
www.pandigital.net/kodaksupport.
Garantía Limitada
La garantía limitada que se describa a continuación es ofrecida por Pandigital en relación con los productos electrónicos de la
marca Pandigital adquiridos en los Estados Unidos de América. Pandigital garantiza que este producto no tiene fallas materiales
ni de mano de obra de la siguiente manera:
MANO DE OBRA: Pandigital reparará o reemplazará el producto, según su criterio, sin cargo si se encuentran fallas durante un
período de un (1) año a partir de la fecha de compra. Después de ese período, se cobrará la mano de obra de acuerdo con cada
caso.
PIEZAS: Pandigital suministrará sin costo piezas nuevas o reparadas de repuesto, según su criterio, sin cargo, si se encuentran
fallas durante un período de un (1) año a partir de la fecha de compra. Después de ese período, se cobrará el valor de las piezas
de acuerdo con cada caso. Las modificaciones no aprobadas por la parte responsable del cumplimiento podría anular la autoridad
del usuario para poner el equipo en funcionamiento.
Esta garantía no cubre: (1) el accionar, la instalación o la configuración del cliente; (2) los daños físicos o provocados por un
accidente, uso incorrecto, abuso o negligencia; (3) uso comercial del producto; (4) modificación de cualquier pieza del producto;
(5) daño debido al manejo incorrecto, mantenimiento incorrecto o la conexión a un suministro eléctrico incorrecto; (6) pérdida de
datos, independientemente del valor o el formato, que pueda producirse a través del uso adecuado y/o inadecuado del producto;
(7) daño provocado por un intento de reparación del producto realizado por una persona ajena a un centro autorizado por
Pandigital para realizar el servicio técnico del producto; (8) materiales consumibles (tales como fusibles o baterías). Esta garantía
sólo tiene validez en los Estados Unidos.
El producto debe estar acompañado de una copia del recibo de compra minorista original. Si no se adjunta el comprobante de
compra, la garantía no tendrá validez y se cobrarán los costos de la reparación. Esta garantía sólo es válida con la
documentación escrita que detalla el reclamo que se indica fuera o dentro de la caja. Esta garantía no tendrá validez si el número
de serie de fábrica ha sido modificado y/o quitado del producto. Además, no ofrece protección contra la pérdida de datos,
independientemente del formato. Pandigital se reserva el derecho de modificar y diseñar el producto sin previo aviso por escrito o
de otro modo.
22 Asistencia al cliente: http://www.pandigital.net/kodaksupport
Page 69

Para obtener el servicio de garantía, debe enviar el producto por flete prepago en el embalaje original o un embalaje con el mismo
nivel de protección, junto con el comprobante de compra.
La reparación o el reemplazo previstos según esta garantía es la única solución para el consumidor. Pandigital, su empresa
matriz, filiales o subsidiarias, no serán responsables de ningún daño incidental o consecuente de una brecha de ninguna garantía
explícita o implícita de este producto. Salvo en la medida que la ley lo prohíba, toda garantía implícita de comercialización o
aptitud de un fin en particular de este producto se limita a la duración de esta garantía.
Algunos estados no permiten la exclusión o la limitación de los daños incidentales o consecuentes, o permiten limitaciones sobre
la duración de una garantía implícita, de manera que las limitaciones o exclusiones mencionadas pueden no corresponder a su
caso. Esta garantía le otorga derechos legales específicos y usted puede tener otros derechos que varían de un estado a otro.
Todo el contenido del sitio Web de Pandigital, como así también los productos Pandigital, entre ellos, imágenes de demostración
precargadas, medios digitales, los libros de cocina digitales, textos, gráficos, logotipos, diseños, fotografías, iconos de botones,
imágenes, clips de audio/video, descargas digitales, compilaciones de datos y software, es propiedad de Pandigital o sus
proveedores y está protegido por las leSí de derecho de autor de los Estados Unidos e internacionales u otras leSí y tratados de
propiedad intelectual. Queda prohibida la reproducción o el uso de dicho contenido sin el permiso expreso por escrito de
Pandigital y sus proveedores, respectivamente.
El uso de este producto constituye la aceptación de los términos y condiciones de la garantía.
Número de teléfono del soporte técnico: 1-800-715-5354.
Normativas FCC
Información del apartado 15 de FCC
Este equipo ha sido sometido a las pruebas pertinentes y cumple con los límites establecidos para un dispositivo digital de
la Clase B, según lo establecido en el apartado 15 de las normas de la FCC. Estos límites están destinados a proporcionar
protección adecuada ante interferencias perjudiciales en instalaciones domésticas.
Este equipo genera, usa y puede emitir energía radioeléctrica. Respete las instrucciones pertinentes durante la instalación
y utilización del equipo para evi tar la ap ar ic ión de posibles interferencias de radio. No obstante, no hay garantía de que no
vayan a producirse interferencias en una instalación concreta.
Si este equipo es el responsable de la presencia de interferencias en la recepción de radio o televisión (lo que puede
verificarse apagando y encendiendo el equipo), se aconseja tomar una o varias de las medidas siguientes para intentar
eliminar las interferencias:
Cambie la orientación o la ubicación de la antena receptora.
Aumente la separación entre el equipo y el receptor.
Conecte el equipo a una toma de corriente perteneciente a un circuito difer ente al que está conectado el receptor.
Recurra a su distribuidor o a personal técnico especializado en radio y televisión.
Malgaste disposición Eléctrica y Electrónica de Equipo/Batería
En Europa: Para la pr otección humano/am b iental, es su responsab ilidad de deshacerse de este equipo y baterías en una
facilidad de la colección estableció para este fin(separe del desecho municipal). Para más información, contacte a su
detallista, la facilidad de la colección, o apropia a administración local; o va a www.kodak.com/go/recycle. El peso del
producto: 130 G (4,6 oz) inclusive tarjeta y batería.
Pandigital Copyright 2010.
Kodak y la imagen comercial de Kodak son marcas registradas de Kodak que se usan bajo licencia.
EasyShare es una marca registrada de Kodak.
Asistencia al cliente: http://www.pandigital.net/kodaksupport 23
 Loading...