

Page 1

oXYgen Scan
Version 2.5.5
including
Release Notes
English
oXYgen Scan for Scientific Research
Internal 739-00249A-EN Rev A
graphics.kodak.com
Page 2

Copyright
© 2005 Kodak. All rights reserved.
Creo, EverSmart, and oXYgen are trademarks of Kodak.
Adobe, Acrobat, Adobe Illustrator, Distiller, Photoshop, PostScript, and PageMaker are trademarks of Adobe Systems
Incorporated.
Apple, iMac, Power Macintosh, Mac OS, AppleShare, AppleTalk, TrueType, ImageWriter, and LaserWriter are registered
trademarks of Apple Computer, Inc. Macintosh is a trademark of Apple Computer, Inc., registered in the U.S.A. and other
countries.
PANTONE, Hexachrome, PANTONE Hexachrome, and PANTONE MATCHING SYSTEM are the property of Pantone, Inc.
PEARL, PEARLsetter, PEARLhdp, PEARLdry, and PEARLgold are registered trademarks of Presstek, Inc.
XEROX® is a trademark of XEROX CORPORATION.
http://graphics.kodak.com/
Internal 739-00249A-EN Rev A
Revised December 2005
Page 3

Contents 3
Contents
Overview ........................................................................................................................................................ 1
oXYgen Scan for Scientific Research......................................................................................................... 1
Version Highlights........................................................................................................................................... 2
Minimum System Requirements...................................................................................................................... 2
Installation Procedure on Mac OS X ................................................................................................................ 3
Application Folder.................................................................................................................................... 4
Registration ............................................................................................................................................. 4
Recommendations ................................................................................................................................... 5
Documentation Folder ............................................................................................................................. 5
Feature Details................................................................................................................................................ 6
Numbered Mask Display .......................................................................................................................... 6
Removing the Moire Effect in Copydot Scans ........................................................................................... 7
16-bit B/W Mode ..................................................................................................................................... 8
Producing a Gray Image from a Black-and-white or Color Original ......................................................... 10
Defining a Crop Area for Analysis .......................................................................................................... 11
Using a Naming Convention .................................................................................................................. 12
Quick Balance in Negative Mode............................................................................................................ 13
Known Limitations........................................................................................................................................ 14
Page 4

4 oXYgen Scan Version 2.5.5 Release Notes
Page 5
Overview
Kodak oXYgen Scan version 2.5.5 software (CD 634-00277D) supports Kodak
EverSmart Supreme II and Kodak EverSmart Select II scanners, as well as Kodak
EverSmart Supreme and Kodak EverSmart Select scanners with FireWire
connectivity. Its features include a 16-bit mode for black-and-white originals,
custom crop analysis, as well as automatic naming and numbering that suit imageindexing requirements. oXYgen Scan version 2.5.5 enables you to further improve
the high quality of your scans and ensure the integrity of your workflow.
oXYgen Scan for Scientific Research
From oXYgen Scan version 2.5.5, you can also install Kodak oXYgen Scan for
Scientific Research, the specialized software designed for use in scientific research
labs. With an interface that’s straightforward and easy to use, it provides automatic
and manual focus, and enables batch scans that span the height of multiple
sections.
Benefit from the flexibility of choosing from a variety of file types for your scanned
files including 16-bit Raw (as RGB or separate red, green, or blue channels) and
toned 16-bit or 8-bit RGB that give you the added value of our advanced
image-processing algorithms and high-quality color tools.
Page 6

2 oXYgen Scan Version 2.5.5 Release Notes
Version Highlights
oXYgen Scan version 2.5.5 software provides the following new features and
enhancements:
• Direct access to oXYgen Scan for Scientific Research software. For details about
this software, which includes specialized tools and new Setup dialog box
options, see the oXYgen Smart Tips: Scientific Research Tools document.
• 16-bit B/W scanning mode for B/W or RGB images. You can now scan a B/W
original negative as a color RGB 16-bit and obtain a neutral image. New
options are available in the Setup dialog box that are specifically designed for
this workflow. For details, see “16-bit B/W Mode” on page 8.
• With RGB 16-bit files, you can include an output profile to simulate an RGB
working space such as Adobe 1998 and ProFoto.
• In the Setup dialog box, the focus mode list includes Auto, which provides
automatic focus-selection for reflective scans.
• You can specify width and height values to define an area for crop analysis,
during setup or interactively in Preview. For details, see “Defining a Crop Area
for Analysis” on page 11.
• Automatic image-indexing support especially useful for archiving. For details,
see “Using a Naming Convention” on page 12.
• New numbered mask display.
• With copydot scans, Excellent scanning mode prevents moire effects with
screens of over 175 lpi with 0 in. and 45 in. mesh angles.
“Removing the Moire Effect in Copydot Scans” on page 7.
For detailed scanner cleaning procedures, see http://graphics.kodak.com/us/product/
scanners/prepress_scanners/cleaning_videos.htm.
For more information about digital archiving, see the documents oXYgen Smart Tips:
Digital Archiving with Creo Scanners and oXYgen Smart Tips: Scanning Photographic
Glass Plates.
For more information about oXYgen Scan software, see the oXYgen Scanning
Application User Guide and the oXYgen Scanning Application User Guide Addendum.
Minimum System Requirements
• Apple Power Macintosh G5 or G4 computer
• Mac OS X only (version 10.3.x or version 10.4.x)
• 200 MB RAM for the scanning software (not including memory for the system
software)
For details, see
• Minimum 2 GB of free internal hard disk space
• 24-bit color display
• Color monitor with a display resolution of 1024 x 768 pixels
Page 7

Installation Procedure on Mac OS X
Notes:
You must create all scanner hardware tables using the Install&Utils program.
Full installation of either oXYgen Scan version 2.5.5 or oXYgen Scan for Scientific
Research provides you with access to both on your system.
You must have administrator rights to install the software.
1. Insert the software CD and leave it in the CD-ROM during installation.
2. Double-click the oXYgen Scan 2.5.5 icon.
3. In the oXYgen Scan Ver. 2.5.5 window, you can install any or all of the
following items by double-clicking the related icon:
• oXYgen Scan version 2.5.5
• oXYgen Scan for Scientific Research version 2.5.5
• Scanner and oXYgen documentation in one or more languages
3
4. In the Authenticate window, enter your user name and password, and then
OK.
click
5. In the oXYgen Installer window, click Continue.
6. In the oXYgen Installer Read Me window, read the information provided and
Continue.
click
7. In the Choose Folder window that opens, select the Mac Application Folder.
Notes:
It is important that you install the software on the hard drive not on the desktop.
A message informs you that the Macintosh computer may need to be restarted after
installation is complete.
Page 8
4 oXYgen Scan Version 2.5.5 Release Notes
8. Click Choose. The installation starts.
When the installation is complete, a message informs you that the software is
successfully installed.
9. Click Quit.
10. Restart the computer. The oXYgen Version Folder window opens.
11. Install the other version if you require.
Application Folder
Following installation, the oXYgen Version 2.5.5 folder contains the following
items:
• oXYgen Scan: Software version 2.5.5 for EverSmart scanners
• Install&Utils: Software required for installation and setting of parameters
required for scanner operation
• EverSmart Tables folder: Contains a set of tables used by the software
• CreoScannersExplorer: Software for checking scanner FireWire connectivity
Registration
• Open Registration: Registration form
• Photoshop Plugins folder: Adobe Photoshop software plug-ins
• Send to Support: Software utility that automatically generates log files as you
work.
WARNING: When you use Send to Support, detailed information from the System Profiler
is automatically included in the Send to Support folder.
• Read Me First folder: Contains the software release notes for the oXYgen Scan
version.
After running the oXYgen Scan software, a registration prompt appears. It is highly
recommended that you register the software. As a registered user, you can access
current product information.
¾ You can access the registration form on the software CD in the documentation
folder or at
eversmart_select_ii/scanners_registration_form.htm.
Note: If you do not register the software, a registration prompt appears bi-weekly until
you complete the Registration Form and register the application.
http://graphics.kodak.com/us/product/scanners/prepress_scanners/
Page 9

Recommendations
On the internal hard disk, you should have free space that is at least three times the
size of the scanned file. This space is for temporary use by the scanner.
For further information, see the oXYgen Scanning Application User Guide (399Z1P555C),
Chapter 11, page 174.
Documentation Folder
The following documents are located in the Documentation folder on the oXYgen
Scan software CD.
• oXYgen Scan Version 2.5.5 Release Notes (in English)
• Feedback Form for EverSmart Users (English)
• oXYgen Scanning Application User Guide (English, French, German, Italian,
Spanish, Dutch, and Swedish) and the oXYgen Scanning Application User
Guide Addendum (most up-to-date version in English; older version in French,
German, Italian, Spanish, Dutch, and Swedish)
• Creo Smart Scanners Quick Reference Guide (English, French, German,
Italian, Spanish, Chinese, and Japanese)
5
• Installation and user guides for EverSmart scanners (English, French, German,
Italian, Spanish, Dutch, and Swedish)
• oXYgen Smart Tips:
Scientific Research Tools
Digital Archiving with Creo Scanners
Scanning Photographic Glass Plates
Viewing and Retouching DT Files
Producing Quality Scans
Opening Scanned Images with Photoshop Software
• Creo oXYgen DTi Scanning Procedure
• oXYgen DOT User Guide (English, French, German, Italian, Spanish, Dutch,
and Swedish)
Page 10
6 oXYgen Scan Version 2.5.5 Release Notes
Feature Details
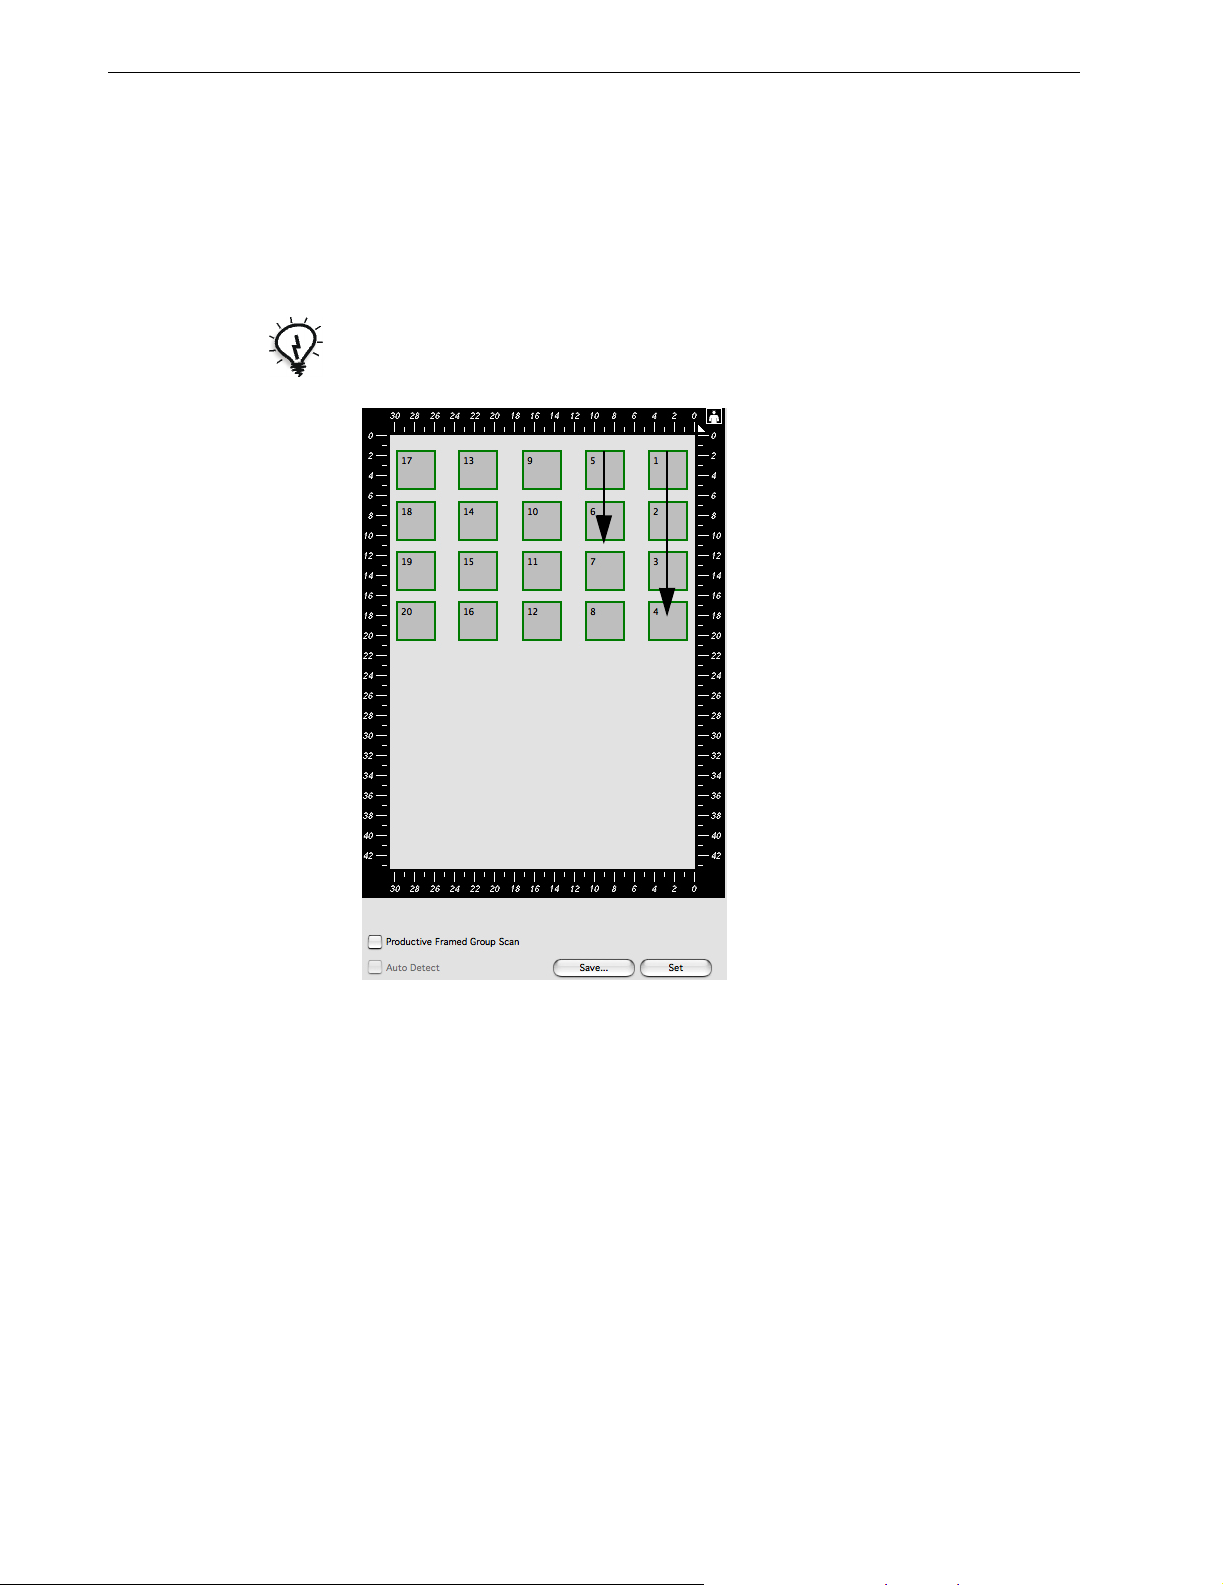
Numbered Mask Display
Numbers appear on the mask display, indicating the order in which the images are
scanned.
Tip: The recommended scanning order is to start from the top of the right column,
downwards, and continuing from the top of the next column to the left.
Page 11

Removing the Moire Effect in Copydot Scans
To remove the moire effect that appears with screens of more than 175 lpi that have
mesh angles of 0 in. and 45 in. use the
1. On the keyboard, press CMD + L to open the Scanning Mode dialog box.
2. On the CopyDOT tab, select Excellent.
3. Click OK.
Excellent scanning mode.
7
Page 12
8 oXYgen Scan Version 2.5.5 Release Notes
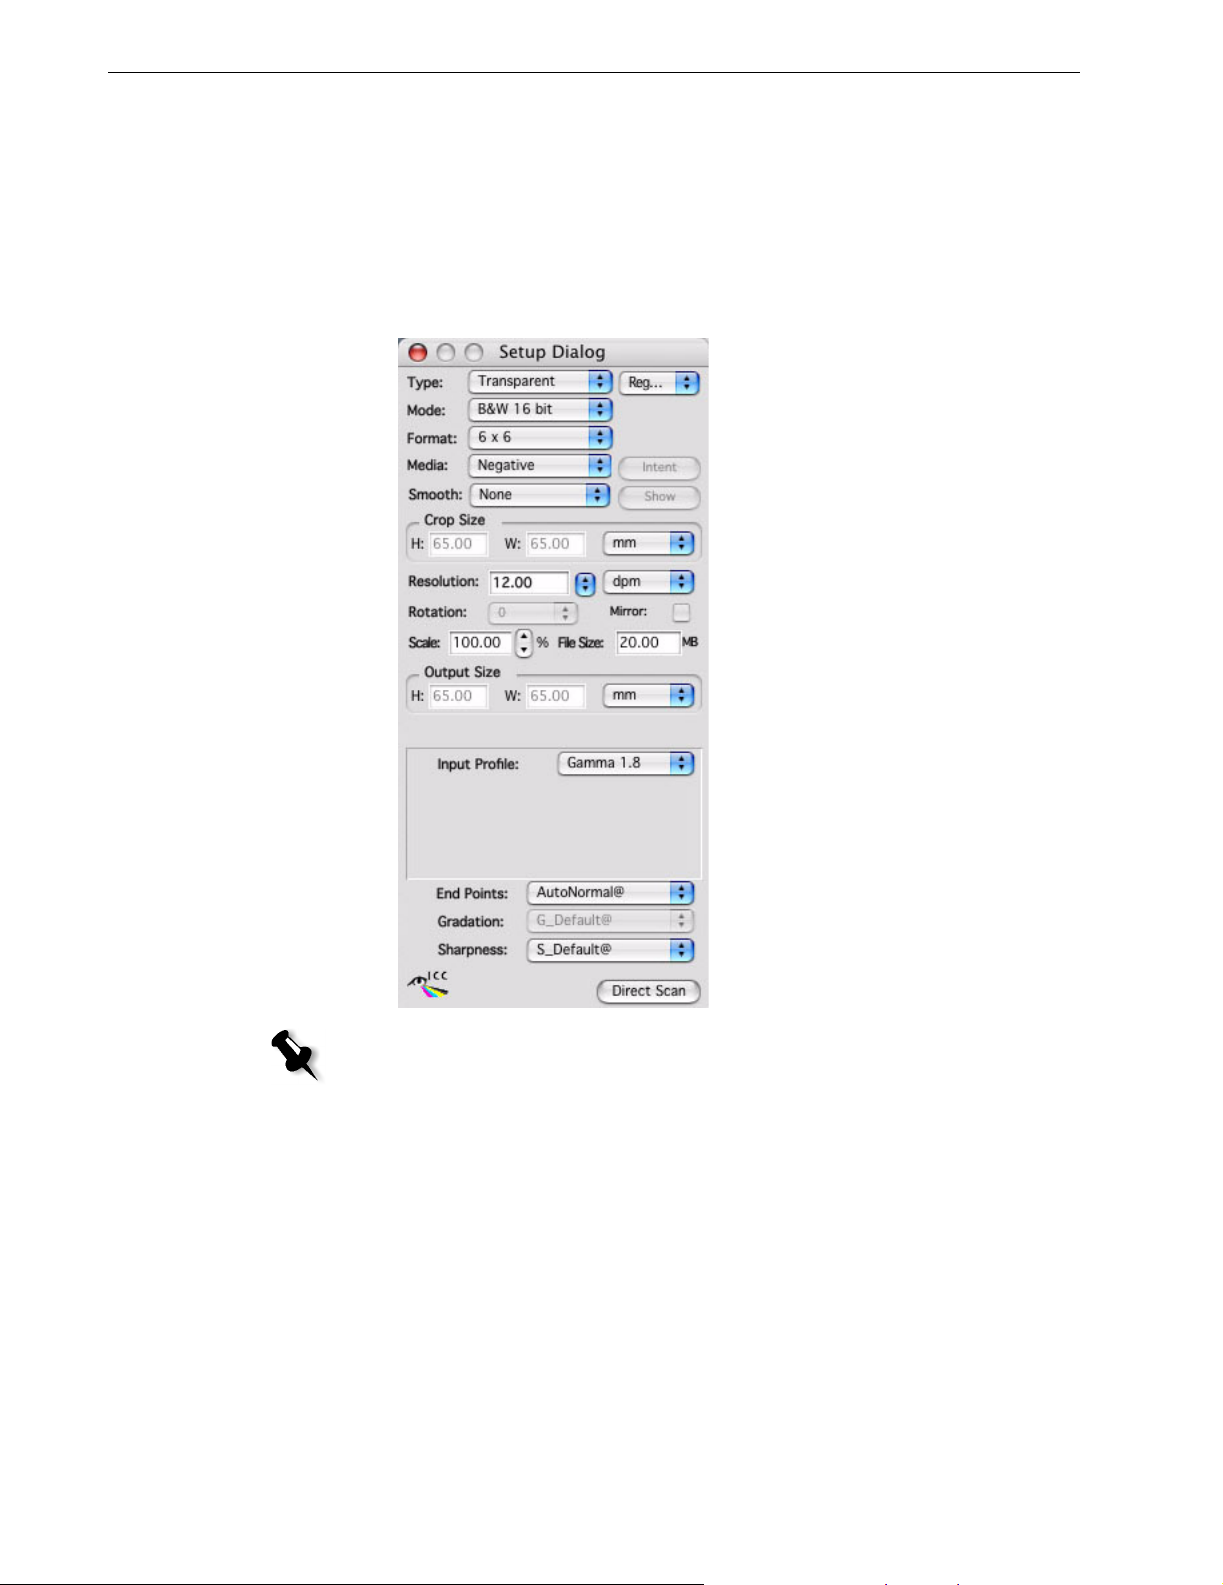
16-bit B/W Mode
16-bit B/W is a new scanning mode for scanning B/W images, as well as RGB
images, that addresses the ever-increasing need for archival of analog images as
digital media. Many analog originals are historical black-and-white negative
images. To ensure that these images are preserved digitally, the maximum amount
of image information must be captured in digital form.
1. From the Mode list, select B&W 16 bit.
Note: In the Setup dialog box, in the Media list, Negative is selected. For positives,
from the Media list, select Positive.
2. From the Input Profile list, select Gamma 1.8 or Gamma 2.2.
Page 13
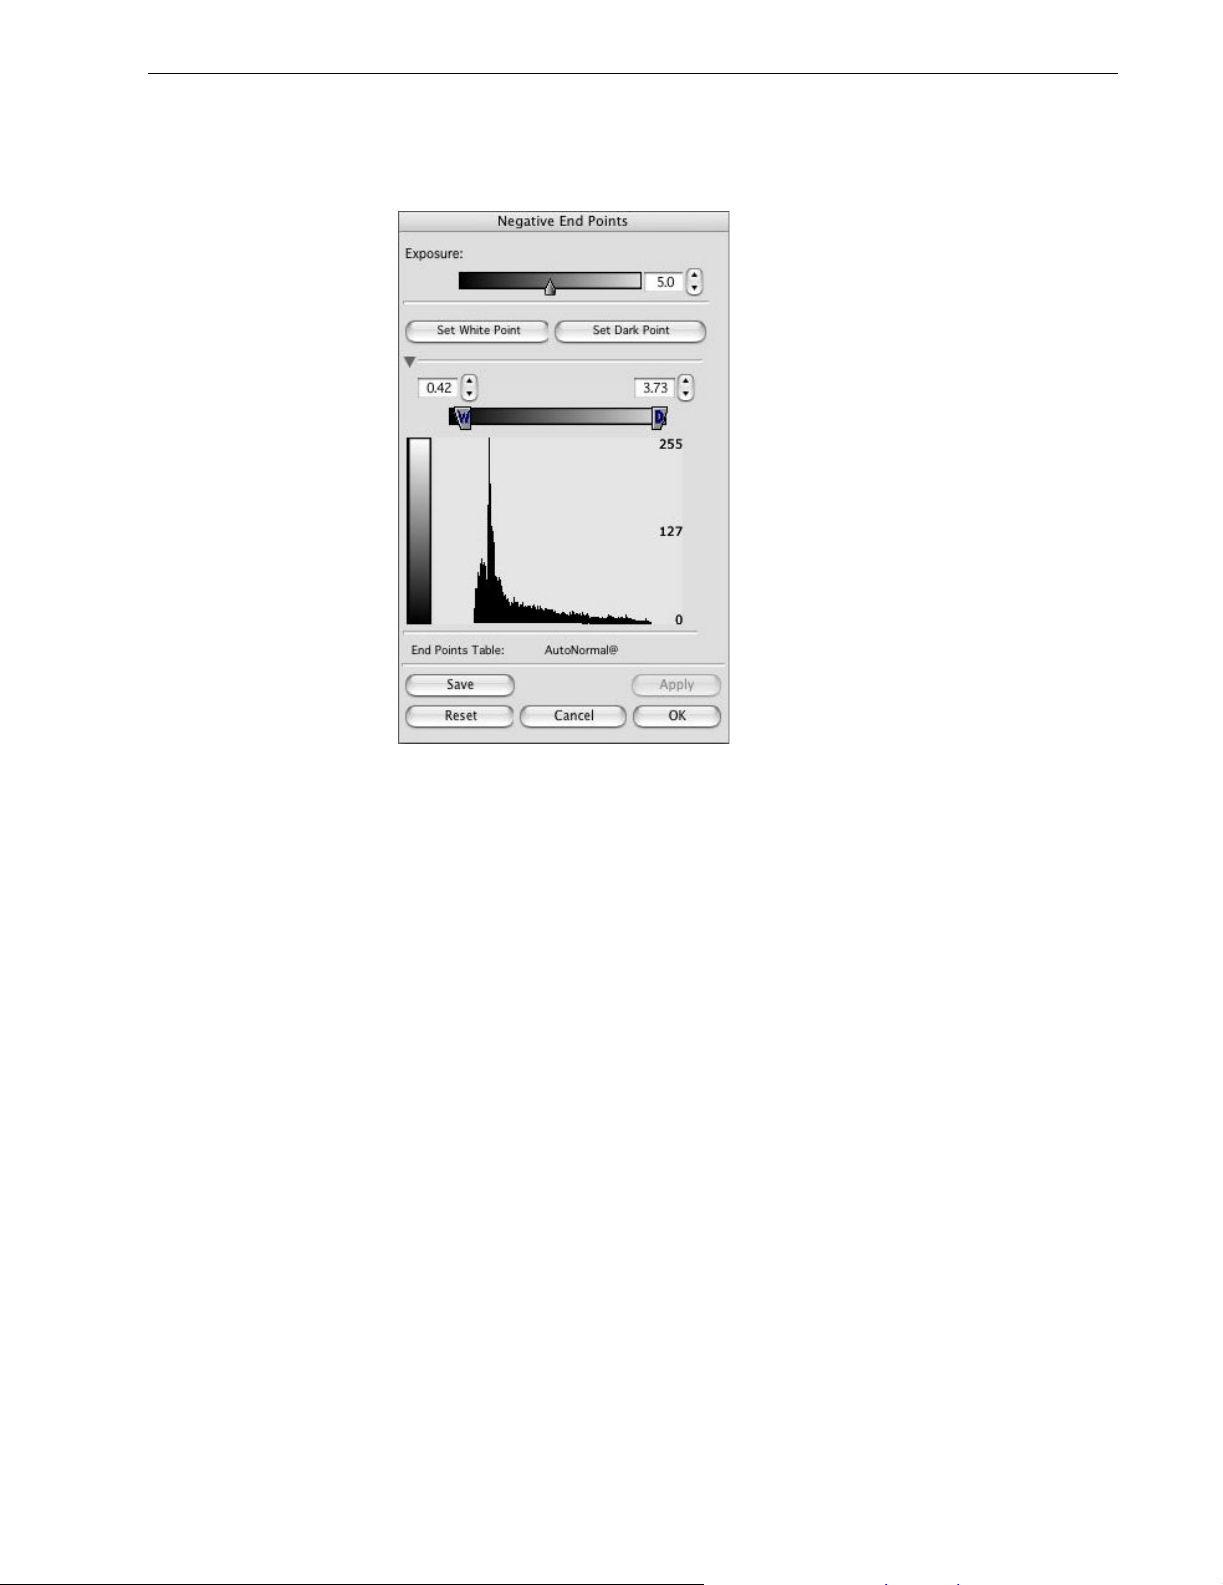
Negative End Points Dialog Box
The Negative End Points dialog box for use in B/W Negative mode has less options
that the Negative End Points dialog box used for general purposes.
9
Page 14

10 oXYgen Scan Version 2.5.5 Release Notes
Producing a Gray Image from a Black-and-white or Color Original
To produce a gray image from a black-and-white or color original, you can use
either of the following input profiles:
• Tr_ES_Gray: For use with transparent originals
• Ref_ES_Gray: For use with reflective originals
Note: R, G, and B values may not be equal. The input profile converts these values to
grays.
Scanning Black-and-white or Color Negative Originals
In the Setup dialog box, select the following options:
• Type: Transparent
• Mode: Color RGB 16 bit or Color RGB 8 bit
• Media: Negative
• Intent: Balanced
Note: If you are producing a color output, in Intent make sure to select Vivid.
• Input Profile: Tr_ES_Gray
• Film Type: AutoBWDefault
Page 15

Defining a Crop Area for Analysis
You can specify that only part of the crop is used for the crop analysis. If you do not
use this option to define a crop area, the default for the crop analysis is 90%.
1. Select Setup>Operations Modes or on the keyboard press CMD+K.
2. In the Operation Mode Preferences dialog box, select the Define Area for Crop
Analyze
3. In the W box (width or x-axis) and in the H box (height or y-axis), enter a
value from 40% to 100%.
check box.
11
4. With the Preview window open, press SHIFT to display the image area
currently designated for crop analysis.
Page 16

12 oXYgen Scan Version 2.5.5 Release Notes
5. Press SHIFT and the up and down arrow keys to adjust the area for the crop
analysis, if necessary.
6. In the Setup dialog box, click Apply to perform the crop analysis.
Using a Naming Convention
Use the Automatic Naming Setup option in oXYgen Scan software to assign a
prefix, suffix, and indexed numbering to the image files in a collection.
1. From the oXYgen menu, select Setup>Automatic Naming Setup.
2. To include a prefix:
a. In the Automatic Naming Setup dialog box, click the top button.
b. Click the Prefix check box.
c. Enter a prefix.
Note: If you select Default, SCAN is automatically used as the prefix and 1 as the
first number for indexing.
Page 17

13
3. To include a suffix:
a. Click the top button in the dialog box.
b. Click the Suffix check box.
c. Enter a suffix. The suffix appears after the indexing numbers in the
filename (for example, if red is the suffix, then the filename might be
house_1_red).
4. To set the first index number for a series of image, select the Automatic Image
Indexing
check box and then enter a number. Other images in the series are
automatically numbered sequentially according to this first number (for
example, SCAN_1, SCAN_2, and so on).
5. If you want the file format suffix (such as JPEG or TIFF) to appear as part of
the filename, click the
intending to use the files on a Microsoft Windows system.
Note: In oXYgen Scan for Scientific Research, the File Format Suffix check box is
automatically selected.
Quick Balance in Negative Mode
If you are working in Negative mode, you can hide or show the Quick Balance tool
in the following ways:
¾ From the menu, select Image>Show Quick Balance or Image>Hide Quick
Balance
¾ On the keyboard, press CMD+N.
File Format Suffix check box. This is useful if you are
Page 18

14 oXYgen Scan Version 2.5.5 Release Notes
Known Limitations
• The metadata feature is not fully functional.
• If you open a DT file created with an earlier oXYgen Scan version, you must use
input profiles from an earlier oXYgen Scan version.
• After you manually adjust cast factors, you must quit and restart the oXYgen
Scan software.
• Rotate is disabled for all Line Art scans (such as Bitmap, De-screen).
• Auto Detect does not support the Delete Crop and the Duplicate Crop options.
• When you work with DT files, you can use up to a maximum of 24 characters
in a file name (including the suffix).
• The toning curve that results from the scan of a DT file that includes crop
analysis, is used by the DT Toning plugin with Adobe Photoshop software;
however, if you open the DT file with oXYgen software, a new toning curve is
automatically created based on the current value in the Operation Mode
Preferences dialog box, in the
• With oXYgen Scan, you can use file names of no more than 29 characters.
Define Area for Crop Analyze box.
• File size and scaling should not be changed in the Setup dialog box when
scanning in Copydot mode.
• If oXYgen Scan software crashes while you are working, in order for the
software to open correctly for the next user, you must login again, and then
quit.
• Scanner FireWire driver is not compatible with Leaf digital camera backs
• If you click Abort Scan and then quit the software, turn the scanner off and
then on again.
• You can scan files to a maximum size of 4 GB (64,000 pixels x 64,000 pixels).
• LAB densitometer does not function consistently.
• In Input Grey Levels, settings you save in the input profile are not always
correct.
 Loading...