

Specifications and Main Features
- Detain: Kodak EasyShare M763 M863 MD863 Digital Camera.
- Battery: Kodak Li I-on Rechargeable Digital Camera Battery With The Number Klic 7001
- Type of charger: USB AC adapter and a computer USB port.
- LCD Display: Facilitating the framing and reviewing of the pictures taken.
- Features of picture taking:
- Optical Zoom: Maximum of three times.
- Flash Modes: Auto, Off, Fill, Red-Eye.
- Picture modes: Auto, Digital Image Stabilization, Close-Up, Scene, High Iso, Video.
- Maximum resolution of the picture and its aspect ratio: Not given.
- Recording of video: With sound.
- Memory media support: An SD or SDHC card slot for the memory card.
- Connectivity Interfaces: USB cable, A/V Connecting Cable.
- Size and weight: Not given.
- Other characteristics:
- Self-timer / video light.
- Help function.
- Sounds tags for pictures.
- Kodak Perfect Touch technology to enhance pictures taken.
- Features that allow editing of pictures and videos.
Frequently Asked Questions
- Q: What should I do to energize the KLIC-7001 battery?
- It is possible to plug the USB AC adapter into the camera and the power socket which is the battery charging device, or a USB cable can be connected to the USB port of the computer: and from the battery user manual edes the Multifunctional battery charging light contains information on which light is on.
- Q: What is the remedy to employ it the camera is still not half open?
A: Consider removing the battery and replacing it in the correct way or changing the battery completely. The battery must be charged so that power is supplied.
- Q: Can the camera still work even though there is no SD card?
A: Yes, however pictures or video footage captured will not be able to saved or recorded.
- Q: What is the method of making video using the camera?
A: In order to record and video, depress the shutter button down to the bottom, and do it again to stop.
- Q: What do I do when SD card is suppose to but in fact does not show up in the camera?
A: Either buy a pre-certified SD/SDHC or format card which should remove all pictures and videos out of the card.
- Q: How flash and other settings are changed?
A: Flash mode is normally set on or off using a button, when it needs to be adjusted the button is pressed and held and the entire mode is cycled through.
- Q: Where can I find instructions on how to properly operate my camera?
A: There is a Help option available in the camera menu, which provides documentation for each of the camera options.
User Manual
Page 1
OWNERS MANUAL
Page 2
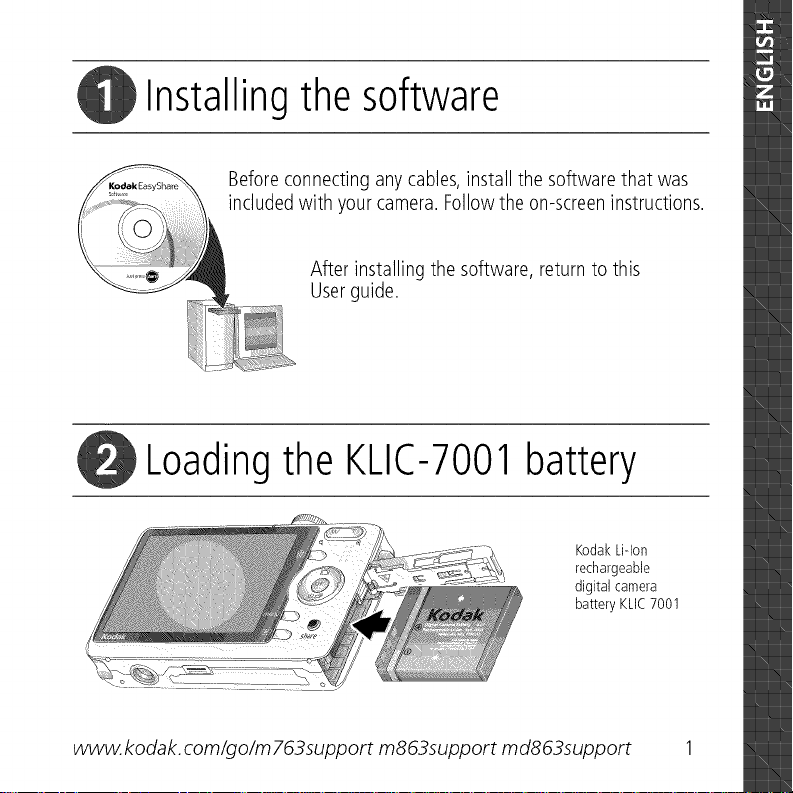
Installing the software
Beforeconnectingany cables,install the software that was
includedwith your camera. Followthe on-screeninstructions.
After installing the software, return to this
Userguide.
Loading the KLIC-7001 battery
KodakLiqon
rechargeable
digital camera
batteryKLIC7001
www. kodak, com/go/m 763support m863support md863support 1
Page 3
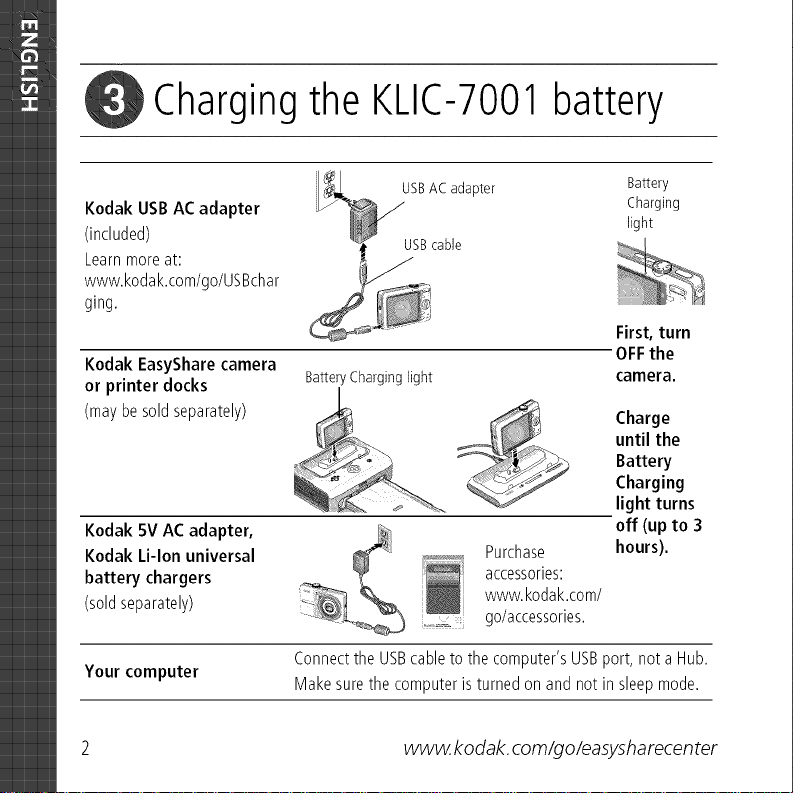
Charging the KLIC-7001 battery
USBAC adapter Battery
Kodak USBAC adapter light
(included) USBcable
Learnmoreat:
www.kodak.com/go/USBchar
ging.
Kodak EasyShare camera
or printer docks
(maybesoldseparately)
Kodak 5V ACadapter,
Kodak Li-lon universal
battery chargers
(soldseparately)
Your computer Makesurethe computeristurnedonand notin sleepmode.
BatteryCharginglight
__ light turns
Purchase hours).
accessories:
www.kodak.com/
go/accessories.
Connectthe USBcableto thecomputer'sUSBport, not a Hub.
Charging
First, turn
OFFthe
camera.
until the
Charge
Battery
Charging
off (up to 3
2 www. kodak, com/go/easysharecen ter
Page 4

_1 Turning on the camera
Setting the language, date/time
Language:
(_ _i_ to change.
(_ OK to accept.
Date/Time:
(_At prompt, press
(_ _/._. to change.
the OK.
4/_ for previous/nextfield.
OK to accept.
OK
www. kodak, com/go/m 763support m863support md863support 3
Page 5
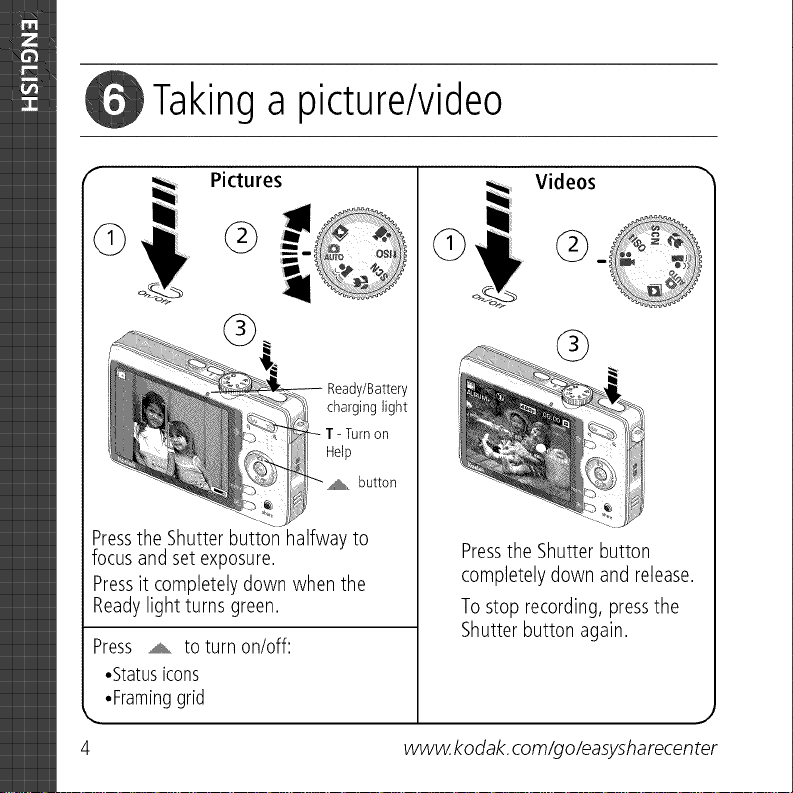
Takinga picture/video
"_ Videos "
G
Pictures
G
@
@
Ready/Battery
charginglight
on
Help
,_ button
Pressthe Shutterbutton halfway to
focus and set exposure.
Pressit completelydown when the
Readylight turns green.
Press _ to turn on/off:
•Statusicons
•Framinggrid
,,,..
Pressthe Shutter button
completely down and release.
Tostop recording, pressthe
Shutter button again.
www. kodak, com/go/easysharecen ter
J
Page 6
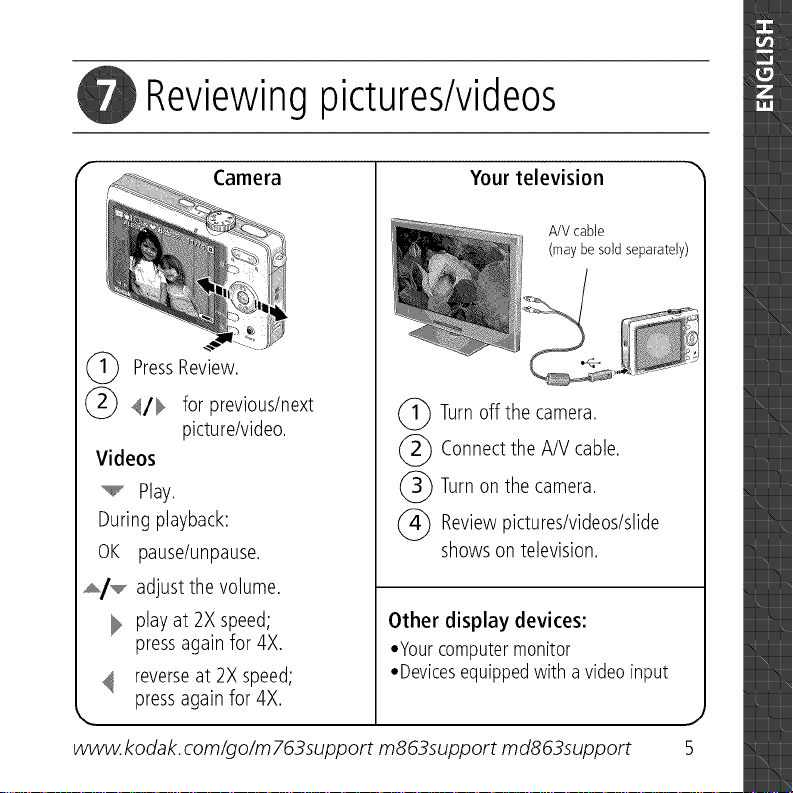
Reviewing pictures/videos
Camera
(_ PressReview.
@ _/_ forprevious/next
picture/video.
Videos
Play.
During playback:
OK pause/unpause.
_/_ adjust the volume.
playat 2X speed;
pressagain for 4X.
reverseat 2X speed;
k. pressagain for 4X.
www. kodak, com/go/m 763support m863support md863support
(_) Turnoff the camera.
(_ Connectthe A/V cable.
(_) Turnon the camera.
(_ Reviewpictures/videos/slide
Other display devices:
•Yourcomputermonitor
•Devicesequippedwith a video input
Your television
A/V cable
(may be sold separately)
showson television.
5
Page 7
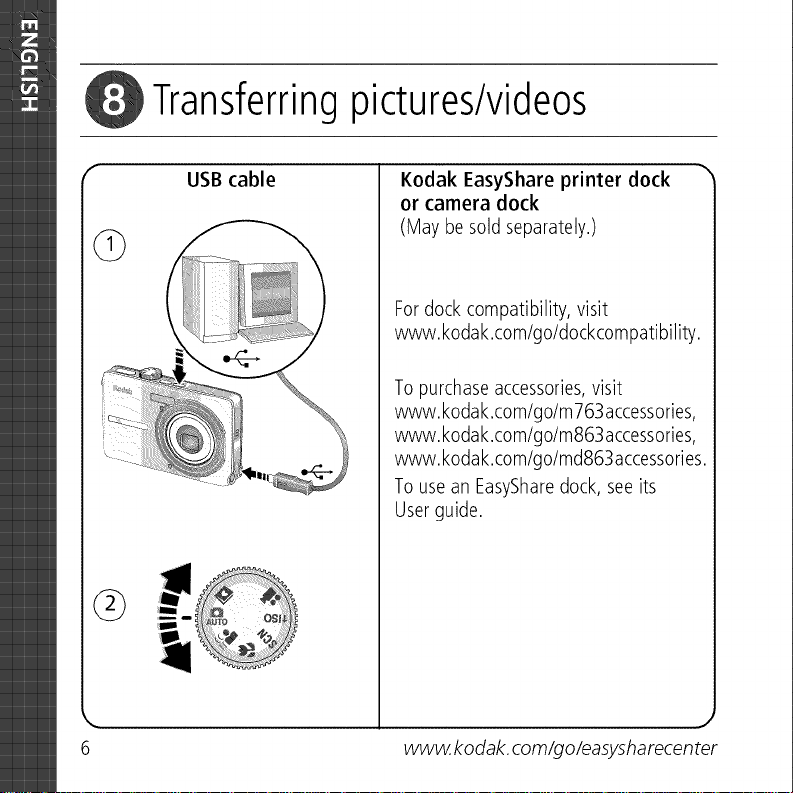
Transferringpictures/videos
6
G
USB cable
Kodak EasyShare printer dock
or camera dock
(May be soldseparately.)
Fordock compatibility, visit
www.kodak.com/go/dockcompatibility.
Topurchaseaccessories,visit
www.kodak.com/go/m763accessories,
www.kodak.com/go/m863accessories,
www.kodak.com/go/md863accessories.
Tousean EasySharedock, seeits
Userguide.
www. kodak, com/go/easysharecen
ter
J
Page 8

Keeplearning about your camera!
Congratulations!
You have:
• set up your camera
• taken pictures
• transferred pictures to your computer
Keep learning!
Finishreading this book, soyou can take and share your bestpictures!
Visit www.kodak.comlgolm763support, m863support, or
md863support and www.kodak.comlgoleasysharecenter for:
• the Extendeduserguide
• interactive troubleshooting and repairs
• interactive tutorials
• FAQs
• downloads
• accessories
• printing information
• product registration
www. kodak, com/go/m 763support m863support md863support 7
Page 9
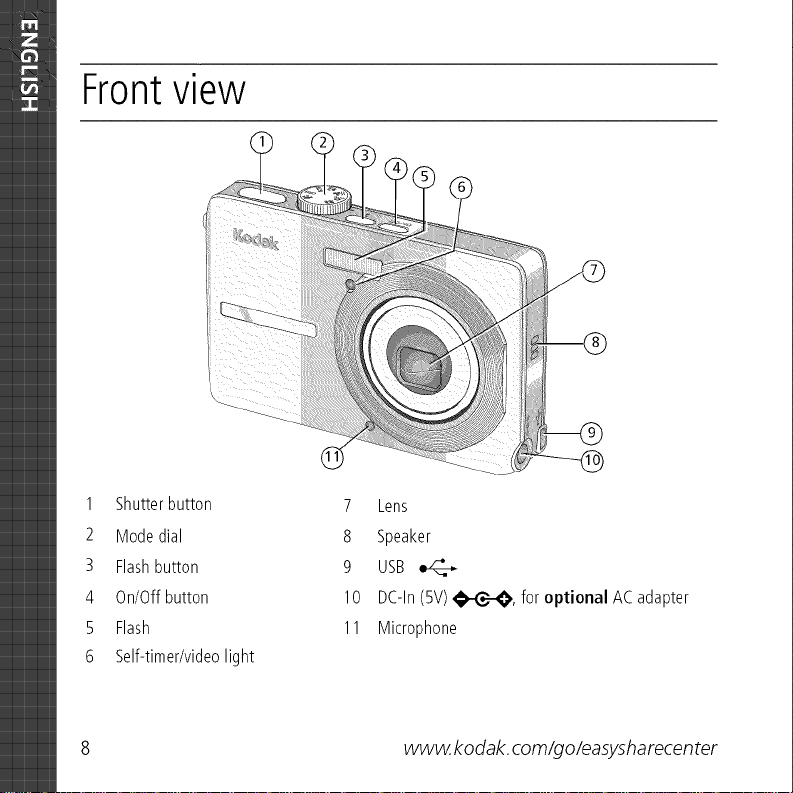
Frontview
1 Shutterbutton
2 Modedial
3 Flashbutton
4 On/Offbutton
5 Flash
6 Self-timer/videolight
8 www. kodak, com/go/easysharecen ter
7 Lens
8 Speaker
9 USB
I0 DC-ln(5V)_I_-C_, foroptional ACadapter
11 Microphone
Page 10

Backview
optional memorycard
(soldseparately)
1 LCD 8 SDorSDHCmemorycardslot
2 Ready/Batterycharginglight 9 Batterycompartment
3 Deletebutton 10 Sharebutton
4 Zoombutton (Wide/Telephoto) 11 Menu button
5 _//_ _/,,,® .... 12 Reviewbutton
6 OKbutton 13 Dockconnector
7 Strappost 14 Tripodsocket
www. kodak, com/go/m 763support m863support md863support 9
Page 11

Doing more with your camera
Using optical zoom
Useopticalzoomto get up to 3X closerto yoursubject.
1 Usethe LCDto frameyoursubject.
2 PressTelephoto(T)to zoomin. PressWideAngle(W)
to zoomout.
Thezoomindicatorshowszoomstatus.
3 Takethepictureor video.
m Alwaysusethe autofocusframingmarks.
m If youarenot usingzoom(lX, wide angle),you
Optical Digital _
zoom zoom
range range
canbeascloseas13.8in.(35 cm)to your
subject.
m Asyouzoom,you needto movefurtherfromyour
subject.
10 (_ www.kodak, com/go/easysharecenter
Page 12

Doing more with your camera
Using the flash
Use the flash when you take pictures at night, indoors, or outdoors in heavy shadows.
Pressthe _ button repeatedly to scroll
throughflashmodes(seeFlashmodesbelow).
ThecurrentflashmodeappearsintheLCDscreen.
Flashmodes Flash fires
Auto Whenthe lightingconditionsrequireit.Flash
_,,_ Off Never.
Red-
the subjectisinshadowor is"backlit" (whenthelight isbehindthe subject).
In low light, hold the camerasteadyor usea tripod.
IfRed-eyePre-flashisturnedoff: IfRed-eyePre-flashisturned on:
Theflashfiresonceandthe
m
cameraautomatically
correctsred-eyeinthe
picture.
m Theflash firesoncesothe eyes
becomeaccustomedto theflash,then
firesagainwhen the pictureistaken.
_, Fill Everytime youtake a picture,regardlessof the lightingconditions.Usewhen
eye
www. kodak, com/go/m 763support m863support md863support _ 11
Page 13

Doing more with your camera
Using different picture-taking modes
Choosethe modethat bestsuits
yoursubjectsandsurroundings.
Usethis mode For .............................
I_1 Auto Generalpicturetaking--offers an excellentbalanceofimagequality
AUTO andeaseof use.
(( • Digital Image Minimizingthe effectsof camerashakeandsubjectmovement.
[[_ Stabilization
Close-up Closerange.Useavailablelight insteadof flashif possible.
SCN Scene Point-and-shootsimplicitywhentaking picturesunderspecial
conditions.(Seepage13.)
lSO High ISO Peoplein low-light scenesindoorsusinga higher ISO.
00 Video Capturingvideowith sound.(Seepage4.)
mD
_j Favorites Reviewingfavoritepictures.
12 (_ www.kodak, com/go/easysharecenter
Page 14

Doing more with your camera
Scene modes
Choosea Scenemode--for greatpicturesin practicallyany situation!
1 Turnthe Modedial to Scenesca.
2 Press</_ to displayScenemodedescriptions.
If themodedescriptionturnsoff beforeyoufinishreadingit, pressOK.
3 PressOKto choosea Scenemode.
Using camera Help
Tobetterunderstandeachmenuoption,usecameraHelp.Selectanoptionyouwant to
learnmoreabout,then pressthe Zoomtelephoto(T)button.
-- T Turn on Help
Scroll up/down
OK Turn off Help
www. kodak, com/go/m 763support m863support md863support (_) 13
Page 15

Doing more with your camera
Taking panoramic pictures
Usepanoramato "stitch" up to 3 picturesinto a panoramicscene.
1 Turnthe Modedial to SCN.
2 Press_/_ onthe4-way buttonto highlightPanoramaLeft-Rightor Panorama
Right-Left(dependingonthe directionyouwant to pan),then presstheOKbutton.
3 Takethefirst picture.
After aquickview,theLCDdisplaystheliveviewandan "overlay"fromthefirstpicture.
4 Composethe secondpicture.Maketheoverlayfrom the first picturecoverthesame
portionin the new picture.(Youcanpressthe Deletebuttonto re-takea picture.)
5 if youaretakingonly2 pictures,pressthe OKbutton to stitchthemtogether.
Afteryoutake3pictures,thepicturesareautomaticallystitchedtogether
TheLCDdisplaysaquickviewfor approximately5seconds.
Take 2 or 3
pictures.
Get1
panoramicpicture.
14 (_ www.kodak, com/go/easysharecenter
Page 16

Doingmorewithyourcamera
Understanding picture-taking icons
Self-timer/Burst Date stamp
Flash Pictures/time remaining
Camera -- Storage location
mode Zoom: Wide, Telephoto,
Album Digital
name Focus zone
Framing Exposure metering
marks White balance
Framing
grid
Picture size
Long time exposure
ISO speed
Battery level
Exposure compensation
www. kodak, com/go/m 763support m863support md863support (_) 15
Page 17

Working with pictures/videos
Magnifying pictures
1 Pressthe Reviewbutton.
2 PressW/Tto magnify2X-8X.
3 Press._./"',,_,"_/_ to viewotherpartsof the
picture.
4 PressOKto returnto 1X.
Cropping pictures
Youcancropa picturesothat onlythe desiredportionof thepictureremains.
1 Pressthe Reviewbutton,then _/_ to find a
picture.
2 Pressthe Menubutton.Press _/_ to find Edit.
Picture Cropped pictur_ 3 Press _/",lllllllll,''' to highlightCrop,thenpressOK.
4 PressTelephoto(T)to zoomin, or _/_ _/_ to movethe cropbox. PressOK.
5 Followthe screenprompts.
16 (_) www.kodak, com/go/easysharecenter
Page 18

Workingwithpictures/videos
Using sound tags
Youcanadda uniquesound/message(up to 1minute long)to your picture(notto
videos).
Recording a sound tag
1
Pressthe Reviewbutton, then 4/_ to find a picture.
2
Pressthe Menu button, then 4/_ to
highlightSoundTag.Pressthe OKbutton.
3
ChooseRecord,then pressOK.
4
Followthe screenprompts.
Thesoundtagisappliedtoyourpicture.
Playing a sound tag
1 PresstheReviewbutton, then _/_ to find atagged
picture.
2 Press_ to playthesoundtag.
3 Press _/",,,i,,,,,,"to adjustthe volume.
Review
4 PressOKto pauseor replaythe soundtag during
playback.
www. kodak, com/go/m 763support m863support md863support (_ 17
Page 19

Working with pictures/videos
Viewing thumbnails (multi-up)
1 Pressthe Reviewbutton.
2 Pressthe ZoomWideAngle(W)buttonto change
from single-pictureviewto multi-upthumbnails.
3 PressTelephoto(T)to returnto single-pictureview.
m Toselectmultiplepictures/videos,seepage21.
Using Kodak Perfect Touch technology
KodakPerfectTouchtechnologyhelpsensurebetter,brighterpictures.
1 Pressthe Reviewbutton,then _/_ for previous/nextpicture.
2 Pressthe Menubutton.Press _/_ to find Edit.
3 Press ._f"',,,P to highlight PerfectTouchtech.,then pressOK.
Theenhancementispreviewedinasplitscreen.Press4/_ to viewotherpartsofthe
picture.
4 PressOK.Followthe screenpromptsto replacethe originalpictureorto savethe
enhancedpictureas a newone.
NOTE:Youcannotenhancepreviouslyenhancedpictures.
18 (_ www.kodak, com/go/easysharecenter
Page 20

Workingwithpictures/videos
Editing videos
Making a picture from a video
Youcanchoosea singleframefrom a video,then makea picturesuitablefor printing.
1 Pressthe Reviewbutton,then </_ to find avideo.
2 Pressthe Menubutton.Press _/_ to find Edit.
3 Press _f",,P to highlightMakePicture,thenpress
Video Picture OK.
4 Press _ to selectavideoframe.
5 Followthe screenpromptsto savethe picture.
Trimming a video
Youcandeletean unwantedportionfromthe beginningor endof a video.
1 Pressthe Reviewbutton,then </_ to find avideo.
_ _mnl_H 2 Pressthe Menubutton.Press_/_ to find Edit.
Video Trimmedvideo 4 Followthe screenprompts.(Usefast-forwardand
www. kodak, com/go/m 763support m863support md863support (_) 19
U
3 Press ._f"",,P to highlightTrim,thenpress _.
fast-reverse,if needed.)
Page 21

Working with pictures/videos
Making a video action print
Froma video,you canmakea4-, 9-, or 16-uppicture,suitablefor a4 x 6-inch
(lOx 15 cm)print.
1 Pressthe Reviewbutton,then </_ to find avideo.
H iniml_ 2 Pressthe Menubutton. Press _/"""111111'"tOhighlight
Video 4-,9-,or 3 Press _./""11111111''' tO highlightVideoAction Print,then
16-up picture pressOK.
EditVideo,thenpressOK.
4 Choosean option,thenpressOK.
Auto options: Thecameraincludesthe firstand lastframes,then 2,7, or 14
equallyspacedframes.
Manual options: Youchoosethe first and lastframes;the camerachooses2, 7,or
14equallyspacedframes.
Running a slide show
UseSlideShowto displayyourpictures/videoson the camera,a television,or any
deviceequippedwith a video input (seepage 5).
1 Pressthe Reviewbutton,thenthe Menubutton.
2 Press_/_ _/'_'_ to highlightSlideShow,then pressthe OKbutton.
3 Press._/'_'_to highlightBeginShow,thenpressthe OKbutton.
Tointerruptthe SlideShow,pressthe OKbutton.
20 (_ www, kodak, com/go/easysharecenter
Page 22

Workingwithpictures/videos
Running a multimedia slide show
MultimediaSlideShowissimilarto SlideShow,butalsooffersmusicandvisualeffects.
First,select2-20 pictures(seepage21).Then:
1 Pressthe Reviewbutton.
2 Press /_ to highlight MultimediaSlideShow,then pressthe OKbutton.
3 Press /_ to highlighta choicefromthemenu,then pressthe OKbutton.
Selecting multiple pictures/videos
Usethe multi-selectfeaturewhen you havetwo ormorepictures/videosto print,
transfer,delete,etc. (Multi-selectis usedmosteffectivelyin Multi-Upmode,page 18.)
12Pressthe Reviewbutton,then _/_ to find a
picture/video.
Pressthe OKbutton to selectpictures/videos.
A checkmarkappearsonthepicture.Youcannowprint,
transfer,ordeletetheselectedpictures.Youcanpress
OKasecondtimetoremoveacheckmark.
Selected
pictures
..8,
www. kodak, com/go/m 763support m863support md863support (_ 21
Page 23

Working with pictures/videos
Deleting pictures/videos
1 Pressthe Reviewbutton.
2 Press _/_ for previous/nextpicture/video.
3 Pressthe Deletebutton.
4 Followthe screenprompts.
NOTE:Afteryoudeleteapicture,thenextpicture(overlaidwiththe
DeletemenuwiththeUndoDeleteoption)appears.Ifthereare
nomorepictures,theDeletemenuonablankscreenappears.
SeeUsingtheundodeletefeatureformoreinformation.
Using the undo delete feature
if youaccidentallydeletea picture,useUndoDeleteto retrieveit. Thisfeatureis
availableonlyimmediatelyafteryoudeletea picturein Reviewmode.TheUndoDelete
optionappears.
1 Press _/_ to highlight UndoDelete.
2 PressOK.
Thedeletedpicture(overlaidwith the Deletemenu)appears.
22 _ www, kodak, com/go/easysharecenter
Page 24

Solving camera problems
Forsupport,visit www.kodak.com/go/m763support,www.kodak.com/go/m863support,
www.kodak.com/go/md863supportandselectInteractiveTroubleshooting& Repairs.
Camera problems
If.i.
Cameradoesnot
turn on/off.
Cameradoesnot
recognizeSDcard.
Shortbatterylife
with KodakLi-lon
rechargeable
digitalcamera
batteryKLIC-7001
Batterydoesnot
chargeusingUSB
charging.
m Removethe battery,then reinsertcorrectly(seepage1).
m Installnewbattery.
m Chargerechargeablebattery(see page2).
m Purchasea certifiedSD/SDHCcard.
m Reformatthecard.
Caution: Formatting a card deletes all pictures and videos,
includingprotected files.
m Inserta cardinto theslot,then pushto seat.
m Limitthe following activitiesthat quicklydepletebattery power:
reviewingpictures/videosonthe LCD;excessiveuseofthe flash.
m Seepage2 orvisitwww.kodak.com/go/usbcharging.
www. kodak, com/go/m 763support m863support md863support (_) 23
Page 25

Appendix
Important safety instructions
CAUTION:
Do not disassemble this product; there are no user-serviceable parts inside. Refer servicing to
qualified service personnel. Do not expose this product to liquid, moisture, or extreme
temperatures. Kodak AC adapters and battery chargers are intended for indoor use only. The
use of controls, adjustments, or procedures other than those specified herein may result in
exposure to shock and/or electrical or mechanical hazards. If the LCD breaks, do not touch the
glass or liquid. Contact Kodak customer support.
The use of an accessory that is not recommended by Kodak may cause fire, electric shock, or injury.
m Use only a USB-certified computer. Contact your computer manufacturer if you have questions.
m If using this product in an airplane, observe all instructions of the airline.
m When removing the battery, allow it to cool; it may be hot.
m Read and follow all warnings and instructions supplied by the battery manufacturer.
m Use only batteries approved for this product to avoid risk of explosion.
m Keep batteries out of the reach of children.
m Do not allow batteries to touch metal objects, including coins. Otherwise, a battery may short circuit,
discharge energy, become hot, or leak.
m Do not disassemble, install backward, or expose batteries to liquid, moisture, fire, or extreme temperature.
m Remove the battery when the product is stored for an extended period of time. In the unlikely event that
battery fluid leaks inside the product, contact Kodak customer support.
m In the unlikely event that battery fluid leaks onto your skin, wash immediately with water and contact your
local health provider. Foradditional health-related information, contact your local Kodak customer support
m Dispose of batteries according to local and national regulations.
m Do not charge non-rechargeable batteries.
For more information on batteries, see www.kodak.com/go/batterytypes
24 _ www.kodak.com/go/easysharecenter
Page 26

Appendix
Upgrading your software and firmware
Download the latest versions of the software included on the Kodak EasySharesoftware CDand the camera
firmware (the software that runs on the camera), See www, kodak,com/go/m763downloads,
www.kodak.com/go/m863downloads, or www.kodak.com/go/md863downloads.
Additional care and maintenance
Jm If the camera has been subjected to inclement weather or you suspect water has gotten inside the camera,
turn off the camera and remove the batteries and card. Allow components to air-dry for at least 24 hours
before using the camera again.
m Blow gently on the lens or LCDto remove dust and dirt. Wipe gently with a soft, lint-free cloth or an
untreated lens-cleaning tissue, Do not usecleaning solutions unless designed specifically for camera lenses,
Do not allow chemicals, such as suntan lotion, to contact painted surfaces,
Jm Service agreements are available in some countries. Contact a dealer of Kodak products for more
information,
Fordigitalcameradisposalorrecyclinginformation, contactyourlocalauthorities.IntheUS,visitthe Electronics
IndustryAllianceWebsite atwww.eiae.orgorvisit www.kodak.com/go/m76Ssupport,
www.kodak.com/go/m86Ssupport,or www.kodak.com/go/md86Ssupport.
Warranty
KodakwarrantsKodakconsumerelectronicproductsandaccessories("Products"),excludingbatteries,to be
freefrommalfunctionsand defectsin both materialsandworkmanshipfor oneyearfrom the date of purchase.
Retaintheoriginal datedsalesreceipt.Proofof the date of purchasewill be requiredwith anyrequestfor
warrantyrepair.
Limited warranty coverage
Warrantyserviceis only availablefromwithin the countrywherethe Productswereoriginally purchased.You
mayberequiredto ship Products,at yourexpense,to theauthorizedservicefacility for thecountrywhere the
Productswere purchased.Kodakwill repairor replaceProductsiftheyfail to function properlyduring the
warrantyperiod,subjecttoany conditionsand/orlimitationsstatedherein.Warrantyservicewill includeall
laboraswell asanynecessaryadjustmentsand/orreplacementparts.If Kodakis unableto repair or replacea
Product,Kodakwill, at itsoption, refundthe purchasepricepaidfor the ProductprovidedtheProducthasbeen
returnedto Kodakalongwith proofof the purchasepricepaid. Repair,replacement,orrefundof the purchase
pricearethesole remediesunderthewarranty.Ifreplacementpartsareusedin makingrepairs,those partsmay
www. kodak, com/go/m 763support m863support md863support (_) 25
Page 27

Appendix
be remanufactured, or may contain remanufactured materials, If it is necessary to replace the entire Product, it
may be replaced with a remanufactured Product. Remanufactured Products, parts and materials are warranted
for the remaining warranty term of the original Product, or 90 days after the date of repair or replacement,
whichever is longer,
Limitations
Thiswarrantydoesnotcover circumstancesbeyondKodak'scontrol,Thiswarrantydoesnot applywhen failure
isdue to shippingdamage,accident,alteration,modification,unauthorizedservice,misuse,abuse,usewith
incompatibleaccessoriesor attachments(suchasthird partyink or inktanks),failureto follow Kodak's
operation,maintenanceor repackinginstructions,failureto useitemssuppliedby Kodak(suchasadaptersand
cables),orclaimsmadeafter theduration ofthiswarranty.Kodakmakesnoother expressorimpliedwarranty
for thisproduct,anddisclaimstheimpliedwarrantiesof merchantabilityandfitnessfor aparticular purpose.In
theeventthatthe exclusionof anyimpliedwarranty isineffectiveunderthe law,theduration ofthe implied
warrantywill beoneyearfrom the purchasedate or suchlongerperiodasrequiredbylaw, Theoptionof repair,
replacement,or refund is Kodak'sonlyobligation, Kodakwill not beresponsiblefor anyspecial,consequential
or incidentaldamagesresultingfrom thesale,purchase,oruseof this productregardlessof thecause.Liability
for anyspecial,consequentialor incidentaldamages(includingbut notlimitedto lossof revenueor profit,
downtimecosts,lossof the useof the equipment,cost of substituteequipment,facilitiesor services,or claims
ofyour customersfor suchdamagesresultingfrom thepurchaseuseor failureofthe Product),regardlessof
causeor for breachof anywritten or impliedwarrantyis expresslydisclaimed.
Your rights
Somestatesorjurisdictionsdo not allowexclusionor limitationof incidentalor consequentialdamages,so the
abovelimitationor exclusionmaynot applyto you, Somestatesorjurisdictionsdo not allow limitationson how
longan impliedwarrantylasts,sotheabovelimitationmaynot applyto you,Thiswarrantygivesyouspecific
rights,andyou mayhaveother rightswhich varyfrom stateto stateor byjurisdiction,
Outside the United States and Canada
Incountriesotherthanthe UnitedStatesandCanada,thetermsand conditionsofthis warrantymaybe
different. Unlessa specificKodakwarrantyis communicatedto the purchaserinwriting bya Kodakcompany,
nowarrantyor liabilityexistsbeyondanyminimumrequirementsimposedbylaw,eventhough defect,damage,
or lossmaybebynegligenceor otheract,
26 (_ www.kodak.com/go/easysharecenter
Page 28

Appendix
FCCcompliance and advisory
_ Kodak EasyShare M763/M863/MD863 digital camera J
This equipment has been tested and found to comply with the limits for a Class Bdigital device, pursuant to
Part 15 of the FCC Rules, Theselimits are designed to provide reasonable protection against harmful
interference in a residential installation,
Thisequipmentgenerates,uses,andcanradiateradio frequencyenergyand, if notinstalledor usedin
accordancewith the instructions,maycauseharmfulinterferenceto radiocommunications,However,there is
noguaranteethat interferencewill not occurina particularinstallation,
If this equipmentdoescauseharmfulinterferenceto radio or televisionreception,which canbedeterminedby
turningthe equipmentoff andon,the userisencouragedtotry to correctthe interferencebyoneor moreof the
following measures:1)reorientor relocatethe receivingantenna;2) increasetheseparationbetweenthe
equipmentandthe receiver;3)connectthe equipmentto anoutlet on a circuitdifferentfromthat towhich the
receiverisconnected;4) consultthe dealeroran experiencedradio/TVtechnicianfor additionalsuggestions,
Anychangesor modificationsnot expresslyapprovedbythe partyresponsiblefor compliancecould voidthe
user'sauthorityto operatetheequipment.Whereshieldedinterfacecableshavebeenprovidedwith the
productorspecifiedadditionalcomponentsoraccessorieselsewheredefinedto beusedwith the installationof
theproduct,they mustbeusedin orderto ensurecompliancewith FCCregulation,
FCC and Industry Canada
This device complies with Industry Canada RSS-210 and FCC Rules, Operation is subject to the following two
conditions: (1) this device may not cause harmful interference, and (2) this device must accept any interference
received, including interference that may cause undesired operation.
Pt3C et. Inda_ie Canada
Cet appareil e_t conforn_ _ la nonne RSS-210 d'In,_rle Canada et a,_ r_gleir_nta_ioias de la FCC. Son
u_ili_ation e.st _:mmi_e aux deu_ cotxtiti¢,i_ _aivant_ : ( 1) cet appareil ne dolt. p_ provoquer d_nt_rNre1_e_
nui_ibb_ et (2) cet appareil dolt _mppor_r le_ mt_ff_encas reque_, y compri_ celb._ .m_eptihle_ d_ mire
_on bon for_tionnelr_nt
www. kodak, com/go/m 763support m863support md863support @ 27
Page 29

Appendix
Canadian DOC statement
DOC Class BCompliance
This Class B digital apparatus complies with Canadian ICES-003,
Observation des normes-Classe B
Cet apparel num6rique de la classe B est conforme _ la norme NMB-003 du Canada,
Australian C-tick
_1t N137
Waste Electrical and Electronic Equipment labeling
EU:It isthe user'sresponsibilitytodiscardthisequipmentintoanapproved,segregatedcollection
schemetoenable itssuitabletreatment/disposalandto improvehuman/environmental
protection.Formoreinformation,seeyour retailer,localauthority orwww.kodak.com/go/recycle.
(Productweight: 125g.)
VCCl Class B ITE
Korean Class B ITE
I
28 _ www.kodak.com/go/easysharecenter
Page 30

China RollS
_t_ _tJ__ (EPUP)
Appendix
_';_ ,_H9l _,_#_2Xs_'€ x 0 0 0 0
_. _,_ x 0 0 0 0
_[_)_ x 0 0 0 0
USB At_
0
0
0
Kodak
Eastman Kodak Company
Rochester, NY 14650
Eastman Kodak Company, 2007
Kodak, EasyShare,and Perfect Touch are trademarks of Eastman Kodak Company,
2F6825en
www. kodak, com/go/m 763support m863support md863support (_) 29
 Loading...