

Page 1

Start Here
Print Copy Scan Fax
9
All-in-One Printer
Note: For a USB cable connection, a USB 2.0 cable
is required to connect your KODAK All-in-One
Printer to your WINDOWS or MACINTOSH OS
computer. Available in the KODAK store or see
your local retailer.
Page 2
10
Color Ink Cartridge
1
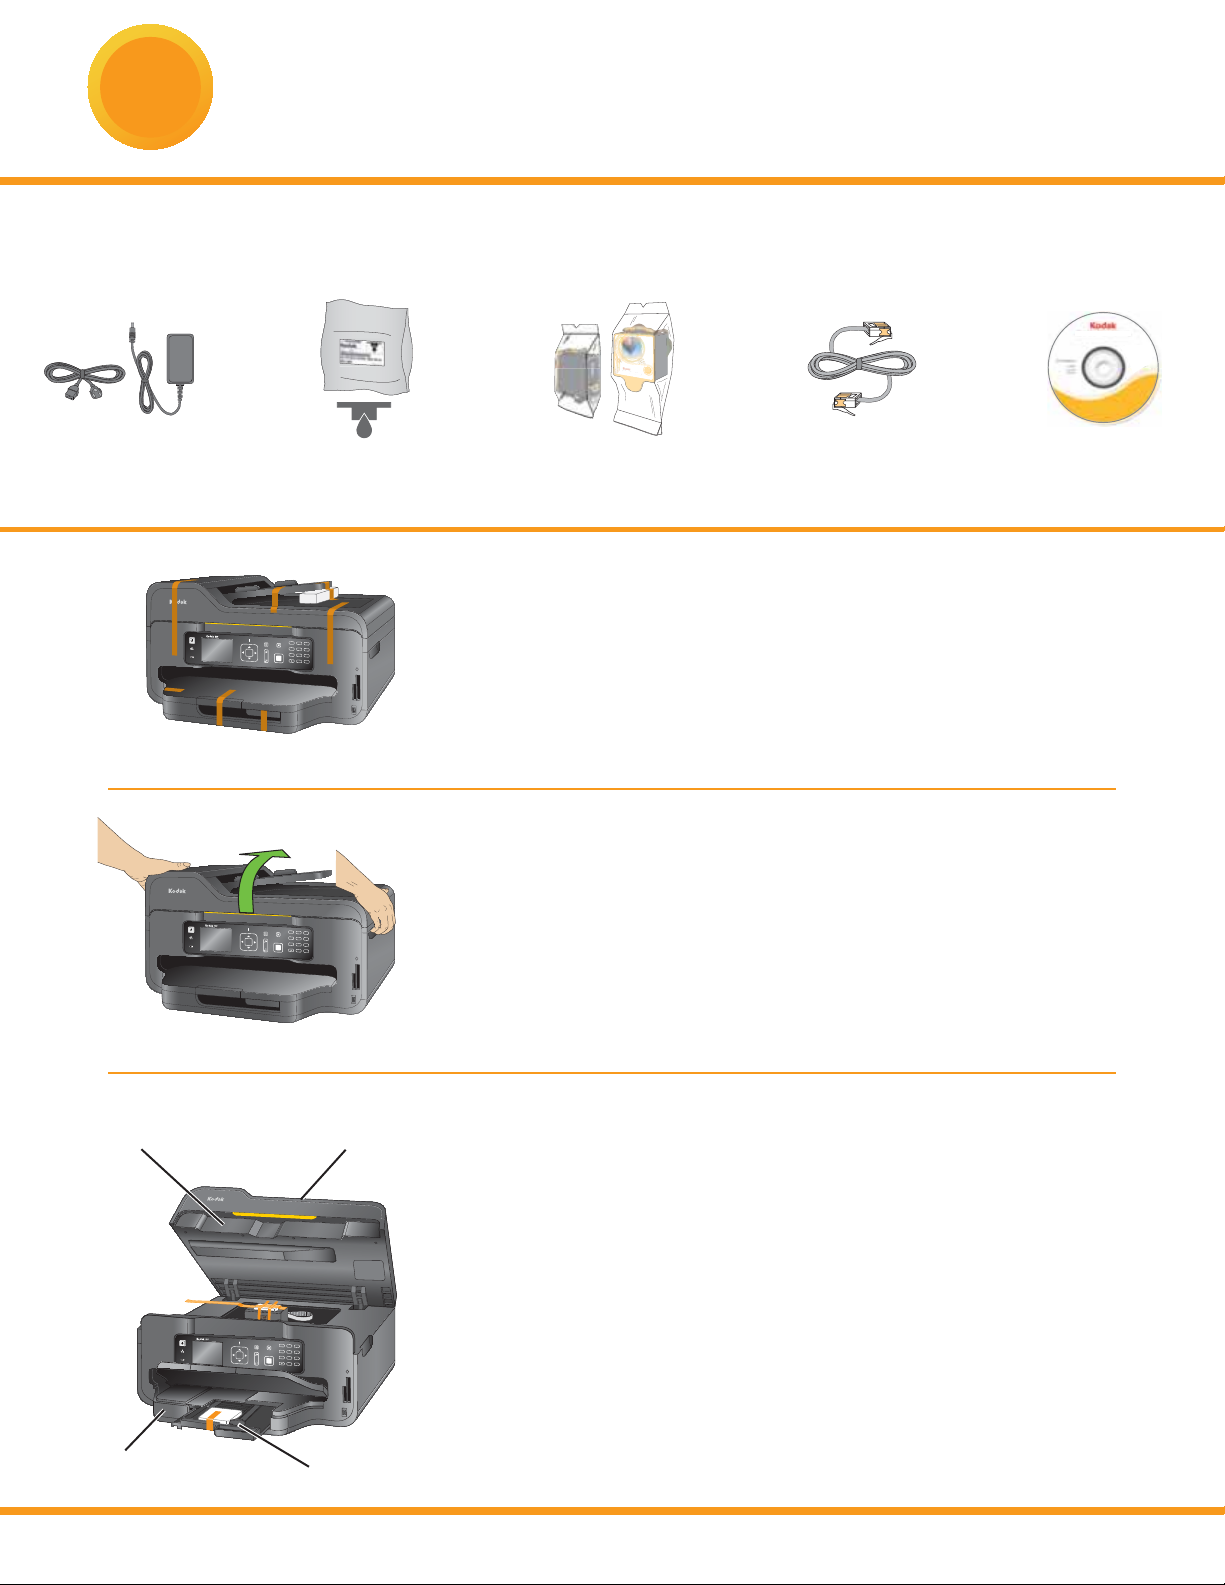
Unpacking the Printer
Included with your KODAK All-in-One Printer:
Power Cord
and Adapter
FOR WINDOWS & MACINTOSH
Color Ink Cartridge
10
Printhead Black & Color
Phone Cord Software CD
Ink Cartridges
9
All-in-One Printer
Menu
Can
c
el
1 2
3
abc
def
Zoom
4
5
6
Network
ghi
jkl
mno
S
T
A
R
T
OK
7
8
9
pq
r
s
tuv
w
xyz
0
#
Symbols
Space
a) Remove all orange shipping tape and any foam pieces
from the outside of the printer.
Inkjet Printer Software
with User Guide
b) Lift the printer access door.
9
All-in-One Printer
Menu
Canc
el
12
3
abc
def
Zoom
4
5
6
Network
ghi
jkl
mno
S
TART
OK
7
8
9
pq
r
s
tuv
wxyz
0
#
Symbols
Space
Printer access door
Bottom paper tray
2
.
Scanner lid
.
c) Remove all orange shipping tape and any foam
pieces from the inside of the printer.
d) Pull out the top paper tray and remove the orange
9
All-
in-One
Printer
Menu
Can
cel
1
2
3
abc
def
Zoom
4
5
6
Network
ghi
jkl
mno
START
OK
7
8
9
pq
rs
tuv
w
xyz
0
#
Symbols
Spa
ce
.
Top paper tray
.
www.kodak.com/go/aiosupport
shipping tape and foam from the top paper tray.
Close the top paper tray.
e) Close the printer access door.
Page 3
2
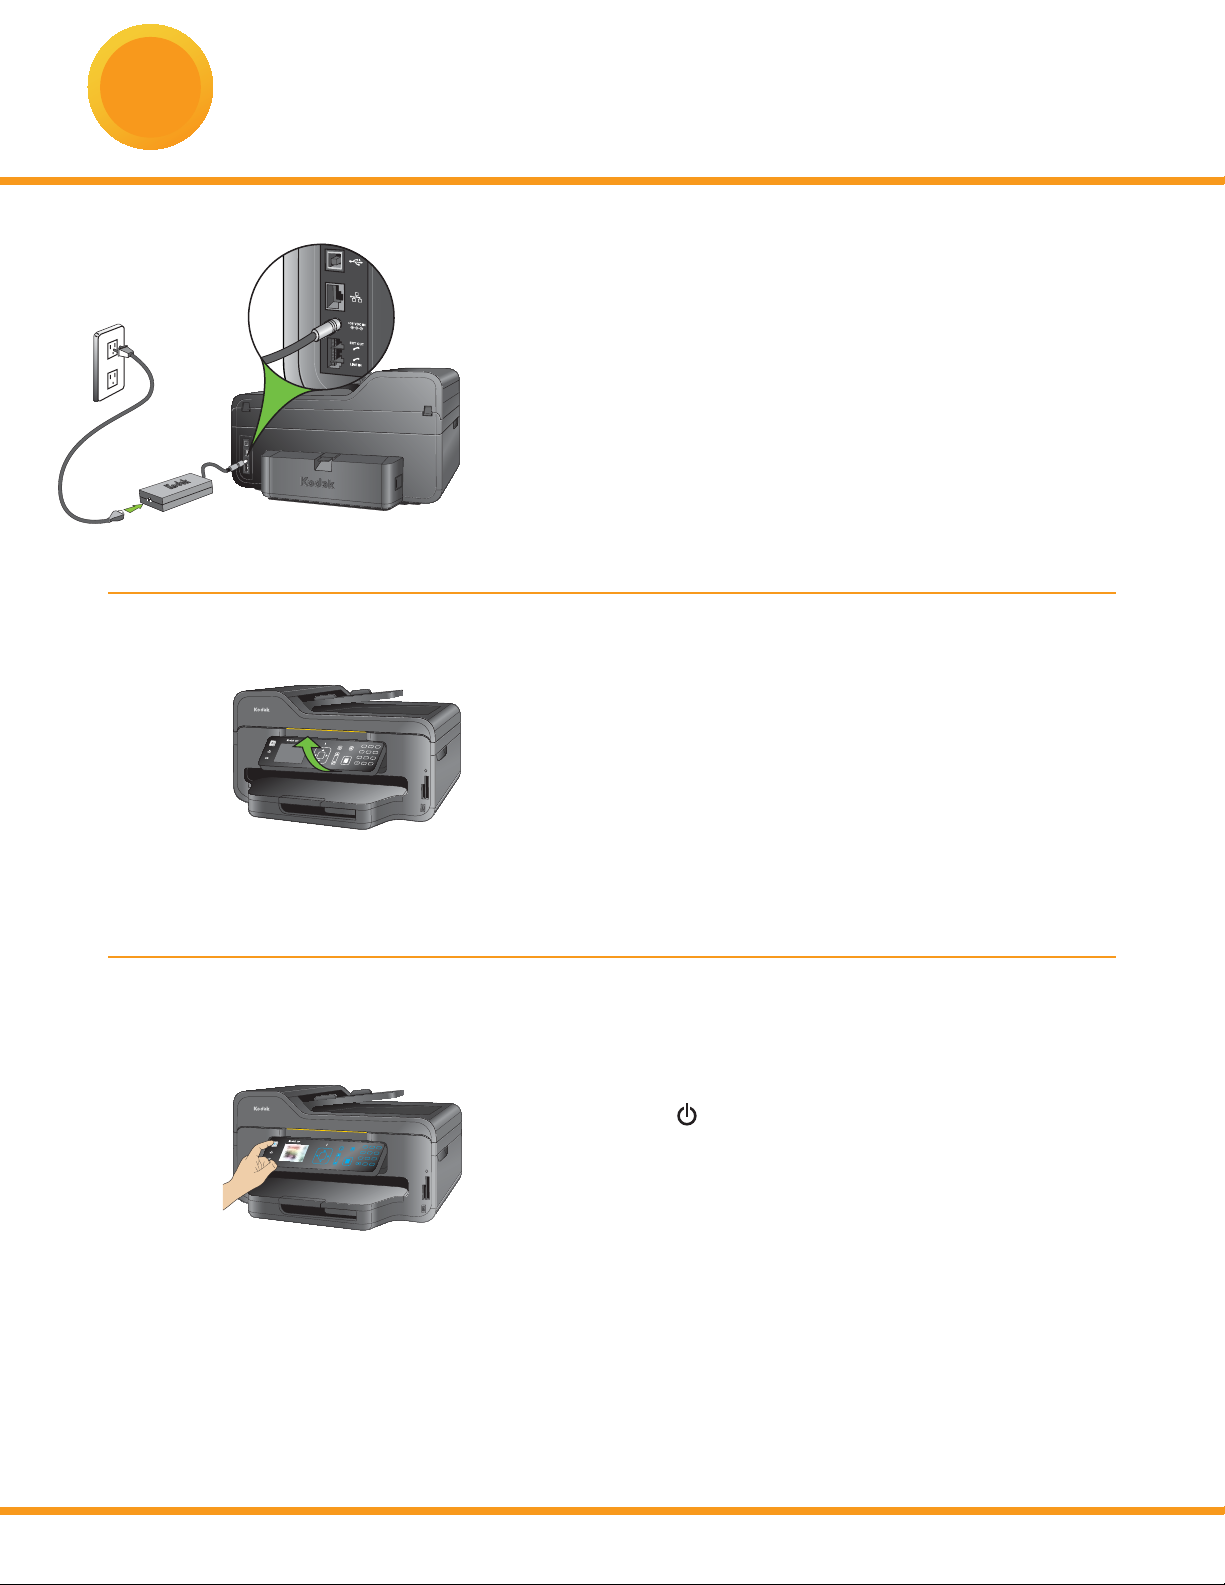
Connecting the Power
a) 1. Connect the power cord to the adapter.
2. Connect the adapter to the printer.
3. Connect to the power source.
9
Al
l-in
-One Printer
Menu
Canc
el
1 2
1 2
3
3
abc
def
def
Zoom
4
4
5
5
6
6
ghi
Network
ghi
jkl
jkl
mno
mno
S
TART
OK
7
7
8
8
9
9
pq
pq
rs
rs
tuv
tuv
wxyz
0
0
#
#
Symbols
Symbols
Spa
Space
ce
b) Remove the plastic fi lm from the LCD display and raise
the control panel.
9
c) Press ON
All-in-One Printer
Menu
Menu
Can
c
el
1 2
3
abc
def
Zoom
Zoom
4
5
6
Network
ghi
jkl
mno
S
TA
RT
OK
7
8
9
pqr
s
tuv
w
xyz
0
#
S
ymbols
Spa
ce
.
d) Select your language and press OK.
e) Select your country/region and press OK.
www.kodak.com/go/aiosupport
3
Page 4
3
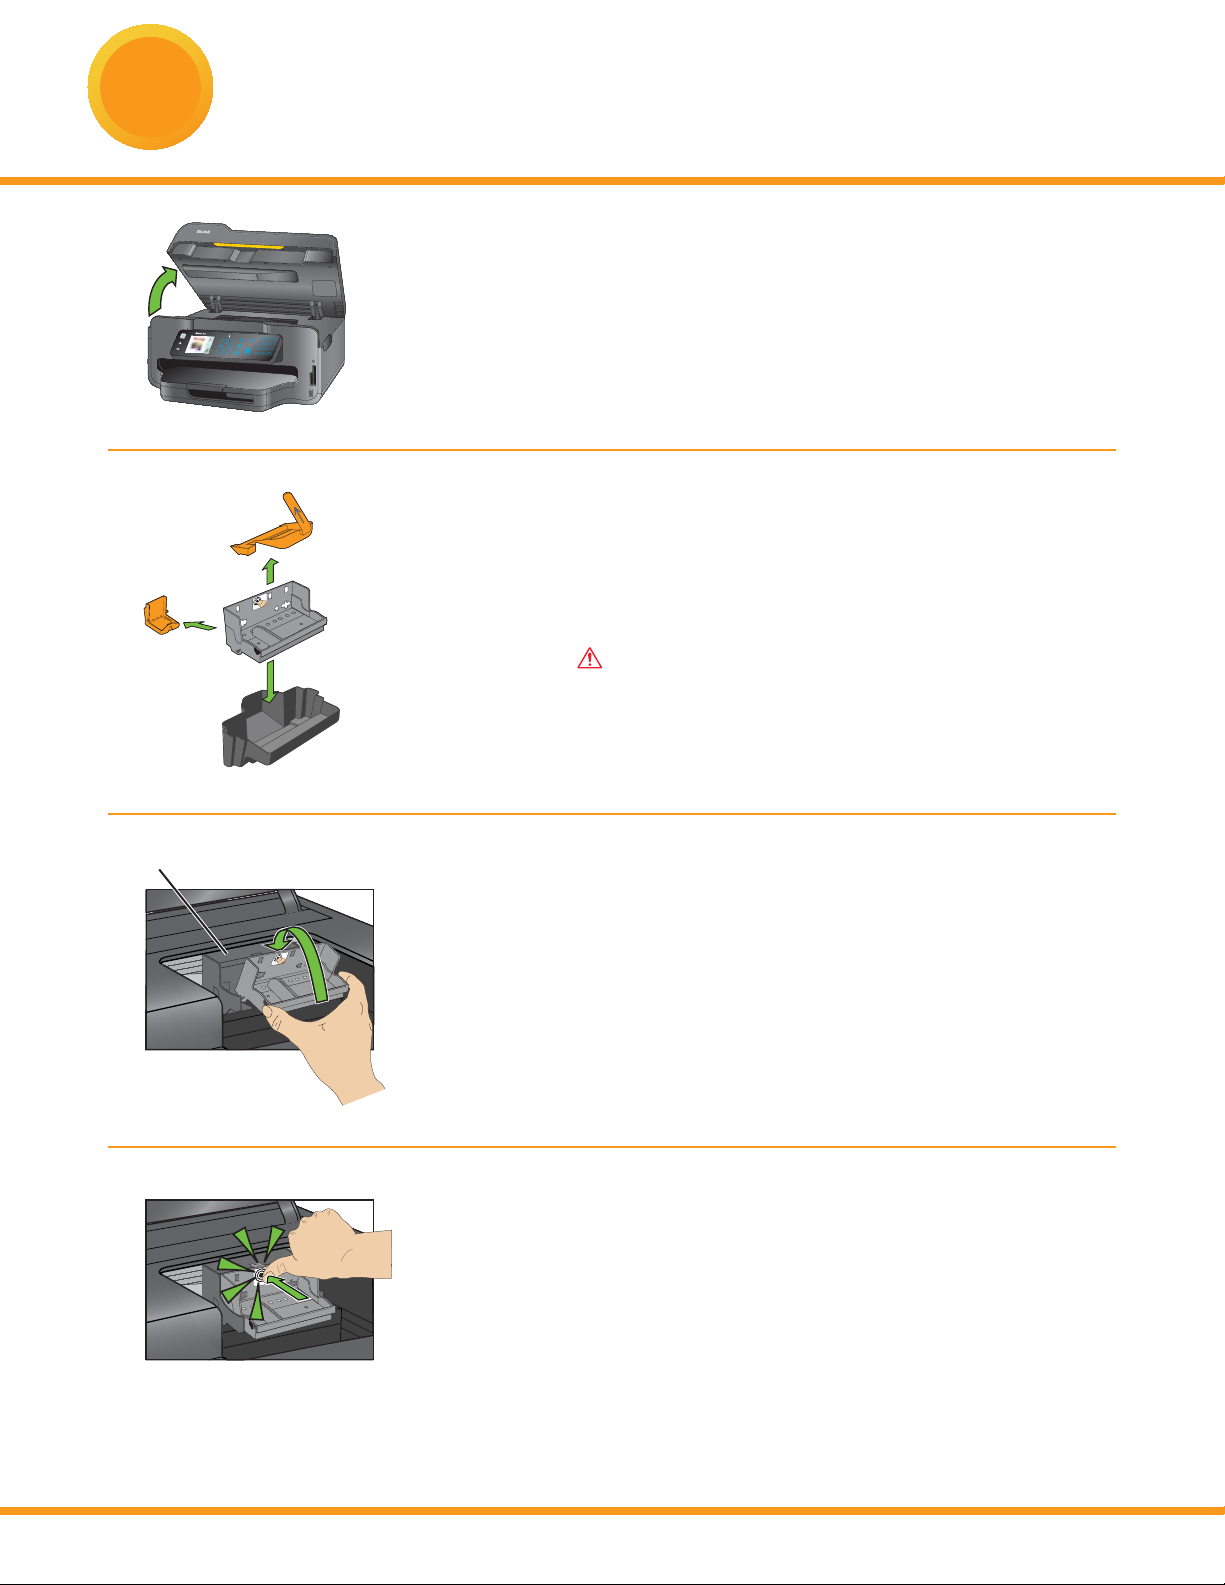
Inserting the Printhead
a) Lift the printer access door.
9
All-in-One Print
er
Menu
Canc
el
1
2
3
abc
def
Zoom
4
5
6
Network
ghi
jkl
mno
ST
ART
OK
7
8
9
pq
rs
tuv
w
xyz
0
#
Symbols
Spa
c
e
b) Carefully remove the printhead from its bag.
Remove the 3 plastic protective shields.
Do not touch the copper-colored contacts.
Carriage
.
c) Place the printhead into the carriage.
Insert at the angle shown.
d) Push fi rmly against the target label of the printhead
until you hear a loud snap.
4
www.kodak.com/go/aiosupport
Page 5
4
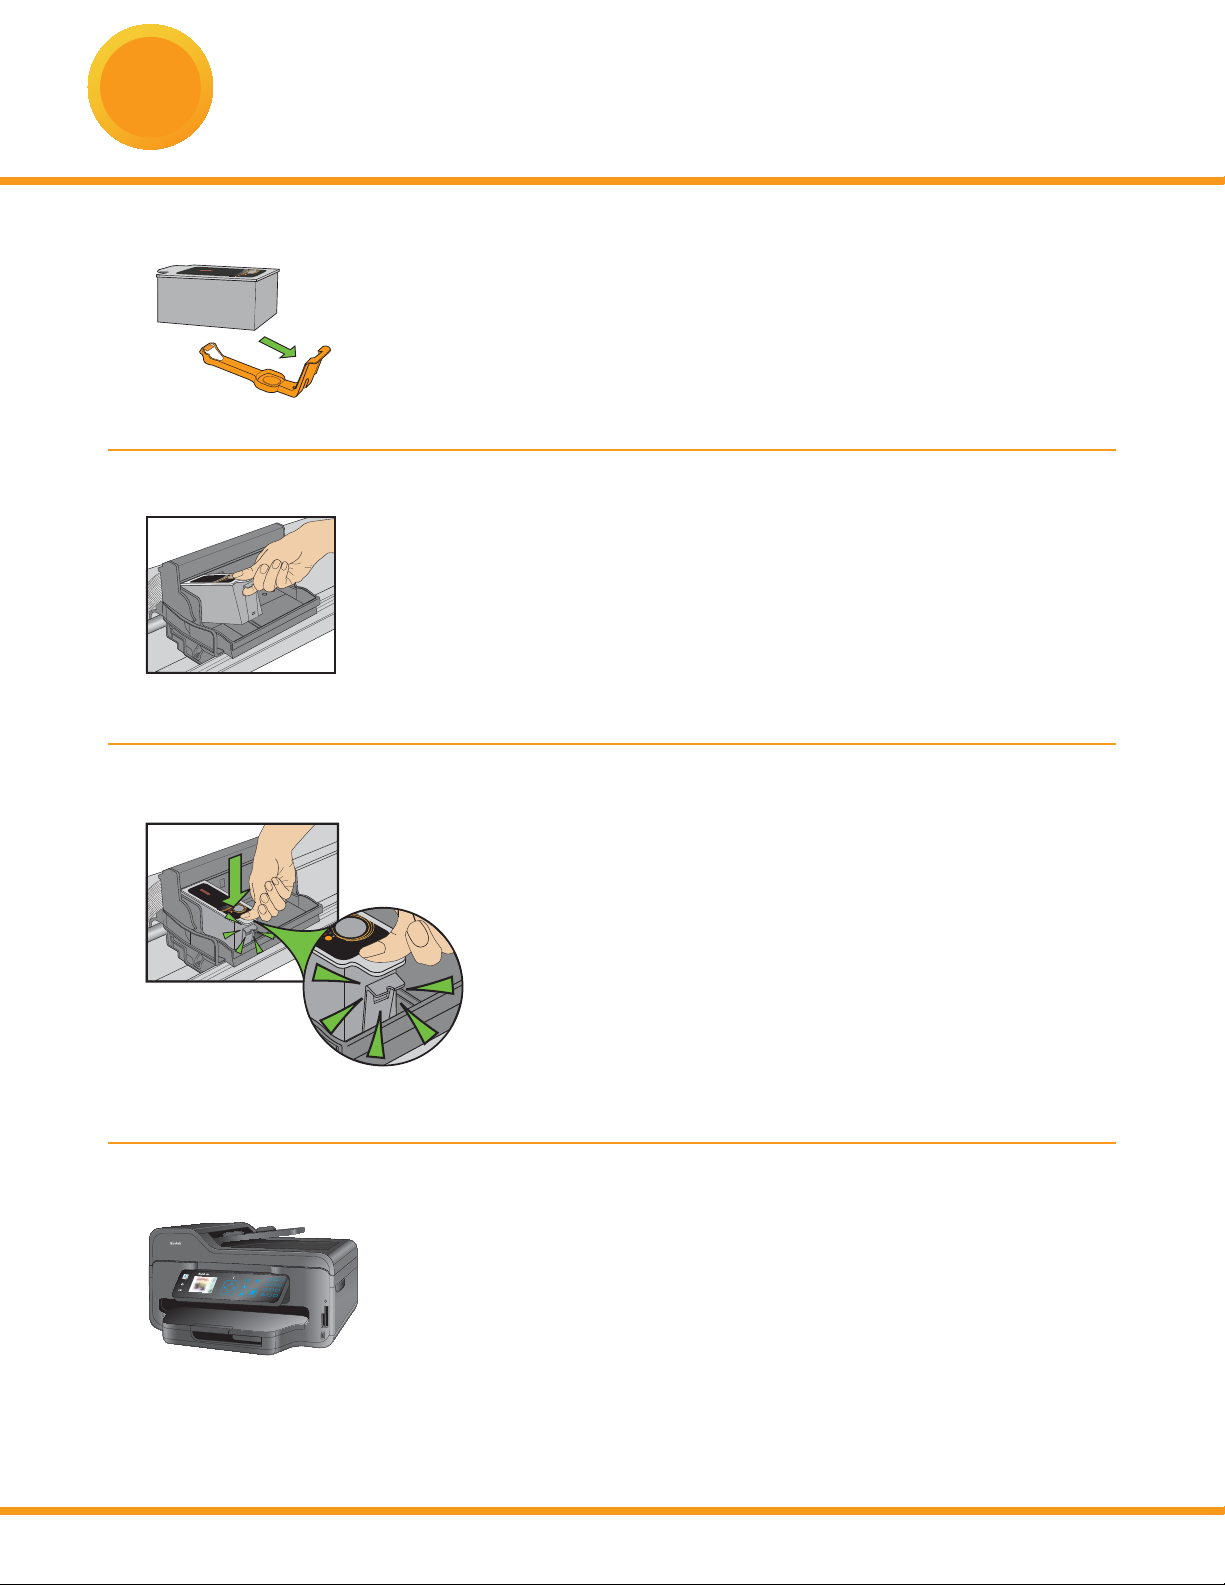
Black Ink Cartridge
Inserting the Ink Cartridges
10
a) Remove the black ink cartridge from its bag.
Carefully remove and discard the orange cap.
Handle ink cartridges carefully to avoid ink transfer.
Black Ink Cartridge
Cartouche d'encre noire
10
b) Insert the black ink cartridge into the printhead.
c) Press down on the ink cartridge until you hear it click
into position.
10
10
d) Repeat steps 4a - 4c with the color ink cartridge.
9
All-in-One Printer
Menu
Cancel
12
12
3
3
abc
def
def
Zoom
4
4
5
5
6
6
ghi
Network
ghi
jkl
jkl
mno
mno
START
OK
7
7
8
8
9
9
pqr
pqr
s
s
tuv
tuv
w
xyz
0
0
#
#
Symbols
Symbols
Spac
Spac
e
e
www.kodak.com/go/aiosupport
e) Close the printer access door and press OK.
5
Page 6

5
Network
ST
ART
Can
cel
Zoom
Menu
OK
All-in-One Printer
9
1
2
5
8
4
7
3
6
9
Spa
ce
0
abc
jkl
tuv
ghi
pqr
s
def
mno
w
xyz
S
ymbols
#
Loading Paper and Calibrating
Paper
output tray
Bottom
paper tray
.
a) Raise the paper output tray and pull the bottom paper
.
9
All-in-O
ne Printer
Menu
Cancel
1 2
3
abc
def
Zoom
4
5
6
Network
ghi
jkl
mno
S
TA
R
T
OK
7
8
9
pq
r
s
tuv
w
xyz
0
#
S
ymbols
Space
tray out.
b) Load plain paper and slide the 2 paper edge guides
against the left and front edge of the paper.
Bottom paper tray
extender tab
c) Close the bottom paper tray.
9
All-in-O
ne Printer
Menu
Cancel
1 2
3
abc
def
Zoom
4
5
6
Network
ghi
jkl
mno
START
OK
7
8
9
pqrs
tuv
wxyz
0
#
Symbo
ls
Spac
e
NOTE: If the bottom paper tray will not close all the
way, press the bottom paper tray extender tab on the
front left edge of the tray while pushing the tray in.
9
All-in-One Printer
Menu
etwork
Zoom
S
T
ART
OK
Symbols
d) Pull out the top paper tray and insert 4x6 in. (10x15 cm)
photo paper face down.
9
All-in-One Printer
Menu
Can
cel
12
3
abc
def
Zoom
4
5
6
Network
ghi
jkl
mno
S
T
A
RT
OK
7
8
9
pq
rs
tuv
w
xyz
0
#
S
ymbols
Spa
c
e
Slide the paper edge guides, close the top paper tray.
Lower the paper output tray.
9
All-in
-One Printe
r
Menu
Can
cel
1
1
2
2
3
3
abc
def
def
Z
oom
4
4
5
5
6
6
ghi
Network
ghi
jkl
jkl
mno
mno
S
TAR
T
OK
7
7
8
8
9
9
pq
pq
r
s
r
s
tuv
tuv
wxyz
0
0
#
#
Symbols
Symbols
Spac
Space
e
OK
e) Press START. Calibration will take 2-3 minutes.
6
www.kodak.com/go/aiosupport
Page 7

6
Connecting to a Computer or Network
Choose 1 of the following options to connect your new printer to your computer. Refer to the
corresponding sections for more information on connecting to a computer or network.
USB CABLE CONNECTION
WIRELESS (Wi-Fi) CONNECTION
ETHERNET CABLE CONNECTION
NONE (CAN CONNECT LATER)
Use this option if you will be connecting to your printer using
a USB cable.
Use this option if you will be connecting to your printer using
a wireless network.
Use this option if you will be connecting to your printer using
a wired network.
Use this option if you will not be connecting to a computer or
network at this time.
NOTE: You can switch your connection type at a later date. See the chapter Setting Up Your Printer in the
User Guide for detailed instructions.
USB CABLE CONNECTION- WAIT TO CONNECT
USB
a) Select USB cable from the LCD display
and press OK.
9
All-in-
One P
rinter
Menu
Can
cel
1
1
2
2
3
3
abc
def
def
Z
oom
4
4
5
5
6
6
ghi
Network
ghi
jkl
jkl
mno
mno
STA
RT
OK
7
7
8
8
9
9
pqrs
pqrs
tuv
tuv
wxyz
0
0
#
#
Sy
Symbols
mbols
Spa
S
pac
c
e
e
b) Proceed to step
www.kodak.com/go/aiosupport
Do not connect the USB cable to the printer
until instructed during software install.
7
.
7
Page 8

6
Connecting to a Computer or Network
(continued)
WIRELESS (Wi-Fi) CONNECTION
You will need your wireless router settings:
For additional Wi-Fi/Networking setup
information, please go to:
www.kodak.com/go/inkjetnetworking
9
All-in-O
ne
Prin
ter
Menu
Can
c
el
12
3
abc
def
Z
oom
4
5
6
Network
ghi
jkl
mno
S
TA
RT
OK
7
8
9
pqrs
tuv
wxyz
0
#
Sym
bols
Space
Network Name (SSID): _______________________________
Security String: _____________________________________
The security string is unique to your network’s access point.
Check with whomever set up your access point, your internet
provider, or check the access point documentation for this
information.
a) Select Wireless from the LCD display and press OK.
b) Select your wireless network from those listed and
press OK.
If the name (the SSID) of your network is not listed,
make sure your wireless access point (wireless router)
is turned on and within range.
If your access point does not broadcast its SSID, then
select Connect to Unlisted Network and press OK.
c) Use the arrow keys and the OK button to enter your
security string now.
Enter Security String
123
ABCDEFGHIJ
KLMNOPQRST
U V W X Y Z SP DONE
8
abc/123 !@#
BKSP
4567890
NOTE: To use the virtual keyboard, select the letter
you want and press OK. Select BKSP and press OK
to clear any mistakes you may make. When you are
fi nished, select Done and press OK.
OK
d) If successfully connected, your Wi-Fi indicator should
be solid blue. Proceed to step
.
7
If you are unable to connect to your wireless network, go
to www.kodak.com/go/inkjetnetworking or refer to the
User Guide for troubleshooting information. Detailed
instructions on where to locate the User Guide can be
found in step
www.kodak.com/go/aiosupport
8
of this guide.
Page 9
6
Connecting to a Computer or Network
(continued)
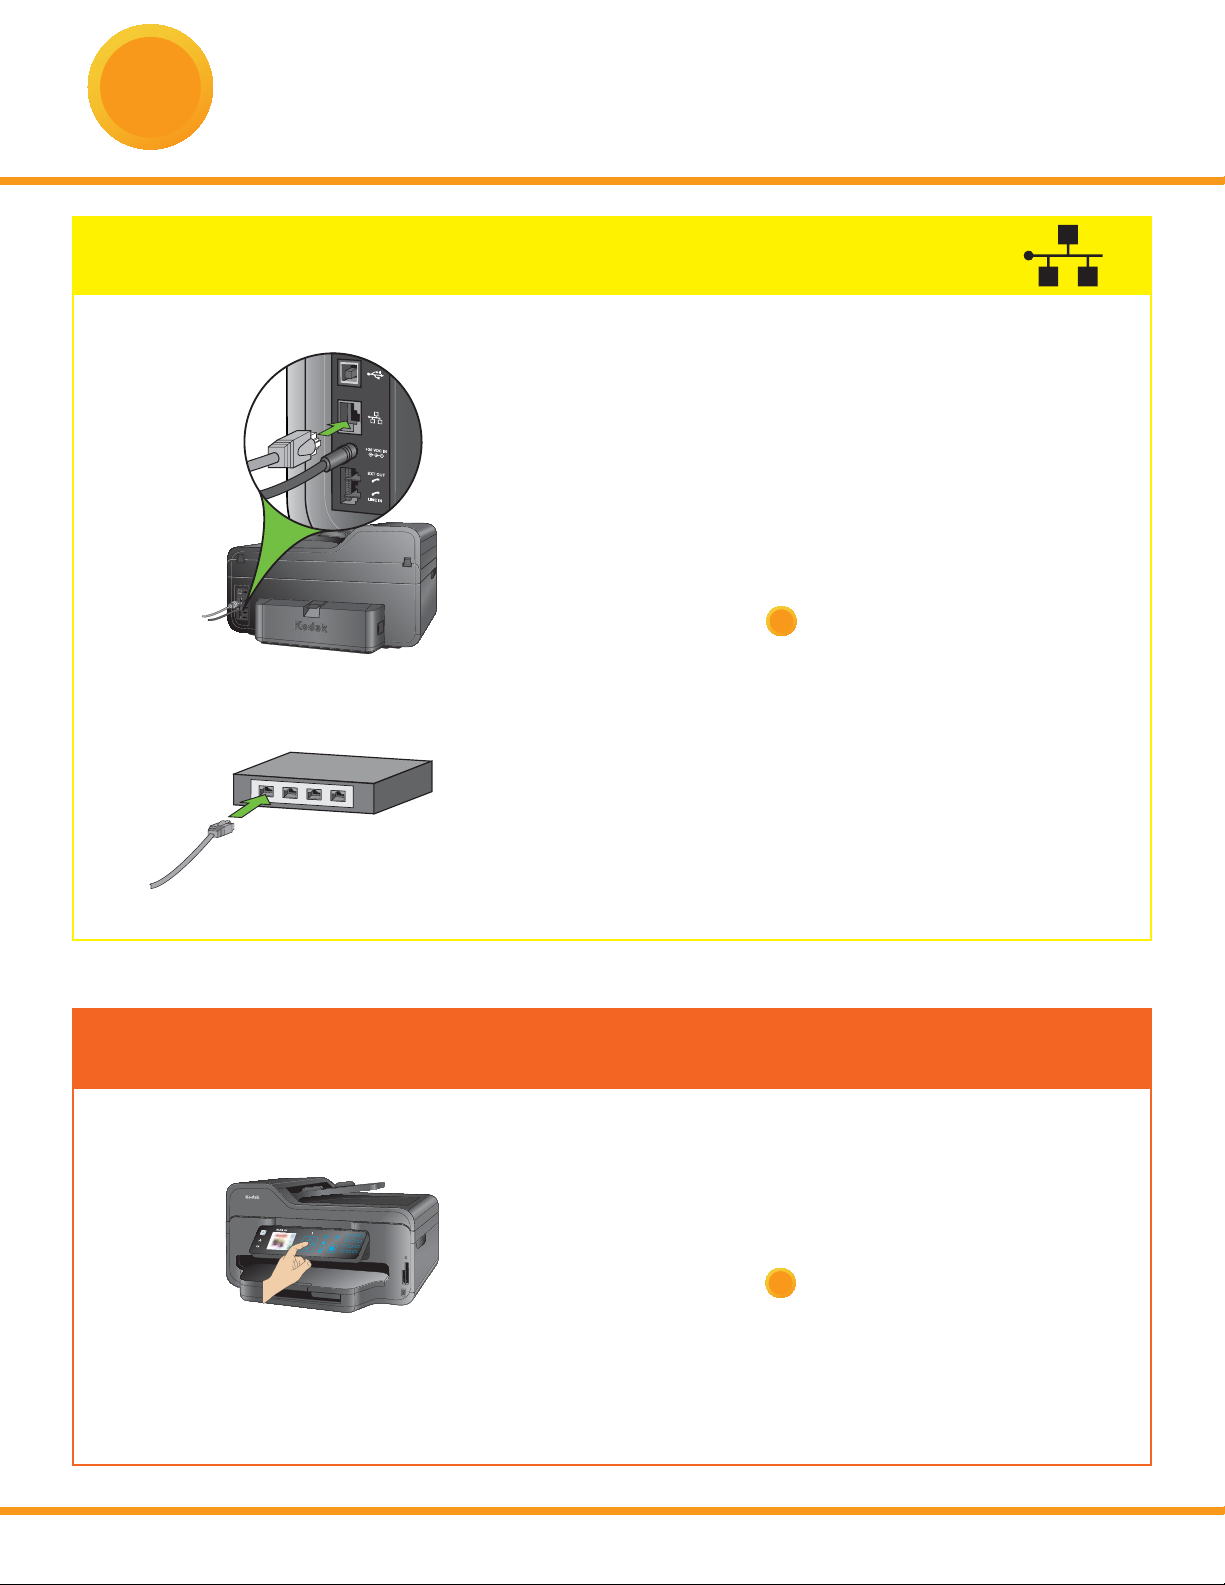
ETHERNET CABLE CONNECTION (WIRED)
b)
c)
a) Select Ethernet cable from the LCD display
and press OK.
b) Connect the Ethernet cable into the Ethernet port
on the back of the printer.
c) Connect the other end of the Ethernet cable into an
available port on your Ethernet router or hub.
d) Proceed to step
7
.
NONE (CAN CONNECT LATER)
9
A
ll-in-One
P
rint
er
Menu
Canc
el
12
1 2
3
3
abc
def
def
Z
oom
4
4
5
5
6
6
ghi
Network
ghi
jkl
jkl
mno
mno
STAR
T
OK
7
7
8
8
9
9
pqrs
pqr
s
tuv
tuv
wxyz
0
0
#
#
Symbols
Symbols
Spac
Space
e
You can connect your printer at a later time.
a) Select None from the LCD display and press OK.
b) Proceed to step
www.kodak.com/go/aiosupport
7
.
9
Page 10

7
Setting up a Fax Machine
Use the instructions in this section to connect the fax
feature of the All-in-One Printer. More setup
confi gurations can be found in the User Guide. Detailed
instructions on how to locate the User Guide can be found
in step
a) Connect your printer to the phone line as shown in the
If you are using a separate fax line, (no devices such
8
of this guide.
illustration. (Plug the wall phone line into the LINE
IN port.)
as answering machines on this line) then your fax is
ready to use and will automatically answer on the
4th ring.
If you have another device such as an answering
machine or phone on this line, these devices should be
plugged into the EXT OUT port of the printer. In this
case, you may want to disable the fax auto-answer
mode by doing the following:
1. Press Menu to display the main menu.
2. Press until Fax Auto Answer is selected.
3. Press or so that Fax Auto Answer is set to O .
You can manually receive a fax by pressing the
Start button whenever a phone call comes in.
NOTE: For additional fax settings, refer to the User Guide.
10
www.kodak.com/go/aiosupport
Page 11

8
Installing Software on WINDOWS OS
WINDOWSWINDOWS
WINDOWSWINDOWS
WINDOWSWINDOWS
WINDOWSWINDOWS
FOR WINDOWS & MACINTOSH
WINDOWSWINDOWS
WINDOWSWINDOWS
WINDOWSWINDOWS
WINDOWSWINDOWS
WINDOWSWINDOWS
WINDOWSWINDOWS
WINDOWSWINDOWS
WINDOWSWINDOWS
WINDOWSWINDOWS
WINDOWS
Do not connect the USB cable to the printer
until instructed during software installation.
a) Load the KODAK Inkjet Printer Software CD into the
CD-ROM drive. Follow the on-screen prompts when the
instructions appear.
If the KODAK Inkjet Printer Software installer window
does not open, click Start, then click Computer or My
Computer, and double-click on your CD-ROM drive.
b) If instructed, connect the USB cable to the USB port on
the printer and to your computer. Continue to follow the
on-screen prompts until installation is complete.
NOTE: If you are prompted by your fi rewall during software
installation, be sure to allow access. For additional
information go to www.kodak.com/go/inkjetnetworking.
WINDOWSWINDOWS
NOTE: If you have additional computers on your network,
install the KODAK Inkjet Printer Software on each computer.
WINDOWSWINDOWS
The User Guide is installed with your KODAK Inkjet Printer
WINDOWSWINDOWS
Software and is located here:
Start Programs Kodak User Guide
WINDOWSWINDOWS
Setting your KODAK All-in-One Printer as the default on your WINDOWS OS
WINDOWS XP:
WINDOWS VISTA:
Start Printers and Faxes.
Right-click the icon for the printer you want to use as the default printer, and
then click Set As Default Printer.
Start
Right-click on the printer you want to use, and then click Set As Default Printer.
Control Panel Hardware and Sound Printers.
www.kodak.com/go/aiosupport
11
Page 12

8
Installing Software on MACINTOSH OS
MACINTOSHMACINTOSH
MACINTOSHMACINTOSH
MACINTOSHMACINTOSH
MACINTOSHMACINTOSH
MACINTOSHMACINTOSH
MACINTOSHMACINTOSH
MACINTOSHMACINTOSH
MACINTOSHMACINTOSH
MACINTOSHMACINTOSH
MACINTOSHMACINTOSH
MACINTOSHMACINTOSH
MACINTOSH
USB CONNECTION
a) Connect the USB cable to the USB port on the printer and
to your MACINTOSH Computer.
b) Load the KODAK Inkjet Printer Software CD into the
CD-ROM drive.
The KODAK Inkjet Printer Software installer window should
be displayed. If not, double-click the KODAK Inkjet Printer
Software CD icon on the desktop. Follow the on-screen
prompts until installation is complete.
NETWORK CONNECTION
a) Make sure the printer and computer are set up. Follow
step b above.
b) Once software installation is completed:
1. Open the System Preferences. Double-click on Print &
Fax System Preferences and click (+) to add a printer.
2. Look for your printer with a connection type of Bonjour,
and select it.
MACINTOSHMACINTOSH
MACINTOSHMACINTOSH
FOR WINDOWS & MACINTOSH
3. Click the Add button. Quit System Preferences.
NOTE: If you are prompted by your fi rewall during software
installation, be sure to allow access. For additional information
www.kodak.com/go/inkjetnetworking.
go to
MACINTOSHMACINTOSH
TE: If y
NO
MACINTOSHMACINTOSH
MACINTOSHMACINTOSH
MACINTOSHMACINTOSH
Setting your KODAK All-in-One Printer as the default on your MACINTOSH OS
MAC OS X defaults to the printer most recently added. To change the default printer, follow these steps:
1. From the print dialog, choose Edit Printer List from the Printer pop-up menu.
2. Select a printer from the Printer List.
3. Choose Make Default from the Printer’s menu.
install the Kodak Inkjet Printer Software on each computer.
The User Guide is installed with your KODAK Inkjet Printer
Software and is located here:
Library
ou have additional computers on your network,
Documentation Kodak AiO Printers
12
www.kodak.com/go/aiosupport
Page 13

Warranty Information
Limited Warranty
Kodak warrants Kodak consumer electronic products and accessories (“Products”), excluding batteries, to be free
from malfunctions and defects in both materials and workmanship for one year from the date of purchase. Retain the
original dated sales receipt. Proof of the date of purchase will be required with any request for warranty repair.
Limited Warranty Coverage
Warranty service is only available from within the country where the Products were originally purchased. You may
be required to send Products, at your expense, to the authorized service facility for the country where the Products
were purchased. Kodak will repair or replace Products if they fail to function properly during the warranty period,
subject to any conditions and/or limitations stated herein. Warranty service will include all labor as well as any
necessary adjustments and/or replacement parts. If Kodak is unable to repair or replace a Product, Kodak will, at its
option, refund the purchase price paid for the Product provided the Product has been returned to Kodak together
with proof of the purchase price paid. Repair, replacement, or refund of the purchase price are the sole remedies
under this warranty. If replacement parts are used in making repairs, those parts may be remanufactured or may
contain remanufactured materials. If it is necessary to replace the entire Product, it may be replaced with a remanufactured Product. Remanufactured Products, parts and materials are warranted for the remaining warranty term of
the original Product, or 90 days after the date of repair or replacement, whichever is longer.
Limitations
This warranty does not cover circumstances beyond Kodak’s control. This warranty does not apply when
failure is due to shipping damage, accident, alteration, modifi cation, unauthorized service, misuse, abuse, use
with incompatible accessories or attachments (such as third party ink or ink tanks), failure to follow Kodak’s
operation, maintenance or repacking instructions, failure to use items supplied by Kodak (such as adapters and
cables), or claims made after the duration of this warranty. KODAK MAKES NO OTHER EXPRESS OR IMPLIED
WARRANTY FOR THIS PRODUCT, AND DISCLAIMS THE IMPLIED WARRANTIES OF MERCHANTABILITY AND
FITNESS FOR A PARTICULAR PURPOSE. In the event that the exclusion of any implied warranty is ine ective
under the law, the duration of the implied warranty will be one year from the purchase date or such longer
period as required by law. The option of repair, replacement, or refund is Kodak’s only obligation. Kodak will not be
responsible for any special, consequential or incidental damages resulting from the sale, purchase, or use of this
product regardless of the cause. Liability for any special consequential or incidental damages (including but not
limited to loss of revenue or profi t, downtime costs, loss of the use of the equipment, cost of substitute equipment,
facilities or services or claims of your customers for such damages resulting from the purchase, use or failure of the
Product), regardless of cause, or for breach of any written or implied warranty is expressly disclaimed.
Your Rights
Some states or jurisdictions do not allow exclusion or limitation of incidental or consequential damages,
or exclusion may not apply to you. Some states or jurisdictions do not allow limitations on how long an implied
warranty lasts, so the above limitation may not apply to you. This warranty gives you specifi c rights, and you may
have other rights which vary from state to state or by jurisdiction. Your statutory rights are not a ected.
so the above limitation
Outside the United States and Canada
In countries other than the United States and Canada, the terms and conditions of this warranty may be di erent.
Unless a specifi c Kodak warranty is communicated to the purchaser in writing by a Kodak company, no warranty or
liability exists beyond any minimum requirements imposed by law, even though defect, damage, or loss may be by
negligence or other act.
www.kodak.com/go/aiosupport
13
Page 14

Safety Information
- Read and follow these instructions before using KODAK Products.
- Always follow basic safety procedures.
- Follow all warnings and instructions marked on the equipment.
WARNING STATEMENTS
- Do not expose this product to liquid, moisture, or extreme temperatures. KODAK AC Adapters are intended for
indoor use only. The use of controls, adjustments, or procedures other than those specifi ed herein may result in
exposure to shock and/or electrical or mechanical hazards.
- Keep ink cartridges out of reach of children. Ink may be harmful if swallowed.
- Do not place your All-in-One Printer on an unstable cart, stand, bracket, or table. Injury to persons and damage to
the equipment may occur.
- The use of an accessory attachment that is not recommended by Kodak, such as an AC adapter, may cause fi re,
electric shock, or injury.
- Pushing objects through the equipment openings can result in an electric shock or risk of fi re.
CAUTIONARY STATEMENTS
- Adjust only those controls covered in the operating instructions.
- Do not disassemble this product; there are no user-serviceable parts inside. Refer servicing to qualifi ed
service personnel.
- The AC adapter power supply is equipped with 3-wire grounding type plugs. If you cannot insert the plug into the
power outlet, contact an electrician to check or replace the power outlet.
- Do not plug the AC adapter into a household extension cord.
- If the power cord or plug is frayed or damaged, the equipment gets wet, or the equipment does not operate
normally when the operating instructions are followed, unplug your All-in-One Printer from the power outlet and
contact Kodak qualifi ed service personnel for further instructions.
- For added protection from damage during a lightning storm, or any time when your All-in-One Printer and its
associated AC adapter will be left unused for long periods of time, unplug the AC adapter from the power outlet
and any attached fax line from the printer.
- To prevent your All-in-One Printer from overheating, do not place it near a heat register, or install it in a cabinet
without proper ventilation.
- Do not use your All-in-One Printer near water or spill liquid on it.
- Unplug the equipment from the wall outlet before cleaning.
- Dropping your All-in-One Printer may damage the housing and result in extensive damage that will require repair
by a qualifi ed technician to restore normal operation.
- Excessive dust levels may damage internal parts.
14
For more information, go to www.kodak.com/go/MSDS
www.kodak.com/go/aiosupport
Page 15

Registration has its rewards— including a terrifi c o er.
Register your KODAK All-in-One Printer and get great support, expert tips, free software
downloads—plus a phenomenal deal on inkjet supplies to get you started. Simply register right
away when prompted during software installation or on the web at www.kodak.com/go/register.
Registration takes a minute—but the rewards are lasting.
Inkjet supplies o er valid for U.S. residents only.
KODAK Home Center Software for WINDOWS OS
KODAK Home Center is installed with your KODAK Inkjet Printer
Software. You can use it to browse, print, copy, scan, order supplies,
access the User Guide, and confi gure your All-in-One Printer from
your c
omputer.
KODAK Home Center Software for MACINTOSH OS
KODAK Home Center is installed with your KODAK Inkjet Printer
Software. You can use it to order supplies and confi gure your
All-in-One Printer from your computer.
www.kodak.com/go/aiosupport
15
Page 16

THANK YOU FOR PURCHASING THIS KODAK ALL-IN-ONE PRINTER.
PLEASE DO NOT RETURN IT TO THE STORE.
You can get support from the Internet. Visit www.kodak.com/go/aiosupport for
information and help regarding your KODAK Printer.
Kodak provides several methods to help you troubleshoot and solve problems with your KODAK Printer.
First attempt to power cycle the printer by unplugging the printer. Wait 5 seconds,
and then plug the power cord back into the printer.
You should also confi rm that you are using a 2.0 USB cable. 2.0 USB cables can be
purchased online at www.kodak.com/go/shop or at your local retailer.
Make sure that you have the most up-to-date software, fi rmware and Help fi les from
the Web. Visit www.kodak.com/go/aiodownloads to download the latest fi les.
For additional Wi-Fi/Networking setup information, please go to:
www.kodak.com/go/inkjetnetworking
Further, you can access topics for troubleshooting through Home Center by clicking
the question mark (?) button at the top right-hand corner of the menu bar. In the Help
panel, select Troubleshoot.
The User Guide is installed with your KODAK Inkjet Printer Software and is located here:
WINDOWS OS: Start Programs Kodak User Guide
MACINTOSH OS: Library Documentation Kodak AiO Printers
Eastman Kodak Company
Rochester, NY 14650 U.S.A.
© Eastman Kodak Company, 2008
MC/MR/TM: Kodak, EasyShare.
*1K3399*
*1K3399*
1K3399 A
*A*
*A*
Printed in
The Bluetooth® trademarks are owned by the Bluetooth SIG, Inc.
Windows® is a registered trademark of Microsoft Corporation
Macintosh® is a registered trademark of Apple Computer, Inc.
 Loading...