

Page 1
KODAK ESP 7200 Series
All-in-One Printer
User Guide
Page 2

Eastman Kodak Company
Rochester, NY 14650
© Eastman Kodak Company, 2009
Kodak, EasyShare, and Perfect Touch are trademarks of Eastman Kodak Company.
Specifications subject to change without notice.
P/N XXXXXX
September 2009
Page 3

Table of contents
1 Printer Overview
Components.......................................................................................................................................................................1
Control panel.....................................................................................................................................................................2
Home Center Software ..................................................................................................................................................3
2 Configuring Your Printer
Configuring printer settings ..........................................................................................................................................4
Connecting to a wireless network ...............................................................................................................................5
Before you connect ...................................................................................................................................................5
Connecting to a wireless network using the WiFi Setup Wizard..................................................................5
Setting up an IP address...........................................................................................................................................9
Verifying the network configuration...................................................................................................................10
Printing the network configuration .....................................................................................................................10
Installing your printer on additional computers on the network.................................................................10
Connecting to another KODAK All-in-One Printer ........................................................................................10
Adding a network connection to a USB-connected computer ........................................................................... 11
Changing from USB to wireless connection ......................................................................................................11
Changing from USB to Ethernet connection..................................................................................................... 12
3 Handling Paper
Paper types......................................................................................................................................................................14
Paper sizes.......................................................................................................................................................................14
Envelope sizes................................................................................................................................................................. 15
Loading paper ................................................................................................................................................................. 16
Loading paper in the main paper tray.................................................................................................................16
Loading legal-size paper in the main paper tray.............................................................................................. 18
Loading the photo paper tray ............................................................................................................................... 21
Loading envelopes...................................................................................................................................................23
4 Printing
Switching paper trays .................................................................................................................................................. 25
Printing documents ...................................................................................................................................................... 26
Printing two-sided documents............................................................................................................................ 26
Printing pictures ............................................................................................................................................................ 28
Printing from a memory card or USB-connected device.............................................................................. 29
Printing from a BLUETOOTH Technology enabled device...........................................................................35
Printing pictures or documents from a wireless device.......................................................................................35
Transferring pictures to a computer........................................................................................................................ 36
Transferring pictures to a WINDOWS OS-based computer ...................................................................... 36
Transferring pictures to a MACINTOSH Computer ..................................................................................... 36
5 Copying
Copying a document.....................................................................................................................................................37
Using the default settings to copy a document ...............................................................................................37
Adjusting the settings and copying a document............................................................................................ 38
www.kodak.com/go/aiosupport i
Page 4

Table of contents
Changing the number of copies of a document ..............................................................................................39
Enlarging or reducing a document .....................................................................................................................40
Darkening or lightening a copy ............................................................................................................................ 41
Copying a photograph................................................................................................................................................. 42
Using the default settings to copy a photograph ........................................................................................... 42
Adjusting the settings and copying a photograph ......................................................................................... 43
Changing the number of copies of a photograph........................................................................................... 45
Enlarging or reducing a photograph .................................................................................................................. 46
Darkening or lightening a copy of a photograph............................................................................................ 47
6 Scanning
Before you begin scanning ......................................................................................................................................... 48
Changing the scan settings for scanning from the control panel .............................................................. 48
Scanning from the computer ..................................................................................................................................... 49
Scanning multiple pictures simultaneously..................................................................................................... 50
Scanning from the control panel.................................................................................................................................51
7 Maintaining Your Printer
General care and cleaning...........................................................................................................................................53
Cleaning the scanner glass and document backing ...................................................................................... 54
Replacing ink cartridges...............................................................................................................................................56
Replacing the printhead ...............................................................................................................................................59
Updating the software and printer firmware..........................................................................................................63
Updating if your printer is connected to a computer with WINDOWS OS .............................................63
Updating if your printer is connected to a computer with MAC OS......................................................... 64
Monitoring and adjusting printer performance .................................................................................................... 64
Checking ink levels................................................................................................................................................. 64
Resetting factory defaults .....................................................................................................................................65
8 Troubleshooting
Basic troubleshooting .................................................................................................................................................. 66
Getting help on the Web ............................................................................................................................................ 68
Status lights.................................................................................................................................................................... 69
Power status light................................................................................................................................................... 69
Wi-Fi status light .................................................................................................................................................... 69
9 Product and Safety Specifications
Features and Specifications ....................................................................................................................................... 70
Print performance .................................................................................................................................................. 70
Photo printing features ......................................................................................................................................... 70
Copy document features........................................................................................................................................71
Copy photo features ................................................................................................................................................71
Scanning features.....................................................................................................................................................71
Bottom input paper tray ........................................................................................................................................72
Top input paper tray ...............................................................................................................................................72
ii www.kodak.com/go/aiosupport
Page 5

Table of contents
Output paper tray................................................................................................................................................... 72
Ink cartridges ........................................................................................................................................................... 72
Connectivity............................................................................................................................................................. 72
Software support .....................................................................................................................................................73
Physical specifications ...........................................................................................................................................73
Warranty....................................................................................................................................................................73
System requirements............................................................................................................................................. 74
Safety information ........................................................................................................................................................ 77
Regulatory compliance................................................................................................................................................ 78
FCC statement ........................................................................................................................................................ 78
Canadian statements............................................................................................................................................. 79
German compliance statement .......................................................................................................................... 79
REACH Article 33 declarations........................................................................................................................... 79
Waste electrical and electronic equipment labeling..................................................................................... 79
ENERGY STAR® Qualified ..........................................................................................................................................80
Warranty Information..................................................................................................................................................80
Declaration of Conformity.......................................................................................................................................... 82
www.kodak.com/go/aiosupport iii
Page 6

Page 7

1
15
13
14
2
7
11
43
9108
1
16
12
21
5
6
18
17
20
19
Printer Overview
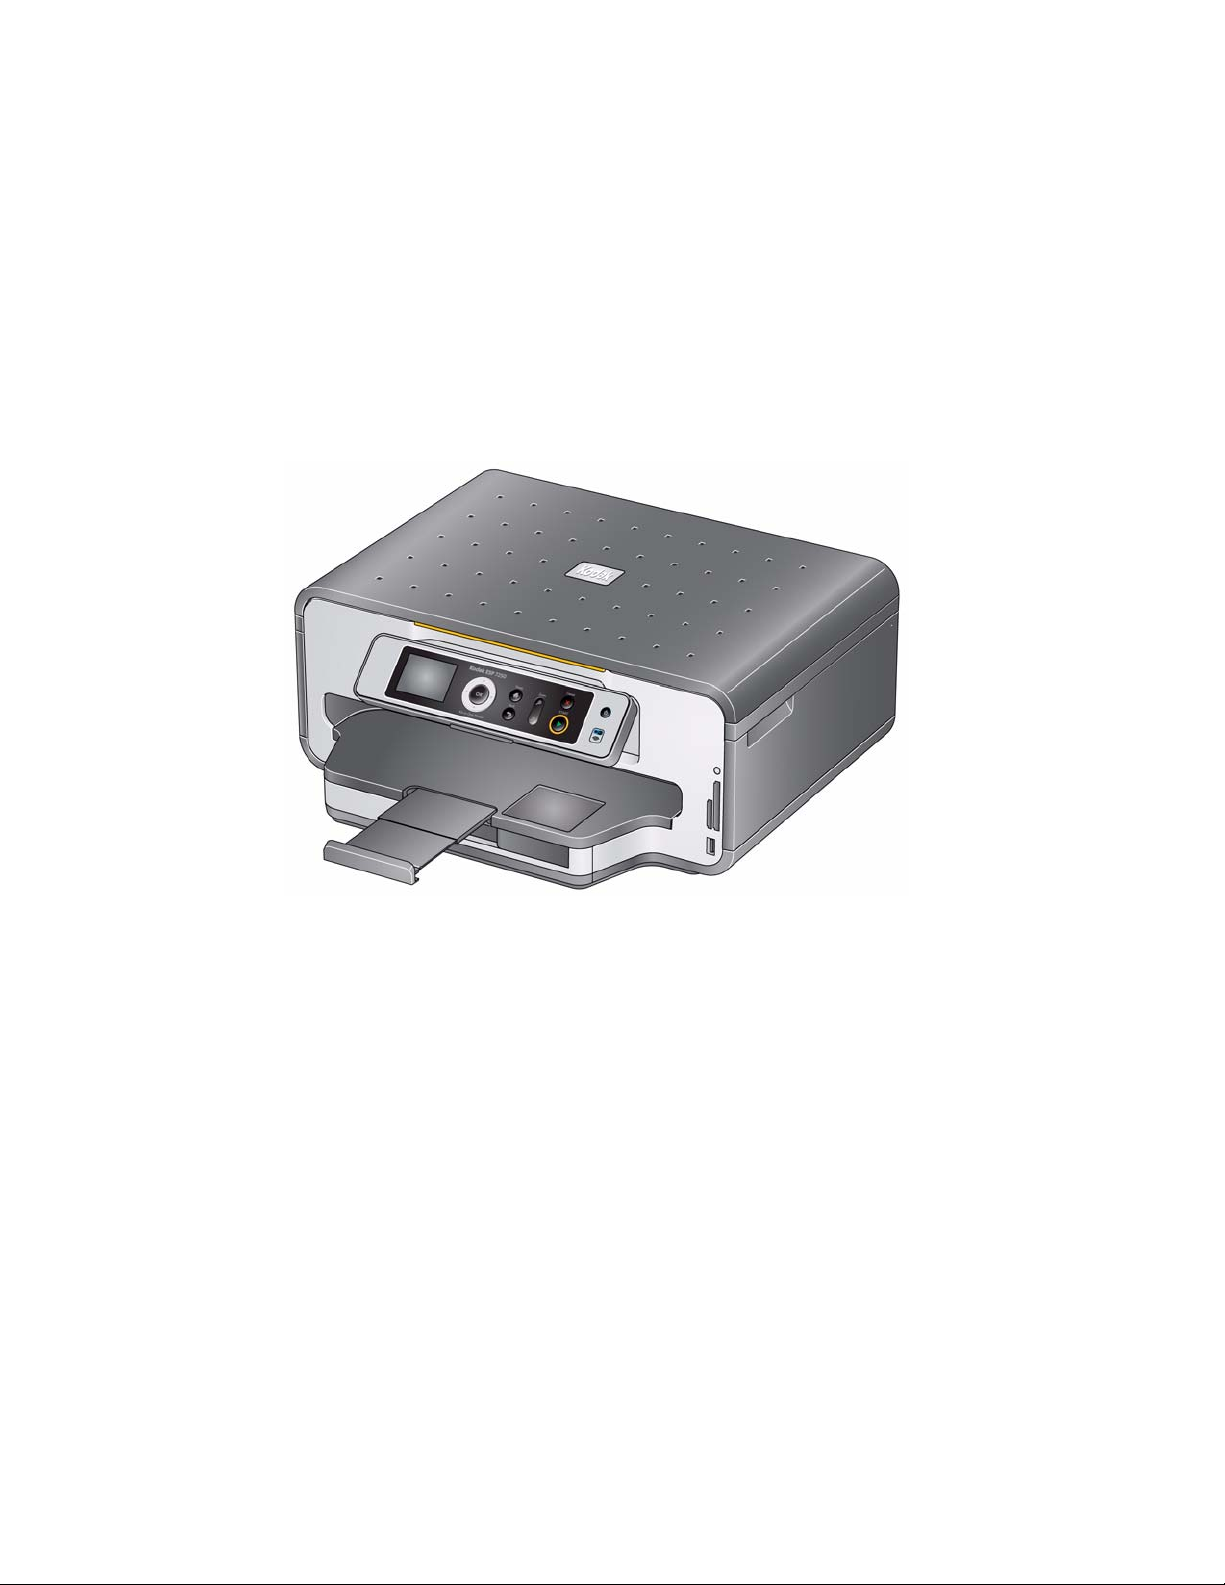
Components
This printer lets you print, copy, and scan pictures and documents. In addition, this
printer supports networking, letting you access the printer over a wireless (Wi-Fi) or
Ethernet network.
Control panel 12 View port for photo paper
1
Power cord port 13 Output tray extender with paper stop
2
USB port 14
3
Ethernet port 15 Scanner glass
4
Rear-access cleanout area 16 Scanner lid
5
Duplexer (pulled out) 17 Front paper-edge guides
6
Printer access door 18 Main paper tray
7
CF card slot 19 Paper tray extender for legal paper
8
Front USB port 20 Left paper-edge guides
9
MS/XD/SD card slot 21 Photo paper tray
10
11 Printhead with ink cartridges installed
Output tray
www.kodak.com/go/aiosupport 1
Page 8
Printer Overview
731 2
10
984 5 6
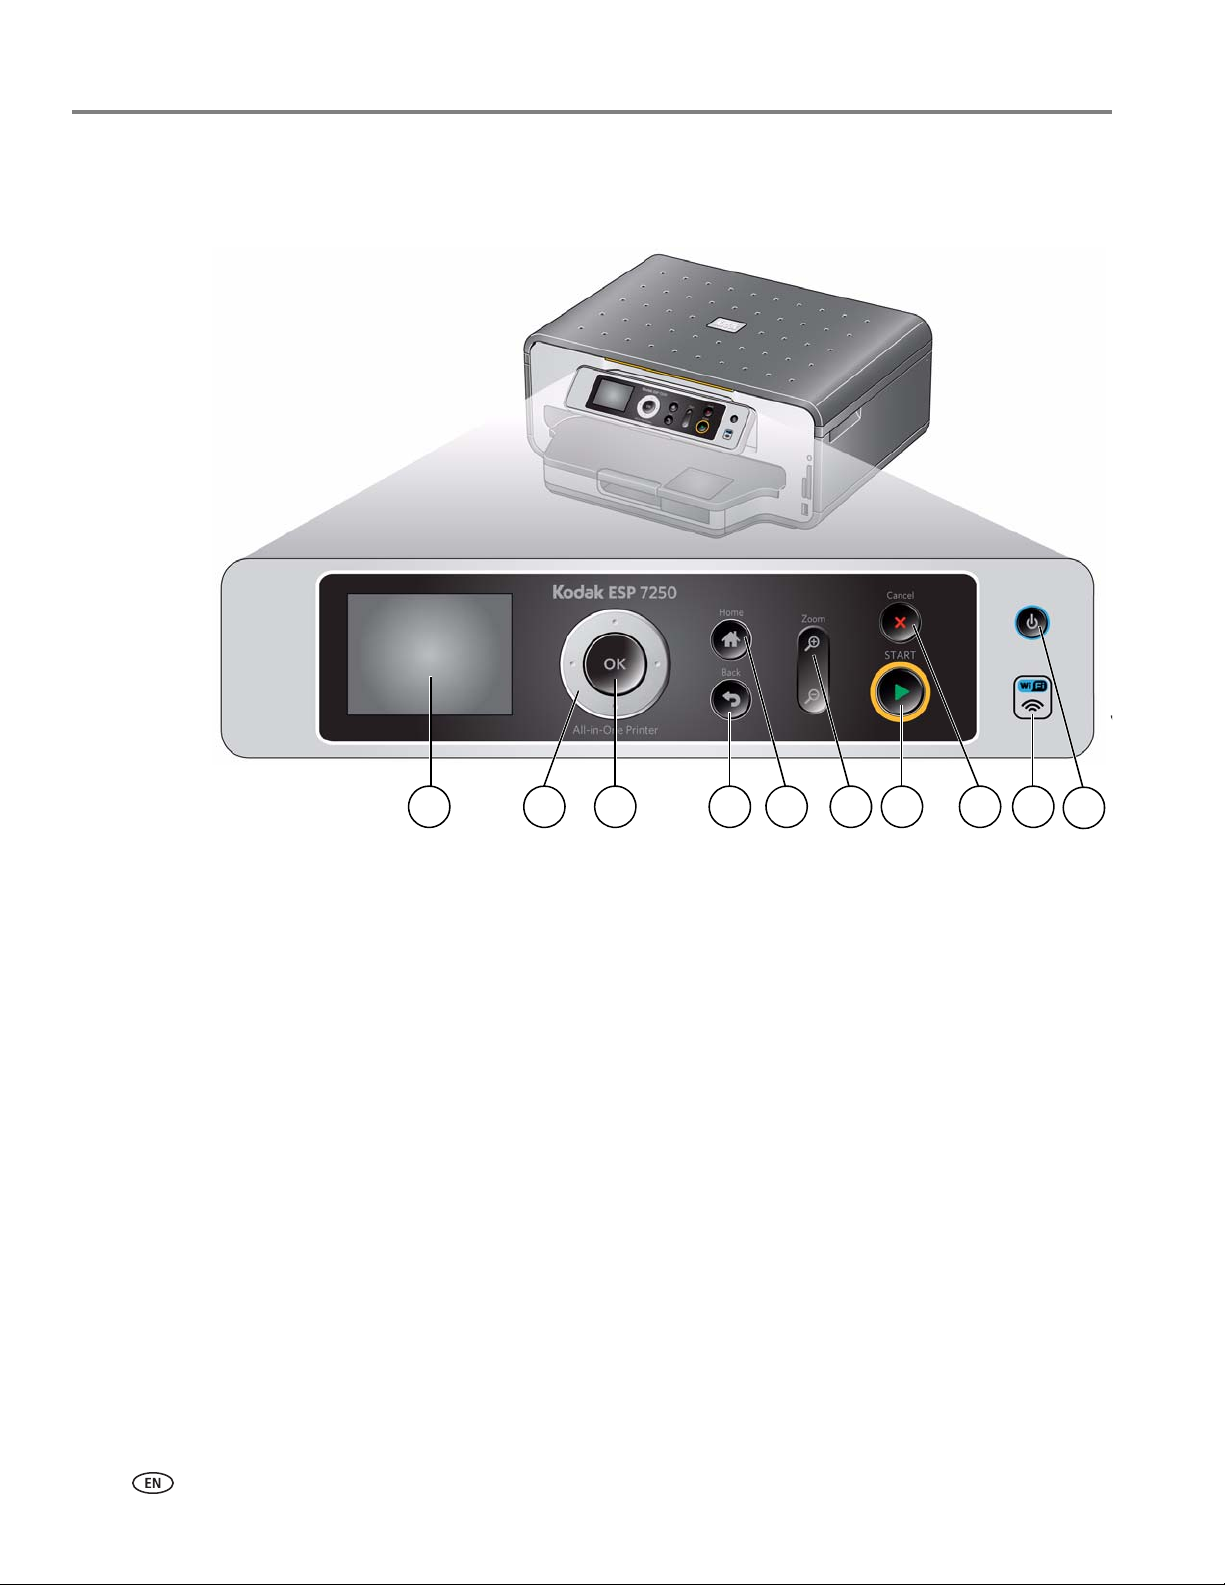
Control panel
Feature Description
1 LCD Displays pictures, messages, and menus
2 Navigation buttons Used to navigate menus; scroll through pictures
3 OK button Selects a menu item, accepts a setting, and continues with the current
operation
4 Back button Displays the next higher menu
5 Home button Displays the main menu; toggles between screens
6 Zoom buttons Enlarge or reduce the size of the displayed picture
7 Start button Begins copying, scanning, printing, maintenance task, and file transfer
8 Cancel button Stops the current operation and returns to the menu; displays the next
higher menu
9Wi-Fi connectivity
LED
10 On/Off button Turns the printer on or off
When lit, signals that the printer is connected to a wireless (Wi-Fi)
network; blinks when searching for an available Wi-Fi network or
reconnecting to an already configured network
2 www.kodak.com/go/aiosupport
Page 9

Home Center Software
KODAK Home Center Software is installed as part of the software installation on
your computer. The Home Center icon is added to your desktop and, depending on
your configuration, to the Start menu. Use this icon to start Home Center Software.
On a computer with WINDOWS Operating System (OS), you can use Home Center
Software to:
• browse, crop, enhance, and edit pictures
• print and scan
• upgrade your printer with the latest software and firmware
•configure your printer
• order supplies
• access the KODAK Tips and Projects Center
• access this Extended User Guide
KODAK ESP 7200 Series All-in-One Printer
On a computer with MAC OS, you can use Home Center Software to scan, order
supplies, configure your printer, or check for printer software updates.
www.kodak.com/go/aiosupport 3
Page 10

2
Configuring Your Printer
This section explains how to configure or change your printer settings and your
wireless network settings.
Configuring printer settings
NOTE: When you first power on the printer, the printer automatically steps you
through the process of selecting the
To set or change basic printer settings:
Language and Country/Region.
1. Press
2. Press to select
3. Press to select one of the following settings:
NOTE: Resetting factory defaults does not change the date and time, language, or
Home.
Printer Settings, then press OK.
Date and Time*
•
–Press
Button Sounds
•
– Press to select
Ti m e to Low P o w e r
•
– Press to change the time to energy-saving low power (select from 1 to 4
DPOF Printing
•
– Press to select
Language
•
–Press OK, press to select a language, then press OK.
Country/Region
•
–Press OK, press to select a country or region, then press OK.
Reset All Settings (see Resetting factory defaults, page 65)
•
country/region.
OK, then press to select Ye a r , Month, Day, Hour, or Minute.
Press or to change the values; press
On or Off.
hours in 0.5 hour increments). After the time to low power, the printer goes
into a low-power mode.
On or Off.
OK when you are done.
4. Press
* You can also synchronize the printer's date and time to your computer from
Center Settings
4 www.kodak.com/go/aiosupport
Back to go back to the Main Menu.
under Tools in Home Center Software.
Home
Page 11

Connecting to a wireless network
To connect your printer to an 802.11 wireless (Wi-Fi) network, refer to the following
information.
Before you connect
You need:
• A computer equipped with a network interface card or wireless networking
support.
• A working 802.11 wireless network. Kodak recommends that you use a wireless
access point/router that uses Dynamic Host Configuration Protocol (DHCP).
• Your network name (SSID - Service Set Identifier). You can obtain your SSID
from the wireless access point, most commonly a router, using the router’s
embedded Web server. See the manufacturer’s documentation provided with
your wireless system for more information.
• Your Wired Equivalent Privacy (WEP) key or Wi-Fi Protected Access
(WPA/WPA 2) passphrase.
be sure to temporarily disable your firewall until the printer is successfully
•To
installed and communicating.
KODAK ESP 7200 Series All-in-One Printer
Connecting to a wireless network using the WiFi Setup Wizard
You can use the WiFi Setup Wizard on the printer to connect to your wireless
network. Read the following procedures and use the one that is appropriate for your
network setup.
Connecting to a listed network
See Before you connect to determine what is needed to connect your printer to the
network.
To connect to a listed network using the WiFi Setup Wizard:
1. Press
2. Press to select
3. With
NOTE: The Wi-Fi radio is turned on automatically when you select WiFi Setup
Home.
Network Settings, then press OK.
WiFi Setup Wizard selected, press OK.
Wizard.
www.kodak.com/go/aiosupport 5
Page 12
Configuring Your Printer
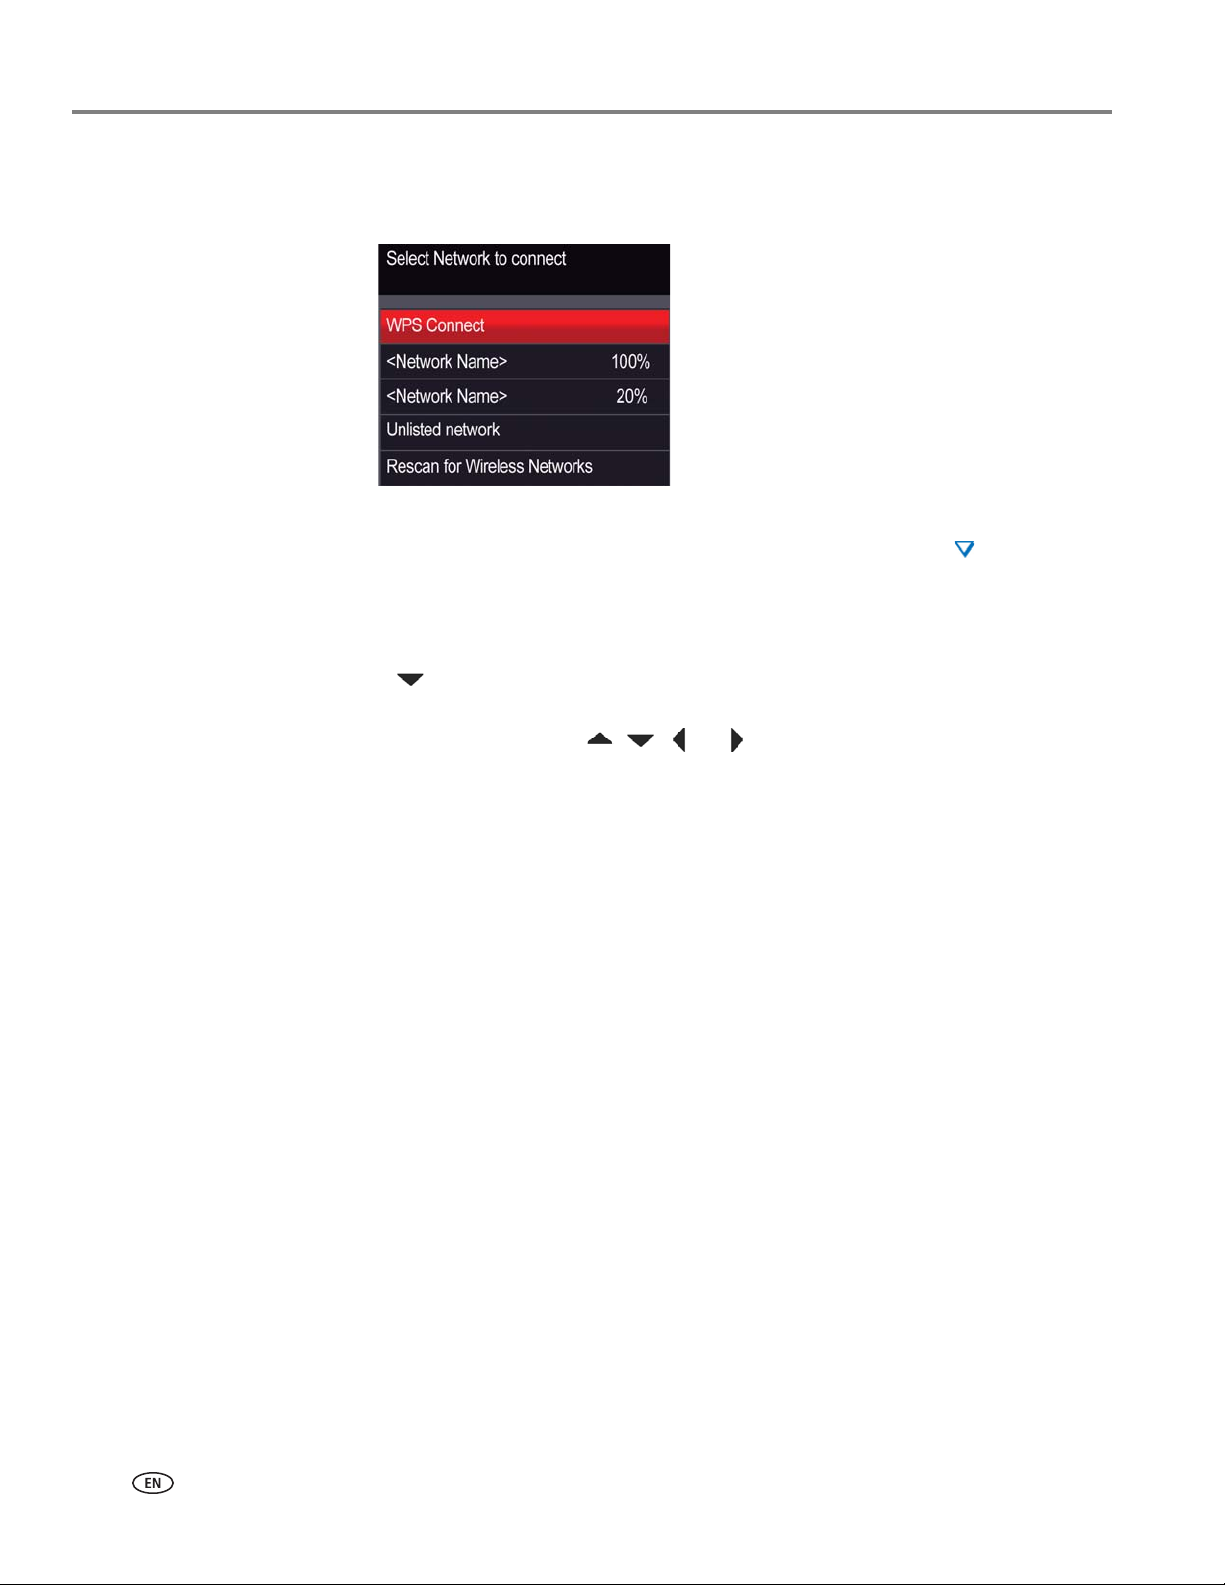
The printer searches for available wireless networks within range, then displays
the list in order of signal strength. For example:
NOTE: If there are more networks than can be shown on the LCD, a (page down)
symbol appears in the bottom right of the display. If you don’t see your
network in the list or want to change your network, select
Wireless Networks
, then press OK.
Rescan for
4. Press to select your network, then press
OK.
5. If your network requires a password, “Enter Security String” and a keyboard
appear on the LCD. Press , , or to select the letters and numbers of
your password, using the correct uppercase and lowercase letters. Press
after each character. When your security string is entered, select
OK.
press
• To erase a character, select
• To change from uppercase to lowercase, select
• To change from lowercase to uppercase, select
• To enter punctuation or symbols, select
6. When the confirmation message appears, press
BKSP (backspace), then press OK.
abc/123, then press OK.
ABC/123, then press OK.
!@#, then press OK.
OK.
DONE, then
OK
7. If you haven’t yet installed the KODAK All-in-One Printer Software that came
with your printer, insert the software CD and follow the on-screen instructions
to install the software.
The printer with a wireless connection is listed as the name of the printer plus a
number (for example, KodakESP7200+1133).
6 www.kodak.com/go/aiosupport
Page 13

Connecting to an unlisted network
To connect to an unlisted network using the WiFi Setup Wizard:
KODAK ESP 7200 Series All-in-One Printer
1. Press
2. Press to select
3. With
Home.
Network Settings, then press OK.
WiFi Setup Wizard selected, press OK.
NOTE: The Wi-Fi radio is turned on automatically when you select WiFi Setup
Wizard.
4. If your network is configured to not broadcast its SSID (network name) and does
not appear in the list, select
Unlisted Network, then press OK.
5. Use the keyboard on the LCD to enter the network name.
Press , , or to select the letters and numbers of your network name,
using the correct uppercase and lowercase letters. Press
character. When you have finished entering the network name, select
then press
• To erase a character, select
• To change from uppercase to lowercase, select
• To change from lowercase to uppercase, select
• To enter punctuation or symbols, select
6. Select
press
OK.
BKSP (backspace), then press OK.
abc/123, then press OK.
ABC/123, then press OK.
!@#, then press OK.
WEP or WPA/WPA2 as required for your network's security setup, then
OK.
OK after each
DONE,
7. Use the keyboard on the LCD to enter the required security information
(password or passphrase), pressing
security information is entered, select
8. When the confirmation message appears, press
OK after each character. When your
DONE, then press OK.
OK.
9. If you haven’t yet installed the KODAK All-in-One Printer Software that came
with your printer, insert the software CD and follow the on-screen instructions
to install the software.
The printer with a wireless connection is listed as the name of the printer plus a
number (for example, KodakESP7200+1133).
www.kodak.com/go/aiosupport 7
Page 14

Configuring Your Printer
Using WPS to connect to a Wi-Fi network
If your router supports Wi-Fi Protected Setup (WPS), you can use WPS Connect.
WPS lets you configure your printer for a wireless network by pressing buttons or
entering a PIN.
To connect to a network using WPS:
1. Press
2. Press to select
3. With
Home.
Network Settings, then press OK.
WiFi Setup Wizard selected, press OK.
NOTE: The Wi-Fi radio is turned on automatically when you select Wi-Fi Setup
Wizard.
4. Press to select
WPS Connect, then press OK.
5. Select one of two methods of connecting:
IMPORTANT: Before you press OK on the printer, make sure you know where the router's
push button is, or where to enter the generated PIN.
If necessary, consult your Internet service provider or router device
manufacturer’s documentation for more information.
• To use push buttons:
a. With
Push Button Configuration selected, press OK.
b.You will have two minutes to push the WPS button on your router (this may
either be a physical button on the router or a virtual button in the router’s
software).
•To enter a PIN:
a. Press to select
Generate WPS PIN, then press OK.
b.Go to your router’s software and locate the PIN button.
c. Enter the PIN you received on the LCD into the PIN screen for your router.
6. When the confirmation message appears, press
OK.
7. If you haven’t yet installed the KODAK All-in-One Printer Software that came
with your printer, insert the software CD and follow the on-screen instructions
to install the software.
The printer with a wireless connection is listed as the name of the printer plus a
number (for example, KodakESP7200+1133).
8 www.kodak.com/go/aiosupport
Page 15

Setting up an IP address
IMPORTANT: You should only need to set up an IP address for your printer if you are
All IP address entries have the following format: 000.000.000.000. Within each
three-digit grouping, the number must be right-justified. If an address or subnet
mask has only one or two characters between the periods, include one or two
leading zeros in front of that number. For example:
KODAK ESP 7200 Series All-in-One Printer
having a problem with connecting. Typically, it is not necessary to set up an
IP address. This procedure is for advanced users who know how to obtain
the IP address for the printer.
The address as it may appear
in your documentation
149.89.138.149 149.089.138.149
149.2.40.149 149.002.040.149
How to enter the address
in the printer menu
For information about obtaining the printer IP address, go to
www.kodak.com/go/inkjetnetworking.
To set up your IP address on the printer:
1. Press
2. Press to select
3. Press to select
4. Press
5. Select one of the following, then press
Home.
OK again to continue.
Dynamic (DHCP)
•
Automatic (Private)
•
Network Settings, then press OK.
Advanced IP Address Setup, then press OK.
OK:
• Manual (Static)
6. If you selected Manual (Static), you are prompted to enter an IP address, a
Subnet Mask, a Gateway Address, and a DNS Server address. Press
OK after
each entry. Use the navigation buttons to enter each digit of the numbers.
Consult your Internet service provider or network administrator for more
information.
www.kodak.com/go/aiosupport 9
Page 16

Configuring Your Printer
Verifying the network configuration
To verify that you are connected to your wireless network:
1. Press
2. Press to select
3. Press to select
4. To scroll through the information, press .
5. When you are done, press
Home.
The wireless network settings appear on the LCD.
If the printer is connected to your network, you will see the network name and
the word CONNECTED.
Printing the network configuration
To print the current network configuration:
1. Load plain paper into the printer. (See Loading paper in the main paper tray,
page 16.)
2. Press
3. Press to select
4. Press to select
Home.
The printer prints a summary of the network configuration.
Network Settings, then press OK.
View Network Configuration, then press OK.
OK.
Network Settings, then press OK.
Print Network Configuration, then press OK.
Installing your printer on additional computers on the network
To add your printer to another computer(s) on your network, install the KODAK
All-in-One Printer Software that came with your printer on each computer. Follow
the on-screen instructions.
Connecting to another KODAK All-in-One Printer
If you are connecting to a newer model printer (for example, you already have an
ESP 7 printer and now you are adding an ESP 7250 printer), you must install the
software for the newer model.
If you are connecting to another ESP 7250 printer or to an older model:
On a computer with WINDOWS OS:
1. Select
• If your wireless all-in-one printer (example: KodakESP7200+1133)
Start > All Programs > Kodak > Kodak Printer Network Setup Utility.
listed:
a. Select
b.From the drop-down list, select your printer.
c. Select
When your printer is detected, driver installation begins.
No, my printer is not listed, then click Next.
Network - Wireless/ WiFi, then click Next.
is not
10 www.kodak.com/go/aiosupport
Page 17

KODAK ESP 7200 Series All-in-One Printer
• If your wireless all-in-one printer (example: KodakESP7200+1133) is listed:
a. Highlight the all-in-one printer that is connected to your network.
b. Select
Yes, my printer is listed, then click Next.
When your printer is detected, driver installation begins.
2. When driver installation is complete, click
On a computer with MAC OS:
Done.
1. From the dock, open
2. Click
Print & Fax.
System Preferences.
3. On a computer with WINDOWS OS:
a. Click the
b. Select the printer from the list of available printers, then click
+ sign to add the printer.
Add.
Adding a network connection to a USB-connected computer
You can change the way you connect to your printer at any time.
Changing from USB to wireless connection
To change the printer connection type from USB to a wireless (Wi-Fi) network:
If your printer is connected to a computer with WINDOWS OS:
1. On the printer control panel, press Home.
2. Press to select
3. Press to select
an IP address.
4. If you have not already done so, connect your printer to your wireless network.
See Connecting to a wireless network, page 5.
5. On your computer, disable any firewall you have installed until you have
successfully completed the installation For more information on firewalls, go to
www.kodak.com/go/inkjetnetworking.
6. Select
Start > All Programs > Kodak > Kodak Printer Network Setup Utility.
• If your wireless all-in-one printer (example: KodakESP7200+1133)
listed:
a. Select
No, my printer is not listed, then click Next.
b.From the drop-down list, select your printer:
c. Select
Network - Wireless/WiFi, then click Next.
When your printer is detected, driver installation begins.
• If your wireless all-in-one printer (example: KodakESP7200+1133)
a. Highlight the all-in-one printer that is connected to your network.
b. Select
Yes, my printer is listed, then click Next.
When your printer is detected, driver installation begins.
Network Settings, then press OK.
View Network Configuration, press OK, then confirm you have
ESP7200 Series.
is not
is listed:
www.kodak.com/go/aiosupport 11
Page 18
Configuring Your Printer
7. When driver installation is complete, click Done.
The printer with a wireless connection is listed as the name of the printer plus a
number (for example, KodakESP7200+1133).
If your printer is connected to a computer with MAC OS:
1. Disconnect the printer from the computer.
2. On the printer control panel, press
3. Press to select
4. Press to select
Network Settings, then press OK.
View Network Con figura tion , press OK, then confirm you have
Home.
an IP address. If you do not have an IP address, see Connecting to a wireless
network, page 5.
5. From the dock, open
6. Click
7. Clic k the
Print & Fax.
+ sign to add the printer.
8. Select the printer from the list of available printers, then click
System Preferences.
Add.
The printer with a wireless connection is listed as the name of the printer plus a
number (for example, KodakESP7200+1133).
Changing from USB to Ethernet connection
Before you connect, you need:
• A functional Ethernet network that includes a router, switch, or hub with an
Ethernet port.
• A Category 5 (or higher) Ethernet cable.
• To temporarily disable your firewall until the printer is successfully installed and
communicating.
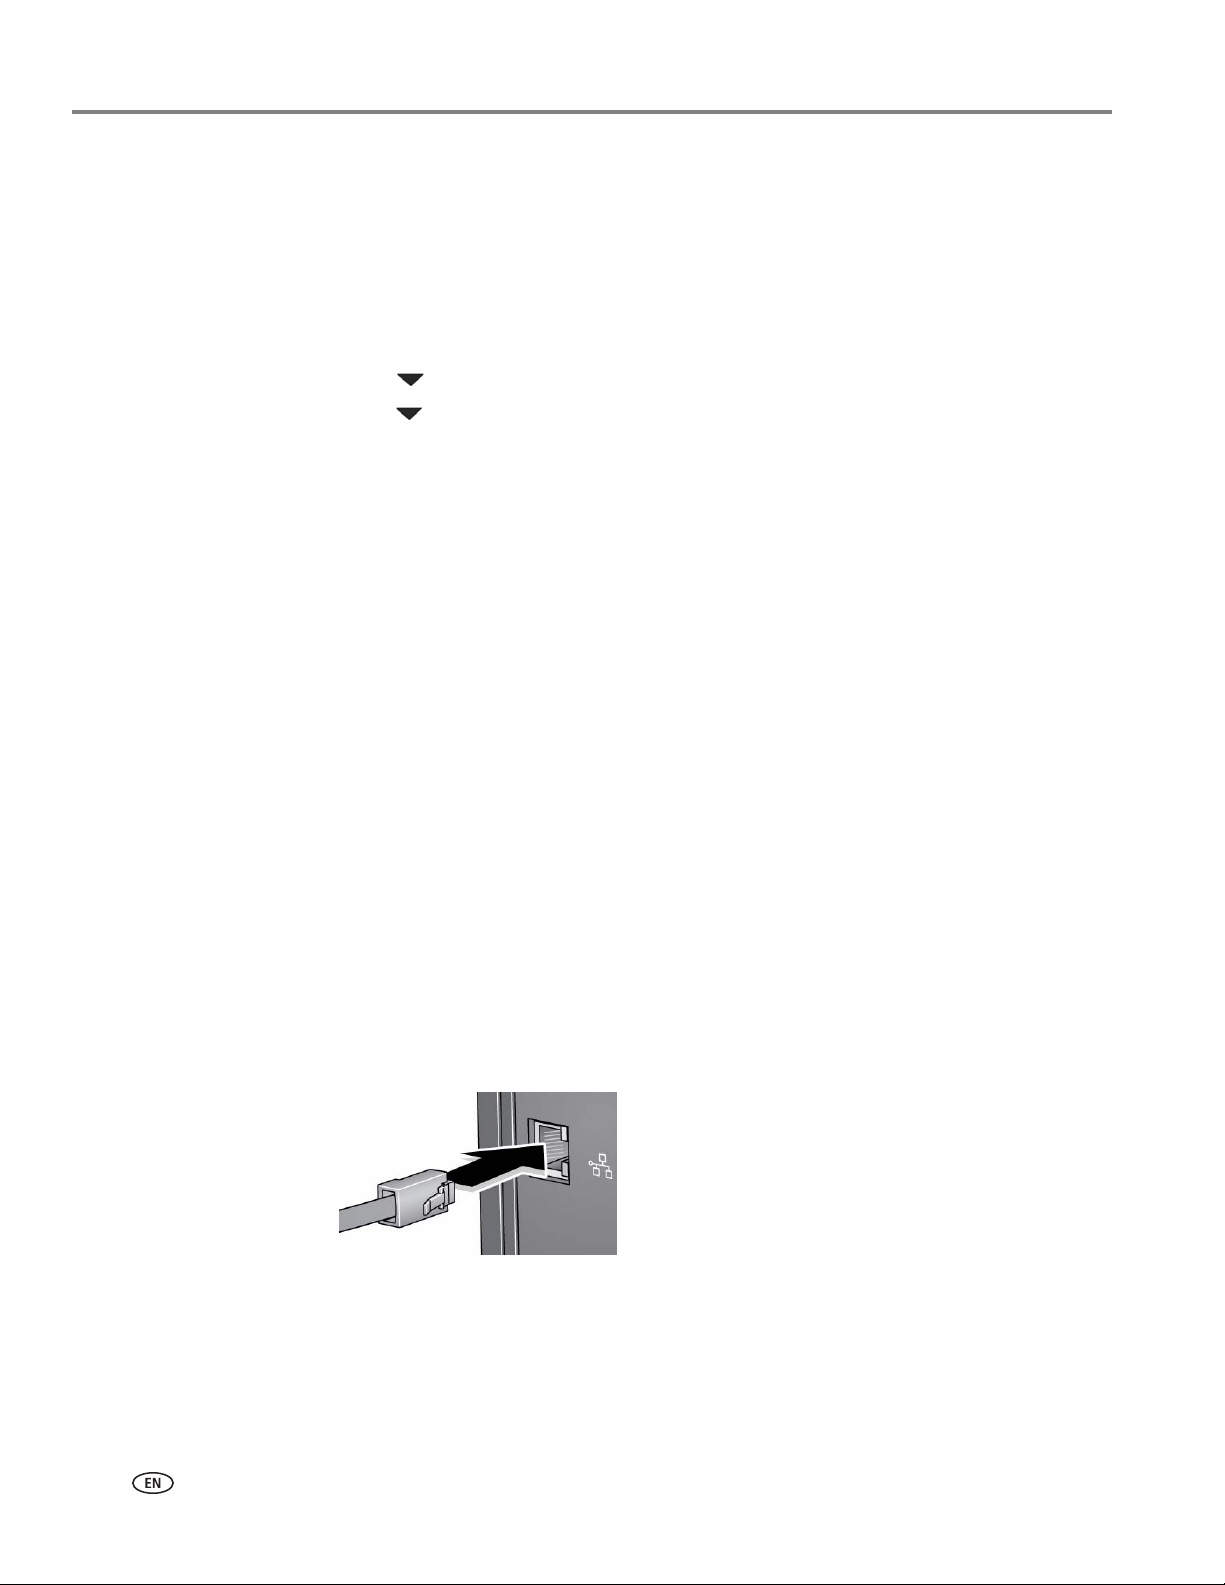
To change from a USB connect an Ethernet network connection:
1. Unplug the USB cord from your printer and computer.
2. Connect the Ethernet cable to the Ethernet port on the back of the printer.
3. Connect the other end of the Ethernet cable to an available Ethernet port on
your router, switch, or hub.
12 www.kodak.com/go/aiosupport
Page 19

KODAK ESP 7200 Series All-in-One Printer
If your printer is connected to a computer with WINDOWS OS:
1. Select Start > All Programs > Kodak > Kodak Printer Network Setup Utility.
2. Select
3. Select
4. Select
No, my printer is not listed, then click Next.
ESP 7200 Series, from the printer drop-down menu.
Network - Ethernet cable, then click Next.
The Printer Setup Utility searches for your printer and connects automatically.
5. Click
If your printer is connected to a computer with MAC OS:
Done.
1. Select Apple > System Preferences.
2. Under Hardware, select
3. In the Print & Fax dialog box, click
4. Select your printer from the list, then click
Print & Fax.
+.
Add.
www.kodak.com/go/aiosupport 13
Page 20
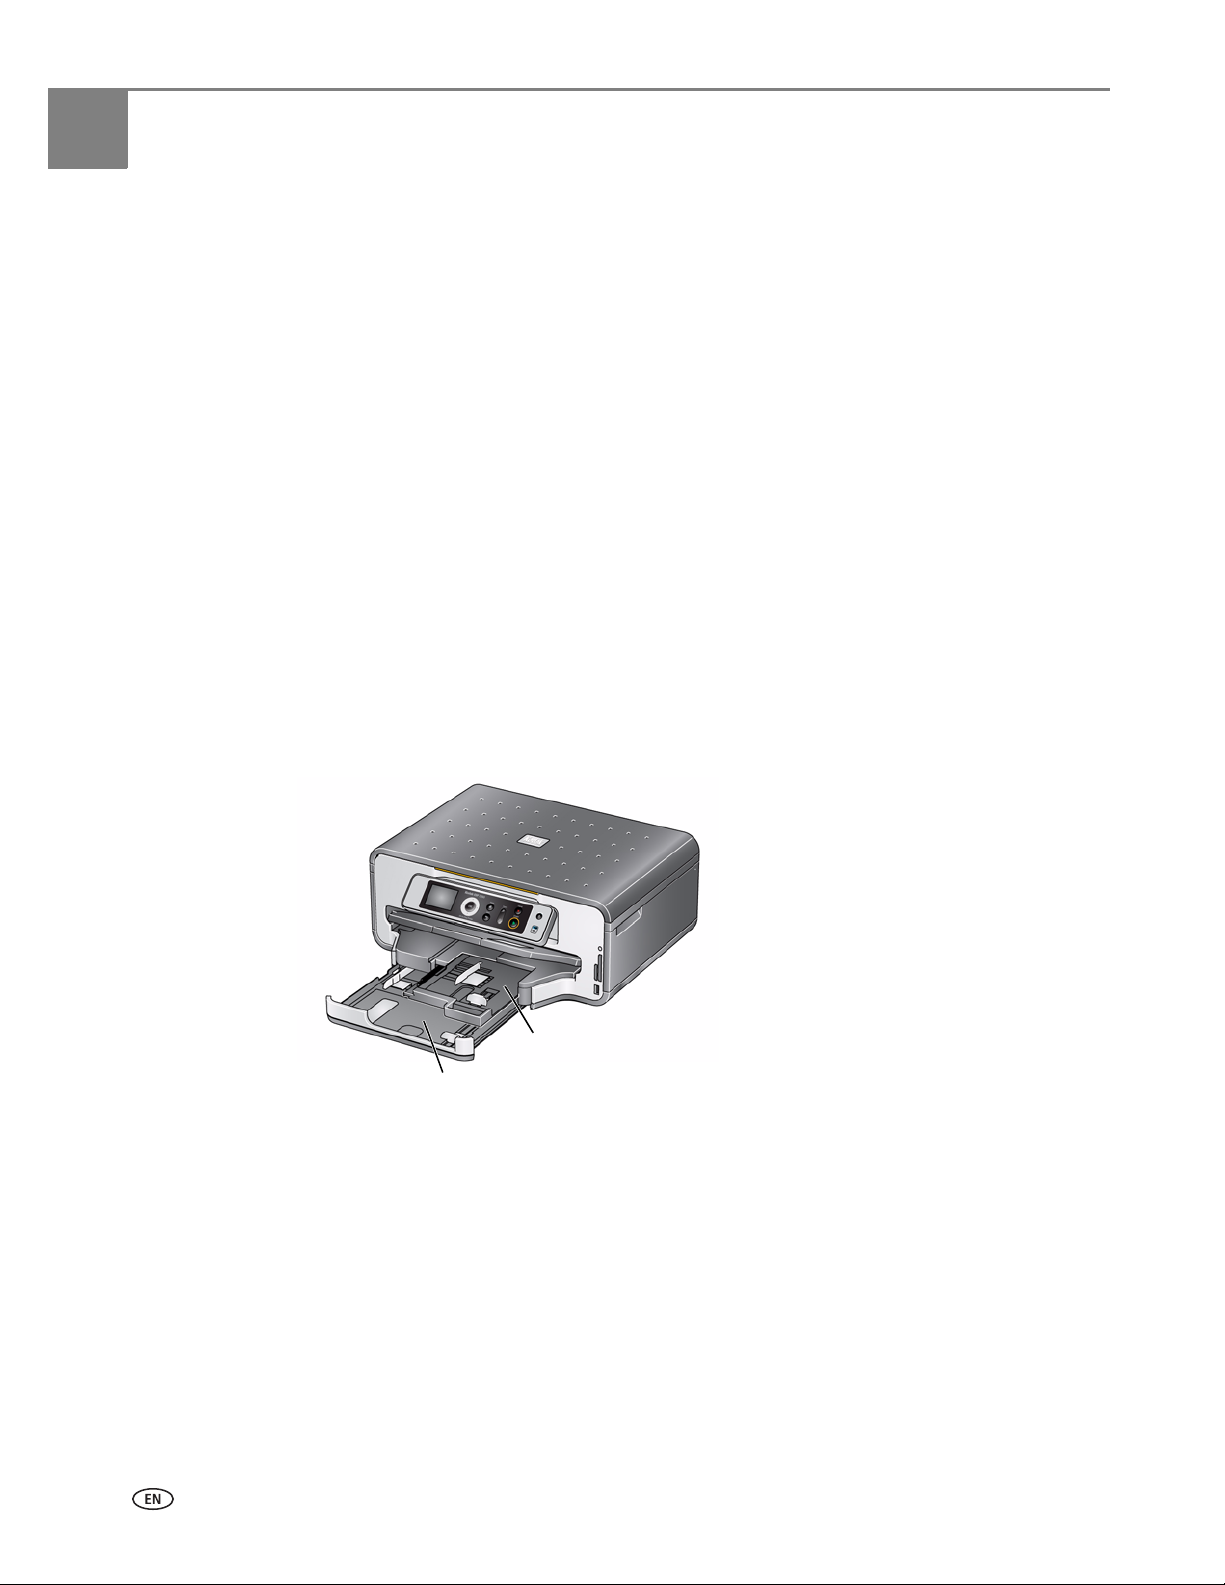
3
Main (bottom) paper tray
Photo (top) paper tray
Handling Paper
Paper types
Paper sizes
For the best photo printing results, use KODAK Photo Papers, which are optimized to
work with KODAK All-in-One Printers.
For the best document printing results, use KODAK Document Papers or a paper
with the COLORLOK Technology logo on the package. Use only paper that is
designed for inkjet printers.
You can use:
• Plain paper — 20 to 24 lb / 75 to 90 gsm
• Photo paper — 6.5 to 12 mils (up to 290 gsm)
• Card stock — 110 lb / 200 gsm, max
• Envelopes — 20 to 24 lb / 75 to 90 gsm
• Transparencies — inkjet variety with white stripe
• Labels — all commercially available inkjet varieties on 8.5 x 11-in. or A4 sheets
This printer has two paper trays, which accept different sizes of paper.
14 www.kodak.com/go/aiosupport
Page 21

KODAK ESP 7200 Series All-in-One Printer
The main paper tray accepts the following paper sizes:
• 4 x 6 in. / 101 x 152 mm
• 4 x 7 in. / 101 x 178 mm
• 4 x 12 in. / 101 x 305 mm
• 5 x 7 in. / 127 x 178 mm
• 7.25 x 8.5 in. / 184 x 216 mm
• 8 x 10 in. / 203 x 254 mm
• 8.5 x 11 in. / 216 x 279 mm
• 8.5 x 14 in. / 216 x 356 mm
• A4 (8.27 x 11.69 in. / 210 x 297 mm)
• A5 (5.83 x 8.27 in. / 148 x 210 mm)
• A6 (4.13 x 5.83 in. / 105 x 148 mm)
• B5 (6.93 x 9.48 in. / 176 x 250 mm)
The photo paper tray accepts the following paper sizes:
• 4 x 6 in. / 101 x 152 mm
• 4 x 7 in. / 101 x 178 mm
• 5 x 7 in. / 127 x 178 mm
• A6 (4.13 x 5.83 in. / 105 x 148 mm)
NOTE: Do not load paper smaller than 4 x 6 in. / 101 x 152 mm in either paper tray.
Envelope sizes
The printer accepts the following envelope sizes (in the main paper tray):
• C5 (6.38 x 9 in. / 162 x 229 mm)
• C6 (4.5 x 6.38 in. / 114 x 162 mm)
• DL (4.31 x 8.69 in. / 110 x 220 mm)
• US #7¾ (3.88 x 7.5 in. / 98 x 190 mm)
• US #9 (3.88 x 8.88 in. / 98 x 225 mm)
• US #10 (4.13 x 9.5 in. / 105 x 241 mm)
• A2 (4.37 x 5.75 in.) (111 x 146 mm)
IMPORTANT: Do not load envelopes with cutout or clear windows.
www.kodak.com/go/aiosupport 15
Page 22
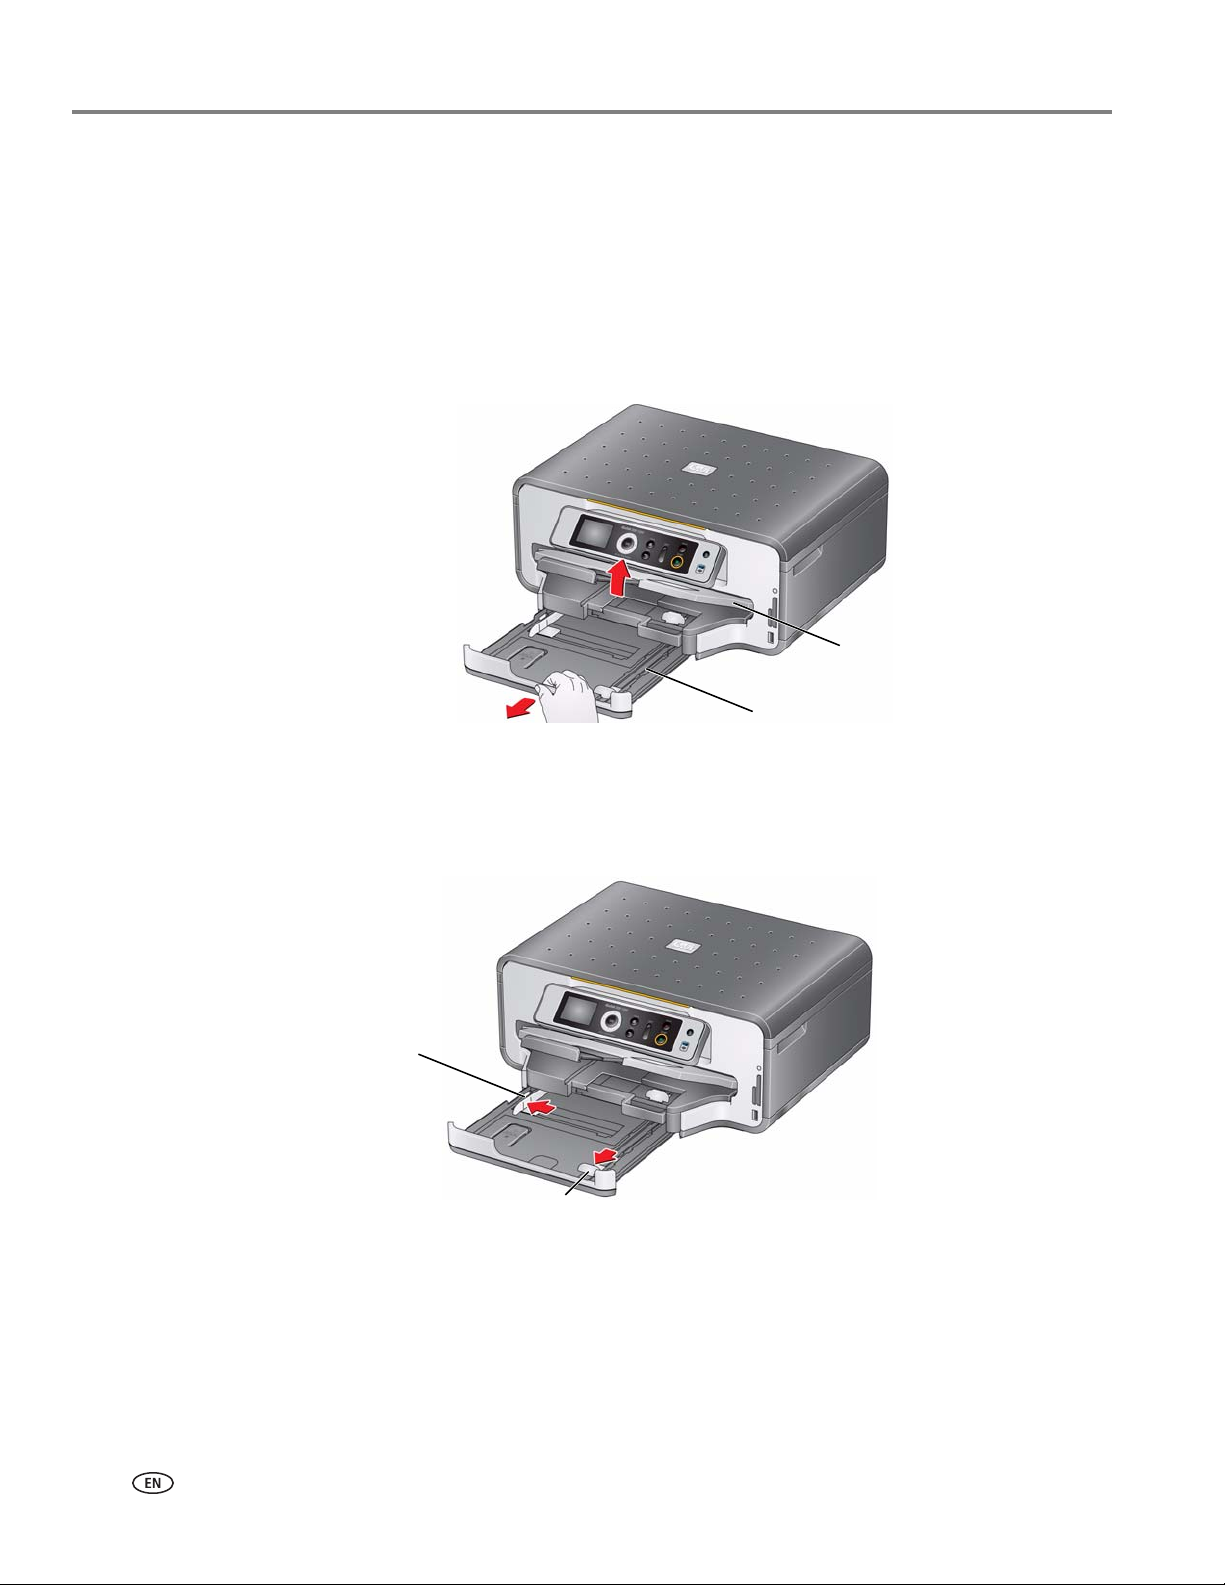
Handling Paper
Main paper tray
Output tray
Left paperedge guide
Front paper-edge guide
Loading paper
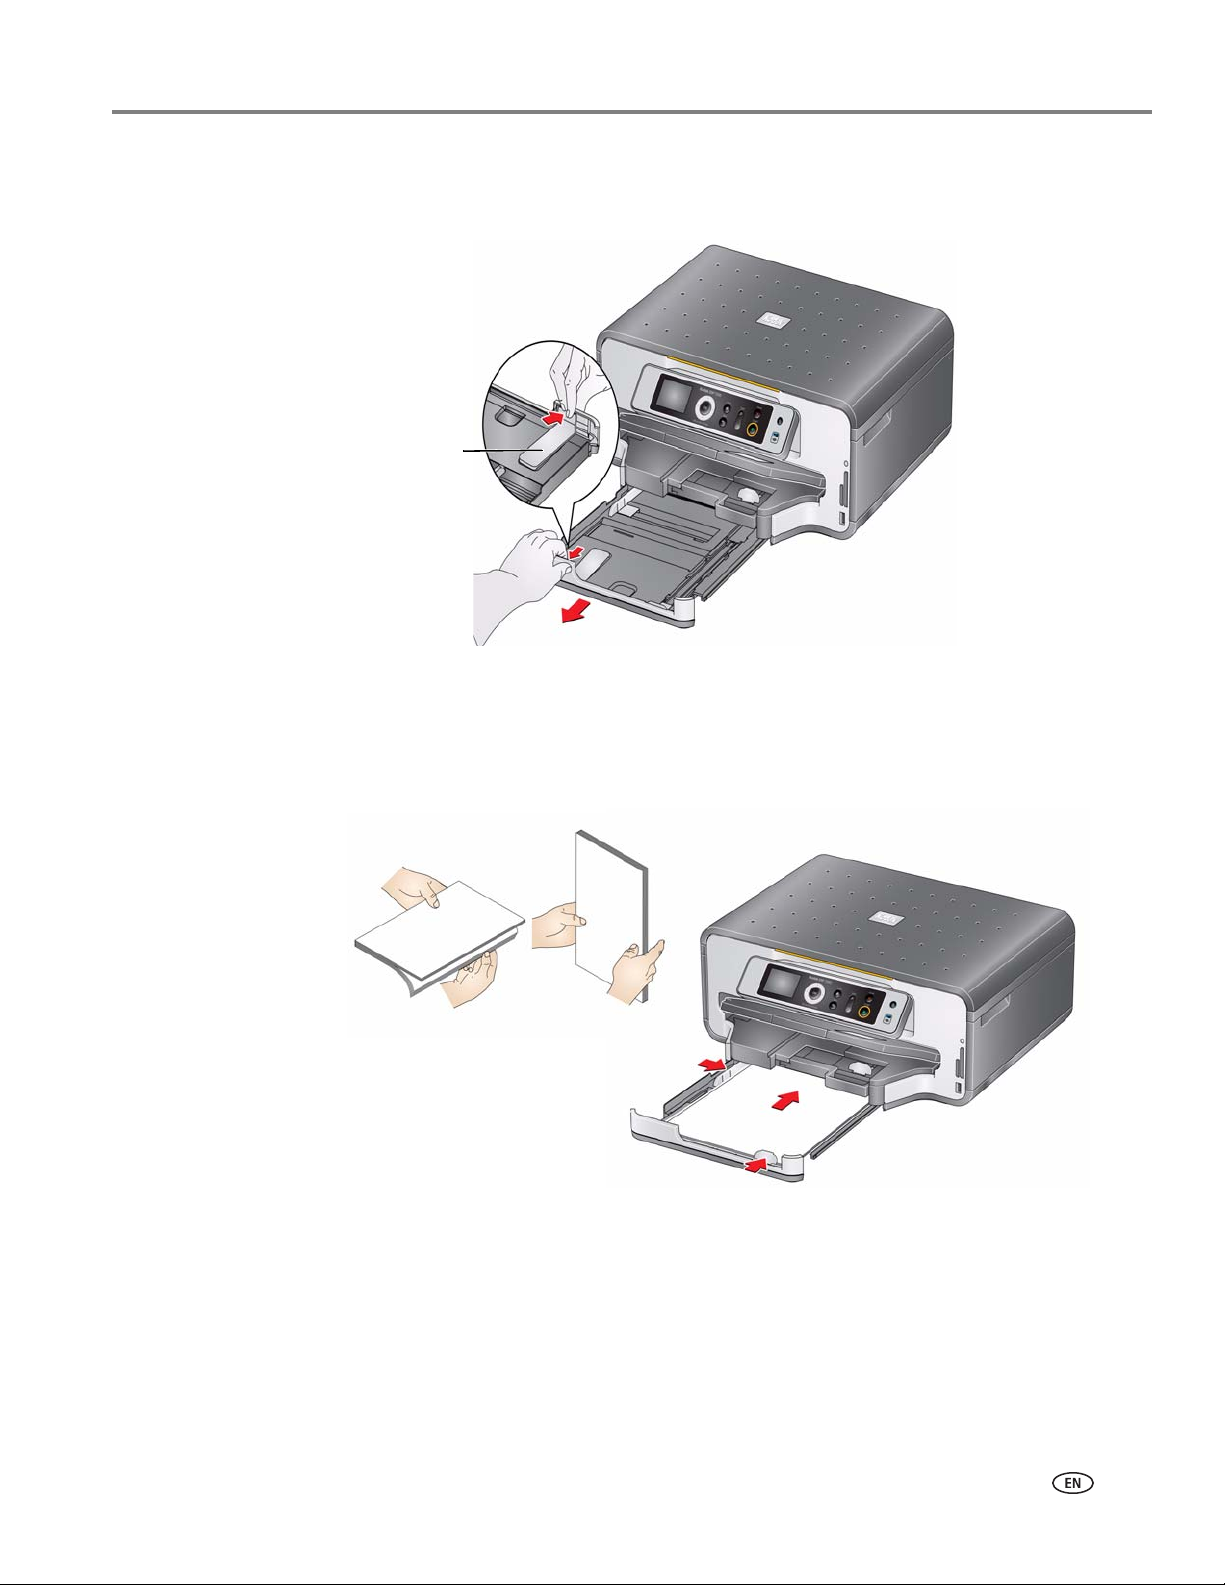
Loading paper in the main paper tray
The main paper tray capacity is 100 sheets of plain paper.
To load plain paper:
1. Raise the output tray, and pull out the main paper tray.
2. Make sure the left paper-edge guide is to the far left.
3. Move the front paper-edge guide forward.
4. Fan and stack the paper, then insert it into the tray.
5. Move the paper forward until it stops.
6. Move both the left and front paper-edge guides until they touch the paper.
16 www.kodak.com/go/aiosupport
Page 23
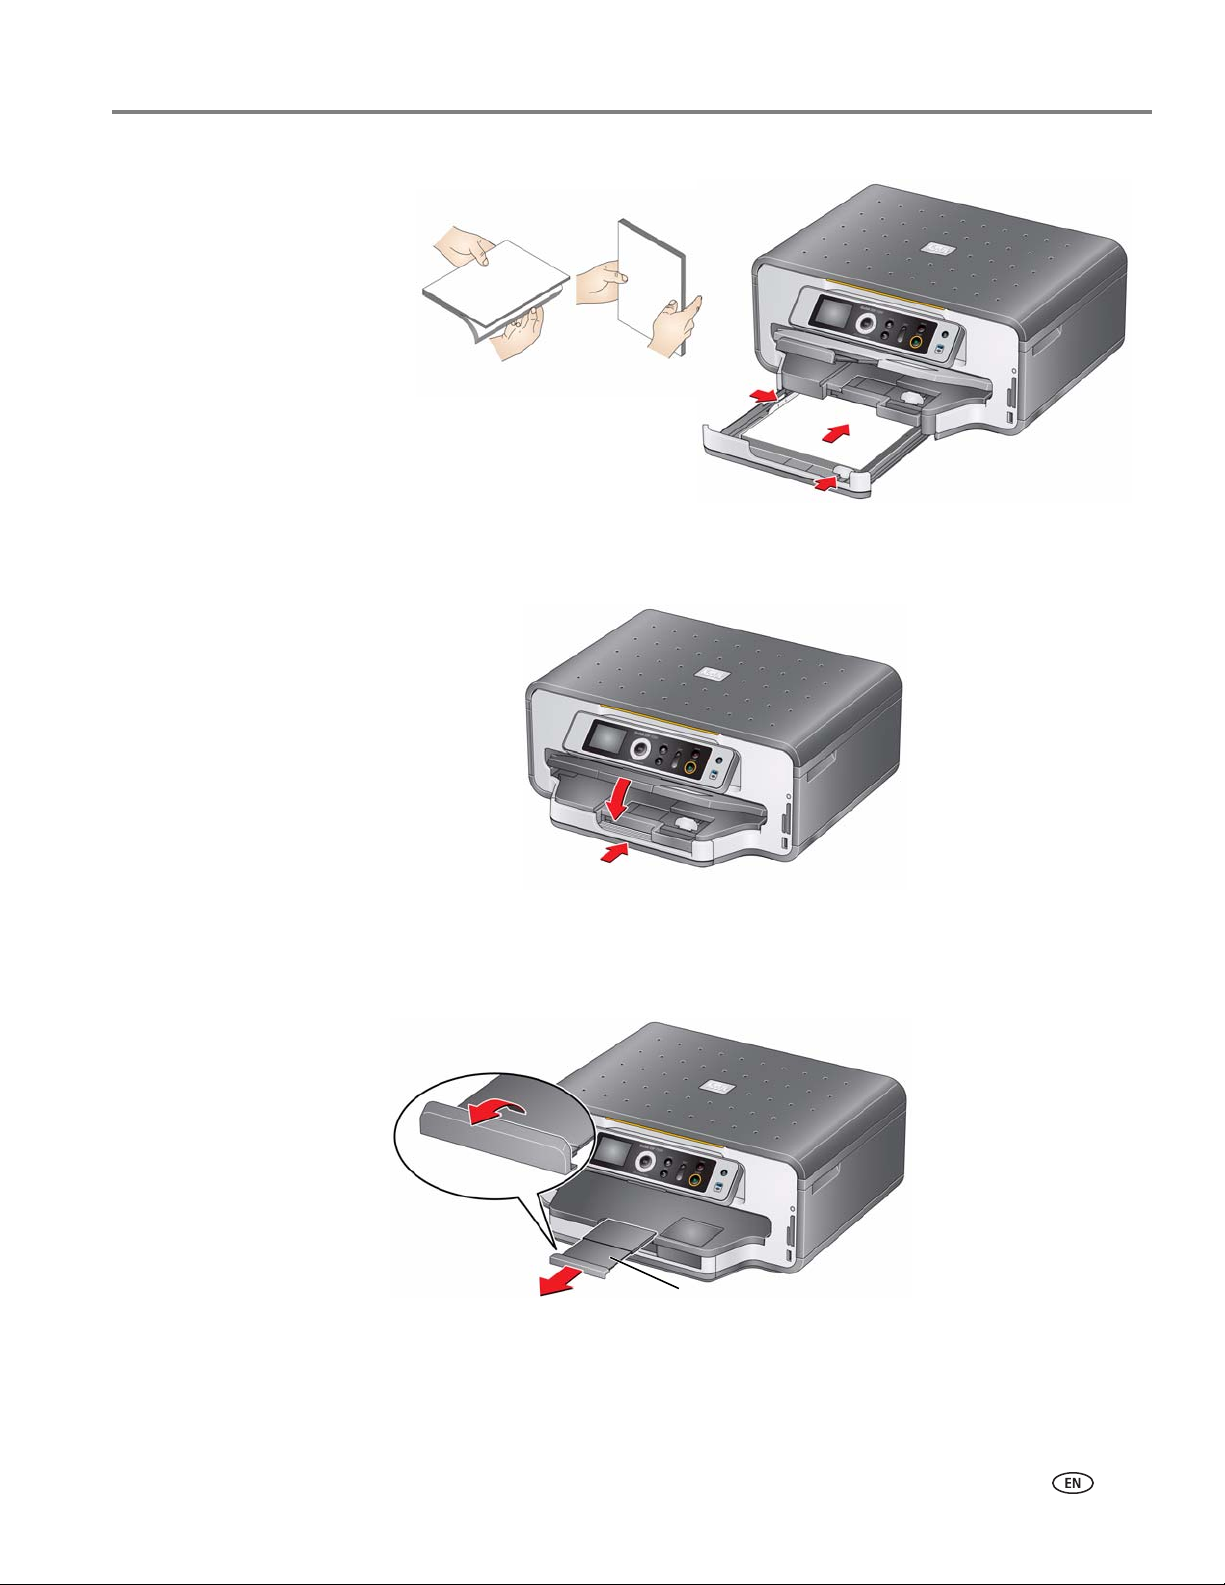
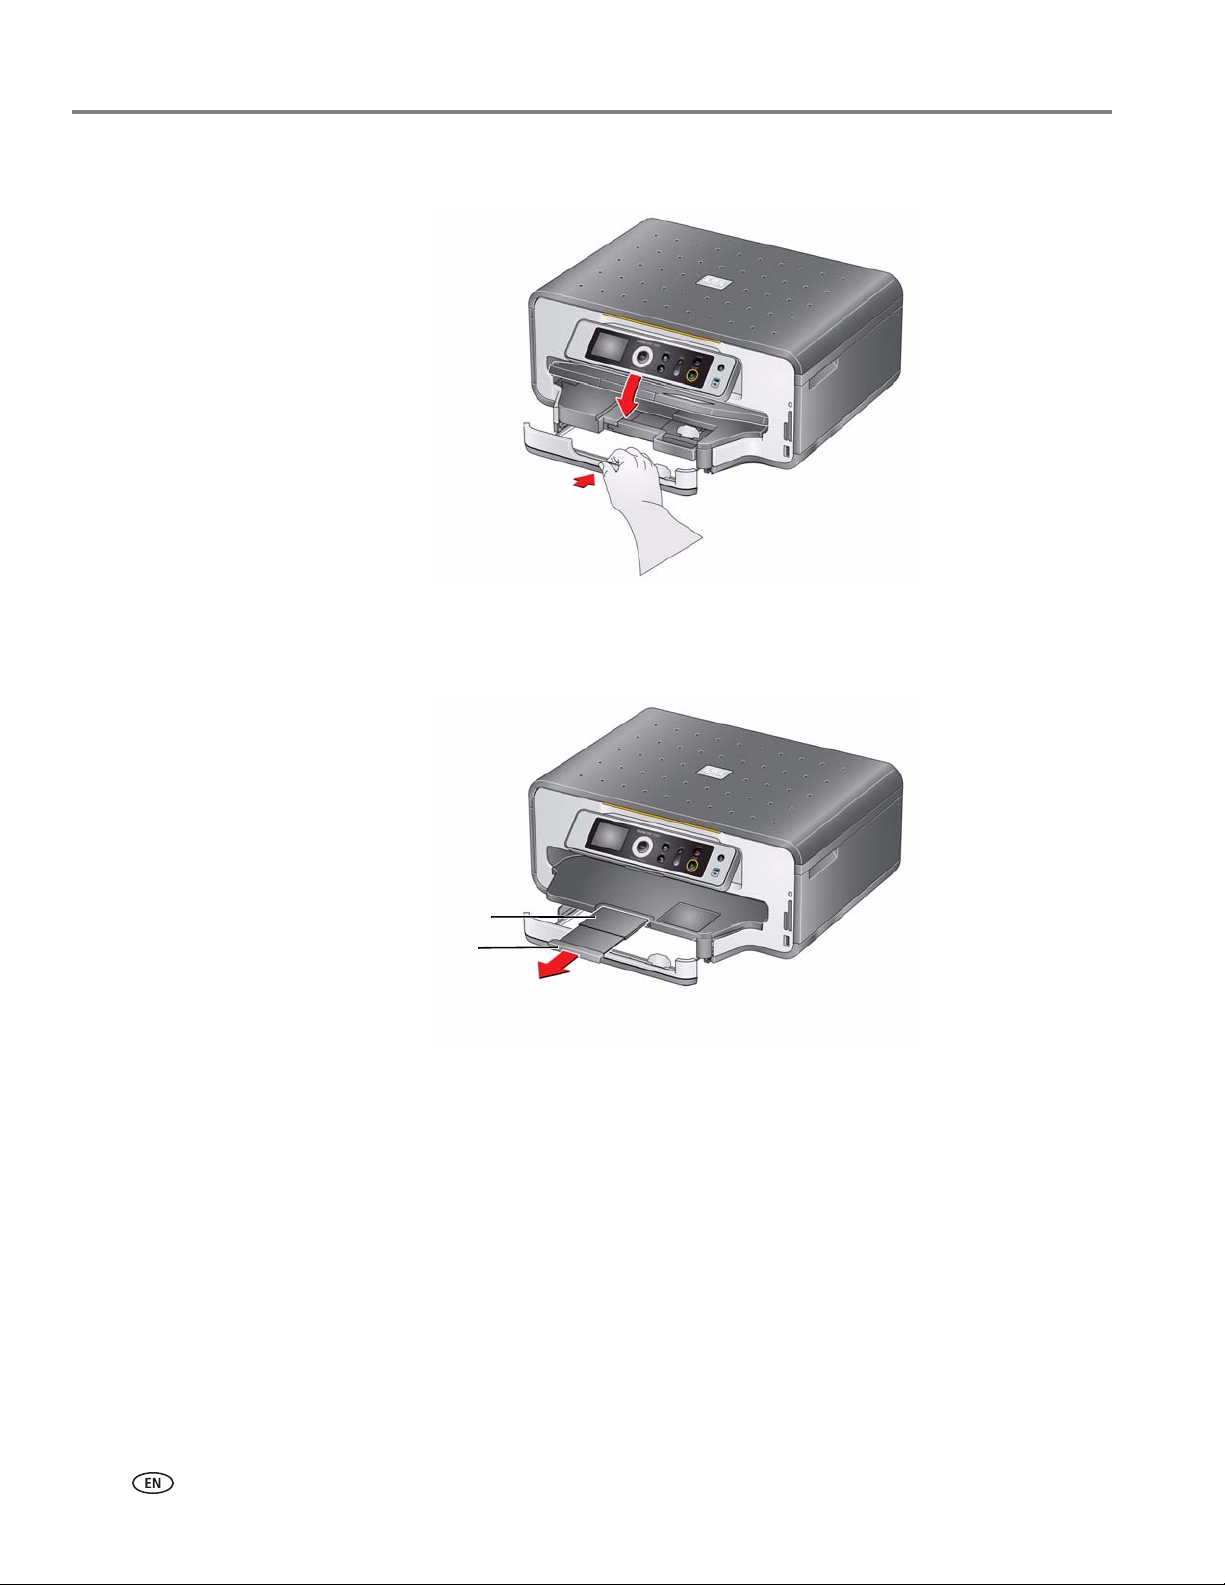
KODAK ESP 7200 Series All-in-One Printer
Output tray extender
Paper stop
7. Push in the main paper tray until it clicks into place, and lower the output tray.
8. Pull out the output tray extender until it is fully extended.
9. Lift the paper stop.
NOTE: You may also load photo paper as small as 4 x 6 in. / 101 x 152 mm in the
main paper tray.
www.kodak.com/go/aiosupport 17
Page 24
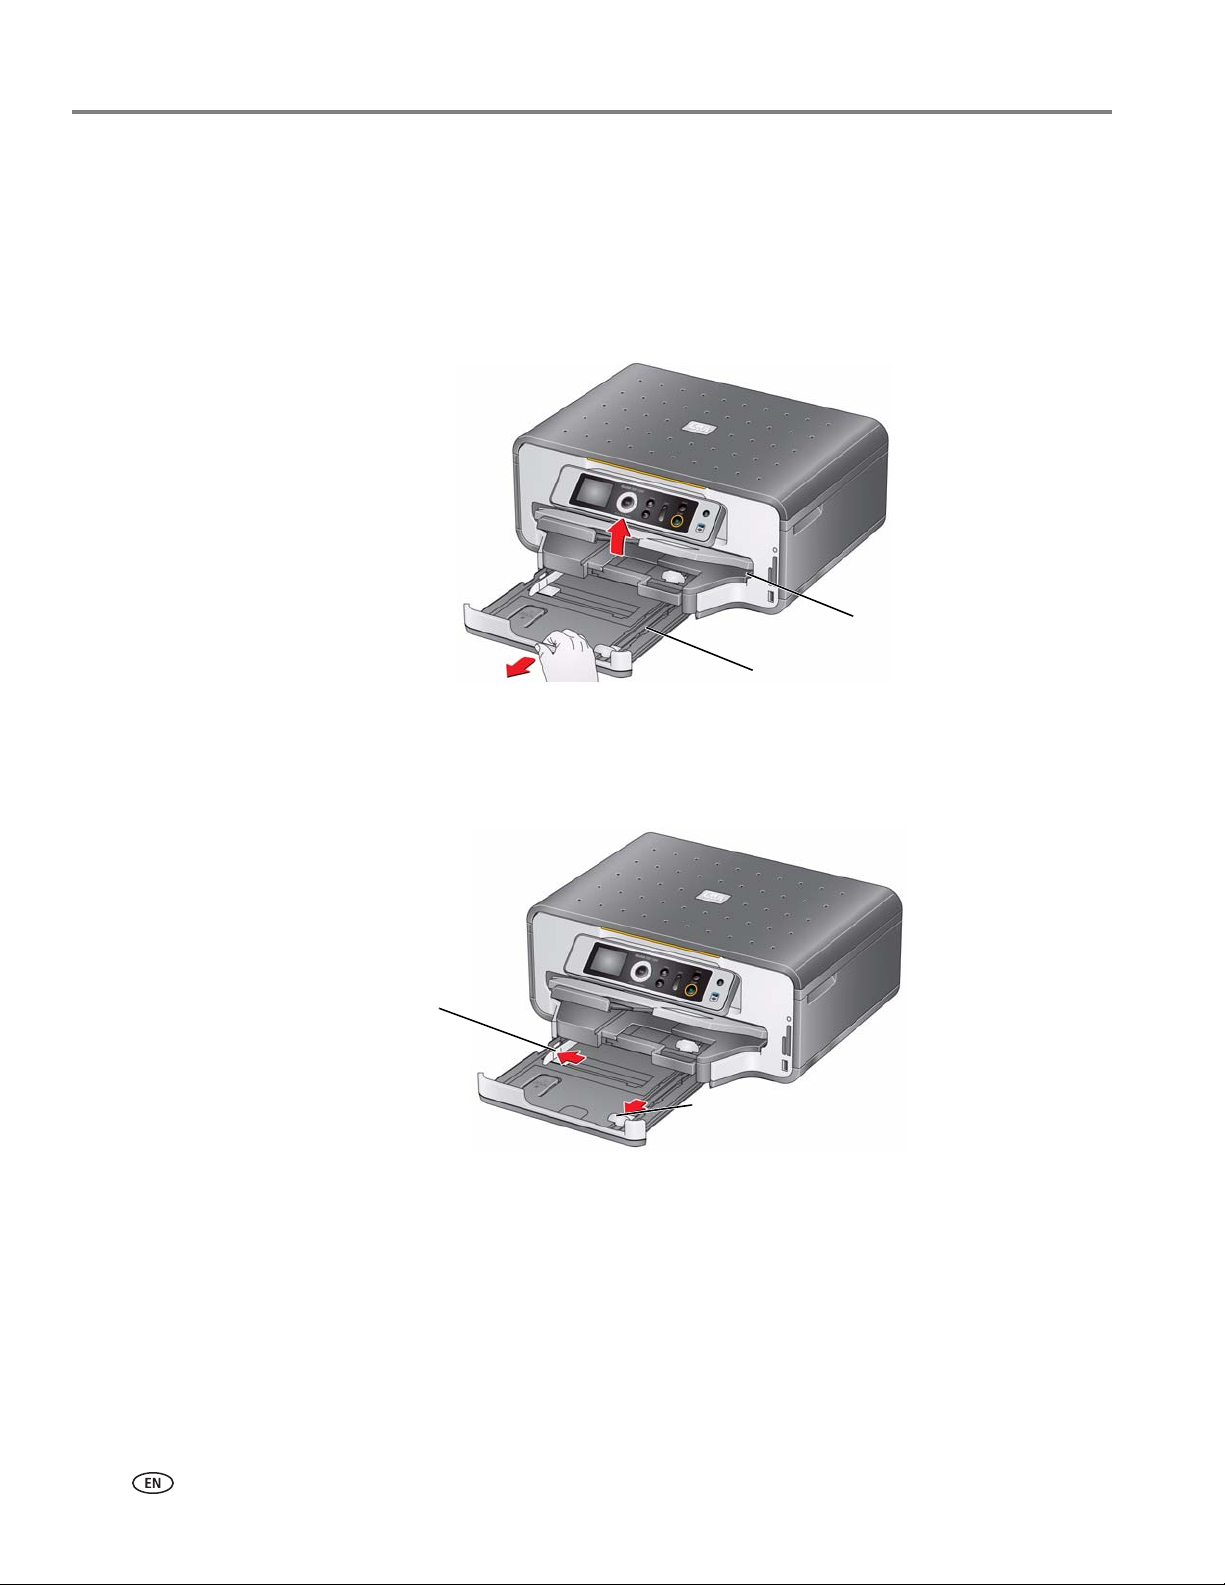
Handling Paper
Main paper tray
Output tray
Left paperedge guide
Front paper-edge guide
Loading legal-size paper in the main paper tray
The main (bottom) paper tray capacity is 100 sheets of legal-size (8.5 x 14 in. /
216 x 356 mm) paper.
To load legal-size paper:
1. Raise the output tray, and pull out the main paper tray.
2. Make sure the left paper-edge guide is to the far left.
3. Move the front paper-edge guide forward until it is fully extended.
18 www.kodak.com/go/aiosupport
Page 25
KODAK ESP 7200 Series All-in-One Printer
Paper tray
extender
4. Press the paper tray extender, and pull the paper tray forward until it is fully
extended.
5. Fan and stack the paper, then insert it into the tray.
6. Move the paper forward until it stops.
7. Move both the left and front paper-edge guides until they touch the paper.
www.kodak.com/go/aiosupport 19
Page 26
Handling Paper
Output tray extender
Paper stop
8. Push in the main paper tray until it clicks into place, and lower the output tray.
9. Pull out the output tray extender until it is fully extended, but do not lift the
paper stop.
20 www.kodak.com/go/aiosupport
Page 27

Loading the photo paper tray
Photo paper tray
Output tray
Front paper-edge guide
Left paperedge guide
The photo (top) paper tray capacity is 40 sheets of photo paper.
To load photo paper:
1. Raise the output tray, and pull out the photo paper tray.
KODAK ESP 7200 Series All-in-One Printer
2. Move the left paper-edge guide to the far left.
3. Move the front paper-edge guide forward.
www.kodak.com/go/aiosupport 21
Page 28

Handling Paper
4. Fan and stack the photo paper, then insert it (short side first) into the tray with
logo side facing up and the glossy side down.
the
IMPORTANT: If the photo paper is loaded the wrong way, the ink on your pictures will be
wet and the image quality will be affected.
5. Move the paper forward until it stops.
6. Move both the left and front paper-edge guides until they touch the paper.
7. Push in the photo paper tray until it clicks into place, and lower the output tray.
22 www.kodak.com/go/aiosupport
Page 29

Loading envelopes
Main paper tray
Output tray
Left paperedge guide
Front paper-edge guide
KODAK ESP 7200 Series All-in-One Printer
The main paper tray capacity is 20 envelopes.
IMPORTANT: Do not load envelopes with cutout or clear windows.
To l o a d e nve l o pes :
1. Raise the output tray, and pull out the main paper tray.
2. Remove any paper from the tray.
3. Make sure the left paper-edge guide is to the far left.
4. Move the front paper-edge guide forward.
www.kodak.com/go/aiosupport 23
Page 30

Handling Paper
5. Insert the envelopes into the tray with the flap up and against the right side of
the tray.
6. Move the envelopes forward until they stop.
7. Move both the left and front paper-edge guides until they touch the envelopes.
8. Push in the main paper tray until it clicks into place, and lower the output tray.
24 www.kodak.com/go/aiosupport
Page 31

4
Printing
Print documents and lab-quality pictures on your printer.
Switching paper trays
The printer has two paper trays. When you print documents, the printer
automatically selects paper from the main (bottom) paper tray. When you print
photos, the printer automatically selects paper from the photo (top) paper tray. You
may, however, choose the top or bottom tray at any time.
To switch paper trays when printing from a computer with WINDOWS OS:
1. Open the document you want to print, then select
2. In the Print dialog box, make sure that
then click
3. In the
4. Click
5. Click
To switch paper trays when printing from a computer with MAC OS:
1. Open the document you want to print, then select
2. In the Print dialog box, make sure that
is selected.
AiO
3. From the
4. From the
5. Click
To switch paper trays when printing from the printer control panel:
1. Press
2. Press to select
3. Press to select
NOTE: Top Tray is the default when printing pictures. You cannot switch to the
bottom tray from the control panel.
Properties.
General tab under Paper tray, click then select Bottom Tray or To p Tray.
OK to close the Properties dialog box.
OK to begin printing.
Copies & Pages drop-down menu, select the Printer Options.
Paper Tray drop-down menu, select To p tray or Bottom tray.
Print.
Home.
Copy Photo or View and Print P hotos .
Tray Selection, then press to select Bottom Tray.
KODAK ESP 7200 Series AiO is selected,
Eastman Kodak Company ESP 7200 Series
File > Print.
File > Print.
www.kodak.com/go/aiosupport 25
Page 32

Printing
Printing documents
To print a document from your computer:
1. Open the document.
2. Select
3. In the Print dialog box, select your KODAK Printer.
4. Choose the pages to print, number of copies, etc, then click
WINDOWS OS-based computer) or
Printing two-sided documents
Print two-sided documents either automatically with the built-in duplexer or by
manually rotating and reloading the paper.
Automatic two-sided printing
The duplexer can print two-sided documents automatically on:
• plain paper
• standard paper sizes
– letter (8.5 x 11 in. / 216 x 279 mm)
– A4 (8.3 x 11.7 in. / 210 x 297 mm)
– executive (7.25 x 8.5 in. / 184 x 216 mm)
– B5 (7.2 x 10.1 in. / 183 x 257 mm)
NOTE: The paper width must be 3.9 to 8.5 in. / 100 to 216 mm. The paper length
File > Print.
must be between 7 to 11.7 in. / 175 to 297 mm.
OK (on a
Print (on a MACINTOSH Computer).
The duplexer cannot print:
• borderless prints
• poster layout
Automatic two-sided printing from a computer with WINDOWS OS
To print two-sided documents from a computer with WINDOWS Operating System
(OS) using the duplexer:
1. Load plain paper into the paper tray.
2. Open the document you want to print, then select
3. In the Print dialog box, make sure that
then click
4. Select the
5. Select
6. Under Flip on, select
7. Clic k
26 www.kodak.com/go/aiosupport
Properties.
Layout tab.
Automatically with Duplexer.
Long edge or Short edge, then click OK.
OK.
File > Print.
KODAK ESP 7200 Series AiO is selected,
Page 33

Automatic two-sided printing from a computer with MAC OS
To print two-sided documents from a computer with MAC OS using the duplexer:
1. Load plain paper into the paper tray.
2. Open the document you want to print, then select
3. In the Print dialog box, make sure that
4. In the
5. In the
6. Click
Manual two-sided printing
You can print two-sided documents on any size paper that the printer accepts (See
“Paper sizes” on page 14.) when you rotate the paper manually.
IMPORTANT: Manual two-sided printing will not work on bar-coded photo paper (the bar
KODAK ESP 7200 Series All-in-One Printer
File > Print.
Eastman Kodak Company ESP 7200 Series
is selected.
AiO
Copies & Pages drop-down menu, select Layout.
Tw o- S id e d drop-down menu, select either Long-Edge binding or
Short-Edge binding.
Print.
code is on the back side). Manual two-sided printing can only be done on
media that can absorb ink on both sides, such as plain paper or two-sided
photo paper.
Manual two-sided printing from a computer with WINDOWS OS
To print two-sided documents from a computer with WINDOWS Operating System
(OS):
1. Load paper into the paper tray.
2. Open the document you want to print, then select
3. In the Print dialog box, make sure that
then click
4. Select the
5. Select
6. Click
Properties.
Layout tab.
Manual (Instructions provided), then click OK.
OK.
KODAK ESP 7200 Series AiO is selected,
File > Print.
7. When a message appears on your computer and printer LCD, remove the
printed pages from the output tray.
8. Rotate the printed pages 180 degrees and place them into the paper tray
(printed side up).
9. Press
NOTE: It does not matter which
Start on the printer.
Start button you press; the print job will continue
printing in either color or black, depending on the document.
www.kodak.com/go/aiosupport 27
Page 34

Printing
Manual two-sided printing from a computer with MAC OS
To print two-sided documents from a computer with MAC OS:
1. Load paper into the paper tray.
2. Open the document you want to print, then select
3. In the Print dialog box, make sure that
is selected.
AiO
4. In the
5. In the
6. In the
7. Clic k
Copies & Pages drop-down menu, select Paper Handling.
Pages to Print drop-down menu, select Odd Only.
Page Order drop-down menu, select Reverse.
Print.
Eastman Kodak Company ESP 7200 Series
File > Print.
8. When the odd pages have finished printing, remove the printed pages from the
output tray.
9. Rotate the printed pages 180 degrees and place them into the paper tray
(printed side up).
10. Select
11. In the
12. In the
13. In the
14. Click
File > Print.
Copies & Pages drop-down menu, select Paper Handling.
Pages to Print drop-down menu, select Even Only.
Page Order drop-down menu, select Normal.
Print.
Printing pictures
You can print pictures with your all-in-one printer from:
• A memory card inserted into a memory card slot
• A camera or storage device (such as a flash drive) connected to the front USB
• A BLUETOOTH Technology enabled device (with the optional KODAK Wireless
• An iPhone / iPod Touch or BLACKBERRY Device
You can also print pictures using Home Center Software from your computer with
WINDOWS OS. Home Center Software lets you edit and enhance your pictures
quickly. Open Home Center Software, select
on-screen instructions.
On a computer with either MAC OS or WINDOWS OS, you can print pictures from
KODAK EASYSHARE Software or any picture-editing or photo-management
software.
port with a USB cable
2.0 USB BLUETOOTH Adapter plugged into the front USB port)
1
(for information, go to
www.kodak.com/go/picflick)
Print Pictures, then follow the
1. May not be available with all models.
28 www.kodak.com/go/aiosupport
Page 35

Printing from a memory card or USB-connected device
You can print pictures from the following cards or USB-connected devices:
MS/XD/SD Card slot CF Card slot Front USB port
KODAK ESP 7200 Series All-in-One Printer
MULTIMEDIA
•
Card (MMC)
•XD Picture Card
•SECURE DIGITAL
(SD) Card
•SECURE DIGITAL
High Capacity
(SDHC) Card
• COMPACTFLASH
Card (Types I and
II)
• MICRODRIVE
•PICTBRIDGE
Te c h n o l o g y
enabled camera
•Flash drive
• Variations of the
memory cards
above that require
an adapter
example,
MEMORY STICK
Duo, miniSD
microSD, and
T-F lash )
(for
,
IMPORTANT: If you use a memory card with an adapter, make sure you insert and remove
the adapter and the memory card as a unit; do not remove the memory card
while leaving the adapter in the printer.
Using default settings to print a picture
To print a picture from a memory card or USB-connected device using the default
settings:
1. Insert the memory card into the appropriate slot, or connect the digital camera
or portable drive to the front USB port.
IMPORTANT: Use only one slot or port at a time.
www.kodak.com/go/aiosupport 29
Page 36

Printing
Front USB port
Front USB port
2. Press or to select the picture you want to print.
3. Press
Start to begin printing.
The printer prints a single 4 x 6 in. / 10 x 15 cm picture.
IMPORTANT: To prevent loss of data from your memory card, do not remove it from the
printer while printing.
Changing the settings and printing a picture
You can change the print photos options for an individual picture or group of
pictures, or you can change the settings and save them as the default.
To print a picture or pictures using settings other than the default settings:
1. Insert the memory card into the appropriate slot, or connect the digital camera
or portable drive to the front USB port.
IMPORTANT: Use only one slot or port at a time.
2. Press or to select the picture you want to print, then press
3. Repeat step 2 for each additional picture you want to print.
4. Press
30 www.kodak.com/go/aiosupport
Home.
OK.
Page 37

KODAK ESP 7200 Series All-in-One Printer
5. Press to select View and Pr int Pho tos, then press OK.
6. Press to select an option, then press or to change the setting.
Print Photos Option Settings Description
View Photos -- Scroll through the pictures on the
memory card.
Transfer All to PC -- To transfer all the pictures on the
memory card to your computer, press
OK then Start. (Your printer and
computer must be connected with a USB
cable.)
Rotate This Photo Press
Quantity 1 (default) to 99 The number of copies that print.
Tray Selection Top Tray (default) Print is made on the paper in the top tray
Bottom Tray Print is made on the paper in the bottom
Print Size 2 x 3
3.5 x 5
4 x 6 (default)
4 x 7
5 x 7
If bottom tray is
selected (above), the
following choices also
appear:
4 x 12
8 x 10
8.5 x 11 or A4
Plain Paper Quality
(only available if
Bottom Tray is
selected)
Normal (default) Good quality output; prints faster than
Best The highest quality, but the slowest print
OK to rotate the selected photo.
tray
If the selected copy size is smaller than
the paper in the paper tray, the printer
automatically arranges the pictures to
best fit the paper size.
Best.
speed; eliminates the banding effect that
sometimes occurs when printing Draft or
Normal.
Draft The fastest print speed, but the lowest
Photo Paper Quality Automatic
(default)
www.kodak.com/go/aiosupport 31
quality.
The printer detects when you load photo
paper and sets Best quality
automatically.
Page 38

Printing
Print Photos Option Settings Description
IMPORTANT: To prevent loss of data from your memory card, do not remove it from the
Printing tagged pictures
Some digital cameras let you tag (or “mark”) pictures on the memory card for
printing. This creates a tag that is recognized by the printer. If you choose to print
tagged pictures, they will be printed according to the default settings on your printer
(unless otherwise specified by the tag from the camera).
Scene Balance On (default)
Off
Color Color (default) Prints full color.
Black & White Prints black and white (gray scale).
Add Date to Prints No (default)
Ye s
Save as Defaults No (default)
Ye s
Adjusts the image brightness to correct
for underexposure and reduces the
variation in contrast in different areas of
the picture.
Prints the date of the picture(s) (the date
the picture was taken or last edited) in a
corner of the print.
To save settings as the new default,
press
OK, select Ye s , then press OK.
7. When you have finished changing settings, press Start to begin printing.
printer while printing.
NOTE: Refer to your camera user guide to determine whether your camera supports
tagged (also “marked” or “DPOF”) functionality.
To print tagged pictures:
1. Insert the memory card into the appropriate slot.
2. When the “Print tagged images?” message appears, press
Start.
32 www.kodak.com/go/aiosupport
Page 39

Printing panoramic pictures
Front USB port
To print a panoramic picture, load 4 x 12 in. / 101 x 305 mm paper, or US letter or A4
paper in the main paper tray.
1. Insert the memory card into the appropriate slot, or connect the digital camera
or portable drive to the front USB port.
IMPORTANT: Use only one slot or port at a time.
KODAK ESP 7200 Series All-in-One Printer
2. Press or to select the picture you want to print, then press
3. Press
4. Press to select
5. Press to select
6. Press to select
7. Pre ss
IMPORTANT: To prevent loss of data from your memory card, do not remove it from the
Home.
View and Pr int Photos, then press OK.
Tray Selection, then press to select Bottom Tray.
Print Size, then press to select 4 x 12.
Start to begin printing.
OK.
printer while printing.
www.kodak.com/go/aiosupport 33
Page 40

Printing
Front USB port
Zooming and cropping pictures
Zooming and cropping lets you print a specific part of your picture. Use the zoom
buttons to select a portion of your picture for printing. The crop window matches the
aspect ratio of the selected output print size.
To zoom and crop a picture:
1. Insert the memory card into the appropriate slot, or connect the digital camera
or portable drive to the front USB port.
IMPORTANT: Use only one slot or port at a time.
2. Press or to select the picture you want to crop, then press
3. Press
Zoom + to enlarge the picture on the LCD. A red box shows the area that
will be printed.
NOTE: You can press
Zoom + repeatedly to enlarge the picture in increments of
0.25 up to a magnification of 5X. Press
in increments of 0.25 back down to 1X.
4. Use the navigation buttons to move the picture on the LCD up, down, left, or
right. Only the part of the picture in the red box will print.
NOTE: Zooming and cropping does not change the saved picture on the memory
card.
5. When you are satisfied with the picture, press
original view with a red box around the portion of the picture that will print.
6. Press
34 www.kodak.com/go/aiosupport
Start to begin printing.
OK.
Zoom – to decrease the magnification
OK. The picture appears in the
Page 41

Printing from a BLUETOOTH Technology enabled device
You can print pictures from wireless devices, such as mobile phones, digital
cameras, and Personal Digital Assistants (PDAs) using the optional KODAK
Wireless 2.0 USB BLUETOOTH Adapter.
To print a picture from a BLUETOOTH Technology enabled device:
1. Insert the KODAK Wireless 2.0 USB BLUETOOTH Adapter into the front USB
port.
2. “Pair” the printer and the device so they can communicate.
NOTE: You must “pair” from your device’s interface. For instructions, see the user
manual for your device.
KODAK ESP 7200 Series All-in-One Printer
3. Select the picture you want to print, then select
The printer prints a single 4 x 6 in. / 10 x 15 cm picture.
NOTE: See the user guide for your device for more information.
Send to begin printing.
Printing pictures or documents from a wireless device
Wirelessly print pictures from an iPhone or iPod Touch Device* at the touch of a
button. Download the KODAK Pic Flick App from the App Store, or go to
www.kodak.com/go/picflick for more information.
You can also print MICROSOFT Word, PowerPoint, and Excel documents with your
Documents To Go software included with your WIFI-enabled BLACKBERRY Device.
For more information go to www.kodak.com/go/blackberry.
* Compatible with iPhone (with MAC OS 2.2 or later) and iPod Touch (2nd
generation).
www.kodak.com/go/aiosupport 35
Page 42

Printing
Transferring pictures to a computer
You can transfer .jpg, .mov, and .wav files from a memory card in the printer to your
computer. To transfer these files, the printer
with a USB cable and KODAK Home Center software must be installed on your
computer.
NOTE: If you have large video files or a large number of pictures (400 or more), we
recommend that you use a memory card reader attached directly to your
computer to transfer them.
Transferring pictures to a WINDOWS OS-based computer
1. Insert the memory card into the memory card slot on the printer.
2. Press
3. Press to select
4. Press to select
5. Press
6. If your computer is connected to a wireless network and with a USB cable, select
7. Follow the on-screen instructions on your computer.
Back.
View an d Pr int Photos, then press OK.
Transfer All to PC, then press OK.
Start.
the USB-connected printer (no number after the printer name).
must be connected to your computer
Transferring pictures to a MACINTOSH Computer
1. Insert the memory card into the memory card slot on the printer.
2. Press
3. Press to select
4. Press to select
5. Press
6. If your computer is connected to a wireless network and with a USB cable, select
7. Use iPhoto or Image Capture on your computer to complete the transfer.
Back.
View an d Pr int Photos, then press OK.
Transfer All to PC, then press OK.
Start.
the USB-connected printer (no number after the printer name).
36 www.kodak.com/go/aiosupport
Page 43

5
Copying
You can copy documents and photographs with your all-in-one printer. The printer
produces high-quality color or black-and-white copies on a variety of paper types
(see Paper types, page 14).
Copying a document
You can copy a document using the default settings, or you can make adjustments to
the quantity, size, quality, and brightness of your copies. When you copy a
document, the printer will always use paper from the main (bottom) paper tray.
Using the default settings to copy a document
The default settings are either the factory default settings (see Resetting factory
defaults, page 65), or defaults that you have set on the printer (see Save as Defaults,
page 39).
To copy a document using the current default settings:
1. Lift the scanner lid, and place the document face down in the right-front corner
of the scanner glass.
2. Close the lid.
3. Press
4. Press
Home.
Start to begin copying.
www.kodak.com/go/aiosupport 37
Page 44

Copying
Adjusting the settings and copying a document
To copy a document using settings other than the default settings:
1. Lift the scanner lid, and place the document face down in the right-front corner
of the scanner glass.
2. Close the lid.
3. Press
4. Make sure
Home.
Copy Document is selected, then press OK.
5. Press to select an option, then press or to change the setting.
Copy Document
Option
Quantity 1 (default) to 99 The number of copies that print.
Color Color (default) Prints full color.
Copy Size Same Size
Setting
Black & White Prints black and white (gray scale).
(default)
Fit to Page The printer detects the size of the
Description
The copy is the same size as the
original.
original on the scanner glass and the
size of the paper in the paper tray, and
automatically reduces or enlarges the
original so that the copy fits on the
paper.
20% to 500% Reduces up to 20% or enlarges up to
38 www.kodak.com/go/aiosupport
500% of the original size.
Page 45

KODAK ESP 7200 Series All-in-One Printer
Copy Document
Option
Plain Paper Quality Normal
Photo Paper Quality Automatic
Brightness Normal, -3 to +3
Save as Defaults No / Yes To save settings as the new default,
Setting
(default)
Best The highest quality, but the slowest
Draft The fastest print speed, but the lowest
(default)
(Normal is default)
Description
Good quality output; prints faster than
Best.
print speed; eliminates the banding
effect that sometimes occurs when
printing Draft or Normal.
quality.
The printer detects photo paper in the
paper tray and sets Best quality
automatically.
Lightens or darkens the copy.
Normal is no change from the original;
-3 is the darkest; +3 is the lightest.
press
OK, select Ye s , then press OK.
6. Press Start to begin copying.
Changing the number of copies of a document
To change the number of copies:
1. Lift the scanner lid, and place the document face down in the right-front corner
of the scanner glass.
2. Close the lid.
www.kodak.com/go/aiosupport 39
Page 46

Copying
3. Press Home.
4. Make sure
5. Press
Copy Document is selected, then press or to select a number.
Start to begin copying.
Enlarging or reducing a document
To enlarge or reduce the size of the copy of the document:
1. Lift the scanner lid, and place the document face down in the right-front corner
of the scanner glass.
2. Close the lid.
3. Press
4. Make sure
5. Press to select
Home.
Copy Document is selected, then press OK.
Copy Size.
6. Press or to select an enlargement or reduction.
7. Pre ss
Start to begin copying.
40 www.kodak.com/go/aiosupport
Page 47

Darkening or lightening a copy
You can make the copy darker or lighter than the original document.
To darken or lighten the copy:
1. Lift the scanner lid, and place the document face down in the right-front corner
of the scanner glass.
KODAK ESP 7200 Series All-in-One Printer
2. Close the lid.
3. Press
4. With
5. Press to select
Home.
Copy Document selected, press OK.
Brightness.
6. Press to select a number below zero for a darker copy, or press to select a
number above zero for a lighter copy.
7. Pre ss
Start to begin copying.
www.kodak.com/go/aiosupport 41
Page 48

Copying
Copying a photograph
You can copy a photograph using the default settings, or you can make adjustments
to the quantity, size, quality, and brightness of your copies. When you copy a
photograph, the printer will use paper from the top paper tray, unless you specify
otherwise.
Using the default settings to copy a photograph
The default settings are either the factory default settings (see Resetting factory
defaults, page 65), or defaults that you have set on the printer (see Save as Defaults,
page 44).
To copy a photograph using the current default settings:
1. Lift the scanner lid, and place the photograph face down in the right-front corner
of the scanner glass.
2. Close the lid.
3. Press
4. Press to select
5. Press
42 www.kodak.com/go/aiosupport
Home.
Copy Photo.
Start to begin copying.
Page 49

Adjusting the settings and copying a photograph
To copy a photograph using settings other than the default settings:
1. Lift the scanner lid, and place the photograph face down in the right-front corner
of the scanner glass.
KODAK ESP 7200 Series All-in-One Printer
2. Close the lid.
3. Press
4. Press to select
Home.
Copy Photo, then press OK.
5. Press to select an option, then press or to change the setting.
Copy Photo
Option
Quantity
Color Color (default) Prints full color.
Tray Selection Top Tray (default) Copy is made on the paper in the top
Setting Description
1 (default) to 99 The number of copies that print.
Black & White Prints black and white (gray scale).
tray.
Bottom Tray Copy is made on the paper in the
bottom tray.
www.kodak.com/go/aiosupport 43
Page 50

Copying
Copy Photo
Option
Copy Size 2 x 3
3.5 x 5
4 x 6 (default)
4 x 7
5 x 7
If bottom tray is
selected (above),
the following choices
also appear:
4 x 12
8 x 10
8.5 x 11 or A4
Plain Paper Quality
(available only if
bottom tray is
selected)
Normal
(default)
Best The highest quality, but the slowest
Setting Description
The printer enlarges or reduces the
original to make it the copy size you
select.
If the selected copy size is smaller
than the paper in the paper tray, the
printer automatically arranges the
pictures to best fit the paper size.
Good quality output; prints faster than
Best.
print speed; eliminates the banding
effect that sometimes occurs when
printing Draft or Normal.
Draft The fastest print speed, but the lowest
quality.
Photo Paper Quality Automatic
(default)
Brightness Normal, -3 to +3
(Normal is default)
Preview No (default) / Yes To see a preview of the photograph on
Save as Defaults No / Yes To save settings as the new default,
The printer detects photo paper in the
paper tray and sets Best quality
automatically.
Lightens or darkens the copy.
Normal is no change from the original;
-3 is the darkest; +3 is the lightest.
the LCD, select
OK, select Ye s , then press OK.
press
Ye s .
6. Press Start to begin copying.
44 www.kodak.com/go/aiosupport
Page 51

Changing the number of copies of a photograph
To change the number of copies:
1. Lift the scanner lid, and place the photograph face down in the right-front corner
of the scanner glass.
KODAK ESP 7200 Series All-in-One Printer
2. Close the lid.
3. Press
4. Press to select
5. Make sure
Home.
Copy Photo, then press OK.
Quantity is selected.
6. Press or to select a number.
7. Pre ss
Start to begin copying.
www.kodak.com/go/aiosupport 45
Page 52

Copying
Enlarging or reducing a photograph
To enlarge or reduce the size of the copy of the photograph:
1. Lift the scanner lid, and place the photograph face down in the right-front corner
of the scanner glass.
2. Close the lid.
3. Press
4. Press to select
5. To make a copy larger than 5 x 7 in. / 127 x 178 mm, press to select
6. Press to select
Home.
Selection
Copy Photo, then press OK.
Tr ay
, then press to select Bottom Tray.
Copy Size.
7. Press or to select the copy size.
NOTE: Make sure that the paper in the bottom tray is the size and type (plain paper,
photo paper, etc.) that you want.
8. Press
Start to begin copying.
46 www.kodak.com/go/aiosupport
Page 53

Darkening or lightening a copy of a photograph
You can make the copy darker or lighter than the original photograph.
To darken or lighten the copy:
1. Lift the scanner lid, and place the photograph face down in the right-front corner
of the scanner glass.
KODAK ESP 7200 Series All-in-One Printer
2. Close the lid.
3. Press
4. Press to select
5. Press to select
Home.
Copy Photo, then press OK.
Brightness.
6. Press to select a number below zero for a darker copy, or press to select a
number above zero for a lighter copy.
7. Pre ss
Start to begin copying.
www.kodak.com/go/aiosupport 47
Page 54

6
Scanning
Scanning digitizes documents and pictures, and sends the digital files to your
computer.
When you scan, the digital file can:
• Open in Home Center Software
• Open in a third-party scanner software
• Be saved in a format and location that you determine (see Changing the scan
settings for scanning from the control panel, page 48)
Scanning from a software program on the computer (such as Home Center
Software) gives you more options, but you can also scan from the printer control
panel.
Before you begin scanning
Make sure that the printer is connected to a computer using a USB cable, Ethernet
cable, or wireless network (see Configuring Your Printer, page 4).
Changing the scan settings for scanning from the control panel
Make sure that Home Center Software is installed on the computer, then change the
scan settings in the Home Center Software. These settings are the defaults that the
printer uses when you scan from the printer control panel.
1. Open Home Center Software
2. Select
3. Select
4. Adjust settings for scanning documents and pictures as described below.
To adjust settings for scanning documents, select the
• Color, Black and white, or Grayscale
• File format (.pdf, .rtf, .tif, .jpg)
• Resolution (75, 150, 300, 600 dpi)
• Prompt for File Name and Location or Automatically Save
If you choose to automatically save, then specify:
– Base name (by default, scanned files are named “scan1”, “scan2”, etc)
– Location (folder) where the scanned files will be saved
Tools and Documentation.
Printer Scan Settings.
Document tab, then select:
48 www.kodak.com/go/aiosupport
Page 55

To adjust settings for scanning pictures, select the Picture tab, then select:
• Color or Black and white
• File format (.jpg, .bmp, .tif)
• Resolution (75, 150, 300, 600 dpi)
• Quality (Best for E-mail, Normal, High, Maximum)
• Prompt for File Name and Location or Automatically Save
If you choose to automatically save, then specify:
– Base name (by default, scanned files are named “scan1,” “scan2,” etc)
– Location (folder) where the scanned files will be saved
Before saving a scanned file, you can preview it in Home Center Software, crop and
sharpen the image, and adjust color, if desired. See the Home Center Software Help
? icon) for instructions.
(
Scanning from the computer
KODAK ESP 7200 Series All-in-One Printer
To scan a document or a picture:
1. Lift the scanner lid, and place the original face down in the right-front corner of
the scanner glass.
2. Close the lid.
3. Open Home Center Software, then:
• On a computer with WINDOWS OS, select
then follow the on-screen instructions.
• On a computer with MAC OS, select the
then follow the on-screen instructions.
Scan Documents and Pictures,
Tools tab, click Scan Application,
www.kodak.com/go/aiosupport 49
Page 56

Scanning
Scanning multiple pictures simultaneously
Using Home Center Software, you can scan multiple pictures simultaneously and
save them as separate files.
When scanning multiple pictures, leave space between the pictures so that the
printer can detect the separate pictures. Any pictures that overlap are interpreted as
a single picture.
Scanning multiple pictures when connected to a computer with WINDOWS OS
To scan multiple pictures simultaneously, and save them as separate files:
1. Lift the scanner lid, and place the pictures face down on the glass, leaving space
between the pictures.
2. Close the lid.
3. Open Home Center Software, then select
4. Select
5. Select
Printer Scan Settings, then select the Picture tab.
Automatically Detect Pictures, if it is not selected, then click OK.
6. Click the Home icon in the top right corner, then select
Pictures
7. Make sure t h a t
.
Picture is selected and Collage - Combine all pictures is cleared,
then follow the on-screen instructions.
NOTE: Click the Help icon for additional instructions.
To o l s a nd Docum e n t at ion.
Scan Documents and
Scanning multiple pictures when connected to a computer with MAC OS
To scan multiple pictures simultaneously, and save them as separate files:
1. Lift the scanner lid, and place the pictures face down on the glass, leaving space
between the pictures.
2. Close the lid.
3. Open Home Center Software, and select your printer.
4. Select the
5. Click
6. Select
7. S el ect
8. Click
Tools tab.
Scan Application.
Color Picture or Black and White Picture.
Automatically detect multiple pictures, if it is not selected.
Preview or Scan All, and follow the on-screen instructions.
NOTE: Click the Help icon for additional instructions.
50 www.kodak.com/go/aiosupport
Page 57

Scanning from the control panel
To scan a document or a picture from the control panel:
1. Lift the scanner lid, and place the original face down in the right-front corner of
the scanner glass.
KODAK ESP 7200 Series All-in-One Printer
2. Close the lid.
3. Press
4. Press to select
Home.
Scan, then press OK.
5. Press to select an option, then press or to change the setting.
Scan Option Settings Description
Scan To USB-connected
computer
(default)
Name of computer
(only if a computer is
connected by
wireless or Ethernet
network)
Memory card The scanned file is sent to the
The scanned file is sent to the
USB-connected computer.
The scanned file is sent to the
computer on the wireless or Ethernet
network.
memory card in one of the card slots.
IMPORTANT: Use only one card slot at
a time.
www.kodak.com/go/aiosupport 51
Page 58

Scanning
Scan Option Settings Description
Scan What
Destination File
Save as Defaults No / Yes To save settings as the new default,
Document
(default)
Photo Sets the scan settings for scanning a
(default)
Application Sends the scanned file to Home
Sets the scan settings for scanning a
document (see Changing the scan
settings for scanning from the control
panel, page 48).
photograph (see Changing the scan
settings for scanning from the control
panel, page 48).
Sends the scanned file in the format
and to the location on your computer
that you designate (see Changing the
scan settings for scanning from the
control panel, page 48).
Center Software.
press
OK, select Ye s , then press OK.
6. Press Start to begin scanning.
The scanned file appears at the destination you specified.
52 www.kodak.com/go/aiosupport
Page 59

7
CAUTION:
Maintaining Your Printer
Your printer requires little maintenance. However, Kodak recommends cleaning the
scanner glass and lid regularly to remove dust and fingerprints, which affect the
quality and accuracy of scanning.
Except while cleaning the printer, keep the printer plugged into an AC power outlet.
If you use a power strip, don't turn off the power strip. (The printer does not
necessarily have to be turned on, but should be plugged in.)
Keep the printhead and ink cartridges in the printer at all times to help prevent
damage to the printhead.
For recycling and/or disposal information, contact your local authorities. In the US,
go to the Electronics Industry Alliance at www.eia.org or go to
www.kodak.com/go/recycle.
General care and cleaning
Always disconnect the power to the printer before cleaning it. Do not use
harsh or abrasive cleaners on the printer or any of its parts.
• To clean the printer, wipe the outside with a clean, dry cloth.
• Keep the surrounding area vacuumed and litter-free.
• Protect the printer from tobacco smoke, dust, and liquid spills.
• Do not place objects on the printer.
• Keep the printer supplies away from direct sunlight and out of high-temperature
environments.
• Do not allow chemicals to come into contact with the printer.
www.kodak.com/go/aiosupport 53
Page 60

Maintaining Your Printer
CAUTION:
Cleaning the scanner glass and document backing
The scanner glass can get smudged and minor debris can accumulate on the white
document backing under the scanner lid. Periodically clean the scanner glass and
document backing.
Do not use harsh or abrasive cleaners on any part of the printer.
Do not spray liquid directly on the glass.
Do not use paper-based wipes on the document backing under the scanner
lid, as they can scratch the document backing.
To clean the scanner glass and document backing under the scanner lid:
1. Unplug the printer and lift the scanner lid.
2. Wipe the glass with a soft cloth or sponge, slightly moistened with a
nonabrasive glass cleaner.
54 www.kodak.com/go/aiosupport
Page 61

KODAK ESP 7200 Series All-in-One Printer
3. Dry the glass with a lint-free cloth.
4. Gently clean the document backing with a soft cloth or sponge, slightly
moistened with mild soap and warm water.
5. Dry the document backing with a chamois or soft, lint-free cloth.
NOTE: If the document backing needs further cleaning, use isopropyl (rubbing)
alcohol on a soft cloth, then wipe thoroughly with a cloth moistened with
water to remove any residual alcohol.
6. When you finish cleaning, plug in the printer.
www.kodak.com/go/aiosupport 55
Page 62

Maintaining Your Printer
Color ink cartridge
Printhead
Black
ink cartridge
Replacing ink cartridges
Your printer uses both black and color ink cartridges. You can check the approximate
ink levels on the LCD (see Checking ink levels, page 64) or in Home Center
Software. When an ink cartridge is out of ink, the printer LCD displays a message
stating that the black or color ink cartridge needs replacing.
IMPORTANT: Do not use non-Kodak brand or refilled ink cartridges.
To replace an ink cartridge:
1. Make sure your printer is on.
2. Lift the printer access door, and wait for the carriage to move to the access
position.
The ink cartridges are located in the printhead.
56 www.kodak.com/go/aiosupport
Page 63

KODAK ESP 7200 Series All-in-One Printer
3. Pinch the tab on the ink cartridge and lift it out of the printhead.
4. Remove the new ink cartridge from its bag.
IMPORTANT: Insert the ink cartridge into the printhead immediately to prevent the
printhead from drying out.
5. Remove the protective cap from the cartridge.
www.kodak.com/go/aiosupport 57
Page 64

Maintaining Your Printer
6. Insert the ink cartridge into the printhead.
7. Press down on the tab until you hear a click.
8. Close the printer access door.
58 www.kodak.com/go/aiosupport
Page 65

Replacing the printhead
IMPORTANT: Replacing the printhead is not a regular maintenance procedure. Replace
To replace the printhead:
1. Make sure your printer is on.
2. Lift the printer access door, and wait for the carriage to move to the access
position.
KODAK ESP 7200 Series All-in-One Printer
the printhead only if you receive a new printhead from Kodak.
3. Remove both ink cartridges and set them aside.
www.kodak.com/go/aiosupport 59
Page 66

Maintaining Your Printer
CAUTION:
4. Unlatch the used printhead by lifting the button in the center of the carriage.
5. Lift the used printhead out of the carriage.
6. Remove the new printhead from its bag.
Do not touch the gold contacts on the printhead, as this may damage it.
60 www.kodak.com/go/aiosupport
Page 67

7. Remove the two plastic, protective shields.
8. Place the new printhead into the carriage.
KODAK ESP 7200 Series All-in-One Printer
9. Push firmly against the target label of the printhead until you hear a loud snap.
www.kodak.com/go/aiosupport 61
Page 68

Maintaining Your Printer
10. Insert the black ink cartridge into the printhead.
11. Press down on the ink cartridge tab until you hear a click.
12. Repeat steps 10 - 11 for the color ink cartridge.
62 www.kodak.com/go/aiosupport
Page 69

KODAK ESP 7200 Series All-in-One Printer
13. Close the printer access door.
The printer detects the new printhead. Follow the instructions on the LCD to
calibrate your printer.
Updating the software and printer firmware
Using the latest software and firmware helps ensure optimal performance of your
printer.
NOTE: Firmware is the software that runs on the printer.
When you open Home Center Software on a computer with WINDOWS OS, the
software automatically checks for software and firmware updates. On a computer
with MAC OS, you have to check manually for updates.
Use the following procedure to update manually.
Updating if your printer is connected to a computer with WINDOWS OS
To u p d a te the so f t w a r e:
1. Make sure that your computer is connected to the Internet.
2. Open Home Center Software.
3. Click
4. Under Web Links, click
5. If there are updates, click
To update the printer firmware:
1. Make sure that your computer is connected to the Internet.
2. Connect the printer to the computer with a USB cable, Ethernet cable, or
3. Open Home Center Software.
4. Click
5. Under Web Links, click
6. If there are updates, click
IMPORTANT: Do not turn off or unplug your printer or your computer during the update.
To o l s a nd Docu m e n t ation.
Check for Software Updates to check whether software
updates are available.
Next and follow the on-screen instructions.
wirelessly (if not currently connected).
To o l s a nd Docu m e n t ation.
Check for Printer (Firmware) Updates.
Next and follow the on-screen instructions.
www.kodak.com/go/aiosupport 63
Page 70

Maintaining Your Printer
Updating if your printer is connected to a computer with MAC OS
To u p d a te the so f t w a re :
1. Make sure that your computer is connected to the Internet.
2. Open Home Center Software.
3. On the File menu, select
4. If there are updates, follow the on-screen instructions.
To u p d a te the fi r m w a r e :
1. Go to www.kodak.com/go/esp7250downloads.
2. Connect the printer to the computer with a USB cable, Ethernet cable, or
wirelessly (if not currently connected).
3. Select your operating system from the drop-down list.
4. Click
5. Read the instructions, click
IMPORTANT: Do not turn off or unplug your printer or your computer during the update.
Select in the Firmware box.
Check for Updates.
Download, then follow the on-screen instructions.
Monitoring and adjusting printer performance
From the control panel, you can perform tasks to help you keep the printer
functioning well.
Checking ink levels
To check the ink levels:
1. Press
2. Press to select
3. With
Home.
Maintenance, then press OK.
Check Ink Levels selected, press OK.
The LCD shows approximate levels of ink in the cartridges so you know when it’s
time to order replacement cartridges.
64 www.kodak.com/go/aiosupport
Page 71

Resetting factory defaults
To reset all defaults to the factory default settings:
KODAK ESP 7200 Series All-in-One Printer
1. Press
2. Press to select
3. Press to select
Home.
Printer Settings.
Reset All Settings, then press OK.
4. When you see the message, “This will reset printer settings to factory defaults,”
OK.
press
NOTE: Resetting factory defaults does not change the date and time, language,
country/region, or network settings.
www.kodak.com/go/aiosupport 65
Page 72

8
Troubleshooting
Basic troubleshooting
Some problems can be resolved quickly by power cycling the printer: Turn off your
printer. Wait five seconds. Turn on the printer.
Use the following information to help troubleshoot problems with your printer.
Problem Possible Solutions
Printer does not
power on
Printer not detected
• Make sure you are using the power cord that came with
your printer.
• Make sure the power cord is connected to the AC adapter
and is plugged into an outlet or power strip.
• If the USB 2.0 cable was disconnected from the printer,
then reconnected, or if power to the printer was
interrupted, restart the computer.
• Make sure your printer is plugged in and turned on.
• If you are using a USB cable, make sure:
– you have a USB 2.0 cable.
– that the USB cable is connected to both your printer and
your computer.
• If you are using a wireless connection, make sure:
– the printer is connected to your wireless network (check
the Wi-Fi connectivity LED and the SSID).
– your router is transmitting data.
– the firewall (excluding WINDOWS Firewall) is allowing
the services needed for your printer.
For additional information, go to
www.kodak.com/go/inkjetnetworking.
Wireless
connectivity
Printhead carriage
jam
Print quality
66 www.kodak.com/go/aiosupport
For wireless connectivity issues, go to
www.kodak.com/go/inkjetnetworking.
• Open the printer access door and clear any obstructions.
• Check that the printhead and ink cartridges are installed
correctly.
(The printhead and ink cartridges are installed correctly
when you hear them click into place.)
• For best results, use KODAK Paper or a paper with the
COLORLOK Technology logo on the package.
• Make sure the paper is loaded correctly (see Loading paper,
page 16).
For more information, go to www.kodak.com/go/itg, select
All-in-one printer, then Print Quality (missing colors, blank
prints, etc)
.
Page 73

Problem Possible Solutions
KODAK ESP 7200 Series All-in-One Printer
Ink cartridge
Paper jam
Error messages or
other problems you
cannot resolve
• Check that KODAK Ink Cartridge(s) are installed. Do not
use non-Kodak brand or refilled ink cartridges.
• Remove, then install the cartridges again. Make sure the
cartridges click into place.
• Check for paper behind the duplexer in the rear-access
cleanout area.
• Remove the duplexer and gently remove any paper from
inside the printer.
• Make sure the paper in the tray is free of tears or creases.
• Make sure you do not overload the paper tray.
For more information, go to www.kodak.com/go/itg. Select
All-in-one printer, then Paper jam.
If you need to contact Kodak (see www.kodak.com/go/contact),
have the following information available:
• Kodak Service Number (located inside or on the outside of the
printer)
• Printer model number (located on the back of the printer)
• Computer model, operating system, and version of Home
Center Software
• Exact wording of any error message(s)
www.kodak.com/go/aiosupport 67
Page 74

Troubleshooting
Getting help on the Web
For more troubleshooting information:
Get help with wireless networking. www.kodak.com/go/inkjetnetworking
Use our Step-by-Step Solutions and
Repair tool to troubleshoot common
problems.
Search our knowledge base of FAQs
(Frequently Asked Questions).
Download the latest firmware and
software for optimal printer
performance.
See the recommended system
requirements.
Get help with problems you cannot
resolve.
www.kodak.com/go/itg
www.kodak.com/go/esp7250support
www.kodak.com/go/esp7250downloads
www.kodak.com/go/esp7250specs
Contact Kodak at www.kodak.com/go/contact
and have the following information available:
– Kodak Service Number (located inside the
printer when you open the printer access
door)
– Printer model number (located on the
control panel above the LCD)
– Computer model, operating system, and
version of Home Center Software
68 www.kodak.com/go/aiosupport
Page 75

Status lights
Power status light
KODAK ESP 7200 Series All-in-One Printer
The status lights indicate the condition of the printer. There are two status lights on
the printer, one that indicates power, the other indicates Wi-Fi status.
Power light What it means
Off The printer is turned off.
Press the on/off button to turn on power.
The printer does not have power.
Make sure that the power cord is plugged into the back of the
printer and into an electrical outlet, and that the electrical outlet
has power.
Blinking The printer is busy.
Wait for the printer to finish the task.
On The printer is ready
Wi-Fi status light
Power light What it means
Off The Wi-Fi radio is either turned off or is turned on but not
connected to a wireless network.
Blinks continuously The Wi-Fi radio is turned on and the printer is searching for
available wireless networks within range.
Blinks intermittently The Wi-Fi radio is turned on and the printer cannot find any
available wireless networks within range, or the Wi-Fi radio
connection has been interrupted or is too weak to send signals to
and from the printer.
To find and connect to an available wireless network within
range, press
Wizard (see Connecting to a wireless network, page 5).
On The Wi-Fi radio is turned on and there is a working connection
between the printer and a wireless network.
OK, turn the Wi-Fi radio off, and run the WiFi Setup
www.kodak.com/go/aiosupport 69
Page 76

9
Product and Safety Specifications
The following specifications are subject to change without notice.
Features and Specifications
Print performance
Black print speed Up to 32 pages per minute on plain paper
Color print speed Up to 30 pages per minute on plain paper
Print technology Continuous-tone, thermal inkjet
Print quality modes Draft, Normal, and Best on plain paper
Photo quality mode on photo paper
Photo printing features
Quantity Up to 99
(may vary for different models of the 7200 series printers)
Print sizes 2 x 3 in. (5 x 7.6 cm)
3.5 x 5 in. (9 x 12.7 cm)
4 x 6 in. (10 x 15 cm)
4 x 7 in. (10 x 18 cm)
(Panoramic) 4 x 12 in. (10 x 30 cm)
5 x 7 in. (13 x 18 cm)
8 x 10 in. (20 x 25 cm)
US Letter - 8.5 x 11 in. (22 x 28 cm)
A4 (21 x 30 cm)
Quality Best, Normal, Draft, Automatic
Auto-detect media Auto-detect plain paper, photo paper, and transparency
Optimize image quality for KODAK Photo Papers with barcode
Image enhancement KODAK PERFECT TOUCH Technology with
Home Center Software (from the computer only)
Color Color, Black-and-white
Scene balance On (default), Off
70 www.kodak.com/go/aiosupport
Page 77

Copy document features
Quantity 1 to 99 copies
Copy sizes Same Size, Fit-to-Page, 20% to 500%
Plain paper quality Best, Normal, Draft
Brightness – 3 to + 3
Copy photo features
Quantity 1 to 99 copies
Copy sizes 2 x 3 in. (5 x 7.6 cm)
KODAK ESP 7200 Series All-in-One Printer
Color Black-and-white or color
(may vary for different models of the 7200 series printers)
(may vary for different models of the 7200 series printers)
Color Black-and-white or color
(may vary for different models of the 7200 series printers)
3.5 x 5 in. (9 x 12.7 cm)
4 x 6 in. (10 x 15 cm)
4 x 7 in. (10 x 18 cm)
(Panoramic) 4 x 12 in. (10 x 30 cm)
5 x 7 in. (13 x 18 cm)
8 x 10 in. (20 x 25 cm)
US Letter - 8.5 x 11 in. (22 x 28 cm)
A4 (21 x 30 cm)
Scanning features
Maximum scan size 8.5 x 11.7 in. (21.6 x 29.7 cm)
Quality Automatic
Brightness – 3 to + 3
Scanner type Contact Image Sensor (CIS)
Functions Segmentation scanning
Auto-destination
OCR
www.kodak.com/go/aiosupport 71
Page 78

Product and Safety Specifications
Bottom input paper tray
Paper capacity 100 sheets of 20 lb plain paper
Tray s i ze 4 x 6 in. to 8.5 x 14 in. (10 x 15 cm to 21.6 x 36 cm)
Top input paper tray
Paper capacity 40 sheets of photo paper, up to 12 mil (290 gsm)
Tray s i ze 4 x 6 in. to 5 x 7 in. (10 x 15 cm to 13 x 18 cm)
Output paper tray
Paper capacity 50 sheets of 20 lb plain paper
20 envelopes
Ink cartridges
Connectivity
Image formats supported Image printing supports JPEG (EXIF v2.21 non-progressive);
Number of USB ports Two USB 2.0 high-speed ports, one device port on the back of
Ink handling 2-cartridge, 6-ink system
Ink life 1-year warranty from date of purchase
Protocols supported USB 2.0 high speed
Devices supported Computers with WINDOWS OS and computers with MAC OS;
mobile phones with custom print applications; memory cards
(MMC, XD, SD, SDHC, COMPACTFLASH Types I and II,
MICRODRIVE), PICTBRIDGE Technology enabled cameras,
flash drives
does not support progressive JPEG format
the printer, one host port in the front
Wi-Fi technology
supported
72 www.kodak.com/go/aiosupport
802.11n, WPA, WMM, and WPS
Page 79

Software support
Application support Third-party image-management software; optical character
Media support Plain paper, photo paper, envelopes, greeting cards, card stock,
Scanner support TWAIN and WIA, WIA2 (VISTA OS), including segmentation
Update support Software and firmware updates available through Web support
Physical specifications
KODAK ESP 7200 Series All-in-One Printer
reader (OCR) support for documents
transparencies with white stripe, labels
scanning
Power WW: 110-240 V AC, 50-60 Hz
Output: 36 V DC at 1.6 A
Warranty
Dimensions 445 x 189 x 427 mm [L x W x D]
(17.5. x 7.44. x 16.8 in.)
Wei ght 6.57 kg (14.5 lb) without power supply, printhead, or ink
cartridges
Operating range 5°C (41°F) to 35°C (95°F), 15 to 85% RH (non-condensing)
and atmospheric pressure of no less than 15 PSI
(approximately 10,000 ft.)
Full image quality
environmental range
Energy efficiency ENERGY STAR® Qualified
Product One year from purchase (with proof of purchase)
Printhead One year from purchase (with proof of purchase)
15°C (59°F) to 30°C (86°F), and 20 to 80% RH.
www.kodak.com/go/aiosupport 73
Page 80

Product and Safety Specifications
System requirements
Computer with WINDOWS OS
Computer Minimum
Operating System MICROSOFT WINDOWS VISTA or XP Home (SP2 or above)
CPU Intel Celeron
Clock speed 1.2 GHz
Memory 512 MB RAM
Available hard disk space 500 MB available
Interface USB
Removable drive CD-ROM
Computer with MAC OS
Computer Minimum
Operating System MACINTOSH OS X 10.4.8 or later
CPU PowerPC G4, G5, or Intel Based Mac
Clock speed 1.2 GHz
Memory 512 MB RAM
Available disk space 200 MB available
Interface USB
Removable drive CD-ROM
74 www.kodak.com/go/aiosupport
Page 81

Paper types supported
Transparencies All commercially available inkjet varieties (with a white stripe)
Iron-on transfers All commercially available inkjet varieties on 8.5 x 11 in. and A4
Paper sizes supported
KODAK ESP 7200 Series All-in-One Printer
Plain paper 20 to 24 lb (75 to 90 gsm)
Photo paper Up to 12 mil
Card stock 110 lb index max (200 gsm)
Envelopes 20 to 24 lb
Labels All commercially available inkjet varieties on 8.5 x 11 in. and A4
size sheets
size sheets
Type Size
Plain paper A4 (210 x 297 mm)
A5 (148 x 210 mm)
A6 (105 x 148 mm)
B5 (176 x 250 mm)
US Executive (7.25 x 10.5 in.) (184 x 266 mm)
US Letter (8.5 x 11 in.) (216 x 280 mm)
US Legal (8.5 x 14 in.) (216 x 356 mm)
Custom sizes from 4–8.5 in. / 101–216 mm wide and 6–14 in. /
152–356 mm long
Labels A4 (210 x 297 mm)
US Letter (8.5 x 11 in.) (216 x 280 mm)
Index card stock 4 x 6 in. index cards (101 x 152 mm)
5 x 7 in. index cards (127 x 178 mm)
Transparencies and
iron-on transfers
A4 (210 x 297 mm)
US Letter (8.5 x 11 in.) (216 x 280 mm)
www.kodak.com/go/aiosupport 75
Page 82

Product and Safety Specifications
Envelopes
C5 (6.38 x 9 in. / 162 x 229 mm)
C6 (4.5 x 6.38 in. / 114 x 162 mm)
DL (designated long) (4.33 x 8.66 in.) (110 x 220 mm)
US #10 (4.12 x 9.5 in) (105 x 241 mm)
US #7¾ (3.88 x 7.5 in. / 98 x 190 mm)
US #9 (3.88 x 8.88 in. / 98 x 225 mm)
A2 (4.37 x 5.75 in. / 111 x 146 mm)
Photos 4 x 6 in. (102 x 152 mm)
4 x 7 in. (102 x 178 mm)
4 x 12 in. (102 x 305 mm)
5 x 7 in. (127 x 178 mm)
8 x 10 in. (203 x 254 mm)
US Letter (8.5 x 11 in.) (216 x 280 mm)
A4 (210 x 297 mm)
76 www.kodak.com/go/aiosupport
Page 83

Safety information
• Always follow all warnings and instructions marked on the product.
• Use only the power source indicated on the product regulatory label.
• Use only the power cord that comes with the product. Using another power cord
may cause fire and/or shock. Do not use the included power cord with any other
equipment.
• Always turn this product off by using the On/Off button. Wait until the On/Off
button stops flashing before removing the power plug from the outlet.
• Do not allow the power cord to become damaged or frayed.
• If you need to use an extension cord with this product, make sure that the
ampere rating of the product does not exceed the ampere rating of the extension
cord.
• Place the product on a flat, stable surface that extends beyond the product’s
base in all directions. This product will not operate properly if tilted or at an
angle.
• When storing or transporting this product, do not tilt or stand it on its side.
Never turn this product upside down (ink can leak out of the product).
• Avoid placing this product in an environment that is subject to rapid changes in
temperature or humidity, mechanical shocks, vibration, or dust. Do not place
near radiators, heating vents, or in direct sunlight.
• Leave enough room around this product for sufficient ventilation.
• Do not block this product’s covers or openings, or insert any objects through
slots.
• Do not use aerosol products inside or around this product.
• Do not spill any liquid on this product.
• Do not attempt to repair or service this product.
• If the power cord or plug is damaged, if any liquid has been spilled onto the
product, if the product has been dropped or the case damaged, if the product
does not operate normally or exhibits a major change in performance level,
unplug this product and contact Kodak at www.kodak.com/go/contact.
KODAK ESP 7200 Series All-in-One Printer
LCD screen safety
• Use only a dry, soft cloth to clean the LCD screen. Do not use any liquid or
chemical cleaners.
• If the LCD screen is damaged, contact Kodak immediately. If any of the solution
from the display gets on your hands, wash them thoroughly with soap and water.
www.kodak.com/go/aiosupport 77
Page 84

Product and Safety Specifications
CAUTION:
Ink cartridge safety
• Keep all ink cartridges out of the reach of children.
• If ink gets on your skin, wash with soap and water. If ink gets into your eyes, flush
immediately with water. If any discomfort or change in vision persists after
washing, seek medical attention immediately.
• For MSDS information on inks, go to www.kodak.com/go/MSDS.
Regulatory compliance
FCC statement
The United States Federal Communications Commission (in CFR 47 Part 15.105) has
specified that the following notice be brought to the attention of the users of this
product:
NOTE: This equipment has been tested and found to comply with the limits for a
Class B digital device, pursuant to part 15 of the FCC Rules. These limits are
designed to provide reasonable protection against harmful interference in a
residential installation. This equipment generates, uses, and can radiate
radio frequency energy and, if not installed and used in accordance with the
instructions, may cause harmful interference to radio communications.
However, there is no guarantee that interference will not occur in a particular
installation. If this equipment does cause harmful interference to radio or
television reception, which can be determined by turning the equipment off
and on, the user is encouraged to try to correct the interference by one or
more of the following measures:
• Reorient or relocate the receiving antenna.
• Increase the separation between the equipment and receiver
• Connect the product into an outlet on a circuit different from that to which the
receiver is connected.
• Consult the dealer or an experienced radio/TV technician for help.
Pursuant to Part 15.21 of the FCC Rules, any changes or modifications to this
product not expressly approved by Eastman Kodak Company might cause
harmful interference and void the FCC authorization to operate this product.
The radiated energy from this product is well below the FCC radio frequency
exposure limits. Nevertheless, the product shall be used in such a manner
that the potential for human contact during normal operation is minimized.
This product and any attached external antenna, if supported, shall be placed
in such a manner to minimize the potential for human contact during normal
operation. In order to avoid the possibility of exceeding the FCC exposure
limits, human proximity shall not be less than 20 cm (8 inches) during normal
operation.
78 www.kodak.com/go/aiosupport
Page 85

Canadian statements
This product meets the applicable Industry Canada technical specifications.
Operation is subject to the following two conditions: (1) this device may not cause
interference, and (2) this device must accept any interference, including interference
that may cause undesired operation of the device.
This Class B digital apparatus complies with Canadian ICES-003.
Industry Canada (IC) Radiation Exposure Statement
This equipment complies with IC radiation exposure limits set forth for an
uncontrolled environment. This equipment should be installed and operated with a
minimum distance of 20 cm between the radiator and your person.
German compliance statement
Noise emissions for this equipment do not exceed 70 dBa.
This equipment is not intended for use in the work place in accordance with
BildscharbV regulations.
KODAK ESP 7200 Series All-in-One Printer
“Das Gerät ist nicht für die Benutzung am Bildschirmarbeitsplatz gemäß
BildscharbV vorgesehen.”
REACH Article 33 declarations
Go to www.kodak.com/go/REACH for information about the presence of
substances included on the candidate list according to article 59(1) of Regulation
(EC) No. 1907/2006 (REACH).
Waste electrical and electronic equipment labeling
In the European Union, do not discard this product as unsorted municipal waste.
Contact your local authorities or go to www.kodak.com/go/recycle for recycling
program information.
www.kodak.com/go/aiosupport 79
Page 86

Product and Safety Specifications
ENERGY STAR® Qualified
ENERGY STAR and the ENERGY STAR mark are registered U.S. service marks. As an
ENERGY STAR partner, KODAK has determined that this product meets ENERGY
STAR Guidelines for energy efficiency. For more information on the ENERGY STAR
program, see www.energystar.gov.
Warranty Information
Limited Warranty
Kodak warrants Kodak consumer electronic products and accessories (“Products”),
excluding batteries, to be free from malfunctions and defects in both materials and
workmanship for one year from the date of purchase. Retain the original dated sales
receipt. Proof of the date of purchase will be required with any request for warranty
repair.
Limited Warranty Coverage
Warranty service is only available from within the country where the Products were
originally purchased. You may be required to send Products, at your expense, to the
authorized service facility for the country where the Products were purchased.
Kodak will repair or replace Products if they fail to function properly during the
warranty period, subject to any conditions and/or limitations stated herein.
Warranty service will include all labor as well as any necessary adjustments and/or
replacement parts. If Kodak is unable to repair or replace a Product, Kodak will, at its
option, refund the purchase price paid for the Product provided the Product has been
returned to Kodak together with proof of the purchase price paid. Repair,
replacement, or refund of the purchase price are the sole remedies under this
warranty. If replacement parts are used in making repairs, those parts may be
remanufactured or may contain remanufactured materials. If it is necessary to
replace the entire Product, it may be replaced with a remanufactured Product.
Remanufactured Products, parts and materials are warranted for the remaining
warranty term of the original Product, or 90 days after the date of repair or
replacement, whichever is longer.
Limitations
This warranty does not cover circumstances beyond Kodak’s control. This warranty
does not apply when failure is due to shipping damage, accident, alteration,
modification, unauthorized service, misuse, abuse, use with incompatible
accessories or attachments (such as third party ink or ink tanks), failure to follow
Kodak’s operation, maintenance or repacking instructions, failure to use items
80 www.kodak.com/go/aiosupport
Page 87

KODAK ESP 7200 Series All-in-One Printer
supplied by Kodak (such as adapters and cables), or claims made after the duration
of this warranty. KODAK MAKES NO OTHER EXPRESS OR IMPLIED WARRANTY
FOR THIS PRODUCT, AND DISCLAIMS THE IMPLIED WARRANTIES AND
CONDITIONS OF MERCHANTABILITY AND FITNESS FOR A PARTICULAR
PURPOSE. In the event that the exclusion of any implied warranty is ineffective
under the law, the duration of the implied warranty will be one year from the
purchase date or such longer period as required by law. The option of repair,
replacement, or refund is Kodak’s only obligation. Kodak will not be responsible for
any special, consequential or incidental damages resulting from the sale, purchase,
or use of this product regardless of the cause. Liability for any special consequential
or incidental damages (including but not limited to loss of revenue or profit,
downtime costs, loss of the use of the equipment, cost of substitute equipment,
facilities or services or claims of your customers for such damages resulting from
the purchase, use or failure of the Product), regardless of cause, or for breach of any
written or implied warranty is expressly disclaimed.
Yo u r R ights
Some states or jurisdictions do not allow exclusion or limitation of incidental or
consequential damages, so the above limitation or exclusion may not apply to you.
Some states or jurisdictions do not allow limitations on how long an implied
warranty lasts, so the above limitation may not apply to you. This warranty gives you
specific rights, and you may have other rights which vary from state to state or by
jurisdiction. Your statutory rights are not affected.
Outside the United States and Canada
In countries other than the United States and Canada, the terms and conditions of
this warranty may be different. Unless a specific Kodak warranty is communicated to
the purchaser in writing by a Kodak company, no warranty or liability exists beyond
any minimum requirements imposed by law, even though defect, damage, or loss
may be by negligence or other act.
www.kodak.com/go/aiosupport 81
Page 88

Product and Safety Specifications
Declaration of Conformity
Manufacturer's Name: Eastman Kodak Company
Manufacturer's Address: 16275 Technology Drive
San Diego, CA 92127, USA
Declares our sole responsibility that the product
Product Name:
Power adapters:
Radio Module Number:
KODAK ESP 7250 Series All-in-One Printer
HP-A0601R3, VP-09500084-000
WLU6120
conforms to the following Product Specifications:
Safety: IEC 60950-1:2001
EN 60950-1:2001 + A11:2004
UL 60950-1:2003 R7.06
CAN/CSA-C22.2 No. 60950-1-03
EMC: EN 55022:2006+A1:2007, Class B
CISPR 22:1997 Class B
EN 61000-3-2:2006, Class A
EN 61000-3-3:1995+A1:2001 +A2:2005
AS/NZS CISPR 22:2006, Class B
EN 61000-4-2:1995 + A1:1998 + A2:2001
EN 61000-4-3:2006 + A1:2008
EN 61000-4-4:2004
EN 61000-4-11:2004
EN 61000-4-8:2001 ED 1.1
CFR 47, FCC Part 15, Subpart B, Class B
EN 61000-4-5:2006
EN 61000-4-6:2007
ICES–003:2004 Class B
ANSI C63.4-2003
Radio: EN 301 489-1 V1.8.1 (2008-04)
EN 301 489-17 V1.3.2 (2008-04)
AS/NZS 4268:2003 + A1:2005 + A2:2006
The product herewith complies with the requirements of the Low Voltage Directive
2006/95/EC, the EMC Directive 2004/108/EC and carries the CE marking. In
addition, it complies with the WEEE Directive 2002/96/EC and RoHS Directive
2002/95/EC.
The product was tested in a typical configuration.
82 www.kodak.com/go/aiosupport
Page 89

Index
Numerics
2-sided printing, 26
A
Access to printhead and ink cartridges, 1
Adding a network connection to a USB-connected
computer, 11
Additional computers on network, installing printer
on, 10
B
Back button, 2
BLUETOOTH Technology enabled device, printing
pictures from, 35
Button sounds, changing, 4
Buttons, on control panel, 2
C
Cancel button, 2
Card slots
CF, location, 1
MS/XD/SD location, 1
CF card slot, 1
Changing ink cartridges. See Replacing ink
cartridges
Changing the connection method, 11
from USB to Ethernet connection, 12
printer connected to computer with MAC
OS, 13
printer connected to computer with
WINDOWS OS, 13
from USB to wireless connection, 11
printer connected to computer with MAC
OS, 12
printer connected to computer with
WINDOWS OS, 11
Cleaning
printer, 53
scanner glass and document backing, 54
Computer requirements, 74
Configuring printer settings, 4
Connecting to a wireless network, 5
connecting to another KODAK All-in-One
printer, 10
installing printer on additional computers on
network, 10
listed network, 5
printing the configuration, 10
setting up an IP address, 9
unlisted network, 7
using WPS, 8
verifying the configuration, 10
Connection to printer, changing the method, 11
from USB to Ethernet connection, 12
printer connected to computer with MAC
OS, 13
printer connected to computer with
WINDOWS OS, 13
from USB to wireless, 11
printer connected to computer with MAC
OS, 12
printer connected to computer with
WINDOWS OS, 11
Connectivity features, 72
Control panel, 1, 2
Copy document features, 71
Copy photo features, 71
Copying, 37
darkening or lightening a copy of a document, 41
darkening or lightening a copy of a photo, 47
documents, 37
enlarging or reducing a copy of a photo, 46
enlarging or reducing documents, 40
photographs, 42
Country/Region, setting, 4
Cropping pictures, 34
D
Darkening copies
of documents, 41
of photos, 47
Date and time
setting, 4
synchronizing to your computer, 4
Declaration of Conformity, 82
Default printer settings, resetting, 4
Defaults
Save document copy options, 39
Save document scanning options, 52
Save photo copy options, 44
Devices supported with printer, 72
Document paper sizes, 75
DPOF, 32
DPOF printing (printing tagged images), 4
Duplex printing, 26
Duplexer, location, 1
E
ENERGY STAR qualification, 80
Enlarging or reducing a copy
document, 40
picture, 46
Envelopes
capacity, 23
loading, 23
sizes, 15, 76
Ethernet connection, making, 12
www.kodak.com/go/aiosupport 83
Page 90

printer connected to computer with MAC OS, 13
printer connected to computer with WINDOWS
OS, 13
Ethernet port, location, 1
F
Features
connectivity, 72
copy document, 71
copy photo, 71
photo printing, 70
scanning, 71
Firewall, disabling, 5
Front paper-edge guides, location, 1
G
Glass, scanner, 1
cleaning, 54
power status, 69
Wi-Fi status, 69
Loading paper
envelopes, 23
legal-size paper, 18
photo paper, 21
plain paper, 16
M
Main paper tray
capacity
legal-size paper, 18
plain paper, 16
location, 1
Maintaining your printer, 53
Media supported, 75
Monitoring printer performance, 64
MS/XD/SD card slot, location, 1
H
Home button, 2
Home Center Software, 3
I
Image Capture software, 36
Image formats supported, 72
Index card stock sizes, 75
Ink cartridges, replacing, 56
Ink levels, 56
Installing printer on additional computers on
network, 10
IP Address, format for entering, 9
iPhoto software, 36
Iron-on transfers, 75
K
Keypad on LCD, using, 6
KODAK Home Center Software. See Home Center
Software
L
Label sizes, 75
Language, setting, 4
LCD screen, 2
Left paper-edge guides, location, 1
Legal-size paper
capacity, 18
loading, 18
Lightening copies
of documents, 41
of photos, 47
Lights
N
Navigation buttons, 2
Network configuration
printing, 10
verifying, 10
Network name (SSID), 5
Number of copies, changing
document, 39
photo, 45
O
OK button, 2
On/Off button, 2
Output paper tray, location, 1
Overview of printer, 1
P
Panoramic pictures, printing, 33
Paper, 14
loading
envelopes, 23
legal-size paper, 18
photo paper, 21
plain paper, 16
sizes, 14, 75
types, 14, 75
Paper stop, 17
Paper tray
extender for legal paper, location, 1
switching from one to the other, 25
Paper tray, main
capacity
envelopes, 23
legal-size paper, 18
84 www.kodak.com/go/aiosupport
Page 91

KODAK ESP 7200 Series All-in-One Printer
plain paper, 16
loading
envelopes, 23
legal-size paper, 18
plain paper, 16
location, 1
Paper tray, photo
capacity, 21
loading, 21
location, 1
Paper-edge guides
front, location, 1
left, location, 1
Photo paper
capacity, 21
loading, 21
Photo paper sizes, 76
Photo paper tray, location, 1
Photo printing features, 70
Pictures
printing, 28
from a BLUETOOTH Technology enabled
device, 35
from a wireless device, 35
panoramic, 33
tagged (marked/DPOF), 32
transferring to computer, 36
zooming and cropping, 34
Plain paper
capacity, 16
loading, 16
Ports
Ethernet, location, 1
power cord, location, 1
USB, location, 1
view for photo paper, location, 1
Power cord port, location, 1
Power cycling the printer, 66
Power status light, 69
Print performance, 70
Print sizes, 70
Printer
components, 1
performance, monitoring and adjusting, 64
settings, configuring, 4
supplies, maintaining and recycling, 53
Printer access door, location, 1
Printhead
removing, 60
replacing, 59
Printhead and ink cartridge access, location, 1
Printing, 25
documents, 26
documents, two-sided
automatically, 26
manually, 27
pictures, 28
from a BLUETOOTH Technology enabled
device, 35
from a memory card or USB-connected
device, 29
panoramic, 33
tagged (marked/DPOF)), 32
Protecting the printer, 53
R
Rear-access cleanout area, location, 1
Recycling printer or supplies, 53
Red box around image on LCD, 34
Reducing or enlarging a copy
document, 40
photo, 46
Regulatory compliance, 78
Removing the printhead, 60
Replacing ink cartridges, 56
S
Safety information, 77
Scanner
glass
cleaning, 54
location, 1
lid, location, 1
Scanning
documents or pictures, 48
features, 71
from the computer, 49
from the control panel, 51
multiple pictures simultaneously, 50
Software
support, 73
updating, 63
Sounds, button, changing, 4
Specifications, printer, 73
Start button, 2
System requirements, 74
T
Time to low power, setting, 4
Transferring pictures to a computer, 36
Transparency sizes, 75
Troubleshooting, 66
error messages, 67
getting help on the Web, 68
ink cartridge, 67
paper jam, 67
print quality, 66
www.kodak.com/go/aiosupport 85
Page 92

printer does not power on, 66
printer not detected, 66
printhead carriage jam, 66
wireless connectivity, 66
Two-sided printing, 26
U
Unlisted network, connecting to, 7
Updating software and firmware, 63
USB ports, location, 1
USB to Ethernet connection, changing, 12
USB to wireless connection, changing, 11
V
View port for photo paper, location, 1
W
Warranty information, 80
Web support
www.eia.org, 53
www.energystar.gov, 80
www.kodak.com/go/blackberry, 35
www.kodak.com/go/contact, 67, 68, 77
www.kodak.com/go/esp7250downloads, 64, 6
8
www.kodak.com/go/esp7250specs, 68
www.kodak.com/go/esp7250support, 68
www.kodak.com/go/inkjetnetworking, 9, 66, 68
www.kodak.com/go/itg, 67, 68
www.kodak.com/go/MSDS, 78
www.kodak.com/go/picflick, 28, 35
www.kodak.com/go/REACH, 79
www.kodak.com/go/recycle, 53, 79
WEP key, 5
Wi-Fi
connectivity LED, 2
status light, 69
supported technology, 72
WiFi Setup Wizard, on printer, 5
Wireless device, printing pictures from, 35
Wireless network, connecting to, 5
connecting to another KODAK All-in-One
Printer, 10
installing printer on additional computers on
network, 10
listed network, 5
printing the configuration, 10
setting up an IP address, 9
unlisted network, 7
using WPS, 8
verifying the configuration, 10
WPA/WPA2 passphrase, 5
WPS, using to connect to wireless network, 8
PIN, 8
push button, 8
Z
Zoom button, 2
Zooming and cropping pictures, 34
86 www.kodak.com/go/aiosupport
 Loading...